1
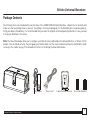
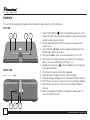
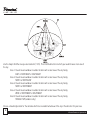
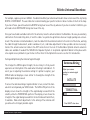
SLBB2 Stiletto Universal Boombox / Compatible with: Stiletto 10/100 & Stiletto 2 / / Owner’s Guide Stiletto Universal Desktop DockingBoombox Station Table of Contents FCC Notice Warning and Safety information Congratulations Trademarks and Copyrights Package Contents Controls Configuring the boombox for your Stiletto model Docking your SIRIUS Stiletto Radio Installing the Indoor/Outdoor Antenna for Indoor Use Connecting the AC Power Adapter Battery Installation Operation Troubleshooting Optional Accessories Specifications Sirius ID Warranty © Directed Electronics, all rights reserved. 4 5 6 6 7 8 9 10 11 14 15 15 17 18 18 19 21 FCC NOTICE: This device complies with Part 15 of FCC rules. Operation is subject to the following conditions: (1) This device may not cause harmful interference, and (2) This device must accept any interference received, including interference that may cause undesired operation. Changes or modifications not expressly approved by the party responsible for compliance could void the user’s authority to operate this device. Directed Electronics is not responsible for any radio or TV interference caused by unauthorized modifications to this equipment. Such modifications could void the User’s authority to operate the equipment. © Directed Electronics, all rights reserved. Stiletto Universal Desktop DockingBoombox Station Warning and Safety Information Safety Precautions Be sure to observe the following warning. Failure to follow these safety instructions and warnings may result in a serious accident and/or personal injury. • Installation must be performed according to this installation guide. SIRIUS is not responsible for issues arising from installations not performed according to the procedures in this guide. • Use only the provided AC Power Adapter or 8 “D” cell batteries. (NOTE: Do not store batteries in the Boombox for long periods of time as they may leak and cause damage to the system.) • Do not install the unit where it will be exposed to high levels of humidity, moisture, or dust. • To avoid short circuits, do not open the unit, and never put or leave any metallic objects (coins, tools, etc.) inside the unit. • If the unit emits smoke or unusual odors, turn the power off immediately, and disconnect the unit from any power source. • Do not drop the unit or subject it to strong shocks. • The installation and use suggestions contained in this manual are subject to any restrictions or limitations that may be imposed by applicable law. The purchaser should check applicable law for any restrictions or limitations before installing and/or operating this unit. Warnings Cleaning and Maintenance: If the Boombox becomes dirty, turn the power off and wipe it clean with a soft cloth. Do not use hard cloths, strong cleaning fluids, paint thinner, alcohol, or other volatile solvents to clean. These may cause damage to the unit. © Directed Electronics, all rights reserved. Congratulations Congratulations on the Purchase of your new SLBB2 SIRIUS Stiletto Boombox! Your new SLBB2 SIRIUS Stiletto Boombox lets you enjoy SIRIUS Satellite Radio’s digital entertainment in your home, office or other location. Use this manual as a guide for the installation. The Boombox is compatible with all Stiletto Live Personal Satellite Radios. For the latest information about this and other SIRIUS products and accessories, visit http://www.directedsirius.com. Copyrights & Trademarks 2007 SIRIUS Satellite Radio Inc. All Rights Reserved. “SIRIUS”, the SIRIUS dog logo, channel names and logos are trademarks of SIRIUS Satellite Radio Inc. All Rights Reserved. Hardware, subscription, and activation fee required. For full Terms & Conditions, visit http://www.sirius.com. Prices and programming are subject to change. Not available in HI and AK. Equipment and subscription sold separately. Installation required with some equipment. © Directed Electronics, all rights reserved. Stiletto Universal Desktop DockingBoombox Station Package Contents The following items are included with your purchase of the SLBB2 SIRIUS Stiletto Boombox. Unpack the kit carefully and make sure that everything shown is present. If anything is missing or damaged, or if the Boombox fails to operate properly, notify your dealer immediately. It is recommended that you retain the original carton and packing materials in case you need to ship your Boombox in the future. Note: The Reversible Guides allow you to configure your Stiletto Universal Boombox for docking Stiletto 2, or Stiletto 10/100 models. Once installed correctly, they will guide your Stiletto radio onto the unviersal docking connector and hold the radio securely in the cradle. See pg. 9 for detailed instructions on installing the Reversible Guides. AC Adapter © Directed Electronics, all rights reserved. Power Cord Indoor/Outdoor Antenna Reversible Adapters Controls The section following identify and describe the buttons and connectors of the Boombox. TOP VIEW 4 EDVV EDVV FRONT VIEW 3 VDW VDW 2 DX[ DX[ SIRIUS SIRIUS 7 6 1 1. Power On/Off Button ( ): Turns the Boombox power On or Off Power On Light is blue when the Boombox is powered on (power on light is under power switch). 2. Volume Up/Down Buttons (+/-): Increases or decreases the volume level. 3. Source Button (sat /aux): Switches audio output between the SIRIUS radio and the AUX input 4. Bass button (bass): Turns the bass equalization, On or Off 5. AUX Connection: Input connection for audio from an external device, such as an MP3 player, CD Player, etc. 6. Headphone Connection ( ): Stereo headphone jack for private listening to Boombox. 7. IR receiver for remote control (not supplied) 8. Cable Storage: Storage area for the antenna cable. 9. Antenna Storage: Storage area for the Indoor/Outdoor Antenna. 10. DC12V Power Connector: Connection for the AC Power Adapter. 11. ANT Antenna Connector: Connector for the Indoor/Outdoor Antenna. 12. Battery Compartment: Battery compartment holds eight “D” size cells (bottom of unit) 5 © Directed Electronics, all rights reserved. SIRIUS Stiletto Universal Desktop DockingBoombox Station Configuring the boombox for your Stiletto model SIRIUS REAR VIEW Your Boombox comes with reversible adapters which can be installed to accept Stiletto 2 or Stiletto 10/100. Antenna Aiming Adjust your antenna position to maximize signal strenght Install into side wall openings with key* facing backward (Fig 1), insert rear of adapter first and then hinge front SATELLITE inwards. TERRESTRIAL 12 9 8 10 11 To remove or reverse simply push adapter back, grip edge with flat object or fingernail and hinge outward from side Press SELECT when done wall front first (Fig 2), if reversing sides keep key to back, then reinsert. *Note: The metal adapters have placement grooves in both front and back however one groove is keyed, this key always faces backward when inserting as shown in diagram. Adapter Detail REAR VIEW GROOVE KEY © Directed Electronics, all rights reserved. Adapter Detail TOP VIEW For Stiletto 2 reverse for Stiletto 10/100 Remove guide by pushing Fig 1 FRONT VIEW Docking your SIRIUS Stiletto Radio Place the Stiletto portable radio into the Boombox, aligning the connector on the radio with the connector on the until it is fully Boombox, and gently press the radio down seated in the dock. EDVV VDW DX[ SIRIUS Remove guide by pushing Fig 2 TOP VIEW 10 © Directed Electronics, all rights reserved. Stiletto Universal Desktop DockingBoombox Station Installing the Indoor/Outdoor Antenna for Indoor Use When using the Boombox indoors read this entire section before installing the indoor/outdoor antenna. To ensure consistent reception of the SIRIUS signal indoors, it is important that the antenna be oriented correctly. Note the following considerations for antenna placement: BEST reception can be achieved by placing the antenna outside on the roof, with a clear 360 degree view of the sky. This position will afford the best view of the sky for best reception. When placed in this location, an antenna extension cable may be required. BETTER reception can be achieved by placing the antenna outside a window, or by mounting it to the side of the house. In either case, try to achieve the best possible clear view of the sky. GOOD reception can be achieved by placing your antenna in a window. Try to achieve a clear unobstructed view of the sky. If your location is in major metropolitan area, the antenna may be located inside the home because terrestrial transmitters are used to boost signal strength. If you cannot obtain a clear 360 degree view of the sky (BEST), then for the BETTER and GOOD installations you must at least have a clear view of the sky in the direction of the SIRIUS satellites, as shown in the following map diagram. © Directed Electronics, all rights reserved. 11 Use the map to find the area you are located in (1 to 5). Then find the direction in which you need to have a clear view of the sky. Area 1: You will need a window or outdoor location with a clear view of the sky facing EAST or NORTHEAST or SOUTHEAST Area 2: You will need a window or outdoor location with a clear view of the sky facing NORTH or NORTHEAST Area 3: You will need a window or outdoor location with a clear view of the sky facing NORTH or NORTHWEST Area 4: You will need a window or outdoor location with a clear view of the sky facing WEST or NORTHWEST or SOUTHWEST Area 5: You will need a window or outdoor location with a clear view of the sky facing STRAIGHT UP (outdoors only) Choose a mounting location for the antenna which has an unobstructed view of the sky in the direction for your area. 12 © Directed Electronics, all rights reserved. Stiletto Universal Desktop DockingBoombox Station For example, suppose you live in AREA 2. You determined that your antenna will need to have a clear view of the sky facing NORTH or NORTHEAST. The exact direction is determined by your specific location in Area 2 relative to the X on the map: If you live in Texas, you will need a more NORTH facing clear view of the sky whereas if you live in southern California, you will need a more NORTHEAST facing clear view of the sky. Once you have found a suitable location for the antenna, route the antenna cable to the Boombox. Be sure you avoid any obstructions that could crimp, kink, or twist the cable. Use protective grommets wherever rough openings are encountered. If the antenna is installed outdoors, route the cable from the antenna locations to the interior of the home, working the cable through the basement, under a window sill, etc., and make adjustments to take up cable slack as necessary. Connect the antenna extension cable to the ANT connection on the rear of the Boombox. Optional antenna extension cables are available if needed. The SIRIUS Echo Repeater System or an optional signal distribution kit may be used to solve signal access problems in your home or office. Refer to the Optional Accessories section for more details. Testing and Optimizing the Antenna Signal Strength The stronger the SIRIUS signal strength, the less likely it is that you will experience an interruption of the audio when listening to a broadcast. To assist you in adjusting the antenna aiming for optimal reception, your SIRIUS radio can display a screen similar to showing the strength of the SIRIUS signal being received. To access the antenna aiming or signal indicator screen, consult the manual which accompanied your SIRIUS radio. The SATELLITE portion of the display screen shows the strength of the signal being received from the satellite, while the TERRESTRIAL portion of the display screen shows the strength of the signal being received from terrestrial based transmitters, if available. Make small adjustments to the aiming of the antenna until you achieve the strongest possible signal. © Directed Electronics, all rights reserved. Antenna Aiming Adjust your antenna position to maximize signal strenght SATELLITE TERRESTRIAL Press SELECT when done 13 Connecting the AC Power Adapter Connect the AC Power Adapter to the DC12V connector at the rear of the Boombox. Connect the AC power cord to the AC Power Adapter and plug it into an AC outlet. Subscribing to the SIRIUS Service If you have not yet subscribed your radio to the Sirius Satellite Radio service, you’ll need to subscribe before you can listen to your radio. To subscribe, do the following: 1. Be sure that the SIRIUS radio is correctly installed as described in this manual, is in the Boombox, and that the antenna is oriented to receive the SIRIUS signal. 2. Turn the Boombox on (verify that both the Boombox and Sirius radio turn on). After the startup sequence, it will update the SIRIUS channel lineup. Wait until the channel updates have completed before pressing any buttons. 3. Once the channels have been updated, the display will change to Call 1-888-539-SIRIUS to Subscribe and will tune to channel 184. You will not be able to listen to other channels until you activate your SIRIUS subscription. 4. Use the radio’s channels up/down buttons to tune to channel 0 to display the radio’s unique 12-digit SIRIUS ID Number (SID). You can also tune to channel 0 by using the remote control: Press the SELECT button then the 0 (zero) button and then press SELECT button again. The SID number is available on the radio’s packaging, and may also be accessed by pressing the MENU button and selecting Sirius ID. Write the SID number down in the space provided near the end of this guide. 5. Have your credit card handy and contact SIRIUS on the Internet at: https://activate.siriusradio.com/ and follow the prompts to activate your subscription. You can also call SIRIUS toll-free at: 1-888-539-SIRIUS (1-888-539-7474). 6. When you have successfully subscribed to the SIRIUS service, and the radio has been updated with your subscription information, an alert will be displayed. To continue, press the SELECT button. You are now ready to begin enjoying SIRIUS Satellite Radio’s digital entertainment, and can tune to other channels! 14 © Directed Electronics, all rights reserved. Stiletto Universal Desktop DockingBoombox Station Battery Installation Your Boombox can operate independently of AC power by installing 8 “D” batteries. The batteries are bypassed automatically whenever the supplied AC Adapter is plugged into the DC 12V jack on the rear panel. 1 Turn the Boombox upside down to access the battery compartment. 2 Push the battery cover latches forward and flip up the battery compartment cover to the open position 3 Insert eight 8 “D” batteries observing battery polarity as shown, then close the cover. WARNING: Do not store batteries in the Boombox for long periods of time as they may leak and cause damage to the system. BOTTOM VIEW Front Battery compartment The diagram below shows correct polarity of installed batteries based on the above view. This diagram can also be B found inside the ' battery'compartment. B B B ' B ' ' B ' ' ' ' ' ' ' B B ' ' ' ' Operation Once the Boombox antenna has been installed, the power connected, and the Stiletto radio docked according to the setup and installation instructions, power on the Boombox by pressing the Power On/Off button on the top panel. The light on the top panel of the Boombox should light blue to indicate the power is on. If the radio does not power on at the same time, press the Power On/Off button on the upper left side of radio. © Directed Electronics, all rights reserved. 15 SIRIUS audio begins after the Stiletto completes its power up cycle. If it does not, adjust the volume of the Boombox by pressing the Volume Up button on the front panel. Make sure "sat" source has been selected. If you want to listen to an external audio device such as a computer, MP3 player or CD player through the Boombox, do the following: 1. Connect the output of the audio device to the AUX connection at the front of the Boombox. Press the SOURCE button to select the AUX input. 2. Adjust the volume on the audio device to obtain satisfactory audio output from the Boombox. If the sound is distorted, lower the volume level on the audio device. Pressing the bass button switches between flat and bass boost. Backlight behind the power button is red in power off mode when connected to AC power and turns blue when powered on. All other buttons will light blue for 10 to 20 seconds and then go to sleep until a button is pressed. In battery operation, the power button will flash red when the batteries are almost discharged. If Boombox is left on with no sound for a period of over 5 to10 minutes it will turn the power off automatically. The Boombox will charge the docked Stiletto radio provided the AC power adapter is connected. The Stiletto will not be charged when operating the Boombox with battery power. Low battery status is indicated when BLUE power LED begins blinking RED on the SLBB2. Low battery status is not indicated by the power LED when SLBB2 is in Sleep mode. NOTE: When switching between power operation modes (AC or Battery), the Boombox and Stiletto radio should be powered off. When installing or removing the Stiletto radio from the Boombox, the Boombox and Stiletto radio should be powered off. 16 © Directed Electronics, all rights reserved. Stiletto Universal Desktop DockingBoombox Station Troubleshooting Symptom Solution Boombox does not power on The AC Power Adapter is not connected, or the AC outlet into which it is plugged is not working. Check that the AC Power Adapter is connected to the Boombox. Try plugging the AC Power Adapter into a different outlet. Boombox does not operate on batteries When the AC Power Adapter is connected to the Boombox, the battery operation is disabled. Disconnect the AC Power Adapter. Batteries are not installed, are installed incorrectly, or are bad. Install new batteries, if necessary, observing the correct polarity. SIRIUS radio displays: Antenna Not Detected The Indoor/outdoor antenna is not connected to the Boombox. Check the indoor/outdoor antenna connection to the Boombox. Radio is not completely seated into the Boombox. Re-Seat the radio into the Boombox. SIRIUS radio displays: Acquiring Signal or Sirius sound reception is cutting in and out No or poor satellite signal is being received. Check for obstacles over or around the satellite antenna. No sound from the Boombox speakers Headphones are connected to the Boombox. Disconnect the headphones. Change the location of the antenna to eliminate nearby obstacles (buildings, trees, overhangs, etc.) AUX is selected when trying to use Sirius radio device. Select SAT. Volume is turned all the way down. Turn volume up. © Directed Electronics, all rights reserved. 17 Optional Accessories The following optional accessories are available for purchase from your SIRIUS retailer to maximize your SIRIUS experience: Directed SIR-WRS1, SIRIUS Echo Repeater System Directed 14130, 20 foot SIRIUS antenna extension Directed 14230, 50 foot SIRIUS antenna extension Directed 14240, SIRIUS Outdoor Antenna Directed 14245, SIRIUS Dual Receiver Distribution System Directed 14250, SIRIUS CATV Plus SIRIUS Signal Distribution System Directed 14255, Satellite TV Plus SIRIUS Signal Distribution System Specifications Nominal Output Power per Channel......5 Watts RMS x 2, 10 Watts x 1 (woofer) (30W total peak music power, 1% THD+N) Total Harmonic Distortion (THD).......................................................0.1% at 1 Watt Speaker Frequency Response.........................................................70Hz to 20KHz Signal-to-Noise ratio (S/N).........................................................>75dB Minimum Headphone Output Impedance..............................................................32 Ohms Headphone Output Level (Variable).......................................500mV (Minimum) Headphone Connector Type........................................3.5mm Stereo Jack (1/8") Auxiliary Input Impedance...................................................3K Ohms (Nominal) Auxiliary Input Level...........................................................2.0 Volts (Maximum) Auxiliary Input Connector ..........................................3.5mm Stereo Jack (1/8") Battery type/Quantity..................................................................."D" Cell/8 Total AC Adapter ................................................................12 Volt, 3A, Center Positive Overall Dimensions (W x H x D)................................. 487mm x 223mm x 205mm (19.2"x8.8"x8") Weight (Without Batteries).............................................................3.3Kg (7.3lb) 18 © Directed Electronics, all rights reserved. Stiletto Universal Desktop DockingBoombox Station SIRIUS ID Write down the SIRIUS ID (SID) of your SIRIUS radio in the space provided below. SID: ______________________________________________________ © Directed Electronics, all rights reserved. 19 Stiletto Universal Desktop DockingBoombox Station Limited One Year Consumer Warranty Directed Electronics (herein “DIRECTED”) promises to the original purchaser, to replace this product should it prove to be defective in workmanship or material under normal use, for a period of one-year from the date of purchase from the dealer as indicated by the date code marking of the product. During this one-year period, there will be no charge for this replacement PROVIDED the unit is returned to DIRECTED, shipping pre-paid. This warranty is non-transferable and does not apply to any unit that has been modified or used in a manner contrary to its intended purpose, and does not cover damage to the unit caused by installation or removal of the unit. This warranty is void if the product has been damaged by accident or unreasonable use, neglect, improper service or other causes not arising out of defects in materials or construction. Units which are found to be damaged by abuse resulting in thermally damaged voice coils are not covered by this warranty but may be replaced at the absolute/sole discretion of DIRECTED. ALL WARRANTIES, INCLUDING BUT NOT LIMITED TO EXPRESS WARRANTY, IMPLIED WARRANTY, WARRANTY OF MERCHANTABILITY, FITNESS FOR PARTICULAR PURPOSE, AND WARRANTY OF NONINFRINGEMENT OF INTELLECTUAL PROPERTY ARE EXPRESSLY EXCLUDED TO THE MAXIMUM EXTENT ALLOWED BY LAW, AND DIRECTED NEITHER ASSUMES NOR AUTHORIZES ANY PERSON TO ASSUME FOR IT ANY LIABILITY IN CONNECTION WITH THE SALE OF THE PRODUCT. DIRECTED HAS ABSOLUTELY NO LIABILITY FOR ANY AND ALL ACTS OF THIRD PARTIES INCLUDING ITS AUTHORIZED DEALERS OR INSTALLERS. IN NO EVENT WILL DIRECTED BE LIABLE FOR ANY INCIDENTAL, SPECIAL OR CONSEQUENTIAL DAMAGES (INCLUDING LOSS OF PROFITS) AND IN NO EVENT, SHALL DIRECTED’S LIABILITY EXCEED THE PURCHASE PRICE PAID BY PURCHASER FOR THE PRODUCT. Some states do not allow the exclusion or limitation of incidental or consequential damages, so the above limitation or exclusion may not apply to you. Some states do not allow limitations on how long an implied warranty lasts, so the above limitation may not apply to you. Unit must be returned to DIRECTED, postage prepaid, with bill of sale or other dated proof of purchase bearing the following information: consumer’s name, telephone number, and address, authorized dealer’s name and address, and product description. Note: This warranty does not cover labor costs for the removal and reinstallation of the unit. IN ORDER FOR THIS WARRANTY TO BE VALID, YOUR UNIT MUST BE SHIPPED WITH PROOF OF PURCHASE FROM AN AUTHORIZED DIRECTED DEALER. BY PURCHASING THIS PRODUCT, THE CONSUMER AGREES AND CONSENTS THAT ALL DISPUTES BETWEEN THE CONSUMER AND DIRECTED SHALL BE RESOLVED IN ACCORDANCE WITH CALIFORNIA LAWS IN SAN DIEGO COUNTY, CALIFORNIA. 9200018 09-06 © Directed Electronics, all rights reserved. 21 GSLBB2 2007-09 www.directedsirius.com © 2007 Directed Electronics, all rights reserved