1
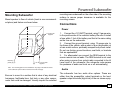
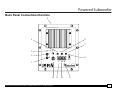
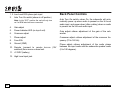
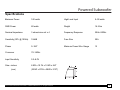
SIR-PS1 Powered Subwoofer
User Guide
Congratulations!
Your new SIR-PS1 Powered Subwoofer lets you enjoy SIRIUS Satellite Radio digital entertainment to its fullest sonic range.
Use this manual to install your Powered Subwoofer and to familiarize yourself with all the features and capabilities of the
subwoofer. For the latest information about this and other products, visit www.directedsirius.com. For technical help regarding this product please contact Directed Electronics, Inc. at at 1-800-753-0800.
Table of Contents
Box Contents . . . . . . . . . . . . . . . . . . . . . . . . . . . . . . . . . .3
Safety Precautions . . . . . . . . . . . . . . . . . . . . . . . . . . . . . .3
Cleaning the Unit . . . . . . . . . . . . . . . . . . . . . . . . . . . . . . .4
Installation Preparation . . . . . . . . . . . . . . . . . . . . . . . . . .4
Mounting Subwoofer . . . . . . . . . . . . . . . . . . . . . . . . . . . .5
Connections . . . . . . . . . . . . . . . . . . . . . . . . . . . . . . . . . . .5
Power . . . . . . . . . . . . . . . . . . . . . . . . . . . . . . . . . . . . .5
Audio . . . . . . . . . . . . . . . . . . . . . . . . . . . . . . . . . . . . . .5
2
Tuning . . . . . . . . . . . . . . . . . . . . . . . . . . . . . . . . . . . . . . .6
Back Panel Connections/Controls . . . . . . . . . . . . . . . . . .7
Back Panel Controls . . . . . . . . . . . . . . . . . . . . . . . . . . . .8
Specifications . . . . . . . . . . . . . . . . . . . . . . . . . . . . . . . . . .9
Limited One Year Consumer Warranty . . . . . . . . . . . . .10
© Directed Electronics, Inc. all rights reserved—Sirius Powered Subwoofer User Guide
Powered Subwoofer
Box Contents
❍
Unpack your SIR-PS1 Powered Subwoofer carefully and
make sure that everything listed below is present:
Failure to mount the unit securely following the instructions in the manual could allow the unit to move, causing personal injury or property damage.
❍
Failure to follow these safety instructions and warnings
may result in a serious accident.
1.
2.
3.
4.
Powered Subwoofer
Mounting plates with hardware
Power cabling kit
High Level Input harness
Safety Precautions
Warning
Take the following precautions to prevent fire and avoid personal injury:
❍
To avoid short circuits, never put or leave any metallic
objects (coins, tools, etc.) on the unit.
❍
If the unit emits smoke or unusual odors, disconnect the
power immediately and consult your authorized retailer.
❍
Do not drop the unit or subject it to strong shocks.
Warning
Observe the following precautions:
❍
Installation must be performed according to this user’s
guide. Directed Electronics and Sirius Satellite Radio
are not responsible for issues arising from installations
not performed according to the procedures in this
manual.
❍
Do not install the unit where it may obstruct your view.
❍
The installation and use suggestions contained in this
manual are subject to any restrictions or limitations that
may be imposed by applicable law—the purchaser
should check applicable law for any restrictions or limitations before installing and/or operating this unit.
Sirius Powered Subwoofer User Guide—© Directed Electronics, Inc. all rights reserved
Warning
During installation and making electrical connections,
observe the following safety instructions:
❍
Disconnect the negative terminal of the vehicle’s battery. When doing so observe the vehicle manufacturer’s safety instructions.
❍
Check before drilling any holes to avoid damaging
3
vehicle wiring or components.
❍
The minimum power wiring size is 12 gauge.
❍
Incorrect installation may cause interference with electronic vehicle systems or your car radio.
Caution
Take the following precautions to keep the unit in proper
working order:
❍
Be sure the unit is connected to a 12V DC power
source with a negative ground connection.
❍
Do not open the unit.
❍
Do not install the unit where it will be exposed to high
levels of humidity, moisture, or dust. When replacing
the fuse, use only a new one with the proper rating.
Using a fuse with the wrong rating may cause the unit
to malfunction.
❍
To prevent a short circuit when replacing a fuse, first
disconnect the power wiring harness.
Note
If the unit doesn’t seem to be working properly:
4
❍
Turn the unit’s power off, wait 5–10 seconds, then turn
the power back on again.
❍
If the problem persists, consult your local Sirius retailer.
Cleaning the Unit
If the unit becomes dirty, remove power from the unit and
wipe it with a soft dry cloth. Do not use hard cloths or any
solvents to clean the unit as these may damage the finish of
the unit.
Installation Preparation
It is recommended that you have a professional installation
accomplished by an authorized dealer.
Ensure that the selected mounting surface for the subwoofer will provide a firm support to facilitate quality sonic
reproduction.
Install a fuse in the power harness no more than a foot from
the vehicle’s battery, in order to protect the battery and the
power cable in the event of a short-circuit between it and the
power amplifier of the subwoofer. The fuse on the subwoofer
is only intended to protect the amplifier.
Note: Before disconnecting the vehicle’s negative battery lead, ensure that any required security code for the
head unit is available. This code may be required to
restore the head unit to normal operation.
© Directed Electronics, Inc. all rights reserved—Sirius Powered Subwoofer User Guide
Powered Subwoofer
Mounting Subwoofer
Mount speaker to floor of vehicle (trunk is one recommended place) and fasten as shown below.
mounting area underneath or the other side of the mounting
surface to assure proper clearance is available for the
mounting screws.
Connections
Power
4 screws total
supplied
Mounting
plates (qty 2)
4 screws total
supplied
Note: The mounting plates can be installed on any edge of the bottom surface
of the subwoofer (shown above mounted on the left and right).
Be sure to mount to a surface that is clear of any electrical
harnesses, fuel/brake lines, fuel tank, or any other components that could be damaged. Visually inspect the selected
Sirius Powered Subwoofer User Guide—© Directed Electronics, Inc. all rights reserved
1. Connect the +12V BATT terminal, using 12 gauge wire,
to the positive side of the vehicle’s battery. Be sure to install
a fuse within 1 foot of the battery and that is the same rating
as the fuse on the subwoofer.
2. Connect the ground terminal, using 12 gauge wire, to
the frame of the vehicle, with as short of a run as possible, at
a bare metal surface; preferably scraped body sheet metal.
Do not use factory ground locations, seat bolts, or brackets
that are spotwelded.
3. For aftermarket use connect the REM terminal to the
source remote turn-on leads. The REM terminal is not used
when using a source from a stock radio connected to the Hi
Level input of the subwoofer (the subwoofer auto-senses
the presence of audio and turns on or off automatically).
Audio
The subwoofer has two audio drive options. These are
either from the preamplifier output terminals or the loudspeaker output terminals (high level) of the car stereo equipment.
5
Preamplifier output terminals are connected to the RCA
phono jacks of the woofer box via shielded audio lines.
When using the loudspeaker output terminals (high level) as
an audio drive source, run the input leads to the nearest
loudspeakers (front or back), ensuring connection to both
left and right audio channels. Ensure the polarity of the connections, + or -, is observed. Bridged output radios (BTL)
can also be connected without an additional adapter. Make
sure the speakers you are connecting to are driven by the
radio as a full-range signal, not just the midrange or above.
Tuning
Before using your subwoofer, we recommend that you set
the controls to the following positions.
1.
2.
3.
4.
5.
6.
6
Gain—at minimum
Phase—at 0°
Crossover—at 80 Hz
Turn on the system and select a music track from
a CD or cassette that contains powerful bass.
Turn up your stereo’s volume to the desired listening level.
Now slowly turn up the Gain control on the subwoofer until you clearly hear an increase in the
bass level.
7.
Next, using the Crossover control, select a
crossover frequency that produces a well-balanced bass sound.
You may have to alternate between finely tuning the Gain
control and the Crossover control to optimize the sound.
Check your tuning of your powered subwoofer with the Bass
control on your head unit or radio fully turned up and, if necessary with the loudness switched on. Over amplification of
the Powered Subwoofer caused by setting the sensitivity too
high can lead to distorted reproduction and can irreparably
damage the subwoofer.
The Phase control should be adjusted once the other adjustments are made. Adjust this control for the point where the
bass sounds the most natural from your normal listening
position. In most cases the “0” or “180” settings will be used.
© Directed Electronics, Inc. all rights reserved—Sirius Powered Subwoofer User Guide
Powered Subwoofer
Back Panel Connections/Controls
5
AUTO TURN OFF DELAY (Max. 5 Min)
6
4
7
L
R
GAIN
CROSSOVER PHASE
Off
Min
+
-
2
AUTO
TURN ON
Auto
LINE
INPUT
Max
70 Hz 160
0°
+
-
3
R
180°
8
L
HIGH LEVEL
INPUT
1
12 11
Sirius Powered Subwoofer User Guide—© Directed Electronics, Inc. all rights reserved
FUSE 20A
+12V
BATT
REM
10
GND
9
7
1, 2. Low Level RCA phono jack input
3.
Auto Turn On switch (shown in off position)
Note: In the “OFF” position the unit will only turn
on if a REM wire has been connected.
4.
Gain adjust
5.
Power Indicator LED (on top of unit)
6.
Crossover adjust
7.
Phase adjust
8.
Fuse 20A
9.
Ground (GND)
10. Remote (connect to remote turn-on (12V
switched) from source or head unit.
Back Panel Controls
Auto Turn On switch—when On, the subwoofer will automatically power up when audio is present on the Hi Level
audio input, and power down (after a delay) when no audio
is present on the Hi Level audio input.
Gain adjust—allows adjustment of the gain of the subwoofer.
Crossover adjust—allows adjustment of the crossover frequency (70 to 160 Hz).
Phase adjust—allows adjustment of the audio phase
between the input audio and the subwoofer speaker audio
(0 to 180 degrees).
11. +12VDC (battery)
12. High Level input jack
8
© Directed Electronics, Inc. all rights reserved—Sirius Powered Subwoofer User Guide
Powered Subwoofer
Specifications
Maximum Power
160 watts
High Level Input
5–50 watts
RMS Power
80 watts
Weight
16.5 lbs
Nominal Impedance
3 ohms/voice coil x 4
Frequency Response
20Hz–200Hz
Sensitivity (SPL @ 100Hz)
104dB
Fuse Size
20A
Phase
0–180°
Minimum Power Wire Gauge
12
Crossover
70–160Hz
Input Sensitivity
0.2–8.0V
Size—inches
8.9W x 10.7H x 10.6D x 8.4T
(mm)
T
(225W x 272H x 296D x 213T)
H
D
Sirius Powered Subwoofer User Guide—© Directed Electronics, Inc. all rights reserved
W
9
Limited One Year Consumer Warranty
Directed Electronics, Inc. (herein "DIRECTED") promises to
the original purchaser, to replace this product should it prove
to be defective in workmanship or material under normal
use, for a period of one-year from the date of purchase from
the dealer as indicated by the date code marking of the product. During this one-year period, there will be no charge for
this replacement PROVIDED the unit is returned to
DIRECTED, shipping pre-paid. This warranty is non-transferable and does not apply to any unit that has been modified or used in a manner contrary to its intended purpose,
and does not cover damage to the unit caused by installation
or removal of the unit. This warranty is void if the product has
been damaged by accident or unreasonable use, neglect,
improper service or other causes not arising out of defects in
materials or construction. Units which are found to be damaged by abuse resulting in thermally damaged voice coils
are not covered by this warranty but may be replaced at the
absolute/sole discretion of DIRECTED. ALL WARRANTIES,
INCLUDING BUT NOT LIMITED TO EXPRESS WARRANTY, IMPLIED WARRANTY, WARRANTY OF MERCHANTABILITY, FITNESS FOR PARTICULAR PURPOSE,
AND WARRANTY OF NONINFRINGEMENT OF INTEL-
10
LECTUAL PROPERTY ARE EXPRESSLY EXCLUDED TO
THE MAXIMUM EXTENT ALLOWED BY LAW, AND
DIRECTED NEITHER ASSUMES NOR AUTHORIZES ANY
PERSON TO ASSUME FOR IT ANY LIABILITY IN CONNECTION WITH THE SALE OF THE PRODUCT. DIRECTED HAS ABSOLUTELY NO LIABILITY FOR ANY AND ALL
ACTS OF THIRD PARTIES INCLUDING ITS AUTHORIZED
DEALERS OR INSTALLERS. Unit must be returned to
DIRECTED, postage prepaid, with bill of sale or other dated
proof of purchase bearing the following information: consumer's name, telephone number, and address, authorized
dealer's name and address, and product description. Note:
This warranty does not cover labor costs for the removal and
reinstallation of the unit. IN ORDER FOR THIS WARRANTY
TO BE VALID, YOUR UNIT MUST BE SHIPPED WITH
PROOF OF PURCHASE FROM AN AUTHORIZED
DIRECTED DEALER. BY PURCHASING THIS PRODUCT,
THE CONSUMER AGREES AND CONSENTS THAT ALL
DISPUTES BETWEEN THE CONSUMER AND DIRECTED
SHALL BE RESOLVED IN ACCORDANCE WITH CALIFORNIA LAWS IN SAN DIEGO COUNTY, CALIFORNIA.
920-0020 06-05
© Directed Electronics, Inc. all rights reserved—Sirius Powered Subwoofer User Guide
Powered Subwoofer
Sirius Powered Subwoofer User Guide—© Directed Electronics, Inc. all rights reserved
11
G_SIR-PS1 06-05
SIRIUS, the SIRIUS dog logo and related marks are trademarks
of SIRIUS Satellite Radio Inc.
© 2005 Directed Electronics, Inc. all rights reserved