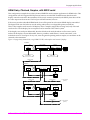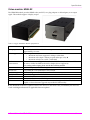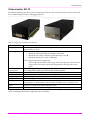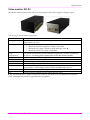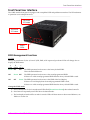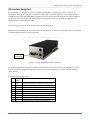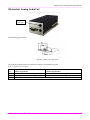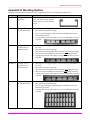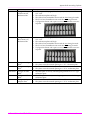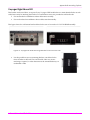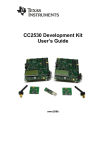
1
Installation and User Guide Document # 5310238‐01‐02 (12/02/2011), Rev 1.01 © 1998‐2011 by Magenta Research, Ltd., All rights reserved. Magenta Research, Ltd. 128 Litchfield Road New Milford, CT 06776 USA This document and the Magenta Research Ltd. products to which it relates, and the copyright in each, is the property of Magenta Research Ltd. Neither the document nor the products may be reproduced by any means, in whole or in part, without the prior written permission of Magenta Research. Magenta Research makes no warranty or representation, either express or implied, with respect to this software or documentation, including their quality, performance, merchantability, or fitness for a particular purpose. As a result, this software or documentation is licensed ʺas isʺ and you, the licensee, are assuming the entire risk as to their quality and performance. In no event will Magenta Research be liable for direct, indirect, special, incidental, or consequential damages arising out of the use of or inability to use the hardware, software or documentation. Magenta Research, the Magenta Research logo and Voyager logo are trademarks of Magenta Research, Ltd. All other brands, product names, and trademarks are the property of their respective owners. Magenta Research reserves the right to change product functionality and/or specifications at any time without prior notification. INSTALLATION AND USER GUIDE ii Precautions Safety Instructions ● English This symbol is intended to alert the user of important maintenance (servicing) and operating information. This symbol is intended to alert the user to the presence of un‐insulated dangerous voltages or other conditions in or around the product enclosure which may present a risk of electric shock, damage to equipment or facilities. This symbol is intended to alert the user of potentially dangerous invisible laser radiation. Caution: Read instructions: Read and understand all operating, installation and safety instructions before using this equipment. Avoid Attachments: Do not use accessories, attachments, tools or materials that are not recommended by the equipment manufacturer. Doing so may compromise operating performance, create an unsafe condition, damage equipment, or violate the terms of usage or warranty. Follow Warnings: Always follow all instructions and warnings marked on the equipment, or as detailed in the related user documentations. INSTALLATION AND USER GUIDE iii Contact Information For sales or technical support, contact your nearest Magenta Research sales office. Region Contact details North, Central and South Americas: Main: 800‐805‐0944 (USA only) or +1 860‐210‐0546 Magenta Research, Ltd. Fax: 1‐860‐210‐1758 Corporate Headquarters Web: www.magenta‐research.com 128 Litchfield Road Sales: sales@magenta‐research.com New Milford, CT 06776 USA Support: techsupport@magenta‐research.com Sales/Support phone hours: 8:30‐17:30 (EST: GMT‐0500) Asia: Main: 852.3105.1493 Magenta Research Asia Limited Fax: 852.3105.1491 Unit 1 21/F Cheung Tat Centre Contact: awaung@magentaresearch‐asia.com Chai Wan, Hong Kong Sales: awaung@magentaresearch‐asia.com Pan European Office: Magenta Research, LTD For all RMA return shipments, use this address unless you are advised otherwise: Magenta Research, Ltd. RMA Department 128 Litchfield Road New Milford, CT 06776 USA INSTALLATION AND USER GUIDE Main: +44 7708‐850582 Contact: rmuddiman@magenta‐research.com Sales: sales@magenta‐research.com Prior to returning any products, please contact Magenta’s support line to obtain an RMA number. This RMA number is essential for tracking your returns and for ensuring they are processed in a timely manner. Support Phone: 800‐805‐0944 (USA only) or +1 860‐210‐0546 Support e‐mail: techsupport@magenta‐research.com Support phone hours: 8:30‐17:30 (EST: GMT‐0500) iv <Contents Contents About this Manual ....................................................................................................................... 1 Introduction .................................................................................................................................. 2 Voyager Applications.................................................................................................................. 3 Basic HDMI‐TX/RX, with RS232 .............................................................................................3 HDMI Daisy‐Chained, Duplex, with RS232 serial ...............................................................4 HDMI Daisy‐Chained, Simplex, with RS232 serial .............................................................5 Application Notes .....................................................................................................................6 HDMI with HDCP‐protected content – HDCP Key limit ...............................................6 Using HDMI (with HDCP‐protected content) with DVI outputs .................................6 Using RS232 Serial With Daisy‐Chained Receivers .........................................................6 RS232 Port Settings and Addressable‐Receiver Operation.............................................7 Specifications ................................................................................................................................ 8 Common Specifications ...........................................................................................................8 Core modules: VG‐TX2, VG‐RX2 ...........................................................................................9 Fiber‐Optic Modules...........................................................................................................10 Video module: HDMI‐TX ......................................................................................................11 Video module: HDMI‐RX ......................................................................................................12 Video module: DVI‐TX ..........................................................................................................13 Video module: DVI‐RX ..........................................................................................................14 Video module: VGA‐TX ........................................................................................................15 Aux module: ISA ....................................................................................................................17 Installation .................................................................................................................................. 19 Prerequisites ............................................................................................................................19 Fiber‐Optic Cable Recommendations ..................................................................................20 Fiber‐Optic Cable Terminology ........................................................................................21 Transmitter & Receiver Earth‐grounding ...........................................................................23 Transmitter/Receiver Installation .........................................................................................24 Voyager Modular Construction............................................................................................25 Voyager Module Disassembly Procedure .......................................................................25 Voyager Module Assembly Procedure ............................................................................25 INSTALLATION AND USER GUIDE v <Contents LED Status Indicators .............................................................................................................26 Front Panel ...........................................................................................................................26 Rear Panel ............................................................................................................................27 Detail of LED indicator blink/flash patterns ...................................................................28 Front Panel User Interface ........................................................................................................ 29 EDID Management Functions ..............................................................................................29 VGA‐TX Controls ...................................................................................................................30 Troubleshooting ......................................................................................................................... 31 Appendix A: Electrical Pin Descriptions ................................................................................ 32 CORE module: Power Connector.........................................................................................32 ISA module: Serial Port..........................................................................................................33 Serial Interface Reference Information ................................................................................34 ISA module: Analog‐Audio Port ..........................................................................................37 ISA module: IR Port................................................................................................................38 Appendix B: Mounting Options .............................................................................................. 39 Voyager Rigid‐Mount Kit ......................................................................................................41 Appendix C: System Design Drawings .................................................................................. 42 Appendix D: Regulatory Compliance Information .............................................................. 43 Appendix E: Default Internal EDID Profile Details .............................................................. 44 Appendix F: VGA‐TX Image Scaling Details ......................................................................... 45 INSTALLATION AND USER GUIDE vi About this Manual About this Manual This manual contains information about the Magenta Voyager series of video extension products. This includes the following primary components: • Voyager VG‐TX2: Transmitter CORE module, equipped with 2 SFP optical ports. • Voyager VG‐RX2: Receiver CORE module, equipped with 2 SFP optical ports. • Voyager HDMI‐TX: Transmitter VIDEO module, supporting HDMI/DVI video input using a standard HDMI connector. • Voyager HDMI‐RX: Receiver VIDEO module, supporting HDMI/DVI video output using a standard HDMI connector. • Voyager DVI‐TX: Transmitter VIDEO module, supporting DVI video input using a standard DVI connector. • Voyager DVI‐RX: Receiver VIDEO module, supporting DVI video output using a standard DVI connector. • Voyager VGA‐TX: Transmitter VIDEO module, supporting VGA and analog video inputs using standard HD15 (VGA) and RCA/miniDIN (analog) connectors. INSTALLATION AND USER GUIDE 1 Introduction Introduction Magenta’s Voyager series is a modular video extension system. It is field‐configurable to handle a wide variety of digital and analog video formats, extending their reach using readily available IT‐grade fiber‐optic cable. The system is based on a standardized Voyager CORE module, which provides the primary image‐processing and fiber‐optic link functionality. To the CORE, an optional VIDEO and/or AUX module can be easily attached. VIDEO modules are offered in different models, supporting digital and analog video formats at virtually any resolution or refresh rate. The AUX module adds support for serial RS232, analog stereo audio, and IR (remote control) signal extension as well. Voyager extension technology currently supports these signal types: • • • Video o HDMI & DVI digital video. o VGA (RGB+HV) analog video. o Composite, component, and Y/C (S‐Video) formats. Audio o Embedded HDMI audio streams (8 channels). o Stereo line‐level analog audio. Serial o RS232. Simplex or full‐duplex. The Voyager video extension technology can be used in point‐to‐point applications and a variety of switched, distributed and daisy‐chained applications as well. Note: The IR capability is designed into the hardware, but not currently supported by the firmware. Check with Magenta Research for applicable firmware updates. INSTALLATION AND USER GUIDE 2 Voyager Applications Voyager Applications The Voyager extension products can be utilized in a variety of system topologies to suit specific needs. This includes basic point‐to‐point extension, daisy‐chained extension, switched video (by adding a VG‐Matrix switch), and automatic 2:1 switch or failover‐backup (2:1 switch at receiver). Below are some examples of these configurations. Please contact Magenta to discuss your specific system‐configuration. Basic HDMI-TX/RX, with RS232 This configuration example shows a very basic point‐to‐point extension application for HDMI video. If the source content is protected (with HDCP), then it will remain protected to the local port, and all the way to the receiver’s output. If the source provides embedded HDMI‐audio, that will be passed to the remote HDMI display unmodified. The HDMI‐digital audio can also be driven out the analog audio jacks. There is also full‐duplex serial‐control of the display. Since a duplex (twin) fiber is being used between the TX and RX units, the display CAN send responses back to the control system. If a simplex (single) fiber were used, then only video and serial can flow TO the display, and no responses can be returned to the control system. Figure 1. Voyager point‐to‐point link, using HDMI‐TX/RX, with full‐duplex serial control of display. Transmitter ISA AUX module Serial VG-TX2 CORE L/R IR Pwr SFP#1 SFP#2 TX TX RX RX HDMI-TX VIDEO module USB (cfg) HDMI-in HDMI-out (on front) HDMI Display Control System HDMI Source Duplex (twin) fiber Receiver ISA AUX module Serial VG-RX2 CORE L/R IR Pwr SFP#1 SFP#2 TX TX RX RX HDMI-RX VIDEO module USB (cfg) HDMI-out HDMI Display INSTALLATION AND USER GUIDE 3 Voyager Applications HDMI Daisy-Chained, Duplex, with RS232 serial This configuration example shows a daisy‐chained DUPLEX mode extension application for HDMI video. If the source content is protected (with HDCP), then it will remain protected to the local port, and all the way to each receiver’s output. Note that the “HDCP‐key‐limit” may apply in this case. See the Application Notes section. If the source provides embedded HDMI‐audio, that will be passed to each remote HDMI display unmodified. The digital audio can also be driven out the analog audio jacks as a configurable option (see MAGui). There is also full‐duplex serial‐control of all displays. Since a duplex (twin) fiber is being used between the TX and RX units, the displays CAN send responses back to the control system. If a simplex (single) fiber were used, then only video and serial can flow TO the display, and no responses can be returned to the control system. If the displays are serial‐port addressable, then the default serial mode (broadcast to all receivers) can be utilized. All return data will be merged together – so it’s important that only one display respond at a time. If the displays are not addressable, then it’s possible to make distinct “virtual connections” with individual receivers’ serial ports. Figure 2. Voyager daisy‐chained link, using HDMI‐TX/RX, with full‐duplex serial control of display. Transmitter ISA AUX module Serial VG-TX2 CORE L/R IR Pwr SFP#1 SFP#2 TX TX RX RX HDMI-TX VIDEO module USB (cfg) HDMI-in HDMI-out (on front) HDMI Display Control System HDMI Source Duplex (twin) fiber Receiver 1 ISA AUX module Serial VG-RX2 CORE L/R IR Pwr SFP#1 SFP#2 TX TX RX RX HDMI-RX VIDEO module USB (cfg) HDMI-out HDMI Display Duplex (twin) fiber Receiver 2 ISA AUX module Serial VG-RX2 CORE L/R IR Pwr SFP#1 SFP#2 TX TX RX RX HDMI-RX VIDEO module USB (cfg) HDMI-out HDMI Display Duplex (twin) fiber INSTALLATION AND USER GUIDE To more receivers (optional) 4 Voyager Applications HDMI Daisy-Chained, Simplex, with RS232 serial This configuration example shows a daisy‐chained SIMPLEX mode extension application for HDMI video. This configuration will NOT support HDCP‐protected content, since the HDCP authentication data from each display cannot be returned to the transmitter. If the source content is protected (with HDCP), then there will be no video output are the receivers. The local port will still function, however. If the source provides embedded HDMI‐audio, that will be passed to each remote HDMI display unmodified. The digital audio can also be driven out the analog audio jacks as a configurable option (see MAGui). There is also simplex serial‐control of all displays. Since a simplex (single) fiber is being used, only video and serial can flow TO the display, but no responses can be returned to the control system. If the displays are serial‐port addressable, then the default serial mode (broadcast to all receivers) can be utilized. If the displays are not addressable, then it’s possible to make distinct “virtual connections” with individual receivers’ serial ports. In any case, since the general operating mode is simplex, no serial data can be returned to the transmitter. Figure 3. Voyager daisy‐chained link, using HDMI‐TX/RX, with simplex serial control of display. Transmitter ISA AUX module VG-TX2 CORE L/R Serial IR Pwr SFP#1 SFP#2 TX TX RX RX HDMI-TX VIDEO module USB (cfg) HDMI-in HDMI-out (on front) HDMI Display Control System HDMI Source Simplex (single) fiber Receiver 1 ISA AUX module Serial VG-RX2 CORE L/R IR Pwr SFP#1 SFP#2 TX TX RX RX HDMI-RX VIDEO module USB (cfg) HDMI-out HDMI Display Simplex (single) fiber Simplex (single) fiber To more receivers (optional) Receiver 2 ISA AUX module Serial VG-RX2 CORE L/R IR Pwr SFP#1 SFP#2 TX TX RX RX HDMI-RX VIDEO module USB (cfg) HDMI-out HDMI Display Simplex (single) fiber Simplex (single) fiber INSTALLATION AND USER GUIDE To more receivers (optional) 5 Voyager Applications Application Notes HDMI with HDCP-protected content – HDCP Key limit When the video source is protected HDMI content (with HDCP), there may be a limit to the total number of display devices allowed for a particular source device (PC, BluRay player, etc.). This limitation is a function of the source device – not the Voyager extension. Sometimes the limit can be as low as 1, 2 or 3 displays. To be certain – check the technical documentation for your source device, or conduct a bench test to confirm that you can indeed drive the actual number of displays required for your application. Note that the absolute maximum number of displays for HDCP‐protected content is 127, which is defined by the HDCP content‐protection technology. Not all source devices will support this maximum. For video switching applications using the Voyager Matrix products, please contact Magenta Research with any concerns regarding HDCP “key limits”. Using HDMI (with HDCP-protected content) with DVI outputs When the video source is protected HDMI content (with HDCP), it will still be possible to view that protected content by using a DVI‐RX module. Most displays equipped with only DVI connectors also accept HDMI video. If there is any doubt regarding HDCP support within a particular display – the best way to confirm this is to simply test it first. Using RS232 Serial With Daisy-Chained Receivers The following only applies if the ISA auxiliary module is being used with daisy‐chained receivers: The VG‐TX2 CORE module can send RS232 serial traffic downstream (to receivers) using either (or both) optical ports simultaneously. The VG‐RX CORE module is pre‐configured to behave as follows: Serial traffic received on the Optical‐1 port is sent to the ISA’s serial port on this receiver. Also, the same serial traffic is immediately retransmitted to the Optical‐2 port to the next receiver in the daisy‐chain. Serial traffic entering the ISA’s serial port on this receiver is only sent upstream (to the VG2‐TX) on the Optical‐1 port. Serial traffic received on the Optical‐2 port is immediately retransmitted to the Optical‐1 port. INSTALLATION AND USER GUIDE 6 Voyager Applications RS232 Port Settings and Addressable-Receiver Operation The default RS232 port settings are: 9600 baud, 8 data bits, one stop bit, no parity (9600/8/n/1). The baud rate and stop‐bit settings are configurable using the MAGui utility. The default behavior for the ISA’s RS232 serial‐port is to simply provide the equivalent of a “pass through” cable from the transmitter end to one or more receiver endpoints. Any data coming into the transmitter is broadcast to all receivers. Any data from any receiver is sent to the transmitter. If two receivers send data at the same time – the data will come out of transmitter interleaved (and effectively garbled). In some cases, the ability to selectively communicate with one receiver at a time is required. To address an individual receiver, the controlling device at the transmitter (typically a PC or other control system) must transmit the following string: [2‐Sec quiet] “@xxxxxxxxxxxxxxxx@” [2‐Sec quiet] Note: The double‐quotes (“) are not transmitted to the VG‐TX2 – only the characters between them. As shown, the addressing string must be delimited before and after with 2 seconds of quiet‐line (no data). Also, the entire string (from first @ to second @, inclusive) must be transmitted completely within 2 seconds. If either of these rules are violated, the “addressing command” is ignored and the entire string is passed through to all receivers as if it were normal broadcast data. The xx..xx portion of the string is the 16‐digit address of a specific receiver. This address can be found on the bottom of the receiver’s CORE module, printed on the ID‐label as shown here on this example VG‐RX label: Receiver ID (16 digits) Using the above label as an example, to address this receiver the address‐string would be: [2‐Sec quiet] “@1122334455667788@” [2‐Sec quiet] Once the address has been selected successfully, it will remain addressed‐receiver mode until power is cycled at the transmitter, OR, by setting the address back to broadcast‐mode. To configure the transmitter back to its default behavior of “broadcast mode” without cycling power, use a receiver address of all 0’s (zeros). This is simply 16 zeros in a row: “@0000000000000000@”. Note: The total number of characters required is always 18: @ + 16 digits + @ Note: There are many more features and functions available through the RS‐232 port. Please refer to the Voyager Programming Guide for more in‐depth information. INSTALLATION AND USER GUIDE 7 Specifications Specifications Common Specifications The following tables list the specifications common to all Voyager extension products. Subsequent sections detail the specifications for each individual Voyager module. Table 1. Voyager family, common specifications. Item Environmental Enclosure System Size MTBF Description Operating temperature: 32 to 104°F (0 to 40°C) . Storage temperature: ‐40 to +140°F (‐40 to +60°C). Humidity: 80% RH, non‐condensing. Steel (0.040”/1mm thick). Powder‐coat black paint, white epoxy graphics. Assumes a typical 3‐module configuration consisting of VIDEO + CORE + AUX modules, docked together: 1.75ʺ(4.45cm)H x 7.75ʺ(19.68)W x 5.25ʺ(13.33cm)D Weight: 2.2lbs (1kg) 100,000 hours. Warning: This equipment is not intended for, nor does it support, distribution through an Ethernet or IT‐related copper or fiber network. Do not connect these devices to any type of networking or telecommunications equipment. Caution: This equipment may output continuous, invisible laser radiation. Do not look directly into the ends of any fiber‐optic cables, or into the fiber‐optic ports on this equipment. Preventive: When a fiber‐optic cable is unplugged, use appropriate dust‐caps on the cable ends and in any unused fiber‐optic ports to protect from accidental laser‐light exposure, and ingress of unwanted contaminants. INSTALLATION AND USER GUIDE 8 Specifications Core modules: VG-TX2, VG-RX2 The Voyager CORE modules provide the main video‐processing and fiber‐optic interface logic. It supports 2 SFP+ fiber‐optic modules. It also provides power for all the VIDEO and AUX option modules. The VG‐TX2 and VG‐RX2 CORE modules look identical, externally. They mainly differ in the firmware loaded into them at the factory. The product‐ID label on the bottom of the enclosure will identify which version of firmware was loaded at the factory. Table 2. Voyager Specifications: VG‐TX2, VG‐RX2 core module, transmitter & receiver. Item DC input power Maximum fiber length Optical ports USB‐Config port USB‐Config port Characteristics Connectors Module Size Module Weight Description 10 to 13VDC regulated, 3A max. Actual total system power consumption depends on what option modules are connected to the CORE. Power consumption of the CORE module alone is approximately 3 Watts. 2km (6600ft) with the “MMF SFP” fiber‐optic module and OM4 grade multi‐mode fiber. If using OM3 grade fiber the distance will be limited to approximately 1km (3300ft). 4km with the “SMF SFP 4km” fiber‐optic module and OS1 (or better) grade single‐ mode fiber. 30km with the “SMF SFP 30km” fiber‐optic module and OS1 (or better) grade single‐ mode fiber. NOTE: See next section for additional fiber distance ratings. This CORE module provides 2 SFP+ fiber‐optic module ports. The optical modules will need to be specified at time of order. Note: It is possible to use 2 different module types in the same CORE module, if both optical outputs are used but different maximum extension lengths are required. By default, each core unit ships with one (1) SFP module. Add-on SFP modules are available on the price list. The USB port is for configuration only. It is a type “B” device port. A standard USB A‐ B cable is typically required to connect a CORE to a host‐PC. The USB‐Config port supports host computers with USB‐2.0 or USB‐1.1 interface capability. A Magenta‐supplied USB‐driver and configuration utility is required to use this configuration port. (1) Coaxial DC power jack (2.1mm pin, 5.5mm OD, 11mm long) (2) SFP+ optical ports (1) USB type “B” port (1) Video‐module docking connector. (1) Aux‐module docking connector. 1.53ʺ(3.88cm)H x 3.27ʺ(8.30cm)W x 5.12ʺ(13cm)D 0.8 lb. (0.37 kg) INSTALLATION AND USER GUIDE 9 Specifications Fiber-Optic Modules Each Voyager VG‐TX2 CORE module has two SFP+ ports, meant for insertion of 1 or 2 fiber‐optic modules. The Voyager extension products can use three types of fiber‐optic modules: • • Module type = “MMF SFP”. o Multi‐Mode: Up to 2Km (6600 ft) extension over OM4 multi‐mode fiber cable. o Multi‐Mode: Up to 1Km (3300 ft) extension over OM3 multi‐mode fiber cable. o Multi‐Mode: Up to 666m (2200 ft) extension over OM2 multi‐mode fiber cable. o Multi‐Mode: Up to 496m (1640 ft) extension over OM1 multi‐mode fiber cable. Module type = “SMF SFP 4km”. o • Single‐mode: Up to 4Km (13200 ft) extension over single‐mode fiber cable. Module type = “SMF SFP 30km”. o Single‐mode: Up to 30Km (99000 ft) extension over single‐mode fiber cable. The fiber‐optic modules used with Voyager products have been thoroughly tested and are Magenta approved. To ensure maximum system performance and reliability, do not attempt to use non‐Magenta approved optical modules. Note: Both multi‐mode and single‐mode modules can be utilized in Simplex and Duplex Voyager system configurations. The terms “Simplex” and “Duplex” refer to how the Voyager transmitters and receivers are interlinked with fiber. They do NOT refer to the type of fiber or type of fiber‐optic modules being used. Note: It is possible to use different module types in the same CORE module. Sometimes both optical outputs are needed but different maximum extension lengths are required for a specific application. Table 3. Voyager Specifications: Model “MMF SFP”, Multi‐mode fiber‐optic module. Item Form‐factor Optical ports Description Industry‐standard “SFP+” module. 2 fiber ports: TX and RX (full‐duplex capable), type “LC” fiber‐optic connector. 850nm Wavelength Table 4. Voyager Specifications: Model “SMF SFP 4km”, Single‐mode fiber‐optic modules, 4km capable. Item Form‐factor Optical ports Wavelength Description Industry‐standard “SFP+” module. 2 fiber ports: TX and RX (full‐duplex capable), type “LC” fiber‐optic connector. 1310nm Table 5. Voyager Specifications: Model “SMF SFP 30km”, Single‐mode fiber‐optic modules, 30km capable. Item Form‐factor Optical ports Wavelength Description Industry‐standard “SFP+” module. 2 fiber ports: TX and RX (full‐duplex capable), type “LC” fiber‐optic connector. 1310nm INSTALLATION AND USER GUIDE 10 Specifications Video module: HDMI-TX The HDMI‐TX module accepts HDMI video (and DVI, via a plug‐adapter or cable‐adapter) as an input signal. There is also a local‐output port which is often used for a local HDMI (or DVI) display for test or debugging purposes. Table 6. Voyager HDMI‐TX Module Specifications Item DC input power Video Support Audio Characteristics Connectors Module Size Module Weight EDID/DDC HDMI HDCP CEC Description Provided by the CORE module. However, power consumption of this module alone is approximately 0.5 watts. Video input formats (video input port): • Maximum resolution supported = 1080p or 1920x1200. • Maximum color‐depth = 24 bits per pixel (8 bits per color). • Maximum refresh rate = 60Hz @ 1920x1200. Video output formats (local output port): The local port is essentially a direct copy of the video input port. However, the output video color‐space is always RGB regardless of the input video color‐space. This module recognizes all 8 channels (if present) of embedded HDMI audio, passing them through the system to the receiver. (1) HDMI‐input, (1) HDMI‐output, (1) CORE docking connector 1.53ʺ(3.88cm)H x 2.16ʺ(5.48cm)W x 5.12ʺ(13cm)D 0.6 lb. (0.27 kg) This module supports the EDID/DDC connections on the HDMI connectors. Version 1.3b Version 1.1. Classification: HDCP Repeater Device The HDMI “CEC” interface protocol is not currently supported. Note: The hardware is capable. A future firmware upgrade may enable this functionality. The HDMI‐TX hardware is capable of 30‐bit color. However, this mode is not yet enabled by the firmware. Check with Magenta Research for applicable firmware updates. INSTALLATION AND USER GUIDE 11 Specifications Video module: HDMI-RX The HDMI‐RX module provides HDMI video (and DVI, via a plug‐adapter or cable‐adapter) as an output signal. This module supports 1 display output. Table 7. Voyager HDMI‐RX Module Specifications Item Description DC input power Provided by the CORE module. However, power consumption of this module alone is approximately 0.5 watts. Video output formats: • Maximum resolution supported = 1080p or 1920x1200. • Maximum color‐depth = 24 bits per pixel (8 bits per color). • Maximum refresh rate = 60Hz @ 1920x1200. This module automatically provides embedded HDMI‐audio (if audio is available at the source AND if the EDID in the sink or display device supports it). * For analog‐audio output, please use the ISA auxiliary module. (1) HDMI‐output, (1) CORE docking connector 1.53ʺ(3.88cm)H x 2.16ʺ(5.48cm)W x 5.12ʺ(13cm)D 0.6 lb. (0.27 kg) This module supports the EDID/DDC connections on the HDMI connector. Version 1.3b Version 1.1. Classification: HDCP Repeater Device The HDMI “CEC” interface protocol is not currently supported. Note: The hardware is capable. A future firmware upgrade may enable this functionality. Video Support Audio Characteristics Connectors Module Size Module Weight EDID/DDC HDMI HDCP CEC The HDMI‐RX hardware is capable of 30‐bit color. However, this mode is not yet enabled by the firmware. Check with Magenta Research for applicable firmware updates. INSTALLATION AND USER GUIDE 12 Specifications Video module: DVI-TX The DVI‐TX module accepts DVI video as an input signal. There is also a local‐output port which is often used for a local DVI display for test or debugging purposes. Table 8. Voyager DVI‐TX Module Specifications Item DC input power Video Support Audio Characteristics Connectors Module Size Module Weight EDID/DDC HDMI HDCP CEC Description Provided by the CORE module. However, power consumption of this module alone is approximately 0.5 watts. Video input formats (video input port): • Maximum resolution supported = 1080p or 1920x1200. • Maximum color‐depth = 24 bits per pixel (8 bits per color). • Maximum refresh rate = 60Hz @ 1920x1200. Video output formats (local output port): The local port is essentially a direct copy of the video input port. However, the output video color‐space is always RGB regardless of the input video color‐ space. Embedded digital audio is not supported. * For analog‐audio output, please use the ISA auxiliary module. (1) DVI‐input, (1) DVI‐output, (1) CORE docking connector 1.53ʺ(3.88cm)H x 2.16ʺ(5.48cm)W x 5.12ʺ(13cm)D 0.6 lb. (0.27 kg) This module supports the EDID/DDC connections on the DVI connectors. Version 1.3b. Protected HDMI content is supported. However, it is usually possible via a plug‐adapter or cable‐adapter to interface with an HDMI source or display device. Version 1.1. Classification: HDCP Repeater Device The DVI interface standard does not support the CEC signal. The DVI‐TX hardware is capable of 30‐bit color. However, this mode is not yet enabled by the firmware. Check with Magenta Research for applicable firmware updates. INSTALLATION AND USER GUIDE 13 Specifications Video module: DVI-RX The DVI‐RX module provides DVI video as an output signal. This module supports 1 display output. Table 9. Voyager DVI‐RX Module Specifications Item DC input power Video Support Audio Characteristics Connectors Module Size Module Weight EDID/DDC HDMI HDCP CEC Description Provided by the CORE module. However, power consumption of this module alone is approximately 0.5 watts. Video output formats: • Maximum resolution supported = 1080p or 1920x1200. • Maximum color‐depth = 24 bits per pixel (8 bits per color). • Maximum refresh rate = 60Hz @ 1920x1200. This module automatically provides embedded digital audio (if audio is available at the source). * For analog‐audio output, please use the ISA auxiliary module. (1) DVI‐output, (1) CORE docking connector 1.53ʺ(3.88cm)H x 2.16ʺ(5.48cm)W x 5.12ʺ(13cm)D 0.6 lb. (0.27 kg) This module supports the EDID/DDC connections on the DVI connector. Version 1.3b. Protected HDMI content is supported. However, it is usually possible via a plug‐adapter or cable‐adapter to interface with an HDMI display device. Version 1.1. Classification: HDCP Repeater Device The DVI interface standard does not support the CEC signal. The DVI‐RX hardware is capable of 30‐bit color. However, this mode is not yet enabled by the firmware. Check with Magenta Research for applicable firmware updates. INSTALLATION AND USER GUIDE 14 Specifications Video module: VGA-TX The VGA‐TX module is essential for systems that still contain one or more analog sources, along with modern digital sources. Both types of video (analog and digital) can coexist and thus minimize capital equipment costs by extending the longevity of existing video sources. This is especially important when using Voyager extension technology together with a video switching system such as the VG‐Matrix switch. The VGA‐TX module accepts a wide range of legacy analog‐video signal formats: VGA (RGB+HV) video, typically from PC’s and MAC’s. Composite video (NTSC/PAL). Component video (YUV/YPbPr). Y/C (S‐Video). These video standards can be input at variety of resolutions and refresh‐rates. They are recognized automatically – no user configuration is required. All input video formats are scaled to 1920x1080 resolution and aspect ratios are converted to 16:9 using a non‐linear algorithm. Please refer to Appendix‐F for an explanation of this algorithm. There are no user‐configurable options with regards to the operation of the VGA‐TX module. However, there is an “auto‐adjust” function which is applicable to VGA inputs only (not component/composite/S‐video). The auto‐adjust is invoked simply by pressing the F2 button on the front of the CORE module. In the event that multiple video sources are applied simultaneously, the firmware adopts a strategy of scanning for a valid video signal at each port, and automatically selecting the “highest likely quality” port to display, in this order: 1. VGA (potentially the highest quality) 2. Component (YUV/YPbPr) 3. Y/C (S‐video) 4. Composite (NTSC/PAL) (potentially the lowest quality). If an active video source is removed, the firmware automatically selects the next‐best‐quality input signal, if any exists. To return to a “higher quality” signal, connect the “higher quality” signal and reset the transmitter (cycle power). NOTE: On some VGA‐TX units, the colors on the RCA jacks may be different than shown here. However, the functionality labeled on the enclosure silkscreen (Pb, Y, Pr, and Comp) is still correct. INSTALLATION AND USER GUIDE 15 Specifications Table 10. Voyager VGA-TX Module Specifications Item Description DC input power Provided by the CORE module. However, power consumption of this module alone is approximately 1.5 watts. Video Support Video input formats (VGA video input port): • Maximum resolution supported = 1920x1200. • Maximum color‐depth = 24 bits per pixel (8 bits per color). • Maximum refresh rate = 60Hz @ 1920x1200, 75HZ @ 1152x864. Video output formats (local VGA output port only): The local output port is essentially a direct copy of the VGA video input port. There are no local output ports for the non‐VGA analog signals. Video input formats (Component): Max resolution = 1080i. Refresh rate = 60Hz@720p. Video input formats (Composite): Standard NTSC/PAL formats & refresh rates. Video input formats (S‐Video or Y/C): Standard NTSC/PAL formats & refresh rates. Connectors (1) VGA‐input (HD‐15F) (1) VGA‐output (HD‐15F) (1) S‐Video input (4 pin MiniDIN) (1) Composite video input (RCA phono) (3) Component video inputs (RCA phono) (1) CORE docking connector Module Size 1.53ʺ(3.88cm)H x 2.16ʺ(5.48cm)W x 5.12ʺ(13cm)D Module Weight 0.6 lb. (0.27 kg) EDID/DDC This module supports the EDID/DDC connections on the VGA input connector. INSTALLATION AND USER GUIDE 16 Specifications Aux module: ISA The ISA auxiliary module provided interfaces for RS232 serial, line‐level stereo (analog) audio, and IR remote‐ controls. The same module can be used at the transmitter or receiver end. The signal directions at the audio and IR interfaces are switched automatically. The signal directions at the RS232 interface are fixed, but can be easily changed to suit a specific application with an external null‐modem cable/adapter. Note: The IR capability is designed into the hardware, but not currently supported by the firmware. Check with Magenta Research for applicable firmware updates. Table 11. Voyager ISA Module Specifications Item DC input power Serial Interface Description Provided by the CORE module. However, power consumption of this module alone is approximately 0.5 watts. RS232 standard serial interface. Reflects DCE pinout standard. Signals: TXD, RXD, RTS, CTS, DSR, DTR, DCD and RI. Speeds: 2400, 4800, 9600, 19200, 38400, 57600, 115200, 230400 Baud. Format: 8 data. 1 or 2 stop bits. no parity bit. Flow control: Hardware and software flow‐control is available, configurable on/off. Connector: DB9‐Female, w/4‐40 standoffs. Note: Speed and data format are software‐configurable via MAGui. Note: Some application will require a null‐modem cable. Please refer to Appendix‐A, under “Serial Interface Reference Information” for additional advice regarding interconnecting cables. The ISA hardware is capable hardware and software (Xon/Xoff) handshaking. However, this capability is not yet enabled by the firmware. Check with Magenta Research for applicable firmware updates. INSTALLATION AND USER GUIDE 17 Specifications Item Audio interface IR interface Module Size Module Weight Description Discrete Left and Right line‐level audio. This module can function as an input (for TX) or output (for RX) device. The audio signal direction is under software control, and is selected automatically by the type of CORE module being used. Audio‐input mode (when used with VG‐TX2 CORE): Input voltage: 1V peak‐to‐peak, maximum. Input impedance: >= 10K ohms. Input coupling: AC (capacitive). Input sample rate: 48KHz Input frequency response: 20‐20KHz, (@‐3dB). Audio‐output mode (when used with VG‐RX CORE): Output voltage: 1V peak‐to‐peak, maximum. Output impedance: <= 100 ohms. Output coupling: AC (capacitive). Output sample rate: 48KHz Output frequency response: 20‐20KHz, (@‐3dB). Connector: 3.5mm (1/8”) stereo‐phono type jack. Compatible with industry‐standard IR‐LED emitters, and 12V powered IR‐receivers. The IR signal direction is under software control, and is selected automatically by the type of CORE module being used. Supported IR Standards: 38KHz carrier AM, … TBD For interfacing to IR‐receivers: Power output: 12VDC through 22 ohm current limit resistor. IR‐Receiver input: 5V logic input, 100 ohm resistor to GND. For interfacing to IR‐transmitters (IR‐LED blasters): IR‐Driver output: 5V driving through 22 ohm current limit resistor. Suitable for most direct‐drive IR‐LED transmitters. Connector: 3.5mm (1/8”) stereo‐phono type jack. 1.53ʺ(3.88cm)H x 2.16ʺ(5.48cm)W x 5.12ʺ(13cm)D 0.6 lb. (0.27 kg) Note: The IR capability is designed into the hardware, but not currently supported by the firmware. Check with Magenta Research for applicable firmware updates. INSTALLATION AND USER GUIDE 18 Installation Installation The Voyager extension products come pre‐configured and will usually work with no configuration adjustments. Simply plug in the cables and power‐up! In the event an adjustment is needed, all available configuration settings are modified under software control. There are no internal jumpers to configure. Refer to the MAGui utility user‐guide for additional information on specific configuration settings. Prerequisites The minimal set of installation tools includes one or two screwdrivers, and possibly additional mounting screws (for wall or under‐desk mounting). The screws on the Voyager enclosures are all Philips‐head. A standard #2 Philips screwdriver should suffice in most cases. However, it is unlikely that an enclosure would need to be disassembled – as there are no user‐configurable settings or jumpers inside. For installation materials, you will need the appropriate interconnection cables (video/audio/serial/fiber) for your application. The choice of specific materials will greatly depend on which option modules have been selected, and other specific physical requirements of the installation. If a configuration change is needed, you will need a Windows‐based computer (laptop or desktop) with at least 1 free USB port, a standard A/B USB cable, and Magenta’s MAGui software package (free download available at the www.magenta‐research.com website). INSTALLATION AND USER GUIDE 19 Installation Fiber-Optic Cable Recommendations To ensure maximum performance and compatibility, new installations should be designed to incorporate the appropriate type of fiber‐optic cabling. For existing or retrofit installations which may already have older or lower‐quality fiber installed, proper functionality will likely still be possible, though the maximum extension range may be reduced somewhat. Likewise, the introduction of fiber‐optic patch‐panels or connector adapter‐pigtails into a Voyager link will reduce the maximum range achievable. Some general recommendations for fiber‐optic cables are listed below. Table 12. Recommended fiber‐optic cables for use with Voyager products. Item Fiber‐optic cable type required Description Simplex, Multi‐mode fiber: Single‐jacket, multi‐mode fiber, LC termination. Outer jacket color is usually beige (tan, or light‐brown). 50 micron core diameter (typical for OM2, OM3 and OM4 grade fiber) 62.5 micron core diameter is typical for OM1 grade fiber. 125 micron outer diameter. Type OM4 or better is preferred for full distance performance. Simplex, Single‐mode fiber: Single‐jacket, single‐mode fiber, LC termination. Outer jacket color is usually blue. 9 micron core diameter. 125 micron outer diameter. Type OS1 or better is preferred for full distance performance. Duplex, Multi‐mode fiber: Twin‐jacket, multi‐mode fiber, LC terminations. Outer jacket color is usually beige (tan, or light‐brown). 50 micron core diameter (typical for OM2, OM3 and OM4 grade fiber) 62.5 micron core diameter is typical for OM1 grade fiber. 125 micron outer diameter. Type OM4 or better is preferred for full distance performance. Duplex, Single‐mode fiber: Twin‐jacket, single‐mode fiber, LC terminations. Outer jacket color is usually blue. 9 micron core diameter. 125 micron outer diameter. Type OS1 or better is preferred for full distance performance. Note: There is no correlation between video resolution and maximum range. With Voyager products the fiber‐ optic signaling is a fixed format, optimized for maximum reliability and performance for any video resolution. Therefore, unlike many copper‐based extension devices, lowering the video resolution will not increase the effective operating range. In all cases, the fiber‐optic cables used with Voyager must come terminated with “LC” type connectors: INSTALLATION AND USER GUIDE 20 Installation Fiber-Optic Cable Terminology When specifying and using fiber‐optic cable and systems, often there is considerable confusion surrounding various common terms relating to them. Single‐Mode vs Multi‐Mode: These terms refer to the TYPE and SIZE of glass fiber. Specifically, how the glass fiber‐optic core is manufactured. Both types have an outer (buffer) diameter of approximately 125 microns, and an outer protective jacket structure. For typical fiber‐optic cables, multi‐mode and single‐mode fiber have the following general features: Multi‐mode fiber: Fiber core diameter: 50 or 62.5 microns in diameter. Outer buffer diameter is typically 125 microns. Fiber quality ratings: OM4 is currently the recommended best quality. Lower grades, OM3, OM2 and even OM1, can likely still function with Voyager, though with reduced extension capability. Extension distance is more a function of fiber quality rating, not fiber loss (dB loss per meter). Signal quality degrades (signal distortion increases) more quickly than the rate at which light is attenuated. Patch cords and other fiber‐to‐fiber coupling methods will certainly introduce some additional signal distortion and losses which must be accounted for. Typical extension range for Voyager, using a single length of high quality OM4 cable is 2km. Multi‐mode fiber optic transceivers are generally much less expensive than single‐mode optics. Single‐mode fiber: Fiber core diameter: 9 microns in diameter. Outer buffer diameter is typically 125 microns. Fiber quality ratings: OS1 is currently the recommended best quality. Lower grades, such as ungraded single‐mode fiber, can likely still function with Voyager, though with reduced extension capability. Extension distance is more a function of fiber dB loss rating not fiber quality. Signal integrity is maintained fairly well with SM fiber – but the dB loss in optical power is the primary limit for extension distance. Patch cords and other fiber‐to‐fiber coupling methods will certainly introduce additional dB signal losses which must be accounted for. Typical extension range for Voyager, using a single length of high quality OS2 cable is 4km (with short‐ range SM4K optics) or 30km (with long‐range SM30K optics) Single‐mode fiber optic transceivers are generally much more expensive than multi‐mode optics. It can be difficult to determine visually whether the fiber‐core is the single‐ or multi‐mode type. Primarily, the most reliable means of checking the type is to refer to the jacket color, LC‐connector color, and printing on the outer jacket of the fiber‐optic cable. It should always identify the manufacturer’s name and series or model number of the cable material. Simplex vs Duplex: These terms no NOT refer to the type of glass fiber, only whether you use a single or dual fiber cable to interconnect Voyager units. In a Simplex system configuration, a single fiber is used between a transmitter and receiver. This allows video, audio and serial data to be sent to the receiver; however, there can be no return traffic (such as upstream‐serial data or EDID data). While Simplex mode has some limitations, it is a good solution for those applications that must use only 1 fiber (for a variety of reasons), or simply don’t need the extra functionality that a Duplex connection offers. In a Duplex system configuration, a dual‐fiber, also called twin‐fiber, between a transmitter and receiver. This allows video, audio and serial data to be sent to the receiver, and also support upstream traffic such as serial data and EDID data. It is also more robust and secure in terms of managing and monitoring receivers and their attached displays. INSTALLATION AND USER GUIDE 21 Installation Mixing Single and Multi‐mode fiber in one system: Since Voyager transmitters and receivers support a daisy‐chained configuration, each fiber‐optic link can be chosen to use either single‐ or multi‐mode fiber, depending on the required distance for that leg of the link. It is sometimes possible, though not recommended, to us multi‐mode fiber with single‐mode fiber‐optic modules, and single‐mode fiber with multi‐mode fiber‐optic modules. The extension range will be severely limited ‐ probably on the order of 200m or less. Again, this intermixing of fiber‐types and optics‐types is NOT RECOMMENDED and will not be officially supported by Magenta. However, for very short fiber lengths (10‐ 20m) in a lab‐bench test for evaluation only, it is common to use the “wrong” type of fiber. INSTALLATION AND USER GUIDE 22 Installation Transmitter & Receiver Earth-grounding The VG‐TX2 and VG‐RX CORE modules have an earth‐ground screw on the rear. This is provided for certain installations which may require (by local electrical code), or may otherwise benefit from, using a locally‐ supplied earth‐ground connection. If this connection point is used, the preferred method is to use a crimped or soldered #6 ring‐lug (sized for the correct wire‐gage in use): The ring‐lug should be firmly attached using the earth‐ground, to the rear of the Voyager TX2 or RX2 chassis. The use of bare wires (without the added ring‐lug), either solid or stranded, directly under the earth‐grounding screw is not recommended. Note: The use of the earth‐ground screw on the CORE module is optional. In most cases it will not be required. However, there may be some special installation‐site issues which call for use of this earth‐ground screw. Warning: If there is any doubt about the use of the earth‐ground screw connection, immediately seek the advice of a licensed electrician or qualified technical consultant. Improper use or mis‐wiring can result in an unsafe condition and a risk of electrical shock, or damage to equipment and facilities. INSTALLATION AND USER GUIDE 23 Installation Transmitter/Receiver Installation The following figure shows a typical Voyager transmitter (or receiver) and some associated cabling. Figure 4. Typical Voyager TX/RX, front and rear view (HDMI-TX & ISA option version shown here) General Installation Procedure 1. Determine the appropriate mounting method for each TX/RX. If optional mounting hardware is required, several variants are available from Magenta Research. 2. Ensure that the desired mounting location does not significantly block the cooling vent‐holes on the TX/RX enclosure. 3. EXCEPT for the power cable, connect all interface cables (as appropriate): video source, video display, serial, audio, and IR. Ensure all connectors are clean and free of contaminants prior to making the connections. Any available locking hardware (screws/latches) should be used to prevent cables from disconnecting or causing intermittent operation. 4. Connect your fiber optic cable to the TX/RX, using the Optic‐1 or Optic‐2 SFP ports, as needed. Note that each SFP module has a “TX” and “RX” fiber port. Ensure your fiber optic cables are properly oriented (TXRX), and ensure all fiber connectors are clean and free of contaminants prior to making the connections. 5. Note: The USB “Config” on the TX/RX core module is used only for configuration and firmware upgrades. Nothing connects to this port during normal use. 6. Connect the DC power input cable. It does NOT matter whether the TX or RX is powered up first. 7. Confirm the front and rear panel status LEDs are working as expected. Refer to section 5.5 for this information. INSTALLATION AND USER GUIDE 24 Installation Voyager Modular Construction One of the features of the Voyager extension products is their modular construction. In most cases you should receive your Voyager products already assembled and ready to use. However, in the event a change in the configuration is required (or a failed module needs replacement), the individual sections are easily disassembled/reassembled. You will only need a #2 (or similar) Phillips‐head (cross‐point) screwdriver. Voyager Module Disassembly Procedure To disassemble either the VIDEO or AUX module, simply unscrew the two locking‐screws on the side of the module you want to remove. Once the locking screws are loosened just enough for the modules to be separated (about ¼”) – the screw will remain captive in the assembly and shouldn’t fall out or get lost. Pull the VIDEO or AUX module away from the core in a sideways motion. Do not bend or try to remove the module at an angle. The PCB edge‐connector fingers must disengage properly, and use caution not to damage either the exposed edge‐fingers or the mating socket on the CORE module. Voyager Module Assembly Procedure The assembly procedure is essentially reverse of the disassembly procedure. Carefully dock the edge‐finger contact from the VIDEO or AUX module into the CORE module. Push the enclosures together being careful not to insert the connector at an angle. Once fully docked, tighten both locking‐screws until they are just snug. Excessive tightening can bend or damage the enclosure. Note: If a VIDEO or AUX module is going to be permanently removed, remember to install the appropriate cover‐plate over the open slot. This cover‐plate protects the CORE’s mating connector from foreign objects and possible damage, and also maintains the enclosure’s for RFI/EMI integrity. Note that there are two types of cover‐plates: one each to cover the VIDEO and AUX sides of the CORE module. There are 2 short screws provided for attaching each cover‐plate. VIDEO cover-plate, shown detached. INSTALLATION AND USER GUIDE AUX cover-plate, shown detached. 25 Installation LED Status Indicators Front Panel The following describes the behavior of the LED status indicator on the front of the Voyager transmitter and receiver CORE modules: Table 13. Voyager Transmitter & Receiver Front‐panel status LEDs LED Behavior VID Green Green‐flashing Amber Amber‐flashing Red‐flashing Off VID Green Green‐flashing Amber Amber‐flashing Red‐flashing Off LED Behavior PWR Green Red‐flashing Off LED Behavior AUX Green Red‐flashing Off Description Voyager Transmitter: VID Status LED Behavior Video source is valid. Local display is connected. Video source is valid. Local display is not connected. No video source. Local display is connected. No video source. Local display is not connected Video module not recognized, or there is a H/W fault. Video module not present (a valid condition), or there is a H/W fault. Voyager Receiver: VID Status LED Behavior Valid video being received. Output display is connected. Valid Video being received. Output display is not connected. No video being received. Output display is connected. No video being received. Output display is not connected. Video module not recognized, or there is a H/W fault. Video module not present (a valid condition), or there is a H/W fault. Description Voyager: PWR Status LED Behavior Power on. Firmware is valid. Firmware may be corrupted. Backup firmware is being used but a firmware‐update (with MAGui) should be done as soon as possible. No power is connected, or there is a significant internal H/W fault. Description Voyager: AUX Status LED Behavior Green: Aux module present and recognized. Aux module present but not recognized, or there is a H/W fault. Aux module not present (a valid condition), or there is a H/W fault. Active Video? Display Attached? Yes Yes No No … … Yes No Yes No … … Yes Yes No No … … Yes No Yes No … … Active Video? Display Attached? … … … … … … Active Video? Display Attached? … … … … … … Note: The VID, PWR and AUX status LEDs are bicolor (Red/Green). INSTALLATION AND USER GUIDE 26 Installation Rear Panel The following describes the behavior of the LED status indicator on the rear of the Voyager transmitter and receiver CORE modules: Table 14. Voyager Transmitter & Receiver Rear‐panel status LEDs LED OPTICAL‐1 (TX) and OPTICAL‐2 (TX) OPTICAL‐1 (RX) and OPTICAL‐2 (RX) Description Off: No SFP module is installed. Fast‐Flash: There is an internal fault in the SFP module. Slow‐Flash: SFP module is functional, but no data at all is being transmitted. On = SFP is transmitting video data, no management data. On + Blink = SFP is transmitting video and management data. Off + Blink = SFP is transmitting only management data. Off: No SFP module is installed. Fast‐Flash: Not connected to a working transmitter, fiber is broken/disconnected, or there is an internal fault in the SFP module. Slow‐Flash: SFP module is functional and connected to a working transmitter, but no data is being received. On = SFP is receiving video data, no management data. On + Blink = SFP is receiving video and management data. Off + Blink = SFP is receiving only management data. Note: The Optical‐port status LEDs are Green (not bi‐color). INSTALLATION AND USER GUIDE 27 Installation Detail of LED indicator blink/flash patterns Off: 0% on (always off). Fast‐flash: 1.6Hz, 50% duty cycle (300mS on/off) On Off ┌──────┐ ┌ ─┘ └──────┘… 300ms Slow‐flash: 0.4Hz, 50% duty cycle (1250mS on/off) On Off ┌────────┐ ┌ ─┘ └────────┘… 1250ms On+Blink: 300ms 1250ms On 1Sec, blink 4 times Off at 6.4Hz, 50% duty cycle (~78mSec on/off). On Off ────────┐ ┌───┐ ┌───┐ ┌───┐ ┌… └───┘ └───┘ └───┘ └───┘ 1Sec 78ms 78ms 78ms 78ms 78ms 78ms 78ms [-------------One Complete Sequence-----------------] Off+Blink: Off 1Sec, blink 4 times On at 6.4Hz, 50% duty cycle (~78mSec on/off). On Off ┌───┐ ┌───┐ ┌───┐ ┌───┐ ────────┘ └───┘ └───┘ └───┘ └… 1Sec 78ms 78ms 78ms 78ms 78ms 78ms 78ms [-------------One Complete Sequence-----------------] On: 100% on (always on). NOTE: Waveforms are not to scale, and all timing values are approximate. INSTALLATION AND USER GUIDE 28 Front Panel User Interface Front Panel User Interface The CORE module front‐panel is equipped with a simplified LED and pushbutton interface. The LED indicators in particular serve multiple functions. Recessed F2 button Recessed F1 button Status LEDs EDID Management Functions VG‐TX2: When you press button F1, the A, B and C (VID, PWR, AUX respectively) indicator LEDs will change color to display the EDID status: A (VID) B C (PWR) (AUX) Green Off Off Off: Green Off: The EDID presented to the source is the factory default EDID. This is the default behavior The EDID presented to the source is the stored/programmed EDID. If there is no valid stored/programmed EDID then the factory default EDID is used. Off Off Green: The EDID presented to the source is the EDID of the local display, If there is no local display then the stored/programmed EDID is used, If there is no valid stored/programmed EDID then the factory default EDID is used. Change the EDID mode: a) Press & hold button F1 for 5 seconds (until LEDs flash [Green‐Green‐Green]) then release button F1. b) Press button F1 repeatedly until LEDs show the desired mode. c) The last displayed mode will be set after 5 seconds. LEDs will then return to their normal behavior, see Table 13 in section 5.6. INSTALLATION AND USER GUIDE 29 Front Panel User Interface Initiate local or remote* EDID Copy from Transmitter: This will replace the stored/programmed EDID with the local display EDID, or the remote display EDID if no local display is connected. a) Make certain a proper display is connected to the VG‐TX2 local‐output connector or VG‐RX2 output connector. b) Press & hold button F2 for 5 seconds until LEDs start flashing, then release button F2. c) LEDs will then flash [Off‐Green‐Off] to confirm copy of local display EDID, or [Green‐Off‐Off] to confirm copy of remote display EDID, or [Red‐Red‐Red] if no local nor remote display is connected (or invalid EDID) for 5 seconds. d) LEDs will then return to their normal behavior, see Table 13 in section 5.6. * Note: The remote display EDID copy (from transmitter) will only work in point‐to‐point applications (not in daisy‐chain). Initiate remote EDID Copy from any Receiver: This will replace VG‐TX2 stored/programmed EDID with any of its downstream VG‐RX2’s output display EDID. a) Press & hold button F2 of the desired VG‐RX module for 5 seconds until LEDs start flashing, then release F2. b) LEDs on the VG‐RX module will then flash [Green‐Off‐Off] to confirm the copy, or [Red‐Off‐Off] for 5 seconds if an error occurred. c) LEDs will then return to their normal behavior, see Table 13 in section 5.6. VGA-TX Controls There are no user‐configurable options for the VGA‐TX module. However, there is an “auto‐adjust” function which can be invoked simply by pressing the F2 button on the CORE module. INSTALLATION AND USER GUIDE 30 Troubleshooting Troubleshooting This section lists some common problems and their solutions. Table 15. Troubleshooting Problem PWR indicator does not light. PWR indicator on, RED‐flashing. VID indicator does not light. VID indicator is on, RED‐flashing. AUX indicator does not light. AUX indicator is on, RED‐flashing. Everything is connected and seems right, but there is no video. Display device has a solid BLUE screen image. Display device has a solid YELLOW screen image. Image from a VGA‐TX source is shifted left/right or top/bottom Solution • Check that the AC/DC power supply is plugged into a proper and working AC‐ mains outlet. • Check that the DC power connector is firmly inserted all the way into the power‐ input jack on the CORE module. Firmware may be corrupted. Backup firmware is being used but a firmware‐update (with MAGui) should be done as soon as possible. The CORE module has not detected that a VIDEO module is present. If you are not using a VIDEO module in your configuration, then this condition is normal. Otherwise: • Check for proper mating of the VIDEO and CORE modules, including the small alignment tabs on the back and bottom of the assembly. • Check that the docking screws are properly affixed. The CORE module does not recognize, or does not support (via firmware) the currently attached VIDEO module. The CORE module has not detected that an AUX module is present. If you are not using an AUX module in your configuration, then this condition is normal. Otherwise: • Check for proper mating of the AUX and CORE modules, including the small alignment tabs on the back and bottom of the assembly. • Check that the docking screws are properly affixed. The CORE module does not recognize, or does not support (via firmware) the currently attached AUX module. The two most common causes are: • Fiber interconnection is not correct. Remember to always connect TXRX between any SFP optical module ports. • Video source device or display is not powered on (or is in standby mode). Error condition: Source device is providing HDCP‐protected content, but the connected display device is NOT reporting as being HDCP‐compliant. Solution: Try switching to unprotected content, or change the display device to one that properly supports HDCP‐protected content. Error condition: Source device is providing HDCP‐protected content and the connected display IS reporting as being HDCP‐compliant. However, the fiber‐link between source and display is not a duplex (2 fibers) connection. Solution: Ensure that you have a duplex fiber connection. Important: For HDCP‐protected content to play, it is required to always have a duplex connection throughout the extension path (including the Voyager Matrix switch). When using a Voyager Matrix switch with HDCP‐protected content, ensure your switch is configured with “HDCP‐I/O” cards. Error condition: The VGA‐TX did not find the left/right (or top/bottom) border of the source video. Solution: Press the F2 button on the front of the VGA‐TX CORE module. This will cause the VGA‐TX to re‐synchronize with the incoming video signal. This process will be most successful if the image is an all‐white screen (no black borders within the display area). INSTALLATION AND USER GUIDE 31 Appendix A: Electrical Pin Descriptions Appendix A: Electrical Pin Descriptions This section details some of the I/O connectors on Voyager products. CORE module: Power Connector Magenta provides ready to use power supplies for all Voyager products. HOWEVER, if there is a reason that a substitute power supply must be used, then the following information is important for maintaining product reliability and performance. Magenta AC/DC Power supply output rating: Regulated 12VDC @ 3Amps. Power‐input rating for Voyager products: 10‐13 VDC, 3Amps max. The CORE module DC power input connector accepts an industry‐standard coaxial‐DC plug with the following specifications: Coaxial power connector: OD = 5.5mm ID = 2.1mm (accepted center‐pin diameter) Plug length = 11mm (outer sleeve contact length) Inner contact (pin‐socket) = +12VDC Outer contact (sleeve) = Ground Note: It is highly recommended that the inner contact (center‐pin contact) of any mating DC plug utilize a “tuning‐fork” shaped design, rather than a plain barrel shape. The tuning‐fork design greatly increases the reliability of the power connection. The plain barrel style connector will very likely cause intermittent operation, often resulting in “mysterious” system problems that are difficult to identify. Plain barrel center contact. NOT RECOMMENDED Tuning-fork center contact. PREFERRED Note: The Magenta‐supplied DC power supply for Voyager products already comes with the correct output ratings and DC‐plug configuration. INSTALLATION AND USER GUIDE 32 Appendix A: Electrical Pin Descriptions ISA module: Serial Port The ISA module’s serial port connector is configured to look like a standard 9‐pin “DCE” serial port. In comparison, a typical PC computer would have a 9‐pin “DTE” serial port. Therefore, in most applications a straight through serial cable (DB9‐Male‐to‐Female) is used to connect the controlling device to the transmitter. On the receive side, generally a null‐model cable will be required. However, check the user‐guide for your equipment before connecting any cables. The following figure shows the serial‐port pinout for the ISA module. Note: Both the transmitter and receiver use the same ISA module. Therefore, you will likely need a null‐modem or gender‐adapter cable at one end or the other. DB9-F Serial Port Figure 5. Voyager RS232 DB9‐Female Connection The following table describes the ISA module’s serial‐port pinout. Note that this port is designed as a “DCE” device. Therefore, a straight‐through cable would be used when connecting to a PC (for example, which is a “DTE” device). Table 16. RS232 serial‐port pinout Pin 1 2 3 4 5 6 7 8 9 Signal name DCD RX TX DTR Ground DSR RTS CTS RI Direction Data Carrier Detect: output from ISA module. Receive‐data: output from ISA module. Transmit‐data: input to ISA module. Data Terminal Ready: input to ISA module. Signal common (ground). Data Set Ready: output from ISA module. Request to Send: input to ISA module. Clear to Send: output from ISA module. Ring Indicator: output from ISA module. INSTALLATION AND USER GUIDE 33 Appendix A: Electrical Pin Descriptions Serial Interface Reference Information Examples of “DTE” devices: Serial port on a PC. Serial port on a control device (Crestron/Extron). Typically uses a DB9‐M connector. Examples of “DCE” devices: Serial port on a Voyager ISA module. Serial port on a serial‐enabled display. Typically uses a DB9‐F connector. Figure 6. RS232 DB9‐Female Pin Numbering Pin-5 Pin-1 Pin-9 Pin-6 Figure 7. RS232 DB9‐Male Pin Numbering Pin-1 Pin-5 Pin-6 Pin-9 INSTALLATION AND USER GUIDE 34 Appendix A: Electrical Pin Descriptions This table shows the typical connections between a PC (or control system) and a Voyager‐TX (ISA module), without any hardware‐handshaking (minimal connections): DB9‐M: Typical PC Serial port (DTE pinout) Pin Signal Dir # name 1 DCD 2 RX 3 TX 4 DTR 5 6 7 8 9 Ground DSR RTS CTS RI Typical Connections PC to Voyager‐TX2 (ISA module) Straight Connections (no H/W handshaking) DB9‐F: Voyager ISA Serial port (DCE pinout) Dir Pin # DCD 1 RX 2 TX 3 DTR 4 Ground 5 DSR 6 RTS 7 CTS 8 RI 9 This table shows the typical connections between a PC (or control system) and a Voyager‐TX (ISA module), using full hardware‐handshaking: DB9‐M: Typical PC Serial port (DTE pinout) Pin Signal Dir # name 1 DCD 2 RX 3 TX 4 DTR 5 6 7 8 9 Ground DSR RTS CTS RI Typical Connections PC to Voyager‐TX2 (ISA module) Straight Connections (full H/W handshaking) DB9‐F: Voyager ISA Serial port (DCE pinout) Dir Pin # DCD 1 RX 2 TX 3 DTR 4 Ground 5 DSR 6 RTS 7 CTS 8 RI 9 Note: The ISA hardware is capable hardware and software (Xon/Xoff) handshaking. However, this capability is not yet enabled by the firmware. Check with Magenta Research for applicable firmware updates. INSTALLATION AND USER GUIDE 35 Appendix A: Electrical Pin Descriptions This table shows the typical connections between a Voyager‐RX (ISA module) and a serial‐enabled display device, without any hardware‐handshaking (minimal connections): DB9‐F: Voyager ISA Serial port (DCE pinout) Pin Signal Dir # name 1 DCD 2 RX 3 TX 4 DTR 5 6 7 8 9 Ground DSR RTS CTS RI Typical Connections Voyager‐RX2 (ISA module) to a Display (Minimal) Null‐Modem Connections DB9‐F: Display Serial port (DCE pinout) Dir Pin # DCD 1 RX 2 TX 3 DTR 4 Ground 5 DSR 6 RTS 7 CTS 8 RI 9 Serial Interface Notes: Connecting a PC to a Voyager‐TX (ISA module) will typically require a straight DB9‐M/F cable. Connecting a display to a Voyager‐RX (ISA module) will typically require a “null‐modem” type DB9‐ M/M cable. Slightly different cable connections between devices may be required, depending on the specific needs of the control‐system or serial‐enabled display. Refer to their respective user‐documentation for additional details. Also refer to the Voyager Programmers Guide (VLCP register settings) for how to control the software & hardware handshaking features of the Voyager link. INSTALLATION AND USER GUIDE 36 Appendix A: Electrical Pin Descriptions ISA module: Analog-Audio Port 3.5mm audio jack The following figure shows the 3.5 mm (1/8”) audio connections. Figure 8. Audio Port Connector The following table describes the audio pins and their corresponding signals. Table 17. Audio Pins and Signals Pin Tip Ring Sleeve Signal Description Signal Description (Audio input mode) (Audio output mode) Left channel: line‐level analog audio input. Left channel: line‐level analog audio output. Right channel: line‐level analog audio, input. Right channel: line‐level analog audio, output. Audio common (ground) INSTALLATION AND USER GUIDE 37 Appendix A: Electrical Pin Descriptions ISA module: IR Port 3.5mm IR jack The following figure shows the 3.5 mm (1/8”) IR connections. Figure 9. IR-port connector (IR-receiver version) The following table describes the IR interface pins and their corresponding signals. Table 18. IR‐port Pins and Signals Pin Tip Ring Sleeve Signal Description (IR input mode) IR data input. Signal ground. +12VDC power for IR receiver. Signal Description (IR output mode) IR‐LED emitter output. Signal ground. Important Note: An IR‐receiver usually connects with a stereo‐phono plug (3 contacts: TIP, RING, SLEEVE). This is the connector shown above. However, an IR‐LED emitter typically uses a mono‐phono plug (2 contact: TIP, SLEEVE). This type of connector is similar to the picture above, except there is no separate RING contact. The SLEEVE contact is simply longer. Note: The IR capability is designed into the hardware, but not currently supported by the firmware. Check with Magenta Research for applicable firmware updates. INSTALLATION AND USER GUIDE 38 Appendix B: Mounting Options Appendix B: Mounting Options There are several mounting options for the Voyager link products, as detailed in the table below: Part # 2390017‐01 Model Name Voyager rigid‐ mount kit Description Wall‐mount or desk‐mount for VG‐ TX2, ‐TX4 and RX units. This kit comes with two #4‐40 mounting screws. 2390018‐01 Voyager VCA x2, 1U, Rackmount Kit 2390019‐01 2390020‐01 2390021‐01 Voyager VC x3, Fwd‐mount, 1U, Rackmount Kit Voyager VC x3, Rear‐mount, 1U, Rackmount Kit Voyager VCA x10, 5U, Rackmount Kit INSTALLATION AND USER GUIDE Mounts up to 2 Voyager Video/Core/Aux assemblies in a 19” rack. This rackmount plate is 1U high. The Voyager assemblies can be mounted with either the front or back facing forwards. Voyager units mount with captive screws, no additional screws are required. Mounts up to 3 Voyager (Video/Core) or (Core/Aux) assemblies in a 19” rack. This rackmount plate is 1U high. The (Video/Core) assemblies mount with the front facing forwards. The (Core/Aux) assemblies mount with the rear facing forwards. Voyager units mount with captive screws, no additional screws are required. Mounts up to 3 Voyager (Video/Core) or (Core/Aux) assemblies in a 19” rack. This rackmount plate is 1U high. The (Video/Core) assemblies mount with the rear facing forwards. The (Core/Aux) assemblies mount with the front facing forwards. Voyager units mount with captive screws, no additional screws are required. Mounts up to 10 Voyager Video/Core/Aux assemblies in a 19” rack. This rackmount plate is 5U high. The Voyager assemblies can be mounted with either the front or back facing forwards. Voyager units mount with captive screws, no additional screws are required. 39 Appendix B: Mounting Options Part # 2390022‐01 Model Name Voyager VC x10, Fwd‐mount, 4U, Rackmount Kit Description Mounts up to 10 Voyager (Video/Core) or (Core/Aux) assemblies in a 19” rack. This rackmount plate is 4U high. The (Video/Core) assemblies mount with the front facing forwards. The (Core/Aux) assemblies mount with the rear facing forwards. Voyager units mount with captive screws, no additional screws are required. 2390023‐01 Voyager VC x10, Rear‐mount, 4U, Rackmount Kit Voyager 2x Adapter Plate Voyager 3x Adapter Plate Voyager 2x Filler Plate Voyager 3x Filler Plate Voyager 3x‐Open Adapter Plate 2211102‐01 2211103‐01 2211104‐01 2211105‐01 2211106‐01 INSTALLATION AND USER GUIDE Mounts up to 10 Voyager (Video/Core) or (Core/Aux) assemblies in a 19” rack. This rackmount plate is 4U high. The (Video/Core) assemblies mount with the rear facing forwards. The (Core/Aux) assemblies mount with the front facing forwards. Voyager units mount with captive screws, no additional screws are required. Used with a CORE module only. This plate covers the unused opening in a “VC” rackmount plate. Used with a CORE module only. This plate covers the unused opening in a “VCA” rackmount plate. This filler plate covers any unused (open) positions in a “VC” type rackmount plate. This filler plate covers any unused (open) positions in a “VCA” type rackmount plate. Used with VID+CORE or CORE+AUX assemblies. This plate covers the unused opening in a “VCA” rackmount plate. 40 Appendix B: Mounting Options Voyager Rigid-Mount Kit This bracket can be used alone, or in pairs. Every Voyager CORE module has two #4‐40 threaded holes on each side (front & rear) for attaching this bracket. Two attachment screws are provided in each bracket kit. Use one bracket for installations where cables enter vertically. Use two brackets for installations where cables enter horizontally. This figure shows the wall‐mount bracket affixed to the rear or front side of a VG‐TX2‐HDMI assembly: Figure 10. Voyager link Wall-mounting Bracket on rear or front side It is also possible to use two mounting brackets, one affixed to the front, the other to the back. This can be useful when very secure mounting is required, or when the unit must be mounted sideways or underneath a table. INSTALLATION AND USER GUIDE 41 Appendix C: System Design Drawings Appendix C: System Design Drawings The following drawings are available from Magenta Research, as an aid in system design and configuration. You may download them from the Magenta website: www.magenta‐research.com. There is no charge for obtaining these drawings. These drawings are available in both PDF (Acrobat) and Autocad file formats. Drawing # 2500046‐01 2500047‐01 2500052‐01 2500053‐01 2500064‐01 2510010‐01 Description Sales Drawing, Voyager, VG‐TX2 DVI Sales Drawing, Voyager, VG‐TX2 DVI‐ISA Sales Drawing, Voyager, VG‐TX2 VGA Sales Drawing, Voyager, VG‐TX2 VGA‐ISA Sales Drawing, Voyager, VG‐RX‐MM HDMI Autocad drawing blocks, Voyager link components INSTALLATION AND USER GUIDE 42 Appendix D: Regulatory Compliance Information Appendix D: Regulatory Compliance Information FEDERAL COMMUNICATIONS COMMISSION AND INDUSTRY CANADA RADIO FREQUENCY INTERFERENCE STATEMENTS This device complies with part 15 of the FCC Rules. Operation is subject to the following two conditions: 1) This device may not cause harmful interference, and 2) this device must accept any interference received, including interference that may cause undesired operation. This equipment has been tested and found to comply with the limits for a Class A digital device, pursuant to part 15 of the FCC Rules. These limits are designed to provide reasonable protection against harmful interference when the equipment is operated in a commercial environment. This equipment generates, uses, and can radiate radio frequency energy and, if not installed and used in accordance with the instruction manual, may cause harmful interference to radio communications. Operation of this equipment in a residential area is likely to cause harmful interference in which case the user will be required to correct the interference at his/her own expense. Canada (ICES‐003) notice: This Class A digital apparatus complies with Canadian ICES‐003. Cet appareil numerique de la classe A est conforme a la norme NMB‐003 du Canada. EUROPEAN UNION DECLARATION OF CONFORMITY Warning: This is a Class A product. In a domestic environment this product may cause radio interference in which case the user may be required to take adequate measures. Magenta Research (New Milford CT USA) declares under our sole responsibility that the Magenta Voyager video‐extension products to which this declaration relates is in conformity with the following standard(s) or other normative documents: EN 55022:2006 + A1:2007 Class A ITE emissions requirements. EN61000‐3‐2:2006 Limits for harmonic current emissions (equipment input current up to and including 16A per phase). EN 61000‐3‐3:1995/A1:2001/A2:2005 Limitation of voltage fluctuations and flicker on low‐voltage supply systems for equipment with rated current up to and including 16A. EN55024:2003 Immunity for ITE. SAFETY WARNING Connection: Not for direct connection to Telecommunication Network Circuitry (TNV) Power sources: This equipment should be operated only from the power source indicated on the product. Disconnect all power sources before servicing. Servicing: Refer all servicing to qualified service personnel. There are no user‐serviceable parts inside. Slots and openings: If the equipment has slots or holes in the enclosure, these are provided to prevent overheating of sensitive components inside. These openings must never be blocked by other objects or equipment. INSTALLATION AND USER GUIDE 43 Appendix E: Default Internal EDID Profile Details Appendix E: Default Internal EDID Profile Details The factory‐default Magenta Magic™ EDID profile supplied by the Voyager VG‐TX2 transmitter (with HDMI‐ TX, DVI‐TX or VGA‐TX VIDEO modules attached) contain entries for the following specific video and audio formats: Table 19. Voyager Magenta Magic™ EDID profile information for HDMI interfaces. Item HDMI‐EDID: Manufacturer Monitor name Established timings Standard timings Detailed timings CEA video formats Specific timings Audio Speakers Description Presented to the source when using an HDMI‐TX module. MAG VGTX2‐HDMI‐06. Note: the “06” will change if the EDID is ever changed. 640x480@60Hz, 800x600@60Hz, 1024x768@60Hz 1280x720@60Hz 1280x800@60Hz 1280x1024@60Hz 1440x900@60Hz 1600x1200@60Hz 1680x1050@60Hz 1920x1080@60Hz 1920x1200@60Hz 1920x1080@60Hz 640x480p@(59.94,60Hz)@4:3 720x480p@(59.94,60Hz)@4:3 720x576p@50Hz@4:3 1280x720p@50Hz@16:9 1280x720p@(59.94,60Hz)@16:9 1920x1080i@50Hz@16:9 1920x1080i@(59.94,60Hz)@16:9 1920x1080p@(23.97/24Hz)@16:9 1920x1080p@50Hz@16:9 1920x1080p@(59.94,60Hz)@16:9 [email protected] 1280x720@60Hz [email protected] LPCM 2 channels 32kHz, 44kHz, 48kHz, max byte rate 24 LPCM 8 channels 32kHz, 44kHz, 48kHz, max byte rate 24 Rear‐Left and Rear‐Right, Front‐Center, Sub Woofer, Front‐Left and Front‐ Right Table 20. Voyager Magenta Magic™ EDID profile information for DVI interfaces. Item DVI‐EDID: Manufacturer Monitor name Established timings Standard timings Detailed timings Description Presented to the source when using a DVI‐TX module. MAG VGTX2‐DVI‐02. Note: the “02” will change if the EDID is ever changed. 640x480@60Hz 800x600@60Hz 1024x768@60Hz 1280x720@60Hz 1280x800@60Hz 1280x1024@60Hz 1440x900@60Hz 1600x1200@60Hz 1680x1050@60Hz 1920x1080@60Hz 1920x1200@60Hz 1920x1080@60Hz 1920x1200@60Hz Table 21. Voyager Magenta Magic™ EDID profile information for VGA interfaces. Item VGA‐EDID: Manufacturer Monitor name Established timings Standard timings Detailed timings INSTALLATION AND USER GUIDE Description Presented to the source when using a VGA‐TX module. MAG VGTX2‐ANLG‐02. Note: the “02” will change if the EDID is ever changed. 640x480@(60Hz,72Hz,75Hz) 800x600@(56Hz,60Hz,75Hz) 1024x768@(60Hz,70Hz,75Hz) 1280x1024@75Hz 1152x864@75Hz 1280x1024@(60Hz,70Hz) 1680x1050@60Hz 1920x1080@60Hz 1920x1080@60Hz 44 Appendix F: VGA-TX Image Scaling Details Appendix F: VGA-TX Image Scaling Details The VGA-TX module accepts a wide range of video formats and aspect-ratios. All are automatically converted to 1080p (16:9) format, using a non-linear scaling algorithm as depicted below (example of 4:3 to 16:9 scaling): 4:3 Input Image: 16:9 Output Image: Outer-edge scale factor Applied scale-factor: Center region scale factor Left INSTALLATION AND USER GUIDE Center Right 45 Index Index About this manual, 1 Applications, 3 Audio/serial connections, 37, 38 Connector pinouts, 32 Audio port, 37 IR port, 38 Power jack, 32 Serial port, 33 Connector signals, 32 Contact Information, iv DDC Profiles, 44 Drawings, 42 EDID Management, 29 EDID Profiles, 44 Extension Range, 20 Fiber Terminology, 21 Fiber‐optic cable, 20 Front Panel Interface, 29 Help!, 31 I/O Port Audio, 37 IR, 38 Serial, 33 Installation, 19 Fiber‐optic cable recommendation, 20 Grounding options, 23 Initial Checkout, 26 Installation And User Guide Prerequisites, 19 Replacing Modules, 25 TX/RX, 24 Interfaces, 32 Introduction, 2 LED indicators, 26 Magenta Magic Profile, 44 Mounting options, 39 Rigid Mount Kit, 41 Precautions, iii Regulatory Compliance, 43 RS232 Reference Information, 34 Safety information, 23 Scaling Algorithm, 45 Specifications, 8 DVI‐RX, 14 DVI‐TX, 13 General, 8 HDMI‐RX, 12 HDMI‐TX, 11 ISA, 17 VGA‐TX, 15 VG‐RX2, 9 VG‐TX2, 9 Troubleshooting, 31 VGA‐TX Controls, 30 Video Scaling, 45 46