1
ProtoSphere 2.0 User
Guide
Rev. Date 05-16-2012
Copyright 2012 ProtonMedia Inc.
Contents
Introduction .................................................................................................................................................... 5
Getting to Know the ProtoSphere Interface ............................................................................................. 6
Menu Bar options........................................................................................................................................... 6
Avatars ............................................................................................................................................................ 8
Controlling Your Avatar .......................................................................................................................... 10
Walking Around........................................................................................................................................ 10
Avatar Expressions ................................................................................................................................... 11
Controlling Your View .............................................................................................................................. 12
Zoom Mode .............................................................................................................................................. 14
Interactive Objects .................................................................................................................................. 15
Interacting with the Avatars of Others ................................................................................................. 16
Using the Laser Pointer ............................................................................................................................ 16
Participants List ............................................................................................................................................. 17
Contacts List ................................................................................................................................................. 18
Communicating with Voice Audio ........................................................................................................... 19
Network Quality........................................................................................................................................ 21
Presence.................................................................................................................................................... 22
Selecting an Audio Device .................................................................................................................... 22
Having Private Audio Conversations .................................................................................................... 24
Making a Call ........................................................................................................................................... 25
Communicating with Text Messages........................................................................................................ 27
Having Private Messaging Conversations ............................................................................................ 28
Teleporting .................................................................................................................................................... 30
Browsing for Locations............................................................................................................................. 30
Using the Teleport to Jump Menu ......................................................................................................... 31
Bookmarking a Location ........................................................................................................................ 32
Teleporting by Invitation ......................................................................................................................... 33
Joining Another Person ........................................................................................................................... 35
Media Boards ............................................................................................................................................... 36
Supported File Formats ........................................................................................................................... 37
Adding Text ............................................................................................................................................... 39
Adding Image or PowerPoint Files ........................................................................................................ 40
Video Display and Playback.................................................................................................................. 41
Adding Flash Content ............................................................................................................................. 46
© 2012 ProtonMedia Inc.. All rights reserved.
2
Adding a Web Link .................................................................................................................................. 48
Annotations............................................................................................................................................... 49
Sharing an Application ........................................................................................................................... 50
Locked Media Boards ............................................................................................................................. 55
Moderating ................................................................................................................................................... 56
Obtaining Moderator Status .................................................................................................................. 56
Moderating Voice Audio of Participants ............................................................................................. 57
Moderating the Group Conversation................................................................................................... 58
Moderating Media Boards ..................................................................................................................... 59
Locking a Location .................................................................................................................................. 61
Clearing Content ..................................................................................................................................... 61
Assigning Moderator Status to Others .................................................................................................. 62
Sending People to a Location ............................................................................................................... 63
SharePoint Boards........................................................................................................................................ 65
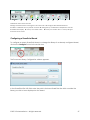
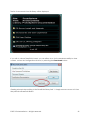
Configuring a SharePoint Board ............................................................................................................ 67
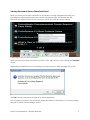
Viewing Documents from a SharePoint Board.................................................................................... 71
Searching the Library or Selecting a Different View........................................................................... 72
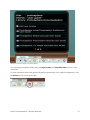
Adding Documents to a SharePoint Board ......................................................................................... 74
User Profiles ................................................................................................................................................... 76
Using ProtoSphere with Office Communicator ....................................................................................... 80
What is supported?.................................................................................................................................. 80
What is Not supported? .......................................................................................................................... 81
ProtoSphere Preferences............................................................................................................................ 82
Appendix A - Keyboard Shortcuts and Controls .................................................................................... 83
Appendix B – About ProtonMedia ............................................................................................................ 84
Appendix C – Privacy Information ............................................................................................................ 85
Overview ................................................................................................................................................... 85
Notice ........................................................................................................................................................ 85
Collection .................................................................................................................................................. 85
Disclosure .................................................................................................................................................. 85
Access ....................................................................................................................................................... 86
Security ...................................................................................................................................................... 86
Enforcement ............................................................................................................................................. 86
© 2012 ProtonMedia Inc.. All rights reserved.
3
ProtonMedia and ProtoSphere are trademarks of ProtonMedia Inc. Microsoft, Microsoft Lync 2010, Microsoft SharePoint
2010, and Microsoft Office Communicator are trademarks of Microsoft Corporation. All other trademarks are the
property of their respective owners.
ProtoSphere Lync Edition contains software licensed under agreement with Microsoft Corporation.
© 2012 ProtonMedia Inc.. All rights reserved.
4
Introduction
ProtoSphere is a 3D virtual immersive environment where people can interact with each other
through the use of text messaging and voice audio, share applications and documents, hold
meetings and collaborative sessions, and even facilitate training events.
ProtoSphere supports a multitude of use cases, including, but not limited to:
Team meetings
Large scale events and presentations
Virtual poster sessions
Continuing Medical Education training
Sales training
Onboarding of new employees
Social networking
Knowledge sharing
Application and software training
Remote clinical trial monitoring
Role play based training engagements
This user guide will provide you with the information on how to use ProtoSphere’s many features
so that you can apply them toward your own use of the environment.
© 2012 ProtonMedia Inc.. All rights reserved.
5
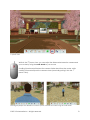
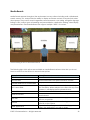
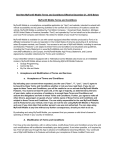
Getting to Know the ProtoSphere Interface
The following diagram shows the main components of ProtoSphere’s application interface:
L
K
A
J
B
I
C
H
D
E
F
G
ProtoSphere’s Application Window
A. Menu bar B. 3D window C. Action bar D. Current location E. Lync presence F. Message center
G. Audio controls H. Network quality monitor I. Conversation area J. People lists
K. Bookmark location L. Teleport jump menu
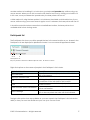
Menu Bar options
The following options are available to you from the menu bar:
© 2012 ProtonMedia Inc.. All rights reserved.
6
Menu Item
Description
ProtoSphere
My Profile
Opens a browser and displays your SharePoint 2010 My Site.
Preferences
Displays the ProtoSphere preferences window.
Exit
Closes the application window and logs you out of ProtoSphere.
Locations
Teleport To…
Hides/Shows the Teleport to jump menu
Browse…
Displays the ‘Browse for Locations’ window.
Bookmark This Location
My Bookmarked
Locations
Recently Visited
Locations
People
Participants
Contacts
Communications
Conversation
Dialer
Audio Devices
Adds the current location to your list of ‘My Bookmarked Locations’.
Displays a list of up to five bookmarked locations.
Mute Microphone
Mute Speakers
Moderate
Request Moderator
Status
Lock Location
Undo All Moderator
Actions
Assign Moderator Status
Release Moderator
Control
Send People to a
Location
Clear All Content within
this Location
Lock All Media Boards
Unlock All Media Boards
Mute Everyone
Unmute Everyone
Enable Group
Displays a list of the past five locations you have visited.
Shows/hides the Participants tab within the People list area.
Shows/hides the Contacts tab within the People list area.
Shows/hides the Conversation area.
Shows/hides the phone dialer.
Displays a list of selectable audio devices currently configured for
you use with ProtoSphere.
Mutes/unmutes your microphone.
Mutes/unmutes your voice audio output.
Clicking this option will automatically send a request to the system
for you to obtain moderator status.
Locks the location you are currently in, disallowing entrance to it by
other users not already present.
Clicking this option will undo any moderator settings you have
enabled including unlocking the location, unlocking media boards,
unmuting all voice audio, and re-enabling the group conversation.
Displays the ‘Assign Moderator Status’ window.
Clicking this relinquishes all moderator controls and any moderator
settings you had enabled.
This option will display the ‘Send People to a Location’ window.
Clicking this option will remove any content on Media Boards that
appears in your current location.
This option will disallow other users from adding, updating, removing,
or otherwise controlling the content displayed on Media Boards.
Unlocks all the Media Boards in location, including any that were
individually locked.
This option will mute the voice audio for everyone (except other
moderators) in your current location.
Clicking this will unmute the voice audio for all users in your current
location, including those whom you may have individually muted.
This option will allow/disallow other users (except other moderators)
© 2012 ProtonMedia Inc.. All rights reserved.
7
Conversation
Help
User Guide
First Time Quick Start
Guide
About ProtoSphere
in the location from using the group conversation window. It is
checked on by default.
Provides access to this user guide.
Provides access to the ProtoSphere quick start guide.
Displays version information about ProtoSphere and provides links to
ProtonMedia’s company information.
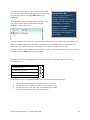
Avatars
In ProtoSphere, avatars are virtual representations of real people. Everyone has their own avatar
and can customize it to their liking.
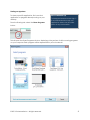
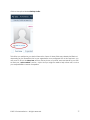
Upon starting ProtoSphere for the first time, you will be asked to create your avatar. The first
option you are presented with is the gender selection. Choose either the Male or Female avatar
options:
Gender selection upon initial entry into ProtoSphere
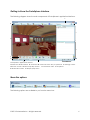
The camera view will change to a mirror view of yourself and the ProtoSphere Action bar will
present you with a series of options for customizing your avatar:
© 2012 ProtonMedia Inc.. All rights reserved.
8
The mirror view while customizing your avatar
A
B
C
D
E
G
F
H
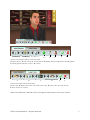
Avatar Customization options in the Action Bar
A. Head choices B. Hair choices C. Outfit choices D. Displays the list all Expressions E. Male gender
F. Female gender G. Save choices H. Cancel
A
B
C
D
E
F
Avatar Color options in the Action Bar
A. Hair color B. Upper outfit colors C. Lower outfit colors D. Shoe colors C. Save choices
E. Save choices F. Cancel
Make your selections, and then click on the green check mark to save your choices.
© 2012 ProtonMedia Inc.. All rights reserved.
9
You can access this avatar customization tool at any time while in ProtoSphere by clicking on
the Select Avatar button in the Action bar:
Controlling Your Avatar
While moving around in ProtoSphere, you have certain abilities for controlling your avatar and
your view of the 3D environment. The Action bar in this view provides access to those common
features.
A
B
C
D
E
F
G
H
I
Avatar Controls in the Action Bar
A. Customize your avatar B. Play the ‘Wave’ expression B. Play the ‘Applaud’ expression
D. Play the ‘Thumbs Up’ expression E. Raise / lower avatar’s hand F. Displays a list of all Expressions
G. Switch to 1st person view H. Switch to 3rd person view I. Enable the laser pointer
Walking Around
You can get your avatar to walk around a location by using either of two sets of keys on your
keyboard: W A S D or your Arrow keys.
Movement Direction
Walk forward
Key
W or
Walk backward
S
or
Turn to the left
A
or
Turn to the right
D
or
© 2012 ProtonMedia Inc.. All rights reserved.
10
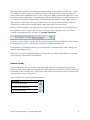
Avatar Expressions
Avatar Expressions are a non-verbal way of communicating sentiment to other people in your
location.
An avatar giving the ‘Thumbs up’
You can access the Expressions list by clicking on the More Expressions button in the Action bar:
Your Avatar’s Expressions List
© 2012 ProtonMedia Inc.. All rights reserved.
11
Four of the most commonly used expressions are also located in the Action bar to the left of this
button. They include Wave, Applaud, Thumbs Up, and Raise/Lower Hand.
Please note that if your avatar’s hand is in the raised position after clicking the Raise Hand
option, you will not be able to gesture with other expressions or use the laser pointer, until you
lower your avatar’s hand.
You should also notice a series of letters next to each of the expression labels. These represent
keyboard shortcuts for playing the expressions. A full list of keyboard shortcuts is available in
Appendix A.
Controlling Your View
There are two main camera views available to you in ProtoSphere: 1st person and 3rd person.
Your default view is from the 3rd person. It’s best described as an “over-the shoulder” view of
your avatar and the environment around you. The 1st person view is a view of the environment
from your avatar’s eyes. You can switch between these two views from the 1st and 3rd person
camera view buttons on the Action Bar, or by simply hitting V on your keyboard.
3rd person view
© 2012 ProtonMedia Inc.. All rights reserved.
12
1st person view
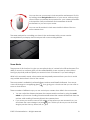
While in the 3rd person view, you can adjust the distance between the camera and
your avatar by using the scroll wheel on your mouse.
Scrolling it backward will extend the camera further back from the avatar, while
scrolling it forward will push the camera closer (eventually putting it into the 1st
person view).
Showing the perspective differences of the 3rd person camera view when using the scroll wheel
© 2012 ProtonMedia Inc.. All rights reserved.
13
You can also use your mouse to look around the environment. Do this
by holding down the right-click button of your mouse, while moving it
around. When you release the mouse button, your camera will remain
in that position until you either left-click somewhere in the 3D
environment or you move your avatar.
You can use this method to look around while in either of the two
main camera views.
The same methods for controlling your views in the environment with a mouse can be
accomplished if your laptop has a track pad with cursor scrolling abilities.
Zoom Mode
The purpose of this function is to give you an optimal view of content in the 3D environment. The
ability to zoom in on surfaces gives you the added flexibility to see content up close without
having to physically walk and place your avatar in front of whatever it is you are looking at.
While in this zoomed-in mode, other avatars are temporarily removed from your view to avoid
any possible obstructions in front of the content.
The zoom mode is available for all Media Board surfaces and SharePoint Boards. Your mouse
cursor will change to a magnifying glass
icon, giving you a visual cue that you can click to
zoom on that surface.
There a number of different ways you can control your camera view while in the zoom mode:
You can adjust the distance between the camera and the surface by using the scroll
wheel on your mouse. Scrolling it backward will extend the camera further back from the
surface, while scrolling it forward will push the camera closer.
If you move your mouse cursor off the edges of the surface you are zoomed in on, you
should see the cursor change to a hand
icon. This lets you know you can click and
drag to pan the view up, down, left, or right.
© 2012 ProtonMedia Inc.. All rights reserved.
14
You can click on the various options in the Zoom tab of the Action bar. Functions are
described below:
A
B
C
D
E
Zoom Tab of the Action Bar
A. Pan the camera left, right, up, or down B. Zoom in closer to surface C. Zoom out farther from the
surface D. Reset to the default zoom state E. Exit the Zoom mode
When zoomed in on a surface, you may also use your keyboard to control the camera in that
state. Those keys include the following:
Key
Up arrow or W
Description
Pans the camera up
Down arrow or S
Pans the camera down
Left arrow or A
Pans the camera left
Right arrow or D
Pans the camera right
+
Zooms in closer to the surface
-
Zooms out farther from the surface
ESC
Exit the Zoom mode
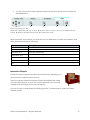
Interactive Objects
Interactive objects appear throughout the environment, allowing you to
click on them to perform various actions.
The most common interactive objects found in ProtoSphere are chairs.
You can easily tell when a chair can be sat in because your cursor will
change when hovering your mouse over top of it.
You can sit down in chairs simply by clicking on them. To stand back up, walk your avatar
forward or back.
© 2012 ProtonMedia Inc.. All rights reserved.
15
Interacting with the Avatars of Others
There are a series of right-click options on the avatars of other people in your location. They
include the following:
Right-click Menu Item
View User Profile
View Lync Contact Card
Invite to Private Voice Conversation
Send a Message
Description
Opens a browser and displays the SharePoint 2010 My
Site of that person.
Displays the contact information for that individual.
Sends the person an invitation to join you in a private
voice conversation.
Opens a tab in the Conversation Window and allows
you to have a private text chat with that individual.
You can also right-click on your own avatar to view your own user profile or your contact card.
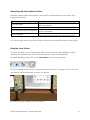
Using the Laser Pointer
You have the ability to use a laser pointer, which can be useful for when needing to call out
attention to a particular item within the 3D environment, or upon a Media Board.
To enable the laser pointer, click on the Laser Pointer button in the Action Bar:
Once it’s enabled, simply move your mouse around to point it at your target. To turn it off, click
anywhere in the 3D environment or move your avatar.
An avatar pointing to something in the environment
© 2012 ProtonMedia Inc.. All rights reserved.
16
Another method of enabling it is to hold down your keyboard Spacebar key while moving your
mouse around. When you do this, be sure the 3D window has focus by clicking once inside of it.
In this case, once you release the spacebar key, the laser pointer will turn off.
A third method of using the laser pointer is to hold down the middle scroll wheel button of your
mouse, while moving your mouse around. Again, once it’s released, the laser pointer will turn off.
It should be noted that when zoomed into a Media Board surface, the laser pointer is not
available while in that viewing mode.
Participants List
The Participants List shows you all the people that are in the same location as you. Names in the
Participants List are displayed in alphabetical order. Your own name will appeared bolded.
A B
C
Participants List
A. Lync presence indicator B. Microphone status C. Person’s name
Right-click options on the names of people in the Participant’s List include:
Right-click Menu Item
View User Profile
View Lync Contact Card
Join
Invite
Invite to Private Voice Conversation
Send a Message
Description
Opens a browser and displays the SharePoint 2010 My
Site of that person.
Displays the contact information for that individual.
Clicking this option will teleport you to the specific
coordinates of the individual in that location.
Sends the person an invitation to join you in your
current location.
Sends the person an invitation to join you in a private
voice conversation.
Opens a tab in the Conversation Window and allows
you to have a private text chat with that individual.
The right-click options that are available on your own name in the Participant’s List include the
ability to view your own User Profile and your own Lync Contact Card.
© 2012 ProtonMedia Inc.. All rights reserved.
17
Contacts List
The Contacts List displays all of the individuals whom you have added to your Lync Contacts.
People listed here may either be somewhere in ProtoSphere, or online in Lync. Your contacts
who are unavailable or otherwise offline will not be shown here.
C
D
A
B
Participants List
A. Lync presence indicator B. Person’s name B. Refresh button D. Location of individual if in ProtoSphere
Right-click options on the names of people in the Contacts List include:
Right-click Menu Item
View Lync Contact Card
Join
Invite
Send a Message
Description
Displays the contact information for that individual.
Clicking this option will teleport you to the specific
coordinates of the individual in that location. Note: this
option is only available when that person is in
ProtoSphere.
Sends the person an invitation to join you in your
current location.
Opens a tab in the Conversation Window and allows
you to have a private text chat with that individual.
© 2012 ProtonMedia Inc.. All rights reserved.
18
Communicating with Voice Audio
Voice audio in ProtoSphere is always-on. Think of each location as a conference call. When you
dial into a conference call with others, unless it’s being moderated, you can start speaking right
away. The same is true for ProtoSphere.
To speak with other users simply talk into your headset microphone or your laptop’s built-in
microphone.
A
B
C
D
E
F
Audio controls
A. Microphone mute B. Speaker mute C. Volume level control
device selection F. Network activity monitor
D. Opens the dialer window
E. Audio
When you speak in ProtoSphere, an inset window of your avatar and name appear to other
participants in that location. This is a benefit to larger groups of people while meeting to
determine who specifically is speaking.
Avatar inset window of a participant speaking
© 2012 ProtonMedia Inc.. All rights reserved.
19
You can mute yourself if you do not wish to be heard.
You can do this by clicking the Microphone Mute icon
in the audio controls (or hitting CTRL + M on your
keyboard).
When another user has muted their microphone, the
icon next to their name in the Participants tab
changes to reflect this status:
Best Practices Tip
If you are using your laptop’s
built-in microphone and
speakers, a good rule of thumb
is to keep yourself muted when
not speaking. Your laptop
microphone is capable of
picking up unwanted
background noise that could be
distracting for other people in
your location.
Your microphone input level will automatically be adjusted by the system based on how loud or
quiet you speak. A good rule of thumb is to speak into your microphone in a normal tone of
voice, as if you were having the conversation with a person sitting in front of you.
To turn on/off the audio coming from ProtoSphere, click on the Speaker Mute icon. This can also
be done by hitting CTRL + S on your keyboard.
The Microphone icon that appears next to each person’s name may take on any of the
following statuses:
Description
Icon
Microphone is on
Microphone is muted
Audio is being broadcast
Microphone is disabled
A microphone icon may appear disabled for a number of reasons including:
A moderator has chosen to mute the audio in a location
The individual is in a different private voice zone than you
The individual is in a private voice conversation with others
A loss of connectivity to the voice conference
© 2012 ProtonMedia Inc.. All rights reserved.
20
When entering a location, you will see a message stating “Starting audio conference…” while
ProtoSphere connects to the Lync conference audio. During this brief connection time your
audio controls will be disabled and you will not hear or be able to speak with other users. Once
connected to the conference, you will hear an audible tone signifying a successful connection.
If you see this message and hear a series of repeating audible tones, it simply means there is a
slight delay in connecting to the Lync conference. In this case, please be patient while the
connection is made, which normally will not take more than just a few seconds.
Because of the integration with Microsoft Lync, there may be times when you are logged into
ProtoSphere but are on a Lync call, outside of the environment. In these cases, your audio
controls will be replaced with an option to “Resume Conference”.
When you see this button, it means that the audio conference for the location you are currently
in has been put on hold. To resume the conference, simply click this button.
Other people in ProtoSphere will see your microphone in a disabled state, when viewing your
name in the Participants list.
Note that if you have not already ended your external Lync call, that call will be put on hold if
you resume the conference in ProtoSphere.
Network Quality
The network quality monitor located in the lower right corner of the application window is a
measure of the current network bandwidth and is provided as an indication of when conditions
are present that may affect the quality of the voice audio. Poor network quality can affect the
audio quality of your conversations.
The network activity monitor shows three states:
Description
Icon
Good network quality
Average network quality
Poor network quality
© 2012 ProtonMedia Inc.. All rights reserved.
21
Presence
Your Lync presence is automatically carried into ProtoSphere and is set based on your activity or
Outlook calendar.
In a typical Lync deployment, the Lync presence status icon (also known as the jellybean) may
appear in the following manner:
Status Description
Available
Icon
Busy, in a meeting, or in a conference
Do not disturb
Be right back, off work, or away
Unknown status
You can also manually update your status directly from within ProtoSphere. You do this by
clicking on the presence menu selection at the bottom of the application window:
Once set, your presence information will carry through to your contacts who may see you online
in ProtoSphere, Lync, Outlook, or SharePoint.
When you enter a ProtoSphere location, your presence is automatically updated to “In a
conference call.”
Selecting an Audio Device
You can change which set of audio devices are used by ProtoSphere by clicking the
Audio
Device selection option located in the audio controls area of the application window. Doing so
will display a list of available devices you can choose from:
© 2012 ProtonMedia Inc.. All rights reserved.
22
Example audio device selections that are available
When you make your selection, ProtoSphere will automatically switch to using that device for its
audio input and output. The same set of options is also available from the menu bar by going to
Communications > Audio Devices.
If you plug in a USB headset while ProtoSphere is running, you will have to select it from this list if
you choose to use it.
If you unplug a USB headset while ProtoSphere is running, and it is your selected device,
ProtoSphere will automatically switch to using your default audio device.
© 2012 ProtonMedia Inc.. All rights reserved.
23
Having Private Audio Conversations
Private Voice Zones appear throughout the environment and are designated by the colored
circles on the floor. When you walk into one of these areas, or sit at a chair within these areas,
you can have a private voice conversation with anyone else who is within that same circular
area.
An example of a Private Voice Zone in the Courtyard location
ProtoSphere also allows you to have a private voice conversation with other people present in
the same location as you without the need to enter a Private Voice Zone. To start a private
voice conversation with another person, right-click on their name in the Participants list and
choose the Invite to Private Voice Conversation option.
This will send that individual a message, asking if they wish to join you in the private conversation:
Private Voice Chat Invitation
© 2012 ProtonMedia Inc.. All rights reserved.
24
If they accept, the two of you will be placed into the private conference. You will hear the
audible conference connection tone and see the microphone icons of all other people in your
Participants list gray out (the same occurs when you step into a Private Voice Zone):
These two people are now in a private voice conversation
To leave the private conference, right click on your own name in the Participants list, or your
avatar, and choose the Leave Private Voice Conversation option. Doing so will put both
participants back into the location’s main conference. The invitee can also leave the private
conversation at any time by selecting the same option from their own name.
Teleporting to another location, or stepping into a Private Voice Zone will also have the same
effect of leaving the private voice conversation.
When an invitation to a private voice conversation is declined, the individual who sent the invite
will receive a message in their Message Center that reads, “[username] has declined your
invitation.”
You can also invite multiple people to a private voice conversation. To do this, CTRL + click on
their names in the Participants List and choose Invite to Private Voice Conversation. This will send
the invite to all the people you selected.
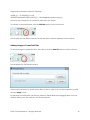
Making a Call
ProtoSphere allows you to make outbound calls to a telephone number, allowing you to add
the receiving party into your zone conference. Calls can be placed to landlines, mobile phones,
and other conference bridge lines.
You can place as many calls as you need to, in order to conference in the non-ProtoSphere
users into your conference. However, you cannot conference in the same phone number more
than one time in a single zone.
External calls can be added to a zone, a private VoIP zone, or a private chat.
© 2012 ProtonMedia Inc.. All rights reserved.
25
To add a call, first click on the
Dialer option in the audio controls section of the audio
controls area of the application window. This will display the Phone Dialer:
A
B
C
D
Phone Dialer
A. Phone number input field & dropdown menu B. Dial pad C. Places the call D. Redial button
You can also access the dialer from the menu bar by selecting Communications > Dialer.
In the input field that appears at the top of the Dialer, type in the phone number you wish to
call, or click on the individual dial pad keys to enter the phone number, then click Call button
(or hit the Enter key on your keyboard).
If need be, you can use the Redial button to call the previously dialed phone number.
The format of the number entered must be <country code><phone number>.
Example: 1 215 6311401 or 44 20 74999000
Note: With conference calls, you may be asked to enter a PIN or conference code by entering
a number. You can enter these numbers by clicking on the dial pad numbers in this same dialer
window.
When your call is connected, the number you dialed will appear in the Participants list:
© 2012 ProtonMedia Inc.. All rights reserved.
26
An outside call connected to the location conference
Only those users who have placed a call have the ability to right-click on the phone number
and choose to Disconnect the call:
Right-click action of disconnecting the call
A call will also be disconnected from that location’s voice conference when the receiving party
ends the call.
Communicating with Text Messages
One of the ways you can communicate in ProtoSphere is with text chat. You can send text
messages to entire groups of people or just to individuals. The Conversation area is where you do
this.
© 2012 ProtonMedia Inc.. All rights reserved.
27
A
C
B
D
E
Text Messaging to the Group
A. Group conversation tab (active) B. Text input field C. Private conversation tab (inactive)
emoticon to the message E. Click to send the message
D. Add an
To send a message, enter your text into the input field and hit Enter on your keyboard. You can
also click the Send Message icon.
With the Group Conversation tab active, any text entered into the input field will be sent to all
participants in your current location, as long as they are not in separate private voice zone.
When you are in a private voice zone and you enter text into the Group Conversation window,
text that appears will only be seen by others if they are present in the same private voice zone
as you, including if they join you in that zone after you have already entered the text.
Having Private Messaging Conversations
To send a private message to another individual, right-click on their avatar or their name in the
Participants list and choose the Send a Message option (you can also double-click their name).
Performing this action will open a private conversation tab with that person’s name on it. When
you select the private conversation tab of another individual, any text entered into the input
field will only be sent to that person.
© 2012 ProtonMedia Inc.. All rights reserved.
28
A
B
Text Messaging to the Group
A. Private conversation tab (active) B. Close the private conversation
ProtoSphere allows you to have a private conversation with other individuals who are not
necessarily in ProtoSphere, but are online with Lync. This is accomplished by right-clicking on their
name in your Contacts list and selecting the Send a Message option. Similar to when the person
is in ProtoSphere, a private conversation tab will appear, allowing you to have a conversation
with each other.
The Send a Message option from the Contacts List
Private messaging can also occur across locations when both individuals are in ProtoSphere but
separate locations.
© 2012 ProtonMedia Inc.. All rights reserved.
29
Teleporting
Within the context of a virtual environment such as ProtoSphere, teleporting is the name given to
the act of moving from one location to another.
ProtoSphere is made up of a number of different locations such as conference rooms, training
classrooms, lecture halls, theatres, and other types of meeting spaces. Locations are permission
based, so access to them can be configured and limited to certain groups of people. These
spaces are likely to be customized by your organization and will a variety of layouts and styles
applied to them, but moving around from location to location in ProtoSphere is the same for
everyone.
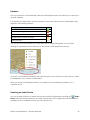
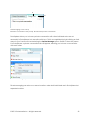
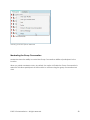
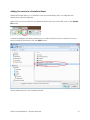
Browsing for Locations
You can browse for locations by going to the menu bar and selecting Locations > Browse…
E
D
A
B
C
Browse for Locations
A. List of available locations B. Number of locations accessible to me C. Teleport button D. Notification
of a locked location E. Number of people currently in that location
Only those locations that you have access to will be shown in this list. Permissions set by
ProtoSphere Administrators dictate which locations you have access to, and which you do not.
When you find the location you are looking for, select it and then click the Teleport button. This
window will close and you will be sent to that location.
A location that is marked as being Locked is not accessible to you for the duration of it being
locked. Typically a location is locked for the sake of holding a private meeting, training event, or
where the moderator does not want the group to be disturbed.
© 2012 ProtonMedia Inc.. All rights reserved.
30
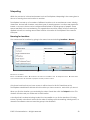
Using the Teleport to Jump Menu
Another means of getting around ProtoSphere is by means of the Teleport to jump menu,
located in the upper right corner of the application window.
The ‘Teleport to’ Jump Menu
If there is a specific location you are looking for, you can start typing its name into the menu’s
input field and it will automatically fill in the rest of the name as it finds the match. In the example
below, as you start typing in the location name “Breakout Room”, it automatically starts filling in
the moment you start entering it. Using this technique, once you’ve found the location hit Enter
on your keyboard or click the Go button to teleport to that location.
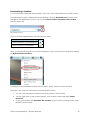
Entering the location name
You can also use the pull down arrow to expand the menu and make your selection from there.
Using this method will teleport you to that location the moment you click on its name.
Selecting the location name
© 2012 ProtonMedia Inc.. All rights reserved.
31
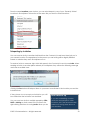
Bookmarking a Location
If you find yourself visiting the same locations often, you can bookmark them for quicker access.
To bookmark a location, while present in that location, click the Bookmark icon located at the
top right of the application window. You can also select Locations > Bookmark This Location
from the menu bar.
The bookmark icon
This icon may be represented by the following two states:
Description
Icon
Current location is not bookmarked
Current location is bookmarked
When you bookmark a location, its name will appear in your Locations menu under the heading
of ‘My Bookmarked Locations’.
To teleport to a bookmarked location from this menu, simply click on its name in the list.
There are a few ways you can remove a bookmarked location:
You can click the yellow bookmark icon while present in that location
You can right-click on the location name in your Locations menu and select Delete
Bookmark
Or you can uncheck the ‘Bookmark This Location’ option from the Locations menu while
present in that location
© 2012 ProtonMedia Inc.. All rights reserved.
32
From the same Locations menu button, you can also teleport to any of your ‘Recently Visited’
locations in ProtoSphere. This section of the menu lists your last five visited locations:
Teleporting by Invitation
You can send an invite to another individual from the Contacts List and have them join you in
your current location. The experience for the person you are inviting will be slightly different
based on whether they are in ProtoSphere or not.
To send an invite to someone, right-click their name in the Contacts List and choose Invite. When
sending an invite to another person already in ProtoSphere, they will see the following message
and hear an audible tone:
Clicking the Yes button will teleport them to your exact coordinates in the location you sent the
invitation from.
If they choose to not accept your invitation, you will
be notified that the invitation was declined.
You can send one invite to multiple people by CTRL /
SHIFT + clicking on their names in the Contacts List,
right-clicking and then choosing Invite. When you do
© 2012 ProtonMedia Inc.. All rights reserved.
Best Practices Tip
If you are moderating a session
and have sent people to other
locations, this is the recommended
method of having them return to
your location.
33
this, all those selected individuals will receive the invitation to join you.
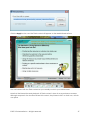
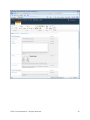
If the individual you send the invitation to is not in ProtoSphere, they will receive a Lync invite in
the form of a new conversation window:
Clicking the ‘Click here’ link will close this window and launch ProtoSphere, placing them into
the location you sent the invitation from. Note: this function will only work if ProtoSphere is
installed on the invitee’s pc.
© 2012 ProtonMedia Inc.. All rights reserved.
34
Joining Another Person
Another method of teleporting is by use of the Join function. You can right-click on the name of
another person in your Contacts List, who is located in a separate location from you, and
choose the Join option.
Right click option to join your contact
When you join another person, you will be teleported to the exact coordinates of that individual
in the location they are present in.
This will only be the case if you have permission access to the location of the individual you are
joining, or the location is not already locked by a moderator. If either of these cases exist, you
will be presented with a message stating that you cannot access the location.
© 2012 ProtonMedia Inc.. All rights reserved.
35
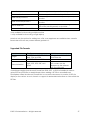
Media Boards
Media Boards appear throughout the environment on any surface including walls, whiteboards,
easels, screens, etc. and provide the ability to display and share content to anyone that enters
those spaces. They can be used for agendas, announcements, note-taking, navigation signage,
linking to URLs, various types of branding and personalization, application sharing, video display,
and presentations. Each Media Board can support multiple “slides” of content.
Avatar standing in front of three Media Boards
The following right-click options are available on Media Board surfaces. Note that you do not
have to zoom in on the surface to access these options.
Right-click Menu Item
Next Slide
Description
Move forward to the next slide of content.
Previous Slide
Move backward to the previous slide of content.
Add/Edit Web Link on Current Slide
Displays the Add/Edit Web Link window
Edit Current Slide
Delete Slide
Clear All Content
Add Text
Add File
Share Application
When selected on a slide that contains text it will open
the Text Editor. When selected on a slide with any other
content, it will display the file upload window.
Removes the current slide.
Removes all the content that has been posted to this
Media board.
Opens the Text Editor window allowing you to enter
text on a new slide.
Opens the File Upload window allowing you to add a
new file to the surface.
Opens the Share Programs window allowing you to
select the applications you wish to share.
© 2012 ProtonMedia Inc.. All rights reserved.
36
Share Desktop*
Starts an appshare of your entire desktop.
Share Monitors**
Starts an appshare of the desktop of both monitors .
Share Primary Monitor**
Share Secondary Monitor**
Launch Web Link
Delete Web Link on Current Slide
Starts an appshare of the desktop on the primary
monitor.
Starts an appshare of the desktop on the secondary
monitor.
Opens your default web browser and navigates to the
URL of the web link present on that slide.
Removes the web link on that slide.
*only available for those using multiple monitors
** only available for those using a single display
Note that only the options for adding text, a file, or an appshare are available when a Media
Board does not have any content already posted to it.
Supported File Formats
Format
Images
Presentations*
Video/Animation
File Type
JPG, JPEG, GIF, TIF, TIFF, PNG,
BMP, TGA, and DDS
PPT, PPTX, PPS, and PPSX
Limitations
No larger than 2048 x 2048
10 MB max size
FLV, F4V, F4P, MP4, MOV,
M4V, 3GP, 3G2, SWF, and
RTMP
100MB max size
SWF content can be
displayed on the surfaces
only via a URL path
*ProtoSphere requires that Microsoft PowerPoint 2003, 2007, or 2010 be installed in order to
upload PPT and PPTX files to Media Boards. When adding a PPT file to a Media Board,
ProtoSphere utilizes the Microsoft PowerPoint to convert the document to a series of JPGs for
display on the surface. As such, there is no support for embedded animations or video within the
PPT files.
© 2012 ProtonMedia Inc.. All rights reserved.
37
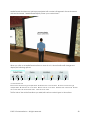
Media Boards that have not yet been populated with content will appear in the environment
with text that reads, “Media Board Display. Place your content here.”
The initial view of a Media Board
When you click on a Media Board surface to zoom in on it, the Action Bar will change and
display the following options:
A
B
C
D
E
F
G
H
I
Content Frame Tab
A. Move backward through multiple slides B. Reset back to the first slide C. Move forward through
multiple slides D. Add text to a new slide E. Add a file to a new slide F. Delete the current slide G. Edit
the current slide H. Clear all the slides I. Exit the zoom state
This first tab of the Action Bar allows you add/edit various content types to the surface.
© 2012 ProtonMedia Inc.. All rights reserved.
38
Adding Text
To add text to a new slide, click the Add Text button on the Action Bar:
The Text Editor window will appear:
F
A
B
C
D
E
The Text Editor window
A. Text alignment options B. Remaining character count C. Preview option D. Submit the text to the
surface E. Cancel the text entry and close the window F. Text input field
Alignment options are at the bottom and allow for placement of the text to the left of the
allotted area, the center, or to the right. If you check off the Preview option, you can see your
text appear on the surface while you are typing into this window. Once you have entered the
text you wish to display click the Submit button.
© 2012 ProtonMedia Inc.. All rights reserved.
39
Supported characters include the following:
!"#$%&'()*+,-./0123456789:;<=>?@
ABCDEFGHIJKLMNOPQRSTUVWXYZ[\]^_`abcdefghijklmnopqrstuvwxyz{|}~
Note that only one person at a time may enter text onto a slide.
To edit text on an existing slide, click the Edit Slide button on the Action bar:
This will open the Text Editor window with the text that is currently displayed on the surface.
Adding Image or PowerPoint Files
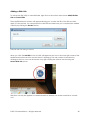
To add an image or PowerPoint file to the surface, click the Add File button on the Action bar:
This will display the File Upload window:
Click the browse button to search for the file you wish to add. Once you have selected your file,
click the Apply button.
Images and PowerPoint files can also be added to Media Boards by dragging them from your
desktop directly onto the surface in the 3D environment.
© 2012 ProtonMedia Inc.. All rights reserved.
40
Video Display and Playback
Video in ProtoSphere uses Adobe Flash as the means of playback, which means any video that
you can view by using Flash, ProtoSphere can play too, as long as you have Flash player
9.0.115.0 or higher installed.
The main video format that is supported in ProtoSphere is FLV. A number of different 3rd party
tools and video editors have the capability to encode FLV videos. Adobe also provides a free
encoder tool available from their website that you can use to convert your video files to that
format. Other supported formats are listed earlier in this section.
Live video is also supported when using the RTMP protocol for the stream.
You can display multiple videos on a single Media Board surface, and on up to three boards in a
single location.
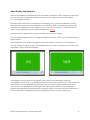
The ProtoSphere video player is designed to accommodate a wide screen, 16:9 formatted
video or smaller. The green areas in the images below show how a widescreen 16:9 video and a
standard 4:3 video would be displayed.
Consideration must be given to the file size of the video you are displaying. Although
ProtoSphere will support up to a 100MB video file to be uploaded to the server, it may not be the
most efficient use of bandwidth when playing back the video. ProtoSphere will stream that
video down to the participants, but a large video will inherently require more bandwidth to
perform well, especially if many people are viewing it while on the same network. Individuals on
slower connections will experience more buffering than those on faster connections.
© 2012 ProtonMedia Inc.. All rights reserved.
41
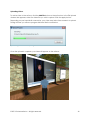
Uploading Videos
To add a video to the surface, click the Add File button on the Action bar. In the File Upload
window that appears, select the video file you wish to upload. Click the Apply button.
Depending on your bandwidth connection, your video may take a few moments to upload.
During this time you will see a progress indicator like the one below:
Upload Progress indicator for posting a video
Once the upload is complete, your video will appear on the surface:
© 2012 ProtonMedia Inc.. All rights reserved.
42
In order to interact with the video player, you must first click on the Media Board to zoom in. The
player controls include the following elements:
A
B
C
D
E
F
Video Player Controls
A. Play/Pause video B. Stop playback C. Scrubber (Fast Forward/Rewind) D. Current Time/Total Time
E. Mute/unmute audio F. Volume slider
Similar to other content that appears on Media Boards, everyone within the location will
see/hear the video at the same time.
Adding Video via a URL
Support also exists for the playback of videos that reside on the internet or other web servers,
without the need to upload them. To do this, click the Add File button. In the File Upload
window, type in or paste the URL path of the video you wish to play. The URL must begin with
http:// and it must end with the file extension of one of the supported video formats.
Note that videos that have been linked to via a URL will require a progressive download in order
to play back for all users in the environment. Unlike streaming videos, progressive downloads
require that a certain portion of the video be downloaded before playback can begin. On
slower connections, longer delays may be experienced when trying to watch one of these
videos.
© 2012 ProtonMedia Inc.. All rights reserved.
43
Adding Video from a Live Broadcast
You can add a video feed from a live broadcast using the RTMP protocol and a live streaming
server.
To add a live video stream, click the Add File button. In the File Upload window that appears,
type in or paste the URL path of the live video you wish to play. The URL must begin with either
rtmp:// or rtmpt:// for this to work properly. Then, check the box labeled Live video stream.
Click Apply. Your live video stream will appear on the surface for all users to experience.
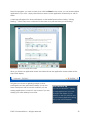
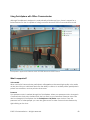
Playing a YouTube Video
ProtoSphere also allows you to play YouTube videos with a similar method as described in
displaying a video via a URL.
In your web browser go to YouTube and bring up the video that you wish to display in
ProtoSphere. Below the video, click the Share button:
© 2012 ProtonMedia Inc.. All rights reserved.
44
Then click the Embed button:
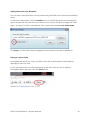
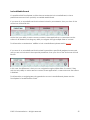
Make sure the checkbox labeled Use old embed code is selected:
Within the HTML block of code that is displayed, highlight and copy the first part of the URL for
the video, up to and including the variable “version=3”:
In this example, the copied URL is: http://www.youtube.com/v/OTbzmcK8uHk?version=3
In order to add this URL to ProtoSphere, you need to append “.swf” to the end of it, so that it
looks like this: http://www.youtube.com/v/OTbzmcK8uHk?version=3.swf
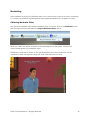
Paste the full URL into the File Upload window in ProtoSphere and click the Apply button.
This will display the YouTube video and player directly on the surface of the environment:
© 2012 ProtonMedia Inc.. All rights reserved.
45
Note: When a YouTube video is displayed on the surface, playback is performed asynchronously
for all users within that location. What this means is if you and another colleague were in the
space together, and your colleague clicked the Play button, only they would see and hear the
video playback. You would see and hear the video playback only at the point in which you
clicked the Play button. Pause/Stop and scrubbing commands work in the same manner.
Adding Flash Content
You can display Flash based content on Media Boards by linking to the SWF files that make up
that content.
Click the Add File button the Action bar.
In the File Upload window, add a link to the SWF content. It must reside on a web server
accessible to those individuals who would be coming into this location.
© 2012 ProtonMedia Inc.. All rights reserved.
46
Click the Apply button, and the Flash content will appear on the Media Board surface.
You can interact with the Flash content as you normally would in your web browser.
Note that the interactions and playback of Flash content is done in an asynchronous manner.
Although everyone in the location will see this content, they interact with it on their own, at their
own pace.
© 2012 ProtonMedia Inc.. All rights reserved.
47
Adding a Web Link
To add a web link (URL) to a Media Board, right-click on the surface and choose Add/Edit Web
Link on Current Slide.
The Add/Edit Web Link window will appear allowing you to enter the URL of the link and then
apply it to the surface. You can preview the web link and make sure you’ve entered the address
correctly by clicking the Preview button.
Add/edit Web Link dialogue window
When you click the Add URL button, the link will appear as an icon in the lower right corner of the
Media Board surface and the content that it’s displaying. The web content is launched by
clicking on this icon. You can also launch it by right-clicking the surface and choosing the
Launch Web Link option.
Web links can only be applied to a Media Board that already has at least one slide of content
on it.
© 2012 ProtonMedia Inc.. All rights reserved.
48
Annotations
ProtoSphere provides you with the ability to annotate over top of individual slides of content.
You can use the annotation tools to draw over top of text, images, PowerPoint slides, and video.
A
Annotations Tab
A. Pen color selections
B
C
B. Eraser C. Clear all annotations
To annotate on a Media Board, select the Annotations tab, and then choose one of the five
colored pen choices. Then use your mouse to draw directly on the surface.
Note that the area in which you are able to draw upon will be determined by the dimensions of
that content.
To use the annotations tools as a whiteboard, right-click on the board surface and choose Add
Text to New Slide. When the Text Editor window appears, simply click the Submit button to create
a blank screen. You now have a blank surface to mimic a whiteboard.
© 2012 ProtonMedia Inc.. All rights reserved.
49
Sharing an Application
Media Boards allow you to share an application from your desktop with other participants in the
location. You can share specific programs or your entire desktop if you choose.
The Sharing tab of the Action bar provides you with various options for starting/stopping and
controlling application shares.
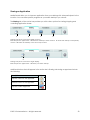
A
B
C
D
Sharing Tab (when used with multiple monitors)
A. Share specific applications B. Share the desktop of both monitors
monitor D. Share the desktop of the secondary monitor
A
C. Share the desktop of the primary
B
Sharing Tab (when used with a single display)
A. Share specific applications B. Share your entire desktop
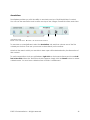
Additional buttons that will appear in the Action bar’s Sharing tab during an appshare include
the following:
Description
Button
Request control of the appshare
Release control of the appshare
Stop the current appshare
© 2012 ProtonMedia Inc.. All rights reserved.
50
Starting an Appshare
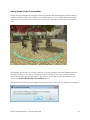
To share a specific application, first have that
application or program already running on your
desktop.
From the Sharing tab, select the Share Programs
button.
Best Practices Tip
To keep performance levels high, it
is recommended that only one
application share at a time take
place in any one location.
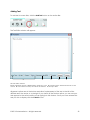
This will open the Share Programs window, displaying a live preview of all the running programs
on your computer. Each program will be represented by a live thumbnail.
© 2012 ProtonMedia Inc.. All rights reserved.
51
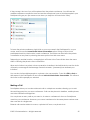
Select the program you want to share, then click the Share button. Note, you can share multiple
applications if you wish – simply check the box next to each application thumbnail you wish to
share.
A message will appear for other participants on the Media Board surface stating “Joining
Sharing…” When they have connected to the share, they will see what you are sharing:
Participants’ view of an application share
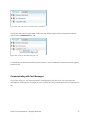
When you initiate an application share, the sharer will see the application share toolbar at the
top of their display:
This gives you access to granting control to other
participants and also provides the ability to stop the
share. Participants will not see this toolbar if you are
sharing applications; however it can be seen if you are
sharing your entire desktop or monitor.
© 2012 ProtonMedia Inc.. All rights reserved.
Best Practices Tip
You can use Windows 7’s ability
to snap applications to the left
and right side edges of your
desktop so that you have a view
of your shared application along
with a view of ProtoSphere.
52
Granting/Requesting Control
As a participant of an appshare, you can request control of the share.
Click on the Media board to zoom in, then from the Sharing tab, click the Request Control
button.
A message will be sent to the sharer that you are requesting control. This message appears in the
application toolbar:
The sharer must click accept, and the requesting party will have control of the application. Be
sure that the application you are sharing remains in focus on your desktop.
The sharer’s toolbar will have the name of the person who is in control of the share at that time:
You must remain zoomed in on the Media Board surface while controlling the appshare of
another person. If you zoom out, you will automatically release the control that was granted to
you.
The sharer can take back control at any time by clicking on the Give Control dropdown option
and selecting Take Back Control. Hitting CTRL+ALT+SPACE on your keyboard also accomplishes
the same thing.
If you wish, you can also choose to automatically accept control requests during an application
share. Select the Automatically Accept Control Requests option from the Give Control menu.
When you do this, any request for control will automatically be accepted.
You can also give control to anyone listed under the ‘Presenters’ heading without the need for
them to request it first.
If a request for control is denied, the requesting individual will receive a message in their
Message Center that states, “Your request for control was not accepted."
© 2012 ProtonMedia Inc.. All rights reserved.
53
The individual who initially requested control may release it at any time by clicking the Release
Control button located in their Sharing tab.
To stop an appshare, you can either click on the Stop Sharing button in the application share
toolbar:
…or you can click the Stop Share button in the ProtoSphere Action bar’s Sharing tab:
A note about Occlusion
Occlusion is when someone is sharing an application, but has another window sitting on top of it.
In ProtoSphere, the participant’s experience will not be interrupted when the shared window is
occluded. However there are some exceptions to this – when the window on top happens to be
a high privileged application, the participants will see a black window sitting on top of the
shared application.
When the sharer has granted control, the occluding window shows up as a transparent overlay,
so that the remote controller knows which areas the clicks will not go through.
Bandwidth Considerations for Shares
Application sharing is inherently a big consumer of bandwidth. That amount of bandwidth that is
consumed is dependent on the type of content being shared. For example, an application that
has a lot of media/motion/ or animation that is present will require more bandwidth to transmit
than say a document that has text in it. This is important to keep in mind when sharing with large
groups of people (up to 25). The performance of the share will vary depending on the total
bandwidth of the network ProtoSphere connects through and the amount of bandwidth
available to the end user client.
© 2012 ProtonMedia Inc.. All rights reserved.
54
Locked Media Boards
It is possible within ProtoSphere to either have a Moderator lock a Media Board, or have
permissions removed from a publicly accessible Media Board.
If you zoom in on a Media Board that has been locked by a Moderator, then your view of the
Action bar will look like this:
Notice that your ability to add or remove content, share applications, or annotate over the
surface is all disabled; including any ability to navigate through multiple slides of content.
For information on Moderators’ abilities to lock a Media Board, please see this section.
If you zoom in on a Media Board that has had its permissions specifically assigned or removed,
and you are not included in those special permissions, then your view of the Action bar will look
like this:
In this case, the difference is that you can navigate through multiple slides of content, if they
exist, but any ability to add or remove content, share applications, or annotate over the surface
is disabled.
For information on assigning/removing permission access to Media Boards, please see the
ProtoSphere 2.0 Administration Guide.
© 2012 ProtonMedia Inc.. All rights reserved.
55
Moderating
The moderator functions in ProtoSphere allow you to have more control of an event or meeting,
it’s content, and the level of participation that people will experience in a specific location.
Obtaining Moderator Status
Any user in ProtoSphere may obtain moderator status. To do this, click on the Moderate button
from the top menu bar and select the Request Moderator Status option.
When you select this option, a request is automatically sent to the system, which in turn
automatically grants you Moderator status.
Participants are made of aware of who the Moderators are in the environment via the
‘Moderator’ label that appears along with their name above the avatar:
© 2012 ProtonMedia Inc.. All rights reserved.
56
Your moderator status is brought with you as you teleport from one location to another. This
allows you to access all the moderator features that may be necessary during events or sessions
that take place in multiple locations.
As a moderator you may also enter a location that already has a moderator or group of
moderators present in it, unless the location has already been locked.
Once you have obtained Moderator status, a series of options is provided to you from the
Moderator menu button as well as the right-click options on Media Boards, SharePoint Boards,
Avatars, and the names of other participants in your location.
Moderating Voice Audio of Participants
Moderators have the ability to control the voice audio of the participants in the current location.
This can be accomplished a few different ways.
From the Moderator menu button, select the Mute Everyone option.
All participants but the moderator are muted
This will disable the audio input for all participants in the location, except other moderators.
These participants will still be able to hear you and other moderators.
To re-enable the voice audio, click the Unmute Everyone option from the Moderator menu
button.
You can also selectively mute/unmute participants by either right-clicking on their avatar or their
name in the Participants list and selecting the Mute & Unmute options.
© 2012 ProtonMedia Inc.. All rights reserved.
57
Choosing to mute a specific individual
Moderating the Group Conversation
Moderators have the ability to control the Group Conversation abilities of participants in the
location.
When you obtain Moderator status, by default, the option to Enable the Group Conversation is
selected. This allows participants in the location to continue using the group conversation text
chat.
© 2012 ProtonMedia Inc.. All rights reserved.
58
If you uncheck this option, it will keep other participants from being able to enter text into the
Group Conversation window. They will only see text that is entered by yourself or other
moderators. Note that this option does not keep participants from being able to have private
text conversations with one another.
Moderating Media Boards
It may be important to moderate the presentation of content on a Media Board during a
session. This allows you, the moderator, to control the content displayed on a Media Board
surface and disallows any other participant from being able to add/edit/remove or otherwise
change it. ProtoSphere provides two methods for achieving this; you can either lock all the
Media Boards in the location, or lock them individually.
To lock all the Media Boards in a single location, go to the Moderator menu button and select
the Lock All Media Boards option.
© 2012 ProtonMedia Inc.. All rights reserved.
59
Locking all the Media Boards in a single location
Conversely, to unlock them all, click the Unlock All Media Boards option.
To lock a specific Media Board, approach the surface, right-click on it, and choose Lock Media
Board.
Locking a specific Media Board
Conversely, to unlock a specific Media Board, approach the surface, right-click on it, and
choose Unlock Media Board.
© 2012 ProtonMedia Inc.. All rights reserved.
60
Locking a Location
If you choose to, as a moderator you have the ability to lock a location. What this does is
prevent other individuals from entering the space.
To lock the location you are currently in, go to the Moderator menu button and select the Lock
Location option.
A padlock icon will display for all participants at the bottom left corner of the application
window, next to the location name:
Signifying a locked location
A location remains locked until the moderator unlocks it, or otherwise teleports to another
location.
Note that the option to lock a location is disabled if that location is set as a default landing zone
for any group of users. For example, it’s common for the Courtyard location be the default
landing zone for many individuals; as such that location cannot be locked.
When a location is locked, only moderators present in that location have the ability to invite
other individuals who are located elsewhere in the 3D environment.
Locking a location does not keep participants from leaving. But those individuals must know that
if they leave the locked location, they cannot re-enter unless invited by a moderator.
Moderators in other locations cannot enter a location that is already locked – they must be
invited by a moderator present in the locked location.
Clearing Content
It may be necessary to clear any content that has been added to Media Boards during a
session or meeting. This can be accomplished in one broad stroke by clicking the Clear All
Content Within this Location option found under the Moderator menu button.
When you select this option, you will not be able to “undo” the clearing of the content.
The clearing of content also removes the configuration of any SharePoint Boards in that location.
© 2012 ProtonMedia Inc.. All rights reserved.
61
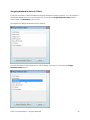
Assigning Moderator Status to Others
It may be necessary to have multiple moderators/facilitators during a session. You can share the
moderator abilities that you have obtained by choosing the Assign Moderator Status option
found under the Moderator menu button.
This displays the Assign Moderator Status window:
Choose the name of the individual you wish to assign the status to, then click the Assign
Moderator Status button.
© 2012 ProtonMedia Inc.. All rights reserved.
62
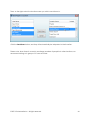
Sending People to a Location
During a moderated event or training engagement, it’s
not uncommon to have a need to break people up into
small groups and send them off to breakout sessions or
other locations. This can be accomplished in ProtoSphere
with the Send People to a Location option found under
the Moderator menu button.
When this option is selected, the following window
appears:
Best Practices Tip
In order to avoid any confusion
on the part of the individual
participants, be sure you clearly
state that you are about send
those people off to a specific
location.
Select the specific individuals that are present in your location from the list on the left. Use the
CTRL key on your keyboard to select multiple people.
© 2012 ProtonMedia Inc.. All rights reserved.
63
Then, on the right, select the location name you wish to send them to:
Click the Send Users button, and they will automatically be teleported to that location.
Please note, when there is a need to send large numbers of people into other locations, we
recommend doing so in groups of 10 users at a time.
© 2012 ProtonMedia Inc.. All rights reserved.
64
SharePoint Boards
SharePoint Boards allow you to upload documents, images, audio files, and web links directly
from your desktop or access files that are stored in SharePoint document libraries, and
collaboratively edit and view them while in ProtoSphere.
Avatar standing in front of a SharePoint Board
© 2012 ProtonMedia Inc.. All rights reserved.
65
A
B
C
D
E
A typical looking SharePoint Board
A. Name of the SharePoint Site B. The current view C. The SharePoint library name D. The list of
documents and files in this view/library E. Page number of the document list
There are a series of right-click options on SharePoint Boards. They include the following:
Right-click Menu Item (on the header)
Description
Configure
Opens the Document Library Configuration window.
Page Forward
Navigates the list of document titles forward one page.
Page Back
View/Search
Navigates the list of document titles backward one
page.
Opens the Select View window.
Right-click Menu Item (on documents)
Opens the File Upload window allowing you to select a
file to add to the library.
Description
View/Edit
Opens a copy of the document for editing.
Save a Local Copy
Allows you to save a local copy of the document.
Delete
Permanently deletes the document from the library.
Upload File
© 2012 ProtonMedia Inc.. All rights reserved.
66
A
B
C
D
E
F
G
H
I
J
SharePoint tab in the Action Bar
A. Page forward and back through the document list B. Configure the SharePoint Board
C. Select a different view or perform a search D. Navigate up a folder level E. Upload a new file
F. Refresh the display G. Sort by document name H. Sort by document date I. Sort by file type
J. Exit the zoom mode
Configuring a SharePoint Board
To configure an empty SharePoint board, or change the library of an already configured board,
click on the Configure button in the Action bar.
The Document Library Configuration window appears:
In the SharePoint Site URL field, enter the path to the base SharePoint site which contains the
library you wish to have displayed on the board:
© 2012 ProtonMedia Inc.. All rights reserved.
67
Then click the Get Libraries button.
The list of available Document Libraries will be populated in the pull down menu.
Select the library name you wish to display, and click OK.
© 2012 ProtonMedia Inc.. All rights reserved.
68
The list of documents from this library will be displayed:
If you wish to clear a SharePoint board, you can either do so via the Moderator ability to clear
content, or from the Configuration window, by selecting the Clear Board button:
Clearing a board does nothing to the SharePoint library itself – it simply removes access to it from
that particular SharePoint Board.
© 2012 ProtonMedia Inc.. All rights reserved.
69
A note about SharePoint Authentication
When a SharePoint board is configured to a SharePoint site that you are not already
authenticated with, you will be prompted to log in with your username and password. Typically,
this username and password is the same in which you use to log into your domain with.
If you do not authenticate with the SharePoint site when prompted, you will not be able to see
any of the documents listed on the board.
© 2012 ProtonMedia Inc.. All rights reserved.
70
Viewing Documents from a SharePoint Board
When you hover your mouse over the list of documents, a tooltip will appear for each one
providing you more detailed information about that particular file. This includes the Title,
Filename, the original creator of the document, the file size, and the version number.
Tooltips appear with document information
When you have found the document you wish to view, right-click on it and choose the View/Edit
option.
Depending on SharePoint’s security settings, you may receive an alert message such as this:
Click OK, and the document will open in its native application.
Any changes you make to the document will be saved back to the library if you do not change
the path to which the file is being saved to.
© 2012 ProtonMedia Inc.. All rights reserved.
71
Searching the Library or Selecting a Different View
You can perform searches or select different views within the document library that the
SharePoint board is configured with. To do this, make sure you are zoomed into the SharePoint
Board and click on the Select View button in the Action bar.
This will display the Select View window:
To perform a search, in the Search input field, type in your search term(s) and click the Search
button. Or, you can change the view by clicking the Select View dropdown menu.
The results of the search or selected view will appear on the board:
© 2012 ProtonMedia Inc.. All rights reserved.
72
Results of a search of the document library
You can page through the results using the Page Forward and Page Backward buttons on the
Action Bar.
To clear the search results and reset the SharePoint board back to its original configuration, click
the Refresh button on the Action Bar.
© 2012 ProtonMedia Inc.. All rights reserved.
73
Adding Documents to a SharePoint Board
SharePoint Boards allow you to add files to the document library that it is configured with,
directly from within ProtoSphere.
Make sure you are zoomed into the SharePoint Board. From the Action Bar, click on the Upload
File button.
A Windows dialogue will open, prompting you to select the file you wish to upload. Once you
have chosen the document, click the Open button.
The file will be posted to the SharePoint Board.
© 2012 ProtonMedia Inc.. All rights reserved.
74
Please note that in order to successfully add a file to the board, that file cannot be open on your
desktop.
© 2012 ProtonMedia Inc.. All rights reserved.
75
User Profiles
Each person in ProtoSphere has a personal user profile that is accessible through SharePoint’s My
Site service. SharePoint My Sites are commonly referred to as the “Facebook of the enterprise
and are personal sites that contain both private and public information that may include,
pictures, documents, status updates, skillsets, contact information, blog posts, etc. Your
ProtoSphere User Profile is a direct link to your SharePoint My Site profile.
Firs time users of SharePoint My Site will need to go to the ProtoSphere menu and select the My
Profile option.
Your browser will open, and direct you to your My Site.
The initial view of your SharePoint My Site
© 2012 ProtonMedia Inc.. All rights reserved.
76
Click on the option labeled Edit My Profile.
This will let you edit/enter your basic information. Some of these fields may already be filled out,
depending on the SharePoint site in your organization was configured. But at the very least, you
may want to fill out the About me section, add a picture of yourself, and add details to your skill
set and your “ask me about” section – topics that you might be able to help others with, such as
your responsibilities or areas of expertise.
© 2012 ProtonMedia Inc.. All rights reserved.
77
The edit screen of the SharePoint My Site
© 2012 ProtonMedia Inc.. All rights reserved.
78
Once you have add your information, click the Save and Close option located at the top or
bottom of the screen:
Now, anytime another participant in ProtoSphere right-click’s on your avatar or username, and
chooses the View User Profile option, they will see your public SharePoint My Site content.
© 2012 ProtonMedia Inc.. All rights reserved.
79
Using ProtoSphere with Office Communicator
Although ProtoSphere is designed to work primarily with Microsoft Lync, there is support for a
limited feature set that is capable of being used with Microsoft Office Communicator as well.
ProtoSphere’s application interface when used with Microsoft Communicator
What is supported?
Voice audio
When used with Communicator, participants will experience the same high quality voice audio
as they do with Lync. Individuals also have the ability to dial-out to outside parties, participate in
private conversations, and use private voice zones.
Presence
Your presence status is carried through into ProtoSphere. When your presence status changes in
Communicator, that status is reflected in the icon next to your username. Presence status can
also be changed in ProtoSphere via the ProtoSphere > My Status menu button. From the
presence icon of other people, you can also gain access to other Communicator features by
right-clicking on the icon:
© 2012 ProtonMedia Inc.. All rights reserved.
80
Right-click options on presence indicator of a participant
Interoperability with other Lync participants
For example, it is possible for two individuals in ProtoSphere, one being connected with Lync and
the other being connected with Communicator, to interact with one another and use Voice
Audio.
Other features that are functional in ProtoSphere when used with Communicator include:
Teleporting, controlling your avatar and camera views, moderating the environment,
adding/viewing content on Media Boards, adding/viewing content from SharePoint Boards, and
accessing SharePoint My Site information.
What is Not supported?
The features that are not supported in ProtoSphere when used in conjunction with Microsoft
Office Communicator include the following:
Contacts list
Ability to invite or join other participants
Cannot initiate or view an application share
Group and private text messaging
© 2012 ProtonMedia Inc.. All rights reserved.
81
ProtoSphere Preferences
ProtoSphere allows you to customize the way a few of the features in the environment function.
You can access these preferences by selecting ProtoSphere > Preferences on the main toolbar.
The Preferences Settings window will appear.
The options available are:
Settings Option
Avatar Name Visibility
Text Chat
3D Window
Check for Art Updates
© 2012 ProtonMedia Inc.. All rights reserved.
Description
This lets hide/show the names of people
above their avatars’ heads.
This allows you to turn/off the audible
notifications you hear when you send or
receive a text message.
The one option here allows you to
show/hide the inset windows that appear
when other people are speaking.
This setting will determine the frequency of
new art updates to check for. When set to
Never, ProtoSphere load times are shorter
than when set to Always.
82
Appendix A - Keyboard Shortcuts and Controls
Description
Mute / unmute your microphone
Mute / unmute your speaker audio
Walk forward
Walk backward
Turn left
Turn right
Spin around while seated in a chair
Stand up out of a chair
Toggle between first and third person views
Agree
Applaud
Cheer
Chin Rub
Disagree
Laugh
Look at Watch
Point
Point at hand
Raise/Lower Hand
Shrug
Thumbs up
Time out
Wave
Enable the laser pointer
Turn on / off free camera
Turn on / off heads up display (HUD) information
Exit from a zoomed in state
Take back control during an appshare
Stop the appshare
© 2012 ProtonMedia Inc.. All rights reserved.
Keyboard Commands
CTRL + M
CTRL + S
W or Up Arrow
S or Down Arrow
A or Left Arrow
D or Right Arrow
A and D or Left and Right Arrows
W and S or Up and Down Arrows
V
Y
U
H
C
N
L
O
P
I
R
G
T
M
E
Spacebar
CTRL + SHIFT + C
CTRL + SHIFT + F
ESC
CTRL + ALT + SPACE
CTRL + SHIFT + S
83
Appendix B – About ProtonMedia
ProtonMedia is the developer of ProtoSphere, the market-leading virtual collaboration
environment for the high-performance workplace, and a leading virtual environment for
collaborative PLM in life sciences. ProtoSphere’s virtual environment provides an arsenal of
business-focused collaboration and communication tools that help companies accelerate
decision-making and raise productivity, improving workplace performance overall. The
company is a Gartner “Cool Vendor in the High-Performance Workplace” for 2010. Its customers
include some of the world’s most respected brands, including AstraZeneca, Johnson & Johnson,
Ethicon, DePuy, Merck, Novartis, Bristol-Myers Squibb, American Express, BP, Chevron, Duke
University, Lockheed Martin, and Boeing. For more information, visit www.ProtonMedia.com.
© 2012 ProtonMedia Inc.. All rights reserved.
84
Appendix C – Privacy Information
Overview
ProtonMedia values the privacy of those who utilize our software and we think it is important for
our clients to understand when and why we collect personally identifiable information and how
we may use it. This Privacy Policy describes ProtonMedia data collection and use policies. Please
read the entire Privacy Policy before having your users provide any personally identifiable
information to us, and please feel free to share this documentation with your ProtoSphere user
base.
Notice
ProtonMedia collects personally identifiable information, such as your name, work address, work
telephone number, or e-mail address, only if you provide this information to us voluntarily. The
voluntary information we collect is only used for internal verification to establish user accounts
and social network profiles within ProtoSphere, complete transactions within the ProtoSphere
platform, ensure appropriate legal use of licensed ProtonMedia software, provide notification to
licensees about updates to ProtonMedia’s software, data, services, and to help provide
technical and product support to our users.
Collection
Certain information, such as the Internet Protocol (IP) address of your computer, may be stored
through the use of “cookies” intended to speed access to ProtonMedia information and
services. A cookie is a small file that can be used to tell us when you visit our Web sites and track
your browsing preferences. ProtonMedia does not use cookies to store information such as credit
card numbers, telephone numbers, or other information you provide. To maintain your privacy,
you can disable your browser’s ability to accept cookies.
The ProtoSphere application requires registration and sign-up to gain access to the platform. This
information will be used to deliver the services mentioned in the previous section.
Disclosure
Other than as described in this Privacy Policy, ProtonMedia will not disclose your personally
identifiable information unless required to do so by law or in the good faith belief that such
action is necessary to (1) conform to the edicts of the law, (2) protect and defend the rights or
property of ProtonMedia, or (3) as part of a transfer of assets to a successor in interest.
Except as stated, ProtonMedia does not rent, sell, or otherwise share personally identifiable
information.
© 2012 ProtonMedia Inc.. All rights reserved.
85
Access
ProtonMedia will permit you to access information about yourself in our ProtoSphere Social
Network. Updating of personally identifiable information is up to the sole discretion of the user
and their employer.
Security
ProtonMedia will take reasonable and prudent precautions to ensure that your personally
identifiable data is protected against unauthorized access, use, or disclosure.
Enforcement
If you believe for any reason that ProtonMedia has not followed these principles, please contact
us at [email protected], and ProtonMedia will act promptly to investigate, correct as
appropriate, and advise you of the correction. Please identify the issue as a Privacy Policy
concern in your communication to ProtonMedia.
You may also contact your employer’s local IT support help desk and file a report with them.
© 2012 ProtonMedia Inc.. All rights reserved.
86