1
for Vertex Standard VX-P820/P920
USER’S GUIDE
General Dynamics SATCOM Technologies
3750 W. Loop 281
Longview, Texas 75604
Copyright 2007 General Dynamics
All Rights Reserved
Printed in U.S.A.
CG-1345 Rev. C
AutoTune™ for VX-P820/P920
Rev. C
AUTOTUNE™ SOFTWARE LICENSE AGREEMENT
The software license agreement governing use of the AutoTune™ for VX-P820/P920
software may be found on the installation CD in the license folder in
License_Agreement.rtf.
TRADEMARKS
VS Vertex Standard, the Vertex Standard logo, and Vertex Standard are registered ®
trademarks of Vertex Standard USA, Inc.
All other products or names referenced throughout this document are the property of
their respective owners.
i
AutoTune™ for VX-P820/P920
Rev. C
TABLE OF CONTENTS
1. Introduction .............................................................................................................. 1
2. Scope....................................................................................................................... 1
3. Requirements........................................................................................................... 2
3.1. Firmware ........................................................................................................... 2
3.2. Analyzer ............................................................................................................ 2
4. Radio Alignment Test Setup .................................................................................... 2
4.1. Setup Recommendations.................................................................................. 2
4.2. VX-P820/P920 Test Setup ................................................................................ 2
4.3. Radio Test Set .................................................................................................. 2
5. Alignment and Test Descriptions.............................................................................. 2
5.1. Frequency ......................................................................................................... 2
5.1.1. Alignment................................................................................................... 2
5.1.2. Test............................................................................................................ 2
5.2. RX Tune............................................................................................................ 2
5.2.1. Alignment................................................................................................... 2
5.3. SQL Sensitivity.................................................................................................. 2
5.3.1. Alignment................................................................................................... 2
5.4. TX Power .......................................................................................................... 2
5.4.1. Alignment................................................................................................... 2
5.4.2. Test............................................................................................................ 2
5.5. Maximum Deviation .......................................................................................... 2
5.5.1. Alignment................................................................................................... 2
5.5.2. Test............................................................................................................ 2
5.6. Sub Audio Deviation ......................................................................................... 2
5.6.1. Alignment................................................................................................... 2
5.6.2. Test............................................................................................................ 2
6. Basic Troubleshooting.............................................................................................. 2
6.1. Firmware ........................................................................................................... 2
6.2. Power-Up Error Codes...................................................................................... 2
6.3. Alignment and Test Troubleshooting ................................................................ 2
7. Support Information.................................................................................................. 2
7.1. Technical Support ............................................................................................. 2
7.2. Sales Support ................................................................................................... 2
8. References............................................................................................................... 2
APPENDIX A.
Test Set ...........................................................................................A-2
APPENDIX B.
Analyzer Interface Specifications.....................................................B-2
APPENDIX C.
Limits .............................................................................................. C-2
APPENDIX D.
Sample Test Result Report............................................................. D-2
LIST OF FIGURES
Figure 4-1. General Radio Test Setup............................................................................. 2
Figure A-1. Test Set Schematic ...................................................................................A-2
Figure D-1. Sample Test Result Report ...................................................................... D-2
ii
AutoTune™ for VX-P820/P920
Rev. C
LIST OF TABLES
Table 4-1. Radio Test Setup Connections....................................................................... 2
Table 5-1. Test Channel Configuration............................................................................ 2
Table 5-2. Analyzer Configuration for Frequency Alignment and Test ............................ 2
Table 5-3. Frequency Alignment Results ........................................................................ 2
Table 5-4. Frequency Test Results ................................................................................. 2
Table 5-5. Analyzer Configuration for RX Tune Alignment.............................................. 2
Table 5-6. RX Tune Alignment Results ........................................................................... 2
Table 5-7. Analyzer Configuration for SQL Sensitivity Alignment.................................... 2
Table 5-8. SQL Sensitivity Alignment Results ................................................................. 2
Table 5-9. Analyzer Configuration for TX Power Alignment and Test ............................. 2
Table 5-10. TX Power Alignment Results........................................................................ 2
Table 5-11. TX Power Test Results. ............................................................................... 2
Table 5-12. Analyzer Configuration for Maximum Deviation Alignment and Test............ 2
Table 5-13. Maximum Deviation Alignment Results. ....................................................... 2
Table 5-14. Maximum Deviation Test Results................................................................. 2
Table 5-15. Analyzer Configuration for Sub Audio Deviation Alignment and Test........... 2
Table 5-16. Sub Audio Deviation Alignment Results. ...................................................... 2
Table 5-17. Sub Audio Deviation Test Results................................................................ 2
Table 6-1. Firmware. ....................................................................................................... 2
Table 6-2. Power-Up Error Codes. .................................................................................. 2
Table 6-3. Alignment and Test Troubleshooting Chart. ................................................... 2
Table B-1. Analyzer to PC Serial Cable .......................................................................B-2
Table C-1. Default Vertex Standard VX-P820 Test Limits........................................... C-2
Table C-2. Default Vertex Standard VX-P820 Alignment Targets ............................... C-2
Table C-3. Default Vertex Standard VX-P920 Test Limits........................................... C-2
Table C-4. Default Vertex Standard VX-P920 Alignment Targets. .............................. C-2
iii
AutoTune™ for VX-P820/P920
Rev. C
1. Introduction
The Vertex Standard VX-P820/P920 are VHF/UHF P25 portable radios providing
analog FM and digital P25 reception and transmission of voice and data in the
VHF/UHF frequency bands used in land mobile environments. The General Dynamics
AutoTune™ application is designed to provide an automated test and alignment solution
for Vertex Standard VX-P820/P920 radios. AutoTune™ supports the R2600 family of
Communications Systems Analyzer.
2. Scope
This document is intended to provide information regarding the operation of the
AutoTune™ software application with the Vertex Standard VX-P820/P920. This
document encompasses radio information specific to the Vertex Standard VXP820/P920 radios only. Any references to other test equipment appearing in this
document are for illustration purposes only, unless otherwise noted.
1
AutoTune™ for VX-P820/P920
Rev. C
3. Requirements
3.1.
Firmware
Before attempting to align or test a VX-P820/P920 radio, the radio’s firmware must be
version 1.29 or later. This firmware version is required to support the AutoTune™
alignment and test capabilities.
On models equipped with an LCD, the radio firmware version may be viewed by
pressing and holding the side LAMP Button key while turning the radio on. After radio
power-on and self test, the radio will enter the screen test/version view mode.
Subsequent LAMP Button presses will cycle through the following screens, in this order:
•
•
•
•
•
Icon test
Character test
Serial number
Firmware version/band
DSP version
On the Firmware version/band screen, the firmware version is the 4 character value on
the left.
For models without an LCD, the radio firmware version may be obtained by using
Vertex Standard CE76 software. With the radio connected to a PC, select the Radio >
Upload command from the main menu bar. Once the radio’s information has been
uploaded, the firmware version number is displayed in the “FW Version” field.
3.2.
Analyzer
Because of the P25 nature of Vertex Standard VX-P820/P920 radios, a P25-equipped
R2600 series Communications System Analyzer is necessary for full use of AutoTune™
for VX-P820/P920 radios. However, a R2600 series analyzer without the P25 option will
perform all alignments and tests except for Maximum Deviation. If Maximum Deviation
is selected for performance and the R2600 series analyzer in use is not P25 equipped,
the user will be notified and the Maximum Deviation test will be marked as Fail.
The analyzer must contain the following PROJ 25/ASTRO/SNET software version to
perform correctly:
6.04.B00 or later
2
AutoTune™ for VX-P820/P920
Rev. C
Software issues in some previous versions of the PROJ 25/ASTRO/SNET firmware may
prevent correct monitor frequency configuration. Please refer to the analyzer’s
Operator’s Manual for information on how to upgrade the analyzer firmware if
necessary.
3
AutoTune™ for VX-P820/P920
Rev. C
4. Radio Alignment Test Setup
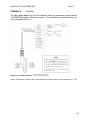
In order to perform the alignment procedures, the VX-P820/P920 must be connected to
both the PC and the communications analyzer as shown in the figure(s) below.
Please make certain that the radio under test is configured as described in
Figure 4-1 before attempting to perform the indicated alignment or test. Failure
to do so may result in poor radio performance and/or damage to the
communications analyzer or radio equipment under test.
4.1.
Setup Recommendations
In the absence of a battery eliminator, it is highly recommended to use a fully charged
battery when performing radio alignments or tests, and to perform alignments or tests
with the radio under test out of the battery charger. Failure to do so may result in poor
alignment performance and/or random radio resets, especially during high power tests
or alignments such as TX Power.
As electronic parts generally exhibit their best typical performance at normal operating
temperatures, it is recommended that the radio under test be allowed to warm-up for 60
seconds after power-on and before beginning an alignment or test. This waiting period
allows the radio’s internal electrical components to achieve proper operating
temperature, resulting in more accurate test results.
Analyzer Setup: Adjust the SQUELCH knob on the analyzer fully clockwise until
rotation stops and then adjust it counter-clockwise until the squelch indicator light
comes on before beginning any tests or alignments. Some radio tests or alignments
may not perform accurately without this analyzer adjustment.
4
AutoTune™ for VX-P820/P920
4.2.
Rev. C
VX-P820/P920 Test Setup
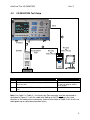
Figure 4-1. General Radio Test Setup
Cable
1
2
3
Connections
VX-P820/P920 Antenna port to R2670 RF IN/OUT port
PC COM port OR USB to Serial Adapter to VX-P820/P920
Accessory Port
PC COM port OR USB to Serial Adapter to R2670 RS-232
Port
Table 4-1. Radio Test Setup Connections.
Cable Description
Coaxial BNC Cable
Vertex Standard Part Number
CT-109 and (optional) USB to
Serial adapter.
See APPENDIX B.
Note: For Cable 2 in Table 4-1, the Accessory Port connector must be configured as
described in Figure 4-1, with the cable wire leading to the PC pointing in the same
direction as the radio antenna connector. Incorrect orientation of Cable 2 will result in no
radio power-up or radio communication failure.
5
AutoTune™ for VX-P820/P920
4.3.
Rev. C
Radio Test Set
A radio test set is a service aid which provides a means of injecting signals into and
sampling audio output from a radio under test for purposes of performance verification.
It generally connects to the radio’s universal/accessory port, to a PC, and to other test
equipment, such as the R2670. For example, to determine the radio receiver’s
sensitivity to incoming signals, a SINAD test may be performed. A radio test set can be
used to route the radio’s audio output to a SINAD meter for measurement.
Currently, Vertex Standard does not market a radio test set for VX-P820/P920 radios.
However, a test set may be constructed using the schematic provided in the radio’s
Service Manual. This schematic is also included in Appendix A of this document.
Though not critical for AutoTune™ performance, a radio test set may be used to verify
certain receiver alignments supported within AutoTune™, such as RX Tune and SQL
Sensitivity. Because of the lack of a standardized test set, AutoTune™ currently does
not directly support a RX Tune or SQL Sensitivity test. If such verification is desired and
a radio test set is available, configure the R2600 and radio channels as described for
RX Tune and SQL Sensitivity in sections 5.2 and 5.3, respectively. Using the R2600,
sample the appropriate SINAD and squelch measurements and compare against Vertex
Standard VX-P820/P920 published tolerances for acceptance.
6
AutoTune™ for VX-P820/P920
Rev. C
5. Alignment and Test Descriptions
Table 5-1 provides the channel configuration for each Test Channel referenced
throughout this section. Note that to find the channel operating frequency for a particular
radio, the radio operating band must be known. The band designation can usually be
located on a sticker underneath the radio’s battery.
Band
Signaling
485.1MHz
Channel
Space
Wide
Center
---
380.1MHz
450.1MHz
Wide
Low
---
469.9MHz
449.9MHz
519.9MHz
Wide
High
---
154.1MHz
435.1MHz
415.1MHz
485.1MHz
Wide
Center
CTCSS
CH 05
154.1MHz
435.1MHz
415.1MHz
485.1MHz
Wide
Center
DCS
CH 06
154.1MHz
435.1MHz
415.1MHz
485.1MHz
Narrow
Center
---
CH 07
154.1MHz
435.1MHz
415.1MHz
485.1MHz
Narrow
Center
CTCSS
CH 08
154.1MHz
435.1MHz
415.1MHz
485.1MHz
Narrow
Center
DCS
CH 09
154.1MHz
435.1MHz
415.1MHz
485.1MHz
Digital
Center
Digital
VHF
UHF-A (G6)
UHF-H (G8)
UHF-D (G7)
CH 01
154.1MHz
435.1MHz
415.1MHz
CH 02
134.1MHz
400.1MHz
CH 03
173.9MHz
CH 04
Table 5-1. Test Channel Configuration
5.1.
Frequency
Monitor Mode
RF Control
Port
Frequency
Modulation
Standard
Monitor
RF I/O
Test Channel 06
FM
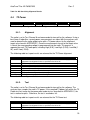
Table 5-2. Analyzer Configuration for Frequency Alignment and Test
5.1.1.
Attenuation
20 dB
Alignment
The radio is set to Test Channel 6 and commanded to transmit by the software. Using a
best linear fit algorithm, several frequency error samples are taken with the analyzer
and used to determine the radio softpot value with a frequency error closest to the
alignment target value found in APPENDIX C. Once the measurement closest to the
target value is found, the corresponding softpot is programmed into the radio.
7
AutoTune™ for VX-P820/P920
Rev. C
The following radio test report results are returned for the Frequency alignment:
Name
Result
Description
Pass or Fail. This indicates whether the alignment succeeded in bringing the radio
parameter into alignment limits as specified in the limits file.
Frequency
Band center frequency for the radio under test.
Max Limit
Maximum passable frequency error, inclusive, as specified in the limits file.
Freq Error
Measured frequency error after alignment
Min Limit
Minimum passable frequency error, inclusive, as specified in the limits file.
Old Softpot
Radio parameter softpot value before alignment.
New Softpot
Radio parameter softpot value after alignment.
Table 5-3. Frequency Alignment Results
5.1.2.
Test
The radio is set to Test Channel 6 and commanded to transmit by the software. The
analyzer then samples the radio’s frequency error. If the sampled frequency error falls
within the Frequency test limit range described in APPENDIX C, the test is marked as
pass. Otherwise, the test is marked as fail.
The following radio test report results are returned for the Frequency test:
Name
Result
Description
Pass or Fail. This indicates whether the radio’s sampled Frequency error fell
within the test limits as specified in the limits file.
Frequency
Band center frequency for the radio under test.
Max Limit
Maximum passable frequency error, inclusive, as specified in the limits file.
Freq Error
Measured frequency error after alignment
Min Limit
Minimum passable frequency error, inclusive, as specified in the limits file.
Softpot
Current radio parameter softpot value.
Table 5-4. Frequency Test Results
5.2.
RX Tune
Monitor Mode
RF Control
Port
Frequency
Standard
Generate
RF I/O
Test Channel 01
Standard
Generate
RF I/O
Test Channel 02
Standard
Generate
RF I/O
Test Channel 03
Table 5-5. Analyzer Configuration for RX Tune Alignment
5.2.1.
Modulation
1 kHz @ 3 kHz dev.
1 kHz @ 3 kHz dev.
1 kHz @ 3 kHz dev.
Output Level
-103 dBm
-103 dBm
-103 dBm
Alignment
The radio is set to receive at Test Channel 1. After setting up the analyzer according to
Table 5-5, the radio’s RSSI softpot is sequentially incremented across the Low (CH 02),
Center (CH 01) and High (CH 03) portions of the radio band. The software uses the
Peak RSSI values it locates at each of these points to calculate appropriate softpot
8
AutoTune™ for VX-P820/P920
Rev. C
values for the respective portions of the band. These softpot values are then
programmed into the radio. Each configured channel’s RX Tune value is then updated
to reflect these new radio softpot values.
The following radio test report results are returned for the RX Tune alignment:
Name
Description
Result
Pass or Fail. This indicates whether the alignment succeeded.
Frequency
Band Center frequency for the radio under test.
Low Old
Band Low slope softpot setting before alignment.
Low New
Band Low slope softpot setting after alignment.
Center Old
Band Center softpot setting before alignment.
Center New
Band Center softpot setting after alignment.
High Old
Band High slope softpot setting before alignment.
High New
Band High slope softpot setting after alignment.
Table 5-6. RX Tune Alignment Results
5.3.
SQL Sensitivity
Monitor Mode
SQL Point
Frequency
Output Level
Standard
TI NSQ W
Test Channel 01
-103 dBm
““
TH NSQ W
Test Channel 01
““
““
RSSI SQL W
Test Channel 01
““
““
TX SAVE W
Test Channel 01
““
““
TI NSQ N
Test Channel 06
““
““
TH NSQ N
Test Channel 06
““
““
RSSI SQL N
Test Channel 06
““
““
TX SAVE N
Test Channel 06
““
Table 5-7. Analyzer Configuration for SQL Sensitivity Alignment
5.3.1.
Modulation
1 kHz @ 3 kHz dev.
1 kHz @ 3 kHz dev.
None
None
1 kHz @ 1.5 kHz dev.
1 kHz @ 1.5 kHz dev.
None
None
Alignment
The radio is set to receive at Test Channel 1 and the Audio Frequency volume is
changed by the software to an adequate level for receiver testing. After setting up the
analyzer according to Table 5-7, the radio’s first squelch point is sampled repeatedly,
averaged, and the result is programmed into the radio as the new squelch point softpot.
This process is repeated for each row in Table 5-7.
The following radio test report results are returned for the SQL Sensitivity alignment:
Name
Result
Name
Frequency
Power Level
Old Softpot
New Softpot
Description
Pass or Fail. This indicates whether the alignment succeeded.
Squelch point title.
Band Center frequency for the radio under test.
Signal generator output level for aligning this squelch point.
Old squelch point softpot setting before alignment.
New squelch point softpot setting after alignment.
9
AutoTune™ for VX-P820/P920
Rev. C
Table 5-8. SQL Sensitivity Alignment Results
5.4.
TX Power
Monitor Mode
RF Control
Port
Frequency
Modulation
Standard
Monitor
RF I/O
Test Channel 06
FM
Table 5-9. Analyzer Configuration for TX Power Alignment and Test
5.4.1.
Attenuation
20 dB
Alignment
The radio is set to Test Channel 6 and commanded to transmit by the software. Using a
best linear fit algorithm, several power measurements are taken with the analyzer and
used to determine the radio softpot value with a TX power closest to the alignment
target value found in APPENDIX C. Once the measurement closest to the target value
is found, the corresponding softpot is programmed into the radio. This process is
repeated for each TX Power point, including High (5 W), Low-High (2.5 W), Low-Mid (1
W), and E-Low (.25 W).
The following radio test report results are returned for the TX Power alignment:
Name
Result
Description
Pass or Fail. This indicates whether the alignment succeeded in bringing the radio
parameter into alignment limits as specified in the limits file.
Name
TX Power point under test.
Frequency
Band center frequency for the radio under test.
Max Limit
Maximum passable power, inclusive, as specified in the limits file.
Power
Measured power after alignment.
Min Limit
Minimum passable power, inclusive, as specified in the limits file.
Old Softpot
Radio parameter softpot value before alignment.
New Softpot
Radio parameter softpot value after alignment.
Table 5-10. TX Power Alignment Results.
5.4.2.
Test
The radio is set to Test Channel 6 and commanded to transmit by the software. The
analyzer then samples the radio’s TX power. If the sampled TX power falls within the TX
Power test limit range for the power point under test as described in APPENDIX C, the
test is marked as pass. Otherwise, the test is marked as fail.
The following radio test report results are returned for the TX Power test:
Name
Result
Name
Description
Pass or Fail. This indicates whether the alignment succeeded in bringing the radio
parameter into alignment limits as specified in the limits file.
TX Power point under test.
10
AutoTune™ for VX-P820/P920
Rev. C
Frequency
Band center frequency for the radio under test.
Max Limit
Maximum passable power, inclusive, as specified in the limits file.
Power
Measured power after alignment.
Min Limit
Minimum passable power, inclusive, as specified in the limits file.
Softpot
Current radio parameter softpot value.
Table 5-11. TX Power Test Results.
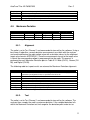
5.5.
Maximum Deviation
Monitor Mode
RF Control
Port
Attenuation
Name
Frequency
P25 Conventional
Monitor
RF I/O
20 dB
Wide
Test Channel 01
P25 Conventional
Monitor
RF I/O
20 dB
Narrow
Test Channel 06
P25 Conventional
Monitor
RF I/O
20 dB
Digital
Test Channel 09
Table 5-12. Analyzer Configuration for Maximum Deviation Alignment and Test
5.5.1.
Alignment
The radio is set to Test Channel 1 and commanded to transmit by the software. Using a
best linear fit algorithm, several deviation measurements are taken with the analyzer
and used to determine the radio softpot value with a deviation closest to the alignment
target value found in APPENDIX C. Once the measurement closest to the target value
is found, the corresponding softpot is programmed into the radio. This process is
performed for each Maximum Deviation point in Table 5-12: Wide (CH 01), Narrow (CH
06), and Digital (CH 09).
The following radio test report results are returned for Maximum Deviation alignment:
Name
Result
Description
Pass or Fail. This indicates whether the alignment succeeded in bringing the radio
parameter into alignment limits as specified in the limits file.
Name
Maximum Deviation point under test.
Frequency
Band center frequency for the radio under test.
Max Limit
Maximum passable deviation, inclusive, as specified in the limits file.
Deviation
Measured deviation after alignment.
Min Limit
Minimum passable deviation, inclusive, as specified in the limits file.
Old Softpot
Radio parameter softpot value before alignment.
New Softpot
Radio parameter softpot value after alignment.
Table 5-13. Maximum Deviation Alignment Results.
5.5.2.
Test
The radio is set to Test Channel 1 and commanded to transmit by the software. The
analyzer then samples the radio’s maximum deviation. If the sampled deviation falls
within the Maximum Deviation test limit range for the deviation point under test as
11
AutoTune™ for VX-P820/P920
Rev. C
described in APPENDIX C, the test is marked as pass. Otherwise, the test is marked as
fail.
The following radio test report results are returned for the Maximum Deviation test:
Name
Result
Description
Pass or Fail. This indicates whether the alignment succeeded in bringing the radio
parameter into alignment limits as specified in the limits file.
Name
Maximum Deviation point under test.
Frequency
Band center frequency for the radio under test.
Max Limit
Maximum passable deviation, inclusive, as specified in the limits file.
Deviation
Measured deviation after alignment.
Min Limit
Minimum passable deviation, inclusive, as specified in the limits file.
Softpot
Current radio parameter softpot value.
Table 5-14. Maximum Deviation Test Results.
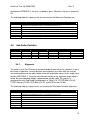
5.6.
Sub Audio Deviation
Monitor Mode
RF Control
Port
Modulation
Attenuation
Name
Standard
Monitor
RF I/O
FM
20 dB
CTCSS Wide
Standard
Monitor
RF I/O
FM
20 dB
CTCSS Narrow
Standard
Monitor
RF I/O
FM
20 dB
DCS Wide
Standard
Monitor
RF I/O
FM
20 dB
DCS Narrow
Table 5-15. Analyzer Configuration for Sub Audio Deviation Alignment and Test.
5.6.1.
Frequency
Test Channel 04
Test Channel 05
Test Channel 07
Test Channel 08
Alignment
The radio is set to Test Channel 4 and commanded to transmit by the software. Using a
best linear fit algorithm, several deviation measurements are taken with the analyzer
and used to determine the radio softpot value with a deviation closest to the target value
found in APPENDIX C. Once the measurement closest to the alignment target value is
found, the corresponding softpot is programmed into the radio. This process is
performed for each Sub Audio Deviation point in Table 5-15: CTCSS Wide (CH 04),
CTCSS Narrow (CH 05), DCS Wide (CH 07) and DCS Narrow (CH 08).
The following radio test report results are returned for Sub Audio Deviation alignment:
Name
Result
Name
Frequency
Max Limit
Deviation
Min Limit
Old Softpot
New Softpot
Description
Pass or Fail. This indicates whether the alignment succeeded in bringing the radio
parameter into alignment limits as specified in the limits file.
Sub Audio Deviation point under test.
Band center frequency for the radio under test.
Maximum passable sub audio deviation, inclusive, as specified in the limits file.
Measured deviation after alignment.
Minimum passable sub audio deviation, inclusive, as specified in the limits file.
Radio parameter softpot value before alignment.
Radio parameter softpot value after alignment.
12
AutoTune™ for VX-P820/P920
Rev. C
Table 5-16. Sub Audio Deviation Alignment Results.
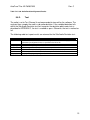
5.6.2.
Test
The radio is set to Test Channel 4 and commanded to transmit by the software. The
analyzer then samples the radio’s sub audio deviation. If the sampled deviation falls
within the Sub Audio Deviation test limit range for the deviation point under test as
described in APPENDIX C, the test is marked as pass. Otherwise, the test is marked as
fail.
The following radio test report results are returned for the Sub Audio Deviation test:
Name
Result
Description
Pass or Fail. This indicates whether the alignment succeeded in bringing the radio
parameter into alignment limits as specified in the limits file.
Name
Maximum Deviation point under test.
Frequency
Band center frequency for the radio under test.
Max Limit
Maximum passable deviation, inclusive, as specified in the limits file.
Deviation
Measured deviation after alignment.
Min Limit
Minimum passable deviation, inclusive, as specified in the limits file.
Softpot
Current radio parameter softpot value.
Table 5-17. Sub Audio Deviation Test Results.
13
AutoTune™ for VX-P820/P920
Rev. C
6. Basic Troubleshooting
6.1.
Firmware
The radio firmware must be version 1.29 or later to be tested or aligned by the
AutoTune software.
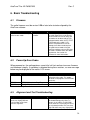
Symptom
AutoTune software fails to put
radio into test mode.
Possible Cause
Incompatible radio
firmware.
Solution
Before beginning a test or alignment,
the radio under test must be placed
into test mode. Successful entry into
test mode can be observed on LCDequipped models when “AUTO TEST”
is displayed on the radio’s LCD
screen. If repeated unsuccessful
attempts have been made to place
the radio into test mode using the
AutoTune software, please verify that
the radio’s firmware meets the above
requirement. See section 3.1
Firmware for more information.
Table 6-1. Firmware.
6.2.
Power-Up Error Codes
When powered on, the radio performs some initial self test routines to ensure firmware
and hardware integrity. If a problem is detected during these routines, an error message
below may be displayed to the radio’s LCD screen.
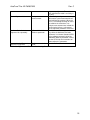
Message
ERROR 1
Description
EEPROM Checksum Non-Fatal Error
ERROR 2
EEPROM Checksum Fatal Error
ERROR 3
FLASH ROM Checksum Fatal Error
Table 6-2. Power-Up Error Codes.
6.3.
Corrective Action
Use AutoTune™ or CE 76 to
realign/retest the radio. This action
calculates and programs the EEPROM
checksum.
Send radio to depot
Send radio to depot
Alignment and Test Troubleshooting
Symptom
RX Tune Low, High Old
results are slightly different
than the New results from
previous alignment.
Possible Cause
None.
Solution
This seeming error is caused by storing
calculated floating-point values as
integers in the radio’s FLASH ROM.
Since some loss of precision will occur,
the calculated previous RX Tune Low,
High Old values may vary slightly from
14
AutoTune™ for VX-P820/P920
Test or Alignment failure
Analyzer
measurement.
Maximum Deviation test or
alignment fails repeatedly
Mistuned Modulation
Balance parameter
Radio left in AutoTest mode
Radio communication
after test or alignment.
error.
Table 6-3. Alignment and Test Troubleshooting Chart.
Rev. C
alignment to alignment. This variance
does not affect the radio’s sensitivity in
any way.
Occasionally, an alignment or test may
fail because a poor measurement was
received from the analyzer. When this
occurs, first attempt to realign or retest
the radio for the failed item. If an
analyzer measurement was indeed the
reason for the failure, a subsequent
test or alignment should be successful.
The Modulation Balance parameter
may affect the Maximum Deviation
parameter. Use Vertex Standard CE76
tuning software to properly align the
Modulation Balance parameter. Please
see the CE76 Help for instructions on
how to adjust this parameter.
Turn the radio off, then back on.
15
AutoTune™ for VX-P820/P920
Rev. C
7. Support Information
7.1.
Technical Support
Telephone: 480.441.0664
Fax: 480.441.4535
Email: [email protected]
7.2.
Sales Support
Telephone: 903-381-4131
Fax: 903-295-1479
Mobile: 847-878-2274
Email: [email protected]
16
AutoTune™ for VX-P820/P920
Rev. C
8. References
VX-P920 Series UHF Band Service Manual. Part# EC033U95A. Cypress,
CA: Vertex Standard CO., LTD., 2005.
VX-P920 Series VHF Band Service Manual. Part# EC033N95A. Cypress,
CA: Vertex Standard CO., LTD., 2005.
17
AutoTune™ for VX-P820/P920
APPENDIX A.
Rev. C
Test Set
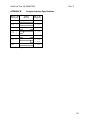
The figure below depicts the test set schematic necessary to perform several manual
VX-P820/P920 receiver alignments and tests. This schematic is provided courtesy of
Vertex Standard USA, Inc.
Figure A-1. Test Set Schematic
Source: EC033U95A, VX-P920 Series UHF Band Service Manual, ©2005, Vertex Standard CO., LTD.
A-1
AutoTune™ for VX-P820/P920
APPENDIX B.
DB-25 (M)
Analyzer
Rev. C
Analyzer Interface Specifications
Cable
Wiring
DB-9 (F)
Computer
TxD
2
2
RxD
RxD
3
3
TxD
RTS
4
7
RTS
CTS
DSR
5
6
4
DTR
DCD
8
1
DCD
20
8
6
CTS
DSR
7
5
GND
DTR
GND
Table B-1. Analyzer to PC Serial Cable
B-1
AutoTune™ for VX-P820/P920
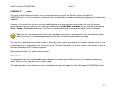
APPENDIX C.
Rev. B
Limits
The limits used to determine whether a test or alignment passes or fails are stored in Vertex Standard.VXP820/P920.Limits.ini. This file contains the default limits as defined by the radio manufacturer and generally should not be
modified.
However, in the event that the limits must be modified because of extenuating circumstances, the limits file may be
accessed from the main screen by first selecting a radio from the Radio Make and Model list box and then selecting the
Tools > Radio > Test Limits menu item. The limits file can be edited with a standard text editor, such as Notepad.
Modify the test and alignment limits with care. Improper use of the test and alignment limits can adversely affect
radio test results. It is recommended to back up the limits file before modifications are made.
The limits file is partitioned into various sections. Generally, each section corresponds to a specific alignment or test, or to
a specific point in an alignment or test. For instance, the TX Power High point is in its own section, even though it’s part of
the more comprehensive TX Power alignment.
When editing the limits file, make sure the format:
Name=limit
is followed precisely, with no embedded spaces between the equals sign and the test limit. Any improper editing may
cause AutoTune™ to incorrectly test or align a radio.
The following tables list the default test limits and alignment targets by model for Vertex Standard VX-P820/P920 radios.
C-1
AutoTune™ for VX-P820/P920
Rev. B
Section
Name
5.1
Frequency
+/- 300 Hz
5.2
RX Tune
-103 dBm
5.3
SQL Sensitivity
5.4
5.5
5.6
TX Power
Maximum Deviation
Sub Audio Deviation
Point
VHF
UHF A (G6)
UHF H (G8)
TI NSQ Wide
Min: -113 dBm; Max: -119 dBm
TH NSQ W
Min: -119 dBm; Max: -125 dBm
RSSI SQL W
Min: -111 dBm; Max: -117 dBm
TX SAVE W
Min: -95 dBm; Max: -101 dBm
TI NSQ N
Min: -113 dBm; Max: -119 dBm
TH NSQ N
Min: -121 dBm; Max: -124 dBm
RSSI SQL N
Min: -114 dBm; Max: -117 dBm
TX SAVE N
Min: -95 dBm; Max: -101 dBm
High
Min: 4.5 W; Max: 5.5 W
Low-High
Min: 2.1 W; Max: 2.9 W
Low-Mid
Min: 0.7 W; Max: 1.4 W
E-Low
Min: 0.1 W; Max: 0.4 W
Wide
Min: 3.7 kHz; Max: 4.7 kHz
Narrow
Min: 1.7 kHz; Max: 2.5 kHz
Digital
Min: 3.0 kHz; Max: 3.9 kHz
CTCSS Wide
Min: 0.5 kHz; Max: 0.8 kHz
CTCSS Narrow
Min: 0.2 kHz; Max: 0.55 kHz
DCS Wide
Min: 0.5 kHz; Max: 0.8 kHz
DCS Narrow
Min: 0.2 kHz; Max: 0.55 kHz
UHF D (G7)
Table C-1. Default Vertex Standard VX-P820 Test Limits
C-2
AutoTune™ for VX-P820/P920
Section
Name
5.1
Frequency
5.2
RX Tune
5.3
SQL Sensitivity
5.4
5.5
5.6
TX Power
Maximum Deviation
Sub Audio Deviation
Rev. B
Point
VHF
UHF A (G6)
UHF H (G8)
UHF D (G7)
0 Hz
-103 dBm
TI NSQ Wide
-116 dBm
TH NSQ W
-122 dBm
RSSI SQL W
-114 dBm
TX SAVE W
-98 dBm
TI NSQ N
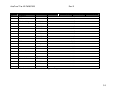
-116 dBm
TH NSQ N
-121 dBm
RSSI SQL N
-114 dBm
TX SAVE N
-98 dBm
High
5.0 W
Low-High
2.5 W
Low-Mid
1.0 W
E-Low
0.25 W
Wide
4.2 kHz
Narrow
2.1 kHz
Digital
3.4 kHz
CTCSS Wide
0.6 kHz
CTCSS Narrow
0.3 kHz
DCS Wide
0.6 kHz
DCS Narrow
0.3 kHz
Table C-2. Default Vertex Standard VX-P820 Alignment Targets
C-3
AutoTune™ for VX-P820/P920
Section
Name
5.1
Frequency
5.2
RX Tune
5.3
SQL Sensitivity
5.4
5.5
5.6
TX Power
Maximum Deviation
Sub Audio Deviation
Rev. B
Point
VHF
+/- 300 Hz
UHF A (G6)
UHF H (G8)
UHF D (G7)
+/- 500 Hz
-103 dBm
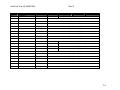
TI NSQ Wide
Min: -110 dBm; Max: -116 dBm
TH NSQ W
Min: -119 dBm; Max: -125 dBm
RSSI SQL W
Min: -110 dBm; Max: -116 dBm
TX SAVE W
Min: -95 dBm; Max: -101 dBm
TI NSQ N
Min: -111 dBm; Max: -117 dBm
TH NSQ N
Min: -119 dBm; Max: -125 dBm
RSSI SQL N
Min: -111 dBm; Max: -117 dBm
TX SAVE N
Min: -95 dBm; Max: -101 dBm
High
4.3 W – 5.7 W
Min: 4.4 W; Max: 5.8 W
Low-High
2.1 W – 2.9 W
Min: 2.1 W; Max: 2.9 W
Low-Mid
0.7 W – 1.4 W
Min: 0.7 W; Max: 1.4 W
E-Low
0.1 W – 0.4 W
Min: 0.2 W; Max: 0.6 W
Wide
Min: 3.7 kHz; Max: 4.7 kHz
Narrow
Min: 1.7 kHz; Max: 2.5 kHz
Digital
Min: 3.0 kHz; Max: 3.9 kHz
CTCSS Wide
Min: 0.5 kHz; Max: 0.8 kHz
CTCSS Narrow
Min: 0.2 kHz; Max: 0.55 kHz
DCS Wide
Min: 0.5 kHz; Max: 0.8 kHz
DCS Narrow
Min: 0.2 kHz; Max: 0.55 kHz
Table C-3. Default Vertex Standard VX-P920 Test Limits.
C-4
AutoTune™ for VX-P820/P920
Section
Name
5.1
Frequency
5.2
RX Tune
5.3
SQL Sensitivity
5.4
5.5
5.6
TX Power
Maximum Deviation
Sub Audio Deviation
Rev. B
Point
VHF
UHF A (G6)
UHF H (G8)
UHF D (G7)
0 Hz
-103 dBm
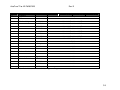
TI NSQ Wide
Min: -110 dBm; Max: -116 dBm
TH NSQ W
Min: -119 dBm; Max: -125 dBm
RSSI SQL W
Min: -110 dBm; Max: -116 dBm
TX SAVE W
Min: -95 dBm; Max: -101 dBm
TI NSQ N
Min: -111 dBm; Max: -117 dBm
TH NSQ N
Min: -119 dBm; Max: -125 dBm
RSSI SQL N
Min: -111 dBm; Max: -117 dBm
TX SAVE N
Min: -95 dBm; Max: -101 dBm
High
5.0 W
Low-High
2.5 W
Low-Mid
1.0 W
E-Low
0.25 W
Wide
4.2 kHz
Narrow
2.1 kHz
Digital
3.4 kHz
CTCSS Wide
0.6 kHz
CTCSS Narrow
0.3 kHz
DCS Wide
0.6 kHz
DCS Narrow
0.3 kHz
Table C-4. Default Vertex Standard VX-P920 Alignment Targets.
C-5
AutoTune™ for VX-P820/P920
APPENDIX D.
Rev. B
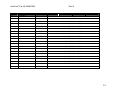
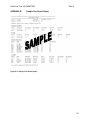
Sample Test Result Report
Figure D-1. Sample Test Result Report
D-1