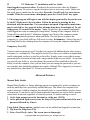
1
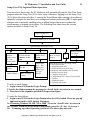
Setting Limits, Not Controls Installation and User Guide Model PCM-1 www.pcmoderator.com © Copyright 2006 Woog Laboratories, Inc. All rights reserved, Patents Pending 2 PCMode r at or™ I ns t a l l at i onandUs e rGui de Contraindications Some mental health professionals believe that for certain individuals, excessive computer use that causes problems in academic, occupational or social functioning may be symptomatic of more serious mental health problems such as Obsessive Compulsive Disorder (OCD), anxiety or depression (Woog, 2004). If you suspect a more serious mental health issue or your child exhibits violence, drug and/or alcohol abuse, self-injurious behavior or threats of suicide, CONTACT A MENTAL HEALTH PROFESSIONAL IMMEDIATELY. Limitation of Liability Woog Laboratories, Inc. expressly disclaims all other warranties, including, but not limited to, the implied warranties of merchantability and fitness for a particular purpose and non-infringement of third-party rights with respect to the documentation, software, and hardware. In no event shall Woog Laboratories, Inc. or its suppliers be liable for any damages whatsoever (including, without limitation, personal injury, property damage, damages for loss of business profits, business interruption, loss of business information, or other losses) arising out of the use or inability to use this product or arising from its installation or removal. Limited Product Warranty WoogLa bor a t o r i e s ,I nc .wa r r a nt st h a tt hePCMode r a t or ™s ha l lbef r e ef r omde f e c t si nma t e r i a la nd workmanship for a period of one (1) year from the date of purchase and that the licensed PC Moderator software stored in semiconductor devices will perform in accordance with the accompanying documentation. Batteries and case silk-screen defects due to normal wear are specifically excluded. Woog Laboratories, Inc. does not warrant t ha tt h eha r dwa r e ,doc ume nt a t i ona nds o f t wa r ea r ede f e c t f r e ee xc e pta ss e tf o r t ha bov e .Wo ogLa bor a t or i e s ,I nc . ’ s hardware and software warranty is non-transferable. Wo ogLa bor a t o r i e s ,I nc . ’ se n t i r el i a bi l i t ya ndy oure x c l u s i v e r e me dys ha l lb e ,a tWoogLa bo r a t or i e s ,I nc . ’ sopt i on, e i t he r( a )r e pa i rorr e p l a c e me ntoft hePCMode r a t oro r( b) return of the purchase price provided that the PC Moderator is returned to place of original purchase with a copy of the original sales receipt. Any replacement hardware and/or software will be warranted for the remainder of the original warranty period, or ninety (90) days, whichever is longer. These remedies are only valid within the United States of America and do not cover defects arising under normal use and failures due to misuse, abuse, neglect, alteration, modification, improper installation or repairs from other than Woog Laboratories, Inc. There are no other expressed or implied warranties (including implied warranties of merchantability and fitness for a particular purpose) regarding the hardware, software and documentation, except any implied warranties which cannot be excluded or limited under applicable law. Software Copyright Notice The product described in this manual contains copyrighted Woog Laboratories and third party software stored in semiconductor devices. Woog Laboratories, Inc. reserves the exclusive right to distribute and reproduce this software as protected by laws in the United States and other countries. The aforementioned copyrighted software may only by used on one (1) computer at a time, and may not be used or transferred over a computer network. This software may not be reverse-engineered, decompiled, disassembled or modified in any manner. No part of the software, including all accompanying documentation, manuals, binders, and containers may be copied or reproduced in any form or by any means (including photocopying) without the prior written consent of Woog Laboratories, Inc. The purchase of this product shall not be deemed to grant any license under the copyrights, patents or patent applications of Woog Laboratories or third party suppliers except for the non-exclusive license to use that arises by operation of law in the sale of a product. FCC Compliance and Advisory Statement This device complies with Part 15 of the FCC Rules. Operation is subject to the following two conditions 1) this device may not cause harmful interference, and 2) this device must accept any interference received, including interference that may cause undesired operation. This equipment has been tested and found to comply with the limits for a Class B digital device, pursuant to Part 15 of the FCC Rules. These limits are designed to provide reasonable protection against harmful interference in a residential installation. This equipment generates, uses, and can radiate radio frequency energy and, if not installed or used in accordance with the instructions, may cause harmful interference to radio communications. However, there is no guarantee that interference will not occur in a particular installation. If this equipment does cause harmful interference to radio or television reception, which can be determined by turning the equipment off and on, the user is encouraged to try to correct the interference by one or more of the following measures: 1) orient or relocate the receiving antenna; 2) increase the separation between the equipment and the receiver; 3) connect the equipment to an outlet on a circuit different from that to which the receiver is connected; 4) consult the dealer or an experienced radio/TV technician for help. Any changes of modifications not expressly approved by the party responsible for compliance could void the user's authority to operate the equipment. Where shielded cables have been provided with the product or specified additional components or accessories elsewhere defined to be used with the installation of the product, they must be used in order to ensure compliance with FCC regulations. Copyright ©2006, Woog Laboratories, Inc. All rights reserved PC Moderator ™ I ns t a l l at i ona ndUs e rGui de 3 PCMode r a t or ™ PCM1I ns t a l l a t i ona ndUs e rGui de Tha n ky ouf o rp ur c ha s i ngt hePCMode r a t or ™f r omWoogLa b s ™. Yo uha v ema dea n i mpor t a nti n ve s t me ntt owa r dr e c l a i mi ngy ourc hi l d r e n’ sva l ua b l et i met ha two u l d ot he r wi s ebel o s td uet oe xc e s s i v ec omput e ru s e . I ns t a l l a t i o noft hePCMod e r a t or ™i s easy. Just follow the Quick Installation Guide. The only tool required is a small Phillips screwdriver. Setup is also easy. Power up the computer, type a few keys and the setup runs automatically with no software to install. Simply answer the questions one-by-one. PC Moderator Installation and PC Moderator First Time Setup sections of this manual are provided should you need additional technical guidance through this process. Once the PC Mo de r a t o ri si ns t a l l e da nds e tu p, s ki pa he a dt o“ Be f or eUs i n gt hePCMod e r a t or ”( p g. 1 2) . Features Supports 8 password protected users (in addition to parent and setup users) Independent limit settings for each user (time ranges/amount in 1-minute intervals) Limit settings can be set independently for each day of week Easy setup of a restricted time period during the day for homework, chores or meals Hol i da ys e t t i n gsa l l owr e l a xe dl i mi t sd ur i n gc h i l d’ sva c a t i o norho l i d a y sf r oms c hoo l Daily use can be restricted until parents manually enable user (i.e. homework complete) Bonus time feature allows from 10-90 minutes of time easily added by parent User-disable feature with re-enable date (i.e. for computer grounding) Nighttime display dim helps reduce biological effects of late night computer use Computer Use Report provides daily usage and period average use statistics Parent User allows unlimited use without setup access to reduce risk of tampering Automatically logs out users when computer is turned off or shutdown Internal setup password override jumper if the setup password is forgotten/changed Lithium battery-backed real time clock with Daylight Saving Time option Time remaining graphic and screen flash warnings at 10, 5 and 1 minutes remaining Nos o f t wa r ei ns t a l l a t i o nr e qu i r e d–wor kswi t hany operating system Tamper resistant design using heavy-duty 18-gauge stainless steel enclosure Software hack resistant since it operates completely independent of the computer Easy step-by-step first time setup with on screen tutorial Advanced setup menu allows for advanced controls and reports Compatible with virtually any desktop computer with VGA display and PS/2 keyboard Padlock with hardened steel shackle included Optional DVI Port Upgrade Kit Optional USB Port Upgrade Kit System Requirements: IBM Compatible PC with external VGA monitor and PS/2 Keyboard Copyright © 2006, Woog Laboratories, Inc. All rights reserved PCMode r at or™ I ns t a l l at i onandUs e rGui de 4 Operating Quick Reference Charts Log in sequence for all users Standard Login: Select User by pressing <F1>-<F10> Enter password of selected User (F1-F10) followed by <Enter> Enter <0>-<9> key to select 00-90 minutes of bonus time for this User. Press <Enter>. Daily Enable / Bonus Time Login: Press <F1> - <F8> F1- F9 Operation Enter Setup (F10) password, then press <Enter> Log in as User F1-F8, F9 Press <Scroll Lock> twice in 2 seconds (hot key) OPTION Prompt (dim purple screen) <Scroll Lock> = Remaining Time Graphic Display (F1- F8 only) <Enter> = User Status Report (must be running text editor application) (F1-F8 only) Setup User F10 Operation <Esc> = Log out current user and back To Login Prompt User must be running Text Editor S T Tutorial (without Setup information) (F9 only) Log in as Setup User Press Scroll Lock twice in 2 seconds (hot key) Option Prompt (dim purple screen) V or H = vacation / holiday mode N = nonholiday mode Back to Login Prompt Quick Change Bonus Time Enable Press 1-9, 1=10 minutes, 9=90 min Select user - press F1- F8 Back To Login Prompt Manual Daily Enable. Press F1-F8 <Esc> = Back To Login prompt S Must be running Text Editor T Enable other users (F1F8) or press <Esc> to go to Login Prompt Setup Menu (or First Time Setup if new) 1 - Set clock time/date 2–Se t up/ Ed i t / de l e t eu s e r s 3 - Enable/disable users (until date) 4 - Manually enable/disable users for today 5 - Holiday/vacation on/off 6 - Computer usage report 7 - Change Parent (F9) / Setup (F10) password 8–Tut o r i a l 9–Di a g nos t i cMe n u 0 - Exit setup and log out Copyright ©2006, Woog Laboratories, Inc. All rights reserved PC Moderator ™ I ns t a l l at i ona ndUs e rGui de 5 Table of Contents Table of Contents................................................................................................5 PC Moderator Installation ................................................................................6 PC Moderator First Time Setup .......................................................................9 Setup Suggestions...........................................................................................11 Before Using the PC Moderator .....................................................................12 Talking To Your Children about the PC Moderator.................................12 Battles With Your Children Regarding the PC Moderator......................13 I fYouFor ge torDon’ tKnowt heSe t upPas s wor d....................................14 PC Moderator Operation ................................................................................14 Power Up.........................................................................................................14 Logging In.......................................................................................................15 Display Prompt Summary ............................................................................16 Us e rF1–F8Ope r at i on..............................................................................17 Remaining Time Graphic Display .............................................................17 User Status Report ......................................................................................18 Log Out.........................................................................................................19 Monitor Standby and Screen Saver ..........................................................19 System Standby............................................................................................19 Display Dim..................................................................................................20 Parent (User F9) Operation ..........................................................................20 Setup (User F10) Login and Menu Operation ............................................21 Temporary User (F8).....................................................................................22 Advanced Features.........................................................................................22 Manual Daily Enable ..................................................................................22 Enable/disable users (until date)................................................................23 Bonus time....................................................................................................23 Enable or Disable Holiday/Vacation Mode ..............................................24 Computer Usage Reports............................................................................25 Resetting the PC Moderator as New .........................................................25 Internal Components and Configuration ......................................................25 Setup Override Jumper.................................................................................25 Replacing the Battery ....................................................................................26 Troubleshooting................................................................................................27 References..........................................................................................................28 Trademark Notices...........................................................................................28 Copyright © 2006, Woog Laboratories, Inc. All rights reserved 6 PCMode r at or™ I ns t a l l at i onandUs e rGui de PC Moderator Installation The PC Moderator plugs into (and is mechanically mounted to) the VGA port of your computer. The video display cable then connects to the connector on the VGA cable exiting the rear of the PC Moderator. This is how the PC Moderator intercepts the video s i g na l s .ThePCMo de r a t ori nt e r c e pt st heke y boa r ds i g na l sbyc a bl i n gt ot hePC’ sPS/ 2 keyboard port and to the keyboard itself. The PC Moderator receives its power via the c a b l ec on ne c t e dt ot hec omput e r ’ sPS/ 2ke y boa r dpor t . I ft h i sc a bl ei sd i s c on ne c t e d, t hePC Moderator and the VGA display are turned off. An internal lithium battery provides backup power for the built-in real time clock when the computer us powered off or the PC Moderator is unplugged or removed. PS/2 Keyboard Port or USB with USB Adapter Kit VGA–PCM1-VGAmode l DVI PCM-1 DVI model with DVI to VGA adapter plug PS/2 Keyboard VGA Display The cover of the PC moderator is open only for installation and to change the battery. A jumper inside can also be removed temporarily in the event that the setup password was forgotten or otherwise unknown. Only when the cover is removed are the screws that attach the PC Moderator to the VGA port of the computer accessible. To install follow the steps below: 1. Turn off your personal computer and unplug the computer from the AC outlet. (This is important as many PCs supply live power to the keyboard port even when “ t ur ne dof f ” . 2. Find the cable connecting the c omput e r ’ sVGApor tt ot hevi de omoni t or / di s pl a y. Remove the cable from the computer port by unscrewing the set screws, either by hand or with an appropriate screwdriver. Note: The PC Moderator only operates with monitors that provide a VGA connection. If your computer or video display adapter provides one or more DVI (Digital Visual Interface) ports, you will need the DVI Upgrade Kit (included with the PC Moderator DVI model) to ensure compatibility and security. The upgrade kit includes a DVI to VGA Shield allowing the PC Moderator to connect to and securely lock to a DVI to VGA adapter plug. The DVI Cover Lock locks access to DVI ports on the computer or video adapter to prevent users from using alternative port connections. Refer to www.pcmoderator.com for product and compatibility information. Copyright ©2006, Woog Laboratories, Inc. All rights reserved PC Moderator ™ I ns t a l l at i ona ndUs e rGui de 7 VGA Cable to Monitor 3. Re movet hec o ve rt ot hePCMode r at or ™ bys l i di ngt hec o ve rbac kt o war dt he cables until it is off the base panel. You do not need to remove the cover completely away from the unit. The cables will hold it in place. 4. I de nt i f yt hec or r e c tor i e nt at i o nandpl ugt hePCMode r at o r ™i nt ot hec omput e r ’ s VGA port as shown in the photo below. Note that the case of the PC Moderator is heavy and must be held in place in order to secure the screws in the next step. Tip: The PC Moderator should plug in correctly. If not, try again with the PC Moderator turned upside down. If it still does not plug-in, check to make sure you are plugging it into the VGA video connector and make sure that the connector is a 15pi nt y pea ndt h a tpi n9oft hePC’ sVGAc onn e c t ori sno tp l ugg e d( c e r t a i no l de r PCs). 5. Whi l eho l di ngt heope ne dPCMode r at or ™i npl ac e , t i g ht e nt het womount i ng screws with a small Phillips screwdriver. Tip: Depending on the orientation of the PC Moderator it may be more convenient to place the PC on its side or front in order to tighten the set screws. Do not over tighten. Copyright © 2006, Woog Laboratories, Inc. All rights reserved 8 PCMode r at or™ I ns t a l l at i onandUs e rGui de 6. Sl i det hec ove roft hePCMode r at o r ™ ba c kont hebas easf arasi twi l lgo. The hole on the cover should line up perfectly with the hole on the base. If the cover does not slide on easily, make sure the internal wires do not interfere with the case cover. If the cover has been removed completely, the cables will need to be fed through the slit in the bottom of the cover. 7. At t ac ht hemoni t or ’ sc abl et ot heVGAc abl eoft hePCMode r at o r . Ti ght e nt heset screws finger-tight. 8. Unplug the PS/2 style keyboard connector from the keyboard socket on the back of the computer and plug the keyboard into the short keyboard cable of the PC Mode r at or ™. 9. Pl ugt hel o ngke yboa r dc abl ef r om t hePCMode r at or ™i nt ot hePS/ 2ke yboa r d socket on the computer (where the keyboard cable was unplugged). 10. Guide the shackle of the padlock through the hole at the center of the back of the PC Moderator cover and base. Lock the padlock Tip: You may replace the supplied padlock if desired to any style including combination t y pe s , h owe v e r , t hes h a c k l emus tn otbegr e a t e rt ha n7/ 3 2”d i a me t e r . Whe nu s i ngake y e d Copyright ©2006, Woog Laboratories, Inc. All rights reserved PC Moderator ™ I ns t a l l at i ona ndUs e rGui de 9 lock, keep the keys in a safe place where users do not have access. This preferably should not be kept in the home unless you are absolutely sure that users cannot access the keys. Re me mbe rt ha tt e e n a g e r sa r eb ot hi ma gi na t i vea n dpe r s i s t e nts odo n’ tj u s thi det he mi na pl a c ewhe r ey out hi nkt ha tt h e ywon’ tf i n di t . Do not use luggage locks or very small padlocks as these can be easily pried open. 11. Makes ur et hec omput e ri supr i ghtandc onne c tt hec omput e r ’ spo we rc abl et o AC power. PC Moderator First Time Setup Onc et hePCMo de r a t o r ™ ha sbe e ni n s t a l l e do nt hePC, i tmus tbec o nf i g ur e d. I ft h i sha s already been done or was configured for you by Woog Labs or your retailer, you may skip this section. 1. Power up the computer. The computer should display a tinted screen and then blue and red screens before the display appears normal. If blinking color bars are displayed followed by a blinking red or purple bar at the top of the screen, the PC Moderator has previously been setup. If this has already been done or was configured by Woog Labs or your retailer, you may skip this section and proceed to the section Before Using the PC Moderator. If the PC Moderator has not been previously setup or you are not aware of the Setup password, refer to the section If You Forget the Setup Password (page 14). If nothing appears on the display aware of the Setup password, then it must be reset before proceeding. Refer to the section or if the computer fails to power up, refer to the troubleshooting section of this manual. 2. Wait for the operating system to load completely. You may need to enter a password. Close all applications that might pop up automatically such as AIM (AOL Instant Messenger) or virus scanners. You may need to right click on icons in the system tray to disable these various applications. This is important as the PC Moderator setup works by sending keystrokes to the computer as though you are typing to the text editor application. If the keys are sent to another application, quite undesirable results may occur! If this does happen, press <Scroll Lock> to abort the setup process. Tip: If the computer is password protected so you cannot run any applications, remove the PC Moderator and install it on another computer. Then follow the configuration steps listed below. Once configured, remove a n di ns t a l lont h eor i gi na lc omput e r . I ft hi si so neofy ourc hi l d r e n’ s computers, suggest that they provide you with password access or you may not be able to change many of the settings. Regardless, you will be able to set the most common settings such as manually daily enable, enable/disable holiday/vacation mode and add bonus time without being able to log into or use their computer. Copyright © 2006, Woog Laboratories, Inc. All rights reserved 10 PCMode r at or™ I ns t a l l at i onandUs e rGui de 3a. Windows 98, NT, ME, XP or 2000 users. Press and release the <Scroll Lock> key two times (this is the hot key). The screen should turn a dim purple. If nothing happens, try it again at a slower or faster rate. Once the screen is purple, press and r e l e as et he“ S”ke y. ThePCMode r at orwi l lr unWinpad, make it full screen, and enable word wrap. Then after a delay the setup program will start automatically. Be patient, it may take up to 30 seconds. Go to step 5. 3b. All other Operating Systems or if 3a. does not work. Run a text editor application. Examples are Wordpad (preferred for Windows platforms) and Notepad ( Wi ndo ws )or“Te xtEdi t o r ”( Linux). Most text editors should work fine although many wor dpr oc e s s or sma ynot . Ma kes ur et het e x te di t o rha s“ wor dwr a p”e n a b l e da nd maximized on the screen (full screen) otherwise the character formatting will be wrong and reading some of the text might be difficult. The Winpad and Notepad applications are found under the Accessories folder. To run Wordpad, click on the t heWi nd ows“ St a r t ” bu t t o n, t he nc l i c k“ Pr ogr a ms ”or“ Al lPr o gr a ms ” , t he n“ Ac c e s s or i e s ” , t he n“ Wor dpa d”( or i fn ota va i l a b l e , “ Not e pa d” ) . Tip: In order to enable word wrap, refer to the following instructions: Winpad –Pr e s s<Alt>-V (View), then O ( Opt i o n s )a n dc he c k“ Wr a pt oWi ndow” . Notepad –<Alt>-E (Edit), check to see if there is a check by Word wrap. If not, click on it and word wrap will be enabled. For Notepad under Windows 95, word wrap may need to be set each time you run notepad. 4. While in the text editor, press and release the <Scroll Lock> key two times (within 2 seconds). The screen should turn a dim purple. Press and release the <T> key. The text editor should reappear and the setup program will begin. 5. Follow the on-screen instructions to set the clock, passwords and user settings. Be c a u s et h ePCMo de r a t ordoe sno tu s et hec omput e r ’ sop e r a t i n gs y s t e mora pp l i c a t i onst o operate, it uses a simple menu system for setup. It literally disconnects the keyboard from the computer and displays items on the screen by emulating typing on the keyboard. It then looks for what you type at the various prompts. Wait for the menus or questions to be displayed and answer the questions when asked. You may press <Esc> at any time to go back to the previous question/prompt or <F10> to exit the step-by-step setup altogether. Default values will be displayed for many of the settings as they are prompted. Press <Enter> to simply accept the current displayed value or enter the new value followed by the <Enter> key. For convenience, pressing any other key will usually cause the current value to be completely erased. To speed input, values that can be either single or multiple digits can be entered as only a single digit (i.e. date values). Some prompts will only a c c e ptas i ng l edi g i ti n p uts uc ha s“ A”f orAM or“ Y”f orYe s . Pr e s s i ng<Sc r ol lLoc k> during setup will abort the setup immediately leaving the user in the text editor application. Copyright ©2006, Woog Laboratories, Inc. All rights reserved PC Moderator ™ I ns t a l l at i ona ndUs e rGui de 11 The PC Moderator displays the setup screen by generating keystrokes to the text editor application. If you enable the setup operation while another application is enabled (as the foreground application), the keystrokes will be fed to that application or to the Windows Operating system with unpredictable results. This is why pop up screens or applications such as AIM should not be enabled while setting up the PC Moderator. Note that the mouse cannot be used to operate the setup program.. Press the <Scroll Lock> key at any time to abort the setup process. Setup Suggestions During first time setup, passwords must be created for Setup, Parent User and the F1F8 users. These passwords should not be obvious. The Setup password is most critical to remember as Setup provides access of all User passwords. Memorize it and keep a written copy away from the home. Note that if you forget the Setup Password, you will need to remove the Setup jumper inside the PC Moderator and then run the setup pr o gr a ma sde s c r i be di nt h es e c t i o nt ha tf o l l ows“ I fYouFo r ge tt h eSe t upPa s s wor d” . Choose passwords for your children that they will be able to remember but not obvious (i.e. their name) unless there will be only one child using the computer. Choosing the time limits for computer use should be done with care. In general, drastically reducing the available computer time abruptly will result in distress for both you and your child (regardless of what you think is fair and even what they verbally agree to). Depending on how defiant your child is they may resort to unpleasant manipulation or device tampering in an attempt to get their way. Remember that installing the PC Moderator gives you a great deal of power and control over what may bey ourc hi l d’ smos tc he r i s he dp a s tt i me . Don’ tbet e mpt e dt os i mpl ys e ty ourwi l l i mme di a t e l yory ouwi l lf i ndt hep owe rs t r ug g l es h i f t i ngt oot he ra r e a soft h ec h i l d’ s life. We recommend that you initially establish a time amount that will cover virtually un l i mi t e du s a ge( i . e . 1 0h ou r s / d a y )butwi t ht i mer a ngel i mi t ss uc ht ha tt he yc a n’ tus ei t after a certain time in the evening (i.e. 9:30pm bedtime). You can also create a restricted time range, say between 5 and 6pm for homework, dinner or chores. Let the PC Moderator monitor use over several weeks. Then you can generate a usage report for that user over that period to see how much the computer was actually used each day and on average. (see Setup Menu). If you then feel the computer is being used too much, each week manually change the amount of time available for use each day by lowering the amount of time by 10 minutes. Do this for weekday, weekend settings and/or day of week settings until you reach your target levels. This gives you and your child time to adjust to the change. Keep an open mind and compromise with your child. You can even reward better school grades by increasing the time allowed. Keep in mind that by taking unlimited access to the computer away they will need to fill recovered time with other activities. Copyright © 2006, Woog Laboratories, Inc. All rights reserved 12 PCMode r at or™ I ns t a l l at i onandUs e rGui de He l pt he mf i n dc o n s t r u c t i vea n dr e wa r di ngu s eoft h e i rt i me–pe r h a pse ve nt i mes pe n t with you. Otherwise you may find them simply filling their available time playing video games or watching TV. For more information, tips and support visit our web site at www.pcmoderator.com. 6. View the on-screen tutorial. The on-screen tutorial walks you through the operation and features of the PC Moderator. It is highly recommended that first time users view this program that runs automatically after the first time setup program. 7. Exit setup by pressing <0> and <Enter> at the Setup Menu. If you want to keep a hard copy of the settings you may print out the text at any time during setup (using the mouse only). Before Using the PC Moderator Some mental health professionals believe that for certain individuals, excessive computer use that causes problems in academic, occupational or social functioning may be symptomatic of more serious mental health problems such as Obsessive Compulsive Disorder (OCD), anxiety or depression (Woog, 2004). If you suspect a more serious mental health issue or your child exhibits violence, drug and/or alcohol abuse, selfinjurious behavior or threats of suicide, CONTACT A MENTAL HEALTH PROFESSIONAL IMMEDIATELY. Talking To Your Children about the PC Moderator Before your children use the computer with the PC Moderator, explain to them the purpose and the conditions for which they are allowed the privilege of using the computer. Even if your child has their own computer that was given to or purchased by them, using it your home is still a privilege. Remember that you are paying for the electricity, Internet connection and a place to use the computer. Explain to them that the purpose of the PC Moderator is to allow parents to monitor and set reasonable limits on computer use. Explain that it cannot be easily removed even if they open up the computer since it is locked onto the VGA port. Explain that the key for the lock will not be kept in the home so they should not waste time looking for it. Also let them know that attempting to detach the PC Moderator without properly removing the lock and cover might seriously damage the computer or cause them personal injury (i.e. they attempt to cut the case or lock shackle). Note: While the PC Moderator is constructed of 18 gauge stainless steel and the padlock of hardened steel, nothing is 100% impenetrable. That is why you will need to explain to your children before they use the computer that if they tamper, destroy or otherwise remove the PC Moderator, they will lose access to the computer for 3 weeks or longer Copyright ©2006, Woog Laboratories, Inc. All rights reserved PC Moderator ™ I ns t a l l at i ona ndUs e rGui de 13 and if they persist, the computer may be removed from the home indefinitely. We suggest that you also inform them in advance that if they damage or destroy the PC Moderator or computer they will be required to pay for or work to pay the cost of repair or replacement. You will need to tell each child they have a unique identification number (F1-F8) and give them the password you have assigned them. We suggest you write this information down on a piece of paper and give it to them. Tell them to destroy the paper once they have it memorized. If you have more than one child using the computer be sure to choose passwords that are not obvious (i.e. their name) or the same for all users (i.e. password). If they want to change the password or if both you and they forget the password, you can recall or change their password from the Setup Menu. If you have only one child using the c omput e r , y ouc a ns i mpl ypr e s s<Ent e r >whe npr ompt e df ort h eu s e r ’ spa s s wor di nt he Se t uppr ogr a m.The nt he ywon’ tha vet or e me mbe rapa s s wor dore n t e ron ea f t e rt heLo g i n prompt. They can simply press <Enter> at the Password screen. Battles With Your Children Regarding the PC Moderator It is likely, especially if you have teenagers, that your children will not be happy about the setting of limits on their computer use. There is little you can say to convince them that this product is helpful to them except for research suggesting negative biological effects due to nighttime computer use. Getting into an argument about the PC Moderator will not be useful. Tell them that you have decided to set limits and will continue to do so until you decide otherwise. It is important to be empathic and understanding of their frustration while continuing to stand firm on your decision. Temper tantrums, yelling matches and other forms of adolescent manipulation may result. Usually these will settle down quickly followed by days of griping or attempts to coerce you into removing it. They might explain that it conflicts with their programs especially those that use the <Scroll Lock> key. Very f e wpr o gr a mus et h i sk e ya ndma ny( e s pe c i a l l yga me s )a l l owt he“ r e ma ppi n g”( c ha n gi ng the keys used for certain functions) of conflicting keys. If you are not sure about conflicts or the compatibility problems reported by your child, please go to our technical support section of our web site www.pcmoderator.com. Once things have settled down, it is likely your child will be coming to you for some additional bonus time. If you choose to offer bonus time, we suggest you do so only after they have shown you their completed homework and/or chores. Explaining this to your children from the very beginning is strongly recommended. Remember that bonus time overrides the time ranges thus it may allow your child to stay on the computer later than you expect. Copyright © 2006, Woog Laboratories, Inc. All rights reserved 14 PCMode r at or™ I ns t a l l at i onandUs e rGui de I fYouFo r ge torDon’ tKno wt heSe t upPas s wor d I fy oudo n’ tk nowt h eSe t u ppa s s wor df ora nyr e a s o n( s u c ha sy ouf o r g oti tort hePC Moderator has been previously configured by someone else) you will not be able to run setup or edit the configuration settings. Removing the internal Setup Override jumper will allow you to run Setup to either change the Setup password or reset the PC Moderator as new allowing for First Time Setup to run. To do this: 1. Turn off the computer, remove the PC Moderator lock and case cover. 2. Remove the blue Setup jumper from inside the PC Moderator. 3. Replace the cover and power up the computer. 4.Fo l l owt hepr oc e du r ea sl i s t e di nt hes e c t i o ne n t i t l e d“ PCMode r a t orFi r s tTi meSe t up ” (page 9) to enter the Setup Menu. 5a . Ch a n get heSe t upPa s s wor d. Fr omt heMa i nSe t u pMe nu, s e l e c t“ 7-Cha ng ePa r e nt ( F9)/Se t u p( F1 0)pa s s wo r d” , t h e n“ 2-Cha n geSe t u p( F1 0)Pa s s wor d”a n df ol l owt he prompts to change the Setup password. Proceed to Step 6. or if first time setup 5b. Reset the PC Moderator as n e w. Fr omt heMa i nSe t upMe n u, s e l e c t“ 9. Di a gn o s t i c Me n u” , t he n“ 9. Re s e ta l l ” . En t e r“ Y”t oc on f i r m.ThePCMo de r a t o rwi l lh a vea l lt he defaults reset and all users and user data cleared. Proceed with Steps 6, 7 and then follow t hei ns t r uc t i on so np a g e9f or“ PCMode r a t o rFi r s tTi meSe t up” . 6. Shutdown the computer, remove the PC Moderator cover and replace the blue jumper. 7. Install the case cover and again lock the PC Moderator using the padlock. PC Moderator Operation Power Up When the computer is powered with the PC Moderator installed and users configured, the display shows the power on test pattern for about 40 seconds. This pattern will include a bright then dimmed image of the display, full blue and red screens followed by a flashing blue screen (red indicates possible hacking attempt) pattern that gets smaller over time. The keyboard is not disabled during this time. When the 40-second timeout elapses, the screen will show the Login prompt. The Login prompt is presented by alternating blue and red (normal mode) or purple (vacation mode) full screen patterns. At any time during the 40 second timeout the user may press <Scroll Lock> twice (within 1 second) and the login prompt will be immediately displayed. It is recommended that the user does not type on the keyboard until sure that the keyboard has been properly initialized and the operating system is loading. Your child will probably want to wait before logging in otherwise they waste their allowed time waiting for the operating system to load. Typing on the keyboard immediately after powering the computer may create a start up error that could prevent the computer from powering up properly. Copyright ©2006, Woog Laboratories, Inc. All rights reserved PC Moderator ™ I ns t a l l at i ona ndUs e rGui de 15 Logging In Onc et heLo g i nPr ompti sd i s pl a y e d, t heus e rma y“ l ogi n” . Onc el o g ge di n( a nda s s umi ng time is available for that user), the PC Moderator will enable the display and keyboard. Thi spr oc e s sr e q u i r e st wos t e p s1)e n t e r i n gt heus e r ’ sn umbe r( F1F10 )a n d2)e n t e r i n gt he password. The user can be a Parent user (F9), Setup user (F10) or users F1-F8. The passwords for each user were set during first time setup or by using the Setup Menu. To log in from the Login Prompt: 1. Se l e c taus e rnumbe rbypr e s s i ngaf unc t i o nke yF1–F8( us e r s ) , F9( Par e nt )orF1 0 (Setup). After you select a valid user number (F1-F10) that has been setup, a steady solid purple bar will be displayed at the top of the screen. If you select the wrong user press <Esc> until the Login Prompt appears and repeat this step. If the user has been disabled then the screen will flash red after the user presses the function key. 2. Enter your password followed by <Enter>. As the password is entered, the display will extend downward with small blue and red bars appearing for each character pressed. Press the <Enter> key after the password has been entered. If you make a mistake while typing a password you can backspace or just press <Esc> to clear your entry. Pressing <Esc> twice will return you to the Login Prompt. Note: Entering the Setup password for users F1-F8 will enable them (Manual Daily Enable) for that day. Also entering <+> from 1 to 9 times, followed by <Enter> before entering the Setup password will add from 10-90 minutes of bonus time to that user. If the password is entered correctly (and for F1-F8 users, they are currently allowed use), the display and keyboard are immediately enabled. If no time available is available now for the user, the screen will flash a red pattern three times. If the password is entered incorrectly, the display will flash a solid red and then the steady solid purple bar will again be displayed at the top of the screen to prompt the user to reenter the password. If the password is entered incorrectly three times, the PC Moderator displays a red screen, clears the user number, waits 10 seconds and goes back to the Login prompt. If the password is entered incorrectly 9 times, the PC Moderator displays a red screen, waits one minute and makes a record of possible tampering. This information is displayed as a red flashing pattern instead of blue during all power up sequences until a Setup or Parent user logs in. This warns the parent of possible tampering or power cycling of the computer or the PC Moderator without logging in. Copyright © 2006, Woog Laboratories, Inc. All rights reserved 16 PCMode r at or™ I ns t a l l at i onandUs e rGui de Display Prompt Summary State Powerup waiting Display Blinking blue or red (1) pattern getting smaller from top of screen What to do next Wait for Login Prompt (40 seconds). If you are 100% confident the keyboard has been enabled, you can go directly to Login prompt by pressing <Scroll Lock> 2 times Login Prompt User Entry Alternating red (purple for vacation Mode) and blue screens Press F1-F8 for users 1-8, F9 for parent or F10 for setup. If does not go to Password Screen, then not valid user (not set up) or user not enabled User Disabled Flashing red screen after pressing F1-F8 User is disabled, wait until enabled by parent or automatically on specified date Password Entry Purple bar at top of red screen. As keys entered, blue/red bars appear down the screen Enter password followed by <Enter> (10 digits maximum). Parent may add bonus time and log in for user 1-8 by entering <1>(10 min.) - <9> (90min), then <Enter> followed by Setup password and then <Enter> Wrong password Screen flashes red then Enter correct password followed by <Enter> entered or user back to Password Entry or wait for parent to log in or enable user for not yet enabled that day (Manual Daily Enable set) Wrong password Full red screen 3 times Wait approximately 10 seconds before return to Login prompt Wrong password Full red screen 9 times Wait approximately 1 minute before return to Login prompt No time available Flashing full red now for user screen 3 times Wait until you have time available before attempting to log in. Option Prompt Enter appropriate key depending on option or setting and user type Dim purple screen Not e1–r e di n di c a t e sa tl e a s t9un s uc c e s s f u lp a s s wor da t t e mpt ss i nc el a s tPa r e ntorSe t u p login. This is provided to provide evidence of hacking attempts. This resets to blue pattern when either Parent or Setup User logs in. Copyright ©2006, Woog Laboratories, Inc. All rights reserved PC Moderator ™ I ns t a l l at i ona ndUs e rGui de 17 Us e rF1–F8Ope r at i on While a user is logged-in, the duration of time used for that day and the current time is continually being monitored against the limit and range settings for the user for that day of the week. In order to provide warning that time is running out, the display will flash in various ways. At 10 minutes remaining, the display will flash once and at 5 minutes twice to alert the user of the upcoming time limit. With only 1 minute remaining, the display will flash once per second. After the minute has elapsed, the keyboard will be shut off except for the <Esc> and <Scroll Lock> keys and the display will continue to flash for another minute. The <Esc> key allows full screen applications to be closed. The <Scroll Lock> key allows the user to log out immediately. It is during this time that the computer should be shut down (using the mouse and if required the <Esc> key) if the computer is not going to be used by another user. After the minute has elapsed, the display will turn off, the keyboard will be disabled and the display will return to the Login Prompt as described in the previous section. While the user is logged in, they may access the PC Moderator to 1) find out how much time they have left to use the computer until the display and keyboard are shut off, 2) ou t pu tar e po r toft oda y ’ sus a get oat e xte di t oro r3)l o go u t . The s et hr e eo pt i o n sa r e accessed from the User Control Prompt as shown in the following operating chart. Log in as User F1-F8 Press <Scroll Lock> twice in 2 seconds Option Prompt (screen turns a dim purple) <Scroll Lock> = Remaining Time Graphic Display <Enter> = User Status Report (must be running text editor application) <Esc> = Log out current user and back To Login Prompt Remaining Time Graphic Display While a user is logged in (the computer may be running any application), the PC Moderator can be prompted to provide a graphic display of remaining time until shutoff. The time remaining reported is the amount of time until the next time the display shuts off due to 1) running out of total time (daily limit), 2) reaching an end of day range 3) impending lock-out period or 4) bonus time is running out. To invoke this graphic display while logged in and running any application: 1. Press the <Scroll Lock> key twice in two seconds. Copyright © 2006, Woog Laboratories, Inc. All rights reserved 18 PCMode r at or™ I ns t a l l at i onandUs e rGui de 2. When the screen turns a dim purple, press the <Scroll Lock> key again. The bar chart graphic of remaining time will now be displayed. This display consists of red and blue bars with a dimmed view of the current display in the background. The graphic is the full width of the display starting at the bottom and extending upwards like a bar chart. The length of the visible display (solid dark blue if the screen background is black) represents how much time is remaining. The red bars signify one-hour intervals and the thinner blue bars represent 30-minute intervals. Each scan line of the display signifies 1 minute. If more time remains than can be displayed, then the display will simply extend to the top of the screen. If the remaining time is less than 10 minutes, you may not see any display past the bottom thick red bar. To estimate the remaining time, count the number of red bars seen through the visible display and that is the number of full hours of user time remaining. See how far the display extends upward past the last red bar. If it is less than the next higher blue bar, then the remaining minutes are less than 30. The graphic display will timeout after a brief period or press the <Shift> key to end the di s pl a y( do n’ tpr e s sot h e rk e y sa st h e ywi l lge tp a s s e dt ot hea pp l i c a t i o n) . Thef ol l owi ng picture provides an example: 2r e dba r s–2hr s 1bl ueba r–30mi n Total: approx. 2hrs, 30 min Thicker red bars signify 1 hour intervals Thinner blue bars mark 30 minute intervals User Status Report This display graphic above gives a quick sense of how much time is remaining. For a more exact report, the User Status Report may be invoked. The user must be running a text editor before invoking the report. To invoke this report: 1. Press the <Scroll Lock> key twice in two seconds. 2. When the screen turns a dim purple, press the <Enter> key. The PC Moderator will output the report by generating keystrokes to the text editor. Make sure you are running a text editor and it is selected or the keystrokes may be sent to another application or the operating system with unpredictable results. Copyright ©2006, Woog Laboratories, Inc. All rights reserved PC Moderator ™ I ns t a l l at i ona ndUs e rGui de 19 Log Out At any the user may log out by either shutting down the computer or manually logging off the PC Moderator (this does not log out of the Operating System). To log out manually: 1. Press the <Scroll Lock> key twice in two seconds to enter the Option Prompt (screen turns a dim purple). 2. Press the <Esc> (escape) key. The login screen will be immediately displayed and another user may log in immediately. Note: Logging out is independent of the operating system or application(s) running. User Tips: Th ePCMode r a t or ™o n l ya f f e c t st hed i s pl a ya ndke y bo a r da n da s such the computer will still operate and provide operating features even when logged out. To conserve time, the user could log out when waiting for mail or instant messages such as AOL Instant Message (AIM) that provide audible notification. The user can log in after hearing the notification without wasting valuable use time waiting for a friend to go on-line. The user can also listen to music such as MP3s by running a play list and then logging out. In this way, valuable use time is not wasted while simply listening to music. On-line game pl a y e r sc a nr un“ bot s ”wh i l et hed i s p l a ya ndkeyboard are disabled. Downloads, disk maintenance (defragmentation), virus checking and hard drive backups can all be performed while the user is logged out. Consider this when children ask for more time to fix the computer or perform routine maintenance. Monitor Standby and Screen Saver Si n c et hePCMo de r a t o r ™a l s os e n s e smi s s i n gv i d e os i g na l sa spowe r i n gof f , c e r t a i n screen saver settings and standby modes may a l s oc a us et hePCMod e r a t or ™t os h utof f and will automatically log out the current user. In order to log in a new user, move the mouse to bring back the screen. Note that pressing keys will not return the screen saver or the computer from standby since the keyboard is switched off. For most systems, the power indicator light on the monitor can provide clues to the state of the system. A steady power light (usually green) with a black display screen indicates that the monitor is not in standby mode. If the indicator is flashing or changes color (yellow or red), the computer may have placed the monitor in standby mode. System Standby For Energy Star compliant computers with the latest operating systems, the keyboard will often include a standby or suspend key. The PC Moderator detects when this key is pressed, logs out the current user when the computer enters standby and will be ready for log in faster when returning from standby. Do not press this key and then turn the computer off. You may need to power cycle the computer for proper operation. Copyright © 2006, Woog Laboratories, Inc. All rights reserved 20 PCMode r at or™ I ns t a l l at i onandUs e rGui de Display Dim If the time reaches the point where the display is dimmed (if enabled), the display will dim and remain dimmed for that user until any new login the next the morning. The colors are not dimmed equally. Blue is dimmed approximately 90% while green and red are dimmed approximately 50%. The intended purpose of dimming the display is to reduce the effects of delayed sleep cycles caused by late night computer use. While the primary goal is to reduce blue light, the other colors are also dimmed to help keep a more balanced color on the display. Recent research from Japan (Higuchi, Motohashi, Yang, Ahara & Kaneko, 2003) found that youth playing computer games at night with a bright video display had lower saliva levels of melatonin and did not report being as tired as those that played with the display dimmed. Melatonin is the natural substance produced by the pineal gland that helps to regulate the day/night sleep cycles in mammals. An increase in this substance naturally occurs in the evening in response to lower blue light levels and causes us to feel sleepy. While parents already know that when teens stay up late on the computer it affects their ability to wake up in the morning, this research helps explain why they are able to stay up so late and not get tired. It has even been suggested that there exists significant developmental and environmental hazards presented by blue light at night-time (Pauly, 2004). Parent (User F9) Operation Parent (F9) operation is the same as that for users F1-F8 except there are no time limits, dimmed display or control/status options except logging out and running the Tutorial. If you would like to monitor your own computer use, or use the display dim features, setup one of the users F1-F8 for yourself. The only options for Parent users are to log out and to run the Tutorial. It is suggested that you run the Tutorial from the parent user to familiarize users with the operation of the PC Moderator. Although you can run the Tutorial from the Setup Menu, this is not recommended if you intend to leave a child alone with the computer. Log in as User F9 Press <Scroll Lock> twice in 2 seconds OPTION Prompt (dim purple screen) T = Tutorial (must run Text Editor first). S = Tutorial (automatic) <Esc> = Log out current user and back To LOGIN Prompt Copyright ©2006, Woog Laboratories, Inc. All rights reserved PC Moderator ™ I ns t a l l at i ona ndUs e rGui de 21 Setup (User F10) Login and Menu Operation If no users have been setup, the PC Moderator will automatically run the First Time Setup program when the Setup User (F10) enters setup. Otherwise, logging in as the Setup User (F10) allows the option of either 1) entering the Setup Menu while running a text editor to manually configure the time/date, user settings and various preferences OR 2) make quick changes such as manually enabling users or adding bonus time to users without the inconvenience of running a text editor. The following flow chart shows the various options available to Setup User F10: Log in as Setup User Press Scroll Lock twice in 2 seconds Option Prompt (dim purple screen) V or H= vacation / holiday mode N = nonholiday mode Back to Login Prompt Quick Change To make Bonus Time Enable Press 1-9, 1=10 minutes, 9=90 min. Select user - press F1- F8 Back To Login Prompt Must be running Text Editor Manual Daily Enable. Press F1-F8 <Esc> = Back To Login prompt Enable other users (F1F8) or press <Esc> to go to Login Prompt Setup Menu (or First Time Setup if new) 1 - Set clock time/date 2–Se t up/ Ed i t / de l e t eu s e r s 3 - Enable/disable users (until date) 4 - Manually enable/disable users for today 5 - Holiday/vacation on/off 6 - Computer usage report 7 - Change Parent (F9) / Setup (F10) password 8–Tut o r i a l 9–Di a g nos t i cMe n u 0 - Exit setup and log out Quick Changes: S T To make a quick change: 1. Login as user F10 from the Login Prompt 2. Invoke the Option prompt by pressing the <Scroll Lock> key twice in two seconds. 3. Press keys in the sequence specified in the previous figure. To enter the Setup Menu: 1. Login as user F10 from the Login Prompt after the OS is loaded. Close any pop up applications such as AOL Instant Messenger. 2a. If running Windows 98, ME, XP or 2000 - Press the <Scroll Lock> key twice in two seconds. When the screen turns a dim purple, press the <S> key. Go to step 3. 2b. –I fr unni nganyot he rOpe r at i ngSy s t e m ori f2aabov edoe snotwor k- Copyright © 2006, Woog Laboratories, Inc. All rights reserved 22 PCMode r at or™ I ns t a l l at i onandUs e rGui de Once logged in, run a text editor. Wordpad is the preferred text editor on Windows operating systems. Do not use a regular word processor or errors may result. Make sure that word wrap is enabled on the text editor. Press the <Scroll Lock> key twice in two seconds. When the screen turns a dim purple, press the <Scroll Lock> key again. 3. The setup program will begin to run with the display generated by keystrokes sent by the PC Moderator to the text editor. Follow the menus by pressing the key associated with the menu line. For convenience and speed of operation, menu items may be selected (i.e. key pressed) before all menu items have been displayed. To exit Setup, press <0> at most of the menus. Note: Do not leave the computer unattended while logged into setup or running the Setup Menu! Turning off the computer while in Setup will not result in the PC Moderator logging out of Setup if the computer retains power to the keyboard and mouse when shut down. The next person to power the computer (i.e. your child) will have full access to setup. In Summary - Always log out of the Setup Menu before shutting down the computer or leaving the computer unattended. Temporary User (F8) You can create a temporary user F8 so that you can provide additional time when you are not home (i.e. working late). This might be useful if you have your child on a manual daily enable setting and you have to stay late at the office. Simply create a user with its unique pa s s wo r da n das e ta moun toft i mewi t har a n ges i mi l a rt ot ha tofy ourc h i l d’ s . Ata nyt i me you can tell your child (i.e. over the phone) the password. This would allow them the ability to use the computer. Once you are home you can change the password so you can use it another time should the situation arise again. Although F8 is suggested, you can use any function key other than F10, F9 and your existing users. Advanced Features Manual Daily Enable Manual Daily Enable is a feature allowing parents to automatically restrict computer use each day until they have specifically enabled that user. This allows the computer to be used to motivate a child to complete less desirable tasks or responsibilities such as chores or homework. It can also be used to limit unattended computer use such as before parents return home from work regardless of when they return. To enable and log in a user: 1. At the login prompt, press the function key of the user (F1-F8). 2. At the password input screen, enter the Setup (F10) pa s s wor di ns t e adoft heus e r ’ s password followed by <Enter>. Using Quick Change options, multiple users can be enabled (not logged in) at one time: 1. Log in as the Setup user (F10) 2. Press <Scroll Lock> twice. The screen turns a dim purple. Copyright ©2006, Woog Laboratories, Inc. All rights reserved PC Moderator ™ I ns t a l l at i ona ndUs e rGui de 23 3. Press the function keys of the users (F1-F8) to be enabled that day, one at a time. 4. Press <Esc> to exit from User Setup prompt. The user can now log in (F1-F8, password) and use the computer according to the limit and range settings for that day. Once the user has been logged in, the computer can be shut down and turned on and off that day without requiring re-enabling by the parent. However, if the computer is turned off before the user logs in, then the parent will need to re-enable for that day before the user can log in. Alternately, users can be enabled from the Setup Menu item number 4, “ Ma nua l l y e na bl e / di s a bl eu s e r sf ort oda y ” . Onc eIu s e rha sbe e ne na bl e da n dl og ge di n, t he yc a nn ot be disabled using this menu item. See Setup Menu item 3, Enable/disable users (until da t e ) ” , d e s c r i be di nt h ef ol l owi n gs e c t i on. Enable/disable users (until date) Users can be enabled and disabled from the Setup Menu. When a user is disabled, an option is available to input a date to be re-enabled. This allows parents to institute grounding from the computer as a consequence of some undesired behavior. Since the date is entered into the device, it is easier for parents to hold to their consequence as it is easier to leave the current settings (and hear the child gripe) than to run the Setup menu and make the change. It is recommended that you consider the grounding carefully. The length of the grounding should not be so long that the computer loses its role as an effective motivator. You want the consequence to teach an effective lesson and not serve to alienate you from your child. Bonus time There may be circumstances where a parent may want to add time for a user at that moment. An example might be a late school project or as a special privilege. Rather than making permanent setting changes, an easy and quick method is provided to allow a onetime addition of between 10 and 90 minutes for a user regardless of the time limit or range settings. The easiest way to log in a user and add bonus time is: 1. At the login prompt, press the function key of the user (F1-F8). 2. At the password input screen, press a single numeric (0-9) key corresponding to the amount of time to add. Pressing 1 corresponds to 10 minutes, 2=20 minutes, 3=30, …9 =9 0mi nut e s , e t c . Pr e s s i ng0wi l lc l e a ranybo nust i mepr e vi ous l ys e t . Press <Enter> and the password input screen will appear reset (single purple bar at the top of screen). 3. Enter the Setup (F10) pas s wo r di ns t e ado ft heus e r ’ spa s s wor df ol l o we dby <Enter>. Alternatively, bonus time can also be provided using the Quick Change options as follows: Copyright © 2006, Woog Laboratories, Inc. All rights reserved 24 PCMode r at or™ I ns t a l l at i onandUs e rGui de Setting Bonus Time using Quick Change: 1. Log in as setup user (F10, password). 2. Once logged in, press <Scroll Lock> twice to enter the Setup User Prompt. The screen turns a dim purple. 3. Then press a numeric (1-9) key corresponding to the amount of time to add. Pressing 1 corresponds to 10 minutes, 2=20 minutes, 3=30, … 9=9 0mi nut e s , e t c . 4. Then press the function key of the user (F1-F8) for whom the bonus time is being added. The setup user will be automatically logged out. Remember that bonus time overrides both the amount of time allowed and the time ranges thus it may allow your child to stay on the computer later in the evening than you might anticipate. Make sure that your child has no remaining time and is not simply saving their time for late night computer use. Consider the case where it is 7 pm and your child is asking you for 90 minutes of bonus time. If they still had 2 hours of remaining time and their time range that day ended at 9pm the bonus time you gave them would last them until 10:30pm! Note: Bonus time can be an effective reward as long as it does not become a regular occurrence. When children are aware that the parent can add time easily, they may grow to demand it and may use various methods including tantrums in an attempt to get additional time. Using this feature as a condition for showing completed homework can be an effective way to reward their school effort even if it done every day. Contact www.pcmoderator.com for more information. Enable or Disable Holiday/Vacation Mode The Holiday/Vacation mode allows parents a relaxed setting for holidays or vacation periods without the need to constantly make editing changes to the days of the week. The settings for this mode were input during first time setup or when a user was created or edited using the Setup Menu. When the Holiday/Vacation mode is enabled, the current day and all following days (until disabled) are considered Holiday/Vacation days and use the settings for those types of days. It is recommended that this mode be turned off several days before the actual vacation is over to get your child back on a schedule more suitable for school or work. To enable: To enable or disable Holiday/ Vacation mode: 1. Log in as the Setup user (F10) 2. Press <Scroll Lock> twice. The screen turns a dim purple. 3. Pr e s st he“H”or“V”ke yt oe nabl eHol i day /Vac at i onmodeor“N”t odi s abl e Holiday/ Vacation mode. When Holiday/ Vacation mode is enabled, the blinking pattern for user login turns purple colored (normally is red) as a reminder that it is enabled. Copyright ©2006, Woog Laboratories, Inc. All rights reserved PC Moderator ™ I ns t a l l at i ona ndUs e rGui de 25 Computer Usage Reports The PC Moderator allows parents to find out exactly how much time their children (and if set up properly even they) spend on the computer and, with their children, make effective changes to the computing habits. The computer usage reports are available from the Setup Me n u. Ent e rt hes e t upme nua n dpr e s s“ 6”f orComput e rUs a geRe por t s . Se l e c tas i n gl e us e ror“ a l lu s e r s “a nde n t e rt heda t er a ngef ort h er e p or t s . Th er e p or twi l li d e n t i f yt heus e r , days the computer was used by them and for how long. It also provides an average use statistic. This averages the total usage amount by the number of days in the selected period (including days the computer was not used at all). Since the output of the report is generated in a text editor you can edit and print it for you and your child to see. This report can be effective at identifying problematic computer use. There is often a discrepancy be t we e nt h epa r e n t ’ sa n dt hec h i l d’ spe r c e pt i o no fh owmuc ht hec omput e ri sbe i ngus e d. This report provides a definitive answer that can help both parents and children make more productive choices. It also serves as a first step toward mapping out a plan to make more e f f e c t i veu s eoft hec h i l d’ st i me . I ti si mpor t a n tt oma ket hi sac ol l a bo r a t i vee f f or tr a t he r t ha napo i ntofy ourc h i l d’ sr e be l l i on.Compr omi s ea ndhe l py ourc hi l di de nt i f ymor e effective use for their time. Continue to generate these reports and discuss them with your children on an ongoing basis to evaluate progress. Resetting the PC Moderator as New The PC Moderator can be reset completely as new allowing the easy setup option for a f i r s tt i meus e r . Toc l e a ra l l , f r omt heSe t u pMe nus e l e c t“ 9. Di a gno s t i cMe n u” , t he n“ 9. Re s e ta l l ” . En t e r“ Y”t oc o nf i r m.ThePCMod e r a t orwi l lha vea l lt hede f a ul t sr e s e ta nda l l users and user data cleared. The next time the PC Moderator is powered it will power up as though the Setup user (F10) has logged in. Attempting to run the Setup Menu will result in the PC Moderator running the first time setup and the tutorial. Internal Components and Configuration Setup Override Jumper The setup override jumper (switch on some models) is provided to force a setup login if the setup password is forgotten or unknown for any reason. To remove the jumper, turn off the computer and unplug it from the wall power. Remove the lock and pull the cover back exposing the internals of the PC Moderator as shown in the following photo. Pull the blue jumper and then slide the cover back in place. Plug and power up the computer and the display will be on as though the user logged in as the Setup user (F10). To run Setup, power up the computer, letting Windows® OS run as usual. Shut down any pop applications such as AIM or virus scanners. Then press and release <Scroll Lock> twice. When the screen turns a dim purple, press the <S> key. The setup menu should run Copyright © 2006, Woog Laboratories, Inc. All rights reserved 26 PCMode r at or™ I ns t a l l at i onandUs e rGui de automatically. Note: If you are not running a Windows OS, you will need to run a text editor, press <Scroll-Lock> twice, followed by the <T> key. Now you may view and c ha ng et heSe t u pPa s s wor da n da nys e t t i n gs . The ne x i ts e t u p, pr e s s“ 0”a ta nyme nu, power down the computer, disconnect the power cord, replace the blue jumper, reinstall the cover, lock and AC power cord. Setup Password override jumper Replacing the Battery The CR2032 3V lithium coin cell battery should last at least 1 year under normal use. If your computer provides continuous power to the mouse (i.e. you can see the optical mouse glowing red in the dark when the computer is off) and keyboard even when turned off, your battery may last for years. It only supplies power to the real time clock when the PC Moderator does not have a source of power. If you notice the clock does not keep time but occasionally resets to some random time/date, especially after the computer is turned off, the battery has most likely run out of power and will need to be replaced. To remove the battery, turn off the computer and unplug it from the wall power. Remove the lock and pull the cover back exposing the internals of the PC Moderator as shown in the following photo. Remove battery by prying up with non-metallic object. . Install new battery (+ Side Up) by placing right side of battery down first as shown by arrow, then snap left side down. Pr yt hes i deoft heba t t e r yup( a sp i c t u r e da b o v e )wi t haf l a tn on me t a l l i co bj e c t–e v e n your finger may do. Pull the battery out from under the cables. Install a new battery (+ side up) into the battery holder. Place the right side of the battery down in the holder first and then snap the left side down to lock the coin cell battery in place. When correctly installed, the battery should appear like the one in the photo above. Tip: Be careful of the internal cables. Move these wires as little as possible to change the battery or replace the cover. Copyright ©2006, Woog Laboratories, Inc. All rights reserved PC Moderator ™ I ns t a l l at i ona ndUs e rGui de 27 Troubleshooting The following is a list of common problems and possible solutions. For more information and the latest troubleshooting hints, please visit our web site at www.pcmoderator.com. Problem Answer PC Moderator cannot plug into the PC or the cover will not fully slide over the base due to mechanical interference. The computer displays only a dim purple screen on power up. Keyboard and/or mouse is locked up after installation or removal of the PC Moderator. Refer to the product web site at www.pcmoderator.com and c l i c kon“ Suppo r t ”f o rt e c hn i c a lh e l p.Pl e a s ebep r e pa r e dt o report the computer manufacturer and model number. Device may have locked up. Unplug (critical) the computer from AC power, wait 5 minutes, plug in and power up again. Make sure that the computer was unplugged or disconnected from AC power (not just turned off) during installation or removal of the PC Moderator. Nothing appears on the display when the 1) Check that the VGA display cable is properly connected to computer is first powered. the cable exiting the PC Moderator. 2) Check that the long keyboard plug is completely plugged into the PS/2 keyboard port of the PC. 3) Check that the PC Moderator is properly secured to the VGA port of the computer (or the DVI/VGA adapter). 4) Make sure the computer and display are properly powered. 5) Make sure that a screen saver has not timed out. Nothing appears on the display when the The monitor may have been placed in standby or powered off computer has been left unattended for some by the computer. Screen savers or power saving features of the period of time. Pressing a key does not restore c omput e ra u t oma t i c a l l ys hutd own“ Ene r g ySt a r ”moni t o r s . the login prompt. Move the mouse and see if the screen returns. You may need to press the power button on the computer to return the computer from standby. When attempting to run Setup, nothing happens May be pressing keys too fast or too slow. Try slowing down when pressing <Scroll Lock> two times to 1 time per second or alternatively speeding it up. When attempting to run Setup, many Winpad or Notepad text editor application was not running or application windows open up and the PC beeps was not the active window when Setup was activated. Press <Scroll Lock> to abort setup, close the errant applications, open/select the text editor and try again. Make sure that no pop up applications such AIM or virus scanners are running. The PC Moderator powers up with the display 1) The PC Moderator is not set up or has been completely on after displaying a few colored screens. reset 2) The blue Setup override jumper may be pulled off. The PC Moderator does not keep time or The CR2032 Lithium battery may have run down and must be properly provide time limits after powering replaced. It should last at least 1 year with normal use. It may down the computer. last years on PCs with constant keyboard power. The Setup and/or parent passwords no longer If the passwords have been changed or forgotten, refer to the work (or my children have discovered the ma nua ls e c t i o ne n t i t l e d“ I fYouFor g e tt heSe t upPa s s wo r d”to Setup password and made changes). change the password. My child has damaged the PC Moderator and it Return the PC Moderator for out of warranty service. We no longer works or will not lock. suggest you make you child pay for the repairs/upgrade. Check www.pcmoderator.com for return information. Computer only uses a USB style keyboard. Order the USB adapter upgrade kit. Check www.pcmoderator.com for more info. Once the PC Moderator times out, the child Parent should shut down computer and encourage the child to cannot see the display to shut down the shut down properly during last 1 minute when the keyboard computer and asks for bonus time to do so. ha sbe e ns h uto f f .Pr e s st he“ Es c ”k e y ,t he nc omput e r k e y boa r d’ spowe rors t a ndbyk e yorpowe rbu t t o nont hec a s e . Copyright © 2006, Woog Laboratories, Inc. All rights reserved 28 PCMode r at or™ I ns t a l l at i onandUs e rGui de References Higuchi, S., Motohashi, Y., Yang, L. Ahara, M., Kaneko, Y. (2003). Effects of VDT tasks with a bright display at night on melatonin, core temperature, heart rate and sleepiness. Journal of Applied Physiology. Pauly, S. (2004). Lighting for the human circadian clock; recent research indicates that lighting has become a public health issue. Medical Hypothesis. Woog, K. (2004) A survey of mental health professionals clinical exposure to problematic computer use. www.pcmoderator.com/survey.pdf. Trademark Notices AIM, and AOL Instant Messenger are trademarks, service marks and/or registered service marks of America Online, Inc. IBM and PS/2® are registered trademarks of IBM Corporation Linux® is a registered trademark of Linux Mark Institute Windows® is a registered trademark of Microsoft Corporation. PC Moderator is a trademark of Woog Laboratories, Inc. Battery Replacement type: CR2032 - 3V lithium coin cell Notes: ____________________________________________________________________ ____________________________________________________________________ ____________________________________________________________________ ____________________________________________________________________ ____________________________________________________________________ ____________________________________________________________________ ____________________________________________________________________ ____________________________________________________________________ ____________________________________________________________________ ____________________________________________________________________ ____________________________________________________________________ ____________________________________________________________________ ____________________________________________________________________ Manual #: PCM-20-16 5/10/06 Copyright ©2006, Woog Laboratories, Inc. All rights reserved