1
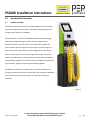
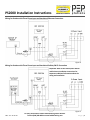
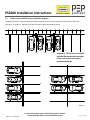
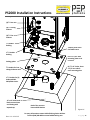
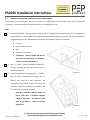
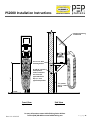
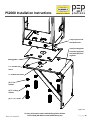
PS2000 Installation Instructions
PS2000 INSTALLATION INSTRUCTIONS FOR
ELECTRICAL CONTRACTORS
PS2000
Rev. 4.1--12.12.13
For more information contact Hubbell Wiring Device Kellems
Toll free (800) 288-6000 or www.hubbell-wiring.com
P age |0
PS2000 Installation Instructions
IMPORTANT SAFETY INSTRUCTIONS
SAVE THESE INSTRUCTIONS
WARNING- When using electrical products, basic precautions should always be followed including the following:
Read all the instructions before using this product
This device should be supervised when used around children
Do not put fingers into the electric vehicle conductor
Do not use this product if the flexible power cord or EV cable are frayed, have broken insulation, or other signs
of damage.
Do not use the PEP Station PS2000 if the enclosure or the EV connector is broken, cracked, open or shows any
other indication of damage.
Do not operate the PEP Station PS2000 in temperatures outside the operating range of -22⁰F to 131⁰F
(-30⁰C to 55⁰C)
The wiring and concrete pedestal or wall mounting bracket must be installed by a certified electrician and must
comply with local electrical codes and ordinances.
Do not install the PEP Station PS2000 near flammable, explosive or combustible materials.
WARNING- To reduce the risk of fire or electric shock, do not remove the rear panel. No user serviceable parts are
inside. Repair should only be done by Customer Service Engineers.
RISK OF ELECTRIC SHOCK
IMPORTANT- These Installation Instructions must be strictly adhered to.
The specifications, instructions and other information in this manual are subject to revision at any time without prior
notice.
Rev. 4.1--12.12.13
For more information contact Hubbell Wiring Device Kellems
Toll free (800) 288-6000 or www.hubbell-wiring.com
P age |1
PS2000 Installation Instructions
1.0
2.0
3.0
4.0
Introduction & Overview
1.1
Product overview
Figure 1- PEP Station
1.2
Product specifications
1.3
Electrical wiring requirements and information
Figure 2 –Single Phase Input and Hardwired Ethernet Connection
Figure 3- Single Phase Input and Cellular/Wi-Fi Connection
Figure 4- Three Phase Input and Hardwired Ethernet Connection
Figure 5- Three Phase Input and Hardwired Cellular/Wi-Fi Connection
Pedestal Mounted PEP Station Installation
2.1
Before you start
2.2
Component list
2.3
Pedestal mounted PEP Stations installation diagrams and images
Figure 6- Installation location examples
Figure 7- Installation example
Figure 8- Installation example
2.4
Concrete pedestal installation process and checklist
Figure 9- Excavation
Figure 10- Reinforcement and conduit
Figure 11- Reinforcement
Figure 12- Mounting plate/J-bolt assembly
Figure 13- Mounting plate installation
Figure 14- Electric vehicle signage (parking space)
Figure 15- Electric vehicle signage (parking lot)
2.5
Concrete pedestal installation diagrams
Figure 16- Top view
Figure 17- Section
Figure 18- Isometric
Figure 19- Front view
Figure 20- Side view
2.6
Securing the component housing and wiring the PEP Station
Figure 21- Exploded isometric
Wall Mounted PEP Station Installation
3.1
Before you start
3.2
Component List
3.3
Wall mounting bracket installation process and checklist
Figure 22- Isometric
Figure 23- Isometric
Figure 24- Electric vehicle signage (parking space)
Figure 25- Electric vehicle signage (parking lot)
Figure 26- Front view
Figure 27- Side view
3.4
Securing the component housing
Figure 28- Exploded isometric
Startup Procedure
Figure 29- Home screen
Rev. 4.1--12.12.13
For more information contact Hubbell Wiring Device Kellems
Toll free (800) 288-6000 or www.hubbell-wiring.com
3
3
3
4
5
6
6
7
7
8
8
8
9
9
10
10
11
11
11
11
12
12
13
13
14
14
14
14
15
15
16
17
18
18
18
19
19
19
20
20
21
21
22
23
24
24
P age |2
PS2000 Installation Instructions
1.0
Introduction & Overview
1.1
Product overview
PEP Stations meet all National Electric Code and National Fire Protection
Association requirements for electric vehicle (EV) charging stations and
comply with all relevant UL standards.
Each PEP Station is a dual Level 2(208-240V/30A) commercial charging
station that charges two plug-in electric vehicles simultaneously.
Each PEP Station has a touch screen user-interface which guides the
electric vehicle driver through a few simple steps to initiate charging. A
built-in card reader allows each unit to be configured for either access
cards or credit cards; the hourly rate being determined by the station’s
owner. Each PEP Station is networked to be centrally monitored and has
communication capabilities to allow for system management functions for
station owners, diagnostic reporting and software upgrades.
PEP Stations are distinctive in design and are easily identifiable by the
stainless steel exterior and yellow coiled cords; they represent sustainable
sites, innovation and a property owner’s commitment to reducing
emissions.
Figure 1
Rev. 4.1--12.12.13
For more information contact Hubbell Wiring Device Kellems
Toll free (800) 288-6000 or www.hubbell-wiring.com
P age |3
PS2000 Installation Instructions
1.2
Product specifications
Power Specifications
AC Power Output (maximum)
AC Power Input
Input Power Connections
Standby Power
Recommended Panel Breaker
Energy Metering Accuracy
Output Charging Connector
Level 2: 7.2kW (two dedicated circuits, 208/240V AC min. of 30A continuous)
Level 2: 7.2kW (two dedicated circuits, 208V/240V AC @ 30A per charging circuit)
Single phase Line 1, Line 2 per circuit with common ground
20W
Double pole 40A max breaker on dedicated branch for each circuit
3% @ 2 minute intervals
SAE J1772™ EV connectors on 18’ max. extended length coiled cord
Safety and Operational Specifications
Safety Compliance
Grounds Fault Detection
Plug-Out Detection
Surge Protection
EMI Compliance
Complies with UL 2594, UL 2231, UL 1998, NFPA 70, NEC Article 625, ADA
20mA CCID with auto retry (15 min delay, 4 tries)
Power terminated per SAE J1772 specification
6 kV @ 3,000 A
FCC Part 15 Class A
Environmental Specifications
Enclosure Rating
Operating Humidity
Operating Temperature
Terminal Block Temperature Rating
NEMA 3R per NEMA 250-1997
Up to 100% over full operating temperature range
-22⁰F to 131⁰F (-30⁰C to 55⁰C) ambient temperature
212⁰F (100⁰C)
Functional Interfaces
LCD Screen Resolution
Screen Characteristics
Vertical Viewing Angle
Horizontal Viewing Angle
Card Reader
800 x 600 PIXELS
8.0” diagonal touch screen, sunlight readable and fingerprint resistant
124⁰ viewing angle
120⁰ viewing angle
ISO 7811 compliant
Network Specifications
Ethernet
Cellular
Network Communication Protocol
Network Security
10/100 Base-T Full Duplex Ethernet
3G EVDO for Verizon
TCP/IP, IPv4/IPv6, DHCP Addressing
HTTPS, SSL
Other Specifications
Approximate Shipping Weights
Component Housing Dimensions
Reinforced Concrete Pedestal
Wall Mounting Bracket
Rev. 4.1--12.12.13
75 lbs for the component housing, 30 lbs for the installation kit
9”x9”x24” plus front-mounted cord/connector assemblies
12”x12”x29” above grade with 42” below grade, form provided
9”x11”x12” steel bracket, secured to approved wall with (4) 5/8” lag bolts
For more information contact Hubbell Wiring Device Kellems
Toll free (800) 288-6000 or www.hubbell-wiring.com
P age |4
PS2000 Installation Instructions
1.3
Electrical wiring requirements and information
PEP Stations require the following:
Two dedicated circuits of single phase 208/240VAC L-L power.
o
The left and right circuits must be in phase.
o
The L1-L1 and L2-L2 voltage must be equal to 0 volts AC.
Each circuit must be connected to a 40 Amp circuit breaker.
All current carrying conductors between the circuit breaker and the PEP Station must be 8 AWG copper
wires or lower.
All high-voltage wiring must be installed in a 1 ¼” conduit (rigid or PVC).
The CAT5e low-voltage Ethernet cable shall be gel-filled or rated for underground applications, have a
maximum segment length of 100 meters and must installed in a ¾” conduit (rigid or PVC). If using
cellular, there will be an additional 12V power supply wire that will also run in the ¾” conduit from the
PEP Station.
Important:
A centrally located ground must be provided so that the line voltage to central ground does not
exceed 150 Vrms .This type of connection must be used.
Do not provide GFCI protection at the panel, this feature is built-in to the PEP Station.
In areas prone to frequent thunderstorms, install surge protection at the panel for both circuits.
Disconnect the power supply before performing any electrical work.
Label wires from the breaker panel.
The conduit sizes specified above must be maintained within the concrete base and where the
conduit terminates for the wall mounting bracket.
Rev. 4.1--12.12.13
For more information contact Hubbell Wiring Device Kellems
Toll free (800) 288-6000 or www.hubbell-wiring.com
P age |5
PS2000 Installation Instructions
Wiring for Stations with Single Phase Input and Hardwired Ethernet Connection
Figure 2
Wiring for Stations with Single Phase Input and Cellular/Wi-Fi Connection
Important: Refer to the Cellular/Wi-Fi Router
and Enclosure Installation Instructions for
important additional information about the
wiring and installation
Rev. 4.1--12.12.13
For more information contact Hubbell Wiring Device Kellems
Toll free (800) 288-6000 or www.hubbell-wiring.com
Figure 3
P age |6
PS2000 Installation Instructions
Wiring for Stations with Three Phase Input and Hardwired Ethernet Connection
Figure 4
Wiring for Stations with Three Phase Input and Hardwired Cellular/Wi-Fi Connection
Important: Refer to the Cellular/Wi-Fi Router
and Enclosure Installation Instructions for
important additional information about the
wiring and installation
Figure 5
Rev. 4.1--12.12.13
For more information contact Hubbell Wiring Device Kellems
Toll free (800) 288-6000 or www.hubbell-wiring.com
P age |7
PS2000 Installation Instructions
2.0
Pedestal Mounted PEP Station Installation
2.1
Before you start
The following procedures must be completed before installing a pedestal mounted PEP Station:
Secure a licensed electrician (additional sub contractors may be required for the concrete, site work, painting
and installation of signage).
The licensed electrician will secure permits and any necessary approvals from the local municipality.
Verify that the concrete strength, bolt length and reinforcement meet local building codes.
Verify that all of the listed components have been provided within the installation kit.
2.2
Component list
The following items are supplied to the installer:
8”x8”x 1/16” Steel mounting plate
12”x12” Square Sonotube concrete form
12”x12” Square tapered form
(8) ½” Hex nuts
(4) ½” Flat washers
(4) ½” Locking washers
(4) ½”x 6” J-Bolts.
1 Quart of Black Magic latex paint
Sealing gasket
(1) ¾” Conduit bushing
(1) 1 ¼” Conduit bushing
PEP Station component housing
The following items are provided by the installer:
1 ¼” Conduit (rigid or PVC)
¾” conduit (rigid or PVC)
Duct Seal or similar putty-like conduit sealer
3,000 psi concrete mixture*
Black concrete pigment
Wire. 8 AWG or lower and wire nuts
CAT5e low-voltage Ethernet cable* and RJ45 connectors
9”x54” Prefabricated circular reinforcing cage
Typically #4 bars*
Loxon latex exterior concrete primer, A24W8300
Green parking lot paint
Electric vehicle signage
Necessary tools and equipment
*Important: Material and specifications may vary depending on site characteristics and local building codes.
Rev. 4.1--12.12.13
For more information contact Hubbell Wiring Device Kellems
Toll free (800) 288-6000 or www.hubbell-wiring.com
P age |8
PS2000 Installation Instructions
2.3
Pedestal mounted PEP Station installation diagrams
The diagrams below in Figure 6 indicate possible installation locations and orientation for PEP Stations within the
parking lot. The letter ‘F’ indicates the front of the PEP Station component housing.
Important: PEP Stations should be
installed flush with the front edge
of the curb and do not require
protective bollards.
Figure 6
Rev. 4.1—12.12.13
For more information contact Hubbell Wiring Device Kellems
Toll free (800) 288-6000 or www.hubbell-wiring.com
P age |9
PS2000 Installation Instructions
Figure 7
Figure 8
The images above are examples of a finished PEP Station installations. The concrete base should be finished
to this quality.
Rev. 4.1—12.12.13
For more information contact Hubbell Wiring Device Kellems
Toll free (800) 288-6000 or www.hubbell-wiring.com
P a g e | 10
PS2000 Installation Instructions
2.4
Concrete pedestal installation process and checklist
The following set of instructions outlines the process for casting the concrete pedestal and installing the associated
components. Some installations may deviate from this process due to site restraints and local codes. Any significant
deviation from this process must be reported and approved by PEP Stations, LLC. This section does not include
instructions on wiring.
Steps:
1. Excavate approximately an 18”diameter by 42” deep area for an
earth formed footing and Sonotube concrete form.
2. Position the 9”x54” prefabricated circular reinforcing cage within
the excavated area
3. Run the 1 ¼” and ¾” conduits through the reinforcing cage, see
Figure 3
Figure 10.
4. Mix the first batch of concrete (3,000 psi or greater, no pigment
necessary) and pour the earth formed footing from 42” below
grade to 10” below grade, 32” total. The top of the earth formed
footing should be 10” below finished grade.
Important: Do not allow the concrete footing to cure
Figure 9
before pouring the concrete base in steps 8 through 11.
5. Position the 38” Sonotube concrete form in the excavated area.
The top of the Sonotube should be 28” above the surface that the
user will stand on when operating the PEP Station. The bottom of
the square insert should be approximately 1” below grade and
bottom of the tube approximately 10” below finished grade. See
Figures 19 and 20 for details.
6. Backfill around the Sonotube form. Plumb and level the form.
Figure 10
7. Extend 1 ¼” conduit and ¾” conduit up through the center of the tube.
Important: The 1 ¼” conduit should be centrally located in the Sonotube. The ¾”
conduit should be installed 2 ½” (center-to-center) to the RIGHT of the 1 ¼”conduit
when looking at the base from the parking spots.
Rev. 4.1—12.12.13
For more information contact Hubbell Wiring Device Kellems
Toll free (800) 288-6000 or www.hubbell-wiring.com
Figure 6
Figure 11
P a g e | 11
PS2000 Installation Instructions
8. Mix another batch of concrete and add the black pigment. The ratio should be 1 ½ Lbs of pigment per 80Lbs of
concrete.
9. Pour the black concrete base from the bottom of the Sonotube form (10” below grade) to the top of the
Sonotube (28” above grade) vibrating frequently to relieve air bubbles.
Important: Hold the conduit and reinforcement in position as the concrete is poured and vibrated.
10. Position the tapered form so that the bottom is flush with the top of the Sonotube and so that the top of the
tapered form is at 29” above finished grade (1” above the top of the Sonotube). Level and set in place.
11. Pour the remaining black concrete to the top of the tapered form, vibrating frequently to evenly disperse the
concrete in the corners and relieve air bubbles.
12. Position (4) ½”x6” J-Bolts in the (4) perimeter
12”x12” Square
tapered form
Bottom side of
8”x8”x ¼” Steel
mounting plate
(4) ½” Hex nuts
below and (4) above
(4) ½”x6” J-Bolts
holes of the 8”x8”x1/16” steel mounting plate.
Use (8) ½” hex nuts to tighten the bolts in the
from the bottom. Install the (4) flat
washers, (4) locking washers and (4) ½” hex nuts
on the top side of the plate.
Figure 12
Important: The threaded portion of the J-bolts should not rise more than 1 ¼” above the top of the
steel mounting plate. Do not modify the steel
mounting plate for any reason.
13. Install the steel plate and J-Bolt assembly in the tapered
form and level. The top of the plate should be flush with
the top of the tapered form at 29” above grade.
14. Allow concrete to cure for 2-3 days.
15. Remove the Sonotube form, 12”x12” square tapered form
and backfill around the base. Allow concrete to cure for an
additional 2-3 days.
16. Cut the conduits so that they both rise 7/8”-1” above the top of the steel mounting plate.
Figure 13
17. Pass (6) 208/240V wires through the 1 ¼” conduit. Run the CAT5e Ethernet wire through the ¾” conduit and
install RJ45 connector. For installations using a cellular or Wi-Fi connection, the 12V power supply wire needs to
be included in the ¾” conduit from the station to router.
Important: Ethernet cabling should be CAT5e cable with a maximum segment length of 100 meters.
The Ethernet cable shall be gel-filled or rated for outdoor applications.
Rev. 4.1—12.12.13
For more information contact Hubbell Wiring Device Kellems
Toll free (800) 288-6000 or www.hubbell-wiring.com
P a g e | 12
PS2000 Installation Instructions
18. Perform a continuity test on the Ethernet wire to ensure connectivity before mounting the PEP Station. If an
Internet connection is not available at the time of start-up the station will not become active.
19. Repair any concrete/asphalt around the perimeter of the base.
Important: If repairing an adjacent concrete sidewalk or parking area, install a continuous ¾”
expansion joint and paper around the perimeter of the base.
20. After the concrete has cured for at least 5 days, complete any finish work required to provide a smooth finished
surface on all four sides of the base.
21. Prime the concrete base with a minimum of 2 coats of exterior latex concrete and masonry primer.
22. Allow primer to dry and paint the base using 1-quart of the Black Magic All Surface Enamel provided in the PEP
Stations Installation Kit. Apply at least 2 coats.
23. Install the electric vehicle parking signage. Two signs per charging station are required, see Figure 14. This sign
can be purchased at www.evsigns.com or by calling the Creative Retail Design Group at (866) 439-6233. Figure
15 is an optional sign for the entrance to the facility parking lot. The signs should be installed at the same height
and in a similar manner to existing handicap signage on the property.
Important: Some cities and municipalities may have standard signage for electric vehicle parking that
will be required. Confirm that the signage specified herein is acceptable; otherwise install the signage
specified by the local jurisdiction.
Important: If connectivity is provided by the WC12000 cellular network a sign will be provided with
the installation kit.
Figure 14
Figure 15
24. Paint parking lot striping and electric vehicle emblems. These colors, emblems and dimensions may need to be
specified or approved by the local jurisdiction to maintain consistency with other installations.
25. Verify that all of the items above have been completed and that the site is clean and clear of all construction
debris.
Rev. 4.1—12.12.13
For more information contact Hubbell Wiring Device Kellems
Toll free (800) 288-6000 or www.hubbell-wiring.com
P a g e | 13
PS2000 Installation Instructions
Concrete pedestal installation diagrams
Exterior of Sonotube
concrete form
12”x12” Square steel
tapered form
12”x12” Square steel
tapered form
Rear
Saw cut line
1’
8”
1
Exterior of Sonotube
Concrete form and
square foam insert
1
8”
1’- 4 1/8”
2.5
Front
Front face of
curb
Square foam
insert flush with
curb line
(4) ½”x 6” J-Bolts, leave
1 ¼” max. above steel
plate
1’
Top View
8”x8”x1/16” Steel
mounting plate with
pre-drilled holes for (2)
rigid conduit and (4) JBolts
Figure 16
(1) 1 ¼” Conduit and (1)
¾” conduit, leave 1”
max. above steel plate
Section 1-1
Figure 17
(4) ½”x 6” J-Bolts, leave 1 ¼”
max. above steel plate
¾” Conduit for lowvoltage Ethernet wire,
leave 1” max. above
steel plate
12”x 12”x 29” Reinforced
black concrete base on
16” Dia. x 42” deep footing
8”x 8”x 1/16” Steel
mounting plate with
pre-drilled holes for (2)
rigid conduit and (4) JBolts
Front of the concrete base
and PEP Station
Isometric of Base
Figure
16 of Base
Isometric
1 ¼” Conduit for 208240V dedicated circuits,
leave 1” max. above
steel plate
Figure 18
Rev. 4.1—12.12.13
For more information contact Hubbell Wiring Device Kellems
Toll free (800) 288-6000 or www.hubbell-wiring.com
P a g e | 14
PS2000 Installation Instructions
1”
Component housing
installed and
commissioned
12”x 12”x 29” by
Diebold,
Incblack
Reinforced
concrete base
Outside perimeter of
Sonotube concrete form
Black concrete
2’-4”
Transition between
square insert and
round form should be
1” below grade
Curb grade
Curb grade
1’
Parking lot
grade
2’-8”
9” 1”
Parking lot
grade
Bottom of Sonotube
form. Use an earth
form for the lower 32”
of the footing.
Rev. 4.1—12.12.13
1’-4 1/8”
Front View
Side View
Figure 19
Figure 20
For more information contact Hubbell Wiring Device Kellems
Toll free (800) 288-6000 or www.hubbell-wiring.com
P a g e | 15
PS2000 Installation Instructions
2.6
Securing the component housing and wiring the PEP Station
The following set of instructions outlines the process for securing the PEP Station component housing to the concrete
base and making wiring connections. This requires two people. See Figure 21 which shows the rear of the enclosure.
The sealing gasket is shown beneath the enclosure. The large and small conduit bushings, flat washers, locking washers,
and nuts are shown inside the enclosure.
Steps:
1. Verify that there are (6) 208/240V wires through the 1 ¼” hole and (1) CAT5e Ethernet wire through the ¾” hole
in the bottom of the enclosure. For installations using a cellular or Wi-Fi connection, the 12V power supply wire
needs to be included in the ¾” conduit from the station to router.
Important: A common ground wire may be installed to the PEP Station reducing the wire count to (5).
2. Remove any debris from the top of the steel mounting plate and set the sealing gasket in place.
3. Remove the rear cover of the PEP Station by unscrewing the T-25 tamper proof screws and sliding the rear cover
off of the structural frame.
4. While one person holds the enclosure above the base, pass (6) 208/240V wires through the 1 ¼” hole in the
bottom of the enclosure and pass the CAT5e Ethernet wire through the ¾” hole. For installations using a cellular
or Wi-Fi connection, the 12V power supply wire needs to be included in the ¾” conduit from the station to
router.
Important: Take extreme caution to not scratch any circuit boards or come in contact with any interior
components when passing the wires through the enclosure.
5. Place the PEP Station component housing on the pedestal allowing all four studs and two conduits to pass
through the base of the enclosure.
6. Install (4) ½” flat washers, (4) ½” locking washers, and (4) ½-13 hex nuts and tighten securely.
7. Firmly press both conduit bushings onto the conduit stubs using a light adhesive to secure them into place.
8. Complete all electrical terminations at the whips from the terminal block. Refer to Figures 2-5 on Page 6 and 7
for additional wiring information. The ground wires should terminate at the ground whips on the bottom plate
of the enclosure. If only (1) ground is provided connect the ground to both whips.
Important: Each wire nut should be installed to 15 in-lbs of toque. At least two wraps of electrical
tape are to be used on the wire nuts.
9. For installations where the conduits run underground, use a putty-like sealing and caulking compound around
the wires to seal the 1¼” and ¾” conduits from moisture. This product is commonly referred to as ‘Duct Seal and
is available in the electrical section of most hardware stores.
10. Plug the RJ45 Ethernet connector in to the receiving end on the single board computer.
11. Check that the (2) USB plugs into the USB receptacles on the single board computer.
12. Secure the 12 AWG ground wire from the bottom plate of the enclosure to the removable rear cover.
13. Replace the removable rear cover of the PEP Station and screw the T-25 tamper proof screws then continue to
4.0, Startup Procedure. Be careful that the ground wire does not get stuck in the rear enclosure.
Rev. 4.1—12.12.13
For more information contact Hubbell Wiring Device Kellems
Toll free (800) 288-6000 or www.hubbell-wiring.com
P a g e | 16
PS2000 Installation Instructions
(4) ½” Hex nuts
(4) ½” Locking
washers
(4) ½” Flat
washers
¾” Conduit
bushing
Tamper proof screw
threaded inserts
1 ¼” Conduit
bushing
8”x 8” x 1/16” Steel
mounting plate set in
concrete
Sealing gasket
(4) ½”x 6” J-bolts, leave
1-1/4” max. above
steel mounting plate
¾” Conduit for lowvoltage Ethernet wire
1 ¼” Conduit for (2)
dedicated 208240V/30A circuits
12”x 12” Reinforced
black concrete base
and footing with
tapered top
Rev. 4.1—12.12.13
Back of the concrete
base and PEP Station
For more information contact Hubbell Wiring Device Kellems
Toll free (800) 288-6000 or www.hubbell-wiring.com
Figure 21
P a g e | 17
PS2000 Installation Instructions
3.0
Wall Mounted PEP Station Installation
3.1
Before you start
The following procedures must be completed before installing a wall mounted PEP Station:
Secure a licensed electrician (additional sub contractors may be required for the concrete, site work, painting
and installation of signage).
The licensed electrician will secure permits and any necessary approvals from the local municipality.
Verify that the bolt length meets local building codes and that the mounting surface is a type listed in section 3.3
or equivalent.
Verify that all of the listed components have been provided within the installation kit.
3.2
Component list
The following items are supplied to the installer:
9”x11”x12” Steel mounting bracket
(4) ½” x 1 ½”-11 Bolts
(4) ½” Flat washers
(4) ½” Locking washers
Sealing gasket
PEP Station component housing
The following items are supplied by the installer:
1 ¼” Conduit (rigid or PVC)
¾” Conduit (rigid or PVC)
Duct Seal or similar putty-like conduit sealer
(4) 5/8”x5” Lag bolts and expansion anchors*
Wire. 8 AWG or lower and wire nuts
CAT5e low-voltage Ethernet cable* and RJ45
connectors
Green parking lot paint
Electric vehicle signage
Necessary tools and equipment
*Important: Material and specifications may vary depending on site characteristics and local building codes.
Rev. 4.1—12.12.13
For more information contact Hubbell Wiring Device Kellems
Toll free (800) 288-6000 or www.hubbell-wiring.com
P a g e | 18
PS2000 Installation Instructions
3.3
Wall mounting bracket installation process and checklist
The following set of instructions outlines the process for installing the wall mounting bracket and the associated
components. This section does not include instructions on installing any wiring.
Steps:
1. Install the steel wall mounting bracket using (4) 5/8”x5” Lag bolts and expansion anchors* on the approved
mounting surface. The horizontal PEP Station mounting surface should be located 29” above the finished floor
as indicated in Figure 26. Approved wall mounting surfaces include, but are not limited to:
Concrete
Concrete Masonry Units
Brick
Structural steel member
*Important: Fastener length and thread
type may vary depending on mounting
surface and local building codes.
2. Run 1 ¼” and ¾” conduit through the bottom of
the steel mounting bracket and terminate at the
conduit stub sleeves.
3. Pass (6) 208/240V wires through the 1 ¼” conduit.
Figure 22
Run the CAT5e Ethernet wire through the ¾”
conduit and install the RJ45 connector. For
installations using a cellular or Wi-Fi connection, the
12V power supply wire needs to be included in the
¾” conduit from the station to router.
Important: Ethernet cabling should be
CAT5e cable with a maximum segment
length of 100 meters. The Ethernet cable
shall be gel-filled or rated for outdoor
applications.
Rev. 4.1—12.12.13
Figure 23
For more information contact Hubbell Wiring Device Kellems
Toll free (800) 288-6000 or www.hubbell-wiring.com
P a g e | 19
PS2000 Installation Instructions
4. Perform a continuity test on the CAT5e Ethernet wire to ensure connectivity before mounting the PEP Station. If
an Internet connection is not available at the time of start-up the station will not become active.
5. Install the electric vehicle parking signage. Two signs per charging station are required, see Figure 24. This sign
can be purchased at www.evsigns.com or by calling the Creative Retail Design Group at (866) 439-6233. Figure
25 is an optional sign for the entrance to the facility parking lot. The signs should be installed at the same height
and in a similar manner to existing handicap signage on the property.
Important: Some cities and municipalities may have standard signage for electric vehicle parking that
will be required. Confirm that the signage specified herein is acceptable; otherwise install the signage
specified by the local jurisdiction.
Important: If connectivity is provided by the WC12000 cellular network a sign will be provided with
the installation kit.
Figure 24
Figure 25
6. Paint parking lot striping and electric vehicle emblems. These colors, emblems and dimensions will most likely
need to be specified by local jurisdiction to maintain consistency with other installations.
7. Verify that the all the items above have been completed and that the site clean and clear of all construction
debris.
Rev. 4.1—12.12.13
For more information contact Hubbell Wiring Device Kellems
Toll free (800) 288-6000 or www.hubbell-wiring.com
P a g e | 20
PS2000 Installation Instructions
Component housing
installed and
commissioned by
Diebold, Inc
9”x 11”x 12” Steel
mounting bracket
2’-5”
(4) 5/8”x5” Lag bolts
and expansion
anchors secured to
one of the wall
types indicated in
Step 1, P. 19 or
approved equivalent
1 ¼” Conduit
with ¾” conduit
behind
Grade
Rev. 4.1—12.12.13
Front View
Side View
Figure 26
Figure 27
For more information contact Hubbell Wiring Device Kellems
Toll free (800) 288-6000 or www.hubbell-wiring.com
P a g e | 21
PS2000 Installation Instructions
3.4
Securing the component housing and wiring the PEP Station
The following set of instructions outlines the process for securing the PEP Station component housing to the wall mount
bracket. See Figure 28 which shows the rear of the enclosure. The sealing gasket is shown beneath the enclosure. The
large and small conduit bushings, flat washers, locking washers, and nuts are shown below the enclosure.
Steps:
1. Verify that there are (6) 208/240V wires through the 1 ¼” hole and (1) CAT5e Ethernet wire through the ¾” hole
in the bottom of the enclosure. For installations using a cellular or Wi-Fi connection, the 12V power supply wire
needs to be included in the ¾” conduit from the station to router.
Important: A common ground wire may be installed to the PEP Station reducing the wire count to (5).
2. Remove any debris from the top of the steel mounting plate and set the sealing gasket in place.
3. Remove the rear cover of the PEP Station by unscrewing the T-25 tamper proof screws and sliding rear cover off
of the structural frame.
4. While one person holds the enclosure above the bracket, pass (6) 208/240V wires through the 1 ¼” hole in the
bottom of the enclosure and pass the CAT5e Ethernet wire through the ¾” hole. For installations using a cellular
or Wi-Fi connection, the 12V power supply wire needs to be included in the ¾” conduit from the station to
router.
Important: Take extreme caution to not scratch any circuit boards or come in contact with any interior
components when passing the wires through the enclosure.
5. Place the PEP Station component housing on the bracket. The front of the Component Housing shall be oriented
90⁰ clockwise as illustrated in Figure 28. Loosely install one ½” x 1 ½” bolt for stability.
6. Complete all electrical terminations at the whips from the terminal block. Refer to Figure 2-5 on Page 6 and 7
for additional wiring information. The ground wires should terminate at the ground whips on the bottom plate
of the enclosure. If only (1) ground is provided connect the ground to both whips.
Important: Each wire nut should be installed to 15 in-lbs of toque. At least two wraps of electrical
tape are to be used on the wire nuts.
Important: There is a group of yellow, red and black wires with two connectors near the power supply.
These are auxiliary and do not need to be plugged in.
7. For installations where the conduits run underground, use a putty-like sealing and caulking compound around
the wires to seal the 1¼” and ¾” conduits from moisture. This product is commonly referred to as ‘Duct Seal and
is available in the electrical section of most hardware stores.
8. Plug the RJ45 Ethernet connector in to the receiving end on the single board computer.
9. Check that the (2) USB plugs into the USB receptacles on the single board computer.
10. Secure the 12 AWG ground wire from the bottom plate of the enclosure to the rear panel.
11. Replace the removable rear cover of the PEP Station and screw the T-25 tamper proof screws.
12. Rotate the enclosure 90° counterclockwise so that the coiled cords are facing the parking spaces.
13. Install (4) ½” flat washers, (4) ½” locking washers, and (4) ½” x 1½” bolts from the bottom and tighten securely
then continue to 4.0, Startup Procedure.
For more information contact Hubbell Wiring Device Kellems
Toll free (800) 288-6000 or www.hubbell-wiring.com
Rev. 4.1—12.12.13
P a g e | 22
PS2000 Installation Instructions
Tamper proof screw
threaded inserts
Steel mounting plate
secured to approved
wall with (4) 5/8”x5”
Lag bolts
Sealing gasket
1 ¼” Conduit stub
sleeve
¾” Conduit stub sleeve
(4) ½” Flat
washers
(4) ½” Locking
washers
(4) ½” x 1 ½” bolts
Figure 28
Rev. 4.1—12.12.13
For more information contact Hubbell Wiring Device Kellems
Toll free (800) 288-6000 or www.hubbell-wiring.com
P a g e | 23
PS2000 Installation Instructions
4.0
Startup Procedure
The following set of instructions outlines the process to startup the PEP Station.
Steps:
1. Activate power to both circuits of the PEP Station.
2. The unit will begin starting up automatically. This process will look similar to the start up procedure for any PC.
After about 4-5 minutes have elapsed, verify that the screen shown below in Figure 29 is displayed.
Important: When the PEP Station is going through its initial startup, do not touch the screen or
attempt to open/close any programs or applications. It is programmed to launch the program
automatically.
3. Contact the service and technical support help desk at (888) 760-0140 x114 to verify that the PEP Station is
communicating over the internet.
Important: This must be completed and a connection
verified by PEP Stations corporate office.
4. The station owner will have to complete the on-line registration,
assign site administrator(s) and configure the station via a stepby-step set up process at www.pepstations.com before the PEP
station will become available for vehicle charging.
Figure 28
Figure 29
Rev. 4.1—12.12.13
For more information contact Hubbell Wiring Device Kellems
Toll free (800) 288-6000 or www.hubbell-wiring.com
P a g e | 24