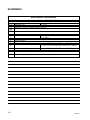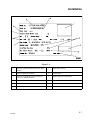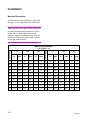
1
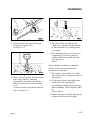
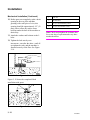
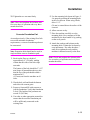
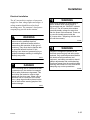
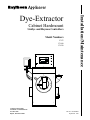
Installation/Maintenance Dye-Extractor Cabinet Hardmount Unidye and Heynau Controllers Model Numbers UY75 UY160 UY230 PanelView 550 Commercial Laundry Technical Communications P.O. Box 990 Ripon, WI 54971-0990 F1 F2 F3 F4 F5 F6 F7 F8 F9 F10 7 8 9 4 5 6 1 2 3 . 0 - Part No. F232048R3 September 1997 Table of Contents Installation/Maintenance Safety Safety Decal Location ...................................... 1–3 Operator Safety ................................................ 1–4 Safe Operating Environment ............................ 1–4 Environmental Conditions ............................ 1–4 Drain Connection ............................................. 2–20 Electrical Installation ....................................... 2–21 Water Connection ............................................ 2–24 Steam Requirements ........................................ 2–25 Air Requirements ............................................. 2–26 Control Function Test ...................................... 2–26 Machine Location ......................................... 1–5 Input and Output Services ............................ 1–6 Maintenance AC Inverter Drive ......................................... 1–7 Daily ................................................................ 3–1 Misuse .............................................................. 1–7 Installation Machine Overview ........................................... 2–1 General Specifications ..................................... 2–3 Uncrating .......................................................... 2–4 Inspection ......................................................... 2–4 Damage Claim .................................................. 2–4 Warranty Registration Form ............................ 2–5 Model Number Familiarization Guide ............. 2–6 Machine Dimensions ........................................ 2–8 Beginning Of Day ........................................ 3–1 End Of Day .................................................. 3–2 Weekly ............................................................. 3–2 Monthly ........................................................... 3–2 Quarterly .......................................................... 3–4 Care Of Stainless Steel .................................... 3–5 Maintenance Checklists ................................... 3–6 Removal From Service Decommissioning .............................................. 4-1 Dimensional Clearances ............................... 2–10 Machine Foundation ........................................ 2–10 Mechanical Installation .................................... 2–12 Expansion Bolt Installation .......................... 2–13 J-Bolt Installation ......................................... 2–14 Elevated Base Frame Installation ................. 2–17 Concrete Foundation Pad ............................. 2–19 F232048 i &RS\ULJKW 5D\WKHRQ &RPPHUFLDO /DXQGU\ $OO ULJKWV UHVHUYHG 1R SDUW RI WKLV ERRN PD\ EH UHSURGXFHG RU WUDQVPLWWHG LQ DQ\ IRUP RU E\ DQ\ PHDQV ZLWKRXW WKH ZULWWHQ SHUPLVVLRQ RI WKH SXEOLVKHU LL F232048 Section 1 Safety Anyone operating or servicing this machine must follow the safety rules in this manual. Particular attention must be paid to the DANGER!, WARNING!, and CAUTION! blocks which appear throughout the manual. CAUTION The following warnings are general examples that apply to this machine. Warnings specific to a particular installation or maintenance procedure will appear in the manual with the discussion of that procedure. DANGER Be careful around the open door, particularly when loading from a level below the door. Impact with door edges can cause personal injury. SW025 Death or serious injury can result if children become trapped in the machine. Do not allow children to play on or around this machine. Do not leave children unattended while the machine door is open. SW001 WARNING Dangerous voltages are present in the electrical control box(es) and at the motor terminals. Only qualified personnel familiar with electrical test procedures, test equipment, and safety precautions should attempt adjustments and troubleshooting. Disconnect power from the machine before removing the control box cover, and before attempting any service procedures. SW005 WARNING This machine must be installed, adjusted, and serviced by qualified electrical maintenance personnel familiar with the construction and operation of this type of machinery. They must also be familiar with the potential hazards involved. If this warning is not observed, personal injury or equipment damage resulting in voiding the warranty may result. SW004 F232048 1–1 Safety CAUTION WARNING Ensure that the machine is installed on a level floor of sufficient strength and that the recommended clearances for inspection and maintenance are provided. Never allow the inspection and maintenance space to be blocked. SW020 Never touch internal or external steam pipes, connections, or components. These surfaces can be extremely hot and will cause severe burns. The steam must be turned off and the pipe, connections, and components allowed to cool before the pipe can be touched. SW014 Key to Symbols 7KH OLJKWQLQJ IODVK DQG DUURZKHDG ZLWKLQ WKH 7KLV ZDUQLQJ V\PERO LQGLFDWHV WKH SUHVHQFH RI WULDQJOH LV D ZDUQLQJ VLJQ LQGLFDWLQJ WKH SRVVLEO\ GDQJHURXV FKHPLFDOV 3URSHU SUHVHQFH RI GDQJHURXV YROWDJH SUHFDXWLRQV VKRXOG EH WDNHQ ZKHQ KDQGOLQJ FRUURVLYH RU FDXVWLF PDWHULDOV 7KH H[FODPDWLRQ SRLQW ZLWKLQ WKH WULDQJOH LV D 7KLV ZDUQLQJ V\PERO LQGLFDWHV WKH SUHVHQFH RI ZDUQLQJ VLJQ LQGLFDWLQJ LPSRUWDQW LQVWUXFWLRQV KRW VXUIDFHV WKDW FRXOG FDXVH VHULRXV EXUQV FRQFHUQLQJ WKH PDFKLQH DQG SRVVLEO\ 6WDLQOHVV VWHHO DQG VWHDP OLQHV FDQ EHFRPH GDQJHURXV FRQGLWLRQV H[WUHPHO\ KRW DQG VKRXOG QRW EH WRXFKHG 7KLV ZDUQLQJ V\PERO LQGLFDWHV WKH SUHVHQFH RI 7KLV ZDUQLQJ V\PERO LQGLFDWHV WKH SUHVHQFH RI SRWHQWLDOO\ GDQJHURXV GULYH PHFKDQLVPV SRVVLEO\ GDQJHURXV SLQFKSRLQWV 0RYLQJ ZLWKLQ WKH PDFKLQH *XDUGV VKRXOG DOZD\V EH PHFKDQLFDO SDUWV FDQ FUXVK DQGRU VHYHU LQ SODFH ZKHQ WKH PDFKLQH LV LQ RSHUDWLRQ ERG\ SDUWV 1–2 F232048 Safety Safety decals appear at crucial locations on the machine. Failure to maintain legible safety decals could result in injury to the operator or service technician. Figure 1–1. F232048 1–3 Safety To provide personal safety and keep the machine in proper working order, follow all operation and safety procedures presented in this manual. If questions regarding safety arise, contact the factory immediately. Use factory-authorized spare parts to avoid safety hazards. Operator Safety c. Close and lock the door and start a cycle. Attempt to open the door while the cycle is in progress. The door should not open. If the door lock and interlock are not functioning properly, call a service technician. 3. Do not attempt to operate the machine if any of the following conditions are present: a. The door does not remain securely locked during the entire cycle. b. Excessively high water level is evident. WARNING NEVER insert hands or objects into basket until it has completely stopped. Doing so could result in serious injury. SW012 To ensure the safety of machine operators, the following maintenance checks must be performed daily: 1. Prior to operating the machine, verify that all warning signs are present and legible. Missing or illegible signs must be replaced immediately. Make certain that spares are available. 2. Check door interlock before starting operation of the machine: a. Attempt to start the machine with the door open. The machine should not start with the door open. c. Machine is not connected to a properly grounded circuit. Do not bypass any safety devices in the machine. Safe Operating Environment Safe operation requires an appropriate operating environment for both the operator and the machine. If questions regarding safety arise, contact the factory immediately. Environmental Conditions • Ambient Temperature. Water in the machine will freeze at temperatures of 32° F or below. b. Close the door without locking it and attempt to start the machine. The machine should not start with the door unlocked. 1–4 F232048 Safety Temperatures above 120° F (50° C) will result in more frequent motor overheating and, in some cases, malfunction or premature damage to solid state devices that are used in some models. Special cooling devices may be necessary. • Humidity. Relative humidity above 90% may cause the machine’s electronics or motors to malfunction or may trip the ground fault interrupter. Corrosion problems may occur on some metal components in the machine. If the relative humidity is below 30%, belts and rubber hoses may eventually develop dry rot. This condition can result in hose leaks, which may cause safety hazards external to the machine in conjunction with adjacent electrical equipment. • Ventilation. The need for make-up air openings for such laundry room accessories as dryers, ironers, water heaters, etc., must be evaluated periodically. Louvers, screens, or other separating devices may reduce the available air opening significantly. • Radio Frequency Emissions. A filter is available for machines in installations where floor space is shared with equipment sensitive to radio frequency emissions. settings (particularly temperature) or desired results may not be achieved. • Chemicals. Keep stainless steel surfaces free of chemical residues. DANGER Do not place volatile or flammable fluids in any machine. Do not clean the machine with volatile or flammable fluids such as acetone, lacquer thinners, enamel reducers, carbon tetrachloride, gasoline, benzene, naptha, etc. Doing so could result in serious personal injury and/or damage to the machine. SW002 • Water Damage. Do not spray the machine with water. Short circuiting and serious damage may result. Repair immediately all seepage due to worn or damaged gaskets, etc. Machine Location • Foundation. The concrete floor must be of sufficient strength and thickness to handle the floor loads generated by the high extract speeds of the machine. • Service/Maintenance Space. Provide sufficient space to allow comfortable performance of service procedures and routine preventive maintenance. • Elevation. If the machine is to be operated at elevations of over 3,280 feet (1,000 meters) above sea level, pay special attention to electronic F232048 1–5 Safety Safe Operating Environment (Continued) This is especially important in connection with machines equipped with an AC inverter drive. Consult installation instructions for specific details. CAUTION Replace all panels that are removed to perform service and maintenance procedures. Do not operate the machine with missing guards or with broken or missing parts. Do not bypass any safety devices. For machines equipped with optional steam heat, install piping in accordance with approved commercial steam practices. • Compressed Air. Best performance will be realized if air is provided at a pressure of 90–95 psi (6.0–6.3 bar). • Drainage System. Provide drain lines or troughs large enough to accommodate the total number of gallons that could be dumped if all machines on the site drained at the same time from the highest attainable level. If troughs are used, they should be covered to support light foot traffic. SW019 Input and Output Services • Water Pressure. Best performance will be realized if water is provided at a pressure of 30–85 psi (2.0–5.7 bar). Although the machine will function properly at lower pressure, increased fill times will occur. Water pressure higher than 100 psi (6.7 bar) may result in damage to machine plumbing. Component failure(s) and personal injury could result. • Steam Heat (Optional) Pressure. Best performance will be realized if steam is provided at a pressure of 30–80 psi (2.0–5.4 bar). Steam pressure higher than 125 psi (8.5 bar) may result in damage to steam components and may cause personal injury. 1–6 • Power. For personal safety and for proper operation, the machine must be grounded in accordance with state and local codes. The ground connection must be to a proven earth ground, not to conduit or water pipes. Do not use fuses in place of the circuit breaker. An easy-access cutoff switch should also be provided. WARNING Ensure that a ground wire from a proven earth ground is connected to the ground lug in the electrical junction box on this machine. Without proper grounding, personal injury from electric shock could occur and machine malfunctions may be evident. Computer-controlled machines must have a proper ground to prevent computer malfunctions. SW008 F232048 Safety Always disconnect power and water supplies before a service technician performs any service procedure. Where applicable, steam and/or compressed air supplies should also be disconnected before service is performed. AC Inverter Drive This machine is equipped with an AC inverter drive requiring special attention with regard to the operating environment. • An especially dusty or linty environment will require more frequent cleaning of the AC inverter drive cooling fan filter and of the AC inverter drive itself. • Power line fluctuations from sources such as uninterruptible power supplies (UPS) can adversely affect machines equipped with the AC inverter drive. • A clean power supply free from voltage spikes and surges is absolutely essential for machines equipped with the AC inverter drive. Nonlinear inconsistencies (peaks and valleys) in the power supply can cause the AC inverter drive to generate nuisance errors. down transformer kit available from the manufacturer. Voltages above 250V and 490V require additional measures. • Sufficient space to perform service procedures and routine preventive maintenance is especially important for machines equipped with the AC inverter drive. Misuse Never use this machine for any purpose other than textile processing. • Never wash petroleum-soaked rags in the machine. This could result in an explosion. • Never wash machine parts or automotive parts in the machine. This could result in serious damage to the basket. • Never allow children to play on or around this machine. Death or serious injury can result if children become trapped in the machine. Do not leave children unattended while the machine door is open. These cautions apply to animals as well. • Never use UY machines in pressurized applications. If input voltage measures above 240V for a Q voltage machine, above 415V for a P voltage machine, or above 480V for an N voltage machine, either ask the power company if their representative can lower the voltage or install a step- F232048 1–7 Safety Notes 1–8 F232048 Section 2 Installation This manual is designed as a guide to the installation and maintenance of the UY 75, 160, and 230 cabinet hardmount dye/ extractors. ([WUDFWLRQ VSHHG FDQ EH SURJUDPPHG WR UXQ DW DQ\ VSHHG XS WR WKH PD[LPXP VSHHG RI WKH SDU WLFXODU PDFKLQH LQ * LQFUHPHQWV :DWHU LV LQMHFWHG LQWR WKH PDFKLQH WKURXJK Machine Overview 7KH GHVLJQ RI WKH PDFKLQH HPSKDVL]HV SHUIRU PDQFH UHOLDELOLW\ DQG D ORQJ VHUYLFH OLIH 7KH F\OLQGHU VKHOO DQG DOO ZHWWHG VXUIDFHV DUH IDE ULFDWHG RI W\SH / FRUURVLRQUHVLVWDQW VWDLQ OHVV VWHHO 7KH RXWHU SDQHOV DUH IDEULFDWHG RI W\SH VWDLQOHVV VWHHO 7KH PDFKLQH XWLOL]HV D VLQJOH PRWRU WR GULYH WKH F\OLQGHU YLD D 9EHOW LQ DOO VSHHGV 7KH F\OLQGHU LV VXSSRUWHG ZLWK WZR VHDOHG EHDULQJV PRXQWHG LQ D PDFKLQHG FDVWLURQ WUXQQLRQ ZKLFK LV EROW HG WR D KHDY\ JDPPD VWHHO IUDPH 7KH IUDPH LV JDOYDQL]HG DQG SDLQWHG WR SURYLGH DGGLWLRQDO UHVLVWDQFH WR FRUURVLRQ 0DFKLQHV ZLWK WKH +H\QDX PLFURFRPSXWHU FRQWURO KDYH SUHVHW G\H VSHHGV DQG FDQ EH UXQ DW DQ\ VSHHG EHWZHHQ DQG 530 XVLQJ WKH VSHHG FRQWURO NQRE RQ WKH FRQWURO SDQHO 7KH VSHHG LV GLVSOD\HG RQ WKH GLJLWDO 530 PHWHU RQ WKH FRQWURO SDQHO ([WUDFW VSHHG LV VHW DW *©V IRU DOO +H\QDX FRQWUROOHG PRGHOV 0DFKLQHV ZLWK WKH 8QL'\H FRQWURO FDQ EH SUR JUDPPHG WR RSHUDWH IURP WR 530 LQ 530 LQFUHPHQWV 3UHVHW VSHHGV DUH QRW UH TXLUHG EHFDXVH WKH SURJUDPPHU VLPSO\ HQWHUV WKH VSHHG WKH PDFKLQH VKRXOG UXQ ZKHQ WKH SUR JUDP LV FUHDWHG 7KH VSHHG LV GLVSOD\HG RQ WKH 3DQHO9LHZ VFUHHQ 8QL'\H PDFKLQHV DOVR KDYH HOHFWULFDOO\ RSHUDWHG YDOYHV 2Q +H\QDX PRG HOV WKH YDOYHV DUH FRQWUROOHG E\ WKH GLJLWDO ZD WHU PHWHU ZKLFK KDV WZR FXVWRPL]DEOH ZDWHU OHYHOV 2Q 8QL'\H PRGHOV SUHVHWV DUH QRW QHHGHG EHFDXVH WKH SURJUDPPHU VLPSO\ HQWHUV WKH YROXPH RI ZDWHU UHTXLUHG 7KH 8QL'\H V\V WHP DOVR SURYLGHV OLTXRU UDWLR FRQWURO 0DQXDO FRQWURO RI WKH ZDWHU OHYHO DW WKH PDFKLQH LV SUR YLGHG RQ ERWK V\VWHPV $ SQHXPDWLFDOO\ RSHUDWHG GUDLQ YDOYH LV XVHG WR UHWDLQ WKH ZDWHU DQG G\H VROXWLRQ LQ WKH PD FKLQH 7KH GUDLQ YDOYH LV LQVWDOOHG LQ D QRUPDO O\ FORVHG FRQILJXUDWLRQ 7KH F\OLQGHU LV GHVLJQHG ZLWK WKUHH OLIWHUV RU ULEV WKDW OLIW WKH JDUPHQWV IURP WKH G\H VROXWLRQ ZKHQ WKH F\OLQGHU URWDWHV DW ORZ VSHHGV DQG DO ORZ WKH JDUPHQWV WR WXPEOH EDFN LQWR WKH VROX WLRQ 7KH F\OLQGHU LV SHUIRUDWHG DOORZLQJ WKH ZDWHU WR SDVV WKURXJK DQG GUDLQ IURP ZLWKLQ GXULQJ WKH G\H SURFHVV DQG H[WUDFWLRQ 7KH GRRUORFN V\VWHP SUHYHQWV RSHQLQJ RI WKH VWDLQOHVV VWHHO GRRU ZKHQ ZDWHU LV LQ WKH PD FKLQH ,W DOVR SUHYHQWV WKH PDFKLQH IURP RSHU DWLQJ ZKHQ WKH GRRU LV RSHQ $ OLTXRU VDPSOH YDOYH LV ORFDWHG QHDU WKH ERW WRP RQ WKH ULJKW VLGH RI WKH PDFKLQH DV YLHZHG IURP WKH IURQW 7KLV YDOYH LV SURYLGHG WR DOORZ G\H VROXWLRQ VDPSOHV WR EH WDNHQ DW DQ\ WLPH YDULDEOH VSHHG H[WUDFWLRQ F232048 2–1 Installation $ WDQN DXWRPDWLF VXSSO\ GLVSHQVHU $6' LV PRXQWHG RQ WKH OHIW VLGH RI WKH PDFKLQH DV VHHQ IURP WKH IURQW 7KH $6' LV GHVLJQHG WR DXWR PDWLFDOO\ LQMHFW OLTXLG VXSSOLHV LQWR WKH PD FKLQH DW WKH WLPHV VSHFLILHG LQ WKH SURJUDP 7KH $6' FDQ DOVR EH RSHUDWHG PDQXDOO\ IURP PDQXDO RYHUULGH EXWWRQV RQ WKH +H\QDX FRQ WUROOHG PDFKLQHV DQG IURP IXQFWLRQ NH\V RQ WKH IURQW SDQHO RI 8QL'\H FRQWUROOHG PDFKLQHV $ VDOWFKHPLFDO SRUW LV SURYLGHG VR WKDW VDOW RU RWKHU VXEVWDQFHV QRW VXLWDEOH IRU XVH LQ WKH DX WRPDWLF VXSSO\ GLVSHQVHU FDQ EH DGGHG GXULQJ WKH G\H F\FOH (OHFWULFDO FRQWUROV DORQJ ZLWK WKH $& LQYHUWHU GULYH DUH LQVWDOOHG LQ D VSODVKUHVLVWDQW HQFOR VXUH PRXQWHG RQ WRS RI WKH PDFKLQH 6HUYLFH DFFHVV LV SRVVLEOH E\ UHPRYLQJ WKH WRS DQG VLGHV RI WKH HQFORVXUH Note: All information, illustrations, and specifications contained in this manual are based on the latest product information available at the time of printing. We reserve the right to make changes at any time without notice. 2–2 F232048 Installation F232048 2–3 Installation General Specifications Specification UY 75 UY 160 UY 230 Overall Dimensions Overall width, in/mm 43 / 1092 47 / 1194 51 / 1295 Overall height, in/mm 56-1/4 / 1429 61 / 1550 64 / 1626 Overall depth, in/mm 41-1/2 / 1054 48 / 1219 52 / 1321 Weight and Shipping Information Net weight, lb/kg 620 / 281 900 / 408 1070 / 485 Domestic shipping weight, lb/kg 710 / 322 1020 / 463 1190 / 540 Domestic shipping volume, ft3/m3 71.3 / 2.02 115.6 / 3.27 130.2 / 3.69 Export shipping weight, lb/kg 860 / 390 1170 / 531 1340 / 608 Export shipping volume, ft3/m3 81.7 / 2.32 129.9 / 3.69 145.5 / 4.12 21 / 533 26.25 / 667 30 / 762 Cylinder depth, in/mm 13.75 / 349 18.375 / 467 20 / 508 Cylinder volume, ft3/l 2.76 / 78.1 5.76 / 163.1 8.18 / 232 12 / 305 13.9375 / 354 16.25 / 413 17.25 / 438 19 / 480 18.25 / 465 3 / 2.24 5 / 3.73 Wash Cylinder Information Cylinder diameter, in/mm Door Opening Information Door opening size, in/mm Height of door bottom above floor, in/mm Drive Train Information Motor power, hp/kW 1 / 0.746 Cylinder Speeds Dye/reverse speed, rpm 4–60 4-60 4-60 Extract speed, rpm 525 470 440 Extract speed centrifugal force, G’s 82.1 82.3 82.4 7.8 15.6 23.4 3 6 9 2.6 2.6 2.6 Electrical Heating (Optional) Total electrical heating capacity, kW Number of electrical heating elements Electrical heat element size, kW 2–4 F232048 Installation Delivery Inspection Customer Service Upon delivery, visually inspect crate, protective cover and unit for any visible shipping damage. If the crate, protective cover, or unit are damaged or signs of possible damage are evident, have the carrier note the condition on the shipping papers before the shipping receipt is signed, or advise the carrier of the condition as soon as it is discovered. If literature or replacement parts are required, contact the source from whom the dyeextractor was purchased or contact Raytheon Commercial Laundry at (920) 748-3950 for the name of the nearest authorized parts distributor. Remove the crate and protective cover as soon after delivery as possible. If any damage is discovered upon removal of the crate and/or protective cover, advise the carrier and file a written claim immediately. For technical assistance, call any of the following numbers: (850) 718-1035 (850) 718-1026 Marianna, Florida (920) 748-3121 Ripon, Wisconsin A record of each dye-extractor is on file with the manufacturer. The serial number decal is located on the left side of the control module at the rear of the machine. Figure 2–1 shows the location of the serial number on the decal. Always provide the machine’s serial number and model number when ordering parts or when seeking technical assistance. F232048 2–5 Installation Notes Model Number Familiarization Sample Model Number: UY160PVQU10001 UY Machine Type 75 160 230 Machine Capacity (cylinder volume in liters) H A Type of Electrical Control V Variable Speed Q P N Electrical Characteristics U1 Design Series 0001 2–6 Y = Dye H = Heynau ES24-S A = Unidye Q = 200–240V/50–60Hz/3Ph/3 wire/120V Control P = 380–415V/50–60Hz/3Ph/3 wire/120V Control N = 440-480V/50–60Hz/3Ph/3 wire/120V Control Option Identification (varies from machine to machine) F232048 Installation Figure 2–1. 1 Electrical Connection Data: Hertz, Wire, Phase, Voltage 7 Brand Name Location 2 Machine Operation Parameters 8 Machine Mass 3 Required Circuit Breaker Size for Electrical Connection. Do not use fuses. 9 Machine approval (as applicable) 4 Electrical Connection Data: Amps 10 Steam Heat Connection Data 5 Model Number 11 Date of Manufacture of Individual Machine 6 Recorded Serial Number for Individual Machine F232048 2–7 Installation Machine Dimensions The dimensions of this machine are indicated in Figure 2–2 and specified in the table below. Note: Dimensions are approximate and subject to normal manufacturing tolerances. If exact dimensions are required for construction purposes, request certified drawings from the factory. We reserve the right to make changes at any time without notice. Machine Dimensions (see Figure 2–2) 160 230 in mm in mm in mm A 51.25 1302 58 1473 60.25 1530 B 9 229 10 254 10 C 26 660 30.125 765 D 8 203 8 E 34 864 F 56.25 G Dimension Dimension 75 75 160 230 in mm in mm in mm K 2.5 64 2.375 60 2.25 57 254 L 8 203 5 127 5 127 34 864 M 42.25 1073 47 1194 50 1270 203 8 203 N 8 203 8 203 8 203 37.5 953 39.5 1003 O 7.75 197 10.5 267 11.25 286 1429 61 1550 64 1626 P 31.5 800 33.75 857 37 940 9.5 241 9.5 241 9.5 241 Q 9.5 241 12.5 318 12.75 324 H 5 127 4.25 108 4.75 121 R 25.5 648 34 864 34.75 883 I 6.25 159 6.5 165 8.25 210 S 10.25 260 12 305 10.5 267 J 3.25 83 3.5 89 3.25 83 T 10.5 267 16 406 14 356 2–8 F232048 Installation 6 B 5 4 D F 7 A 3 8 E 2 G H K I C 1 J N O L M P Q T S R Y057R Figure 2–2. 1 Drain 5 Air Inlet 2 Condensate/Cooling return 6 Hot water inlets 3 Cooling water inlet 7 Cold water inlet 4 Electrical connection 8 Steam Inlet F232048 2–9 Installation Machine Dimensions (Continued) Machine Foundation Dimensional Clearances Allow a minimum of 30" (762 mm) at the rear and sides and 36" (914 mm) between machines in multiple installations. Figure 2–3 shows the dimensional clearances. Note: Do not mount on wooden floors, above ground level, or over basements or crawlspaces. Installation must be “slab on grade” or equivalent. CAUTION Dimensional Clearances (see Figure 2–3) UY 75 UY 160 UY 230 in mm in mm in mm A 30 762 30 762 30 762 B 43 1092 48-1/8 1222 52 1321 C 36 914 36 914 36 914 D 12 305 14 356 16-1/4 413 E 41-1/2 1054 47 1194 47-3/4 1213 F 30 762 30 762 30 762 Ensure that the machine is installed on a level floor of sufficient strength and that the recommended clearances for inspection and maintenance are provided. Never allow the inspection and maintenance space to be blocked. SW020 A proper foundation is absolutely necessary for all machines because of the high extract speed and the G-forces exerted. Thoroughness of detail must be stressed with all foundation work to insure a stable unit installation, eliminating possibilities of excessive vibration during extract. The machine must be secured to a foundation or floor of adequate construction. The floor must be no less than 4" (10 cm) thick. The concrete floor must be embedded in clean, compacted fill dirt. Figure 2–3. 2–10 F232048 Installation The machine must be anchored to a smooth level surface so that the entire base of the machine is supported and rests on the mounting surface. (Do not support the machine on only four points.) Anchor bolts must be a minimum of 5/8" diameter, grade 2. Care must be exercised in the design of the mounting base due to the force exerted by the machine during extract. Static and dynamic loads on the floor or foundation are shown in the table below. This table can be used as a reference when designing floors and foundations. If the existing floor fails to meet these minimum requirements, a concrete foundation pad must be constructed. Floor Load Data Specification UY 75 UY 160 UY 230 Static floor load, lbs/kN 812 / 3.61 1234 / 5.49 1552 / 6.90 Static pressure, lbs-ft2/kN-m2 176 / 8.44 173 / 8.31 189 / 9.06 Maximum dynamic load, lbs/kN 296 / 1.31 581 / 2.58 860 / 3.83 Dynamic pressure, lbs-ft2/kN-m2 64.4 / 3.08 82 / 3.91 97 / 4.64 8.75 7.83 7.50 Dynamic load frequency, Hz F232048 2–11 Installation Mechanical Installation UY75 UY160 UY230 Figure 2–4. 2–12 F232048 Installation Installation on an existing concrete floor may be accomplished using either expansion bolts or J-bolts. An elevated base frame may also be used to raise the machine if desired. In each case, the floor must be at least 4" (102 mm) thick and of good quality. If the floor fails to meet the above requirements, a concrete foundation pad must be constructed. Note: Improper installation may void the warranty. Consult the manufacturer or the distributor before deviating from the following procedures. Figure 2–5. 3. Set the drill depth gauge to 2-9/16" (65 mm). See Figure 2–6. Expansion Bolt Installation Note: If the floor is not level and even, use J-bolts and machinery grout to ensure a stable installation. Use the following instructions and Figures 2–5 through 2–10 as a guide to step-by-step installation of the expansion bolts. 1. Verify that the floor is at least 4" (102 mm) thick and of good quality. If the floor fails to meet the above requirements, a concrete foundation pad must be constructed. Figure 2–6. 4. Drill the holes to the set depth. See Figure 2–7. 2. Use the base of the machine as a template by positioning the machine in the desired location and marking the pre-drilled mounting holes on the floor. See Figure 2– 5. Figure 2–7. F232048 2–13 Installation Mechanical Installation (Continued) 5. Use compressed air or a squeeze bulb to remove debris from the hole. See Figure 2–8. The completed expansion bolt installation is shown in Figure 2–10. Figure 2–10. Figure 2–8. 6. Install the machine anchors using the included tool. 7. Secure the machine to the floor using the bolts furnished with the anchors. See Figure 2–9. 1 Washer 2 Lock Nut 3 Machine Base 4 5/8" (19 mm) diameter Expansion Bolt Note: Check and retighten the locknuts after five to ten days of operation and every three months thereafter. J-Bolt Installation Figure 2–9. Install J-bolts in concrete per the mounting bolt layout in Figure 2–4. Use the following instructions and Figures 2–11 through 2–15 as a guide to step-by-step installation of the J-bolts. 1. Verify that the floor is at least 4" (102 mm) thick and of good quality. If the floor fails to meet the above requirements, a concrete foundation pad must be constructed. 2. Adjust the drill depth gauge to match the length of the J-bolt, minus 1-1/2" (38 mm). See Figure 2–11. 2–14 F232048 Installation Figure 2–11. 3. Drill and chisel out a conical hole large enough to accept the J-bolt. See Figure 2–12. Figure 2–13. 5. Place the machine carefully over the J-bolts. Never attempt to lift the machine by the door handle or by pushing on the cover panels. 6. If the mounting surface is level and even and grouting is not desired, place the washers and lock nuts on the mounting bolts and skip to step 11. When installing a machine on a mounting surface which is not level and even, the machine must be grouted. Figure 2–12. 4. Remove debris from hole. Anchor J-bolt in place, using “Sulfaset” anchoring compound or equivalent; verify that the Jbolts are in the correct locations and that 1-1/2" (38 mm) of each J-bolt protrudes from the floor. See Figure 2–13. 7. Raise and level the machine 1/2" off the floor on three points, using spacers such as nut fasteners. 8. Fill the space between the machine base and the floor with a good quality non-shrinking machinery grout to ensure a stable installation. Grout completely under all frame members. 9. Remove the spacers carefully, allowing the machine to settle into the wet grout. F232048 2–15 Installation Mechanical Installation (Continued) 10. Before grout sets completely, make a drain opening in the rear of the machine grouting with a stiff piece of wire; this opening should be approximately 1/2" (13 mm) wide to allow any surface water build-up under the base of the machine to drain away. 11. Attach the washers and locknuts to the Jbolts. 1 Lock Nut 2 Machine Base 3 1/2" (13 mm) Machinery Grout 4 5/8" (19 mm) diameter J-bolt Note: Check and retighten the locknuts after five to ten days of operation and every three months thereafter. 12. Tighten the lock nuts by even increments—one after the other—until all are tightened evenly and the machine is fastened securely to the floor. See Figure 2–14. Figure 2–14. Figure 2–15 shows the completed J-bolt installation with grout. Figure 2–15. 2–16 F232048 Installation Elevated Base Frame Installation Factory-built elevated steel base frames are designed to meet the specifications of the appropriate model dye/extractor. See Figure 216. 2. Adjust the drill depth gauge to match the length of the J-bolt, minus 1-1/2" (38 mm). See Figure 2–18. Figure 2–18. Figure 2–16. 3. Drill and chisel out a conical hole large enough to accept the J-bolt. See Figure 2–19. Use Figures 2–11 through 2–15 and the following instructions as a guide to step-bystep installation of the elevated base frame. 1. Use the elevated base frame as a template by positioning the frame in the desired location and marking the pre-drilled mounting holes on the floor. See Figure 2– 17. Figure 2–19. Figure 2–17. F232048 2–17 Installation Mechanical Installation (Continued) 4. Remove debris from hole. Anchor J-bolt in place, using “Sulfaset” anchoring compound or equivalent; verify that the Jbolts are in the correct locations and that 1-1/2" (38 mm) of each J-bolt protrudes from the floor. See Figure 2–20. 10. Tighten the lock nuts by even increments—one after the other—until all are tightened evenly and the base frame is fastened securely to the floor. See Figure 2–21. Figure 2–21. Figure 2–20. 5. Raise and level the base frame 1/2" (13mm) off the floor on three points, using spacers such as nut fasteners. 6. Fill the space between the frame base and the floor with machinery grout; grout completely under all frame members. 7. Remove the spacers carefully, allowing the base frame to settle into the wet grout. 8. Before grout sets completely, make a drain opening in the rear of the machine grouting with a stiff piece of wire; this opening should be approximately 1/2" (13 mm) wide to allow any surface water build-up under the base of the machine to drain away. 11. After the grout is completely dry, tighten all of the lock nuts to 100 ft-lbs (136 N/m) torque. 12. Position the machine over the base frame, aligning the mounting holes on the machine with the corresponding holes on the frame. 13. Install a bolt, lockwasher, and nut in each mounting hole. Use 5/8–18x2" grade 5 mounting bolts with 5/8–18" grade B nuts and 5/8 lockwashers. 14. Handtighten each nut. 15. Tighten the two rear nuts two turns. 16. Tighten the two front nuts two turns. 17. On 160s and 230s, firmly tighten the two middle nuts. 18. Tighten the two front nuts firmly. 9. Attach the washers and locknuts to the Jbolts after the grout has hardened. 2–18 F232048 Installation 19. Tighten the two rear nuts firmly. Note: Check and retighten the locknuts after five to ten days of operation and every three months thereafter. 5. Use the mounting bolt layout in Figure 2– 4 to properly position the mounting bolts in the wet concrete. When using J-bolts, allow 1 1/2" (38 mm) to extend above the surface of the concrete. 6. Allow concrete to dry. Concrete Foundation Pad As noted previously, if the existing floor fails to meet the minimum foundation requirements, a concrete foundation pad must be constructed. Note: Expansion bolts should not be used in single machine concrete foundation pads. 1. Break up the floor to a depth of approximately 9" (230 mm), making certain that the sides of the hole slope outwards. 7. Place the machine carefully over the mounting bolts. Never attempt to lift the machine by the door handle or by pushing on the cover panels. 8. Attach the washers and locknuts to the mounting bolts. Tighten the lock nuts by even increments—one after the other— until all are tightened evenly and the machine is fastened securely to the floor. Note: Check and retighten the locknuts after five to ten days of operation and every three months thereafter. The bottom of the hole should be 5" (127 mm) larger all around than the top; note that the top of the pad should extend a minimum of 6" (152 mm) out from the machine on all sides. 2. Wet the hole well and brush the bottom and sides with cement grout. 3. Prepare a form and fill with concrete to join the foundation. Verify that foundation is level. The height of the pad must not exceed 8" (203 mm). 4. Use rebar or other appropriate material to ensure that the concrete foundation pad will be sufficiently connected to the existing floor. F232048 2–19 Installation Drain Connection the customer or installer should contact the manufacturer. A drain system of adequate capacity is essential to machine performance. Ideally, the water should empty through a flexible connection directly into a sump or floor drain. A flexible connection must be made to a vented drain system to prevent an airlock or siphon effect. Increasing the drain hose length or using elbows or bends decreases the flow rate and increases drain times, impairing machine performance. If the machine is equipped with the optional indirect steam heating/water cooling option, drainage must also be provided for the two 1/ 2" NPT (13 mm) condensate/cooling outlets. If proper drain size is not available or practical, a surge tank is required. A surge tank in conjunction with a sump pump should be used when gravity drainage is not possible, such as in below-ground-level installations. In multiple machine installations, use the information in the following table to ensure proper drainage. Before any deviation from specified installation procedures is attempted, Drain Information Specification UY 75 UY 160 UY 230 1.5 / 3.8 1.5 / 3.8 1.5 / 3.8 2 / 52 2 / 52 3 / 76 1 1 1 Drain flow capacity, gal-min/l-min 20 / 76 35 / 132 50 / 189 Recommended drain pit size, ft3/l 1.80 / 51 3.14 / 88.9 4.52 \ 128 Overflow size, in/mm Drain connection size, ID, in/mm Number of drain outlets Drain Line Sizing Model Number of Machines 1 2 3 4 5 UY 75 2" / 5.08 cm 3" / 7.62 cm 3" / 7.62 cm 4" / 10.2 cm 4" / 10.2 cm UY 160 2” / 5.08 cm 3" / 7.62 cm 3.5" / 8.89 cm 4" / 10.2 cm 4" / 10.2 cm UY 230 3" / 7.62 cm 4" / 10.2 cm 6" / 15.2 cm 6" / 15.2 cm 6" / 15.2 cm 2–20 F232048 Installation Electrical Installation The AC inverter drive requires a clean power supply free from voltage spikes and surges. A voltage monitor should be used to check incoming power. The customer’s local power company may provide such a monitor. WARNING This machine must be installed, adjusted, and serviced by qualified electrical maintenance personnel familiar with the construction and operation of this type of machinery. They must also be familiar with the potential hazards involved. If this warning is not observed, personal injury or equipment damage resulting in voiding the warranty may result. SW004 DANGER When controlling the AC inverter drive with a parameter unit, the machine’s computer and its safety features are bypassed. This would allow the basket to rotate at high speeds with the door open. When using a parameter unit to control the AC inverter drive, a large sign should be placed on the front of the machine warning people of the imminent danger. WARNING Never touch terminals or components of the AC inverter drive unless power is disconnected and the “CHARGE” indicator LED is off. The AC inverter drive retains potentially deadly voltage for some time after the power is disconnected. There are no user-serviceable parts inside the AC inverter drive. Tampering with the drive will void the warranty. SW009 WARNING Dangerous voltages are present in the electrical control box(es) and at the motor terminals. Only qualified personnel familiar with electrical test procedures, test equipment, and safety precautions should attempt adjustments and troubleshooting. Disconnect power from the machine before removing the control box cover, and before attempting any service procedures. SW005 SW003 F232048 2–21 Installation Electrical Installation (Continued) require additional measures. Contact the distributor or the manufacturer for assistance. The AC drive provides thermal overload protection for the drive motor. However, a separate three-phase circuit breaker must be installed for complete electrical overload protection. This prevents damage to the motor by disconnecting all legs if one should be lost accidentally. Refer to the table below for circuit breaker requirements. Do not use fuses in place of the circuit breaker. Use wire size indicated in the Voltage Designation Chart for runs up to 50 feet. Use next larger size for runs of 50 to 100 feet. Use two sizes larger for runs greater than 100 feet. Note: UY models must be connected to threephase service. The use of Roto-Phases or other phase adders is forbidden. If input voltage measures above 240V for a Q voltage machine, above 415V for a P voltage machine, or above 480V for an N voltage machine, either ask the power company if their representative can lower the voltage or install a step-down transformer kit available from the manufacturer. Voltages above 250V and 490V Note: If a Delta supply system is used, the high leg must be connected to L3. Voltage Designation Chart Model 75 160 230 Code Voltage Cycle Phase Wire Full Load Amps Breaker Size (Amps) AWG mm2 N 440-480 50-60 3 3 2.6 15 14 2.50 P 380-415 50-60 3 3 3.0 15 14 2.50 Q 200-240 50-60 3 3 5.8 15 14 2.50 N 440-480 50-60 3 3 4.2 15 14 2.50 P 380-415 50-60 3 3 4.8 15 14 2.50 Q 200-240 50-60 3 3 9.2 15 14 2.50 N 440-480 50-60 3 3 6.7 15 14 2.50 P 380-415 50-60 3 3 7.8 15 14 2.50 Q 200-240 50-60 3 3 14.7 20 12 4.00 Note: wire sizes shown are for copper, THHN, 90° conductor per NEC article 310. The machine should be connected to an individual branch circuit not shared with 2–22 lighting or other equipment. F232048 Installation The connection should be shielded in a liquidtight or approved flexible conduit with proper conductors of correct size installed in accordance with the National Electric Code or other applicable codes. The connection must be made by a qualified electrician using the wiring diagram provided with the machine. See the table below for correct wire sizes. Rotation should be forward in extract. To change the direction of basket rotation, have a qualified electrician switch any two of the leads between the AC inverter drive and the motor. F232048 2–23 Installation Water Connection Water Supply Information Individual hot and cold plumbing lines with individual shut-off valves must be available to the machine. Best performance will be realized if water is provided at a pressure of 30–85 psi. Although the machine will function properly at lower pressure, increased fill times will occur. Water inlet connection size, in/mm 3/4 NHT / 19 Flush the water system for at least 2 minutes. Hang the hoses in a large loop; do not allow them to kink. The hose connections should be supplied by a hot and a cold water line of at least the sizes shown in the adjacent table. Installation of additional machines will require proportionately larger water lines. See the adjacent table. Suitable air cushions should be installed in supply lines to prevent “hammering.” If the water pressure is above 60 psi, flexible copper tubing should be used in place of rubber hoses. Number of water inlets 3 Supply Dispenser flush inlet size 3/4 NHT / 19 Recommended water pressure, psi/bar 30-85 / 2-6 Functioning limits, psi/bar 10-120 / 0.5-8 Inlet flow capacity, gal-min/l-min (80psi) 12 / 45 Water Supply Line Sizing Number of Machines Supply Line Size, in/mm Main Hot/Cold 1 0.75 / 19 0.75 / 19 2 1.0 / 25 0.75 / 19 3 1.25 / 32 1.0 / 25 4 1.5 / 38 1.0 / 25 An additional water supply line must be provided for the 3/4" NHT (19 mm) supply tank flush inlet. 2–24 F232048 Installation Steam Requirements Indirect Steam Heating/Water Cooling Option WARNING Never touch internal or external steam pipes, connections, or components. These surfaces can be extremely hot and will cause severe burns. The steam must be turned off and the pipe, connections, and components allowed to cool before the pipe can be touched. SW014 For machines equipped with optional indirect steam heating/water cooling, an additional cold water supply line must be provided for the 1/2" NPT (13 mm) cooling inlet. See the table below for more information about the indirect steam heating/water cooling option. Indirect Steam Option Condensate return/cooling water drain connection size, in/mm Install piping in accordance with approved commercial steam practices. Steam requirements are shown in the table below. Number of condensate return/cooling water drains 1/2 NPT / 13 2 Cooling water connection size, in/mm 1/2 NPT / 13 Number of cooling water inlets 1 Steam Supply Information Steam inlet connection size, in/mm 1/2 NPT / 13 Number of steam inlets 1 Recommended pressure, psi/bar 50 / 3.4 Maximum pressure, psi/bar 80 / 5.4 The condensate return/cooling water drains should either drain through an elbow and pipe into a floor drain or directly into a closed drain system. Recommended Boiler Sizes F232048 Model Bhp kW UY 75 0.8 7.8 UY 160 1.5 14.7 UY 230 2.25 22.0 2–25 Installation Air Requirements A clean, dry compressed air source is required to operate the drain valve(s) and the supply tank drain valves. The compressed air inlet for the machine is on the rear of the machine. Air Supply Information Air inlet connection size, in/mm 1/4 / DN6 Number of air inlets 1 Recommended air pressure, psi/bar 90-95 / 6.0-6.3 Functioning limits, psi/bar 90-100 / 6.0-6.7 a. Open the loading door by pressing and holding the door unlock button on the front of the control panel and then pressing the door handle button and turning the handle clockwise. b. Attempt to start the machine with the door open. The machine should not start with the door open. c. Close the door without locking it and attempt to start the machine. The machine should not start with the door unlocked. d. Close and lock the door and start a cycle. Attempt to open the door while the cycle is in progress. The door should not open. Control Function Test e. Open the sample port while the cylinder is rotating. The cylinder should stop. The machine should be cleaned after the installation is complete. A function test should then be executed on the unloaded machine: If the door lock and interlock are not functioning properly, call a service technician. 1. Verify that the wire tie which keeps the door lock open is removed. 2. Check the power supply for such characteristics as correct voltage, phase, and cycles to be certain they are correct for the machine. 3. Open manual shut-off valves to the machine. 6. Run a complete cycle, checking operation of water inlet valves, drain, and extract functions. 7. Rotation must be forward in the extract step. If rotation is not forward in the extract step, disconnect power. A qualified electrician must reverse any two leads between the AC inverter drive and the motor. 4. Turn on electric power. 5. Check the door interlock before starting operation: 2–26 F232048 Section 3 Maintenance Routine maintenance maximizes operating efficiency and minimizes downtime. The maintenance procedures described below will prolong the life of the machine and help prevent accidents. CAUTION Replace all panels that are removed to perform service and maintenance procedures. Do not operate the machine with missing guards or with broken or missing parts. Do not bypass any safety devices. SW019 Daily, weekly, monthly, and quarterly checklists are provided at the end of this section. Laminate the checklists to preserve them for repeated copying. Operators and technicians are encouraged to add checks specific to their machine’s particular application. Space is provided on the checklists for this purpose. The following maintenance procedures must be performed regularly at the required intervals. Daily Beginning of Day 1. Inspect water inlet valve hose connections on the back of the machine for leaks. 2. Inspect steam hose connections for leaks. 3. Verify that insulation is intact on all external wires and that all connections are secure. If bare wire is evident, call a service technician. 4. Check door interlock before starting operation: a. Attempt to start the machine with the door open. The machine should not start with the door open. b. Then, close the door without locking it and attempt to start the machine. The machine should not start with the door unlocked. c. Close and lock the door and start a cycle. Attempt to open the door while the cycle is in progress. The door should not open. If the door lock and interlock are not functioning properly, call a service technician. F232048 3–1 Maintenance Daily (Continued) Weekly 1. Check the machine for leaks. Note: Leave loading door open at the end of each completed cycle to allow moisture to evaporate. Unload the machine promptly after each completed cycle to prevent moisture buildup. a. Start an unloaded cycle to fill the machine. b. Verify that door and door gasket do not leak. c. Verify that the drain valve is operating. End of Day 1. Clean the two fan intake filters located on either side of the control enclosure. a. Snap off the external plastic cover which contains the filter. Remove the foam filter from the cover. b. Wash the filter in a mild soap solution or vacuum it clean. 2. Clean the door gasket of residual chemicals and all foreign matter. 3. Flush supply tanks with clean water. 4. Clean the machine’s top, front, and side panels with mild detergent. Rinse with clean water. 5. Leave loading door open at the end of each day to allow moisture to evaporate. 3–2 Monthly Note: Disconnect power to the machine at its source before performing the monthly maintenance procedures. 1. Clean the AC drive fins: a. Remove the top and right side of the control module as seen from the front. b. Blow the fins clean using compressed air at a pressure of 60–90 psi or canned compressed air. Use care to avoid damaging cooling fan or other components. Note: No amount of visible foreign matter should be allowed to accumulate on the fins or the finger guard. F232048 Maintenance 2. Use the following procedures to determine if V-belt(s) require(s) replacement or adjustment. Call a qualified service technician in either case. a. Check V-belt(s) for uneven wear and frayed edges. b. Verify that V-belt(s) are properly aligned by checking pulley alignment. Place a straightedge across both pulley faces. The straightedge should make contact with the pulleys in four places. See Figure 3–2. 6. Clean interior of machine, both basket and shell, by wiping with a watersoaked sponge or cloth. 7. Use compressed air to ensure that all electrical components are free of moisture and dust. 8. Check the air filter/regulator/lubricator: a. If water has accumulated in the filter bowl, drain by pushing on the small valve at the bottom of the bowl. b. Check the level in the oil reservoir bowl. If it is below the empty line, shut off air service to the machine and refill up to the full line. Use a misting type oil, 50-150 SSU at 100°F (38°C). Figure 3–1. 1 Drive Motor 2 Motor Pulley 3 Straight Edge 4 Basket Pulley 3. Remove back panel and check overflow hose and drain hose for leaks. 4. Tighten motor mounting bolt locknuts and bearing bolt locknuts, if necessary. 5. Use compressed air to clean lint from motor. F232048 3–3 Maintenance Quarterly Note: Disconnect power to the machine before performing the quarterly maintenance procedures. 1. Tighten door hinges and fasteners, if necessary. 2. Tighten anchor bolts. 3. Check all painted surfaces for bare metal. (Matching gray paint is available from the manufacturer.) • If bare metal is showing, paint with primer or solvent-based paint. • If rust appears, remove it with sandpaper or by chemical means. Then paint with primer or solvent-based paint. 4. Clean steam filter, where applicable. a. Turn off steam supply and allow time for the valve to cool. b. Unscrew nut. c. Remove element and clean. d. Replace element and nut. 5. Clean the air filter/regulator/lubricator: a. Shut off air service to the machine. b. Use compressed air to clean the filter element. c. Use warm water to clean the bowls, if necessary. 3–4 Care of Stainless Steel Maintain the natural beauty of stainless steel and prolong its service life by following these steps: 1. Ordinary deposits of dirt and grease can be removed with detergent and water. The metal should be thoroughly rinsed and dried after washing. Periodic cleaning will help to maintain the bright surface appearance and prevent corrosion. 2. Contact with dissimilar metals should be avoided whenever possible. This will help prevent galvanic corrosion when salty or acidic solutions are present. 3. Salty or acidic solutions should not be allowed to evaporate and dry on stainless steel. They may cause corrosion. Ensure that the stainless steel is wiped clean of acidic solution residues. 4. Deposits that adhere to the stainless steel should be removed, especially from crevices and corners. When using abrasive cleaners, always rub in the direction of the polish lines or “grain” of the stainless steel to avoid scratch marks. Never use ordinary steel wool or steel brushes on the stainless steel. Use stainless steel wool or soft nonmetal bristle brushes. 5. If the stainless steel appears to be rusting, the source of the rust may actually be an iron or steel part not made of stainless steel, such as a nail or screw. One remedy is to paint all carbon steel parts with a heavy protective coating. Stainless steel fasteners should be used whenever possible. F232048 Maintenance Care of Stainless Steel (Continued) 6. Discolorations or heat tint from overheating may be removed by scouring with a powder or by employing special chemical solutions. 7. Sanitizers or sterilizing solutions should not be left in stainless steel equipment for prolonged periods of time. They often contain chlorine, which may cause corrosion. The stainless steel should be cleaned and rinsed thoroughly of any solution containing chlorine. F232048 3–5 Maintenance Daily Preventive Maintenance Checklist Machine ____________________________ Week of: ________________ Days Operator ___________________________ Checks 1 2 3 4 5 6 7 OBSERVE ALL SAFETY WARNINGS! Beginning of Day 1. Inspect water inlet valve hose connections on the back of the machine for leaks. 2. Inspect steam hose connections for leaks (where applicable). 3. Verify that insulation is intact on all external wires and that all connections are secure. 4. Inspect door lock and interlock before starting operation: a. Attempt to start the machine with door open. b. Close the door without locking it and attempt to start the machine. c. Close and lock the door, start a cycle, and attempt to open the door while the cycle is in progress. End of Day 1. Clean the air intake filters. 2. Clean the door gasket of all foreign matter. 3. Flush the supply tanks. 4. Clean the machine’s top, front, and side panels. 5. Leave loading door open at the end of each day to allow moisture to evaporate. 6. 7. NOTE: Leave loading door open after each completed cycle to allow moisture to evaporate. NOTE: Unload the machine promptly after each completed cycle to prevent moisture buildup. 3–6 F232048 Maintenance Weekly Preventive Maintenance Checklist Machine ____________________________ Month __________ Week Ending: Operator ___________________________ Checks / / / / / OBSERVE ALL SAFETY WARNINGS! 1. Check the machine for leaks: a. Start an unloaded cycle to fill the machine. b. Verify that door and door gasket do not leak. c. Verify that the drain valve is operating. 2. 3. 4. 5. 6. 7. F232048 3–7 Maintenance Monthly Preventive Maintenance Checklist Machine ________________________ Month Operator _______________________ Checks OBSERVE ALL SAFETY WARNINGS! Disconnect power to the machine before performing the monthly maintenance procedures. 1. Clean the AC drive fins. 2. Determine if V-belt(s) require(s) replacement or adjustment: a. Check V-belt(s) for uneven wear and frayed edges. b. Verify that V-belt(s) is (are) properly aligned. 3. Remove back panel and check hoses for leaks. 4. Tighten motor mounting bolt locknuts and bearing bolt locknuts, if necessary. 5. Use compressed air to clean lint from motor. 6. Clean interior of machine, both basket and shell, by wiping with a water-soaked sponge or cloth. 7. Use compressed air to clean moisture and dust from all electrical components. 8. Check air filter/regulator/lubricator: a. Drain water from filter bowl. b. Check level in oil reservoir bowl. 9. 10. Quarterly Preventive Maintenance Checklist 3–8 F232048 Maintenance Machine ________________________ Quarter Operator _______________________ Checks OBSERVE ALL SAFETY WARNINGS! Disconnect power to the machine before performing the quarterly maintenance procedures. 1. Tighten door hinges and fasteners, if necessary. 2. Tighten anchor bolts. 3. Check all painted surfaces for bare metal. Repair, if necessary. 4. Clean steam filter, where applicable. 5. Clean air filter/regulator/lubricator. 6. 7. 8. 9. 10. 11. 12. 13. 14. F232048 3–9 Maintenance NOTES 3–10 F232048 Section 4 Removal from Service Decommissioning In the event that the machine must be decommissioned, follow these steps: 1. Clean interior of machine, both basket and shell. a. Flush supply system with water. b. Run a short rinse cycle to clean dye and chemical residues from the interior of the machine. 2. Disconnect electrical power. a. Turn off steam supply and allow time for the valves to cool. b. Disconnect steam hoses from machine. 6. Remove the machine from its foundation pad. a. Keep all panels in place to provide stability when moving the machine. b. Verify that door is closed and secure. a. Shut off main power supply at the breaker box or main control panel. c. Loosen and remove the mounting bolts. b. Have a qualified electrician disconnect power to the machine at its source. d. Break the grout seal at each corner of the machine, using a crowbar. 3. Disconnect hoses. a. Disconnect drain hose from sump, gutter, or drain. b. Turn off water supply. Disconnect individual hot and cold water inlet hoses from the machine. c. Allow time for residual water in the machine to drain. Then disconnect drain hose from the machine. 4. Turn off air supply and disconnect air hose. e. Use crowbars at the front corners to lift the machine a few inches so that the forks of a forklift truck can reach under the machine. f. Bolting the base frame to a pallet will facilitate removal to a transport vehicle. 7. Recycle. Raytheon Commercial Laundry uses the highest quality materials in their products so that those materials may be recycled at the end of the product’s service life. 5. Disconnect steam hoses. F232048 4–1 Removal From Service NOTES 4–2 F232048