1
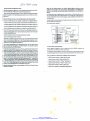
GTM6
GUITAR TO MIDI CONVERTER
USER'S MANUAL
TM
6V JACKSON / CHARVEL
Scan by Manual Manor
http://www.markglinsky.com/ManualManor.html
CONTENT
INSTANTSTART
Page 4
1. SENSITIVITY ADJUSTMENT
Page 6
2. DYNAMICS
Page 6
3. SYNTHESIZER ON-OFF
Page 6
4. TRIGGER, QUANTIZE, BEND MODES
Page 7
5. CHANNEL, TRANSPOSE, TUNE
Page 8
CHANNEL
Page 8
TRANSPOSE
Page 9
TUNETHEGTM6
Page 9
TUNE THE GUITAR
6. PROGRAM CHANGE AND CHAIN PROGRAMING
7. HOLD
Page 9
Page 10
Page 11
8. SEQUENCER
Page 12
Scan by Manual Manor
http://www.markglinsky.com/ManualManor.html
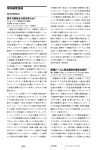
GUITAR TO MIDI CONVERTER
GTM6
FOOT PEDAL
POWER
INDIVIDUAL STRING
SENSITIVITY
GUITAR INPUT
REMOTE CONTROL
DYNAMICS CONTROL
CERAMIC PICKUP
OUTPUT
MAGNETIC PICKUP
OUTPUT
MIDI OUTPUTS
PLAY
TRIGGER
o
PROGRAM
0
quantize! I
o
88
RECORD
o
RAT
ON
PLAY
o
OFf SHARP
DETACHABLE REMOTE CONTROL
Scan by Manual Manor
http://www.markglinsky.com/ManualManor.html
INSTANT START
Now that you are the happy owner of the CHARVEL GTM 6 we understand that you
do not want to spend your time reading boring manuals, you would rather play the
guitar synthesizer as soon as possible. Here we provide you with a short guide of
how to do this, but after you have had some fun please return to this manual in or
der to make full use of the extraordinary capabilities this unit offers. Later on you
will find the programing card very useful. This reminds you of all program possibi
lities with a short example.
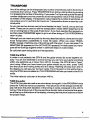
To use the GTM 6 you need a guitar equipped with a special pickup and also a spe
cial stereo cable to connect it to the main unit. You must also have a synthesizer
or an expander with a MIDI IN socket on it and a standard MIDI cable Connect all
JSfn u9fher aS Seen °n Fig-1 Tune both the 9uitar and the synthesizer to normal
Set your MIDI synthesizer to recieve channel number 1. If you do not know how to
do this check your synthesizer's manual, all MIDI synthesizers must have a way to
When you turn the GTM 6 on for the first time, make a so called "cold start". This
means that any previous adjustments made on the unit will be erased from the me
mory and everything will be initialized in the simplest straightforward way. It can
be achieved by holding down both the TRIGGER and SEQUENCER knobs while
you turn the main power switch on.
When you do this, PLAY lights up in the upper left comer, two horizontal lines ap-
S^Thl
?PoiSAno k°?
startremains
t0 flash-lf
press the SEQUENCER
buttonLEPS
RECbel0W
turns the
off display
and PLAY
on, vou
and naif
you
SJ°UL i!!.ar the "Dwarfs Dance" mel°dy of Grieg. If this does not happen then
fS? .
ume is turned up both on the amPl'fier and the synthesizer if the
MIDI cable is good; and also if the recieving channel adjustment is good.
Press SEQUENCER again, then the melody stops, and both REC and PLAY will
Xe£3^
Scan by Manual Manor
http://www.markglinsky.com/ManualManor.html
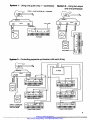
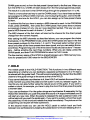
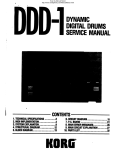
System 1 - Using one guitar amp +1 synthesizer
System 2 - Using two amps
and one synthesizer
SYSTEM I — USING ONE GUITAR AMP ♦ 1 SYNTHESIZER
o
o
mmiiiiiiimi
TO PA MIXER
System 3 - Controlling separate synthesizer with each string
GTM4
V
^-4
(N MICH
TK»U
LINE OUT
Ol i. ... I ... li.l
[N
THRU
UNE OUT
IMIMIIMMM
ASSIGN TO MIDI CHANNEL \
IN MIDI —THRU
UNI OUT
LJ.i .. luJ
t
tlUIIUIlllllIl
ASSIGN TO MOM CHANNEL 2
IN
THRU
ASSIGN TO MUM CHANNEL 5
i
_(N tKRU
Oil
SYSTEM 4 - CONTROLLING
SEPARATE SYNTHESIZER
LINE
feJ
JI
LINE OUT
I., I ■ . . ll.l
innunuur
WITH EACH STRING
ASSIGN TO MIDI CHANNH 3
ASSIGN TO Mtt> CHANNU 6
Scan by Manual Manor
http://www.markglinsky.com/ManualManor.html
DETAILED DESCRIPTION
1. SENSITIVITY ADJUSTMENT
Optimal results of tracking speed and reliability can be obtained only if the indivi
dual sting sensitivities are adjusted properly.
The sensitivity of each string can be adjusted separately according to the type of
strings used and the usual strength of your plucking, whether you play heavy me
tal or soft jazz etc.
Press PLAY/PROGRAM and turn the DYNAMICS potentiometer slightly in any di
rection. The display disappears completely and the REC and PLAY LEDs start to
flash. Now the display acts like a level indicator of a tape recorder. When you pluck
a string two horizontal lines will appear in the lower, middle or upper part of the dis
play. Pluck one string continously with average plucking strength and adjust the
corresponding trimmer until the light settles in the middle of the display. Repeat
this for all strings, then press PLAY/PROGRAM again to return to PLAY.
If your synthesizer accepts key velocity information then there is another possibi
lity too:
Pluck one string continously with average plucking strength while the DYNAMICS
is turned down to zero, then turn it on to maximum. If the sound gets louder, turn
the trimmer corresponding to the plucked string back, if it becomes softer, then
turn it up slightly. Do this until the sound is about the same in both positions of the
DYNAMICS. Do this for all of the strings.
Certain errors will be indicated when the sensitivity is not adjusted properly:
Sensitivity too low:
a./ At very soft plucking no sound starts at all.
b./ At soft and high sounds bending is not followed properly.
Sensitivity too high:
a./ When chopped chords are played strange sounds appear when the
strings are damped.
b./ When you are bending a string the neighbouring string starts too when
you hit it whith your left hend.
2. DYNAMICS
If your synthesizer accepts key velocity information then you can use the DYNA
MICS potentiometer on the front plate. If you turn it up, the sounds will be very
sensitive to the strength of your plucking. If you turn it down the sounds will settle
down more and more to an average level.
3. SYNTHESIZER ON'OFF
The leftmost pedal is the ON-OFF/REC-PLAY pedal, which turns the synthesizer
sound on and off. You can see this as the REC and PLAY LEDs both turn on and
off at the same time. This pedal has a second function too, but more about this la
ter.
6
Scan by Manual Manor
http://www.markglinsky.com/ManualManor.html
4. TRIGGER, QUANTIZE, BEND modes
The GTM 6 can respond to the bending of a string in three different ways. None of
these are better then the other, each of these is very useful in the correct musical
application.
In TRIGGER mode pitch bending does not follow smoothly, instead a new note is
started as you reach the pitch of the neighbouring semitone. The result is as
if a piano player was trying to imitate a guitarist.
QUANTIZE mode is similar to this, only the exact pitches of a semitone scale are
allowed, but the sound changes from one semitone to the other without
starting the attack period again.
BEND mode follows even the slightest bending of your left hand accurately.
The decimal points on the display will help you to remember which of the three
bend modes is functioning; no points means that the TRIGGER mode is selected,
the left point alone means QUANTIZE mode, both points mean BEND mode.
If you use TRIGGER mode, any MIDI synthesizer can be used without further ad
justments. In the other two modes the GTM 6 sends out pitch bend information,
so the pitch bend range of the recieving synthesizer has to be set accordingly to
this to 8 semitones. For example DX 7 owners should set their PITCH RANGE pa
rameter to 8, POLY 800 owners do not have to do anything since their instrument
is fixed at this value.
Some synthesizers from ROLAND have a maximum pitch bend range of 7 semito
nes, some others from SEQUENTIAL have it fixed at 4. In order to use one of these
you must switch the GTM 6 to 4 semitone range. Press the BEND button and keep
it down while you change from PLAY mode to PROGRAM mode. On the display
the number 4 appears denoting the new pitch bend range. If you repeat this proce
dure, it flips back to 8.
Remember, since the pitch bend wheel of a synthesizer bends all notes together,
there is a disagreement between the possibilities of MIDI and the guitar player
when you pluck two or more strings in BEND mode and try to bend one of them.
In this case the GTM 6 uses it's TRIGGER mode provisionally until you play monophonically again. If you can afford six synthesizers, (one for each string) then this
limitation does not stand as you will see in the next chapters.
Scan by Manual Manor
http://www.markglinsky.com/ManualManor.html
5. CHANNEL, TRANSPOSE, TUNE
When you press the PLAY/PROGRAM switch, PLAY turns off and PROGRAM
turns on. The previous three switches will work now as CHANNEL, TRANSPOSE
and TUNE. Any sounds coming from the synthesizer will be halted while you are
in PROGRAM. In PROGRAM you can program the important parameters of the
GtM 6. These parameters will remain intact even if you turn the unit off and they
can only be erased by a cold start.
CHANNEL
The GTM 6 can be used with 1 to 6 synthesizers (or a synthesizer with MONO
mode) for the 6 strings, an other for the sequencer and one more for the HOLD. If
you want to use all these possibilities, you should connect all synthesizers to the
MIDI OUT sockets of the GTM 6. The MIDI THROUGH outputs on the synthesizers
can be used as well. First assign a channel number between 1 and 8 to each as it
is given in their manual and turn OMNI mode off on all synthesizers.
The REC and PLAY leds flash until you define the source you want to assign to a
MIDI channel. You can define a string by plucking it, or entering the number of the
string on the keypad. The number of the string appears on the display, and you
should enter the required MIDI channel number. If you do not want to do anything
more, then press PLAY/PROGRAM again and you can play.
Besides the strings you can also name the sequencer as a source if you press the
SEQUENCER button (then SE appears on the display) or you can press the HOLD
pedal (hd appears on the display). There is one more source you can assign a MIDI
channel to: the program change. To achieve this press the CHAIN button (ch ap
pears on the display). With this you can determine which of the synthesizers will
be affected by remote program change.
If you want to assign all the 6 strings to the same channel there is a possibility to
do it more conveniantly. Instead of pressing the keys 1 -6 for choosing one of the
strings, press 7 or 8 and AL appears on the display. All strings will be assigned to
the MIDI channel now entered.
A cold start assigns every MIDI channel parameter to channel 1.
Excercise
A. The aim is to assign the D string
to channel 7:
1./ Press PLAY/PROGRAM
2.1 Press CHANNEL
3./ Pluck the D string
or press a on the kaypad
4./ Press 7 on the keypad
5./ Press PLAY/PROGRAM
B. The aim is to assign the A string
to 3 and the SEQUENCER to 8:
1./
2./
3./
4./
5./
6./
7./
8./
Press PLAY/PROGRAM
Press CHANNEL
Press 5 (for A string)
Press 3
Press CHANNEL
Press SEQUENCER
Press 8
Press PLAY PROGRAM
Scan by Manual Manor
http://www.markglinsky.com/ManualManor.html
TRANSPOSE
Any of the strings can be transposed any number of semitones within the limits of
3 octaves down and up. Press TRANSPOSE then define a string either by plucking
it or pressing the number of the string. If you press 7 or 8 just very quickly the string
number disappears and the presently stored transposition value of that string will
be written on the display. Transposition value means the number of semitones, so
one octave up is 12, and 36 is the maximum. Transposition down is noted by a de
cimal point.
As you can see two arrows can be found beside the keys 7 and 8, one up and one
down. These can be used to edit the transposition values either stepping one by
one or running fast on the scale if held down. If you have reached the required va
lue then press TRANSPOSE again to go to an other string or PLAY/PROGRAM to
return to play.
Although you can reach any pitch by the way described above, there are two addi
tional transposition possibilities to make life easier. When you press TRANS
POSE, instead of defining one of the strings with the keys 1 -6 you can press 7 for
SEMITONE (SI appears) or 8 for OCTAVE (OC appears). In these cases you trans
pose all the 6 strings together either in semitone steps or octave steps.
By cold start each string starts at 0 transposition.
TUNEtheGTM6
In order to run perfectly the GTM 6 and the guitar should be tuned together ex
actly. You are not restricted to normal tuning, you can tune your guitar anywhere
within one semitone up or down from 440 Hz. Anyway, the GTM 6 has to "learn"
your tuning. When you have tuned your guitar exactly as you wish, press TUNE
and then pluck the A string softly and let it decay. Flashing will stop soon and on
the display you will see your tuning in cents. From this point on this will be the tu
ning the GTM 6 accomodates to. PLAY/PROGRAM will take you back to the PLAY
mode.
The initial value by cold start is the exact 440 Hz.
TUNE the guitar
The GTM 6 can also be used as an extrordinary tuning aid. In the PROGRAM mode
press the TUNE key twice successively. Then pluck any of the strings and the dis
play will show the pitch deviation of that string in cents compared to the 440 Hz
tuning. If the string is out of the one semitone border limits a horizontal line appe
ars at the top or the bottom of the display, showing that the pitch is above or below
the proper range.
Scan by Manual Manor
http://www.markglinsky.com/ManualManor.html
6. Program change and CHAIN programing
The presents of the synthesizer can be changed from the numeric keypad of the
GTM 6. To achieve this you have to take care for the following things:
a./ The program change MIDI channel described above is the same as on
the synthesizer.
b./ Program change is engaged on the synthesizer. Check the manual how
to do this:
In order to get a program change you have to type two numbers successively, just
like on KORG synthesizers. The numbers appearing on the GTM 6 display and a
KORG display will be the same. Some other manufacturers, YAMAHA for example
use different system. Programs will be changed on these as well, only the num
bers appearing will be different. Here is a list of the display numbers belonging to
the same program preset:
With the CHAIN pedal a preprogrammed chain of presets can be recalled. If you
decide the order of presets for a particular performance then you can program
them into the GTM 6 and later on they can be recalled one by one.
Take care because whenever you program a new CHAIN, the contents of the se
quencer will be lost.
££!&£???!the re<*uired chain of Presets on a sheet of paper and press the PLAY/
PROGRAM, so that it is in PROGRAM mode. Press the CHAIN button Type in the
SJS^iSf8
°ne*by
°ne (0f COurse by the K0RG notati°n)After
typing
in the
SJS^iJf8
°neby
tti)
Aftof the
two digits of a preset
you can see on the display the serial
number
next pre-
GWtoZmVoKJR" " ^ ^ °HA'N aflain'the" pr6SS PLAY/P"°-
If^h^f h!V«the Possibilityt0 memorize one of the bend modes together with
each preset. If you press one of the TRIGGER, QUANTIZE, or BEND buttons im
mediately before entering the next preset number whilst programming, the correct
bend mode will be recalled together with this preset. Otherwise bend mode will
not be affected by the preset chain.
10
Scan by Manual Manor
http://www.markglinsky.com/ManualManor.html
CHAIN goes around, so from the last preset it jumps back to the first one. When you
turn the GTM 6 on, CHAIN will start always from the first preprogrammed preset.
The result of a cold start is that CHAIN will go through the presets from 11 to 48.
There is a more advanced way to use the CHAIN pedal. If you have three synthesi
zers assigned to different MIDI channels, one for playing the guitar, one for the SE
QUENCER, and one for the HOLD, you can also assign up to three preset chains
to them.
To achieve this first you have to assign a MIDI channel to each. In the PROGRAM
mode, press CHANNEL, then press the CHAIN pedal. Now press three numbers
successively (instead of only one as it was described earlier). This way you assi
gned a MIDI channel to each of chains 1,2, and 3.
The MIDI channel of the first chain will also be the channel for the direct preset
change from the numeric keypad.
After setting the MIDI channels as described above, you can program the chains
themselves. In the PROGRAM mode, press the CHAIN pedal and type in the first
three preset numbers for the chains 1,2, and 3. The preset serial number will ad
vance only after all the three presets have been typed, and you can assign the se
cond three. Programming one of the three bend modes should be done - if neces
sary - before entering the next three numbers. When you are ready, press the
CHAIN pedal, and then PLAY/PROGRAM to return to PLAY mode.
The free memory space of the GTM 6 is shared between up to 7500 memory loca
tions for presets and 1000 notes for the SEQUENCER.
7. HOLD
The middle pedal is the HOLD-FUNCTION. This functions in two different ways
depending on whether you can dedicate a separate synthesizer to it or if it has to
be shared with the guitar itself. This will be acknowledged by the fact that the MIDI
channel of the guitar strings is the same as that of the HOLD.
If you cannot dedicate a synthesizer to it, then HOLD will sustain the sound that on
is the moment you press the pedal and will sustin it until you release it again. Du
ring this you can play further using the natural sound of the guitar. If you want to
sustain a chord, for example, you have to play the chord first then press the pedal
a moment later.
If you use synthesizer A for the guitar strings and synthesizer B separately for the
HOLD then whenever you push the pedal the sound of A stops immidiately and B
will start any new note. When the pedal is released the last sustained notes of B
will be held until you push the pedal again. If you want to sustain a chord then push
the pedal first, hit the chord and release the pedal immidiately. The pictures on the
programing card explain all these operations.
In the second mode you can use the HOLD pedal to switch back and forth
between two synthesizers by keeping the pedal down for B and releasing it for A.
11
Scan by Manual Manor
http://www.markglinsky.com/ManualManor.html
8. SEQUENCER
Cartainly any MIDI sequencer can be connected to the GTM 6 just as if it were a
MIDI keyboard itself. In spite of this the GTM 6 contains an internal sequencer
which is rather unusual in that it is optimized for live performance.
If you press SEQUENCER then REC and PLAY leds will start flashing. This indica
tes that the sequencer is waiting for a start command. This can be achieved by eit
her pressing SEQUENCER once again so that it starts to replay the last contents
of its memory or pushing the REC-PLAY/ON-OFF pedal which starts recording
once again.
Recording has to start in time with the music. If you want to record one measure
for an ostinato accompaniment then press the pedal as soon as the first note is
plucked (the REC light remains on). Now the same pedal has to be pushed again
at the start of the next measure and at this point the REC led goes off, PLAY led
turns on and the sequencer starts to replay, so you will not notice when the se
quencer started. See also the programing card how to do this.
The sequencer can memorize about 1000 notes and recording time is limited to
about 90 seconds. Pitch bending is recorded too, although in this case it uses up
some of the memory. A melody stored in the memory will remain intact even if the
GTM 6 has been turned off and on again.
If the same synthesizer is shared between playing directly and the sequencer, the
GTM 6 jumps automatically to TRIGGER MODE. Otherwise pitch bendings would
bend the sequence out of tune as well.
You can record a sequence so, that you are listening to the continous patterns of
a drum machine while playing. Since you cannot press the pedal exactly in time,
the two machines would slip out of timing after a few loops. To prevent this con
nect the MIDI OUT of the GTM6 to the MIDI IN of the drum machine. The GTM 6
sends out stop and start signals to bring the drum machine back into sync at the
end of each loop.
WrittenbyA.A.Szalay
THE CHARVEL GUITAR COMPANY
P.O. BOX 2344
FORT WORTH, TX 76113
12
Scan by Manual Manor
http://www.markglinsky.com/ManualManor.html
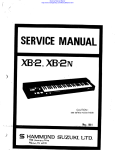
a
niswitch {see Drawing). The socket earth wire 5s soldered to the pcrtenfoneter casing.
Fit stereo socket instead of original socket.
Montageanleitung
When fitting, check that shielding is Insufated from pick-up cabte to avoid short-circuit
Whenalicc^orerrtshawe
cable (mono-plug) and connect it to the guttar amplifier.
CD
in
furMIDI-Tonabnehmer
und Multiplexer
in die Elektro-Gitarre
guitar. Msik opposite position MO output.
Set guitar to MO position, connect to GTM 6 by stereo cable supplied with the GTM 8.
Connect outputs ai back of GTM 6toam^erviaagjitarc^e/thBl'BectficH outputmill
now transmit signal Iron electric guitar pick-up and the "Acoustic" output ait the backof
theGTM6witiartsmttthesig^
acoustic guitar.
Connect MO output to MO-iN input on synthesizer.
Check mat synthesizer fe set to MIDI receiving channel No. 1, When pteyingtlvough GIM6
be a^usted with thepolentiometer on the guftar as usual. The acoustic guitar sound of
your electric guitar fe adjusted by mea>s of the poter^meter you hav^ fitted {connected
tomultipfexer).
You can switch synthesizer sound on &off wfri the on-crff pedd. See theGTM 6 ffistru>
<E
cr5
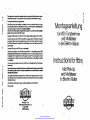
Instructions for fitting
If you want to use your electric guitar as an ordinary slectricgultar, connect it lay
the stanctord guitar cable to tw guitar amplifier and set mini-switch to normal
electric guitar position.
Your guitar must always be property tuned to avoid mcorrect signals and oi^-of-tune no
tes. Guitar neck must be straight and the strings must bectear of it, since incorrect ssgrafc
wfliresdt otherwise,
Enjoy yourself!
SHADCW-JM
BektroaJojst^GmbH&Co. KG
D-852OEr1angen
Scan by Manual Manor
http://www.markglinsky.com/ManualManor.html
Midi Pick-Up
and Multiplexer
to Electric-Guitar
bausattbesteMaMsMgemfenTelkm:
S >&!MBR. eingebaut in TREMOLO, aufschraubbawnStegoderLESPAULSTEG.
oi <er mit Potentiometer, MWschaflerundStereoausgartgsbucrtse.
Wenn Sle Sire Elektro-Gftarre sis ehrfache BektatHSHtam banuban wollen,
schllaflen Sle die Gitarra mit dam normals*! QSarrenkabal an den GHarrenversUrker an und schatten sie den Minischattar In die Stetlung tur normals SektroOKarre.
^ OMgen Bautefen in der GterrenscriaJturig bekommt. da as sonst einen Kurz$ lebenksnn.
Ihre Gitarre soil immer gut gesftnmt sain, sonst kflnrrte es zu Falschinfofmatlonen kommen und dadureh falsche T<5 ne etMngen lasaen. Es ist wichtig, dafl der Gitarranhals gerade ist und die Saiten nictit am Hals aaschtagen, da ae sonst falsche Informalionen har-
en
vonufenkonnen.
S iabneri)Tiorkab«JwenlenaufderMultiplexp!atfnewl»folgt*ngel8tet:
< nit WauerMariderung an der Ldtstelle mit der Bezelchnung «««•« (Seite A 5).
I mitgetoer MarWerungander LoteteBe mit derBezefchnung -Yellow. (Seite D 4).
Unser technisches Personal steht Ihnen beiallen Problemen zurVadugung und isterreicribaruntarTelafon 09131/601347.
Wlr wurvschen Jhnen viel SpaBI
ilmitgiurerMart(ieriireanderLdtste1lornitdereez9lchnung»a-«en«(SeiteG3).
il mit toter MarWBrungan der Lfflstelte mit der Bezaichnung •Re* (Seite B 2).
" i(ohneMari<iaii^and«Lj5ts!e!temitcJ8f8aza*nung»TransparenU(SeiteE1).
llnabucrise solabgefctat und der heiBe Draht (Steckerspitze) auf dam Minischaiter
et wercten (siehe Zefcrnung).
ssedraht der Buchse wind am Potentiometergehause angeiotet.
xictee anstatt Cfiginalbuchse montteren.
aim Bnibau zu beachtan, daS die Abschirmung vom Tonabnahmerkabel isoliert
urtt sis keinari KurzsohlUB tiden kann. Wenn Sie ale Bauteiie eingebaut und ver-
°: haben, verbinden Sie Ihre Gltarre mit ehem nonnalen Gitanenkabel (Monostekm. 1sdiUe6eoesandenOitafronverstari(aran.
3 Sie, rsweicherSchalleretGlungvom Minischaiter Sie den Klarig der Sektro-Gitarre
§ men. Markieren Sie ciiess SteUung als Elektro-Gltarre. Die geganubertlsgende
f- AeltfigrnaihierenSlernttMIDI-Ausgang.
>ieliraGitarrejeWajfMO-Gt6