1
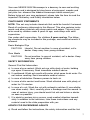
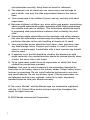
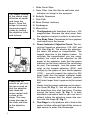
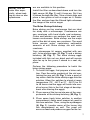
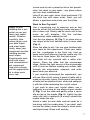
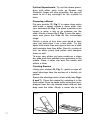
Instruction Manual
Meade 900X Microscope
2
Your new MEADE 900X Microscope is a doorway to new and exciting
adventures and is designed to bring hours of enjoyment, wonder and
just plain fun...discover the hidden microscopic world around you!
Before trying out your new equipment, please take the time to read the
important Cautionary and Safety information below.
CAUTIONARY STATEMENTS
NOTE: This set may include chemicals that could be harmful if misused.
Read all cautionary statements in this Manual. This also contains instruments and other materials with sharp points and edges. This set is not
to be used by children under 8 years of age, and always with adult
supervision.
Use under adult supervision. For children 8 years and up. The following chemicals may be included in this package, and could be harmful if
misused.
Eosin Biological Dye
CAUTION:
Harmful. Do not swallow. In case of accident, call a
doctor. Keep away from young children.
Gum Media
CAUTION:
Do not swallow. In case of accident, call a doctor. Keep
away from young children.
SAFETY INFORMATION
General First Aid Information
a) In case of eye contact: Wash out eye with plenty of water, holding
eye open if necessary. Seek immediate medical advice.
b) If swallowed: Wash out mouth with water, drink some fresh water. Do
not induce vomiting. Seek immediate medical advice.
c) In case of inhalation: Remove person to fresh air.
d) In case of skin contact and burns: Wash affected area with plenty of
water for 15 minutes.
e) In case of a cut: Wash the cut with antiseptic solution (if unavailable,
use clean water). Next, carefully place a bandage over the wound. In
case of serious injury, you should seek first aid and inform a doctor
as soon as possible.
f) If in doubt or serious injury occurs, seek medical attention immediately. In addition to the container, take these instructions and any
material used in the slide preparation with you.
ADVICE FOR SUPERVISING ADULTS
a) Read and follow the instructions, the safety information and the first
3
aid information carefully. Keep them on hand for reference.
b) The incorrect use of chemicals can cause injury and damage to
one’s health. Use only the slide preparations listed in the instructions.
c) This microscope is for children 8 years and up, and only with adult
supervision.
d) Because children’s abilities vary, even within age groups, supervising
adults should exercise discretion regarding which slide preparations
are suitable and safe for children. The instructions should aid adults
in assessing slide preparations to discern their suitability for each
child.
e) Supervising adults should discuss the warnings and safety information with the child before commencing the preparation of slides. Pay
particular attention to the safe handling of chemicals (if used).
f) Your preparation space should be kept clean, clear and away from
any food storage areas. Prepare your slides in a well-lit area and
close to a water supply. A solid table with a heat resistant top should
also be used.
g) A separate tin or bucket should be used for the disposal of solid
waste materials. Any wasted solution should be poured directly down
a drain, but never into a sink basin.
h) To be used solely under the strict supervision of adults that have
studied the precautions provided.
Caution: Use care to install batteries in the orientation indicated by
illustration in the battery slots of the battery holder. Follow battery manufacturer’s precautions. Do not install batteries backwards or mix new
and used batteries. Do not mix battery types. If these precautions are
not followed, batteries may explode, catch fire or leak. Improperly
installed batteries void your Meade warranty.
® The name “Meade” and the Meade logo are trademarks registered
with the U.S. Patent Office and in principal countries throughout the
world. All rights reserved.
© 2003 Meade Instruments Corporation
4
Let’s Begin!
Microscope Features
Carefully lift the microscope from
the box using two hands. Place
one hand around the microscope
arm and the other under the base.
For best results, use the microscope on flat, sturdy surfaces.
Always be mindful of your mirror
and light source. The more light
that is reflected or transmitted
through the hole in the stage, the
brighter and sharper the images
will appear in the microscope eyepiece.
Take a few moments to study
Figure 1 and become familiar with
the various parts and features of
your microscope.
A.
B.
C.
D.
E.
F.
G.
H.
Tweezers
Scalpel
Spatula
Prepared Slides
Blank Slides
Gum Media, Eosin
Sea Salt, Brine Shrimp
Eggs
Blank Labels
Fig. 1
A
B
C
D
E
P
W
Q
F
J
L
G
H
I
R
K
S
M
T
U
N
O
V
5
I. Slide Cover Slips
TIP: Begin viewing
at the lowest magnification or power
and focus the
object. Once the
image is focused,
increase magnification by turning
the objective turret
and refocus.
J. Color Filter. Use this filter to add color and
enhance an image in the eyepiece.
K. Butterfly Specimen
L. Petri Dish
M. Brine Shrimp Hatchery
N. Eyedropper
O. Micro-slicer
P. The Eyepiece with fixed lens that has a 10X
magnification. Remove the dust cover from
the eyepiece and put it aside in a safe place.
Q. The Body Tube. Connected to the eyepiece
and helps focus the lenses.
Fig. 2
CAUTION: Be
careful as you turn
the focus knob so
that the objective
lens does not
make contact with
a slide or the
stage. This may
cause damage to
the slide and also
to the objective
lens.
6
R. Power Indicator/ Objective Turret. The turret has 3 lenses or objectives: 10X, 40X, and
90X (See Fig. 2). The shorter the objective,
the lower the power or magnification. The
longest objective is the highest power. To
calculate the magnification you are using,
multiply the value of the objective by the
power of the eyepiece (note that the power
indicator on the turret makes this calculation
for you). For example, turn the power indicator to the longest objective (90X), and
multiply by the power of your fixed eyepiece
(1OX) – you will magnify the object by 900
times (note that the power indicator reads
900). This means that the object appears
900 times larger than it appears to the naked
eye!
Gently turn the power indicator on the objective turret (R, Fig. 1). You will feel and hear
the objectives lens click into place. Practice
turning the focus knob (X, Fig. 1) in both
directions and notice how far you can turn it
without letting the objective come into contact with the stage (S, Fig. 1).
S. The Stage is a flat platform with a hole in the
center to allow reflected light off the mirror or
light source to enter the microscope.
T.
TIP: Always keep
both eyes open
when looking
through the eyepiece. Doing so
will relieve stress
on your eyes.
The Stage Clips (2) hold the glass slide
firmly onto the stage.
U. Mirror/Light Source. While holding the
base down, pull on the arm to tip the microscope back. Examine the mirror and light
source located below the stage to see how
you can adjust them, and choose one or the
other. The light source turns on automatically when tipped upwards toward the stage.
The mirror gathers and reflects light into the
microscope.
As you look through the eyepiece, try adjusting the mirror and light source to discover
how best to adjust the amount of light coming through the eyepiece.
CAUTION: To prevent the wires
attached to the
light from breaking,
never rotate the
light source a full
360°.
V. Base/Battery Compartment. Place the
microscope on its side. To remove the bottom plate from the base, slide coin or screwdriver into slot. Gently lift and the base will
pop open. Insert two “AA” batteries (user
supplied) in the base. Match the positive (+)
and negative (-) poles of the batteries with
the (+) and (-) markings on the base (Fig. 3).
To replace lid, position it over the opening
and gently press down until it clicks into
place.
W. Focus Knob. Slowly turn the knob back
and forth to focus an object in the eyepiece.
Notice what happens to the power indicator
(R, Fig. 1) as you turn the knob.
Start Observing!
Now that you’ve studied the features of your
microscope, it's time to take it out for a test drive
and try out a simple observing exercise.
1. Rotate the focus knob (W, Fig. 1) and lower
the stage (S, Fig. 1) as far as it will go. Place
Fig. 3
7
CAUTION: Be
careful not to touch
the slide with the
objective lens. You
can break the slide
and/or the lens by
touching the slide
with the lens.
NOTE: The view
presented in the
eyepiece is
upside-down and
reversed from left
to right of the
object. In other
words, if you wish
to examine more
of the left side,
move the slide to
the right. Or if you
wish to examine
more of the top of
the image, move
the slide down—
and vice-versa.
CAUTION: When
you are finished
observing, be sure
to turn the light
source around, if
necessary, so that
it turns off and
doesn’t wear down
the batteries.
Remove the batteries before storing the microscope
for a month or
longer.
8
the 10X eyepiece into the microscope, if necessary. Turn the objective turret (R, Fig. 1) to
the shortest objective (4X).
2. Put one of the prepared glass slides (D, Fig.
1) under the stage clips (T, Fig. 1) and position the prepared specimen over the hole in
the stage.
3. Look through the eyepiece (P, Fig. 1) and
slowly turn the focus knob until the specimen
can be seen in focus.
4. Observe what happens when you slowly
move the light source (U, Fig. 1) or the mirror.
Adjust the mirror or light source to provide the
amount of light that gives you the best image.
5. Look in the eyepiece and observe what happens to the image when you move the slide
from side to side and up and down.
6. If you wish to increase magnification, rotate
the objective turret to a higher power and
refocus. Also, observe with the 25X eyepiece.
Practice rotating the objective turret to
change magnification.
Try Out the Color Filter
Locate the color filter (J, Fig. 1) and press it onto
the bottom of the stage (S, Fig. 1). Below the
stage, a fitting will line up with the opening in the
center of the filter. Rotate the filter to change filter colors. Remove the filter, turn it around 180°,
and reinstall it onto the stage. Two more filter colFig. 4
Fig. 5
NOTE: Use the
color filter especially when looking at clear or dim
specimens.
ors are available in this position.
Install the filter as described above and turn the
light source (U, Fig. 1) until it turns on. Set it so
it shines through the filter. Take a blank slide and
place a few grains of salt or sugar on it. Rotate
the filter and see how the filtered light enhances
the image of the salt or sugar.
The Brine Shrimp Hatchery
Brine shrimp are tiny crustaceans that are ideal
for study with a microscope. Crustaceans are
sea creatures with hard shells and antennae.
Crabs and lobsters are perhaps the most wellknown crustaceans. Brine shrimp are the major
part of the diet of many sea creatures. The word
brine means water containing noticeable
amounts of salt. Brine shrimp are salt water
creatures.
Your microscope kit comes supplied with sea
salt , brine shrimp eggs (G, Fig. 1) and a shrimp
hatchery (M, Fig. 1). The brine shrimp eggs
included with this set are dried and will remain
alive for up to five years if stored in a cool, dry
place.
Perform the following procedure to hatch the
brine shrimp eggs:
1. To hatch the eggs, first prepare a brine solution. Pour the entire contents of the vial containing the sea salt (G, Fig. 1) into a quart of
tap water. Add the brine shrimp eggs into the
solution. Allow the solution to stand at room
temperature (70° - 80°F or 21° - 26°C) for 24
to 48 hours and the eggs will hatch into nauplius larvae (this is the first stage of development after leaving the eggs).
2. Place some of the larvae into one of the compartments of the shrimp hatchery (M, Fig. 1).
3. Place some fresh brine solution in another
compartment. Add a small amount of yeast to
this new solution. Then, using the eyedropper
(N, Fig. 1), transfer some of the larvae into
this compartment as well. The yeast will
serve as food and produce oxygen for the lar-
9
vae as they develop into maturity. Without
food and oxygen, the shrimp cannot develop
and will die. Mature brine shrimp are known
as Artemia Salina.
Note: Using an eyedropper with just the right
pressure to get a desired amount of liquid
onto a slide can be harder than it looks. Take
out a clean slide and practice squeezing a
drop of water onto the slide until you feel
comfortable that you can control the size of
the drop that you’re squeezing out.
4. Observe the life cycle of the shrimp as they
grow: the dried eggs, the hatching eggs, the
developing larvae, and finally, the mature
shrimp.
TIP: Don’t always
assume that
increasing magnification will produce
the best image for
viewing.
Each time you
increase in magnification, the
amount of light
decreases, and the
section of the
image you are able
to view also
decreases. This is
desirable for some
specimens, but not
for others.
Experiment
observing with all
three objectives for
all specimens until
you get a feel for
magnification levels.
10
5. The mature shrimp may be fed to fish in an
aquarium if you so wish. However, first
remove the shrimp from the brine solution
and place them into fresh water. An increase
in salt may harm the fish in the aquarium.
Make Your Own Slides
It’s so easy to make slides that the variety of
slides you can create will be limited only by your
own imagination.
A section of almost any material can be placed
on a slide and observed with a microscope. All
you need is the proper equipment and a little
patience, and you’ll be making slides in no time.
Everything you need for the experiments in this
booklet can be found in this kit or your home
(make sure to ask a parent first before you borrow any of his or her items, such as the measuring cup). Locate the follow items:
•
•
•
•
•
•
Scissors
• Paper towels
Petroleum jelly
• A measuring cup
Natural, uncolored toothpicks
2 or 3 small bottle caps
Wide mouth jar and lid
3 or 4 paper cups, or any small containers
which can be discarded after use.
Next, set up your work area....the kitchen table
(make sure to ask a parent for his or her permission), the desk in your room....any place where
you can work undisturbed.
Label 3 of your cups: clean, flush and waste. Fill
the flush cup with clean water. Next, you will
obtain a specimen and make your first slide.
Want to See Crystals?
Begin to start
thinking like a scientist as you perform your experiments. Observe
carefully, take
notes (make sure
you date them),
and most importantly, keep your
equipment and the
working environment clean.
Experiments work
best with clean
and uncontaminated equipment.
And your parents
will be appreciative
of a clean work
area, too.
Use a measuring cup to measure one or two
ounces of hot (but not boiling) water and pour it
into a clean cup. Slowly add as much salt to the
water as will dissolve. Stir the solution
continuously while adding the salt.
Use the eye dropper (N, Fig. 1) to place one or
two drops of the salt solution onto a clean slide
(Fig. 4).
Allow the slide to dry. You are now finished with
your tools for this experiment. Clean your tools:
put the eyedropper in the flush cup, take up
some water and release it into the waste cup. Do
this two or three times. Stir the flush water.
The slide will dry covered with a white substance. Place the slide into the microscope
stage. Rotate the light source of the microscope
until it turns on. Before reading any further, look
through the microscope eyepiece and write
down what you observe.
If you carefully performed the experiment, you
will see little crystal cubes. A grain of table salt is
made up of many cubes. Place one or two grains
of table salt on another blank slide and compare
it with the slide containing the crystal cubes.
If you wish to save your crystal slides, use a
toothpick to put one or two drops of gum media
(F, Fig. 1) on the slide and gently place a cover
slip on top of the media (Fig. 5). Lightly tap the
cover slip with a toothpick to evenly spread the
media under the slip.
Attach a label to each slide and set aside for a
few days until the media dries. If you don’t wish
to save the slides, wash the slides in clean water
and liquid soap. Rinse well and dry.
11
Further Experiments: Try out the above procedure with other salts such as Epsom and
Rochelle. Sugar will also crystallize, but you will
need to let it dry overnight for the crystals to
form.
Preparing a Mount
Dip your spatula (C, Fig. 1) in some clean water
and make a smear across a clean slide. Use
your tweezers (A, Fig. 1) to place a portion of an
insect—a wing, a leg, or an antenna—on the
slide. Attach a cover slip (I, Fig. 1) over the specimen and place the slide on the microscope
stage.
Obtain a piece of hair from your head or from
your pet and place it on a wet slide. Try this
again with more than one type of hair on a slide
and compare how they differ. Also try a piece of
fern (or other plant) and pollen and compare
them as well.
To save your slides, put gum media on a clean
dry slide and then position your specimen in the
media. Place a cover slip over the media and
attach a label.
Creating Smears
Using your scalpel (B, Fig. 1), gently scrape off
small shavings from the surface of a freshly cut
potato.
Smear the shavings onto a clean slide (see Figs.
6 and 7). Clean the scalpel by swishing it in the
flush water. Draw up some water using your eyedropper from the cup labeled clean and put one
drop onto the slide. Attach a cover slip to the
Fig. 6
12
Fig. 7
slide and place to the microscope stage.
Observe the slide and write down your observations. You will see hundreds of starch grains.
Take a few kernels from an uncooked ear of
corn. Scrape off some shavings and make a
smear as you did with the potato. Compare how
the corn is different from potato. Create smears
of other foods such as apples, bananas, peaches, and pineapples. You will observe that these
items have membranes rather than starch.
To save your slides, put gum media on a clean
dry slide and then position your specimen in the
media. Place a cover slip over the media and
attach a label.
Before you make a permanent mount, you may
wish to stain the specimen first.
Note:
In order to stain a
slide, you will need
to prepare the
eosin:
Without opening
the container, look
closely at the
container marked
“Eosin (F, Fig. 1).”
You’ll notice a few
grains of ‘dust’ at
the bottom of the
container. These
are the grains of
eosin. Remove the
container’s lid and
use the eye
dropper (N, Fig. 1)
to fill the containe
with water. Gently
stir the mixture.
You have now
prepared the eosin
for use.
Staining Smears
Not all specimens are easily observed in the
microscope. Staining specimens make them
easier to see. Staining is not difficult, but it does
require care. It is recommended that you keep
paper towels nearby as the process can be
messy.Before you prepare the smear, you will
need to prepare the eosin. See note at the left.
First, create a fresh smear (you may use shavings from an apple or other piece of fruit), as
described previously. Do not place any water or
a cover slip on the specimen. Set the slide aside
to dry, if necessary.
When the slide is dry, use the eyedropper to
place one drop of eosin (F, Fig. 1) on the slide.
From the cup labeled flush, draw up water into
the eyedropper. Dispose of the water into the
cup labeled waste. Perform this operation a few
times to clean out all the eosin from the eyedropper.
Tilt the slide from side to side to spread the stain
over the specimen. Remove the excess fluid to
the waste cup. Put down the slide and wait about
two minutes.
To flush away the excess stain and to stop the
staining action, hold the slide at an angle over
13
the waste cup. Using the eyedropper, touch the
slide just above the specimen area and slowly let
the water drain into the cup.
With a paper towel, pat the underside of slide
dry. Be very careful and try not to touch the
specimen. Allow the specimen to air dry for several minutes.
Some of the specimen will be flushed away, but
enough will remain on the slide to make good
observations. To save your slides, follow the procedure described previously.
CAUTION: The
blade of the microslicer is very
sharp. Handle the
micro-slicer with
care.
The Micro-Slicer
Insert specimens you wish to study into the holes
of the micro-slicer (O, Fig. 1). Rotate the knob to
cut your specimen into thin slices. The Microslicer is an ideal tool in the making of section
slides.
A Simple Section Slide
Section slides are extremely thin slices of tissues
of skin, leaves, flower stems, and other materials. Generally, section slides are very difficult to
make without special equipment and procedures. However, there is one common household item which can be sectioned without special
equipment: the common onion, made up of layers of tissue.
Peel off the very thinnest layer you can. One that
is nearly transparent will make an ideal section.
Slice into a piece about 1/4 x 1/4 inch.
Put two drops of eosin (F, Fig. 1) in a bottle cap.
Pick up the piece of onion with your tweezers (A,
Fig. 1) and place it in the bottle cap.
Wait for a minute or two. Using the tweezers,
remove the piece from the stain. Hold it over the
waste cup and flush it with clean water from your
eyedropper. Place it on a clean slide. To save
your slide, follow the procedure described previously.
Life Under Glass
Fill a wide mouth jar with fresh water. Let it stand
for three or four days without the lid. Then drop
14
a handful of dry grass and a pinch or two of dirt
into the jar. Put the cap on the jar and keep it in
a place where it will receive light (but not direct
sunlight).
Remember, you
can make a specimen slide out of
almost any material. When you are
on a playground,
at school, in a
park, or just sitting
around at home,
train yourself to
look at all the
material around
you. Keep an eye
out for what might
make a good specimen and discover
the hidden microscopic world that
surrounds us all.
In about five days, you may examine the water.
First make a special slide: Using a toothpick,
make a ring of petroleum jelly on a clean slide.
The ring should be smaller than a cover slip and
be about half as thick as a slide.
Put a drop of water from the jar onto the slide
inside the ring. Use the lowest power of your
microscope and write down your observations.
Did you detect any movement in the water? The
movement is caused by microscopic animals.
Try to focus on one of the animals – this may not
be very easy as a drop of water is like an ocean
to a microscopic creature.
If the animals seem to be moving too fast to
study or don’t stay in focus for very long, soak up
a little bit of water with a corner of a paper towel.
Care for Your Microscope
The MEADE 900X Microscope is a precision
optical instrument and, when treated with care,
will provide you with years of use and discovery
fun.
•
•
•
•
•
•
Always carry the microscope with two hands
—one around its arm and one under the
base.
Always remove slides from the stage before
putting the microscope away.
Cover the microscope when not in use.
Do not use anything except lens cleaning tissue to clean the lenses.
Never touch a slide with the objective lenses
of the turret.
Remove the batteries before storing the
microscope for a month or longer.
15
7/03