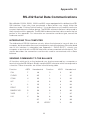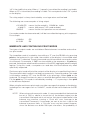
1
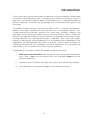
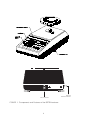
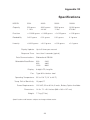
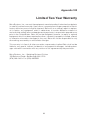
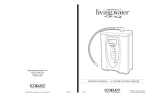
Table of Contents
Introduction
3
Section One
Installing Your Balance
5
5
Section Two
Understanding Your Balance
7
7
Section Three
Using Your Balance
9
9
Section Four
Advanced Functions
15
15
Appendix I
Set-Up Functions
17
17
Appendix II
Calibration
20
20
Appendix III
Glossary of Terms
21
21
Appendix IV
RS-232 Serial Data Communications
22
22
Appendix V
Accessories and Options
27
27
Appendix VI
In Case of Difficulty
28
28
Appendix VII
Specifications
29
29
Appendix VIII
Limited Two Year Warranty
30
30
Index
31
1
2
Introduction
Thank you for purchasing a Setra precision balance. Its ease of operation and durable
construction should provide years of reliable service. While your balance is easy to
operate, it is advisable to read this guide carefully before use. It is designed to help you
perform weighing, formulation by percentage and related operations quickly and
accurately.
This guide is divided into four major sections. Section One, “Installing Your Balance,”
explains the proper installation of your balance in its surroundings. Section Two,
“Understanding Your Balance,” explains the various keys, functions, displays and
messages you will encounter while using your balance. Section Three, “Using Your
Balance,” provides the actual instructions necessary to execute your balance’s various
functions. Section Four, “Advanced Functions,” describes some of the more salient
features of the balance. Following Section Four, this guide contains Appendices. The
Appendices include calibration information, a Glossary of Terms, and instructions for
interfacing the balance with computers and other equipment. Also provided are
specifications, a list of accessories, and a warranty statement.
Typographical conventions used in this guide include the following:
1.
bold, lower case characters indicate specific keys on the balance keyboard.
(e.g., Press — tare, asks you to press the — key and then the tare key on the
balance keyboard.)
2.
"Quotation marks" enclose messages you receive from the balance display.
3.
nnn indicates that a number will appear in the display message.
3
RS-232
Serial Connector
D.C.Connector
FIGURE 1. Components and Features of the SETRA balance.
4
Section One
Installing Your Balance
SETUP
1. Locating your balance
The rugged design of your Setra balance ensures that it will withstand most
environmental conditions it might encounter. Nonetheless, you should treat
your balance as you would any piece of precision equipment, locating it away
from extremes of draft and vibration.
2. Levelling your balance
To level your balance, adjust the two front feet on the bottom of the balance, until
the bubble on the left front corner of the keyboard is centered inside the circle
(see FIGURE 1).
3. Installing the weighing pan
Next, you should place the pan to your balance over the shaft (or rubber guides
on the Model 12000L - see special assembly instructions included), on the top
of the unit.
4. Connecting your balance to an AC outlet
To connect your balance to an AC outlet, insert the appropriate end of the A.C.
adaptor into an electrical outlet. Now connect the other end into the back of the
balance (see FIGURE 1). Once you have plugged your scale into a live outlet,
it is automatically on. The balance itself, when not in use, draws very little current
from an outlet, and may be left connected. For best accuracy, allow the balance
to warm up for 45 minutes prior to use.
5. Calibration
It is recommended that you calibrate your balance prior to initial use to allow for
gravitational differences between your location and the factory. Follow the
procedure outlined in Appendix II, “Calibration.”
5
EXPERIMENTATION
1. Display test
When your balance is first powered on (connected to an AC outlet or battery),
it automatically runs through a “display test,” showing all possible segments
which might be displayed. This test lasts approximately six seconds. The
balance next says “HELLO” and performs self-diagnostics to ensure proper
operation. The balance then counts down to zero, and is ready for use.
2. Trying your balance
It is important that you read this User’s Guide thoroughly to ensure proper use
of your balance. Nonetheless, experimenting with your balance and its keyboard prior to reading this guide in its entirety will not harm your balance, and
may actually give you a better understanding of the instructions in this guide.
If you instruct the balance to do something it is not capable of doing, the balance
will simply respond by displaying “UnAbLE”. To continue experimenting, press
the clear key.
6
Section Two
Understanding Your Balance
KEYBOARD FUNCTIONS
tare
%
Clears display. Assigns the pan and whatever is currently
being weighed a value of zero.
Instructs the balance to display percent weight.
conv
Converts weighing units (for example, changes from grams to
ounces).
print
Sends to a printer or other peripheral device information
displayed, along with the sample number, if entered.
clear
Clears the display and the last number entered or function
requested, and displays weight.
Note: — clear sets the sample number and aggregate percent
weight registers to zero.
sample no.
Instructs balance to accept identification number of up to
twenty-five digits for use as desired; e.g., an experiment
number to be printed out with batch weight.
cal
Instructs the balance to accept calibration data.
int
When filling a container with liquids, use of the key provides a
rapid display update to help prevent overshooting the target
weight. With special programming this key can also improve
stability in the presence of vibration. Pressing the key again
returns to the normal weighing mode. See Set Up Functions,
Appendix I.
X10
Instructs the balance to toggle the display between full resolution and one less digit (decade) of resolution.
—
Instructs the balance to change the sign of a number. Also acts
as a second function key for certain commands and may be
used to insert dashes into a sample number.
0-9
Instructs the balance to enter numerical values, such as
percentage or tare weight.
7
DISPLAY SYMBOLS
OK
Reading on balance is stable. Further operations may be
performed.
INT
Balance is operating in the fast integration mode, for use when
filling containers to a target weight, or in the slow integration
mode for use when vibration is present.
APW
Reading given in “aggregate percent weight.” This is the
weight equivalent to 100% when using the percent function.
PC
g
Reading shown is given in percent.
Reading shown is given in grams.
oz
Reading shown is given in ounces (avoir-dupois).
lb
Reading shown is given in pounds.
t oz
Reading shown is given in troy ounces.
dwt
Reading shown is given in pennyweights.
c
Reading shown is given in carats.
t
Reading shown is given in user-definable, tamperproof units.
Note: t units are preset by the factory in grains (15.4326 = 1
gram).
X
Reading shown is given in user-definable units.
Note: X units are preset at the factory to grams.
DISPLAY MESSAGES
bUSY
The balance is developing a stable reading.
UnAbLE
The balance is unable to complete your requested function.
Clear the display, and select another function.
OFLO
The number in the display exceeds six digits. Remove some of
the weight or formulate and weigh in smaller batches. Press
clear to continue.
FLASHING
DISPLAY
The weight on the pan exceeds the capacity of the instrument.
Remove some of the weight to continue.
8
Section Three
Using Your Balance
ENTERING A NUMBER OR FUNCTION
To enter a number or function on your balance, simply press the key or keys which
correspond to the numbers or functions you wish to enter.
CLEARING A NUMBER OR FUNCTION
To clear the last function or number you entered on the balance’s keyboard, simply
press the clear key. This automatically returns your balance to the weighing mode.
CONVERTING A NUMBER OR FUNCTION
Your balance is capable of weighing in any of the units listed in the “Display Symbols”
portion of this guide. To convert from one unit to another, simply press the conv key.
Each time you press the key, the display converts to the unit next in line in your program.
Continue pressing the key until the unit you wish to use is displayed. The order of units
is as follows: GRAMS - OUNCES - POUNDS - TROY OUNCES - PENNYWEIGHTS CARATS - t UNITS - X UNITS - GRAMS. To return directly to grams, press — then conv.
BASIC WEIGHING
To weigh a sample on your balance, use the following procedure:
1.
Press the tare key.
2.
Place the object(s) to be weighed on the pan.
3.
Wait for the “OK” symbol, then read the weight from the display.
BASIC MASS DETERMINATION
To determine mass on your balance, use the following procedure:
1.
Calibrate your balance using a mass standard of known value. (See Appendix
II, “Calibration.”)
2.
Press the tare key.
3.
Place the mass to be determined on the pan.
4.
Wait for the “OK” symbol, then read the display.
9
Since mass and weight are different measurements, your instrument must be compensated for local gravitational effects in order to determine mass. This calibration should
be performed prior to initial use and on a regular basis thereafter. Refer to Appendix II,
“Calibration.” Further references to weight in this manual may be assumed to be
interchangeable with mass if calibration has been performed.
WEIGHING WITH THE TARE FUNCTION
You can use your balance to weigh objects (or liquids) by placing or pouring them into
a container. To weigh objects or liquids in this manner, WITHOUT including the weight
of the container, use the TARE function. This function subtracts out and stores the tare
or container weight before you begin weighing. To do this, use the following procedure:
1.
Place the empty container on the pan.
2.
Press the tare key.
3.
Place or pour objects or liquids into the container.
4.
Wait for the “OK” symbol, then read the net weight from the display.
ENTERING A TARE WEIGHT
To find the weight of the contents of a container when the container weight is known,
follow this procedure:
1.
Press tare.
2.
Place the object or liquid and the container to be weighed on the pan.
3.
Enter the container weight.
4.
Press tare.
5.
Wait for the “OK” symbol. The display reads net (contents) weight.
FILLING TO A TARGET WEIGHT
The int key is factory pre-set to provide a rapid display update for filling operations. (If
your balance does not provide a rapid update when in the INT mode, refer to Appendix
I, Set-Up Functions, to alter the INT key functionality.)
1.
Press the int key. The INT symbol will be displayed.
2.
Place a container on the pan and press tare.
3.
Pour to the targeted weight.
4.
Return to the normal weighing mode by repressing int.
10
REDUCED RESOLUTION WEIGHING
In the presence of severe vibration or draft a stable display can often be achieved by
reducing the displayed resolution.
1.
Press the x10 key to reduce displayed reading by one digit.
2.
To return to the normal displayed resolution, press the x10 key again.
PERCENT DEVIATION
To calculate the amount by which a weight varies from a reference, follow this
procedure:
1.
Press tare.
2.
Place the reference weight on the pan.
3.
Press the % key. After acquiring a stable reading, the display will read “100.000
pc”.
4.
Press the tare key. After acquiring a stable reading, the display will read
“0.000pc”. The display shows percent deviation.
5.
Remove the reference weight.
6.
Place the weight to be measured on the pan.
7.
Wait for the “OK” symbol to appear. Read the display. The display indicates
percent deviation from the reference.
8.
Remove the weight.
9.
Repeat Steps 6-8 as many times as desired.
10.
Press clear to return to weighing.
FILLING TO A TARGET WEIGHT - FORMULATION BY PERCENTAGE
It is often useful to measure out a certain weight of substance which is a mixture (by
percent) of component parts. This is easily done by using the percent function.
1.
Place a container on the pan.
2.
Press tare.
3.
Press the — key.
4.
Enter the target weight.
11
5.
Press the % key. The display now reads in percent.
6.
Press the int key to select the fast update rate for filling operations.
7.
Add a substance until the desired percentage is reached and the “OK” symbol
appears.
8.
Press the tare key.
9.
Repeat Steps 8 and 9 until all substances have been added.
10.
Press clear to return to weighing.
11.
Press the int key to return to the normal weighing mode.
To display the target weight (or aggregate percent weight), press — then %. To return
to percentage weighing, using the same APW, repeat Steps 3-5 above.
FILLING TO 100%
You may specify a weight as a given percentage of a total. To fill to 100%, proceed as
follows:
1.
Place a container on the pan.
2.
Press tare.
3.
Place the substance or solute to be specified as a percentage on the pan.
4.
Enter the percentage of the total.
5.
Press the “%” key. The display will show the entered percentage.
6.
Press the int key to select the fast update rate for filling operations.
7.
Fill the container (with solvent) until the display reads “100.00 pc” and the “OK”
symbol appears.
8.
Press clear to return to weighing.
9.
Press the int key to return to the normal weighing mode.
12
WEIGHING IN THE PRESENCE OF VIBRATION
The int key can be used to enter a slow update mode for weighing in the presence of
vibration. However, the int key is factory pre-set to provide a rapid update for filling
operations. Refer to Appendix I, “Set-Up Functions” to alter the functionality of the int
key for a longer integration time. Once altered, follow the procedure below to activate
the longer integration time.
1.
Press the int key to select the slow update mode. The INT symbol will be
displayed.
2.
Perform any weighing procedure.
To exit this mode, press the int key again.
ASSIGNING A SAMPLE NUMBER TO A BATCH
To assign a number ( such as a test number or an account number) to a given batch,
use the following procedure:
1.
Enter the number you wish to assign (up to twenty-five digits).
2.
Press the sample no. key.
NOTE: Although the display will only show the last six digits entered, up to twentyfive digits may be stored and printed as a sample number. The — key may
be used to insert dashes into the sample number.
NOTE: The number entered will be assigned to all batches until a new number is
entered. To clear a number, enter 0 and press the sample no. key.
PRINTING OUT INFORMATION
Your Setra balance is designed to print out information regarding a given batch when
connected to an optional printer. To print out information using the Setra Model 240P or
340P printer, use the following procedure:
1.
Connect the printer’s AC adaptor to a 110-volt outlet.
2.
Connect the other end of the adaptor to the printer.
3.
Connect the appropriate end of the printer connection cord to the printer.
4.
Connect the other end of the connection cord to the balance.
5.
Perform the necessary functions on the balance.
6.
Make sure the printer is turned on (as indicated by the printer’s green light). If
the printer is not on, press the power switch, located on the left hand side of the
printer, to the on position.
13
7.
Press the print key on the balance.
8.
Repeat Steps 5, 6 and 7 anytime you wish to print out information.
NOTE: When using a printer other than the Setra 240P or 340P, set the baud rate
on your balance to match the printer (see Appendix I).
NOTE: To interpret the meaning of the symbols printed, see Appendix IV - “RS-232
Serial Data Communications.”
REPETITIVE PRINTING
It is sometimes desirable to measure weight at fixed intervals of time. One use of this
procedure is evaporation studies. To print out weight at fixed intervals, follow this
procedure:
1.
Connect a printer as previously outlined.
2.
Enter the number of seconds between readings.
3.
Press print. The balance will print out a reading at the specified interval.
4.
To cancel repetitive printing, press — then print.
To interpret the meaning of the symbols printed, see Appendix IV - “RS-232 Serial Data
Communications.”
NOTE: Since all Setra balances employ Auto Zero Tracking, it is important not to
perform evaporation or similar studies at zero. To disable Auto Zero
Tracking, enter an artificial tare weight. (For example, tare out 100g.) When
the study is completed, enter the negative of the tare weight.
INTERFACING WITH A COMPUTER
Your Setra balance is designed to interface with a wide variety of computer equipment.
If your balance is connected to a computer, transmit information to the computer by
following the instructions given for “Printing Out Information.” For further details, see
Appendix IV.
14
Section Four
Advanced Functions
USER-DEFINABLE UNITS
It is often convenient to weigh in user-defined units. This balance has two user-definable
units of measure, X and t units. Conversion factors can be entered through the keyboard
to be multiplied by the displayed weight, or divisors can be entered to be divided into
the displayed weight.
X units can be changed by entering a factor or divisor. To measure in X units, proceed
as follows:
1.
Calculate the ratio you wish to enter. If your ratio is in grams per X unit, ounces
per X unit, pounds per X unit, etc., you will enter a divisor. Proceed with steps
2 through 7.
If your ratio is in X units per gram, X units per ounce, X units per pound, etc., you
will enter a factor. Proceed with steps 2 through 7, skipping step 3.
2.
Press the conv key until the display reads in the known units from which you
wish to convert.
3.
If you are entering a divisor, press the — key.
4.
Enter the conversion ratio.
5.
Press the conv key.
6.
Place an object on the balance.
7.
Wait for the “OK” symbol, then read the display. The reading given is in X units.
t units are tamperproof user-definable units which are changed by entering a factor or
divisor. To change t units, proceed as follows:
1.
Calculate the ratio you wish to enter. If your ratio is in grams per t unit, ounces
per t unit, etc., you will enter a divisor. Proceed with steps 2 through 10.
If your ratio is in t units per gram, t units per ounce, t units per pound, etc., you
will enter a factor. Proceed with steps 2 through 10, skipping step 6.
2.
Press the conv key until the display reads in the units from which you wish to
convert.
15
3.
Press the — key.
4.
Enter 1732. This is the tamperproof code.
5.
Press the cal key.
6.
If you are entering a divisor, press —.
7.
Enter the conversion ratio.
8.
Press the cal key.
9.
Place an object to be weighed on the balance.
10.
Wait for the “OK” symbol, then read the display. The weight is given in t units.
NOTE: X units and t units remain stored in the balance until they are replaced by
new units. Both X and t units may be directly converted to new units. Simply
follow the procedures given above converting from old X units to new X
units, or old t units to new t units.
MEASURING VOLUME WITH YOUR BALANCE
The two user-definable units may be useful for determination of other parameters by
weight. An example of this is volume determination by weight. This is generally far more
accurate than other volumetric measurement methods. For example, the density of
water at 20˚ C is 0.999823 g/ml. To measure the volume of water in a container using
X units, follow this procedure:
1.
Place the container on the pan.
2.
Press tare (or, if known, enter the tare weight).
3.
Be certain that the balance is reading in grams.
4.
Press the — key. This instructs the balance to divide by the density.
5.
Enter the density of water .999823.
6.
Press the conv key. The balance now displays milliliters of water.
7.
Fill the container to the desired volume.
16
Appendix I
Set-Up Functions
Changing Display Update Rate (INT Mode)
The int key is factory preset to provide a rapid display update (short integration time)
for pouring liquids to a target weight. The use of this key can be altered to provide a slow
display update (long integration time) for weighing in the presence of vibration. Follow
the procedure below to change the functionality of the int key to either a slow or a rapid
display update:
1.
Press the — key.
2.
Enter 11110. This is the INT mode selection access code.
3.
Press the cal key. The display will read “INT 1 or 0”.
4.
Press 1 for a long integration time (vibration) or press 0 for a short integration
time (filling).
5.
Press the cal key.
NOTE: The integration speed selected will remain programmed even if the scale
is off.
FORMATTING BAUD RATE
Your Setra balance is capable of interfacing with a wide variety of computer equipment
or other peripheral devices. To set the baud rate (the rate at which your balance sends
information to a computer or printer), use the following procedure:
1.
Press the — key.
2.
Enter 5555. This is the baud rate access code.
3.
Press the cal key. The display will read “cal br”.
4.
Enter the baud rate. Choose either 300, 600, 1200, 2400, 4800 or 9600.
5.
Press the cal key.
6.
To retain this baud rate after power has been removed, repeat Steps 1-5 above
using the same baud rate.
NOTE: A baud rate of 2400 is automatically assigned when none is formatted.
17
DISABLING TONE
Your Setra balance emits a tone when a number or function is entered. To disable the
tone, use the following procedure:
1.
Press the — key.
2.
Enter 9999. This is the tone access code.
3.
Press the cal key. The tone is disabled.
NOTE: To return the tone to use, repeat Steps 1-3.
FIRMWARE VERSION
Setra is continually making improvements to its products. As a result the operating
software, or firmware, of the scale has a revision number. The revision number may
prove useful in communicating with your dealer or Setra in case of difficulty.
To find out your scale's firmware version number, follow this procedure:
1.
Press the — key and enter 7777.
2.
Press the setup/cal key. The scale will display “rEF x.x”, where “x.x” is firmware
version number.
3.
Press clear to return the scale to normal operation.
RESTORING THE FACTORY DEFAULT SETUPS
The many features described in this section allow the user to customize the scale to suit
a particular application. However, in doing this it is also possible to inadvertently setup
the scale in such a way that it will not operate as expected. To reset the scale to the
original factory defaults, follow the steps outlined below.
The factory defaults are set as follows:
-
Baud rate is equal to 2400 and no parity.
print is assigned to the standard serial tape printer (Setra 240P).
The beeper is enabled.
The int mode is set to rapid display update (short integration time).
Span = factory calibration
X units = 1 gram.
T units = 1 grain.
To restore the factory default setups use the following procedure:
1.
Press the — key and enter 8888.
18
2.
Press the cal key. The display will read “d-noS”.
3.
Press the CAL key. The factory defaults will now be restored.
If any error message is displayed during the self-diagnostic test, the balance will emit
a prolonged tone. WRITE DOWN THE ERROR MESSAGE. Unplug the balance and plug
it back in. The display will read “d-noS”. Run the self-diagnostics again. If the same
message appears, call for service.
DO NOT ATTEMPT TO REPAIR THE SETRA BALANCE. IT MUST BE RETURNED TO
THE SETRA FACTORY OR TO AN AUTHORIZED SERVICE CENTER FOR PROPER
REPAIR. THE SELF-DIAGNOSTIC SHOULD ONLY BE USED TO VERIFY PROPER
OPERATION OF A BALANCE.
19
Appendix II
Calibration
Your Setra balance is highly stable, and requires infrequent calibration. While it may be
calibrated as often as desired, periodic calibration is adequate for most applications.
FULL-SCALE CALIBRATION
To calibrate your balance with a full scale mass use the following procedure:
1.
Press the clear key.
2.
Press the tare key.
3.
Place the mass on the pan.
4.
Press the cal key.
CALIBRATION WITH A SPECIFIC MASS
To calibrate your balance with a specific known mass (but less than full scale), use the
following procedure:
1.
Press the clear key.
2.
Press the tare key.
3.
Press the conv key until the balance reads in the units of the known mass.
4.
Place the known mass on the pan.
5.
Enter the value of the known mass.
6.
Press the cal key.
NOTE: To ensure maximum accuracy, a mass should be used which is as close
as possible to the full-scale value of the balance.
20
Appendix III
Glossary of Terms
ACCURACY
The degree of conformity of a measured value to the true value.
AGGREGATE PERCENT WEIGHT
The weight associated with 100%. The reference weight.
BAUD RATE
The rate at which the balance transmits or receives data to or from a computer or
peripheral device.
GROSS WEIGHT
The weight of a container and its contents.
MASS
The quantity of matter in a body as measured by its inertia. Mass is independent of
gravity.
NET WEIGHT
The weight of the contents of a container without the weight of the container.
PRECISION
The degree of certainty which can be placed on an average value derived from multiple
measurements.
RESOLUTION
The minimum amount that a reading or measurement can change for an incremental
weight change.
TARE WEIGHT
The weight of a container without its contents. The amount of weight assigned a value
of zero.
WEIGHT
The gravitational force between an object and the earth. Weight varies with gravity and
can vary from location to location by as much as 5%.
21
Appendix IV
RS-232 Serial Data Communications
Setra Models 12000L, 5000L, 2000L and 500L come equipped with a bidirectional RS232 interface. Users who have purchased a Setra printer may simply follow the
directions under “Printing Out Information.” It may be necessary to read this section to
connect the balance to another device. The RS-232 software interface is discussed in
the first portion of this appendix. The RS-232 hardware interface is discussed in the last
portion of this appendix. For information on connection and data type, consult the
hardware section.
INTERFACING TO A COMPUTER
The bidirectional RS-232 interface not only allows the balance to transmit data to a
computer, but also enables the use of a computer to control the balance. Since the baud
rate of this interface is selectable (see Appendix I- “BAUD RATE”), virtually any
computer or terminal with an RS-232 interface can be connected to the balance. This
section describes the conventions and formats used to communicate with a Setra
balance.
SENDING COMMANDS TO THE BALANCE
All functions which exist on the keyboard may also be accessed by a computer or
terminal using the RS-232 port. Simply send the ASCII character which corresponds to
a function. These characters are shown in the following table:
Function
ASCII
Hexadecimal
Function
ASCII
Hexadecimal
CAL
F
46
0
0
30
CLEAR
K
4B
1
1
31
CONV
U
55
2
2
32
I
49
3
3
33
%
%
25
4
4
34
PRINT
P
50
5
5
35
SAMPLE NO.
S
53
6
6
36
TARE
T
54
7
7
37
X10
X
58
8
8
38
-
-
2D
9
9
39
2E
VERIFY
V
56
INT
.
22
It is not necessary to include a carriage return or line feed in any command sequence.
The balance uses any command character as a terminator for an input string. For
example, if you wish to enter a tare weight of 1000 (in the units currently being
displayed), simply send “1000T”. This will enter the number 1000 into the tare register.
To enter a percentage of 12.35, send “12.35%”.
RECEIVING DATA FROM THE BALANCE
The print or output format from the balance is known as “string format.” When the
balance is instructed to print, it will transmit whatever number or message appears in
the display when requested to do so. (See the description of “Immediate and Continuous Print Modes” later in this section.)
The “string format” output is shown below:
+/- 1 2 3 4 5 6 . c0 c1 c2 c3 CR LF
The first eight digits represent the number field. A sign (+ or -) always precedes the
number and a decimal point is always transmitted. Numbers less than six digits long are
preceded by spaces. (Messages, when transmitted, are sent in the number field.)
“c0” is a space.
“c1” is the “mode” character. It describes what the number being transmitted represents. The following is a list of all possible characters sent in this digit:
CHARACTER
(space)
MEANING
Balance is in the normal operating mode
I
Balance is in the INT (fast or slow integration) mode
A
Balance is in the APW (aggregate percent weight) mode
“c2” is the “units” character. It describes the units of the number being transmitted. The
following is a list of all possible characters sent in this digit:
CHARACTER
MEANING
G
Number is expressed in grams
O
Number is expressed in ounces
P
Number is expressed in pounds
Y
Number is expressed in troy ounces
D
Number is expressed in pennyweights
K
Number is expressed in carats
T
Number is expressed in tamperproof units
X
Number is expressed in user units
%
Number is expressed in percent
23
“c3” is the stability character. When a “ “ (space) is transmitted, the reading is not stable.
When an “S” is transmitted, the reading is stable. This corresponds to the “OK” symbol
on the display.
The string output is always terminated by a carriage return and line feed.
The following are some examples of string output:
+12.3456 PS
+0.846 IO
UNABLE
means that the weight is 12.3456 lbs. stable
means .846 ounces, INT mode enabled
means that the last operation was not allowed.
If a sample number has been entered, it will be transmitted during any print sequence.
For example:
+12345.6
04-10-92
GS
S#
IMMEDIATE AND CONTINUOUS PRINT MODES
Two types of output modes are available on Setra balances: immediate and continuous print modes.
The immediate mode is invoked by transmitting a “P” over the RS-232 or by pressing
print on the keyboard. In this mode, the contents of the display is transmitted when
“string format” is selected. The print command may follow another command or series
of commands. For example, if “•%P” was transmitted; or the sequence, •, %, print was
pressed, the balance would send the contents of the APW (aggregate percent weight)
register. Using this mode, a computer can read data from the balance only when
specifically requested.
Continuous print mode will print the contents of the display at a specified time interval.
The rate at which data is output is variable from once every .2 seconds and up.This mode
is initiated by sending “.2P” over the RS-232, or by pressing •, 2 then print on the
keyboard. For longer time intervals, press or send the desired time interval followed by
P or the print key. This mode is cancelled by sending “— P’ or pressing — then print
on the balance keyboard.
When using the continuous print mode, any other messages that appear on the display,
including error messages such as “UnAbLE”, would also be transmitted over the RS232.
NOTE: When using continuous print mode, it is recommended that the baud rate
be set at 1200 or above to insure that all the balance output can be
transmitted. If the baud rate is set too low, the internal output buffer in the
balance may overflow, causing a “Q-out oflo” error message to be
transmitted. Conversely, if commands are sent at too fast a rate for the
balance to process them, a “Q-in-oflo” error may be caused. However,
since the balance can buffer 256 input characters, the probability of
24
encountering this error is small.
THE VERIFY FUNCTION
When many balances or other peripherals are connected to a computer, it is useful for
the computer to be able to check on the status of these devices. The verify function can
be used to determine the model number of a balance and determine that the unit is
functioning correctly. To invoke the verify function, transmit an ASCII “V”. If the balance
is functioning correctly, it will send one of the following messages followed by a carriage
return and line feed:
“Setra 12000”
“Setra 5000”
“Setra 2000”
“Setra 500”
STATUS AFTER POWER IS APPLIED
All Setra balances have an internal nonvolatile memory for storing certain status
information. This memory does not erase when power is removed from the unit. All setup
functions (such as baud rate, and tone enable/disable) and user conversion factors are
stored in this memory. As a result, the baud rate will not need to be reset each time the
balance is turned on. However, if continuous print mode is desired, follow the procedure
outlined previously.
During the first thirty seconds of operation, the balance will run through a self-diagnostic
procedure. When the unit is ready to be used, it will identify itself by transmitting a “wakeup” message.
THE RS-232 INTERFACE HARDWARE
Although Setra balances can communicate with almost any RS-232 device, the built-in
interface does not include the complete protocol. Only four lines of the standard
interface are used. The data format is:
8 bits
1 start bit
1 stop bit
no parity
framing errors ignored
Use a RS-232 cable to connect the external device to the balance, or construct one
following the instructions below.
The female connector pinout, as viewed from the back of the balance, is shown below.
13
321
*************
************
25
14
25
PIN
DESCRIPTION
1
2
3
7
Protective Ground
Scale Receives Data
Scale Transmits Data
Protective Ground
It is necessary for the receive data pin of the external device to be connected to pin 3
(transmit data pin) of the scale. Likewise, the transmit data pin of the external device
must be connected to the receive data pin (pin 2) of the scale. With certain devices such
as computers with 9 pin serial ports (DB9), pins 2 and 3 must be "crossed." That is, pins
2 and 3 of the external device should be connected to pins 3 and 2 of the scale
respectively. Cables for this purpose are generally available from computer equipment
suppliers. Computers with 25 pin serial ports (DB25) generally require "straight" cables
to the Setra scale's RS-232 port.
NOTE: The “handshake” signals, such as RTS and CTS, are not implemented. This
requires that the peripheral have a minimal buffer (15 characters).
Use a mating connector (subminiature “D” type, female DB25-RJ45 converter to male
DB25-RJ45 converter) to gain access to these lines. The protective ground may be
attached to other grounds as deemed appropriate. This protective ground is available
at pin 1 and is connected to the chassis of the balance.
The maximum recommended cable length is 15 meters. The cable may be longer if it
has less than 2500 pF capacitance. The load impedance of the device connected
should be between 3000 and 7000 ohms with not more than 2500 pF shunt capacitance.
For more information, consult EIA Standard RS-232: “Interface Between Data Terminal
Equipment Employing Serial Data Interchange.”
In addition, some computers requiring handshaking will need a connection between
two pins on the computer’s connector named DTR and DSR (Data Terminal Reading
and Data Set Ready). CTS (Clear To Send) may also need to be jumpered to RTS
(Request To Send) at your computer interface.
26
Appendix V
Accessories and Options
The following accessories are available for Setra counting scales. Ask your dealer for
current price information and/or a demonstration.
Part Number
Description
401160
DYMO/Setra 300 - quiet, direct thermal printer for labels or receipt
paper. Communicates at 2400 baud via RS232 interface. Printer comes
with a Setra balance to printer ready cable. It uses a switching power
supply and can be operated in 100 to 240 VAC, 47 to 63 Hz. Printer has
a 4 K input buffer and prints 2 inches per second.
Dimensions: 4 7/8 in. x 7 1/4 in.
400496
SECURITY LOCK KIT - Components include a stainless steel rod and
hardware necessary to secure scale to bench or table surface. Instructions included.
403682
PORTA PAK BATTERY - Includes portable battery, charger and cable.
401660
EXTRA BATTERY - Includes battery and charger only.
403910
DRAFTSHIELD - Fits Models 500L and 2000L only. Detachable. Three
sliding glass doors, including top opening for tall containers. All glass
and aluminum construction.
27
Appendix VI
In Case of Difficulty
Setra balances are designed to be easy to use. If, however, you have reached a state
in which the scale will no longer follow your instructions, you may wish to “reset” the
scale. It is possible to do so by following this sequence.
1.
2.
3.
Remove all weight from the pan.
Press the — and clear keys to clear the display and set all registers to zero.
Press the tare key. This sets the displayed reading to zero.
If this procedure does not solve the problem, try briefly unplugging the scale from its
power source; then, plug it in again. If any unusual messages are displayed during the
warm-up period, contact a Setra Authorized Service Center or Setra Systems, Inc., as
service may be required. (During the first 30 seconds of operation, the scale normally
performs a segment test, says “HELLO”, then counts down to zero.)
If the scale displays "d-noS", press the cal key as described under "Restoring the
Factory Defaults" in Appendix I. After returning to the factory defaults it may be
necessary to reenter User Defined Units (see Section IV) and User Set-Ups (see
Appendix I). These include X units , T units, baud rate, tone enable/disable and span
calibration. If these user units and user setups are not reentered the scale will default
to factory settings.
If the scale displays "UnAbLE" during calibration, make sure you are using the correct
calibration weight. See Appendix II, "Calibration." Try performing the steps above to
reset the scale prior to calibration.
For problems with the RS-232 interface, first make certain that the RS-232 cable is
securely fastened to the scale and the peripheral device. Next, reset the baud rate of
the scale and external device to be sure that they are identical. See Appendix I, "Setup
Functions." Now, make certain the data formats are identical. See Appendix IV, "RS-232
Serial Data Communications." If data transmission or reception is still not possible, be
certain that the cable is the correct type. (When communicating with certain types of
devices, especially computers, it may be necessary to "cross" the receive and transmit
lines of the interface. That is, the receive line of the scale must connect to the transmit
line of the external device. Likewise, the transmit line of the scale must connect to the
receive line of the external device. These special cables can be purchased from a
computer dealer.) See Appendix IV for more information.
If the problem still persists, contact your dealer or Setra Systems, Inc.
28
Appendix VII
Specifications
MODEL
500L
2000L
5000L
12000L
Capacity
500 grams
1.1 lbs.
2000 grams
4.4 lbs.
5000 grams
11 lbs.
12,500 grams
27.6 lbs
Precision
+ 0.0005 grams + 0.005 grams
+ 0.015 grams
+ 0.05 grams
Readability
0.001 grams
0.01 grams
0.01 grams
0.1 grams
Linearity
± 0.002 grams
± 0.01 grams
± 0.02 grams
± 0.1 grams
Display Update:
Up to 5 times per second
Response Time:
Less than 2 seconds (typical)
Data Communications:
Selectable Baud Rates:
Display:
Pan:
Bidirectional RS-232
300
600
1200
2400
4800
9600
6 digit LCD, long life
Type 304 stainless steel
Operating Temperature:
50˚ to 104˚F (10˚ to 40˚C)
Temp. Drift of Sensitivity:
15 ppm/˚C
Power Requirements:
Dimensions:
Weight:
120 VAC, 50 or 60 Hz, 5 watts, Battery Option Available
14.3 x 7.1 x 5.0 inches (363 x 180 x 127 mm)
7.7 kg (17 lbs)
Specifications and features subject to change without notice.
29
Appendix VIII
Limited Two Year Warranty
Setra Systems, Inc., warrants the equipment manufactured by it to be free from defects
in material and workmanship. Upon return, transportation charges prepaid, to Setra’s
factory within two years of original shipment, Setra will, at no charge, repair or replace,
at its option, any equipment which it determines to contain defective material or
workmanship and will return said equipment to purchaser, transportation prepaid to any
point in the United States. Setra will not be obligated, however, to repair or replace
equipment which has been repaired by others, abused, improperly installed, altered,
or otherwise misused or damaged in any way. Setra will not be responsible for any
dismantling, reassembly or reinstallation charges.
This warranty is in lieu of all other warranties, expressed or implied. Setra shall not be
liable for any special, indirect, incidental or consequential damages, including damages claimed in connection with any revision of this agreement by the purchaser.
Setra Systems, Inc. - Weighing Systems Division
159 Swanson Road • Boxborough MA 01719
(978) 263-1400 • Fax (978) 635-9551
30
Index
accessories 3, 27
accuracy 5, 20, 21
APW 8, 12, 23, 24
auto zero tracking 14
battery 6, 27, 29
baud rate 14, 17, 18, 21, 22, 24, 25, 27, 28, 29
bUSY 8, 19, 26
cable 25, 26, 27, 28
calibration 3, 5, 7, 9, 10, 18, 20, 28
carats 8, 9, 23
clear 6, 7, 8, 9, 11, 12, 13, 18, 19, 20, 22, 28
Clear To Send 26
computer 3, 14, 17, 21, 22, 24, 25, 26, 28
continuous print 23, 24, 25
conv 7, 9, 15, 16, 19, 20, 22
draft 5, 11
draftshield 27
factory calibration 18
factory defaults 18, 28
firmware 18
grams 7, 8, 9, 15, 16, 23
ounces 7, 8, 9, 15, 23
pennyweights 8, 9, 23
percent 7, 8, 11, 12, 21, 23
pinout 25
pounds 8, 9, 15, 23
precision 21, 29
print 7, 13, 14, 18, 22, 23, 24
readability 29
register 28
Request To Send 26
resolution 7, 11, 21
RS-232 14, 22, 24, 25, 26, 27, 28, 29
sample no. 7, 13, 22
service 19, 28
setup functions 25, 28
specifications 3, 29
t units 8, 9, 15, 16, 18, 28
tare 3, 7, 9, 10, 11, 12, 14, 16, 20, 21, 22, 23, 28
tone 18, 19, 25, 28
troy ounces 8, 9, 23
UnAbLE 6, 8, 24, 28
user units 23, 28
user-definable units. See T units: X units
vibration 5, 7, 8, 11, 13, 17
volume 16
warm up 5
warranty 3, 30
X units 8, 9, 15, 16, 18, 28
x10 7, 11, 22
zero 6, 7, 14, 19, 21, 28
31