1
Instruction Manual
"This machine corresponds to the EEC-prescriptions 76/889"
elna
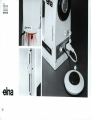
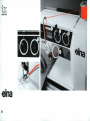
Your new Elna-tx - class 57
The Instruction Manual
your Ena-tx,
enables you to become acquainted with
manipulation
operation,
its
with
yourself
familiarize
to
and certain basic seams.
Description and main parts
Preparation of the machine
Adjustments and sewing
Extra accessories
Maintenance
To remedy minor disorders
Pages
2 to 11
12 to 19
20 to 41
42 to 45
46 to 47
47 to 48
General
Please keep this instruction manual in a safe place for
future reference.
All rights to make any modifications reserved.
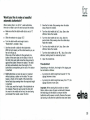
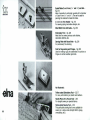
Everything is then ready for your everyday sewing
jobs:
sewing foot, for the usual straight and zigzag
5 The
stitches.
6 A number 80 needle (medium size).
7 The thread tension set at the "Universal" position,
marked between 4 I/ and 5 'A
There is no longer any need to adjust the
pressure of the sewing foot. It is universal and
has been adjusted at the factory to cope with
sheer as well as thick fabrics.
Service. Should you require any further information,
please don't hesitate to ask your Elna dealer. His
qualified staff will be glad to answer your questions.
In accordance with the terms of the guarantee, he Is
also the only person authorized to attend to any
mechanical adjustments on your Elna.
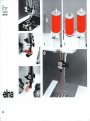
Preparation
You don't have to remove your EIna-tx from a case.
Elna sewing machine
Record in space provided below the Serial No.
and Model No. of this appliance.
The Serial No. Is located Rear of arm.
The Model No. is located Rear of arm.
Serial No.
I Open it by raising the clasps slightly to free the
protection flaps. Open the latter in the order 2-4-3
Model No.
Retain these numbers for future reference.
to form a comfortable sewing surface.
3
3
e~na
1
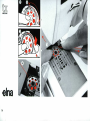
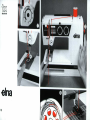
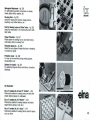
Your ElIna-tx is a convertible
sewing machine
You can use it with the convenient sewing table, by
leaving the protection flaps opened out, or with the
free arm.
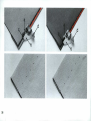
You can obtain a practical free arm by removing the
3 protection flaps, namely:
1-2 Flaps 1 and 2: open (or raise) the flaps to a
horizontal position (a), press them towards the red
mark (I) and lift the other end (11).
The flaps will
then come free.
3 Flap 3: press the button (b) while raising and
pulling the flap upwards.
4 You thus have a free arm. It makes it easy to sew
the openings of trousers, the waistbands of skirts,
aprons, patches on the seats of trousers, pockets,
etc.
To reclos. the flaps: Turn the flywheel by hand to
move the thread take-up lever to its lowest
position.
You then put the flaps back In place In the reverse
order.
3 Start by inserting flap 3 In the slit.
The red mark 0* should be on the outside.
Push it right down, until It clicks Into place.
2-1 Next, fit the flaps 2 and 1, holding them in a
horizontal position. Place the end marked In reda
(I) in the hole of the hinge. Press the flap towards
the hinge and insert the other end (11)in the hole,
d na
5
!a
66
eina
i, i
1
2
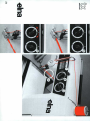
Your EIna-tx is easy to understand
Here are the other main parts:
1 Stitch length dial.
2 Stitch width dial.
3 Stitch selector.
4 Rotary hook cover.
5 Built-in sewing light. Input 15 w maximum.
6 Universal upper thread tension.
7 Thread take-up lever,
8 Bobbin winder.
9 Retractable spool pin.
13 Mains lead.
14 Pneumatic foot control.
15 Light switch and motor switch. Each switch can be
turned on or off Independently.
Safety
In accordance with the recommendations of
specialized safety, standards and electrical control
authorities, the sewing machine must be
disconnected from the main supply by removing the
plug from the socket-outlet whenever:
-
the machine is left unattended
10 Flywheel, with coupling knob.
-
the machine is being serviced
11 Electronic speed controller.
-
mechanical parts are changed
12 Specification plate. Make sure that the voltage
-
(volts) is the same as that indicated on the light
bulbs in your home.
-ngaccessories
are changed.
See also pages 46-47.
7
56
A
e ina
10a
i
ii!~~
7.!i~~
i i i i i! i ! i !!
l0b
11l
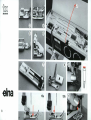
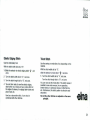
The Accessory Case
built into your Elne-tx is a true fitted case, where
every accessory has its place. There is no longer any
separate box to be mislaid. it is an integral part of
your Elna-tx.
1-2Raise the clasp slightly and open the cover. In the
he
1case you wils idhtlyacessoriesndeov
case you will find the accessories and removable
soles for:
(3 sewing foot already in place on the machine)
4
embroidery foot
5 zipper foot
6
blind stitch foot
7
buttonhole foot with slide
8
darning foot and plate
2 bobbins (plus one already placed in the rotary
hook)
Assortment of needles and a needle threader
Small cleaning brush and oiler
Buttonhole knife and seam ripper
Small screwdriver
9 Should you have to change the needle
Hold the needle with its flat part against the index
finger and push it as far as it will go into the
needle clamp. Tighten the screw firmly (no need
Use needles of the system
for a screwdriver).
130/ 705H (15 1).
10 Should you have to change the sole of the foot
a) Raise the foot. By pressing downwards on the
sole of the foot with the fingers, it is
disengaged and can be removed easily.
b) Place the other sole under the foot support
attachment. Lower the foot and press on the
support with the fingers so that the sole
engages by itself.
11 If you use a foot that is attached in the
conventional manner, the support fixing screw can
be unscrewed, Remove the support and attach the
foot in its place. Tighten the fixing screw firmly.
For the darning foot see pages 34/35.
9
wi
46bcu1 41
71
eina
elna
10
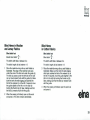
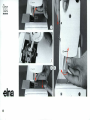
Operation
1 Foot Control
The foot control Is not electric. It is a pneumatic
foot control. It controls an electronic device
housed within the machine, to regulate motor and
sewing speeds.
2 Connect the nozzle with the machine.
3 Plug in the mains lead.
4 The sewing light is situated in the head of the
machine,
5 It can be switched on or off independently by
pressing the light switch. Useful for changing the
needle or the bobbin, preparing a piece of sewing
work, etc. The input of the light (15 w maximum) is
marked on the machine.
6 The motor switch is a safety switch that makes it
possible to cut off the supply of electric current to
the motor (without cuffing off the supply to the
light). Switch it on to run the machine. Switch it off
when you are not sewing,
7 Electronic Speed Controller
With this sliding control, It is possible to set,
before or during sewing, the maximum speed
desired, by sliding the knob upwards or
downwards to the setting required between the
"hare" and the "tortoise", symbolising the fast and
slow speeds.
A bobbin winding position "I " shows, too, the
recommended speed for winding the bobbin.
The range of speeds Is then controlled by the
pressure exerted on the foot control. The greater
the pressure, the higher the speed, until the
maximum speed set with the electronic speed
controller is reached. Press preferably with the
sole of the foot (and not with the toes).
Get usedo the speeds by running the machine
for a few turns (without thread).
N.B.
Thanks to the electronic control combined with
the permanent magnet motor, the optimum
needle penetration power is maintained, even
when sewing stitch-by-stitch. Very useful for
thick or delicate seams.
d na
11
5784
elm
elna2
12a
If you are using your Elna-tx
1 for the first time or have not used it for some time,
put a drop of oil in the rotary hook, on the point
marked in red.
Wind the bobbin
For the usual sewing jobs, it is best to use a mediumsized thread.
2 Raise the thread guide which is under the cover of
the accessory case and which serves for bobbin
winding and for threading the upper thread (see
also page 16). Close the cover,
3 Disengage the flywheel by unscrewing the
coupling knob as far as it will go.
4 Slide the knob of the electronic speed control to
the position "X ", bobbin winding.
5 Place the bobbin on the bobbin winder, holed side
upwards.
6 Pull out the spool pin and place the spool of
thread on it.
7 Pass the thread through the raised thread guide.
8 Wind the end of the thread around the bobbin by
hand, in the direction indicated and push the
bobbin winder to the right.
9 Wind the bobbin, pressing lightly with a finger on
the spool so as to stretch the thread better and
thus fill the bobbin to a maximum. The full bobbin
stops automatically.
10 Re-engage the flywheel by tightening the coupling
knob in the opposite direction to the arrow. Cut
the thread and remove the bobbin from the winder
by pushing the latter to the left,
13
elna
14
Putting the Bobbin in Place and
Threading the Lower Thread
There is no bobbin case,
The bobbin Is placed direct In the rotary hook, i.e.:
1 Open the rotary hook cover by pushing it to the
back, as far as it will go. Drop the bobbin into the
rotary hook, holed side upwards.
2
Hold back the bobbin with the left index finger.
Slide the thread into the slit (a). Bring it around to
the front, at the angle Illustrated (b).
3 Continue to hold back the bobbin. By pulling the
thread and pressing it downwards with the index
finger, It will snap into the tension device.
4 Immediately check that the thread will not
come out of the tension device. When it is
pulled gently upwards, it should not come
out of the slit (2-a). If by chance it should
do so, repeat the operations as explained
under 2 and 3. Pull about 15 cm of thread
out towards the rear.
15
1m
elna
16
Threading the Upper Thread
Make sure that the thread take-up lever and the foot
are in their highest positions,
1 Pull out the spool pin and place the spool of
thread on it. Hold back the spool with the tip of
your finger and pass the thread through in the
following order: (all the thread guides are open,
including the thread take-up lever).
2 Thread guide.
3 Universal upper thread tension, marked between
4/2 and 5 .
tto ensure good sewing
Important tinserted
results:
Give the thread a sharp tug upwards so that it is
properly engaged in the tension device (3).
Check: If the thread is then pulled downwards,
it should not come out of the tension device.
4 Thread take-up lever - pass the thread through
the rear of the notch in the cover, from right to left,
passing it around the thread take-up lever. The
thread will slip into the opening of the thread takeup lever.
5 Thread guide.
6 Needle clamp. Pull the thread well Into the clamp.
(Ba) The thread has not been pulled well into the
needle clamp.
(6b) Correctly threaded needled clamp.
7 Needle. It is threaded from the front to the back. (If
the needle threader is used, it must therefore be
Into the eye of the needle from the back).
8 Pull forward about 15 cm (6") of thread to the
front.
e lna
1
eina
182
ne "
abctwnt.
Drawing up the Lower Thread
Universal Tension
1 Leave about 15 cm (6") of upper thread in front of
7 It is delimited by the frame around the figure 5
and makes it possible to do most sewing jobs
without changing the tension.
if, however, an adjustment is required:
Turn the tension wheel to between 5 and 9 to
increase the tension.
Turn the tension wheel to between 5 and 1 to
reduce the tension.
For more detailed information and advice on tension
settings - see page 41.
the needle and hold it with your index finger
against the edge of the needle plate.
2 Turn the flywheel one full turn (towards you), by
hand.
3 This makes the thread take-up lever descend and
return to Its highest position and will draw up the
lower thread-(4).
4 Free the loop of thread by hand.
5
Check to make sure that the thread
crosses the hook and the bobbin correctly.
Close the rotary hook cover.
6 Leave about 15 cm (6") of each thread to the
side, passing them under the presser foot.
You are now ready to start sewing.
d na
19
elna
20
Selection and Adjustment
of the Stitches according
to the "Synchrocolor" System
The selection chart (1), the stitch selector (2) and the
adjusting dials (3-4) are provided with green and red
guide marks. By turning the dials to the
corresponding colours, the most common basic
adjustments are synchronized.
1 Stitch Selection Chart
The Eina-tx has 12 built-in stitches, i.e. 6 single
automatic stitches shown on a green background.
* straight stitch
* stretch seam
* interlock stitch
" zigzag stitch
" elastic blind and edging stitch
" overcasting stitch or three-step zigzag
Thus, these stitches are set, on principle, by
turning the stitch width and length dials (3 and 4)
6 double superautomatic stitches shown on a red
background
a elastic triple seam
net-stitch
* overlook stitch
9 triple zigzag
* decorative edging stitch
9 tricot stitch
Thus, these stitches are set, on principle, by turning
the stitch width and length dials (3 and 4) to the red
guide marks.
*
to the green guide marks.2
21
lie
na
22I
II
I
Al
Jr
Elementary Sewing
Straight Sewing backwards
Make sure that the coupling knob has been tightened
firmly,
* Use the sewing foot (see page 8).
* Always place material under the foot and lower
the foot before running a threaded machine.
5
Straight Sewing forwards
I Leave the stitch width dial at 0".
2 Set the stitch length dial at between 1 and 2,
depending on the length required (green zone up
to 2).
To start sewing, lower the needle Into the material
and hold back the two threads by hand while
sewing the first two or three stitches.
3 You will then sew a straight seam with stitches 1 to
2 mm long (in the green zone), but you can also
sew stitches between 2 and 4 mm long by turning
the dial beyond the green zone, to the
corresponding figures - and depending on the
work and on the fabric.
For continuous sewing backwards, turn the stitch
length dial to the stitch symbols "---".It is possible
to sew stitches backwards in various lengths.
-'c....
Removing the Work
6 To remove the work, first turn the flywheel by
hand, towards you, to raise the thread take-up
lever to its highest position. This Is essential to
complete the stitch pattern. It Is also Important
because it ensures that the next seam can be
trte easily. Raise the presser bar lever (foot).
Pull the material out towards the rear and cut the
threads with the thread cutter on the presser bar.
Changing the Bobbin
7 With the foot raised, pull the bobbin extractor
(whichinto
is situated
justhole
above
the bobbin;
rotary hook)
down
the centre
of the
when It is
released, the bobbin is removed automatically
You can change the needle position for
straight sewing
With the stitch width dial set at "0", the straight seam
Is In the centre (a).
By turning the stitch width dial to -- A-, the seam is
decentred to the right (b).
By turning the stitch width dial In the opposite direc-
tion to
"Z-, the seam is decentred to the left (c).
Any other intermediate position is also possible.
To sew
4 Guide the material only with your fingers, along the
side of the foot, without holding it back (4). (Do not
pull the material from the rear). At the same time,
carefully observe the seam. You can thus keep an
eye on your sewing and avoid the risk of pricking
your fingers accidentally.
This is very practical for sewing the rims of collars,
cuffs, zip fasteners, see also pages 36-37.
If you want to darn, see pages 34-35.
N.B. For technical reasons, the stitch lengths are
the following when decentring the seam:
- decentred to the right - approx. 1, 2, 3, 4
-
decentred to the left - approx. 1'A 214 31,%4.
23
2
N)
....
i
i-
Aiw"
q~0
wnu
iacnr
Sewing with the Zigzag Stitch
Satin Stitch
Use the sewing foot.
1 Leave the stitch width dial at "0" and
2 Slide the selector to zigzag " ", green.
Turn the stitch width dial to 4, green zone.
3 Turn the stitch length dial to between 1 and 2,
green zone.
4 You are now ready to sew the zigzag stitch.
You can set the width and length of your zigzag
stitch at any position desired between 1 and 4.
Use the embroidery foot.
To change the foot, see pages 8-9.
5 By selecting a stitch width between 1 and 4 and a
stitch length between / and VAyou will sew a
beautiful satin stitch. ft's ideal for the hems of
sheets, pillow-cases, table-cloths, cushions, etc.
Tapered Satin Stitch
This stitch is often used for overcasting, sewing
on patches, setting elastic, sewing garments and
underwear made of jersey fabrics, blind hems in
woollens, etc.
6 if you turn the stitch width dial slowly by hand
between 1-4-1 while your EIna-tx is running fast,
you will sew a satin stitch tapered as you fancy.
e
25
5!
elna
26
Overcasting Stitch or Three-step Zigzag
Use the sewing foot.
1-2With the stitch width dial at "0", slide the selector
to the three-step zigzag " E ", green.
2 Turn the stitch width dial to "4", green zone.
3 Turn the stitch length dial to "2", green zone.
4 You are then ready to sew the three-step zigzag,
You can set the width and length of your threestep zigzag at any position you desire between
"1" and "4". This stitch is highly appreciated for
Its strength and elasticity and is suitable for
overcasting, for setting elastics, sewing jersey and
stretch fabrics, patching In a single operation,
sewing edge-to-edge.
. Turn the stitch width dial to '4", green zone.
e Turn the stitch length dial to "1-1l'A ", green zone.
You are then ready to sew the blind stitch, - see
also pages 38-39.
6 The length of this stitch can also be reduced to
between 'hand /4 to produce a fancy satin stitch.
Use the embroidery foot.
This stitch has many uses, viz.:
Elastic Blind Stitch or Edging Stitch
Elastic shell hem:
5 With the stitch width dial at "0", slide the selector
"green zone.
to the edging stitch
Edging stitch:
for edging table-cloths,
serviettes, fancy insertions,
reinforcing buttonholes.
Blind stitch and
Elastic blind stitch: for woollens, stretch fabrics, etc.
for underwear, In jersey fabric.
for example.
okia
edna
28
The Elastic Triple Seam
Use the embroidery foot or the sewing foot
1-2With the stitch width dial at "0", slide the selector
to triple seam " I ", red zone (same position as for
the triple zigzag).
3 Turn the stitch length dial to "S", red zone.
4 You
thenforready
to sew
very garments,
strong elastic
tripleare
seam
working
andthe
sports
trlensear, working, a
ts
gbe
garden chairs, curtains, etc.
5 Turn the stitch width dial to "4, red zone.
Turn the stitch length dial to "S, red zone.
You are then ready to sew the triple zigzag. This
zigzag,
bothcertain
useful seams
and attractive,
is suitable
for also
reinforcing
in garments
and can
most attractive as a decorative seam on jeans,
skirts, etc,
Triple Zigzag
Use th. embroidery foot
With the stitch width dial at "0", slide the selector to
zigzag "5", red zone stitch,
N.B.: You can also obtain a narrower stitch by
turning the stitch width dial to between 3 and 1.
29
elna
30
Elastic Edging Stitch
Tricot Stitch
Use the embroidery foot.
With the stitch width dial set at "0",
1-2 slide the selector to elastic edging stitch ".
zone.
2 Turn the stitch width dial to '4", red zone.
3 Turn the stitch length dial to "5", red zone.
Use the sewing or embroidery foot, depending on the
material.
With the stitch width dial at "0",
slide the selector to tricot stitch 5 ", red zone.
5 Turn the stitch width dial to "4". red zone.
Turn the stitch length dial to "S", red zone.
You can now sew the tricot stitch, This stitch makes it
possible to sew and overcast, in one operation,
stretch fabrics, in particular jerseys, knitted fabrics,
etc. Furthermore, this stitch pattern is attractive and
", red
4 You are then ready to sew the elastic edging
stitch which is an ideal and very pretty stitch for
the edges of sleeves, for edging table-cloths and
place mats, etc.
Used as a decorative stitch, It can also be
combined with other stitches.
decorative.
N.B. All the other stitches are adjusted on the same
principle.
--
31
5
elna
32
67
Would you like to make a beautiful
automatic buttonhole?
When making this 4 mm (3/16") wide buttonhole,
there is no need to turn the work around the needle.
" Make sure that the stitch width dial is set at "0"
and
* Slide the selector to zigzag "i".
" Turn the stitch width and length dials to
"Buttonhole", marked in blue.
1 Use the sole with a slide for the buttonhole.
With the foot raised, pull the slide towards you, as
far as it will go (a).
Place one of the buttons for the garment (or a
button of the same size) on the slide, in front of
the foot, then push and screw the stop-screw (b)
against the button. Remove the button. The slide
will stop automatically when the length of the
buttonhole corresponding to the size of the button
is reached.
2 N.B. Buttonholes can also be sewn or repaired
without placing a button on the slide. The user
keeps a check on the length of the buttonhole
herself and stops sewing when the required length
Is reached.
In this case, mark the length of the buttonhole on
the material. Place the work under the foot with
the mark In the middle of the foot, the start being
just beneath the needle. Lower the foot.
3 Sew the first side. Stop sewing when the slide
stops. Raise the needle.
4 Turn the stitch width dial to 2, blue. Sew a few
stitches. Raise the needle.
5 Turn the stitch width dial to 3, blue. Sew the
second side, Stop sewing when the slide stops.
Raise the needle.
6 Turn the stitch width dial to 4, blue. Sew a few
stitches. Raise the needle.
7 Turn the stitch width dial to "',
blue. Sew a few
stitches, holding back the material by hand.
8 Open the buttonhole.
Fine-adjustment
Depending on the fabric, the length of the zigzag can
be corrected as follows:
- by turning the stitch length dial towards "0", the
zigzag becomes closer,
by turning the stitch length dial away from "0", the
g cestmore open.
zig
zigzag becomes more open.
Important: When sewing thick woollen or stretch
fabrics, slide a piece of paper underneath, between
the feed-dog and the fabric to ensure that the
buttonhole will be sewn correctly. Remove the paper
(by tearing it off) after the buttonhole has been sewn.
m a
33
aa
4
A7
eina
34
i
5
Darning
Use darning thread.
With a little practice, you will find it easy to darn by
machine and thereby make your household linen,
undergarments, working clothes, etc. last two to three
times longer.
1 First put the darning plate (a) in place and then
attach the darning foot.
The darning plate simplifies darning without a
darning hoop, since it covers the openings in the
needle plate making Itunnecessaryto haveaspecial
additional mechanism for lowering the feed dog.
The darning foot does not have a removable
sole. Unscrew the fixing screw and remove the
foot support. Attach the darning foot from the
rear. The lever of the foot touches the rear of
the stud (b) on the needle clamp.
Turn the stitch width and length dials to the position
Don't forget to lower the presser foot before
starting to darn and hold back the threads.
2 Lower the needle into the material. Stretch the
material tightly between the fingers and sew a
screen of closely woven stitches, moving from
right to left and vice versa.
3 Keep the fingers as close to the darning foot as
possible and finish the darn by sewing parallel
serpentines backwards and forwards. To reinforce
worn-out spots, it is not necessary to sew a
screen first.
Threading Very Slippery Threads
Certain very slippery threads (usually synthetic) can
tend to fall In spirals from the spool onto the machine.
4 To avoid this, place the removable spool pin on
the bobbin winder stop, as well as the spool.
Raise the retractable spool pin and pass the
thread through the hole (a). Next, thread in the
usual way.
Threading when using Twin Needle
5 Place the removable spool pin on the bobbin
winder stop, as well as the spool. Place the
second spool on the retractable spool pin, after
having raised It Hold the 2 threads and thread
them together in the usual way, up to the needle
clamp (see pages 16-17).
6 Next pass a thread to one side and the other to
the other side of the needle clamp. Thread the two
eyes of the needle. Draw up the lower thread In
the usual way, but holding the 2 upper threads
(pages 18-19).
35
-
a
I c
1 2
36
I
3
y_
abctat
Zip Fastener
With the clip-on zipper foot
I This foot can be positioned to the left (fig. 1) or to
the right (fig. 3) of the needle by fitting the foot
support into the left or right recess of the sole.
This makes it possible to sew without turning the
work around, by sewing the zip fastener once on
one side of the foot and once on the other side.
" Stitch width dial on ""
* Stitch length dial at between 1-3.
Baste on the fastener by folding the opening as per
the diagram. Leave the fastener open and sew from
the opening to the point.
2 When the middle of the seam is reached, lower
the needle into the material and close the fastener
by pulling the slide. Lower the foot and continue
sewing up to the point.
3 When one side has been sewn, pull the work (and
the fastener) back towards you, move the ole to
the other side of the needle and sew the other
e
side from the opening to the point of the fastener.
37
rd
38
ctR
Blind Hems in Woollen
and Jersey Fabrics
Blind stitch foot
Elastic blind stitch
".
The stitch width dial at between 2-4
The stitch length dial at between 1-2
1 Place the material wrong side up and folded as
illustrated. The edge of the material must pass
under the sole of the foot and under the guide (b).
The fold (c) passes under the left side of the sole
(a), but must remain flush with the guide (b). Make
sure that only the wide zigzag just catches the
fold of the material (c) at the left. If required, move
the guide slightly to the left or to the right by
turning the thumb nut (d). Sew, making sure that
the fold (c) remains flush with the guide.
Blind Hems
in Coton Fabrics
Blind stitch foot
Blind stitch I -The stitch width dial at between 2-4
The stitch length dial at between 1-2
3 Place the material wrong side up and folded as
illustrated. Make sure that only the wide zigzag
stitch just catches the fold of the material (c) at
the left. It required, move the guide slightly to the
left or to the right by turning the thumb nut (d).
Sew, making sure that the fold (c) remains flush
with the guide.
4 When the sewing is finished, open the work out
and press It.
2 When the sewing is finished, open out the work
and press It.This hem remains stretchable.3
39
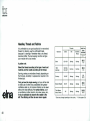
Needles, Thread and Fabrics
It is preferable to use good quality dull or mercerized
thread. For darning, use fine, left-twist thread,
because it is stronger. Remember that a dry thread
MateWi
Cotton
Threads
Silk
Synthetic
NeW]e
Sizes
180/70H
Fibres
t_15XI
becomes brittle. The best sewing machine will give
poor results with a bad needle.
Sewing
70-70
Darning
Darning
7-10
100-60-
Sewing
Sewing
80
t0-12
80-40'
Sewing
Sewing
n0.mo
12-14
40"
Sewing
Sewing
90-100
Sheer
120-100'
Sewing
Worn
(darning)
Darning
120-100-
D070
Ordinary
Medium Weight
A golden rule:
Select the thread according to the type of work and
material, and the needle according to the thread.
Darning, sewing or embroidery thread, depending on
fineness,
the
job. durability or appearance required o the
finished
First, get used to simple sewing, and you will be able
to make use of other Elna possibilities with greater
confidence later on. All common fabrics can be sewn
without the least difficulty. For certain fabrics, such
as synthetics, knitted, stretch, silk, sheer Jersey, etc.,
It may be advisable to decentre the needle to the
left The stitching will then be
40
even more
regular.
Thick Weave
Heavy Sheets
7-10
14-16
Sizes may change depending on the country. " Or the system 705.
Universal Thread Tensions
P
The universal settings make it possible for most
sewing jobs to be done without changing the tension,
i.e.:
Lower tension: red number '1", facing the lever.
Upper tension: number 5, framed zone, facing the
guide mark.
If the tension has to be changed (for certain Nylon or
metallic threads, special seams, etc.), it is usually the
upper tension that is modified by turning the knob, as
follows:
A good tension
The threads are locked properly between the two
layers of material.
Upper tension too strong
The lower thread is visible on top. Decrease the
tension, turn to the thinner lines, between 5 and 1.
Upper tension too weak
The upper thread is visible underneath the material.
Increase the tension, turn to the thicker lines,
between 5 and 9.
If the tensions are tried out for a particular sewing
job, do so on a double layer of a scrap of the material
(and not single), as will be the case when the final
sewing is done,
If the lower tension should have to be modified
(certain Nylon or elastic threads or special seams),
turn the graduated screw with the screwdriver. The
graduation marks make it easy to reset the universal
tension position.
nlflfl
elna
42
Sewing with Extra Accessories
If desired, the already wide range of applications for
the Elns-tx can be extended even further with the
use of extra feet that can be purchased from all Elna
shops, Simply refer to the respective numbers.
Button Foot - fig. 200
For buttons and hooks, curtain rings, etc.
Button Foot with Adjustable Guide - fig. 202
For sewing buttons with a stem on collars, woollens,
thick fabrics, etc.
abcwr
Multiple Cord Foot - fig. 205
As many as five fine cords can be inserted Into this
foot. By covering them with decorative stitches, very
attractive designs can be obtained.
Roller Foot - fig. 207
For ordinary or decorative seams, especially on
plastics, the edges of thick materials and for joining
elastic or slippery materials of different thicknesses.
Felling Feet 4 mm or 6 mm - fig. 208
For felled seams,
Tucker Foot - fig. 210
Tucks are sewn with the twin needle.
Rolled Hem Foot - fig. 211
For making rolled hems with the zigzag stitch.
Especially useful for fine handkerchiefs.
Braiding Foot - fig. 212
For sewing on braids and cords.
Not Illustrated:
Hemmer Feet 2, 4 or 6 mm - 206
Quilting Foot with guide - 204
Gathering Foot - 209
Buttonhole Length Guide - 232
For checking the length of buttonholes and for
sewing them at the right distance from the edge of a
garment
Embroidery Hoops 60 num and 138 mm - 240...
Elit Sewing Stencil - 244
For drawing and modifying patterns, guide marks,
practical and decorative designs.
Fagoting Plate - 248
43
{b~
Eyelet Plates 2 and 4 mm
(1/i6"
and '/") and Awl
-
fig.
213
Make it possible to embroider eyelets with a diameter
2 and 4 mm (1/ie" and Ib"). The awl is used for
of
piercing the material to make the holes.
2 or 2,7 mm Twin Needle - fig. 216
For sewing piping, decorative designs, etc.
Blind Stitch Foot with Guide - fig. 203
Embroidery Foot - fig. 223
Metal foot for sewing various satin stitches,
decorative stitches, etc.
Darning Plate with Round Hole - fig. 224
For particularly fine darning.
Fork for Rug-making and Fringes - fig. 229
Used for making rugs, the undersides of cushions or
fringes on certain woollen garments.
ix
Not illustrated:
44
Teflon-coated Embroidery Foot - 223 T
For easy embroidering on plastic and leathers.
Needle Plate with a Round Hole - 225
For straight sewing on special fabrics.
Nickel-plated Sewing Foot - 228
This particularly strong foot is very suitable for
sewing on a large scale (straight stitch, zigzag,
overcasting, etc.).
Monogram Attachment - fig. 226
For embroidering perfect monograms on sheets,
towels, table-cloths, napkins, etc.
No-snag Foot - fig. 230
Useful for sewing net curtains, shaggy fabrics,
towelling, curly knitted fabrics, etc.
sas
Foot for Sewing Loops and Tailor Tacks - fig. 236
Useful for embroidery or for marking the fabric with
tailor tacks.
Finger Protection - fig. 237
Placed above the sewing toot or used when doing
embroidery without a sewing foot.
Horizontal spool pin - fig. 246
Useful for very slippery threads that have a tendency
to unwind too easily,
Protection cover - fig. 249
To cover up the machine during sewing pauses,
transportation, etc.
Gatherer for elastic - fig. 245
For gathering lingerie fabrics and fabrics of medium
thickness.
Not illustrated:
Box otS needles No. 80 and 75 "Stretch" - 233
Particularly suitable for sewing sheer and fairly fine
stretch fabrics (Jersey for underwear).
Box of 5 needles No. 90 "Stretch" - 234
Particularly suitable for sewing medium and heavy
weight fabrics (jersey, knits, etc.).
Box of 5 needles No. 90 "Jeans" - 243
Particularly suitable for sewing fabrics used for jeans,
such as denim.
elna
45
e~na
462
dlna4.6
......... . . .
4
Maintenance
Your Elna-tx will always serve you faithfully if it is
cared for properly.
Disconnect the machine according to the "Safety"
recommendations on page 7.
1 Remove the needle and the foot.
Slide the rotary hook cover to the rear and
remove the bobbin.
Lift off the needle plate. Remove remains of thread
and fibres by brushing the rotary hook and the
feed dog with the cleaning brush.
2 Place the brush in the middle of the rotary hook
and move It about so that the bristles protrude
through the openings in the side of the hook.
Oil the rotary hook (see pages 12-13).
3 Replace the needle plate. Press down on it so that
it clicks into place. Put the foot, needle and bobbin
back Into place. Close the rotary hook cover,
To remedy minor disorders
consult the instruction manual on the pages
indicated, if:
The upper thread breaks
Pages
- Needle not of the system 130/705 H (15X1),
of poor quality, bent, not Inserted correctly,
not suitable for the kind of work ........
9-40
- Incorrectthreading or threead ofpoorquality 16-17
- Lower thread not drawn up properly ...... 18-19
- Size of thread not suitable for the kind of
work .............................
40
- Machine needs cleaning ...............
46-47
- Upper tension too tight .............. 19 and 41
Sewing Light Bulb
Maximum input of the lamp 15 w. Remember this,
should it have to be changed.
The Input of the lamp is also shown on the switch
plate of the machine and on the front cover (on the
left of the latter).
4 To replace the bulb: first of all, disconnect your
Elna from the mains. Press down on the lug (a).
Bayonet socket: push In, turn and remove the bulb.
Replace the bulb by following the same procedure
In the reverse order. Note its sloping position.
The lower thread breaks
- Thread not wound evenly on the bobbin or
not drawn up correctly (does not cross the
bobbin at the right angle) .......... 12-13-14-15
- Lower tension too tight ...........
19 and 41
The machine skips stitches
- Sewing foot not suitable for the kind of
work ..............................
22-35
- Machine not threaded correctly ......... 16-19
- Needle not of the system 130/705 H (15 X 1),
is the wrong way round, incorrectly inserted,
not suitable for the kind of work .........
40
- Thread too coarse for the size of needle or
not flexible enough ..................
40
- Lower thread not drawn up correctly .....
18-19
The thread knots beneath the material
To close your Elna-tx
-
-
Remove the upper thread and place a piece of
cloth under the sewing foot. Lower the thread
guide into the accessory case.
Turn the flywheel by hand until the thread take-up
lever Is in its lowest position. Put the foot control
and mains lead into the box provided, which can
be kept In your Elna. Push down the spool pin.
Close the protection flaps.
The upper tension has not been threaded
correctly. Repeat the threading operation.,
The material puckers
16-17
-
Sewing foot not suitable for kind of work
-
Thread too thick .....................
40
Stitch too long ......................
23
Upper and/or lower thread tensions too
tight .............................
41
Lower thread not drawn up correctly ...
18-19
-
..
22-35
/
The material Is fed unevenly
Pages
- Needle plate not fitted properly .......... 46-47
- Sewing foot not lowered or not attached
securely
The motor runs but the machine does not
- Tighten the flywheel coupling knob ......
-
Sewing foot not suitable for the kind of work 22-35
-
-
Stitch length not suitable for job
Stitch length (for superautomatic stitches)
not set at "S" red .....................
29-31
Feed dog needs cleaning .............. 46-47
-
na
Pages
12-13
The bobbin winder runs but the machine does not
Tighten the flywheel coupling knob . .....
12-13
The stitch selector cannot be turned
-
Stitch width dial should be set at",....
It is not possible to obtain the stitch desired
- Stitches in the green zone: stitch length dial
should be set between 1/ and 4.
- Stitches in the red zone: stitch length dial
should be set at "S" red, in the notch (click
stop).
The front protection flap cannot be closed
- Thread take-up lever should be at its lowest
position .............................
The needle breaks
- Foot, needle plate and darning plate not
fitted properly ...................
8, 34 and
- By pulling the material, the needle strikes
the foot or the needle plate
- Needle too fine for the material and the
thread ..............................
- Needle not of the system 130/705 H (15 X 1),
of poor quality, bent, not inserted properly,
not suitable for the kind of work ....... 9 and
.........
- Upper tension too tight .....
The left protection flap cannot be put beck into place
- Not fitted properly, the red dot should be on
the outside ..........................
4-5
The protection flaps cannot be put beck Into place
- Put them back according to the red marks.
4-5
46
The machine will not run
40
40
41
-
Check power supply
Switch on the safety switch .............
Darning foot not fitted corrrectly .........
-
Remains of thread or lint in the rotary hook:
a Remove needle, bobbin and needle plate
* Turn the flywheel slightly by hand, several
times, first backwards, then forwards, until
the thread tangle has been cuL Clean out
... 46-47
the remains of thread .....
* Oil the rotary hook and run the machine
13
without thread for a few seconds ......
The machine runs too slowly
- Tighten the flywheel coupling knob ...... 12-13
11
- Disconnect and reconnect the foot control.
Check that the slide of the speed controller
11
is at the top ..........................
12-13
- Put a drop of oil in the rotary hook ......
Rotary hook has not been oiled or is dirty . 12-13
Needle is blunt
A-I 0.86-
Anglais -
10-11
34-35
The buttonhole is not sewn correctly
The machine Is noisy
-
47
N0 103 382-1
-
Wrong foot and stitch length too short ....
t
32-33
Tavaro $A., Genbve - Suiss