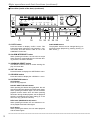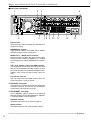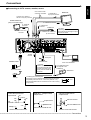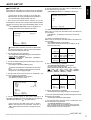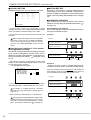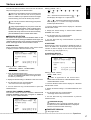
1
ENGLISH
DIGITAL RECORDER
OTHERS
INSTALLATION AND
OPERATION MANUAL
MODEL
DX-TL950E
THIS INSTRUCTION MANUAL IS IMPORTANT TO YOU. PLEASE READ IT BEFORE USING YOUR DIGITAL RECORDER.
1
Features
Built-in duplex 9 channel multiplexer
• The screen mode can be switched on the monitor such as single screen, split4 screen, split9 screen and
sequential screen, split4 sequential screen. (
see page 36)
• The unit is equipped with the 2 type-output connector to display the different mode split screen on the each of
different monitors. (
see page 37)
• Convenient simultaneous recording-playback function. Live picture from all cameras can be recorded continuously while the recording of desired camera is played back.
• The unit can neither record nor display on the monitor the camera image legally prohibited.
Recording
• Recording rate 50 pps ( picture per second )
50 pps recording which is becoming the industrial standard is available on the 9 ch unit. 3 pps recording per
each camera is also available even using 9 cameras.
• Built-in 250GB HDD. Furthermore 2 HDDs can be built in the unit by installing 1 additional HDD.
• Various record setting
Recording interval and picture quality of each camera can be set individually to both normal recording and
alarm recording. (
see pages 41-43)
• Flexible alarm recording
Any camera number for alarm recording of 3 modes such as Alarm Channel, Alarm Plus and Alarm25 can be
assigned. 4 triggers are also selectable out of various combination such as external alarm input and motion
detection, external alarm input or motion detection, only external alarm input or only motion detection.
(
see pages 41-43)
• Partition recording
Alarm images can be recorded in a designated area within HDD to keep alarm images longer term than normal
recording. The partition area can be set from 10% to 90% of HDD capacity. (
see page 75)
• Mirror recording
Mirror recording for prevention against a data loss in case of HDD crash. (
see pages 74,75)
When using a MIRRORING function, two sets of HDD are required. It does not function in one HDD.
Please consult with the retailer, when you add HDD.
• Built-in motion detection
It is available the high-fidelity detection setting by the detection area of 192 (12 x 16) dots.
(
see pages 39,40)
• Wavelet compression
Wavelet method with compression of higher-rate than JPEG.
• 1ch PCM audio recording. (
see page 48)
Network
• From the personal computer connected to Internet using the Microsoft Internet Explorer, the image screen
such as live images, search and playback image can be displayed. (
see pages 77-82)
• LAN software for applications in grate variety
Optional software with high-quality communication functions.
••••••••••••••••••••••••••••••••••••••••••••••••••••••••••••••••••••••••••••••••••••••••••••••••••••••••••••••••••••••••••••••••••••••••••••
2
ENGLISH
Ease of use
• Auto set-up
By selecting only the recording period of 24, 96 or 168 hrs. and 14 or 30 days, the unit assigns automatically
recording interval and picture grade for all channels and other menu settings are set to the default.
(
see pages 17,18)
Microsoft is either registered trademarks or trademarks of Microsoft Corporation in the United States
and/or other countries.
Compact FlashTM is a trademark of SanDisk Corporation.
Storage capacity is indicated in gigabytes (GB). (1GB = 1000 x 1000 x 1000 bytes.)
••••••••••••••••••••••••••••••••••••••••••••••••••••••••••••••••••••••••••••••••••••••••••••••••••••••••••••••••••••••••••••••• Beginning
3
Caution and care
HEAVY OBJECTS SHOULD NEVER BE PLACED ON THE UNIT (E.G., TV)
NEVER TOUCH OR INSERT ANY OBJECT INSIDE THE UNIT
Touching the inside of the cabinet or inserting foreign objects of any kind not only creates a safety hazard
but can also cause extensive damage.
PROTECT THE POWER CORD
Damage to the power cord may cause fire or shock hazard. If the mains cord is damaged, switch off the
mains outlet and carefully unplug the cord by holding the mains plug.
UNPLUG THE POWER CORD DURING A LONG ABSENCE
Turn off the power and unplug the power cord during a long absence.
MAINTAIN GOOD VENTILATION
Do not obstruct the many ventilation holes on the unit. For maximum ventilation, leave some space around
the unit and place the unit on a hard level surface only, and ensure it is not covered during use. Heavy objects
should never be placed on the unit.
WHEN NOT IN USE
When not in use always turn OFF the MAIN switch.
CABINET CARE
Never use petroleum-based cleaners. Clean with a soft cloth moistened with soap and water and wipe dry.
PVC cables or leads should not be left in contact with the cabinet surface for long periods.
INSTALLATION LOCATION
For excellent performance and lasting reliability install in a location that is:1.
Well ventilated, out of direct sunlight and away from direct heat.
2.
A solid vibration-free surface.
3.
Free from high humidity, excessive dust and away from magnetic fields.
4.
Please ensure that the ventilation fan located on the unit’s back panel is not blocked.
UNSUITABLE LOCATIONS
Placing the unit in the following places might shorten the product life:
•
Extremely cold places, such as refrigerated warehouses and ice houses
•
Places where excessive hydrogen sulfide is likely to be generated, such as hot-springs areas
•
Places or locations with salt air environment.
WARNING: TO PREVENT FIRE OR SHOCK HAZARD, DO NOT EXPOSE THIS APPARATUS TO RAIN OR
MOISTURE. THIS APPARATUS MUST BE GROUNDED.
••••••••••••••••••••••••••••••••••••••••••••••••••••••••••••••••••••••••••••••••••••••••••••••••••••••••••••••••••••••••••••••••••••••••••••
4
ENGLISH
MAINS LEAD CONNECTION
The mains lead on this Unit is fitted with a non-rewireable mains plug, incorporating a 5A fuse. If you
need to replace the fuse, use a 5A fuse approved by BSI or ASTA to BS 1362, ensuring you refit the
fuse cover. If the mains plug is not suitable for the sockets in your home, and you require to remove
the plug, remove the fuse, cut off the plug then dispose of the plug immediately, to avoid a possible
electric shock hazard. To refit a new plug, follow these instructions; Green-and-yellow: Earth, Blue:
Neutral and Brown: Live. As the colours in the mains lead of this Unit may not correspond with the
coloured markings identifying the terminals in your plug, proceed as follows.
• The wire which is coloured green-and-yellow must be connected to the terminal in the plug which is
marked by the letter E or by the safety earth symbol
or coloured green or green-and-yellow.
• The wire which is coloured blue must be connected to the terminal which is marked with the letter N or
coloured black.
• The wire which is coloured brown must be connected to the terminal which is marked with the letter L or
coloured red.
This Unit complies with the requirements of the EC Directive 89/336/EEC, “EMC Directive” and 73/23/EEC,
“Low Voltage Directive”, as amended by Directive 93/68/EEC. The requirements for the susceptibility
according to EN 55024 and the requirements for interference according to EN 55022 are observed for the
operation on residential areas, business, light industrial premises and in small scale enterprises, inside as
well as outside of the building. All places of operation are characterised by their connection to the public
low voltage power supply system. This unit is manufactured in accordance with EN 60950.
There may be cases when the unit’s built-in MOTION DETECTION function does not operate properly
due to external condition or video input signal or other factors.
The user will not be indemnified for problems (e.g., recording failure or playback failure) that occur with
either the unit or a connected device during operation. It is recommended that backups of important
recordings are made regularly as a precaution against possible breakdowns and accidents.
Recordable time and product warranty
Continuous recordable time and the estimated time displayed on the menu screen is the continuous
recordable time when operating this unit and is not the product warranty period. Furthermore, it is not
the period that guarantees life time at the unit.
• This unit has a built-in hard disk, which is a precision device. Please handle this unit with sufficient
care.
• Do not subject this unit to vibrations or shocks. This may cause trouble specially when the unit is
switched on or when the hard disk is being accessed, and sufficient care is required.
• Do not disconnect the power plug while the unit is switched on or while recording or playing.
• For early detection of faults, we recommend that you request inspection once a year.
• Please do not move the unit at least one minute after turning off the power.
• The hard disk and cooling fan are not permanent items and will need replacement with time.
When operated in an ambient temperature of 25°C, it is recommended that both the hard disk and fan
be replaced after 30,000 hours.
(This figure is only a guide, and should not be taken as a guaranteed lifespan of the products. Use the
“ELAPSED TIME” on the <INFORMATION/SERVICE> screen as a guide to performing checkups.)
••••••••••••••••••••••••••••••••••••••••••••••••••••••••••••••••••••••••••••••••••••••••••••••••••••••••••••••••••••••••••••••• Beginning
5
Contents
Features ................................................................. 2,3
Caution and care ................................................... 4,5
Contents ................................................................. 6,7
Flowchart ............................................................... 8,9
Flowchart for connection and settings ............................. 8,9
Major operations and their functions .............. 10-14
Front View .................................................................... 10,11
Front View (Inside of the door) ..................................... 11,12
Inserting/Ejecting Compact Flash Card ............................ 11
Rear View ..................................................................... 13,14
Connections ...................................................... 15,16
Connecting to CCTV camera, monitor, sensor ................. 15
EMERGENCY/ALARM IN/REC/
CLOCK ADJ Input terminal ............. 15
MODE OUT1 - 5 Output terminal ...................................... 15
CALL OUT Output terminal ............................................... 15
Alarm Recording Connection ............................................ 16
Connecting with analog video recorder ............................. 16
SEQUENCE SETTING ..................................................... 38
INTERLACE ...................................................................... 38
<MOTION DETECTION SETTINGS> ................. 39,40
SELECTION CAMERA NUMBER ..................................... 39
DETECTION MASK SETTING ......................................... 39
SENSITIVITY .................................................................... 40
MOTION THRESHOLD ..................................................... 40
TEST MODE ..................................................................... 40
<RECORD SETTINGS> ..................................... 41-43
Settings concerning normal recording
and alarm recording ............ 41
Recording mode settings for normal recording
and alarm recording ....... 41,42
ALARM REC DURATION .................................................. 43
PRE ALARM REC ............................................................. 43
MOTION DET REC ........................................................... 43
<TIMER PROGRAM SETTINGS> ...................... 44-46
INITIALIZATION ................................................................ 18
HDD SETTING ............................................................ 18
INITIALIZATION .......................................................... 18
TIMER PROGRAM SETTINGS ........................................ 44
TIMER PROGRAM ...................................................... 44,45
Structure of the <TIMER PROGRAM> screen ....... 44,45
HOLIDAY SETTING .......................................................... 46
Recording mode settings A ~ D
for normal recording/alarm recording ............ 46
MOTION DET REC ........................................................... 46
ALARM REC DURATION .................................................. 46
Overlapping Timer settings ......................................... 46
Basic Operations ............................................... 19-25
<INITIAL SET UP/INFORMATION> ................... 47-58
Multiplexer functions ......................................................... 19
Multiplexer buttons ...................................................... 19
Menu settings ............................................................... 19-21
To return to the normal screen from a menu screen ... 20
DAYLIGHT SAVING/DAYLIGHT SETTING ................. 20
TIME DATE ADJUST ............................................. 20,21
Present time display .................................................... 21
Recorded capacity display function ............................ 21
Basic manual recording ............................................... 21-23
Setting the recording interval and recording
picture quality for normal recording ................... 22,23
Basic playback ............................................................. 23,24
Basic search ................................................................ 24,25
TIME DATE SEARCH ............................................ 24,25
LANGUAGE SELECTION ................................................. 25
HDD SETTINGS .......................................................... 47,48
HDD REPEAT REC MAIN/HDD REPEAT REC SUB .. 47
HDD REPEAT PLAY ................................................... 47
IM-CHECK PLAY ........................................................ 47
SEQUENTIAL PLAY ................................................... 48
AUDIO RECORDING ........................................................ 48
REAR TERMINAL SETTINGS ..................................... 49-51
MODE OUT 1 ~ MODE OUT 5 ................................... 49
KEY SOUND ............................................................... 49
BUZZER ................................................................. 49,50
REMAIN HDD ............................................................. 50
CALL OUT SETTINGS ........................................... 50,51
HDD MAIN REMAIN/HDD SUB REMAIN ......... 50,51
HDD MAIN FULL/HDD SUB FULL ......................... 51
EMERGENCY REC DURATION ................................. 51
COMMUNICATION PORT SETTINGS ........................ 51-54
RS-232C ................................................................ 51,52
MODE .................................................................... 51
SETTINGS ............................................................. 52
ETHERNET ............................................................ 52-54
E-MAIL ADDRESS ................................................. 52
SERVICE PORT SETTING .................................... 53
ALARM NOTIFICATION SETTING ................... 53,54
INFORMATION/SERVICE ........................................... 54-56
HDD INFORMATION/CFC INFORMATION ................ 54
WARNING LOG LIST ............................................. 54,55
RESET TO FACTORY SETTINGS ............................. 55
DATA CLEAR ......................................................... 55,56
PASSWORD ................................................................ 56-58
SIMPLE LOCK ............................................................ 56
PASSWORD LOCK ................................................ 56-58
LANGUAGE SELECTION ................................................. 58
AUTO SET UP .................................................... 17,18
AUTO SET UP ............................................................. 17,18
Initial settings ......................................................... 18
Menu functions .................................................. 26-31
MENU SETTING .......................................................... 26-30
COPY MENU .................................................................... 31
SEARCH SELECTION MENU .......................................... 31
<TIME DATE/DISPLAY SETTINGS> .................. 32-34
TIME DATE ADJUST ........................................................ 32
DISPLAY MODE ............................................................... 32
CLOCK LOCATION SETTING .......................................... 32
CAMERA DISPLAY ........................................................... 32
CAMERA TITLE/MEMO SETTING .............................. 32,33
DUPLEX MODE DISPLAY ................................................ 34
<MPX DISPLAY SETTINGS> ............................. 35-38
Multiplexer function related button
operations/operation table ............ 35
Camera number button operations ............................. 35
SPLIT/SEQUENCE button operations ........................ 35
ZOOM button operations ............................................ 35
The function of the SPLIT/SEQUENCE button,
ZOOM button, and camera number buttons ........... 36
MPX DISPLAY SETTINGS ............................................... 37
SPLIT4 SCREEN SETTING ............................................. 37
SPLIT9 SCREEN SETTING ........................................ 37,38
<QUICK SETTINGS> .............................................. 59
QUICK SETTINGS ............................................................ 59
To update menu settings of this unit ........................... 59
To save menu settings of this unit
to a Compact Flash Card ............................ 59
••••••••••••••••••••••••••••••••••••••••••••••••••••••••••••••••••••••••••••••••••••••••••••••••••••••••••••••••••••••••••••••••••••••••••••
6
With Audio recording .............................................. 84
Operation example 1 ......................................................... 60
Operation example 2 .................................................... 61,62
Operation example 3 .................................................... 62,63
Troubleshooting ................................................ 85,86
ENGLISH
Operation examples .......................................... 60-63
Warnings and CALL OUT output ..................... 87,88
Various recordings ................................................. 64
Warnings and their appropriate countermeasures ......... 87,88
PRE ALARM RECORDINGS ............................................ 64
EMERGENCY RECORDINGS .......................................... 64
Glossary .................................................................. 89
Various playback functions .............................. 65,66
Glossary ............................................................................ 89
Relation of recording operation to the number of
cameras and recording interval settings ........... 89
Playing still frames ............................................................ 65
Shuttle viewing/direct shuttle viewing ............................... 65
Shuttle hold ....................................................................... 65
Frame-by-frame playback ................................................. 65
Reverse playback ............................................................. 65
High-speed fast-forward/high-speed rewind ..................... 65
Changing playback intervals ........................................ 65,66
Simultaneous playback during recording .......................... 66
Various search ................................................... 67-71
SEARCH SELECTION ...................................................... 67
SEARCH TYPE ........................................................... 67
SELECTION CAMERA NUMBER ............................... 67
DATE/TIME ................................................................. 67
PLAYBACK DEVICE ................................................... 67
TIME DATE SEARCH ....................................................... 67
INDEX SEARCH/ALARM INDEX SEARCH ................. 68,69
ALARM SKIP SEARCH ................................................ 69,70
ALARM LIST SEARCH ................................................ 70,71
START/END SEARCH ...................................................... 71
Making Copy/Restore ....................................... 72,73
Making Copy/Restore .................................................. 72,73
Copying from unit to videotape ......................................... 73
Other convenient functions ............................. 74-76
Power failure compensation circuit ................................... 74
Power failure reset recording ............................................ 74
Log function for when power failure occurs while
the unit is in operation or the MAIN switch
on the rear of the unit is turned OFF ................ 74
RESET button ................................................................... 74
HDD SETTING ............................................................. 74,75
MIRRORING .......................................................... 74,75
PARTITION/PARTITION SIZE .................................... 75
COVERT CAMERA SETTING .......................................... 76
ALARM DISPLAY ........................................................ 76
Specifications ......................................................... 90
How to read this manual
• Viewing displays
(Refer to this information when operating)
Reference information concerning operation is
described.
(Caution required)
Cautionary items concerning operation are
described.
(See reference page)
Reference item and page number are indicated.
INFORMATION
(Reference)
Other reference information is described.
• Finding desired information
There is an index on the each right page of this
manual. There is also “Contents” at the beginning
of this manual. In addition, reference pages are
indicated throughout this manual.
• Troubleshooting
Read Troubleshooting (pages 85,86) for possible
remedies to the problem.
Communications by Web Browser .................. 77-82
Communications by Web Browser ............................... 77-82
The personal computer product requirements ............ 77
Connections ................................................................ 77
AUTHENTICATION ................................................ 77,78
Welcome ................................................................ 78-82
Live monitor ...................................................... 78,79
Playback ........................................................... 79,80
Time Search ........................................................... 80
Alarm Search ......................................................... 80
Index Search .......................................................... 80
User maintenance ............................................. 80,81
Log out ................................................................... 81
Change log in user ............................................ 81,82
Recording time table ......................................... 83,84
Continuous recording time table .................................. 83,84
HDD continuous recording time (for 250GB drive) ....... 83
Without Audio recording ......................................... 83
With Audio recording .............................................. 83
Compact Flash Card continuous
recording time (for 64MB) ...................... 84
Without Audio recording ......................................... 84
••••••••••••••••••••••••••••••••••••••••••••••••••••••••••••••••••••••••••••••••••••••••••••••••••••••••••••••••••••••••••••••• Beginning
7
Flowchart
■ Flowchart for connection and settings
Installation example :
This is an example operational flowchart of the following : making connections at the rear of the terminal ; setting
HDD mode to PARTITION ; making default settings ; making an Alarm recording with Timer mode ; searching
recorded data with ALARM LIST SEARCH ; using playback, and copying to a Compact Flash Card.
Connection to the terminals on the back
• Connection to the terminals on the back.
See “■ Connecting to CCTV camera, monitor,
sensor”, page 15.
• Connection to the alarm recording.
See “n Alarm Recording Connection”,
page 16 and “n Rear View” , pages 13,14.
Connection to the terminals on the back
• Connection to the terminals on the back.
See “■ Connecting to CCTV camera, monitor,
sensor”, page 15.
• Connection to the alarm recording.
See “n Alarm Recording Connection”,
page 16 and “n Rear View” , pages 13,14.
The unit is booted
The unit is booted
AUTO SET UP
AUTO SET UP
• Setting the auto set up.
See “■ AUTO SET UP”, pages 17,18.
• Setting the auto set up.
See “■ AUTO SET UP”, pages 17,18.
Only when the unit is turned on for the first time, the
<AUTO SET UP> screen is displayed automatically. It is not
automatically displayed after next time.
Only when the unit is turned on for the first time, the
<AUTO SET UP> screen is displayed automatically. It is not
automatically displayed after next time.
Selecting the “YES” in “PERFORM AUTO SET
UP?” setting.
Selecting the “NO” in “PERFORM AUTO SET
UP?” setting.
Recording
Making the HDD REC SETTING
• Setting the PARTITION. “♦ PARTITION/PARTITION SIZE”
default settings “NORMAL” } “PARTITION”.
See “♦ PARTITION/PARTITION SIZE”, page 75.
Changing the initial menu settings
• Setting the language.
See “■ LANGUAGE SELECTION”, page 25.
• Setting the present time and screen display.
See “<TIME DATE/DISPLAY SETTINGS>”,
pages 32-34.
• Setting the present time.
See “♦ TIME DATE ADJUST”, pages
20,21.
• Setting the display mode.
See “■ DISPLAY MODE”, page 32.
• Setting the audio recording.
See “■ AUDIO RECORDING”, page 48 and
“■ Continuous recording time table”, pages
83,84.
Setting the HDD (hard disk drive) mode
• Setting the repeat recording.
See “♦ HDD REPEAT REC MAIN/HDD
REPEAT REC SUB”, page 47.
• Setting the remain HDD capacity.
See “♦ REMAIN HDD”, page 50.
• Setting the call out.
See “• HDD MAIN REMAIN/HDD SUB
REMAIN”, pages 50,51 and “• HDD MAIN FULL/
HDD SUB FULL”, page 51.
•••••••••••••••••••••••••••••••••••••••••••••••••••••••••••••••••••••••••••••••••••••••••••••••••••••••••••••••••••••••••••••••••••••••••••
8
• Changing the split4 , split9 screen settings.
See “■ SPLIT4 SCREEN SETTING”, page 37,
“■ SPLIT9 SCREEN SETTING”, pages 37,38.
• Changing the sequence setting.
See “■ SEQUENCE SETTING”, page 38.
Setting other various functions
• Changing the display mode.
See “■ CLOCK LOCATION SETTING”, page
32 and “■ DUPLEX MODE DISPLAY”, page 34.
• Setting the camera title/memo.
See “■ CAMERA TITLE/MEMO SETTING”,
pages 32,33 and “■ CAMERA DISPLAY”, page
32.
• Setting to output signals of the unit status.
See “♦ MODE OUT 1 ~ MODE OUT 5”, page
49.
• Setting the buzzer.
See “♦ BUZZER”, pages 49,50.
Setting the motion detection
• Selecting the camera number.
See “■ SELECTION CAMERA NUMBER”,
page 39.
• Setting the active/inactive of detection function.
See “■ Recording mode settings for normal
recording and alarm recording”, pages 41,42.
• Setting the detection areas.
See “■ DETECTION MASK SETTING”, page
39.
• Setting the sensitivity.
See “■ SENSITIVITY”, page 40.
• Setting the minimum number of dots for starting the
motion detection operation.
See “■ MOTION THRESHOLD”, page 40.
Setting the timer recording (continued)
ENGLISH
Changing the multiplexer function
• Setting the timer program mode.
See “<TIMER PROGRAM SETTINGS>”,
pages 44-46.
• Setting the holiday.
See “■ HOLIDAY SETTING”, page 46.
• Selecting the timer program.
See “♦ Structure of the <TIMER
PROGRAM> screen”, pages 44,45.
• Setting the timer recording.
• Selecting the day.
• Selecting the start time.
• Selecting the end time.
• Selecting the recording mode.
• Selecting the motion detection mode.
Timer recording is executed/completed
See “■ Warnings and their appropriate
countermeasures”, pages 87,88.
Searching the recorded data
• Setting the device of searching.
See “♦ PLAYBACK DEVICE”, page 67.
• Selecting the camera number of searching.
See “♦ SELECTION CAMERA NUMBER”,
page 67.
• Selecting the search mode.
See “♦ SEARCH TYPE”, page 67.
• Setting the alarm list search.
See “■ ALARM LIST SEARCH”, pages 70,71.
• Setting the search time and date of alarm list.
See “♦ DATE/TIME”, page 67.
The search is completed/The search result
is displayed
Setting the timer recording
Setting the recording
• Selecting the normal & alarm recording or pre-alarm
recording.
See “■ Recording mode settings A ~ D for
normal recording/alarm recording”, page 46.
• Setting the recording mode.
• Setting the motion detection recording.
See “■ MOTION DET REC”,
page 46.
• Selecting the camera selection during
the alarm recording.
See “■ Recording mode
settings for normal recording and
alarm recording”, pages 41,42.
• Setting the interval/picture grade for
normal recording.
See “♦ Setting the recording
interval and recording picture
quality for normal recording”,
pages 22,23.
• Setting the interval/picture grade for
alarm recording.
See “♦ Setting the recording
interval and recording picture
quality for normal recording”,
pages 22,23.
• Setting the duration of alarm recording.
See “■ ALARM REC DURATION”,
page 46.
• Setting the duration of pre-alarm recording.
See “■ PRE ALARM REC”, page 43.
Playback the search result
• Selecting the camera number of playback.
See “<MPX DISPLAY SETTINGS>”, pages 3538.
• Selecting the sequence screen.
See “♦ SPLIT/SEQUENCE button
operations”, page 35.
• Playback
See “■ Basic playback”, pages 23,24.
• Selecting the speed of playback.
See “Various playback functions”, pages 65,
66.
Copy the data
• Inserting the Compact Flash Card.
See “■ Inserting/Ejecting Compact Flash
Card”, page 11.
• Setting the copy function.
See “Making Copy/Restore”, pages 72,73.
•••••••••••••••••••••••••••••••••••••••••••••••••••••••••••••••••••••••••••••••••••••••••••••••••••••••••••••••••••••••••••••• Flowchart
9
Major operations and their functions
■ Front View
1
4
3
2
5
6
7
REC/STOP
1
ACCESS
2
3
4
5
6
7
8
CLEAR/
REW
9
POWER
ENTER/
FF
TIMER
SPLIT/
SEQUENCE
ZOOM / 0
OUTPUT B
COM
PRE ALARM
M-DET EMERGENCY
LOCK
OUTPUT
A/B
DIGITAL RECORDER DX-TL950
8
9
Digital Multplex
& Record
10 11 12 13 14 15 16
1. POWER button
When pressing this button while the MAIN switch on
the rear of this unit is set to ON, the power turns on
and the button lights. When the button is pressed
again, the unit will be in stand-by and the light will
turn off. When the unit is in operational transition
such as booting, the button will flash and other operations are not accepted.
2. ACCESS indicator
Illuminates during access to hard disk drive or Compact Flash Card.
3. Camera number buttons (1 to 9)
Press the button to display the image from the camera connected to this input on to the monitor.
4. TIMER button
When pressing this button, the unit is set to timer
recording/stand-by and the TIMER button lights.
When pressing this button for more than 1 second,
timer recording/stand-by is cancelled and the TIMER
button turns off.
5. REC/STOP button
When pressing this button, recording starts and the
button lights. When pressing the button for more than
1 second, the recording stops and the light turns off.
When pressing this button for more than 1 second
during alarm recording, recording stops. During timer
recording, recording will not stop even if the button
is pressed.
6. SHUTTLE ring
Used to set various menus and search functions,
adjusting the playback speed, and rewinding or forwarding the recording images.
7. JOG dial
Used to set various menus and search functions,
forwarding or rewinding the image during playback
(field-by-field).
8. SPLIT/SEQUENCE button
Press the button to display SPLIT9, SPLIT4 screen
or SEQUENCE screen setting on multiplexer
functions.
9. ZOOM button
When pressing this button once during single screen
display, the screen is magnified by 100%. In the same
way, pressing the button twice magnifies the screen
by 200% and pressing the button three times magnifies the screen by 400%. The magnification center point
(X) is displayed in the center of the screen in screen
display 1. Press the camera number buttons (1, 2, 3,
4) to move the magnification location. When the ZOOM
button is kept pressed for one second or longer, the
operation of the camera number buttons and the SPLIT/
SEQUENCE button is switched between operation for
OUTPUT A (screen of the monitor connected to the
OUTPUT A connector and the VIDEO OUT connector) and operation for OUTPUT B (screen of the monitor
connected to the OUTPUT B connector).
To display image of the monitor connected to OUTPUT B, set to “ON” in the setting of the “OUTPUT B
ON/OFF” of the <MPX DISPLAY SETTINGS> screen.
see page 37.
10. OUTPUT B indicator
This is not lit when the operation of the camera
number buttons and the SPLIT/SEQUENCE button
is set to OUTPUT A, and it lights with switching to
OUTPUT B.
11. COM (COMMUNICATION) indicator
Illuminates when establishing the communication with
personal computer.
12. PRE ALARM indicator
Illuminates during pre-alarm recording mode.
13. M-DET indicator
Illuminates when the motion detection function is on.
••••••••••••••••••••••••••••••••••••••••••••••••••••••••••••••••••••••••••••••••••••••••••••••••••••••••••••••••••••••••••••••••••••••••••••
10
ENGLISH
■ Front View (Inside of the door)
REC/STOP
1
ACCESS
2
4
5
6
OUTPUT B
COM
PRE ALARM
3
7
8
ENTER/
FF
CLEAR/
REW
9
POWER
TIMER
SPLIT/
SEQUENCE
ZOOM / 0
M-DET EMERGENCY
LOCK
OUTPUT
A/B
COPY
VIDEO OUT
AUDIO OUT
ALARM WARNING
INTERRUPT RESET
SET UP
SEARCH
STOP
COMPACTFLASH
17
18
REV. PLAY PLAY
PAUSE
PLAY
MODE
SHUTTLE
HOLD
19
20 21 22 23
14. EMERGENCY indicator
Flashes during emergency recording and lights when
recording is completed.
24
Do not eject the Card when copying/restoring, copying/loading menus, or immediately after inserting the
Card. The Card or the contained data may become
damaged.
15. LOCK indicator
Illuminates when simple lock or password lock is on.
Securely insert the Compact Flash Card. Otherwise, the unit may not work properly.
16. LOCK button
Pressing it with a pointed object (such as a ballpoint
pen) while the MAIN switch (main power) on the rear
of the unit is on, will activate the simple lock or password lock. Moreover, the PASSWORD can be set on
the <PASSWORD SETTING> screen. The indicator
will light while the lock is active.
17. ANALOGUE OUT connectors
VIDEO OUT connector
Output connector for video signal (RCA pin).
AUDIO OUT connector
Output connector for audio signal (RCA pin).
18. COMPACT FLASH slot
Please use the Compact Flash Card which we recommend. When a non recommended Card is used,
there is a possibility that reading and writing of data
may not operate correctly.
For usable Compact Flash Card check with your
dealer of purchase.
When using a new Card, be sure to execute CFC
DATA CLEAR in the <INFORMATION/SERVICE>
screen.
<Ejecting Card>
1. Press the CFC EJECT button and eject the Card.
2. Attach the COMPACT FLASH slot cover.
Compact Flash Card can be used for saving/loading
data and menus. When not using the slot, attach the
COMPACT FLASH slot cover to prevent dust from
entering within the unit.
REC/STOP
11
ACCESS
22
33
44
55
66
88
ENTER/
FF
CLEAR/
REW
99
TIMER
SPLIT/
SPLIT/
SEQUENCE
SEQUENCE
ZOOM
ZOOM
/0
OUTPUT B
ALARM
COM PRE
PRE
ALARM
M-DET
EMERGENCY
M-DET EMERGENCY
LOCK
LOCK
OUTPUT
A/B
COPY
■ Inserting/Ejecting Compact Flash Card
Before using the Card, read the cautionary notes
described in the manual included with Compact Flash
Card.
77
POWER
VIDEO OUT
SPLIT/
SEQUENCE
AUDIO OUT
COMPACTFLASH
SET UP
SEARCH
STOP
PAUSE
REV. PLAY PLAY
SHUTTLE
HOLD
PLAY
MODE
CFC EJECT Button
ZOOM / 0
COPY
<Inserting Card>
1. Remove the COMPACT FLASH slot cover attached to the
unit.
2. Please turn down the side which contains notch in right and
left, securely insert the Card until the CFC EJECT button pops
out.
VIDEO OUT AUDIO OUT
Compact Flash Card
••••••••••••••••••••••••••••••••••••••••••••••••••••••••••••••••••••••••••••••••••••••••••••••••••••••••••••••••••••••••••••••• Beginning
11
Major operations and their functions (continued)
■ Front View (Inside of the door) (continued)
REC/STOP
1
ACCESS
2
3
4
5
6
7
8
ENTER/
FF
CLEAR/
REW
9
POWER
TIMER
SPLIT/
SEQUENCE
ZOOM / 0
OUTPUT B
COM
PRE ALARM
M-DET EMERGENCY
LOCK
OUTPUT
A/B
COPY
VIDEO OUT
AUDIO OUT
17
ALARM WARNING
INTERRUPT RESET
SET UP
SEARCH
COMPACTFLASH
18
STOP
PAUSE
REV. PLAY PLAY
SHUTTLE
HOLD
19
20 21 22 23
19. COPY button
Press this button to display <COPY> menu. This
button lights when performing copy operation. Copies cannot be made when a card is not in the
COMPACT FLASH slot.
PLAY
MODE
24
PLAY MODE buttons
The playback interval can be changed during normal and reverse playback by pressing PLAY(+) or
REV. PLAY( - ).
20. ALARM INTERRUPT button
When pressing this button, the unit will not accept
alarm signals or motion detection for 5 minutes. During this time, the button will flash.
21. WARNING RESET button
This button is used to clear on-screen warning display and clear data.
22. SET UP button
Press this button to display the <SETTINGS> menu.
23. SEARCH button
Press this button to display the <SEARCH > menu.
24. OPERATION buttons
STOP button
Press to stop playback.
PAUSE / SHUTTLE HOLD button
When pressing this button during playback, the unit
switches to still frame playback and the button lights.
When pressing this button again, the unit resumes
playback and the button turns off. When pressing
this button during shuttle playback, the set playback
speed is maintained even when letting go of the
SHUTTLE ring. (SHUTTLE HOLD)
REV. PLAY (REVERSE PLAY) button
When pressing this button, the unit switches to reverse playback and the button lights.
PLAY button
When pressing this button, the unit starts playback
and the button lights.
••••••••••••••••••••••••••••••••••••••••••••••••••••••••••••••••••••••••••••••••••••••••••••••••••••••••••••••••••••••••••••••••••••••••••••
12
2
1
3
ENGLISH
■ Rear View
4
ON
MAIN
OFF
AC IN~
VIDEO
1
2
3
OUTPUT A
1
2
3
4 CAMERA IN 5
6
7
8
9
4 CAMERA OUT 5
6
7
8
9
1
2
3
4
5
6
7
8
9
ALARM IN
OUTPUT B
OUT AUDIO IN
6
RS-232C
RS-232C
RESET
GND
5
MIC
RESET
CLOCK ADJ
REC
EMERGENCY
MODE OUT 1
MODE OUT 2
MODE OUT 3
MODE OUT 4
MODE OUT 5
CALL OUT
CALL OUT GND
GND
DC 12V OUT
MAX 350mA
100-240V
Y/C
RECEIVE
7 8 9
1. MAIN switch
This is the main power switch. When using this unit,
set this switch to ON. Otherwise, the power cannot
be turned on/off using the POWER button on the front
of the unit.
2. VIDEO OUT connectors
OUTPUT A VIDEO connector
Output connector for video signal to monitor (BNC
connector).
OUTPUT A S(Y/C) connector
This is output connector for video signals that separate brightness signals and color signals for higher
picture quality. Simultaneous output along with OUTPUT A VIDEO is also possible.
OUTPUT B connector
Output connector for video signal to monitor only for
live image (BNC connector)(
see page 37). To
display the image, set “OUTPUT B ON/OFF” on the
<MPX DISPLAY SETTINGS> screen to “ON”. The
playback image cannot be put out to the OUTPUT B
connector.
ETHERNET
10
11
12
SEND
13
This unit must be earthed at all times. Never connect this unit to a power outlet which does not have
an earth terminal.
Please use the AC power cord accessory.
6. GND terminals
It is the common GND terminal.
7. AUDIO connectors
AUDIO IN connector
Input connector for audio signal (RCA pin).
AUDIO OUT connector
Output connector for audio signal (RCA pin).
8. MIC jack
Input connector for microphone (600 ohm impedance). Use of MIC for audio recording has priority to
use of the AUDIO IN connector.
9. RESET button
Pressing this button resets the unit and the power
turns off. In this case, video data, menu settings and
the current time are kept.
3. CAMERA IN connectors
Input connector for signal of camera (BNC connector).
10. ALARM IN terminals
Input terminal for alarm signal.
4. CAMERA OUT connectors
Camera video output connectors for use of BNC connectors. If the MAIN switch is ON, the loop through
output is possible for the camera image inputted into
each CAMERA IN connector.
11. I/O terminals
CLOCK ADJ terminal
Input terminal to set the present time. Time display is
adjusted to the nearest hour (00 minutes 00 seconds)
when this terminal receives the CLOCK ADJ signal.
5. AC power socket
This socket connects to the power cord. Earth terminal is for safety. Use the 100 ~ 240V plug with
earth for the power of this unit.
INFORMATION
The on-screen clock can be reset to the nearest hour,
by applying a signal to the CLOCK ADJ terminal. For
example, if the current time is 11:29:59, it will be reset
to 11:00:00, and if the current time is 11:30:00, it will be
reset to 12:00:00.
••••••••••••••••••••••••••••••••••••••••••••••••••••••••••••••••••••••••••••••••••••••••••••••••••••••••••••••••••••••••••••••• Beginning
13
Major operations and their functions (continued)
■ Rear View (continued)
2
1
3
4
ON
MAIN
OFF
AC IN~
VIDEO
1
2
3
OUTPUT A
1
2
3
4 CAMERA IN 5
6
7
8
9
4 CAMERA OUT 5
6
7
8
9
1
2
3
4
5
6
7
8
9
ALARM IN
OUTPUT B
OUT AUDIO IN
6
RS-232C
RS-232C
RESET
GND
5
MIC
RESET
CLOCK ADJ
REC
EMERGENCY
MODE OUT 1
MODE OUT 2
MODE OUT 3
MODE OUT 4
MODE OUT 5
CALL OUT
CALL OUT GND
GND
DC 12V OUT
MAX 350mA
100-240V
Y/C
7 8 9
ETHERNET
RECEIVE
10
11
12
SEND
13
REC terminal
Input terminal to start recording. Not available during timer recording.
EMERGENCY terminal
Input terminal initiating immediate shift to EMERGENCY recording mode compulsorily.
MODE OUT 1 ~ MODE OUT 5 terminals
Output terminal to indicate the unit’s current mode.
Select the unit’s condition by MODE OUT 1 ~ MODE
OUT 5 setting in the <REAR TERMINAL SETTINGS>
menu.
CALL OUT terminal / CALL OUT GND terminals
This is the ISOLATION output terminal. Information
that can be transmitted externally consists of CALL
OUT settings made on the <REAR TERMINAL SETTINGS> menu screen as well as fixed output settings.
DC 12V OUT terminal
Will only output when the MAIN switch is ON. The
maximum electric current is 350mA.
12. RS-232C connector
This connector is used to connect to host device with
RS-232C connector. This unit can be controlled by
another device through this connector.
13. ETHERNET connector
Use a 10BASE-T cable to connect to the Ethernet
terminal. Please use the cable adapted to 10BASET. DUPLEX MODE is HALF DUPLEX.
RECEIVE indicator
Illuminates when the unit is receiving a signal.
SEND indicator
Illuminates when the unit is transmitting a signal.
•••••••••••••••••••••••••••••••••••••••••••••••••••••••••••••••••••••••••••••••••••••••••••••••••••••••••••••••••••• Beginning
14
Connections
One of either codes
should be connected.
ENGLISH
■ Connecting to CCTV camera, monitor, sensor
MONITOR
To VIDEO IN or
S(Y/C) IN connector
To OUTPUT A VIDEO or
OUTPUT A S(Y/C) connector
VIDEO MONITOR
(Only for the live image)
To AUDIO IN connector
To VIDEO IN
connector
To AUDIO OUT
connector
CAMERA #1
To OUTPUT B
connector
CAUTION
Connecting a coaxial transmission
camera wrong may damage the input
terminal. Be careful.
To CAMERA IN 1 connector
Up to 9 cameras
ON
MAIN
OFF
AC IN~
VIDEO
1
2
3
OUTPUT A
1
2
3
4 CAMERA IN 5
6
7
8
9
4 CAMERA OUT 5
6
7
8
9
1
2
3
4
5
6
7
8
9
ALARM IN
OUTPUT B
GND
OUT AUDIO IN
MIC
RESET
CLOCK ADJ
REC
EMERGENCY
MODE OUT 1
MODE OUT 2
MODE OUT 3
MODE OUT 4
MODE OUT 5
CALL OUT
CALL OUT GND
GND
DC 12V OUT
MAX 350mA
100-240V
Y/C
ETHERNET
RS-232C
RS-232C
RESET
RECEIVE
To GND
terminal
SEND
To ETHERNET
connector
To MIC jack
MICROPHONE
POWER CORD
HALF DUPLEX MODE
CAUTION
When a microphone is
connected to the MIC jack,
the MIC jack will be given
priority over the AUDIO IN
connector.
for the Continent
To ALARM IN terminal
corresponds to the
CAMERA #.
SENSOR #1
Processing the connecting line
for U.K
Connection on the ALARM IN terminals and the I/O terminals
Compatible power lines ø0.32 ~ ø0.65 mm (AWG 28 ~ 22)
5~7mm
Cut the designated area from the electric wire’s outer covering
(vinyl portion).
EMERGENCY/ALARM IN/REC/
CLOCK ADJ Input terminal
• Input Circuit
5V
MODE OUT 1 - 5 Output terminal
• Output Circuit
CALL OUT Output terminal
• Output Circuit
0.047µF
10kΩ
Input
terminal
5V
CALL OUT terminal
22kΩ
Output terminal
GND terminal
GND
CALL OUT GND terminal
4.7kΩ
<Interface circuit inside the unit>
<Interface circuit inside the unit>
<Interface circuit inside the unit>
•••••••••••••••••••••••••••••••••••••••••••••••••••••••••••••••••••••••••••••••••••••••••••••••••••••••••••••••••••••••••• Connections
15
Connections (continued)
■ Alarm Recording Connection
Example : The diagram below shows an example of con-
1
2
3
4
5
6
7
8
9
ALARM IN
OUTPUT B
GND
OUT AUDIO IN
MIC
RESET
CLOCK ADJ
REC
EMERGENCY
MODE OUT 1
MODE OUT 2
MODE OUT 3
MODE OUT 4
MODE OUT 5
CALL OUT
CALL OUT GND
GND
DC 12V OUT
MAX 350mA
nection for alarm signals corresponding to camera
number 1. (In the case of ALARM SETTING of default
setting.)
RESET
ALARM SWITCH
■ Connecting with analog video recorder
This unit is equipped with video output (RCA) and audio
output (RCA) connectors on the front and OUTPUT A S(Y/
C), OUTPUT A VIDEO (BNC) and AUDIO OUT (RCA) connectors on the rear. Video signals can be simultaneously
outputted from the video output connector on the front and
the OUTPUT A VIDEO/S(Y/C) connector on the rear. In
the same manner, audio signals can be outputted in simultaneously from the audio output connector on the front and
AUDIO OUT connector on the rear. By connecting an analog video recorder to these terminals, recorded contents
can be copied.
Make sure to turn off this unit when connecting with
peripheral recording devices.
••••••••••••••••••••••••••••••••••••••••••••••••••••••••••••••••••••••••••••••••••••••••••••••••••••••••••••••••• Connections
16
AUTO SET UP
AUTO SET UP is displayed, in order to set up an indispensable function, when this unit is turned on for the first time.
Only when the unit is turned on for the first time,
the AUTO SET UP screen is displayed automatically. It
is not automatically displayed after next time.
1. After connect the cameras and the monitors, turn on the
MAIN switch on the rear of the unit and wait until the ACCESS
indicator is turned off, then press the POWER button on the
front.
• The <LANGUAGE SELECTION> screen is displayed. The
language of the menu can be selected in this screen.
<LANGUAGE SELECTION>
>>LANGUAGE
ENGLISH
EXECUTE
6. Turn the JOG dial to move the cursor to “EXECUTE”, and
turn the SHUTTLE ring clockwise.
ENGLISH
■ AUTO SET UP
• “PERFORM AUTO SET UP?” is displayed on the screen.
PERFORM AUTO SET UP?
>>YES
NO
SHUTTLE>>:EXECUTE
7-1. (When not execute AUTO SET UP • • • )
Select “NO” by turning the JOG dial and turn the SHUTTLE
ring clockwise.
• “SETTING UP...” is displayed on the screen, and the unit
starts-up.
7-2. (When execute AUTO SET UP • • • )
Select “YES” by turning the JOG dial and turn the SHUTTLE
ring clockwise.
• The <CAMERA CHECK> screen appears.
• The cameras connected and the video condition can be
confirmed in this screen.
JOG
:SELECT
SHUTTLE>>:EXECUTE
POWER button operation will not be accepted while
the ACCESS indicator is flashing. Press the POWER
button after the indicator turns off.
<CAMERA CHECK>
>>EXECUTE
2. Turn the SHUTTLE ring clockwise.
• The background of the setting changes to red and flashes.
• Setting ( default : “ENGLISH” )
“ENGLISH”, “FRANCAIS”, “DEUTSCH”, “ESPAÑOL”,
“ PyCCKNN”, “ITALIANO”
3. Turn the JOG dial to display the desired setting and turn the
SHUTTLE ring clockwise.
• The setting is confirmed and flashing stops.
Beware while setting the AUTO SET UP, the menu
screen can not be exited. Furthermore the screen already set can not be displayed again.
4. Turn the JOG dial to move the cursor to “EXECUTE”, and
turn the SHUTTLE ring clockwise.
• The <TIME DATE ADJUST> screen appears.
• The date/time is set in this screen.
<TIME DATE ADJUST>
>>DAYLIGHT SAVING
DAY
MONTH
YEAR
TIME
OFF
01
01
2004
00:00:00
APPLY
EXECUTE
JOG
:SELECT
SHUTTLE>>:EXECUTE
5. Set the desired setting in this screen referring to “♦
DAYLIGHT SAVING/DAYLIGHT SETTING (
see page 20)”,
“♦ TIME DATE ADJUST (
see pages 20,21)”.
By turning the JOG dial to the cursor to “APPLY”
and turn the SHUTTLE ring clockwise, “00:00:00” of
“TIME” will start after the moment of turning the SHUTTLE ring.
CHECK CAMERA CONNECTION AND
IMAGE BEFORE EXECUTE
SHUTTLE>>:EXECUTE
8. Turn the SHUTTLE ring clockwise.
• The <AUTO RECORD SETTING> screen appears.
• The period of the record can be set.
• Setting of AUTO RECORD SETTING ( default : “24H” )
“24H”, “48H”, “72H”, “96H”, “120H”, “144H”, “1WEEK”,
“2WEEK”, “3WEEK”, “1MONTH”, “2MONTH”, “3MONTH”,
“4MONTH”, “5MONTH”, “6MONTH”, “1YEAR”
<AUTO RECORD SETTING>
>>RECORDING CYCLE
EXECUTE
24H
JOG
:SELECT
SHUTTLE>>:EXECUTE
9. Turn the SHUTTLE ring clockwise.
• The background of the setting changes to red and flashes.
10. Turn the JOG dial to display the desire setting and turn the
SHUUTLE ring cloclwise.
• The setting is confirmed and flashing stop.
11. Turn the JOG dial to move the cursor to “EXECUTE”, and
turn the SHUTTLE ring clockwise.
• The <RECORD SETTING> screen appears.
• The recording interval and recording picture quality of
normal recording and alarm recording corresponding to each
camera numbers can be set in this screen.
•••••••••••••••••••••••••••••••••••••••••••••••••••••••••••••••••••••••••••••••••••••••••••••••••••••••••••••• AUTO SET UP
17
AUTO SET UP (continued) / Initial settings
The <RECORD SETTING> screen consists of 2
pages. The second page is displayed when turning the
JOG dial to move the cursor to “NEXT PAGE”, and turn
the SHUTTLE ring clockwise.
<RECORD SETTING> 1/2
Camera selection during alarm recording
<RECORD SETTING>
ALARM CH
NO PPS
GRADE A-PPS A-GRADE
>> 1 12.5P SUPER 12.5P SUPER
------ SUPER ------ SUPER
2
------ SUPER ------ SUPER
3
4
12.5P SUPER 12.5P SUPER
------ SUPER ------ SUPER
5
<ESTD REC>
D
H
Please perform initialization, when a <INITIALIZATION>
setup is changed.
1. Turn ON the MAIN switch on the rear of the unit, and wait
until the ACCESS indicator goes off. Hold down the REC/STOP
button, and press the POWER button on the front of the unit.
• The unit starts-up, and the <INITIALIZATION> screen is
appears.
POWER button operation will not be accepted while
the ACCESS indicator is flashing. Press the POWER
button after the indicator turns off.
2. Select “INITIALIZATION” by turning the JOG dial, and turn
the SHUTTLE ring clockwise.
M
• The setting is made, and the display returns to normal after
initialization.
NEXT PAGE
<RECORD SETTING> 2/2
<RECORD SETTING>
NO PPS
GRADE A-PPS
>> 6
------ SUPER -----7
12.5P SUPER 12.5P
8
------ SUPER -----9
------ SUPER ------
<ESTD REC>
♦ INITIALIZATION
D
H
A-GRADE
SUPER
SUPER
SUPER
SUPER
M
Settings are not confirmed unless you perform
“INITIALIZATION”.
Performing “INITIALIZATION” initializes all data on
the HDD. It deletes the complete ALARM LIST, and
the next entry is registered from 00001.
Select “POWER OFF” to abort initialization.
PRESS POWER BUTTON TO EXIT
According to the number of the cameras connected
and the value of “RECORDING CYCLE”, the most suitable setting of the “PPS”, “A-PPS”, “GRADE” and “AGRADE” are set automatically.
12. When the setting is complete, press the POWER button.
• “SETTING UP...” is displayed on the screen, and the unit
starts-up.
To execute AUTO SET UP again, press and hold
the camera number button 1 and press the POWER
button, when the MAIN switch is set to ON and the
POWER button is set to OFF. The <CAMERA CHECK>
screen appears. However all menu of record setting
will be reset.
■ INITIALIZATION
The <INITIALIZATION> setting is used to select the mode of
peripheral recording devices connected to SCSI connector
ID4•ID5, to make HDD SETTING, and to initialize the HDD.
♦ HDD SETTING
The HDD SETTING can be set to MIRRORING (simultaneous recording to the internal HDD as a pair), PARTITION
(an independent partition that can be set within the total
HDD memory specifically for ALARM RECORDING). (
see pages 74,75 “MIRRORING”, “PARTITION”)
<INITIALIZATION>
>>HDD SETTING
NORMAL
POWER OFF
INITIALIZATION
ALL DATA WILL BE ERASED
WHEN PROCEED INITIALIZATION
•••••••••••••••••••••••••••••••••••••••••••••••••••••••••••••••••••••••••••••••••••••••••• AUTO SET UP / Initial settings
18
Basic Operations
■ Multiplexer functions
♦ Multiplexer buttons
ENGLISH
Example : Set DISPLAY MODE to “3” ( default : “1” ).
Buttons on the front of the unit can be used to perform
some of the multiplexer functions.
1. Set the MAIN switch on the rear of the unit to ON. Press
the POWER button on the front after the ACCESS indicator
turns off.
• “SETTING UP...” appears on the screen and the unit is
booted.
1 Camera number buttons (1 to 9)
1
SPLIT/
SEQUENCE
2
3
4
ZOOM / 0
5
6
7
8
9
POWER button operation will not be accepted
while the ACCESS indicator is flashing. Press the
POWER button after the indicator turns off.
MOVE button
2. After boot-up, press the SET UP button inside the door on
the front of the unit.
• The <SETTINGS> screen appears.
3 ZOOM button
2 SPLIT/SEQUENCE button
1. Camera number buttons (1 to 9)
Video images of cameras connected to CAMERA IN terminals 1 to 9 on the rear of the unit are displayed.
By pressing a camera number button, video images can be displayed even if the camera is not set
for recording.
2. SPLIT/SEQUENCE button
The screen switches in order of SPLIT9 SCREEN
SETTING, 3 types of SPLIT4 SCREEN SETTING (a, b and
c), SPLIT4 SEQUENTIAL and SINGLE SEQUENTIAL set
in the <MPX DISPLAY SETTINGS> screen (SEQUENTIAL
display is skipped during playback).
Pressing the ZOOM button for more than 1
second on the front of this unit can switch the
operation of camera number buttons and the SPLIT/
SEQUENCE button to the screen of the monitor
connected to the OUTPUT B connector. Pressing
the ZOOM button for more than 1 second again can
switch to the screen of the monitor connected to the
OUTPUT A connector.
<SETTINGS>
>>TIME DATE/DISPLAY SETTINGS
MPX DISPLAY SETTINGS
MOTION DETECTION SETTINGS
RECORD SETTINGS
TIMER PROGRAM SETTINGS
INITIAL SET UP/INFORMATION
QUICK SETTINGS
MEMO:
When the SET UP button is pressed and the
menu screen appears, the background darkens and
the displayed characters become easier to see.
3. Check to see that the cursor (>>) is positioned at “TIME
DATE/DISPLAY SETTINGS”, and then turn the SHUTTLE ring
clockwise.
• The <TIME DATE/DISPLAY SETTINGS> screen appears (
see page 32).
<TIME DATE/DISPLAY SETTINGS>
>>TIME DATE ADJUST
DISPLAY MODE
1
CLOCK LOCATION SETTING
CAMERA DISPLAY
NUMBER
CAMERA TITLE/MEMO SETTING
DUPLEX MODE DISPLAY
BOTTOM
<MODE 1>
3. ZOOM button
When this button is pressed during single screen display,
magnification 100% screen appears and the magnification
centre point (X) is displayed at the centre. Pressing the
button again will switch the magnification to 200% and then
400%. By pressing the MOVE buttons, the magnified screen
can be moved vertically/horizontally with the centre point
see “ZOOM button operations”, page 35).
as the axis (
When the ZOOM button is pressed, camera number
buttons 1 to 4 become the MOVE buttons.
4. Turn the JOG dial to move the cursor to “DISPLAY MODE”
and turn the SHUTTLE ring clockwise.
• The background of the “DISPLAY MODE” setting turns red
and flashes.
When turning the JOG dial clockwise, the cursor
(>>) moves down. When turning counterclockwise,
the cursor (>>) moves up.
5. Turn the JOG dial to display “3”.
■ Menu settings
The operational conditions of this unit can be set in the
menu screens according to use. Although the setting
method will differ slightly depending on the menu screen,
the basic setting method of using the JOG dial and SHUTTLE ring will remain the same. e.g. setting the display
mode.
SHUTTLE ring
01-01-2004 00:00:00
JOG dial
• The display mode sample on the bottom of the screen
changes to <MODE 3>.
6. Turn the SHUTTLE ring clockwise.
• The setting is confirmed and flashing stops.
• To continue with other settings, repeat steps 4 and 5.
When turning the SHUTTLE ring counterclockwise
while the setting is flashing, the setting will return to
the previous setting.
To exit the screen, turn the SHUTTLE ring
counterclockwise.
•••••••••••••••••••••••••••••••••••••••••••••••••••••••••••••••••••••••••••••••••••••••••••••••••••••••••••••••••••••• Basic Operations
19
Basic Operations (continued)
<TIME DATE/DISPLAY SETTINGS>
TIME DATE ADJUST
>>DISPLAY MODE
3
CLOCK LOCATION SETTING
CAMERA DISPLAY
NUMBER
CAMERA TITLE/MEMO SETTING
DUPLEX MODE DISPLAY
BOTTOM
<MODE 3>
01-01-2004 THU
00:00:00 12.5P 99% A00001
♦ To return to the normal screen from a menu screen
The procedure to return to the normal screen after completing menu screen settings using the JOG dial/SHUTTLE ring is detailed below.
1. Check to see that the setting item is no longer flashing and
the item has been changed to the desired setting.
• The setting has not been confirmed if the item is flashing.
Refer to the previous setting procedure to confirm the setting.
• To continue with other settings or to check the setting item,
turn the SHUTTLE ring counterclockwise once to return to
the previous screen.
This operation is not accepted when the setting
item is flashing.
2-1. (To return to the normal screen by moving up menu
screens one at a time • • • )
• Turn the SHUTTLE ring counterclockwise for the amount of
menu screens opened. The previous menu screen is
displayed every time the SHUTTLE ring is turned
counterclockwise.
2-2. (To directly return to the normal screen • • • )
• Press the SET UP button to clear the menu screen and return
to the normal screen.
The menu screen will not be cleared even when
pressing the SET UP button when the setting item
is flashing.
♦ DAYLIGHT SAVING/DAYLIGHT SETTING
The clock is put forward one hour by activating this setting.
The default setting for this function is “OFF”. On the DAY
LIGHT SAVING in <TIME DATE ADJUST> menu, turn the
JOG dial to flash “AUTO” (the daylight saving function is
automatically activated). Turn the SHUTTLE ring clockwise
to enter the selection.
In the “DAYLIGHT SETTING” setting, start/end time of the
“DAYLIGHT SAVING” function can be checked and
changed.
Example : Set the start time of the “DAYLIGHT SAVING”
function “IN” to “MON”, “1ST”, “APR” and “02:00”.
( default : “SUN”, “LAST”, “MAR”, “01:00” ).
1. Press the SET UP button to display the <SETTINGS>
screen.
2. Check to see that the cursor (>>) is positioned at “TIME
DATE/DISPLAY SETTINGS”, and then turn the SHUTTLE ring
clockwise.
• The <TIME DATE/DISPLAY SETTINGS> screen appears.
3. Check to see that the cursor is positioned at “TIME DATE
ADJUST”, and then turn the SHUTTLE ring clockwise.
• The <TIME DATE ADJUST> screen appears.
<TIME DATE ADJUST>
>>DAYLIGHT SAVING
OFF
DAY
01
MONTH
01
YEAR
2004
TIME
00:00:00
DAYLIGHT SETTING
DAY OF WEEK MONTH TIME
IN SUN
LAST MAR 01:00
OUT SUN
LAST OCT 02:00
JOG
:SELECT
SHUTTLE>>:EXECUTE
4. Turn the JOG dial to move the cursor (>>) to “IN” and turn
the SHUTTLE ring clockwise twice.
• The “DAY” display reverses in color when the SHUTTLE
ring is turned the first time. When the ring is turned for the
second time, the display turns red and flashes.
5. Turn the JOG dial to display “MON” and turn the SHUTTLE
ring clockwise.
• The setting is confirmed and flashing stops.
6. Turn the JOG dial clockwise to move the cursor (>>) to
“WEEK”.
7. Repeat steps 4, 5 and 6 to set “WEEK”, “MONTH” and
“TIME”.
8. Turn the SHUTTLE ring clockwise.
• The setting is confirmed and flashing stops.
9. Turn the SHUTTLE ring counterclockwise or press the SET
UP button.
♦ TIME DATE ADJUST
Before starting recording, it is necessary to set
accurately the current date and time.
Example : Set the date/time to 28/10/2004 6:30pm
(18:30)( default : “01/01/2004 00:00:00” ).
1. Press the SET UP button to display the <SETTINGS>
screen.
2. Check to see that the cursor (>>) is positioned at “TIME
DATE/DISPLAY SETTINGS”, and then turn the SHUTTLE ring
clockwise.
• The <TIME DATE/DISPLAY SETTINGS> screen appears.
3. Check to see that the cursor is positioned at “TIME DATE
ADJUST”, and then turn the SHUTTLE ring clockwise.
• The <TIME DATE ADJUST> screen appears.
<TIME DATE ADJUST>
>>DAYLIGHT SAVING
DAY
MONTH
YEAR
TIME
OFF
01
01
2004
00:00:00
4. Turn the JOG dial to move the cursor to “DAY” and turn the
SHUTTLE ring clockwise.
• The background of “DAY” changes to red and flashes.
<TIME DATE ADJUST>
DAYLIGHT SAVING
>>DAY
MONTH
YEAR
TIME
OFF
01
01
2004
00:00:00
5. Turn the JOG dial to display “28” and turn the SHUTTLE
ring clockwise.
• The setting is confirmed and flashing stops.
••••••••••••••••••••••••••••••••••••••••••••••••••••••••••••••••••••••••••••••••••••••••••••••••••••••••••••••••••••••••••••••••••••••••••••
20
OFF
28
01
2004
00:00:00
ENGLISH
♦ Recorded capacity display function
<TIME DATE ADJUST>
DAYLIGHT SAVING
>>DAY
MONTH
YEAR
TIME
Day of
Recorded capacity of
Day Month Year the week the Hard Disk
6. Turn the JOG dial clockwise to move the cursor (>>) to
“MONTH”.
When turning the JOG dial clockwise, the cursor
(>>) moves down. When turning counterclockwise,
the cursor (>>) moves up.
01 - 01 - 2004 THU
00 : 00 : 00 12.5P 99% A00001
Minute
Hour
Playback interval
(Single screen playback only)
Second
Alarm recording number
7. Repeat steps 4 ~ 6 to set “MONTH” and “YEAR”.
8. Turn the JOG dial to move the cursor (>>) to “TIME” and
turn the SHUTTLE ring clockwise twice.
• The “TIME” display reverses in color when the SHUTTLE
ring is turned the first time. When the ring is turned for the
second time, the display turns red and flashes.
<TIME DATE ADJUST>
DAYLIGHT SAVING
DAY
MONTH
YEAR
TIME
1) Select the device and set the remaining capacity using
“REMAIN HDD” of the <REAR TERMINAL SETTINGS>
see page 50).
screen (
OFF
28
10
2004
00:00:00
9. Turn the JOG dial to display “18” and turn the SHUTTLE
ring clockwise.
• The setting is confirmed and flashing stops.
<TIME DATE ADJUST>
DAYLIGHT SAVING
DAY
MONTH
YEAR
TIME
2) Select “3” for “DISPLAY MODE” in the <TIME DATE/
see page 32).
DISPLAY SETTINGS> screen (
During recording, the used HDD space is displayed. When recording is stopped, the display is
cleared (with the exception of when pausing recording). The HDD usage display appears again after a
few moments when recording is started once more.
OFF
28
10
2004
18:00:00
The time is indicated using the 24-hour system.
10. Repeat steps 8 and 9 to set “MINUTE” and “SECOND”.
11. Turn the SHUTTLE ring clockwise.
• The setting is confirmed and flashing stops.
<TIME DATE ADJUST>
DAYLIGHT SAVING
DAY
MONTH
YEAR
TIME
This unit displays the used space of the specified recording device (HDD) on the screen when “REMAIN HDD” of
the <REAR TERMINAL SETTINGS> screen is set to
“MAIN”, “SUB”. The “%” indicates the ratio detected as HDD
against the total HDD capacity. The following settings are
required to enable this function.
OFF
28
10
2004
18:30:00
■ Basic manual recording
Normal recording using manual operation is explained here.
Before starting recording, recording settings must be
checked. After checking the settings of “HDD REPEAT REC
MAIN”, “HDD REPEAT REC SUB” in the <HDD SETTINGS> screen (
see page 47), the REC mode settings are made.
Settings here are for normal recording only. For
timer recording, settings must be made on the
<TIMER PROGRAM SETTINGS> screen (
see
page 46).
12. Turn the SHUTTLE ring counterclockwise.
♦ Present time display
When turning on the unit power, the time/date display shown
to the right appears (in the case of DISPLAY MODE 3).
For setting other display modes,
“DISPLAY MODE” page 32.
see
INFORMATION
This unit uses 4 digits to display the year. The
allowed display range is 99 years between 1/1/
2001 ~ 31/12/2099. The unit is also equipped with
a function to automatically calculate leap years.
The date returns to the year 2001 after 31/12/
2099.
•••••••••••••••••••••••••••••••••••••••••••••••••••••••••••••••••••••••••••••••••••••••••••••••••••••••••••••••••••••• Basic Operations
21
Basic Operations (continued)
♦ Setting the recording interval and recording
picture quality for normal recording
<RECORD SETTING>
Camera selection during alarm recording
To perform normal recording, “PPS” and “GRADE” must
be set for each camera.
<RECORD SETTING> >>ALARM CH
NO PPS
GRADE A-PPS A-GRADE
2.5P
STD
2.5P
STD
1
2.5P
STD
2.5P
STD
2
2.5P
STD
2.5P
STD
3
4
2.5P
STD
2.5P
STD
2.5P
STD
2.5P
STD
5
6
2.5P
STD
2.5P
STD
2.5P
STD
2.5P
STD
7
2.5P
STD
2.5P
STD
8
2.5P
STD
2.5P
STD
9
<ESTD REC>
D H M
Setting of “PPS” ( default : “2.5P” )
“5P”, “2.5P”, “1.667P”, “1.25P”, “1P”, “0.833P”,
“0.625P”, “0.5P”, “0.2P”, “0.1P”, “0.05P”, “0.025P”,
“- - - - - -”
“- - - - - -” : Recording cannot be performed with
camera set to this item.
Available recording intervals will vary according
to the number of cameras operating or ALARM REsee page 41). Interval disCORDING settings (
plays will be according to the chart.
Setting of “GRADE” ( default : “STD” )
“SUPER”, “HIGH”, “STD”(STANDARD), “BASIC”,
“LONG”
About <ESTD REC>
• The estimated recordable time is displayed as <ESTD REC>
depending on the “PPS” and “GRADE” settings. (The time
will not change when changing the alarm recording settings.)
4. Turn the JOG dial to select “ 1 ” , and then turn the SHUTTLE
ring clockwise.
• The “PPS” setting reverses in color.
<RECORD SETTING>
ALARM CH
NO PPS
GRADE A-PPS A-GRADE
2.5P
STD
2.5P
STD
1
2.5P
STD
2.5P
STD
2
2.5P
STD
2.5P
STD
3
4
2.5P
STD
2.5P
STD
2.5P
STD
2.5P
STD
5
6
2.5P
STD
2.5P
STD
2.5P
STD
2.5P
STD
7
2.5P
STD
2.5P
STD
8
2.5P
STD
2.5P
STD
9
<ESTD REC>
D H M
Example : Set “PPS” of camera number “ 1 ” to “0.5P” and
“GRADE” to “HIGH” for normal recording.
1. Press the SET UP button to display the <SETTINGS> screen.
2. Turn the JOG dial to move the cursor to “RECORD
SETTINGS” and turn the SHUTTLE ring clockwise.
• The <RECORD SETTINGS> screen appears.
<RECORD SETTINGS>
>>ALARM SETTING
RECORD SETTING
ALARM REC DURATION
PRE ALARM REC
( S
MOTION DET REC
5. Turn the SHUTTLE ring clockwise again.
• The background of the “PPS” setting turns red and flashes.
5S
)
S
ALARM
<RECORD SETTING>
ALARM CH
NO PPS
GRADE A-PPS A-GRADE
STD
2.5P
STD
1 2.5P
2.5P
STD
2.5P
STD
2
2.5P
STD
2.5P
STD
3
4
2.5P
STD
2.5P
STD
2.5P
STD
2.5P
STD
5
6
2.5P
STD
2.5P
STD
2.5P
STD
2.5P
STD
7
2.5P
STD
2.5P
STD
8
2.5P
STD
2.5P
STD
9
<ESTD REC>
D H M
3. Turn the JOG dial to move the cursor to “RECORD
SETTING” and then turn the SHUTTLE ring clockwise.
• The <RECORD SETTING> screen appears.
Relationship between the number of operational cameras and available “PPS” (pictures per second)
Number of
operational
cameras
PPS
SHORT
Recording
interval
LONG
#1
#2
#3
#4
#5
#6
#7
#8
#9
25P
12.5P
8.333P
6.25P
5P
4.167P
3.125P
2.5P
1P
0.5P
0.25P
0.125P
25P
12.5P
8.333P
6.25P
5P
4.167P
3.125P
2.5P
1P
0.5P
0.25P
0.125P
12.5P
6.25P
4.167P
3.125P
2.5P
2.083P
1.563P
1.25P
0.5P
0.25P
0.125P
0.063P
12.5P
6.25P
4.167P
3.125P
2.5P
2.083P
1.563P
1.25P
0.5P
0.25P
0.125P
0.063P
8.33P
4.165P
2.777P
2.083P
1.666P
1.388P
1.041P
0.833P
0.333P
0.167P
0.083P
0.042P
8.33P
4.165P
2.777P
2.083P
1.666P
1.388P
1.041P
0.833P
0.333P
0.167P
0.083P
0.042P
6.25P
3.125P
2.083P
1.563P
1.25P
1.042P
0.781P
0.625P
0.25P
0.125P
0.063P
0.031P
6.25P
3.125P
2.083P
1.563P
1.25P
1.042P
0.781P
0.625P
0.25P
0.125P
0.063P
0.031P
5P
2.5P
1.667P
1.25P
1P
0.833P
0.625P
0.5P
0.2P
0.1P
0.05P
0.025P
••••••••••••••••••••••••••••••••••••••••••••••••••••••••••••••••••••••••••••••••••••••••••••••••••••••••••••••••••••••••••••••••••••••••••••
22
6. Turn the JOG dial to select “0.5P” and turn the SHUTTLE
ring clockwise.
• Setting is confirmed and flashing stops.
<RECORD SETTING>
ALARM CH
NO PPS
GRADE A-PPS A-GRADE
STD
2.5P
STD
1 0.5P
2.5P
STD
2.5P
STD
2
2.5P
STD
2.5P
STD
3
4
2.5P
STD
2.5P
STD
2.5P
STD
2.5P
STD
5
6
2.5P
STD
2.5P
STD
2.5P
STD
2.5P
STD
7
2.5P
STD
2.5P
STD
8
2.5P
STD
2.5P
STD
9
<ESTD REC>
D H M
7. Turn the JOG dial clockwise to reverse display “GRADE”
and turn the SHUTTLE ring clockwise.
• The background of the “GRADE” setting turns red and
flashes.
<RECORD SETTING>
ALARM CH
NO PPS
GRADE A-PPS A-GRADE
0.5P
STD
2.5P
STD
1
2.5P
STD
2.5P
STD
2
2.5P
STD
2.5P
STD
3
4
2.5P
STD
2.5P
STD
2.5P
STD
2.5P
STD
5
6
2.5P
STD
2.5P
STD
2.5P
STD
2.5P
STD
7
2.5P
STD
2.5P
STD
8
2.5P
STD
2.5P
STD
9
<ESTD REC>
D H M
10. Turn the SHUTTLE ring counterclockwise three times or
press the SET UP button to return to the normal screen.
11. Press the REC/STOP button.
• The REC/STOP button turns on and recording starts.
12. To stop recording, press the REC/STOP button for more
than 1 second.
• Recording stops and the REC/STOP button turns off.
REC/STOP
■ Basic playback
This unit allows recorded video to be played back using
various methods. The basic playback described here is the
most common method for playback.
This unit will stop playback when a request for
acquisition of live images is communicated during
playback.
This unit will not playback while a request for the
acquisition of live images is being communicated.
1. Press the PLAY button ( inside the front door) on the front of
the unit.
• Recorded contents of the HDD are played back.
• After turning the power on, the oldest recorded video is
played back first. Otherwise, playback resumes at the position
of the previous playback.
STOP
When the setting item is flashing, the menu
screen cannot be cleared even when pressing the
SET UP button.
8. Turn the JOG dial to select “HIGH” and turn the SHUTTLE
ring clockwise.
• The setting is confirmed and flashing stops.
<RECORD SETTING>
ALARM CH
NO PPS
GRADE A-PPS A-GRADE
HIGH 2.5P
STD
1 0.5P
2.5P
STD
2.5P
STD
2
3 2.5P
STD
2.5P
STD
4
2.5P
STD
2.5P
STD
5
2.5P
STD
2.5P
STD
6
2.5P
STD
2.5P
STD
7
2.5P
STD
2.5P
STD
8
2.5P
STD
2.5P
STD
9
2.5P
STD
2.5P
STD
<ESTD REC>
D H M
9. When the setting is complete, turn the SHUTTLE ring
counterclockwise.
• The cursor appears to the camera number on the left.
• When continuing with other camera number settings, turn
the JOG dial to move the cursor to the desired camera number
and repeat steps 4 ~ 9 to perform settings.
<RECORD SETTING>
ALARM CH
NO PPS
GRADE A-PPS A-GRADE
>> 1
0.5P
HIGH 2.5P
STD
2.5P
STD
2.5P
STD
2
3
2.5P
STD
2.5P
STD
4
2.5P
STD
2.5P
STD
5
2.5P
STD
2.5P
STD
6
2.5P
STD
2.5P
STD
7
2.5P
STD
2.5P
STD
8
2.5P
STD
2.5P
STD
9
2.5P
STD
2.5P
STD
<ESTD REC>
D H M
ENGLISH
The menu screen will not be cleared even when
pressing the SET UP button when the setting item
is flashing.
PAUSE
REV. PLAY PLAY
When the “HDD REPEAT PLAY” setting in the
“HDD SETTINGS” is set to “OFF”, playback is
stopped when reaching the end of the physical HDD
or recorded section. When the “HDD REPEAT PLAY”
setting is set to “ON”, recorded video data is played
see “HDD REPEAT PLAY”,
back repeatedly (
page 47).
2-1. (To change HDD or Compact Flash Card playback device
•••)
• Setting ( default : “MAIN” )
“MAIN” : Select when playing back MAIN HDD contents.
“SUB” : Select when playing back SUB HDD contents.
“CFC” : Select when playing back CFC contents.
• When changing the playback device to Compact Flash Card,
press the SEARCH button twice (
see page 67) to display
the <SEARCH SELECTION> screen and select “CFC”
(Compact Flash Card) in “PLAYBACK DEVICE”.
“SUB” is appeared on the screen when
“PARTITION” is selected on “HDD SETTING” of the
<INITIALIZATION> screen.
2-2. Press the PLAY button.
• Plays from the playback device that has been selected.
•••••••••••••••••••••••••••••••••••••••••••••••••••••••••••••••••••••••••••••••••••••••••••••••••••••••••••••••••••••• Basic Operations
23
Basic Operations (continued)
3. To pause playback, press the PAUSE button.
• To resume playback, press the PAUSE button again or press
the PLAY button.
6. Repeat steps 4 and 5 to set “YEAR”, “HOUR”, “MINUTE”
and “SECOND”.
<TIME DATE SEARCH>
4. To stop playback, press the STOP button.
>>03-03-2004
• During HDD playback/pause, playback will start the next
time from the paused position.
• During CFC playback/pause, playback will start the next time
from the oldest recorded video on the media.
EXECUTE(FORWARD)
MAIN
START
END
■ Basic search
This unit displays a menu of most used search functions
simply by pressing the SEARCH button.
This unit will not move to search mode when a
request for acquisition of live images is
communicated while search mode is set. Also, this
unit will not search when a request for the acquisition
of live images has been communicated.
This unit will not search while a request for the
acquisition of live images is being communicated.
♦ TIME DATE SEARCH
On this unit, various search functions are available for
searching the start point of video clips. In this section, the
most common search method referred to as time/date
search is explained. With this method, searching is possible by date, hour, minute, second and specified camera
number.
Example : Search a scene recorded on the MAIN HDD
with time/date stamp of 03/03/2004 9:25:40pm
(21:25:40) using camera number “ 3 ”.
21:25:40
02-02-2004 00:00:00
04-04-2004 12:30:15
PUSH SEARCH KEY FOR
SEARCH SELECTION
To exit the <TIME DATE SEARCH> screen without
searching, turn the SHUTTLE ring counterclockwise
or press the SEARCH button twice.
For details concerning <SEARCH SELECTION>
see page 67).
for selecting search functions (
7. Press the SEARCH button to display the <SEARCH
SELECTION> screen.
8. Check to see that the cursor is positioned at “SELECTION
CAMERA NUMBER”, and then turn the SHUTTLE ring
clockwise.
• The background of the setting item changes to red and
flashes.
9. Turn the JOG dial to select “ 3 ” and turn the SHUTTLE
ring clockwise.
• Setting is confirmed and flashing stops.
• Setting ( default : “ALL” )
“ALL”, “ 1 ”, “ 2 ”, “ 3 ”, “ 4 ”, “ 5 ”, “ 6 ”, “ 7 ”, “ 8 ”,
“ 9 ”
1. Press the SEARCH button to display the <TIME DATE
SEARCH> screen.
• The default setting of the search menu displayed when
pressing the SEARCH button is “TIME DATE SEARCH”.
<TIME DATE SEARCH>
>>01-01-2004
00:00:00
EXECUTE(FORWARD)
MAIN
START
END
02-02-2004 00:00:00
04-04-2004 12:30:15
PUSH SEARCH KEY FOR
SEARCH SELECTION
2. Check to see that the cursor is next to the search date and
turn the SHUTTLE ring clockwise twice.
• The display reverses in color when the SHUTTLE ring is
turned the first time. When the ring is turned for the second
time, the display turns red and flashes.
3. Turn the JOG dial to display “03” for “DAY” and turn the
SHUTTLE ring clockwise.
• Setting is confirmed and flashing stops.
4. Turn the JOG dial to reverse display “MONTH” and turn the
SHUTTLE ring clockwise.
• The background of the setting item changes to red and
flashes.
“ALL” : Search is conducted for all camera number “ 1 ” ~
“ 9 ”and displays the results on SPLIT9 screen.
“ 1 ” ~ “ 9 ” : This search mode scans for matches to
search criteria in the selected camera and displays the results
on 1 screen.
<SEARCH SELECTION>
SEARCH TYPE
TIME DATE
3
>>SELECTION CAMERA NUMBER
PLAYBACK DEVICE
MAIN
MAIN
START
END
02-02-2004 00:00:00
04-04-2004 12:30:15
10-1. (To change HDD or Compact Flash Card playback device
•••)
Turn the JOG dial to select “PLAYBACK DEVICE” and turn
the SHUTTLE ring clockwise.
• The background of the setting item changes to red and
flashes. Turn the JOG dial to display the desired playback
device and confirm.
• Setting ( default : “MAIN” )
“MAIN” : Select when playing back MAIN HDD contents.
“SUB” : Select when playing back SUB HDD contents.
5. Turn the JOG dial to display “03” for “MONTH” and turn the
SHUTTLE ring clockwise.
“CFC” : Select when playing back CFC contents.
• Setting is confirmed and flashing stops.
••••••••••••••••••••••••••••••••••••••••••••••••••••••••••••••••••••••••••••••••••••••••••••••••••••••••••••••••••••••••••••••••••••••••••••
24
ENGLISH
“SUB” is appeared on the screen when
“PARTITION” is selected on “HDD SETTING” of the
<INITIALIZATION> screen.
3
03-03-2004 21:25:40
10-2. (To change the search type • • • )
Turn the JOG dial to select “SEARCH TYPE” and turn the
SHUTTLE ring clockwise.
• The background of the setting item changes to red and
flashes. Turn the JOG dial to display the desired search menu
and confirm.
• Setting ( default : “TIME DATE” )
“TIME DATE”, “INDEX”, “ALARM INDEX”, “ALARM SKIP”,
“ALARM LIST”
11. When the setting is complete, turn the SHUTTLE ring
counterclockwise.
• The display returns to the <TIME DATE SEARCH> screen
and the cursor appears on the left of the search date.
12. Turn the JOG dial to select “EXECUTE(FORWARD)” and
turn the SHUTTLE ring clockwise.
• When the TIME DATE SEARCH is executed, the video of the
set date/time (or the video closest to the search) will appear
in still frame.
• The search result will appear using SPLIT9 screen when
“ALL” is selected in “SELECTION CAMERA NUMBER” of the
<SEARCH SELECTION> screen. If a camera number has been
selected individually, the still frame will be displayed in full
screen.
<TIME DATE SEARCH>
>>03-03-2004
21:25:40
EXECUTE(FORWARD)
MAIN
START
END
02-02-2004 00:00:00
04-04-2004 12:30:15
PUSH SEARCH KEY FOR
SEARCH SELECTION
PLAY
14. To stop playback/still frame playback, press the STOP
button.
• The display returns to the normal screen.
15. Press the SEARCH button twice to clear the <SEARCH
SELECTION> screen.
■ LANGUAGE SELECTION
With this unit, the menu screen display can be selected
from 6 languages. As “ENGLISH” is selected for the initial
setting, please perform setting according to the following
procedure if you want to select a language other than “ENGLISH”.
Setting ( default : “ENGLISH” )
“FRANCAIS”,
“ENGLISH”,
“DEUTSCH”,
“ESPAÑOL”, “ PyCCK NN”, “ITALIANO”
1. Press the SET UP button } <SETTINGS> } Select
“LANGUAGE SELECTION” in the <INITIAL SET UP/
INFORMATION> screen and display the desired setting.
<LANGUAGE SELECTION>
>>LANGUAGE
ENGLISH
When there is no recording of the set time, the
video of the closest time and date for the set camera number will be displayed in still frame.
Depending on the recording condition, TIME
DATE SEARCH may not operate correctly.
JOG
:SELECT
SHUTTLE>>:EXECUTE
2. Turn the SHUTTLE ring counterclockwise or press the SET
UP button.
To display full screen view by selecting a camera number from the SPLIT9 screen of the search
result when “ALL” is selected in the “SELECTION
CAMERA NUMBER” setting, press the SEARCH
button to clear the SEARCH menu and press the
desired camera number button. The desired video
is displayed in full screen.
Press the camera number buttons during still
image playback to call up search mode. The search
mode status may continue for several hours if the
number of a camera with a small number of recorded
images has been specified. When not required,
press the STOP button to cancel the search status.
13. To playback the searched image.
• Press either the PLAY button or the PAUSE button.
For playback,
tions”, pages 65,66.
see “Various playback func-
•••••••••••••••••••••••••••••••••••••••••••••••••••••••••••••••••••••••••••••••••••••••••••••••••••••••••••••••••••••• Basic Operations
25
Menu functions
■ MENU SETTING
You can set the basic settings for this unit in the MENU SETTING. Refer to pages shown below for details.
During playback, recording, pre-alarm recording stand-by mode you cannot change setting of some MENUs.
SUB MENU (2)
SUB MENU (1)
<TIME DATE/DISPLAY SETTINGS>
>>TIME DATE ADJUST
DISPLAY MODE
1
CLOCK LOCATION SETTING
CAMERA DISPLAY
NUMBER
CAMERA TITLE/MEMO SETTING
DUPLEX MODE DISPLAY
BOTTOM
<MODE 1>
01-01-2004 00:00:00
<TIME DATE/DISPLAY SETTINGS>
Pages 19-21, 32-34
<TIME DATE ADJUST>
>>DAYLIGHT SAVING
OFF
DAY
01
MONTH
01
YEAR
2004
TIME
00:00:00
DAYLIGHT SETTING
DAY OF WEEK MONTH TIME
IN SUN
LAST MAR 01:00
OUT SUN
LAST OCT 02:00
JOG
:SELECT
SHUTTLE>>:EXECUTE
<TIME DATE ADJUST>
Pages 20,21
••••••••••••••••••••••••••••••••
• 01-01-2004 00:00:00 ••••••••••
••••••••••••••••••••••••••••••••
••••••••••••••••••••••••••••••••
••••••••••••••••••••••••••••••••
••••••••••••••••••••••••••••••••
••••••••••••••••••••••••••••••••
••••••••••••••••••••••••••••••••
••••••••••••••••••••••••••••••••
••••••••••••••••••••••••••••••••
••••••••••••••••••••••••••••••••
••••••••••••••••••••••••••••••••
SET UP
<CLOCK LOCATION SETTING>
MAIN MENU
Page 32
<CHARACTERS>
••••••••••••••••
<CAMERA TITLE/MEMO SETTING>
>> 1
••••••••••••••••
2
••••••••••••••••
3
••••••••••••••••
4
••••••••••••••••
5
••••••••••••••••
6
••••••••••••••••
7
••••••••••••••••
8
••••••••••••••••
9
••••••••••••••••
MEMO
••••••••••••••••
SHUTTLE>>:CHARACTERS
<SETTINGS>
>>TIME DATE/DISPLAY SETTINGS
MPX DISPLAY SETTINGS
MOTION DETECTION SETTINGS
RECORD SETTINGS
TIMER PROGRAM SETTINGS
INITIAL SET UP/INFORMATION
QUICK SETTINGS
MEMO:
! " # $%& ' ( ) + , -. / : ; < = >?@•••••••
0123456789••••••••••••••••••••
ABCDEFGHIJKLMNOPQRSTUVWXYZ••••
abcde f gh i j k l mnopqrs t uvwxyz••••
´
ÀÁÂÃÄÅÆÇÈÉÊËÌÍÎÏDÑÒÓÔÕÖXØÙÚÛÜY
ß••••••••••••••••••••••••••••
´ˆ˜
àaaaäåæçèeêëìÍîï
ñòoôoö÷øùuûüy
´ ´
´ ˜
´
pÿ••••••••••••••••••••••••••••
SHUTTLE<<:BACK
<CAMERA TITLE/MEMO SETTING>
Pages 32,33
<CHARACTERS>
Page 33
SUB MENU (3)
<MPX DISPLAY SETTINGS>
>>OUTPUT A
OUTPUT B ON/OFF
OUTPUT B
OFF
<OUTPUT A>
>>SPLIT4 SCREEN SETTING
SPLIT9 SCREEN SETTING
SEQUENCE SETTING
INTERLACE
<SPLIT4 SCREEN SETTING>
>>SPLIT4(a)
( 1 ) ( 2)
SPLIT4(b)
( 5) (6 )
ON
( 3)
( 4)
( 7)
(8)
SPLIT4(c)
(9) ( 1)
(2)
<MPX DISPLAY SETTINGS>
Pages 35-38
<OUTPUT A>
Pages 35-38
<OUTPUT B>
>>SPLIT4 SCREEN SETTING
SPLIT9 SCREEN SETTING
SEQUENCE SETTING
INTERLACE
SAME AS OUTPUT A
(3)
<SPLIT4 SCREEN SETTING>
Page 37
<SPLIT9 SCREEN SETTING>
>>SPLIT9
( 1 ) ( 2 ) ( 3)
ON
( 4) ( 5 ) ( 6)
( 7 ) ( 8 ) ( 9)
<OUTPUT B>
Pages 35-38
<SPLIT9 SCREEN SETTING>
Pages 37,38
<SEQUENCE SETTING>
SEQUENCE NUMBER TIME
>>1
2S
1
2
2S
2
3
3
2S
4
2S
4
5
2S
5
6
2S
6
7
2S
7
8
2S
8
9
2S
9
SPLIT4
abc
2S
<SEQUENCE SETTING>
Page 38
<OUTPUT B>
>>EXECUTE
SHUTTLE>>:EXECUTE,<<:CANCEL
<OUTPUT B>
Page 37
••••••••••••••••••••••••••••••••••••••••••••••••••••••••••••••••••••••••••••••••••••••••••••••••••••••••••••••••••••••••••••••••••••••••••••
26
SUB MENU (1)
MAIN MENU
<MOTION DETECTION SETTINGS>
Pages 39,40
<SETTINGS>
>>TIME DATE/DISPLAY SETTINGS
MPX DISPLAY SETTINGS
MOTION DETECTION SETTINGS
RECORD SETTINGS
TIMER PROGRAM SETTINGS
INITIAL SET UP/INFORMATION
&
&
&
&
&
&
&
&
&
&
&
&
MEMO:
& & & & & & & & & &
& & & & & & & & & &
& & & & & & & & & &
& & & & & & & & & &
& & & & & & & & & &
& & & & & & & & & &
& & & & & & & & & &
& & & & & & & & & &
& & & & & & & & & &
& & & & & & & & & &
& & & & & & & & & &
& & & & & & & & & &
& & & &
& & & &
& & & &
& & & &
& & & &
& & & &
& & & &
& & & &
& & & &
& & & &
& & & &
& & & &
<DETECTION MASK SETTING>
•
•
•
•
•
•
•
•
•
•
•
•
QUICK SETTINGS
&
&
&
&
&
&
&
&
&
&
&
&
•
•
•
•
•
•
•
•
•
•
•
•
• • • • • • • • • •
• • • • • • • • • •
• • • • • • • • • •
• • • • • • • • • •
• • • • • • • • • •
• • • • • • • • • •
• • • • • • • • • •
• • • • • • • • • •
• • • • • • • • • •
• • • • • • • • • •
• • • • • • • • • •
• • • • • • • • • •
Page 39
• • • •
• • • •
• • • •
• • • •
• • • •
• • • •
• • • •
• • • •
• • • •
• • • •
• • • •
• • • •
<TEST MODE>
<RECORD SETTINGS>
>>ALARM SETTING
RECORD SETTING
ALARM REC DURATION
PRE ALARM REC
( S
MOTION DET REC
<RECORD SETTINGS>
)
5S
S
ALARM
Pages 21-23,41-43
Page 40
>>ALARM CH
<ALARM SETTING>
ALARM RECORD CAMERA
TRIGGER
1
EXT
1 -------2
- 2 ------EXT
3
-- 3 -----EXT
4
--- 4 ----EXT
5
---- 5 ---EXT
6
----- 6 --EXT
7
------ 7 -EXT
8
------- 8 EXT
9
-------- 9
EXT
12 345 6789
EMR
<ALARM SETTING>
Pages 41,42
<RECORD SETTING> >>ALARM CH
NO PPS
GRADE A-PPS A-GRADE
2.5P
STD
2.5P
STD
1
2.5P
STD
2.5P
STD
2
2.5P
STD
2.5P
STD
3
4
2.5P
STD
2.5P
STD
2.5P
STD
2.5P
STD
5
6
2.5P
STD
2.5P
STD
2.5P
STD
2.5P
STD
7
2.5P
STD
2.5P
STD
8
2.5P
STD
2.5P
STD
9
<ESTD REC>
D H M
%
<RECORD SETTING>
<TIMER PROGRAM SETTINGS>
>>SELECTED PATTERN
P1-SET
HOLIDAY SETTING
REC MODE A
REC MODE B
REC MODE C
REC MODE D
ALARM REC DURATION
5S
#1
Pages 22,23,41,42
<TIMER PROGRAM>
DW
START END
--- --:-- --:---- --:-- --:---- --:-- --:---- --:-- --:---- --:-- --:---- --:-- --:---- --:-- --:---- --:-- --:--
>>1
2
3
4
5
6
7
8
SPL
<TIMER PROGRAM SETTINGS> Pages 44-46
ENGLISH
SET UP
SUB MENU (2)
<MOTION DETECTION SETTINGS>
>>SELECTION CAMERA NUMBER
1
DETECTION MASK SETTING
SENSITIVITY
HIGH••<<<LOW
MOTION THRESHOLD
5
TEST MODE
P1
MD
-
MODE
-------------------------
SAT-SUN
<TIMER PROGRAM>
CAUTION : For <ESTD REC>,
see “Continuous recording time table” ,
pages 83,84.
#1. Appears when “PARTITION”
is set is on the screen.
Pages 44,45
<HOLIDAY SETTING>
--/-- --/-- --/---/-- --/-- --/---/-- --/-- --/---/-- --/-- --/---/-- --/-- --/--
--/---/---/---/---/--
DAY/MONTH
<HOLIDAY SETTING>
Page 46
SUB MENU (3)
<REC MODE A>
>>ALARM SETTING
RECORD SETTING
PRE ALARM REC
MOTION DET REC
( S
)
S
ALARM
<REC MODE A> ~ <REC MODE D> Page 46
<ALARM SETTING A> >>ALARM CH
ALARM RECORD CAMERA
TRIGGER
1
EXT
1 -------2
- 2 ------EXT
3
-- 3 -----EXT
4
--- 4 ----EXT
5
---- 5 ---EXT
6
----- 6 --EXT
7
------ 7 -EXT
8
------- 8 EXT
9
-------- 9
EXT
12 345 6789
EMR
<ALARM SETTING A> ~
<ALARM SETTING D>
<RECORD SETTING
NO PPS
GRADE
2.5P
STD
1
2.5P
STD
2
2.5P
STD
3
4
2.5P
STD
2.5P
STD
5
6
2.5P
STD
2.5P
STD
7
2.5P
STD
8
2.5P
STD
9
<ESTD REC>
Page 46
A>>>ALARM CH
A-PPS A-GRADE
2.5P
STD
2.5P
STD
2.5P
STD
2.5P
STD
2.5P
STD
2.5P
STD
2.5P
STD
2.5P
STD
2.5P
STD
D H M
%
#1
<RECORD SETTING A> ~
<RECORD SETTING D> Page 46
•••••••••••••••••••••••••••••••••••••••••••••••••••••••••••••••••••••••••••••••••••••••••••••••••••••••••••••••••••••••••••• Operations
27
Menu functions (continued)
SET UP
MAIN MENU
<SETTINGS>
>>TIME DATE/DISPLAY SETTINGS
MPX DISPLAY SETTINGS
MOTION DETECTION SETTINGS
RECORD SETTINGS
TIMER PROGRAM SETTINGS
INITIAL SET UP/INFORMATION
QUICK SETTINGS
MEMO:
SUB MENU (1)
<INITIAL SET UP/INFORMATION>
>>HDD SETTINGS
AUDIO RECORDING
OFF
REAR TERMINAL SETTINGS
COMMUNICATION PORT SETTINGS
INFORMATION/SERVICE
PASSWORD
SUB MENU (2)
<HDD SETTINGS>
>>HDD REPEAT REC MAIN
HDD REPEAT REC SUB
HDD REPEAT PLAY
IM-CHECK PLAY
SEQUENTIAL PLAY
ON
OFF
OFF
OFF
OFF
#1
#1. Appears when “PARTITION” is set on the screen.
LANGUAGE SELECTION
<INITIAL SET UP/INFORMATION>
Pages 47-58
<HDD SETTINGS>
Pages 47,48
<REAR TERMINAL SETTINGS>
>>MODE OUT 1
OFF
MODE OUT 2
OFF
MODE OUT 3
OFF
MODE OUT 4
OFF
MODE OUT 5
OFF
KEY SOUND
ON
BUZZER
OFF
REMAIN HDD
MAIN-10%
CALL OUT SETTINGS
EMERGENCY REC DURATION
10M
<REAR TERMINAL SETTINGS>
Pages 49-51
<COMMUNICATION PORT SETTINGS>
>>RS-232C
ETHERNET
<COMMUNICATION PORT SETTINGS>
Pages 51-54
SUB MENU (3)
<CALL OUT SETTINGS>
>>HDD MAIN REMAIN
HDD MAIN FULL
OFF
OFF
HDD SUB REMAIN
HDD SUB FULL
OFF
OFF
<CALL OUT SETTINGS>
Pages 50,51
<RS-232C>
MODE
>>SETTINGS
<RS-232C>
REMOTE A
Pages 51,52
<ETHERNET>
>>IP ADDRESS
192.168.000.100
SUB NET MASK 255.255.255.000
GATEWAY
000.000.000.000
E-MAIL ADDRESS
SERVICE PORT SETTING
ALARM NOTIFICATION SETTING
<MAC ADDRESS>
08-00-70-2E-3F-FF
PLEASE PRESS SET UP BUTTON
TO APPLY NEW SETTING
<ETHERNET>
Pages 52-54
#1
SUB MENU (4)
<RS-232C SETTINGS>
>>TRANSMISSION MODE
DATA BIT LENGTH
PARITY BIT
STOP BIT LENGTH
DELIMITER
<RS-232C SETTINGS>
9600
8BIT
NONE
1BIT
CR
Page 52
<E-MAIL ADDRESS>
SMTP SERVER
RECORDER ID
USER ADDRESS
1
2
3
4
5
<E-MAIL ADDRESS>
<SERVICE PORT SETTING>
>>WEB
USER ACCESS
SUPER USER
LIVE USER1
LIVE USER2
LIVE USER3
LIVE USER4
<SERVICE PORT SETTING>
Page 52
•00080
53705
53706
53707
53708
53709
53710
Page 53
<ALARM NOTIFICATION SETTING>
NO IP ADDRESS
TARGET OWN
>>1 000.000.000.000•55111 01111
2 000.000.000.000•55111 01112
3 000.000.000.000•55111 01113
4 000.000.000.000•55111 01114
5 000.000.000.000•55111 01115
WARNING
ALARM SENS
REC MODE
RETRY TIME
OFF
OFF
OFF
10S
<ALARM NOTIFICATION SETTING>
Pages 53,54
••••••••••••••••••••••••••••••••••••••••••••••••••••••••••••••••••••••••••••••••••••••••••••••••••••••••••••••••••••••••••••••••••••••••••••
28
MAIN MENU
<SETTINGS>
>>TIME DATE/DISPLAY SETTINGS
MPX DISPLAY SETTINGS
MOTION DETECTION SETTINGS
RECORD SETTINGS
TIMER PROGRAM SETTINGS
INITIAL SET UP/INFORMATION
QUICK SETTINGS
ENGLISH
SET UP
SUB MENU (1)
SUB MENU (2)
<INFORMATION/SERVICE>
>>HDD INFORMATION
CFC INFORMATION
<INITIAL SET UP/INFORMATION>
>>HDD SETTINGS
AUDIO RECORDING
OFF
REAR TERMINAL SETTINGS
COMMUNICATION PORT SETTINGS
INFORMATION/SERVICE
PASSWORD
(2/2)
3H
WARNING LOG LIST
RESET TO FACTORY SETTINGS
#1
LANGUAGE SELECTION
<INFORMATION/SERVICE>
ELAPSED TIME: SYSTEM
(1/2)
HDD SETTING
PARTITION SIZE
MAIN HDD DATA CLEAR
SUB HDD DATA CLEAR
CFC DATA CLEAR
PARTITION
10%
#1
MEMO:
<INITIAL SET UP/INFORMATION>
Pages 47-58
<INFORMATION/SERVICE> 1/2
Pages 54-56
<INFORMATION/SERVICE> 2/2
SUB MENU (3)
<HDD INFORMATION>
INTERNAL HDD
MASTER:
HDD(250GB)
SLAVE :
NONE
#1. Appears when “PARTITION” is set on the screen.
#1
MAIN START
END
SUB START
END
01-01-2004
01-01-2004
01-01-2004
01-01-2004
00:00:00
00:00:05
00:00:00
00:00:05
<HDD INFORMATION>
Page 54
<CFC INFORMATION>
CFC
CAPACITY 128MB
START
END
---------- --:--:----------- --:--:--
<CFC INFORMATION>
Page 54
<WARNING LOG LIST>
NO
DATE
TIME
WARNING
>>0001 01-01-04 00:00:00 ALM ON
<WARNING LOG LIST>
Pages 54,55
<RESET TO FACTORY SETTINGS>
>>EXECUTE
SHUTTLE>>:EXECUTE,<<:CANCEL
<RESET TO FACTORY SETTINGS>
<QUICK SETTINGS>
>>LOAD SETTING DATA FROM CFC
SAVE SETTING DATA TO CFC
Page 55
<SETTING DATA LOADING>
>>EXECUTE
SHUTTLE>>:EXECUTE,<<:BACK
<QUICK SETTINGS>
Page 59
<SETTING DATA LOADING>
Page 59
<SETTING DATA SAVING>
>>EXECUTE
SHUTTLE>>:EXECUTE,<<:BACK
<SETTING DATA SAVING>
Page 59
•••••••••••••••••••••••••••••••••••••••••••••••••••••••••••••••••••••••••••••••••••••••••••••••••••••••••••••••••••••••••••• Operations
29
Menu functions (continued)
SET UP
SUB MENU (1)
MAIN MENU
<SETTINGS>
>>TIME DATE/DISPLAY SETTINGS
MPX DISPLAY SETTINGS
MOTION DETECTION SETTINGS
RECORD SETTINGS
TIMER PROGRAM SETTINGS
INITIAL SET UP/INFORMATION
QUICK SETTINGS
<INITIAL SET UP/INFORMATION>
>>HDD SETTINGS
AUDIO RECORDING
OFF
REAR TERMINAL SETTINGS
COMMUNICATION PORT SETTINGS
INFORMATION/SERVICE
PASSWORD
LANGUAGE SELECTION
SUB MENU (2)
<INFORMATION/SERVICE>
>>HDD INFORMATION
CFC INFORMATION
(1/2)
<INFORMATION/SERVICE>
ELAPSED TIME: SYSTEM
(2/2)
3H
WARNING LOG LIST
RESET TO FACTORY SETTINGS
MAIN HDD DATA CLEAR
SUB HDD DATA CLEAR
CFC DATA CLEAR
HDD SETTING
PARTITION SIZE
PARTITION
10%
#1
#1
MEMO:
<INITIAL SET UP/INFORMATION>
Pages 47-58
<INFORMATION/SERVICE> 1/2
Pages 54-56
<INFORMATION/SERVICE> 2/2
SUB MENU (3)
<MAIN HDD DATA CLEAR>
PUSH WARNING RESET KEY
FOR 1 SECOND TO CLEAR
<MAIN HDD DATA CLEAR>
Pages 55,56
#1. Appears when “PARTITION” is set on the screen.
#1
<SUB HDD DATA CLEAR>
PUSH WARNING RESET KEY
FOR 1 SECOND TO CLEAR
<SUB HDD DATA CLEAR>
Pages 55,56
<CFC DATA CLEAR>
PUSH WARNING RESET KEY
FOR 1 SECOND TO CLEAR
<CFC DATA CLEAR>
Pages 55,56
<PASSWORD SETTING>
<PASSWORD>
>>OPERATION CONTROL
HDD DATA CLEAR
FIRST
----
SECOND
----
2
----
----
3
----
----
>>1
REC/STOP + POWER button
PRESS WARNING RESET BUTTON
TO CLEAR PASSWORD
SHUTTLE>>:TO SET PASSWORD
<INITIALIZATION>
>>HDD SETTING
PARTITION SIZE
<PASSWORD>
PARTITION
10%
Pages 56-58
#1
Pages 56-58
<PASSWORD SETTING>
POWER OFF
INITIALIZATION
>>4
ALL DATA WILL BE ERASED
WHEN PROCEED INITIALIZATION
<INITIALIZATION>
<PASSWORD SETTING>
FIRST
----
SECOND
----
PRESS WARNING RESET BUTTON
TO CLEAR PASSWORD
SHUTTLE>>:TO SET PASSWORD
Pages 74,75
<PASSWORD SETTING>
Pages 56-58
<LANGUAGE SELECTION>
>>LANGUAGE
ENGLISH
JOG
:SELECT
SHUTTLE>>:EXECUTE
<LANGUAGE SELECTION>
Page 25
••••••••••••••••••••••••••••••••••••••••••••••••••••••••••••••••••••••••••••••••••••••••••••••••••••••••••••••••••••••••••••••••••••••••••••
30
ENGLISH
■ COPY MENU
MAIN MENU
<COPY>
>>DIRECTION
MAIN HDD}CFC
MODE
OVERWRITE
TRANSFER PERIOD
START•END
START
01-01-2004 00:00:00
END
01-01-2004 00:00:10
EXECUTE
<RESTORE>
>>DIRECTION
CFC}MAIN HDD
MODE
OVERWRITE
TRANSFER PERIOD
START•END
START
01-01-2004 00:00:00
END
01-01-2004 00:00:10
EXECUTE
<COPY>
Pages 72,73
<RESTORE>
Pages 72,73
■ SEARCH SELECTION MENU
SEARCH
SUB MENU (1)
MAIN MENU
<SEARCH SELECTION>
SEARCH TYPE
TIME DATE
>>SELECTION CAMERA NUMBER
ALL
<TIME DATE SEARCH>
>>01-01-2004
00:00:00
EXECUTE(FORWARD)
SEARCH
MAIN
---------- --:--:----------- --:--:-START
END
PUSH SEARCH KEY FOR
SEARCH SELECTION
<TIME DATE SEARCH>
>>INDEX
---------- --:--:----------- --:--:--
<SEARCH SELECTION>
Pages 24,25
<SEARCH SELECTION>
SEARCH TYPE
<INDEX SEARCH>
Page 67
INDEX
01
EXECUTE(FORWARD)
EXECUTE(REVERSE)
MAIN
START
---------- --:--:-END
---------- --:--:--
SEARCH
<INDEX SEARCH>
START
END
MAIN
---------- --:--:----------- --:--:--
<SEARCH SELECTION>
Pages 68,69
Page 67
<SEARCH SELECTION>
SEARCH TYPE
ALARM INDEX
>>SELECTION CAMERA NUMBER
ALL
<ALARM INDEX SEARCH>
01
EXECUTE(FORWARD)
EXECUTE(REVERSE)
MAIN
START
---------- --:--:-END
---------- --:--:--
SEARCH
PLAYBACK DEVICE
MAIN
MAIN
START
END
PUSH SEARCH KEY FOR
SEARCH SELECTION
<ALARM INDEX SEARCH>
>>PLAYBACK DEVICE
MAIN
PUSH SEARCH KEY FOR
SEARCH SELECTION
>>INDEX
PLAYBACK DEVICE
MAIN
MAIN
START
END
---------- --:--:----------- --:--:--
<SEARCH SELECTION>
Pages 68,69
<ALARM SKIP SEARCH>
Page 67
<SEARCH SELECTION>
SEARCH TYPE
ALARM SKIP
>>SELECTION CAMERA NUMBER
ALL
>>EXECUTE(FORWARD)
EXECUTE(REVERSE)
SEARCH
PLAYBACK DEVICE
MAIN
MAIN
START
END
PUSH SEARCH KEY FOR
SEARCH SELECTION
<ALARM SKIP SEARCH>
<ALARM
>>00004
00003
00002
00001
<SEARCH SELECTION>
Pages 69,70
LIST SEARCH>
01-01-2004 00:00:04
01-01-2004 00:00:03
01-01-2004 00:00:02
01-01-2004 00:00:01
2 1
EMR
1 1
EMR
---------- --:--:----------- --:--:--
SEARCH
Page 67
<SEARCH SELECTION>
SEARCH TYPE
ALARM LIST
>>SELECTION CAMERA NUMBER
ALL
DATE/TIME
- : :
PLAYBACK DEVICE
SUB
SUB
START
END
01-01-2004 00:00:00
01-01-2004 00:00:05
PUSH SEARCH KEY
<ALARM LIST SEARCH>
Pages 70,71
<SEARCH SELECTION>
Page 67
•••••••••••••••••••••••••••••••••••••••••••••••••••••••••••••••••••••••••••••••••••••••••••••••••••••••••••••••••••••••••••• Operations
31
<TIME DATE/DISPLAY SETTINGS>
■ TIME DATE ADJUST
See pages 20,21.
■ DISPLAY MODE
Display format of the date and current time can be set.
<TIME DATE/DISPLAY SETTINGS>
TIME DATE ADJUST
>>DISPLAY MODE
1
CLOCK LOCATION SETTING
CAMERA DISPLAY
NUMBER
CAMERA TITLE/MEMO SETTING
DUPLEX MODE DISPLAY
BOTTOM
2. Use the , , and buttons to move the time and date to
the desired display position and turn the SHUTTLE ring
clockwise.
• The setting is confirmed.
The date, the present time, etc. on a screen can be
moved to right and left and the upper and lower sides
by pushing , , and button.
The display can be moved continuously to the right
by turning the JOG dial clockwise, to the left by turning
it counterclockwise.
<MODE 1>
01-01-2004 00:00:00
Setting ( default : “1” )
“1” : Displays the date/month/year, current time.
“2” : Displays the date/month/year, day of week, current
time, playback interval (single screen playback only).
“3” : Displays the date/month/year, day of the week,
time, playback interval (single screen playback only),
HDD usage space (
see page 21) (during recording/
playback only if REMAIN HDD is set to MAIN, SUB),
and alarm recording number (during alarm recording/
playback).
“4” : No indication.
(When alarm signal is input, displays the date/month/
year, day of week, current time and alarm recording
number (during alarm recording/playback)).
“5” : No indication.
(When warning signal is input, displays warning message.)
“6” : No indication.
<MODE 1>
3. Turn the SHUTTLE ring counterclockwise or press the SET
UP button.
■ CAMERA DISPLAY
Setting can be made to display the title and memo set in
“CAMERA TITLE/MEMO SETTING”, camera number
only, etc.
<TIME DATE/DISPLAY SETTINGS>
TIME DATE ADJUST
DISPLAY MODE
1
CLOCK LOCATION SETTING
>>CAMERA DISPLAY
NUMBER
CAMERA TITLE/MEMO SETTING
DUPLEX MODE DISPLAY
BOTTOM
<MODE 1>
01-01-2004 00:00:00
Setting ( default : “NUMBER” )
“NUMBER” : Only the camera number is displayed.
“TITLE” : The title set in “CAMERA TITLE/MEMO SETTING” is displayed. The title can also be recorded along
with the video.
“COMMENT” : The comment inputted by RS-232C connection is displayed.
01-01-2004 00:00:00
“NONE” : No display.
<MODE 2>
01-01-2004 THU
00:00:00 12.5P
1. Press the SET UP button } <SETTINGS> } Select
“CAMERA DISPLAY” in the <TIME DATE/DISPLAY
SETTINGS> screen. Display the desired setting and confirm.
01-01-2004 THU
00:00:00 12.5P 99% A00001
2. Turn the SHUTTLE ring counterclockwise or press the SET
UP button.
<MODE 3>
1. Press the SET UP button } <SETTINGS> } Select
“DISPLAY MODE” in the <TIME DATE/DISPLAY SETTINGS>
screen. Display the desired setting and confirm.
2. Turn the SHUTTLE ring counterclockwise or press the SET
UP button.
■ CAMERA TITLE/MEMO SETTING
Titles can be set individually to each connected camera.
When selecting “TITLE” in “CAMERA DISPLAY”, the title,
such as the location of the camera, will appear on the
screen for an easy-to-understand monitoring system.
■ CLOCK LOCATION SETTING
The display positions of the date, current time, camera
number and title can be set.
1. Press the SET UP button } <SETTINGS> } Select “CLOCK
LOCATION SETTING” in the <TIME DATE/DISPLAY
SETTINGS> screen and turn the SHUTTLE ring clockwise.
• The <CLOCK LOCATION SETTING> screen appears.
••••••••••••••••••••••••••••••••
• 01-01-2004 00:00:00 ••••••••••
••••••••••••••••••••••••••••••••
••••••••••••••••••••••••••••••••
••••••••••••••••••••••••••••••••
The maximum number of characters for the title is
16. The number of characters displayed on the screen
all 16 for single screen, first 10 for SPLIT4, first 6 for
SPLIT9.
Example : When setting titles of “ENTRANCE” and
“COUNTER” to camera number “ 1 ” and “ 4 ”, respectively, and setting memo of “BANK”.
••••••••••••••••••••••••••••••••••••••••••••••••••••••••••••••••••••••••••••••••••••••••••••••••••••••••••••••••••••••••••••••••••••••••••••
32
• The <CAMERA TITLE/MEMO SETTING> screen appears.
<CAMERA TITLE/MEMO SETTING>
<CAMERA TITLE/MEMO SETTING>
>> 1
••••••••••••••••
2
••••••••••••••••
3
••••••••••••••••
4
••••••••••••••••
5
••••••••••••••••
6
••••••••••••••••
7
••••••••••••••••
8
••••••••••••••••
9
••••••••••••••••
MEMO
••••••••••••••••
SHUTTLE>>:CHARACTERS
2. Turn the JOG dial to select camera number “ 1 ” and turn
the SHUTTLE ring clockwise.
• The <CHARACTERS> screen appears and the character on
the very left of the string is displayed in reversed color.
<CHARACTERS>
••••••••••••••••
! " # $%& ' ( ) + , -. / : ; < = >?@•••••••
0123456789••••••••••••••••••••
ABCDEFGHIJKLMNOPQRSTUVWXYZ••••
abcde f gh i j k l mnopqrs t uvwxyz••••
´
ÀÁÂÃÄÅÆÇÈÉÊËÌÍÎÏDÑÒÓÔÕÖXØÙÚÛÜY
ß••••••••••••••••••••••••••••
´ˆ˜
àaaaäåæçèeêëìÍîï
ñòoôoö÷øùuûüy
´ ´
´ ˜
´
pÿ••••••••••••••••••••••••••••
SHUTTLE<<:BACK
7. When completed with input, turn the SHUTTLE ring
counterclockwise.
ENGLISH
1. Press the SET UP button } <SETTINGS> } Select
“CAMERA TITLE/MEMO SETTING” in the <TIME DATE/
DISPLAY SETTINGS> screen and turn the SHUTTLE ring
clockwise.
• The display returns to the <CAMERA TITLE/MEMO
SETTING> screen.
8. Repeat steps 2 ~ 6 to input “COUNTER” in the camera
number “ 4 ”.
Example
<CAMERA TITLE/MEMO SETTING>
<CAMERA TITLE/MEMO SETTING>
ENTRANCE
1
••••••••••••••••
2
••••••••••••••••
3
>> 4
COUNTER
••••••••••••••••
5
6
••••••••••••••••
••••••••••••••••
7
••••••••••••••••
8
••••••••••••••••
9
MEMO
••••••••••••••••
SHUTTLE>>:CHARACTERS
9. When completed with input, turn the SHUTTLE ring
counterclockwise.
• The display returns to the <CAMERA TITLE/MEMO
SETTING> screen.
10. Repeat steps 2 ~ 7 to input “BANK” in MEMO.
11. Turn the SHUTTLE ring counterclockwise or press the SET
UP button.
Example <SPLIT9 SCREEN>
03-03-2004 21:25:40
3. Turn the SHUTTLE ring clockwise.
• The very left character “_” (space) on the bottom row of the
available characters turns red and flashes.
<CHARACTERS>
••••••••••••••••
! " # $%& ' ( ) + , -. / : ; < = >?@•••••••
0123456789••••••••••••••••••••
ABCDEFGHIJKLMNOPQRSTUVWXYZ••••
abcde f gh i j k l mnopqrs t uvwxyz••••
´
ÀÁÂÃÄÅÆÇÈÉÊËÌÍÎÏDÑÒÓÔÕÖXØÙÚÛÜY
ß••••••••••••••••••••••••••••
´ˆ˜
àaaaäåæçèeêëìÍîï
ñòoôoö÷øùuûüy
´ ´
´ ˜
´
pÿ••••••••••••••••••••••••••••
:SELECT,SHUTTLE>>:CONFIRM
4. Use the , , and buttons and the JOG dial to select
“E” and turn the SHUTTLE ring clockwise.
ENTRAN
COUNTE
Example <MEMO SETTING>
<SETTINGS>
>>TIME DATE/DISPLAY SETTINGS
MPX DISPLAY SETTINGS
MOTION DETECTION SETTINGS
RECORD SETTINGS
TIMER PROGRAM SETTINGS
INITIAL SET UP/INFORMATION
• “E” appears in reversed color on the very left of the string.
QUICK SETTINGS
The JOG dial can be turned to continuously move
the cursor horizontally.
MEMO:
BANK
5. Turn the JOG dial clockwise to reverse display the character
on the right.
6. Repeat steps 3 ~ 5 to input “ENTRANCE” in the string.
To erase an inputted character, move the cursor to the
very left character “_” (space), turn the SHUTTLE ring
clockwise and confirm.
To change a character inputted in error :
1. While one of the characters in the string is displayed
in reversed color, turn the JOG dial to reverse display
the character to change.
2. Perform steps 3 and 4.
•••••••••••••••••••••••••••••••••••••••••••••••••••••••••••••••••••••••••••••••••••••••••••••••••••••••••••••••••••••••••••• Operations
33
<TIME DATE/DISPLAY SETTINGS> (continued)
■ DUPLEX MODE DISPLAY
Operation conditions such as PLAYBACK, COPY, REC
and ALARM REC (ALARM is displayed in red during
emergency recording), etc., can be displayed on the upper or lower portions of the screen.
<TIME DATE/DISPLAY SETTINGS>
TIME DATE ADJUST
DISPLAY MODE
1
CLOCK LOCATION SETTING
CAMERA DISPLAY
NUMBER
CAMERA TITLE/MEMO SETTING
>>DUPLEX MODE DISPLAY
BOTTOM
<MODE 1>
01-01-2004 00:00:00
Setting ( default : “BOTTOM” )
“BOTTOM” : The operation condition is displayed on
the bottom of the screen.
“NONE” : The operation condition is not displayed.
“TOP” : The operation condition is displayed on the top
of the screen.
1. Press the SET UP button } <SETTINGS> } Select
“DUPLEX MODE DISPLAY” in the <TIME DATE/DISPLAY
SETTINGS> screen. Display the desired setting and confirm.
2. Turn the SHUTTLE ring counterclockwise or press the SET
UP button.
••••••••••••••••••••••••••••••••••••••••••••••••••••••••••••••••••••••••••••••••••••••••••••••••••••••••••••••••••••••••••••••••••••••••••••
34
<MPX DISPLAY SETTINGS>
■ Multiplexer function related button
operations/operation table
♦ Camera number button operations
When pressing a camera number button, the video of the camera connected to that camera number terminal is displayed
using a single screen. Even during split/sequential screen display, video from any camera can be displayed using a single
screen by pressing the respective camera number button.
The magnification display function can only be
set when in the single screen mode. The screen can
be moved vertically and horizontally with the magnification centre point (X) as the axis by pressing the
MOVE buttons.
ENGLISH
The multiplexer function of this unit allows the connected
camera video to be displayed using SPLIT4 screen and
SPLIT9 screens. It is also possible to set the order of the
camera number displayed. Basic operations of the multiplexer can also be found on
see page 19.
1. Press the ZOOM button during single screen display.
• “X1” appears on the top left the single screen display and
the magnification centre point (X) appears at the centre of
the screen.
X1
X
♦ SPLIT/SEQUENCE button operations
By pressing the SPLIT/SEQUENCE button, the display
modes shown below set in each split screen setting of the
multiplexer setting can be displayed in order.
Available modes
“SPLIT9”, “SPLIT4(a)”, “SPLIT4(b)”, “SPLIT4(c)”,
“SPLIT4 sequential”, “Single screen sequential”.
During playback, the underlined displayed modes
and single screen can be selected.
2. To shift the screen vertically or horizontally, press the , ,
and buttons.
The position of the magnification centre point is
stored even when the display screen is switched or
the power is turned off. This is convenient when the
point to magnify is determined in advance.
3. Press the ZOOM button.
The split screen setting can be set using “SPLIT4
SCREEN SETTING” and “SPLIT9 SCREEN SETTING” in the <OUTPUT A> screen and <OUTPUT
B> screen respectively.
• Pressing the button each time switches the magnification
in order of X2(200%), X4(400%), normal and X1(100%).
X2
The update speed of camera video becomes
slower as the quantity of camera increases. Also,
when performing live communication by LAN via
Ethernet, the update speed may decrease.
To return the screen to single screen display
Pressing a camera number button (1 ~ 9) cancels the split/
sequential display and returns to the single screen display
of the pressed camera number button. Pressing the SPLIT/
SEQUENCE button again returns the screen to the split/
sequential display previous to cancelling.
When a menu screen is displayed, the single
screen display will not appear even when pressing a
camera number button (1 ~ 9). In this case, clear the
menu screen and then press a camera number button (1 ~ 9).
♦ ZOOM button operations
By pressing the ZOOM button in single screen display, the
displayed video can be viewed at 100%, 200% or 400%
magnification.
If the OUTPUT B indicator is turned off in the
screen of OUTPUT A, the ZOOM button will function.
The ZOOM button dose not function when the
OUTPUT B indicator illuminates by pressing the
OUTPUT B button.
X4
The magnification function can also be used during playback of recorded contents.
INFORMATION
A black screen may appear when pausing recorded
video of multiple cameras in the single screen display mode and magnifying. In this case, display the
magnified screen by turning the JOG dial and forwarding a frame.
INFORMATION
The magnification display function of this unit uses
digital magnification and screen details may appear
pixelized when magnifying.
•••••••••••••••••••••••••••••••••••••••••••••••••••••••••••••••••••••••••••••••••••••••••••••••••••••••••••••••••••••••••••• Operations
35
<MPX DISPLAY SETTINGS> (continued)
■ The function of the SPLIT/SEQUENCE button, ZOOM button, and camera number buttons
The screen of cameras with no video input signal will appear blue. Furthermore, the screen of cameras set to
“OFF” for COVERT CAMERA SETTING will appear black (
see page 76).
Display
SPLIT9
SPLIT4 (a)
SPLIT4 (b)
SPLIT4 (c)
SPLIT/
SEQUENCE
button
ZOOM
button
OFF
ZOOM
SPLIT/
SEQUENCE
OFF
OFF
ZOOM
SPLIT/
SEQUENCE
OFF
Iluminating
ZOOM
SPLIT4 Sequential
SPLIT4 sequential screen
can be switched.
SPLIT/
SEQUENCE
OFF
Iluminating
ZOOM
Illuminating/Off of Camera number buttons
The video of camera number selected in <OUTPUT A>
(<OUTPUT B>) } <SPLIT9 SCREEN SETTING> screen
is displayed using SPLIT9 display.
During video display, the corresponding camera number
button lights.
The video of camera number selected in <OUTPUT A>
(<OUTPUT B>) } <SPLIT4 SCREEN SETTING> screen
is displayed using SPLIT4 display.
During video display, the corresponding camera number
button lights.
The SPLIT4 screen video set in <OUTPUT A>
(<OUTPUT B>) } <SEQUENCE SETTING> screen is
displayed and updated in order by the set switching time.
During video display, the corresponding camera number
button lights.
Page
37,38
37
38
Single screen Seqential
Single screen sequential
can be switched.
Not
enlarged
Single
screen
SPLIT/
SEQUENCE
OFF
OFF
ZOOM
SPLIT/
SEQUENCE
OFF
OFF
ZOOM
Enlarged
SPLIT/
SEQUENCE
During Alarm recording and Motion
detection recording
*If the Alarm signal is
input during
SPLIT/ SEQUENCE
mode.
Iluminating
The single screen video set in <OUTPUT A>
(<OUTPUT B>) } <SEQUENCE SETTING> screen is
displayed and updated in order by the set switching time.
During video display, the corresponding camera number
button lights.
Camera number button which has display is
illuminating.
Camera number buttons which has been activated as
100%, 200% or 400% will be illuminated.
Not available the magnification function when the
OUTPUT B indicator illuminates.
Regardless of SPLIT9, SPLIT4 or Single screen,
camera number buttons which are activated via
the Alarm recording start flashing.
38
35
35
-
••••••••••••••••••••••••••••••••••••••••••••••••••••••••••••••••••••••••••••••••••••••••••••••••••••••••••••••••••••••••••••••••••••••••••••
36
With this unit, the multiplexer settings for the <OUTPUT
A> screen for the monitor video connected to the OUTPUT
A terminal and the analog output terminal and the
multiplexer settings for the <OUTPUT B> screen for liveonly monitor video connected to the OUTPUT B terminal
can be set individually.
<MPX DISPLAY SETTINGS>
>>OUTPUT A
OUTPUT B ON/OFF
OUTPUT B
ENGLISH
■ MPX DISPLAY SETTINGS
<SPLIT4 SCREEN SETTING>
>>SPLIT4(a)
( 1 ) ( 2)
( 3)
( 4)
SPLIT4(b)
( 5) ( 6 )
( 7)
(8)
SPLIT4(c)
(9) ( 1)
(2)
(3)
OFF
3. Turn the JOG dial to select the split display to set (a, b or c)
and turn the SHUTTLE ring clockwise.
• The (most upper left) camera number reverses in color.
<OUTPUT A>
>>SPLIT4 SCREEN SETTING
SPLIT9 SCREEN SETTING
SEQUENCE SETTING
INTERLACE
4. Turn the JOG dial to move to the camera number with the
reversed display and turn the SHUTTLE ring clockwise.
ON
• The background of the camera number turns red and
flashes.
5. Turn the JOG dial to display the camera number to set and
turn the SHUTTLE ring clockwise.
<OUTPUT B>
>>SPLIT4 SCREEN SETTING
SPLIT9 SCREEN SETTING
SEQUENCE SETTING
INTERLACE
SAME AS OUTPUT A
• Flashing stops.
ON
Select “ON” in the “OUTPUT B ON/OFF” to display the live monitor video of OUTPUT B on the
screen. When the setting is kept “OFF” in the “OUTPUT B ON/OFF”, the live monitor video of OUTPUT
B is not displayed.
When set the multiplexer setting of the <OUTPUT B> screen the same as the setting of the <OUTPUT A> screen, turn the JOG dial to move the cursor to “SAME AS OUTPUT A” on the <OUTPUT B>
screen and turn the SHUTTLE ring clockwise.
When the ZOOM button is kept pressed for at
least 1 sec, the operation of the camera No. button
and the SPLIT/SEQUENCE button is switched to
the operation for OUTPUT A (monitor video
connected to the OUTPUT A terminal and the analog
output terminal) and OUTPUT B (monitor video
connected to the OUTPUT B terminal).
■ SPLIT4 SCREEN SETTING
For the SPLIT4 SCREEN SETTING, 3 types of SPLIT4
screen types (a, b and c) can be set.
1. Press the SET UP button } <SETTINGS> } Select
“OUTPUT A” (“OUTPUT B”) in the <MPX DISPLAY
SETTINGS> screen and turn the SHUTTLE ring clockwise.
• The <OUTPUT A> (<OUTPUT B>) screen appears.
2. Turn the JOG dial to select “SPLIT4 SCREEN SETTING”
and turn the SHUTTLE ring clockwise.
• The <SPLIT4 SCREEN SETTING> screen appears.
The same camera number can be set multiple
times on the split screen display. When multiple settings with the same camera number have been
made, the playback image is displayed at the camera location with the lowest number.
6. Repeat steps 4 and 5 to set the desired camera number.
7. When completed with setting, turn the SHUTTLE ring
counterclockwise.
• Setting is confirmed and the cursor appears.
8. To set other split screen displays, repeat steps 3 ~ 7.
9. When completed with all settings, turn the SHUTTLE ring
counterclockwise or press the SET UP button.
The <SPLIT4 SCREEN SETTING> screen cannot be exited when camera number is flashing.
■ SPLIT9 SCREEN SETTING
For the SPLIT9 SCREEN SETTING, SPLIT9 screen can
be set.
1. Press the SET UP button } <SETTINGS> } Select
“OUTPUT A” (“OUTPUT B”) in the <MPX DISPLAY
SETTINGS> screen and turn the SHUTTLE ring clockwise.
• The <OUTPUT A> (<OUTPUT B>) screen appears.
2. Turn the JOG dial to select “SPLIT9 SCREEN SETTING”
and turn the SHUTTLE ring clockwise.
• The <SPLIT9 SCREEN SETTING> screen appears.
<SPLIT9 SCREEN SETTING>
>>SPLIT9
( 1 ) ( 2 ) ( 3)
( 4) ( 5 ) ( 6)
( 7 ) ( 8 ) ( 9)
3. Turn the SHUTTLE ring clockwise.
• The (most upper left) camera number reverses in color.
4. Turn the JOG dial to move to the camera number with the
reversed display and turn the SHUTTLE ring clockwise.
• The background of the camera number turns red and
flashes.
•••••••••••••••••••••••••••••••••••••••••••••••••••••••••••••••••••••••••••••••••••••••••••••••••••••••••••••••••••••••••••• Operations
37
<MPX DISPLAY SETTINGS> (continued)
5. Turn the JOG dial to display the camera number to set and
turn the SHUTTLE ring clockwise.
• Flashing stops.
The same camera number can be set multiple
times on the split screen display. When multiple settings with the same camera number have been
made, the playback image is displayed at the camera location with the lowest number.
6. Repeat steps 4 and 5 to set the desired camera number.
7. When completed with setting, turn the SHUTTLE ring
counterclockwise.
• Setting is confirmed and the cursor appears.
6. Display the desired time and turn the SHUTTLE ring
clockwise.
• The setting is confirmed and flashing stops.
• The time can be set at 1 second intervals (max. 30 seconds).
7. Turn the SHUTTLE ring counterclockwise.
• The cursor appears to sequence number on the left.
8. Repeat steps 3 ~ 7 to set other display orders of camera
number and time.
9. (When setting switching for SPLIT4 sequential display • • • )
Select “SPLIT4” and turn the SHUTTLE ring clockwise twice.
• The setting reverses in color when the SHUTTLE ring is
turned the first time. When the ring is turned for the second
time, the background turns red and flashes.
9. Turn the SHUTTLE ring counterclockwise or press the SET
UP button.
10. Display the desired item to set and turn the SHUTTLE
ring clockwise.
The <SPLIT9 SCREEN SETTING> screen cannot be exited when camera number is flashing.
• The setting is confirmed.
• Setting of “SPLIT4” ( default : SPLIT4 “abc” )
“abc” : SPLIT4(a), (b) and (c) are displayed using sequence
display.
■ SEQUENCE SETTING
The display order of connected camera video can be
switched automatically or the switching time can be set.
Furthermore, the 3 types of split screen displays set in
“SPLIT4 SCREEN SETTING”, “SPLIT9 SCREEN
SETTING” can be switched automatically or the same camera can be displayed repeatedly.
1. Press the SET UP button } <SETTINGS> } Select
“OUTPUT A” (“OUTPUT B) in the <MPX DISPLAY SETTINGS>
screen and turn the SHUTTLE ring clockwise.
• The <OUTPUT A> (<OUTPUT B>) screen appears.
“ab” : SPLIT4(a) and (b) are displayed using sequence
display.
“a” : SPLIT4(a) is displayed using sequence display.
11. Turn the JOG dial clockwise to shift the reversed display
to “TIME” and turn the SHUTTLE ring clockwise.
• The background of the “TIME” setting turns red and flashes.
12. Display the desired time and turn the SHUTTLE ring
clockwise.
• The setting is confirmed and flashing stops.
13. Turn the SHUTTLE ring counterclockwise.
• The cursor appears to “SPLIT4” on the left.
2. Turn the JOG dial to select } “SEQUENCE SETTING” and
turn the SHUTTLE ring clockwise.
• The <SEQUENCE SETTING> screen appears.
<SEQUENCE SETTING>
<SEQUENCE SETTING>
SEQUENCE NUMBER TIME
>>1
2S
1
2
2S
2
3
3
2S
4
2S
4
5
2S
5
6
2S
6
7
2S
7
8
2S
8
9
2S
9
SPLIT4
abc
2S
3. Select the desired display order ( 1 ~ 9 ) and turn the
SHUTTLE ring clockwise twice.
• The camera number display reverses in color when the
SHUTTLE ring is turned the first time. When the ring is turned
for the second time, the background turns red and flashes.
• Setting
“ 1 ”, “ 2 ”, “ 3 ”, “ 4 ”, “ 5 ”, “ 6 ”, “ 7 ”, “ 8 ”,
“ 9 ”, “ - ”
“ - ” : No display.
4. Display the desired camera number to display and turn the
SHUTTLE ring clockwise.
14. When completed with all settings, turn the SHUTTLE ring
counterclockwise or press the SET UP button.
■ INTERLACE
The picture quality when splitting the screen of
camera video can be set.
<OUTPUT A>
SPLIT4 SCREEN SETTING
SPLIT9 SCREEN SETTING
SEQUENCE SETTING
>>INTERLACE
ON
Setting ( default : “ON” )
“ON” : Video is displayed in detail.
“OFF” : Screen flickering is reduced.
Although screen flickering of video during SPLIT4
and SPLIT9 screen display can be reduced when
setting “INTERLACE” to “OFF”, the vertical resolution will drop.
1. Press the SET UP button } <SETTINGS> } Select
“OUTPUT A”(“OUTPUT B”) in the <MPX DISPLAY
SETTINGS> screen and turn the SHUTTLE ring clockwise.
• The <OUTPUT A> (<OUTPUT B>) screen appears.
• The setting is confirmed.
5. Turn the JOG dial clockwise to shift the reversed display to
“TIME” and turn the SHUTTLE ring clockwise.
• The background of the “TIME” setting turns red and flashes.
2. Turn the JOG dial to select “INTERLACE” and display the
desired setting and confirm.
3. Turn the SHUTTLE ring counterclockwise or press the SET
UP button.
••••••••••••••••••••••••••••••••••••••••••••••••••••••••••••••••••••••••••••••••••••••••••••••••••••••••••••••••••••••••••••••••••••••••••••
38
<MOTION DETECTION SETTINGS>
■ SELECTION CAMERA NUMBER
The camera for motion detection setting is selected. Since
settings can be made for each camera, more detailed settings are possible.
<MOTION DETECTION SETTINGS>
>>SELECTION CAMERA NUMBER
1
DETECTION MASK SETTING
SENSITIVITY
HIGH••<<<LOW
MOTION THRESHOLD
5
TEST MODE
Setting ( default : “ 1 ” )
“ 1 ”, “ 2 ”, “ 3 ”, “ 4 ”, “ 5 ”, “ 6 ”, “ 7 ”, “ 8 ”,
“ 9 ”
When selecting the <MOTION DETECTION
SETTINGS> screen during single screen display of
any specified camera number, that camera will be
displayed as the initial value of “SELECTION CAMERA NUMBER”.
1. Press the SET UP button } <SETTINGS> } Select
“SELECTION CAMERA NUMBER” in the <MOTION
DETECTION SETTINGS> screen. Display the desired setting
and confirm.
Confirm the “SELECTION CAMERA NUMBER”
setting to switch the background to the video of the
selected camera number.
2. Turn the SHUTTLE ring counterclockwise or press the SET
UP button.
The motion detection function will not operate
when the <MOTION DETECTION SETTINGS>
screen is displayed.
■ DETECTION MASK SETTING
The area to activate motion detection is set here. Any of
the 192 dotted detection areas displayed by splitting individually loaded video to equal 16 X 12 pixel sizes can be
selected and set.
Definition of setting mark ( default : all areas “ & ” (active) )
“ & ” : Area activated with motion detection.
“ • ” : Area inactivated with motion detection.
It is possible to set various areas per camera.
Example of screen setting
For the video loaded from the camera set in “SELECTION
CAMERA NUMBER” :
• Display “ & ” for the right half of the screen to activate
motion detection.
• Display “ • ” for the left half of the screen to inactivate
motion detection.
ENGLISH
In this menu, the conditions of the motion detection function for normal recording and alarm recording, which is
started when detecting motion within the video of the connected camera, are set.
1. In “SELECTION CAMERA NUMBER , select the camera
for setting the detection area.
2. Select “DETECTION MASK SETTING” and turn the
SHUTTLE ring clockwise.
• The dotted screen with detection areas is displayed and the
background of the most upper left dot turns red and flashes.
&
&
&
&
&
&
&
&
&
&
&
&
&
&
&
&
&
&
&
&
&
&
&
&
& & & & & & & & & &
& & & & & & & & & &
& & & & & & & & & &
& & & & & & & & & &
& & & & & & & & & &
& & & & & & & & & &
& & & & & & & & & &
& & & & & & & & & &
& & & & & & & & & &
& & & & & & & & & &
& & & & & & & & & &
& & & & & & & & & &
& & & &
& & & &
& & & &
& & & &
& & & &
& & & &
& & & &
& & & &
& & & &
& & & &
& & & &
& & & &
3. Use the , , and buttons to select the dot to activate/
inactivate and press the camera number button 8 .
• The “ & ” (active) setting changes to “ • ” (inactive) setting.
•
&
&
&
&
&
&
&
&
&
&
&
&
&
&
&
&
&
&
&
&
&
&
&
& & & & & & & & & &
& & & & & & & & & &
& & & & & & & & & &
& & & & & & & & & &
& & & & & & & & & &
& & & & & & & & & &
& & & & & & & & & &
& & & & & & & & & &
& & & & & & & & & &
& & & & & & & & & &
& & & & & & & & & &
& & & & & & & & & &
& & & &
& & & &
& & & &
& & & &
& & & &
& & & &
& & & &
& & & &
& & & &
& & & &
& & & &
& & & &
When pressing the SPLIT/SEQUENCE button,
all dots change to “ & ” (active). When pressing the
ZOOM button, all dots change to “ • ” (inactive).
When pressing the camera number 8 button,
dot change to “ • ” (inactive). When pressing the
camera number 9 button, dot change to “ & ”
(active).
4. Repeat step 3 to activate/inactivate all desired dots.
•
•
•
•
•
•
•
•
•
•
•
•
•
•
•
•
•
•
•
•
•
•
•
•
• • • • • • & & & &
• • • • • • & & & &
• • • • • • & & & &
• • • • • • & & & &
• • • • • • & & & &
• • • • • • & & & &
• • • • • • & & & &
• • • • • • & & & &
• • • • • • & & & &
• • • • • • & & & &
• • • • • • & & & &
• • • • • • & & & &
& & & &
& & & &
& & & &
& & & &
& & & &
& & & &
& & & &
& & & &
& & & &
& & & &
& & & &
& & & &
5. Turn the SHUTTLE ring counterclockwise.
• The setting is confirmed and the display returns to the
<MOTION DETECTION SETTINGS> screen.
During set detection mask setting, other settings
are not accepted. To exit the menu screen during
setting, turn the SHUTTLE ring counterclockwise.
•••••••••••••••••••••••••••••••••••••••••••••••••••••••••••••••••••••••••••••••••••••••••••••••••••••••••••••••••••••••••••• Operations
39
<MOTION DETECTION SETTINGS> (continued)
■ SENSITIVITY
■ TEST MODE
The sensitivity of detection for changes in the loaded video
data is set. The sensitivity setting is divided into the 5 levels of brightness.
The set motion detection operation is tested here.
<MOTION DETECTION SETTINGS>
SELECTION CAMERA NUMBER
1
DETECTION MASK SETTING
>>SENSITIVITY
HIGH••<<<LOW
MOTION THRESHOLD
5
TEST MODE
•
•
•
•
•
•
•
•
•
•
•
•
•
•
•
•
•
•
•
•
•
•
•
•
• • • • • • • • • •
• • • • • • • • • •
• • • • • • • • • •
• • • • • • • • • •
• • • • • • • • • •
• • • • • • • • • •
• • • • • • • • • •
• • • • • • • • • •
• • • • • • • • • •
• • • • • • • • • •
• • • • • • • • • •
• • • • • • • • • •
• • • •
• • • •
• • • •
• • • •
• • • •
• • • •
• • • •
• • • •
• • • •
• • • •
• • • •
• • • •
1. In “SELECTION CAMERA NUMBER” (
select the camera to test operates.
Setting ( default : “HIGH • • < < < LOW” )
“HIGH • • • • < LOW”, “HIGH • • • < < LOW”,
“HIGH • • < < < LOW”, “HIGH • < < < < LOW”,
“HIGH < < < < < LOW”
Sensitivity increases as “<” increases from
“HIGH • • • • < LOW” to “HIGH < < < < < LOW”.
To detect the slightest changes, set to
“HIGH < < < < < LOW”. However, detection may
not operate properly due to flickering of fluorescent
lighting, etc.
1. Select the camera to set the sensitivity in “SELECTION
CAMERA NUMBER” (
see page 39).
2. Display the desired setting in “SENSITIVITY” and turn the
SHUTTLE ring clockwise.
• The setting is confirmed.
■ MOTION THRESHOLD
The minimum number of dots for starting the motion detection operation from the number of active dots within the
detection area is set here. Motion detection operates when
change that exceeds the number of minimum dot set is
detected.
<MOTION DETECTION SETTINGS>
SELECTION CAMERA NUMBER
1
DETECTION MASK SETTING
SENSITIVITY
HIGH••<<<LOW
>>MOTION THRESHOLD
5
TEST MODE
see page 39),
2. Select “TEST MODE” and turn the SHUTTLE ring
clockwise.
• The operation test begins.
3. To end “TEST MODE”, turn the SHUTTLE ring counterclockwise.
• During test operation, active areas of motion detection are
displayed using “ • ”. The screen displays “ & ” when motion
that meets the each condition of sensitivity and number of
dots for recording start is detected. If the motion detection
does not operate properly, set the conditions again.
• The red “ & ” display may be overdue to an actual motion.
Cautionary items concerning motion detection
• If changes are detected repeatedly, alarm recording
is also started repeatedly. Thus functions such as setting change, etc., will not be accepted. In this case,
press the ALARM INTERRUPT button to forcibly stop
the motion detection function for a period of 5 minutes.
During, this time, settings can be changed. This manual
stop is automatically restored after 5 minutes and the
history of the manual stop is left in the history of the
WARNING LOG LIST. To cancel the alarm interrupt,
press the ALARM INTERRUPT button again.
• Even if the motion detection setting is active ALARM
IN terminal on the rear is constantly given priority over
the others.
• The M-DET indicator lights when the motion detection
function is in operation.
• When the SENSITIVITY is set too high, sometimes it
can cause the incorrect detection. Please watch out for
erroneous operation in case of connection to a system
with signaling using the motion detection of this unit.
Setting ( default : “5” )
“ 1 ” , “ 2 ”, • • ,“ 5 ”, • • • ,“191”, “192”
For MOTION THRESHOLD, set the number of
active dots in the detection area as the upper limit.
The motion detection function will not operate when
setting a value that exceeds this number.
• To perform alarm recording with the motion detection
function, set “TRIGGER” in the <ALARM SETTING>
screen to MD, MD/EXT or MD&EXT, set the “MOTION
DET REC” in the <RECORD SETTING> screen to
“ALARM” and set the recording intervals of “A-PPS” of
desired camera for alarm recording in the <RECORD
SETTING> screen.
1. Select the camera to set the motion threshold in
“SELECTION CAMERA NUMBER” (
see page 39).
• Motion detection will not operate while making settings in the <MOTION DETECTION SETTINGS>.
2. Display the desired setting in “MOTION THRESHOLD” and
turn the SHUTTLE ring clockwise.
• The setting is confirmed.
••••••••••••••••••••••••••••••••••••••••••••••••••••••••••••••••••••••••••••••••••••••••••••••••••••••••••••••••••••••••••••••••••••••••••••
40
<RECORD SETTINGS>
This unit allows independent settings for normal recording
and alarm recording. By this, more detailed settings are
possible such as changing the recording intervals of the
camera inputting the alarm signals while maintaining the
normal recording settings as they are.
Certain settings and mode changes are limited
during Alarm recording. Pressing the ALARM INTERRUPT button halts additional alarm inputs, and lifts
the limitations by stopping recording.
During recording, the setting in the <RECORD
SETTING> screen cannot be changed.
When the cameras for recording are not input
video signal, warning display of “NO SIGNAL” apsee “Warnings and CALL
pears (for details,
OUT output” pages 87,88).
■ Recording mode settings for normal
recording and alarm recording
Setting of the camera number for alarm recording and
emergency recording, the TRIGGER for alarm recording,
the recording intervals and recording picture quality for normal recording and alarm recording and whether to perform
pre-alarm recording for alarm recording can be set here
(for normal recording,
see “Basic manual recording”
pages 21-23). Pre-alarm recording is a function to start recording before the ALARM IN terminal on the rear of the
unit is grounded or motion is detected (for details concerning pre-alarm recording,
see page 64).
<RECORD SETTINGS>
>>ALARM SETTING
RECORD SETTING
ALARM REC DURATION
PRE ALARM REC
( S
MOTION DET REC
• Setting ( default : “ALARM CH” )
“ALARM CH” : Alarm recording is performed for only the
cameras set for alarm recording and inputted with alarm
signals. When there is input of alarm signals from multiple
cameras, alarm recording is performed for all cameras
containing alarm signals.
ENGLISH
■ Settings concerning normal recording and
alarm recording
“ALARM PLUS” : Recording is performed in the frame speed
set in “A-PPS” for the camera inputted with alarm signals
during normal recording. All other cameras will be recording
in the normal frame intervals.
“ALARM25” : Recording is performed so that normal
recording and alarm recording each are up to max. 25 frames.
With playback of a recording where an alarm recording has
occurred during normal recording, there will be no recording
interval display.
3. Display the desired item to set and turn the SHUTTLE ring
clockwise.
• The setting is confirmed and flashing stops.
4. (When setting “RECORD CAMERA” (the alarm recording
camera) and “TRIGGER” • • • )
Turn the JOG dial to select the desired “ALARM” (alarm sensor
input number) and turn the SHUTTLE ring clockwise.
• The first item from the left side in the “RECORD CAMERA”
setting display reverses in color.
• The camera numbers are lined in order of the number from
“ 1 ” to “ 9 ”. Multiple camera numbers can be selected for
one alarm camera channel number.
When turn the JOG dial counterclockwise, the camera number setting or the TRIGGER setting will reverses in color in order such as 1 , EXT, 9 , 8 • • • .
5. Turn the JOG dial to display the desired camera number
reversed in color and turn the SHUTTLE ring clockwise.
• The background of setting turns red and flashes.
While the setting is flashing, the setting screen cannot be exited even when pressing the SET UP button.
)
5S
S
ALARM
6. Turn the JOG dial to display the desired setting and turn the
SHUTTLE ring clockwise.
• The setting is confirmed and flashing stops.
1. Press the SET UP button } <SETTINGS> } Select “ALARM
SETTING” in the <RECORD SETTINGS> screen and turn the
SHUTTLE ring clockwise.
• The <ALARM SETTING> screen appears.
<ALARM SETTING>
Camera selection during alarm recording
<ALARM SETTING>
>>ALARM CH
ALARM RECORD CAMERA
TRIGGER
1
EXT
1 -------2
- 2 ------EXT
3
-- 3 -----EXT
4
--- 4 ----EXT
5
---- 5 ---EXT
6
----- 6 --EXT
7
------ 7 -EXT
8
------- 8 EXT
9
-------- 9
EXT
12 345 6789
EMR
2. (When setting the camera selection during alarm recording
•••)
Turn the JOG dial and move the cursor to camera selection
item for alarm recording and turn the SHUTTLE ring clockwise.
Two or more camera numbers can be chosen to
one sensor input.
7. Turn the JOG dial clockwise to display “TRIGGER” setting
reversed in color and turn the SHUTTLE ring clockwise.
• The background of setting turns red and flashes.
8. Turn the JOG dial to display the desired setting and turn the
SHUTTLE ring clockwise.
• The setting is confirmed and flashing stops.
• Setting of “TRIGGER” ( default : “EXT” )
“EXT” : Alarm recording can only be started when the ALARM
IN terminal is grounded.
“MD&EXT” : Alarm recording can be started when the ALARM
IN terminal is grounded and the motion is detected
simultaneously.
“MD/EXT” : When the ALARM IN terminal is grounded or
motion is detected alarm recording is started.
“MD” : Alarm recording can only be started when the motion
is detected.
• The background of setting turns red and flashes.
•••••••••••••••••••••••••••••••••••••••••••••••••••••••••••••••••••••••••••••••••••••••••••••••••••••••••••••••••••••••••••• Operations
41
<RECORD SETTINGS> (continued)
9. (When setting the emergency recording camera • • • )
Turn the JOG dial and move the cursor to “EMR” and turn the
SHUTTLE ring clockwise.
• The first item from the left side in the “ALARM RECORD
CAMERA” setting display reverses in color.
10. Repeat steps 5, 6 for settings.
11. When the setting is complete, turn the SHUTTLE ring
counterclockwise.
• The cursor moves to the camera number on the left.
• When continuing with other camera number settings, turn
the JOG dial to move the cursor to the desired camera number
and repeat steps 4 ~ 11 to perform the settings.
12. (When setting recording intervals and recording picture
quality • • • )
Press the SET UP button } <SETTINGS> } Select “RECORD
SETTING” in the <RECORD SETTINGS> screen and turn the
SHUTTLE ring clockwise.
• The <RECORD SETTING> screen appears.
<RECORD SETTING>
Camera selection during alarm recording
<RECORD SETTING> >>ALARM CH
NO PPS
GRADE A-PPS A-GRADE
2.5P
STD
2.5P
STD
1
2.5P
STD
2.5P
STD
2
2.5P
STD
2.5P
STD
3
4
2.5P
STD
2.5P
STD
2.5P
STD
2.5P
STD
5
6
2.5P
STD
2.5P
STD
2.5P
STD
2.5P
STD
7
2.5P
STD
2.5P
STD
8
2.5P
STD
2.5P
STD
9
<ESTD REC>
D H M
Appears when “PARTITION” is set.
CAUTION : For <ESTD REC>,
see
“Continuous recording time table”, pages 83,84.
About <ESTD REC>
• The estimated recordable time is displayed as <ESTD REC>
depending on the “PPS” and “GRADE” settings. (The time
will not change when changing the alarm recording settings.)
The storage area in MAIN HDD set in “PARTITION” is displayed with the percentage (%) and the
recordable time of that storage area is displayed in
“<ESTD REC>”.
13. (When setting the recording intervals and recording picture
quality for normal recording • • • )
Turn the JOG dial to select the desired camera number and
turn the SHUTTLE ring clockwise twice.
14. Display the desired item to set and turn the SHUTTLE
ring clockwise.
• The setting is confirmed and flashing stops.
15. Turn the JOG dial clockwise to reverse display the
“GRADE” setting and turn the SHUTTLE ring clockwise.
• The background of the “GRADE” display changes to red
and flashes.
• Setting of “GRADE” ( default : “STD” )
“SUPER”, “HIGH”, “STD”(STANDARD), “BASIC”, “LONG”
16. Display the desired item to set and turn the SHUTTLE
ring clockwise.
• The setting is confirmed and flashing stops.
17. (When setting recording intervals and recording picture
quality for alarm recording • • • )
Repeat steps 13 ~ 16 and select desired settings for “A-PPS”
and “A-GRADE” as well.
18. When the setting is complete, turn the SHUTTLE ring
counterclockwise.
• The cursor moves to the camera number directly to the left.
19. When continuing with other camera number, turn the JOG
dial to move the cursor to the desired camera number and
repeat steps 13 ~ 18 for settings.
20. When completed with all settings, turn the SHUTTLE ring
counterclockwise or press the SET UP button.
About alarm recording
• If alarm recording or emergency recording is entered
during timer recording, recording is stopped at the stop
time set for time recording.
• If “TRIGGER” for <ALARM SETTING> is set to “MD/
EXT”, the last alarm entered takes priority.
• If “TRIGGER” for <ALARM SETTING> is set to “MD/
EXT” and <ALARM REC DURATION> is set to
“MANUAL”, alarm recording will stop 2 seconds after
entering if MOTION DETECTION is entered afterwards
even if the ALARM IN terminal is grounded.
• If there is a power outage during alarm recording or
emergency recording, alarm recording and emergency
recording are released after power is restored.
• The background of the “PPS” display changes to red and flashes.
• Setting of “PPS” ( default : “2.5P” )
“5P”, “2.5P”, “1.667P”, “1.25P”, “1P”, “0.833P”, “0.625P”,
“0.5P”, “0.2P”, “0.1P”, “0.05P”, “0.025P”, “- - - - - -”
“- - - - - -” : Recording cannot be performed with camera set
to this item.
Pressing the WARNING RESET button while the
cursor is on the left of the desired camera number
changes that camera’s “PPS” and “A-PPS” to “- - - - -”.
For details concerning normal recording settings,
see “Setting the recording interval and recording
picture quality for normal recording” pages 22,23.
••••••••••••••••••••••••••••••••••••••••••••••••••••••••••••••••••••••••••••••••••••••••••••••••••••••••••••••••••••••••••••••••••••••••••••
42
The recording time during alarm recording can be set.
<RECORD SETTINGS>
ALARM SETTING
RECORD SETTING
>>ALARM REC DURATION
PRE ALARM REC
( S
MOTION DET REC
)
)
5S
S
ALARM
5S
S
ALARM
Setting ( default : “5S” )
“2S”, “5S”, “10S”, “15S”, “30S”, “45S”, “1M”, “2M”,
“5M”, “10M”, “20M”, “30M”, “60M”, “MANUAL”
“MANUAL” : Alarm recording is continued until the
grounding of the ALARM IN terminals is cancelled.
1. Press the SET UP button } <SETTINGS> } Select “ALARM
REC DURATION” in the <RECORD SETTINGS> screen.
Display the desired setting and confirm.
2. Turn the SHUTTLE ring counterclockwise or press the SET
UP button.
■ PRE ALARM REC
The pre-alarm recording can be set.
<RECORD SETTINGS>
ALARM SETTING
RECORD SETTING
ALARM REC DURATION
>>PRE ALARM REC
( S
MOTION DET REC
<RECORD SETTINGS>
ALARM SETTING
RECORD SETTING
ALARM REC DURATION
PRE ALARM REC
( S
>>MOTION DET REC
ENGLISH
■ ALARM REC DURATION
Setting ( default : “ALARM” )
“ALARM” : Alarm recording is started when the motion is detected.
“NORMAL” : Normal recording is started when the
motion is detected.
When “NORMAL” is selected by “MOTION DET
REC” setting during alarm partition employment,
data is recorded on HDD(MAIN). When playing back
recorded data, please select “MAIN” in the
“PLAYBACK DEVICE” setting.
1. Press the SET UP button } <SETTINGS> } Select
“MOTION DET REC” in the <RECORD SETTINGS> screen,
and display the desired setting.
2. Turn the SHUTTLE ring counterclockwise or press the SET
UP button.
)
5S
S
ALARM
Setting ( default : “0S” )
“0S”, “1S”, “2S”, • • • • • ,“58S”, “59S”, “60S”, “90S”,
“120S”, “150S”, “180S”
When “0S” is selected, the pre-alarm recording
is inoperable.
The maximum pre-alarm recordable time is displayed in “( )”. Beware that when set the pre-alarm
recording time longer than the maximum the settings will turn red. Set the time within the recording
time limit, so that the display returns to white. Even
if the time is set beyond the limit, Pre-Alarm recording time is not changed.
1. Press the SET UP button } <SETTINGS> } Select “PRE
ALARM REC” in the <RECORD SETTINGS> screen, and
display the desired setting.
2. Turn the SHUTTLE ring counterclockwise or press the SET
UP button.
■ MOTION DET REC
Select whether alarm recording or normal recording is to
be started when motion is detected.
•••••••••••••••••••••••••••••••••••••••••••••••••••••••••••••••••••••••••••••••••••••••••••••••••••••••••••••••••••••••••••• Operations
43
<TIMER PROGRAM SETTINGS>
■ TIMER PROGRAM SETTINGS
8) Select timer setting number (P1 ~ P3) is displayed.
Up to 3 most used operation patterns can be set in advance. By individually setting the camera, recording intervals and recording picture quality for normal recording/
alarm recording to A ~ D, settings can be changed instantly by switching operations and is very convenient.
Before recording, accurately set the date and cursee pages
rent time (for setting the date and time,
20,21).
■ TIMER PROGRAM
♦ Structure of the <TIMER PROGRAM> screen
1) 2)
3)
4) 5)
<TIMER PROGRAM>
DW
START END
>>1 --- --:-- --:-2 --- --:-- --:-3 --- --:-- --:-4 --- --:-- --:-5 --- --:-- --:-6 --- --:-- --:-7 --- --:-- --:-8 --- --:-- --:-SPL
SAT-SUN
6)
7) 8)
MODE
-------------------------
P1
MD
-
9) SPL (special day of the week setting)
The start day of the week and end day of the week are
set. When selecting “SPL” in “DW”, the period from the
start day of the week and end day of the week set here
are active.
Example : Using program 1 in <TIMER PROGRAM>
P2, REC MODE A will record to Wednesday ~ Saturday
from 12:30 to 13:00 and “MD” is set to “ON”.
1. Press the SET UP button } <SETTINGS> } select “TIMER
PROGRAM SETTINGS”.
<TIMER PROGRAM SETTINGS>
>>SELECTED PATTERN
P1-SET
HOLIDAY SETTING
REC MODE A
REC MODE B
REC MODE C
REC MODE D
ALARM REC DURATION
5S
2. Check to see that the cursor is to the left of “SELECTED
PATTERN” and turn the SHUTTLE ring clockwise twice.
9)
1) PROGRAM NUMBER
Up to 8 programs can be set for a single operation.
2) DW
The day of week from “SUN” to “SAT” can be set.
“DAY” : When recording at the same time daily.
“SPL” : When recording the period specified in “9) SPL
(special day of the week setting)” below.
“HOL” : When setting holidays specified in the <HOLIDAY SETTING> screen.
3) REC START TIME
The time is indicated using the 24-hour system.
If there is an overlap in the reservation time, the
program with the larger program number is given priority for recording.
4) NEXT DAY
Next day mark appears when recording is to be carried
over to the following day.
5) REC END TIME
6) MODE
“A” ~ “D” : When recording using the camera operation
type and recording intervals set in “REC MODE A” ~
“REC MODE D” of the <TIMER PROGRAM SETTINGS>
screen (for details concerning REC mode settings,
see pages 22,23).
“SKIP” : When temporarily skipping timer recording (the
recording will not be made for the specified time frame
of that program number).
• The “P1” display reverses in color when the SHUTTLE ring
is turned the first time. When the ring is turned for the second
time, the background turns red and flashes.
3. Turn the JOG dial to select “P2” and turn the SHUTTLE ring
clockwise.
• The setting is confirmed and flashing stops.
4. Turn the JOG dial clockwise to reverse display “SET” and
turn the SHUTTLE ring clockwise.
• The <TIMER PROGRAM> screen appears.
<TIMER PROGRAM>
DW
START END
>>1 --- --:-- --:-2 --- --:-- --:-3 --- --:-- --:-4 --- --:-- --:-5 --- --:-- --:-6 --- --:-- --:-7 --- --:-- --:-8 --- --:-- --:-SPL
MODE
-------------------------
P2
MD
-
SAT-SUN
5. Check to see that the cursor is to the left of program number
“1” and turn the SHUTTLE ring clockwise twice.
• The “DW” display reverses in color when the SHUTTLE ring
is turned for the first time. When the ring is turned for the
second time, the background turns red and flashes.
6. Turn the JOG dial to display “SPL” in “DW” and turn the
SHUTTLE ring clockwise.
• The setting is confirmed and flashing stops.
When selecting the wrong day of the week in error,
turn the SHUTTLE ring clockwise, use the JOG dial to
display the correct day of the week and turn the SHUTTLE ring clockwise again.
7. Turn the JOG dial clockwise to move the reversed display
to the “hour” of the start time and turn the SHUTTLE ring
clockwise.
• The background of the “hour” of the START changes to red
and flashes.
7) MD
The motion detection function can be set to ON/OFF.
••••••••••••••••••••••••••••••••••••••••••••••••••••••••••••••••••••••••••••••••••••••••••••••••••••••••••••••••••••••••••••••••••••••••••••
44
20. Turn the SHUTTLE ring counterclockwise.
ENGLISH
8. Turn the JOG dial to display “12 ” in the “hour” and turn the
SHUTTLE ring clockwise.
• The cursor appears to the “SPL” on the left.
• The setting is confirmed and flashing stops.
<TIMER PROGRAM>
DW
START END
1 SPL 12:30 13:00
2 --- --:-- --:-3 --- --:-- --:-4 --- --:-- --:-5 --- --:-- --:-6 --- --:-- --:-7 --- --:-- --:-8 --- --:-- --:--
9. Repeat steps 7 and 8 to set “30” in “minutes” of the start
time and “13” in the “hour” and “00” in the “minutes” of the
end time, and then confirm.
10. Turn the JOG dial clockwise to move the reversed display
to the “MODE” and turn the SHUTTLE ring clockwise.
• The background of the “MODE” setting turns red and flashes.
11. Turn the JOG dial to display “A” in “MODE” and turn the
SHUTTLE ring clockwise.
• The setting is confirmed and flashing stops.
>>SPL
MODE
A
----------------------
P2
MD
ON
-
WED-SAT
21. Turn the SHUTTLE ring counterclockwise or press the SET
UP button.
• Turn the SHUTTLE ring counterclockwise to return the cursor
to the previous operation. Then, press the SET UP button to
clear the <TIMER PROGRAM SETTINGS> screen and return
to the normal screen.
12. Turn the JOG dial clockwise to move the reversed display
to the “MD” and turn the SHUTTLE ring clockwise.
• The background of the “MD” setting turns red and flashes.
13. Turn the JOG dial to display “ON” in “MD” and turn the
SHUTTLE ring clockwise.
If there is an unset item with in the program (- - display), the setting screen cannot be exited even when
turning the SHUTTLE ring counterclockwise. In this
case, set all unset items.
• The setting is confirmed and flashing stops.
14. Turn the SHUTTLE ring counterclockwise.
• The cursor appears to the program number on the left.
22. Press the TIMER button.
15. When input timer reservations in other program number,
repeat steps 5 ~ 14.
16. Turn the JOG dial to select “SPL” and turn the SHUTTLE
ring clockwise twice.
• The start day display reverses in color when the SHUTTLE
ring is turned for the first time. When the ring is turned for
the second time, the background turns red and flashes.
17. Turn the JOG dial to display “WED” in start day and turn
the SHUTTLE ring clockwise.
• The TIMER button lights.
• Timer recording starts if the current time is within the timer
reservation time frame.
• The power turns off and recording will be in the stand-by
mode if the current time is not within the timer reservation
time frame.
Timer recording/timer recording standby can be
cancelled by pressing the TIMER button again for more
than 1 second.
• The setting is confirmed and flashing stops.
18. Turn the JOG dial clockwise to move the reversed display
to the end day and turn the SHUTTLE ring clockwise.
• The background of the end day setting turns red and flashes.
Not available during alarm recording.
To delete program contents, or to exit the program
without performing settings, press the WARNING RESET button during program setting.
19. Turn the JOG dial to display “SAT” in end day and turn the
SHUTTLE ring clockwise.
• The setting is confirmed and flashing stops.
INFORMATION
Recording will not be performed if there is an error in the setting. To prevent such errors for timer recording, this unit notifies errors using methods shown below. If there is an error in the setting, take the
necessary procedures shown below.
Unit status
Description of error
Countermeasure
TIMER button flashes.
Series of short beeps
(beep-beep-beep)
will sound.
1) The date/time is not set.
2) Timer reservation setting has not been
set to operate.
3) Program is currently being set.
1) Set the date/time.
2) Set the correct reservation.
3) Check the settings.
Timer recording is not
performed even when
the timer recording
time is reached.
• “HDD REPEAT REC MAIN” is set to “OFF”
or “HDD REPEAT REC SUB”, is set to “OFF”.
There is no HDD space left of HDD(MAIN),
HDD(SUB).
• Press the WARNING RESET button for
canceling the warning.
• Set to “ON” in the “HDD REPEAT REC MAIN”
or “HDD REPEAT REC SUB” when “OFF” is
selected.
Page
20,21
44,45
44,45
87
47
••••••••••••••••••••••••••••••••••••••••••••••••••••••••••••••••••••••••••••••••••••••••••••••••••••••••••••••••••••••••••••• Operations
4545
<TIMER PROGRAM SETTINGS> (continued)
■ HOLIDAY SETTING
■ MOTION DET REC
Holidays throughout the year can be set in advance.
Recording is done with the recording interval and the
quality set by “A-PPS” and “A-GRADE”, independent of
whether “ALARM” or “NORMAL” has been selected (for
details concerning setting MOTION DET REC, see page
43).
<HOLIDAY SETTING>
--/-- --/-- --/---/-- --/-- --/---/-- --/-- --/---/-- --/-- --/---/-- --/-- --/--
--/---/---/---/---/--
■ ALARM REC DURATION
The recording time for alarm recording can be set (for
details concerning setting ALARM REC DURATION,
see page 43).
DAY/MONTH
1. Press the SET UP button } <SETTINGS> } Select
“HOLIDAY SETTING” in the <TIMER PROGRAM SETTINGS>
screen, and display the desired holidays and confirm.
♦ Overlapping Timer settings
When Timer settings overlap, the unit will give priority to
the higher-numbered program.
2. Turn the SHUTTLE ring counterclockwise or press the SET
UP button.
Example 1
When overlap both holidays set in the <HOLIDAY
SETTING> screen and the <TIMER PROGRAM>
screen, the unit records giving the priority to the holiday set in the <TIMER PROGRAM> screen over the
others.
Example 1)
14:00
15:00
In Program 1, recording is set for PPS
to 5P, from 14:00 to 17:00.
16:00
17:00
16:00
17:00
5P
In Program 2, recording is set for PPS
to 1P, from 15:00 to 16:00.
1P
■ Recording mode settings A ~ D for normal
recording/alarm recording
The camera, recording intervals and recording picture quality for normal recording/alarm recording can be set to 4
patterns of recording mode settings A ~ D (for details concerning recording mode settings,
see pages 22,23,
41-43).
14:00
Actual recorded contents
15:00
1P
5P
5P
Program 2
Program 1
1. Press the SET UP button } <SETTINGS> } Select “REC
MODE A” in the <TIMER PROGRAM SETTINGS> screen and
turn the SHUTTLE ring clockwise.
• The <REC MODE A> screen appears.
<REC MODE A>
>>ALARM SETTING
RECORD SETTING
PRE ALARM REC
MOTION DET REC
( S
)
S
ALARM
Program 1
Example 2
• Program 1 is set for 14:00 to 17:00 with the PPS to 5P.
• Program 2 is set for 15:00 to 16:00 with the SKIP setting.
Again, the unit will give priority to Program 2 for the duration of
the overlapping period. As shown in the illustration below, the
unit will activate the Skip setting from 15:00 to 16:00.
Example 2)
14:00
15:00
In Program 1, recording is set for PPS
to 5P, from 14:00 to 17:00.
2. Turn the JOG dial to select either “ALARM SETTING”,
“RECORD SETTING” or “PRE ALARM REC” and confirm.
3. When continuing to REC MODE B ~ D, repeat step 2.
The storage area in MAIN HDD set in “PARTITION”
is displayed with the percentage(%) and the recordable time of that storage area is displayed in “<ESTD
REC>” (For details on PARTITION,
see page 75).
16:00
17:00
SKIP
14:00
Actual recorded contents
17:00
5P
In Program 2, the SKIP setting is
entered for 15:00 to 16:00.
For details on “ALARM SETTING”, “RECORD
SETTING” and “PRE ALARM REC” settings,
see
pages 41-43.
16:00
15:00
5P
NO
RECORDING!
5P
Program 2
Program 1
Program 1
••••••••••••••••••••••••••••••••••••••••••••••••••••••••••••••••••••••••••••••••••••••••••••••••••••••••••••••••••••••••••••••••••••••••••••
46
<INITIAL SET UP/INFORMATION>
■ HDD SETTINGS
♦ HDD REPEAT REC MAIN/HDD REPEAT REC
SUB
“ON” : After the recorded data is played back to the
end, playback is resumed by automatically returning to
the beginning of the recorded data.
The operation when HDD (Hard Disk Drive) space becomes full during recording.
“OFF” : After the recorded data is played back to the
end, playback is stopped.
<HDD SETTINGS>
>>HDD REPEAT REC MAIN
HDD REPEAT REC SUB
HDD REPEAT PLAY
IM-CHECK PLAY
SEQUENTIAL PLAY
ON
OFF
OFF
OFF
OFF
ENGLISH
Setting ( default : “OFF” )
1. Press the SET UP button } <SETTINGS> } <INITIAL SET
UP/INFORMATION> } Select “HDD REPEAT PLAY” in the
<HDD SETTINGS> screen. Display the desired setting and
confirm.
2. Turn the SHUTTLE ring counterclockwise or press the SET
UP button.
♦ IM-CHECK PLAY
“HDD REPEAT REC SUB” is appeared when
“PARTITION” is selected on “HDD SETTING” of the
<INITIALIZATION> screen.
Setting ( default of HDD REPEAT REC MAIN : “ON”, default
of HDD REPEAT REC SUB : “OFF”)
“ON” : Automatically returns to the beginning of the
HDD and resumes recording (by overwriting old data).
“STANDBY” : When the HDD space becomes empty,
recording is stopped and the unit switches to the
standby mode. Recording is resumed when the REC
terminal is grounded or the REC button is pressed.
Recording is temporarily stopped if the alarm input is
continuously grounded or during timer recording. Then,
recording is resumed from the beginning of the HDD.
“OFF” : Recording is stopped and “REC/FULL” or “REC/
SUB FULL” is displayed on the screen. To resume recording, press the WARNING RESET button to cancel
the warning display and press the REC button.
If either the WARNING “REC/FULL” or “REC/SUB
FULL” appears when the ALARM PARTITION is set, recording on both will stop.
This function is to check whether alterations have been
made to the recorded video or the recording date/time.
“IMAGE MODIFIED” warning is displayed when alteration
is checked.
<HDD SETTINGS>
HDD REPEAT REC MAIN
HDD REPEAT REC SUB
HDD REPEAT PLAY
>>IM-CHECK PLAY
SEQUENTIAL PLAY
ON
OFF
OFF
OFF
OFF
Setting ( default : “OFF” )
“ON” : Alteration check is performed during playback
and displays a warning at the point containing alteration.
“OFF” : Alteration check is not performed.
This function may cause problems during recording
and playback. Normally, set this function to “OFF”.
1. Press the SET UP button } <SETTINGS> } <INITIAL SET
UP/INFORMATION> } Select “IM-CHECK PLAY” in the <HDD
SETTINGS> screen. Display the desired setting and confirm.
“STANDBY” is displayed only in “HDD REPEAT
REC MAIN”.
2. Turn the SHUTTLE ring counterclockwise or press the SET
UP button.
1. Press the SET UP button } <SETTINGS> } <INITIAL SET
UP/INFORMATION> } Select “HDD REPEAT REC MAIN” or
“HDD REPEAT REC SUB” in the <HDD SETTINGS> screen.
Display the desired setting and confirm.
3. Select the device for alteration check and then start playback.
Warning will also be displayed for parts where recorded data is damaged for some reason.
2. Turn the SHUTTLE ring counterclockwise or press the SET
UP button.
♦ HDD REPEAT PLAY
The contents recorded on the HDD (Hard Disk Drive)
can be repeatedly played back.
<HDD SETTINGS>
HDD REPEAT REC MAIN
HDD REPEAT REC SUB
>>HDD REPEAT PLAY
IM-CHECK PLAY
SEQUENTIAL PLAY
IMAGE MODIFIED( 1 2 3 )
ON
OFF
OFF
OFF
OFF
When performing complex playback operations with
the SHUTTLE ring during alteration check, the “IMAGE
MODIFIED” warning may appear. Perform alteration
check using playback or playback with changed playback intervals.
•••••••••••••••••••••••••••••••••••••••••••••••••••••••••••••••••••••••••••••••••••••••••••••••••••••••••••••••••••••••••••• Operations
47
<INITIAL SET UP/INFORMATION> (continued)
♦ SEQUENTIAL PLAY
Setting ( default : “OFF” )
It is possible to make archive of the video recorded with
this unit to an analogue video recorder, etc., while playing
back the video of each camera in order using the single
screen display. During single screen sequential playback,
the SPLIT/SEQUENCE button will light. In addition, the
playback order/time of each camera will be the order of
the recorded video.
<HDD SETTINGS>
HDD REPEAT REC MAIN
HDD REPEAT REC SUB
HDD REPEAT PLAY
IM-CHECK PLAY
ON
OFF
OFF
OFF
>>SEQUENTIAL PLAY
OFF
Setting ( default : “OFF” )
“ON” : Plays back the video in the single screen sequential mode.
“ON” : Records video and audio.
“ALARM” : During alarm recording or emergency recording, records video and audio.
“OFF” : Does not record audio.
1. Press the SET UP button } <SETTINGS> } Select “AUDIO
RECORDING” in the <INITIAL SET UP/INFORMATION>
screen. Display the desired setting and confirm.
2. Turn the SHUTTLE ring counterclockwise or press the SET
UP button.
When setting “AUDIO RECORDING” to “ON”, a
speaker display ( ) appears to the right of recordable
time display in the <RECORD SETTING> and
<RECORD SETTING A> ~ <RECORD SETTING D>
screens.
<RECORD SETTING>
<RECORD SETTING> >>ALARM CH
NO PPS
GRADE A-PPS A-GRADE
2.5P
STD
2.5P
STD
1
2.5P
STD
2.5P
STD
2
2.5P
STD
2.5P
STD
3
4
2.5P
STD
2.5P
STD
2.5P
STD
2.5P
STD
5
6
2.5P
STD
2.5P
STD
2.5P
STD
2.5P
STD
7
2.5P
STD
2.5P
STD
8
2.5P
STD
2.5P
STD
9
<ESTD REC>
D H M
“OFF” : Does not play back the video in the single
screen sequential mode.
Playback is performed during camera sequential play
at an interval of 25P. To change the playback interval, press
the PLAY button (or the REV. PLAY button)(
see
“Changing playback intervals, pages 65,66).
1. Press the SET UP button } <SETTINGS> } <INITIAL SET
UP/INFORMATION> } Select “SEQUENTIAL PLAY” in the
<HDD SETTINGS> screen. Display the desired setting and
confirm.
Even when setting “AUDIO RECORDING” to “ON”,
audio cannot be recorded for the following settings.
2. Turn the SHUTTLE ring counterclockwise or press the SET
UP button.
• Audio recording cannot be performed when “PPS” of
“RECORD SETTING” are all set to smaller than
“0.333P” when setting normal recording. In this case,
3. Press the PLAY button.
(
4. Press one of the camera number buttons with recorded video.
• When the camera selection during alarm recording is
as follows :
“ALARM CH” : “A-PPS” of all cameras set for alarm
recording are set to smaller than “0.333P”.
• Single screen sequential playback starts.
When performing camera sequential playback for
video with long recording intervals, the video of the
largest camera number selected for recording will be
played back the longest.
X ) appears to the right of recordable time display.
“ALARM PLUS”, “ALARM25” : “PPS” and “A-PPS” of
all cameras set for normal recording and alarm recording are set to smaller than “0.333P”.
Only the camera number (title) of the pressed camera number button is displayed. Other camera number
(titles) will not be displayed. If display is not necessary,
see
select “NONE” in the <CAMERA DISPLAY> (
page 32).
■ AUDIO RECORDING
This unit can simultaneously record audio along with the
video. When recording audio, the continuous recording
time becomes shorter than when recording only video.
<INITIAL SET UP/INFORMATION>
HDD SETTINGS
>>AUDIO RECORDING
OFF
REAR TERMINAL SETTINGS
COMMUNICATION PORT SETTINGS
INFORMATION/SERVICE
PASSWORD
LANGUAGE SELECTION
••••••••••••••••••••••••••••••••••••••••••••••••••••••••••••••••••••••••••••••••••••••••••••••••••••••••••••••••••••••••••••••••••••••••••••
48
3. To set other terminals, repeat step 2.
♦ MODE OUT 1 ~ MODE OUT 5
4. Turn the SHUTTLE ring counterclockwise or press the SET
UP button.
The unit status can be outputted from the MODE OUT terminals on the rear. There are 5 MODE OUT terminals and each
terminal can be set to generate a certain type of output.
<REAR TERMINAL SETTINGS>
>>MODE OUT 1
OFF
MODE OUT 2
OFF
MODE OUT 3
OFF
MODE OUT 4
OFF
MODE OUT 5
OFF
KEY SOUND
ON
BUZZER
OFF
REMAIN HDD
MAIN-10%
CALL OUT SETTINGS
EMERGENCY REC DURATION
10M
Setting ( default : “OFF” )
ENGLISH
■ REAR TERMINAL SETTINGS
♦ KEY SOUND
It is possible for the unit to make button sounds when
using the operation buttons on the front of the unit or
when operating the JOG dial or SHUTTLE ring.
<REAR TERMINAL SETTINGS>
MODE OUT 1
OFF
MODE OUT 2
OFF
MODE OUT 3
OFF
MODE OUT 4
OFF
MODE OUT 5
OFF
>>KEY SOUND
ON
BUZZER
OFF
REMAIN HDD
MAIN-10%
CALL OUT SETTINGS
EMERGENCY REC DURATION
10M
“REC” : Outputs signals during recording.
“PLAY” : Outputs signals during playback.
“REMAIN” : Outputs signals when the remaining HDD
device space reaches the value specified in “REMAIN
HDD”.
“POWER” : Outputs signals when the power of the unit
turns on.
“MOTION1” ~ “MOTION4” : Outputs the camera numbers detected during motion detection recording using
binary notation (MODE OUT 1 ~ MODE OUT 4 are
linked). Furthermore, motion detection inputted the last
is maintained for 2 seconds.
Relation between a camera number and a MODE OUT output
1
2
3
4
5
6
7
8
9
MODE OUT terminals
1
2
3
4
O
X
X
X
X
O
X
X
O
O
X
X
X
X
O
X
O
X
O
X
X
O
O
X
O
O
O
X
X
X
X
O
O
X
X
O
1. Press the SET UP button } <SETTINGS> } <INITIAL SET
UP/INFORMATION> } Select “KEY SOUND” in the <REAR
TERMINAL SETTINGS> screen. Display the desired setting
and confirm.
2. Turn the SHUTTLE ring counterclockwise or press the SET
UP button.
♦ BUZZER
It is possible for a buzzer to sound when the remaining
HDD device space reaches the value set in “REMAIN
HDD” of the <REAR TERMINAL SETTINGS> screen.
Other than the above, it is possible to set the buzzer to
sound when starting alarm recording or emergency
recording, or when a warning is displayed.
<REAR TERMINAL SETTINGS>
MODE OUT 1
OFF
MODE OUT 2
OFF
MODE OUT 3
OFF
MODE OUT 4
OFF
MODE OUT 5
OFF
KEY SOUND
ON
>>BUZZER
OFF
REMAIN HDD
MAIN-10%
CALL OUT SETTINGS
EMERGENCY REC DURATION
10M
O : Signal is outputted.
X : No signal is outputted.
“ALARM” : Outputs signals during alarm recording.
“LAN” : It is the MODE OUT terminal controllable from
a communication function’s.
“OFF” : No signal is outputted.
Capacity warning from MODE OUT is only outputted
during recording.
1. Press the SET UP button } <SETTINGS> } <INITIAL SET
UP/INFORMATION> } Select “REAR TERMINAL SETTINGS”
screen.
2. From the 5 MODE OUT terminals, display the desired setting
for the terminal (MODE OUT 1 ~ MODE OUT 5) to output
signals and then confirm.
To sound a buzzer only when reaching a specified value :
1) Select “REMAIN” for “BUZZER” in the <REAR TERMINAL SETTINGS> screen.
2) Set the remaining capacity in “REMAIN HDD” of the
<REAR TERMINAL SETTINGS> screen.
To sound a buzzer when reaching the set remaining capacity or when a warning is displayed :
1) Select “WARNING” for “BUZZER” in the <REAR TERMINAL SETTINGS> screen.
2) Set the remaining HDD capacity (HDD MAIN REMAIN/HDD SUB REMAIN) in “CALL OUT SETTINGS”
of the <REAR TERMINAL SETTINGS> screen.
•••••••••••••••••••••••••••••••••••••••••••••••••••••••••••••••••••••••••••••••••••••••••••••••••••••••••••••••••••••••••••• Operations
49
<INITIAL SET UP/INFORMATION> (continued)
2. Turn the JOG dial to display the desired device and turn the
SHUTTLE ring clockwise.
Setting ( default : “OFF” )
“REMAIN”, “WARNING”, “ALARM”, “OFF”
• The setting is confirmed and flashing stops.
SETTING
BUZZER
REMAIN WARNING ALARM OFF
When reaching the remaining
capacity set in “REMAIN HDD”
ON
When a failure occurs and
a warning is displayed
OFF
ON
OFF
OFF
When an alarm recording or
emergency recording is started
OFF
OFF
ON
OFF
OFF
OFF
OFF
1. Press the SET UP button } <SETTINGS> } <INITIAL SET
UP/INFORMATION> } Select “BUZZER” in the <REAR
TERMINAL SETTINGS> screen. Display the desired setting
and confirm.
2. Turn the SHUTTLE ring counterclockwise or press the SET
UP button.
♦ REMAIN HDD
A warning indicating that the either remaining capacity
of HDD has become low during recording is outputted.
The device can be selected and the remaining capacity
can be set here.
<REAR TERMINAL SETTINGS>
MODE OUT 1
OFF
MODE OUT 2
OFF
MODE OUT 3
OFF
MODE OUT 4
OFF
MODE OUT 5
OFF
KEY SOUND
ON
BUZZER
OFF
>>REMAIN HDD
MAIN-10%
CALL OUT SETTINGS
EMERGENCY REC DURATION
10M
A warning is outputted using the following methods
when the remaining capacity becomes low during recording.
• The HDD usage display flashes when “3” is set to
“DISPLAY MODE” in the <TIME DATE/DISPLAY SETTINGS> screen.
• A buzzer will sound when “REMAIN” is set to “BUZZER”
in the <REAR TERMINAL SETTINGS> screen.
Setting of DEVICE ( default : “MAIN” )
“MAIN” : Displays a warning of low MAIN HDD capacity.
“SUB” : Displays a warning of low SUB HDD capacity.
“OFF” : Does not display warning of low capacity.
“SUB” is appeared when “PARTITION” is selected
on “HDD SETTING” of the <INITIALIZATION> screen.
Setting of “REMAIN HDD” ( default : “10%” )
3. Turn the JOG dial clockwise to move the reversed display
to the REMAIN HDD value and turn the SHUTTLE ring
clockwise.
• The background of the REMAIN HDD value turns red and
flashes.
4. Turn the JOG dial to display the desired capacity and turn
the SHUTTLE ring clockwise.
• The setting is confirmed and flashing stops.
5. Turn the SHUTTLE ring counterclockwise or press the SET
UP button.
♦ CALL OUT SETTINGS
The CALL OUT setting is a setting to notify to the outside warning signals outputted by this device by
outputting the signals from the CALL OUT terminal on
the rear.
CALL OUT SETTINGS use photo-coupler output
to decrease the amount of malfunctions due to wiring.
See page 15 “CALL OUT Output terminal” for apt
connection procedures.
• HDD MAIN REMAIN/HDD SUB REMAIN
When the remaining memory in the HDD reaches the
set value, the unit outputs a signal from the CALL OUT
terminal, and the “REC/REM” warning displayed on the
screen.
<CALL OUT SETTINGS>
>>HDD MAIN REMAIN
HDD MAIN FULL
HDD SUB REMAIN
HDD SUB FULL
OFF
OFF
OFF
OFF
“HDD SUB REMAIN” is appeared when
“PARTITION” is selected on “HDD SETTING” of the
<INITIALIZATION> screen.
Setting ( default : “OFF” )
“2%”, “4%”, “6%”, “8%”, “10%”, “15%”, “20%”, “30%”,
“40%”, “50%”, “OFF”
1. Press the SET UP button } <SETTINGS> } <INITIAL SET
UP/INFORMATION> } <REAR TERMINAL SETTINGS> }
Select “HDD MAIN REMAIN” or “HDD SUB REMAIN” in the
<CALL OUT SETTINGS> screen. Display the desired setting
and confirm.
“2%”, “4%”, “6%”, “8%”, “10%”, “15%”,“20%”, “30%”,
“40%”, “50%”
2. Turn the SHUTTLE ring counterclockwise or press the SET
UP button.
1. Press the SET UP button } <SETTINGS> } <INITIAL SET
UP/INFORMATION> } “Select “REMAIN HDD” in the <REAR
TERMINAL SETTINGS> screen and turn the SHUTTLE ring
clockwise twice.
By pressing the WARNING RESET button, the HDD
capacity warning from the CALL OUT terminal can be
cancelled.
• The setting display reverses in color when the SHUTTLE
ring is turned the first time. When the ring is turned for the
second time, the background turns red and flashes.
••••••••••••••••••••••••••••••••••••••••••••••••••••••••••••••••••••••••••••••••••••••••••••••••••••••••••••••••••••••••••••••••••••••••••••
50
For the relationship of the warning display and CALL
OUT signal output,
see pages 87,88. Although the
warning will be displayed regardless if the output item
for the CALL OUT signal is set to “Fixed”, the condition
to output CALL OUT signals can be added when the
output is set to “Selectable”. For example, the buzzer
can be set to sound when reaching a value set in “HDD
MAIN REMAIN” or “HDD SUB REMAIN” of the <CALL
OUT SETTINGS> screen if “BUZZER” in the <REAR
TERMINAL SETTINGS> screen is set to “WARNING”.
• HDD MAIN FULL/HDD SUB FULL
When the HDD is full, the CALL OUT terminal outputs a CALL
OUT signal.
<CALL OUT SETTINGS>
HDD MAIN REMAIN
>>HDD MAIN FULL
HDD SUB REMAIN
HDD SUB FULL
1. Press the SET UP button } <SETTINGS> } <INITIAL SET
UP/INFORMATION> } Select “EMERGENCY REC
DURATION” in the <REAR TERMINAL SETTINGS> screen.
Display the desired setting and confirm.
ENGLISH
INFORMATION
2. Turn the SHUTTLE ring counterclockwise or press the SET
UP button.
■ COMMUNICATION PORT SETTINGS
<INITIAL SET UP/INFORMATION>
HDD SETTINGS
AUDIO RECORDING
OFF
REAR TERMINAL SETTINGS
>>COMMUNICATION PORT SETTINGS
INFORMATION/SERVICE
PASSWORD
LANGUAGE SELECTION
OFF
OFF
OFF
OFF
1. Press the SET UP button } <SETTINGS> } Select
“COMMUNICATION PORT SETTINGS” in the <INITIAL SET
UP/INFORMATION> screen and turn the SHUTTLE ring
clockwise.
• The <COMMUNICATION PORT SETTINGS> screen appears.
“HDD SUB FULL” is appeared when the “HDD
SETTING” is selected on “PARTITION” of the <INITIALIZATION> screen.
Setting ( default : “OFF” )
“ON” : Signal is outputted when the recording capacity
becomes full.
“OFF” : No signal is outputted when the recording capacity becomes full.
1. Press the SET UP button } <SETTINGS> } <INITIAL SET
UP/INFORMATION> } <REAR TERMINAL SETTINGS> }
Select “HDD MAIN FULL” or “HDD SUB FULL” in the <CALL
OUT SETTINGS> screen. Display the desired setting and
confirm.
2. Turn the SHUTTLE ring counterclockwise or press the SET
UP button.
♦ EMERGENCY REC DURATION
The recording time for emergency recording can be set.
<REAR TERMINAL SETTINGS>
MODE OUT 1
OFF
MODE OUT 2
OFF
MODE OUT 3
OFF
MODE OUT 4
OFF
MODE OUT 5
OFF
KEY SOUND
ON
BUZZER
OFF
REMAIN HDD
MAIN-10%
CALL OUT SETTINGS
>>EMERGENCY REC DURATION
10M
For details concerning setting EMERGENCY RECORDINGS,
see page 64.
<COMMUNICATION PORT SETTINGS>
>>RS-232C
ETHERNET
♦ RS-232C
Settings for the communication device connected to this
unit is set.
• MODE
This unit can be remote controlled from a PC connected
to the RS-232C terminal. Comments can also be inputted
from a PC for recording of comments along with the video.
<RS-232C>
>>MODE
SETTINGS
REMOTE A
Setting ( default : “REMOTE A” )
“REMOTE A” : This unit can be controlled from a PC
and every status information is returned from the unit.
“REMOTE B” : This unit can be controlled from a PC
and from the unit when the status for command is
changed.
“REMOTE C” : This unit can be controlled from a PC
with no status information.
“OFF” : This unit cannot be controlled from a PC.
1. Press the SET UP button } <SETTINGS> } <INITIAL SET
UP/INFORMATION> } <COMMUNICATION PORT
SETTINGS> } Select “MODE” in the <RS-232C> screen.
Display the desired setting and confirm.
2. Turn the SHUTTLE ring counterclockwise or press the SET
UP button.
Setting ( default : “10M” )
“1M”, “2M”, “5M”, “10M”, “20M”, “30M”, “60M”
•••••••••••••••••••••••••••••••••••••••••••••••••••••••••••••••••••••••••••••••••••••••••••••••••••••••••••••••••••••••••••• Operations
51
<INITIAL SET UP/INFORMATION> (continued)
• SETTINGS
RS-232C settings can be made when setting “MODE”
previous to “REMOTE A”, “REMOTE B” or “REMOTE C”.
Perform settings so that the settings are the same
with the connecting PC.
Setting of “TRANSMISSION MODE” ( default : “9600” )
“1200”, “2400”, “4800”, “9600”, “19200”
Setting of “DATA BIT LENGTH” ( default : “8BIT” )
“8BIT”, “7BIT”
1. Press the SET UP button } <SETTINGS> } <INITIAL SET
UP/INFORMATION> } Select “ETHERNET” in the
<COMMUNICATION PORT SETTINGS> screen and turn the
SHUTTLE ring clockwise.
• The <ETHERNET> screen appears.
<ETHERNET>
>>IP ADDRESS
192.168.000.100
SUB NET MASK 255.255.255.000
GATEWAY
000.000.000.000
E-MAIL ADDRESS
SERVICE PORT SETTING
ALARM NOTIFICATION SETTING
<MAC ADDRESS>
Setting of “PARITY BIT” ( default : “NONE” )
“NONE”, “ODD”, “EVEN”
Setting of “STOP BIT LENGTH” ( default : “1BIT” )
“1BIT”, “2BIT”
08-00-70-2E-3F-FF
PLEASE PRESS SET UP BUTTON
TO APPLY NEW SETTING
2. Select the setting you wish to alter by turning the JOG dial
and then turn the SHUTTLE ring clockwise.
• The leftmost number of the setting will reverse in color.
Setting of “DELIMITER” ( default : “CR” )
“CR”, “CR•LF”
3. Turn the JOG dial to reverse display the number you wish
to alter and turn the SHUTTLE ring clockwise.
• The background of the selected number turns red and flashes.
1. Set “MODE” in the <RS-232C> screen to “REMOTE A”,
“REMOTE B” or “REMOTE C”.
2. Select “SETTINGS” and turn the SHUTTLE ring clockwise.
• The <RS-232C SETTINGS> screen appears.
<RS-232C SETTINGS>
>>TRANSMISSION MODE
DATA BIT LENGTH
PARITY BIT
STOP BIT LENGTH
DELIMITER
4. Turn the JOG dial to display the desired number and turn
the SHUTTLE ring clockwise.
• The setting is confirmed and flashing stops.
5. Repeat steps 2 and 4 to change the other numbers.
9600
8BIT
NONE
1BIT
CR
3. Select the setting to change and turn the SHUTTLE ring
clockwise.
• The background of the setting turns red and flashes.
4. Display the desired sub item and turn the SHUTTLE ring
clockwise.
6. When the setting is complete, turn the SHUTTLE ring
counterclockwise.
• The cursor move to setting directly to the left.
7. (Finalizing updated menu settings • • • )
When any setting of “IP ADDRESS”, “SUB NET MASK”,
“GATEWAY” is changed, press ths SET UP button.
• The power turns off automatically, then the unit will boot up.
Press the SET UP button to return to the normal
screen without changing the setting.
• The setting is confirmed and flashing stops.
6. Turn the SHUTTLE ring counterclockwise or press the SET
UP button.
• E-MAIL ADDRESS
The contents of the setting of “SMTP SERVER”, “RECORDER ID” and “USER ADDRESS” can be referred
to here.
♦ ETHERNET
The IP address used to specify the connected recorder, sub
net mask setting, and MAC address can be referred to here.
The specific software is required to input “SMTP
SERVER”, “RECORDER ID” and “USER ADDRESS”.
Please refer to the instruction manual of the software.
Do not change the setting without sufficient knowledge about the network setting.
1. Press the SET UP button } <SETTINGS> } <INITIAL SET
UP/INFORMATION> } <COMMUNICATION PORT SETTING>
} select “E-MAIL ADDRESS” in the <ETHERNET> screen.
5. To set other setting, repeat steps 3 and 4.
In regard to the network settings it is recommended
to obtain advance confirmation by the network manager.
Do not assign “000.000.000.000” IP address. And
do not assign it as the broadcast address. If this address
were to be assigned, we could not guarantee
communications or any other functions of the recorder
unit.
• The <E-MAIL ADDRESS> screen appears.
<E-MAIL ADDRESS>
SMTP SERVER
RECORDER ID
USER ADDRESS
1
2
3
4
5
The setting can not be changed during the record.
Stop the record to change the setting.
“USER ADDRESS” is displayed only for 20 characters from the beginning.
••••••••••••••••••••••••••••••••••••••••••••••••••••••••••••••••••••••••••••••••••••••••••••••••••••••••••••••••••••••••••••••••••••••••••••
52
Do not change the setting without sufficient knowledge about the network setting.
When perform other setting except “WEB”, the specific software is required. Please refer to the instruction manual of the software.
1. Press the SET UP button } <SETTINGS> } <INITIAL SET
UP/INFORMATION> } <COMMUNICATION PORT
SETTINGS> } select “SERVICE PORT SETTING” in the
<ETHERNET> screen.
• The <SERVICE PORT SETTING> screen appears.
<SERVICE PORT SETTING>
>>WEB
USER ACCESS
SUPER USER
LIVE USER1
LIVE USER2
LIVE USER3
LIVE USER4
•00080
53705
53706
53707
53708
53709
53710
1. Press the SET UP button } <SETTINGS> } <INITIAL SET
UP/INFORMATION> } <COMMUNICATION PORT
SETTING> } select “ALARM NOTIFICATION SETTING” in
the <ETHERNET> screen.
ENGLISH
• SERVICE PORT SETTING
The port number can be set here to connect personal
computer.
• The <ALARM NOTIFICATION SETTING> screen appears.
<ALARM NOTIFICATION SETTING>
NO IP ADDRESS
TARGET OWN
>>1 000.000.000.000•55111 01111
2 000.000.000.000•55111 01112
3 000.000.000.000•55111 01113
4 000.000.000.000•55111 01114
5 000.000.000.000•55111 01115
WARNING
ALARM SENS
REC MODE
RETRY TIME
OFF
OFF
OFF
10S
2. (Cases of setting the IP ADDRESS number of connected
PC, the port setting number, etc. • • • )
Turn the JOG dial to select the desired setting number and
turn the SHUTTLE ring clockwise.
• The leftmost figure of the port number reverses in color.
3. Turn the JOG dial to display the desired figure of numbers
of IP ADDRESS, TARGET PORT and OWN PORT reversed
in color and turn the SHUTTLE ring clockwise.
• The background of the desired figure turns red and flashes.
2. Turn the JOG dial to select the desired setting and turn the
SHUTTLE ring clockwise.
• The first figure of the port number reverses in color.
3. Turn the JOG dial to display the desired figure reversed in
color, and turn the SHUTTLE ring clockwise.
• The background of the selected figure turns red and flashes.
4. Turn the JOG dial to display the desired port number and
turn the SHUTTLE ring clockwise.
• The setting is confirmed and flashing stops
5. Turn the SHUTTLE ring counterclockwise.
• The cursor appears to the setting on the left.
When change the “WEB” setting, the “ • ” situated
on the left of the port number turns its color from green
to red.
6. To change other settings repeat steps 2 to 5.
7. (Finalizing update menu settings • • • )
Return to the <ETHERNET> screen by turning the SHUTTLE
ring counterclockwise and press the SET UP button.
• The power turns off automatically, then the unit will boot
up.
Press the SET UP button to return to the normal
screen without changing the setting.
• ALARM NOTIFICATION SETTING
The setting is for the transmission of warning signals and
other signals for status changes such as the short-circuit
of the rear terminal or when initiated the recording.
The specific software is required. Please refer to
the instruction manual of the software.
Issuing of reports to broadcast addresses is not
supported.
4. Turn the JOG dial to display the desired number and turn
the SHUTTLE ring clockwise.
• The setting is confirmed and flashing stops
5. Turn the SHUTTLE ring counterclockwise.
• The cursor appears to the setting on the left.
When TARGET PORT number is set to 00000 01023, the “ • ” situated on the left of the value turns red
from green, and in case of 01024 - 49151 turns yellow.
6. To change other setting number repeat steps 2 to 5.
7. (Cases of the setting of the transmission contents to
connected PC • • • )
Turn the JOG dial to select the desired setting and turn the
SHUTTLE ring clockwise.
• The background of the setting turns red and flashes.
Setting of “WARNING” ( default : “OFF” )
“ON” : Transmits warning signals to connected PC. Email is sent to address displayed on “USER ADDRESS”
of the <E-MAIL ADDRESS> screen.
“OFF” : Does not transmit.
Setting of “ALARM SENS” ( default : “OFF” )
“ON” : Only for the short-circuit of rear terminal transmits the status information to connected PC. E-mail is
sent to address displayed on “USER ADDRESS” of the
<E-MAIL ADDRESS> screen.
“OFF” : Does not transmit.
Setting of “REC MODE” ( default : “OFF” )
“ON” : Transmits the recording status such as normal
recording or alarm recording to connected PC. E-mail
is sent to address displayed on “USER ADDRESS” of
the <E-MAIL ADDRESS> screen.
OFF : Does not transmit.
Setting of “RETRY TIME” ( default : “10S” )
1S, 2S, • • • •, 10S, • • • • • • 59S, 60S
•••••••••••••••••••••••••••••••••••••••••••••••••••••••••••••••••••••••••••••••••••••••••••••••••••••••••••••••••••••••••••• Operations
53
<INITIAL SET UP/INFORMATION> (continued)
8. Turn the JOG dial to display the desired setting and turn the
SHUTTLE ring clockwise.
• The setting is confirmed and stops flashing.
9. (Finalizing update menu settings of the transmission
contents • • • )
Return to the <ETHERNET> screen by turnning the SHUTTLE
ring counterclockwise and turn the SHUTTLE ring
counterclockwise or press the SET UP button.
10. (Finalizing update menu settings of number of IP
ADDRESS , TRAGET PORT or OWN PORT • • • )
Return to the <ETHERNET> screen by turnning the SHUTTLE
ring counterclockwise and press the SET UP button.
• The power turns off automatically, then the unit will boot
up.
Press the SET UP button to return to the normal
screen without changing the setting.
■ INFORMATION/SERVICE
The <INFORMATION/SERVICE> screen is used to
check log and device lists after power failure, and initialization the menu. The total operating time is displayed
on the 2/2 screen.
<INFORMATION/SERVICE> 1/2
<INFORMATION/SERVICE>
(1/2)
>>HDD INFORMATION
CFC INFORMATION
WARNING LOG LIST
RESET TO FACTORY SETTINGS
MAIN HDD DATA CLEAR
SUB HDD DATA CLEAR
CFC DATA CLEAR
1-1. (To check HDD RECORD data • • • )
Press the SET UP button } <SETTINGS> } <INITIAL SET
UP/INFORMATION> } Select “HDD INFORMATION” in the
<INFORMATION/SERVICE> (1/2) screen, and turn the
SHUTTLE ring clockwise.
• The <HDD INFORMATION> screen is displayed.
<HDD INFORMATION>
INTERNAL HDD
MASTER:
HDD(250GB)
SLAVE :
NONE
MAIN START
END
SUB START
END
-------------------------------------
--:--:---:--:---:--:---:--:--
Recording start and end times of “SUB” area is appeared when the “HDD SETTING” is selected on
“PARTITION” of the <INITIALIZATION> screen.
1-2. (To check RECORD data of the Compact Flash Card
inserted into the unit or whether MENU INFORMATION is
recorded • • • )
Press the SET UP button } <SETTINGS> } <INITIAL SET
UP/INFORMATION> } Select “CFC INFORMATION” in the
<INFORMATION/SERVICE> (1/2) screen, and turn the
SHUTTLE ring clockwise.
• The <CFC INFORMATION> screen of the Compact Flash Card
inserted into the unit is displayed.
<CFC INFORMATION>
CFC
CAPACITY 128MB
START
END
---------- --:--:----------- --:--:--
<INFORMATION/SERVICE> 2/2
<INFORMATION/SERVICE>
ELAPSED TIME: SYSTEM
(2/2)
3H
MENU INFORMATION is appeared on the screen
when there is recorded MENU INFORMATION.
HDD SETTING
PARTITION SIZE
PARTITION
10%
The <INFORMATION/SERVICE> screen consists
of 2 pages. The second page is appeared by turning
the JOG dial clockwise when the cursor points out the
setting of the bottom of the screen.
“SUB HDD DATA CLEAR” is appeared on page
1/2 of the <INFORMATION/SERVICE> screen when
“PARTITION” is selected on “HDD SETTING” of the
<INITIALIZATION> screen.
“PARTITION SIZE” is appeared on page 2/2 of the
<INFORMATION/SERVICE>
screen
when
“PARTITION” is selected on “HDD SETTING” of the
<INITIALIZATION> screen.
2.Turn the SHUTTLE ring counterclockwise or press the SET
UP button.
♦ WARNING LOG LIST
The WARNING LOG LIST enables to check the number
of failure, date, time and type of failure, etc.
<INFORMATION/SERVICE>
HDD INFORMATION
CFC INFORMATION
(1/2)
>>WARNING LOG LIST
RESET TO FACTORY SETTINGS
MAIN HDD DATA CLEAR
SUB HDD DATA CLEAR
CFC DATA CLEAR
♦ HDD INFORMATION/CFC INFORMATION
INFORMATION is used to check the amount of
available space in the HDD and Compact Flash Cards
inserted into the unit.
••••••••••••••••••••••••••••••••••••••••••••••••••••••••••••••••••••••••••••••••••••••••••••••••••••••••••••••••••••••••••••••••••••••••••••
54
• The <WARNING LOG LIST> screen appears.
• The WARNING LOG LIST can display up to 1000 items. When
the number of items exceed this limit, the latest 1000 items
are displayed.
• button/turn JOG dial counterclockwise : Selection moves
to the next number.
•
button/turn JOG dial clockwise : Selection moves to the
previous number.
• button : Displays the page with date prior to the date of
the currently opened page.
• button : Displays the page with date newer than the date
of the currently opened page.
♦ RESET TO FACTORY SETTINGS
Menu screen settings are reset.
ENGLISH
1. Press the SET UP button } <SETTINGS> } <INITIAL SET
UP/INFORMATION> } Select “WARNING LOG LIST” in the
<INFORMATION/SERVICE> (1/2) screen. Turn the SHUTTLE
ring clockwise.
1. Press the SET UP button } <SETTINGS> } <INITIAL SET
UP/INFORMATION> } Select “RESET TO FACTORY
SETTINGS” in the <INFORMATION/SERVICE> (1/2) screen.
Turn the SHUTTLE ring clockwise.
• The <RESET TO FACTORY SETTINGS> screen appears.
• When not resetting menu screen settings, turn the SHUTTLE
ring counterclockwise.
<RESET TO FACTORY SETTINGS>
>>EXECUTE
When a failure occurs while the <WARNING LOG
LIST> is being displayed, exit the screen and display
the screen again. A new item will be added to the list.
SHUTTLE>>:EXECUTE,<<:CANCEL
Failures displayed in the WARNING LOG LIST
see pages 87,88).
(
<WARNING LOG LIST>
NO
DATE
TIME
WARNING
>>0001 02-02-04 10:00:00 ALM ON
<The “WARNING” are displayed in red.>
• “P-LOSS” : Power failure.
• “SYS RST” : Reset button was pressed and the unit
was reset.
<The “WARNING” are displayed in green.>
• “ALM OFF” : The ALARM INTERRUPT button was
pressed and the unit was put on interruption.
• “ALM ON” : The ALARM INTERRUPT button was
pressed and the alarm interrupt was cancelled.
• “REC ON” : The record was started.
• “REC OFF” : The record was stopped.
• “PS-OFF” : PASSWORD LOCK was unlocked.
• “PS-1” : The PASSWORD level 1 was locked.
• “PS-2” : The PASSWORD level 2 was locked.
• “PS-3” : The PASSWORD level 3 was locked.
• “PS-4” : The PASSWORD level 4 was locked.
• “PS-E” : The SIMPLE LOCK was locked.
When recording is started, “REC ON” is registered
in <WARNING LOG LIST>. However, “REC ON” will
not be registered when recording is resumed after
power is restored.
For power outages that occur while timer recording
is standing by, “P-LOSS” that indicates a power outage
is not displayed. In addition, power outages that overlap
with timer recording start times and those where power
is restored after the recording end time are also not
recorded.
2. Turn the SHUTTLE ring clockwise.
• The menu screen settings are reset.
The <TIMER PROGRAM> setting is not initialized.
When menu initialization is performed when a
setting change has been made for any one item of “IP
ADDRESS”, “SUB NET MASK”, “GATEWAY”,
“SERVICE PORT SETTING” on the <ETHERNET>
screen or “IP ADDRESS”, “TARGET” or “OWN” of the
<ALARM NOTIFICATION SETTING> settings, restart
is performed after the power has been cut.
3. Turn the SHUTTLE ring counterclockwise or press the SET
UP button.
♦ DATA CLEAR
For deleting data in MAIN HDD, SUB HDD or CFC (Compact Flash Card).
“SUB HDD DATA CLEAR” is appeared when the
“HDD SETTING” is selected on “PARTITION” of the
<INITIALIZATION> screen.
Performing “MAIN HDD DATA CLEAR” while in
“MIRRORING” mode deletes all data.
1. Press the SET UP button } <SETTINGS> } <INITIAL
SET UP/INFORMATION> } Select the desired item to clear
in the <INFORMATION/SERVICE> (1/2) screen. Turn the
SHUTTLE ring clockwise.
• “PUSH WARNING RESET KEY FOR 1 SECOND TO CLEAR”
appears on the bottom of the screen.
• To cancel the deletion, turn the SHUTTLE ring counterclockwise.
<MAIN HDD DATA CLEAR>
2. Turn the SHUTTLE ring counterclockwise or press the SET
UP button.
PUSH WARNING RESET KEY
FOR 1 SECOND TO CLEAR
•••••••••••••••••••••••••••••••••••••••••••••••••••••••••••••••••••••••••••••••••••••••••••••••••••••••••••••••••••••••••••• Operations
55
<INITIAL SET UP/INFORMATION> (continued)
When a password for level 4 has been registered
and locked, and the settings for “MAIN HDD DATA
CLEAR” and “SUB HDD DATA CLEAR” are made, the
<UNLOCK PASSWORD> screen will be displayed and
the lock must be unlocked.
2. Press the WARNING RESET button for 1 second.
• “CLEARING ...” appears on the screen.
Data cannot be erased when accessing to HDD as
playing/recording/copying/restoring.
3. Turn the SHUTTLE ring counterclockwise or press the SET
UP button.
■ PASSWORD
The unit is equipped with 2 lock functions : SIMPLE
LOCK that does not require the PASSWORD when unlocking and PASSWORD LOCK that require the PASSWORD when unlocking.
When The PASSWORD LOCK of level 1 is active,
functions of all operations can be locked.
3) Unlock the PASSWORD LOCK of level 1.
• The PASSWORD LOCK of level 2 will be active.
When The PASSWORD LOCK of level 2 is active,
only the SPLIT/SEQUENCE button, ZOOM button and
camera number buttons are operable.
4) Unlock the PASSWORD LOCK of level 2.
• The PASSWORD LOCK of level 3 will be active.
When The PASSWORD LOCK of level 3 is active,
it is operable except the SET UP button and ALARM
INTERRUPT button.
5) Unlock the PASSWORD LOCK of level 3.
• The PASSWORD LOCK of all levels will be unlocked.
Functions of all operations can be operable.
• If the PASSWORD for unlocking has not been set :
Lock function will be SIMPLE LOCK
• If the PASSWORD for unlocking has been set : Lock
function will be PASSWORD LOCK.
When the MAIN switch on the rear of the unit is set
to ON, SIMPLE LOCK/PASSWORD LOCK setting can
be made even with the POWER button on the front set
to OFF.
When the MAIN switch on the rear of the unit is set
to OFF or when a menu is being displayed, SIMPLE
LOCK/PASSWORD LOCK will not function.
♦ SIMPLE LOCK
When SIMPLE LOCK is on, buttons other than the
SPLIT/SEQUENCE button, ZOOM button, camera
number buttons 1 ~ 9 and the MAIN switch become
inoperable and the unit will be locked in the current state.
To apply simple lock • • •
1. Press the LOCK button using a ballpoint pen, etc., when
the MAIN switch is set to ON.
• The lock turns on and the LOCK indicator lights.
To unlock simple lock • • •
1. Press the LOCK button.
• The lock is unlocked and the LOCK indicator turns off.
♦ PASSWORD LOCK
PASSWORD LOCK is divided into the two types of “OPERATION CONTROL” and “HDD DATA CLEAR”. “OPERATION CONTROL” can be locked in three levels by
operation functions. “HDD DATA CLEAR” makes it possible to lock the settings “MAIN HDD DATA CLEAR” and
“SUB HDD DATA CLEAR”.
<About PASSWORD LOCK for OPERATION CONTROL (level 1 to level 3)>
1) Input the PASSWORD of level 1 to level 3.
For level 1 and level 2, press the LOCK button on
the front of the unit to display the <UNLOCK PASSWORD> screen. Input the PASSWORD to unlock. For
level 3, press the SET UP button to display the <UNLOCK
PASSWORD> screen and input the
PASSWORD. When don’t cancel the password lock, it
is in the state where the <UNLOCK PASSWORD>
screen is displayed, and please press the LOCK button.
When the MAIN switch (main power) on the rear is
set to ON, the PASSWORD can be registered, set and
cancelled even with the POWER button on the front is
set to OFF.
To register the PASSWORD • • •
The PASSWORD is registered using a 4 digit number
using numbers from 0 ~ 9.
1. Press the SET UP button } <SETTINGS> } Select
“PASSWORD” in the <INITIAL SET UP/INFORMATION> screen.
• The <PASSWORD> screen appears.
<PASSWORD>
>>OPERATION CONTROL
HDD DATA CLEAR
2-1. ( To register the PASSWORD for OPERATION CONTROL
for (level 1 to level 3) • • • )
Confirm the cursor is positioned at left side of “OPERATION
CONTROL”, turn the SHUTTLE ring clockwise.
• The <PASSWORD SETTING> screen appears.
<PASSWORD SETTING>
FIRST
----
SECOND
----
2
----
----
3
----
----
>>1
PRESS WARNING RESET BUTTON
TO CLEAR PASSWORD
SHUTTLE>>:TO SET PASSWORD
2) Set the PASSWORD LOCK.
• The PASSWORD LOCK of level 1 will be active.
••••••••••••••••••••••••••••••••••••••••••••••••••••••••••••••••••••••••••••••••••••••••••••••••••••••••••••••••••••••••••••••••••••••••••••
56
• The first input position of “FIRST” will be displayed in
reversed color and flashes.
<PASSWORD SETTING>
1
FIRST
----
SECOND
----
2
----
3
----
To unlock the PASSWORD • • •
1. ( To unlock the PASSWORD for level 1 and level 2 • • • )
Press the LOCK button.
• The <UNLOCK PASSWORD> screen appears.
<UNLOCK PASSWORD>
>>1
----
----
2
----
----
EXECUTE
PRESS CAMERA BUTTON TO ENTER
PASSWORD
SHUTTLE>>:TO SET PASSWORD
The PASSWORD may consist of the numbers from
1 to 9 which are assigned to the camera number buttons. 0 is assigned to the ZOOM button.
2. Confirm the cursor is moved to the left side of level “1” and
turn the SHUTTLE ring clockwise.
2-3. Input 4 digits of the PASSWORD by pressing the camera
number buttons and the ZOOM button.
3. Input 4 digits of the PASSWORD by pressing the camera
number buttons or the ZOOM button.
• The first input position of “SECOND” will be displayed
reversed color and flashs.
2-4. Input the PASSWORD entered in “FIRST” in “SECOND”.
• The cursor moves to the left side of the setting of level 1.
<PASSWORD SETTING>
ENGLISH
2-2. Confirm the cursor is moved to the left side of the level “1” ,
turn the SHUTTLE ring clockwise.
• The first digit reverse in color.
• The cursor moves to the left side of the setting of level 1.
4. Turn the JOG dial to select the level “2” and turn the
SHUTTLE ring clockwise.
• The first input position will be displayed reversed color.
5. Input the 4 digits of the PASSWORD by pressing the
camera number buttons or the ZOOM button.
FIRST
SECOND
• The cursor moves to the left side of the setting “2”.
2
----
----
3
----
----
When the PASSWORD LOCK of level 1 and level 2
are set, if unlock level 1 the PASSWORD LOCK of level
2 will be active.
>>1
PRESS WARNING RESET BUTTON
TO CLEAR PASSWORD
SHUTTLE>>:TO SET PASSWORD
Input the same number in “FIRST” and “SECOND”.
The setting returns to step 2 if the different PASSWORD
number is inputted.
2-5. Repeat steps 2-2 ~ 2-4 to set level 2 and level 3.
It is not necessary to input the PASSWORD all levels 1, level 2 and level 3. Input the PASSWORD in the
desired level only.
2-6. Turn the SHUTTLE ring counterclockwise.
3-1. ( To register the PASSWORD for HDD DATA CLEAR for
(level 4) • • • )
Turn the JOG dial to move the cursor to “HDD DATA CLEAR”,
turn the SHUTTLE ring clockwise.
• The <PASSWORD SETTING> screen appears.
When the PASSWORD LOCK of level 1 and level
2 are set, level 2 only can not be unlocked. Be sure to
unlock level 1 too.
Input the PASSWORD correctly. If there is an error
in input, repeat steps 4 and 5 to input again.
6. Turn the JOG dial to move the cursor to “EXECUTE” and
turn the SHUTTLE ring clockwise.
• The PASSWORD LOCK is unlocked and turns off the LOCK
indicator.
• The normal screen is returned.
7. ( To unlock the PASSWORD for level 3 • • • )
Press the SET UP button.
• The <UNLOCK PASSWORD> screen appears.
<UNLOCK PASSWORD>
3
----
<PASSWORD SETTING>
>>4
FIRST
----
SECOND
----
3-2. Repeat steps 2-2 ~ 2-4 to set level 4.
4. Turn the SHUTTLE ring counterclockwise, or press the
SET UP button.
The password lock for HDD data deletion (level
4) becomes effective when leaving the setting
screen.
PRESS CAMERA BUTTON TO ENTER
PASSWORD
When the PASSWORD LOCK of level 1, level 2
and level 3 are set, the PASSWORD LOCK of level 2
will be active in case of unlocking level 1 , and level 3
will be active in case of unlocking level 1 and level 2.
When the PASSWORD LOCK of level 1, level 2
and level 3 are set, level 3 only can not be unlocked.
Be sure to unlock level 1 and level 2 too.
•••••••••••••••••••••••••••••••••••••••••••••••••••••••••••••••••••••••••••••••••••••••••••••••••••••••••••••••••••••••••••• Operations
57
<INITIAL SET UP/INFORMATION> (continued)
8. Input the 4 digits of the PASSWORD number by pressing
the camera number buttons or the ZOOM button.
• The PASSWORD LOCK is unlocked and turns off the LOCK
indicator.
• The normal screen is returned.
Press the LOCK button to return to the normal
screen without input PASSWORD.
9. ( To unlock the PASSWORD for level 4 • • • )
Set “MAIN HDD DATA CLEAR” or “SUB HDD DATA CLEAR”
at the <INFORMATION/SERVICE> (1/2) screen.
• The <UNLOCK PASSWORD> screen appears.
<UNLOCK PASSWORD>
4
3-4. Input the new PASSWORD referring to “To register the
PASSWORD • • •”.
Changing from PASSWORD LOCK mode to
SIMPLE LOCK mode • • •
1.Unlock the PASSWORD of level 1 to level 3 to display the
<PASSWORD SETTING> screen.
<PASSWORD SETTING>
FIRST
SECOND
>>1
2
3
PRESS WARNING RESET BUTTON
TO CLEAR PASSWORD
SHUTTLE>>:TO SET PASSWORD
----
10. Input the 4 digits of the PASSWORD number by pressing
the camera number buttons or the ZOOM button.
2. Confirm the cursor is at the left side of level 1 and press the
WARNING RESET button.
• The PASSWORD LOCK is unlocked and DATA CLEAR screen
appears.
• The PASSWORD in “FIRST” and “SECOND” are cleared to
appear “- - - -”.
To lock the PASSWORD (only level1 to level 3) • • •
3. Turn the JOG dial to move the cursor to level 3 after level 2
press the WARNING RESET button.
1. Press the LOCK button using a ballpoint pen, etc., when
the MAIN switch is set to ON.
• The PASSWORD of all levels are changed to display “- - - -”.
• The PASSWORD LOCK is applied and the LOCK indicator lights.
To change the PASSWORD • • •
4. Turn the SHUTTLE ring counterclockwise or press the SET
UP button.
1. Unlock the PASSWORD of level 1 to level 3 to display the
<PASSWORD SETTING> screen.
■ LANGUAGE SELECTION
See Page 25.
2-1. (To change the PASSWORD for level 1 to level 3 • • • )
Display the <PASSWORD SETTING> (level 1 to level 3)
screen. Turn the JOG dial to move the cursor to desired level
to change the PASSWORD number and press the WARNING
RESET button.
• The PASSWORD in “FIRST” and “SECOND” are cleared to
appear “- - - -”.
<PASSWORD SETTING>
FIRST
SECOND
>>1
2
3
PRESS WARNING RESET BUTTON
TO CLEAR PASSWORD
SHUTTLE>>:TO SET PASSWORD
2-2. Input the new PASSWORD referring to “To register the
PASSWORD • • •”.
3-1. (To change the PASSWORD for level 4 • • • )
Display the <PASSWORD> screen. Turn the JOG dial to move the
cursor to cursor to “HDD DATA CLEAR”, and turn SHUTTLE ring
clockwise.
• The <CHANGE PASSWORD> screen appears.
3-2. Input the 4 digits of the PASSWORD number by pressing
the camera number buttons or the ZOOM button.
• The PASSWORD LOCK is unlocked and <PASSWORD
SETTING> screen appears.
3-3. Press the WARNING RESET button.
• The PASSWORD in “FIRST” and “SECOND” are cleared to
appear “- - - -”.
••••••••••••••••••••••••••••••••••••••••••••••••••••••••••••••••••••••••••••••••••••••••••••••••••••••••••••••••••••••••••••••••••••••••••••
58
<QUICK SETTINGS>
Menu settings stored on the Compact Flash Card can
be read and altered with the unit. Menu settings in the
unit can be copied to the Compact Flash Card.
During execution of menu quick settings, other operations are not accepted.
♦ To update menu settings of this unit
To read/alter menu settings stored on the Compact
Flash Card using the unit, synchronize the HDD setting
to that of the unit the menu settings were copied to. The
HDD setting that needs to be synchronized is the “HDD
SETTING”, and “PARTITION SIZE”.
If the HDD settings are not synchronized, the menu
settings are not updated.
1. Insert a Compact Flash Card recorded with menu settings
into the COMPACT FLASH slot of this unit.
2. Select “QUICK SETTINGS” in the <SETTINGS> screen and
turn the SHUTTLE ring clockwise.
After menu read-out has been completed, the time
is not reflected and the correct time should be set.
ENGLISH
■ QUICK SETTINGS
5. (Finalizing updated menu settings • • • )
Turn the SHUTTLE ring counterclockwise three times, or return
to normal screen by pressing the SET UP button.
6. Press the POWER button to turn the unit off, then press it
once more to turn the unit back on.
• The setting is confirmed.
♦ To save menu settings of this unit to a Compact
Flash Card
1. Insert a Compact Flash Card into the COMPACT FLASH
slot of this unit.
2. Select “QUICK SETTINGS” in the <SETTINGS> screen and
turn the SHUTTLE ring clockwise.
• The <QUICK SETTINGS> screen appears.
3. Select “SAVE SETTING DATA TO CFC” and turn the
SHUTTLE ring clockwise.
• The <SETTING DATA SAVING> screen appears.
• When not saving the menu settings to the Compact Flash
Card, turn the SHUTTLE ring counterclockwise.
• The <QUICK SETTINGS> screen appears.
<SETTING DATA SAVING>
<QUICK SETTINGS>
>>LOAD SETTING DATA FROM CFC
SAVE SETTING DATA TO CFC
>>EXECUTE
SHUTTLE>>:EXECUTE,<<:BACK
3. Select “LOAD SETTING DATA FROM CFC” and turn the
SHUTTLE ring clockwise.
• The <SETTING DATA LOADING> screen appears.
• To cancel the update of menu settings, turn the SHUTTLE
ring counterclockwise.
<SETTING DATA LOADING>
>>EXECUTE
4. Turn the SHUTTLE ring clockwise.
• The menu settings are overwritten in the Compact Flash
Card and <<COMPLETED>> appears on the screen.
• When no Compact Flash Card has been inserted <<MEDIA
NONE>> will appear on the screen.
5. Turn the SHUTTLE ring counterclockwise or press the SET
UP button.
Menu read-out, setting change, and menu copying
can be performed only when this unit is stopped (stop
of playback/recording/communication).
For LOAD/SAVE in the menu sometimes it takes a
few seconds immediately after perform “EXECUTE”.
SHUTTLE>>:EXECUTE,<<:BACK
4. Turn the SHUTTLE ring clockwise.
• The menu settings of this unit is updated and
<<COMPLETED>> appears on the screen.
• When no Compact Flash Card has been inserted <<MEDIA
NONE>> will appear on the screen.
Turn off POWER to finalize updated menu settings.
When data with setting changes for any one item
of “IP ADDRESS”, “SUB NET MASK”, “GATEWAY”,
“SERVICE PORT SETTING” on the <ETHERNET>
screen or “IP ADDRESS”, “TARGET” or “OWN” of the
<ALARM NOTIFICATION SETTING> settings are read
out or when settings are changed, restart is performed
after the power has been cut.
•••••••••••••••••••••••••••••••••••••••••••••••••••••••••••••••••••••••••••••••••••••••••••••••••••••••••••••••••••••••••••• Operations
59
Operation examples
■ Operation example 1
This example illustrates the procedure for switching between cameras according to time and day, when different
numbers of cameras are allocated to RECORD SETTINGS
A and B for normal recording in Timer record mode.
For loading of camera video,
see “Relation
of recording operation to the number of cameras
and recording interval settings”, page 89.
< Operation >
5) <RECORD SETTING A> screen setting (
• REC MODE A (normal recording with all cameras) is
set to Monday ~ Friday from 08:00 to 15:00 and REC
MODE B (normal recording with camera number “ 1 ”,
“ 2 ”, “ 3 ”, “ 7 ”, “ 8 ”, “ 9 ” ) is set to 15:00 ~ 20:00.
• On weekends, REC MODE B (normal recording with camera number “ 1 ”, “ 2 ”, “ 3 ”, “ 7 ”, “ 8 ”, “ 9 ” ) is set to
08:00 ~ 17:00.
08:00
From Monday
to Friday
15:00
20:00
REC MODE B
REC MODE A
08:00
Saturday and
Sunday
<TIMER PROGRAM SETTINGS>
>>SELECTED PATTERN
P1-SET
HOLIDAY SETTING
REC MODE A
REC MODE B
REC MODE C
REC MODE D
ALARM REC DURATION
5S
17:00
<RECORD SETTING A>
<RECORD SETTING
NO PPS
GRADE
2.5P
STD
1
2.5P
STD
2
2.5P
STD
3
4
2.5P
STD
2.5P
STD
5
6
2.5P
STD
2.5P
STD
7
2.5P
STD
8
>> 9 2.5P
STD
<ESTD REC>
A> ALARM CH
A-PPS A-GRADE
------ STD
------ STD
------ STD
------ STD
------ STD
------ STD
------ STD
------ STD
------ STD
D H M
6) <RECORD SETTING B> screen setting (
REC MODE B
< Setting >
1) <CAMERA TITLE/MEMO SETTING> screen setting
(
see pages 32,33).
• All cameras ( “ 1 ” ~ “ 9 ” ).
• Input title.
see page 46).
• All cameras ( “ 1 ” ~ “ 9 ” ).
• PPS, GRADE : Set desired interval and picture quality
for each camera.
• A-PPS : “- - - - - -”.
see page 46).
• Camera number “ 1 ”, “ 2 ”, “ 3 ”, “ 7 ”, “ 8 ” and “ 9 ”
only.
• PPS, GRADE : Set desired interval and picture quality
for each camera.
• A-PPS : “- - - - - -”.
• Other camera.
• PPS, A-PPS : “- - - - - -”.
<RECORD SETTING B>
<CAMERA TITLE/MEMO SETTING>
<CAMERA TITLE/MEMO SETTING>
1
ENTRANCE1
2
ENTRANCE2
3
VAULT
4
COUNTER1
5
COUNTER2
6
COUNTER3
7
EXIT1
8
EXIT2
>> 9
PARKING
MEMO
••••••••••••••••
SHUTTLE>>:CHARACTERS
2) <INITIAL SET UP/INFORMATION> screen setting.
• AUDIO RECORDING : “OFF” (
see page 48)
<INITIAL SET UP/INFORMATION>
HDD SETTINGS
>>AUDIO RECORDING
OFF
REAR TERMINAL SETTINGS
3) <HDD SETTINGS> screen setting (
see pages 47,48 ).
• HDD REPEAT REC MAIN : “ON”.
<HDD SETTINGS>
>>HDD REPEAT REC MAIN
HDD REPEAT REC SUB
HDD REPEAT PLAY
IM-CHECK PLAY
ON
OFF
OFF
OFF
4) <TIMER PROGRAM SETTINGS> screen setting
(
see pages 44-46).
• SELECTED PATTERN : “P1”.
<RECORD SETTING
NO PPS
GRADE
4.165P SUPER
1
4.165P SUPER
2
3
4.165P SUPER
4
------ STD
5
------ STD
6
------ STD
7
4.165P SUPER
8
4.165P SUPER
>> 9 4.165P SUPER
<ESTD REC>
B> ALARM CH
A-PPS A-GRADE
------ STD
------ STD
------ STD
------ STD
------ STD
------ STD
------ STD
------ STD
------ STD
D H M
7) <TIMER PROGRAM> screen setting (
44,45).
see pages
• PROGRAM NO.1 : “SPL”, “08:00”, “15:00”, “A”, “OFF”.
• PROGRAM NO.2 : “SPL”, “15:00”, “20:00”, “B”, “OFF”.
• PROGRAM NO.3 : “SAT”, “08:00”, “17:00”, “B”, “OFF”.
• PROGRAM NO.4 : “SUN”, “08:00”, “17:00”, “B”, “OFF”.
• SPL : “MON - FRI”.
<TIMER PROGRAM>
DW
START END
1 SPL 08:00 15:00
2 SPL 15:00 20:00
3 SAT 08:00 17:00
4 SUN 08:00 17:00
5 --- --:-- --:-6 --- --:-- --:-7 --- --:-- --:-8 --- --:-- --:->>SPL
MODE
A
B
B
B
-------------
P1
MD
OFF
OFF
OFF
OFF
-
MON-FRI
When completed with all settings above and after clearing the menu screen, press the TIMER button. The unit
will switch to the timer mode.
••••••••••••••••••••••••••••••••••••••••••••••••••••••••••••••••••••••••••••••••••••••••••••••••••••••••••••••••••••••••••••••••••••••••••••
60
3) <HDD SETTINGS> screen setting (
• HDD REPEAT REC MAIN : “ON”.
This example uses the holiday setting.
< Operation >
• REC MODE A (normal recording with camera number
“ 1 ” ~ “ 9 ” ) is set to Monday ~ Friday from 08:00 to 15:00
and REC MODE B (normal recording with camera number
“ 1 ”, “ 2 ”, “ 3 ”, “ 7 ”, “ 8 ” and “ 9 ” ) is set to 15:00 ~
20:00.
• On weekends, REC MODE B (normal recording with camera number “ 1 ”, “ 2 ”, “ 3 ”, “ 7 ”, “ 8 ” and “ 9 ” ) is set
to 08:00 ~ 17:00.
• 31/12, 1/1, 2/1 and 3/1 are set as holidays and REC MODE
B is set to 08:00 ~ 17:00.
08:00
From Monday
to Friday
15:00
08:00
Saturday and
Sunday
17:00
REC MODE B
08:00
Holiday
(31/12, 1/1,
2/1, 3/1)
<HDD SETTINGS>
>>HDD REPEAT REC MAIN
HDD REPEAT REC SUB
HDD REPEAT PLAY
IM-CHECK PLAY
ON
OFF
OFF
OFF
4) <TIMER PROGRAM SETTINGS> screen setting (
see pages 44-46).
• SELECTED PATTERN : “P2”.
• HOLIDAY SETTING : 31/12, 01/01, 02/01, 03/01.
<TIMER PROGRAM SETTINGS>
SELECTED PATTERN
P2-SET
>>HOLIDAY SETTING
REC MODE A
REC MODE B
REC MODE C
REC MODE D
ALARM REC DURATION
5S
20:00
REC MODE B
REC MODE A
see pages 47,48).
ENGLISH
■ Operation example 2
<HOLIDAY SETTING>
31/12 01/01 02/01
--/-- --/-- --/---/-- --/-- --/---/-- --/-- --/---/-- --/-- --/--
03/01
--/---/---/---/--
17:00
REC MODE B
DAY/MONTH
5) <RECORD SETTING A> screen setting (
When overlap both holidays set in the <HOLIDAY SETTING> screen and the <TIMER PROGRAM> screen, the unit records giving the priority
to the holiday set in the <TIMER PROGRAM> screen
over the others.
< Setting >
1) <CAMERA TITLE/MEMO SETTING> screen setting
(
see pages 32,33).
• Camera number “ 1 ” ~ “ 9 ”.
• Input title.
<CAMERA TITLE/MEMO SETTING>
<CAMERA TITLE/MEMO SETTING>
1
ENTRANCE1
2
ENTRANCE2
3
VAULT
4
COUNTER1
5
COUNTER2
6
COUNTER3
7
EXIT1
8
EXIT2
9
>>
PARKING
MEMO
••••••••••••••••
SHUTTLE>>:CHARACTERS
2) <INITIAL SET UP/INFORMATION> screen setting.
• AUDIO RECORDING : “OFF” (
see page 48).
<INITIAL SET UP/INFORMATION>
HDD SETTINGS
>>AUDIO RECORDING
OFF
REAR TERMINAL SETTINGS
see page 46).
• Camera number “ 1 ” ~ “ 9 ”.
• PPS, GRADE : Set desired interval and picture quality
for each camera.
• A-PPS : “- - - - - -”.
<RECORD SETTING A>
<RECORD SETTING
NO PPS
GRADE
2.5P
STD
1
2.5P
STD
2
2.5P
STD
3
4
2.5P
STD
2.5P
STD
5
6
2.5P
STD
2.5P
STD
7
2.5P
STD
8
>> 9 2.5P
STD
<ESTD REC>
A> ALARM CH
A-PPS A-GRADE
------ STD
------ STD
------ STD
------ STD
------ STD
------ STD
------ STD
------ STD
------ STD
D H M
6) <RECORD SETTING B> screen setting (
see page 46).
• Camera number “ 1 ”, “ 2 ”, “ 3 ”, “ 7 ”, “ 8 ” and
“ 9 ” only.
• PPS, GRADE : Set desired interval and picture quality
for each camera.
• A-PPS : “- - - - - -”.
• Other camera.
• PPS, A-PPS : “- - - - - -”.
<RECORD SETTING B>
<RECORD SETTING
NO PPS
GRADE
4.165P SUPER
1
4.165P SUPER
2
3
4.165P SUPER
4
------ STD
5
------ STD
6
------ STD
7
4.165P SUPER
8
4.165P SUPER
>> 9 4.165P SUPER
<ESTD REC>
B> ALARM CH
A-PPS A-GRADE
------ STD
------ STD
------ STD
------ STD
------ STD
------ STD
------ STD
------ STD
------ STD
D H M
•••••••••••••••••••••••••••••••••••••••••••••••••••••••••••••••••••••••••••••••••••••••••••••••••••••••••••••••••••••••••••• Operations
61
Operation examples (continued)
7) <TIMER PROGRAM> screen setting (
44,45 ).
see pages
• PROGRAM NO.1 : “SPL”, “08:00”, “15:00”, “A”, “OFF”.
• PROGRAM NO.2 : “SPL”, “15:00”, “20:00”, “B”, “OFF”.
• PROGRAM NO.3 : “SAT”, “08:00”, “17:00”, “B”, “OFF”.
• PROGRAM NO.4 : “SUN”, “08:00”, “17:00”, “B”, “OFF”.
• PROGRAM NO.5 : “HOL”, “08:00”, “17:00”, “B”, “OFF”.
• SPL : “MON - FRI”.
<TIMER PROGRAM>
DW
START END
1 SPL 08:00 15:00
2 SPL 15:00 20:00
3 SAT 08:00 17:00
4 SUN 08:00 17:00
5 HOL 08:00 17:00
6 --- --:-- --:-7 --- --:-- --:-8 --- --:-- --:->>SPL
MODE
A
B
B
B
B
----------
<MOTION DETECTION SETTINGS>
>>SELECTION CAMERA NO.
1
DETECTION MASK SETTING
SENSITIVITY
HIGH••<<<LOW
MOTION THRESHOLD
5
TEST MODE
P2
MD
OFF
OFF
OFF
OFF
OFF
-
4) <TIMER PROGRAM SETTINGS> screen setting (
see pages 44-46).
• SELECTED PATTERN : “P3”.
• ALARM REC DURATION : “5M”.
MON-FRI
When completed with all settings above and after clearing the menu screen, press the TIMER button. The unit
will switch to the timer mode.
■ Operation example 3
This example illustrates the procedure for using Pre-alarm
recording, Alarm recording, Emergency recording with normal recording in Timer record mode.
< Operation >
• On weekends, REC MODE D (pre-alarm recording, alarm
recording and emergency recording with camera number
“ 1 ”, “ 2 ”, “ 3 ”, “ 7 ”, “ 8 ” and “ 9 ” ) is set to 08:00 ~
08:00 of the following day.
15:00
08:00
REC MODE C
Next day
08:00
REC MODE D
Next day
08:00
08:00
Saturday and
Sunday
<TIMER PROGRAM SETTINGS>
SELECTED PATTERN
P3-SET
HOLIDAY SETTING
REC MODE A
REC MODE B
REC MODE C
REC MODE D
>>ALARM REC DURATION
5M
5) <REC MODE C> screen setting (
• REC MODE C (pre-alarm recording, alarm recording and
emergency recording with all cameras) is set to Monday ~
Friday from 08:00 to 15:00 and REC MODE D (pre-alarm
recording, alarm recording and emergency recording with
camera number “ 1 ”, “ 2 ”, “ 3 ”, “ 7 ”, “ 8 ” and “ 9 ”) is
set to 15:00 ~ 08:00 of the following day.
From Monday
to Friday
3) Set each item in the <MOTION DETECTION SETTINGS> screen for all cameras (
see pages 39,40).
REC MODE D
< Setting >
1) Set 1) ~ 3) of “Operation example “ 1 ” previous.
2) <REAR TERMINAL SETTINGS> screen setting (
page 51).
• EMERGENCY REC DURATION : “20M”.
<REAR TERMINAL SETTINGS>
MODE OUT 1
OFF
MODE OUT 2
OFF
MODE OUT 3
OFF
MODE OUT 4
OFF
MODE OUT 5
OFF
KEY SOUND
ON
BUZZER
OFF
REMAIN HDD
MAIN-10%
CALL OUT SETTINGS
>>EMERGENCY REC DURATION
20M
see
see page 46).
• MOTION DET REC : “ALARM”
• PRE ALARM REC : Set desired pre-alaem recording time.
<REC MODE C>
ALARM SETTING
RECORD SETTING
PRE ALARM REC
>>MOTION DET REC
( S
)
S
ALARM
6) <ALARM SETTING C> screen setting (
46).
see page
• All cameras ( “ 1 ” ~ “ 9 ” ).
• TRIGGER : MD/EXT.
• EMR : All cameras ( “ 1 ” ~ “ 9 ” ) is setting.
<ALARM SETTING C>
<ALARM SETTING C> ALARM CH
ALARM RECORD CAMERA
TRIGGER
1
MD/EXT
1 -------2
- 2 ------MD/EXT
3
-- 3 -----MD/EXT
4
--- 4 ----MD/EXT
5
---- 5 ---MD/EXT
6
----- 6 --MD/EXT
7
------ 7 -MD/EXT
8
------- 8 MD/EXT
>>9
-------- 9
MD/EXT
EMR
12 345 6789
7) <RECORD SETTING C> screen setting (
46).
see page
• Camera selection during alarm recording : “ALARM CH”.
• All cameras ( “ 1 ” ~ “ 9 ” ).
• PPS, GRADE, A-PPS, A-GRADE : Set desired interval
and picture quality for each camera.
When “0S” is selected, the pre-alarm recording
is inoperable.
••••••••••••••••••••••••••••••••••••••••••••••••••••••••••••••••••••••••••••••••••••••••••••••••••••••••••••••••••••••••••••••••••••••••••••
62
<RECORD SETTING
NO PPS
GRADE
2.5P
STD
1
2.5P
STD
2
2.5P
STD
3
4
2.5P
STD
2.5P
STD
5
6
2.5P
STD
2.5P
STD
7
2.5P
STD
8
>> 9 2.5P
STD
<ESTD REC>
<TIMER PROGRAM>
DW
START END
1 SPL 08:00 15:00
2 SPL 15:00•08:00
3 SAT 08:00•08:00
4 SUN 08:00•08:00
5 --- --:-- --:-6 --- --:-- --:-7 --- --:-- --:-8 --- --:-- --:--
C> ALARM CH
A-PPS A-GRADE
2.5P
HIGH
2.5P
HIGH
2.5P
HIGH
2.5P
HIGH
2.5P
HIGH
2.5P
HIGH
2.5P
HIGH
2.5P
HIGH
2.5P
HIGH
D H M
8) <REC MODE D> screen setting (
>>SPL
see page 46).
• PRE ALARM REC : Set desired pre-alarm recording time.
• MOTION DET REC : “ALARM”
<REC MODE D>
ALARM SETTING
RECORD SETTING
PRE ALARM REC
>>MOTION DET REC
( S
)
MODE
C
D
D
D
-------------
ENGLISH
<RECORD SETTING C>
P3
MD
ON
ON
ON
ON
-
MON-FRI
When completed with all settings above and after clearing the menu screen, press the TIMER button. The unit
will switch to the timer mode.
S
ALARM
9) <ALARM SETTING D> screen setting (
see page 46).
• Camera number “ 1 ”, “ 2 ”, “ 3 ”, “ 7 ”, “ 8 ” and
“ 9 ” only.
• TRIGGER : MD/EXT.
<ALARM SETTING D>
<ALARM SETTING D> ALARM CH
ALARM RECORD CAMERA
TRIGGER
1
MD/EXT
1 -------2
- 2 ------MD/EXT
3
-- 3 -----MD/EXT
4
--- 4 ----EXT
5
---- 5 ---EXT
6
----- 6 --EXT
7
------ 7 -MD/EXT
8
------- 8 MD/EXT
>>9
-------- 9
MD/EXT
12 345 6789
EMR
10) <RECORD SETTING D> screen setting (
46).
see page
• Camera number “ 1 ”, “ 2 ”, “ 3 ”, “ 7 ”, “ 8 ” and
“ 9 ” only.
• PPS, GRADE, A-PPS, A-GRADE : Set desired interval
and picture quality for each camera.
• Other camera.
• PPS, A-PPS : “- - - - - -”.
When “0S” is selected, the pre-alarm recording
is inoperable.
<RECORD SETTING D>
<RECORD SETTING
NO PPS
GRADE
2.083P SUPER
1
2.083P SUPER
2
3
2.083P SUPER
4
------ STD
5
------ STD
6
------ STD
7
2.083P SUPER
8
2.083P SUPER
>> 9
2.083P SUPER
<ESTD REC>
D> ALARM CH
A-PPS A-GRADE
4.165P HIGH
4.165P HIGH
4.165P HIGH
------ STD
------ STD
------ STD
4.165P HIGH
4.165P HIGH
4.165P HIGH
D H M
11) <TIMER PROGRAM> screen setting (
44,45).
see pages
• PROGRAM NO.1 : “SPL”, “08:00”, “15:00”, “C”, “ON”.
• PROGRAM NO.2 : “SPL”, “15:00”, “08:00”, “D”, “ON”.
• PROGRAM NO.3 : “SAT”, “08:00”, “08:00”, “D”, “ON”.
• PROGRAM NO.4 : “SUN”, “08:00”, “08:00”, “D”, “ON”.
• SPL : “MON - FRI”.
•••••••••••••••••••••••••••••••••••••••••••••••••••••••••••••••••••••••••••••••••••••••••••••••••••••••••••••••••••••••••••• Operations
63
Various recordings
■ PRE ALARM RECORDINGS
During alarm recording, recording can be started a few
seconds before the ALARM IN terminal is grounded or
motion is detected.
For details concerning pre-alarm recording settings,
see “Recording mode settings A ~ D for
normal recording/alarm recording” page 46.
disturbance
Alarm input
Time
Camera input
Recording process
If a power outage occurs during emergency
recording, emergency recording is released after
power is restored.
If emergency recording is entered during timer
recording, recording is stopped at the timer recording end time.
2) Cameras used
• Recording is performed with all cameras with “A-PPS”
on the <RECORD SETTING> screen set to other than
“- - - - - -” out of the camera numbers selected by “EMR”
on the <ALARM SETTING> screen.
• During timer recording, recording is performed using all
cameras other than those set to “- - - - - -” in the recording
mode of the set time frame.
Records data on HDD before alarm is input.
Pre-alarm recording :
1) A PRE ALARM indicator will be turned on if a “PRE
ALARM REC” setup is set up in addition to “0S.”
2) Starts recording video before the ALARM IN terminal is
ground or motion is detected.
3) Can only be executed when pre-alarm recording has
been set in the <RECORD SETTINGS> screen or <REC
MODE A> ~ <REC MODE D> screen. The recording channels after input of an alarm signals is executed only of camera set in the <RECORD SETTINGS> screen and <REC
MODE A> ~ <REC MODE D> screen.
3) During recording
• The EMERGENCY indicator flashes and then turns on
when recording is completed.
• The camera number buttons that are used for alarm recording and the camera number display on the screen flash.
• The operation mode “ALARM” (in red) is displayed on the
screen.
To turn off the indicator, display the <ALARM LIST
SEARCH> screen and press the WARNING RESET
button for more than 5 seconds.
4) Recording is stored and displayed in the alarm list in
red.
When a prealarm recording enters during normal recording, pre-alarm recording may be performed for a time different from the time entered for
“PRE ALARM REC”.
When the alarm recording mode at the time of
prealarm recording is “ALARM CH”, prealarm
recording during normal recording is not possible
for all camera numbers set for alarm recording.
■ EMERGENCY RECORDINGS
If the EMERGENCY terminal is grounded when the MAIN
switch on the rear of the unit, and the POWER button on
the front of the unit are both ON and during timer recording, EMERGENCY RECORDING will start automatically
overriding all other settings.
Emergency recording cannot be made when the
MAIN switch is OFF, the POWER button is OFF
and during timer recording stand-by.
For details concerning emergency recording settings,
see page 51.
Emergency recording :
1) Emergency recording is performed using all cameras
set to recording interval in “A-PPS” in the <RECORD SETTING> screen which cameras are selected in “EMR” in the
<ALARM SETTING> screen. For the record “SUPER” in
“A-GRADE” is selected and “A-PPS” is the minimum recording interval which is selectable in each camera.
••••••••••••••••••••••••••••••••••••••••••••••••••••••••••••••••••••••••••••••••••••••••••••••••••••••••••••••••••••••••••••••••••••••••••••
64
Various playback functions
If this unit is prompted to receive a live image
while playing back, this unit will end playback.
While this unit is being prompted to receive a live
image while transmitting, this unit cannot play back.
1. Press the PAUSE button during playback.
• The unit switches to still frame playback. Press the button
again to resume playback.
• If a camera number (1 ~ 9) button is pressed during single
screen still frame playback, the video of the camera number
button pressed will be displayed by searching forward.
Image playback displays only one picture. Press
the camera button to perform search. When a
camera number without a recorded image or few
recorded images is specified, search may continue
for hours. If it is unnecessary, press the SEARCH
button to release search status.
■ Shuttle viewing/direct shuttle viewing
Turning the SHUTTLE ring during still frame playback, playback or reverse playback, the playback speed can be
changed.
1. (During shuttle viewing • • • )
Turn the SHUTTLE ring during still frame playback.
• The playback speed depends on the angle the SHUTTLE
ring is turned.
• When letting go of the SHUTTLE ring, the ring will return to
the center and the unit will return to still frame playback.
3
2
1
1
2
3
4
5
6
7
8
9
2. Let go of the SHUTTLE ring.
• The playback speed is maintained.
• To cancel shuttle hold, press the PAUSE button. The unit
will switch to still frame playback.
■ Frame-by-frame playback
1. Turn the JOG dial during still frame playback.
■ Playing still frames
4
1. Press the PAUSE (SHUTTLE HOLD) button while holding
the SHUTTLE ring in angle during shuttle playback.
ENGLISH
Various playback functions that can be operated using the
JOG dial and SHUTTLE ring keys are featured on this unit.
5
• Clockwise : Forward frame feeding.
• Counterclockwise : Reverse frame feeding.
• Clockwise and hold : Continuous forward frame feeding.
• Counterclockwise and hold : Continuous reverse frame
feeding.
• When turning of JOG dial is stopped : Unit returns to still
frame playback.
During frame feeding in the single screen mode,
the frame feeding operation may not operate correctly when the JOG dial is turned too fast since
frame feeding is performed while searching the video
of the display camera number.
■ Reverse playback
1. Press the REV. PLAY (REVERSE PLAYBACK) button while
playback is stopped.
• Playback will be made in the reverse direction. Playback
will stop when press the STOP button.
When reverse playback is performed first after
turning the power on, the last recorded video will be
played back in reverse first.
■ High-speed fast-forward/high-speed rewind
1. Turn the SHUTTLE ring for more than 1 second while
playback is stopped.
6
7
8
9
High-speed rewind (1GB units)
Reverse speed search (100MB units)
Reverse speed search (10MB units)
Reverse speed search (1MB units)
Still frame playback
Forward speed search (1MB units)
Forward speed search (10MB units)
Forward speed search (100MB units)
High-speed fast forward (1GB units)
2. (During direct shuttle viewing • • • )
Turn the SHUTTLE ring during playback or reverse playback.
• The playback speed depends on the angle the SHUTTLE
ring is turned.
• When letting go of the SHUTTLE ring, the ring will return to
the center and the unit will return to still frame playback. (The
unit will not return to playback or reverse playback.)
■ Shuttle hold
The playback speed can be maintained even when letting
go of the SHUTTLE ring during shuttle viewing.
• Clockwise for more than 1 second :
Will activate High-speed fast-forward playback (1GB units).
• Counterclockwise for more than 1 second :
Will activate High-speed rewind playback (1GB units).
• Press the STOP button: Playback is stopped.
During high-speed fast-forward/rewind, the current
position is displayed on the bottom or top of the screen.
S (start) and E (end) indicate the beginning and end of
the HDD space and “I” indicates the current position.
current position
S
E
■ Changing playback intervals
Although, playback and reverse playback use the same
interval as that for recording, it is possible to change the
playback interval. This function is useful for slow-motion
playback of fast-moving footage, or quick playback of extensive footage without skipping frames.
1-1. (To play back recording with fast motion slowly • • • )
Press the REV. PLAY (REVERSE PLAYBACK) button during
playback or reverse playback.
• Playback or reverse playback will be made at 0.125P intervals
per camera.
•••••••••••••••••••••••••••••••••••••••••••••••••••••••••••••••••••••••••••••••••••••••••••••••••••••••••••••••••••••••••••• Operations
65
Various playback functions (continued)
1-2. Press the PLAY button.
• The playback interval is changed to a faster setting (0.25P,
0.5P, and so on) each time the button is pressed.
2-1. (To play back video recorded using extended recording
intervals fast • • • )
Press the PLAY button during playback or reverse playback.
• Playback or reverse playback will be made at 50P intervals
per camera.
2-2. Press the REV. PLAY (REVERSE PLAYBACK) button.
• The playback interval is changed to a slower setting (25P,
12.5P, and so on) each time the button is pressed.
Audio cannot be played back when changing the
playback interval.
Once the playback interval is changed, audio
will not be played back even when returning the playback interval to the original value. To playback audio, pause playback and then play the video again.
Once the playback interval is changed, the green
display of the playback interval will remain unchanged even when returning the playback interval
to the original value. To check the original playback
interval of the recording, pause playback and then
play the video again.
Altering the playback interval settings and then
performing a quick playback of data with long recording time may cause discrepancies between actual recording time and the recording time displayed
on the screen.
When changing to the single display mode with
“2” or “3” set in “DISPLAY MODE” in the <TIME
DATE /DISPLAY SETTINGS> screen, the playback interval is displayed on the screen in green
for easy confirmation if the value is changed.
■ Simultaneous playback during recording
The recorded data can be played back simultaneously
during the unit is recording.
The video being played back may pause temporarily or the sound may be interrupted.
Noise may be noticeable on the video during
shuttle playback.
Split screen display can be selected individually
for recording/playback.
••••••••••••••••••••••••••••••••••••••••••••••••••••••••••••••••••••••••••••••••••••••••••••••••••••••••••••••••••••••••••••••••••••••••••••
66
Various search
If this unit is prompted to receive live images while
search is set, this unit will not move to perform
search. In addition, if prompted to receive live images
while searching, this unit will forcibly stop search.
This unit cannot search while being prompted to
receive live images.
Image playback displays only one picture. Press the
camera button to perform search. When a camera number
without a recorded image or few recorded images is
specified, search may continue for hours. If it is unnecessary,
press the SEARCH button to release search status.
“ALL” : Searches all camera numbers (“ 1 ” ~ “ 9 ”)
and displays all images on a 9 split-screen.
“ 1 ” ~ “ 9 ” : Searches selected camera numbers,
and displays on 1 screen the image that best
matches specified criteria.
1. Press the SEARCH button twice to display the <SEARCH
SELECTION> screen.
2. Display the desired setting in “SELECTION CAMERA
NUMBER” and confirm.
• The display returns to the search screen.
The search screen appears when the SEARCH button on this
unit is pressed. When pressing the SEARCH button again, the
<SEARCH SELECTION> screen appears to select the playback
device, search type and the camera number to search.
♦ SEARCH TYPE
When pressing the SEARCH button, which search screen
to display from the 5 search functions is set.
<SEARCH SELECTION>
>>SEARCH TYPE
TIME DATE
SELECTION CAMERA NUMBER
ALL
4. Turn the SHUTTLE ring counterclockwise or press the
SEARCH button.
♦ DATE/TIME
Displayed only when the previous “SEARCH TYPE” is
set to “ALARM LIST”. Used when narrowing down the
number of lists to display on the screen during alarm
see pages 70,71 ).
list search (
♦ PLAYBACK DEVICE
Select the HDD to play back.
MAIN
<SEARCH SELECTION>
SEARCH TYPE
TIME DATE
SELECTION CAMERA NUMBER
ALL
MAIN
START
END
“ALL”, “ 1 ”, “ 2 ”, “ 3 ”, “ 4 ”, “ 5 ”, “ 6 ”, “ 7 ”,
“ 8 ”, “ 9 ”
3. Turn the SHUTTLE ring counterclockwise.
■ SEARCH SELECTION
PLAYBACK DEVICE
Setting ( default : “ALL” )
ENGLISH
The various search functions of this unit can be used to
skip to the beginning of the desired video.
02-02-2004 00:00:00
04-04-2004 12:30:15
>>PLAYBACK DEVICE
MAIN
MAIN
Setting ( default : “TIME DATE” )
“TIME DATE”, “INDEX”, “ALARM INDEX”,
“ALARM SKIP”, “ALARM LIST”
1. Press the SEARCH button twice.
• The search screen appears when the button is pressed the
first time. The <SEARCH SELECTION> screen appears when
the button is pressed again.
2. Display the desired setting in “SEARCH TYPE” and confirm.
START
END
02-02-2004 00:00:00
04-04-2004 12:30:15
Setting ( default : “MAIN” )
“MAIN”, “SUB”, “CFC”
“SUB” is appeared on the screen when
“PARTITION” is selected on “HDD SETTING” of the
<INITIALIZATION> screen.
3. Turn the SHUTTLE ring counterclockwise.
• The search screen set in step 2 appears.
4. Turn the SHUTTLE ring counterclockwise or press the
SEARCH button.
♦ SELECTION CAMERA NUMBER
The camera number to search is selected. “SELECTION
CAMERA NUMBER” setting will not appear if “SEARCH
TYPE” is set to “INDEX SEARCH”.
<SEARCH SELECTION>
SEARCH TYPE
TIME DATE
>>SELECTION CAMERA NUMBER
ALL
PLAYBACK DEVICE
MAIN
MAIN
START
END
02-02-2004 00:00:00
04-04-2004 12:30:15
1. Press the SEARCH button twice to display the <SEARCH
SELECTION> screen.
2. Display the desired setting in “PLAYBACK DEVICE” and
confirm.
3. Turn the SHUTTLE ring counterclockwise.
• The display returns to the search screen.
4. Turn the SHUTTLE ring counterclockwise or press the
SEARCH button.
START/END display
The date/time of the recording start/end points of
the device set in “PLAYBACK DEVICE” is displayed.
Use this as reference when searching.
■ TIME DATE SEARCH
See pages 24,25.
•••••••••••••••••••••••••••••••••••••••••••••••••••••••••••••••••••••••••••••••••••••••••••••••••••••••••••••••••••••••••••• Operations
67
Various search (continued)
■ INDEX SEARCH/ALARM INDEX SEARCH
With this unit, index signals are automatically written to the HDD at the start
of each recording. It is possible to search these signals and playback starting at such index points.
There are 2 types of index searches :
• <INDEX SEARCH> : Searches index signals written when starts recording.
• <ALARM INDEX SEARCH> : Searches index signals written when starts
alarm recording and emergency recording.
Up to 99 indexes can be searched in either forward/reverse direction.
How indexes are counted for <INDEX SEARCH>, <ALARM INDEX
SEARCH>
Reverse
INDEX COUNT
99
02
Present
position
01
01
Recording
Recording
Recording
( )
( )
( )
Index
signal
Index
signal
Forward
Index
signal
99
02
Recording Recording
( )
Index
signal
Recording
( )
Index
signal
( )
Index
signal
( ) : Normal recording for INDEX SEARCH. Alarm recording or emergency
recording for ALARM INDEX SEARCH.
1. Press the SEARCH button.
• The search screen selected in the “SEARCH TYPE” (
see page 67) appears.
“SELECTION CAMERA NUMBER” setting will not appear if “INDEX SEARCH” is set.
2. (When the desired search screen is not displayed on the screen • • • )
Change the previous “SEARCH TYPE” setting and display the “INDEX SEARCH”
screen or “ALARM INDEX SEARCH” screen.
• When searching index signals of normal recording, display the “INDEX SEARCH”
screen.
• When searching index signals of alarm recording or emergency recording,
display the “ALARM INDEX SEARCH” screen.
• After performing INDEX SEARCH/ALARM INDEX SEARCH :
• SPLIT9 screen is always displayed for INDEX SEARCH.
• For ALARM INDEX SEARCH, SPLIT9 screen is displayed when setting the
“SELECTION CAMERA NUMBER” (
see page 67) to “ALL”. Single
screen with still frame playback is displayed when selecting individual
camera number.
When execute “ALARM INDEX SEARCH” while the “PARTITION”
is set, set to “SUB” in “PLAYBACK DEVICE”.
The camera number written by the start index signal of the prealarm recording may differ from the camera number displayed in the
alarm list.
<INDEX SEARCH>
>>INDEX
01
EXECUTE(FORWARD)
EXECUTE(REVERSE)
MAIN
START
02-02-2004 00:00:00
END
04-04-2004 12:30:15
PUSH SEARCH KEY FOR
SEARCH SELECTOIN
<ALARM INDEX SEARCH>
>>INDEX
01
EXECUTE(FORWARD)
EXECUTE(REVERSE)
MAIN
START
02-02-2004 00:00:00
END
04-04-2004 12:30:15
PUSH SEARCH KEY FOR
SEARCH SELECTION
3. Display the desired setting in “INDEX” and confirm.
4. Select “EXECUTE(FORWARD)” or “EXECUTE(REVERSE)” and confirm.
• “EXECUTE (FORWARD)” : Search is performed in the forward direction.
• “EXECUTE (REVERSE)” : Search is performed in the reverse direction.
• To cancel the search, press the SEARCH button twice.
• Search will not be performed if there are no index signals. To return to the normal
screen, press the SEARCH button twice.
Search may take time, depending on the recording status of the
index signal. Press the STOP button while searching to end search.
If the intervals of the index are long, search may continue for
hours.
5. Playback the search result.
• Press the PLAY (REV. PLAY) or PAUSE button.
••••••••••••••••••••••••••••••••••••••••••••••••••••••••••••••••••••••••••••••••••••••••••••••••••••••••••••••••••••••••••••••••••••••••••••
68
ENGLISH
6. To stop playback or still-frame playback, press the STOP button.
To change the desired camera number to the single screen display during still-frame playback in SPLIT9 display, press the SEARCH
button to clear the search setting screen and press the desired camera number button.
Search may not perform properly at times depending on the recorded condition of the index signals.
7. To clear the search screen, press the SEARCH button twice.
■ ALARM SKIP SEARCH
This function searches up to where the Alarm recording signal is located,
and can playback at 4 second intervals.
<ALARM SKIP SEARCH> In the case of forward direction
Present position
01
SKIP COUNT
02
Alarm
Recording
Index signal
Search
03
Alarm
Recording
Index signal
Search
Approx. 4 sec.
play
Search
Approx. 4 sec.
play
Alarm
Recording
Index signal
Search
Approx. 4 sec.
play
1. Press the SEARCH button.
• The search screen selected in the “SEARCH TYPE” (
see page 67) appears.
2. (When the desired search screen is not displayed on the screen • • • )
Change the previous “SEARCH TYPE” setting and display the “ALARM SKIP
SEARCH” screen.
3. Select “EXECUTE(FORWARD)” or “EXECUTE(REVERSE)” and confirm.
• “EXECUTE(FORWARD)” : Search is performed in the forward direction.
• “EXECUTE(REVERSE)” : Search is performed in the reverse direction.
• To cancel the search, press the SEARCH button twice.
• Playback of search result from skip search will be in SPLIT9 display regardless
of whether the “SELECTION CAMERA NUMBER” (
see page 67) is set to
“ALL” or individual camera number is selected.
• To return to the normal screen, press the SEARCH button twice.
When execute “ALARM SKIP SEARCH” while the “PARTITION”
is set, set to “SUB” in “PLAYBACK DEVICE”.
<ALARM SKIP SEARCH>
>>EXECUTE(FORWARD)
EXECUTE(REVERSE)
PUSH SEARCH KEY FOR
SEARCH SELECTION
Search may take time, depending on the recording status of the
index signal. Press the STOP button while searching to end search.
Press the desired camera number button when performing skip
search in SPLIT9 display, the video of the camera number button is
changed to single screen display.
4. Press the PAUSE button when the desired video is displayed and press the
PLAY button.
5. To stop ALARM SKIP SEARCH, press the STOP button.
6. To clear the search screen, press the SEARCH button twice.
When performing skip search in the reverse direction with index
signals of less than 4 seconds, that portion may play back repeatedly. In this case, press the STOP button to stop the search and
perform skip search in the reverse direction again after the particular
portion has been passed using reverse playback, etc.
•••••••••••••••••••••••••••••••••••••••••••••••••••••••••••••••••••••••••••••••••••••••••••••••••••••••••••••••••••••••••••• Operations
69
Various search (continued)
Search may not perform properly at times depending on the recorded condition of the index
signals.
Search may take time, depending on the
recording status of the index signal. Press the STOP
button while searching to end search.
Camera of alarm input
Recorded camera
<ALARM
>>00004
00003
00002
00001
LIST SEARCH>
01-01-2004 00:00:04
01-01-2004 00:00:03
01-01-2004 00:00:02
01-01-2004 00:00:01
2 1
EMR
1 1
EMR
6. To clear the search screen, press the SEARCH button twice.
■ ALARM LIST SEARCH
This unit stores the start time of alarm recording and emergency recording in the alarm list when such recording begins. It is also possible to index search the desired time (or
the closest time) from the list of alarm recording (emergency recording) start times stored in the alarm list.
To clear the alarm list, erase the data in the
<MAIN HDD DATA CLEAR> (<SUB HDD DATA
CLEAR>) screen. Beware that executing it erases
all the data of HDD contained the video data. Alarm
recording then will be stored again from 00001.
Up to 10,000 alarm recording (emergency recording) start times can be stored and displayed.
In the alarm list, items with the ALARM IN terminal on the rear grounded are indicated in white, items
that were detected with motion are indicated in green
and items with the EMERGENCY terminal grounded
are indicated in red.
1. Press the SEARCH button.
• The search screen selected in the “SEARCH TYPE” (
see page 67) appears.
<SEARCH SELECTION>
>>SEARCH TYPE
ALARM LIST
SELECTION CAMERA NUMBER
ALL
DATE/TIME
- : :
PLAYBACK DEVICE
SUB
SUB
START
END
02-02-2004 00:00:00
04-04-2004 12:30:15
PUSH SEARCH KEY
“Camera of alarm input” displays the camera
number which is input alarm signals, and “record
camera” displays the camera number which started
recording.
When the correspondent cameras for alarm signals are not set for the recording, the record is
storaged using the camera of the youngest number.
When execute “ALARM LIST SEARCH” while
the “PARTITION” is set, set to “SUB” in “PLAYBACK
DEVICE”.
If motion is detected and the ALARM IN terminal
on the back is grounded at the same time, all of
those start times may not be registered to the alarm
list. In such cases, the smallest numbered camera
is registered to the camera list.
4. Select the desired alarm list number and turn the
SHUTTLE ring clockwise to confirm.
• button/turn JOG dial counterclockwise : Selection moves
to the next number.
•
button/turn JOG dial clockwise : Selection moves to the
previous number.
• button : Displays the page with date prior to the date of
the currently opened page.
• button : Displays the page with date newer than the date
of the currently opened page.
• To cancel search, press the SEARCH button twice.
• After performing alarm search, the screen will be in the single
screen display with still-frame playback regardless of whether
setting “ALL” in the “SELECTION CAMERA NUMBER” (
see page 67) or selecting an individual camera number.
The Alarm list may take time to display completely
when there are many list items or the HDD has been
expanded.
The camera number written by the start index
signal of the pre-alarm recording may differ from the
camera number displayed in the alarm list.
2. (When the desired search screen is not displayed on the
screen • • • )
Change the previous “SEARCH TYPE” setting and display the
“ALARM LIST SEARCH” screen.
When setting “HDD REPEAT REC MAIN” to
“OFF” or “STANDBY”, “HDD REPEAT REC SUB” to
“OFF” and there is an alarm recording (emergency
recording) at the end of the HDD, that recording may
not be stored in the alarm list and that number may
become missing and not displayed.
To display the emergency recording start time in
the alarm list, set “SELECTION CAMERA NUMBER”
in the <SEARCH SELECTION> screen to “ALL”.
“EMR” indicating emergency recording will appear
in the place of the camera number in the alarm list.
When an alarm recording (emergency recording) is performed during using display of the
<ALARM LIST SEARCH> screen, exit the <ALARM
LIST SEARCH> screen and display the screen
again. The new item will be added to the list.
••••••••••••••••••••••••••••••••••••••••••••••••••••••••••••••••••••••••••••••••••••••••••••••••••••••••••••••••••••••••••••••••••••••••••••
70
ENGLISH
When using “DATE/TIME” in the <SEARCH SELECTION> screen, the number of list items displayed
on the screen can be narrowed down.
1. Press the SEARCH button to display the <SEARCH
SELECTION> screen.
2. Set the desired date and time of the result in “DATE/
TIME” and confirm.
3. Turn the SHUTTLE ring counterclockwise once to
display narrowed-down list.
4. Playback the search result.
• Press either the PLAY (REV. PLAY) or PAUSE button.
5. To stop playback or still-frame playback, press the STOP
button.
6. To clear the search screen, press the SEARCH button twice.
■ START/END SEARCH
It is possible to search the recording starting/ending point
of the device (media) selected by “PLAYBACK DEVICE” in
<TIMER DATE SEARCH>, <INDEX SEARCH> and
<ALARM INDEX SEARCH> for playback.
1. Press the SEARCH button.
• The search screen selected in previous “SEARCH TYPE”
appears.
2-1. (To play back the oldest recording • • • )
Select “START” and turn the SHUTTLE ring clockwise.
2-2. (To play back the last recording • • • )
Select “END” and turn the SHUTTLE ring clockwise.
3. Playback the search result.
• Press the PLAY (REV. PLAY) or PAUSE button.
4. To stop playback or still-frame playback, press the STOP
button.
To change the SPLIT9 screen during still-frame
playback to single screen display of the desired camera number, press the SEARCH button to clear the
search mode screen and press the desired camera
number button.
5. To clear the search screen, press the SEARCH button twice.
•••••••••••••••••••••••••••••••••••••••••••••••••••••••••••••••••••••••••••••••••••••••••••••••••••••••••••••••••••••••••••• Operations
71
Making Copy/Restore
■ Making Copy/Restore
3. Display the desired setting in “MODE” and confirm.
Data in MAIN HDD or SUB HDD can be copied to Compact
Flash Card. Data in Compact Flash Cards can be restored
to MAIN HDD.
Setting ( default : “OVERWRITE” )
“OVERWRITE” : Overwrites current data.
Setting
“MAIN HDD } CFC” : The data recorded on MAIN
HDD is copied to Compact Flash Card.
“SUB HDD } CFC” : The data recorded on SUB
HDD is copied to Compact Flash Card.
“CFC } MAIN HDD” : The data recorded on Compact Flash Card is restored to MAIN HDD.
“SUB HDD } CFC” is appeared when “PARTITION” is selected on “HDD SETTING” of the <INITIALIZATION> screen.
Before use, read the cautionary notes described
in the manual included with Compact Flash Card.
1-1. (To copy to a Compact Flash Card • • • )
Insert the Compact Flash Card into the COMPACT FLASH
slot of this unit.
1-2. Press the COPY button.
• The <COPY> screen appears.
1-3. Display “MAIN HDD } CFC” (“SUB HDD } CFC”) on
“DIRECTION” and confirm.
<COPY>
>>DIRECTION
MAIN HDD}CFC
MODE
OVERWRITE
TRANSFER PERIOD
START•END
START
01-01-2004 00:00:00
END
01-01-2004 00:00:10
EXECUTE
2-1. (To restore data from or Compact Flash Card • • • )
Press the COPY button.
• The COPY screen is displayed.
2-2. Display the desired setting “CFC } MAIN HDD” on
“DIRECTION” and confirm.
<RESTORE>
>>DIRECTION
CFC}MAIN HDD
MODE
OVERWRITE
TRANSFER PERIOD
START•END
START
01-01-2004 00:00:00
END
01-01-2004 00:00:10
EXECUTE
The menu changes to <RESTORE> when “CFC
} MAIN HDD” is selected.
The warning display at the time of RESTORE
execution displays “RESTORE/XXX” when the <RESTORE> screen is displayed and “REST/XXX” when
the normal screen is displayed.
“NO OVERWRITE” : Writes following last entry.
When “DIRECTION”, and “OVERWRITE” on
“MODE”, all data on the Compact Flash Card regardless of menu division is overwritten.
4. Display the desired setting in “TRANSFER PERIOD” and
confirm.
Setting ( default : “START•END” )
“START•END” : Sets the recording start/end date/
time.
“START” : Sets the recording start date/time.
“LATEST DATA” : Starts copying from the end point
according to the available memory in the COPY device.
5. Set the desired copy (restore) start date and time to “START”
and confirm.
6. (When setting “START•END” in step 4 • • • )
Set the desired copy (restore) end date and time to “END”
and confirm.
7. Select “EXECUTE” and turn the SHUTTLE ring clockwise.
• The copy (restore) operation is executed.
• If the copy (restore) operation does not start, turn the
SHUTTLE ring counterclockwise or press the COPY button.
The “COPY/NO MEDIA” or “REST/NO MEDIA”
warning is displayed when executing COPY or
RESTORE without a Compact Flash Card inserted
in the slot.
If the copy range exceeds the available capacity of the Compact Flash Card, “COPY/SIZE/
DATA ERROR” warning will appear on the screen
when copying (
see pages 87,88). In this case,
set again using narrower copy range or insert a
Card larger capacity.
If a data with no date is included in the copy
range, “COPY/SIZE/DATA ERROR” warning will appear on the screen.
When there is no data to restore in the Compact
Flash Card “REST/SIZE/DATA ERROR” warning will
appear on the screen when restoring.
A “REST/MEDIA ERROR” error is displayed
when executing RESTORE from a non-FSM2 Compact Flash Card.
For usable Compact Flash Card, check with your
dealer of purchase.
When copy is performed during record, an image may not be recorded at the time of a copy start
and an end. Be careful.
••••••••••••••••••••••••••••••••••••••••••••••••••••••••••••••••••••••••••••••••••••••••••••••••••••••••••••••••••••••••••••••••••••••••••••
72
ENGLISH
For the recordable time when copying to a Comsee page 84.
pact Flash Card,
This image data is administrated in 1MB unit.
Therefore, the copied area may be larger than the
set area because copying is performed in 1MB units
that include the specify area.
■ Copying from unit to videotape
Data can be copied even when the unit is recording. For
recording operations, see the instruction manual accompanying the analog video cassette recorder.
To AUDIO OUT
terminal
To VIDEO OUT
terminal
VIDEO CORD
(commercially
available cable)
To VIDEO IN
terminal
AUDIO CORD
(commercially
available cable,
if necessary)
To AUDIO IN
terminal
ANALOGUE VIDEO CASSETTE RECORDER
1. [Analogue video cassette recorder] Prepare the unit for
recording.
• First, set the input source to the external input connecting
this unit.
2. [This unit] Press the SPLIT/SEQUENCE button to select
the screen type to play back (
see page 36).
• Single screen, SPLIT4 (a, b and c) screen and SPLIT9 screen
can be selected.
It is also possible to copy the video of each camera in order using single screen sequential playback (
see “SEQUENTIAL PLAY”, page 48).
3. [This unit] Use the search function to move to the beginning
of the video to copy (
see “START/END SEARCH”, page
71).
4. [Analogue video cassette recorder] Start recording.
5. [This unit] Press the PLAY button to start playback.
6. To stop copying, press the STOP button of this unit. After
stopping playback, stop the recording on the analogue video
cassette recorder.
Only video recorded of camera number displayed on the screen can be copied to videotape.
•••••••••••••••••••••••••••••••••••••••••••••••••••••••••••••••••••••••••••••••••••••••••••••••••••••••••••••••••••••••••••• Operations
73
Other convenient functions
■ Power failure compensation circuit
■ HDD SETTING
The unit is equipped with an internalized power failure compensation circuit. When the unit has been charged for 48
hours (full), the date, time, timer record settings, and menu
settings are kept up to 1 month without power. The accuracy of the time will decline if the power plug is not connected to the wall outlet for and extensive period. In this
case, it is recommended to check the current time setting.
On the unit, “MIRRORING” and “PARTITION” can be selected for the HDD recording mode (
see page 18).
■ Power failure reset recording
If there is a power failure during recording or when turning
OFF the MAIN switch, the recording will resume after the
power is restored. If there is a power failure during timer
recording, the recording will resume after the power is restored when within the set time period of the timer. For alarm
recording, recording will stop even within the set recording
time.
If there is a power outage while recording, video
and audio of up to 6MB from immediately before the
power outage will not be recorded.
If there is a power outage while alarm recording or
emergency recording, alarm recording and emergency
recording will be released after power is restored.
When recording is started, “REC ON” is registered
in <WARNING LOG LIST>. However, “REC ON” will
not be registered when recording is resumed after
power is restored.
The playback video at the start position where recording is resumed after a power failure may be disturbed and the search function may not operate properly.
■ Log function for when power failure occurs
while the unit is in operation or the MAIN
switch on the rear of the unit is turned OFF
In the event of power failure or the MAIN switch on the
rear of the unit is turned OFF, up to 1000 items (including the time of failure and warning log displays as well
as other warning items) are saved in the <WARNING
LOG LIST> (
see pages 54,55), and are displayed
in red on the screen.
For power outages that occur while timer recording
is standing by, “P-LOSS” that indicates a power outage
is not displayed. In addition, power outages that overlap
with timer recording start times and those where power
is restored after the recording end time are also not
recorded.
Setting ( default : “NORMAL” )
“NORMAL”, “MIRRORING”, “PARTITION”
♦ MIRRORING
By saving the data in duplicate on two HDD’s with the
same capacity, the risk of data loss due to an HDD crash
is greatly reduced.
When using a MIRRORING function, two sets of
HDD are required. It does not function in one HDD.
Please consult with the retailer, when you add HDD.
1. Turn ON the MAIN switch on the rear of the unit, and wait
until the ACCESS indicator goes off. Hold down the REC/STOP
button, and press the POWER button on the front of the unit.
• The <INITIALIZATION> screen is displayed.
<INITIALIZATION>
>>HDD SETTING
NORMAL
POWER OFF
INITIALIZATION
ALL DATA WILL BE ERASED
WHEN PROCEED INITIALIZATION
POWER button operation will not be accepted while
the ACCESS indicator is flashing. Press the POWER
button after the indicator turns off.
2. Select “HDD SETTING” by turning the JOG dial, display the
“MIRRORING” setting, and turn the SHUTTLE ring clockwise.
<INITIALIZATION>
>>HDD SETTING
MIRRORING
POWER OFF
INITIALIZATION
ALL DATA WILL BE ERASED
WHEN PROCEED INITIALIZATION
3. Select “INITIALIZATION” by turning the JOG dial, and turn
the SHUTTLE ring clockwise.
• The setting is made, and initialization commences.
Settings are not confirmed unless you perform
“INITIALIZATION”.
Initialization deletes all data in the HDD.
■ RESET button
When pressing the RESET button on the rear of the unit
with a ballpoint pen, etc., the unit is reset and the power
turns off.
The menu settings, the current time and video data
are kept even when resetting the unit.
••••••••••••••••••••••••••••••••••••••••••••••••••••••••••••••••••••••••••••••••••••••••••••••••••••••••••••••••••••••••••••••••••••••••••••
74
• Performing “MAIN HDD DATA CLEAR” in “MIRRORING” mode deletes all data in both HDD.
• In the event of a HDD master/HDD slave malfunction, HDD master/HDD slave items are registered
separately on the <WARNING LOG LIST>.
• In the event that either HDD maste or HDD slave
malfunction, the “MIRROR” warning is displayed,
and the operable HDD continues the recording.
Press the WARNING RESET button on the front
of the unit to reset the “MIRROR” warning.
• The “MIRROR” warning is displayed every time
the unit is started-up until the faulty HDD is replaced.
• Automatic data archive commences at start-up
after replacement with an operational HDD.
• If any HDD of each HDD master and HDD slave
malfunction simultaneously, the data can not be
repaired.
• Ask at place of purchase about data restoration
when repairing/replacing a faulty HDD.
♦ PARTITION/PARTITION SIZE
PARTITION mode only uses the internal HDD.
PARTITION mode designates the area inside the HDD
that is specified as each HDD’s sub-device capacity for
Alarm recording. This independent partition inside the
HDD allows to keep the data of alarm recording.
The normal recording area is referred to as “MAIN”,
and the alarm recording area (PARTITION area) is referred to as “SUB”.
3. Display the desired device capacity, and turn the SHUTTLE
ring clockwise.
ENGLISH
Points to be aware of regarding MIRROR mode
• Performing RESTORE restores identical data to
both HDD master and HDD slave.
• The setting is made.
• Setting of “PARTITION SIZE” ( default : 10% )
10%, 20%, 30%, 40%, 50%, 60%, 70%, 80%, 90%
The storage area in MAIN HDD set in “PARTITION”
is displayed with the percentage(%) and the recordable time of that storage area is displayed in “<ESTD
REC>”.
7
8
9
2.5P
STD
2.5P
STD
2.5P
STD
<ESTD REC>
2.5P
2.5P
2.5P
D H
STD
STD
STD
M
%
4. Select “INITIALIZATION” by turning the JOG dial, and turn
the SHUTTLE ring clockwise.
• The setting is made, and initialization commences.
Settings are not confirmed unless you perform
“INITIALIZATION”.
Initialization deletes all data in the HDD.
Points to be aware of regarding PARTITION
mode
• Either “MAIN” or “SUB” can be selected for copy.
• Playback, search, information display, REMAIN
HDD, CALL OUT, and data delete functions are
performed independently for “MAIN” and “SUB”.
• When “HDD REPEAT REC SUB” is set to “OFF”,
and all memory in SUB HDD is used, the recording stops. Afterwards, the indicator will blink when
an alarm enters, but no recording will be
performed.
• When at the time of “ALARM CH” use an alarm
signal enters to a camera number not set for normal recording, pre-alarm recording may not be
performed in some cases.
1. Turn ON the MAIN switch on the rear of the unit, and wait
until the ACCESS indicator goes off. Hold down the REC/STOP
button, and press the POWER button on the front of the unit.
• The <INITIALIZATION> screen is displayed.
POWER button operation will not be accepted while
the ACCESS indicator is flashing. Press the POWER
button after the indicator turns off.
2. Select “HDD SETTING” by turning the JOG dial, display
“PARTITION”, and turn the SHUTTLE ring clockwise.
• The “PARTITION SIZE” setting appears on the
<INITIALIZATION> screen.
<INITIALIZATION>
>>HDD SETTING
PARTITION SIZE
PARTITION
10%
POWER OFF
INITIALIZATION
ALL DATA WILL BE ERASED
WHEN PROCEED INITIALIZATION
•••••••••••••••••••••••••••••••••••••••••••••••••••••••••••••••••••••••••••••••••••••••••••••••••••••••••••••••••••••••••••• Operations
75
Other convenient functions (continued)
■ COVERT CAMERA SETTING
1
The video of the specified camera number can be set to
not be displayed regardless of the presence of video
signals.
2
3
5
6
Setting ( default : “ON” )
“ON”, “OFF”
While COVERT CAMERA SETTING operation
mode when the video is interrupted to playback such
as camera trouble, warning indicator will not appear
on the screen. If “WARNING” is set in BUZZER setting
the BUZZER sounds and the unit registers this error in
the WARNING LOG LIST, CALL OUT signal is emitted.
When setting “COVERT CAMERA SETTING” to
“OFF” for a camera set for recording operation, recording will be performed without displaying the video on
the screen.
When setting “COVERT CAMERA SETTING” to
“OFF”, the playback video will not be displayed and the
set camera number screen will turn black. Furthermore,
the operation mode display and alarm display setting
will not function.
1. Press the SET UP button and <SETTINGS> appears. With
the <MPX DISPLAY SETTINGS> screen displayed, press the
WARNING RESET button for more than 5 seconds.
• The <COVERT CAMERA SETTING> screen appears.
<COVERT CAMERA SETTING>
<COVERT CAMERA SETTING>
NUMBER
DISPLAY
>> 1
ON
ON
2
3
ON
4
ON
5
ON
6
ON
7
ON
8
ON
9
ON
ALARM DISPLAY
OFF
7
9
♦ ALARM DISPLAY
Setting for displaying the single screen with alarm signal inputted when there is alarm signal. If another alarm
signal is inputted during alarm recording, the camera
video with the latest alarm signal will appear on the single screen display. After alarm recording is completed,
the screen returns to the previous display.
Setting ( default : “OFF” )
“OFF”, “ON”
1. Press the SET UP button and <SETTINGS> appears. With
the <MPX DISPLAY SETTINGS> screen displayed, press the
WARNING RESET button for more than 5 seconds.
• The <COVERT CAMERA SETTING> screen appears.
2. Select “ALARM DISPLAY” by turning the JOG dial, and turn
the SHUTTLE ring clockwise.
• The background of the setting turns red and flashes.
3. Turn the JOG dial to select “ON” and turn the SHUTTLE
ring clockwise.
• The setting is confirmed and flashing stops.
4. Turn the SHUTTLE ring counterclockwise or press the SET
UP button.
2. Turn the JOG dial to select the camera number to set and
turn the SHUTTLE ring clockwise.
• The background of the setting turns red and flashes.
3. Turn the JOG dial to select “OFF” and turn the SHUTTLE
ring clockwise.
• The setting is confirmed and flashing stops.
• The set camera number screen will turn black.
4. When continuing with setting for other camera number,
repeat steps 2 and 3.
5. When completed with all settings, turn the SHUTTLE ring
counterclockwise or press the SET UP button.
• The channel display of the camera number screen set with
“OFF” for “COVERT CAMERA SETTING” will become black.
••••••••••••••••••••••••••••••••••••••••••••••••••••••••••••••••••••••••••••••••••••••••••••••••••••••••••••••••••••••••••••••••••••••••••••
76
Communications by Web Browser
The Web browser on the personal computer can capture the pictures that have been recorded and live pictures from the camera that is connected to this equipment.
♦ AUTHENTICATION
Start up the Microsoft Internet Explorer and log in.
ENGLISH
■ Communications by Web Browser
1. Start up the Microsoft Internet Explorer and enter the IP
address.
• The “[Authentication]” screen will appear.
Microsoft and Windows are registered trademarks of the Microsoft Corporation in the US and
other regions.
(The official name of Windows is Microsoft Windows
Operating System.)
All other company and product names appearing
herein are the property of their respective owners.
“ ® ” is not shown in this text.
• Windows 98SE is an abbreviation of Microsoft
Windows 98 Second Edition.
• Windows 2000 is an abbreviation of Microsoft
Windows 2000 Professional.
• Windows Me is an abbreviation of Microsoft
Windows Millennium Edition.
• Windows XP is an abbreviation of Microsoft
Windows XP Home Edition/Professional.
♦ The personal computer product requirements
• OS : Microsoft Windows 98SE, Windows 2000,
Windows ME or Windows XP.
• CPU : IBM PC/AT compatible with an Intel Pentium
series processor of at least 500MHz.
• RAM : 256MB or more.
• Hard disk drive : System drive with unused space of at
least 200MB.
• Web Browser Soft : Microsoft Internet Explorer 5.01SP2
or later.
• Display device : XGA (1024 pixels x 768 pixels) or
higher.
2-1. (When logging in • • • )
First, enter the “userID” and then enter the “password”. When
shipped from the factory, the userID for the full-rights user is
“root”, and the password is “admin000”, the userID for the
live user is “guest” and the password is “guest”.
More than one user can log in simultaneously
using the same userID and password.
However, there are restrictions due to authorization. The maximum number of users that can be
connected at the same time is 10.
2-2. Select “log in” and then left-click or press ENTER.
• The “Welcome” screen will appear.
The product requirement described above cannot guarantee operations in all environments.
Lack of compatibility between Web functions and
the PC peripheral driver may, in rare instances, result in abnormal operation. If this happens, upgrade
to the newest version of Internet Explorer and try
again.
♦ Connections
• When making a direct connection between this equipment and a personal computer (here in after PC), use a
cross cable, and when making a connection through a
HUB, use a straight cable.
• The duplex mode is half duplex.
• Refer to the PC instruction manual for instructions on
how to set the Web settings on the PC.
••••••••••••••••••••••••••••••••••••••••••••••••••••••••••••••••••••••••••••••••••••••••••••••••••••••••••••••••••••••••••••• Operations
77
Communications by Web Browser (continued)
3-1. (If you make an error in entering the userID or password
•••)
• The “[Rejection]” screen will appear.
3-2. Select “[Back to Authentication]” and either left-click or
press ENTER.
Live and recorded images can be acquired when
the recorder POWER button is lit.
1. Select the desired “Menu” and left-click.
• The “[Authentication]” screen will appear.
3-3. Follow the steps in step 2-1 and enter the correct “userID”
and “password”.
4-1. (If you do not log in • • • )
Select “If you don’t want to log in, click here to exit.” and leftclick.
4-2. The message “SessionID removed in recorder & browser.
Please shut this Web Browser down to clear of your browser’s
cache.” will display. Close the Web Browser.
5-1. (To change password • • • )
The password can be changed in the “[Authentication]” screen
only by the user who has the authorization to change a
password. Follow the instructions in the menu and enter the
present “userID” and “password”.
5-2. Enter the new password in “new password:” and again in
“retype new password:”.
The number of characters that can be used in
registering a password is 16. Both alphabet letters
and numbers can be used with a distinction made
between upper and lower case. You cannot use
spaces.
5-3. To change into a new password, select “change” and leftclick or press ENTER. To stop the change, select “clear”, and
left-click or press ENTER.
♦ Welcome
This is the screen for selecting, from “Menu”, “live monitor” with which live pictures will be retrieved and displayed, “playback” with which pictures that have already
been recorded will be retrieved and displayed, “user
maintenance”, with which the settings for user authorization will be configured, “log out” for ending a job, or
“change log in user” for making a change in the loggedin user.
• Live monitor
Retrieves live images and displays the images on the
PC screen.
1. Select “live monitor” and left-click.
• The “live monitor” screen will display.
When image acquisition is tried for the first time
with the Web browser of a personal computer, a message as shown below will be displayed. Please click
“Yes”.
Depending on what the user’s authorization is,
there are certain menus that cannot be selected.
During playback or during a search, this device
will stop playback or search mode when a request
for the acquisition of live images is transmitted.
The transfer rate during transmission depends
on the standard environment and load status of the
recorded. To ensure stable transmission, use an
image transfer rate that best matches the current
usage conditions.
The user’s sessionID (connection data) will be
lost in 5 minutes from the final operation that includes
image retrievals. If no operations are made within
that 5 minutes, no other operations can be made
after that so close the browser and then log in again.
When a live picture is acquired from the recorder
and the <OUTPUT B ON/OFF> setting is “ON”, the
updating speed for the Live monitor screen decreases. It is recommended to set the <OUTPUT B
ON/OFF> setting to “OFF”.
•••••••••••••••••••••••••••••••••••••••••••••••••••••••••••••••••••••••••••••••••••••••••••••••••••••••••••••••••••••••••••••••••••••••••••
78
ENGLISH
Setting “Transfer Rate” too far on “Hi” may
present obstacles to PC operation as determined
by the performance of the PC you are using. Please
set it to the appropriate rate to the image retrieval
speed of your machine.
Depending on the network capacity and the load
conditions, the transfer rate may not rise.
Only a user who has the authorization for
“Change Password” can store screen layouts in the
“Recorder” side using “Save Layout”. If the user who
has authorization for “Change Password” stores
screen layouts in both “Local PC” and “Recorder”,
the information for “Local PC” is given priority. When
storing layouts in “Local PC”, only one layout can
be stored for one PC, even if users are different. To
delete layouts that are stored in “Local PC”, delete
the “Cookies” in the browser.
• Playback
Retrieves, plays back and search for images that have
been recorded by the recorder.
<Explanation of functions>
1. Select “playback” and left-click.
• The “playback” screen appears.
STOP
: Stops the retrieval of an image.
GO
: Starts (or restarts) the retrieval of
an image.
Display
: For selecting either the display or
non-display of a camera number.
Layout
: For selecting from the 4 types of
display patterns.
( default : split4 screen )
Camera
: Selects the camera number that
you want to display and check.
Size
: Selects one of 7 patterns for the
screensize: x2, x1.5, x1, x2/3,
x1/2, x1/3, x1/4.
Transfer Rate
: Selects one of 5 stages from “Lo”
to “Hi” for image retrieval speed.
( default : middle )
Save Layout
: The layout of the screen display is
registered to “Local PC” and
“Recorder”.
Back to [Welcome] : Returns to the “Welcome” menu.
[Log out]
: For logging out.
2. Press the PLAY button to start playback.
<Function description>
: Press to start playback.
The sequence in which camera numbers have
been selected is displayed from the top left.
: Press to start speed search in the forward di
rection at speeds of x2, x4, x8 and x16.
The screen size regulated by “Size” is applied to
the display field at the farthest upper left point in the
screen layout.
: Press to frame-by frame playback in the for
ward direction.
: Press to start reverse playback.
••••••••••••••••••••••••••••••••••••••••••••••••••••••••••••••••••••••••••••••••••••••••••••••••••••••••••••••••••••••••••••• Operations
79
Communications by Web Browser (continued)
: Press to start speed searches in the reverse
direction at speeds of x2, x4, x8 and x16.
: Press to frame-by-frame playback in the re
verse direction.
: During playback or searching, press to stop
playback for still frame.
Device : Selects the HDD for playback and search.
( default : MAIN )
• The following searches can be selected in single-screen
display.
Click “Refresh” to re-acquire the “Alarm List”, and click
“Close” to hide the “Alarm List Search - MAIN” menu.
• Index Search
Click “Prev” for an index search in the reverse direction
and click “Next” for an index search in the forward direction.
• User maintenance
This is the screen for changing the settings for registered user authorization and for deleting a registration.
It can also be used for registering new users.
1. Select “user maintenance” and left-click.
The date and time and the camera number for the image acquired are displayed in “Image Information”. Clicking “Save Image” stores the picture that is freeze-frame
displayed in the PC in bit map format.
• The “[Registration]” screen will appear.
For the recorded image data search function,
select single screen display at the “playback” screen
to use each search mode while playback is stopped.
• Time Search
Select the date and time and click “Search”.
• Alarm Search
Click “Alarm List” and the “Alarm List Search - MAIN”
screen will appear in the sub-screen. Select the “Alarm
No.” desired, and then click “Search”.
2-1. (To change registered user settings • • • )
Select the userID for changing the settings in the “Review &
Change user-attribute” settings.
• Select the items that you want to change.
•••••••••••••••••••••••••••••••••••••••••••••••••••••••••••••••••••••••••••••••••••••••••••••••••••••••••••••••••••••••••••••••••••••••••••
80
3-4. (If you have selected “cancel” • • • )
ENGLISH
<User authorization>
• The return will be made to the “[Registration]” screen.
Live Monitor
: Allows acquisition of live images.
It is a mandatory rank to be
registered.
Play Mode
: Allows acquisition of recorded im
ages. This authorization is only to
a one user.
All Camera
: Allows the acquisition of images
from a covert camera.
(You also can acquire images
from cameras that have the
“COVERT CAMERA SETTING”
set to “OFF”. )
Change Password : Allows the changing of user’s
password. Moreover, a screen
layout can be saved to the
recorder.
Registration
: Allows the viewing and editing of
user registration information.
Certain items cannot be selected depending on
what the user authorization is.
4-1. (To register a new user • • • )
Enter the new userID and new password in “Register new
user”.
4-2. Refer to step 2-1, select the “access auth.” desired and
check it.
A userID with the same name cannot be registered. The maximum number of characters that can
be used in registering a password is 16. Both alphabet letters and numbers can be used with a distinction made between upper and lower case. You cannot use spaces.
4-3. If you want to make a new registration, left-click “register”.
If you want to cancel a new registration, left-click “cancel”.
4-4. (If you have selected “Register” • • • )
It will be added to “Review & Change user-attribute”.
4-5. (Selecting “cancel” • • • )
Clears the specified contents.
• Log out
In this screen, assign “Log out” settings to end the job.
1. Select “log out” and left-click.
“Registration” authorization can be used by only
one user. From the time that a user logs in until that
user logs out and gives up authorization, any other
user that logs in is regarded as a user who does
not have “Registration” authority.
• The “[log out]” screen will appear.
“Play Mode” authorization can only be used by
one user. From the time that a user logs in until that
user logs out and gives up authorization, any other
user that logs in is regarded as a user who does
not have “Play Mode” authority.
2-2. (To change settings • • • )
Select “change” and left-click. The “[Change Confirmation]”
screen will appear.
2-3. If you want to make the change, left-click “change”. If
you want to cancel a change, left-click “cancel”.
2-4. (When you have selected “change” • • • )
The “[User’s Attribute Changed]” screen will appear, so then
left-click “Back to [Registration]”.
• The return will be made to the “[Registration]” screen.
2-5. (When you have selected “cancel” • • • )
• The return will be made to the “[Registration]” screen.
3-1. (When you have deleted a registered user • • • )
Left-click on “remove” in the userID that you want to delete in
“Review & Change user-attribute”.
• The “[Remove confirmation]” screen will appear.
3-2. If you want to delete it, left-click “remove”. If you don’t
want to delete it, left-click “cancel”.
3-3. (If you have selected “remove” • • • )
The “[User Removed]” screen will appear, so left-click “Back
to [Registration]”.
• The return will be made to the “[Registration]” screen.
2. Close the Web Browser.
If the browser is closed without correctly operating the log out, the user’s sessionID will be saved
for 5 minutes, If the Log in is made with the same
userID within that 5 minutes, operation limits may
take effect.
• Change log in user
This screen is for changing the logged in user.
1. Select “change log in user” and left-click.
• The “[Authentication]” menu appears.
••••••••••••••••••••••••••••••••••••••••••••••••••••••••••••••••••••••••••••••••••••••••••••••••••••••••••••••••••••••••••••• Operations
81
Communications by Web Browser (continued)
2-1. (To change the logged in user • • • )
In the “Log in ( or log in as a different user ):” settings, execute
step 2-1 and 2-2 in “♦ AUTHENTICATION” and change the
logged in user.
• The logged in user is changed and the “Welcome” screen
appears.
2-2. (If the log in is made without changing the user • • • )
Select “Back to [Welcome] as Current User” and left-click.
• The logged in user will remain as is and the “Welcome”
screen will appear.
2-3. (To log out • • • )
Select “If you don’t want to log in, click here to exit.” and leftclick.
••••••••••••••••••••••••••••••••••••••••••••••••••••••••••••••••••••••••••••••••••••••••••••••••••••••••••••••••••••• Operations
82
Recording time table
ENGLISH
■ Continuous recording time table
♦ HDD continuous recording time (for 250GB drive)
Displays the estimated recordable time (when recording on a 250GB HDD).
The following table shows estimated recordable time when operating with 2 cameras and the
recording interval is set at a constant PPS rate given at the top of the column.
• Without Audio recording
PPS
25P
12.5P
SUPER
1d4h
2d9h
3d13h
HIGH
1d13h
3d3h
STD
2d16h
5d8h
BASIC
3d17h
7d10h
11d3h
LONG
8d3h
16d7h
GRADE
8.333P 6.25P
5P
4.167P 3.125P
0.25P 0.125P
NUMBER OF
RECORDING
FIELD
119d1h
238d3h
5,140,000
78d18h 157d12h
2.5P
1P
0.5P
11d21h
29d18h
59d12h
4d18h
5d22h
7d3h
9d12h
4d17h
6d7h
7d21h
9d10h
12d14h 15d18h
39d9h
315d1h
6,800,000
8d
10d16h
13d8h
16d1h
21d9h
26d17h
66d20h 133d17h 267d10h 534d21h
11,550,000
14d20h 18d13h
22d6h
29d16h
37d2h
92d17h 185d11h 370d22h 741d20h
16,020,000
24d11h 32d15h 40d19h 48d23h
65d6h
81d14h
204d
408d
816d1h
1632d2h
35,250,000
• With Audio recording <Audio recording using 12.8KHz PCM sampling is possible.>
PPS
25P
12.5P
SUPER
1d4h
2d9h
3d13h
4d13h
5d16h
6d19h
9d2h
11d8h
119d1h
238d3h
HIGH
1d13h
3d3h
4d17h
6d1h
7d14h
9d2h
12d3h
14d15h 33d21h 56d18h 157d12h
315d1h
STD
2d14h
5d5h
7d16h
10d6h
12d13h
15d1h
19d15h 23d23h 51d17h 81d12h 267d10h 534d21h
BASIC
3d15h
7d4h
10d15h 13d22h
17d4h
20d6h
26d3h
31d14h
LONG
7d
14d1h
34d11h
40d1h
50d8h
59d14h 105d2h 141d12h 816d1h
GRADE
8.333P 6.25P
21d
28d
5P
4.167P 3.125P
2.5P
1P
0.5P
25d15h 45d19h
65d6h
0.25P 0.125P
100d6h 370d22h 741d20h
1632d2h
d : day, h : hour
Continuous recordable time and the estimated time displayed on the menu screen is the continuous recordable time when operating this unit and is not the product warranty period. Furthermore, it
is not the period that guarantees the operation of used parts.
Audio recording cannot be performed when “PPS” of “RECORD SETTING” are all set to smaller
than “0.333P” for normal recording.
• In this case, ( X ) appears to the right of recordable time display.
Audio recording cannot be performed when the camera selection for alarm recording is as follows:
“ALARM CH” : “A-PPS” of all cameras set for alarm recording are set to smaller than “0.333P”.
“ALARM PLUS”, “ALARM25”: “PPS” and “A-PPS” of all cameras set for normal recording and alarm
recording are set to smaller than “0.333P”.
: Since audio recording cannot be made during recording interval of 0.25P and 0.125P, even
when the recording with audio recording is set to ON, the recordable time is the same for when
setting audio recording to OFF.
•••••••••••••••••••••••••••••••••••••••••••••••••••••••••••••••••••••••••••••••••••••••••••••••••••••••••••••• Recording Time Table
83
Recording time table (continued)
♦ Compact Flash Card continuous recording time (for 64MB)
Displays the estimated recordable time (when recording on a 64MB Compact Flash Card).
• Without Audio recording
PPS
25P
12.5P
SUPER
20s
HIGH
GRADE
8.333P 6.25P
5P
4.167P 3.125P
40s
1m10s
1m30s
2m
2m20s
30s
1m
1m30s
2m
2m40s
NUMBER OF
RECORDING
FIELD
2.5P
1P
0.5P
0.25P 0.125P
3m10s
4m
10m
20m
40m
1h20m
1,200
3m10s
4m10s
5m20s
13m
26m
53m
1h40m
1,600
STD
50s
1m40s
2m40s
3m30s
4m30s
5m20s
7m10s
9m
22m
45m
1h30m
3h
2,700
BASIC
1m10s
2m30s
3m40s
5m
6m10s
7m30s
10m
12m
31m
1h
2h
4h10m
3,700
LONG
2m40s
5m30s
8m10s
11m
13m
16m
22m
27m
1h
2h10m
4h30m
9h10m
8,300
• With Audio recording <Audio recording using 12.8KHz PCM sampling is possible.>
PPS
25P
12.5P
SUPER
20s
40s
1m10s
1m30s
1m50s
2m10s
HIGH
30s
1m
1m30s
2m
2m30s
STD
50s
1m40s
2m30s
3m20s
BASIC
1m10s
2m20s
3m30s
LONG
2m20s
4m40s
7m
GRADE
8.333P 6.25P
5P
4.167P 3.125P
2.5P
1P
0.5P
0.25P 0.125P
3m
3m50s
8m40s
15m
40m
1h20m
3m
4m
4m50s
11m
19m
53m
1h40m
4m10s
5m
6m40s
8m
17m
27m
1h30m
3h
4m40s
5m50s
6m50s
8m50s
10m
22m
34m
2h
4h10m
9m30s
11m
13m
17m
20m
35m
48m
4h30m
9h10m
: Since audio recording cannot be made during recording interval of 0.25P and 0.125P, even
when the recording with audio recording is set to ON, the recordable time is the same for when setting
audio recording to OFF.
Recalculate the values on the recording times chart according to the capacity of the CFC you are
using. For example, for a 128MB CFC, multiply all the values by two.
For usable Compact Flash Card, check with your dealer of purchase.
••••••••••••••••••••••••••••••••••••••••••••••••••••••••••••••••••••••••••••••••••••••••••••••••••••••• Recording Time Table
84
Troubleshooting
Description of problem
The unit will not turn on.
INSTALLATION
Power is on, but the unit
will not operate.
Page
• Is the power cord properly plugged in?
-
• Is the LOCK indicator light on?
• Is the TIMER button light on?
11,56-58
10
• Is the MAIN switch on the rear set to “OFF” ?
13
• Is the LOCK indicator light on?
• Is the POWER button blinking?
11,56-58
10
(The unit cannot be operated when the POWER button is flashing.)
• It is possible that the safety features are in operation.
13,74
Restart the unit by pressing the RESET button located on the back
of the unit using a ballpoint pen or similar object.
Images are not appearing
• Are the monitor and camera(s) connected correctly?
on the monitor.
• Is the unit receiving an input signal from the selected camera?
Check this by setting the unit to SPLIT9.
15
36
37
The quality of the monitor
• Is “OUTPUT B ON/OFF” set to “ON”?
Video from OUTPUT B will not be displayed when “OFF”.
• Is the connecting cord connected correctly?
picture is poor.
• Is the camera’s focus adjusted correctly?
-
The unit will not start
recording.
• Is the “HDD REPEAT REC MAIN” set to “OFF” or “STANDBY” and
47
The unit will not stop
recording.
RECORDING
Please consult the following
ENGLISH
If problems with the unit persist even after you’ve followed the suggestions below, please disconnect the power cord
and contact the retailer from whom you purchased the unit.
The unit will not perform
Repeat Recording.
The unit will not perform
Timer Recording.
The unit will not perform
Alarm Recording.
-
“HDD REPEAT REC SUB” set to “OFF”?
• The unit begins recording only after the specified recording time.
Was the unit stopped during the specified recording time?
22,23
• Is the LOCK indicator light on?
• During normal recording, alarm recording and emergency
recording, press the REC/STOP button for more than 1 second.
11,56-58
10,23
• Is timer recording in progress?
To stop timer recording, press the TIMER button again for more
than 1 second.
• Is the “HDD REPEAT REC MAIN” and “HDD REPEAT REC SUB”
set to “ON”?
• Are the date and current time set accurately?
• Are the Recording Start-/End-times and the recording interval
set correctly?
• Is the “HDD REPEAT REC MAIN” set to “OFF” or “STANDBY” and
10
“HDD REPEAT REC SUB” set to “OFF”?
• Is the “A-PPS” in the <RECORD SETTING> set as “- - - - - -”?
• Is the SUB HDD recordable capacity full?
• Is the unit in timer recording stand-by mode?
(Is the TIMER button light on?)
• Are the peripheral switches, etc., connected correctly?
47
20,21
44-46
47
41,42
47
10
15
•••••••••••••••••••••••••••••••••••••••••••••••••••••••••••••••••••••••••••••••••••••••••••••••••••••••••••••• Troubleshooting
85
Troubleshooting (continued)
Description of problem
PLAYBACK
The unit will not perform
playback.
• Is the LOCK indicator light on?
• Has the image data been erased?
• Is the correct playback device selected?
• Is there a prompt to receive live images?
Playback cannot be performed while receiving images.
The Compact Flash Card
will not perform playback.
The unit will not perform
the motion detection
function.
OTHERS
Please consult the following
Page
11,56-58
54
67
23,65,78
• Is the media correctly inserted?
• Is the correct playback device selected?
• Is the data of FSM2 format recorded?
11
67
• Is “TRIGGER” of the camera number that the motion detection
41
function is confirmed in the <ALARM SETTING> screen set as
“EXT” ?
• Is the “A-PPS” of the camera number that the motion detection
42
function is confirmed in the <RECORD SETING> screen set
as “- - - - - -”.
• Is the value in “MOTION THRESHOLD” of the <MOTION
40
DETECTION SETTINGS> screen larger than the value set in
“DETECTION MASK SETTING” ?
• Is the <RS-232C> set correctly ?
The unit will not respond
• Are the unit and computer connected correctly ?
to PC control.
• Is there a defect in the connecting cable ?
• Is the proper connecting cable being used ?
There is a camera number • The screens of camera number with no video signal input will be
blue even when setting for operation.
with a blue screen during
split screen display.
• Is the POWER button flashing?
Button operation is not
(The unit cannot be operated when the POWER button is flashing?)
working.
• Is the LOCK indicator light on?
• Is the Menu screen being displayed?
Cameras cannot be
Camera number buttons cannot be used when the Menu screen
switched with the
is displayed.
camera number buttons.
-
52
36
10
11,56-58
-
• Is the OUTPUT setup correct?
10
While the OUTPUT B indicator is turned off, operation of OUTPUT
A will function. While the OUTPUT B indicator illuminates, operation
Unable to search.
of OUTPUT B will function.
• Is there a prompt to receive live images?
24,67,78
Search cannot be performed while receiving images.
•••••••••••••••••••••••••••••••••••••••••••••••••••••••••••••••••••••••••••••••••••••••••••••••••••••••••••••• Troubleshooting
86
Warnings and CALL OUT output
ENGLISH
■ Warnings and their appropriate countermeasures
#1 Options in the CALL OUT options column:
• Selectable : CALL OUT output can be selected/de-selected on the menu.
• Fixed
: a CALL OUT signal is emitted without prior selection of this function using the menu.
• None
: no CALL OUT signal is emitted, but a warning indicator will appear on screen.
CALL OUT signal output can be stopped by pressing the WARNING RESET button.
Warning Display
REC/FULL
REC/SUB FULL
COPY/FULL
REST/FULL
REC/REM
Status
• When the warning is
cancelled, the unit will start
over-writing the oldest data
remaining in the hard disk
• SUB HDD recordable
drive.
capacity is full.
• Copy data as necessary.
• Replace with new media.
• Media recordable
• Replace media if necess
capacity is full.
-ary.
• The remaining HDD capa • Copy data as necessary.
-city has reached the value
set in HDD REMAIN.
• MAIN HDD recordable
capacity is full.
• The data that is being
copied exceeds the
capacity ofCompact Flash
Card, or there is no
original data.
It restored from the
Compact Flash of a
different format.
• Error has occurred in the
COPY/
MEDIA ERROR media as Compact Flash.
REST/
MEDIA ERROR
• No inserted media as
COPY/NO MEDIA
Compact Flash.
REST/NO MEDIA
COPY/SIZE/
DATA ERROR
REST/SIZE/
DATA ERROR
NO SIGNAL
(The warning will
indicate the number
of the non-functioning
camera. )
Countermeasure
• Video signal was lost for
more than 5 seconds
during recording.
Canceling
the warning
Code
CALL OUT
page
output
#1
Press the
WNG1100
WARNING
RESET button.
WNG1101
Selectable 47
Press the
WARNING
RESET button.
Press the
WARNING
RESET button.
WNG3100
WNG4100
None
WNG1200
(MAIN)
WNG1201
(SUB)
Selectable 72,73
72,73
-
• Set the copy/restore
Press the
WNG3701
range again.
WARNING
WNG4701
• Replace with new media. RESET button.
None
• Check media in recording Press the
WNG3702
device. (Insert the media
WARNING
WNG4702
if there is none.)
RESET button.
None
11,72
Press the
None
WNG3703
WARNING
WNG4703
RESET button.
Stop recording. WNG54 #3 Fixed
11,72
Output video
signals.
36
Press the
WARNING
RESET button.
22,23,
41-43
• Insert the media.
• Check whether the unit
and camera are properly
connected, and that electri
-city is on.
• Check whether the visual
signal is being properly
outputted.
• Check to see if there is a
camera set for operation
with no video signal input.
72,73
-
15
•••••••••••••••••••••••••••••••••••••••••••••••••••••••••••••••••••••••••••••••••••••••••• Warnings and CALL OUT output
87
Warnings and CALL OUT output (continued)
Warning Display
Status
IMAGE MODIFIED
• Video data that has been
altered was played back.
SYSTEM ERROR #4
REC/
SYSTEM ERROR #4
PLAY/
SYSTEM ERROR #4
COPY/
SYSTEM ERROR #4
REST/
SYSTEM ERROR #4
REC/RW #4
COPY/RW
REST/RW
• System error has
occurred.
MIRROR
• One HDD could not be
detected during mirroring.
• Reboot.
<DEVICE ERROR> • Unable to recognize
HDD.
• Issued when in a high
TEMP
temperature environment
within the tolerance level.
• Reboot.
FAN
• Reboot.
• Check the HDD/media.
• Error has occurred during • Check the HDD/media.
writing ( or reading )of
data to HDD/media.
• The fan stopped.
• HDD recording has
overtaken copy recording.
Copy recording has
stopped.
• HDD recording is about
COPY/OVER
(WHITE) to overtake copy recording.
COPY/OVER(RED)
(NONE)
Countermeasure
• Turn off the power and
change the installation
condition.
• Turn off the power and
stop usage.
• Repair is requested.
• Stop HDD recording to
continue copy recording.
• Stop HDD recording to
continue copy recording.
• Stop copy recording to
continue HDD recording.
• Reboots by watchdog
operation.
#2 : (The following numbers are in
0 0 : MASTER
01 : SLAVE
2 0 : CFC
Canceling
the warning
Press the
WARNING
RESET button.
Press the
WARNING
RESET button.
Code
page
output
#1
Fixed when 47
setting is
“ON”
Fixed
WNG5100
WNG14 #2
WNG24 #2
WNG34 #2
WNG44 #2
WNG5500
Press the
WNG13
WARNING
WNG33
RESET button. WNG43
Press the
WARNING
RESET button.
Turn off the
power.
Press the
WARNING
RESET button.
Lower
the temperature.
Press the
WARNING
RESET button.
Rotate the fan.
Press the
WARNING
RESET button.
CALL OUT
#2 None
#2
#2
-
WNG6100
Fixed
-
WNG6200
Fixed
-
WNG5200
Fixed
-
WNG5300
Fixed
-
WNG3500
None
72,73
Press the
WNG3600
WARNING
RESET button.
None
72,73
WNG5101
-
)
#3 : (The following numbers are in
)
0 1 : CH 1 0 2 : CH 2 0 3 : CH 3
0 4 : CH 4 0 5 : CH 5 0 6 : CH 6
0 7 : CH 7 0 8 : CH 8 0 9 : CH 9
#4 : A warning display disappears automatically after 1 minute.
•••••••••••••••••••••••••••••••••••••••••••••••••••••••••••••••••••••••••••••••••••••••••• Warnings and CALL OUT output
88
Glossary
■ Glossary
ENGLISH
• Hard disk drive (HDD)
Storage device using the same magnetic recording process as tapes and is used in PCs. An aluminium disk coated
with magnetic materials is used on the surface as the storage medium and since there is no contact during recording/playback, there is no head wear. Data search is also
quick since recording is performed in numbered sections
called sectors.
• I/O terminals
Terms used for referring to both input and output.
• RS-232C
Connection standard used for handling data between devices such as a PC, modem, etc. A standard when connecting a PC and modem. The upper limit for the communication speed of this standard is 115.2kbps and the maximum transfer distance is 15m. Since this standard only
defines the roles and physical characteristics of the connector pins, there are various types of connectors such as
25-pin, D-sub, etc.
• Media
Term was originally referred to media that transmits information. Media mostly refers to hard disks, DVD RAM, MO
disks, magnetic tapes, and are commonly referred to as
storage media. Media types are largely categorized by the
recording method, such as optical disks, magnetic optical
disks, magnetic disks, etc.
• Copy
Term used when copying part of data to an external storage media. The term “copy” in this manual refers strictly to
the process of taking out only the data before and after
failures from continuous video to the Compact Flash Card
or video for analytical purposes.
• Capacity
Term to indicate the amount of data that can be stored in a
storage device such as memory, disk, etc., and unit is indicated in B (bytes).
• Compact Flash Card (CFC)
• Restore
One of the standards for a compact memory card. The
Compact Flash Card has such merits as strong durability
and ease of handling.
Term referred to when copying data that has been backedup in a Compact Flash Card, etc., to the built-in hard disk
of the unit.
• Partition
• Mirroring
A partition is one of the many divided areas on the Hard
Disk.
One way of protecting data on magnetic disks. This function writes data alternately to 2 Hard disk drives with the
same capacity. However, there is the demerit of using 2
drives in place of 1, resulting in half the available space.
■ Relation of recording operation to the number of cameras and recording interval settings
The recording pattern of this unit is as illustrated in the diagram below. Video data input from all the connected cameras
is recorded sequentially. ( Max. 50P recording interval during normal recording.)
The example when setting
a setup of each channel to “1PPS”
1 second
C1-3
50P
1 second
12:00:03~
C4-2
C3-2
C2-2
C1-2
50P
12:00:02~
Examples of time displayed
during playback.
C4-1
C3-1
C2-1
C1-1
50P
12:00:01~
•••••••••••••••••••••••••••••••••••••••••••••••••••••••••••••••••••••••••••••••••••••••••••••••••••••••••••••••••••••••• Glossary
89
Specifications
Rated Power Supply:
Rated Input:
Color System:
AC 100-240V 50/60Hz
0.60 - 0.30A (100-240V)
PAL type color system.
Operating Temperature:
Relative Humidity:
Altitude:
Dimensions:
Weight:
Recording System
Sampling
Data Compression
Compression Unit
Resolution
Recording Device
41°F-104°F (5°C to 40°C).
Max.80(%)
Max.2000(m)
300(Width) x 350(Depth) x 88(Height)(mm).
5.0kg
Digital recording method using WAVELET compression.
13.5MHz
WAVELET
Field
684 x 288
250GB HDD
Video Input:
Monitor Output:
9 Input BNC-Connector:
S-Connector:
Throughout Output:
Audio Input:
Audio Output:
Microphone Input:
2 Output BNC-Connector:
RCA-Pinplug:
9 Output BNC-Connector:
RCA-Pinplug:
2 Output RCA-Pinplug:
Ø3.5mm minijack:
Timer Program:
Memory Backup:
8 programs-Daily start and stop time for one week x 3set.
Lasts for more than 1 month.
CONNECTORS
ALARM IN(1-9) Input:
CLOCK ADJ Input:
REC Input:
EMERGENCY Input:
GND:
MODE OUT(1-5) Output:
DC 12V OUT Output:
CALL OUT/CALL OUT GND:
Terminal for starting alarm recording.
Terminal for adjusting clock.
Terminal for start recording.
Terminal for start emergency recording.
Terminal for ground.
Terminal for indication of recording selected mode.
Terminal for DC 12V OUT. Max. Drive current 350mA DC. ( 350mA : 11.5 V typ ± 1.5 V )
Terminal for external warning device.
Rating:
MODE OUT(1-5)
ALARM IN / CLOCK ADJ /
REC/EMERGENCY
CALL OUT /
CALL OUT GND
RS-232C
ETHERNET
Active:
Non active:
Active:
Non active:
Active:
Non active:
“Low” Level.
Max. Drive current 7mA DC.
Open.
Max. Voltage +24V DC.
When terminals are short-circuited
or “Low” Level voltage is applied.
Open.
ON.
Max. Drive current 7mA DC.
Open.
Max. Voltage +24V DC.
RS-232C (D-SUB 9pin) connector for connection with personal computer.
Connector form:
RJ-45
Physical interface:
10BASE-T
Accessories
AC power cord (for U.K / for the Continent)
COMPACT FLASH slot cover (mounted on unit)
Compact Flash Card recording format
1.0 V(p-p), 75 ohms.
Y-Signal: 1.0 V(p-p), 75 ohms.
C-Signal: 0.3 V(p-p), 75 ohms.
1.0 V(p-p), 75 ohms.
1.0 V(p-p), 75 ohms.
1.0 V(p-p), 75 ohms.
308 mV(rms), 50 kohms.
308 mV(rms), 1 kohms.
0.346 mV(rms), 600 ohms.
2
1
Original format (FSM2)
Weight and dimensions shown are approximate.
Design and specifications are subject to change without notice.
•••••••••••••••••••••••••••••••••••••••••••••••••••••••••••••••••••••••••••••••••••••••••••••••••••••••••••••••••• Specifications
90
Others
DEUTSCH
STELLEN SIE NIEMALS SCHWERE GEGENSTÄNDE AUF DEN REKORDER
(z. B. EIN FERNSEHGERÄT)
STECKEN SIE NIEMALS GEGENSTÄNDE IN DEN REKORDER
OTHERS
Gegenstände, die innen am Gehäuse anstoßen, oder alle eingesteckten Fremdkörper sind nicht nur gefährlich
sondern verursachen auch große Beschädigung.
SCHÜTZEN SIE DAS NETZKABEL
Ein defektes Netzkabel kann Brand oder elektrischen Schlag verursachen. Im Falle eines defekten Netzkabels
den Strom abschalten und das Kabel vorsichtig am Stecker herausziehen.
ZIEHEN SIE DAS NETZKABEL BEI LÄNGERER ABWESENHEIT HERAUS
Bei längerer Abwesenheit den Strom abschalten und das Netzkabel herausziehen.
SORGEN SIE FÜR GUTE VENTILATION
Blockieren Sie nicht die vielen Ventilationsöffnungen am Rekorder. Lassen Sie für eine maximale Ventilation
etwas Platz um den Rekorder herum und stellen Sie den Rekorder nur auf eine harte ebene Oberfläche, und
vergewissern Sie sich, daß sich während des Betriebs nichts auf dem Rekorder befindet.
WENN SIE DEN REKORDER NICHT BENUTZEN
Wenn das Gerät nicht verwendet wird, immer den Hauptschalter (MAIN) ausschalten (OFF).
PFLEGE DES GEHÄUSES
Verwenden Sie niemals Reinigungsmittel, die Petroleum enthalten. Ein weiches Tuch in Seifenlauge eintauchen,
den Rekorder reinigen und trocken wischen. PVC-Kabel oder Leitungen sollten niemals über längere Zeit mit
dem Gehäuse Kontakt haben.
AUFSTELLPLATZ
Wegen ausgezeichneter Leistung und langjähriger Zuverlässigkeit sollte der Platz:
1.
Gut belüftet sein und sich nicht in unmittelbarer Nähe der Heizung oder praller Sonne befinden.
2.
Eine harte, erschütterungsfreie Unterlage haben.
3.
Keine Feuchtigkeit, kaum Staub und keine magnetischen Felder aufweisen.
4.
Bitte stellen Sie sicher, daß der sich auf der Rückseite des Rekorders befindliche Lüfter nicht blockiert
ist.
UNGEEIGNETE AUFSTELLPLÄTZE
Wenn Sie den Rekorder an den folgenden Plätzen aufstellen, kann dies die Lebensdauer des Gerätes verkürzen.
•
Extrem kalte Plätze, wie Kühl-Lagerhäuser und Kühlhäuser.
•
Piätze, an denen Hydrogensulfide erzeugt werden, wie in Thermalquellen-Gebieten.
•
Plätze oder Stellen mit einer salzigen Umgebungsluft.
WARNUNG :
Um Brand oder elektrischen Schlag zu verhüten, den Rekorder vor Regen oder
Feuchtigkeit schützen. Dieser Rekorder muß geerdet werden.
••••••••••••••••••••••••••••••••••••••••••••••••••••••••••••••••••••••••••••••••••••••••••••••••••••••••••••••••••••••••••• Others
1
Others (Continued)
DEUTSCH
Dieser Gerät entspricht den Anforderungen der EG Richtlinie 89/336/EWG, „EMV Richtlinie“ und 73/23/
EWG, „Niederspannungsrichtlinie“, ergänzt durch die Richtlinie 93/68/EWG. Die Anforderungen an die
Störfestigkeit gemäß EN 55024 und an die Störaussendung gemäß EN 55022 beim Betrieb im
Wohnbereich, in Geschäfts- und Gewerbebereichen sowie in Kleinbetrieben, sowohl innerhalb als auch
außerhalb der Gebäude werden eingehalten. Alle Einsatzorte sind dadurch gekennzeichnet, daß sie
direkt an die öffentliche Niederspannungs-Stromversorgung angeschlossen sind.
Dieses Gerät wurde entsprechend der Norm EN 60950 hergestellt.
Es kann Fälle geben, in denen die eingebaute Bewegungsentdeckungsfunktion des Gerätes auf Grund
von externen Bedingungen, Videoeingangssignal oder anderen Faktoren nicht angemessen arbeitet.
Der Benutzer wird nicht entschädigt für Probleme (z.B. Versagen von Aufzeichnung oder Wiedergabe),
die mit dem Gerät oder einem angeschlossenen Gerät während des Betriebs auftreten. Es wird als
Vorsichtsmaßnahme gegenüber Ausfall und Unfälle empfohlen, in regelmäßigen Zeiträumen
Sicherheitskopien von wichtigen Aufzeichnungen zu machen.
Aufnahmezeit und Produktgarantie
Die kontinuierliche aufnehmbare Zeit und die geschätzte Zeitanzeige auf dem Menübildschirm sind
die kontinuierliche aufnehmbare Zeit bei Betrieb dieses Gerätes und nicht die Garantiezeit für das
Produkt. Weiterhin ist dies auch nicht die Garantiezeit für den Betrieb der verwendeten Teile.
• Dieses Gerät hat eine eingebaute Festplatte, die ein Präzisionsmechanismus ist. Lassen Sie bei der
Handhabung dieses Gerätes ausreichende Sorgfalt walten.
• Setzen Sie dieses Gerät nicht Vibrationen oder Stößen aus. Dies kann besonders bei eingeschaltetem
Gerät und während Zugriff auf die Festplatte zu Störungen führen, weshalb ausreichende Vorsicht
erforderlich ist.
• Ziehen Sie bei eingeschaltetem Gerät bzw. Während Aufnahme und Wiedergabe nicht den Stecker
des Netzkabels aus der Steckdose.
• Für frühzeitige Entdeckung von Störungen empfehlen wir, dass Sie das Gerät jedes Jahr inspizieren
lassen.
• Bitte das Gerät nach dem Ausschalten mindestens eine Minute lang nicht bewegen.
• Die Festplatte und der Kühlventilator sind keine permanenten Teile und müssen nach einer gewissen
Zeit ersetzt werden. Bei Betrieb in einer Umgebungstemperatur von 25°C wird empfohlen, die
Festplatte und den Ventilator nach 30.000 Stunden auswechseln.
(Diese Zahl ist nur ein Leitwert und sollte nicht als garantierte Lebensdauer der Erzeugnisse aufgefasst
werden. Verwenden Sie „BETRIEBSSTD“ am Bildschirm <INFO&SERVICE MENÜ> als Hilfe für die
Durchführung von Überprüfungen.)
•••••••••••••••••••••••••••••••••••••••••••••••••••••••••••••••••••••••••••••••••••••••••••••••••••••••••••••••••••••••••••••••••••••••••••••
2
FRANÇAIS
INTERDICTION DE POSER DES OBJETS LOURDS SUR L’ENREGISTREUR (PAR EX: TÉLÉVISEUR)
INTERDICTION DE TOUCHER L’INTÉRIEUR DE L’ENREGISTREUR ET D’Y INTRODUIRE TOUT
CORPS ÉTRANGER
OTHERS
Tout contact avec l’intérieur du boîtier ou toute introduction de corps étranger peut non seulement constituer
un danger mais peut également entraîner d’importants dégâts.
PROTECTION DU CÂBLE D’ALIMENTATION
Un câble d’alimentation endommagé est une source potentielle d’incendie et d’électrocution. Si le câble
d’alimentation est endommagé, couper le courant au niveau de la prise et débrancher soigneusement le câble
en tirant sur la fiche.
DÉBRANCHER LE CÂBLE D’ALIMENTATION EN CAS D’ABSENCE PROLONGÉE
Couper le courant et débrancher le câble d’alimentation en cas d’absence prolongée.
MAINTENIR UNE BONNE VENTILATION
Ne pas obstruer les nombreux trous de ventilation de l’enregistreur. Pour obtenir la ventilation maximale, laisser
de l’espace autour de l’enregistreur, le placer seulement sur une surface dure et de niveau et veiller à ce qu’il ne
soit jamais recouvert pendant l’utilisation. Ne jamais placer d’objet lourd sur l’enregistreur.
LORSQUE L’APPAREIL EST INUTILISÉ
Lorsqu’on ne se sert pas de l’appareil, toujours couper (OFF) I’interrupteur MAIN.
ENTRETIEN DU BOÎTIER
Ne jamais utiliser de détergents à base de pétrole. Nettoyer à l’aide d’un chiffon doux imbibé d’eau savonneuse
puis sécher. Les câbles en PVC ne doivent pas être laissés en contact avec la surface du boîtier pendant de
longues périodes.
EMPLACEMENT D’INSTALLATION
Pour obtenir d’excellentes performances et une fiabilité à long terme, l’emplacement de l’appareil doit être :
1.
Bien ventilé, à l’abri des rayons du soleil et éloigné de sources de chaleur.
2.
Posé sur une surface solide et à l’abri de toute vibration.
3.
Sans humidité importante ni poussière excessive et éloigné des champs magnétiques.
4.
Veuillez vous assurer que le ventilateur d’aération situé sur le panneau arrière de l’enregistreur
n’est pas bloqué.
EMPLACEMENTS INADEQUATS
L’installation de l’enregistreur dans les endroits suivants peut réduire sa durée de vie:
•
Les endroits extrêmement froids tels que les entrepôts réfrigérés et chambres froides.
•
Les atmosphères contenant un excès de sulfure d’hydrogène telles qu’à proximité des sources chaudes.
•
Les régions avec air salin.
ATTENTION :
AFIN D’ÉVITER TOUT RISQUE D’ÉLECTROCUTION ET D’INCENDIE, NE PAS EXPOSER CET APPAREIL À LA PLUIE OU À L’HUMIDITÉ. CET APPAREIL DOIT
ÊTRE RACCORDÉ À LA TERRE.
••••••••••••••••••••••••••••••••••••••••••••••••••••••••••••••••••••••••••••••••••••••••••••••••••••••••••••••••••••••••••••••••••• Others
3
Others (Continued)
FRANÇAIS
Cet enregistreur longue durée satisfait aux exigences des directives communautaires n° 89/336/CEE
“Directive Compatibilité Electromagnétique” et n° 73/23/CEE “Directive Basse Tension”, modifiées par
la directive n° 93/68/CEE. Les exigences sur la susceptibilité conformément à la norme EN 55024 et les
exigences sur les perturbations conformément à la norme EN 55022 sont respectées pour le
fonctionnement dans des zones résidentielles, commerciales, locaux d’industries légères et dans des
entreprises de taille moyenne, à l’intérieur ainsi qu’à l’extérieur de l’immeuble. Les lieux d’usage de
l’appareil doivent être reliés au réseau public d'alimentation électrique à basse tension selon les règles
de l’art. Cet appareil est fabriqué conformément à la norme EN 60950.
Dans certains cas, la fonction DETECTION MOUV. incorporée dans l’appareil ne fonctionne pas
convenablement en raison des conditions externes ou du signal d’entrée vidéo ou d’autres facteurs.
L’utilisateur ne sera pas dédommagé des problèmes (par exemple, une défaillance d’enregistrement ou
une défaillance de lecture) se produisant soit avec l’appareil, soit avec un dispositif connecté, pendant
le fonctionnement. Il est conseillé que des sauvegardes des enregistrements importants soit effectuées
régulièrement à titre de précaution contre des pannes et accidents possibles.
Temps d’enregistrement possible et garantie du produit
L’affichage du temps d’enregistrement en continu possible et du temps estimé sur l’écran de menu
représente le temps d’enregistrement en continu possible lorsque l’appareil fonctionne ; il ne représente
pas la période de garantie du produit. De plus, il ne représente pas la période de garantie des pièces
usagées.
• Cet appareil possède un disque dur intégré, qui est un appareil de précision. Veuillez manipuler cet
appareil avec en faisant suffisamment attention.
• Ne soumettez pas cet appareil aux vibrations ou aux chocs. Cela pourrait causer des problèmes quand
l’appareil est sous tension ou lors de l’accès au disque dur, et c’est pourquoi il est nécessaire de faire
suffisamment attention.
• Ne déconnectez pas la fiche d’alimentation secteur pendant que l’appareil est sous tension ou pendant
l’enregistrement ou la lecture.
• Afin de pouvoir détecter rapidement les problèmes, nous recommandons que vous effectuiez une
inspection une fois par an.
• Ne déplacez pas l’appareil pendant la minute qui suit la mise hors tension.
• Le disque dur et le ventilateur de refroidissement ne sont pas des éléments permanents et il faudra
donc les remplacer avec le temps. Lorsque vous utilisez l’appareil à une température ambiante de
25°C, nous vous recommandons de remplacer à la fois le disque dur et le ventilateur de refroidissement
toutes les 30 000 heures d’utilisation.
(Ce chiffre n’est donné qu’à titre indicatif, et il ne doit pas être considéré comme la durée de vie
garantie des produits. Utilisez la rubrique “TEMPS ECOULE” de l’écran <INFORMATION/SERVICE>
pour vous guider dans les vérifications.)
•••••••••••••••••••••••••••••••••••••••••••••••••••••••••••••••••••••••••••••••••••••••••••••••••••••••••••••••••••••••••••••••••••••••••••••
4
CASTELLANO
NO COLOQUE NUNCA OBJETOS PESADOS SOBRE LA UNIDAD (P.E. TV)
NO TOCAR NUNCA NI INSERTAR OBJETO ALGUNO EN EL INTERIOR DEL UNIDAD
OTHERS
El tocar el interior de la caja o el insertar objetos extraños de cualquier clase no sólo crea peligros a la seguridad
del usuario sino que también será causa de graves daños.
DESCONECTE EL CABLE DE ALIMENTACION AL AUSENTARSE POR PERIODOS PROLONGADOS
DE TIEMPO
Al ausentarse de casa por períodos prolongados de tiempo, apague siempre el grabador de videocassettes y
desconecte el cable de alimentación.
DESENCHUFE EL CABLE DE ALIMENTACIÓN DURANTE AUSENCIAS PROLONGADAS
Apague la corriente y desenchufe el cable de alimentación durante ausencias prolongadas.
MANTENGA UNA BUENA VENTILACIÓN
No obstruya los orificios de la ventilación principal del grabador. Para lograr la máxima ventilación, deje cierto
espacio alrededor del grabador, colóquelo únicamente sobre una superficie plana y rígida, y asegúrese de que
el aparato no esté cubierto durante su uso. Nunca deben colocarse objetos pesados sobre el grabador.
CUANDO NO SE UTILICE
Siempre asegrese de desactivar (OFF) el interruptor PRINCIPAL (MAIN) de la unidad cuando no la utilice.
CUIDADOS CON LA CAJA
No utilizar nunca productos de limpieza que contengan petróleo. Limpie la caja con un paño suave humedecido
en agua y jabón. Los cables del grabador no deberán estar en contacto con las superficies de la caja por un
período de tiempo muy largo.
INSTALACIÓN
Para lograr un óptimo y duradero funcionamiento, instalar el grabador en un lugar que esté:
1.
Bien ventilado y alejado de la luz directa del sol y de otras fuentes de calor.
2.
Una superficie exenta de vibraciones.
3.
Libre de excesiva humedad, polvo y alejado de campos magnéticos.
4.
Compruebe que el ventilador situado en el panel posterior de la grabadora no está bloqueado.
LUGARES INAPROPIADOS DE INSTALACIÓN
Localizar el grabador en los siguientes lugares puede causar una reducción de la vida útil de este producto:
•
Lugares extremadamente fríos, tales como un almacén refrigerado o una fábrica de hielo.
•
Lugares donde existan emanaciones excesivas de hidrógeno sulfúrico, tales como zonas de manantiales
calientes.
•
Lugares o localidades de aire salino.
ADVERTENCIA :
PARA EVITAR INCENDIOS O DESCARGAS ELÉCTRICAS, NO EXPONER EL
APARATO A LA LLUVIA O LA HUMEDAD.
••••••••••••••••••••••••••••••••••••••••••••••••••••••••••••••••••••••••••••••••••••••••••••••••••••••••••••••••••••••••••••••••••• Others
5
Others (Continued)
CASTELLANO
Este unidad está fabricada de acuerdo con las Directivas del Consejo de la Unión Europea 89/336/CEE,
“EMC Directive” y la Directiva del Consejo 73/23/CEE relativa a “Directiva de Baja Tensión”, de acuerdo
con las modificaciones establecidas por la Directiva 93/68/CEE. Asímismo, también se observan las
normativas EN 55024 para la inmunidad y las EN 55022 para las interferencias en lo que respecta al
funcionamiento del aparato en zonas residenciales, en las empresas comerciales y de industria ligera,
en las pequeñas empresas, tanto en el interior como en el exterior del edificio. Todos los lugares de
funcionamiento están caracterizados por estar conectados al sistema público de alimentación de baja
tensión. Esta unidad está fabricada de acuerdo con EN 60950.
En algunos casos, puede suceder que la función DETEC MOVIMIENTO incorporada a la unidad no
funcione correctamente debido a condiciones externas, a señal de entrada de vídeo u otros factores.
No se indemnizará al usuario por problemas (por ejemplo, fallos de grabación o de reproducción) que
pudieran producirse durante la operación, ya sea en la unidad o en un dispositivo conectado. Se
recomienda efectuar regularmente copias de seguridad de las grabaciones importantes como una medida
de protección contra posibles averías y accidentes.
Tiempo posible de grabación y garantía del producto
El tiempo posible de grabación continua y el tiempo estimado de visualización en la pantalla de menú
es el tiempo de grabación continua posible sobre la operación esta unidad, y no es el período de garantía
del producto. Tampoco es el período que garantiza la operación de las pieza utilizadas.
• Esta unidad dispone de un disco duro incorporado, que es un dispositivo de precisión. Por favor trate
esta unidad con sumo cuidado.
• Evite someter esta unidad a los ruidos o vibraciones. Los problemas tienden a producirse especialmente
cuando se enciende esta unidad o se accede al disco duro y por lo tanto, se requiere especial cuidado.
• No desconecte el enchufe de alimentación mientras la unidad está encendida o durante la grabación
o reproducción.
• Para detectar las averías con antelación, se recomienda solicitar la inspección una vez al año.
• Por favor no mueva la unidad por lo menos durante un minuto después de desconectar la fuente de
alimentación.
• El disco duro y el ventilador de enfriamiento no son elementos perennes y deberán reemplazarse
después de un tiempo. Funcionando a una temperatura ambiente de 25°C, se recomienda efectuar el
reemplazo del disco duro y del ventilador de enfriamiento después de las 30.000 horas.
(Esta cifra es sólo una guía, y no debe considerarse como una duración garantizada de tales productos.
Utilice “TIEMPO TRANS” en la pantalla <INFORMACION/SERVICIO> como una guía para ejecutar las
verificaciones.)
•••••••••••••••••••••••••••••••••••••••••••••••••••••••••••••••••••••••••••••••••••••••••••••••••••••••••••••••••••••••••••••••••••••••••••••
6
ITALIANO
NON COLLOCARE SULL’UNITÀ OGGETTI PESANTI (es. apparecchio TV)
NON TOCCARE E NON INSERIRE OGGETTI ALL’INTERNO DELL’UNITÀ
OTHERS
Toccare all’interno del mobiletto che contiene l’unità o inserire oggetti estranei, di qualsiasi tipo, oltre ad essere
causa di pericolo per la sicurezza può condurre a danni onerosi.
PROTEGGERE IL CAVO DI ALIMENTAZIONE ELETTRICA
Il danneggiamento del cavo di alimentazione elettrica può essere causa d’incendio o scossa elettrica. Se il cavo
di alimentazione elettrica è danneggiato, togliere la corrente alla presa a muro della rete elettrica e, con molta
attenzione, sfilare la spina afferrandola direttamente, senza tirare afferrando il cavo.
PRIMA DI UNA LUNGA ASSENZA, SFILARE LA SPINA DEL CAVO DI ALIMENTAZIONE ELETTRICA
Prima di una lunga assenza, spegnere l’unità e sfilare la spina del cavo di alimentazione elettrica dalla presa di
rete.
MANTENERE SEMPRE UNA BUONA VENTILAZIONE
Non ostruire i molti fori di ventilazione dell’unità. Per assicurare la massima ventilazione, lasciare dello spazio
attorno all’unità, collocare l’unità solo su una superficie rigida e a livello, e accertarsi che durante l’uso non
venga coperta. Non collocare nessun oggetto sull’unità.
QUANDO SI TERMINA L’USO
Quando non se ne fa uso regolare sempre su OFF I’interruttore MAIN dell’apparecchio.
CURA DEL MOBILETTO ESTERNO
Non usare mai preparati per la pulizia che contengano benzina. Pulire usando un panno morbido inumidito con
acqua e sapone e asciugare, strofinando con un panno asciutto. I cavi in PVC o i fili non devono essere lasciati
a lungo a contatto con la superficie esterna del mobiletto.
POSTO D’INSTALLAZIONE
Per assicurarsi il massimo rendimento dell’unità e mantenerla a lungo in perfetta efficienza, installarla in un
posto che sia:
1.
Ben ventilato, non esposto alla luce diretta del sole e lontano da fonti di calore.
2.
Abbia una superficie di appoggio solida e senza vibrazioni.
3.
Non esposto ai rischi di alta umidità, polvere eccessiva e che sia lontano da campi magnetici.
4.
Assicurarsi che la ventola di ventilazione che si trova nel pannello posteriore non sia ostruita.
POSTI NON ADATTI
Collocare l’unità nei posti seguenti potrebbe accorciarne la durata di vita utile:
•
Posti estremamente freddi, quali magazzini refrigerati e ghiacciaie.
•
Posti dove può essere prodotto molto solfuro d’idrogeno, ad esempio in stabilimenti termali.
•
Posti o ambienti con aria ricca di sale.
AVVISO :
PER EVITARE I RISCHI DI ‘INCENDIO O SCOSSA ELETTRICA, NON ESPORRE
QUEST’APPARECCHIO A PIOGGIA O ALTA UMIDITÀ. QUEST’APPARECCHIO HA
BISOGNO DI ESSERE MESSO ELETTRICAMENTE A TERRA.
••••••••••••••••••••••••••••••••••••••••••••••••••••••••••••••••••••••••••••••••••••••••••••••••••••••••••••••••••••••••••••••••••• Others
7
Others (Continued)
ITALIANO
Questa Unità è conforme alla direttiva della CE 89/336/EEC, “Direttiva EMC” e della direttiva EC 73/23/
EEC “Direttiva sui bassi voltaggi”, così come emendata dalla Direttiva 93/68/EEC. I requisiti per la
suscettibilità in conformità con EN 55024 e il requisito per le interferenze in conformità con EN 55022
sono osservati per il funzionamento in zone residenziali, per uffici, zone a bassa attività industriale e in
stabilimenti non molto grandi, sia all’interno che all’esterno dei palazzi. Tutti i posti di funzionamento
sono caratterizzati dal loro collegamento alla rete pubblica di energia elettrica a basso voltaggio.
Quest’unità è stata fabbricata in conformità con EN 60950.
Ci possono essere casi in cui la funzione MOTION DETECTION (RILEVAMENTO MOVIMENTO), incorporata
nell’unità non funzioni correttamente a causa di condizioni esterne, o segnale d’ingresso video, o altri
fattori.
L’utente non sarà indennizzato per problemi (es., mancata registrazione o mancata riproduzione) che si
verifichino con quest’unità o con un’apparecchiatura collegata durante il funzionamento. Si raccomanda
di fare, regolarmente, copie di riserva di registrazioni importanti, per precauzione contro i rischi di guasti
e incidenti.
Tempo di registrazione e garanzia del prodotto
Quando quest’unità viene utilizzata, la visualizzazione del tempo di registrazione ininterrotta e del tempo
stimato, sullo schermo di menu, sta a indicare il tempo di registrazione ininterrotta e non indica il periodo
di garanzia. Ugualmente, non indica il periodo di garanzia di funzionamento delle parti utilizzate.
• Questa unità dispone di un disco rigido incorporato, che è un dispositivo di precisione. Maneggiare
questa unità con la dovuta cautela.
• Non sottoporre questa unità a vibrazioni o urti. Questo può causare problemi particolarmente quando
l’unità è accesa o durante l’accesso al disco rigido, per cui è necessario usare la dovuta cautela.
• Non scollegare la spina del cavo di alimentazione mentre l’unità è accesa o durante la registrazione o
la riproduzione.
• Per una rapida individuazione di eventuali problemi, consigliamo di richiedere un’ispezione una volta
all’anno.
• Si prega di non muovere l’unità per almeno un minuto dopo lo spegnimento.
• Il disco fisso e la ventola di raffreddamento non sono parti permanenti e devono essere sostituiti
periodicamente. Quando si usa l’unità a temperature ambientali di 25°C, si consiglia di sostituire sia
il disco fisso che la ventola di raffreddamento ogni 30.000 ore.
(Questa cifra è puramente indicativa e non deve essere intesa come garanzia di durata dei prodotti.
Usare la voce “ELAPSED TIME” della schermata <INFORMATION/SERVICE> come guida all’esecuzione
dei controlli periodici.)
•••••••••••••••••••••••••••••••••••••••••••••••••••••••••••••••••••••••••••••••••••••••••••••••••••••••••••••••••••••••••••••••••••••••••••••
8
NEDERLANDS
ZET IN GEEN GEVAL ZWARE VOORWERPEN BOVENOP DIT TOESTEL (BIJV. TV.)
RAAK IN GEEN GEVAL ENIG VOORWERP IN HET TOESTEL AAN EN STEEK ER NIETS IN
Aanraken van het binnenwerk, of naar binnen steken van voorwerpen die daar niet in thuishoren kan niet alleen
gevaar opleveren, maar ook ernstige schade veroorzaken.
OTHERS
BESCHERM HET NETSNOER
Schade aan het netsnoer kan leiden tot een elektrische schok of brand. Als het netsnoer beschadigd is, dient
u de stroomvoorziening voor het stopcontact uit te schakelen en vervolgens de stekker voorzichtig uit het
stopcontact te trekken.
HAAL DE STEKKER UIT HET STOPCONTACT BIJ LANGERE AFWEZIGHEID
Schakel de stroom uit en haal de stekker uit het stopcontact wanneer u langere tijd afwezig zult zijn.
ZORG VOOR EEN GOEDE VENTILATIE
Zorg ervoor dat de vele ventilatie-openingen in de behuizing van het toestel niet afgedekt worden. Voor een zo
goed mogelijke ventilatie dient u enige ruimte rondom het toestel vrij te houden, het toestel alleen op een harde
ondergrond te plaatsen en ervoor te zorgen dat het tijdens gebruik niet wordt afgedekt. Plaats in geen geval
zware voorwerpen op het toestel.
WANNEER U HET TOESTEL NIET GEBRUIKT
Schakel altijd de HOOFDSCHAKELAAR van het toestel uit wanneer u het toestel.
VERZORGING VAN DE BEHUIZING
Gebruik in geen geval reinigingsmiddelen op petroleum-basis. Reinig de behuizing met een zachte doek die
bevochtigd is met zeep en water en wrijf de behuizing vervolgens droog. PVC kabels en bedrading mogen niet
langere tijd in contact blijven met het oppervlak van de behuizing.
INSTALLATIEPLEK
Voor de beste prestaties en betrouwbaarheid op de lange termijn dient u voor de installatie een locatie te kiezen
die:
1.
Goed geventileerd is, uit de zon en uit de buurt van directe hittebronnen.
2.
Een solide, trillingsvrije ondergrond biedt.
3.
Vrij is van hoge vochtigheid, overmatig stof en uit de buurt van magnetische velden.
4.
Waarborgt dat de ventilator aan de achterkant van het toestel niet geblokkeerd wordt.
ONGESCHIKTE LOCATIES
Als u het toestel in de volgende locaties plaatst, kan de levensduur van het product bekort worden:
•
Zeer koude plekken, zoals gekoelde pakhuizen en magazijnen.
•
Plekken waar de mogelijkheid bestaat dat grotere hoeveelheden waterstof-sulfide vrijkomen, zoals
gebieden met hete bronnen.
•
Plekken of locaties met zoute lucht.
WAARSCHUWING :
OM HET GEVAAR VAN ELEKTRISCHE SCHOKKEN EN BRAND TE
VOORKOMEN, MAG U DIT APPARAAT NIET BLOOTSTELLEN AAN REGEN
OF VOCHT. DIT APPARAAT MOET GEAARD WORDEN.
••••••••••••••••••••••••••••••••••••••••••••••••••••••••••••••••••••••••••••••••••••••••••••••••••••••••••••••••••••••••••••••••••• Others
9
Others (Continued)
NEDERLANDS
DIT toestel voldoet aan de vereisten van EC Richtlijn 89/336/EEC, “EMC Richtlijn” en 73/23/EEG,
“Laagspanningsrichtliin”, zoals geamendeerd door Richtlijn 93/68/EEC. Aan de vereisten voor de
gevoeligheid volgens EN 55024 en de vereisten voor interferentie volgens EN 55022 wordt voldaan voor
woongebieden, zaken- en licht industriele terreinen en kleinbedrijf, zowel binnen als buiten de gebouwen.
Alle gebruikslocaties worden gekarakteriseerd door hun aansluiting op het publieke laagspanningsnet.
DIT toestel is gefabriceerd in overeenstemming met EN 60950.
Er kunnen zich gevallen voordoen waarin de ingebouwde MOTION DETECTION(BEWEGINGSDETECTIE)
functie van het toestel niet naar behoren functioneert vanwege externe omstandigheden, het videoingangssignaal of andere factoren.
De gebruiker zal niet worden gevrijwaard tegen problemen (bijv. niet opnemen of afspelen) die in het
gebruik kunnen optreden met DIT product of een aangesloten toestel. U wordt aanbevolen regelmatig
reservekopieÅE te maken van belangrijke opnamen als voorzorg tegen mogelijke defecten en ongelukken.
Opnametijd en productgarantie
De op het menuscherm aangegeven continue opnametijd en de geschatte tijdsaanduiding zijn
aanduidingen van de continue opnametijd bij gebruik van dit toestel en niet de garantieperiode voor het
product. Bovendien is dit niet de garantieperiode voor gebruikte onderdelen.
• Dit toestel heeft een ingebouwde harddisk, een precisie-instrument. Wees daarom voorzichtig met het
toestel.
• Stel dit toestel niet bloot aan trillingen of schokken. Dit kan in het bijzonder problemen geven wanneer
het toestel is ingeschakeld of wanneer de harddisk in werking is. Wees daarom voorzichtig.
• Maak de stroomvoorziening niet los terwijl het toestel ingeschakeld is of terwijl er wordt opgenomen
of afgespeeld.
• Om eventuele mankementen in een zo vroeg mogelijk stadium op het spoor te komen raden we u aan
het toestel ÈÈn keer per jaar te laten inspecteren.
• Wacht tenminste 1 minuut na het uitschakelen voor u het toestel beweegt.
• De harde schijf en de ventilator zijn aan slijtage onderhevig en zullen na verloop van tijd vervangen
dienen te worden. Indien gebruikt bij een omgevingstemperatuur van 25°C, wordt aanbevolen zowel
de harde schijf als de ventilator na 30000 bedrijfsuren te vervangen.
(Dit is slechts een vuistregel en geldt niet als gegarandeerde levensduur van de producten. Gebruik
“ELAPSED TIME” op het <INFORMATION/SERVICE> scherm als richtlijn voor het uitvoeren van
controles.)
•••••••••••••••••••••••••••••••••••••••••••••••••••••••••••••••••••••••••••••••••••••••••••••••••••••••••••••••••••••••••••••••••••••••••••••
10
PORTUGES
OBJETOS PESADOS NUNCA DEVEM SER COLOCADOS EM CIMA DO APARELHO (POR EX., TV)
NÃO MEXA DENTRO DO APARELHO NEM INSIRA NELE QUALQUER OBJETO
OTHERS
Tocar a parte interna do gabinete ou inserir objetos estranhos de qualquer natureza além de provocar um risco
em termos de segurança, podem causar danos consideráveis ao aparelho.
PROTEJA O FIO DE ELETRICIDADE
O fio de eletricidade danificado pode provocar incêndio ou choques. Se o cabo principal estiver danificado,
desligue a rede elétrica e retire com cuidado o fio da tomada da parede.
DESCONECTE O FIO DE ELETRICIDADE DURANTE UMA LONGA AUSÊNCIA
Desligue a eletricidade e desconecte o fio de eletricidade durante uma longa ausência.
MANTENHA UMA BOA VENTILAÇÃO
Não obstrua os vários orifícios de ventilação do aparelho. Para uma ventilação máxima, deixe algum espaço em
volta do aparelho e o coloque somente numa superfície plana e dura, certificando-se de que não fique coberto
durante o uso. Objetos pesados nunca devem ser colocados em cima do aparelho.
QUANDO NÃO ESTIVER SENDO USADO
Quando o aparelho não estiver sendo usado, DESLIGUE (OFF) sempre seu interruptor PRINCIPAL (MAIN).
CUIDADOS COM O GABINETE
Não use nunca limpadores à base de petróleo. Limpe com um pano macio umedecido com água e sabão e
esfregue até secar. Os cabos de PVC ou de chumbo não devem ficar em contato com a superfície do gabinete
por longos períodos de tempo.
LOCAL PARA INSTALAÇÃO
Para um ótimo desempenho e uma fidedignidade duradoura, instale o aparelho num local:
1.
Bem ventilado, longe da luz direta do sol e distante de fontes diretas de calor.
2.
Numa superfície sólida livre de vibrações.
3.
Livre de grande umidade, poeira excessiva e longe de campos magnéticos.
4.
Certifique-se que o ventilador localizado na parte de trás do painel do aparelho não esteja bloqueado.
LOCAIS NÃO APROPRIADOS
A colocação do aparelho nos seguintes locais pode encurtar a vida útil do produto:
•
Locais extremamente frios, como depósitos refrigerados e frigoríficos.
•
Locais onde se pode gerar quantidades excessivas de sulfito de hidrogênio, como por exemplo áreas
de estações hidrotermais.
•
Locais de atmosfera salina.
AVISO :
PARA EVITAR INCÊNDIO OU RISCO DE CHOQUES, NÃO EXPONHA ESTE
APARELHO À CHUVA OU UMIDADE. ESTE APARELHO DEVE TER LIGADO À
TERRA.
••••••••••••••••••••••••••••••••••••••••••••••••••••••••••••••••••••••••••••••••••••••••••••••••••••••••••••••••••••••••••••••••••• Others
11
Others (Continued)
PORTUGES
Este aparelho cumpre os requisitos da Diretriz EC 89/336/EEC, “Diretriz EMC”, e 73/23/EEC, “Diretriz
sobre Baixa Voltagem”, corrigida pela Diretriz 93/68/EEC. Foram observados os requisitos de
susceptibilidade de acordo com EN 55024 e os de interferência, segundo EN 55022 para a operação em
áreas residenciais, comerciais, locais de indústrias leves e de empresas de pequeno porte, tanto dentro
como fora dos prédios. Todos os locais de operação são caracterizados pela sua conexão ao sistema
público de abastecimento de eletricidade de baixa voltagem. Este aparelho foi fabricado de acordo com
EN 60950.
Podem ocorrer casos em que a função integrada de MOTION DETECTION (DETECÇÃO DE MOVIMENTO)
não funcione corretamente devido a condições externas ou sinais de entrada de vídeo, entre outros
fatores.
O usuário não será indenizado por problemas (ex., falha na gravação ou na reprodução) que ocorram
tanto com o aparelho ou com um dispositivo conectado a ele durante a operação. Recomenda-se fazer
regularmente cópias-reserva de gravações importantes, como precaução contra possíveis panes ou
acidentes.
Tempo de gravação e garantia do produto
O tempo de gravação contínua e a exibição do tempo estimado na tela do menu correspondem ao
tempo de gravação contínua durante o funcionamento desta unidade, não ao período de garantia do
produto. Tampouco correspondem ao período de garantia de funcionamento das peças usadas.
• Esta unidade incorpora um disco rígido, que é um dispositivo de precisão. É portanto necessário ter
bastante cuidado ao manusear a unidade.
• Não submeta esta unidade a vibrações ou choques. É necessário ter bastante cuidado na prevenção
de vibrações ou choques, que poderiam causar danos, principalmente quando se liga a unidade ou
durante o acesso ao disco rígido.
• Não desligue o fio da tomada elétrica quando a unidade estiver ligada ou durante qualquer gravação
ou reprodução.
• Para uma detecção imediata de falhas, recomenda-se a realização de uma inspeção regular a cada
ano.
• Por favor não mova a unidade durante pelo menos um minuto depois de desligá-la.
• O disco duro e o ventilador de refrigeração não são itens permanentes e precisam ser trocados com o
tempo. Quando utilizar o equipamento sob uma temperatura ambiente de 25ºC, recomenda-se que
tanto o disco duro como o ventilador sejam trocados após 30.000 horas de funcionamento.
(Este número é apenas uma orientação, e não deve ser considerado como uma vida útil garantida dos
produtos. Utilize o “ELAPSED TIME” na tela <INFORMATION/SERVICE> como uma guia para realizar
as verificações.)
•••••••••••••••••••••••••••••••••••••••••••••••••••••••••••••••••••••••••••••••••••••••••••••••••••••••••••••••••••••••••••••••••••••••••••••
12
SVENSKA
TUNGA FÖREMÅL (T EX EN TV) FÅR ABSOLUT INTE PLACERAS OVANPÅ ENHETEN
RÖR INTE VID INSIDAN AV ENHETEN OCH STOPPA INTE IN NÅGRA FÖREMÅL I ENHETEN
OTHERS
Om du rör vid insidan av skåpet eller stoppar in främmande föremål utsätter du inte bara dig själv för fara, utan
kan även orsaka omfattande skador på enheten.
SKYDDA STRÖMKABELN
Skador på strömkabeln kan orsaka brand eller elstötar. Om strömkabeln är skadad ska du slå av huvudströmmen
och försiktigt koppla loss kabeln genom att hålla i kontakten.
STÄNG AV STRÖMMEN NÄR ENHETEN INTE SKA ANVÄNDAS UNDER EN LÄNGRE TID
Stäng av strömmen och dra ut kontakten när enheten inte ska användas under en längre tid.
SÖRJ FÖR GOD VENTILATION
Se till att de många ventilationshålen på enheten inte blockeras. För maximal ventilation ska du lämna fritt
utrymme runt enheten och endast placera enheten på en stadig och jämn yta, samt se till att enheten inte täcks
över när den används. Inga tunga föremål får placeras ovanpå enheten.
NÄR ENHETEN INTE ANVÄNDS
Glöm inte att ställa in huvudströmbrytaren MAIN i Iäge OFF, när denna apparat inte används.
UNDERHÅLL AV SKÅP
Använd aldrig rengöringsmedel som innehåller petroleum. Torka av skåpet med en mjuk tygtrasa som fuktats
lätt med tvål och vatten. Torka av PVC-kablar och sladdar som inte bör tillåtas komma i kontakt med skåphöljet
under längre perioder.
INSTALLATIONSPLATS
För bästa prestanda och varaktig driftssäkerhet bör du installera enheten på en plats som:
1.
Är välventilerad och inte utsätts för direkt solljus eller en direkt värmekälla.
2.
Erbjuder en stabil, vibrationsfri yta.
3.
Är fri från hög luftfuktighet, stora mängder damm samt magnetfält.
4.
Kontrollera att ventilationsfläkten som sitter på enhetens bakre panel inte blockeras.
OLÄMPLIGA INSTALLATIONSPLATSER
Om du placerar enheten på följande platser kan dess livstid förkortas:
•
Extremt kalla platser, t ex kylda magasin och fryshus.
•
Platser där stora mängder svavelväte bildas, t ex trakter med heta källor.
•
Platser eller områden där luften innehåller saltvatten.
VARNING :
FÖR ATT UNDVIKA BRAND ELLER ELSTÖTAR, FÅR DENNA APPARAT INTE
UTSÄTTAS FÖR REGN ELLER FUKT. APPARATEN MÅSTE JORDAS.
••••••••••••••••••••••••••••••••••••••••••••••••••••••••••••••••••••••••••••••••••••••••••••••••••••••••••••••••••••••••••••••••••• Others
13
Others (Continued)
SVENSKA
Denna apparat uppfyller kraven angivna i EC-direktivet 89/336/EEG, “EMC Directive” och 73/23/EEG,
“Low Voltage Directive”, vilka ar andrade genom direktivet 93/68/EEG. Kraven om frekveneskanslighet
enligt EN 55024 och kraven om storningar enligt EN 55022 ar iakttagna for anvandning pa
bostadsomraden,affarsomraden, lattindustrifastigheter samt inom sma foretag saval innanfor som utanfor
byggnader. Pa samtliga anvandningaplatser for denna apparat skall vara det allmanna lagspanningsnatet
tillgangligt. Apparaten ar konstruerad enligt EN 60950.
Det kan förekomma fall då enhetens funktion för MOTION DETECTION (RÖRELSEDETEKTERING) inte
fungerar ordentligt på grund av yttre omständigheter, videoingångssignal eller andra faktorer.
Användaren får inte ersättning för problem (t ex misslyckad inspelning eller uppspelning) som uppstår
under drift med själva enheten eller en ansluten enhet. Därför rekommenderar vi att användaren
regelbundet gör säkerhetskopior av viktiga inspelningar till skydd mot eventuella haverier och olyckor.
Inspelningstid och produktgaranti
Då du använder denna enhet, gäller indikationen om oavbruten inspelningstid och total tid på
menyskärmen den oavbrutna inspelningstiden och inte garantiperioden. På samma sätt, gäller
indikationen inte funktionsgarantin för de använda komponenterna.
• I denna enhet är en hårdvara inbyggd som är en precisionsapparat. Var därför mycket försiktig vid
hantering av denna enhet.
• Undvik att skaka eller stöta denna enhet häftigt. Om man gör sådant speciellt under tiden enheten är
strömförd eller under åtkomst till hårdvaran kan fel uppstå i enheten.
• Drag aldrig ut stickproppen till nätströmmen under inspelning/återgivining eller under tiden enheten
är ströförd.
• Det rekommenderas att låta underhålla enheten minst en gång varje år, så att eventuellt fel kan åtgärdas
så tidigt som möjligt.
• Flytta inte enheten i minst en minut efter att strömmen slagits av.
• Både hårddisken och kylfläkten är förbrukningsartiklar. Därför rekommenderar vi att byta dem ut då
de har som tumregel använts för 30.000 timmar samt omgivningstemperaturen vid användningarna
ligger ca 25 grader.
(Detta villkor om tiden är dock en indikation menas ej att garantera artiklarna. Och vid inspektionen
av operationstid kan det vara användbart att se “ELAPSED TIME” på skärmen <INFORMATION/
SERVICE>.)
•••••••••••••••••••••••••••••••••••••••••••••••••••••••••••••••••••••••••••••••••••••••••••••••••••••••••••••••••••••••••••••••••••••••••••••
14
Others
РУССКИЙ
НИКОГДА НЕ СТАВЬТЕ НА АППАРАТ ТЯЖЕЛЫЕ ПРЕДМЕТЫ (НАПРИМЕР, ТЕЛЕВИЗОР)
НИКОГДА НЕ ПРИКАСАЙТЕСЬ И НЕ ВСТАВЛЯЙТЕ ВНУТРЬ АППАРАТА КАКИЕ-ЛИБО ПРЕДМЕТЫ
Прикосновение к внутренним частям аппарата внутри корпуса или вставка внутрь аппарата каких-либо посторонних
предметов создает не только угрозу безопасности, но и может привести к сильному повреждению аппарата.
OTHERS
ПРЕДОХРАНЯЙТЕ СЕТЕВОЙ ШНУР
Повреждение сетевого шнура может привести к пожару или поражению электрическим током. В случае повреждения
сетевого шнура, обесточьте аппарат, осторожно отсоединив сетевой шнур от штепсельной розетки, взявшись за
штепсельную вилку.
ОТСОЕДИНИТЕ СЕТЕВОЙ ШНУР НА ВРЕМЯ ДЛИТЕЛЬНОГО ОТСУТСТВИЯ
Выключите питание и отсоедините сетевой шнур на время длительного отсутствия.
ОБЕСПЕЧЬТЕ ХОРОШУЮ ВЕНТИЛЯЦИЮ
Не закрывайте множество вентиляционных отверстий на аппарате. Для обеспечения максимальной вентиляции,
следует оставить пространство вокруг аппарата и поместить аппарат на твердую ровную поверхность и проследить,
чтобы он ничем не был закрыт во время эксплуатации. Никогда не ставьте на аппарат тяжелые предметы.
ЕСЛИ АППАРАТ НЕ ИСПОЛЬЗУЕТСЯ
Если аппарат не используется, ВЫКЛЮЧИТЕ на аппарате ПИТАНИЕ.
УХОД ЗА КОРПУСОМ
Никогда не используйте очистители на основе бензина. Для очистки аппарата используйте мягкую ткань, смоченную
мылом, и водой и вытирайте его досуха. Полихлорвиниловые кабели или шнуры не следует оставлять в контакте с
корпусом на длительное время.
МЕСТО ДЛЯ УСТАНОВКИ
Для обеспечения наилучших эксплуатационных качеств и надежности в течение длительного времени, установите
аппарат в месте:1. Которое хорошо проветривается, находится вне попадания прямого солнечного света и вдали прямых источников
тепла.
2. Поверхность которого не подвержена вибрации.
3. Которое не подвержено воздействию высокой влажности, чрезмерной пыли и магнитных полей.
4. Убедитесь, пожалуйста, что расположенный с задней стороны вентилятор ничем не закрыт.
НЕПОДХОДЯЩИЕ МЕСТА
Размещение аппарата в следующих местах может при вести к сокращению его срока службы:
• Крайне холодных местах, типа холодильных или морозильных складов.
• Местах с чрезмерным выделением сероводорода, например, вблизи горячих источников.
• Местах с повышенной концентрацией соли в воздухе.
ВНИМАНИЕ: ДЛЯ ПРЕДОТВРАЩЕНИЯ ПОЖАРА ИЛИ ПОРАЖЕНИЯ ЭЛЕКТРИЧЕСКИМ ТОКОМ, НЕ
ПОДВЕРГАЙТЕ ДАННЫЙ АППАРАТ ВОЗДЕЙСТВИЮ ДОЖДЯ ИЛИ ВЛАГИ. ДАННЫЙ
АППАРАТ ДОЛЖЕН БЫТЬ ЗАЗЕМЛЕН.
••••••••••••••••••••••••••••••••••••••••••••••••••••••••••••••••••••••••••••••••••••••••••••••••••••••••••••••••••••••••••• Others
15
r_dx_tl2500e_others_e.p65
15
9/26/03, 3:36 PM
Others (Continued)
Данный аппарат соответствует требованиям Директивы ЕС 89/336/EEC, “Директиве относительно
электромагнитной совместимости” и 73/23/EEC, “Директиве низкого напряжения”, с учетом
поправок, внесенных Директивой 93/68/EEC. Требования относительно восприимчивости
радиоэлектронных средств в соответствии со стандартами Европейского комитета по
стандартизации EN 55024 и требования относительно помех в соответствии со стандартами
Европейского комитета по стандартизации EN 55022, соблюдаются при эксплуатации в жилых
районах, деловых районах, в небольших помещениях промышленного назначения и в малых
промышленных предприятиях, как внутри, так и вне помещений. Все места характеризуются
их связью с системами электропитания низкого напряжения бытового типа. Этот аппарат
изготовлен в соответствии со стандартами Европейского комитета по стандартизации EN 60950.
Возможны случаи, когда встроенная функция РЕГИСТРАЦИИ ДВИЖЕНИЯ не работает
надлежащим образом вследствие внешних условий окружающей среды или входных
видеосигналов, либо других факторов.
Пользователь не застрахован от различного рода проблем (например, прерывание записи или
прерывание воспроизведения), которые могут возникнуть как в самом аппарате, так и в
подсоединенном к нему оборудовании во время эксплуатации. Поэтому рекомендуется
регулярно выполнять резервные копии важных записей в качестве меры предосторожности
на случай возможных поломок аппарата или различного рода аварий.
Время записи и гарантия изделия
Непрерывное время записи и примерное время отображения на экране меню является
непрерывным временем записи при эксплуатации данного аппарата и не представляет собой
период гарантии изделия. К тому же, это не является периодом гарантируемой эксплуатации
используемых деталей.
• В данном аппарате имеется встроенный жесткий диск, который является прецизионным
прибором. Обращайтесь, пожалуйста, с данным аппаратом с надлежащей осторожностью.
• Не подвергайте данный аппарат воздействию вибраций или ударов. Это может привести к
неисправности, поэтому, если аппарат включен или же при обращении к жесткому диску,
требуется особая осторожность.
• Не отсоединяйте штепсельную вилку в то время, когда аппарат включен или во время записи
или воспроизведения.
• Для своевременного выявления дефектов, рекомендуется обращаться за проверкой аппарата
один раз в год.
• Пожалуйста, не двигайте аппарат как минимум одну минуту после выключения питания.
• Жесткий диск и вентилятор для охлаждения не являются вечными устройствами и требуют
замены через некоторое время эксплуатации. При работе при температуре окружающей среды
в 25°C рекомендуется заменять и жесткий диск, и вентилятор через 30 000 часов.
(Данный показатель приведен только в справочных целях и не должен рассматриваться как
гарантированный ресурс эксплуатации данных изделий. Используйте параметр “ВРЕМЯ
РАБОТЫ” экрана “<ИНФОРМАЦИЯ/СЕРВИС>” для получения справок по проведению
проверок).
••••••••••••••••••••••••••••••••••••••••••••••••••••••••••••••••••••••••••••••••••••••••••••••••••••••••••••••••••••••••••• Others
16
r_dx_tl2500e_others_e.p65
16
9/26/03, 3:36 PM
UK
Mitsubishi Electric Europe B.V.
UK Branch Office
Visual Information Systems Division
Travellers Lane Hatfield Herts AL10 8XB
Telephone: +44 (0)1707 278 684
Fax: +44 (0)1707 278 541
ITALY
Mitsubishi Electric Europe B.V.
Italian Branch Office
Centro Direzionale Colleoni
Palazzo Perseo - Ingresso 2, Via
Paracelso 12, 20041 Agrate Brianza, Italy
Telehone: +39 (0) 39-60531
Fax : + 39 (0) 39-6053214
GERMANY
Mitsubishi Electric Europe B.V.
German Branch Office
Electric Visual Systems
Gothaer Str. 8 40880 Ratingen Germany
Telehone: +49 (0)2102 486-925
Fax: +49 (0)2102 486-732
The Netherlands
Mitsubishi Electric Benelux
A Division of Mitsubishi Electric Europe B.V.
Niiverheidsweg 23A, 3641 RP Mijdrecht
Netherlands.
Telephone: +31 (0)297-28 24 61
Fax : +31 (0)297-28 39 36
SPAIN
Sweden
Mitsubishi Electric Europe B.V.
Spanish Branch Office
Ctra. de Rubi, 76-80 Apdo.420
08190 Sant Cugat del Valles
(Barcelona) SPAIN
Mitsubishi Electric Scandinavia
Hammarbacken 14 Box750
SE-191 27 Sollentuna
Sweden
Telephone : +34 (93) 565 3154
Fax: +34 (93) 589 4388
Telephone: +46 8 625 10 70
Fax : +46 8 625 10 71
FRANCE
Ireland
Mitsubishi Electric Europe B.V.
French Branch Office 25,
Boulevard des Bouvets 92741 Nanterre
Cedex
Mitsubishi Electric Ireland
A Division of Mitsubishi Electric Europe B.V.
Westgate Business Park, Ballymount,
Dublin 24. Ireland
Telephone : +33 (1) 41 02 83 23
Fax : +33 (1) 49 01 07 23
Telephone: +00353 1 419 8800
Fax : +00353 1 419 8895
872C277A9
PRINTED IN MALAYSIA