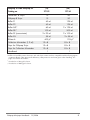
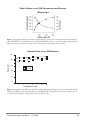
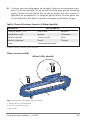
1
Second Edition
December 2006
QIAprep® Miniprep Handbook
For purification of molecular biology grade DNA
Plasmid
Large plasmids (>10 kb)
Low-copy plasmids and cosmids
Plasmid DNA prepared by other methods
W W W. Q I A G E N . C O M
Trademarks: QIAGEN®, QIAprep®, BioRobot®, R.E.A.L.®, TurboFilter® (QIAGEN); DH5α™ (Invitrogen); pBluescript® (Stratagene); pGEM® (Promega Corp.);
Beckman® (Beckman Instruments, Inc); Finntip®, Multistepper® (Thermo Electron Oy Corporation); Impact® (Matrix Technologies Corporation, USA);
Minifuge® (Heraeus Instruments GmbH).
© 2002–2006 QIAGEN, all rights reserved.
Contents
Kit Contents
4
Storage
7
Quality Control
7
Product Use Limitations
7
Product Warranty and Satisfaction Guarantee
7
Technical Assistance
8
Safety Information
9
Introduction
10
Principle
11
Using LyseBlue reagent
14
Important Notes
Guidelines for QIAvac manifolds
15
18
Protocols
Plasmid DNA Purification Using the QIAprep Spin Miniprep Kit
and a microcentrifuge
22
and 5 ml collection tubes
23
and a vacuum manifold
24
Plasmid DNA Purification Using the QIAprep 8 Miniprep Kit
28
Plasmid DNA Purification Using the QIAprep 8 Turbo Miniprep Kit
31
Plasmid DNA Purification Using the QIAprep 96 Turbo Miniprep Kit
33
Troubleshooting Guide
36
Appendix A: Background Information
39
Growth of bacterial cultures
39
Preparation of cell lysates
42
Appendix B: Agarose Gel Analysis of Plasmid DNA
43
Appendix C: Special Applications
44
Purification of low-copy plasmids and cosmids
44
Purification of plasmid DNA prepared by other methods
44
References
45
Ordering Information
46
QIAGEN Distributors and Importers
51
QIAprep Miniprep Handbook 12/2006
3
Kit Contents
QIAprep Spin Miniprep Kit
Catalog no.
(50)
(250)
27104
27106
QIAprep Spin Columns
50
Buffer P1
20 ml
73 ml
Buffer P2
20 ml
73 ml
Buffer N3*
30 ml
140 ml
Buffer PB*
250
30 ml
150 ml
2 x 6 ml
55 ml
Buffer EB
15 ml
55 ml
LyseBlue
20 µl
73 µl
200 µl
730 µl
Buffer PE (concentrate)
RNase A
†
Collection Tubes (2 ml)
Handbook
QIAprep 8 Miniprep Kit
Catalog no.
QIAprep 8 Strips
50
250
1
1
(50)
27144
50
Buffer P1
140 ml
Buffer P2
140 ml
Buffer N3*
250 ml
Buffer PB*
500 ml
Buffer PE (concentrate)
2 x 100 ml
Buffer EB
2 x 55 ml
RNase A‡
140 µl
Collection Microtubes (1.2 ml)
55 x 8
Caps for QIAprep Strips
55 x 8
Caps for Collection Microtubes
55 x 8
Handbook
1
* Buffers N3 and PB contain chaotropic salts which are irritants and not compatible with disinfecting agents
containing bleach. Take appropriate laboratory safety measures and wear gloves when handling. See
page 9 for further information.
†
Provided as a 10 mg/ml solution.
‡
Provided as a 100 mg/ml solution.
4
QIAprep Miniprep Handbook 12/2006
QIAprep 8 Turbo Miniprep Kit
Catalog no.
(10)
(50)
27152
27154
TurboFilter® 8 Strips
10
50
QIAprep 8 Strips
10
50
Buffer P1
40 ml
Buffer P2
40 ml
125 ml
Buffer N3*
60 ml
2 x 125 ml
100 ml
500 ml
2 x 20 ml
2 x 100 ml
Buffer EB
55 ml
2 x 55 ml
RNase A
400 µl †
Buffer PB*
Buffer PE (concentrate)
125 ml
125 µl ‡
Collection Microtubes (1.2 ml)
13 x 8
55 x 8
Caps for QIAprep Strips
13 x 8
55 x 8
Caps for Collection Microtubes
13 x 8
55 x 8
1
1
Handbook
* Buffers N3 and PB contain chaotropic salts which are irritants and not compatible with disinfecting agents
containing bleach. Take appropriate laboratory safety measures and wear gloves when handling. See
page 9 for further information.
†
Provided as a 10 mg/ml solution.
‡
Provided as a 100 mg/ml solution.
QIAprep Miniprep Handbook 12/2006
5
QIAprep 96 Turbo Miniprep Kit
Catalog no.
(4)
(24)
27191
27193
TurboFilter 96 Plates
4
24
QIAprep 96 Plates
4
24
125 ml
1 x 700 ml, 1 x 125 ml
Buffer P1
Buffer P2
Buffer N3*
Buffer PB*
Buffer PE (concentrate)
125 ml
1 x 700 ml, 1 x 125 ml
2 x 80 ml
1 x 1000 ml, 1 x 80 ml
500 ml
6 x 500 ml
2 x 100 ml
5 x 200 ml, 2 x 100 ml
Buffer EB
2 x 55 ml
1 x 55 ml, 2 x 250 ml
RNase A†
1 x 125 µl
1 x 125 µl, 1 x 700 µl
Tape Pads
1
6
Rack of Collection Microtubes (1.2 ml)
4
24
Caps for Collection Microtubes
55 x 8
6 x 55 x 8
Flat-Bottom Blocks and Lids
4
24
Handbook
1
1
* Buffers N3 and PB contain chaotropic salts which are irritants and not compatible with disinfecting agents
containing bleach. Take appropriate laboratory safety measures and wear gloves when handling. See
page 9 for further information.
†
6
Provided as a 100 mg/ml solution.
QIAprep Miniprep Handbook 12/2006
Storage
QIAprep Miniprep Kits should be stored dry at room temperature (15–25°C). Kits can
be stored for up to 12 months without showing any reduction in performance and quality.
For longer storage these kits can be kept at 2–8°C. If any precipitate forms in the buffers
after storage at 2–8°C it should be redissolved by warming the buffers to 37°C before use.
After addition of RNase A and optional LyseBlue reagent, Buffer P1 is stable for
6 months when stored at 2–8°C. RNase A stock solution can be stored for two years at
room temperature.
Quality Control
In accordance with QIAGEN’s ISO-certified Total Quality Management System, each
lot of QIAprep Miniprep Kit is tested against predetermined specifications to ensure consistent product quality.
Product Use Limitations
QIAprep Miniprep Kits are developed, designed, and sold for research purposes only.
They are not to be used for human diagnostic or drug purposes or to be administered
to humans unless expressly cleared for that purpose by the Food and Drug Administration
in the USA or the appropriate regulatory authorities in the country of use. All due care
and attention should be exercised in the handling of many of the materials described
in this text.
The QIAcube, BioRobot 3000, BioRobot 8000 and BioRobot Universal System workstations
are intended for research applications. No claim or representation is intended for their
use to provide information for the diagnosis, prevention, or treatment of a disease.
Product Warranty and Satisfaction Guarantee
QIAGEN guarantees the performance of all products in the manner described in our
product literature. The purchaser must determine the suitability of the product for its
particular use. Should any product fail to perform satisfactorily due to any reason other
than misuse, QIAGEN will replace it free of charge or refund the purchase price. We
reserve the right to change, alter, or modify any product to enhance its performance
and design. If a QIAGEN product does not meet your expectations, simply call your
local Technical Service Department. We will credit your account or exchange the product
— as you wish.
A copy of QIAGEN terms and conditions can be obtained on request, and is also
provided on the back of our invoices. If you have questions about product specifications or performance, please call QIAGEN Technical Services or your local distributor
(see back cover).
QIAprep Miniprep Handbook 12/2006
7
Technical Assistance
At QIAGEN we pride ourselves on the quality and availability of our technical support.
Our Technical Service Departments are staffed by experienced scientists with extensive
practical and theoretical expertise in molecular biology and the use of QIAGEN products.
If you have any questions or experience any difficulties regarding QIAprep Miniprep
Kits, or QIAGEN products in general, please do not hesitate to contact us.
QIAGEN customers are a major source of information regarding advanced or
specialized uses of our products. This information is helpful to other scientists as well as
to the researchers at QIAGEN. We therefore encourage you to contact us if you have
any suggestions about product performance or new applications and techniques.
For technical assistance and more information please call one of the QIAGEN Technical
Service Departments or local distributors (see back cover).
Comprehensive background information on plasmid preparation procedures and
common plasmid applications — in addition to kit selection guides, frequently asked
questions, and information about our purification technologies — can be found on our
plasmid Web page www.qiagen.com/goto/plasmidinfo .
8
QIAprep Miniprep Handbook 12/2006
Safety Information
When working with chemicals, always wear a suitable lab coat, disposable gloves,
and protective goggles. For more information, please consult the appropriate material
safety data sheets (MSDSs). These are available online in convenient and compact PDF
format at www.qiagen.com/ts/msds.asp where you can find, view, and print the MSDS
for each QIAGEN kit and kit component.
CAUTION: DO NOT add bleach or acidic solutions directly to the sample-preparation
waste.
Buffers N3 and PB contain guanidine hydrochloride, which can form highly reactive
compounds when combined with bleach.
If liquid containing these buffers is spilt, clean with suitable laboratory detergent and
water. If the spilt liquid contains potentially infectious agents, clean the affected area
first with laboratory detergent and water, and then with 1% (v/v) sodium hypochlorite.
The following risk and safety phrases apply to QIAprep Miniprep Kits.
Buffer N3
Contains guanidine hydrochloride, acetic acid: harmful, irritant. Risk and safety phrases:*
R22-36/38, S13-23-26-36/37/39-46.
Buffer P2
Contains sodium hydroxide: irritant. Risk and safety phrases:* R36/38, S13-26-36-46.
Buffer PB
Contains guanidine hydrochloride, isopropanol: harmful, flammable, irritant. Risk and
safety phrases:* R10-22-36/38, S13-23-26-36/37/39-46
RNase A
Contains ribonuclease: sensitizer. Risk and safety phrases:* R42/43, S23-24-2636/37.
24-hour emergency information
Emergency medical information in English, French, and German can be obtained
24 hours a day from:
Poison Information Center Mainz, Germany
Tel: +49-6131-19240
* R10: Flammable; R22: Harmful if swallowed; R36/38: Irritating to eyes and skin; R42/43: May cause
sensitization by inhalation and skin contact; S13: Keep away from food, drink, and animal feedingstuffs;
S23; Do not breathe spray; S24: Avoid contact with skin; S26: In case of contact with eyes, rinse immediately
with plenty of water and seek medical advice; S36: Wear suitable protective clothing; S36/37: Wear suitable
protecting clothing and gloves; S36/37/39: Wear suitable protective clothing, gloves and eye/face protection;
S46: If swallowed seek medical advice immediately and show the container or label.
QIAprep Miniprep Handbook 12/2006
9
Introduction
The QIAprep Miniprep system provides a fast, simple, and cost-effective plasmid
miniprep method for routine molecular biology laboratory applications. QIAprep
Miniprep Kits use silica membrane technology to eliminate the cumbersome steps associated with loose resins or slurries. Plasmid DNA purified with QIAprep Miniprep Kits
is immediately ready for use. Phenol extraction and ethanol precipitation are not
required, and high-quality plasmid DNA is eluted in a small volume of Tris buffer (included
in each kit) or water. The QIAprep system consists of four products with different
handling options to suit every throughput need.
Low throughput
The QIAprep Spin Miniprep Kit is designed for quick and convenient processing of
1–24 samples simultaneously in less than 30 minutes. QIAprep spin columns can be
used in a microcentrifuge or on any vacuum manifold with luer connectors (e.g., QIAvac
24 Plus, or QIAvac 6S with QIAvac Luer Adapters).
The QIAprep Spin Miniprep Kit can be fully automated on the QIAcube. The innovative
QIAcube uses advanced technology to process QIAGEN spin columns, enabling
seamless integration of automated, low-throughput sample prep into your laboratory
workflow. Sample preparation using the QIAcube follows the same steps as the manual
procedure (i.e., lyse, bind, wash, and elute) enabling you to continue using the QIAprep
Spin Miniprep Kit for purification of high-quality plasmid DNA.
The QIAcube is preinstalled with protocols for purification of plasmid DNA, genomic
DNA, RNA, viral nucleic acids, and proteins, plus DNA and RNA cleanup. The range
of protocols available is continually expanding, and additional QIAGEN protocols can
be downloaded free of charge at www.qiagen.com/MyQIAcube .
Medium throughput
For medium throughput requirements the QIAprep 8 Miniprep Kit and QIAprep 8 Turbo
Miniprep Kit utilize 8-well strips on QIAvac 6S allowing up to 48 minipreps to be performed simultaneously in approximately 40 and 30 minutes respectively. In addition,
the QIAprep 8 Turbo BioRobot ® Kit enables automated purification of up to 48
minipreps in 50 minutes on BioRobot systems.
High throughput
The QIAprep 96 Turbo Miniprep Kit enables up to 96 minipreps to be performed simultaneously in less than 45 minutes on the QIAvac 96. For automated high-throughput
plasmid purification the QIAprep 96 Turbo BioRobot Kit enables up to 96 minipreps to
be processed in 70 minutes.
10
QIAprep Miniprep Handbook 12/2006
Applications using QIAprep purified DNA
Plasmid DNA prepared using the QIAprep system is suitable for a variety of routine
applications including:
■
Restriction enzyme digestion
■
Sequencing
■
Library screening
■
Ligation and transformation
■
In vitro translation
■
Transfection of robust cells
Principle
The QIAprep miniprep procedure is based on alkaline lysis of bacterial cells followed
by adsorption of DNA onto silica in the presence of high salt (1). The unique silica
membrane used in QIAprep Miniprep Kits completely replaces glass or silica slurries
for plasmid minipreps.
The procedure consists of three basic steps:
■
Preparation and clearing of a bacterial lysate
■
Adsorption of DNA onto the QIAprep membrane
■
Washing and elution of plasmid DNA
All steps are performed without the use of phenol, chloroform, CsCl, ethidium bromide,
and without alcohol precipitation.
Preparation and clearing of bacterial lysate
The QIAprep miniprep procedure uses the modified alkaline lysis method of Birnboim
and Doly (2). Bacteria are lysed under alkaline conditions, and the lysate is subsequently neutralized and adjusted to high-salt binding conditions in one step. After lysate
clearing, the sample is ready for purification on the QIAprep silica membrane. For more
details on growth of bacterial cultures and alkaline lysis, please refer to Appendix A on
pages 39–42. In the QIAprep Spin and QIAprep 8 miniprep procedures, lysates are
cleared by centrifugation, while the QIAprep 8 and 96 Turbo Miniprep kits provide
TurboFilter strips or plates for lysate clearing by filtration.
LyseBlue reagent *
Use of LyseBlue is optional and is not required to successfully perform plasmid preparations. See “Using LyseBlue reagent” on page 14 for more information.
* LyseBlue reagent is only supplied with QIAprep Spin Miniprep Kits since multiwell or automated formats do
not allow visual control of individual samples.
QIAprep Miniprep Handbook 12/2006
11
LyseBlue is a color indicator which provides visual identification of optimum buffer mixing. This prevents common handling errors that lead to inefficient cell lysis and incomplete precipitation of SDS, genomic DNA, and cell debris. This makes LyseBlue ideal
for use by researchers who have not had much experience with plasmid preparations
as well as experienced scientists who want to be assured of maximum product yield.
DNA adsorption to the QIAprep membrane
QIAprep columns, strips, and plates use a silica membrane for selective adsorption of
plasmid DNA in high-salt buffer and elution in low-salt buffer. The optimized buffers in
the lysis procedure, combined with the unique silica membrane, ensure that only DNA
will be adsorbed, while RNA, cellular proteins, and metabolites are not retained on the
membrane but are found in the flow-through.
Washing and elution of plasmid DNA
Endonucleases are efficiently removed by a brief wash step with Buffer PB. This step is
essential when working with endA+ strains such as the JM series, HB101 and its
derivatives, or any wild-type strain, to ensure that plasmid DNA is not degraded. The
Buffer PB wash step is also necessary when purifying low-copy plasmids, where large
culture volumes are used.
Salts are efficiently removed by a brief wash step with Buffer PE. High-quality plasmid
DNA is then eluted from the QIAprep column with 50–100 µl of Buffer EB or water. The
purified DNA is ready for immediate use in a range of applications — no need to
precipitate, concentrate, or desalt.
Note: Elution efficiency is dependent on pH. The maximum elution efficiency is achieved
between pH 7.0 and 8.5. When using water for elution, make sure that the pH value
is within this range. Store DNA at –20°C when eluted with water since DNA may
degrade in the absence of a buffering agent.
DNA yield
Plasmid yield with the QIAprep miniprep system varies depending on plasmid copy
number per cell (see page 39), the individual insert in a plasmid, factors that affect
growth of the bacterial culture (see pages 39–42), the elution volume (Figure 1), and
the elution incubation time (Figure 2). A 1.5 ml overnight culture can yield from 5 to
15 µg of plasmid DNA (Table 1, page 14). To obtain the optimum combination of DNA
quality, yield, and concentration, we recommend using Luria-Bertani (LB) medium for
growth of cultures (for composition see page 41), eluting plasmid DNA in a volume of
50 µl, and performing a short incubation after addition of the elution buffer.
12
QIAprep Miniprep Handbook 12/2006
Elution Volume versus DNA Concentration and Recovery
QIAprep Spin
Figure 1 10 µg pUC18 DNA was purified using the QIAprep Spin protocol and eluted with the indicated volumes of Buffer EB. The standard protocol uses 50 µl Buffer EB for elution, since this combines high yield with
high concentration. However the yield can be increased by increasing the elution volume.
Incubation Time versus DNA Recovery
100
Recovery (%)
80
60
100 µl
50 µl
40
20
0
1
2
3
4
5
Incubation time (min)
10
30
Figure 2 10 µg pBluescript DNA was purified using the QIAprep Spin Miniprep protocol and eluted after the
indicated incubation times with either 50 µl or 100 µl Buffer EB. The graph shows that an incubation time of
1 minute and doubling the elution buffer volume increases yield.
QIAprep Miniprep Handbook 12/2006
13
Table 1. Effect of Different Compositions of Growth Medium LB on DNA Yield
Culture media
LB (containing 10 g/liter NaCl)
LB (containing 5 g/liter NaCl)
Yield
11.5 µg
9.5 µg
QIAprep Spin Miniprep Kit was used to purify DNA from 1.5 ml LB overnight cultures of XL1-Blue containing
pBluescript ®. Elution was performed according to the standard protocol (50 µl Buffer EB and 1 min incubation). Use of the recommended LB composition (with 10 g/liter NaCl, also see Appendix A, p. 43) provides
optimal plasmid yield.
Using LyseBlue reagent
Using a simple visual identification system, LyseBlue reagent prevents common handling
errors that lead to inefficient cell lysis and incomplete precipitation of SDS, cell debris,
and genomic DNA.
LyseBlue can be added to the resuspension buffer (Buffer P1) bottle before use. Alternatively, smaller amounts of LyseBlue can be added to aliquots of Buffer P1, enabling
single plasmid preparations incorporating visual lysis control to be performed.
LyseBlue reagent should be added to Buffer P1 at a ratio of 1:1000 to achieve the
required working concentration (e.g., 10 µl LyseBlue into 10 ml Buffer P1). Make sufficient LyseBlue/Buffer P1 working solution for the number of plasmid preps being performed.
LyseBlue precipitates after addition into Buffer P1. This precipitate will completely dissolve after addition of Buffer P2. Shake Buffer P1 before use to resuspend LyseBlue particles.
The plasmid preparation procedure is performed as usual. After addition of Buffer P2
to Buffer P1, the color of the suspension changes to blue. Mixing should result in a homogeneously colored suspension. If the suspension contains localized regions of colorless
solution or if brownish cell clumps are still visible, continue mixing the solution until a
homogeneously colored suspension is achieved.
Upon addition of neutralization buffer (Buffer N3), LyseBlue turns colorless. The presence of a homogeneous solution with no traces of blue indicates that SDS from the lysis
buffer has been effectively precipitated.
14
QIAprep Miniprep Handbook 12/2006
Important Notes
Please read the following notes before starting any of the QIAprep procedures.
Growth of bacterial cultures in tubes or flasks
1.
Pick a single colony from a freshly streaked selective plate and inoculate a culture of
1–5 ml LB medium containing the appropriate selective antibiotic. Incubate for
12–16 h at 37°C with vigorous shaking.
Growth for more than 16 h is not recommended since cells begin to lyse and plasmid yields may be reduced. Use a tube or flask with a volume of at least 4 times
the volume of the culture.
2.
Harvest the bacterial cells by centrifugation at > 8000 rpm (6800 x g ) in a conventional, table-top microcentrifuge for 3 min at room temperature (15–25°C).
The bacterial cells can also be harvested in 15 ml centrifuge tubes at 5400 x g for
10 min at 4°C. Remove all traces of supernatant by inverting the open centrifuge
tube until all medium has been drained.
Cell Cultivation in a 96-Well Block for QIAprep Turbo 96
1.
Fill each well of a 96-well flat-bottom block with 1.3 ml of growth medium containing the appropriate selective agent. Inoculate each well from a single bacterial
colony. Incubate the cultures for 20–24 h at 37°C with vigorous shaking.
The wells in the block may be protected against spill-over by covering the block
with a plastic lid or adhesive tape. AirPore microporous tape sheets promote gas
exchange during culturing (see ordering information, page 49). If non-porous tape
is used, pierce 2–3 holes in the tape with a needle above each well for aeration.
2.
Harvest the bacterial cells in the block by centrifugation for 5 min at 2100 x g in a
centrifuge with a rotor for microtiter plates (e.g., QIAGEN Centrifuge 4K15C, or
Heraeus Minifuge® GL), preferably at 4–10°C. The block should be covered with
adhesive tape during centrifugation. Remove media by inverting the block.
To remove the media, peel off the tape and quickly invert the block over a waste
container. Tap the inverted block firmly on a paper towel to remove any remaining droplets of medium.
WARNING: Ensure that the buckets on the rotor have sufficient clearance to accommodate the 2 ml flat-bottom blocks before starting the centrifuge.
QIAprep Miniprep Handbook 12/2006
15
Buffer notes
■
Add the provided RNase A solution to Buffer P1, mix, and store at 2–8°C.
■
Add ethanol (96–100%) to Buffer PE before use (see bottle label for volume).
■
Check Buffers P2 and N3 before use for salt precipitation. Redissolve any
precipitate by warming to 37°C. Do not shake Buffer P2 vigorously.
■
Close the bottle containing Buffer P2 immediately after use to avoid acidification
of Buffer P2 from CO2 in the air.
■
Buffers P2, N3, and PB contain irritants. Wear gloves when handling these buffers.
■
Optional: Add the provided LyseBlue reagent to Buffer P1 and mix before use. Use
one vial LyseBlue (spin down briefly before use) per bottle of Buffer P1 to achieve
a 1:1000 dilution. LyseBlue provides visual identification of optimum buffer mixing thereby preventing the common handling errors that lead to inefficient cell lysis
and incomplete precipitation of SDS, genomic DNA, and cell debris. For more
details see “Using LyseBlue reagent” on page 14.
Centrifugation notes
■
All centrifugation steps are carried out at 13,000 rpm (~17,900 x g) in a
conventional, table-top microcentrifuge.
Vacuum notes
■
Switch off vacuum between steps to ensure that a consistent, even vacuum is
applied during manipulations.
■
Wear safety glasses when working near a manifold under pressure.
■
For safety reasons, do not use 96-well plates that have been damaged in any way.
■
For QIAprep 8, QIAprep 8 Turbo, and QIAprep 96 Turbo miniprep procedures,
the negative pressure (vacuum) should be regulated before beginning the
procedure by applying the vacuum to the appropriate number of empty QIAprep
modules (indicated in Table 2) on the QIAvac manifold.
The vacuum pressure is the pressure differential between the inside of the manifold
and the atmosphere (standard atmospheric pressure: 1013 millibar or 760 mm Hg)
and can be measured using a vacuum regulator (see ordering information, page 48).
Vacuum recommendations are given in negative units (Table 2) to indicate the
required reduction in pressure with respect to the atmosphere. Table 3 provides
pressure conversions to other units.
■
Use of a vacuum pressure lower than recommended may reduce DNA yield and
purity.
16
QIAprep Miniprep Handbook 12/2006
Table 2. Regulation of Vacuum Pressures for QIAprep Multiwell Procedures
Procedure
Vacuum
manifold
Module used for
checking pressure*
Vacuum pressure‡
mbar
mm Hg
QIAprep 8
QIAvac 6S
QIAprep 8 strip(s)† –100 to –530
–75 to –400
QIAprep 8 Turbo
QIAvac 6S
QIAprep 8 strip(s)
–100 to –530
–75 to –400
QIAprep 96 Turbo QIAvac 96 QIAprep 96 plate
–40 to –200
–30 to –150
†
* Pressure should be regulated using empty modules on the manifold.
†
Regulate the vacuum using the number of 8-well strips that will be used in the purification.
‡
Values apply to empty modules on QIAvac. During the working procedure the vacuum may exceed the
values indicated.
Table 3. Pressure Conversions
To convert from millibars (mbar) to
Multiply by:
Millimeters of mercury (mm Hg)
0.75
Kilopascals (kPa)
0.1
Inches of mercury (inch Hg)
0.0295
Torrs (Torr)
0.75
Atmospheres (atm)
0.000987
Pounds per square inch (psi)
0.0145
Elution notes
■
Ensure that the elution buffer is dispensed directly onto the center of the QIAprep
membrane for optimal elution of DNA. Average eluate volume is 48 µl from an
elution-buffer volume of 50 µl (QIAprep spin procedures), and 60 µl from an
elution-buffer volume of 100 µl (QIAprep multiwell procedures).
■
For increased DNA yield, use a higher elution-buffer volume. For increased DNA
concentration, use a lower elution-buffer volume (see “DNA yield”, pages 13–14).
■
If water is used for elution, make sure that its pH is between 7.0 and 8.5. Elution
efficiency is dependent on pH and the maximum elution efficiency is achieved
within this range. A pH <7.0 can decrease yield.
Note: Store DNA at –20°C when eluted with water, as DNA may degrade in the
absence of a buffering agent.
■
DNA can also be eluted in TE buffer (10 mM Tris·Cl, 1 mM EDTA, pH 8.0), but
the EDTA may inhibit subsequent enzymatic reactions.
QIAprep Miniprep Handbook 12/2006
17
Multichannel pipet recommendations
Many steps of the QIAprep 8 procedure and the QIAprep 8 and 96 Turbo procedures
require repeated pipetting, and a reservoir or multichannel pipet can greatly facilitate
liquid handling. The Matrix Impact® cordless multichannel pipet can be purchased with
an optional expandable tip-spacing system for direct liquid transfer from tubes to
microtiter plates.
These can be purchased from Matrix Technologies Corporation:
www.matrixtechcorp.com .
Pipet tip recommendations
Some standard 1 ml pipet tips are not easily accommodated in the flat-bottom blocks
that are used in the QIAprep 96 Turbo Miniprep protocol. When pipetting into flat-bottom
blocks, we recommend using pipet tips with 1.25 ml or 1.5 ml fill volume, such as:
■
Matrix pipet tips (cat. no. 8051) for use with the Matrix pipet mentioned above.
These can be purchased from the supplier listed above.
■
Finntip® Multistepper® pipet tips for use with single-channel pipets. These are
available from Thermo Electron Corporation: www.thermo.com .
Guidelines for QIAvac manifolds
QIAvac 24 Plus, QIAvac 6S, and QIAvac 96 facilitate DNA minipreps by providing a
convenient modular vacuum manifold for use with the QIAprep system. The following
recommendations should be followed when handling QIAvac manifolds.
■
QIAvac manifolds operate with a house vacuum or Vacuum Pump (e.g., Vacuum
Pump, cat. no. 84010 [USA and Canada], 84000 [Japan], or 84020 [rest of
world]).
■
Always store QIAvac manifolds clean and dry. To clean, simply rinse all components with water and dry with paper towels. Do not air dry, as the screws may rust
and need to be replaced. Do not use abrasives or solvents.
■
Always place the QIAvac manifold on a secure bench top or work area. If
dropped, the manifold may crack.
■
The components of QIAvac manifolds are not resistant to ethanol, methanol, or
other organic solvents (Table 4). Do not bring solvents into contact with the
vacuum manifold. If solvents are spilled on the unit, rinse thoroughly with distilled
water. Ensure that no residual Buffer PE remains in the vacuum manifold.
18
QIAprep Miniprep Handbook 12/2006
■
To ensure consistent performance, do not apply silicone or vacuum grease to any
part of a QIAvac manifold. The spring lock on the top plate and the self-sealing
gasket (QIAvac 6S and QIAvac 96) provide an airtight seal when vacuum is
applied to the assembled unit. To maximize gasket lifetime, rinse the gasket free
of salts and buffers after each use and dry with paper towels before storage.
Table 4. Chemical-Resistance Properties of QIAvac Manifolds
Resistant to:
Not resistant to:
Chlorine bleach (12%)
Acetic acid*
Benzene
Hydrochloric acid
Acetone
Chloroform
Sodium chloride
Chromic acid*
Ethers
Sodium hydroxide
Phenol
Toluene
Urea
Concentrated alcohols*
* QIAvac 24 Plus is resistant to these chemicals.
QIAvac vacuum manifolds
QIAvac 24 Plus Manifold
3
3
12
2
2
1
11
10
9
8
7
6
5
4
24
3
23
2
22
1
21
20
E
QIAG
N
19
18
17
16
15
14
13
1
Figure 3 Components of the QIAvac 24 Plus manifold.
1. QIAvac 24 Plus vacuum manifold
2. Luer slot closed with luer plug
3. Spin column
QIAprep Miniprep Handbook 12/2006
19
QIAvac 6S Manifold
9
8
10
6
4
6
5
3
2
7
1
Figure 4 Components of the QIAvac 6S manifold.
1. QIAvac base, which holds a waste tray, a strip
holder, or a microtube rack
5. Microtube rack
2. Waste tray
7. Blanks to seal unused slots
3. QIAvac strip holder to hold 8-well strips
8. QIAvac Luer Adapter†
4. QIAvac top plate with slots for 8-well strips or
QIAvac Luer Adapters
6. 8-well strip*
9. QIAprep spin column*
10. Plug to seal unused luer connectors†
QIAvac 96 Manifold
6
4
6
3
5
2
1
Figure 5 Components of the QIAvac 96 manifold.
1. QIAvac base, which holds a waste tray, a plate
holder, or a microtube rack
4. QIAvac 96 top plate with aperture for 96-well
plate
2. Waste tray
5. Microtube rack
3. Plate holder (shown with 96-well plate)
6. 96-well plate‡
* Not included with QIAvac 6S. Included in appropriate kits. † Not included with QIAvac 6S. Must be
purchased separately. ‡ Not included with QIAvac 96. Included in QIAprep 96 Turbo Miniprep Kits.
20
QIAprep Miniprep Handbook 12/2006
QIAprep Spin Procedure
in microcentrifuges
on vacuum manifolds
Pelleted bacteria
Resuspend
Lyse
Neutralize
Bind
Bind
Vacuum
Wash
Wash
Vacuum
Elute
Pure plasmid DNA
QIAprep Miniprep Handbook 12/2006
Elute
Pure plasmid DNA
21
QIAprep Spin
Protocol: Plasmid DNA Purification Using the QIAprep
Spin Miniprep Kit and a Microcentrifuge
This protocol is designed for purification of up to 20 µg of high-copy plasmid DNA from
1–5 ml overnight cultures of E. coli in LB (Luria-Bertani) medium. For purification of
low-copy plasmids and cosmids, large plasmids (>10 kb), and DNA prepared using
other methods, refer to the recommendations on page 44.
Please read “Important Notes” on pages 15–21 before starting.
Note: All protocol steps should be carried out at room temperature.
Procedure
1.
Resuspend pelleted bacterial cells in 250 µl Buffer P1 and transfer to a microcentrifuge tube.
Ensure that RNase A has been added to Buffer P1. No cell clumps should be visible
after resuspension of the pellet.
If LyseBlue reagent has been added to Buffer P1, vigorously shake the buffer bottle to ensure LyseBlue particles are completely dissolved. The bacteria should be
resuspended completely by vortexing or pipetting up and down until no cell clumps
remain.
2.
Add 250 µl Buffer P2 and mix thoroughly by inverting the tube 4–6 times.
Mix gently by inverting the tube. Do not vortex, as this will result in shearing of
genomic DNA. If necessary, continue inverting the tube until the solution becomes
viscous and slightly clear. Do not allow the lysis reaction to proceed for more than
5 min.
If LyseBlue has been added to Buffer P1 the cell suspension will turn blue after addition of Buffer P2. Mixing should result in a homogeneously colored suspension. If
the suspension contains localized colorless regions or if brownish cell clumps are
still visible, continue mixing the solution until a homogeneously colored suspension
is achieved.
3.
Add 350 µl Buffer N3 and mix immediately and thoroughly by inverting the tube
4–6 times.
To avoid localized precipitation, mix the solution thoroughly, immediately after
addition of Buffer N3. Large culture volumes (e.g. ≥5 ml) may require inverting up
to 10 times. The solution should become cloudy.
If LyseBlue reagent has been used, the suspension should be mixed until all trace
of blue has gone and the suspension is colorless. A homogeneous colorless suspension indicates that the SDS has been effectively precipitated.
4.
Centrifuge for 10 min at 13,000 rpm (~17,900 x g) in a table-top microcentrifuge.
A compact white pellet will form.
22
QIAprep Miniprep Handbook 12/2006
Apply the supernatants from step 4 to the QIAprep spin column by decanting or
pipetting.
6.
Centrifuge for 30–60 s. Discard the flow-through.
7.
Recommended: Wash the QIAprep spin column by adding 0.5 ml Buffer PB and
centrifuging for 30–60 s. Discard the flow-through.
This step is necessary to remove trace nuclease activity when using endA+ strains
such as the JM series, HB101 and its derivatives, or any wild-type strain, which
have high levels of nuclease activity or high carbohydrate content. Host strains
such as XL-1 Blue and DH5α™ do not require this additional wash step.
8.
Wash QIAprep spin column by adding 0.75 ml Buffer PE and centrifuging for
30–60 s.
9.
Discard the flow-through, and centrifuge for an additional 1 min to remove residual
wash buffer.
Important: Residual wash buffer will not be completely removed unless the
flow-through is discarded before this additional centrifugation. Residual ethanol
from Buffer PE may inhibit subsequent enzymatic reactions.
10. Place the QIAprep column in a clean 1.5 ml microcentrifuge tube. To elute DNA,
add 50 µl Buffer EB (10 mM Tris·Cl, pH 8.5) or water to the center of each QIAprep
spin column, let stand for 1 min, and centrifuge for 1 min.
Protocol: Plasmid DNA Purification Using the QIAprep
Spin Miniprep Kit and 5 ml Collection Tubes
The QIAprep Spin Miniprep procedure can be performed using 5 ml centrifuge tubes
(e.g., Greiner, cat. no. 115101 or 115261) as collection tubes to decrease handling.
The standard protocol on pages 22–23 should be followed with the following
modifications:
Step 4: Place a QIAprep spin column in a 5 ml centrifuge tube instead of a 2 ml
collection tube.
Step 6: Centrifuge at 3000 x g for 1 min using a suitable rotor (e.g., Beckman®
GS-6KR centrifuge at ~4000 rpm). (The flow-through does not need to be
discarded.)
Steps 7 For washing steps, centrifugation should be performed at 3000 x g for 1 min.
and 8: (The flow-through does not need to be discarded.)
Step 9: Transfer the QIAprep spin column to a microcentrifuge tube. Centrifuge at
maximum speed for 1 min. Continue with step 10 of the protocol.
QIAprep Miniprep Handbook 12/2006
23
QIAprep Spin
5.
QIAprep Spin
Protocol: Plasmid DNA Purification Using the QIAprep
Spin Miniprep Kit and a Vacuum Manifold
This protocol is designed for purification of up to 20 µg high-copy plasmid DNA from
1–5 ml overnight cultures of E. coli grown in LB (Luria-Bertani) medium, using QIAprep
spin columns on QIAvac 24 Plus, QIAvac 6S, or other vacuum manifolds with luer connectors. For purification of low-copy plasmids and cosmids, large plasmids (>10 kb),
and DNA prepared using other methods, refer to the recommendations on page 44.
Please read “Important Notes” on pages 15–21 before starting.
Note: All protocol steps should be carried out at room temperature.
Procedure
1.
Resuspend pelleted bacterial cells in 250 µl Buffer P1 and transfer to a microcentrifuge tube.
Ensure that RNase A has been added to Buffer P1. No cell clumps should be visible after resuspension of the pellet.
If LyseBlue reagent has been added to Buffer P1, vigorously shake the buffer bottle to ensure LyseBlue particles are completely dissolved. The bacteria should be
resuspended completely by vortexing or pipetting up and down until no cell clumps
remain.
2.
Add 250 µl Buffer P2 and mix thoroughly by inverting the tube gently 4–6 times.
Do not vortex, as this will result in shearing of genomic DNA. If necessary,
continue inverting the tube until the solution becomes viscous and slightly clear. Do
not allow the lysis reaction to proceed for more than 5 min.
If LyseBlue has been added to Buffer P1 the cell suspension will turn blue after addition of Buffer P2. Mixing should result in a homogeneously colored suspension. If
the suspension contains localized colorless regions or if brownish cell clumps are
still visible, continue mixing the solution until a homogeneously colored suspension
is achieved.
3.
Add 350 µl Buffer N3 and mix immediately and thoroughly by inverting the tube
4–6 times.
To avoid localized precipitation, immediately after addition of Buffer N3 mix the
solution gently but thoroughly. Large culture volumes (e.g. ≥5 ml) may require
inverting up to 10 times. The solution should become cloudy.
If LyseBlue reagent has been used, the suspension should be mixed until all trace
of blue has gone and the suspension is colorless. A homogeneous colorless suspension indicates that the SDS has been effectively precipitated.
4.
Centrifuge for 10 min at 13,000 rpm (~17,900 x g) in a table-top microcentrifuge.
A compact white pellet will form.
24
QIAprep Miniprep Handbook 12/2006
During centrifugation, prepare the vacuum manifold and QIAprep spin columns:
QIAvac 24 Plus (see pages 16 and 18–19):
QIAvac 24 Plus and the lower threaded hole is tightly sealed using the screw
cap.
■ If using the QIAvac Connecting System, connect the system to the manifold
and vacuum soured as described in the QIAvac 24 Plus Handbook.
■ Insert up to 24 spin columns into the luer slots of the QIAvac 24 Plus. Close
unused luer slots with luer plugs.
QIAvac 6S manifold:
(Note: The following procedure applies to the manifold with a hinged lid and
spring lock. See pages 16 and 18–20.)
■ Open QIAvac 6S lid. Place QIAvac luer adapter(s), or blanks (provided with
QIAvac 6S) to seal unused slots, into the slots of the QIAvac top plate. Close
the QIAvac 6S lid. Place the waste tray inside the QIAvac base, and place
the top plate squarely over the base. Attach the QIAvac 6S to a vacuum
source.
■ Insert each QIAprep spin column into a luer connector on the luer adapter(s)
in the vacuum manifold. Seal unused luer connectors with plugs provided with
the QIAvac Luer Adapter Set.
Other vacuum manifolds: Follow the supplier’s instructions. Insert each QIAprep
column into a luer connector.
5.
Apply the supernatant from step 4 to the QIAprep spin column by decanting or
pipetting.
6.
Switch on vacuum source to draw the solution through the QIAprep spin columns,
and then switch off vacuum source.
7.
Recommended: Wash the QIAprep spin column by adding 0.5 ml Buffer PB. Switch
on vacuum source. After the solution has moved through the column, switch off
vacuum source.
This step is necessary to remove trace nuclease activity when using endA+ strains
such as the JM series, HB101 and its derivatives, or any wild-type strain, which
have high levels of nuclease activity or high carbohydrate content. Host strains
such as XL-1 Blue and DH5α do not require this additional wash step.
8.
Wash the QIAprep spin column by adding 0.75 ml Buffer PE. Switch on vacuum
source to draw the wash solution through the column, and then switch off vacuum
source.
QIAprep Miniprep Handbook 12/2006
25
QIAprep Spin
■ Ensure that the vacuum source is connected to the upper threaded hole of the
QIAprep Spin
9.
Transfer the QIAprep spin columns to a microcentrifuge tube. Centrifuge for 1 min.
Important: This extra spin is necessary to remove residual Buffer PE. Residual
ethanol from Buffer PE may inhibit subsequent enzymatic reactions.
10. Place the QIAprep column in a clean 1.5 ml microcentrifuge tube. To elute DNA,
add 50 µl Buffer EB (10 mM Tris·Cl, pH 8.5) or water to the center of the QIAprep
spin column, let stand for 1 min, and centrifuge for 1 min.
26
QIAprep Miniprep Handbook 12/2006
QIAprep 8 Procedure
Pelleted bacteria
QIAprep Spin
Resuspend
Lyse
Neutralize
Bind
Vacuum
Wash
Vacuum
Elute
Vacuum
Pure plasmid DNA
QIAprep Miniprep Handbook 12/2006
27
Protocol: Plasmid DNA Purification Using the QIAprep
8 Miniprep Kit
QIAprep 8
This protocol is designed for purification of high-copy plasmid DNA from up to 48 samples
in parallel. Up to 20 µg DNA can be purified from 1–5 ml cultures of E. coli grown in
LB (Luria-Bertani) medium. For purification of low-copy plasmids and cosmids, large
plasmids (>10 kb), and DNA prepared using other methods, refer to the recommendations on page 44.
Please read “Important Notes for QIAprep Procedures” on pages 15–21 before starting.
Note: All protocol steps should be carried out at room temperature.
Procedure
1.
Resuspend pelleted bacterial cells in 250 µl Buffer P1 and transfer to a microcentrifuge tube.
Ensure that RNase A has been added to Buffer P1. No cell clumps should be
visible after resuspension of the pellet.
2.
Add 250 µl Buffer P2 and mix thoroughly by gently inverting the tube 4–6 times.
Mix gently by inverting the tube. Do not vortex, as this will result in shearing of
genomic DNA. If necessary, continue inverting the tube until the solution becomes
viscous and slightly clear. Do not allow lysis reaction to proceed for more than
5 min.
3.
Add 350 µl Buffer N3 and mix immediately and thoroughly by inverting the tube
4–6 times.
To avoid localized precipitation, mix the solution gently but thoroughly, immediately after addition of Buffer N3. The solution should become cloudy.
4.
Centrifuge for 10 min at 13,000 rpm (~17,900 x g) in a table-top microcentrifuge.
A compact white pellet will form.
During centrifugation, prepare QIAvac 6S:
(Note: The following procedure applies to the manifold with a hinged lid and
spring lock. See pages 16 and 18–20).
■ Open the QIAvac 6S lid and place QIAprep 8 strips in the slots of the QIAvac
top plate, making sure the strips are positioned tightly. Seal any unused slots
with blanks provided with the QIAvac 6S, and close the QIAvac 6S lid.
■ Place the waste tray inside the QIAvac base. Place the top plate squarely over
the base. Seal any unused wells of the QIAprep strips with strip caps provided.
Attach the QIAvac 6S to a vacuum source.
5.
Apply the supernatants from step 4 to the wells of the QIAprep 8 strips and switch
on vacuum source.
28
QIAprep Miniprep Handbook 12/2006
Make sure the QIAvac 6S is assembled correctly before loading. Load the supernatants promptly onto the QIAprep 8 strips. If the supernatants become cloudy,
centrifuge again immediately before loading to prevent clogging the QIAprep
8 strips. The flow-through is collected in the waste tray.
6.
Recommended: Switch off vacuum and wash QIAprep 8 strips by adding 1 ml
Buffer PB to each well and applying vacuum.
7.
Switch off vacuum. Wash QIAprep 8 strips by adding 1 ml Buffer PE to each well
and applying vacuum.
Allow Buffer PE to flow through the QIAprep 8 strips.
8.
Repeat step 7.
9.
After Buffer PE has been drawn through all wells, apply maximum vacuum for an
additional 5 min to dry the membrane.
Important: This step removes residual Buffer PE from the membrane. The removal is
only effective when maximum vacuum is used (i.e., turn off vacuum regulator or leakage valves if they are used), allowing maximum airflow to go through the wells.
10. Switch off the vacuum source and ventilate the QIAvac manifold. Lift the top plate
from the base (not the QIAprep strips from the top plate), vigorously tap the top
plate on a stack of absorbent paper until no drops come out, and blot the nozzles
of the QIAprep strips with clean absorbent paper. Proceed to step 11a or 11b.
This step removes residual Buffer PE, which may be present around the outlet
nozzles and collars of the QIAprep 8 strips. Residual ethanol from Buffer PE may
inhibit subsequent enzymatic reactions.
11a. For elution into collection microtubes provided:
Replace waste tray with the blue collection microtube rack (provided with the QIAvac
6S) containing 1.2 ml collection microtubes. Place the top plate back on the base.
Rows of collection microtubes should be lined up with the QIAprep 8 strips.
11b. For elution into a 96-well microplate:
Replace waste tray with empty blue collection microtube rack (provided with
QIAvac 6S) and place a 96-well microplate directly on the rack. Place the top plate
back on the base.
12. Elute DNA by adding 100 µl Buffer EB (10 mM Tris·Cl, pH 8.5) or water to
the center of each well of the QIAprep 8 Strips, let stand for 1 min, and switch
on vacuum source. After elution, switch off vacuum source and ventilate the
QIAvac 6S slowly.
For increased DNA concentration, an elution volume of 75 µl can be used.
QIAprep Miniprep Handbook 12/2006
29
QIAprep 8
This step is recommended to remove trace nuclease activity when using endA+
strains such as the JM series, HB101 and its derivatives, or any wild-type strain,
which have high levels of nuclease activity or high carbohydrate content. Host
strains such as XL-1 Blue and DH5α do not require this additional step.
QIAprep 8 and 96 Turbo
Procedure
Pelleted bacteria
Resuspend
Lyse
Neutralize
QIAprep 8 Turbo
TurboFilter
Filter
Vacuum
QIAprep
Bind
Vacuum
Wash
Vacuum
Elute
Vacuum
Pure plasmid DNA
30
QIAprep Miniprep Handbook 12/2006
Protocol: Plasmid DNA Purification Using the QIAprep
8 Turbo Miniprep Kit
This protocol is designed for medium-throughput plasmid DNA minipreps using
TurboFilter 8 and QIAprep 8 strips on QIAvac 6S. The kit accommodates 8–48 parallel
preparations of up to 20 µg of high-copy plasmid DNA from 1–5 ml overnight cultures
of E. coli grown in LB (Luria-Bertani) medium. For purification of low-copy plasmids and
cosmids, large plasmids (>10 kb), and DNA prepared using other methods, refer to the
recommendations on page 44. DNA purification can be automated, please call QIAGEN
for more details.
Please read “Important Notes” on pages 15–21 before starting.
Note: All protocol steps should be carried out at room temperature.
1.
Resuspend pelleted bacterial cells in 250 µl Buffer P1.
Ensure that RNase A has been added to Buffer P1. No cell clumps should be visible
after resuspension of the pellet.
2.
Add 250 µl Buffer P2 to each sample, mix thoroughly by gently inverting the tubes
4–6 times, and incubate at room temperature for 5 min.
It is important to mix gently by inverting the tubes. Do not vortex, as this will result
in shearing of genomic DNA. If necessary, continue inverting the tubes until the
solution becomes viscous and slightly clear.
During incubation prepare the QIAvac 6S (see pages 16 and 18–20):
■ Open QIAvac 6S lid and place TurboFilter 8 Strips in the slots of the QIAvac
top plate. Make sure the strips are positioned tightly. Seal any unused slots
with blanks (provided with QIAvac 6S), and close QIAvac 6S lid.
■ Place the strip holder inside the QIAvac base. Place QIAprep 8 strips into the
strip holder such that a QIAprep strip is placed under each TurboFilter strip.
■ Place the top plate squarely over the base. Seal any unused wells of the
TurboFilter strips with the strip caps provided. Attach the QIAvac to vacuum source.
3.
Add 350 µl Buffer N3 to each sample and mix immediately and thoroughly by
inverting the tubes 4–6 times.
To avoid localized precipitation, mix the samples gently but thoroughly, immediately after addition of Buffer N3. The solutions should become cloudy.
4.
Pipet the lysates from step 3 (850 µl per well) into the wells of the TurboFilter strips.
Unused wells of TurboFilter strips should be sealed with the strip caps provided.
Apply vacuum until all samples have passed through TurboFilter.
Optimal flow rate is 1–2 drops/s, which can be regulated by using a 3-way valve
or vacuum regulator (see page 48) between the QIAvac and the vacuum source.
QIAprep Miniprep Handbook 12/2006
31
QIAprep 8 Turbo
Procedure
5.
Switch off vacuum, and ventilate the QIAvac 6S slowly. Discard the TurboFilter
strips. Transfer the QIAprep strips containing the cleared lysates into the slots of
the QIAvac top plate. Close QIAvac 6S lid. Replace strip holder in the base with
the waste tray. Place the top plate squarely over the base. Seal any unused wells
of the QIAprep strips with the strip caps provided. Apply vacuum.
The flow-through is collected in the waste tray.
6.
Recommended: Switch off vacuum, and wash QIAprep strips by adding 1 ml Buffer
PB to each well and applying vacuum.
QIAprep 8 Turbo
This step is necessary to remove trace nuclease activity when using endA+ strains
such as the JM series, HB101 and its derivatives, or any wild-type strain, which
have high levels of nuclease activity or high carbohydrate content. Host strains
such as XL-1 Blue and DH5α do not require this additional step.
7.
Switch off vacuum. Wash QIAprep strips by adding 1 ml Buffer PE to each well
and applying vacuum. Repeat once.
8.
After Buffer PE has been drawn through all wells, apply maximum vacuum for an
additional 5 min to dry the membrane.
Important: This step removes residual Buffer PE from the membrane. The removal
is only effective when maximum vacuum is used (i.e., turn off vacuum regulator or
leakage valves if they are used), allowing maximum airflow to go through the wells.
9.
Switch off vacuum, and ventilate the QIAvac 6S slowly. Lift the top plate from the base
(not the QIAprep strips from the top plate), vigorously tap the top plate on a stack of
absorbent paper until no drops come out, and blot the nozzles of the QIAprep strips
with clean absorbent paper. Proceed either to step 10a or 10b, as desired.
This step removes residual Buffer PE, which may be present around the outlet
nozzles and collars of QIAprep strips. Residual ethanol from Buffer PE may inhibit
subsequent enzymatic reactions.
10a. For elution into collection microtubes provided:
Replace waste tray with the blue collection microtube rack (provided with the
QIAvac 6S) containing 1.2 ml collection microtubes. Place the top plate back on
the base.
Rows of collection microtubes should be lined up with the QIAprep 8 strips.
10b. For elution into a 96-well microplate:
Replace waste tray with empty blue collection microtube rack (provided with the
QIAvac 6S) and place a 96-well microplate directly on the rack. Place the top plate
back on the base.
11. To elute DNA, add 100 µl Buffer EB (10 mM Tris·Cl, pH 8.5) or water to the center
of each well of the QIAprep strips, let stand 1 min, and apply maximum vacuum
for 5 min. Switch off vacuum and ventilate the QIAvac 6S slowly.
For increased DNA concentration, an elution volume of 75 µl can be used.
32
QIAprep Miniprep Handbook 12/2006
Protocol: Plasmid DNA Purification Using the QIAprep
96 Turbo Miniprep Kit
This protocol is designed for high-throughput plasmid DNA minipreps using TurboFilter 96
and QIAprep 96 plates on QIAvac 96. The kit accommodates up to 96 parallel
preparations of up to 20 µg of high-copy plasmid DNA from 1–5 ml overnight cultures
of E. coli grown in LB (Luria-Bertani) medium. If 1.3 ml overnight cultures are used, up
to 96 cultures can be grown in a flat-bottom block (see page 15 for protocol). For purification of low-copy plasmids and cosmids, large plasmids (>10 kb), and DNA prepared
using other methods, refer to the recommendations on page 44. DNA purification can
be automated, please call QIAGEN for more details.
Please read “Important Notes” on pages 15–21 before starting.
Note: All protocol steps should be carried out at room temperature.
Procedure
1.
Resuspend pelleted bacterial cells in 250 µl Buffer P1 and transfer to the flatbottom block (if cells were not harvested in this block) provided with the kit.
2.
Add 250 µl Buffer P2 to each sample. Dry the top of the flat-bottom block with
a paper towel, seal the block with the tape provided, gently invert the block
4–6 times to mix, and incubate at room temperature for 5 min.
It is important to mix gently by inverting the block. Do not shake vigorously, as this
will result in shearing of genomic DNA. If necessary, continue inverting the block
until the solution becomes viscous and slightly clear.
During incubation prepare QIAvac 96 (see pages 16 and 18–20):
■ Place the TurboFilter 96 plate in the QIAvac top plate, make sure that the plate
is seated securely. Seal unused wells of the TurboFilter with tape.
■ Place the plate holder inside the QIAvac base. Place QIAprep 96 plate into
the plate holder.
■ Place QIAvac 96 top plate squarely over base. The QIAprep plate should now
be positioned under the TurboFilter plate. Attach QIAvac to a vacuum source.
3.
Remove the tape from the block. Add 350 µl Buffer N3 to each sample, dry the top
of the flat-bottom block with a paper towel, and seal the block with a new tape
sheet. Gently invert the block 4–6 times.
To avoid localized precipitation, mix the samples gently but thoroughly, immediately after addition of Buffer N3. The solutions should become cloudy.
QIAprep Miniprep Handbook 12/2006
33
QIAprep 96 Turbo
Ensure that RNase A has been added to Buffer P1. No cell clumps should be
visible after resuspension of the pellet.
4.
Remove the tape from the block. Pipet the lysates from step 3 (850 µl per well) into
the wells of the TurboFilter plate. Unused wells of the TurboFilter plate should be
sealed with tape. Apply vacuum until all samples have passed through.
The optimal flow rate is approximately 1–2 drops/s, which can be regulated by
using a 3-way valve or vacuum regulator (see page 48) between the QIAvac and
the vacuum source.
5.
Switch off vacuum and ventilate the QIAvac 96 slowly. Discard the TurboFilter
plate. Transfer the QIAprep plate containing the cleared lysates to the top plate of
the manifold. Seal any unused wells of the QIAprep plate with tape. Replace plate
holder in the base with waste tray. Place the top plate squarely over the base,
making sure that the QIAprep plate is seated securely. Apply vacuum.
The flow-through is collected in the waste tray.
QIAprep 96 Turbo
6.
Recommended: Switch off vacuum, and wash QIAprep plate by adding 0.9 ml
Buffer PB to each well and applying vacuum.
This step is necessary to remove trace nuclease activity when using endA+ strains
such as the JM series, HB101 and its derivatives, or any wild-type strain, which
have high levels of nuclease activity or high carbohydrate content. Host strains
such as XL-1 Blue and DH5α do not require this additional step.
7.
Switch off vacuum. Wash QIAprep plate by adding 0.9 ml of Buffer PE to each well
and applying vacuum. Repeat once.
8.
After Buffer PE has been drawn through all wells, apply maximum vacuum for an
additional 10 min to dry the membrane.
Important: This step removes residual Buffer PE from the membrane. The removal
is only effective when maximum vacuum is used (i.e., turn off vacuum regulator or
leakage valves if they are used), allowing maximum airflow to go through the
wells.
9.
Switch off vacuum, and ventilate the QIAvac 96 slowly. Lift the top plate from the
base (not the QIAprep plate from the top plate), vigorously tap the top plate on a
stack of absorbent paper until no drops come out, and blot the nozzles of the
QIAprep plate with clean absorbent paper. Proceed either to step 10a, or 10b, as
desired.
This step removes residual Buffer PE, which may be present around the outlet
nozzles and collars of QIAprep plate. Residual ethanol from Buffer PE may inhibit
subsequent enzymatic reactions.
34
QIAprep Miniprep Handbook 12/2006
10a. For elution into provided collection microtubes:
Replace waste tray with the blue collection microtube rack containing 1.2 ml
collection microtubes. Place the top plate back on the base, making sure that the
QIAprep plate is seated securely.
10b. For elution into a 96-well microplate:
Replace waste tray with an empty blue collection microtube rack (provided with
the QIAvac 96). Place a 96-well microplate directly on the rack. Place the
top plate back on the base, making sure that the QIAprep plate is positioned
securely.
11. To elute DNA, add 100 µl of Buffer EB (10 mM Tris·Cl, pH 8.5) or water to the
center of each well of the QIAprep plate, let stand for 1 min, and apply maximum
vacuum for 5 min. Switch off vacuum and ventilate QIAvac 96 slowly.
For increased DNA concentration, an elution volume of 75 µl can be used.
QIAprep 96 Turbo
QIAprep Miniprep Handbook 12/2006
35
Troubleshooting Guide
This troubleshooting guide may be helpful in solving any problems that may arise. The
scientists in QIAGEN Technical Services are always happy to answer any questions you
may have about either the information and protocol(s) in this handbook or molecular
biology applications (see back cover for contact information).
Comments and suggestions
Low or no yield
General
Low yields may be caused by a number of factors. To
find the source of the problem, analyze fractions saved
from each step in the procedure on an agarose gel
(e.g., Figure 6, page 43). A small amount of the cleared
lysate and the entire flow-through can be precipitated
by adding 0.7 volumes isopropanol and centrifuging at
maximum speed (13,000 rpm or ~17,000 x g) for
30 minutes. The entire wash flow-through can be
precipitated by adding 0.1 volumes of 3 M sodium
acetate, pH 5.0, and 0.7 volumes of isopropanol.
No DNA in the cleared lysate before loading
a)
Plasmid did not
propagate
Read “Growth of bacterial cultures” (pages 39–41) and
check that the conditions for optimal growth were met.
b)
Lysate prepared
incorrectly
Check storage conditions and age of buffers.
c)
Buffer P2 precipitated
Redissolve by warming to 37°C.
d)
Cell resuspension
incomplete
Pelleted cells should be completely resuspended in
Buffer P1. Do not add Buffer P2 until an even suspension is obtained.
DNA is found in the flow-through of cleared lysate
a)
36
QIAprep membrane
overloaded
If rich culture media, such as TB or 2x YT are used,
culture volumes must be reduced. It may be necessary
to adjust LB culture volume if the plasmid and host strain
show extremely high copy number or growth rates. See
“Culture media” on page 41.
QIAprep Miniprep Handbook 12/2006
Comments and suggestions
b)
RNase A digestion
omitted
Ensure that RNase A is added to Buffer P1 before use.
c)
RNase A digestion
insufficient
Reduce culture volume if necessary. If Buffer P1
containing RNase A is more than 6 months old, add
additional RNase A.
DNA is found in the wash flow-through
Ethanol omitted from
wash buffer
Repeat procedure with correctly prepared wash buffer
(Buffer PE).
Little or no DNA in eluate
a)
Elution buffer incorrect
DNA is eluted only in the presence of low-salt buffer
(e.g., Buffer EB [10 mM Tris·Cl, pH 8.5] or water).
Elution efficiency is dependent on pH. The maximum
efficiency is achieved between pH 7.0 and 8.5. When
using water for elution, make sure that the pH value is
within this range.
b)
Elution buffer incorrectly Add elution buffer to the center of the QIAprep
dispensed onto
membrane to ensure that the buffer completely covers
membrane
the surface of the membrane for maximum elution
efficiency.
Low DNA quality
DNA does not perform well in downstream applications
a)
Eluate salt concentration For the QIAprep spin column, modify the wash step by
too high
incubating the column for 5 minutes at room temperature
after adding 0.75 ml of Buffer PE and then centrifuging.
For QIAprep 8 preparations and QIAprep 8 and 96
Turbo preparations, ensure that two wash steps are
carried out prior to elution.
b)
Nuclease contamination When using endA+ host strains such as HB101 and its
derivatives, the JM series, or any wild-type strain,
ensure that the wash step with Buffer PB is performed.
c)
Eluate contains residual
ethanol
Ensure that step 9 in the QIAprep Spin Miniprep protocol
and steps 9 and 10 in the QIAprep 8 Miniprep,
QIAprep 8 Turbo Miniprep, or QIAprep 96 Turbo
Miniprep protocols are performed.
QIAprep Miniprep Handbook 12/2006
37
Comments and suggestions
RNA in the eluate
a)
RNase A digestion
omitted
Ensure that RNase A is added to Buffer P1 before use.
b)
RNase A digestion
insufficient
Reduce culture volume if necessary. If Buffer P1
containing RNase A is more than 6 months old, add
additional RNase A.
Genomic DNA in the eluate
a)
Buffer P2 added
incorrectly
The lysate must be handled gently after addition of
Buffer P2 to prevent shearing. Reduce culture volume if
lysate is too viscous for gentle mixing.
b)
Buffer N3 added
incorrectly
Upon addition of Buffer N3 in step 3, mix immediately
but gently.
c)
Lysis too long
Lysis in step 2 must not exceed 5 minutes.
d)
Culture overgrown
Overgrown cultures contain lysed cells and degraded
DNA. Do not grow cultures for longer than 12–16 hours.
38
QIAprep Miniprep Handbook 12/2006
Appendix A: Background Information
Growth of bacterial cultures
Plasmids are generally prepared from bacterial cultures grown in the presence of a
selective agent such as an antibiotic (3,4). The yield and quality of plasmid DNA may
depend on factors such as plasmid copy number, host strain, inoculation, antibiotic,
and type of culture medium.
Plasmid copy number
Plasmids vary widely in their copy number per cell (Table 5), depending on their origin
of replication (e.g., pMB1, ColE1, or pSC101) which determines whether they are
under relaxed or stringent control; and depending on the size of the plasmid and its
associated insert. Some plasmids, such as the pUC series and derivatives, have
mutations which allow them to reach very high copy numbers within the bacterial cell.
Plasmids based on pBR322 and cosmids are generally present in lower copy numbers.
Very large plasmids and cosmids are often maintained at very low copy numbers per cell.
Table 5. Origins of replication and copy numbers of various plasmids (3).
DNA construct
Origin of
replication
Copy number
Classification
Plasmids
pUC vectors
pMB1*
500–700
high copy
pBluescript vectors
ColE1
300–500
high copy
pGEM vectors
pMB1*
300–400
high copy
®
pTZ vectors
pMB1*
>1000
high copy
pBR322 and derivatives
pMB1*
15–20
low copy
pACYC and derivatives
p15A
10–12
low copy
pSC101 and derivatives
pSC101
~5
very low copy
Cosmids
SuperCos
ColE1
10–20
low copy
pWE15
ColE1
10–20
low copy
* The pMB1 origin of replication is closely related to that of ColE1 and falls in the same incompatibility
group. The high-copy-number plasmids listed here contain mutated versions of this origin.
QIAprep Miniprep Handbook 12/2006
39
Host strains
Most E. coli strains can be used successfully to isolate plasmid DNA, although the strain
used to propagate a plasmid has an effect on the quality of the purified DNA. Host
strains such as DH1, DH5α, and C600 give high-quality DNA. The slower growing
strain XL1-Blue also yields DNA of very high-quality which works extremely well for
sequencing. Strain HB101 and its derivatives, such as TG1 and the JM series, produce
large amounts of carbohydrates, which are released during lysis and can inhibit enzyme
activities if not completely removed (4). In addition, these strains have high levels of
endonuclease activity which can reduce DNA quality. The methylation and growth
characteristics of the strain should also be taken into account when selecting a host strain.
XL1-Blue and DH5α are highly recommended for reproducible and reliable results.
Inoculation
Bacterial cultures for plasmid preparation should always be grown from a single colony
picked from a freshly streaked selective plate. Subculturing directly from glycerol stocks,
agar stabs, and liquid cultures may lead to uneven plasmid yield or loss of the plasmid.
Inoculation from plates that have been stored for a long time may also lead to loss or
mutation of the plasmid.
The desired clone should be streaked from a glycerol stock onto a freshly prepared agar
plate containing the appropriate selective agent so that single colonies can be isolated.
This procedure should then be repeated to ensure that a single colony of an antibioticresistant clone can be picked. A single colony should be inoculated into 1–5 ml of
media containing the appropriate selective agent, and grown with vigorous shaking for
12–16 hours. Growth for more than 16 hours is not recommended since cells begin to
lyse and plasmid yields may be reduced.
Antibiotics
Antibiotic selection should be applied at all stages of growth. Many plasmids in use
today do not contain the par locus which ensures that the plasmids segregate equally
during cell division. Daughter cells that do not receive plasmids will replicate much
faster than plasmid-containing cells in the absence of selective pressure, and can quickly
take over the culture.
The stability of the selective agent should also be taken into account. Resistance to
ampicillin, for example, is mediated by β-lactamase which is encoded by the plasmidlinked bla gene and which hydrolyzes ampicillin. Levels of ampicillin in the culture
medium are thus continually depleted. This phenomenon is clearly demonstrated on
ampicillin plates, where “satellite colonies” appear as the ampicillin is hydrolyzed in
the vicinity of a growing colony. Ampicillin is also very sensitive to temperature, and
when in solution should be stored frozen in single-use aliquots. The recommendations
given in Table 6 are based on these considerations.
40
QIAprep Miniprep Handbook 12/2006
Table 6. Concentrations of Commonly Used Antibiotics
Stock solutions
Concentration
Storage
Working concentration
(dilution)
Ampicillin
(sodium salt)
50 mg/ml in water
–20°C
100 µg/ml (1/500)
Chloramphenicol
34 mg/ml in ethanol
–20°C
170 µg/ml (1/200)
Antibiotic
Kanamycin
10 mg/ml in water
–20°C
50 µg/ml (1/200)
Streptomycin
10 mg/ml in water
–20°C
50 µg/ml (1/200)
–20°C
50 µg/ml (1/100)
Tetracycline HCl
5 mg/ml in ethanol
Culture media
Luria-Bertani (LB) broth is the recommended culture medium for use with QIAprep Kits,
since richer broths such as TB (Terrific Broth) or 2x YT lead to extremely high cell
densities, which can overload the purification system. It should be noted that cultures
grown in TB may yield 2–5 times the number of cells compared to cultures grown in LB
broth. If these media are used, recommended culture volumes must be reduced to match
the capacity of the QIAprep membrane. If excess culture volume is used, alkaline lysis
will be inefficient, the QIAprep membrane will be overloaded, and the performance of
the system will be unsatisfactory. Furthermore, the excessive viscosity of the lysate will
require vigorous mixing, which may result in shearing of bacterial genomic DNA and
contamination of the plasmid DNA. Care must also be taken if strains are used which
grow unusually fast or to very high cell densities. In such cases, doubling the volumes
of Buffers P1, P2, and N3 may be beneficial. It is best to calculate culture cell density
and adjust the volume accordingly.
Please note that a number of slightly different LB culture broths, containing different
concentrations of NaCl, are in common use. Although different LB broths produce
similar cell densities after overnight culture, plasmid yields can vary significantly.
Table 7. Recommended composition of Luria Bertani medium
Contents
Per liter
Tryptone
10 g
Yeast extract
NaCl
QIAprep Miniprep Handbook 12/2006
5g
10 g
41
Preparation of cell lysates
Bacteria are lysed under alkaline conditions. After harvesting and resuspension, the
bacterial cells are lysed in NaOH/SDS (Buffer P2) in the presence of RNase A (2, 5).
SDS solubilizes the phospholipid and protein components of the cell membrane, leading
to lysis and release of the cell contents while the alkaline conditions denature the
chromosomal and plasmid DNAs, as well as proteins. The optimized lysis time allows
maximum release of plasmid DNA without release of chromosomal DNA, while minimizing the exposure of the plasmid to denaturing conditions. Long exposure to alkaline
conditions may cause the plasmid to become irreversibly denatured (2). This denatured
form of the plasmid runs faster on agarose gels and is resistant to restriction enzyme
digestion.
The lysate is neutralized and adjusted to high-salt binding conditions in one step by the
addition of Buffer N3. The high salt concentration causes denatured proteins,
chromosomal DNA, cellular debris, and SDS to precipitate, while the smaller plasmid
DNA renatures correctly and stays in solution. It is important that the solution is
thoroughly and gently mixed to ensure complete precipitation.
To prevent contamination of plasmid DNA with chromosomal DNA, vigorous stirring
and vortexing must be avoided during lysis. Separation of plasmid from chromosomal
DNA is based on coprecipitation of the cell wall-bound chromosomal DNA with insoluble
complexes containing salt, detergent, and protein. Plasmid DNA remains in the clear
supernatant. Vigorous treatment during the lysis procedure will shear the bacterial
chromosome, leaving free chromosomal DNA fragments in the supernatant. Since
chromosomal fragments are chemically indistinguishable from plasmid DNA under the
conditions used, the two species will not be separated on QIAprep membrane and will
elute under the same low-salt conditions. Mixing during the lysis procedure must
therefore be carried out by slow, gentle inversion of the tube.
42
QIAprep Miniprep Handbook 12/2006
Appendix B: Agarose Gel Analysis of Plasmid DNA
The QIAprep Miniprep procedure can be analyzed using agarose gel electrophoresis
as shown in Figure 6. Samples can be taken from the cleared lysate and its flow-through,
precipitated with isopropanol and resuspended in a minimal volume of TE buffer. In
Figure 6 the cleared lysate shows closed circular plasmid DNA and degraded
RNase A-resistant RNA. The flow-through contains only degraded RNA and no plasmid
DNA is present. The eluted pure plasmid DNA shows no contamination with other
nucleic acids.
Agarose Gel Analysis
M
C
F
E
M
Figure 6 Agarose gel analysis of the QIAprep Miniprep procedure. C: cleared lysate; F: flow-through;
E: eluted plasmid; M: markers.
QIAprep Miniprep Handbook 12/2006
43
Appendix C: Special Applications
Purification of low-copy plasmids and cosmids
All QIAprep miniprep protocols in this handbook can be used for preparation of lowcopy-number plasmid or cosmids from 1–10 ml overnight E. coli cultures grown in LB
medium.
Only two slight modifications to the protocols are required:
■
The wash step with Buffer PB is required for all strains.
■
When plasmid or cosmids are >10 kb, pre-heat Buffer EB (or water) to 70°C prior
to eluting DNA from the QIAprep membrane. A 10 ml overnight LB culture
typically yields 5–10 µg DNA.
Note: When using 10 ml culture volume, it is recommended to double the volumes of
Buffers P1, P2, and N3 used.
Purification of very large plasmids (>50 kb)
Plasmids >50 kb elute less efficiently from silica than smaller plasmids, but do elute
efficiently from QIAGEN anion-exchange resin. QIAGEN provides the anion-exchangebased QIAGEN Large-Construct Kit for efficient large-scale purification of ultrapure
genomic DNA-free BAC, PAC, P1, or cosmid DNA. For high-throughput, small-scale
purification of BACs, PACs, and P1s, an optimized alkaline lysis protocol in R.E.A.L.®
Prep 96 Kits yields DNA suitable for sequencing and screening. Call QIAGEN
Technical Services or your local distributor for more information on these kits, or see
ordering information on page 47.
Purification of plasmid DNA prepared by other methods
Plasmid DNA isolated by other methods can be further purified using QIAprep modules
and any of the QIAprep protocols in this handbook.
1.
Add 5 volumes of Buffer PB to 1 volume of the DNA solution and mix (e.g., add
500 µl Buffer PB to 100 µl of DNA sample).
2.
Apply the samples to QIAprep spin columns or to the wells of a QIAprep 8
strip or 96-well plate. Draw the samples through the QIAprep membrane by
centrifugation or vacuum, and continue the appropriate protocol at the Buffer PE
wash step. The optional wash step with Buffer PB is not necessary.
44
QIAprep Miniprep Handbook 12/2006
References
1.
Vogelstein, B., and Gillespie, D. (1979) Preparative and analytical purification of DNA from agarose.
Proc. Natl. Acad. Sci. USA 76, 615–619.
2.
Birnboim, H.C., and Doly, J. (1979) A rapid alkaline lysis procedure for screening recombinant plasmid
DNA. Nucleic Acids Res. 7, 1513–1522.
3.
Sambrook, J. et al., eds. (1989) Molecular cloning: a laboratory manual. 2nd ed., Cold Spring Harbor
Laboratory Press.
4.
Ausubel, F.M. et al., eds. (1991) Current protocols in molecular biology. Wiley Interscience, New York.
5.
Birnboim, H.C. (1983) A rapid alkaline extraction method for the isolation of plasmid DNA. Methods
Enzymol. 100, 243–255.
QIAprep Miniprep Handbook 12/2006
45
Ordering Information
Product
Contents
Cat. no.
QIAprep Spin
Miniprep Kit (50)
For 50 plasmid minipreps:
50 QIAprep Spin Columns, Reagents,
Buffers, Collection Tubes (2 ml)
27104
QIAprep Spin
Miniprep Kit (250)
For 250 plasmid minipreps:
250 QIAprep Spin Columns, Reagents,
Buffers, Collection Tubes (2 ml)
27106
QIAprep 8
Miniprep Kit (50)*
For 50 x 8 plasmid minipreps:
50 QIAprep 8 Strips, Reagents, Buffers,
Collection Microtubes (1.2 ml), Caps
27144
QIAprep 8 Turbo
Miniprep Kit (10)*
For 10 x 8 plasmid minipreps:
10 TurboFilter 8 Strips, 10 QIAprep 8 Strips,
Reagents, Buffers, Collection Microtubes
(1.2 ml), Caps
27152
QIAprep 8 Turbo
Miniprep Kit (50)*
For 50 x 8 plasmid minipreps:
50 TurboFilter 8 Strips, 50 QIAprep 8 Strips,
Reagents, Buffers, Collection Microtubes
(1.2 ml), Caps
27154
QIAprep 8 Turbo
BioRobot Kit (48)
For 48 x 8 plasmid minipreps,
48 each: TurboFilter 8 and QIAprep 8 Strips,
Reagents, Buffers, Collection
Microtubes (1.2 ml), Caps, 96-Well
Microplates RB and Lids
962134
QIAprep 96 Turbo
Miniprep Kit (4)†
For 4 x 96 plasmid minipreps:
4 TurboFilter 96 Plates, 4 QIAprep 96 Plates,
4 Flat-Bottom Blocks with Lids,
Reagents, Buffers, Collection Microtubes
(1.2 ml), Caps
27191
QIAprep 96 Turbo
Miniprep Kit (24)†
For 24 x 96 Plasmid minipreps:
24 x TurboFilter 96 Plates,
24 x QIAprep 96 Plates, 24 Flat-Bottom Blocks
with Lids, Reagents, Buffers,
Collection Microtubes (1.2 ml), Caps
27193
* Requires the use of QIAvac 6S.
†
Requires the use of QIAvac 96.
46
QIAprep Miniprep Handbook 12/2006
Ordering Information
Product
QIAprep 96 Turbo
BioRobot Kit (4)
Contents
Cat. no.
For 4 x 96 plasmid minipreps,
962141
4 each: TurboFilter 96 and QIAprep 96 Plates,
Flat-Bottom Blocks and Lids, Reagents,
Buffers, Collection Microtubes (1.2 ml), Caps,
96-Well Microplates RB and Lids, Tape Pads
DirectPrep 96 Kits — for high-throughput plasmid DNA purification
DirectPrep 96
Miniprep Kit (4)*
For 4 x 96 plasmid Minipreps:
4 DirectPrep 96 Plates, Reagents, Buffers,
Flat-Bottom Blocks and Lids, Air Pore Tape
Sheets, Tape Pads, Elution Microtubes RS,
Caps
DirectPrep 96
BioRobot Kit (4)†
For 4 x 96 plasmid Minipreps:
4 DirectPrep 96 Plates, Reagents, Buffers,
Flat-Bottom Blocks and Lids, 96-Well Microplates RB, AirPore Tape Sheets, Tape Pads
27361
962341
Related products for BAC/PAC/P1 purification
QIAGEN®
10 QIAGEN-tip 500, Reagents, Buffers,
Large-Construct Kit (10) ATP-Dependent Exonuclease ‡
12462
R.E.A.L. Prep 96
Plasmid Kit (4) §
For 4 x 96 rapid extraction alkaline
lysis minipreps: 4 QIAfilter 96 Plates,
Square-Well Blocks, Tape Pads,
Reagents, Buffers
26171
R.E.A.L. Prep 96
BioRobot Kit (4)
For 4 x 96 rapid extraction alkaline lysis
minipreps: 4 QIAfilter 96 Plates, Flat-Bottom
Blocks and Lids, Square-Well Blocks, Reagents,
Buffers, Tape Pads
961141
QIAvac and accessories
QIAvac 24 Plus
Vacuum manifold for processing 1–24 spin
columns: includes QIAvac 24 Plus Vacuum
Manifold, Luer Plugs, Quick Couplings
19413
* Requires use of QIAvac Multiwell. Larger kit sizes available, please inquire.
†
For use with BioRobot 3000 or 8000 workstations. Larger kit sizes available, please inquire.
‡
ATP solution required for exonuclease digestion is not provided.
§
Requires use of QIAvac 96.
QIAprep Miniprep Handbook 12/2006
47
Ordering Information
Product
Contents
Cat. no.
QIAvac 6S
Vacuum manifold for processing 1–6
QIAGEN 8-well strips: includes QIAvac
6S Top Plate with flip-up lid, Base,
Waste Tray, Blanks, Strip Holder
Rock of Collection Microtubes (1.2 ml)
19503
QIAvac 96
Vacuum manifold for processing QIAGEN
96-well plates: includes QIAvac 96 Top Plate,
Base, Waste Tray, Plate Holder
Rock of Collection Microtubes (1.2 ml)
19504
QIAvac Luer
Adapter Set*
For processing 1–24 QIAprep Spin Columns:
6 adapters, each with 4 luer connectors,
24 plugs
19541
Vacuum Regulator
For use with QIAvac manifolds
19530
Vacuum Pump
(100 V, 50/60 Hz)
Universal vacuum pump
84000
Vacuum Pump
(115 V, 60 Hz)
Universal vacuum pump
84010
Vacuum Pump
(230 V, 50 Hz)
Universal vacuum pump
84020
Automated low-throughput plasmid purification
QIAcube (110 V)†
QIAcube (230 V)‡
Robotic workstation for automated purification 9001292†
of nucleic acids or proteins using QIAGEN
9001293‡
spin-column kits, 1-year warranty on parts and
labor§
Accessories
Starter Pack, QIAcube Pack includes: reagent bottle racks (3); rack
labeling strips (8); 200 µl filter-tips (1024);
1000 µl filter-tips (1024); 1000 µl filter-tips,
wide-bore (1024); 30 ml reagent bottles (18);
rotor adapters (240); rotor adapter holder
990395
†
* Compatible only with QIAvac Top Plates containing flip-up lid.
US, Canada, and Japan.
‡
§
Rest of world.
Agreements for comprehensive service coverage are available; please inquire.
The QIAcube is intended for research applications. No claim or representation is
intended for its use to provide information for the diagnosis, prevention, or treatment of
a disease.
48
QIAprep Miniprep Handbook 12/2006
Ordering Information
Product
Contents
Cat. no.
Individual Buffers and accessories
Buffer N3
500 ml Buffer N3
19064
Buffer PB
500 ml Buffer PB
19066
Buffer PE (concentrate) 100 ml Buffer PE (concentrate)
19065
RNase A
19101
250 mg RNase A (70 U/mg; 100 mg/ml)
Collection Tubes (2 ml) 1000 collection tubes (2 ml)
19201
Collection Microtubes Nonsterile polypropylene tubes (1.2 ml),
(racked)
960 in racks of 96
19560
Collection Microtube
Caps
19566
Nonsterile polypropylene caps for
collection microtubes (1.2 ml), 960 in
strips of 8, loose in bag
Flat-Bottom Blocks (24) 96-well blocks with 2 ml wells, 24 blocks
per case
19579
Tape Pads (5)
Adhesive tape sheets for sealing
multiwell plates and blocks:
25 sheets per pad, 5 pads per pack
19570
AirPore Tape Sheets
(50)
Microporous tape sheets for covering
96-well blocks during bacterial cultivation:
50 sheets per pack
19571
QIAprep Miniprep Handbook 12/2006
49
Notes
50
QIAprep Miniprep Handbook 12/2006
QIAGEN Distributors and Importers
Please see the back cover for contact information for your local QIAGEN office.
Argentina
Tecnolab S.A.
Tel:
(011) 4555 0010
Fax:
(011) 4553 3331
E-mail:
[email protected]
Egypt
Clinilab
Tel:
Fax:
E-mail:
Bosnia-Herzegovina
MEDILINE d.o.o.
Tel.:
+386 1 830-80-40
Fax:
+386 1 830-80-70
+386 1 830-80-63
E-mail:
[email protected]
Estonia
Quantum Eesti AS
Tel:
+372 7301321
Fax:
+372 7304310
E-mail:
[email protected]
Brazil
Uniscience do Brasil
Tel:
011 3622 2320
Fax:
011 3622 2323
E-mail:
[email protected]
Chile
Biosonda SA
Tel:
+562 209 6770
Fax:
+562 274 5462
E-mail:
[email protected]
China
Eastwin Scientific, Inc.
Order:
+86-400-8182168
Tel:
+86-10-51663168
Fax:
+86-10-82898283
E-mail:
[email protected]
Gene Company Limited
Tel:
+86-21-64951899
Fax:
+86-21-64955468
E-mail:
[email protected] (Beijing)
[email protected] (Shanghai)
[email protected] (Chengdu)
[email protected]
(Guangzhou)
Genetimes Technology, Inc.
Order:
800-820-5565
Tel:
+86-21-54262677
Fax:
+86-21-64398855
E-mail:
[email protected]
Colombia
GENTECH – Genetics & Technology
Tel:
(+57)(4)2519037
Fax:
(+57)(4)2516555
E-mail:
[email protected]
[email protected]
Croatia
INEL Medicinska Tehnika d.o.o.
Tel:
(01) 2984-898
Fax:
(01) 6520-966
E-mail:
[email protected]
Cyprus
Scientronics Ltd
Tel:
+357 22 467880/90
Fax:
+357 22 764614
E-mail:
[email protected]
Czech Republic
BIO-CONSULT spol. s.r.o.
Tel/Fax: (+420) 2 417 29 792
E-mail:
[email protected]
Ecuador
INMUNOCHEM S.A.C.
Tel:
+51 1 4409678
Fax:
+51 1 4223701
E-mail:
[email protected]
52 57 212
52 57 210
[email protected]
Greece
BioAnalytica S.A.
Tel:
(210)-640 03 18
Fax:
(210)-646 27 48
E-mail:
[email protected]
Hong Kong SAR
Gene Company Limited
Tel:
+852-2896-6283
Fax:
+852-2515-9371
E-mail:
[email protected]
Genetimes Technology International
Holding Ltd.
Tel:
+852-2385-2818
Fax:
+852-2385-1308
E-mail:
[email protected]
Lithuania
INTERLUX
Tel:
+370-5-2786850
Fax:
+370-5-2796728
E-mail:
[email protected]
Singapore
Research Biolabs Pte Ltd
Tel:
6777 5366
Fax:
6778 5177
E-mail:
[email protected]
Malaysia
RESEARCH BIOLABS SDN. BHD.
Tel:
(603)-8070 3101
Fax:
(603)-8070 5101
E-mail:
[email protected]
Slovak Republic
BIO-CONSULT Slovakia spol. s.r.o.
Tel/Fax: (02) 5022 1336
E-mail:
[email protected]
Mexico
Quimica Valaner S.A. de C.V.
Tel:
(55) 55 25 57 25
Fax:
(55) 55 25 56 25
E-mail:
[email protected]
New Zealand
Biolab Ltd
Tel:
(09) 980 6700
0800 933 966
Fax:
(09) 980 6788
E-mail:
[email protected]
Hungary
BioMarker Kft.
Tel:
+36 28 419 986
Fax:
+36 28 422 319
E-mail:
[email protected]
Oman
Al Mazouri Medical & Chemical
Supplies
Tel:
+971 4 266 1272
(ext. 301, 310, 311)
Fax:
+971 4 269 0612
(ATTN: LAB DIVISION)
E-mail:
[email protected]
India
Genetix
Tel:
+91-11-51427031
Fax:
+91-11-25419631
E-mail: [email protected]
Pakistan
Pakistan Microbiological Associates
Tel:
+92-51-5567953
Fax:
+92-51-5514134
E-mail:
[email protected]
Indonesia
PT Research Biolabs
Tel:
+62 21 5865357
E-mail:
[email protected]
Iran
Zist Baran (BIORAIN)
Tel:
+98 (21) 88066348 or
+98 (21) 88066349
Fax:
+98 (21) 88214107
E-mail:
[email protected]
Israel
Eldan Electronic Instruments Co. Ltd.
Tel:
+972-3-937 1133
Fax:
+972-3-937 1121
E-mail:
[email protected]
Jordan
SAHOURY GROUP
Tel:
+962 6 4633290-111
Fax:
+962 6 4633290-110
E-mail:
[email protected]
Korea
LRS Laboratories, Inc.
Tel:
(02) 924-86 97
Fax:
(02) 924-86 96
E-mail:
[email protected]
Philekorea Technology, Inc.
Tel:
(02) 576-6540
Fax:
(02) 576-6541
E-mail:
[email protected]
Latvia
SIA “J.I.M.”
Tel:
7136393
Fax:
7136394
E-mail:
[email protected]
QIAprep Miniprep Handbook 12/2006
Peru
INMUNOCHEM S.A.C.
Tel:
+51 1 4409678
Fax:
+51 1 4223701
E-mail:
[email protected]
Poland
Syngen Biotech Sp.z.o.o.
Tel:
(071) 798 58 50 - 52
Fax:
(071) 798 58 53
E-mail:
[email protected]
Portugal
IZASA PORTUGAL, LDA
Tel:
(21) 424 7312
Fax:
(21) 417 2674
E-mail:
[email protected]
Qatar
Sedeer Medical
Tel:
+974 - 488 5218
Fax:
+974 - 488 1988
E-mail:
[email protected]
Romania
Zyrcon Medical S. R. L.
Tel:
+40 21 2245607
Fax:
+40 21 2245608
E-mail:
[email protected]
[email protected]
Saudi Arabia
Abdulla Fouad Holding Company
Tel:
(03) 8324400
Fax:
(03) 8346174
E-mail:
[email protected]
Slovenia
MEDILINE d.o.o.
Tel:
(01) 830-80-40
Fax:
(01) 830-80-70
(01) 830-80-63
E-mail:
[email protected]
South Africa
Southern Cross Biotechnology
(Pty) Ltd
Tel:
(021) 671 5166
Fax:
(021) 671 7734
E-mail:
[email protected]
Spain
IZASA, S.A.
Tel:
(93) 902.20.30.90
Fax:
(93) 902.22.33.66
E-mail:
[email protected]
Taiwan
TAIGEN Bioscience Corporation
Tel:
(02) 2880 2913
Fax:
(02) 2880 2916
E-mail:
[email protected]
Thailand
Theera Trading Co. Ltd.
Tel:
(02) 412-5672
Fax:
(02) 412-3244
E-mail:
[email protected]
Turkey
Medek Medikal Ürünler
ve Saglik Hizmetleri A. S.
Tel:
(216) 302 15 80
Fax:
(216) 302 15 88
E-mail:
[email protected]
United Arab Emirates
Al Mazouri Medical & Chemical
Supplies
Tel:
+971 4 266 1272
(ext. 301, 310, 311)
Fax:
+971 4 269 0612
(ATTN: LAB DIVISION)
E-mail:
[email protected]
Uruguay
Bionova Ltda
Tel:
+598 2 6130442
Fax :
+598 2 6142592
E-mail:
[email protected]
Venezuela
SAIXX Technologies c.a.
Tel:
+58212 3248518
+58212 7616143
+58212 3255838
Fax:
+58212 7615945
E-mail:
[email protected]
[email protected]
Vietnam
Viet Anh Instruments Co., Ltd.
Tel:
+84-4-5119452
Fax:
+84-4-5119453
E-mail:
[email protected]
All other countries
QIAGEN GmbH, Germany
51
Australia ■ Orders 03-9840-9800 ■ Fax 03-9840-9888 ■ Technical 1-800-243-066
Austria ■ Orders: 0800/28-10-10 ■ Fax: 0800/28-10-19 ■ Technical: 0800/28-10-11
Belgium ■ Orders 0800-79612 ■ Fax 0800-79611 ■ Technical 0800-79556
Canada ■ Orders 800-572-9613 ■ Fax 800-713-5951 ■ Technical 800-DNA-PREP (800-362-7737)
China ■ Orders 021-51345678 ■ Fax 021-51342500 ■ Technical 021-51345678
Denmark ■ Orders 80-885945 ■ Fax 80-885944 ■ Technical 80-885942
Finland ■ Orders 0800-914416 ■ Fax 0800-914415 ■ Technical 0800-914413
France ■ Orders 01-60-920-920 ■ Fax 01-60-920-925 ■ Technical 01-60-920-930
Germany ■ Orders 02103-29-12000 ■ Fax 02103-29-22000 ■ Technical 02103-29-12400
Ireland ■ Orders 1800 555 049 ■ Fax 1800 555 048 ■ Technical 1800 555 061
Italy ■ Orders 02-33430411 ■ Fax 02-33430426 ■ Technical 800 787980
Japan ■ Telephone 03-5547-0811 ■ Fax 03-5547-0818 ■ Technical 03-5547-0811
Luxembourg ■ Orders 8002-2076 ■ Fax 8002-2073 ■ Technical 8002-2067
The Netherlands ■ Orders 0800-0229592 ■ Fax 0800-0229593 ■ Technical 0800-0229602
Norway ■ Orders 800-18859 ■ Fax 800-18817 ■ Technical 800-18712
Sweden ■ Orders 020-790282 ■ Fax 020-790582 ■ Technical 020-798328
Switzerland ■ Orders 055-254-22-11 ■ Fax 055-254-22-13 ■ Technical 055-254-22-12
UK ■ Orders 01293-422-911 ■ Fax 01293-422-922 ■ Technical 01293-422-999
USA ■ Orders 800-426-8157 ■ Fax 800-718-2056 ■ Technical 800-DNA-PREP (800-362-7737)
W W W. Q I A G E N . C O M
1043788 12/2006
Please tear off here
Bench Protocol: QIAprep Spin Miniprep Kit
Using a Vacuum Manifold
This protocol is designed for the purification of up to 20 µg high-copy plasmid DNA
from 1–5 ml overnight E. coli culture in LB medium using a vacuum manifold with luer
connectors. New users and users wanting to purify low-copy plasmids and cosmids,
large plasmids (>10 kb), and DNA prepared using other methods should refer to the
detailed protocols provided in the QIAprep Miniprep Handbook, 2nd ed.
Important: Read “Things to do before starting” (see reverse side)
Procedure
1.
Resuspend pelleted bacterial cells in 250 µl Buffer P1 and transfer to a
microcentrifuge tube.
2.
Add 250 µl Buffer P2 and mix thoroughly by inverting the tube 4–6 times.
If using LyseBlue reagent, solution turns blue.
3.
Add 350 µl Buffer N3 and mix immediately and thoroughly by inverting the tube 4–6
times.
If using LyseBlue reagent, solution turns colorless.
4.
Centrifuge for 10 min at 13,000 rpm (~17,900 x g) in a table-top microcentrifuge.
During centrifugation, prepare the vacuum manifold and QIAprep spin columns as
described in the handbook (page 16 and 18).
5.
Apply the supernatant from step 4 to the QIAprep spin column by decanting or
pipetting.
6.
Switch on vacuum source to draw the solution through the QIAprep spin columns,
and then switch off vacuum source.
7.
Recommended: Wash the QIAprep spin column by adding 0.5 ml Buffer PB. Switch
on vacuum source. After the solution has moved through the column, switch off
vacuum source.
This step is only required when using endA+ or other bacteria strains with high
nuclease activity or carbohydrate content (see QIAprep Miniprep Handbook for
more details)
8.
Wash the QIAprep spin column by adding 0.75 ml Buffer PE. Switch on vacuum
source to draw the wash solution through the column, and then switch off vacuum
source.
9.
Transfer the QIAprep spin columns to a microcentrifuge tube. Centrifuge for 1 min to
remove residual wash buffer.
10. To elute DNA, place the QIAprep column in a clean 1.5 ml microcentrifuge tube. Add
50 µl Buffer EB or water to the center of each QIAprep spin column, let stand for
1 min, and centrifuge for 1 min.
This protocol is designed for the purification of up to 20 µg high-copy plasmid DNA
from 1–5 ml overnight E. coli culture in LB medium. New users and users wanting to
purify low-copy plasmids and cosmids, large plasmids (>10 kb), and DNA prepared
using other methods should refer to the detailed protocols provided in the QIAprep
Miniprep Handbook, 2nd ed.
Things to do before starting
■
Add RNase A solution to Buffer P1.
■
Optional: Add LyseBlue reagent to Buffer P1.
■
Add ethanol (96–100%) to Buffer PE.
■
Check Buffers P2 and N3 for salt precipitation and redissolve at 37°C if necessary.
Procedure
1.
2.
Resuspend pelleted bacterial cells in 250 µl Buffer P1 and transfer to a
microcentrifuge tube.
Add 250 µl Buffer P2 and mix thoroughly by inverting the tube 4–6 times.
If using LyseBlue reagent, solution turns blue.
3.
Add 350 µl Buffer N3 and mix immediately and thoroughly by inverting the tube 4–6
times.
If using LyseBlue reagent, solution turns colorless.
4.
Centrifuge for 10 min at 13,000 rpm (~17,900 x g) in a table-top microcentrifuge.
5.
Apply the supernatant (from step 4) to the QIAprep spin column by decanting or
pipetting.
6.
Centrifuge for 30–60 s. Discard the flow-through.
7.
Recommended: Wash the QIAprep spin column by adding 0.5 ml Buffer PB and
centrifuging for 30–60 s. Discard the flow-through.
This step is only required when using endA+ or other bacteria strains with high
nuclease activity or carbohydrate content (see QIAprep Miniprep Handbook for
more details)
8.
Wash QIAprep spin column by adding 0.75 ml Buffer PE and centrifuging for
30–60 s.
9.
Discard the flow-through, and centrifuge for an additional 1 min to remove residual
wash buffer.
10. To elute DNA, place the QIAprep column in a clean 1.5 ml microcentrifuge tube. Add
50 µl Buffer EB or water to the center of each QIAprep spin column, let stand for
1 min, and centrifuge for 1 min.
Please tear off here
Bench Protocol: QIAprep Spin Miniprep Kit
Using a Microcentrifuge