1
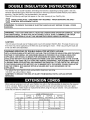
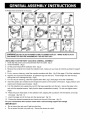
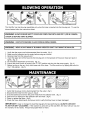
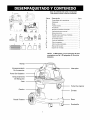
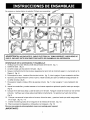
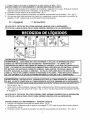
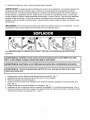
®
Wet/Dry Vacuums
Operator's
3.2Gal
Manual
/ 12 L
Model No.
VHB307WM
FOR YOUR SAFETY
Read and understand
this manual before use.
Keep this manual for future reference.
Intertek
3084514
CONFORMS TO UL
STD. No. 1017
Certified to CSA STD.
C22.2 No.243-10
www.vacmaster.com
Cleva North America
601 Regent Park Court
Greenville, SC 29607
Part No.VH57BZ.20.60.02
SECTION
Page
Warranty ................................................................................................................
Safety Instructions and Warnings ...............................................................................
Double Insulation Instructions ....................................................................................
Extension Cord .......................................................................................................
Unpacking and Checking Carton Contents ....................................................................
General Assembly Instructions ...................................................................................
Dry Vacuuming Operation .........................................................................................
Liquid Vacuuming Operation .....................................................................................
Blowing Operation ...................................................................................................
Maintenance ..........................................................................................................
Installing &Cleaning Reusable Cloth Filter .....................................................................
Installing &Cleaning Foam Sleeve Filter ........................................................................
Troubleshooting ......................................................................................................
Exploded View and Parts List ....................................................................................
2
3
4
4
5
6
7
8
9
9
10
10
11
12
Thank you for purchasing this Vacmaster ® wet/dry vacuum cleaner. Feel confident that with
®
Vacmaster
you are obtaining a high quality product engineered for optimal performance.
This
vacuum is capable of picking up liquids and dry materials,
FOR YOUR SAFETY:
CAREFULLY
READ AND UNDERSTAND
ALL INSTRUCTIONS
We take pride in producing a high quality, durable product. This Vacmaster®product
carries a limited two (2)
year warranty against defects in workmanship and materials from date of purchase under normal household
use. If product is to be used for commercial, industrial or rental use, a 90 day limited warranty will apply.
Warranty does not apply to defects due to direct or indirect abuse, negligence, misuse, accidents, repairs or
alterations and lack of maintenance.
Please keep your receipt as proof of purchase. This warranty gives
you specific legal rights, and you may have other rights, which vary from state to state. For product service
call Customer Service at (866) 384-8432
|
T
TY INSTRUCTIONS
Read and understand all instructions before using this vacuum
Read and understand this owner's manual and all labels on the Wet/Dry Vacuum cleaner before operating.
Safety is a combination of common sense, staying alert and knowing how your vacuum works. Use this
Wet/Dry Vac only as described in this manual.
Household Type
rills MANUAL o.
FUTURE
When using
following:
an electrical
appliance,
WARNING:
basic precautions
REFERENCE.
should always
TO REDUCE THE RISK OF FIRE, ELECTRIC
be followed
including the
SHOCK OR INJURY:
• Do not run vac unattended.
• Do not vacuum, or use this Wet/Dry Vac near flammable liquids, gases, or explosive vapors like gasoline
or other fuels, lighter fluids, cleaners, oil-based paints, natural gas, hydrogen, or explosive dusts like coal
dust, magnesium dust, grain dust, or gun power. Sparks inside the motor can ignite flammable vapors or
dust.
•
•
•
•
•
•
Do not vacuum anything that is burning or smoking, such as cigarettes, matches, or hot ashes.
Keep cord away from heated surfaces.
Do not expose to rain. Store indoors.
Do not unplug by pulling on cord. To unplug, grasp the plug, not the cord.
Do not use with damaged cord, plug or other parts.
If appliance is not working as it should, has been dropped, damaged, left outdoors, or dropped into water,
return it to a service center.
• Do not pull or carry by cord, use cord as handle, close a door on cord, or pull cord around sharp edges or
corners.
•
•
•
•
Do
Do
To
Do
not run Wet/Dry Vac over cord.
not handle plug or the Wet/Dry Vac with wet hands.
reduce the risk of health hazards from vapors or dusts, do not vacuum toxic materials.
not use or store near hazardous materials.
• Do not use this Wet/Dry Vac with a torn filter or without the filter installed except when vacuuming liquids
as described in the operation section of this manual.
• Do not allow to be used as a toy. Close attention is necessary when used by or near children.
• To reduce the risk of injury from accidental starting, unplug power cord before changing or cleaning filter.
• Do not leave Wet/Dry Vac unattended when plugged in. Unplug from outlet when not in use and before
servicing.
• Turn off Wet/Dry Vac before unplugging.
• Do not put any object into ventilation openings. Do not vacuum with any ventilation openings blocked;
keep free of dust, lint, hair or anything that may reduce air flow.
• Keep hair, loose clothing, fingers, and all parts of body away from openings and moving parts.
• To reduce the risk of falls, use extra care when cleaning on stairs.
When using as blower:
• Direct air discharge only at work area
• Do not use Wet/Dry Vac as a sprayer.
• Do not direct air at bystanders.
• Keep children away when blowing.
• Wear safety goggles.
This Wet/Dry Vac is double-insulated,
eliminating the need for a separate grounding system. Use only
identical replacements parts. Read the instructions for Servicing Double-Insulated
Wet/Dry Vacs before
servicing. Use this Wet/Dry Vac as described in this manual.
Observe the following warnings that appear on the motor housing of your Wet/Dry Vac.
r_
OUBLE INSULATED
- GROUNDING
IDENTICAL
REPLACEMENT
PARTS.
I WARNING:
INDOORS.
TO REDUCE
NOT REQUIRED
THE RISK OF ELECTRIC
SHOCK-DO
- WHEN SERVICING
USE ONLY
NOT EXPOSE TO RAIN.
STORE
WARNING:
FOR YOUR OWN SAFETY, READ AND UNDERSTAND OPERATOR'S MANUAL. DO NOT
RUN UNATTENDED.
DO NOT PICK UP HOT ASHES, COALS, TOXIC, FLAMMABLE OR OTHER
HAZARDOUS MATERIALS, DO NOT USE AROUND EXPLOSIVE LIQUIDS OR VAPORS.
CAUTION:
• Do not vacuum drywall dust or fireplace soot or ash with standard Wet/Dry filter. This type of dust is very
fine which may not be captured by the filter and cause damage to motor. When vacuuming fine dust use
a fine dust filter (sold separately).
WARNING:SERVICING
OF DOUBLE-INSULATED
WET/DRY
VACUUM
WITH A DOUBLE-INSULATED
WET/DRY VACUUM, TWO SYSTEMS OF INSULATION ARE PROVIDED
INSTEAD OF GROUNDING.
NO GROUNDING MEANS IS PROVIDED ON A DOUBLE-INSULATED
APPLIANCE, NOR SHOULD A MEANS FOR GROUNDING BE ADDED. SERVICING A DOUBLE
INSULATED WET/DRY VACUUM REQUIRES EXTREME CARE AND KNOWLEDGE OF THE SYSTEM,
AND SHOULD BE DONE ONLY BY QUALIFIED SERVICE PERSONNEL. REPLACEMENT
PARTS FOR
A DOUBLE-INSULATED
WET/DRY VACUUM MUST BE IDENTICAL TO THE PARTS THEY REPLACE.
YOUR DOUBLE-INSULATED
WET/DRY VAC IS MARKED WITH THE WORDS 'DOUBLE INSULATED'
AND THE SYMBOL
APPLIANCE.
|
(SQUARE
i--'1
WITHIN
A SQUARE)
MAY ALSO BE MARKED
• To reduce the risk of electric shock-unplug before cleaning or servicing.
• DO NOT use without filters in place.
CAUTION: TO REDUCE THE RISK OF INJURY FROM MOVING PARTS- UNPLUG
SERVICING.
ON THE
BEFORE
When using an extension cord with your Wet/Dry Vac refer to the following table to determine the required
A.W.G. wire size. Before using the cleaner make sure the power cord and extension cord are in good
working conditions. Make repairs or replacements before using the vacuum cleaner. Only use extension
cords that are rated for outdoor use.
Length of Extension Cord
50 Feet
100 Feet
15.25 Meters
30.5 Meters
110V-120V
25 Feet
7.5 Meter
150 Feet
45.7 Meters
Amps
0-6
18
A.W.G Wire Size
16
16
14
7-10
18
16
14
12
11-12
16
16
14
12
13-16
14
12
Not recommended
I
A
B
Remove entire contents of carton. Check each
item against the carton contents.
Carton Contents
c
F
G
L
H
I
M
N
J
K
0
P
Key
A
B
C
D
E
F
G
H
I
J
K
L
M
N
O
P
List
Description
...............................
Vac Assembly .................................
Hose ...............................................
Base ...............................................
Wheels ...........................................
Casters ............................................
Utility Nozzle ....................................
Crevice Tool .....................................
Dust Bag .......................................
Multi-Surface Floor Nozzle .............
Round Dust Brush .........................
6 Screws (Bag) ..............................
Extension Wand ..............................
Foam Sleeve Filter ..........................
Reusable Cloth Filter .......................
Operator's Manual ...........................
Wall Mounting Support ....................
Qty
1
1
1
2
2
1
1
1
1
1
1
3
1
1
1
1
NOTE: The hose and accessories for this
vacuum are 1.25 inch (3.18 cm) diameter.
Handle
Accessory
Storage
On-Off Switch
Blow Port
Hose Storage
Latch
Vacuum Port
Hook
Wheel
Collection Tank
Base
Caster
A Phili 3s head screwdriver
I
WARNING:DO
DISCONNECTED
UNPACKING
is required.
NOT PLUG IN POWER CORD TO POWER OUTLET.
BEFORE ASSEMBLING THE WET/DRY VAC.
YOUR WET/DRY
VACUUM
& GENERAL
1. Verify that the power cord is disconnected
2. Undo the latches. (fig.2)
3. Lift the power head off the collection
MAKE SURE PLUG IS
I
ASSEMBLY
from the outlet. (fig.l)
tank. (fig.3)
4. Remove the contents from inside the collection tank, make sure you have all contents as listed on page 5.
(fig.4)
5. For dry vacuum cleaning,
install the supplied reusable cloth filter.
6. Optional, for improved dust filtration, fit collection
taking care not to damage the bag. (fig.6)
(fig.5) See page 10 for filter installation.
bag onto the tank.
Fit the flange onto the inlet stub,
7. For wet vacuum cleaning, install the supplied foam filter. (fig.7) See page 10 for filter installation.
8. Insert the casters and wheels into the respective
castors and wheels snap into place.
sockets on the bottom of the base. Apply pressure until
(fig.8)
9. Turn the collection tank upside down and fit the base assembly onto the tank.
tank with the supplied screws. Verify that the base is assembled
correctly.
Secure the base to the
Do not over-tighten
screw.
(fig.9)
10. Place the power head back on the collection tank, aligning the top section with the latches, and snap
into place. (fig.10 & 11)
11. Insert the larger end of the hose into the desired port. (fig.12)
12. Choose the desired accessories
For your convenience
and insert onto the end of the hose.
this vacuum comes with a wall mounting
(fig.13)
support for storage.
IMPORTANT!
•
Do not mount the rack over 5 feet from the floor.
•
Do not screw the rack to drywall only. Secure the screws to a stud.
•
Do not hang from or sit on the vacuum when on mounting rack.
13. Align the two screw holes so that they are over a stud and secure the mounting support to the wall stud,
as shown, with the two screws provided.
(fig.14)
14. Place the wet and dry vacuum cleaner into the support.
POLARIZED PLUG
To reduce the risk of electrical
than the other).
shock, this appliance
(fig.15)
has a double polarized
This plug will fit in a polarized outlet only one way.
reverse the plug.
If it still does not fit, contact a qualified electrician
change the plug in any way. Double insulation
cord and grounded power supply system.
r_
eliminates
plug (one with the blade wider
If the plug does not fit fully in the outlet,
to install the proper outlet.
Do not
the need for the three wire grounded
power
DRY VACUUMING
WARNING:
BE SURE TO READ, UNDERSTAND,
AND APPLY INFORMATION,
ENTITLED 'SAFETY
INSTRUCTIONS
& WARNINGS'.
DO NOT VACUUM IN AREAS WITH FLAMMABLE
GASES, VAPORS,
OR EXPLOSIVE DUSTS IN THE AIR. FLAMMABLE
GASES OR VAPORS INCLUDE BUT ARE NOT
LIMITED TO; LIGHTER FLUID, SOLVENT TYPE CLEANERS, OIL-BASE PAINTS, GASOLINE,
ALCOHOL OR AEROSOL SPRAYS. EXPLOSIVE DUSTS INCLUDE BUT ARE NOT LIMITED TO;
COAL, MAGNESIUM, GRAIN OR GUN POWDER. TO REDUCE THE RISK OF HEALTH HAZARDS
FROM VAPORS OR DUST, DO NOT VACUUM TOXIC MATERIALS.
1. Verify that the power cord is disconnected from the outlet. (fig.l)
2. In order to prepare your vacuum for dry vacuuming, make sure the filter is completely covering the filter
cage against the power head. (fig.2 & 3)(Your Wet/Dry Vac comes with the reusable cloth filter preinstalled, if not, see page 10 for installation instructions.)
3. Place the dust bag to the vacuum port inside the tank, and press to make sure the dust bag is well
assembled. (fig.4)
4. Place the power head section back on the collection tank, and secure it in place using the latches. (fig.5)
OPERATING
INSTRUCTIONS:
DRY VACUUMING
5. Insert the larger end of the hose into the vacuum port on the tank. Push the required attachment onto
the free end of the hose or extension. (fig.6)
6. Plug in the power cord into the outlet. (fig.7)
7. Turn the motor on by flipping the switch to the 'r ON position and begin vacuuming.
(fig.8)
8. Once you have completed vacuuming, flip the switch to the 'O' OFF position and unplug the power cord
from the outlet.
O = OFF
I = ON
DO NOT USE THE REUSABLE CLOTH FILTER FOR LIQUID VACUUMING.
DO NOT USE COLLECTION BAG FOR LIQUID VACUUMING,
LIQUID VACUUMING
WARNING:
BE SURE TO READ, UNDERSTAND,
AND APPLY INFORMATION,
ENTITLED 'SAFETY
INSTRUCTIONS
& WARNINGS'.
DO NOT VACUUM IN AREAS WITH FLAMMABLE GASES, VAPORS,
OR EXPLOSIVE DUSTS IN THE AIR. FLAMMABLE GASES OR VAPORS INCLUDE BUT ARE NOT
LIMITED TO; LIGHTER FLUID, SOLVENT TYPE CLEANERS, OIL-BASE PAINTS, GASOLINE,
ALCOHOL OR AEROSOL SPRAYS. EXPLOSIVE DUSTS INCLUDE BUT ARE NOT LIMITED TO;
COAL, MAGNESIUM, GRAIN OR GUN POWDER. TO REDUCE THE RISK OF HEALTH HAZARDS
FROM VAPORS OR DUST, DO NOT VACUUM TOXIC MATERIALS.
I WARNING:
NOT PLUG
IN POWER THE
CORD
TO POWER OUTLET.
DISCONNECTEDDO BEFORE
CHANGING
FILTERS.
MAKE SURE PLUG IS
1. Verify that the power cord is disconnected from the outlet. (fig.l)
2. Remove reusable cloth filter, then carefully install the foam sleeve filter over the filter cage and place the
power head back on the collection tank. (fig. 2, 3 & 4) See filter installing instructions on page 10.
DO NOT USE THE REUSABLE CLOTH FILTER FOR LIQUID VACUUMING.
DO NOT USE COLLECTION BAG FOR LIQUID VACUUMING.
OPERATING
3.
4.
5.
6.
INSTRUCTIONS
- WET VACUUMING
Fit the desired nozzle to the vacuum hose. (fig. 5)
Verify that the switch is in the 'O' OFF position before plugging the power cord into the outlet.
Turn the motor on by flipping the switch to the '1' ON position. (fig.7)
After use, empty the collection tank, clean and dry the inside and outside before storage.
(fig. 6)
IMPORTANT!
When vacuuming large quantities of liquids, do not immerse the nozzle completely in the
liquid; leave a gap at the tip of the nozzle opening to allow air inflow. The machine is fitted with a float valve
that stops the suction action when the collection tank reaches its maximum capacity. You will notice an
increase in motor speed. When this happens, turn off the machine, disconnect from power supply, and
drain the liquid into a suitable receptacle or drain. To continue vacuuming, refit the power head to the
collection tank. After wet vacuuming, turn the machine off and remove plug from power supply. Empty the
collection tank, clean and dry the inside and outside before storage.
REMEMBER!
The foam filter must be removed after wet vacuuming,
installed before dry vacuuming again.
and a reusable cloth filter must be
I
This Wet/Dry Vac has blowing capabilities only when the hose is inserted into the blowing port. To use the
blower feature follow the instructions listed.
I CSAZ94.3)
ARNING: BEFORE
ALWAYSUSING
WEARBLOWER.
SAFETY GOGGLES
I WARNING:
KEEP BYSTANDERS
I WARNING:
WEAR
COMPLYING
CLEAR FROM BLOWING
A DUST MASK IF BLOWING
CREATES
WITH ANSI Z87.1 (OR IN CANADA,
DEBRIS.
DUST THAT MIGHT BE INHALED.
1.
2.
3.
4.
Verify that the power cord is disconnected from the outlet. (fig.l)
Make sure the collection tank is empty before using as a blower.
Remove hose from the vacuum port.
Insert the larger end of the hose into the blowing port on the backside of the power head and push in
tightly. (fig. 2)
5. Fit the desired attachment to the hose. (fig. 3)
6. Ensure the power switch is turned to the 'O" OFF position and plug into the power supply. (fig. 4)
7. Before turning on the vac, firmly hold loose end of the hose. Turn the motor on by flipping the switch to
the T ON position. (fig. 5)
1.
2.
3.
4.
5.
6.
Verify that the power cord is disconnected from the outlet. (fig.1)
Disconnect the hose from the vacuum. (fig.2)
Undo the latches and remove the power head from the collection tank. (fig. 3)
Clear all dirt or debris from the collection tank and hose. (fig.4)
Clean or replace the filters. (fig.5)
Check the hose, attachments, and power cord to verify that they have not been damaged.
IMPORTANT!
Clean or change the dust filter regularly for best performance. ALWAYS USE DUST
FILTER FOR DRY VACUUMING.
If the machine is used with out the dust filter, the motor will burn out and
the warranty will be voided. Always keep spare filters on-hand.
I
I
I
I
NOTICE!
The filter included is made of high quality material designed to stop small dust particles. The filter
should be used for dry pick-up only. A dry filter is necessary to pick up dust. If the dust filter is wet, it will
clog quickly and be very difficult to clean. Handle the filter carefully when removing it for cleaning and
replacing it. Check the filters for tears or small holes, a small hole can let dust pass through and out of the
cleaner. Do not use a filter with holes or tears. If a hole or tear is found, replace the filter immediately.
I THE
ARNING:ALWAYS
DISCONNECT
THE TANK.
PLUG FROM THE POWER OUTLET
POWER HEAD FROM
COLLECTION
BEFORE
Installing Reusable Cloth Filter
1. Verify that the power cord is disconnected from the outlet. (fig.l)
2. Remove power head and place in upside down position.
3. Slide reusable cloth filter down over the filter cage making sure the whole cage is covered.
4. Replace the power head on to the collection tank.
REMOVING
(fig.2 & 3)
Removing and Cleaning Reusable Cloth Filter
1. With the removed power head in the upside down position.
2. Carefully remove the reusable cloth filter from the filter cage. (fig. 4) Clean the filter by gently tapping or
brushing dirt off. Cleaning should not be done indoors in living areas.
3. Use a mild soap and water solution to wash reusable cloth filter and rinse with clean water. (fig. 5)
4. Allow the wet filter to air dry for 24 hours before installing onto the filter cage.
Installing Foam Sleeve Filter
1. Verify that the power cord is disconnected from the outlet. (fig.l)
2. Remove power head and place in upside down position. Follow instructions to remove cloth filter.
3. Carefully slide foam sleeve filter down over the filter cage making sure the whole cage is covered.
(fig. 2 & 3)
.
Replace the power head onto the collection tank.
Cleaning Foam Sleeve Filter
1. With the removed power head in the upside down position, carefully remove foam sleeve filter. (fig. 4)
2. Use a mild soap and water solution to wash foam sleeve filter and rinse with clean water. (fig. 5)
3. Allow filter to air dry before installing and using again.
]0
I
IWARNING:TO
REDUCE
THE RISK OF ELECTRIC
Symptom
Possible
Vacuum will not operate
1) No power supply.
SHOCK-UNPLUG
Causes
Corrective
2) Faulty power cord.
Dust comes from motor cover.
Reduced efficiency and
motor/speed vibration,
BEFORE TROUBLESHOOTING.
3) Collection tank full.
1) The reusable cloth filter is missing or
damaged,
1) There is a blockage in the nozzle,
hose, or the vacuum inlets. Or the dust
filter is blocked by fine dust.
1!
Action
1) Check power supply - cord,
breakers, fuses.
2) Unplug and check the power
cord. If damaged, have it repaired
by a professional.
3) Empty collection tank.
1) Attach or replace the reusable
cloth filter.
1) Check nozzle, hose and inlets
for blockage. Take off the filter and
clean it. Or install new filter.
I
1!
1
'_
12
VHB307WM Parts List
Key Number
Drawing
. Description
1
VH57PF.A0.01
Handle
2
VH57PF,10.00
Power
3
TVQTZS.05.YZ
Float
4
TVQTZS.05.YZ
Filter Cage
5
VH57PF,20.01
Collection
. Quantity Key Number. Drawing
1
Quantity
FV9502o07.00
Foam Sleeve
13
FV7723,0t,00
Multi-Surface Floor Nozzle
t
1
t4
FV7774.01,00
Utility
1
1
15
FV7773.01.00
Round
1
16
FV7772.02.01
Crevice
t
t7
FV7902,01,01
Extension
Head Assembly
Tank
Description
12
Filter
1
Nozzle
Dust Brush
1
Nozzle
1
i
6
FV9202,02,01
7
TVQTXK.12.01
Hook
18
.FV9620"01"00
8
TVQTGL20.00
.Vacuum
Wheels
Port
2
19
FV7822,09,00
Hose
9
VH57PF,20,02
Base
1
20
VH57BZ,20,60,02
Operator's
10
TVQTJL.12,00
Casters
2
21
FV9201.02,01
Mounting
11
FV9642,02,00
Cloth
1
Filter
.
1
.
12
.Dust
Wands
Bag
3
_
1
1
Manual
1
Support
1
®
Aspiradoras
Mojado/Seco
MANUAL DEL USUARIO
,,_,_i;_'!"!_:_'_'i_!_!_!"!_!_i_i!_!_!!'!
i__ii_
_!__/_ii__i_i_i
II_!_
3.2Gall
12L
Modelo
VHB307WM
PARA SU SEGURIDAD,
Lea y entienda este manual antes de usar.
Guarde este manual para futura referencia.
Intertek
3084514
CONFORMS TO UL
STD. No. 1017
Certified to CSA STD,
C22.2 No.243-10
www.vacmaster.com
Cleva North America
601 Regent Park Court
Greenville, SC 29607
Part No. VH57BZ.20.60.02
Seccion
Pagina
Garantia ...............................................................................................................
Instrucciones de seguridad y advertencias ...................................................................
Instrucciones del aislamiento doble ...........................................................................
Cord6n de extensi6n ...............................................................................................
Desempaquetado
y contenido de la caja .....................................................................
Instrucciones de ensamblaje general ...........................................................................
Recogido de materiales secos ...................................................................................
Recogido de liquidos con la aspiradora .......................................................................
Soplador ...............................................................................................................
Mantenimiento ........................................................................................................
2
3
4
4
5
6
7
8
9
10
Instalaci6n y limpieza del filtro de tela ..........................................................................
Instalaci6n y limpieza del filtro de esponja ....................................................................
Diagnostico ..........................................................................................................
Partes de repuesto y diagrama .................................................................................
10
11
11
12
Gracias por comprar esta aspiradora
mojado/seco
de Vacmaster ®. Sientase confidente
Vacmaster ® esta obteniendo un producto de alta calidad dirigido a el funcionamiento
aspiradora es capaz de recoger liquidos y materiales secos.
PARA SU SEGURIDAD
INSTRUCCIONES
LEA CUIDADOSAMENTE
Y ENTIENDA
TODAS
que con
optimo,
Esta
LAS
Nosotros nos enorgullece en producir un producto durable de alta calidad. Este producto de Vacmaster ®
tiene una garantia limitada de dos aSos contra defectos en la ejecuci6n y materiales a partir de la fecha de
compra bajo uso normal en su hogar. Si el producto va a ser utilizado para uso comercial, industrial o de
alquiler, una garantia limitada de 90 dias se aplicar& La garantia no se aplica a los defectos causados por
abuso, negligencia, uso err6neo, accidentes, reparaciones o alteraciones directas o indirectas y falta de
mantenimiento.
Guarde por favor su recibo como prueba de la compra. Esta garantia le da derechos
legales especificos, y puede tener otros derechos, que varian de estado en estado. Para servicio de su
producto Ilame a Servicio al Cliente a (866) 384-8432.
|NSTRUCC|ONES DE SEGUR|DAD |MPORTANTES
LEA Y ENTIENDA
TODAS LAS INSTRUCCIONES
ANTES DE USAR ESTA ASPIRADORA.
Lea y entienda el manual del usuario y todas las etiquetas en la aspiradora mojado/seco antes de utilizar.
La seguridad es una combinaci6n de sentido comQn, hay que permanecer alerta y saber como su
aspiradora trabaja. Utilizar esta aspiradora mojado/seco solamente segQn Io descrito en este manual.
Para Uso Domestico Solamente.
ESTEMANUALPARA
AI usar electrodomesticos,
siguientes:
precauciones
ADVERT
m
FUTURA
basicas siempre
REFERENCIA
debe de ser seguidas
incluyendo
las
,....ARA
R DUC.R
R. S F
OU SACUD.DA
O, ELI CTRICA
O DE
_A
LESION:
•NO deje laaspiradoradesatendidacuando este enchufada.
•No limpiecon laaspiradora,o utilice
estaaspiradoramojado/seco cerca de liquidosinflamables,
gases, o
vapores explosivoscomo lagasolinau otroscombustibles,liquido
de butano,limpiadores,
pinturasa base
de aceite,gas natural,
hidr6geno,o explosivoscomo el polvo de carb6n,elpolvo de magnesio, el polvode
grano,o p61vora.Las chispas dentrodelmotor pueden encender vapores inflamableso polvos
combustibles.
•No aspireobjetosque estan encendidos o echando humo, porejemplo cigarrillos,
f6sforos,
o lascenizas
calientes.
•Mantenga elcord6n electrico
lejosde superficies
calientes.
•No exponga ala lluvia.
Almacene en interiores.
•No desenchufe tirandodelcord6n. Pare desenchufar,agarrareelenchufe,no elcord6n.
•No utilice
con elcord6n,elenchufe u otraspiezasdalladas.
•Si la aspiradorano funcionacomo debe, lefaltapiezas,se ha caJdo,ha sidoda_ada, se ha dejado a la
intemperieo se ha caJdo alaguE, devuelvalaa un centrode servicio.
•No tirenillevepor elcable,niutilice
elcord6n de uso como manija,no cierrepueFtassobre elcord6n,o le
de tironesalrededorde bordes o de esquinasfilosas.
•No pase laaspiradoramojado/seco encima de su cord6n electrico.
•No toque elenchufe o laaspiradoramojado/seco con lasmanos mojadas.
• ParE reducir el riesgo de peligros parE la salud por vapores o polvo, no aspire materiales t6xicos.
• No utilice ni almacene cerca de materiales peligrosos.
• No utilice esta aspiradora mojado/seco con un filtro rasgado o sin el filtro instalado excepto al limpiar
liquidos con la aspiradora segQn Io descrito en la secci6n de la operaci6n de este manual.
• No utilice como juguete. La maxima atenci6n es necesaria cuando sea utilizada por niSos o cerca de
estos.
• Para reducir el riesgo de lesiones debido a un arranque accidental, desenchufe el cord6n electrico antes
de cambiar o de limpiar el filtro.
• No deje la aspiradora mojado/seco desatendida cuando este conectada a un tomacorriente.
Desenchufe
de la corriente electrica cuando no este siendo utilizada y antes de darle servicio de ajustes y
reparaciones.
• Apague su aspiradora mojado/seco antes de desenchufar.
• No ponga ningQn objeto en las aberturas de la ventilaci6n.
No utilice la aspiradora con ninguna de las
aberturas de la ventilaci6n bloqueadas; mantenga libre de polvo, pelusa, cabellos o cualquier cosa que
pueda reducir el flujo de aire.
• Mantenga el cabello, ropa suelta, dedos, y todas las partes del cuerpo lejos de aberturas y de piezas
m6viles.
•Para reducir el riesgo de caidas, utilice cuidado adicional al limpiar en las escaleras.
AI user como
soplador:
• Dirija la descarga directa del aire solamente al area de trabajo.
• No utilice la aspiradora mojado/seco como rociador.
• No dirija el aire alas personas.
• Mantengaa losnifiosalejadosdelarea.
• Utiliceanteojosde seguridad.
Estaaspiradoramojado/seco
tieneaislamientodoble,eliminandola necesidadde unsistemade conexi6na
tierraseparado.Utilicesolamentepiezasde repuestoidenticas.Lealas instrucciones
paramantenimiento
desu aspiradoramojado/seco
condoble-aislamiento
antesde realizarajustesy reparaciones.Utiliceesta
aspiradorasegQnIodescritoen estemanual.Observelassiguientesadvertencias
queaparecenen la
cubiertadelmotorde su aspiradora.
r_
ISLAMIENTO
DOBLE PIEZAS
- NO REQUIERE
UN SISTEMA
DE CONEXION
UTILICE
SOLAMENTE
DE REPUESTO
IDC:NTICAS.
I ADVERTENCIA
i PARA
LLUVlA
ALMACENE
EN REDUCIR
INTERIORESEL RIESGO DE SACUDIDAS
A TIERRA
ELI_CTRICAS
SEPARADO
NO EXPONGA
A LA
ADVERTENClA:
PARA SU PROPIA SEGURIDAD,
LEA Y ENTIENDA EL MANUAL DEL USUARIO.
NO DEJE DESATENDIDO.
NO RECOJA CENIZAS CALIENTES, CARBONES, MATERIALES
TOXICOS,
INFLAMABLES
U OTROS MATERIALES
PELIGROSOS, NO UTILIZE ALREDEDOR DE LiQUIDOS O
DE VAPORES EXPLOSIVOS.
PRECAUCI0N:
• No limpie el polvo de yeso o cemento con la aspiradora, el hoNin o la ceniza de la chimenea utilizando un
filtro estandar mojado/seco.
Este es un polvo muy fino el cual no sera capturado por el filtro y puede
causar dafio al motor. Cuando aspire polvos finos use un filtro para polvos finos (vendido por aparte).
ADVERTENCIA:
EN LA ASPIRADORA
MOJADO/SECO
CON AISLAMIENTO DOBLE SE
PROPORCIONAN
DOS MEDIOS DE AISLAMIENTO EN VEZ DE CONEXION A TIERRA. NO SE
PROPORCIONA
NINGUN MEDIO DE CONEXION A TIERRA A UN APARATO ELECTRODOMC:STICO
CON AISLAMIENTO
DOBLE, NI SE DEBE ANADIR A €:STE NINGUN MEDIO DE CONEXION A TIERRA.
El SERVICIO DE AJUSTES Y REPARACINES
DE LA ASPIRADORA CON AISLAMIENTO DOBLE
REQUIERE EXTREMO CUIDADO Y CONOCIMIENTO
DEL SISTEMA, Y DEBE SER REALIZADO
UNICAMENTE POR PERSONAL DE SERVICIO AUTORIZADO.
SU ASPIRADORA
ESTA MARCADA
CON LAS PALABRAS 'DOUBLE INSULATED' EL SiMBOLO
CUADRADO) TAMBIC:N ESTA MARCADO EN EL APARATO.
r_
(CUADRADO
DENTRO
DE UN
• NO UTILIZE sin los filtros en su lugar
PRECAUClON
PARA REDUClR EL RIESGO DE LESION A CAUSA DE PIEZAS MOVIBLES
DESENCHUFE ANTES DE REPARAR
AI utilizar un cord6n de extensi6n con su aspiradora mojado/seco refierase a la siguiente tabla para
determinar el tamafio requerido del cord6n de A.W.G. Antes de usar la aspiradora asegQrese de que el
cord6n electrico y el cord6n de la extensi6n estan en buenas condiciones para hacer el trabajo. Haga las
reparaciones o los reemplazos antes de usar la aspiradora.
0nicamente use cordones de extensi6n con
capacidad nominal para uso a la intemperie.
25 Pies
50 Pies
100 Pies
i50 Pfes
110V°120V
7,5 Metros
15,25 Metros
30,5 Metros
4&7 Metros
Amps
0,6
18
7-10
18
16
14
1 I-12
i6
16
14
...............
13-16
;;;;;
;;
A,W,G TamaSo del cord6n
16
16
::;;;;;;;;;
14
::
::
::
12
=
:
14
12
12
....................
...................
No se recomienda
4
-
A
Sacar el contenido del carton. Compruebe
cada articulo contra la lista de contenido.
8
ii'
C
...............
G
H
J
I
M
J
N
0
K
P
Clave
A
B
C
D
E
F
G
H
I
J
K
L
M
N
O
P
Descripci6n
.................................
Cant.
Ensamblaje de la aspiradora ....................
Manguera .............................................
Base ...................................................
Rueda trasera ......................................
Ruedecitta .............................................
1
1
1
2
2
Boquitta de utitidad concepillo ....................
Herramienta para ranuras ........................
Bolsa para polvo ...................................
Boquitta para superficies mQltiples ...........
Cepitlo para polvo .................................
6 Tornittos (saco) ..................................
Tubos de extensi6n .................................
1
1
1
1
1
1
3
Filtro de esponja .....................................
Fittro de tela reutitizable ...........................
Manual del usuario ..................................
1
1
1
Soporte de montaje ......................................
1
NOTA: La Manguera y los accesorios de esta
aspiradora son de 1.25 pulgadas (3.18cm) de
di&metro.
Manija
Aimacenamiento
interruptor
De Accesorios
Podal
Del Soplador
Almacenamiento
De Manguera
Asas
Portal
Gancho
Rueda
Trasera
Del Aspirar
Envase
Base
Ruedecilla
Serequiereundestornillador
de estrella(Philips)paraensamblar.
i
EL ENCHUFE NO
ESTE
DESCONECTADO
DE ENSAMBLAR
SU ASPIRADORA
I QUE
DVERTENCIA:
ENCHUFE
EL CABLE ANTES
ELI_CTRICO
AL TOMACORRIENTE,
ASEGURESE
DESEMPAQUE DE SU ASPIRADORA Y ENSAMBLAJE
1. Verifique que el cord6n electrico este desconectado del enchufe.
2. Suelte las asas. (fig. 2)
3. Levante la tapa que esta sobre el envase.
DE
(fig. 1)
(fig. 3)
4. Saque el contenido dentro del envase, asegSrese de tener todo el contenido segSn Io enumerado
en la
Pagina 5. (fig. 4)
5. Para aspirar en seco,
6. Opcional,
instale el filtro de tela incluido.
(fig. 5) Vea la pagina 10 para instalaci6n
del filtro.
para mejor filtraci6n contra el polvo, instale la bolsa para polvo al deflector asegurandose
de
no daSar la bolsa. (fig.6)
7. Para aspirar mojado, instale el filtro de esponja incluido.
filtro.
(fig. 7) Vea la pagina 11 para instalaci6n
8. Inserte las ruedecillas y ruedas traseras en los huecos respectivos
aplicando
del
presi6n hasta que encajen.
(fig. 8)
9. Coloque el envase boca abajo y case la base con el envase.
incluidos.
Verifique
que la base este ensamblada
Asegure
correctamente.
la base al envase con los tornillos
No apriete muy fuerte los tornillos.
(fig. 9)
10. Coloque nuevamente
en su lugar.
la tapa sobre el envase, alinee las asas, y presione hasta que esten aseguradas
(fig. 10 y 11)
11. Inserte el extremo grueso de la manguera
12. Elija los accesorios
Para su conveniencia
ilMPORTANTE!
deseados y col6quelos
esta aspiradora
en la entrada del envase.
a la manguera.
viene con montaje
(fig. 12)
(fig. 13)
para la pared.
•
No monte el bastidor a mas de 5 pies del piso.
•
No sujete los tornillos alas
paredes de tablero de yeso solamente.
Sujete los tornillos al montante
detras de los tableros de yeso.
•
No se cuelgue del bastidor ni se siente en el.
•
No use la aspiradora mientras este montada sobre el bastidor en la pared.
•
Vaciar el tanque antes de montar la aspiradora sobre el bastidor en la pared.
13. Verifique que el bastidor este nivel y marque los agujeros. Taladre agujeros de piloto de 1/8 de pulgada
de diametro en los puntos para los agujeros.
montante de la pared.
14. Monte la aspiradora
ENCHUFE
Sujete el bastidor con los dos tornillos.
sobre el bastidor.
(fig. 14)
(fig. 15)
POLARIZADO
Para reducir
el riesgo de sacudidas
electricas,
(una hoja es mas ancha que la otra).
una manera.
este aparato electrodomestico
Aislamiento
Doble _
tiene un enchufe polarizado
Este enchufe entrara en un tomacorriente
Si el enchufe no entra por completo en el tomacorriente,
p6ngase en contacto con un electricista
el enchufe.
Alinee los dos agujeros del bastidor que esten sobre el
competente
volteelo.
para instalar el tomacorriente
polarizado
solamente
de
Si sigue sin entrar,
adecuado.
No modifique
elimina la necesidad de un enchufe de tres cables con tierra y de un
sistema de conexi6n a tierra separado.
ASPIRAR
MATERIALES
EN SECO
ADVERTENCIA:
ASEGURESE DE LEER, ENTENDER, Y APLICAR LA INFORMACION,
DADA
SOBRE LAS "INSTRUCCIONES
DE SEGURIDAD Y ADVERTENCIAS".
NO LIMPIE CON LA
ASPIRADORA
EN AREAS CON GASES INFLAMABLES,
VAPORES, O POLVOS EXPLOSIVOS EN EL
AIRE. LOS GASES O LOS VAPORES INFLAMABLES
INCLUYEN PERO NO SE LIMITAN A; LiQUIDO
DE BUTANO, SOLVENTES EN FORMA DE AEROSOL PARA LIMPIAR, PINTURAS A BASE DE
ACEITE, GASOLINA, ALCOHOL O AEROSOL.
EL POLVO EXPLOSIVO INCLUYE PERO NO SE
LIMITA A; POLVO DE CARBON, GRANO DE MAGNESIO O POLVORA.
PARA REDUCIR EL RIESGO
DE LOS VAPORES A LA SALUD NO ASPIRE MATERIALES TOXICOS CON LA ASPIRADORA.
1. Verifique que el cord6n electrico este desconectado
2. Para preparar su aspiradora para limpiar en seco,
la jaula del filtro y que Ilega hasta el cabezal. (fig.
instalado si no esta instalado vea las instrucciones
3. Coloque el retenedor del filtro encima del cartucho
manija hacia la derecha. (fig.4)
del enchufe. (fig. 1)
verifique que el filtro este cubriendo completamente
2 y 3) (Su aspiradora viene con un filtro de tela pre
en la pagina 10.)
del filtro y apriete hacia abajo dando vuelta a la
4. Pongalatapaenel envase,y asegQrela
en su lugarusandolasasas. (fig.5)
INSTRUCClONES
DEFUNClONAMIENTO:
ASPIRARMATERIALESENSECO
5. Inserteel extremogruesode la mangueraen el cabezaly asegQrela
en su lugar. Empujeel accesorio
requeridosobreel finallibrede la manguerao de la extensi6n.(fig.6)
6. Enchufeel cord6nelectricoenel tomacorriente.(fig.7)
7. Enciendael motormoviendoel interruptora la posici6nde encendidoconel simbolo'r ON. (fig.8)
8. Unavezqueustedhayaterminadode limpiarconla aspiradora,muevael interruptora la posici6nde
apagado'O' OFFy desenchufeel cord6nelectricodeltomacorrientes.
O = Apagado
NO UTILICE
NO UTILICE
I = Encendido
EL FILTRO DE TELA PARA ASPIRAR LIQUIDOS CON LA ASPIRADORA.
LA BOLSA PARA POLVO PARA ASPIRAR LIQUlDOS CON LA ASPIRADORA.
P
ASPIRACION
I
DE LiQUIDOS
ADVERTENCIA:
ASEGURESE DE LEER, ENTENDER, Y APLICAR LA INFORMACION
DADA
SOBRE LAS "INSTRUCCIONES
DE SEGURIDAD Y ADVERTENCIAS".
NO LIMPIE CON LA
ASPIRADORA
EN AREAS CON GASES INFLAMABLES,
VAPORES, O POLVOS EXPLOSIVOS EN EL
AIRE. LOS GASES O LOS VAPORES INFLAMABLES
INCLUYEN PERO NO SE LIMITAN A; LiQUIDO
DE BUTANO, SOLVENTES EN FORMA DE AEROSOL PARA LIMPIAR, PINTURAS A BASE DE
ACEITE, GASOLINA, ALCOHOL O AEROSOL.
EL POLVO EXPLOSIVO INCLUYE PERO NO SE
LIMITA A; POLVO DE CARBON, GRANO DE MAGNESIO O POLVORA.
PARA REDUCIR EL RIESGO
DE LOS VAPORES A LA SALUD NO ASPIRE MATERIALES TOXICOS CON LA ASPIRADORA.
I ADVERTENCIA:
NO ENCHUFE AL
EL TOMACORRIENTE
CORDON ELECTRICO
AL TOMACORRIENTES,
DE QUE NO ESTE CONECTADA
ANTES
DE ENSAMBLAR SU ASEGURESE
ASPIRADORA.
1. Verifique que el cord6n electrico este desconectado del enchufe. Verifique que el envase este limpio y
libre de polvo. (fig. 1)
2. Quite el filtro de tela reutilizable, despues instale cuidadosamente
el filtro de esponja sobre la jaula del
filtro y ponga la tapa de vuelta en el envase. (fig. 2, 3 & 4) Vea las instrucciones de instalaci6n del filtro
en la pagina 11.
NO UTILICE EL FILTRO DE TELA REUTILIZABLE
PARA ASPIRAR LIQUIDOS CON LA ASPIRADORA
NO UTILICE LA BOLSA PARA POLVO PARA ASPIRAR LIQUIDOS CON LA ASPIRADORA.
INSTRUCCIONES
DE FUNCIONAMIENTO
- ASPIRAR LIQUIDOS
3. Coloque a la manguera la boquilla que desea utilizar. (fig. 5)
4. Verifique que el interruptor este en posici6n de apagado 'O' OFF antes de enchufar el cord6n electrico
en el enchufe. (fig. 6)
5. Encienda el motor moviendo el interruptor a la posici6n de encendido con el simbolo '1' ON. (fig. 7)
I
6. Despues de cada uso, vacie y limpie el envase antes de guardar.
ilMPORTANTE!
AI aspirar grandes cantidades de liquidos con la aspiradora, no sumerja la apertura de
la manguera totalmente en el liquido; deje un boquete en la extremidad de la manguera para permitir
afluencia del aire. La maquina esta equipada con un flotador que detiene la acci6n de succi6n cuando el
envase alcanza su capacidad maxima. Usted notara un aumento en velocidad del motor. Cuando esto
suceda, apague la maquina, desconectela del tomacorriente, y drene el liquido. Para continuar aspirando,
reinstale la tapa del drenaje. AI terminar de aspirar, cerci6rese que el interruptor este en posici6n de
apagado y quite el enchufe del tomacorriente.
Vacie el envase, limpie y seque el interior y el exterior antes
de almacenar.
iREOUERDE!
El filtro de esponja se debe quitar despues de aspirar liquidos con la aspiradora,
reutilizable de tela se debe instalar antes de limpiar otra vez materiales secos.
y un filtro
B
Esta aspiradora
puede ser utilizada como soplador.
Para usar como soplador siga las instrucciones
siguientes.
I Z87.1
ADVERTENCIA:
SIEMPRE
UTILIZE
ANTEOJOS
(O EN CANADA,
CSAZ94.3)
ANTES
DE USARDEELSEGURIDAD
SOPLADOR. QUE CONFORMEN
I ADVERTENCIA:
I
MANTENGA
PUEDA SER INHALADO.
DVERTENCIA:
UTILIZE
1.
2.
3.
4.
ALAS
PERSONAS
UNA MASCARA
ALEJADAS
ANTIPOLVO
DEL LOS RESIDUOS
SI AL SOPLAR
CON ANSI
SOPLADOS.
SE CREA POLVO QUE
Verifique que el cord6n electrico este desconectado del enchufe. (fig. 1)
AsegQrese de que el envase este vacio antes de usar como soplador.
Retire la manguera del portal de aspirar.
Inserte el extremo grueso de la manguera en el portal del soplador Iocalizado en la parte trasera de la
tapa. (fig. 2)
5. Ponga la extensi6n o boquilla deseada a la manguera.
(fig. 3)
6. AsegQrese de que el interruptor este en la posici6n de apagado 'O' y enchufe al tomacorrientes.
(fig. 4)
7. Antes de encender la aspiradora, asegure la manguera entre sus manos con firmeza. Encienda el motor
moviendo el interruptor a la posici6n de '1'. (fig. 5)
I
I
I
i
1.
2.
3.
4.
5.
6.
Verifique que el enchufe este desconectado del tomacorriente.
(fig. 1)
Desconecte la manguera del envase. (fig. 2)
Suelte las asas y quite la tapa del envase. (fig. 3)
Limpie todo el sucio o particulas del envase y manguera. (fig. 4)
Limpie y remplace los filtros. (fig. 5)
Verifique que la manguera, los accesorios y el cord6n electrico no hayan sido daSados.
ilMPORTANTE!
Limpie o cambie el filtro regularmente para mejor funcionamiento.
SIEMPRE UTILICE
EL FILTRO DE POLVO PARA LIMPIAR CON LA ASPIRADORA
EN SECO. Si la maquina se utiliza sin el
filtro de polvo, el motor se quemara y la garantia sera anulada. Siempre tenga a mano repuestos de los
filtros.
iAVISO!
El filtro incluido esta hecho de material de alta calidad dise_ado para atrapar particulas de polvo
peque_as. El filtro se debe utilizar para recoger en seco solamente.
Un filtro seco es necesario para
recoger el polvo. Si el filtro de polvo esta mojado, se estropeara rapidamente y sera muy dificil limpiar.
Utilice cuidado al quitar el filtro para limpiarlo y cambiarlo. Examine los filtros para ver si tienen rasgones o
agujeros peque_os, un agujero peque_o puede dejar pasar el polvo a traves y fuera del aspirador. No
utilice un filtro con a_uieros
o ras_ones, cambie inmediatamente.
I QUlTAR
DVERTENOIA:
SIEMPRE
DESCONECTE
LA TAPA DEL
ENVASE.
InstalaciOn
1. Verifique
2. Quite la
3. Resbale
,
del filtro
EL ENCHUFE
DEL TOMACORRIENTE
ANTES DE
de tela reutilizable
que el enchufe este desconectado del tomacorriente.
(fig. 1)
tapa del envase y col6quela hacia arriba.
el filtro de tela hacia abajo sobre la jaula del filtro y cerci(Srese de que cubra la jaula
completamente.
(fig. 2 y 3)
Ponga la tapa de vuelta a su lugar en el envase.
Retiro y limpieza del filtro de tela reutilizable
1. Retire la tapa con el cabezal y en posici6n invertida.
2. Quite cuidadosamente
el filtro de tela reutilizable de la jaula del filtro. (fig. 4) Limpie el filtro suavemente
golpeando ligeramente o cepillando la suciedad. La limpieza se debe realizar al aire libre y no en el
interior de su vivienda.
3. Utilice una soluci6n de jab6n y agua para lavar el filtro de tela, enjuague con agua limpia. (fig. 5)
4. Permita que el filtro mojado se ventile por 24 horas antes de instalar nuevamente en la jaula del filtro.
10
I
Instalacion del filtro de esponja
1. Verifique que el enchufe este desconectado del tomacorriente.
(fig. 1)
2. Quite la tapa del envase y col6quela hacia arriba. Siga las instrucciones para quitar el filtro de polvo.
3. Cuidadosamente
resbale el filtro hacia abajo, sobre la jaula del filtro y empuje el filtro hacia adentro
hasta que cubra la jaula completamente.
(fig. 2 y 3))
4. Ponga la tapa de vuelta a su lugar en el envase.
Limpieza del filtro de esponja
1. Con la tapa en posici6n invertida quite cuidadosamente
el filtro de esponja. (fig. 4)
2. Utilice una soluciSn de jab6n y agua para lavar el filtro de esponja, enjuague con agua limpia.
3. Permita que el filtro se seque antes de instalar y de usar otra vez.
(fig. 5)
I
I ADVERTENClA:
DIAGNOSTICAR.
SIEMPRE
DESCONECTE
EL ENCHUFE
DEL TOMACORRIENTE
causas
Sintoma
Posibles
Aspiradora no funciona
1) No esta conectada al
tomacorriente,
2) Cord6n electrico defectuoso.
1) Inspeccione el tomacorriente,
cord6n, caja de fusibles y fusibles.
2) Desenchufe y examine el cord6n
electrico. Siesta dafiado, haga que
sea reparado por un profesional.
3) Envase Ileno.
3) Vacie el envase.
Polvo sale de la cubierta del
motor,
1) El filtro de tela no esta puesto o
esta dafiado,
1) Ponga un filtro de tela o
reemplace.
Eficacia reducida y vibraci6n del
motor.
1) Hay una obstrucci6n en la
boquilla, la manguera, o la entrada
del envase. O el flltro esta bloqueado
por polvo fino.
1) Examine las entradas de la
boquilla, de la manguera y del
envase para saber si hay una
obstrucci6n. Saque el filtro y
limpielo. O instale un filtro nuevo.
]!
Como
ANTES DE
corregir
I
I
ii
1
V ..................
-
_
12
...................
13
VHB307WM Lista De Repuestos
Key Numero
Numero Del Dibujo
Descripcibn
1
VH57PF.A0.01
Manija
2
VH57PF,10.00
Ensamblaje
3
TVQTZS.05.YZ
Jaula
4
TVQTZS.05.YZ
5
VH57PF.20.01
6
Cantidad
Key Numerc
Numero
Del Dibujo
Cantidad
Descripcibn
1
12
FV9502.07.00
Filtro
1
13
FV7723.01.00
B_uilla ParaSuperficies
Mtiltip_s
1
1
14
FV7774.01.00
B0quillaDe UtilidadC0ncepilk
1
Flota
1
t5
FV7773.01.00
Cepillo
1
Envase
1
16
FV7772.02.01
Herramienta para ranuras
1
FV9202.02.01
Gancho
1
17
FV7902.01.01
Tubos
3
7
TVQTXK.12.01
Portal Del Sopladort
1
18
FV9620.01.00
Bolsa Para Polvo
1
8
TVQTGL.20.00
Rueda Trasera
2
19
FV7822.09.00
Manguera
1
9
VH57PF.20.02
Base
1
20
VH57BZ.20.60.02
Manual
Del Usuario
1
10
TVQTJL.12.00
Ruedecilla
2
21
FV9201.02.01
Soporte
De Montaje
1
11
FV9642.02,00
Filtro
1
De Motor
De Tela
12
De Esponja
Para Polvo
De Extensibn
1