1
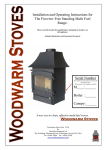
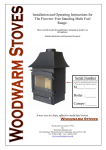
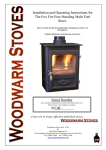
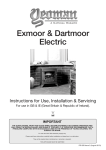
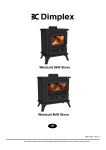
Dovre 250 Cleanburn
Cast Iron Stove
Installation and Operating Manual
PM150 Issue 1 (May 2005)
Craftsmanship in Cast Iron
Dovre 250 Cleanburn Cast Iron Stove
Installation and Operating Manual
These instructions should be read carefully and saved by the user for future reference.
Contents
Introduction to you new Dovre 2505:
Introduction to your Dovre Stove
2
We would like to thank you for purchasing a Dovre stove and trust that
it will provide you with many years of useful service.
Unpacking your Dovre 250
3
Getting the best from your Dovre 250
3
Location for the installation
4
Assembly
3-4
Installation
4
Chimney Connections
4-5
Operating your Dovre 250
5-7
Servicing and Maintenance
7
Warranty Details
7
Guide to Woodburning
8
Troubleshooting
8
At Dovre we have been producing cast iron stoves for over 60 years and
we strive to ensure that our products meet with the highest level of
performance, efficiency, safety and quality. So much so that we
guarantee all Dovre body castings for 5 years.
Owning a stove might be a new experience for you. Therefore, to ensure
that you get the best performance from your new Dovre, do please take
a little time to read through this manual.
The 250CB is a specially designed stove for burning wood and most
smokeless fuels. It is essential that when wood is used, it is well seasoned
for a minimum 2 years and has a maximum moisture content of 20%. If
unseasoned wood is used, heat outputs will not be obtained and serious
damage will occur in the chimney and flueways.
The dimensions of your new stove are illustrated in Fig 1. Be careful to
ensure that your fireplace is going to accept the appliance and that you
have allowed for at least 300mm (12”) of hearth space in front of the
stove.
WE RECOMMEND THAT YOUR DOVRE IS FITTED BY AN
EXPERIENCED INSTALLER ACCUSTOMED TO THE INSTALLATION OF
SOLID FUEL BURNING APPLIANCES.
365
335
450
If you are unsure about any aspect of the installation or operation
procedures, your Dovre dealer will be pleased to help.
410 to centre
of REAR flue
It is important that the Installation is carried out in compliance with
current Building Regulations.
550
SAFETY
110
435
405
A fireguard is not provided with this stove. However, it is
recommended that one compliant with BS 6539 or BS
6778 is fitted, particularly if the stove is to be used in the
presence of young children, the elderly and infirm.
455
Fig 1 - STOVE DIMENSIONS
Width
455mm
Height
Depth
550mm 405mm
Weight
Heat output
Flue diameter
79kg
6kW
125mm
2
Unpacking your Dovre 250
Location for Installation
Your Dovre 250 is constructed from high-grade quality cast iron and is
therefore not light in weight. We recommend that 2 people are
available to handle the stove.
The location in which your stove is to be installed will of course
depend on the chimney available. If you do not have a chimney, there
are a number of prefabricated flue systems available and your Dovre
dealer will be pleased to offer guidance on the subject.
Care should be taken not to break the glass whilst handling the
appliance.
Building Regulations must be observed when considering the location
of your Dovre 250. More precise information can be found later in this
manual but it is important to ensure that a suitable hearth, complying
with Building Regulations, is available.
Before taking your Dovre to its installation location, remove the stove
from its outer packing and timber pallet. Stand the stove in the upright
position, protecting carpets or other floor coverings with rigid
cardboard. The stove carton is ideal for this purpose.
NEVER ALLOW A MECHANICAL AIR EXTRACTOR TO BE USED IN THE
ROOM OR ADJOINING ROOMS AS THIS COULD CAUSE THE
APPLIANCE TO EMIT SMOKE INTO THE ROOM.
Locate the small green quality control slip and retain for future
reference.
Assembly
Getting the best from your Dovre 250
FITTING THE FLUE CONNECTOR
There are 3 golden rules to follow:
If your Dovre 250 is to be connected to the chimney via the top flue
connector, proceed as follows:
1. USE GOOD FUEL - NEVER BURN UNSEASONED OR DAMP WOOD
2. YOU MUST HAVE A GOOD CHIMNEY DRAUGHT - NEVER
USE YOUR DOVRE STOVE WITH A POOR CHIMNEY
3. AVOID OPERATING THE STOVE FOR LONG PERIODS ON
CONTINUOUS LOW TEMPERATURE
•
Apply a thin and even coat of fire cement to the flanges on the
flue spigot and the circular flue blanking plate.
•
Attach the flue spigot to the top opening in the stove, using the
2 nuts and bolts (M8 x 25CSK slotted) supplied.
•
Attach the circular flue blanking plate to the rear opening of the
stove using the retaining bar and (M6 x 25) bolt supplied.
•
Ensure that both flue spigot and blanking plate are securely
tightened and correctly sealed with the fire cement.
USING SMOKELESS FUELS
Your Dovre 250 is capable of burning a wide variety of smokeless fuels
but the availability of different fuels varies from area to area. Seek
advice from your local fuel merchant and try out different fuels by
buying in small quantities until you find the fuel best suited to your
Dovre.
If your Dovre 250 is to be connected to the chimney via the rear flue
connector, proceed as follows.
THE USE OF BITUMINOUS COAL AND PETROLEUM BASED FUELS IS
PROHIBITED.
TOP BAFFLE
PLATE
FIREBRICK
REAR BURN PLATE
OPERATING TOOL
LOG GUARD
ASHPAN
Fig 2 - STOVE COMPONENTS
3
•
Apply a thin and even coat of fire cement to the flanges on the
flue spigot and the circular flue blanking plate.
•
Attach the flue spigot to the rear opening in the stove, using the
2 nuts and bolts (M8 x 25CSK slotted) supplied.
•
Attach the circular flue blanking plate to the top opening of the
stove using the retaining bar and (M6 x 25) bolt supplied.
•
Ensure that both flue spigot and blanking plate are securely
tightened and correctly sealed with the fire cement.
Installation
Chimney Connections
HEARTH & CLEARANCE REQUIREMENTS
CONNECTION FROM THE TOP OF THE APPLIANCE
INSTALLATION AGAINST A WALL
A non-combustible register plate should be fitted to the lower section
of the chimney. (See Fig 4).
For installation as a free standing unit e.g. against a wall. (See Fig 3).
125 mm diameter 316 grade 1mm thick stainless steel flue pipe or
vitreous enamel pipe suitable for use with solid fuel appliances should
be used to connect the top spigot of the stove to the chimney or
chimney liner. (See Fig 4). All connecting joints must be female
pointing up and joints should be properly sealed with fire cement. If
the chimney is not immediately above the stove, off set bends of either
30 degree or 15 degree angles may be used. (See Fig 5). Try to avoid
long runs of pipe that are not vertical.
The minimum constructional hearth required is 840mm (33”) x
840mm (33”)and the unit must not be placed less than 150mm (6”)
from the back and sides of the hearth. The wall must be constructed
from non-combustible materials and must be a minimum height of
1200mm (48”). The required wall thickness will depend on the
distance between the back of the stove and the wall (A). If this
distance is less than 50mm (2”), the wall should be at least 200mm
(8”) thick. If the distance from the back of the stove to the wall is
between 50mm (2”) and 150mm (6”), the wall thickness must be at
least 75mm (3”) thick. If single wall flue pipe is attached to the
appliance, the pipe should be a minimum of three times its diameter
from any combustible materials.
CONNECTION FROM THE REAR OF THE APPLIANCE
A non-combustible register plate should be fitted to the lower section
of the chimney. (See Fig 6).
INSTALLATION IN A FIREPLACE RECESS
150 mm diameter 316 grade 1mm thick stainless steel flue pipe or
vitreous enamel pipe suitable for use with solid fuel appliances should
be used to connect the rear spigot of the stove to the chimney or
chimney liner. All connecting joints must be female pointing up and
joints should be properly sealed with fire cement. If the chimney is not
immediately above the stove, off set bends of either 30 degree or 15
degree angles may be used. Try to avoid long runs of pipe that are not
vertical. Start by connecting a 90-degree or 45 degree “T” section to
the flue spigot at the rear of the stove.
For installation in an fireplace recess or inglenook:
The distance the hearth must protrude in front of the appliance should
be a minimum of 300mm (12”).
The minimum thickness of hearth (B) should be 125mm (5”) and this
may include the thickness of a concrete floor including hearth tiles. If a
hearth is constructed and / or supported on timber, the timber should
be at least 250mm (10”) away from the top surface of the hearth.
NEVER INSTALL HORIZONTAL PIPE RUNS OVER 150mm (6”)
DIRECTLY OFF THE BACK OF THE STOVE.
If a timber mantel is installed, the distance from the stove body and /
or any single skin flue pipe, if attached to the top of the stove, to the
mantel must be a minimum of 450mm (18”).
Fig 3.
Fig 4.
4
The Chimney
Lining the chimney with a suitable 150mm (6”) diameter liner for
wood burning and solid fuel burning applications, will improve the
performance and efficiency of the stove.
ACCESS FOR SWEEPING CHIMNEY
The chimney should be checked and swept at least once a year and it
is important to allow provision for gaining access to the chimney. On
masonry chimneys, a standard soot door, obtainable from your Dovre
dealer, can be used. On other factory made chimneys, it is important
to ensure an access cleaning door is provided. It is advisable to ensure
that the connecting flue pipe to the chimney has an access door fitted.
An access door close to the appliance will also facilitate the use of a
chimney vacuum cleaner to ensure clean appliance maintenance.
THE ADVANTAGES OF A LINED CHIMNEY
•
With most unlined chimneys, the cross-section of the chimney is
excessive as in the case of large old inglenook fireplaces. Because
of the large volume of cold air in large chimneys, it is difficult for
the flue gases to rise easily through the chimney. This causes the
unburned volatile in the smoke to adhere to the chimney walls.
•
The inner surfaces of some unlined chimneys are rough with
jagged edges causing difficulties in obtaining a good draught.
•
Unlined chimneys are often defective with cracks leaking fumes
into other parts of the house.
•
Larger, unlined chimneys, being cold, encourage the formation of
tars (wood smoke condensation), which can penetrate the walls of
the chimney leaving unpleasant black stains on internal plastered
walls.
AIR SUPPLY
Your Dovre 250 requires an air supply to the room. The air vent
should have a minimum air flow area of 110 sq.cm (17 sq inches).
THE CHIMNEY
(Minimum height requirement 4.5 metres (16 ft.)
This is one of the most important aspects of the installation of your
Dovre stove. It is important to ensure the following.
CHIMNEY DRAUGHT
PREFABRICATED CHIMNEY SYSTEMS
Draught Requirement 1.5 to 2mm Wg.
If a masonry chimney is not available, there are a number of
proprietary brand prefabricated flue systems available. Your Dovre
Dealer will be pleased to offer information and advise on this subject.
Too much draught will cause excessive heat outputs and fuel
consumption. Inadequate draught may cause smoke emission to the
room and poor combustion resulting in a build up of tar and
creosote deposits on the glass, inside walls of the appliance and the
chimney.
CHIMNEY TERMINAL
Down draught problems may be experienced if the top of the
chimney is close to adjacent taller trees and / or buildings. Your Dovre
Dealer will be pleased to advise on suitable anti down draught cowls
should these conditions prevail.
For existing chimneys, always ensure that the chimney is checked and
swept prior to the installation taking place.
Provided that your Dovre 250 stove has been installed in accordance
with the above installation procedures, you should now be ready to
‘light up’. (See page 6 to light your Dovre 250).
MASONRY CHIMNEYS
The chimney must be sound, in good condition and must not be
shared with another appliance. In the event of the chimney being
unlined, it is advisable to have a survey carried out to check for the
presence of leakage and other defects.
Fig 5.
Fig 4.
5
Operating your Dovre 250
TO LIGHT YOUR DOVRE 250
If your Dovre 250 is finished in enamel, care should be taken to avoid
knocks as the enamel surface could “chip”.
Non-enamelled Dovre stoves have been treated with a high
temperature resistant protective paint, which produces an odour when
the stove is new. We recommend that you leave a window open
during the first few hours of use while the paint is curing.
•
Open the lower air control wheel.
•
If burning wood, open the top air vent fully by sliding the lever
to the left. (NOTE THE TOP AIR VENT SHOULD MOSTLY BE
CLOSED WHEN BURNING SMOKELESS SOLID FUEL).
•
Lay rolled up newspapers and small sections of wood
(kindling wood) on the grate. Light the paper with a long taper. If
kindling wood is not available, firelighters may be used with small
pieces of split wood laid on top of the firelighters.
•
Close the door but do not fully lock at this stage. The fire should
now start to burn fiercely and brightly. If this does not happen,
check for chimney blockage.
CONTROLLING YOUR DOVRE 250
WOODBURNING
There are two fundamental air controls on your Dovre 250, the lower
spin wheel air control and the top lever air control.
As soon as the wood is burning with a well-established heat, add 2 or
3 logs or a small quantity of smokeless fuel and close the door tightly.
When using your Dovre as a woodburner, the top air control should be
generally left in the fully open position. If the top air control is left for
long periods in the closed position, the air wash system will not
function and the glass will quickly discolour. The lower air control
should only be opened when first lighting or re-fuelling with wood.
After a further couple of minutes, if using wood, fully close the lower
air control and if using solid fuel, close the lower air control to the
almost fully closed position. For solid fuel burning, the lower air control
is used to control the burning rate of the fuel. (See left “Controlling
your Dovre 250”).
Choose well seasoned hardwood logs 300mm (12”) in length and no
greater than 75mm-100mm (3” to 4”) in diameter, and a minimum of
two years old.
REMEMBER: FOR WOODBURNING - OPERATE YOUR DOVRE WITH
THE BOTTOM AIR CONTROL CLOSED.
REMEMBER: THE DRYER THE WOOD THE BETTER
CONTROL THE BURNING RATE BY ADJUSTING THE TOP
AIR CONTROL.
WET UNSEASONED WOOD PRODUCES CREOSOTE AND TAR IN
THE CHIMNEY AND CAUSES RAPID BLACKENING OF THE GLASS
DOOR.
FOR SMOKELESS FUEL BURNING - OPERATE YOUR DOVRE WITH
THE TOP AIR CONTROL MOSTLY CLOSED. CONTROL THE
BURNING RATE BY ADJUSTING THE LOWER AIR CONTROL.
SMOKELESS FUEL BURNING
When using your Dovre for burning smokeless fuel, the top air control
should always be closed (lever pushed fully to the right) a couple of
minutes after re-fuelling. The lower air control should be opened when
first lighting or re-fuelling with solid fuel. The heat output and burning
rate of solid fuel only is regulated by opening and closing the lower air
control.
Note: Try to avoid operating your Dovre 250 with the lower air
control fully open for long periods of time. Operating your stove in this
manner causes the stove to burn excessive amounts of fuel and could
lead to premature wear on the grates, fire bricks and baffle plate.
OVERNIGHT BURNING
WOOD BURNING
Before retiring to bed:
•
Ensure that there is a good hot base to your fire and fully load the
fire with hardwood logs, ideally 300mm (12”) long with a
maximum diameter of 100mm (4”).
•
Open the lower and upper air controls to allow the fire the fire to
burn fiercely. After 2 or 3 minutes, close the lower air control fully
and close the upper air control to the “almost” fully closed
position.
If you require your stove to be used the following morning, carry out
the following procedure:
6
•
Open the lower and upper air controls.
•
Using a poker, lightly rake the ashes in the stove, bringing any hot
embers to the centre of the grate.
•
Place small sections of wood on the grate and close the stove door
to the “almost” closed position.
•
When the fire becomes established, add more fully and proceed as
above (See page 6 “To light your Dovre 250”).
DAILY MAINTENANCE
SMOKELESS FUEL BURNING
•
Empty the ash pan
•
Check and clean light stains from the glass. Wipe the door glass
clean using a cloth and Stovax Glass Cleaner.
WEEKLY MAINTENANCE
Before retiring to bed:
•
•
Empty the ashtray.
•
Load the firebox with smokeless fuel. Do not over-load. The top of
the fuel bed should be below the front fuel retainer.
•
The fibre door gaskets around the inside edge of the doors
provide an air tight seal. Check these regularly and remove any ash
or wood particles gently with a soft brush.
ANNUAL MAINTENANCE
At the end of the heating season, thoroughly clean the inside of the
stove and adjoining flue pipe.
Fully open the lower control. After 2 or 3 minutes, close the
lower air control fully. Ensure that the top air control is fully
closed.
Arrange for your chimney sweep to inspect and clean the chimney.
If you require your stove to be used the following morning, carry out the
following procedure:
Carry out the following checks and procedures:
•
Replace the door and glass gaskets
•
Open the lower air control.
•
Check and replace any worn fire bricks as necessary
•
Empty the ash tray.
•
Check and replace the cast iron grate if necessary
•
Load the firebox with smokeless fuel. Do not over-load. The top of
the fuel bed should be below the front fuel retainer.
•
Check, clean and replace the top baffle plate if necessary
•
Close the door securely and close the lower air control to the
required position.
STOVE BODY
To clean enamelled surfaces use a soft dry cloth. For painted surfaces,
the stove body can be repainted or touched up using Stovax
Thermolac stove paint.
Care and Maintenance
GLASS
You may notice a build up of deposits on your glass, particularly if the
stove has been used for long periods at low temperatures. A hot brisk
fire will normally cure this problem, but if the problem persists, check
the quality of your wood and/or chimney. It is always recommended to
fire your stove hard after an overnight burn. From time to time, the
glass can be cleaned using Stovax stove glass cleaner. Never use
abrasive pads, or clean the glass when hot.
CAUTION: IF THE APPLIANCE EMITS SMOKE INTO YOUR ROOM, IT
IS NOT THE FAULT OF THE APPLIANCE. THERE WILL EITHER BE A
STRUCTURAL FAULT OR DESIGN FAULT IN THE CHIMNEY OR LACK
OF VENTILATION IN THE ROOM.
NEVER LET THE ASHPAN OVERFILL
There should always be a good air space between the top of the
ashpan and the underside of the grate. Failure to do this will cause
premature deterioration of the grate and will make it difficult to empty
the ashpan. Your Dovre 250MFR is equipped with a special grate
mechanism which allows ashes to be riddled into the ashpan whilst the
stove door is closed. The riddling control lever is situated on the lefthand side of the front of the stove above the ashpan door. Gently
move the lever backwards and forwards to clear the grate of ash.
To remove the ashpan open the door and carefully remove the ashpan
using the handle tool provided. Ashes must be disposed of carefully
and it is a good idea to purchase a Stovax Ash Caddy.
After replacing the empty ashpan in the ashpan compartment, ensure
the ashpan door is fully closed.
7
Managing your wood supplies
Five Year Warranty
If you are buying wood from a log merchant, try to ensure that the
wood has been seasoned for at least 2 years. 3 years is even better. The
wood should preferably be cut to lengths of 300mm (12”) and split to
a width of between 50mm and 100mm (2”- 4”).
If the castings on this appliance should prove to be defective within
five years of the purchase date, the faulty castings will be replaced free
of charge, subject to the following conditions:
Store the wood under cover to protect from rain but ideally the wood
should be stored in a place where the wind will be allowed to freely
ventilate the sack.
Try to obtain hardwoods such as oak, elm, beech or ash. These woods
will provide more calorific value per cubic metre than softwoods.
1) The purchaser shall complete the registration card enclosed and
return it within seven days of purchase. Failure to return the
registration card could result in delays in processing any claims.
2) The appliance shall have been installed in compliance with the
installation instructions and current Building Regulations.
3) The appliance shall not have been used for the burning of
unseasoned wood and/or prohibited fuels.
Trouble Shooting
SMOKE EMISSION
If smoke occurs when the stove door is opened, it is a sign that the flue
draught is inadequate. Mostly, burning unseasoned wood causes this
condition and it usually indicates that the combustion temperatures
are too low. To overcome a weak draught, ensure your wood is dry
and build a hot fire, leaving both air controls in the fully open position.
If the problem persists, arrange for your chimney to be expertly
checked for design and contstruction faults. In some instances, down
draught conditions will exist and it may be necessary to fit an anti
down draught device to the top of the chimney.
4) This warranty only applies to the appliance body castings and does
not include renewable components including grates, ashpans, and
glass, seals, baffle plates and chips on enamel castings.
5) This warranty does not cover site visits and any claims should be
notified to your dealer.
This warranty does not affect your Statutory Rights.
FIRE DOES NOT BURN FOR LONG PERIODS
Wood can contain a number of variable factors related to species,
weight, age and moisture content. It is therefore difficult to be precise
with regards to the length of burn time.
If it is thought that the fuel is burning too quickly:•
The diameter of the logs is too small.
•
If softwoods are used, change to using hardwoods.
•
Excessive chimney draught. If so, fit a draught stabiliser.
•
Worn out door and glass seals need replacing.
Always try to avoid running your stove for long periods of time with
the air controls closed. This point is particularly important if the wood
is not well seasoned. Failure to do so, will cause the glass, stove walls,
and chimney to become soiled with tar deposits.
United Kingdom and Eire distributors for Dovre:
Stovax Limited, Falcon Road, Sowton Industrial Estate, Exeter, Devon, England, EX2 7LF.
Telephone: (01392) 474011 Fax: (01392) 219932
E-mail: [email protected]
Internet: www.dovre.co.uk