1
|
RISK OF ELECTRIC SHOCK
DO NOT OPEN
CAUTION: TO REDUCE THE RISK OF ELECTRIC SHOCK,
DO NOT REMOVE COVER (OR BACK).
NO USER-SERVICEABLE
PARTS INSIDE.
REFER SERVICING TO QUALIFIED SERVICE PERSONNEl...
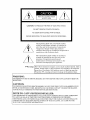
The lightning flash with arrowhead
symbol,
within an equilateral
triangle, is intended to
alert the user to the presence of uninsulated
"dangerous voltage" within the product's
enclosure that may be of sufficient magnitude
constitute a risk of electric shock.
to
The exclamation
point within an equilaterali
triangle is intended to alert the user to the
presence of important
operating and
maintenance
(servicing) instructions
in the
literature
accompanying
the appliance.
"Warning:
Don't leave stationary
images, such as stock market reports, video
games, station logos, or the Projection T_rs displays, on-screen for
more than 10 minutes. Still patterns
such as these can scar the
Projection TV, causing permanent
damage to the picture tctbes.
WARNING:
TO PREVENT
MOISTURE.
FIRE OR SHOCK
HAZARD,
DO NOT EXPOSE
THIS APPLI._ICE
TO RAIN OR
CAUTION:
TO PREVENT ELECTRIC SHOCK HAZARD, DO NOT USE THIS UNIT'S (POLARIZED)PLUG
WITH AN EXTENSION
CORD, RECEPTACLE
OR OTHER OUTLET UNLESS THE BIM_DES
CtLNTBE FULLY INSERTED
TO PREVENT BLADE EXPOSURE.
NOTE
TO CATV SYSTEM
INSTALLER:
THIS REMINDER
IS PROVIDED TO CALL THE CATV SYSTEM INSTALLER'S
ATTENTION
TO ARTICLE 820-40 OF THE NEC THAT PROVIDES GUIDELINES
FOR FROPER
GROUNDING
AND, IN PARTICULAR,
SPECIFIES
THAT THE CABLE GROUND SHALL BE
CONNECTED
TO THE GROUNDING
SYSTEM OF THE BUILDING, AS CLOSE TO THE
POINT OF CABLE ENTRY AS PRACTICAL.
_
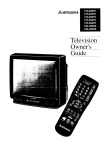
Table
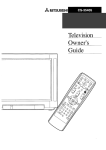
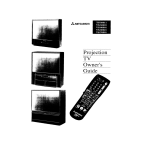
MITSUBISHI
OWNER'S
of Contents
Chapter
1: Getting
GUIDE
to Know Your
Projection
TV ....................................
1
Overview
of the Control Panel ................................................................
2
Overview
of the Remote Control ..............................................................
5
Chapter
Getting
ready to use the remote control ...........................................
5
Remote
control buttons
7
2: Operating
Getting
Your
and functions
Projection
...............................................
TV ..............................................
Started .....................................................................................
13
14
Using the remote control to operate VCRs, cable boxes
and other equipment ....................................................................
15
Turning
20
the Projection
Selecting
the input
Changing
channels
Understanding
Memorizing
TV on/off .....................................................
source ................................................................
21
...........................................................................
22
the ViewPoint
channels
III on-screen
menus
.......................
.......................................................................
25
26
Setting
the clock ...............................................................................
28
Adding
and deleting
31
Setting
the A/V Network
Adjusting
channels
..................................................................
the color alignment
Selecting
the menu
Renaming
.........................................................
32
..........................................................
type ...................................................................
34
36
the inputs ........................................................................
38
Naming
the channels
.......................................................................
39
Locking
A/V functions
......................................................................
40
.........................................................................
41
.......................................................................
44
Adjusting
the sound
Adjusting
the picture
Using the closed caption
Using the Advanced
Setting
the timer
Using the parental
decoder
Features
.......................................................
................................................................
48
..............................................................................
49
lock .....................................................................
Using
Super
Quick View if you haven't
Using
Super
Quick View if you've
subscribed
subscribed
50
to StarSight
to StarSight
46
.. 54
.......... 56
Selecting
an advanced
PIP function
................................................
58
Resetting
the sound and the picture
...............................................
59
Table
of Contents
Chapter
3: Using
(cont.)
the Special
Understanding
the On-Screen
Using the Off-Timer
Setting
Using
Changing
the off-timer
Picture-in-Picture
the picture
63
64
................................................
65
(PIP) Modes .........................
66
67
68
and sound of the PIP image
....................................................................
70
Moving the PIP image .......................................................................
71
Freezing
72
the PIP image ....................................................................
Using the Replay
feature
feature
Using the Active A/V Network
4: Troubleshooting
Cleaning
............................................................
.................................................................
Feature
.................................................
........................................................................
..................................................................................................
73
74
75
77
81
Caution
and Care
..................................................................................
82
Calling
for Service
.................................................................................
83
Appendix:
Parental
Procedure
for Bypassing
the
Lock .................................................................................................
86
..................................................................................................................
Warranty
ii
62
in the PIP image ..........................................
Using the Snap-shot
Index
...............................................
the PIP image ..................................................................
Exchanging
the picture
and the main image
Chapter
Displays
61
..........................................................................
or canceling
the Advanced
Activating
.....................................................
................................................................................
the off-timer
Changing
Features
..........................................................................
Table of Contents
Inside
87
Back
Cover
_
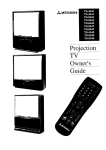
CHAPTER
Getting
toONE
Know
Your Projection
Now that you have connected your Projection
the StarSight
service*, it's time to understand
your Mitsubishi
Projection TV offers.
_Important:
TV
TV and subscribed
to
1;he exciting features
If you have not connected your Projection TV and subscribed
StarSight,
please see Booklet
#1, "Mitsubishi
Installation
Setup Guide" before reading this owner's guide.
to
and
This chapter will introduce you to the range of options available
when using the buttons on the remote control or on the control
panel of"the Projection TV. You'll find information
in these two
sections:
•
Overview
of the
Control
•
Overview
of the Remote
Panel
Control
*"StarSight"
is a subscription
service offered by Star Sight Telecast, Inc.,
not a service of Mitsubishi
Consumer
Electronics
Amer!Lca, Inc. You must
obtain and maintain
a subscription
from StarSight
Telecast to use the
StarSight
features of your Projection
TV. You must be able to receive a
local PBS station in order to receive the StarSight
transmission,
and your
StarSight
features will not work if StarSight
Telecast is not transmitting
a
signal.
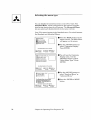
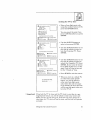
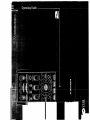
Overview
of the
S-VIDEO
VIDEO
TS-5087,
TS-5089
VS-6085,
VS-6087,
VS-8087
VS-7085,
VS-7087,
Panel
L-AUDIO-R
(9
power/program
This indicator
Projection TV
the Projection
is set and the
®
power button (POWER)
Use to turn the Projection
®
2
Control
timer indicator
lights up in green when you turn the
on; it lights up in red when the timer is set and
TV's power is off; it lights in orange if the timer
Projection TV's power is on.
_
on or off.
S-VIDEO input terminal
Use to connect the S-video output of a VCR, laserdisc player, or
camcorder to the Projection TV. If you connect an S-video cable
to this terminal,
the video input next to it cannot be used.
Chapter
1: Getting
to Know Your TV
®
®
video input terminal
Use to connect the video output from a standard
another component to the Projection TV.
audio input terminals
Use to connect the audio output
equipment.
from a VCR or other
®
input button
(INPUT)
Use to select the input source you wish to watch:
• Antenna A,
• Antenna B, or
• Input 1, 2, or 3.
®
volume
controls
(VOLUME)
Press the • button to turn up the volume
turn down the volume.
®
®
VCR or
channel
controls
(CHANNEL)
Use the • button to switch to a channel
and the • button to switch to a channel
and the • button
to
with a higher number
with a lower number.
A/V reset button (A/V RESET)
Press to reset all audio and video functions
to their
normal
level or setting except for volume, the "Listen to:" function
(Stereo/SAP/Mono),
speaker (Internal/Internal
Center Channel!
External),
monitor out (variable/fixed),
and closed captioning.
®
menu button (MENU)
Use this button to display the on-screen menu system,
contains additional instructions
for special functions.
which
©
cancel button (CANCEL)
This button is used to cancel a channel nuraber, to clear a
channel programmed
into super quick view memory, and to
clear the settings of some on-screen menus
@
enter button
(ENTER)
Use this button after selecting a channel number or after
selecting an item from the on-screen menu system. It is also
used with the PIP button.
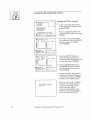
Overview
of the Control
Panel
3
Overview
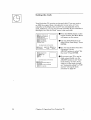
@
_Important:
of the
Control
Panel
(cont,.)
adjust buttons
(ADJUST A T)
After selecting an audio or video function, use these buttons to
adjust it. These buttons can be used to:
- increase or decrease the function (e.g., color),
- shift from one end of a scale to the other (e.g., balance), or
- change a setting (e.g., stereo).
Also use these buttons to select items from the on-screen menu.
These buttons cannot be used to adjust audio/video settings when
you subscribe to StarSight.
If you subscribe to StarSight, use the
left/right buttons on the remote to adjust audioA_ideo settings.
@
audio and video controls
(AUDIO, VIDEO)
Use these buttons to select audio and video ihnctions thai; you
want to adjust. To select an audio or video function, repeatedly
press the AUDIO button or VIDEO button, lifter you have
selected a function, use the ADJUST buttons tc adjust it.
audio
function
button
(AUDIO
"- ) .... Use to select one
of the following audio functions:
stereo/SAP/mono,
bass,
treble,
balance,
surround off/simulate/hall,
speaker internal/internal
center
monitor out variable/fixed.
video
function
button
(VIDEO
channel!external,
-41) --- Use to select one of
the following video functions:
tint,
color,
contrast,
brightness,
sharpness,
color temperature
high/middle/low,
closed captioning.
@
or
or
timer reset button
(TIMER RESET)
Use this button to reset the clock time and to erase any timer
settings. The Projection TV will turn off when you press this
button.
test buttons
The ENTER, ADJUST, AUDIO, and VIDEO buttons can be
used to test and adjust the alignment
of you:r Projection TV's
picture tubes. See page 34 for more information.
4
Chapter
1: Getting
to Know Your TV
Overview
of the Remote
Control
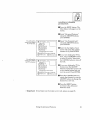
Getting
ready
to use
installing
the batteries
the remote
control
0
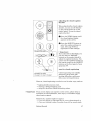
Take the box containing
packing bag.
0
Remove the back cover of the remote control by pushing
in the direction of the arrow and lifting off the cover.
0
Load the batteries
as indicated in the illustration,
making
that they are positioned correctly (+ to +, and - to - ).
O
Replace
four AA size batteries
the back cover of the remote
from the
the tab
sure
control.
@ @
O
O
@ @
For best results,
Overview
use Duracell
of the Remote
AA (MN1500)
Control
batteries.
5
Getting
some
ready
to use
the remote
(cont.)
do's and don'ts
To ensure that your remote
follow these guidelines:
• Don't press two
are specifically
• Don't allow the
• Avoid dropping
• When cleaning
chemicals. Use
general
control
wi]l continue
Be within
O
Point the tip of the remote
20 feet of the desired
control
toward
the equipment.
• Don't use a new battery with an old one.
• Don't heat, take apart, or throw batteries
into a fire.
for using
1: Getting
button
TV, VCR, or
equipment.
of buttons.
Chapter
the appropriate
the Projection
or sequence
guidelines
properly,
instructions
O
Press
working
or more buttons at the same time, unless you
instructed
to do so in this owner's guide.
remote control to get wet or become heated.
the remote control on a hard ,mrface.
the remote control, don't use any harsh
only a soft, slightly moistened cloth.
When using the remote control to operate
cable box, follow these procedures:
6
control
batteries
to Know Your TV
Remote
control
buttons
and. functions
This section provides you with an overview
buttons and the features that they control.
of tlhe remote
control's
This section does not provide detailed explanations
on the use of
these buttons. To determine
which buttons are used with a
particular
feature, refer to the instructions
for that feature.
The instructions
"Operating
Features."
Overview
for individual
Your Projection
of the Remote
features
are found in Chapter
TV," and Chapter
Control
2,
3, "Using the Special
7
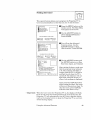
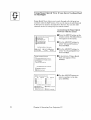
Remote
control
[Z_
buttons
L-2
(Z3
AUX
•
@
REC
iZ_
_
VCR-A
and functions
r-_
CD
STOP
VCR÷B
PAUSE
©C2_®
REW
PLAY
FF
®
@
®
Q®®d5
CHANNE
o_©®®
INDEX
SWAPJ
_ SOURCE
MITSUBISHI
8
Chapter
1: Getting
to Know Your TV
(cont.)
(_)select
@ input button
(INPUT')
Use to select the input source you wish to
watch:
• Antenna A,
• Antenna B, or
• Input 1, 2, or 3.
buttons
Your remote control has four layers: the
TV layer, the VCR-A layer, the VCR-B
layer, and the AUX layer. You can set up
each of these layers to operate a
different piece of equipment.
Use the four
buttons across the top of the remote to
select, the layer you want to set up or use.
When you press a button on the remote,
the lights above the select buttons will
indicate the layer you are using.
(_) channel control
(CHANNEL)
Press the top part of the button to change
to a channel with a higher number; press
the bottom part to change to a channel
with a lower number.
@ VCR buttons
Use t:hese buttons to control most
Mitsubishi
VCRs, or set up the remote to
use them to control other brands of VCRs.
The PLAY button is also used with the
Active A/V Network Feature (page 75).
@ power
button
Use to turn the
When you turn
power indicator
@ enter button (ENTER / EXCH)
Use this button after selecting a channel
number, after selecting an item from
the on-screen menu system, or with the
picture-in-picture
mode.
@adjust
buttons
(A, T,4,, b )
After selecting an audio or video function,
use these buttons to adjust it. Also use
these with the picture-in-picture
mode, and
to select items in the menus
(POWER)
Projection TV on or off.
the Projection TV on, the
will light in green.
@ mute control
(MUTE)
Use to turn the sound off completely
restore it to its original volume.
or to
@ super quick view button
(SQV)
Press to view channels you have
programmed
into super quick view
memory.
@ quick view button
(QV)
Press this button to instantly
switch to the
channel that you designated
as the "quick
view" channel. If you are watching the
quick view channel, you will switch to the
last channel viewed.
(_) light button
Use to light up the remote
@ cancel button (CANCEL)
This button is used to cance] a channel
number, to clear a channel programmed
into super quick view memory, and to ,clear
the settings of some on--screen menus.
@ menu button (MENU)
Use this button to display the on-screen
menu system, which contains additional
instructions
for special functions.
(_) display button (DISPLAY)
Use to view an on-screen summary of the
current settings for the Projection TV or
cable functions and the diisp:[ay related to
Extended Data Services (XI)S).
(for 3 seconds).
@ volume
control
(VOLUME)
Press the top part of the button to turn up
the w_lume; press the bottom part of the
button to turn down the volume.
Overview
@home
button (HOME)
Press to return to regular' TV viewing
from the on-screen menus and to turn off
of the Remote
the on-screen
Control
displays.
9
Remote
control
buttons
and
functions
(cont.)
@
©
@
@
@
@
MITSUBISHI
10
Chapter
1: Getting
to Know Your TV
(_)audio
and video controls
Repeatedly
press the AUDIO button
VIDEO button to select one of the
• swap button (SWAP) -- Press to
exchange the sound between the main
image and the reduced PIP image.
• source
button
(SOURCE)
-- Press
repeatedly
to switch the source of the
reduced PIP image between the TV and
the external inputs.
• pause button
(PAUSE)
-- Press to
freeze the reduced PIP image, to return
to a "live" image, and to use the
Snap-shot
and Replay functions.
• enter button
(ENTER / EXCH) -Press to exchange the pictures of the PIP
image and the main image.
• adjust buttons
(A, V,4, • ) -- Press to
move the PIP image on-screen.
or
functions listed below. After you select the
function, use the ADJUST buttons to
adjust it.
• audio function
button (AUDIO)
- stereo/SAP/mono
- bass
- treble
- balance
- surround off/simulate/hall
- speaker internal/internal
channel/external
- monitor out variable/fixed
• video function
- tint
- color
- contrast
- [)rightness
sharpness
- color temperature
- closed captioning
button
center
(VIDEO)
(_ StarSight
controls
Use to control the StarSight
• guide button
(GUIDE) -- Press to see
the Grid Guide or Channel Guide.
• theme button
(THEME)
-- Press to see
the Theme Guide.
• list button
ILIST) ---Press to see a list
of programs _o record.
• information
button
(INFO) -- Press to
see informatmn
about a selected program.
• day button
(DAY) -- Press to mow_
forward one day or move back one day in
the StarSight guides.
• page button
(PAGE) -- Press to move
forward or back one page in the
StarSight
guides.
• adjust buttons
(A, •,4, • ) -- Press to
move the cursor up, down, left, Or _[ght.
high/middle/low
(_number
buttons
(0-9)
Use to select a channel number
a parental lock code.
or to enter
(_) off-timer
button (OFF-T)
Use to program the Projection TV to turn
off automatically
at a later time.
picture-in-picture
controls
Use to control the special picture-inpicture (PIP) function. (See pages 66 - 74.)
• PIP button (PIP) -- Press to turn on
the reduced PIP image, to change its
size, or to cancel it.
• channel button (CHANNEL)
-- Press
to change the channel of the reduced
PIP image.
Overview
functions.
D Important:
For information
on how to subscribe
to StarSight, please see Booklet
#1,
"Mitsubishi
Installation
and Setup
Guide." To learn how to operate
StarSight,
please see Booklet
#3,
"StarSight
Operating
Guide."
of the Remote
Control
11
_
CHAPTER
Operating
TWO
Your Projection
TV
This chapter will explain how to operate your Projection TV:, first
focusing on functions that are basic and easy and then explaining
some of the advanced features.
_>Important:
Please see Booklet
#3, "StarSight
information
on using the StarSight
This chapter
t
Getting
€
Using
Operating
feature.
Guide"
for
explains:
Started
the Advanced
Features
13
Getting
Started
This section is designed to get you started enjoying your new
Projection TV. If you follow these procedures
one by one, you will
soon begin discovering everything
your television can do.
You'll find information
on:
• Using the remote
control
and other equipment,
• Turning
the Projection
• Selecting
the input
• Changing
channels,
• Understanding
• Memorizing
14
cable
boxes,
source,
the ViewPoint
III on-screen
menus,
channels,
the clock,
• Adding
and deleting
• Setting
the A/V Network,
channels,
• Adjusting
the color
alignment,
• Selecting
the menu
type,
the inputs,
• Naming
the channels,
• Locking
A/V functions,
• Adjusting
the sound,
• Adjusting
the picture,
• Using
VCRs,
TV on/off,
• Setting
• Renaming
,Warning:
to operate
the closed
and
caption
decoder.
Don't leave stationary
images, such as stock market reports, video
games, station logos, or the Projection TV's displays, on-screen for
more than 10 minut:es. Still patterns
such as these can scar the
Projection TV, causing permanent
damage to the picture tubes.
Chapter
2: Operating
Your Projection
TV
Using
boxes,
about
the remote"
and
other
your
remote
control
equipment
to operate
VCRs,
(;able
control
This Projection TV's remote control has four "layers": the _i_ layer,
the VCR-A layer, the VCR-B layer, and the ALVXlayer. Each layer
can be used to operate a different component iin your A/V system.
You select the layer you want to use by pressing one of the "select"
buttons across the top of the remote control.
When you first receive your remote control, the _.W layer is set up
to operate your Mitsubishi
Projection TV, the VCR-A and VCR-B
layers are programmed
to operate Mitsubishi VCRs, and the AUX
layer is set to operate Mitsubishi audio components.
You can use the following buttons
power button
pause button
mute control
super quick view button
quick view button
volume control
input button
channel control
enter button
audio and video controls
to operate
your Projection
StarSight function
menu button
cancel button
TV.
buttons
display button
home button
off-timer button
number buttons
PIP controls
PLAY button
If you have a cable box, a non-Mitsubishi
VCR, a Mitsubishi
laserdisc player, or a Mitsubishi A/V receiver, you can "set up" the
layers in the remote control to operate these components.
The VCR-A layer can be set to operate a non-Mitsubishi
VCR; the
VCR-B layer can be set to operate any VCR, any cable box,. or a
Mitsubishi laserdisc player; the AUK layer can be set up to operate
a cable box, laserdisc player, or A/V receiver; and the TV layer can
be set to operate an A/V receiver.
setting
up the remote
control
to operate
your
VCR
1111Turn off your VCR.
Press one of the select buttons across the top of the remote
choose the layer you want to set. up: VCR-A or VCR-B.
O
to
While holding in the POWER button on the :remote control,
enter the code number listed in the chart on the following page
for your brand of VCR. Be sure to enter both digits of the ('.ode
number. If more than one number is listed, try the first one.
Getting
Started
15
Using
boxes,
If your VCR
is this brand...
Mitsubishi (A)
Mitsubishi (B)
Canon
Emerson
Funai
General Electric
Goldstar
Hitachi
JVC
...enterthis
code
01
O2
O3
04, 05
06
O3
07
O8
O9
the remote
and other
control
to operate
equipment
(cont.)
...enterthis
code
If your VCR
is this brand...
08, 13, 20
14
Sanyo
the POWER
15
16
17.18
03, 10_11
O6
Sharp
Sony
Sylvania
Symphonic
Teknika
Toshiba
Totevision
Zenith
03, 10
03, 10, 11
03
cable
...enterthis
code
If your VCR
is this brand...
Scot
03, 10, 11
O6
12
O3
Magnavox
Multitech
NEC
Panasonic
Philco
Philips
Quasar
RCA
VCRs,
04, 06
15
07
19
0
Release
button.
O
Press the POWER button again. Your VCR should turn on. If
the VCR turns on, your remote control is now set to operate
your VCR.
If your VCR does not turn on, repeat the instruct:ions,
trying each
code number listed for your brand of VCR. If none of these code
numbers work, try each number, 01 through 20.
using
your
remote
control
to operate
your
VCR
After you have set up your remote control for your particular
of VCR, you can use the remote to operate your VCP,.
O
brand
Use the select buttons across the top of the remote control to
choose the layer that you "set up" to operate your VCR: VCR-A
or VCR-B.
Point the remote
buttons.
control
at the VCR and press t:he desired
If you are using a Mitsubishi VCR, you will be able to use all of the
buttons on the remote control to operate your VCR except for MUTE,
VOLUME and the PIP function buttons, which will always operate
the Projection TV itself.
If you are using another brand of VCR, you carl use the POWER,
CHANNEL,
REC, STOP, PAUSE',, REW, PLAY, FF and TV/VCR
buttons to operate your VCR.
setting
up the remote
control
to operate
your
cable
box
Turn on your cable box.
Press one of the select buttons across the top of the remote
choose the layer you want to set up AUX or VCR-B.
16
Chapter
2: Operating
Your Projection
TV
to
O
If your cablebox
is this brand...
ABC
Color Voice
Comtronics
Gemini
General Electric
General Instruments
Hamlin
HitacM
Jerrold
Macom
Magnavox
Memorex
...enterthis
code
While holding in the POWER button on the remote control,
enter the code number listed in the chart bellow for your brand
of cable box. Be sure to enter both digits of the code number. If
more than one number is listed try the first one.
57, 59, 62, 67, 89
73, 74, 98
93
55
66
Oak
Panasonic
55, 56, 57
52, 53, 69
57
Pioneer
Prime Star
Pulsar
RCA
RCA DSS
If your cablebo_
is this brand...
61, 62, 82
63, 70
51
73, 74, 75, 76, 77, 93
94, 95, 96, 97, 98, 99
64, 65, 84
48
51
63
49
53
79
Paragon
Philips
54, 55, 56, 57, 58
59, 60, 85, 87
71
94
51
,%Important:
...enterthis
code
If your cablebox
isthis brand...
Regal
Regency
Scientific Atlanl
Samsunq____
Si_]nature
_ruoar
Starcom
...enter this
code
66, 86, 88, 89, 91, 92
65, 84
57
63
54, 55, 56, 87
55
67, 68, 72
51
62
54
93, 94
51
Star gate
Tocom
Toshiba
Untied Artists
United Cable
Viewstar
Zenith
O
Release
the POWER button.
O
Press the POWER button again. Your cable box should turn off.
If the cable box turns off, your remote control is now set I;o
operate your cable box. If your cable box does not turn off,
repeat the instructions
above, trying each code number listed
for your brand of cable box. If none of these numbers work, try
each number, 51 through 99.
After setting up your remote, be sure that your cable box can be
turned on with the POWER button. Some of the cable boxes can be
turned on with the CHANNEL buttons or the number buttons.
using
your
remote
control
to operate
your
cable
box
After you have set up your remote control for your particular
brand
of cable box, you can use the remote to operate your cable box.
O
Use the select buttons across the top of the remote control to
choose the layer that you "set; up" to operate, your cable box:
AUX or VCR-B.
Point the remote
buttons.
control at the cable box and press the desired
You can use the POWER, CHANNEL, numbers (0-9), and ENTLR
buttons to operate your cable box. If you are using an RCA DSS or
Prime Star converter, you may be able to use additional
buttons.
Getting
Started
17
Using
boxes,
the remote
and other
control
to operate
components
(cont.)
VCRs,
cable
setting up the remote control to operate your Mitsubishi
audio component
(laserdisc
player or A/V receiver)
O
Turn off your audio component.
O
Press one of the select buttons across the top of 1;he remote to
choose the layer you want to set up. For a laserdisc player:,
choose AUX or VCR-B. For an A/V receiver, Choose TV or AUX.
While holding in the POWER button
enter one of these code numbers:
• For a Mitsubishi
• For a Mitsubishi
on the remote
A/V receiver: 30 or 31
laserdisc player: 32 or 33
Be sure to enter both digits of the code number.
one number is listed, try the first one.
Release
O
control,
the POWER
If more than
button.
Press the POWER button again. Your audio component should
turn on. If it does, your remote control is now set to operate
your cable box. If it does not turn on, repeat the instructions
above, trying the other code number listed for your component.
using your remote
laserdisc
player
control
to operate
your
Mitsubishi
After you have set up your remote control for your laserdisc
you can use the remote to operate the player.
Use the select buttons across the top of the remote control
choose the layer that you "set up" to operate your laserdisc
player: AUX or VCR-B.
Point the remote
desired buttons.
control
at the laserdisc
player
player,
to
and press the
You can use the POWER, CHANNEL, numbers (0-9), DISPLAY,
MENU, CANCEL, STOP, PAUSE, REW, PLAY, ]NDEX, and FF
buttons to operate your laserdisc player.
18
Chapter
2: Operating
Your Projection
TV
using your
receiver
remote
control
to operate
After you have set up your remote
can use the remote to operate it.
control
your Mitsubishi
A/V
for your A/V receiver,
you
O
Use the select buttons across the top of the remote control to
choose the layer that you "set; up" _o operate yeur AN receiver:
TV or AUX.
O
Point the remote
desired buttons.
control
at the A/V receiver
and press the
If you are using a Mitsubishi HTS-100, you can use the POWER,
VOLUME, and MUTE buttons to operate the rece!ver.
If you are using a Mitsubishi HTS-300, you can use the POWER,
CHANNEL, INPUT, VOLUME, ENTER, number (0-9), DISPLAY,
MENU, CANCEL, AUDIO, VIDEO, ADJUST, and MUTE buttons
to operate the receiver.
notes
about your
remote
control
_Important:
Sometimes manufacturers
will change their products, or they may
use more than one code. If this is the case, your remote may not be
able to operate your VCR or cable box.
_Important:
When you replace the batteries
will usually return to its initial
your remote again.
Getting
Started
in your remote control, the remote
setting. You may need to set up
19
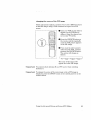
Turning
_Important:
the Projection
TV on/off
Before using the remote control to operate the Projection
the "TV" select button at the top the remote control.
TV, press
Use the POWER button on either the control panel or the remote
control to turn the Projection TV on and off'. The power indicator will
light up in green when you turn the Projection TV on.
o zs--_y-O
_ 0 _
{,@,
®®@
TS-5087, TS-5089
©©©@©@©o
@©©©©©
VS-6085,
VS-6087,
_Important:
20
VS-7085,
VS-7087,
VS-8087
There is always a small amount of current flowing into the
Projection TV, even when the power is turned off. This maintains
any changes to the TV's settings and operates the built-in clock
and timing functions. Unplugging
the set will erase these settings,
requiring you to set them again. Unplug the Projection TV only
when it won't be used for a long time.
Chapter
2: Operating
Your Projection
TV
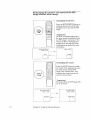
Selecting
the
input
source
If you connected components
such as VCRs, camcorders,
or laserdisc
players to your Projection TV, you will need to change the input source
to view the signals from these components.
To select an input source, press the input
control panel or on the remote control.
button
,-5---%----5
(INPUT)
on the
----H_
C-_ C)
(::::5
0 (3 0
0
k//_
xx._
_¢
g
TS-5087, TS-5089
VS-6085, VS-7085,
_
(('_
/
vs-6osT,v_,s-7o8Kvs_o!}j
_------o_
o, o o o o •
00,©©©©©
You can choose between
the following
input
7
sources:
• Ant-A or Ant-B (antennas
or cable systems connected to the
antenna terminals),
• Input-1 or Input-2 (components
connected to the terminals
on
the back of your television), or
• Input-3 (a component connected to the terminals
on the front of
the television).
The name of the input you have selected
the corner of the screen.
Getting
Started
will be displayed
briefly
in
21
Changing
channels
Your Projection TV offers you four ways of changing
their numbers have been programmed
into channel
• selecting
• directly
channels
accessing
one-by-one
a channel
with the channel
by pressing
channels
memory:
once
controls,
t]he number
buttons,
• using the special Quick View option to switch to a particular
memorized channel, and
• using the Super Quick View function
channels on a user-chosen
list.
_Important:
To change
channels
faster,
use either
to alternate
of the following
between
procedures:
,i Enter three digits for every channel number: using zeros where
needed. (For example, enter "004" to view channel 4 and "028"
to view channel 28.)
I Press the ENTER button after selecting the :number of' the
channel. (For example, press "4" and "ENTER" to view
channel 4.)
_Important:
22
Cable channel numbers 0 and greater than 126 are not used.
TV stations 0, l, and 70 through 999 are not used. If you selec.t one
of these channel numbers, your Projection 'IRr will not change
channels.
Chapter
2: Operating
Your Projection
TV
ooo0
changing
channels
To change
channels:
one-by-one
O Press one of the channel
controls (Ct_NNEL)
on the
control panel or on the remote
control. The P:rojection [IV will
mltomatically
tune to the next
memorized channel.
fl_(_\
vs.6085
I CHA'_NNNEL
)
VS-70S5
\
vs-6o87
/
_.Z_.
TS-5087
TS-5089
__
VS-7087
_S-8087
©O©©_xQ
O©O©'I©O
O •
....
E>Important:
__.f'-
You cannot change channels one-by-one until available
have been programmed
into memory. (See "Memorizing
page 26.)
changing
channels
channels
channels,"
directly
To move directly to a particular
channel without going th:rough the
programmed
channels in--between:
.400_1
_oooQ'
Use the number buttons on the
remote control to select the
number of the channel, you
want to view.
_OOQUI
Press
Getting
Started
the ENTER
button.
23
Changing
channels
(cont.)
using
the Quick
View
o]?tion
Quick View' allows you to
memorize a particular
channel
and switch to it quickly.
0 Tune to the channel
memorize.
O
you wish to
Press and hold the QV button
fbr about 2 seconds. When you
release the button, the ,channel
numbers will appear on the
screen, indicating that you have
memorized that channel.
O After
changing to another
channel, press the QV button
immediately
return to the
memorized channel.
to
0 Press the QV button again to
return to the last channel you
were watching.
_>Important:
The memorized
QV channel
memorize a new channel.
will remain
using
the same until you
Super
Quick
View
option
To view channels programmed
into Super Quick View memory:
@ c::_
o
O :Enter the desired channel into
Super Quick View memory.
(See page 54 or 56,)
_
Press the SQV button
repeatedly to view the SQV
channels in s;equence.
c2_ c:3 _
If you have subscribed to
StarSight,
you ,:an program the
SQV button to cycle through
channels with a particular
theme.
See Booklet #3, "StarSight
Operating
Guide."
24
Chapter
2: Operating
Your Projection
TV
Understanding
menus
the ViewPoint
III on-screen
One of the distinctive features of this Projection TV is Mitsubisbi's
exclusive ViewPoint On-Screen Operating System. Unlike other
television menus systems, ViewPoint includes a slcecial Picture-inPicture screen to let you view the TV picture while you are using
the menu.
ViewPoint also provides step-by-step
instructions
the Projection T_s special capabilities.
When using the ViewPoint
•/ The selected
J The on-screen
minutes.
menu
systera,
please keep the following in mind:
item is indicated
menus
for using some of
in white.
will turn off if no item is selected
_4thin
5
J Some menu items are available only when you subscribe to
StarSight.
(Please see Booklet
#3, "StarSight
Operating
Guide" for more information
about the StarSight
menus.)
€" Some on-screen menu items must be set before other items are
available. For example, "Set the timer" will only be available if
"Set the clock" has been set.
€" You can exit the on-screen
MENU button repeatedly.
viewing.
menus any time by pressing the
You will then return to regular TV
J You can also exit the on-screen
button on the remote control.
Getting
Started
menus
by pressing
the HOME
25
Memorizing
channels
You can use the menus to automatically
memorize the channels
your Projection TV can receive. Once channels are memorized[, you
can scan through them using the channel controls on the remote
control and control panel.
[]
MAIN
O Press the MENU button on the
remote control. The Main Menu
MENU
Customize
will appear
Display
Advanced
Features
StarSight Setup
Use these buttons
[]
[]ADJUST
to select
[]
--
FIRST TIME
on the remote;
ENTER
to enter
_
O Use the ADJUST buttons to
select "First Time Setup." Press
ENTER.
MENU to
go back
O You will see the First Time Set
Up screen. Use the ADJUST
buttons to sdect "Memorize
Channels." Press ENTER.
SET UP
Set the Clock
Add/Delete
Channel
_
on the screen.
Set A/V Network
Channels
Setemorize
up Cable
Box
Align Colors
Use these
buttons
[]ADJUST
to select
[]
MEMORIZE
Antenna
[]
[]
ENTER
to enter
the ADJUST buttons to
select the terminal (Ant-A or
Ant-B) to which you attached
an antenna or coaxial cable.
B (Ant-B)
inout would you like to
channels?
Use these buttons
[_ADJUST
to select
Chapter
O Use
CHANNELS
has two
inputs called
A (Ant-A) and
B (Ant-B).
On whch
memorize
26
_MENUto
go back
A (Ant-A)
Antenna
Your TV
antenna
Antenna
Antenna
on the remote:
[]
on the remote:
ENTER
to enter
2: Operating
_MENUto
go back
Your Projection
Press ENTER. (If you made a
connection to each terminal,
you should memorize the
channels fbr one terminal now,
and for the other terminal
later.)
TV
_---q
If you select
[]
MEMORIZE
O
Indoor/outdoor
antenna
Cable antenna
[]
What kind of antenna is connected
to your TV on Antenna A (Ant-A)?
Use these
buttons
[_ADJUST
to select
[]
on the remote:
ENTER
to enter
MEMORIZE
O
Indoor/outdoor
antenna
]
Cable antenna
without Cable Box
_
MENU
9o back to
kind of antenna
is connected
to your TV on Antenna
B (Ant-B)?
Use these buttons
on the remote:
[]ADJUST
to select
[]
MEMORIZE
O
Channel
In memory
[]
ENTER
to enter
[_
CHANNELS
015
stand by.
Use this button
I_
Important:
CANCEL
B
Use the ADJUST buttons to
choose the tylce of antenna you
connected: Indoor/outdoor
antenna,
cable antenna without
cable box, or cable antenna with
cable box. Press ENTER.
MENU to
go back
Now memorizing
all
the channel you can
receive on Antenna A
(Ant-A).
Please
Antenna
CHANNELS
Cableantenna
with Cable Box
What
A
O Use the ADJUST buttons to
choose the type of antenna you
connected: Indoor/outdoor
antenna or Cable antenna.
Press ENTER.
If you select
[]
[]
Antenna
CHANNELS
on Ihe remote:
to stop memorization
You will see a message that
channel memorization
is in
progress. A channel being
added to memory will be labeled
"In memory." Channels not.
being added will be labeled "Not
in memory." You can stop
channel memorization
at any
time by pressing CANCEL.
Channel controls will work only after channels have been
memorized. After memorizing,
use the channel controls
(CHANNEL) to advance sequentially
to the next memorized
channel. Use the number buttons to select indivi dual channels.
When you select "Cable antenna with cable box," your Projection
TV will memorize channels i through 99. If your cable box can
receive channels 100 through 125, you will have to add them to
your TV's memory with the procedure described in "Adding and
deleting channels."
It can take up to 20 minutes
channels from a cable box.
Getting
Started
for your Projection
TV to memorize
27
Setting
the clock
Your Projection TV contains an internal clock. If you can receive
an XDS time signal from a broadcaster
in your area, or if you
subscribe to StarSight,
then your TV can automatically
set its.
clock. Otherwise,
you can set the clock yourself. (If you subscribe
StarSight,
the "Set the Clock" menu is not available.)
[]
_
FIRST
TIME
emorize
O Press the MENU button on the
remote control. The Main Menu
SET UP
Channels
will appear
Set the Clock
_-
Add/Delete
_L_ Set AN
Network
buttons
I-_ADJUST
to select
[]
on the remote:
ENTER
to enter
_MENUto
go back
i
[]
SET THE CLOCK
_, Automatic
Time
:
Use these
[_
- -
buttons
ADJUST
to turn automatic
on the remote:
setting
off
r-_ ENTER
for clock to set automatically
[]
28
MENU
Chapter
on the screen.
Channel
_L_ Set up Cable Box
_,1 Align Colors
Use these
to
to go back
2: Operating
O Use the ,_d:)JUST buttons to
select "First Time Setup." Press
ENTER.
You will _,;eethe First 'rime Set
Up screen. Use the
ADJUST buttons to select "Set
the clock." Press ENTER.
If you want :your TV to set. its
clock automatically,
use the
ADJUST buttons to set "Automatic setting" to "On"; if you
want to set the clock yourself,
set "Automatic setting" to "Off,"
and see "set';ing the clock
yourself," on page 30.
Your Projection
TV
using
[]
SET THE CLOCK
o Wh ch time zone are you in?
At ant e
[]
Do you follow
No
daylight
Current
Not set
Time:
Use these
buttons
saving
ENTER
to enter
MENU
to go back
• Press the ENTER
daylight
Current
5:30 pm
Time:
Use these
-_
ADJUST
to select
buttons
saving
time?
on the remote:
no
[_
ENTER
to enter
[]
MENU
to go back
button.
If you follow daylight savings
time, use the ADJUST buttons
to answer the question with
"Yes." Othc,rwise, answer "No."
Press
ENTER.
The automatic
clock set-up is completed. The
screen will return to the First
Time Set Up menu.
_>Important:
The Projection TV's clock will not
Projection TV to a channel that is
Extended Data Services (XDS). If
need to tune to that channel again
_>Important:
If you set "Daylight savings" to "On," your TV will adjust
by one hour when daylight savings begins and ends.
Getting
Started
to
Atlantic, Eastern, Central,
Mountain,
Pacific, Alaska and
Hawaii.
on the remote:
Do you tollow
Yes
buttons
select the time zone you live in.
The availalcle time zones are:
time?
[] SET THE CLOCK
[]Which
time zone are you in?
Atlantic
O
clock, setting
Use the ADJUST
ADJUST
to
choose time zone
[]
aute,matic
be set until you tune your
broadcasl_inl; the time via
your TV loses power, you will
to reset your clock.
the clock
29
Setting
the clock
(cont.)
setting
[]
SET THE
1_] Automatic
Time
: - -
buttons
-_--] ADJUST
to turn automatic
i-_
ENTER
to set the day
[]
MENU
on the
setting
remote:
on
to go back
• Use the ADJUST buttons to
select the "Day." Press ENTER.
[]
SET THE CLOCK
@ Automatic
setting : OFF
Day
: Wednesday
Time
: - -
Use these buttons
'-_
yourself
• Use the ADJUST buttons to set
"Auto clock" to "Off." Press
ENTER.
CLOCK
Use these
the clock
ADJUST
to select
on the remote:
the day
ENTER
to set the time
[]
MENU
to go back
[]
_
SET THE CLOCK
utomatic
setting : OFF
Day
: Wednesday
Time
: 9:00pm
Use these buttons
[_
30
• Use the ADJUST
the "Time."
on the remote:
ADJUST
to select the time
i_
ENTER
to start the clock
[]
MENU
The screen will return
Time Setup" menu.
to go back
You can clear the time by pressing
"Automatic setting" is selected.
_Important:
If you are receiving a VCR signal on channel
automatic
setting may not work correctly.
2: Operating
to set
• After you haw_ set the "Day"
and "Time," press the ENTER
button to star'; the clock.
[_Important:
Chapter
buttons
Your Projection
the CANCEL
TV
to the "First
button
3 or channel
when
4, the
Adding
and
deleting
After all available
channels
channels
÷
have been memorized
with the
"Memorize channels" feature, channels with weaker
added or deleted with the following procedure.
signals, can be
_>Important: If
you subscribe to StarSight,
you can only addL and delete Channels
on Antenna A with this menu. If you want to add and delete
channels on Antenna B, use the StarSight menus. (Please see
Booklet
#3, "StarSight
Operating
Guide.")
[]
FIRST
TIME
Press the IvIENU button on the
remote control. The Main Menu
will appear on the screen.
SETUP
Set the Clock
Add/Delete
_
Channel
Set AN Network
Channels
Setemorize
up Cable
Box
Use the ADJUST buttons to
select "First Time Setup." Press
ENTER.
Align Colors
Use these buttons
[]
ADJUST
to select
[]
Either "In memory" or
"Not in memory" will appear.
[]
ADD/DELETE
on the remote:
ENTER
to enter
MENU to
go back
CHANNEL_
Current settings:
Antenna : A
Indoor/outdoor
,._ _:hannel : 0_3
Not in memory
Use these
_
buttons
Use the ADJUST buttons to
select " Add/l: I elete Channel."
Press ENTER.
I
[
|
I
I
.
.
O
l
to go back
[] ADD,OE TE
Current settings:
I
|
[
!
I
I
: A
,, &%e11 8,
v
In memory
Use these
]ADJUST
te select
buttons
scxeen
you would like to add or delete.
(You can also use the
CHANNEL controls to change
channel s.)
O----]
ENTER
to add to memory
Antenna
Channel
on the remote:
]ADJUST
to select the channel
MENU
The Ad(VDelete
will appear. Use the ADJUST
buttons to select the channel
on the remote:
the channel
I
O
If a channel is labeled "In
memory," use the CANCEL
button _o remove it from
memory. If a channel is labeled
"Not in memory," use the
ENTER button to add it to
memory.
CANCEL
to delete
MENU
from
memory
to go back
O When
you are finished adding
and deletins channels, press
the HOME button to return to
normal TV viewing.
Adding a channel to memory allows you to tune to the channel with
the channel controls. If a channel is not in memory, you can only
tune to it with the number buttons.
_>Important:
In this menu, you can use the CHANNEL
channels.
Getting
Started
buttons
to change
31
Setting
the A/V Network
The A/V Network is a special system that Mitsubishi developed to
make it easier to operate many products with one remote control.
When the A/V Network is connected between two Mitsubishi
products, you can point the remote control at one product and it
will "pass" the remote control command to the other. To set up the
A/V Network:
[]
FIRSTTtME
_
emorize
O
SET UP
Channels
will appear
Set the Clock
Add!Delete
Channet
Set AN
Network
Set up Cable
Align Colors
Box
Use these buttons
--_
ADJUST
to select
[]
SETAN
O
AN
Press the MENU button on the
remote control. The Main Menu
[]
O
Use the ADJUST buttons
select "First Time Setup."
the ENTER button.
to
Press
O
Use the ADJUST buttons
select "Set Arc" Network:."
the ENTER button.
to
Press
O
Use the ADJUST buttons to
select "Active," "Basic," or "Off."
Check the rear terminals
of
on the remote:
ENTER
to enter
_
MENU to
go back
on the screen.
NETWORK
Network:
Active
When AN Network is
set to "Active" or
"Basic," your TV can
perform automated
operations
with other
Mitsubishi products.
Set to "OFF" if you do not have other
Active AN Network products or are not
using an AN Network control cable.
Use these buttons
--_--] ADJUST
to select
your VCR, then use the chart
below to determine how you
should set your Projection TV.
on the remote:
[_
MENU to
go back
If your VCR has a rear
terminal
that reads:
O
Press the ttOME button to
return to normal TV viewing.
...and you have set your
VCR to:
...then set your
TV to:
-
Basic
Active A!V Network
Off
Basic
Active A!V Network
Active
Active
AN Network
Does not have an A/V
Network
rear terminal
-
Off
If you are not sure how to set your VCR's A/V Ne;work
refer to your VCR's owner's guide.
32
Chapter
2: Operating
Your Projection
TV
setting,
WhenanA/VNetworkcableis connected
betweer,the Projection
TV andVCRandthefollowingconditionsaremet,yourProjection
TV hastwo additionalfeatures.
If...
¢" You set up "StarSight,"
and
€" Your VCR is one of the following models:
HS-U650, HS-U770, HS-U510, HS-U560,
€" You have
"Active."
set "A/V Network"
HS-U500, HS-U550,
or ES-U760, and
on your Projection
TV and VCR to
Then...
J The Projection TV will control your VCR to record
future programs.
€" You will not have to "set up" your VCR dining
authorization
procedure.
current
and
the StarSigbt
€" An error message will be displayed when you record
"StarSight"
screen if the VCR is:
• currently
recording;
• playing a tape;
• turned off; or
• if a tape is not inserted :into the VCR
from the
_Important:
If connected, the A/V Network will still pass remote
even when the Projection TV's A/V Network setting
_Important:
If you have not connected the A/V Network, set "A/V Network" to
"Off," or there may be problems selecting channels on your TV.
_Important:
If you are using a Mitsubishi VCR with A/V Network or Active A/V
Network, you should have connected it to the II_ PUT-1 of your TV.
Important:
If you subscribe to StarSight,
feature will not be available.
Getting
Started
the A/V Network
control signals,
is "Off:"
':Quick Play"
33
Adjusting
the
color
alignment
Your Mitsubishi Projection TV has three picture tubes, which
are arranged in Line to project the light beams that create your
television picture. These three rubes must be ali_,_ed to create the
best color picture. If the tubes are not aligned correctly, the objects
on your screen will have "halos"' or discoloration
around the edges.
You should check the color alignment when your Projection
first installed and any time you move your Projec,'tion TV.
TV is
The color alignment process has two parts: displaying the color
alignment "test" screen and adjusting the align_.ent.
You can use
either the remote control buttons or the control panel buttons t;o
perform this procedure.
[]
_
Set the Clock
FIRST TIME SET UP
Add/Delete
Channel
displaying
the color alignment
"test" screen with the remote
control
t
Set AN Network
Channels
Setemorize
up Cable
Box
O Press the MENU button on the
remote control. The Main Menu
Align Colors
Use these buttons
[]
ADJUST
to select
[]
ALIGN
[]
ENTER
to enter
ENTER
to select
MENU
MENU to
go back
Use the AiDJ[JST buttons
select "First Time Setup."
ENTER.
to
Press
You wilt see _he "First 'rime
Setup" screen. Use the ADJUST
buttons to seLect "Align colors."
Press ENTER.
on the remote:
Red or Blue
]ADJUST
(Up/Down,
until the crosshairs
[_
I_
on the screen.
COLORS
Use these buttons
[]
will appear
on the remote:
Le_Righ0
appear white
O You
will see _he Align Colors
screen. Press ENTER. The
"test" screen (below lefl:) will
to go back
appear.
(---- Red ----)
displaying
the color alignment
"test" screen with the control
panel
buttons
O At the same time, press
the ENTER button and the
ADJUST down button. (These
buttons are joined by a line
marked "test.") The "test"
screen will appear.
34
Chapter
2: Operating
Your Projection
TV
adjusting
the alignment
0
If the test screen shows a single, solid white cross, the ]Projection TV's tubes are aligned correctly. Skip to step O. If' you see
three crosses, or if the sing]e cross has discoloration
at its
edges, go to step O.
O
When you first display the "test" screen, the word "Red" appears at the top of the screen. This indicat;es that you will be
adjusting the red cross on the screen.
Adjust the position of the red cross until it is perfectly aligned
with the green cross at the center of the screen. To adjust the
red cross, use the ADJUST buttons on the remote, or the
ADJUST, VIDEO, and AUDIO buttons on the control panel.
When you've finished adjusting the red cross, press ENTER.
The word "Blue" will appear at the top of the screen.
• Warning:
_>Important:
O
Adjust the position of the blue cross until it
with the green and red crosses at the center
can use the ADJUST buttoas on the remote,
VIDEO, and AUDIO buttons on the control
O
When all three crosses are perfectly aligned,
appear as a single, solid white cross.
O
To remove the "test" screen from the Projection TV, press the
ENTER button on the remote, or the ENTER and ADJUSTdown buttons on the control panel.
is perfectly aligned
9f the screen. You
or the ADJUST,
panel.
they should
Thetime.
of
"test"It could
screen cause
shoulddamage
not be to
lefttheonpicture
the screer
tubes.for a long period
The alignment of the colors can change over time. If you notice a
change in the color quality of the Projection TV's picture, check the
color alignment.
You may need to adjust the colors periodically.
Getting
Started
35
Selecting
the menu
type
You can display the on-screen menus in one of two ways. The
Standard
Menu, which is illustrated
in this maaual, provides
step-by-step
instructions
for all features. The Advanced
Menu
lets you select each feature directly by its name and icon.
Your TV's normal setting is the Standard
the Standard
and Advanced Menus:
[]
MAIN
_
Customize
Display
Advanced
Features
irst Time Setup
StarSight Setup
ADJUST
to select
[]
ENTER
to enter
CUSTOMIZE
DISPLAY
[]
Select
Type
[]
Rename
[]
Name the Channels
[]
Lock AN
Functions
Use these
buttons
[]
O
_
[]
SELECT
MENU
Standard
Menu
Advanced
O Use the ADJUST
select "Customize
Press ENTER.
O You will see the Customize
Display menu. Use the
ADJUST buttons to select
"Select Menu Type." Press
ENTER.
on the remote:
ENTER
to
enter
_
MENU
go back to
0 Use the ADJUST buttons to
select "Standard Menu" or
"Advanced Menu."
TYPE
Menu
The Standard
Menu lets you select
features in a step-by-step
method,
and contains full descriptions
of
the features.
The TV's picture will
be reduced in size.
Use these
[_
36
ADJUST
to select
Chapter
buttons
buttons to
Display."
MENU to
go back
the Input
-'_"IADJUST
to select
[]
on the remote:
[]
Menu
]_o switch between
O Press the MENU button on the
remote control. The Main Menu
will appear on the scree, n.
MENU
Use these buttons
[]
menu.
Press the ENTER
button.
on the remote:
[]ENTER
to enter
2: Operating
I'_
MENU to
go back
Your Projection
TV
or MENU
If youselectthe StandardMenu,the screenwir, return tothe
CustomizeDisplaymenu.If youselectedtheAdvancedMenu,the
screenwill showthe AdvancedMenu(shownbelow.)
The
Select Menu Type
First Time Setup
Customize Display
Advanced
Menu
-[]N--[][]
N[]
[]
[]
[]
[]
Advanced Features
• Set the Timer
• Use Parental
Lock
• Set SuperQuickView
• Use Adw_nced PIP
• Reset Audio/Video
Menu
display
choices
- StarSight
Program
• StarSight
Setup
• Theme Guide
• Recordings
• Program Guide
Guide
-The
of the
feature
highlighted
name
icon appears
:here.
To use the Advanced Menu, use the ADJUST buttons to highlight
the icon of the feature you want to use, then press ENTER. The
name of the highlighted
icon appears at the bottom of the screen.
You can use the following remote
Advanced Menu:
•
•
•
•
•
control buttons
while viewing
the
input button
channel controls
number buttons
super quick view buttons
quick view buttons
This menu
Getting
disappears
Started
if you do not select an item within
1 minute.
37
Renaming
the
inputs
I?
This feature allows you to rename the inputs so that you can keep
track of components
you have connected to your TV. For example,
you might name one input '_CR," and another one "DISC." After
renaming,
the new name will appear on the screen display. (The
original names are "Input-l," "Input-2," and "Input-3.")
[]
CUSTOMIZE
[]
Select
[]
Rename
[]
Name the Channels
[]
Lock AN
Functions
Use these
buttons
Menu Type
the Input
--
RENAME
Current
on the remote:
r_
MENU to
go back
to enter
THE INPLIT
O
Input-1
.....
Input-2
Input-3
.....
Use these
buttons
on the
_
CANCEL
[]
ENTER
[_
MENU
[]
RENAME
O
Current
Input-1
settings:
ABCD-
[]
Input-2
.....
Input-3
.....
to enter
to cancel
to go back
Use the ADJUST buttons and
the ENTER button to select
each letter in the new name.
THE INPUT
Use these buttons
-_-----] DJUST to
select an input
ENTER
You will see the Custorn.ize
Display screen. Use the ADJUST buttons to select "Rename the Input." Press ENTER.
Use the ADJUST buttons to
select the input you want to
rename (Input-I, Input-2, or
Input-3). Press ENTER..
remote:
DJUST to
select an input
[]
buttons to
Display."
settings:
[]
[_
O Use the ADJUST
select "Customize
Press ENTER.
ro] ENTER
[]ADJUST
to selec!
[]
O Press the MENU button on the
remote control. The Main Menu
will appear on. the screen.
DISPLAY
to enter
You can rename the inputs
using letters (A- Z), numbers
(0 - 9), or symbols (:/., ( ) _"
#$%&'*+;<=>?
blank - ).
on the remote:
r_
CANCEL
_
MENU
to cancel
to go back
If you press the CANCEL
button while setting the name,
you will mow_ one position to
the left. You can clear the
entire name by pressing
CANCEL when the left.-most
position is blinking.
When you are finished, press
the MENU button; the screen
will return to the Customize
Display
38
Chapter
2: Operating
Your Proiection
TV
menu.
Naming
the
channels
C?
You can name the channels your Projection TV receives, helping
you keep track of the many channels available. After you enter a
name, it will appear on-screen, next to the channel number.
[]
CUSTOMIZE
[]
Select
_
ename thethe
Input
Name
Channels
[]
Lock A/V Functions
O
DISPLAY
Menu
Type
will appear
O
Use these buttons
[]ADJUST
to select
[]
NAME
[]
THE
on the remote:
ENTER
to enter
_
MENU
go back to
Name
CHANNELS
" - - - -
Use these buttons
[_
ENTER
[]
NAME
to enter
on the remote:
_
THE CHANNELS
Current settings:
Antenna
A
(Indoor/outdoor)
O Channe
: 003
_]
Name
MENU
to go back
I
Use the ADJUST
select "Customize
Press ENTER.
buttons to
Display."
0 Use the ADJUST buttons to
select an an_enna (A or B). (If
you sut)scribed to StarSight,
you can only select Antenna A).
Press ENTE,R.
DJUST to
select an antenna
[]
on the screen.
O You will ,;ee the Customize
Display screen. Use the ADJUST buttons to selecl: "Name
the Channels."
Press ENTER.
Current settings:
,,_ Antenna
: A
(Indoor/outdoor)
[(91Channel
: 003
[]
Press the MENU button on the
remote control. The Main Menu
I
I
Use the ADJUST buttons to
select the cl: annel you want to
name. Press ENTER.
: ....
O Use
Use these buttons
[_
on the remote:
ADJUST
to
select a channel
[]
ENTER
[]
NAME
to enter
_
MENU
to go back
THE CHANNELS
Current settings:
I'_--IAntenna
: A
L_I (Indoor/outdoor)
[] Channel:
003
O
I_
[]
Name
the t_J)JUST buttons and
the ENTER button to select
each letter in the new name.
You can use letters (A - Z),
numbers (0 - 9), or symbols (:/.
,()!"#$%&'*+;<=>?
blank- ). W:aen you are setting
the name, y_u can clear it by
pressing the CANCEL button.
: ABC ..
Use these buttons
on the remote:
DJUST to
change the letter
_
CANCEL
ENTER
F_
MENU
to enter
to cancel
When you are finished, press
the HOME button to return to
normal viewing
to go back
L>Important: The
names you set will appear instead of the call letters being
supplied by Extended Data Services (XDS). ]if you subscribe to
StarSight,
that system will automatically
name the channels.
[:>Important: You
can name up to sixty channels. If you try to name more, the
message "Memory over!" will indicate that the memory is full.
Getting
Started
39
Locking
A/V functions
You can lock some of the audio and video functions (such as
"Treble" or "Contrast")
to their c,urrent settings. Once you lock a
particular
function, it will not be displayed on-sczeen until you
unlock it. This will prevent others from accidentlv changing the
settings of these functions.
[]
CUSTOMIZE
[]
Select
[]
Rename
[]
Name
[]
Lock A/V Functions
Menu
the Channels
[-_ADJUST
to select
LOCK
Type
the Input
Use these
[]
O Press the MENU button on the
remote control. The Main Menu
will appear on the screen.
DISPLAY
buttons
on the remote:
DqENTER
--
O Use the ADJUST
select "Custoraize
Press ENTER.
to enter
_
MENU to
go back
You will see t:ae Customize
Display screen. Use the
ADJUST buttons to select "Lock
A/V Function,;." Press ENTER.
A/V FUNCTIONS
€} TV Listen to :
buttons to
Display."
Stereo
unlocked
You can lock some AN functions
to
their current settings,
When you do
this, the function will not be
displayed
until it is unlocked.
Use these buttons
on the remote:
I_
AUDIO or VIDEO
to select
a menu item
[_
MENU
to go back
[]
LOCK
A/V FUNCTIONS
O
O To lock an audio function, press
the AUDIO button until the
[_--]
ADJUST
to lock
Use the ADJUST buttons to
switch between "locked" and
"unlocked."
TV Tint
unlocked
You can lock some A/V functions to
their current settings.
When you do
this, the function will not be
displayed
until it is unlocked.
Use these buttons
on the remote:
AUDIO or VIDEO
to select
a menu item
[_-----_ADJUST
L.,..z_.,i
MENU
Important:
flmction you want to lock
appears. To lock a video
flmction, press the VIDEO
button until tile function you
want to lock appears.
to lock
fo go back
When you are finished, press
the MENU button; the screen
will return to the "Customize
Display" menu.
The speaker functions and closed captioning ( _-0]) cannot be
locked. If you try to lock these flmctions, the disp] ay below appears:
[]
LOCK AN
O
TV Speaker
FUNCTIONS
: External
cannot be locked
You can lock some A!V functions to
their current settings.
When you do
this, the function wil_ not be
displayed
until it is unlocked.
Use these
buttons or" the remote:
AUDIO or VIDEO
to select
a menu item
[_
40
MENU to go back
Chapter
2: Operating
Your Projection
TV
Adjusting
the
sound
Your TV allows you to customize and adjust the ,_ettings of its
audio functions. This section gives you descriptions
of each audio
function, then explains how to adjust the functions.
descriptions
of audio
functions
The "Listen to" function allows you to determine
how your TV will
receive an audio signal and play back the sound that you hear. You
can set this function to "Stereo:" "S.A.P.," and "N[ono."
• For almost all situations,
you should choose "Stereo."
With this
setting, the TV will play stereo broadcasts
in stereo and mono
broadcasts
in mono. If a channel is broadcasting
in stereo, the
word "Stereo" will be displayed when you tune to that channel.
• Some TV stations will broadcast a separate audio programming,
or "S.A.P.," signal. This signal is an additional soundtrack
that
you can't hear during normal TV viewing. An S.A.P. si_mal
might be related to the program you are watching (e.g., a
soundtrack
in a foreign language), or it might be unrelated
(e.g.,
a weather report). If a channel is broadcasting
an S.A.P. signal,
the letters "SAP" will appear on-screen when you tune to that
channel. Choose "Listen to: SAP" to hear the S.A.P. signal.
• Use the "Mono" setting if you are receiving a weak audio
signal. This setting will reduce background
_.oise. However,
with this setting, the TV will only play in mono, even if the
program you are watching _s in stereo.
The "Bass"
function
The "Treble"
function
controls
controls
the volume
of low tYequency
sound.
the volume of high frequency
sound.
The "Balance"
function adjusts the level of sound between the left
and right speakers. Adjust the scale until the. sound seems to come
equally from both speakers.
The "Surround"
function creates simulated
stereo and surround
effects. You can set this function to "Off," "Simulate," or "Hall."
• Select "Off' if you do not want to use any surround
effi_cts.
• Select "Simulate"
if are watching a non-stereo program; your
Projection TV will create a simulated
stereo effect.
• Select "Hall" if you are watching a stereo program; your Projection TV will create a simulated surround
effect, making the
sound seem to extend around and behind you.
Getting
Started
41
Adjusting
the
sound
(cont.)
The "Speaker"
function allows you to select how the Projection
TV's speakers will be used.
• Choose "Internal"
if you want to play the Projection TV's sound
through its built-in speakers.
• Choose "Internal
Center Channel"
if you connected your TV
to a surround sound processor and you want _o use the TV's
built-in speakers as center channel speakers.
• Choose "External"
if you connected speakers to the speaker
terminals
on the rear of the TV, or if you wa_t to play tlhe sound
of your TV through an audio system.
The "Monitor
out" function determines
how thc_ TV will send an
audio signal to an audio system or home theal_er receiver. Your
choices are "Variable" or "Fixed."
• If you choose "Fixed," the 2_ will send out al_ audio signal at a
fixed volume level. The level will not change when you .'adjust
the TV's volume. Use the controls on your audio system to
adjust the volume. The "Fixed" setting is most useful wlhen you
can control the audio system's volume with a remote control.
• If you choose '_V'ariable," the TV's audio output will change
when you change the TV_s volume. If you use this setting with
an audio system, turn the TV_s volume all the way down, set the
audio system's volume to an average setting, then turn the TV_s
volume up until you can hear the signal.
42
Chapter
2: Operating
Your Projection
TV
adjusting
the audio
functions
When adjusting the audio
functions, you can use the buttons
on the remote control or on the
control panel.
Press the AUDIO button
repeated][y until the function
you want. to adjust appears
on-screen. (The functions
appear at the center of the
bottom of t_.e screen.)
While the hmction is still on the
screen, use Lhe ADJUST
buttons to adjust its setting.
TS-5087
TS-5089
_"
O The functio:_s will disappear
from the screen after a few
seconds.
function
screen.)
(You cannot adjust
if it is not on the
a
ADJUST
VS-6085
VS-7085 _-VS-6087
VS-7087
VS-8087
_>Important:
_
If you subscribe to StarSight,
you can only use the "left]right"
buttons on the remote control to adjust the audio functions. You
cannot use the up!down buttons on the remote control or the
ADJUST buttons on the front pane] of your projection TV.
Getting
Started
43
Adjusting
the
picture
Your TV allows you to customize and adjust the settings of' its
video functions. This section gives you descriptions
of each video
function, then explains how to adjust the functioas.
descriptions
of video
functions
The "Tint" function provides a scale that adjusts the proportion of
red to green in the picture. This determines
tile delicate tones of
color.
The "Color"
of the color.
function
provides
a scale that determines
the :intensity
The "Contrast"
function provides a scale that. controls the lew_l of
white-to-black
in the picture. When the contrast is low, you will be
able to see the variety of shades in the darker images on the screen.
When the contrast is high, the screen's dark: images will appear
more uniformly black, but this will also make the colors on the
screen seem more vibrant.
The "Brightness"
overall brightness
function provides
of the picture.
The "Sharpness"
function
and clarity of the picture.
provides
a scale that controls
a scale that adjusts
the
the detail
The "Color temp" (Color temperature)
function allows you to set
how the TV will display white images. Your choic.es are "Low,"
"High," or "Middle."
• With the "Low" setting, white images on-screen will have a
yellow cast to them.
• With the "High" setting, white images on-,_creen will have a
blue cast to them.
• With the "Middle" setting, white images
balanced between yellow and blue.
The "_"
44
function
is used to control
on-screen
the closed caption
details,
see "Using the closed caption
decoder,"
Chapter
2: Operating
TV
Your Projection
page 46.
will be
decoder.
For
adjusting
@ cx:_
oooC
c
the video
filnctions
When adjustiag the video
functions, you can use the buttons
on the remotE, control or on the
control
panel.
{[]_Press the _?IDEO button
repeatedly
until the function
you want to adjust appears
on-screen.
(The functions appear at the
center of the bottom of the
screen.)
O While tlhe function i,; still on the
screen, use the ADJUST
buttons to adjust the function's
setting.
TS-5087,
The functions will disappear
from the screen after a ihw
seconds. (You cannot adjust
function if it is not on the
screen.)
VS-6085,
VS-6087,
_>Important:
VS-7085,
VS-7087,
a
VS-8087
If you subscribe to StarSight,
you can only use the "left/right"
buttons on the remote control to adjust the vi_eo functions. You
cannot use the up/down buttons on the remote control or the
ADJUST buttons on the front panel of your projection q_V.
Getting
Started
45
Using
the closed
caption
decoder
Many broadcasters
now supply closed captioning information
along
with their regular broadcasts.
Your TV can decode that information
and display it on the TV screen.
There are two types of captioning
"standard"
and "text."
that broadcasters
can send:
Standard
captioning
is related to the program that is being'
shown. Standard captioning usually follows the dial ogue of the
characters
on-screen.
Text captioning
often contains information
such as weather or
news. Text captioning blocks out your view of the program you are
watching.
Your TV can decode four different "standard
captioning" signals
and four different "text captioning" signals from ,each TV station.
However, each station may be broadcasting
only one or two
captioning signals, or none at all.
When setting
the decoder
you can choose:
• to display one of four "standard
captioning" signals ( _0] :1,
D :2, [0_]:3, _ :4),
• to display one of four "text captioning" signals ( _ : Text 1, C_ :
Text 2, _¢7 : Text 3, _ : Text 4),
• to display captions when muting ( _
• or to turn the captions off ( [] :: Off).
: When Muting),
If you select "_-07: When Muting," the standard
captioning
( [] :1) will appear whenever you use the MUTE button.
46
signal
E>Important:
If you set the decoder to a "standard" caption setting and tune, to a
broadcaster
that is not sending a caption signal, :no captions will
appear.
L>Important:
If you set the decoder to a "text" setting and tune to a broadcaster'
that is not sending a text signal, a large black rectangle will block:
your screen.
E>Important:
The content of captions are determined
by the broadcaster.
If your
captions show strange characters,
misspellings,
or odd grammar,
it
is not a malfunction
of the Projection TV.
Chapter
2: Operating
Your Projection
TV
adjusting
decoder
the closed
caption
When adjustirg
the closed caption
decoder, you can use the buttons
on the remote control or on the
control panel. To use the closed
caption decoder:
Press _he VIDEO button until
the closed caption display
appears on the screen.
O Press _he ADJUST buttons to
select the caption setting you
want. (See ipage 46 fo:r an
explanation
of the settings.)
TS-5087
D Important:
If you subscribe to StarSight,
you
can only use tihe "left/right"
buttons on the remote control to
adjust the caption functions. You
cannot use the up/down buttons on
the remote control or the ADJUST
buttons on the front panel of your
projection TV.
ADJUST
uses
VS-6085,
VS-6087,
VS-7085,
VS-7087_ VS-8087
However,
closed captioning
for closed
Closed capl:ioning was i_itially
designed so that those with
hearing difiSculties could more
fillly enjoy viewing television.
can also be used in other ways, such as:
• helping children learn to read,
• learning a foreign language, and
• using the television without disturbing
_Important:
captioning
others.
If you cannot display any captions on the screen, please keep in
mind that not all broadcasters,
video tapes, or laserdiscs supply
closed caption signals.
Additionally,
captions might not appear:
• if you are playing a video tape that is worn or deteriorated,
or
• if you are starting to play a laserdisc from still or search mode.
Getting
Started
47
Using
the Advanced
Features
This section explains how to use the more advanced
your Mitsubishi Projection TV.
[_Important:
For information
on operating StarSight,
"StarSight
Operation
Guide."
In this chapter,
• Setting
• Using
48
you will learn
please
of
see Booklet
#3,
subscribed
to
about.
the timer,
the parental
lock,
• Using Super
StarSight,
Quick
View
if you haven't
• Using Super
StarSight,
Quick
View
if you've
• Selecting
an advanced
• Resetting
the sound
Chapter
features
2: Operating
subscribed
PIP function,
and the picture.
Your Projection
TV
and
to
Setting
the timer
This special feature allows you to program the Projection TV to
turn on automatically
at a time that you set. To set the timer:
[]
MAIN
_
Customize
Display
Advanced
Features
irst Time Setup
StarSight Setup
O Press the MENU button on the
remote control. The Main Menu
will appear on the screen.
MENU
Use these buttons
E_]ADJUST
tO select
[]
Use the ADJUST
select "Advanced
Press ENTER.
on the remote:
ENTER
to enter
[]
ADVANCED
[]
Set the Timer
[]
Use Parental
[]
Set SuperQuickView
[]
Use Advanced
[]
Reset Audio/Video
I'_
buttons to
Featur_,s.
MENU tO
go back
]
FEATURES
Lock
You will
Features
ADJUST
"Set the
see the Advanced
screen. Use the
buttons to select
ti:aer." Press ENTER.
PIP
Use these buttons
on the remote:
[_--]AOJUST
_ ENTER
r_ ME.Uto
to select
[]
to enter
Use the ADJUST buttons and
the ENTER button to set Day,
Start time_ Input, and Channel.
SET THE TIMER
O Day
_
go back
: Sunday
tart time : -
Input
IOI Channel
: -: - _-
The TV will turn on at a day and time
you select.
It will then turn off in
five minutes unless a button is pushed.
Use these
r_
ADJUST
[]
ENTER
buttons
to select
to enter
on the remote:
the day
[_
MENU
to go back
After setting the timer, make sure
that the program timer indicator
is lit. The iindicator will light in
orange when the TV is turned on
and light in red when the 7_ is
turned off. The indicator will not
light when. using the menus, or
when a lock message is displayed.
If you press the CANCEL button
while setting the timer, the arrow
will move to the previous item. To
clear the timer, press CANCEL
with the arrow next to ':'Day."
_Important:
When the timer turns the Projection TV on, the display will flash.
If you do not press any function buttons for about 5 minutes, the
Projection TV will automatically
turn off. l='re,_s a function button
(such as the display button) to keep the Projection TV on and turn
off the flashing display.
Using the Advanced
Features
49
Using
the parental
lock
This special feature allows you to lock the entire _V during a
certain time period or to lock up to ten individual channels. (You
cannot lock the TV and lock individual channels a_: the same time.)
When you turn on the lock, you enter
allow you to turn off the lock later.
a 4-digit secret
code that will
If you try to turn on a locked TV, view a locked channel, or t:he
locking "time period" begins, you will see a messa_:e asking you to
enter the secret code. If you don't enter the code within five
minutes, the TV will turn off or tune t;o an unlocked channel.
If you enter the secret code, the message will disappear
and the
lock will be turned off temporarily.
However, the 3_V or channels
will be locked again after you turn off the TV This will continue
until you turn the lock off permanently.
To turn the lock off
permanently,
follow the procedure later in this section.
using
[] A VANCEO I
[]
Set the Timer
[]
[]
Use Parental Lock
Set SuperQu ckView
[]
Use Advanced
[]
Reset Audio/Video
[]
ro]
Use the ADJUST
select "Advanced
Press ENTER.
r_
LOCK
Parental Lock allows you to block the
viewing of the TV or the viewing of
up to 10 channels.
[_ADJUST
to select
[]
on the
ENTER
to enter
Use the ADJUST buttons to
select "Use Parental
Lock."
Press ENTER.
MENU to
go back
Lock the "IV
by time
Lock the TV
by channel
Use these buttons
buttons to
Features._ "
on the remote:
to enter
USE PARENTAL
O
The
I
roqENTER
--
]rock
0 Press the MENU button.
Main Menu will appear.
PIP
Use these buttons
[_]ADJUST
to select
I
parental
0 Use the ADJUST buttons to
select "Lock the TV by time" or
"Lock the TV by channel." Press
ENTER.
remote:
If you selected "Lock the TV by
time," see page 51.
F_MENUto
go back
If you selected "Lock the TV by
channel," see 1cage 52.
50
Chapter
2: Operating
Your Projection
TV
locking
[]
USE PARENTAL
• Enter a flint-digit
using t:he number
press the ENTER
LOCK
Lock the TV
O
the TV by time
by time
:OFF
Secret code : ....
secret code
buttons (0-9);
button.
After you turn the TV
You can cancel the code if you
press CANC, EL before you press
ENTER.
OFF, you will not be
able to watch the TV
without
the code.
Use these buttons
[]
NUMBER
KEYS
[]
ENTER
[]
USE PARENTAL
on the remote:
to enter a 4-digit
to enter
_
MENU
code
to go back
Use the ADJUST
LOCK
Day
Lockat
1(31Unlock
:--
on the
DJUST to
select the day
_
CANCEL
[]
ENTER
r_
MENU
[]
USE PARENTAL
to enter
LOCK
Lock the TV
bytime
[]Day
O
[]
[_
[]
Use the ADJUST buttons to set
the time at which you want to
lock the Projection TV. Press
ENTER.
:-at: - -
Use these buttons
-_
: ON
: Sunday
Lock at :11:00pm
Unlock at: 12:00pm
remote:
to cancel
to go back
Use the ,_DJUST
I
I
Use these buttons
on the remote:
DJUST to
select the time
_
CANCEL
ENTER
I_
MENU
to enter
buttons
to set
the time at which you. want to
unlock: the Projection TV. Press
ENTER. If you want the lock to
be in effect all the time, set the
same "Lock at" time as you set
for the "Unlock at" time.
to cancel
to go back
TV LOCKED BY TIME
Secret code : ....
E>Important:
to
select a day; press ENTER.
Lock the TV
by time
:OFF
O
buttons
Press
HOME
to exit the menus.
When you turn on a locked TV,
or if the lock's "time period"
begins, you will be asked to
enter your _our-digit secret
code. Enter the code to temporarily disable the lock. The lock
will be enabled again when you
turn the TV off.
If you lock the TV by _ime and the TV clock is :_eset due to a prolonged power failure, you will be asked to enter your secret code
before you can use the TV again. If the TV only loses power for a
short time, the TV clock will not be reset, and _he lock will operate
normally.
Using the Advanced
Features
51
[
Using
the
parental
lock
(cont.)
locking
[]O
Lock the TV
by channel
USE PARENTAL
Secret
code : ....
LOCK
• Eater a tim:r-digit
using the number
press ENTLR.
I
After you turn the TV
OFF, you will not be
able to watch the TV
without the code.
Use these buttons
[]
NUMBER
[]
ENTER
KEYS
[]
USE PARENTAL
on the remote:
to enter a 4-digit
to enter
_
the TV by channel
MENU
code
to go back
secret code
buttons ((I-9);
You can cancel the code :if you
press CANCEL before you press
ENTER.
You will see the channel
Ant.
Channel
[] ........
[_
[]
[]
O
LOCK
Ant.
Channel
lock
set-up screen. Use the ADJUST
buttons to select a position.
Press ENTER.
[] ........
Use these buttons
on the remote:
DJUST to
select a position
r_
CANCEL
ENTER
[_
MENU
to enter
USE PARENTAL
Ant.
Channel
Ant-A
019
to cancel
to go back
LOCK
Ant.
Channel
_O]
Use the ADJUST buttons to
select the antenna (Ant-A or
Ant-B) that has the channel you
want to lock. Press ENTER.
IOl-
[] ........
[] ........
Use these
'_---]
[]
buttons
on the remote:
DJUST to
select a channel
_
CANCEL
ENTER
_
MENU
to enter
to cancel
to go back
Use the ADJUST buttons or
CHANNEL, buttons to choose
the channel you want to lock.
Press ENTER.
Repeat the steps above to lock
additional channels. When you
are finished, press the HOME
button to turn off the menus.
TV LOCKED
B_ CHANNEL
Secrtet code : ....
52
Chapter
2: Operating
When you try to view a locked
channel, you will be asked to
enter your four-digit secret
code. Enter the code to
temporarily
disable the :lock.
The lock will be enabled again
when you turn the TV off.
Your Projection
TV
canceling
parental
or changing
lock
O Press the _[ENU button. The
Main Menu will appear on the
screen.
Select "Advanced Features"
using the ADJUST buttons;
press ENTER.
You will see this
screen if you locked
the TV by time.
[]
USE PARENTAL
O Select "Use Parental Lock"
using the ADJUST buttons;
press ENTER.
LOCK
Lock the TV
O
bytime
Secret
: ON
code : ....
After you turn the "IV
Enter the four digits of your
secret code using the number
buttons (0-9); press ENTER.
OFF, you will not be
able to watch the TV
without
the code.
Use these
You will see this
screen if you locked
the TV by channel
buttons
[]
NUMBER
KEYS
[]
ENTER
[]
USE PARENTAL
on the remote:
to enter a 4-digit
to enter
I'_
MENU
code
to go back
LOCK
Lock the TV
by channel
:ON
O Secret code : ....
After
Use these
buttons
NUMBER
KEYS to enter
[]
ENTER
to enter
on the remote:
1"_
a 4-digit
MENU
TV by
buttons
press
turn off
If you were locking the TV by
channel, ul_e the ADJUST
buttons to place the cursor next
to the channel whose, lock you
want to cancel. Press ENTER.
you turn the TV
OFF, you will not be
able to watch the "iV
without the code.
[]
If you wer_ locking the
time, use t]_e ADJUST
to select. "Lock at," then
the CANCEL button to
the lock.
code
to go back
@ Press
the CANCEL button to
unlock that channel, or use the
ADJUST buttons to change the
channel to a new one.
Press the MENU button
to return to the Advanced
Features
menu.
_>Important:
If you forget your four-digit
Using the Advanced
Features
secret code, please see page 85.
53
Using
Super
to StarSight
Quick
View
if you
haven't
subscribed
QV
Super-Quick-View
allows you to cycle through a list of up to ten
numbers with the SQV button. You use the menu,; to add channels
to the list or to remove channels from the list. You can also add
channels to the list using only the remote control.
customizing
the Super Quick
View list with tlhe menus
[]
ADVANCED
[]
Set the Timer
FEATURES
[]
[]
Use Parental Lock
Set SuperQu ckView
Use Advanced
[]
Reset Audio/Video
[-_ADJUST
to select
[]
O Use the ADJUST buttons to
select "Advanced Features."
Press ENTER.
PIP
buttons
[]
on the remote:
ENTER
to enter
button
programed
to scan through
list of channels.
Press ENTER to edit list.
Use these
[]
ENTER
I_
MENU
buttons
54
A description
cf Super Quick
View will appear. Press
ENTER.
can be
a custom
on the remote:
to go back
SET SUPERQUICKVIEW
Channel
[] ........
[]
Use the ADJUST buttons to
select "Use SuperQuickView."
Press ENTER.
MENU tO
go back
to continue
Ant.
[_
I_
SET SUPERQUICKVIEW
The SuperQuickView
[]
I
I
[]
Use these
O Press the MENU button on the
remote control. The Main Menu
will appear on the screen.
Ant.
Channel
[] ........
Use these buttons
on the remote:
DJUST to
select a position
_
CANCEL
ENTER
_
MENU
Chapter
O Use the ADJUST buttons to
select a positio:a in the list;
press ENTER.
to enter
2: Operating
to cancel
to go back
Your Projection
TV
QV
[]
SET SUPERQLIICKVIEW
Ant.
Channel
[] ........
Ant.
Channel
on the remote:
DJUST to
select an input
[_
CANCEL
[]
ENTER
_
MENU
[]
SET
O
You can clear the antenna
pressing CANCEL.
[] ........
Use these buttons
-]
O Use the ADJUST buttons to
select an a:atenna (_at-A or
Ant-B). Press ENTER.
to enter
to cancel
to go back
SUPERQUICKVIEW
Ant.
Channel
Ant-A
001
[] ........
Ant.
r_
by
Channel
........
O Use the ADJUST buttons,
CHANNEL buttons or number
buttons to add a channel to the
list; press ENTER. You can
clear a ch_.nnel by pressing the
CANCEL button.
[] ........
Use these buttons on the remote:
[_
[]
DJUST to
select a channel
I-_
CANCEL
ENTER
[_
MENU
to enter
to cancel
to go back
0 Repeat steps 0, 0, and 0
customi[ze the Super Quick
View mere ory.
O Press the :MENU button
this menu.
adding
channels
to the list with
the remote
to
to exit
control
O
Use the channel controls or number buttons
the channel you want to add to the list..
to tune the TV to
0
Press and hold the SQV button for aboat 2 seconds. When you
release the button, the letters "SQV" will appear under the
channel number, indicating that the channel has been added to
Super Quick View memory.
[:>Important:
If the Super Quick View memory is full, the letters
when you release the SQV button.
E>Important:
Once you've added a channel to the SQV memory, the letters "SQV"
appear under the channel number any time t:he channel number is
displayed, even if you tune 1;othe channel in another manner.
Using
the Advanced
Features
"SQV" will flash
55
Using
Super
StarSight
Quick
View
if you've
subscribed
to
QV
When you subscribe to StarSight,
you can use the SQV button to
cycle through a list of channels. You can create this list yourself,
using the "Customize
Channels" option in the menus, or you can
use a "theme list" created by StarSight.
For more information
about using Super Quick View with
StarSight,
please see Booklet
#3, "StarSight
Operating
selecting
choice
[]
ADVANCED
[]
Set the Timer
[]
Use
[]
[]
SuperQuickView
Choices
Use Advanced
[]
Reset
Parenta!
Lock
buttons
--
the ADJUST
select "Advanced
Press ENTER.
buttons to
Features."
_]
MENU to
go back
to enter
O
Use the ADJUST
buttons
SUPERQUICKVIEW
CHOICES
Use these buttons
[]
O
on the remote:
ENTER
to enter
_
MENU to
go back
Use the ADJUST buttons to
select the way you want to
use Super Quick View: by
customizing
tile channel list or
by selecting an S QV theme.
Press ENTER.
customizing
View list
CUSTOMIZE
Ant
CHANNELS
Channel
[] ........
[]
56
Ant.
Channel
........
buttons
on the remote:
DJUST to
select a position
_
CANCEL
ENTER
F_
MENU
Chapter
to enter
2: Operating
the Super
Quick
O Use the ADJUW[ buttons to
select a position in the list;
press ENTER.
[] ........
Use these
[_]
to
select "SuperQuickView
Choices." Press BNTER.
Channel SuperQuickView
will scan
through your list of up to 10
customized
channels.
[]
on the screen.
O Use
on the remote:
lCustomize
Channels
}
Select an SQV Theme
E_ADJUST
to select
View
Press the MENU button on the
remote control. The Main Menu
will appear
roqENTER
_---]ADJUST
to select
Quick
PIP
Audio/Video
Use these
[]
O
FEATURES
a Super
Guide."
to cancel
to go back
Your Projection
TV
QV
[]
CUSTOMIZE
0
CHANNELS
Ant.
Channel
Ant-A
---
Ant.
[] ........
-_
[]
Channel
I'_
O Use the ADJUST buttons to
select an antenna (Ant-A or
Ant-B). Press ENTER.
You can clear the input
pressing CAiNCEL.
[] ........
Use these buttons
on the remote:
DJUST to
select an input
I_
CANCEL
ENTER
r_
MENU
to enter
to cancel
to go back
O
[]
CUSTOMIZE
O
CHANNELS
Ant.
Channel
Ant-A
001
Ant.
_
[] ........
Use these
[_
[]
Channel
........
H
[] ........
buttons
Use the ,aJ3JUST buttons,
CHANNEL buttons, or number
buttons to a,iid a channel to the
list; press ENTER. You can
clear a channel by pressing the
CANCEL button.
on the remote:
DJUST to
select a channel
I_
CANCEL
ENTER
_
MENU
to enter
to cancel
to go back
O Repeat
steps 0, O, and O to
customize the Super Quick
View rnemo::y.
O Press the HOME button
this menu.
selecting
[]
I_
SUPEROUICKVlEW
Customize
I Select
Channels
buttons
--
an SQV theme
For more information
Theme SuperQuickView
will scan through
channels which are currently displaying
a selected topic (SQV Theme).
Press SQV at the SQV Theme Screen
to select a topic.
ADJUST
to select
to exit
CHOICES
an SQV Theme[
Use these
by
about
selecting a Super Quick "View
theme with StarSight,
p]Lease
see Booklet #3, "StarSiight
Operating
Guide."
on the remote:
ENTER
to enter
Using the Advanced
r_
MENU to
go back
Features
57
!oi
Selecting
an advanced
PIP function
When you are using the PIP features, there are special functions
you that can occur when you press the PAUSE button. Before using
these advanced functions, you need to choose one in the menu
system. These advanced functions are:
• "TV Still," which allows you to switch the PIP image between still and moving;
• "Snap-shot,"
which allows you to view several frozen PIP
images and one moving PIP image; and
• "Replay,"
which allows you memorize six PIP images and
display three of them at a time.
For more information,
see "Using the Advanced
(PIP) Modes," page 66.
[]
ADVANCED
[]
Set the Timer
[]
Use Parental
[]
Set SuperQuickView
[]
Use Advanced
[]
Reset Audio/Video
Use these
F_-]ADJUST
tO select
[]
will appear
Lock
PIP
[]
on the remote:
ENTER
to enter
USE ADVANCED
Current
button
is
This feature is available on
A(Ant-A) and External Inputs.
[_ADJUST
to select
buttons
[]
[]
USE ADVANCED
[]
Current
Use the ADJUST buttons to
select "Use Advanced PIP."
Press ENTER.
PIP
The picture in the
PIP window will
freeze when the PAUSE
Use these
on the remote:
ENTER
to enter
O Use the ADJUST buttons to
select the advanced function
you would like to use: TV Still,
Snap-shot,
or Replay. Press
ENTER.
I_MENUto
go back
PIP
setting
: Replay
O Replay Speed
: 1
Three images of
revious scenes will
e shown on the screen after the PAUSE
button is pressed.
Timing between
images can be controlledby
adjusting
speed.
This feature is available on
Antenna A (Ant-A) and External inputs.
Use these buttons on the remote:
[_ADJUST
to select
58
Chapter
[]
on the screen.
O Use the ADJUST buttons to
select "Advanced Features."
Press ENTER.
F_IMENU
tO
go back
setting
:TV Still
O
pressed.
Antenna
O Press the MENU button on the
remote control. The Main Menu
FEATURES
buttons
Picture-in-Picture
ENTER
to enter
2: Operating
I_MENU
to
go back
Your Projection
If you select "Replay," the next
option will be "Replay speed."
Use the ADJUST buttons to set
the replay speed from i to 9.
(1=short interval and 9=long
interval.) Press ENTER. (See
"Using the Replay feature:" on
page 74 for more information..)
Press the MENU button
to return to the Advanced
Features
menu.
TV
Resett,
sound
and
the
pic uro
This feature allows you to reset
their factory level or settings.
all audio and video functions
Certain settings will not reset, including volume,
speaker, monitor out, and closed captioning.
[] AOVANCEO
FEATURES
I
[]
Set the Timer
[]
[]
Use Parental Lock
Set SuperQuickV ew
[]
Use Advanced
[]
Reset AudieNideo
Use these
-_--]
[]
DJUST
to select
RESET
I
PIP
buttons
[]
on the remote:
ENTER
to enter
I
F_
MENU to
go back
"Listen
to
to:,"
O Press the MENU button on the
remote control. The Main Menu
will appear on the screen.
O Use the ADJUST
select "Advanced
Press ENTER.
buttons to
Features."
Use the ADJUST buttons to
select "Reset Audio/Video."
Press ENTER.
AUDIO/VIDEO
O A message explaining this
feature will appear. If :you want
to continue, press ENTER.
This feature will
reset all of the
audio and video
functions
to their
initial settings,
It will also unlock any A/V functions
that you have leckedin
that menu.
Use these buttons
[]
on the remote:
ENTER to reset
MENU to go back
O The screen vrill return to the
Advanced Features menu, and
the A/V fimctions will be reset.
_>Important:
This feature will also unlock any A/V functions
locked in the Lock A/V Functions menu.
DImportant:
You can also use the A/V reset button
the A/V functions.
Using the Advanced
Features
that you have
on the control
pane]L to reset
59
_l
CHAPTER
Using
the THREE
Special
Features
In addition to the basic and advanced features explained in the
previous chapter, this Projection TV offers the user several special
features not generally available on other brand Projection TVs.
This chapter will explain how to use these diLstinctive features. It
contains the following topics:
Understanding
Using
the
]:Displays
the Off-Timer
Using the Advanced
(PIP) Modes
Using
On-Screen
the
Active
Picture-in-Picture
A/V Network
Feature
61
Understanding
the
On-Screen
Displays
Your Projection TV provides an on-screen summary of the current
settings for the TV or cable channels, as well as the information
related to Extended Data Services (XDS). XDS allows broadcasters
to supply you with the current time, channel information
(such as
call letters and the network name), and program information
(such
as the program name and program description).
To view this
information,
press the display button (DISPLAY) on the remote
control to cycle through all the information.
a_Ant-A 023 ESPN
Stereo & SAP
The first time you press
DISPLAY, you will see a
display like this, if your
main source is an antenna:
Lov'LCU
Thursday
The first time you press
DISPLAY, you will see a
display like this, if your
main source is an input:
Input-1
S-VIDEO
This setting shows:
• the input name (Input-i),
• at_ S-video cable was connected,
• the day of the week and time.
Thursday
The second time you
press DISPLAY, you will
see a display like this:
10:23 am
O This setting shows:
• the sound is comin8 from the :main
image,
• the antenna (A) and channel
number (23),
• this channel's call1 letters or name,
• stereo and SAP are available,
• this channel is programmed
into
super quick view (SQV) memory
and quick view (QV) memory,
• the day of the week and the time.
10:23 am
I
network name
I
program name
I
This shows where the network
name and program name will
appear if the broadcaster
is
supplying that information
via
XDS.
This shows where the program
description
will appear if the
broadcaster
is supplying that
information
via XDS.
The third time you
press DISPLAY, you
will see a display like
this:
program description
DImportant:
62
If the broadcaster
is not supplying information
via XDS, then an
error message will appear ("No name available,"
"No description
available"). Also, the "call letters" will not appear.
Chapter
3: Using the Special
Features
t Using
the Off-Timer
This special feature allows you to set the Projection TV to turn off
automatically.
You can set the TV to turn off aJ?ter a period of time
ranging from 10 to 120 minutes, in ten minute intervals.
In this
section you will learn:
• Setting
• Changing
the off-timer,
or canceling
Using the Oft;timer
and
the off-timer,
63
Setting
the off-timer
O Press the OFF-T button on the
remote control. The off-timer
display will appear on the
screen, showing 1;hat the timer
is currently set fi)r 120 minutes.
0
TV Off timer 120 min.
Select how long you want the
Projection TV to stay on by
repeatedly
press:rig the OFF-T
button. The time will decrease
in 10 minute intervals each
time you press the button.
O
When you reach the time you
want, stop pressing the button.
The off-timer display will
disappear
after a few seconds.
O
To view the amount
of time
left in the off-timer, press
the OFF-T button once. The
on-screen display shows the
amount of time remaining.
[_Important:
During the last minute before the Projection
"Off-timer 1 min." will flash in red to remind
is set.
TV Off timer
64
Chapter
3: Using
1 min.
the Special Features
_r turns off,
you that the off-timer
Changing
or canceling
TV Off timer
10 min.
the
0
off-timer
Press the OFF-T button on the
remote ccntrol. An on-screen
display will indicate the
amounl; of time remaining
until
the Projection TV turns off.
O Repeatedly
press the
OFF-T button to change the
remaining
time or to cancel the
off-timer. The off-timer is
canceled when "---"
appears
instead of the remaining
time.
Using the Off-timer
65
Using
the Advanced
Picture-in-Picture
(PIP)
Modes
One of the special features of the TV is the adwmced picture-inpicture (PIP) mode, which allows you to view two different pictures
at the same time. In this section you'll learn:
• Activating
the PIP
image,
• Changing
the picture
in the PIP
• Exchanging
the picture
the main image,
• Moving
the PIP
• Freezing
,Warning:
66
the
and
sound
image,
of the PIP image
and
image,
PIP image,
• Using
the Snap-shot
• Using
the
Replay
feature,
and
feature.
If you are watching Antenna-B
as the main image and
Antenna-A
as the PIP image, DO NOT exchange the images.
You will not be able to exchange the images back See page 80 in
the Troubleshooting
section for more information.
Chapter
3: Using the Special
Features
Activating
the
PIP
image
O Select the number of the TV
channel you want to view with
the channel control.
000
0
SSS
O Press
the PIP button.
_000_
_O00U
_0_
A PIP iraage will appear
corner of the screen.
_Ant-A 023 ESPN
Stereo & SAP
in the
PIP A023
_Ant-A 023 ESPN
Stereo & SAP
Press P]:P again within 10
seconds:: the PIP image will
reduce to a smaller size.
PIP A 023
(If you wait longer than 10
seconds tLe PIP image will
disappear
when you press the
PIP button.)
Press tkLe PIP button once again
to cancel the PIP image.
_Important:
When the main image is black and white,
appear in black and white.
_Important:
If you move the PIP image and then turn it off, it will remain
new position when you turn it, on again.
_Important:
Do not press the PIP button
is not receiving broadcasts.
Using the Advanced
the PIP image will also
while you are watching
Picture-in-Picture
(PIP) :Modes
a channel
in its
that
67
Changing
the picture
in the
PIP
image
When you first activate the PIP image, as described on the previous
page, you will probably see the same picture in the small image as
you do on the main image. This is because both images have the
same "source." A "source" is any signal that your TV is receiving
through the antenna terminals
or through the input terminals.
If you want to see a different picture in the PIP image, you need to
change its channel or change its source.
changing
the channels
PIP image
of the
Because your Projection TV offers
"two-tuner"
PIP, you do not need
to change sources to view a different channel in the PIP image.
O Make sure Antenna A is the
source for ygur PIP image.
O Press the small PIP channel
button (CI-L_qNEL) on the
lower half of your remote to
change tl_e channel of the PIP
image.
DImportant:
68
To use the "two-tuner"
PIP, you :must have made a connection
the Antenna A terminal on your Projection TV.
Chapter
3: Using the Special
Features
to
changing
the
source
These instructions
in the PIP image:
source.
of the PIP image
explain a common way to see a different source
using a VCR connected to Iaput-1 as a PIP
0
Turn your VCR on and select a
channe:[ on the VCR that is
different 1:hun the channel
see on your WV screen.
you
O
Press the SOURCE button on
the remoLe control repeatedly
until the VCR picture appears
in the PIP image
O
If you want to select a source
other than the VCR, continue
pressing Lhe SOURCE button.
The source will change as
follows:
LTV--,I nput-l--,Input-2---*ln put-3 j
The name. oF the source will
appear above the PIP image.
_Important:
You cannot select Antenna
Antenna A.
_Important:
To change the source of the main image while a PIP image is
displayed, press the INPUT button on the control panel or on the
remote control.
Using the Advanced
B as a PIP source when watching
Picture-in-Picture
(PIP) Modes
69
Exchanging
image
and
the picture
and
the main image
sound
exchanging
Press
of the PIP
the
picture
the ENTER/EXCH
button
to
exchange the picture of the main
(background)
image and the :PIP
image.
000_
_O00Q
I ,:::,0
0 O U
i>Important
DO NOT exchange images when
the main image is Antenna-B
and
the PIP image is Antenna-A.
You
will not be able to exchange the
images back. See page 80 in the
Troubleshooting
section for more
information.
_=Ant-A 023 ESPN
Stereo
& SAP
I
_
Input.1
VCR-1
VCR-1
exchanging
Press
the
the sound
SWAt'
button
to switch
tlhe sound of the speakers
bel;ween
tlhe main ima_._e and the PIP
image. The "musical
note" icon
indicates
the [m age from whJich
sound is being played.
000_
_Important:
The sound from the PIP image
not be in stereo.
d,i_Ant-A 023 ESPN
Stereo & SAP
Art-A 023 ESPN
Stereo & SAP
_PIP
70
Chapter
3: Using
the Special
Features
Input-1
will
Moving
the PIP
image
Press and hohi down the ADJUST
buttons to moce the PIP image.
DImportant:
If you move the PIP image and then turn it off, it will remain
new position when you turn it on again.
Using the Advanced
Picture-in-I
icture (PIP) Modes
in its
71
Freezing
the PIP
image
ill
[]
USE ADVANCED
Current
setting
:W Still
0
The picture
PIP window
freeze
when
pressed.
Antenna
PIP
in the
will
the PAUSE
button
is
This feature is available on
A(Ant-A)
and Extemal Inputs.
Use these buttons
'_----1 DJUST
to select
[]
on the remote:
ENTER
to enter
_
=
O0
Select "Use Advanced PIP" in
the Advanced Features menu
and set it to "TV Still." (See
"Selecting an advanced PIP
function," page 58.)
O Use the MEI_U button
to the normal picture.
to return
MENU to
go back
=
=
0
=
Ld
Press the PAUSE button to
freeze the PI]? image on the
screen.
0 Press PAUSF, again to return
a live picture.
000c=_
c::_O 0 O
_000_
TV Still
disappears
after a
few seconds
72
Chapter
3: Using the Special
Features
to
Using
[]
the
Snap-shot
USE ADVANCED
Current
O
A snapshot
feature
PIP
setting
:Snap-shot
of the
picture in the PiP
window will be recorded
each
time the
PAUSE button is pressed.
The screen
will display the last two snapshots.
This feature is available on Antenna A
(Ant-A) and External Inputs.
Use these buttons on the remote:
[]
ADJUST
to select
[]
ENTER
to enter
i_
0 Select "Use Advanced PIP" in
the Adwmced Features menu
and set it to "Snap-shot."
(See
"Selecting an advanced PIP
function." page 58.)
O Use the MENU button
to the normal picture.
1:oreturn
MENU tO
go back
Press the PAUSE button once;
a frozen PIP image and a
moving PIP image will appear.
%0o0
_$8
O Press the PAUSE button again;
a third I='IP image will appear,
moving. TILe previous two PIP
images will be frozen.
O
OOO_
_OO0
Each time you press thE:
PAUSE button, the PIP images
will shift; upwards one by one:
the top image will be replaced
by the second image, the second
image will be replaced by the
third, and a new moving image
will appear in the third space.
To cancel the PIP image,
the PIP button.
if the PIP image
PAUSE
®
[]
[]
if the PIP image
PAUSE
®
[]
[]
is off
®
<,,3
[]
[]
[]
_"D
"
[]
[]
[]
PAJSE
PAUSE
E__O
E_O C
is on
PAUSE
®
[b3
[__:3 c
*A, B, C, D: the moving images
*a, b, c, d: the frozen images of A, B, C, and D at the instant
button is pressed.
Using the Advanced
press
Picture-in-Picture
the PAUSE
(PIP) Modes
73
Using
the
Replay
feature
O
[]
USE ADVANCED
O
Current
PIP
setting
:Replay
Three images of
previous scenes will
be shown on the screen
and set it to "Replay." (See
"Selecting an advanced PIP
function," page 58.)
after the PAUSE
button is pressed.
Timing between
images can be controlled by adjusting
speed.
This feature is available on
Antenna A (Ant-A) and External Inputs.
Use these buttons on the remote:
O Set
the replay speed between
(short inte::val) and 9 (hmg
interval).
I--_-IADJUST
[] ENTER
[_ MENU
to
to select
to enter
go back
O
[]
USE ADVANCED
[]
Current
PIP
setting
: Replay
Speed
• 1
Three images of
revious scenes will
e shown on the screen after the PAUSE
button is pressed.
Timing between
images can be controlledby
adjusting
speed. This feature is available on
Antenna A (Ant-A) and External Inputs.
Use these buttons on the remote:
O
Replay
F-_--]ADJUST
to select
[]
ENTER
to enter
Select "Use Advanced PIP" in
the Advanced Features menu
Use the MENU button
to the normal picture.
1
to return
O Press
the PAUSE button. The
TV will memorize six frames of
video from the main image and
display the first three of these
frames as PIP images. (The
interval between the frames is
[_.MENUto
go back
determined
by the replay
set in step _.)
speed
[]
[]
[]
000_
o000
oO00U
_0o_
Each time you press the:
PAUSE buLton, the mernorized
frames will shift upwards.
D
To cancel the PIP images,
the PIP button.
*al - a6 : memorized
press
frames
PAUSE
PAUSE
PAUSE
PAUSE
PAUSE
0 [] 0 [] O
[]
[]
74
Chapter
,',.-I_]
[]
.,.-_
[]
[]
[_
3: Using the Special Features
the TV will automatically
_>Important:
[]
If you turn
turn. off.
the TV off while it :is set to Input-1,
it will return
to its
€ Using
the Active
AN
Network
Feature
The A/V Network is a special feature that makes it easier to use
your Projection TV and your other Mitsubi,_hi A/V components
together. When you connect the A/V Network, you can point the
remote control at the Projection TV, and it will "pass" the remote
control command to the other components.
Additionally,
if you have a Mitsubishi VCR with Active APV"Network, it is easier and faster VCR's play command (Auto Play).
_>Important:
The A/V Network is only available for select Mitsubishi
components.
If you subscribe to StarSight,
':'Auto Play" is not
available.
before
J
J
J
J
_>Important:
you begin
You must have connected an A/V Network cable from the Active
A/V Network terminal
of your Projection l.W to the A/V Network
IN terminal
of your VCR. See Booklet
#1, "Mitsubishi
Installation
and Setup Guide."
You must have connected your VCR to Input 1 of your TV.
You must have set your Projection TV's "._JV Network" setting
to "Active" or "Basic." See "Setting the ._dV Network," page 32.
Your VCR's remote control switch should 5e set to '_CR-A."
Your VCR's video mute setting should be _urned ON.
When using the Active A/V Network, you shoald
remote control at your Projection TV.
Using
Auto
always
point your
Play
When you press PLAY on the remote:
•/ Active A/V Network will turn your VCR on and begin playing
the tape (if any).
J Active A/V Network will turn your TV on and switch it to
INPUT-1.
When you turn your Projection TV off:
€" If your TV has been set to "Active," your VCR will turn off,
unless it is playing or recording.
_>Important:
If you leave the Projection TV turned on and:
- it is set to Input-l,
and
- it does not receive a signal for five minutes, and
- you do not use the menus for five minutes, then:
the TV will automatically
turn off.
DImportant:
If you turn the TV off while it, is set to Input-1, it will return to its
previous antenna and channel setting when you turn it back on.
Using the Active A/V Network
Feature
75
A
CHAPTER
FOUR
Troubleshooting
Even though you're now familiar with the basi,_ and advanced
operations
of the Projection TV, you may run into trouble from time
to time as you become accustomed
to the Proje,_tion TV. This
chapter offers solutions to some of the common problems you may
encounter. We suggest that you consult this chart before contacting
a Mitsubishi
service representative.
77
Troubleshooting
Problems
The remote
work.
Possible
control
doesn't
Check
installed
(cont.)
Solutions
For
that the batteries
are
More
InformatJion
See "Getting ready to use
the remote control" in
correctly.
Chapter
1 for an explanation
of how to install batteries
in
the remote control.
The TV takes several
seconds to respond to button
commands.
You can't
access
a channel.
You can't see a different
channel in the reduced PIP
image.
Check that the select button
is set to "TV."
See "Remote
Be sure that you are
pointing the tip of the
remote control toward the
TV from a distance of no
more than 20 feet.
See "Gett:!ng ready to use
the remote control" in
• Use the ENTER
button
buttons
and functions" in Chapter 1,
which explains where :the
select buttons are located.
Chapte:r
pointers
control.
to
], which contains
f_r using the _emote
See "Changing channels" in
Chapter 2, which explains
the function of the ENTER
button.
avoid delays.
Be sure that the channel you
want to view is programmed
into memory.
See "Memorizing
channels"
in Chapter 2, which explains
how to program channels
into the _I"V'smemory.
Check that the TV is tuned
to the correct input source
(antenna) for that channel.
See "Selecting the input
source" it. Chapter 2, which
explains how to change the
input source.
Use the SOURCE button to
change the source of the PIP
image.
Make sure you have a
second source, such a VCR,
turned on and connected to
your TV.
78
control
Chapter
4: Troubleshooting
•
See "Usir g the Advanced
Picture-in-Picture
(PIP)
Modes" on page 66.
Possible
Problems
On-screen displays appear
each time you adjust a
function.
•
There's no sound even when
the volume is turned up.
Solutions
For
You forget the code you used
to set the parental lock.
You can't program the
Projection TV to turn on
automatically.
•
See "Understanding
the OnScreen Displays" in Chapter
3 fc,r a full explanation
of
the on-screen displays.
Check that the MUTE
button isn't on.
Se_ "Remote
Use the alternate
procedure
that doesn't require the use
of the code.
The Projection
locked.
The sound doesn't
, image
match
on screen.
the
See: "Adjusting the, sound" in
Chapter 2, which explains
how to adjust the "Listen to"
and "speaker" settings.
•
See, the Appendix,
"Procedure for Bypassing
the Parental
Lock."
SeE, "Using the parental
lock" under "Using the
Advanced Features"
in
TV may be
There is a large black
rectangle on the screen.
The TV has been set to
"text" mode, but there is no
text information
being
broadcast.
Troubleshooting
2.
See "Adjusting the sound" in
Chapter 2, which explains
how to adjust the "Listen to"
set_Sr.g.
The TV's "Listen to:" setting
may be set to "separate
audio program" (S.A.P.).
You may have "swapped"
the sound with the PIP
image.
control buttons
and f_lnctions" in Chapter 1,
wh:ich explains the use of
the NIUTE button.
Chapter
•
Information
This is part of the normal
operation of the TV.
The TV's "Listen to:" setting
may be set to "separate
audio program" (SAP) or' the
"speaker" setting may be set
to the wrong setting.
•
More
•
See "Using the Advanced
Picture-in-Picture
(PIP)
Modes" on page 66.
See "Using the clo:sed
caption decoder" under
"Getting started" in
Chapter 2.
79
Troubleshooting
Problems
Possible
You have problems when
you "exchange" the picture
of the PIP image and the
main image.
Antenna-B
does not appear
as a PIP source.
You cannot see a picture
when you play a tape in the
VCR.
For
Solutions
You should not exchange the
images when the main
image is Antenna-B
and the
PIP image is Antenna A. If
you do, you must press the
INPUT button to return to
viewing
•
(cont.)
•
Antenna
Antenna
More
Information
•
See "Using the Advanced
Picture-in-Picture
(PIP)
Modes" ._n page 66.
•
See "Using the Advanced
Picture-in-Picture
(PIP)
Modes" on page 66.
•
See "Selecting the input
source" for an explanation
about changing the input.
B.
B is not available
as a PIP source when you
are watching Antenna A.
If you connected your VCR
with A/V cables, use the
INPUT button to select the
input (Input 1, 2, or 3) that
the VCR is connected to.
The colors in the Projection
TV's picture are not aligned.
The colors in the Projection
TV's picture tubes may have
become misaligned.
You will
need to align the colors
yourselfi
It takes
This is normal. It takes
several seconds for the infra-
several
seconds
the cable box to change
channels.
80
for
red (IR) emitter to pass the
remote control signals to the
cable box.
Chapter
4: Troubleshooting
See "Adju,;ting the color
alignment" in Chapter 2,
which explains how to align
the colors.
Cleaning
Normally,
TV clean.
light dusting
with a non-scratching
duster
will keep your
If you want to wipe down your TV, turn it off"aad unplug it. Then,
wipe it gently with a soft cloth slightly moistened with water.
You can add a few drops of miM liquid deterge_t to the water for
oily dirt on the cabinet ONLY.
When cleaning
of the screen.
the screen,
wipe up-and-down,
DO NOT allow liquid to enter
DO NOT use strong
DO NOT use spray
the TV through
the ventilation
slots.
or abrasiw_ cleaners.
liquids
or cleaners
DO NOT scrub or rub the TV harshly.
DO NOT use cleaners
Troubleshooting
going with the grain
or detergent
directly
on the TV's surface.
Wipe gently.
on the Projection
TV's screen.
81
Caution
,Warning:
_Important:
and
care
Don't leave stationary
images on-screen for more than 10 minutes.
These images can scar the Projection TV, causing permanent
damage to the picture tubes. Some examples of stationary
images
include the following:
• stock-market
reports,
• station logos (especially bright ones),
• video game displays,
• shopping channel displays,
• the television's
own on-screen displays.
If you plan to place speakers next to the Projection TV, make
sure they are magnetically
shielded. Ordinary speakers will
cause distortion in the picture due to their strong magnets. This
distortion, however, will not harm the picture tubes.
For maximum enjoyment
Color TV, please read the
and apply them properly.
Installation
and Setup
E>Important:
82
and safe operation of your Mitsubishi
"IMPORTANT
SAFEGUARDS"
carefully
(Please see Booklet
#1, "Mitsubishi
Guide.")
When you are disconnecting
AV cables from the front control panel,
be careful not to hit or scratch the front of your Projection TV. (TS5087, TS-5089 only)
Chapter
4: Troubleshooting
Calling
for
service
If you are unable to correct a problem with yoar Projection TV,
consult your Mitsubishi dealer or Mitsubishi Authorized
Warranty
Service Center.
Do not adjust
Do not remove
any controls
not described
the protective
in Lhis owner's
guide.
back cover of this unit.
If you see one of the following display on yo ar screen, you ,_hould
not change any settings. These are special displays used by the
factory.
FACTORY
OPTIOn1 MP'NU
MENU
Inilial
Hotel
: OFF
E2 Initial
3Dia
Power Restore
Antenna
: OFF
:2
Speaker
3D Y/C
Input
When muting
:3
: ON
_
Auto clock
Woofer
SS ATTACH
Firmware
Version
Number
: ON
Ext
: ON
: ON
:
:
:
:
ON
ON
OFF
ON
Initial
Hotel
Power Res'ore
Antenna
: OFF
: OFF
:2
Input
When muting
: 3
: ON
1.04
If these displays appear, make sure that all of the on/off settings
are the same as the illustrations
above and then turn the
Projection TV off. If any of the settings are different from the
illustrations
above, turn the Projection TV off and consult your
Mitsubishi dealer or Mitsubishi Authorized
_Varranty Service
Center.
Troubleshooting
83
Procedure
APPENDIX
for Bypassing
Cut along dotted
the Paren-tal
Lock
line and file after reading.
After you set the lock, you will need the sec:cel; code in order to:
• view a locked channel,
• view the locked TV, or
• cancel the lock.
If you forget the code, you can view the locked. TV without entering
the code. To do this, simply press the buttons on your remote
labeled "QV" and "9" at the same time whenever your secret code is
requested.
_>Important:
Unlocking with this procedure is only temporary.
completely, follow the procedure below:
To cancel the lock
O
Turn on your Projection TV. If the TV requests
code, press the "QV" button and the "9" button
control at the same time.
O
Press the MENU button to view the mai_ menu. Use the
ADJUST buttons to select "Advanced Feotures." Press ENTER.
Use the ADJUST
ENTER.
buttons
to select "Use Parental
your secret
on the remote
Lock." Press
Press the "QV" button and the "9" button on the remote
at the same time, instead of entering the code.
If you were using "lock by time," press the CANCEL
turn off the lock.
If you were using "lock by channel,"
place the cursor next to the channel
turn off. Press ENTER.
control
button
use the ADJUST buttons
whose lock you want to
to
to
Press the CANCEL button to unlock that channel, or use the
ADJUST buttons to change the channel to a new one.
Press the MENU
menu.
_>Important:
button
to return
to the "Advanced
Features"
You must use the remote control included wiLh this Projection
TV. You cannot use a remote control from another Mitsubishi
component,
and you cannot use any "Univer_ al" remotes from
other manufacturers.
85
Index
A
A/V functions, locking ......... 40
A/V Network
active ................................
75
setting ..............................
A/V receiver, operating with
remote ........................
18,
A/V reset button ....................
Active A/V Network ............
adding channels ..................
adjust buttons ............. 4, 9,
adjusting the color
alignment .........................
advanced menu ...................
advanced PIP functions ......
advanced PIP modes .. .........
alignment,
color ..................
Ant-A, Ant-B .......................
audio
adjusting
..........................
function button ............ 4,
input terminal ....................
resetting ...........................
Auto Play .............................
AUX button ...........................
32
19
3
75
31
11
34
36
58
66
34
21
41
11
3
59
75
9
B
balance .................................
41
bass ......................................
41
batteries,
installing ............... 5
brightness
............................
44
buttons, remote control ......... 7
bypassing the lock ............... 85
C
cable box
codes .................................
17
operating with remote 16, 17
cancel button .....................
3, 9
caution and care .................. 82
CC ........................................
46
center channel ..................... 42
channel(s)
adding ...............................
changing ...........................
controls ...........................
deleting .............................
lock ...................................
H
3]
2'.).
3, 9
"3:1
52
memorizing
......................
26
naming .............................
;39
cleaning ...............................
81
clock, setting ........................
28
closed caption ................ 44, 46
codes
cable box ...........................
17
VCR ..................................
16
color .....................................
44
color alignment
................... 34
color temperature
................ 44
contrast ................................
44
control panel, overview ......... 2
D
day button ...........................
11
deleting channels ................ 31
display button .........................
9
displays, on-screen .............. 62
hall .......................................
home button ..........................
41
9
I
information
button
..............
11
Input-l, Input-2, Input-3 .... 21
input
audio ...................................
3
button .............................
3, 9
renar,_ing ..........................
38
S-video ................................
2
selecting ...........................
video ...................................
21
3
installing batteries ................ 5
internal ................................
42
L
laserdi_c, operating with
remote ........................
17, 18
light button ............................
9
list button ............................
11
listen to ................................
41
lock .................................
50-53
bypass!rig .........................
85
locking A!V functions .......... 40
E
enter button ................. 3, 9, ii
exchange button ........ 9, II, 70
external
...............................
42
F
fixed .....................................
42
front panel, overview ............. 2
G
M
memoriz:ng
channels .......... 26
menu buLton ......................
3, 9
menu type ............................
36
menus, understanding
........ 25
monitc.r out ..........................
42
mono ....................................
41
moving PIP ..........................
71
mute cor_trol ..........................
9
Getting to Know Your
Projection TV .................... 1
guide button ........................
ll
87
N
naming
number
R
the channels ........... 39
buttons ................... 11
O
off-timer ...............................
off-timer button ...................
on-screen displays ...............
on/off, turning the TV .........
Operating
Your
Projection TV ...................
overview
control panel ......................
remote control ....................
63
11
62
20
13
2
5
T
remote control
about .................................
buttons ...............................
operating audio
component ............... 18,
operating cable box .... 16,
operating VCR ........... 15,
overview .............................
15
7
19
17
16
5
renaming the inputs ........... 38
replay .............................
58, 74
resetting sound and
picture ..............................
59
test buttons
..........................
test screen ...........................
text .......................................
theme buttorL .......................
time
lock ...................................
4
34
46
11
51
setting ..............................
28
timer reset button ................. 4
timer, setting .......................
tint .......................................
treble ...................................
49
44
41
troubleshooting
...................
TV button ..............................
77
9
S
P
page button ..........................
parental lock .......................
pause button ........................
picture
adjusting
..........................
resetting
...........................
PIP
11
50
11
44
59
activating
.........................
67
advanced functions .......... 58
advanced modes ............... 66
button ...............................
11
changing picture .............. 68
channel button ................. 11
exchanging
picture/sound
................ 70
freezing .............................
72
moving ..............................
71
replay ...............................
74
snap-shot ..........................
73
power button ..................... 2, 9
power indicator
..................... 2
program timer indicator ....... 2
Q
quick view
button .................................
using .................................
88
S-video input terminal .......... 2
SAP ......................................
41
select buttons ........................
9
service ..................................
83
setting the clock .................. 28
sharpness
............................
44
simulate ...............................
41
snap-shot
....................... 58,
sound
adjusting
..........................
resetting ...........................
source button ................. 11,
speaker ................................
standard
menu ....................
StarSight
controls .............................
Telecast, Inc .......................
stereo ...................................
73
41
59
69
42
36
11
1
41
still .................................
58, 72
super quick view
button .................................
9
using .................................
with StarSight
.................
without StarSight ............
surround ..............................
swap button ...................
9
24
Index
24
56
54
41
11, 70
U
understanding
on-screen
displays ............................
understandirLg
the menus...
62
25
V
variable ................................
42
VCR-A, VC,R-B button .......... 9
VCR
codes .................................
16
operating
remote
video
with
.....................
15, 16
adjusting: ..........................
44
function button ............ 4, 11
input terminal .................... 3
resetting ...........................
59
ViewPoint IIJi ....................... 25
volume control ................... 3, 9
W
wake-up
timer
.....................
49
J_
MITSUBISHI
PROJECTION TELEVISION
LIMITED WARRANTY
MITSUBISHI CONSUMER ELECTRONICS AMERICA, INC. ("MCEA") warrants to the original purchaser of this television that if purchased from an
authorized MITSUBISHI Audio/Video Dealer, should it prove defective by reason of improper workmanship and/or materi_d:
a. Parts. The lenticular (i.e. front picture) screen is warranted against defects in materials and workmanship for a period of 30 days. All other parts are
warranted for a period of one year from the date of the original purchase at retail We will repair or replace, at our option, any defective part without charge for
the part. Parts used for replacement are warranted for the remainder of the original warranty period.
b. Labor. For 30 days after the original purchase at retail, we will repair or replace, at our option, the lenticular screen if it proves defective. For all other
parts, we will provide the labor for a warranty repair by an authorized MITSUBISHI service center without charge for oae ),ear from the date or original
purchase at retail.
c. Notice. To obtain warranty service, you must notify an authorized MITSUBISHI service center of any defect within the applicable war:anty time period.
1. TO OBTAIN WARRANTY
SERVICE:
a. Contact your nearest authorized MITSUBISHI service center whose name and address can be obtained from your MITSUBISHI
calling MELA at the address and telephone number provided below.
dealer or by writing or
b. Warranty service will be provided in your home or, if required, at an authorized service shop, provided that your lelevision is located within the
geographic territory customarily covered by an authorized MITSUBISHI service center. If not, you must either deliver 3'our television to an aathorized service
location at your own expense, or pay for any travel and/or transportation costs the service center may charge to and tiom your home. Actual service labor will
be provided without charge.
c. Proof ot' purchase date from an authorized MITSUBISHI dealer is required when requesting warranty service. Prese at your sales receipt or other
document which establishes proof and date of purchase. THE RETURN OF THE OWNER REGISTRATION CARD 1S N DT A CONDITION OF WARRANTY COVERAGE. However, please return the Owner Registration Card so that we can contact you should a question of safety arise which could affect
you.
2. THIS WARRANTY DOES NOT COVER damage caused by: modification, alteration, repair or service of the prodact by anyone other than an authorized
MITSUBISHI service center; physical abuse to, or misuse of, the product; operation in a manner contrary to the instrucdorts which accompar_y the product;
freight damage; or any damage caused by acts of God such as lightning or fluctuation in electrical power. This warrant2€ ah;o excludes all cosls arising from
installation, adjustment of user controls, external antenna systems, service of products purchased or serviced outside _he U S.A., initial technical adjustments
(set-up) and user-required maintenance. Consult the operating instructions furnished with the product for infimnation regarding user controls
3. ANY EXPRESS WARRANTY NOT PROVIDED HEREIN, AND ANY REMEDY WHICH, BUT FOR THIS PROV [SION, MIGHT ARISE BY
IMPLICATION OR OPERATION OF LAW, IS HEREBY EXCLUDED AND DISCLAIMED. THE IMPLIED WARRANTIES OF MERCHANTABILITY
AND OF FITNESS FOR ANY PARTICULAR PURPOSE ARE EXPRESSLY LIMITED TO A TERM OF ONE YEAP,.
4. UNDER NO CIRCUMSTANCES SHALL MELA BE LIABLE TO PURCHASER OR ANY OTHER PERSON FOR ANY INCIDENTAL, SPECIAL OR
CONSEQUENTIAL
DAMAGES, WHETHER ARISING OUT OF BREACH OF WARRANTY, BREACH OF CO NT RACT, OR OTHERWISE.
5. Some states do not allow limitations on how long an implied warranty lasts, or the exclusion or limitation of incidental, special, or consequential damages,
so the above limitations or exclusions may not apply to you.
6.
This warranty gives you specific legal rights, and you may also have other rights which vary from state to state.
7. BEFORE REQUESTING SERVICE, please review the instruction booklet to insure proper installation and correct customer control adjustment. If the
problem persists, contact your nearest MITSUBISHI Dealer for name(s) of authorized MITSUBISHI Service Center(s). If you are unable to 3brain this
information, please call 800-332-2119, or write us at the address below.
MITSU:BISHI
INC.Norcross,PO
Box 5025GA30091-5025
CONSUMER
ELECTRONICS
AMERICA,
I
A
BiSHI
m
RETAIN
THIS PORTION
CUSTOMER
STREET
I
SERIAL
NO.
NAME
ADDRESS
CITY
PHONE
FOR YOUR RECORDS
STATE
(
)
ZiP
PURCHASE
DATE
MO
PLACE
OF PURCHASE
/
/
DAY
YR
MITSUBISHI
MITSUBISHI
6100 Atlantic
Norcross,
CONSUMER
Blvd.
ELECTRONICS
AMERICA,
INC.
GA 30071-1305
© 1995 Mitsubishi Consumer Electronics America, Inc.
871D198B5
Printed in U.S.A