1
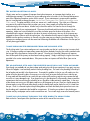
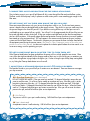
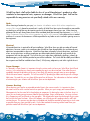
User’s Guide
Safety First!
At Wind River Spas you and your family’s wellbeing is our number one concern.
While we do everything possible to make the safest products available there are some
precautions and potential dangers involved in operating a spa that you as a spa owner
should be aware of...
Risk of Injury
Children
Children are attracted to
water; this puts them at a higher
risk of drowning. Never leave children
unattended in the spa. Always close and
lock down your spa lid after each use, (see
Covers & Lifters in Spa Features section of
this manual). Children are more susceptible
to internal body temperature fluctuation
than adults, because of this we recommend a water temperature that does
not exceed 99 degrees Fahrenheit
for smaller children.
Pregnant
Women
During the early stages of
pregnancy there is a high risk
of fetal damage in water
temperatures that exceed the
bodies natural temperature
of 98.6 degrees
Fahrenheit.
The suction fittings, (see Suction
Fittings in Spa Features section of this
manual), in the foot well of your spa are specifically designed for the water pressure applied
to them. Never restrict the flow of water to these
fittings. Never remove the face of the suction fittings
in the foot well of your spa while it is full and/or
running. It is possible for hair, clothing, and accessories to be drawn to the suction and filter baskets,
(see Skimmer/Filter in Spa Features section of
this manual), if this occurs immediately turn off
all the jets in the spa and/or the spa itself
at the power source, (breaker panel or
sub panel).
Risk of
Electrical Shock
Do not allow any electrical appliances
within 5 feet of the spa at any time.
According to the National Electrical Code
ANSI/NMFP A70-1993 you cannot install
your spa within 5 feet of any metal surfaces
and/or equipment without permanently
grounding that metal surface with no less
than No. 6 AWG (8.42 mm2) solid
copper conductor to the power
terminal box via the bonding
lugs provided.
Controlled
Substances
The use of alcohol, drugs, or
medication before or during the use
of your spa may cause drowsiness
that can lead to drowning. Anyone
suffering from or taking medication for
obesity, heart disease, blood pressure,
diabetes, or circulatory problems
should always consult a physician before using the spa.
www.windriverspas.com
303 - 789 - 2656
Table of Contents
Introduction. ..................................................................................... 1
Health & Safety................................................................................. 2
Hydrotherapy......................................................................................................................2
Safety Features..................................................................................................................3
Operating Procedures...................................................................... 4
Initial start-up.....................................................................................................................4
Chemical Maintenance.....................................................................................................6
Cleaning the filter............................................................................................................7
Draining your spa...............................................................................................................8
Cleaning recommendations............................................................................................9
Spa Features.................................................................................... 10
Spa Side Controls ...........................................................................................................10
Covers and Lifts...............................................................................................................12
Shell.....................................................................................................................................13
Remote Panel.....................................................................................................................13
Jets........................................................................................................................................13
Light(s).................................................................................................................................13
Filter/Skimmer.................................................................................................................13
Pillows.................................................................................................................................14
Air Controls & Diverters..............................................................................................14
Waterfall & Control......................................................................................................14
Suction Fittings................................................................................................................14
Wine Bucket.......................................................................................................................14
Drain.....................................................................................................................................14
Trouble Shooting............................................................................. 15
Not Heating .......................................................................................................................15
No Ozone Bubbles............................................................................................................15
Water On The Ground Around Spa.............................................................................15
Cloudy Water....................................................................................................................16
No Water Pressure From A Jet....................................................................................16
No Air Bubbles Through Jet.........................................................................................16
Disclaimers. ..................................................................................... 18
Winterizing (Freeze Damage)........................................................................................18
(Please read to avoid any installation issues, and unnecessary service charges.)
Introduction
Thank you for choosing to own a Wind River Spa. By doing so you have chosen to own
the best hot tub available backed by the best customer service in the industry.
Over a quarter century of experience building spas specifically for Colorado’s unique climate goes into
every detail of your Wind River. It is this attention to detail that has molded the spa you have today into the
ultimate hot tub experience. Over the history of Wind River many things have changed in our manufacturing process. This means we are always evolving with new innovations and better products in the interest of
building the most stress and worry free spa possible. Providing you with the ultimate relaxation and therapy
experience is the driving force behind our constant product innovations. We understand that poor customer
service is contradictory to the principle of relaxation.
We are proud to say that our helpful staff and inclusive warranty have gained us the reputation for having
the best-backed spa on the market. Achieving this reputation is easy for us because we have cut out the
middle man process that puts the national brand retailers at a disadvantage. We answer only to our
customers and not an out of state spa builder. When you talk we listen! So just sit back, relax, and enjoy
your Wind River Spa.
1
Health & Safety
Hydrotherapy
There are many different reasons for choosing to own a Wind River Spa. Hydrotherapy is the most common
of these reasons. Hydrotherapy has many benefits, some of which you may not be aware of. The history of
hydrotherapy for treatment of a wide array of ailments dates back to the early 18th century in Europe. The
physical conditions that have been relieved throughout history with hydrotherapy are still the cause of too
much suffering today. Today we have an even better understanding of the physical effects that stress has on
our health, and are able to pinpoint certain conditions to stress related activity. This understanding only adds
to the many known health benefits that hydrotherapy offers. Let us tell you about the many rewards that you
as new spa owner will enjoy.
Buoyancy
The decent into the soothing hot water of your Wind River Spa is one of the few times us non astronaut
types get to enjoy the relief of weightlessness. With today’s active lifestyles most people have plenty of valid
reasons for aching joints at the end of the day. Most of us can experience that pain with the physical stress
that gravity alone can cause. The buoyancy of the water relieves gravitational joint stress and allows better
circulation to the joints allowing damaged cartilage to heal. The reduction of body weight you experience
in your spa also relieves the muscles that stabilize your body in normal conditions allowing them to repair
broken down tissue more efficiently.
Hydrothermal Therapy
While buoyancy is important to the concept of hydrotherapy it is the thermal effect that hot water has on the
body that relieves the widest array of symptoms. When submersed in hot water the nerves of the skin send
impulses deep into the body. This helps reduce pain sensitivity while promoting improved blood circulation.
The increase in blood flow stimulates stress hormones and the immune system improving the body’s ability
to fight off a wide array of conditions. Some of these conditions include but are not limited to circulatory
disease, insomnia, diabetes, muscle weakness, atrophy, cramps, premenstrual syndrome, arthritis, balance
disorders, back pain, and muscular-skeletal or soft tissue injuries. Other short-term symptoms like tense
muscles or temporary vertigo can also be treated with a relaxing soak in your Wind River. The hot water in
your spa will also open up the pours of your skin allowing toxins that may have sat below the surface of the
skin for years to evacuate the body.
Massage Therapy
The rewards your spa offers through its massage feature benefit both the mind and body. Relief of muscle
soreness is where the massage feature is most effective. On more physically active days your body can tense
its muscles to the point that a lactic acid will cover your muscle tissue causing soreness and hyperactivity even
as you attempt to sleep that night. A massaging soak in your spa increases blood flow to those muscles while
oxidizing red blood cells. This allows energy from food and oxygen to upload into the muscle with ease
buffing the lactic acid and relieving the soreness. This therapy is so effective it can relieve soreness you may
not even be aware of until it’s gone.
2
Health & Safety
Safety Features
Your Wind River Spa is equipped with many safety features. Most of the safety features are in place to
reduce the risk of mixing water and electricity. These features include various sensors and switches that are
designed for shutting the system down in rare un-safe situations. A “Ground Fault Interrupter” is necessary
in your breaker panel to fulfill the full potential of the spas electrical safety features. Other safety features
include things like cover locks, hand grips for safe entry and exiting of the spa, and secondary suction
sources for your pumps in case of restrictions or foreign objects like clothing getting caught on them. The
orange warning label in your spa illustrated below should be left on and visible to anyone using the spa.
For a more in depth description of your spas safety features refer to this section of the on-line comprehensive
version of this manual at www.windriverspas.com/ownersmanual.
3
Operating Procedures
Initial Start Up
Filling The Spa... Every time you refill your spa you
must remove the filter basket and place the hose down in
the filter compartment as the spa fills, (see Skimmer/
Filter in the Spa Features Section of this manual). This is
important because it primes the pumps of the spa with
water. Failing to prime the pumps can cause an air
pocket to form in the pump. Once the air pocket forms it
will be trapped in the pump and no water can be pulled
through it. If this happens you will hear your pump
running but no water will come from the jets. There
are two solutions to this problem outside of draining and refilling the spa through the filter. The first
and easiest is to place your garden hose against
one of the jets that is designated to the pump in
question. If the pump is running and you can get
enough water pressure into the waterline sometimes
it will burp out the air bubble and start the water flow
from the jets. The other option is to loosen the pumps
suction union with the pump running to bleed the air out,
(see Pumps in Other Components section of the on-line comprehensive version of this manual for union location).
After filling the spa and priming the pumps another thing to keep in mind is your water level. The standard
water level is two to three inches above the filter basket, (see Skimmer/Filter in the Spa Features section of this
manual). This is very important because if the water level drops below the filter level the pump may pull air
bubbles into the line and trigger one of the safety switches in the heater. If the air makes it to the heater the
spa will not heat and an error message will appear on the spa side. At that point you need to shut down the
spa at the breaker while you refill. Make sure the spa has been off for at least five minutes before you turn it
back on. It takes five minutes to power down completely and reset the programming. You will lose as much
as one half to one inch of water per week to evaporation and water run off from people leaving the spa. The
amount you lose is directly affected by the amount of usage so check the water level as you do your weekly
chemical maintenance. To avoid errors in the spas system the spa must always be completely full if the power
at the breaker is on. This process must be repeated every time you drain and refill your spa.
Initial Chemical Start Up... It is a good idea to wait until the spa has heated to at least 90 degrees
Fahrenheit before adding chemicals. Warmer water will dissolve granules more efficiently and allow the
chemicals to mix into the spa water quicker. Every tub that leaves our factory for a delivery has been wet
tested and sanitized, but we still recommend adding a teaspoon of chlorine the first time you fill the spa to
help with any possible contaminants collected during delivery. The majority of the time this will be all the
chemicals you have to add, but sometimes the water in certain areas can require additional maintenance.
The type of water you have out of the faucet or spout depends on what part of the state you are in. In some
areas you may have hard water, (high level of calcium). Hard water is most common with people that use
well water. In situations where the spa is full of hard water we recommend adding two ounces of a stain and
scale control product the first week and one ounce per week there after, (the chemical needed may have a
4
Operating Procedures
different name according to brand so ask your chemical retailer for assistance). Stain and scale will prevent
or reduce scaling of calcium on the water line or in the spa components while making the water softer on the
skin. Often people in hard water areas have soft water filters in their house. If you have a soft water filter,
DO NOT fill the spa with soft water only. The best thing to do in this situation is to fill the spa with half-hard
water from the spout outside and half soft water from inside. If half and half is not possible than hard water
is better than the alternative because stain and scale product can be added to help avoid calcium build-up,
(see Chemical Maintenance in this section of the manual for dosages).
Soft water by itself makes for severe pH and Alkalinity fluctuations that can be hard on your skin and the
spa. If your area water supply is short on calcium you may have trouble balancing your water. If you find
you have the symptoms of soft water then have a water sample tested for calcium and add “calcium hardness
increaser” as needed. Use the chart below for gallons and the chart on the chemical bottle for the dosage
needed to get to two hundred PPM of total calcium hardness. This only needs to be done when the spa is
filled with fresh water, and should stay at the level you get it set to until the spa is drained and filled again.
The last initial chemical maintenance you may require is to balance the alkalinity and pH. Your chemical
start up kit includes a set of test strips for checking chlorine, alkalinity, pH, and Cyanuric acid, (see Chemical
Maintenance in this section of the manual). After you have followed all of the preceding instructions find a still
part of the spas water to submerse the test strip for fifteen seconds, then pull it out and compare it to the color
chart on the bottle of strips immediately. As with the hardness increaser the pH and alkalinity chemicals will
have dosage charts on the bottle according to gallons so the same charts apply.
Using the gallon chart below, find your model and use the gallon amount to
follow the directions on the bottle. Adjust as deemed necessary by the chemical
balance test strips provided. The gallon amounts listed are not exact amounts, but are accurate
and mathematically easy enough for use with your spa chemicals.
84 x 60
78 x 78
82 x 82 (W/ Lounger)
250 Gallons
300 Gallons
400 Gallons
Alpine
Timberline
Hurricane
Passage
Journey
Vail
Virtue
Vitalizer
Summit
–––
–––
Voyage
–––
82 x 82 (W/O Lounger)
–––
92 x 92 (W/ Lounger)
Rejuvenator
92 x 92 (W/O Lounger)
450 Gallons
500 Gallons
550 Gallons
Cyclone
Tornado
Typhoon
Steamboat
Aspen
Telluride
Sierra
Rocky
Avalanche
Endeavor
Destiny
Odyssey
Fortitude
Stamina
Endurance
5
Operating Procedures
Chemical Maintenance
Sanitizers... At Wind River Spas we pride ourselves in having the closest possible system to Chemically
free. This is not to say that you will not have to add chemicals to the water, however; if maintained properly
you can get into chemical free water every time you use it. This is only possible because of our continuous
clean filtration system. Your spa is designed to filter up to fifty five gallons per minute all day and filters the
entire body of water in your spa every 8-10 minutes. It is a combination of this filtration and the latest in
ozone technology that enables you to enjoy chlorine, bromine, and peroxide free water every time you soak
in your new spa. The reason this is possible is because of the corona discharge ozone that comes standard
with every Wind River Spa. This new design of ozone is capable of holding the light frequency needed to
create ozone gas almost twenty-four hours a day, everyday for up to five years. The only part of any day
that the ozone doesn’t run is the twenty minutes after the spas jet pumps are engaged, (see Ozone in the
Safety Features part of the Health and Safety section of the on-line version of this manual).
The ozone gas will eliminate most algae, fungus, or bacteria that could build up in the water when not
being used. Regardless of how clean a person is when getting in the spa, the ozone’s sanitizing power is
not enough to clean the amount of contaminants a person’s body ads. To ensure the water is clean again
for the next use you must add at least half of a teaspoon of chlorinating granules per person each time you
get out of the spa. The less often you use the spa the more chlorine you must add after each use, (check the
chlorine to usage chart in this section of the manual). By doing this you will sanitize the water as needed
based on your usage. Unlike bromine or peroxide a small dosage of chlorine will dissipate in the water after
a few hours leaving only Cyanuric acid as a residual. Since Cyanuric acid is harmless and only builds up in
extremely small doses, (much of which is burned off by UV from the sun), the water is clean and chemical free
the next day when you’re ready to use it again. To ensure this try to leave 4-5 hours between uses so as to
allow the chlorine to dissipate.
If more than two people use the spa the dosage of chlorine you add increases so allow more time for the
chlorine to dissipate. If anyone chooses to use the spa shortly after chlorine has been added it will still be
perfectly safe but the water may smell of the chemical a little bit. Fortunately the amount you add per person
is small enough that it shouldn’t be harsh on your skin even if used again directly after being treated. There
are other sanitizing systems such as bromine, peroxide, or silver nitrate wands, however; we will not discuss
those in this manual as use of them is contradictory to our spa design and will void your warranty in most
situations.
Water Balance... Once a week you will need to check the balance of the water. The balance consists of
two things, alkalinity and pH. If your calcium is at an appropriate level, (see Initial Chemical Start Up in the
Initial Start Up part of this section of the manual), and you are changing your water at least every four months
than your balance should stay consistent. To check the balance you will need to use test strips like the ones
provided in your initial chemical kit.
Every week you should dip a test strip in the water and remove it, then wait 15 seconds and compare it to the
color chart provided on the bottle. You want your alkalinity to test as close to one hundred PPM as possible,
and your pH to test between 7.2 and 7.8. If your balance is off use the gallon chart in this section of the
manual to determine your spas water capacity, then use that information in coordination with the directions
on the bottle to determine dosage. Once this is balanced you should have to do very little in this area until
the next drain and refill.
6
Operating Procedures
If you are having consistent fluctuations in your water balance you will need to check the calcium level of the
water in your area of the state and adjust it accordingly, (see Initial Chemical Start Up in the Initial Start Up
part of this section of the manual). These are the only weekly maintenance chemicals that need to be checked
consistently, but there are situations that can occur that will require additional chemical treatments. These
include but are not limited to hard water, high amounts of detergents from bathing suits, hair products, or
high amounts of lotions and/or body oils rinsing from the spa users into the water. The symptoms of these
problems are cloudy water, foam build up, clogged filters, and build up on the walls of the spa at the water
line. There are specific treatments for each of these symptoms, but you should only seek them out as needed
since the problems are not consistent and vary from user to user. The easiest way to avoid all of these symptoms is to rinse off in the shower in whatever you intend to ware in the spa before each use.
CHLORINE USAGE CHART
After Every Use (if used over 3 times per week) = 1⁄2 Teaspoon Per Person Per Usage.
After Every Use (if used 3 times per week or less) = 1 Teaspoon Per Person Per Usage.
If Not Used For 1 Week = Add 1 Teaspoon W/O Use.
If Not Used For 2 or More Weeks = Add 1 Teaspoon Per week Not Used.
Cleaning The Filter
Weekly Cleaning... Once a week as you do your chemical maintenance you should pull out the filter
and give it a good rinsing off. This can be done with a garden hose, however we suggest using hot water
when you can to help rinse off oils easier. There is a spray on filter cleaner that can be used in coordination
with the weekly rinsing, but it’s not necessary if you soak the filter in cleaner consistently. Do not let the filter
dry before it has been soaked according to the following instructions first.
Filter Soak... The best and most efficient way to clean your filter is to submerse it in a chemical soak
designed for breaking up minerals, oils, and other possible contaminants. First determine how much to add
based on the directions given on the bottle. Add the required amount to a five-gallon bucket of warm to hot
water and submerse the filter in the deluded chemical for at least six hours. For average usage, (two people
three to four times a week), we recommend soaking your filter in the enzyme formula every three months.
This is the longest you should wait in-between soaks even if your usage is lower than average. If your usage
is above average than increase the amount of soaks you give your filter. If you’re an everyday user of the
spa, double the amount of soaks the filter is given in a year. It is extremely important that the filter is soaked
in this formula before you let the filter dry. If there are body oils and lotions caught in the filter, they may
solidify as it dries and the filter will be ruined.
7
Operating Procedures
Filter Rotation... A single filter in a spa with average usage, (two people three to four times a week),
that is cleaned as the preceding instructions describe, has a life of no more than one year. The longevity of
your filters can be increased with a good rotation program. If during each filter soak you rotate between
two filters of the same age they will last up to fifty percent longer. When the filter that has been in use last is
pulled out to be cleaned, put the second filter in the spa for the next cycle of use. Be sure that the filter pulled
out of the spa is soaked in filter cleaner before it dries. If it dries before it’s cleaned throw it away. If you
soak it clean and rinse it out well however, than you should let it dry. By letting a clean filter dry you are
allowing the fibers of the filter to re-adhere to each other and the micron rating of the filter actually improves
as it dries. When you keep cleaning and using the same filter and it always stays wet the fibers keep getting
looser and the micron rating that stops particles from passing through gets weaker. Rotating your filters is
certainly not a necessity but it will improve the filter longevity by up to fifty percent.
Draining your Spa
The Drain... Always turn the power off to the spa at the breaker before beginning to drain the unit.
The drain on all Wind River spas is designed to be usable with a standard garden hose. On all Wind River
models it can be located near the equipment panel on the bottom part of the corner facing the same direction as the spa side control. The drain is a round black unit about 4 1⁄2 inches in diameter mounted on the
outside of the spas panels, (see photo reference in the Spa Features section of the manual).
To drain the spa remove the drain niche by pulling the black handle on top of
the drain cap, (2 3/4 inch in diameter), turn the cap counter clockwise to
remove. Then attach a hose to the on/off valve assembly. Run the hose
to where you’d like the water to drain then open the on/off valve assembly to the “ON” position. It will also help to drain the spa quicker
if you have any kind of downhill slope in your yard that you can run
the hose down to help siphon the water out of the spa. If you’re using
a submersible pump to drain the spa, be aware they may have sharp
feet on the bottom of the pump and their density is much greater than
that of the water. This will cause the pump to sink to the bottom rapidly
if dropped in the spa, and damage to the shell from this is considered
excessive abuse and will not be covered under the warranty. To avoid damage to the spa shell, be sure to gently lower the pump into the water.
Drain Timeline... It is recommended that you drain the water in the spa at least every four months. The
more often the spa is used the more often it needs to be drained. This is because each time you use the spa
and add chlorine after that use the chlorine is leaving a residual behind called Cyanuric acid. Cyanuric
acid is not harmful to you or your spa, but it will make your water cloudy and your chemicals very difficult to
balance when too much has built up. The only way to eliminate Cyanuric acid from the spa safely is to drain
and refill the spa. This is why a consistent draining timeline is necessary. We also recommend following the
cleaning instructions in this section of the manual during at least one draining per year.
8
Operating Procedures
Cleaning Recommendations
Cover Care... The covers that come with every Wind River Spa are designed to withstand the elements
as much as possible. In Colorado this concept takes on a whole different meaning due to its severe weather
variations from season to season. To help the longevity of your cover we recommend cleaning the cover with a
vinyl protectant four times a year. The only thing to remember in this matter is that most vinyl protectants made
for cars are alcohol based and are not designed for an outdoor product like a spa cover. When choosing a
protectant, check the ingredients closely to be sure there is no alcohol in it before using it on your cover. If
clearing snow from the cover use caution as shovels or other rigid materials you may use could puncture the
vinyl and allow water to be taken in and soaked up by the foam inside.
Shell Care... It is recommended that you clean the spa shell at least once per year when you drain it.
The recommended product for cleaning the shell is de-natured alcohol. De-natured alcohol can be found
in most hardware stores paint sections. We recommend this for cleaning because the alcohol completely
evaporates after the cleaning. This means that there is no residual chemicals left on the walls of the spa when
it’s time to refill. If you use any cleaning product other than the de-natured alcohol you will need to rinse out
the tub and drain the rinse water out of the spa again before filling it. If you don’t rinse out the cleaner well
enough the product will mix with the spa water and the chemicals in it causing foam build up and cloudy
water. A dry cloth and a spray bottle of cleaner is all you should need to clean the shell. Do not use bleaching products, acetone, scouring pads, or any product with grit that may scratch the acrylic. We will not be
responsible for damages that occur during cleaning unless only recommended products are used.
Panel Care... The panels that are
installed standard on all models are
weather resistant and non-porous. If
your spa has the synthetic
paneling a wipe down
with a damp cloth
should be all you ever
need to clean with.
9
Spa Features
Spa Side Controls
The spa side is where you will control all of the electrical components designed for regular usage.
The diagram below lists all of the functions of the controller and what purposes they serve.
F
H
A
I
C
D
B
E
G
J
K
M
L
A) LCD Screen... The LCD screen will always display the current water temperature when the spa is not in use.
The only time the screen does not read the current temperature is when the thermostat is being set up or down
with the Warm or Cool buttons to set the desired new temperature. If any other reading appears it is an error
message and you should refer to the Error Message Chart in the Troubleshooting section of this manual. Use the
chart to diagnose what the error is and then call your Wind River Spas service center.
B) Cool Button... The cool button simply allows you to turn down the spas set temperature. The coolest
the spa can be adjusted to is eighty degrees Fahrenheit.
C) Warm Button... The Warm Button on the spa allows you to turn up the spas set temperature. The
warmest the spa can be adjusted to is one hundred and four degrees Fahrenheit.
D) Heat Light... This light indicates when the spa is actually heating. When the light is orange it means
the spa is not heating. When the light is red that indicates that the spa is heating.
E) Jets 1 Button... The Jets 1 Button will turn on the pump that runs up to half of the jets in a two-pump
model and all the jets in a single pump model. This button has three stages to cycle through. The first time you
push the button it will turn the jet pressure on low. The second time you push it, it will turn the pressure from low
to high. The third time turns the pressure off returning to the default filtration modes only.
10
Spa Features
F) Jets 1 Light Indicator... This light simply indicates when the jet pump is engaged. When the light is
orange the pump is off. When the light is red the pump is on. If the light is red indicating the pump should
be engaged but there is no jet pressure refer to the troubleshooting section of this manual.
G) Jets 2 Button... The Jets 2 Button will turn on the pump that runs up to half the jets in a two pump
model. This button has three stages to cycle through. The first time you push the button it will turn the jet
pressure on low. The second time you push it, it will turn the pressure from low to high. The third time turns
the pressure off returning to the default filtration modes only.
H) Jets 2 Light Indicator... This light simply indicates when the jet pump is engaged. When the light is
orange the pump is off. When the light is red the pump is on. If the light is red indicating the pump should
be engaged but there is no jet pressure refer to the troubleshooting section of this manual.
I) Cleanup Mode Button... The Cleanup Mode Button will turn all of the spas jet pumps on high speed
for five minutes only. This function is best used for mixing chemicals into the water at the end of each use.
(see Chemical Maintenance in the Operating Procedures section of this manual)
J) Light Button... This button will turn the light on and off. Some models have color changing LED light
upgrades. If your model is equipped with LED than every time you turn the light off and on it will change to
a different light pattern, (strobe, fade, solid, etc.). You must cycle through the different functions within ten
seconds for them to change. If you turn the light off and leave it off for over ten seconds the function returns
to the previous setting.
K) Light Indicator... Like the Jets Light Indicator this light will glow orange when the light is off and red if
it is on. If the light is red indicating that the light should be on but there is no light call your Wind River Spas
service department.
L) Remote Panel... The Remote Panel allows you to operate the jets and lights from the opposite end of
the spa than your main Spa Side Controls.
M) Floating Remote... The Floating Remote is a great option in your Wind River Spa as it allows you to
operate the jets and the lights from anywhere within the range of the IR sensor. Always store the floating
remote indoor and remove it from the spa water when it is not in use. If the remote is left in the spa it may
float over into the Filter Skimmer and restrict the flow of the water through the filter. The fact that the remote
operates through infrared and is not attached to the spa leaves it susceptible to many types of damage,
because of this it is only covered under the manufactures warranty unless otherwise specified in your written
warranty from the time of purchase.
11
Spa Features
The picture diagrams below are marked with a numeric key that can be used for easy reference when you
have questions about any feature on your spa. Some features may also be accompanied by another picture
diagram that helps with the specifics of that unit. For a similar diagram and description of the spas other
components see the on-line comprehensive version of this manual.
1
2
7
98
3
13
15
6
11
10
12
5
4
14
1) Covers & Cover Lifters... A cover for your Wind River Spa is included with every purchase. The
bottom part of the cover that comes standard with a new spa is made of one pound polystyrene foam for
insulation and lightweight. The top part is a rigid foam fiberboard with a 250-degree Fahrenheit temperature resistance. The foam is lined internally with a 2-inch heavy-duty aluminum channeling for added
strength while maintaining a lightweight. The internal structure is then wrapped with a sealed vinyl that
comes in a variety of colors. The vinyl is seamed together with a water tight melting process as opposed to
a sewn seam that will take on water. This top vinyl can be cleaned and maintained to increase the longevity
12
Spa Features
of the cover, (see Cleaning Recommendations in Operating Procedures section of this manual). The cover that
comes with your Wind River Spa is one of the only parts that is not included in your spas warranty. This is
because damage from abuse, pets, or acts of god like hail or blizzards are impossible to guarantee against.
This is not to say that there is no warranty on the cover however. The manufacturer of the cover gives a
three-year pro rated warranty against faulty seams that allow the cover to take in water beneath the vinyl.
Every cover comes equipped with locking clips for safety. The male end of the clips are attached to a strap
that will snap into a female clip that is mounted on the spa itself. The female clips have a locking feature for
security when the tub is not in use. To open the clips make sure they are unlocked using the keys provided,
then it is only a matter of squeezing the outer tabs of the clip to release it. Cover lifters are an available
option with your spa purchase and come in a variety of styles and brands. Their design ranges from simple
bars that elevate the cover from the ground in the open position to hydraulic assisted lifters that help make
lifting the cover easy for one person. Speak to a sales associate for information about available upgrades
for your cover accessories.
2) Shell... The shell on a Wind River Spa is a made of a Microban Acrylic that is a non-porous antibacterial surface. The acrylic layer is backed by an ABS plastic composite and a fiberglass acryment for
structural support. The shell is then insulated with a layer of high-density foam thin enough to allow heat
disbursement to the cabinet area. This will assure you years of trouble free enjoyment.
3) Remote Panel... The remote panel can be found on the inside wall of the spa opposite the main
Spa Side controls, (Remotes are not available in all models). It serves as a secondary controller for the jets
and lights in your spa.
4) Jets... Most of the jets in your spa are interchangeable with other style jets of the same size. The jets
can be turned on and off individually by turning them clockwise and counter-clockwise. The jets can be
removed by turning them counter-clockwise from inside the spa until they are completely on. Once the jet is
locked into the on position you can remove it by forcing another quarter turn counter-clockwise releasing it
from the jet body. To reinstall it simply reverse the removal process.
5) Light Lens... Your spa comes equipped with a underwater low voltage light that is in place for safety
and ambience. Some models may be equipped with a second Light Lens that will work in coordination with
the first. Certain models are equipped with color changing LCD lights that will cycle through different stages
of color each time you turn the light on and off. The other type is a white light that can be changed only with
the Light Lens covers that come in various colors and clip to the outside of the lens itself. Other lighting
options and upgrades are available upon request.
6) Filter/Skimmer... The skimmer and filter basket serve multiple functions to your spas filtration system.
The telescoping skimmer is the centerpiece of the unit that floats up and down along the water line. The
skimmer will create a waterfall effect in its center as the water passes over its top. This is important for
breaking up oils and particles that are being filtered out of the water before they reach the filter allowing it
to retain more contaminants evenly without needing constant replacement. The filter basket sits beneath the
skimmer and above the filter itself and will strain out large contaminants. To access the filter basket simply
give the outer ring of the Filter Skimmer a quarter turn counter clockwise to release it from its lock. Once
released simply lift the skimmer away and you can pull out the basket. The filter can be pulled out once the
skimmer and basket are removed. The filter must be pushed down securely to the bottom of the filter cavity
before locking the basket and skimmer into place.
13
Spa Features
7) Pillows... The pillows in your Wind River Spa are removable by pulling the pillow away from the spas
shell and releasing the snaps that hold it in place. Simply place your fingers behind the pillow and pull firmly
at the tab. To reinstall the pillow simply snap it back into place making sure the snaps are lined up with their
original positions. Pillows are excluded from our warranty.
8) Air Control... The Air Control handles in your spa will either allow or cut off the airflow to the jet
stream. When the jets are running you can turn the handle clockwise and limit the flow from the jets to water
only. Turning the handle counter clockwise will allow air into the jet stream and increase the pressure from
those jets. Each zone in your spa has its own air control.
9) Neck Jet Diverter... The Neck Jet Diverter can be distinguished from the Air Control by a small arrow
on the handle itself. Turning the handle clockwise will turn on the highest jets in that seat that are designed for
the sub-occipital zone on the back of your neck. Turning the handle counter clockwise will turn these jets off.
10) Primary Diverter... The Primary Diverter is similar to the Neck Jet Diverter but is about three times
as large. This is not available in all models, as it is only usable with certain jet packages. If your model is
equipped with a Primary Diverter than you can customize the flow path of the water by diverting from one
zone to another as you turn the handle clockwise or counter clockwise. You can split the flow path between
multiple zones by leaving the diverter handle centered between the two zones in question. When the spa is
not in use these valves should be left in the middle position so as to ensure good circulation of the water in
the plumbing.
11) Waterfall... The waterfall is an 8” or 3” gray plastic housing with a small slit down the middle of it
that produces a flat steady stream of water. The pressure behind the waterfall can be adjusted at the Waterfall Control. Waterfalls do not come standard with every model. Some models have waterfalls equipped with
color changing LED lighting. Debris can sometimes build up in the waterfall’s screen. To clean this, remove
face cover and remove two screws that hold the screen in place clean and repeat process to close waterfall.
12) Waterfall Control... This handle controls the pressure of the waterfall. In the off position you can
shut the waterfall off completely. As you open the valve the water will increasingly flow from the waterfall in
a flat stream, and will reach farther into the tub the more you open the valve. Waterfalls are not standard in
every model but can be ordered as an option prior to the spas manufacturing.
13) Suction Fittings... Suction Fittings are plastic screens that sit in the center foot well of the spa. The
fittings are in place to protect the plumbing lines from being clogged. They also double as a safety feature
that prevents someone or something from becoming trapped or entangled. The plumbing lines that run to
these fittings double as a primary suction line for the jet pumps, and as a secondary suction for the circulation pump in case the water to the filter area becomes restricted.
14) Wine Bucket... The Wine Bucket is a clear plastic insert designed to insulate most bottle sizes and
shapes. The cavity it rests in has a drain built in to relieve over splash that may get in the area. Be sure to
store the bucket indoors when not in use to prevent weathering.
15) Drain... The drain is a small plastic screen that sits at the lowest point possible in your spas foot well.
The water will drain down through that screen and out of the black outer drain unit located on the lower part
of one of your panels. (see Draining The Spa in the Operating Procedures section of this manual)
14
Trouble Shooting
My spa is not heating the water.
If your spa is set to certain temperature but is not heating the water to that temperature there are a few things
you can do that may not require a service technician. The first thing to check is to see if the heat indicator light
is red or orange. If the light is red but water is still cold than try resetting your breaker for five minutes to see if
the tempurature rises at least two degrees over the next two hours. If not call Wind River Spas service department. If the light is orange than the first thing you want to do is shut down the power to the spa at the breaker.
The power will need to be off for at least five minutes to reset the memory in the spas control system. During
that five minutes remove the filter from the spa and replace the skimmer basket without a filter beneath it.
If when you turn the spa back on the heat light turns red than your filter needs to be cleaned or replaced.
Your spa can also stop heating if the water level is too low. If the level drops enough that an air bubble can be
pulled into the plumbing line a safety switch will be engaged that does not allow the heater to come on. You
will need to power down the spa for five minutes while you top off the water level, (see Filling The Spa in the
Operating Procedures section of this manual). The power down will give the spa a chance to reset the memory
during that five minutes.
I do not have ozone bubbles coming from the foot well.
If the small bubbles that usually rise up through the water in the center of the spa stop it may just be a clogged
filter. To check the filter simply shut down power to the spa and remove it. Without the filter in replace the
skimmer basket and turn the spa back on. If that fixes the problem the filter needs to be cleaned or replaced.
If there are no bubbles when operating without a filter in the spa call Wind River Spas service department.
There is water on the ground
around my spa.
Sometimes you may find a little residual water
around the base of the spa. This water
can be from condensation build up
on the seam of the cover dripping
down the covers skirt. It can also
be from the water in the bottom of
wine bucket area draining
out through the bottom
pan on the spa. If you do
not believe the water
comes from either of
these sources than
monitor the water
line and measure in inches
how much the
water line goes down
on a daily or weekly
basis, and call Wind River
Spas service department with
that information.
the
15
Trouble Shooting
My water is getting cloudy.
Cloudy water can be a symptom of improper chemical maintenance, an improper drain timeline, or a
malfunctioning ozonator. First make sure you are adhering to the instructions in the Chemical Maintenance
part of the Operating Procedures section of this manual. If your maintenance is proper and the problem
persists it may be time to change the water, (see the Drain Timeline part of the Operating Procedures section
of this manual). The other possibility is that your ozone unit is malfunctioning. Over time you will become
accustom to the smell of ozone when you open your cover. Many people can tell that the ozone is
malfunctioning by the scent alone. Another way to check the ozone is to listen for the unit through the
vent on the left side of your equipment panel. The ozone should make a distinctive buzzing sound when
operating. Make sure not to mistake the hum of the circulation pump for the buzz of the ozone. Also
remember that the ozone is designed to shut down for twenty minutes every time any of the jet pumps are
engaged so there will be no noise during that time. Also remember that the ozone unit does not pump the
bubbles into the spa they are drawn in naturally using the water pressure from the circulation pump. This is
important to note because even with the ozone not functioning the bubbles will still be drawn into the spa, but
will only be oxygen bubbles.
I have weak water pressure from one or more jets.
The first thing to do if you notice weak pressure in one jet make sure that jet is on by turning it counter-clockwise. If the pressure does not improve than remove the jet from the body using the instructions provided under
the Jets part of the Spa Features section of this manual. Once the jet is removed if the pressure improves
than the flow path of the jet may not have been lined up properly. Simply install the jet using the instructions
provided in the section mentioned above. If the pressure does not improve call Wind River Spas service
department.
My adjustable jets and/or diverter valve will not turn anymore.
Even though you probably do your best to keep sand and grit out of the spa sometimes it may get in anyway.
When this happens it can eventually make it into the plumbing lines. The sand in the plumbing will end up in
the jet bodies and possibly in the diverter area. To remedy this problem in the jets you will need to turn the
power off to the spa and use pliers if necessary to turn the stuck jet counter-clockwise from inside the spa.
If using metal tools be careful not to scratch the spas surface while working, and do not to squeeze the tool
too much as it may damage the jet. If you keep turning it in that direction it will eventually come out and the
contaminants that are restricting the jets ability to turn should be visible and easily wiped clean. In the case
of the diverter not turning you will again need to turn off the power to the spa. Next you should remove the
diverter top by turning the round piece directly under the handle itself counter-clockwise until it is freed from
the spa. Once it is removed wipe out the plumbing below and check the black plastic piece that inserts into
the plumbing and is attached to the handle for contaminants. If Scratches are evident in the plumbing or
diverter wet/dry sand paper can be used to smooth them out. To re-install simply reverse the removal process.
I have no air coming through the jets when I’m using them.
Refer to the Air Control part of the Spa Features section of this manual for instructions.
16
Trouble Shooting
I cannot feel any floor suction for the circulation pump.
The circulation pump in your spa will pull almost all of its water through the filter and not the floor suction.
The floor suction for that pump is only in place as a relief suction point in case something gets caught in the
filter area.
My jets shut off on their own while the spa is in use.
There are two possible reasons why your jets are shutting down while in use. The first and most common
reason is because they are designed to do so after twenty minutes. They do this in case you walk away from
the spa and forget to turn them off yourself. If you left them running all the way until the spas next use it
would add up on your power bill very quickly. You will no if it is the programmed shut off time if the jets can
be turned right back on after shutting off. If they can not be turned right back on then their thermal protection has shut them down. If the pumps trigger the thermal protection it means that there is too much ambient
heat stored up in the equipment area. This can happen in the warmer months because the spas insulation
system acts kind of like a thermos. To relieve this symptom you can remove the foam insulation from behind
the equipment panel during the warmer season, (see Panels in Other Components section of the on-line comprehensive version of this manual). Just be sure to replace the insulation panels before the winter months so as
to conserve energy costs for operating your spa.
My jets come right back on after I try to turn them off.
If the Cleanup Mode button has been pushed then the pumps will run at high speed for one minute. Often
users of the spa might accidentally hit the cleanup mode on their way in or out of the spa, or sometimes you
may hit the wrong button trying to adjust the light or jets. If when turning the jets off they keep coming back
on, try hitting the Cleanup Mode button to turn them off.
I am getting a strange reading on my LCD display screen.
The Spaside Control on your spa will tell you if certain errors are detected. There are three error messages
you may encounter.
OH Overheat Protection (spa is deactivated)
DO NOT ENTER THE WATER. If the spa water has reached 112 degrees Fahrenheit, remove the spa
cover to cool the water. On a Fitness Series models an overheat may occur if the filter cycle is set too
long during hot parts of the day. At 110 degrees Fahrenheit the spa should reset itself. If the highlimit sensor detects 118 degrees Fahrenheit at the heater the spa will be shut down. When the heater
cools to 110 degrees Fahrenheit press any button to reset the spa. If the spa will not reset shut down
power to the spa, and call Wind River Spas service department.
FL (Not Flashing)
The pressure switch in your spa is malfunctioning. Call Wind River Spas service department.
SN (spa is deactivated)
A temperature sensor is malfunctioning. Call Wind River Spas service department.
17
Disclaimers
Wind River Spa’s shall not be liable for loss of use of Manufacturer’s products or other
incidental or consequential costs, expenses or damages. Wind River Spa’s shall not be
responsible for any promises not specifically stated within our warranty.
Decks.
When choosing a location for your spa, (see Location in Installation section of the online comprehensive
version of this manual), please be aware that it is policy of Wind River Spas not to disassemble or reassemble
any decking or railing that may be impairing access to the equipment area of your spa. When choosing
placement for the spa, always leave access to the ventilated panel that conceals the equipment, (see Panels in
Other Components section of the on-line comprehensive version of this manual). In the event service is needed
and there is no access the homeowner will be responsible for any labor or costs involved in gaining access to
the equipment.
Electrical.
A licensed electrician is required for all spa installations. Wind River Spas can refer a number of licensed
electricians, however; under no circumstances does Wind River Spas accept liability for work done by any
electrician recommended or otherwise. Wind River Spas does not employ in house electricians, and none
of our service technicians or delivery employees are authorized to do any electrical work outside of the
components built into the spa itself. For units for the use in other than single-family dwellings, a clearly labeled emergency switch shall be provided as part of the installation. The switch shall be readily accessible to
the occupants and shall be installed at least 5 feet (1.52 M) away, adjacent to, and within sight of the unit.
Freeze Damage.
In Colorado’s unique climate it is important during the winter months to have your Wind River Spa full and
running. In the event that you choose not to operate the spa it must be winterized. Even after the spa is
completely drained the plumbing of the spa is most likely still retaining enough water to cause damage.
When the water freezes it expands. This will cause the PVC plumbing to shatter and the spa will no longer
hold water. To avoid this you must clear all the water lines of the spa. For information on the best method
of winterizing for your situation call Wind River Spas service department.
Summer Draining.
When draining your spa for an extended period of time in the warmer months it is important to clear
the water lines of as much residual moisture as possible. When your spa is empty and covered there is
little opportunity for the water left in the plumbing to evaporate. By leaving the water in the lines when it is
warm you are creating an environment ideal for growing algae, fungus, and bacteria. You may not know
this is happening until you fill and run the spa again. The contaminants enter the tub through the jet system
the first time the water circulates. When this happens you will find yourself needing to drain, refill, and
sanitize the spa. This process can take days to complete and should be avoided by removing as much water
as possible from your spas manifold system. For the best method of removing residual water from your
particular model call Wind River Spas service department.
18
Disclaimers
Whirlpools & Diverters.
If the whirlpool jet is left in the off position for long periods of time the water behind it has no where to go
and will sit stagnant. Stagnant water is not being cleaned by the ozone and the chlorine you add after each
use has no way of reaching it. This means it can become a breeding ground for algae, fungus, or bacteria.
The same principle is true if you have a spa equipped with a diverter handle that transfers power from one
seat to another. Leaving the power all on one seat all the time will leave stagnant water behind the seat not
in use. To avoid these problems be sure to leave the diverter handle centered between the two seats when not
in use so the daily purge cycle will flush those lines. Also make sure to turn your whirlpool jet on from time to
time for the same reason.
Heavy Objects.
Do not drop heavy objects like rocks, submersible pumps, or any kind of metal objects in your spa. If they
sink to fast and hit the bottom, damage to the acrylic and/or the shell structure may occur. Damage of this
sort is considered excessive abuse and is not covered under warranty.
Enjoy Your New Wind River Hot Tub!
19