1
Guide To RC5000 Setup Version 2.0
For the Marantz RC5000 and RC5000i
Guide to RC5000 Setup © 2000 Marantz America, Inc.
All Rights Reserved
Guide to RC5000 Setup Manual - Version 2.0
The information in this manual is copyright-protected. No part of this manual may be copied or
reproduced in any form without written consent from Marantz America, Inc.
MARANTZ AMERICA, INC. SHALL NOT BE LIABLE FOR OMISSIONS OR FOR TECHNICAL
OR EDITORIAL ERRORS CONTAINED IN THIS MANUAL. MARANTZ AMERICA, INC.SHALL
NOT BE LIABLE FOR INCIDENTAL OR CONSEQUENTIAL DAMAGES RESULTING FROM
THE SUPPLYING OR USE OF THIS INFORMATION. MARANTZ AMERICA, INC. SHALL NOT
BE HELD LIABLE FOR INCIDENTAL OR CONSEQUENTIAL DAMAGES RESULTING FROM
THE PERFORMANCE OR USE OF THE MATERIALS DESCRIBED IN THIS MANUAL.
The information in this manual may be subject to changes without prior notice.
The RC5000 and the RC5000i logos are trademarks of Marantz America, Inc.
All other brand or product names are trademarks or registered trademarks of their respective
companies or organizations.
version 2.0 Beta Release- August 2000
2
Table of Contents
Table of Contents
This Table of Contents is hyperlinked. Simply hover your mouse anywhere on the listing.The
cursor will change to a pointing finger. Click and you will be hyperjumped to the correct page.
Getting Started
8
What do you need to know before you start?
8
What can you do with RC5000 Setup?
9
What is a CCF file?
10
Installing RC5000 Setup
11
PC Requirements
11
Step by Step
11
Starting RC5000 Setup
11
Loading and Saving
12
You need to set the Memory Size first.
12
Uploading from RC5000 to your PC
13
How do you save a configuration?
15
How do you open CCF Files that are stored on your PC?
16
When RC5000 Setup is not running.
16
When RC5000 Setup is running.
16
How do you download a configuration into an RC5000?
17
Fundamentals
18
Update the Operating System!
3
18
Guide to RC5000 Setup © 2000 Marantz America, Inc.
What is the Updater?
18
Updating
18
You can always return to the factory configuration.
18
Using the Programming Window
19
Basic Definitions
20
Using Tree and Panel Views To Examine a CCF.
21
Exploring Tree View
22
Single Clicking In Tree View
22
Double Clicking In Tree View
22
Exploring Panel View
23
Pull Down Menus
24
The File Menu
24
The Edit Menu
24
The View Menu
25
The Tools Menu
25
The Panel Menu — When a Widget is Selected in Panel View
25
The Panel Menu — When an Item is Selected in Tree View
25
The Device Menu
26
The Macro Group Menu
26
The Settings Menu
26
The Window Menu
26
The Help Menu
26
Right Click for Context Menus
27
Using the Emulator
28
Making screenshots of the Emulator
29
4
Table of Contents
The Gallery
30
Using The Gallery
30
How can I create my own gallery?
31
Programming Properties
32
Introduction to Properties
32
Active, Inactive, Selected and Unselected
32
The Action List
32
Learning & Macros Step by Step
34
Restrictions To Jumps
36
Home System Properties
37
Home - Create Your Own or Use Auto Alias?
38
Programming Home Manually
38
Use Automatic Aliasing to Create Home Buttons
38
Configuration is Write Protected
39
Changing Scroll Arrow and Home Icon Artwork
39
Programming Left/Right and Direct Access Buttons Globally
40
Device Properties
40
Device Action
40
Local Programming of Left, Right and Direct Access Buttons
40
Widgets, Buttons and Frames
41
Button Properties
42
Active and Inactive and the Action List
42
Selected or Unselected
42
Labels/Names are Invisible unless you choose a Font!
43
5
Guide to RC5000 Setup © 2000 Marantz America, Inc.
Table of Contents
Active and Inactive Icons
43
Location/Size
44
Colors — For Active, Inactive, Selected and Unselected Text
45
Frame Properties
46
Programming with the Default CCF
47
Basing Your Design on the Marantz Default CCF’s
47
The Process
47
Set Home System Properties
48
Selecting The Devices You Want
48
Viewing and Changing Device “Type”
49
Deleting Devices
50
Copying Device and Macro Groups With Tab Navigation Intact
50
Programming Tips
52
Hidden Panels
52
Moving Panels
52
Copying and Pasting Panels
52
Adding Empty Panels
53
Copying and Pasting Buttons
53
Copying Art from One Button to Another
53
Cleaning Up Device Properties
53
Resizing Widgets
54
Loading New Icons Into Widgets
54
Working with Grids
55
6
Table of Contents
Grouping Widgets in Frames
56
Working With Parents, Children and Siblings
56
Custom CCF Programming
57
Introduction
57
Merging Files
57
Modify the Gallery
58
Customize Default Panels
58
Alphabetical Index
59
7
Guide to RC5000 Setup © 2000 Marantz America, Inc.
Getting Started
What do you need to know before you start?
1. Familiarity with RC5000
RC5000 Setup requires a clear understanding of the capabilities of the RC5000.You should
read the User Manual for the RC5000i (even if you have an old RC5000- it can be downloaded from the Marantz web site) and practice using and programming the RC5000 standalone, before considering using RC5000 Setup for anything more than a way to save your
work. You should know how to:
• navigate to any panel using the built-in menus and scroll arrows
• use the setup panels to control use of the RC5000
• rename frames, buttons, devices and macro groups
• add devices or macro groups
• change the order of devices or macro groups in the menus & home panels
• learn infrared codes from other remotes
• program macros and jumps
Download RC5000i User Manual from:
http://www.marantzamerica.com/rcsetup.htm
2. Familiarity with Windows
RC5000 Setup uses Windows conventions for controls, shortcuts and procedures. If you have
never used a Windows PC, you should become familiar with the Windows environment before
attempting to use RC5000 Setup. Get a good how-to book on Windows. Make sure that you
understand how to install and uninstall programs, use the mouse, work with Windows Explorer
and the Windows file heirarchy, start and close programs, and maximize and minimize windows.
Tip — Use the Table of Contents and the Index
This guide is designed to help you when you need help. If all you want to do is save your work,
go to the chapter on Loading and Saving.
If you are an experienced RC5000 Setup programmer, use this a reference, but download the
What’s New in Version 2.0 adobe document from the Marantz website.
If you would like to customize a few things in the factory default file, upload and save your work
(Loading and Saving) and then start in on the chapter on Fundamentals.
If you would like to create a totally new design from scratch, read everything sequentially and
follow along with the exercises recommended.
8
Getting Started
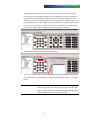
What can you do with RC5000 Setup?
RC5000 Setup enables you to go beyond the programming capabilities of the remote control by
itself. It allows you to rearrange the buttons on every panel.You can control navigation by programming jumps from any button to any panel.You will now be able to program macros and animations on a device or a home panel as well as within Macro panels. Most importantly, it
enables you to save your work on your PC and send configurations via email.
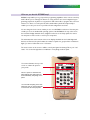
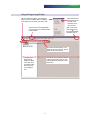
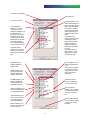
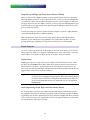
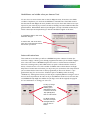
You can change the look of most of what you see on an RC5000’s touchscreen. However, part
of what you see is the fundamental operating system of the RC5000. At the top of the screen,
the menu bars display animated menus, navigation and access to the Setup panels.You cannot
use this portion of the screen to control your components.
The information bar at the bottom of the screen displays the labels for the Left & Right hard
buttons, scroll arrows, the panel number, the number of panels in a group and the mode button.
Again, you cannot reclaim this screen “real estate.”
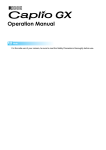
The center section of the screen is called a control panel (panel for brevity).This is your “real
estate.” You control the appearance and behavior of everything inside the panel.
You cannot eliminate the top of the
screen or reclaim the space for
your panels.
This is a “panel.” It measures 240
pixels wide by 219 pixels high. You
control absolutely everything on the
panel.
You can hide everything in the information bar, but you cannot eliminate
or use the bar for other purposes.
9
Guide to RC5000 Setup © 2000 Marantz America, Inc.
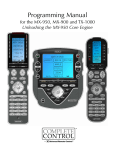
What is a CCF file?
All windows files use a three letter extention to identify themselves to windows. RC5000 Setup
uses the three letters “ccf” for a configuration file including IR codes, macros, animations, button
art etc. A CCF file includes everything an RC5000 needs to operate a given system. The actual
letters “ccf” refer to the early developers hope that the RC5000 would be called the Cabernet.
Thus ccf stood for “cabernet configuration file.” Unfortunately, due to extensive previous marketing by other manufacturers, the Cabernet name appeared to be linked in consumer minds to
a beverage, rather than a remote control. So, your remote control is now called an RC5000.The
ccf designation stayed with us somehow.
10
Installing
Installing RC5000 Setup
PC Requirements
RC5000 Setup system requirements
• PC with a 486DX/66 MHz or higher processor
• Windows 95,Windows 98,Windows NT 4.0 or higher operating system
• 16 megabytes of RAM
• 10 megabytes of free disk space
• Super VGA or higher graphics card and monitor
• Available serial port which supports 115200 baud
Step by Step
We recommend that you close all programs before installing RC5000 Setup.
When installing directly from our web site:
1. Click on the RC5000 Setup link and either execute in place and skip to step 4, or download rc5000rb.exe to a folder on your hard drive.
2. From My Computer, Windows Explorer or the Start button’s Run option, navigate to
the folder you placed rc5000rb.exe.
3. Double click on rc5000rb.exe or choose OK from the Run window.
4. Follow the on-screen instructions.
The first time you run RC5000 Setup, you have to accept the license agreement or RC5000 Setup will
not run.
Starting RC5000 Setup
Like any Windows program, you can start RC5000 Setup from the Start button by choosing
Programs, then RC5000Setup.
11
Guide to RC5000 Setup © 2000 Marantz America, Inc.
Loading and Saving
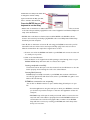
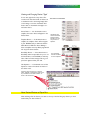
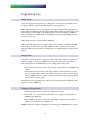
You need to set the Memory Size first.
Before beginning to program, you should tell RC5000 Setup whether you are programming a
one megabyte RC5000 or a two megabyte RC5000i. After you have set this property once; you
can forget about it, RC5000 Setup will remember your choice in any future programming session. Should you purchase a new RC5000i or help a friend with an old RC5000, you can always
change RC5000 Setup to the alternate memory size with this procedure.
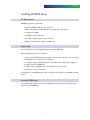
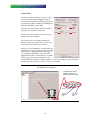
1) Select Set Memory Size from the File menu in RC5000 Setup.
2) A pop up selection window enables you to select 1mg (380kb programmable memory)
or 2mg (1404kb programmable memory). Simply click on OK to confirm.
Click on either radio button and
then press OK.
Note
This selects the correct updater, emulator and the file size warnings that will occur
should you try to save or download a file that is too large to fit in your remote control.
Have you customized your RC5000 in the past? Save your work!
If you’ve spent time customizing your RC5000 in the past (either using the remote’s customization features or with a previous version of RC5000 Setup), you should protect your previous
work before experimenting with RC5000 Setup. Follow the next couple of steps on Uploading
and Saving files before you do anything else. Safety first!
If your remote has never been customized by you or anyone, you can safely experiment without fear. When RC5000 Setup was installed, it automatically installed backups of the default
configurations of your RC5000i with it. Anytime you want, you can return your RC5000 or your
RC5000i to the original factory default files stored in your Samples folder.
12
Loading and Saving
Uploading from RC5000 to your PC
1. Start RC5000 Setup.
2. Connect one end of the RC5000 serial cable to your RC5000 and connect the other end
to a serial port of your PC.
3. Get in the habit of choosing New from the File menu before Uploading. RC5000 Setup
can merge the uploaded file into an open file.This is useful sometimes; see page 57 for
more information. However, it is easy to accidentally merge two files together, creating a
very large and hard to understand file.You’ll prevent that from ever happening by clicking
on New from the file menu now.This will close any open file and create an empty slate
for your uploaded configuration.You’ll be able to save all of your work unchanged. After
you’ve chosen New from the file menu, the title bar should say “Untitled.”
3. Click on the upload shortcut button
from the file menu.
in the toolbar, or select Upload from RC5000
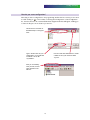
4. RC5000 Setup now tries to connect to your RC5000. After connecting to your RC5000,
RC5000 Setup will upload the configuration from your RC5000 and load it into RC5000
Setup. If you have an RC5000i with a full configuration, the upload will take a few minutes. The uploading window illustrates the progress with bar segments that appear as the
configuration is gradually uploaded.
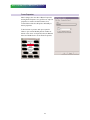
If RC5000 Setup cannot connect to your RC5000, it will display a window saying RC5000
not connected or not responding.You can click on the Details>> button to open a window listing all the serial ports on your PC. Click on OK to try again after checking connections.
• If you have trouble, navigate to the home panel and tap the screen to activate your
RC5000 before uploading again.
• If another application is using the serial port to which your RC5000 is connected, you
can either try another serial port or have the other application release the serial
port.
13
Guide to RC5000 Setup © 2000 Marantz America, Inc.
• If RC5000 Setup could open the serial port to which your RC5000 is connected but
still could not connect, check to see if both ends of the cable are properly inserted
and if RC5000's batteries have not run out.Then wait a few seconds and try again. If
after a number of tries RC5000 Setup still cannot connect, try resetting your
RC5000, wait until it beeps twice and try again.
You can cancel the upload at any time by clicking on the Cancel button.
It is best not to touch your RC5000's screen or use any of your RC5000's direct access buttons, while
uploading is in progress.
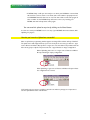
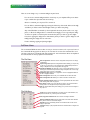
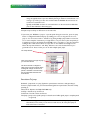
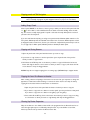
How do you know the Upload was successful?
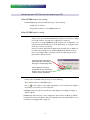
After an upload, the programming window appears unchanged.The title bar still says “Untitled.”
The panel view is still empty. However, if you look closely at the tree view, you will see + signs
next to Devices and Macro Groups.These + signs were not there before.They indicate that the
file now has groups of panels.The previous lack of + signs indicates an empty configuration.
Before Uploading there were no + signs next to Devices and Macro
Groups, indicating an empty configuration.
After Uploading, + signs next to Devices and Macro Groups indicate
the configuration has content.
You’ll explore the tree view soon. Right now, before we make any changes, it is important to
save the uploaded file with a new file name.
14
Loading and Saving
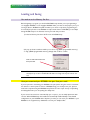
How do you save a configuration?
Now that you have a configuration in the programming window that has content, you can save it
in a CCF clicking on
in the toolbar, or selecting Save Configuration or Save Configuration
As... from the file menu. A conventional Windows navigational window will appear, enabling you
to name the file, put it in the location you want etc.
This shows the root folder of
RC5000 Setup in C:\Program
Files.
Type in the file name for your
configuration. It is a good idea
to indicate a rev #, like
“myccfREV1.”
Use the create new folder button to create
a folder for all of your revisions called
“myccf’s.”
After you successfully
save your file, the new
name appears in the
title bar.
15
Guide to RC5000 Setup © 2000 Marantz America, Inc.
How do you open CCF Files that are stored on your PC?
When RC5000 Setup is not running.
1. Start RC5000 Setup and load a CCF by doing one of the following
• double click on a CCF, or
• drag a CCF and drop it on the RC5000 Setup icon
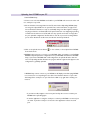
When RC5000 Setup is running.
Warning!
RC5000 Setup will only open one file at a time. If you already have a file open
and you try to open another, RC5000 Setup will ask you if you want to Merge
the new file with the currently open configuration or replace it?
If you decide to merge, RC5000 Setup will merge the two configurations, creating a massive mixed-up file (if you do this by accident), or an elegant combination (if you do this on purpose).
Until you read and understand the Merge function, always click on Replace. If
you haven’t saved changes to the old file, RC5000 Setup will ask you if you
want to save changes, before closing the old file and replacing it in the program window with the new file.
The Merge button is dangerous;
always think twice before using it.
See page 57 for Why Merge files?
Click on Replace to keep the
uploaded file its own separate file.
Whatever file you had open will be
replaced with the uploaded file.
1. Load a CCF into RC5000 Setup by doing one of the following.
• drag a CCF and drop it on RC5000 Setup, or
• click on
in the toolbar or select Open Configuration... from the File menu, navigate to
the folder you stored the ccf in and select CCF
2. RC5000 Setup now loads the selected CCF. Select Replace if the dialog box Merge or
Replace appears.
RC5000 Setup will remove the current configuration (if it has been modified, you will first
be allowed to save it) and replace it with the configuration from the loaded CCF. For more
information see Merging CCF’s on page 57.
16
Loading and Saving
How do you download a configuration into an RC5000?
1. Start RC5000 Setup.
2. Connect one end of the RC5000 serial cable to your RC5000 and connect the other end to a
serial port of your PC.
3. Make sure you have a configuration in RC5000 Setup either by uploading one from your
RC5000 (see How do you upload a configuration from my RC5000?) or by loading one from
a file (see How do you open a CCf stored on your PC?).
4. Click on
in the toolbar, or select Download into RC5000 from the file menu.
5. RC5000 Setup generates the configuration. If the resulting configuration does not fit your
RC5000's available memory, RC5000 Setup will tell you it is too large and cancel the download. Based on how oversized the configuration is (RC5000 Setup displays this information
both in absolute and relative terms) you should check that the memory setting is correct for
your remote. If it is, delete some elements and try again.
6. RC5000 Setup now tries to connect to your RC5000. If RC5000 Setup cannot connect to
your RC5000, it will display a message saying not connected or not responding. See page 13
for tips on improving communications with the RC5000.
7.After connecting to your RC5000, RC5000 Setup will check the configuration in your
RC5000.
• If your RC5000 does not contain a valid configuration, RC5000 Setup will display a message saying Failed to get valid information from RC5000, do you want to overwrite any
configuration currently in RC5000? Click No or Cancel if you don't want to overwrite the
configuration in your RC5000. Click Yes to continue downloading.
• If your RC5000 contains a modified configuration, RC5000 Setup will display a message
with the creation date and the time of this configuration, and ask you if you want to overwrite it. Click No or Cancel if you don't want to overwrite the configuration in your
RC5000. Click Yes to continue downloading.
8. RC5000 Setup will now download the configuration into your RC5000. After downloading,
your RC5000 will tell you when it is ready to be used again by beeping twice.
You can cancel the download at any time by clicking the Cancel button, but doing so may result
in a corrupt configuratiom in your RC5000 (you can fix this by fully downloading a configuration).
It is best not to touch your RC5000's screen or use any of your RC5000's direct access buttons, while uploading is in progress.
17
Guide to RC5000 Setup © 2000 Marantz America, Inc.
Fundamentals
Update the Operating System!
What is the Updater?
The Updater is the most important step of programming an RC5000. It reprograms the remote
control operating system to support the new features of RC5000 Setup Version 2.0.Without
running the update, you will not be able to get any of the new features to work on the remote
control itself. Periodically, Marantz will offer improvements to RC5000 and RC5000 Setup on
our website. Any improvements are retrofittable to your old remote via the Updater.
Updating
Before you start the updating process, you should connect one end of the RC5000 serial cable
to your RC5000 and connect the other end to your serial port of your PC. Check that the
memory size is set correctly in the Set Memory Size in the File Menu.Select “Update RC5000”
from the Tools Menu.
During the update process, you should read the messages that appear on your PC screen and
push the appropriate buttons.When a window asks if you want to Skip or Continue, understand
that it is really asking you if you have customized your RC5000. If you have, choose Continue. If
the RC5000 is un-modified, choose skip (it’s faster).
It is best not to touch your RC5000’s screen or use any of your RC5000’s direct access buttons, while
updating is in progress.
Sometimes, after an update, the RC5000 will get stuck in a Revert loop. If this happens, download any ccf to the reverting RC5000. It is also possible that after updating your RC5000, it will
ask you to calibrate the touch screen. Using a pen top or other hard, blunt object, touch the
corners of the touchscreen as prompted.
You can always return to the factory configuration.
The RC5000 Setup distribution comes with two sample CCF’s in <install>/Samples where
<install> is the directory where RC5000 Setup has been installed (typically C:\Program
Files\RC5000Setup\Samples).The default configurations are named Default_New_RC5000i.ccf
for a two megabyte RC5000i and Defaut_Old_RC5000 for a one megabyte RC5000.
Make a “Tutorial” file to practice with.
Open the Default_Old_RC5000 ccf and save it as “tutorial” in your Myccf folder to follow along
with the fundamentals tutorial.
18
Fundamentals
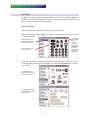
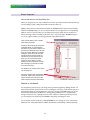
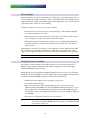
Using the Programming Window
Like any Windows program, menus appear
when you click on a Menu title. For example,
here’s what you’ll see when you click on File.
The file name of the configuration
you are working on is always visible
in the Title bar.
Note that there are
keyboard shortcuts
for most of the
commonly used
menu choices.
Click on the “maximize” box to get
the biggest possible
window to work in.
These are shortcut buttons. If you
hover the mouse over them, popup
labels tell you what they do.
This side of the programming window
is called “panel view” since you will
arrange buttons and artwork on your
panels here.
This side of the
programming
window is called
“tree view” since
it reveals the tree
like structure of
your configuration.
19
Guide to RC5000 Setup © 2000 Marantz America, Inc.
Basic Definitions
Panel - The 240 pixel wide by 219 pixel tall area of the touchscreen you control. See page 9.
Hidden Panel - A panel that you cannot scroll to, only manually jump to. See page 52
Group - Up to 255 panels can be grouped into a Home, Device or Macro Group.This allows
you to navigate to groups using menus, and to panels within groups using scroll arrows.
Device - The division of up to 255 Device groups. Any device that is not a template will automatically appear in the Device Menu (the menu on the right hand side of the remote).
Device Group - A group of up to 255 panels that are accessed via the device menu on the
right hand side of the remote.Within the group, navigation is possible via the scroll arrows or
jumps that you program.
Device panel buttons programmed via the PC can directly learn IR codes and can have macros with animated jumps.With the remote control by itself, they can only learn a single Infrared code.
Template Device Group - A device group that has been made a template will be invisible
on the remote’s Device Menu. It will only appear if the user tries to ADD a device using the
remote control by itself or unchecks “Is Template” in the context menu for the device.The template feature is used by Marantz to make available pre-programmed device groups of panels for
current Marantz components.
Macro Group - The division of up to 255 Macro groups. Any group will automatically appear
in the Macro Menu (the menu on the left hand side of the remote).
Macro panel buttons programmed via the PC can directly learn IR codes and can have macros with animated jumps. When programming via the remote control’s mode menu; the macro buttons can only do
macros via aliases, direct IR learning is not possible.
Home Group - A group of up to 255 panels that are accessed by touching the Home Icon.
Within the home group, navigation is possible via the scroll arrows or jumps that you program.
Home panel buttons can only be programmed via PC, not the remote standalone.
Widget - Our petname for the doohickies you arrange on a panel.These are formally defined
as either Frames or Buttons.
Button - A widget that will do something once programmed and pressed by the user. Buttons
send Infrared codes, jump to other panels, and perform macros. Buttons can be customized with
your own labels, colors, and artwork. Buttons are invisible on an RC5000, unless they have at
least one action in their action list (this can be something as simple as a .1 second delay).
Frame - A widget that is visible, without an action list. Frames are used to display background
artwork and text messages.They cannot be programmed to do anything.They also have the ability to link a number of widgets into one, making moving complex arrangements much easier and
less fuss within RC5000 Setup.
20
Fundamentals
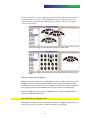
Using Tree and Panel Views To Examine a CCF.
Those three “divisions” that appear in your tree view represent the three sides of your remote
control as accessed by the menu bar at the top of the screen. Click on the + sign next to Home
and the display changes.
After clicking on it, the
+ sign changes to a sign.
All of the contents of
the home division are
displayed now. Double
click on one of the
(panel icons) to view it
in the panel view.
Click on the - sign beside Home to shrink the Home division’s contents again. Now, click on the
+ sign next to Devices. A list of all of the devices appears with + signs next to each device.
Since there are so many devices in the factory configuration, scroll bars appear for you to navigate the list of devices.
Each device has a +
sign, enabling you to
view all of the panels
and properties of each
device.
By using the + and signs you can collapse
and expand tree view.
Click on the + sign next to a device and examine each of the panels of the device in panel view.
Each new panel opens on top of the last panel you opened. If you choose Tile Vertically from the
Window Menu, the panels will neatly arrange themselves.
You can move panels around in
panel view by clicking and dragging the title bar of the panel.
Clicking on
the close box
closes the
panel.
If you can’t see an entire panel,
click and drag the lower right hand
corner to expand it.
21
Guide to RC5000 Setup © 2000 Marantz America, Inc.
Exploring Tree View
Single Clicking In Tree View
You can SELECT anything in tree view with a single click.The item will be highlighted once
ED. Practice the following in RC5000 Setup with your “tutorial” file.
Once it is
SELECTED, you
SELECT-
can press F2 to rename it.
If you SELECT a device or a macro group (not DEVICES or MACRO GROUPS), you can
change their order in the menus of the RC5000 by clicking and dragging them up and
down the list (or holding down the Control key and using the up and down arrows of
your keyboard).This changes the order in which they appear in the RC5000 menus.
You can delete a
SELECTED
item by pressing the delete key.
Any of the Edit Menu commands (or their keyboard shortcuts) can be used to cut, copy,
paste, delete or move the item after it is SELECTED.
Practice deleting, copying and pasting different devices.
Note that you can click and drag a device group into macro groups or vice versa.
Interestingly, you can even click and drag a panel from one device to another.
When a tree view item
is “selected,” it has a
highlighted background.
Double Clicking In Tree View
Practice the following in RC5000 Setup using your tutorial file.
Double clicking on HOME, DEVICES
signs.
OR
MACRO GROUPS is just like hitting the + or the -
Double clicking on Properties (the first item in the lists below each home, device and
macro group) brings up the Properties Window. Explore these.You’ll find more information on properties on page 32.
Double clicking on a Panel pops the panel up into Panel View. Double click on a few panels, so that panel view has two or three visible.The easiest panels to work with for beginners are those in the “EZRead” device group.
22
Fundamentals
Exploring Panel View
You can SELECT any panel in panel view with a single click anywhere on the panel.The panel
selected will have a highlighted title bar. Any other panel’s title bar will be dull.
When a panel is
SELECTED, it has a
highlighted title bar.
To SELECT another
panel, simply click
anywhere on the
panel.
You can move your panels around in panel view by clicking and dragging them. If your window is
not maximized, maximize it now to give yourself room to view several panels at once. If you
can’t see all of a panel, click and drag the bottom right hand corner to expand it to full size.
Once a panel is SELECTED, you can SELECT any widget in panel view with a single click.The widget
will be highlighted with a red line around it. You can move the SELECTED widget around the panel
by clicking and dragging it. Some widgets are grouped inside frames, when you click and drag
the frame, you move all of the widgets inside the frame.
Double Clicking on a widget opens the
The Escape Key
SELECTED
widgets Properties Window. See page 32.
As you explore the default configuration and try to select and move
widgets you will find that sometimes you move the mouse over a
widget, click to SELECT, and nothing happens!
By tapping the Escape key, you will unlock the mouse cursor and be
able to SELECT a new widget.When navigating panels and re-arranging
widgets, it is a good idea to keep one hand on the keyboard’s escape
key and one hand on the mouse.
The reason this occurs is the layered nature of widgets on panels, see
Using Frames to Group Widgets and What are Parents, Children and
Siblings on page 56.
23
Guide to RC5000 Setup © 2000 Marantz America, Inc.
Here are some things to try on
SELECTED
widgets in panel view.
You can move a SELECTED widget with the arrow keys on your keyboard.They move faster
if you combine the space bar with an arrow key.
Once it is
SELECTED, you
can press F2 to rename it.
You can delete a SELECTED widget by pressing the delete key. Go ahead, delete a few widgets! When you delete a frame with widgets inside, you delete everything.
Any of the Edit Menu commands (or their keyboard shortcuts) can be used to cut, copy,
paste, or delete the widget after it is SELECTED. Interestingly, you can copy and paste widgets from one panel to another by first SELECTING the panel you want to get the widget
from, then copying the widget, then SELECTING the panel you want to get the widget to and
finally pasting the widget into its new home.
Practice deleting, copying and pasting widgets.
Pull Down Menus
The conventional Windows menus offer one way to choose an action, tool or process. Some of
the commands will be greyed out when you do not have the correct item SELECTED. Here is an
overview of the menu commands, with page numbers for more information. Note the keyboard
shortcuts beside the most popular menu commands.
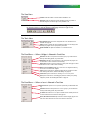
The File Menu
New Configuration closes the current configuration and opens a new empty
configuration.
Open Configuration opens the navigational window enabling you to open any
ccf file on your computer. If a ccf is already open, RC5000 Setup will offer to
Merge or Replace the current configuration. See page 16.
Upload from RC5000 will upload the ccf from a connected RC5000. If a ccf is
already open, RC5000 Setup will offer to Merge or Replace the current configuration. See page 13 for info on Uploading.
Set Memory Size enables you to program for a new 2 megabyte RC5000i or
an old 1 megabyte RC5000.
Save Configuration saves a file you’ve modified with the same file name.
Save Configuration As enables you to save a file with a new file name.
Download to RC5000 will download an opened ccf to a connected RC5000.
Import and Export Grids enables you to share grid patterns with other users.
See “Working With Grids” on page 55.
File History enables you to open the last four CCF’s you’ve opened without
finding them in the navigational “Open Configuration” window.
Exit will close RC5000 Setup, after asking you if you want to save changes to
any open ccf.
The Edit Menu
Undo will undo the last modification you made. You can undo deletions, cuts,
pastes and moves only. It will only undo one mistake.
Cut, Copy, Paste and Delete all work if an item or widget is selected.
Move Up and Move Down List only affect items in Tree View when selected.
They have no effect on Panel View widgets.
Rename brings up the labeling window for the selected item in tree view or
widget in panel view.
Properties brings up the properties window for a selected item or widget. See
page 32.
24
Fundamentals
The View Menu
Toolbar makes the toolbar of shortcut buttons available or not.
Statusbar makes the status bar (which indicates the size and position of
selected widgets in the bottom right corner) available or not.
Note:
The Toolbar can be moved. Simply click the top of the bar and drag it anywhere. You
can change its shape, as well, by clicking and dragging the bottom right corner.
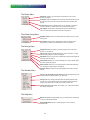
The Tools Menu
Run Emulator loads the current configuration into a PC simulation of the
RC5000. See page 28.
Gallery opens a window with all of the Marantz widgets. You can simply click
and drag any widget onto an open panel in panel view.
Update RC5000 will update the firmware of a connected remote.
The Panel Menu — When a Widget is Selected in Panel View
Add Panel will add a new panel to the selected group. If you hold down the
shift key while adding panels, they will be blank.
Add Button will add a very boring button to an open panel. See page 41-46
for information on how to make it more interesting.
Add Frame will add a very boring frame to an open panel. See page 41-46 for
information on how to make it more interesting.
Move to Front and Back enable you to move
are in front of or behind other widgets.
SELECTED
widgets so that they
Select opens a sub-menu for selecting widgets that are grouped in a frame.
See “Working with Parents, Children and Siblings” on page 56.
Panel Zoom opens a sub-menu for zooming in on a
SELECTED
panel.
Grid opens a sub-menu for controlling grid patterns to assist you in placing
widgets on panels. See “Working With Grids” on page 55.
The Panel Menu — When an Item is Selected in Tree View
Open Panel will open the
ing.
SELECTED
panel in panel view, just like double click-
Add Panel will add a new panel to the SELECTED group. If you hold down the
shift key while adding panels, they will be blank.
Is Hidden will make the SELECTED panel a “Hidden Panel.” Hidden panels cannot be accessed via the scroll arrows. See page 52.
Select, Panel Zoom and Grid open sub-menus that are largely greyed out in
Tree View. These submenus are much more useful in Panel View.
25
Guide to RC5000 Setup © 2000 Marantz America, Inc.
The Device Menu
Add Device creates a new empty Device Group within your list of active
devices. See page 49.
Is Template makes the selected device an inactive Template Device group (can
be made active with the remote control’s ADD mode menu command). See
page 49.
Is Read Only protects the selected device from any changes on the remote
control (via the DEL or LEARN mode menu commands). See page 49.
Has Separator simply places a separating line above the selected device
when it is viewed on the RC5000’s device menu. See page 49.
The Macro Group Menu
Add Macro Group creates a new empty Macro Group within your list of active
macro groups.
Has Separator simply places a separating line above the selected macro
group when it is viewed on the RC5000’s macro menu. See page 49.
The Settings Menu
Display Grid determines whether you will see a grid when you first open a
panel or not. See page 55.
Snap to Grid makes the selected widget easily “snap” into position on a grid
when arranging widgets on panels. See page 55.
Snap Mode brings up a sub menu that determines where and how widgets will
snap to the grid. See page 55.
Set Default Grid brings up a sub menu enabling you to select a specific grid to
open with a panel. See page 55.
Reset All Grids erases all of your personal grids and restores RC5000 Setup
to its one factory programmed grid. See page 55.
The Window Menu
Absolute Location controls the information displayed on the status bar. See
page 44.
Cascade, Tile Horizontally and Tile Vertically will automatically arrange multiple open panels into pleasing arrays in your panel view.
Arrange Icons only arranges minimized panels (in Windows parlance these
are now icons). If the minimized panels are scattered around the panel view,
Arrange Icons will line them up neatly on the bottom of panel view.
Current Open Panel List enables you to quickly
from view by other panels.
SELECT
a panel that is hidden
The Help Menu
Marantz on the web will automatically open your internet browser and attempt
to connect to the Marantz website.
About RC5000 Setup will open a window giving the version number of
RC5000 Setup.
26
Fundamentals
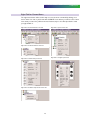
Right Click for Context Menus
The right mouse button offers another way to access the menu commands. By clicking on an
item in either tree view or panel view with the RIGHT mouse button, you will see a list of same
menu items you saw in the pull down menus. However, they are now directly related to what
you right clicked on.
Right click on a panel in tree view.
Right click on the Home Division in tree view.
Right click on the Device Division in tree view.
Right click on a widget in panel view.
Right click on a Device Group in tree view.
Right click on the Macro Group Division in tree view.
27
Guide to RC5000 Setup © 2000 Marantz America, Inc.
Using the Emulator
RC5000 Emulator is a separate application (although it only runs from within RC5000 Setup),
which emulates every aspect of a real RC5000*. You can use RC5000 Emulator to test drive
your configuration without the need to download it to your RC5000. At any time you can
launch RC5000 Emulator from RC5000 Setup by clicking on
in the toolbar or selecting Run
Emulator from the Tools menu.
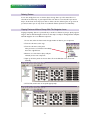
The emulator performs all of the
actions of a real RC5000; mode
menus and Setup panels all work
exactly like a real RC5000.
Just move the mouse over the
touch panel and click to simulate
a touch.
Should you need to emulate hard button presses while clicking on the panel with the mouse,
use the shortcut keyboard keys listed in emulator Help (in the context menu) to activate hard
buttons.
When the cursor is over RC5000
Emulator's window, press the right mouse
button to display a pop-up menu to get
access to the following RC5000 Emulator
functions: Help, About,Transparent,
Minimize, and Close. Turning off the
Transparent function makes the Emulator
run a little faster.
*Note on Timing: The emulator is fairly close to the real RC5000 in behavior. However, the PC
does have more memory than a real RC5000, so timing of jumps, macros, etc.
is often much faster on the emulator than it will be on a real RC5000.
28
Fundamentals
Making screenshots of the Emulator
There are two kinds of screen shots you can make. For a Panel screen shot, simply press the
PRINT SCREEN button which will save the currently displayed screen of RC5000 Emulator in a
Windows bitmap file. RC5000 Emulator will tell you the full path of the file it saves (the screen
shots usually go into directory C:\ProntoScreens). RC5000 Emulator saves up to 100 screenshots before it starts the same filenames again.
You can also make a screen shot that includes the image of the remote control. If you plan to
print this image, follow these ten steps to get optimum print quality.
1
Right click on the Windows desktop and choose properties from the context menu.
2
Click on the Background tab.Temporarily choose None for wallpaper.
3
Click on the Appearance tab.Temporarily change Color to white.
4
Run the Emulator from RC5000 Setup.
5
Minimize RC5000 Setup.
The Emulator should now be running with only the white desktop behind it.
6
Move your mouse to hover over empty desktop and click once.
7
Press and hold the Alt button; then tap the Print Screen button on your keyboard.
8
Open up a graphics program (Microsoft Paint is included with Windows under
accessory programs).
9
Choose paste from the graphics program Edit menu.
10 Save the resulting file after cropping or any other editing you wish to do.
Panel Screen Shot
Full Emulator Screen Shot
29
Guide to RC5000 Setup © 2000 Marantz America, Inc.
The Gallery
The gallery is a collection of all of the widgets Marantz used to create the default configuration.
It makes creating new control panels from scratch a very pleasant operation. If you like, you can
add your own art to the galler; see the next page.
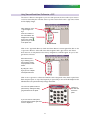
Using The Gallery
1. Open the panel view of the panel to which you want to add a button.
2. Open the Gallery by clicking on
The Gallery appears.
in the toolbar or selecting Gallery from the tools menu.
The selected
group appears
here.
You can click
and drag
frames filled
with widgets or,
by holding
down the shift
key, just a single widget.
Select the gallery group
you want from this alphabetical list by clicking on it.
Use the scroll bar to find
the group you want.
3. Select a group of frames and buttons by clicking on the group's name in the list on the left
side of the gallery window. Use the scroll bar or the cursor UP and DOWN keys to change
the selection.
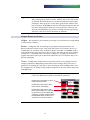
The Gallery includes a
sampling of Channel icons
for one touch surf macros.
The Gallery includes all of
the old RC5000 artwork as
well as the new.
30
Fundamentals
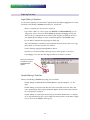
4. Click on the button you want to add, drag it to the panel view and drop it where you want to
add it. If the button you want to add is embedded in a frame, clicking on that button will
select the entire frame. Hold down a SHIFT key while clicking on a button in the gallery to
select only that button.
Clicking and dragging a frame filled with widgets to an empty panel.
Clicking and dragging while holding down the Shift key enables you to drag just one
widget.
How can I create my own gallery?
RC5000 Setup loads the gallery from <install>\gallery.ccf, where <install> is the directory where
RC5000 Setup has been installed. Simply load gallery.ccf as a regular CCF (which it is), make
modifications like you would do for any other configuration, and save the modified configuration
back in gallery.ccf.The next time RC5000 Setup is started, it will use the modified gallery.
Note that RC5000 Setup ignores all but the GALLERY panels of gallery.ccf (HOME has been
renamed into GALLERY in gallery.ccf).
Use the ALT Key to Copy Art Only
By holding down the ALT key on your keyboard, then clicking and dragging a gallery button over
a button in a panel, you can copy the art without affecting the programming.
31
Guide to RC5000 Setup © 2000 Marantz America, Inc.
Programming Properties
Introduction to Properties
Properties windows are used to quickly modify all kinds of RC5000 looks and behaviors.These
windows can be accessed by double clicking, right clicking (and choosing Properties from the
Context menu) or by pressing the Insert key on your keyboard after SELECTING the item or
widget you’d like to modify.You can access:
System Properties (global changes to your entire RC5000) under Home in tree view.
Device Properties (local changes to a particular device) under the Device in tree view.
Macro Properties (local changes to a particular macro group) under the Group in tree view.
Frame Properties (labels, art and colors of the Frame) in Panel View.
Button Properties (IR codes, Macros, labels, art, colors, etc.) in Panel View.
Active, Inactive, Selected and Unselected
Understanding the exact meaning of these terms is critical to successful properties programming.
ACTIVE
The button has an entry in its Action list.The button is programmed to do
something when pressed.You can make a button active by programming a delay
in its action list.
INACTIVE
The button has no entries in its Action list.
SELECTED
After the button is pressed while it is executing the Action list, it is selected.
UNSELECTED
Before the button is pressed, it is unselected.
The Action List
On your RC5000 there is a clear distinction between macros and “regular buttons.” In RC5000
Setup, such a distinction does not exist. Every button and every direct-access or left/right key
can either perform a single action, like transmit an IR code, or be a macro and perform a whole
list of actions.The action list is the place to learn Infrared codes AND to program macros.
Note
All macros can be used on your RC5000, but only macro buttons in a macro group
panel can be edited on your RC5000.
32
Programming Properties
The Name of the Button.
The Action List.
The Action List Tab.
An Alias appears in the
action list preceded by a
[B] if it is a panel button.
The name of the group
is next (the TV device
group), then the panel
name (channels), and
finally the button name
(ON).
If the Alias is to a
Device Action (the act of
selecting the device
from the Device Menu
triggers the Device
Action normally), the
Alias will be preceded
by a [A].
If the Alias was to a
direct access or Left
Right button it will be
preceded by a [K].
The Alias button
enables you to save
memory by simply
telling the RC5000 to go
do whatever is programmed in any button
anywhere as one step
of this action list. Since
RC5000 does not store
the command twice,
only a location address,
much memory is saved.
The Delay button
enables you to place a
delay in the action list.
Delays are preceded by
[D].
A Jump appears in the
action list preceded by
a [J].
The name of the group
is next (the TV device
group), then the exact
name of the panel
(Channels).
IR DB calls up the
Philips Database of
Philips codes.
RC5/6 enables you to
specify an RC5/6 IR
code for Marantz and
Philips components.
RC-MM enables you to
specify a Philips IR
code for wireless PC
keyboards and mice.
Scroll bars appear
when the action list is
too long to fit in view.
The Jump button
enables you to program
up to 255 panel jumps
as steps in an action
list.
Learn IR enables you to
learn IR commands via
a connected RC5000.
Test IR enables you to
test a SELECTED step in
your Action list via a
connected RC5000.
The OK button sets all
of your changes. It does
not save the ccf automatically.
Delete enables you to
delete a SELECTED step
in your Action list.
33
Guide to RC5000 Setup © 2000 Marantz America, Inc.
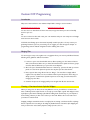
Learning & Macros Step by Step
To program a button to take action when pressed, take the following steps:
1. Double click on a button or select a button by clicking on it and press the INSERT key.
2.The button property sheet appears. Select the Action tab.
3.The currently assigned list of actions is displayed on the right side of the property page. Click
on one of the buttons on the left side of the property page to add to the action list:
• Alias: click on this button to open a tree view of all devices, direct-access and left/right keys,
and buttons in the current CCF. Select an item to add an alias to that item to the action list.
Anything with a green circle can be
aliased.
Click on the + sign to expand that division or group.
Click on the - sign to collapse a division
or group.
You would click here to alias to the Left
and Right Hard keys local to DVD (in
this example they were never named).
Click on these to alias to the direct
access buttons local to DVD.
By clicking on the Setup icon, you
would alias to DVD-Menu-Setup (the
DVD device group, the Menu panel,
and the Setup button).
Note
When your RC5000 is executing an action list and comes across an alias, the entire
action list refered to at that alias is executed. In this way, you can nest macros inside
other macros.
Aliases are shown in the action list preceded by [A] for device alias, [K] for direct-access or
left/right key alias, and [B] for a button alias.
• IRDB: click on this button to open a tree view of the IR database. Select an item to add an IR
code from the database to the action list. IR codes are shown in the action list preceded by a
[C].
• Delay: click on this button to add a delay to the action list. Hold a SHIFT key while clicking on
this button to set the default delay duration.You can always double click on a delay in the
action list to change its duration. Delays are shown in the action list preceded by a [D].
34
Programming Properties
Double click on a delay in the action list
to change the amount of delay.
Type in the amount of delay you want,
from .1 second to 99.9 seconds.
Press the ENTER key on your
keyboard to set the delay.
• RC5/6: click on this button to define an RC5 or RC6 IR code. RC5 and RC6 codes are shown
in the action list preceded by a [C]. RC5/6 codes control equipment from Marantz, Philips and
many other manufacturers.
• RC-MM: click on this button to define a basic mode RC-MM IR code. RC-MM codes are
shown in the action list preceded by a [C]. RC-MM codes control Philips based Infrared keyboards for personal computers.
• Learn IR: click on this button to learn an IR code using your RC5000 connected to your PC.
Learned IR codes are shown in the action list preceded by a [C]. Here’s how to learn an
Infrared command from the component’s original remote control:
a. Connect one end of the RC5000 serial cable to your RC5000 and connect the other end
to a serial port of your PC.
b. Click on the Learn IR button.
c. Press the button on the original remote while pointing it at the learning sensor on your
RC5000. RC5000 Setup will return with one of these three replies:
Learning completed successfully
The learned code has been put on the list of actions. Press the OK button to close the
button property sheet and assign the code to the selected button.
Learning failed (timeout)
RC5000 Setup successfully connected to your RC5000, but somehow couldn't learn
the code.Try again and if it still doesn't work, refer to your RC5000 user guide to troubleshoot IR code learning.
RC5000 not connected or not responding
You can click on Details>> button to open a window listing all serial ports on your
PC.
• If another application is using the serial port to which your RC5000 is connected,
you can either try another serial port or have the other application release the
serial port.
• If RC5000 Setup could open the serial port, but still could not connect, check to
see if both ends of the cable are properly inserted and if RC5000's batteries are
ok.Then wait a few seconds and try again. If after a number of tries RC5000
Setup still cannot connect, try resetting your RC5000, wait until it beeps twice
and try one more time.
35
Guide to RC5000 Setup © 2000 Marantz America, Inc.
Note
Some Infrared commands will not learn successfully when your RC5000 is communicating through Windows. If you have difficulty learning an Infrared command when connecting to your PC, try to learn the command with the RC5000 disconnected, via its
mode menu command “Learn.”
Typically, the RC5000 can learn the command when it is disconnected from Windows
(See the User Manual for IR learning tips).
4. Repeat steps to add up to 255 actions to the action list.
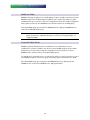
5. If you want your RC5000 to “jump to” a specific panel during the action list, press the jump
button. A navigational window will pop up, enabling you to choose any panel in the ccf to
jump to. You can create a kind of “animation” by placing multiple jumps within an action list.
To see some examples of animation, you might want to set your memory size temporarily to
2 megabytes and open the Default_New_RC5000i ccf. It is very large, so don’t be surprised if
loading it takes a few minutes. Once it is open, click on the emulator and navigate to the
Macro Groups named “Macros” and “Help”. Examine some of the animated macros programmed here for ideas on what you can do with multiple panel jumps.
The Jump Window.
Click on the panel or the type of jump
you want from the list.
Use the scroll bars to navigate to
other types or jumps to panels. When
working with a large ccf with lots of
panels, it is fastest to click and drag
the scroll bar itself rather than the
scroll arrows.
Restrictions To Jumps
Backward - Jumps back one jump (If placed in a panel button, must have a delay preceding it).
Forward - Jumps forward once you’ve browsed back.(If placed in a panel button, must have a delay
preceding it).
Mouse Mode - Operates the Philips DVX-8000 only.
Scroll Up - Acts like an up scroll arrow.
Scroll Down - Acts like a down scroll arrow.
Panel Jump - Jumps to the specific panel you selected even if hidden (panel jumps to template panels
are ignored).
Note
When executing an action list, your RC5000 executes all of the panel jumps in any
aliased button.Thus, when you nest macros inside macros, all of the panel jumps in
both action lists are executed.
36
Programming Properties
Actions can be moved up or down the action list, by selecting the action to be moved, holding
down the CTRL key and using the cursor UP or DOWN keys. Alternatively, you can drag
actions up or down the action list using the mouse.
The Delete button enables you to delete any
SELECTED
action in the action list.
The Test IR button enables you to test any selected command in the action list if the RC5000 is
connected to the PC via the serial cable.This is not the most reliable way to test IR commands,
since it relies on Windows to keep timing accurate. However, if the command works here, it will
work on the RC5000. If a command does not work, however, it is not necessarily bad.
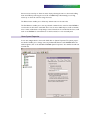
Home System Properties
In tree view, navigate back to home and double click on System Properties.The system properties window enables you to change some very fundamental features of the RC5000.When the
window appears, click on the tab labeled “RC5000 System Properties.” Your window should now
look like this.
37
Guide to RC5000 Setup © 2000 Marantz America, Inc.
Home - Create Your Own or Use Auto Alias?
Decide whether you want to program Home manually or not. Uncheck the “Home Panels are
write protected” checkbox to manually program home buttons. Keep it checked for Automatic
Aliasing.
When programming with the remote control, the user cannot directly program home buttons.
Instead the home buttons are automatically aliased to device action as Device Aliases (see the
User Manual for information on Home panel buttons). When you use the remote, the buttons
you see on the home panel are generated automatically, based on what devices are active in the
device pull down Device menu.
You can choose to make your PC programmed RC5000 a little easier to work with by deciding
to program Home manually, rather than continuing to allow the RC5000 to program them for
you. Here’s the advantages of each method.
Programming Home Manually
If you program Home manually, the device action is no longer automatically linked to the Home
buttons.Thus, you can program macros and navigational jumps in Home buttons and leave
Device actions empty. If a device action is empty, you no longer have to hold down the NO IR
button when using the Device Pull down menu to navigate.Thus the power user who wants to
access other device control panels without triggering macros has an easier time of it.
What you see in RC5000Setup on the Home panel is what you’ll see in the remote control.
Everything is manually programmed, so the remote control does not automatically change the
layout based on the pull down device menu.
Use Automatic Aliasing to Create Home Buttons
Automatic aliasing of home panel buttons is a feature designed to save you programming time.
If you are happy with the way the device menu and the home panels are linked together, there is
no reason to create more work. In order to change the appearance of Home, you will have to
change the order of the Devices in Tree View. That is the only way to adjust the home panel
using Auto Aliases.
Note
You can see five panels underneath Home in tree view.These blank panels have names
and aliases automatically generated for them via Auto Aliasing.There are five, so that
the user can add many components without running out of empty home panels.
If you choose to manually program home, uncheck Home panels are write protected,
and delete all but one of the home panels.
As additional safety margin, you might rename any panel in Home, something other
than “home”. Auto aliasing checks for two conditions:
1.The Home Panels are Write Protected checkbox is checked.
2.There are some panels in Home called “home” (all lower case).
38
Programming Properties
Configuration is Write Protected
This box should be kept UNCHECKED until all programming is complete.The RC5000 learns
IR codes much more effectively stand alone than linked through Windows. If you check the
Configuration is Write Protected checkbox, you cannot do any programming with the remote
control itself.The Mode button will not even appear in the Setup panels! The only way you can
change anything will be on a PC with RC5000 Setup.This is known as the “Attempted Block to
12 year-olds” feature (attempted because all 12 year-olds seem to use PC’s better than we do).
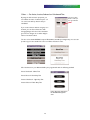
Changing Scroll Arrow and Home Icon Artwork
These tabs enable you to load your own Home icon and/or up and down scroll arrows. Before
loading a new Home icon, you must use a graphics program to create a 40 x 24 pixel bitmap.
Before loading new scroll arrows, you must use a graphics program to create four new icons.
Each icon must be 39 x 24 pixels.The four states you need for scroll arrow icons are:
1) Up Arrow Unselected — This icon is what you will see before
you touch the arrow. Once you touch the arrow (Select it), the
icon displayed will change to the Selected version, immediately
before scrolling up to the next panel.
2) Up Arrow Selected — This icon is the one displayed for the
brief moment before the panel scrolls. Should you elect to save
memory, you can load the same icon you used for selected as
the Unselected icon. After all, the panel scrolling provides pretty
good feedback.
3) Down Arrow Unselected — Identical to Up Arrow Unselected
except that the scroll direction is reversed.
4) Down Arrow Selected — Identical to Up Arrow Selected except
that the scroll direction is reversed.
To change your home icon or scroll arrow icons, follow these steps.
1) Press the Load button for the Icon you want to change.
A standard Windows navigational file finding window appears.
2) Navigate to the .bmp file you want. If the icon does not load, reopen the .bmp file in your
graphics program and check that it is both the correct size and that it has fewer than 256
colors (this is also called “8 bit color”). RC5000 Setup can convert a 256 color graphic into a
4 color graphic, but not one with thousands of colors.Typically, you can convert a bitmap
graphic with thousands or millions of colors to a 256 color by using the graphics program
Save As command.
3) Click on the OK button when finished. Preview your results in the emulator under the Tools
menu.
39
Guide to RC5000 Setup © 2000 Marantz America, Inc.
Programming Left/Right and Direct Access Buttons Globally
When you name a Left or Right hard button in Home System Properties, you are naming the
buttons globally. If you choose to name a particular device or macro group’s Left and Right button properties, it will overide the Global properties when the user has navigated to that particular group. If you leave the name blank in a device or macro group’s Left and Right button properties, the name you programmed in Home System Properties will appear when the user navigates to that group of panels.
To name a hard key, open up Home System Properties, navigate to the Left or Right tab. Click
on the Hard Key Name button to label the hard key.
When you program a step in the action list of any of these buttons within Home System
Properties, you are defining the action globally.You can overide within any device or macro
group properties by programming one step in their action lists. Local overides global.
Device Properties
You access a device’s properties by double clicking on the name of the device in tree view.The
Device properties enable you to program a Device Action list and an action list for each of the
hard and direct access button via tabs at the top of the device properties window.
Device Action
Anything you program as a step in this action list will be executed whenever the user selects
this device via the RC5000’s Device Menu. If the Home System Properties “Home Panels are
Write Protected” checkbox is checked and any of the home panels are named “home” (all
lower case), then Automatic Aliasing is enabled and the Device Action programmed will also be
triggered when a user presses a home panel button.
Suggestion
Many users purposefully leave the Device Action list completely empty, so that
the power user may navigate freely through the device menu without affecting
the Home Theater (and without holding down the NO IR button).This is one
of the most powerful improvements in operational ease you can make with
RC5000 Setup.
Local Programming of Left, Right and Direct Access Buttons
Should you program any steps in these Action lists, they will only be executed when the user
has navigated to this particular device group of panels. Local programming overides the Global
programming done in Home System Properties. If you wish the Left, Right and direct access buttons to operate the way you’ve programmed them in Home System Properties, you must make
sure that all of these action lists are empty!
40
Programming Properties
Suggestion
It is often convenient to copy the TV device group, rename the copy “TV
Only” and program the direct access Vol- and Vol+ with the TV’s own volume
up and down IR commands.Thus, you can watch TV with Surround Sound by
selecting the device group “TV” (in this device group the Vol- and Vol+ action
lists are empty, so the RC5000 executes the Home System Properties Vol- and
Vol+ action lists programmed with your surround receiver’s volume up and
down IR commands).When you select the “TV Only” device group, pressing
either Vol- or Vol+ issues the TV’s IR volume up and down.
Widgets, Buttons and Frames
Widgets - Our petname for the doohickies you arrange on a panel.These are formally defined
as either Frames or Buttons.
Buttons - A widget that will do something once programmed and pressed by the user.
Buttons send Infrared codes, jump to other panels, and perform macros. Buttons can be customized with your own labels, colors, and artwork. Buttons are invisible on an RC5000 (except in
Learn and Label modes), unless they have at least one action in their action list (this can be something
as simple as a .1 second delay). Don’t use buttons to display text or graphics, you will have to
program them with an action just to make them visible. Frames are a much quicker way to display text and graphics.
Frames - A widget that is visible, without an action list. Frames are very quickly and conveniently programmed to display background artwork and text messages.They cannot be programmed to do anything, since they have no action list.They also have the ability to link a number of widgets into one, making moving complex arrangements much easier and less fussy within RC5000 Setup.
Suggestion
Open your “tutorial” ccf and expand Home. Double click on one of the panels
in home.The Marantz home panel has both frames and buttons.
Double click on this button to open a
button properties window.
Double click on this frame to see a
frame used as a text display.
Double click on this frame to see a
frame used to display an icon/graphic
(in this case an icon of italicized text,
created as a graphic, created because
RC5000 Setup does not allow you to
use italics or any other text effect).
41
Guide to RC5000 Setup © 2000 Marantz America, Inc.
Button Properties
ACTIVE and INACTIVE and the Action List
When you program just one step in a Button’s action list, you make the button ACTIVE.That step
can be anything: a jump, a delay, a learned IR command, an alias, etc.
Making a button ACTIVE is important. Remember, the RC5000 makes INACTIVE buttons invisible.
However, in RC5000 Setup you can see a button whether it is programmed or not. By defining
different colors for the two states, you can define how a button looks when it is INACTIVE or
ACTIVE (meaning is there something in the Action list or not?).That way, in RC5000 Setup, you
can see at a glance whether you’ve programmed a button Action list yet.
Click on these tabs to view or modify
other button properties.
A button’s action list, like all action lists
in RC5000 Setup, is quasi-limited to
255 steps. You can place an Alias in the
Action list A to Button B which has 255
steps. Thus when Button A is pressed,
all steps in action list A are executed
and all 255 steps of action list B are
executed. If you want more than 255
steps, you can nest macros inside
macros to get the effect you want.
Nothing we can recommend, however,
will encourage your spouse to sit still
for a macro that long...
Action List
For details on the controls of the Action
List, see page 32.
OK saves changes and closes Button
Properties, Apply saves changes leaving the window open and Cancel discards changes and closes the window.
Selected or Unselected
For many button properties you can change the way a button appears by defining whether it is
Selected (it’s just been pressed and it is now executing the action list) or Unselected (it is just a
pretty button sitting on a panel, waiting for someone to push it). In RC5000 Setup you can use
Selected and Unselected as feedback to a user. By placing a different icon or programming a
change in a button’s text or background color when a button is Selected (just been pressed),
you can make the user aware that the RC5000 is busy doing something for them.
The convention used in the Version 2 default RC5000 file is to change the color of the button
label when it is selected from White on Black (Unselected) to Dark Grey on Black (Selected).
42
Programming Properties
Labels/Names are Invisible unless you choose a Font!
You can choose to name a button, but not have it display the name. In fact, this is the default
condition of any button you create via the Add Button command.This is useful with a button
that has artwork that displays the name (loaded as an Icon).You don’t want a label to be superimposed on your artwork; yet you want to be able to identify your button within the Alias navigational window. Names/Labels without a font still appear correctly in the Alias window! A font
must be selected from the drop down list if you want the name/label to appear on the button.
.
To name/label a button, click on the
Name box and type.
To select a font, click on the down
arrow icon to pull down the Font list,
then click on your choice.
Active and Inactive Icons
These windows control what you will see in RC5000 Setup when a button is Inactive (the
action list is empty) or Active (you’ve already programmed the button). In the default configurations in this new version of RC5000 Setup, the same icons are used for Active and Inactive.
Instead of consuming memory with additional art, we opted to indicate whether a button is
Active or Inactive via the color of the text.We used White text for Active buttons and Light
Grey Text for Inactive buttons. However, you may create your own buttons with unique artwork
just to indicate that the button has not been programmed yet.The art for Version 1 is programmed this way (You can access the old button styles in the Gallery under the listing
“Zoldbuttons”). Although the artwork you load may be completely different looking for each of
the four states, they all must be the same size. If you load different sized icons into the same button, RC5000 will only display the smallest size (the larger icons will be cropped). See page 54
for more information on creating your own icons.
To bring up navigational windows
enabling you to
load/replace new art
or save the old art as
.bmp (bitmap) files,
click on Load or Save.
To delete a buttons
and return to simple
rectangles without
icon art, click on
Delete.
43
Guide to RC5000 Setup © 2000 Marantz America, Inc.
Location/Size
The location windows enable you to type in a new
location accurately, without dragging the button
around the panel. Specify a location by typing in the
new location (in pixels, remember the usable panel is
240 pixels wide and 219 pixels high).
This box controls the distance from the left side of
the button to the left side of the panel.
Distance
from Left
Panel
Edge
Distance
from Top
Panel
Edge
Width
Height
This box controls the distance from the top of the
button to the top of the panel.
If your button has icons loaded, the dimensions
appear, but cannot be changed.The size of the icon
you load determines the size of the button.
When you use the “Add Button” command from the
Panel menu to create an empty grey button (it could
be black, white or light grey), the size and shape of
the rectangular empty button can be clicked and
dragged into any size you want. Likewise, you will be
able to specify a new size accurately here in the
Location/Size button properties window. However, as soon as you load an icon into the button,
the size of the button reverts to the size of the icon you loaded.
Recommendation
Align and position widgets accurately by noting the location information displayed in the Status bar.
The Status bar always
indicates the SELECTED
widget’s size and location.
SELECTa widget by clicking
on it once.
Width
Height
Distance to
Left Panel
Edge
44
Distance to
Top Panel
Edge
Programming Properties
Colors — For Active, Inactive, Selected and Unselected Text
Click on the Radio
Button to make your
text color selections
By using the Colors button properties, you
can indicate the state of a button by the colors of the text with any button that you
name/label.
If you create a button without using any icon
artwork, you can also indicate state with
changing background colors. Note that background color changes do not affect widgets
with icon artwork loaded.
The four colors within RC5000 Setup are Black,White, Dark Grey and Light Grey. You can easily make up your own standard of colors to indicate the button’s state.
All of the buttons in your Marantz Gallery are programmed with the following standard:
Active Unselected - White Text
Active Selected - Dark Grey Text
Inactive Unselected - Light Grey Text
Inactive Selected - Dark Grey Text
Here’s what they look like in
the RC5000 Setup panel
view.
45
Guide to RC5000 Setup © 2000 Marantz America, Inc.
Frame Properties
After looking at the nine tabs of Button Properties,
viewing Frame Properties is a joy.There are only four
properties to examine for frames. Name, Icon,
Location/Size and Colors. All operate identically to
button properties.
To find a frame to practice with open a panel in
Home in your tutorial file.We placed a number of
frames in the center of the panel. Select the Marantz
frame and double click to access Frame Properties.
46
Programming with the Default CCF
Programming with the Default CCF
Basing Your Design on the Marantz Default CCF’s
The default ccf configurations offer you a convenient and fast way to customize your remote
control.They are especially useful for those of you with Marantz components. Here’s the
process of programming using the Default Configuration.
The Process
Peruse the configuration in RC5000 Setup and the Emulator for ideas.
Revise Home System Properties for manual or auto programming of home panels.
Revise Home panel background art and button position as desired.
Delete all devices you don’t want.
Copy or create new devices.
Edit all panels for your system (change art, arrange buttons, etc.)
Program all panel jumps.
Test art & navigation on emulator.
Save file and check actual size in kilobytes.
Modify as necessary.
Download to RC5000.
Learn all IR codes needed on RC5000.
Upload to PC.
Save file as new rev.
Program Macros on PC.
Download to RC5000 and test macros.
Repeat as necessary.
47
Guide to RC5000 Setup © 2000 Marantz America, Inc.
Start with the 2 Megabyte File
There are two default configurations in your RC5000 Setup Samples folder. One is designed to
fit in an RC5000’s 380kb free memory.The other consumes 984kb of free memory. However, it
is a simple and quick process to delete the items you will not use for either remote control.The
advantage of the larger ccf is its complete list of Marantz components and extensive demonstration of animated macros.To start with this file, follow these steps.
1. From the File menu, choose Set Memory Size.
2. Select 2 megabyte in the pop up window.
3. From the File menu, choose Open Configuration.
4. In the pop up navigational window, navigate to the Samples folder and select
“Default_New_RC5000i.ccf.” The samples folder is in <install>\Samples where <install> is
the directory where RC5000 Setup has been installed.This is typically C:\Program
Files\RC5000Setup\Samples.
5. From the File menu, choose Save Configuration As.
6. In the pop up navigational window, navigate to the “My CCF” folder you created in the
Fundamentals tutorial and name the file “MyDesign1.ccf.”
Set Home System Properties
Decide whether you want manual control of Home. Reread pages 37-38 if you are not sure. If
you intend to manually program macros on Home Buttons, UNCHECK the “Home Panels are
Write Protected” checkbox.
Recommendation
If you are manually programming Home buttons, delete all of the
home panels but one. Name that panel HOME (all upper case). Label
and arrange the widgets on the home panel so that there are buttons
for each of your system components and an All On and All Off button. If you want jump links to any other group in your design on the
home panel, create and Label a button for it now.
Selecting The Devices You Want
Open up Devices by clicking on the + sign in tree view. Examine the device list. It has over 40
devices. Some are particular Marantz components, and others are templates for any kind of
device.The User Manual for the RC5000i has information on EZread, Help and Power, which are
special purpose device templates you might find useful.
48
Programming with the Default CCF
Viewing and Changing Device “Type”
In tree view, right click on any device.The
context menu lists three kinds of devices via
a checkmark next to the listing. Simply click
on the listing to turn the checkmark off. A
device with no checkmarks is simply a normal active device.
Active Device — No checkmarks next to
template. An active device will appear in the
Device Menu.
Template Device — A checkmark next to
template. A template device will not appear
in your RC5000 until you utilize the built in
Mode Menu to ADD the device. Making a
device a template erases any Aliases programmed
into any of the device’s buttons.
Read Only Device — A checkmark next to
Read Only makes it impossible for you to use
the Mode Menu on the RC5000 to make any
Learn, Label or Delete changes.This is good
protection against twelve year olds.
The Device Context Menu
Checkmarks indicate that this device
has been made a
template, it is read
only and it has a
separator.
The DVD device
has been modified
to have a separator.
Has Separator — A checkmark next to Has
Separator creates a line above the device in
the device menu.
Symbols in Tree View tell you if a device is
Active, Template, Has Separator, Read Only or
any combination of the three modifiers, as
shown in this screen shot.
Move Desired Devices to Top of List
Click and drag all of the devices you want to the top of the list. Drag any devices you don’t
want below your desired devices.
49
Guide to RC5000 Setup © 2000 Marantz America, Inc.
Deleting Devices
In tree view, simply click once on the first (from the top) device you don’t want. Once it is
selected, hit the delete key on your keyboard.The next device is now selected. If you want to
keep it, hit the down arrow key. If you want to delete it, hit the delete key.You can go as fast as
you want, however you can only undo one accidental deletion (Control Z or Edit-Undo).
Copying Device and Macro Groups With Tab Navigation Intact
Copying and pasting devices is a powerful way to avoid lots of laborious jump to panel programming for devices with Tab navigation. Here’s the best way to modify an existing Marantz template
with tab navigation for a non-Marantz component.
1. In tree view, select the device with the right number of tabs for your component.
2. From the edit menu, select copy.
3. From the edit menu, select paste.
Now, you have a second device immediately
above the original device.
4. Rename one of the devices (they really are
identical) for the new component.
5. Open up all of the panels of the new device. From the Window menu, choose Tile
Vertically.
6. In Tree View, rename each of the panels appropriatly.
50
Programming with the Default CCF
7. Starting with the first panel, rename the first tab and copy the new name to the clipboard.You cannot use the Edit menu when the name window is open, but the keyboard
shortcuts work fine! Simply select the tab and press Function Key F2, type in the name,
double click to select the entire name then press and hold Control and tap the letter C on
your keyboard (this is just like selecting copy from the Edit menu). Click on OK to close the
name box, move your mouse over the same tab in the next panel, select it, press F2 then
press Control-V (paste). Click on OK and repeat until all tabs are renamed.
8. Double click on any tab to open its button properties.
You can see that the jumps are all intact. RC5000 Setup has automatically copied, updated
and renamed all of the jumps within the copied device group.You don’t have to reprogram
jumps.
Recommendation
Instead of building tab style devices from scratch from the gallery, it is
much faster to simply copy a device or macro group with the right
number of tabs, rename its panels and tabs systematically, then delete
and rearrange the button art to suit the new device.
51
Guide to RC5000 Setup © 2000 Marantz America, Inc.
Programming Tips
Hidden Panels
In tree view, right click on any panel icon to bring up the context menu. A checkmark next to
the listing “Is Hidden” offers some additional power to the programmer.
Hidden pages allow the user to create pages that are only accessible through a page jump. If a
device contains a hidden page, this page will be skipped while scrolling through the pages of the
device.When you create a jump to the hidden panel, the scroll arrows appear to enable the
user to scroll back to any visible panels. Interestingly, a device group with all hidden panels has
no scroll arrows at all.
Hidden panels don't have a panel number in USE Mode.
Hidden panels, like all panels, become visible - which means accessible - in LEARN and LABEL
mode. In these modes they also get a panel number.To indicate the fact that the panels are
defined as hidden, the panel numbers of "hidden panels" are displayed between square brackets
('[' & ']').
Moving Panels
You’ll want to move your panels to change the order in which they scroll.The top panel is the
number one panel — it’s the one displayed when the group is selected from the Device or
Macro Group Menu on the RC5000. Here’s how to change panel scrolling order.
1. Select the panel you want to move in the tree view on the left side of the RC5000 Setup
window.
2. Hold down the left mouse button and drag the panel to its new location. If you drop a
panel on another panel, it will be inserted before the panel you drop it on. If you drop a
panel on HOME, a Device or a Macro group, the panel joins that group of panels (and is
removed from its former group).
Alternatively, move the selected panel up or down its current list by holding down a CTRL button while
using the cursor UP or DOWN key.
Copying and Pasting Panels
1. Select the panel you want to copy in the configuration tree view.
2. Press CTRL + C or select Copy from the Edit menu to copy the selected panel into
RC5000 Setup's clipboard.
3. Select HOME, or the device or macro group you want to copy the panel to and press
CTRL + V or select Paste from the Edit menu.
RC5000 Setup does not support copying from one running copy of RC5000 Setup to another.
52
Programming Tips
Copying panels and Tab Navigation
Note
Copying panels from one device to another does not update jumps to panels.You will
have to manually reprogram any tab navigation buttons to jump to the new device.
Adding Empty Panels
Select a panel, HOME, or the device or macro group to which you want to add a panel and click
on
in the toolbar or select Add Panel from the Panel menu while holding down the shift
key. This creates a totally empty panel. If a panel is selected, the newly added panel is inserted
just before the selected panel.
If you don’t hold down the shift key, you will get a new panel with the Marantz default artwork in it. For
home panels, Marantz provides the standard eleven button home. For devices, Marantz provides a totally empty panel with no artwork in it (however, you could create a default device panel with your own art
in it, see page 58). For Macro panels, Marantz provides a standard five button panel.
Copying and Pasting Buttons
1. Open the panel view of the panel with the button you want to copy.
2. If you want to copy a button to another panel, then open the panel view of the panel to
which you want to copy a button.
3. Hold down the CTRL key, click on the button you want to copy, hold down the left mouse
button and drag the button to the location to which you want to copy it, and release the left
mouse button to drop the dragged button.
RC5000 Setup does not support copying from one running copy of RC5000 Setup to support another.
Copying Art from One Button to Another
After creating a button and putting a few actions into its action list, you may want to change the
appearance of that button without having to recreate the action list.You can easily do this by
copying all of the artwork from another button to this button.
1. Open the panel view of the panel with the button of which you want to copy art.
2. If you want to copy art from a button in another panel, open the panel view of that panel.
If you want to copy art from a button in the gallery, open the gallery.
3. Press and hold the ALT key, click on the button from which you want to copy icons, drag
it to the button to which you want to copy bitmaps, and drop the dragged button.
Cleaning Up Device Properties
Many of the devices in the default ccf have an IR code programmed in the Device Action list to
select the appropriate input on a Marantz preamp/receiver. If you would like to avoid this,
delete any and all codes you find in the Device Action lists.
53
Guide to RC5000 Setup © 2000 Marantz America, Inc.
Resizing Widgets
Buttons and frames can only be resized if they do not have any icons loaded. If a button has one
or more bitmaps, the width of the button is fixed to the smallest width of all its bitmaps and the
height of the button is fixed to the smallest height of all its bitmaps.The same is true for frames
except that a frame can have at most one bitmap.
If a button or frame has no icons, you can resize as follows:
1. Select the button or frame you want to resize by clicking on it. A red frame will appear
around the selected button or frame.
2. Release the left mouse button and move over the edge of the button or frame until the
cursor changes into a resize cursor with the desired orientation.
3. Hold down the left mouse button and move the cursor to drag the edge underneath it
and resize the button or frame.The status bar shows the current size of the selected
button or frame.
Alternatively, you can use the cursor keys to resize the button or frame. Hold down the SHIFT
key to move the top or left edge, and hold down a CTRL key to move the bottom or right
edge.To move an edge faster with the cursor keys, hold down the SPACE bar at the same time.
Note
You can only resize a button or frame if it has no icons.
Loading New Icons Into Widgets
Every button or frame can have its own unique artwork..You must create the artwork in a
graphics program capable of saving the file as a .bmp or bitmap such as the Paint program
included with Windows (in Accessories).
Bitmaps take up memory and having many different bitmaps means there is less room for other data,
like IR codes.You can help minimize the memory bitmaps require by reusing bitmaps, where possible, on
your buttons and frames. RC5000 Setup aliases to identical icons, saving memory.
1. Double click on the widget you want to load the new icon into.
2.The property window appears.
3. Click on the Load button underneath the bitmap you want to load, and select the
Windows bitmap file. RC5000 Setup can load any Windows bitmap file that has 1, 4, or 8
bits per pixel and is at most 240 by 219 pixels (the size of a panel). RC5000 Setup will
automatically convert a color bitmap into a grayscale version more suitable for display on
your RC5000.
Once the icon is loaded, you can click on it to see it full size.
Reminder
All of a button’s four states must have the same size icon. If you load different
sizes for the same button, RC5000 will size the button to the smallest size and
crop all of the other icons.
54
Programming Tips
Working with Grids
Panel view grids are a helpful tool to line up buttons and frames. A panel view grid is a set of up
to 64 horizontal and 64 verticle line segments.The main use for grids is grid snapping, which
restricts button and frame locations to grid location (the locations where the line segments of a
grid intersect). Grid snapping affects button and frame moving, dropping a button or frame
dragged from one panel or gallery, as well as button or frame resizing.
All grid functions are accessible through the Grid submenu of the Panel menu or the Grid submenu of the panel view pop-up menu. Default grid settings, which affect all newly opened panel
views, can be set in the Settings menu.The following is an overview of some of the things you
can do with grids:
• RC5000 Setup stores 10 different default grids, which are automatically assigned to a panel
view when it is opened.The grids can be modified per panel view without affecting the
default grids. Use the Set Default Grid submenu of the Settings menu to set any of
RC5000 Setup’s default grids to the current grid of the action panel view.
• To change the current grid of panel view, enable grid editing by selecting Edit Grid in the
Grid submenu.The Edit Grid item is only enabled if a grid is currently visible.
• A horizontal grid line can be added by holding down a CTRL key while clicking on a horizontal grid line. A similar approach works for verticle grid lines.The selected grid line can
be deleted by pressing the DEL key. Note that every grid must contain at least one horizontal and one verticle grid line.Therefore, the last horizontal and vertical grid line cannot
be deleted.When you put the selected grid line on top of another grid line and you deselect the selected grid line, the selected grid line is deleted.
• To add a verticle grid line to the right of two other verticle grid lines at the same distance
as the distance between the two other verticle grid lines, hold down a CTRL key and
press the cursor RIGHT key. A similar approach works for a verticle line to the left of
two verticle grid lines and horizontal grid lines.
• To create an evenly spaced grid, use the Auto Grid... menu item.
• By default RC5000 Setup snaps the top left corner of a button or frame to the nearest
grid location. However, you can instruct RC5000 Setup to snap to any corner or the center of a button or frame using the Snap Mode submenu of the Grid menu. Note that the
snap mode does not affect resizing, only placement or moving.
• To make the current grid of panel A the current grid of panel B: make the current grid of
panel A default grid 9 (or any other unused grid, we just picked 9 for this example), close
panel B, open panel B, and select grid 9.
•To move the entire grid, hold down a SHIFT key and use the mouse or the cursor UP or
DOWN key to move the grid.
•Use the Export Grids or Import Grids items in the Files menu to export or import the
default grids to or from a text file.This allows you to keep your grids with your CCF’s and
makes it easier to make changes to your CCF’s afterwards.
Grids are not stored in CCF’s.
55
Guide to RC5000 Setup © 2000 Marantz America, Inc.
Grouping Widgets in Frames
RC5000 Setup does not have a grouping command, yet. However, you can group a number of
widgets onto one frame, which makes complex arrangements far easier to move around, copy
and paste. Here’s how to group a bunch of widgets into a frame.
1. Add a frame to the panel. Change it’s background to white so that it will be invisible.
This is the PARENT.
2. Copy a widget you would like to have grouped in the frame.You can copy from the
Gallery, the same panel or another panel.
3. Click on the PARENT frame to select it.
4. Choose Paste from the Edit Menu.
The widget will appear in the top left corner of the frame.This is the CHILD.
5. Move the CHILD widget into position within the boundaries of the PARENT frame.
6. Repeat steps 2 through 5 for all the other widgets you’d like to have in this group.
These are the SIBLINGS of the CHILD widget.
Once you’ve finished arranging things inside your PARENT frame, you can move, copy and paste
the entire group, by selecting the PARENT frame.
Working With Parents, Children and Siblings
Sometimes you try to select a widget with a mouse click and you can’t. That’s because you’ve
unknowingly selected a parent and now can’t select a child.There are several ways to deal with
this.
1. You can press the ESC key to release the “parent” selection before trying to select again.
Pressing ESC will always deselect the current selection.
2. Press the TAB key to select the next sibling of the selected button or frame. Hold down
the SHIFT key while pressing the TAB key to select the previous sibling of the selected
button or frame.
3. Use the Select Sub-Menu in the Panel Menu or the Panel context menu.
56
Custom CCF Programming
Custom CCF Programming
Introduction
Many users have found these two websites helpful while creating a custom interface.
http://www.remotecentral.com
http://www.prontoedit.com
You can choose to download ccf’s from these sites, merge them with your own and modify
them for your use.
OR
You can use them for ideas and create your own interface with your own unique art and navigational structure from scratch.
You’ll find the following tips in this manual especially useful if you plan to do any custom programming. However, if you are just starting out, we suggest you read through the chapter on
programming with the default configuration before utilizing this section.
Merging Files
You can merge as many ccf’s together into one gigantic file as your memory will allow. However,
following these guidelines will avoid confusion.
1. It is best to open each downloaded ccf first, delete anything you don’t want and save it
with a new file name. Make sure you delete all unwanted home panels and macro groups
as well as devices.Whenever you open a file choose Replace.
2. Once all of your downloaded files have been “cleaned up,” open the file with your home
panels on it. Set Home System Properties the way that you want. Save the file.
3. Now, open the first merge file and choose “Merge”. The two files are simply added
together.The only deletion is the second files Home System Properties.That’s why you
always open the ccf with Home System Properties set the way you want first, before
merging any other files.
4. Continue the process of merging untill you’ve merged them all, then save the file.
Creating a Consistent Artistic Style for Widgets
When you merge lots of devices from many different sources, you will have a ccf with sometimes conflicting artistic styles. Decide on the style you want. Open a panel with widgets in that
style. Open a panel with conflicting styles.While holding down the ALT key on your keyboard,
click and drag a button you like over a button you don’t like. Release the mouse button and
your button is transformed!
Swapping a widget’s artwork like this does not affect font size, naming or the Action list.The only things
that are copied are the icons that give the widget its fundamental look. Sometimes after swapping artwork, you still need to access button properties, change font size, color etc.
57
Guide to RC5000 Setup © 2000 Marantz America, Inc.
Modify the Gallery
RC5000 Setup loads the gallery from <install>\gallery.ccf, where <install> is the directory where
RC5000 Setup has been installed. Simply load gallery.ccf as a regular CCF (which it is), make
modifications like you would do for any other configuration, and save the modified configuration
back in gallery.ccf.The next time RC5000 Setup is started, it will use the modified gallery.
Note that RC5000 Setup ignores all but the GALLERY panels of gallery.ccf (HOME has been
renamed into GALLERY in gallery.ccf).
Tip
Set your memory size to 2 megabytes before adding to the gallery.That way your
gallery can have up to 1404 kb of artwork in it even if you are programming a one
megabyte RC5000.
Customize Default Panels
RC5000 Setup loads default panels from <install>\home.ccf, <install>\device.ccf, and
<install>\macro.ccf, where <install> is the directory where RC5000 Setup has been installed.
Simply load any of these CCF’s, modify the configuration, and save it back.The next time
RC5000 Setup is started, it will use the modified default panels.
The default macro panel CCF serves a second purpose: when you create a new macro group on
your RC5000, the panels of that macro group are actually copies of the default macro panel.
Note that RC5000 Setup ignores all but the first DEFAULT panel of a default panel CCF
(HOME has been renamed into DEFAULT in the default panel CCF’s).
58
Index
Alphabetical Index
This index is hyperlinked. Simply hover your mouse over the PAGE NUMBER next to the entry you
want to jump to. The cursor will change to a pointing finger. Click; and you will be hyperjumped
to the correct page.
A
Color 45
Communicating 13
Configuration is Write Protected 39
Context Menus 27
Copying Art 53
Copying buttons 53
Copying Devices 50
Copying Macro Groups 50
Copying Panels 52
Custom CCF Programming 57
Action List 32
Active 32
icons for 43
Adding Panels 53
Ahead Jump Button 36
Aliases 34
Align and position widgets 44
ALT key 53
Art changes 54
Auto Alias 38
D
B
Backward Jump 36
Bitmaps 54
Browsing Back & Forth Jumps 36
Buttons 20
Align and position 44
changing artwork 43
Copying and Pasting 53
invisible 41
make active 42
resize 54
C
Child 56
59
Default 18
programming with 47
Delay 34
Device Action 40
Device Group 20
templates 20
device group into macro groups 22
Device Menu 26
Device Properties 40
Device Type 49
Devices 20
Direct Access Buttons Globally 40
Double Clicking In Tree View 22
Downloading 17
Guide to RC5000 Setup © 2000 Marantz America, Inc.
E
Home Panels are write protected 38
Home System Properties 37
Edit Menu 24
Empty Panel 53
Emulator 28
Escape Key 23
I
Icons 43
Inactive 32
icons for 43
Installing 11
PC Requirements 11
Invisible text 43
IRdatabase 34
F
Factory configuration 18
File Menu 24
File name 19
Firmware - updating 18
Forward Jumps 36
Frames 20
align and position 44
Properties 46
resize 54
J
Jumping 36
Nested 36
preserving jumps while copying 51
tabs 51
G
K
Gallery 30
Global programming 40
Grouping Widgets in Frames 56
Groups 20
Keyboard shortcuts 19
L
H
Labels 43
Layers - grouping with frames 56
Learning 34
Learn IR button 35
Left/Right Global Programming 40
Linking or Jumping to Panels 36
Loading New Icons 54
Local Programming 40
Help Menu 26
Hidden Panels 20
Programming 52
Home - Create Your Own 38
Home Group 20
Home Icon 39
60
Index
P
Location 44
Locking your ccf 39
Panel Jump 36
Panel Menu 25
Panel view 19
Exploring 23
Using 21
Panels 20
adding 53
closing 21
Copying and Pasting 52
default 58
expanding 21
moving 21, 52
size 54
Parent 56
Pasting buttons 53
Pasting devices 50
Pasting macro groups 50
Pasting Panels 52
PC Requirements 11
Plus sign 21
Preventing Changes to your ccf 39
Previous Panel Jump 36
Programming Window 19
Properties 32
M
Macro Group Menu 26
Macro Groups 20
Macros 32
changing step order 37
Delay 34
programming 34
Marantz Default CCF 47
Memory Size Setting 12
Menus 24
Merging Files 57
Minus sign 21
Mouse Mode 36
Moving Panels 52
N
Names 43
Navigational Jumps 36
Nested Jumps 36
New Features 18
Next Panel Jump 36
NOIR 40
R
O
RC5/6 codes 35
RC5000 System Properties 37
RC5000i 12
RC-MM 35
Replace 16
Resizing Widgets 54
Right Click 27
Opening 16
61
Guide to RC5000 Setup © 2000 Marantz America, Inc.
S
Saving 15
Screenshots 29
Scroll Arrow 39
Scroll Down Jump 36
Scroll Up Jump 36
Select Sub-Menu 56
Selected 32
more on 42
Selecting 22
escaping 23
Serial Communications Problems 13
set the Memory Size 12
Settings Menu 26
Shortcut buttons 19
Sibling 56
Single Clicking 22
Size 44
Starting RC5000 Setup 11
Status bar 44
T
TAB key 56
Tab Navigation 50
Template Device Group 20
Text color 45
Title bar 19
Tools Menu 25
Tree view 19
Using 21
Troubleshooting invisible buttons 41
Troubleshooting invisible labels 43
Troubleshooting learning IR codes 35
62
Troubleshooting Serial Ports 13
Troubleshooting source switching 53
Tutorial 18
TV Onl 41
U
Unselected 32
more on 42
Updating 18
Uploading 13
V
View Menu 25
W
Why save 12
Widgets 20
align and position 44
grouping in frames 56
Window Menu 26
with parents, children and siblings 56