1
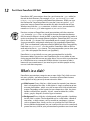
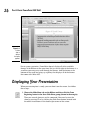
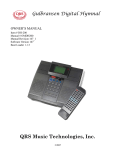
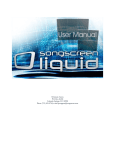
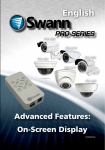
Chapter 1
AL
Welcome to PowerPoint 2007
Introducing PowerPoint
Firing up PowerPoint
TE
Making sense of the PowerPoint screen and the Ribbon
RI
In This Chapter
Creating a presentation
MA
Viewing presentation outlines
Saving and closing your work
Retrieving a presentation from the hard drive
TE
D
Getting out of PowerPoint
T
RI
GH
his chapter is a grand and gala welcoming ceremony for PowerPoint 2007,
the all-new and thoroughly revamped version of Microsoft’s popular slidepresentation program.
CO
PY
This chapter is sort of like the opening ceremonies of the Olympics, in which
all the athletes parade around the stadium and people make speeches in French.
In much the same way, this chapter marches PowerPoint 2007 around the stadium so you can get a bird’s-eye view of what the program is and what you
can do with it. I might make a few speeches, but not in French (unless, of
course, you’re reading the French edition of this book).
What in Sam Hill Is PowerPoint?
PowerPoint is a program that comes with Microsoft Office (although you can
buy it separately, as well). Most people buy Microsoft Office because it’s a
great bargain: You get Word, Excel, and Outlook all together in one inexpensive package. And PowerPoint is thrown in for good measure. Of course,
depending on which edition of Office you buy, you might get other goodies as
10
Part I: Basic PowerPoint 2007 Stuff
well, such as Access, Publisher, a complete set of Ginsu knives, and a Binford
VegaPneumatic Power Slicer and Dicer (always wear eye protection).
You know what Word is — it’s the world’s most loved and most hated word
processor, and it’s perfect for concocting letters, term papers, and great
American novels. Excel is a spreadsheet program used by bean counters the
world over. Outlook is that program you use to read your e-mail. But what the
heck is PowerPoint? Does anybody know or care? (And as long as I’m asking
questions, who in Sam Hill was Sam Hill?)
PowerPoint is a presentation program, and it’s one of the coolest programs I
know. It’s designed to work with a projector to display presentations that will
bedazzle your audience and instantly sway them to your point of view, even if
you’re selling real estate on Mars, season tickets for the Mets, or a new Medicare plan to Congress. If you’ve ever flipped a flip chart, you’re going to love
PowerPoint.
Here are some of the many uses of PowerPoint:
Business presentations: PowerPoint is a great timesaver for anyone who
makes business presentations, whether you’ve been asked to speak in
front of hundreds of people at a shareholders’ convention, a group of
sales reps at a sales conference, or your own staff or co-workers at a
business meeting.
Sales presentations: If you’re an insurance salesperson, you can use
PowerPoint to create a presentation about the perils of not owning life
insurance and then use your laptop to show it to hapless clients.
Lectures: PowerPoint is also useful for teachers or conference speakers
who want to back up their lectures with slides.
Homework: PowerPoint is a great program to use for certain types of
homework projects, such as those big history reports that count for half
your grade.
Church: People use PowerPoint at churches to display song lyrics on big
screens so everyone can sing or to display sermon outlines so everyone
can take notes. If your church still uses hymnals or prints the outline in
the bulletin, tell the minister to join the 21st century.
Information stations: You can use PowerPoint to set up a computerized
information kiosk that people can walk up to and use. For example, you
can create a museum exhibit about the history of your town or set up a
trade-show presentation to provide information about your company
and products.
Internet presentations: PowerPoint can even help you to set up a presentation that you can broadcast over the Internet so people can join in
on the fun without having to leave the comfort of their own homes or
offices.
Chapter 1: Welcome to PowerPoint 2007
Introducing PowerPoint Presentations
PowerPoint is similar to a word processor such as Word, except that it’s
geared toward creating presentations rather than documents. A presentation is
kind of like those Kodak Carousel slide trays that your father used to load up
with 35-mm slides of your family trip to the Grand Canyon. The main difference is that you don’t have to worry about dumping all the slides in your
PowerPoint presentation out of the tray and onto the floor.
Word documents consist of one or more pages, and PowerPoint presentations consist of one or more slides. Each slide can contain text, graphics,
and other information. You can easily rearrange the slides in a presentation,
delete slides that you don’t need, add new slides, or modify the contents of
existing slides.
You can use PowerPoint both to create your presentations and to actually
present them.
You can use several different types of media to actually show your presentations:
Computer monitor: Your computer monitor, either a CRT monitor or an
LCD, is a suitable way to display your presentation when you’re showing
it to just one or two other people.
Computer projector: A computer projector projects an image of your
computer monitor onto a screen so large audiences can view it.
Overhead transparencies: Overhead transparencies can be used to
show your presentation using an overhead projector.
Printed pages: Printed pages allow you to distribute a printed copy of
your entire presentation to each member of your audience. (When you
print your presentation, you can print one slide per page, or you can
print several slides on each page to save paper.)
35-mm slides: For a fee, you can have your presentation printed onto
35-mm slides either by a local company or over the Internet. Then, your
presentation really is like a Kodak Carousel slide tray!
Presentation files
A presentation is to PowerPoint what a document is to Word or a worksheet
is to Excel. In other words, a presentation is a file that you create with PowerPoint. Each presentation that you create is saved on the hard drive as a separate file.
11
12
Part I: Basic PowerPoint 2007 Stuff
PowerPoint 2007 presentations have the special extension .pptx added to
the end of their filenames. For example, Sales Conference.pptx and
History Day.pptx are both valid PowerPoint filenames. When you type
the filename for a new PowerPoint file, you don’t have to type the .pptx
extension, because PowerPoint automatically adds the extension for you.
Windows may hide the .pptx extension, in which case a presentation file
named Conference.pptx often appears as just Conference.
Previous versions of PowerPoint saved presentations with the extension
.ppt instead of .pptx. The x at the end of the new file extension denotes
that the new file format is based on XML, a popular data format that makes it
easier to exchange files among different programs. PowerPoint 2007 can save
files in the old .ppt format, but I recommend you do so only if you need to
share presentations with people who haven’t yet upgraded to PowerPoint
2007. (You can download a program called the Microsoft Office Compatibility
Pack from www.microsoft.com that enables PowerPoint 2002 or 2003 to
read and write files in .pptx format. This program enables you to share your
.pptx files with people who haven’t yet upgraded.)
PowerPoint is set up initially to save your presentation files in the My
Documents folder, but you can store PowerPoint files in any folder of your
choice on your hard drive or on any other drive. You can write a presentation
to a CD-RW drive or to a removable USB flash drive if you want to take it
home with you to work on or if you need to give it to other people so they
can use it on their computers.
What’s in a slide?
PowerPoint presentations comprise one or more slides. Each slide can contain text, graphics, and other elements. A number of PowerPoint features
work together to help you easily format attractive slides:
Slide layouts: Every slide has a slide layout that controls how information is arranged on the slide. A slide layout is simply a collection of one
or more placeholders, which set aside an area of the slide to hold information. Depending on the layout that you choose for a slide, the placeholders can hold text, graphics, clip art, sound or video files, tables,
charts, graphs, diagrams, or other types of content.
Background: Every slide has a background, which provides a backdrop
for the slide’s content. The background can be a solid color; a blend of
two colors; a subtle texture, such as marble or parchment; a pattern,
such as diagonal lines, bricks, or tiles; or an image file. Each slide can
have a different background, but you usually want to use the same background for every slide in your presentation to provide a consistent look.
Chapter 1: Welcome to PowerPoint 2007
Themes: Themes are combinations of design elements such as color
schemes and fonts that make it easy to create attractive slides that
don’t look ridiculous. You can stray from the themes if you want, but
you should do so only if you have a better eye than the design gurus
that work for Microsoft.
Slide Master: The Slide Master is a special type of slide that controls the
basic design and formatting options for slides in your presentation. The
Slide Master includes the position and size of basic title and text placeholders; the background and color scheme used for the presentation;
and font settings, such as typefaces, colors, and sizes. In addition, the
Slide Master can contain graphic and text objects that you want to
appear on every slide.
You can edit the Slide Master to change the appearance of all the slides
in your presentation at once. This helps to ensure that the slides in your
presentation have a consistent appearance.
All the features described in the previous list work together to control the
appearance of your slides in much the same way that style sheets and templates control the appearance of Word documents. You can customize the
appearance of individual slides by adding any of the following elements:
Title and body text: Most slide layouts include placeholders for title and
body text. You can type any text that you want into these placeholders.
By default, PowerPoint formats the text according to the Slide Master,
but you can easily override this formatting to use any font, size, style,
or text color that you want.
Text boxes: You can add text anywhere on a slide by drawing a text box
and then typing text. Text boxes allow you to add text that doesn’t fit
conveniently in the title or body text placeholders.
Shapes: You can use PowerPoint’s drawing tools to add a variety of shapes
on your slides. You can use predefined AutoShapes, such as rectangles, circles, stars, arrows, and flowchart symbols. Alternatively, you can create
your own shapes by using basic line, polygon, and freehand drawing tools.
Illustrations: You can illustrate your slides by inserting clip art, photographs, and other graphic elements. PowerPoint also comes with a
large collection of clip art pictures you can use, and Microsoft provides
an even larger collection of clip art images online.
Charts and diagrams: PowerPoint includes a new diagramming feature
called SmartArt that enables you to create several common types of diagrams, including organization charts, cycle diagrams, and others. In
addition, you can insert pie charts, line or bar charts, and many other
chart types.
Media clips: You can add sound clips or video files to your slides.
13
14
Part I: Basic PowerPoint 2007 Stuff
Starting PowerPoint
Here’s the procedure for starting PowerPoint:
1. Get ready.
Light some votive candles. Take two Tylenol. Put on a pot of coffee. If
you’re allergic to banana slugs, take an allergy pill. Sit in the lotus position
facing Redmond, Washington, and recite the Windows creed three times:
Bill Gates is my friend. Resistance is futile. No beer and no TV make
Homer something something . . .
2. Click the Start button.
The Start button is ordinarily found in the lower-left corner of the
Windows display. When you click it, the famous Start menu appears.
The Start menu works pretty much the same, no matter which version
of Windows you’re using.
If you can’t find the Start button, try moving the cursor all the way to the
bottom edge of the screen and holding it there a moment. With luck on
your side, you see the Start button appear. If not, try moving the cursor
to the other three edges of the screen: top, left, and right. Sometimes the
Start button hides behind these edges.
3. Point to All Programs on the Start menu.
After you click the Start button to reveal the Start menu, move the
cursor up to the word All Programs and hold it there a moment. Yet
another menu appears, revealing a bevy of commands.
4. Choose Microsoft Office➪Microsoft Office PowerPoint 2007.
Your computer whirs and clicks and possibly makes other unmentionable noises while PowerPoint comes to life.
If you use PowerPoint frequently, it might appear in the Frequently
Used Programs List directly on the Start menu so you don’t have to
choose All Programs➪Microsoft Office to get to it. If you want PowerPoint to always appear at the top of the Start menu, choose Start➪All
Programs➪Microsoft Office. Then, right-click Microsoft Office PowerPoint 2007 and choose the Pin to Start Menu command.
Navigating the PowerPoint Interface
When you start PowerPoint, it greets you with a screen that’s so cluttered with
stuff that you’re soon ready to consider newsprint and markers as a viable
alternative for your presentations. The center of the screen is mercifully
Chapter 1: Welcome to PowerPoint 2007
blank, but the top part of the screen is chock-full of little icons and buttons
and doohickies. What is all that stuff?
Figure 1-1 shows the basic PowerPoint screen in all its cluttered glory. The
following list points out the more important parts of the PowerPoint screen:
Office button (a.k.a. the File menu)
Quick Access toolbar
Slides and Outline tabs
The Ribbon
Figure 1-1:
PowerPoint’s
cluttered
screen.
Status bar
Current slide
The Ribbon: Across the top of the screen, just below the Microsoft
PowerPoint title, is PowerPoint’s main user-interface gadget, called the
Ribbon. If you’ve worked with previous versions of PowerPoint, you
were probably expecting to see a menu followed by one or more toolbars in this general vicinity. After meticulous research, Microsoft gurus
decided that menus and toolbars are hard to use. So they replaced the
menus and toolbars with the Ribbon, which combines the functions of
both. The Ribbon takes some getting used to, but after you figure it out,
15
16
Part I: Basic PowerPoint 2007 Stuff
it actually does become easier to use than the old menus and toolbars.
The deepest and darkest secrets of PowerPoint are hidden on the
Ribbon. Wear a helmet when exploring it.
Note that the exact appearance of the Ribbon varies a bit depending on
the size of your monitor. On smaller monitors, PowerPoint may compress the Ribbon a bit by using smaller buttons and arranging them differently (for example, stacking them on top of one another instead of
placing them side by side).
For more information about working with the Ribbon, see the section
“Unraveling the Ribbon,” later in this chapter.
Although PowerPoint 2007 has done away with the menus, the keyboard
shortcuts (technically called accelerators) that were associated with the
PowerPoint 2003 menu commands still work. However, instead of pressing Alt and the accelerator key at the same time, you press them separately. For example, to call up the Open dialog box, press Alt, F, and O
(for the old File➪Open command). And to insert clip art, press Alt, I, P,
and C (for the old Insert➪Picture➪Clip Art command).
The Office button (also known as the File menu): The big colorful
logo in the top-left corner of the PowerPoint window is called the Office
button. You can click it to reveal the program’s one and only traditional
menu. This is the place to come when you need to open or save files,
create new presentations, print a document, and do other file-related
chores.
Quick Access toolbar: Just to the right of the Office button is the Quick
Access toolbar, also called the QAT for short. Its sole purpose in life is to
provide a convenient resting place for the PowerPoint commands you
use the most often.
Initially, this toolbar contains just four buttons: Save, Undo, Redo, and
Print. However, you can add additional buttons if you want. To add any
button to the QAT, right-click the button and choose Add to Quick Access
Toolbar. You’ll also find a pull-down menu at the end of the QAT that lists
several frequently used commands. You can use this menu to add these
common commands to the QAT.
Current slide: Right smack in the middle of the screen is where your
current slide appears.
Slides tab and Outline tab: To the left of the slide is an area that has two
tabs, labeled Outline and Slides. The Slides tab shows thumbnail icons
of your slides, and the Outline tab shows your presentation arranged as
an outline. You can switch between the two tabs by clicking the tab you
want to view. (For more information on working in Outline View, see
Chapter 3.) The Slides tab, shown in Figure 1-1, shows little thumbnail
images of your slides.
Chapter 1: Welcome to PowerPoint 2007
Notes pane: Beneath the slide is a small area called the Notes pane, which
you can use to add notes to your slides. For more information on using
this feature, see Chapter 5.
Task pane: To the right of the slide is an area called the task pane. The
task pane is designed to help you complete common tasks quickly. When
you first start PowerPoint, the task pane isn’t visible, so you can’t see it
in Figure 1-1. However, it will appear whenever it’s needed, and you’ll see
plenty of examples of it throughout this book.
Status bar: At the very bottom of the screen is the status bar, which tells
you the slide that is currently displayed (for example, Slide 1 of 1).
You can configure the status bar by right-clicking anywhere on it. This
reveals a list of options that you can select or deselect to determine
which elements appear on the status bar.
You’ll never get anything done if you feel that you have to understand every
pixel of the PowerPoint screen before you can do anything. Don’t worry about
the stuff that you don’t understand; just concentrate on what you need to
know to get the job done and worry about the bells and whistles later.
Unraveling the Ribbon
The Ribbon is Microsoft’s new user-interface gadget for not just PowerPoint
2007, but also Word 2007, Excel 2007, and Access 2007. The Ribbon replaces
the menus and toolbars found in earlier versions of these programs.
Across the top of the Ribbon is a series of tabs. You can click one of these
tabs to reveal a set of controls specific to that tab. For example, the Ribbon in
Figure 1-1 (earlier in the chapter) shows the Home tab. Figure 1-2 shows the
Ribbon with the Insert tab selected.
Figure 1-2:
The Ribbon
with the
Insert tab
selected.
17
18
Part I: Basic PowerPoint 2007 Stuff
Initially, the Ribbon displays the following seven tabs:
Home: Basic commands for creating and formatting slides
Insert: Commands for inserting various types of objects on slides
Design: Commands that let you tweak the layout of a slide
Animations: Commands that let you add animation effects
Slide Show: Commands for presenting your slide show
Review: Commands for proofing and adding comments to your
presentations
View: Commands that let you change the view
Besides these basic tabs, additional tabs appear from time to time. For example, if you select a picture, a Picture Tools tab appears with commands that
let you manipulate the picture.
The commands on a Ribbon tab are organized into groups. Within each
group, most of the commands are simple buttons that are similar to toolbar
buttons in previous versions of PowerPoint.
The View from Here Is Great
Near the right edge of the status bar is a series of three View buttons. These
buttons enable you to switch among the various views, or ways of looking at
your presentation. Table 1-1 summarizes what each View button does.
Table 1-1
Button
View Buttons
What It Does
Switches to Normal View, which shows your slide, outline,
and notes all at once. This is the default view for PowerPoint.
Switches to Slide Sorter View, which enables you to easily
rearrange slides and add slide transitions and other special
effects.
Switches to Slide Show View, which displays your slides in
an on-screen presentation.
Chapter 1: Welcome to PowerPoint 2007
Creating a New Presentation
When you first start PowerPoint, a new, blank presentation is created. The
simplest way to create a new presentation is to start PowerPoint and then
edit the blank presentation to your liking.
An alternative is to use the Office➪New command, which brings up the big
dialog box shown in Figure 1-3. This dialog box presents several ways to
create a new presentation:
Figure 1-3:
The New
Presentation
dialog box.
Blank Presentation: Double-click Blank Presentation to start a new presentation from scratch.
Recently Used Templates: This section of the New Presentation dialog
box lists templates you’ve recently used to create presentations. You
can double-click any of these templates to create another presentation
based on the template.
19
20
Part I: Basic PowerPoint 2007 Stuff
Installed Templates: Click this item to display a list of all the templates
installed on your computer. When you create a presentation from a template, the presentation inherits various design elements (collectively called
the theme) as well as pre-written content that’s stored in the template.
Installed Themes: Click this item to display a list of all the themes
installed on your computer. Creating a presentation from a theme is
similar to creating a presentation from a template, except that the
new presentation doesn’t contain any pre-written content.
My Templates: Double-click My Templates to bring up a separate dialog
box that lets you locate templates to create your presentation from.
New From Existing: Double-click New From Existing to create a new presentation based on an existing one. Use this option if you want to create
a presentation that is similar to one that you created previously.
Microsoft Office Online: Use this section of the dialog box to select a
template from Microsoft’s online Web site. Note that the templates are
arranged into categories, such as Agendas, Plans, and Presentations.
Zooming in
PowerPoint automatically adjusts its zoom factor so that Slide View displays
each slide in its entirety. You can change the size of your slide by using the
zoom control slider that appears at the bottom right of the window.
Editing text
In PowerPoint, slides are blank areas that you can adorn with various
objects. The most common type of object is a text object, a rectangular area
that is specially designated for holding text. (Other types of objects include
shapes, such as circles or triangles; pictures imported from clip art files; and
graphs.)
Most slides contain two text objects: one for the slide’s title and the other for
its body text. However, you can add more text objects if you want, and you
can remove the body text or title text object. You can even remove both to
create a slide that contains no text.
Whenever you move the cursor over a text object, the cursor changes from
an arrow to the I-beam, which you can use to support bridges or build aircraft carriers. Seriously, when the cursor changes to an I-beam, you can click
the mouse button and start typing text.
Chapter 1: Welcome to PowerPoint 2007
When you click a text object, a box appears around the text, and an insertion
pointer appears at the spot where you clicked. PowerPoint then becomes like
a word processor. Any characters that you type are inserted into the text at
the insertion pointer location. You can press Delete or Backspace to demolish text, and you can use the arrow keys to move the insertion pointer around
in the text object. If you press Enter, a new line of text begins within the text
object.
When a text object contains no text, a placeholder message appears in the
object. For example, a title text object displays the message Click to add
title. Other placeholders display similar messages. The placeholder message magically vanishes when you click the object and begin typing text.
If you start typing without clicking anywhere, the text that you type is
entered into the title text object — assuming that the title text object doesn’t
already have text of its own. If the title object is not empty, any text that you
type (with no text object selected) is simply ignored.
After you finish typing text, press Esc or click anywhere outside the text
object.
In Chapter 2, you find many details about playing with text objects, but hold
your horses. You have more important things to attend to first.
Adding a new slide
When you first create a presentation, it has just one slide, which is useful only
for the shortest presentations. Fortunately, PowerPoint gives you about 50
ways to add new slides to your presentation. You see only three of them here:
On the Home tab, click the New Slide button in the Slides group.
Press Ctrl+M.
Right-click in the Slides or Outline tab on the left and then choose New
Slide.
In all three cases, PowerPoint adds a blank slide with a standard layout that
includes a title and content area as shown in Figure 1-4. If you want to choose
a different layout, click the Layout button in the Home tab to display the
gallery of slide layouts. This pane enables you to pick from several different
types of slide layouts. Just click the one that you want to use, and PowerPoint
sets the new slide to the layout of your choosing.
21
22
Part I: Basic PowerPoint 2007 Stuff
Figure 1-4:
Choosing a
slide layout.
Each slide layout has a name. For example, the Title and Content layout
includes a text object in addition to the title area. This is probably the layout
you’ll use most. It’s the best format for presenting a topic along with several
supporting points. For example, Figure 1-5 shows a typical bulleted list slide,
in which a list of bulleted items describes signs that your son is headed down
the road toward moral decay.
Moving from slide to slide
You have several ways to move forward and backward through your presentation, from slide to slide:
Click one of the double-headed arrows at the bottom of the vertical
scroll bar. Doing so moves you through the presentation one slide at
a time.
Press the Page Up and Page Down keys. Using these keys also moves
one slide at a time.
Chapter 1: Welcome to PowerPoint 2007
Figure 1-5:
A typical
text slide.
Use the scroll bar. When you drag the box in the scroll bar, a ToolTip
appears to display the number and title of the current slide. Dragging
the scroll bar is the quickest way to move directly to any slide in your
presentation.
In the list of slides on the left side of the window, click the thumbnail
for the slide that you want to display. If the thumbnails are not visible,
click the Slides tab above the outline.
Choosing a design
In Parts II and III of this book, you’ll learn many different ways to create
great-looking slides. However, you don’t have to wait until then to apply
some basic style to your presentation. I’ve already mentioned that Office
2007 comes pre-loaded with a handful of professionally-designed themes that
are designed to create polished presentations with just the click of a mouse.
To apply one of these themes, just select the Design ribbon tab, then click the
theme you want to apply in the Themes group. Figure 1-6 shows a presentation after a theme has been applied.
23
24
Part I: Basic PowerPoint 2007 Stuff
Figure 1-6:
A slide
after a
design
has been
applied.
Due to space constraints, PowerPoint doesn’t display all of the available
themes in the Ribbon at the same time. But just to the right of the themes is a
scroll bar you can use to scroll through the themes. And the button at the
bottom of the scroll bar brings up a gallery that displays all of the themes
that come with Office 2007.
Displaying Your Presentation
When your masterpiece is ready, you can show it on the screen. Just follow
these steps:
1. Choose the Slide Show tab on the Ribbon and then click the From
Beginning button in the Start Slide Show group (shown in the margin).
There are several shortcuts to this command. You can also start the
show by pressing F5 or by clicking the Slide Show button, located with
the other view buttons in the lower-right corner of the screen.
Chapter 1: Welcome to PowerPoint 2007
2. Behold the first slide.
The slide fills the screen. Isn’t it pretty?
3. Press Enter to advance to the next slide.
You can keep pressing Enter to call up each slide in the presentation. If
you don’t like the Enter key, you can use the spacebar instead.
If you want to go back a slide, press Page Up.
4. Press Esc when you’re done.
You don’t have to wait until the last slide is shown. If you find a glaring
mistake in a slide or if you just get bored, you can press Esc at any time
to return to PowerPoint.
For the complete lowdown on showing your presentation, kindly turn to
Chapter 6.
Saving Your Work
Now that you’ve spent hours creating the best presentation since God gave
Moses the Ten Commandments, it’s time to save your work to a file. If you make
the rookie mistake of turning off your computer before you’ve saved your presentation, poof! Your work vanishes as if David Copperfield were in town.
Like everything else in PowerPoint, you have at least four ways to save a
document:
Click the Save button on the Quick Access toolbar.
Click the Office button and then choose Save.
Press Ctrl+S.
Press Shift+F12.
If you haven’t yet saved the file to your hard drive, the magical Save As dialog
box appears. Type the name that you want to use for the file in the Save As
dialog box and click OK to save the file. After you save the file once, subsequent saves update the hard drive file with any changes that you made to
the presentation since the last time you saved it.
Also note that after you save a file for the first time, the name in the presentation window’s title area changes from Presentation to the name of your file.
This is simply proof that the file has been saved.
25
26
Part I: Basic PowerPoint 2007 Stuff
Keep the following tips in mind when saving files:
Put on your Thinking Cap when assigning a name to a new file. The filename is how you can recognize the file later on, so pick a meaningful
name that suggests the file’s contents.
Don’t work on your file for hours at a time without saving it. I’ve learned
the hard way to save my work every few minutes. After all, I live in California, so I never know when a rolling blackout will hit my neighborhood.
Get into the habit of saving every few minutes, especially after making a
significant change to a presentation, such as adding a covey of new slides
or making a gaggle of complicated formatting changes.
Opening a Presentation
After you save your presentation to your hard drive, you can retrieve it later
when you want to make additional changes or to print it. As you might guess,
PowerPoint gives you about 2,037 ways to accomplish the retrieval. Here are
the three most common:
Click the Office button and then choose the Open command.
Press Ctrl+O.
Press Ctrl+F12.
All three retrieval methods pop up in the Open dialog box, which gives you a
list of files to choose from. Click the file that you want and then click OK or
press Enter.
The Open dialog box has controls that enable you to rummage through the various folders on your hard drive in search of your files. If you know how to open a
file in any Windows application, you know how to do it in PowerPoint (because
the Open dialog box is pretty much the same in any Windows program).
If you seem to have lost a file, rummage around in different folders to see
whether you can find it. Perhaps you saved a file in the wrong folder by accident. Also, check the spelling of the filename. Maybe your fingers weren’t on
the home row when you typed the filename, so instead of River City.pptx,
you saved the file as Eucwe Xurt.pptx. I hate it when that happens. If all
else fails, you can use Windows’ built-in Search feature. For Windows XP,
click the Start button and then choose Search and follow the instructions
Chapter 1: Welcome to PowerPoint 2007
that appear in the Search Results window. If you’re using Vista, you can
simply type some or all of the filename in the Instant Search box that
appears in the Start menu.
The fastest way to open a file from the Open dialog box is to double-click
the file. This spares you from having to click the file once and then click OK.
Double-clicking also exercises the fast-twitch muscles in your index finger.
PowerPoint keeps track of the last nine files that you’ve opened and displays
them on the File menu. To open a file that you recently opened, click the File
menu and inspect the list of files on the right side of the menu. If the file that
you want is in the list, click it to open it.
Closing a Presentation
Having finished and saved your presentation, you have come to the time to
close it. Closing a presentation is kind of like gathering your papers, putting
them neatly in a file folder, and returning the folder to its proper file drawer.
The presentation disappears from your computer screen. Don’t worry: It’s
tucked safely away on your hard drive where you can get to it later if you
need to.
To close a file, click the Close button that appears at the top right of the
PowerPoint window. Alternatively, you can click the Office button and then
choose Close, or use the keyboard shortcut Ctrl+W. But clicking the Close
button is the easiest way to close a file.
You don’t have to close a file before exiting PowerPoint. If you exit PowerPoint without closing a file, PowerPoint graciously closes the file for you. The
only reason that you might want to close a file is that you want to work on a
different file and you don’t want to keep both files open at the same time.
If you’ve made changes since the last time you saved the file, PowerPoint
offers to save the changes for you. Click Yes to save the file before closing or
click No to abandon any changes that you’ve made to the file.
If you close all the open PowerPoint presentations, you might discover that
most of the PowerPoint commands have been rendered useless (they are
grayed on the menu). Fear not. If you open a presentation or create a new
one, the commands return to life.
27
28
Part I: Basic PowerPoint 2007 Stuff
Exiting PowerPoint
Had enough excitement for one day? Use any of these techniques to shut
PowerPoint down:
Click the Office button and then click the Exit PowerPoint button.
Click the X box at the top-right corner of the PowerPoint window.
Press Alt+F4.
Bam! PowerPoint is history.
You should know a couple things about exiting PowerPoint (or any application):
PowerPoint doesn’t let you abandon ship without first considering
whether you want to save your work. If you’ve made changes to any
presentation files and haven’t saved them, PowerPoint offers to save
the files for you. Lean over and plant a fat kiss right in the middle of
your monitor — PowerPoint just saved you your job.
Never, never, never, ever, never turn off your computer while PowerPoint
or any other program is running. Bad! Always exit PowerPoint and all
other programs that are running before you turn off your computer.