1
The home for award winning remotes!
FAQ documents are collections of answers to Frequently Asked Questions. This particular FAQ file covers
the operation of all remote control models related to the Philips Pronto. To view the answer to a particular
question, click the number on the left side. A separate FAQ is also available for the new Pronto NG.
| French (v1.07i) | Japanese (v1.02) |
Unofficial Philips Pronto & Marantz RC5000 Intelligent Remote Control FAQ
Compiled by Daniel Tonks and the online Pronto community.
Requests for suggestions, additions or modifications are welcome!
Version 1.09d
November 1, 2004
Please note: although this document refers to the "Philips Pronto TS1000" and "ProntoEdit", unless directly specified all information also applies to the
Philips ProntoPro TSU6000, Philips ProntoPro RU970, Philips Pronto TSU2000, Philips Pronto RU890, Philips Pronto RU940, Marantz RC5000,
Marantz RC5000i, Marantz RC5200, Marantz RC9200, Onkyo CHAD USR−5RF, Yamaha RAV−2000, Yamaha RAV−2000Z1, Marantz Touch Screen
Setup, Onkyo CHAD Edit and Yamaha RAVedit.
For more information visit RemoteCentral.com
©1998−2004 Daniel Tonks. All Rights Reserved.
Table Of Contents
SECTION A: HARDWARE & OPERATIONAL QUESTIONS
General Description
A1−01 Briefly, what is the Philips Pronto remote?
A1−02 How many brands and models are there?
A1−03 Approximately how much does it cost?
A1−04 Where can I go to buy one?
A1−05 What are the ProntoNEO and RC3200?
A1−06 What are the Pronto NG and ProntoPro NG?
Physical Characteristics
A2−01 What are the hardware differences between models?
A2−02 How much free memory is there?
A2−03 How much memory do I really need?
A2−04 What processor does the Pronto use?
A2−05 How large is the remote?
A2−06 How big is the screen?
A2−07 How many colors can the screen display?
A2−08 Can I put a different/better display into the Pronto?
A2−09 How can I tell whether my remote has a light sensor or not?
A2−10 How can I tell whether I have the Marantz RC5000 or RC5000i?
Basic Hardware Interaction
A3−01 What frequencies can the remote learn?
RC: Philips Pronto & Marantz RC5000 Unofficial FAQ
1
A3−02
A3−03
A3−04
A3−05
Can I use the Pronto with Sony *G (or VisionTouch) receivers?
Can the Pronto work with RF equipment?
Can the Pronto work with IRDA equipment (ie. Pace cable boxes)?
How can I control my X−10 system?
Using The Remote
A4−01 Why does the backlight stay on as long as the LCD does, even though it's only set for half
the time?
A4−02 I've got a TSU2000. Why does my TV keep turning off?
A4−03 Why is the REVERT button grayed out?
A4−04 I hear there's a hidden game on the remote?
A4−05 In the Macro Menu, why does the left hard button read "OPEN"? Can I change this?
A4−06 Why doesn't the backlight come on when I set the arrow all the way to the left, as described
in the manual?
A4−07 Why do my Device and Macro Menu buttons not work?
A4−08 What happened to my Mode button?
A4−09 What happened to the Macro Menu's REC command?
Batteries & Docking Station
A5−01 Should I buy the docking station for my remote?
A5−02 Why does the remote appear to behave erratically when battery power is still 50%?
A5−03 How often should I recharge the remote?
A5−04 Why does my rechargeable battery read only half full even when I know it's full?
A5−05 Why is my desktop charger's light blinking?
A5−06 I already have a docking station, can I buy another rechargeable battery?
A5−07 My ProntoPro's docking station is dead. Help!
Diagnosis and Repair
A6−01 My remote is dead! What can I try to fix it?
A6−02 My remote is rebooting all the time... help!
A6−03 What can I do if the remote will not power up and I hear 4 beeps?
A6−04 How do I connect to the remote with Hyperterminal?
A6−05 What can I do if my buttons stop working?
A6−06 I've broken the LCD screen and it's out of warranty. Can I replace it?
A6−07 Why does the screen's contrast keep changing?
A6−08 Can I buy spare parts for the Pronto?
A6−09 What's that buzzing sound I can hear?
A6−10 What else can I do to troubleshoot random problems?
SECTION B: WORKING WITH PRONTOEDIT
General Description
B1−01 Briefly, what does the software allow me to do?
B1−02 Is there editing software available other than ProntoEdit?
B1−03 Where can I download the software?
B1−04 Can I take screen captures of my file?
B1−05 How can I change the program that opens CCF files?
B1−06 I'm getting an "Invalid Configuration File Version", "File is not a valid configuration" or
"CCF file is invalid or corrupt" message. What can I do?
B1−07 Can I use Pronto NG .PCF files? How about .ICF and .NCF files?
Software & Firmware
B2−01 What are the current software versions?
B2−02 What are the current firmware versions?
RC: Philips Pronto & Marantz RC5000 Unofficial FAQ
2
B2−03 What are the differences between the various firmware & software versions?
B2−04 I'm told the software will not work with Windows XP. Is this true?
Remote Communications
B3−01 Where can I get a serial cable for the Pronto?
B3−02 What does "Invalid Software Version" mean, and what can I do about it?
B3−03 I'm getting a "Failed to get valid information from Pronto" error message when transferring
CCFs, or timeouts when learning IR codes.
B3−04 Can I make ProntoEdit, Touch Screen Setup, CHAD Edit or RAVedit work on a Macintosh
Computer?
B3−05 Can I hook the Pronto up to a USB port?
B3−06 Why can't I get my computer to talk to the Pronto?
Learning & Infrared
B4−01 How can I tell whether my learned codes are "clean" or not?
B4−02 Why won't my codes repeat when held down?
B4−03 What does 0000, 8000, etc. mean in a hex code?
B4−04 Why can't I get the Pronto to learn a particular device?
B4−05 Why won't my buttons work twice in a row?
B4−06 How can I copy the IR code from one button to another?
B4−07 What is the password for the rcir.mdb infrared database file?
B4−08 Why won't just tapping the button always work?
B4−09 "Test IR" doesn't always work right. Why?
Discrete Codes
B5−01 What are discrete codes?
B5−02 How do I find or create them?
B5−03 How can I use them?
Managing CCF Files
B6−01 What are CCF files?
B6−02 What does 'CCF' stand for?
B6−03 How can I get rid of the "+" symbol before device names?
B6−04 What do the short letter designations ([C], [D] etc.) mean?
B6−05 What do all the symbols before device or page names mean?
B6−06 Why can't I open the CCF file I downloaded?
B6−07 How can I best merge CCF files?
B6−08 With ProntoEdit v4.0, why can't I modify the gallery files?
Designing Layouts
B7−01 Why won't my panels or buttons show? (or How can I preview my CCF file without
learning any IR codes?)
B7−02 Why doesn't my home panel look or act like I designed it to?
B7−03 How do I copy a device, panel or button from one file to another?
B7−04 How can I design my CCF so when I make changes I don't need to relearn my remotes?
B7−05 How do I add plain text to panels?
B7−06 Can I add more FONTs to the Pronto?
B7−07 How can I group buttons together?
B7−08 Can I create a "back" button to return to the last page accessed?
B7−09 Can I create multiple text lines on a single button or otherwise position text?
B7−10 How do I define a custom grid?
B7−11 What keyboard shortcuts are there?
Macros
RC: Philips Pronto & Marantz RC5000 Unofficial FAQ
3
B8−01
B8−02
B8−03
B8−04
B8−05
B8−06
B8−07
B8−08
panel?
B8−09
B8−10
What are macros? How are they different from regular commands?
What would a macro for a system on/off button look like?
How can I get the Pronto to "hold" a button for several seconds in a macro?
How can I enter multiple digits on a single button, say for a favorite channel icon?
Can I use more than one page jump in a macro?
Can I have delays shorter than 0.1 seconds?
Can I change the default delay time from 0.1 seconds?
Why aren't the commands I assigned to each device being sent when I use my custom Home
Why are some of my macro commands not being received?
How can I handle switching Video Inputs?
Custom Bitmaps
B9−01 Where would I use bitmap files?
B9−02 How can I create my own bitmaps?
B9−03 Can I use transparent or animated bitmaps?
B9−04 Why are my bitmaps/icons truncated?
B9−05 How can I create a really large gallery file?
B9−06 How can I best create color graphics for the ProntoPro?
B9−07 How do I convert color CCF graphics to black and white?
B9−08 Is it possible to change system−level bitmaps, such as the device bar and Home icon
background?
Memory Optimization
B10−01 How can I optimize memory usage?
B10−02 What are aliases and how are they used?
B10−03 General ProntoEdit & RC5000 Setup Tips
B10−04 What exactly does the "CCF Optimizer" utility do?
Other Functions
B11−01 What is mouse mode for?
B11−02 Why do my custom beeps not make any sound?
B11−03 How do I use and activate timers?
B11−04 Why won't my timers change to a new page?
B11−05 Can I password protect pages?
B11−06 On Marantz remotes, how can I use the page memory feature?
B11−07 Can I use the built−in database codes with my own custom files?
Problem Diagnosis
B12−01 Why do my RF codes not work?
B12−02 What happens if I get a "Configuration is xx% too big to fit in Pronto" error message?
B12−03 Why does the emulator complain that it "Can't open configuration file"?
B12−04 Why does the alias list show strange symbols? (Plus other FONT troubleshooting.)
B12−05 Why does ProntoEdit not install correctly or give strange errors right after installation
when I try to run it?
B12−06 Why does ProntoEdit crash when learning IR codes in Windows XP, 2000 or NT?
B12−07 I'm getting an error with MFC42.DLL. What can I do?
B12−08 In ProntoEdit v2.0, why can't I edit hex codes?
B12−09 Why can't I change IR code labels?
B12−10 I'm getting a "none or invalid pronto.ini file" error message.
RC: Philips Pronto & Marantz RC5000 Unofficial FAQ
4
Acknowledgments
Thanks to everyone who has helped make the Pronto such a great remote, namely the regulars in Remote
Central's Pronto Forum! Plus special thanks to Andrea Whitlock, Tom Held and Robert Wallace for
developing alternative printable versions.
Recent Additions
v1.09d, November 1, 2004
Modified:
B2−02, B3−01
v1.09c, April 17, 2004
Added:
A1−06 What are the Pronto NG and ProntoPro NG?
A2−10 How can I tell whether I have the Marantz RC5000 or RC5000i?
A5−07 My ProntoPro's docking station is dead. Help!
B1−07 Can I use Pronto NG .PCF files? How about .ICF and .NCF files?
B2−04 I'm told the software will not work with Windows XP. Is this true?
B9−08 Is it possible to change system−level bitmaps, such as the device bar and Home icon background?
Modified:
A3−03, A6−06, A2−09, A4−06, A5−05, B12−04, B12−06.
RC: Philips Pronto & Marantz RC5000 Unofficial FAQ
5
Take a Test Drive at www.harmonyremote.com today!
Unofficial Philips Pronto & Marantz RC5000 FAQ
Section A1: Hardware Questions:
General Description
A1−01 Briefly, what is the Philips Pronto remote?
The Pronto (and its siblings) are universal learning remote controls that offer large, righ−resolution
dot−matrix LCD touchscreen displays along with a number of hard buttons. Their open−ended internal
design allows for complete customization of the user interface, providing users with the opportunity to
design a remote that's as simple and automated or as complex and "technical" as desired.
A1−02 How many brands and models are there?
There are currently fourteen models, based around the same Pronto concept:
• North American 1mb Philips Pronto TS−1000
• North American 2mb Philips Pronto TSU2000
• North American 8mb Philips ProntoPro TSU6000
• European 1mb Philips Pronto SBCRU890
• European 2mb Philips Pronto SBCRU940
• European 8mb Philips ProntoPro SBCRU970
• OEM Philips Pronto (TS1003, sold with Philips HDTV sets only)
• Worldwide 1mb Marantz RC5000
• Worldwide 2mb Marantz RC5000i
• Worldwide 2mb Marantz RC5200
• Worldwide 8mb Marantz RC9200
• Worldwide 2mb Onkyo CHAD USR−5RF
• Worldwide 2mb Yamaha RAV−2000
• North American / European 2mb Yamaha RAV−2000Z1
A1−03 Approximately how much does it cost?
Different models of the Pronto come with different capabilities. MSRP prices range from $399 to
$1299, although street prices are generally much lower. Black and white remotes go for up to $599,
while color models retail for up to $1299. Most models also offer optional accessories.
A1−04 Where can I go to buy one?
The most current list of dealers for both the Philips Pronto and Marantz RC5000 is located at
http://www.remotecentral.com/pronto/wherebuy.htm.
For the TSU2000/RC5000i, the list is located at http://www.remotecentral.com/tsu2000/wherebuy.htm.
Finally, a dealer list for the ProntoPro can be found at
http://www.remotecentral.com/prontopro/wherebuy.htm.
RC: Philips Pronto & Marantz RC5000 Unofficial FAQ
6
A1−05 What are the ProntoNEO and RC3200?
Even though the ProntoNEO and RC3200 sound similar to their more expensive counterparts, these
are in fact totally different products incompatible with the "normal" Pronto's standards. Yes, they can
be similarly customized with macros and bitmaps, however these newer models cannot use standard
Pronto CCF files (they employ a new NCF format), or Pronto−formatted IR hex codes. Currently,
there is no way to convert a CCF to NCF format, or vice versa.
A1−06 What is the Pronto NG and ProntoPro NG?
The black and white Pronto "Next Generation" TSU3000 and SBC−RU950, along with the color
ProntoPro NG TSU7000 and SBR−RU980, are very different remotes from the original Pronto
hardware designs. They feature a completely new hardware platform with better screens, additional
hard buttons, more memory, USB communications and a wealth of operational enhancements. In other
words, progress!
The software programs ProntoEdit NG and ProntoProEdit NG will be instantly recognizable to
original ProntoEdit users, and can import Pronto CCF files and use regular Pronto hex codes. The new
models share that distinctive "Pronto" feel that made the originals so popular. If you'd like more
information on the Pronto NG, be sure to browse Remote Central for full reviews, a discussion forum,
and a completely new file area.
RC: Philips Pronto & Marantz RC5000 Unofficial FAQ
7
The Ultimate Pronto Guide − a must−have for every Pronto owner!
Unofficial Philips Pronto & Marantz RC5000 FAQ
Section A2: Hardware Questions:
Physical Characteristics
A2−01 What are the hardware differences between models?
North American Pronto TS−1000: 1 megabyte of memory. Case color is solid dark blue/green
(something I've coined as "Midnight Sea Foam"). Optional silver desktop charger. Note: All Prontos
no longer include the light sensor!
North American Pronto TSU2000: 2 megabytes of memory. Color is painted silver over gray plastic.
Otherwise, hardware is the same as the TS−1000.
North American ProntoPro TSU6000: 8 megabytes of memory. Features a 256−color LCD screen,
pickup sensor, two additional hard buttons, newly designed case, RF capabilities plus packaged NiMH
rechargable batteries and docking station.
European Pronto RU−890: 1 megabyte of memory. Color is painted silver over gray plastic.
Optional silver desktop charger includes an appropriate AC/DC converter depending on region.
Otherwise identical to the TS−1000.
European Pronto RU−940: 2 megabytes of memory. Otherwise identical to the RU−890.
European Pronto RU−970: 8 megabytes of memory. Otherwise identical to the TSU6000.
OEM Pronto TS−1003: 1 megabyte of memory. Color is solid black. This is only available with
high−end Philips HDTV sets. It is not 100% compatible with other Pronto models.
Worldwide Marantz RC5000: 1 megabyte of memory. Color is painted gold over white plastic. Base
package includes a gold desktop charger plus an appropriate AC/DC converter. Models no longer
include the light sensor.
Worldwide Marantz RC5000i: 2 megabytes of memory. Hardware is otherwise identical to the
RC5000.
Worldwide Marantz RC5200: 2 megabytes of memory. Features a newly designed case, upgrades
total number of hard buttons from the RC5000i's 8 to 16 and adds RF capabilities (RF basestation is
optional).
Worldwide Marantz RC9200: 8 megabytes of memory. Features a 256−color LCD screen, 8
additional hard buttons, newly designed case, RF capabilities and is packaged with NiMH rechargable
batteries, docking station and RF basestation.
Worldwide Onkyo CHAD USR−5RF: 2 megabytes of memory. New physical case design plus RF
capabilities (basestation is optional). Hardware is otherwise identical to the Pronto TSU2000.
RC: Philips Pronto & Marantz RC5000 Unofficial FAQ
8
Worldwide Yamaha RAV−2000 / RAV−2000Z1: 2 megabytes of memory, no recharging dock
option. Channel Up/Down buttons replaced with "Power" and "Standby".
A2−02 How much free memory is there?
Pronto TS−1000: 380kb.
Pronto TSU2000: 960kb.
ProntoPro TSU6000: 5952kb (first firmware: 6144kb).
Pronto RU−890: 380kb.
Pronto RU−940: 1404kb.
Pronto RU−970: 5667kb.
Marantz RC5000: 380kb.
Marantz RC5000i: 1404kb.
Marantz RC5200: 1220kb.
Marantz RC9200: 6900kb.
Onkyo CHAD USR−5RF: 697kb.
Yamaha RAV−2000: 444kb.
Yamaha RAV−2000Z1: 772kb.
A2−03 How much memory do I really need?
You'd be surprised at how much can be packed into the 1 megabyte Pronto, which has 380kb of free
space. Many users have incorporated complete lists for their 300 and 400 disc CD or DVD jukeboxes,
favorite channel lists with station icons, games, calendars and more. But a small minority of owners,
who may have multiple jukeboxes, a huge home theater system or just a penchant for huge bitmaps,
have run out of room. For them, the 960kb of user space offered with the Pronto TSU2000 or 1404kb
with the Marantz RC5000i is a must − but the majority of users simply won't have any use for that
much memory.
The Philips ProntoPro (6144kb) and Marantz RC9200 (6900kb) have quite a bit more "usable"
memory than even the TSU2000 & RC5000i, despite the greater amount of space occupied by color
bitmaps.
A2−04 What processor does the Pronto use?
All black and white models use the 16MHz Motorola Dragonball MC68328, which supports
4−grayshade displays and serial communications.
All color models use the 33MHz Motorola Dragonball MC68VZ328 "VZ" processor, which supports
256−color displays and serial communications.
A2−05 How large is the remote?
All models can be easily held with one hand. Black and white remotes have the approximate
dimensions (WxHxD) of 3.6"x5.4"x1.5" and weigh about 9.5 ounces with batteries. The Yamaha
RAV−2000 is only slightly larger at 3.7"x5.4"x1.5".
The color ProntoPro has a slightly larger footprint at 3.6"x5.5"x1.3" and weighs in at 9.0oz with
batteries. The Marantz RC5200 and RC9200 are again slightly larger, at 3.5"x5.9"x1.5" and 9.5oz.
A2−06 How big is the screen?
The screen resolution on all models is 240 x 320 pixels, however some of that resolution is used by the
user interface. The editable screen area for everything but the Marantz RC5200 and RC9200 is 240 x
RC: Philips Pronto & Marantz RC5000 Unofficial FAQ
9
219 pixels. Physical screen size for black and white units is 3.8" diagonal and feature an aqua−colored
EL (smooth) backlight. The ProntoPro's screen is 3.7" diagonal and employs paper white backlighting.
The RC5200 and RC9200 feature the same physical screens as their counterparts, but provide a larger
editable region of 240 x 270 pixels.
A2−07 How many colors can the screen display?
Black and white models can display four: white, black, light gray, and dark gray. By using special
dithering techniques in custom bitmap files, up to seven shades may be obtained.
The ProntoPro and RC9200 are capable of displaying 256 colors, 216 of which are considered a "web
safe" palette.
A2−08 Can I put a different/better display into the Pronto?
No − the display controller is part of the processor, thus you cannot (for example) install a TFT display
to replace the ProntoPro’s passive matrix version. However, Motorola does produce other compatible
processors that Philips may make use of in the future − for instance a 66MHz processor that supports
16−bit color TFT displays and USB, or a 20MHz processor that supports 16−grayshades.
A2−09 How can I tell whether my remote has a light sensor or not?
This tip applies only to the Philips Pronto TS−1000 and Marantz RC5000 remotes:
All recent remote models do not feature the light sensor due to European environmental restrictions.
The light sensor contained trace amounts of a banned substance, and as all models are manufactured in
Belgium it was removed altogether.
Although units with a light sensor place it under a small clear circle near the top right−hand corner of
the remote, all remotes with that spot do not actually have the sensor.
To check if your unit truly has the sensor, go to the remote's setup menu by pressing and holding the
Pronto icon for three seconds. Scroll to panel two. If the "Light Sensor" bar constantly reads 50% and
will not change by changing the lighting environment around the remote, it does not have the light
sensor. If the bar jumps around and appears to reflect the current lighting situation, it has one.
A2−10 How can I tell whether I have the Marantz RC5000 or RC5000i?
Despite what you may have been told in the past, the 2 megabyte RC5000i should, in fact, say
"RC5000i" on the label on the bottom, not just "RC5000". However, since the remotes are otherwise
physically identical and share the same firmware versions numbers, here's how you can conclusively
check whether the circuit board in your RC5000−labelled model is as it should be − or better:
1. Run the Marantz Touch Screen Setup software program.
2. Run "File −> New" and, when the program asks, be sure to specify that you're using a 1mb
BWRC5000.
3. Now, open any CCF file (the "Default_Old_RC5000.ccf" file would be a good one).
4. Run the emulator.
5. Hold the icon of the RC5000 at the top of the screen for three seconds to access the remote's Setup
Menu.
6. Scroll to panel 3 and make a note of the "free memory".
7. Close the emulator.
8. Download the open CCF file to your connected remote control.
RC: Philips Pronto & Marantz RC5000 Unofficial FAQ
10
9. Perform steps 5 and 6 again, making note of the amount of free memory shown on your remote. If the
number is approximately the same (plus/minus 1 percent), then you do in fact have an RC5000. If the
amount of free memory shown is GREATER (by about 33% for the file mentioned above) then you
do, in fact, have an RC5000i.
RC: Philips Pronto & Marantz RC5000 Unofficial FAQ
11
Visit our new website!
Unofficial Philips Pronto & Marantz RC5000 FAQ
Section A3: Hardware Questions:
Basic Hardware Operation
A3−01 What frequencies can the remote learn?
The Pronto & RC5000 can learn frequencies up to 56KHz. However, they can send frequencies that
are much higher: all you need to do is find a CCF file that has the codes you need. Philips has added
some high−frequency learning ability including BOand Kenwood code formats in the latest firmware
update, however insufficient user feedback on this new feature has been available to determine
whether this is a viable option for equipment owners.
A3−02 Can I use the Pronto with Sony *G (or VisionTouch) receivers?
Without additional equipment, the answer is no. Due to a combination of high frequency and a
non−standard protocol, Sony VisionTouch receivers can't be directly controlled by any low−cost
universal remote control. This problem is not merely limited to the Pronto.
Common models affected include the STR−DA90ESG, STR−DE805G, STR−DE815G,
STR−DE905G, STR−DE1015G, STR−D760Z, STR−G1ES, STR−G3, STR−GA9ESG, TA−VE800G
and TA−VE810G. More information on the VisionTouch problem −− including possible workarounds
−− can be found on the Remote Central web site. Sony has since dropped the VisionTouch system in
favor of a new 2−way protocol that, with a little finessing, can be learned by the Pronto. Remember
that the Pronto is not a 2−way remote, so you can't receive information from the receiver.
A3−03 Can the Pronto work with RF equipment?
The Pronto cannot control RF−only equipment. Certain RF devices such as satellite receivers can also
be controlled by infrared, so you may wish to contact your manufacturer to double−check. Currently,
there are no universal remotes that can control RF components.
Don't be confused by models (such as the ProntoPro, RC5200, RC9200 and CHAD) advertising RF
control of IR devices −− this is not the same as RF control of RF devices.
However, as is the case with most rules, there is an exception. RF−enabled European−model Prontos
can be used to directly control certain European−spec equipment, such as X−10 RF transceivers,
though special codes generated by a program called "CodeGen" (not available for download). Note
that North American models CAN NOT control RF equipment directly.
A3−04 Can the Pronto work with IRDA equipment (ie. Pace cable boxes)?
Currently, the answer is no. You cannot control newer Pace cable boxes or any other IRDA−based
equipment with these remotes.
A3−05 How can I control my X−10 system?
RC: Philips Pronto & Marantz RC5000 Unofficial FAQ
12
If you’re currently using a wireless remote to control your X−10 home automation system it’s most
likely transmitting via RF signals to a transceiver. The transceiver plugs into the wall and re−sends
commands as actual X−10 signals through the house wiring. If you wish to use the Pronto to control
your system you will need to purchase an IR to X−10 transceiver, which takes IR signals from your
remote and rebroadcasts them directly as X−10.
The only such economical device that I’m aware of is the IR543 (which is re−branded to various other
names and sold by many companies). It is a small black console unit with white buttons on the top for
manual control of up to 8 devices on a particular house code. You can download a complete X−10
CCF file for control of a full 16 modules from the file area on Remote Central. Note that the console
can only control one house code at a time and that the IR codes remain the same no matter which code
it is set to −− making it nearly impossible to work with more than one house code at a time. Though
more expensive and complicated home automation systems exist, the price of the IR543 can’t be beat.
You can also buy an IR543AH, which controlls 16 house codes and 16 device IDs.
RC: Philips Pronto & Marantz RC5000 Unofficial FAQ
13
Take a Test Drive at www.harmonyremote.com today!
Unofficial Philips Pronto & Marantz RC5000 FAQ
Section A4: Hardware Questions:
Using the Remote
A4−01 Why does the backlight stay on as long as the LCD does, even though it's only set for half the
time?
This tip only applies to remotes manufacturered before January 2000:
This is normal. If the backlight is configured to be on all the time, or the light sensor setting tells the
remote that it should be on, it will remain on for as long as the LCD does. For instance:
Sensor:
Level:
LCD:
Light:
||||||−−−−−−
−−−−−−−−−−−|
30 Seconds
15 Seconds
Will mean that the light ALWAYS come on automatically and shall remain on for as long as the LCD
does, 30 seconds. A setting of:
Sensor:
Level:
LCD:
Light:
||||||−−−−−−
|−−−−−−−−−−−
30 Seconds
15 Seconds
Means that the light will NEVER come on automatically −− only when the backlight button is pushed.
When that happens the backlight will remain on for 15 seconds and the LCD will stay active for 30. If
your remote has a light sensor, a setting of:
Sensor:
Level:
LCD:
Light:
|||−−−−−−−−−
−−−−−−−|−−−−
60 Seconds
5 Seconds
Will mean that the light is currently coming on automatically and will remain on for 60 seconds. If
ambient light levels increase, the backlight will no longer come on automatically. When manually
enabled it will only remain on for 5 seconds.
The button backlight operates the same as the LCD backlight.
A4−02 I've got a TSU2000. Why does my TV keep turning off?
When using the TSU2000's built−in database, the default configuration assigns certain functions to
automatically transmit each time the device is selected. For some devices this is merely an "input"
command, but in the case of the TV template it sends the "power" code. While it's possible to not send
the command while switching from one device to another with the Device Menu (by holding down the
left or right hard button as you select the device), that can't be done from the Home Menu.
There are two ways to fix this. On the basic remote, without ProntoEdit:
RC: Philips Pronto & Marantz RC5000 Unofficial FAQ
14
1. Open the Mode Menu and select "DEL" mode.
2. Open the device menu.
3. While holding the right hard button, select the device you'd like to remove the command from.
4. When prompted, select "Delete Device Action".
If you're using ProntoEdit:
1. Upload your configuration from the Pronto if you have not done so already.
2. Double−click on the device name.
3. Double−click on the "Properties" option.
4. Under the "Action" tab, delete the [C] UDB command.
5. Download your setup back to the remote.
A4−03 Why is the REVERT button grayed out?
The "revert" function is only available after you have made changes on the physical remote. Whenever
you download a CCF from the computer this function is disabled, and you must make at least one
change to your file on the remote before it will again become active.
Remember, if you would like to change back to the original factory default CCF file it is distributed
along with all software packages in the /SAMPLES/ directory as default.ccf.
A4−04 I hear there's a hidden game on the remote?
You've heard correctly! Built−in to every remote based on the Pronto is a hidden game, very similar to
Tetris. To access it:
On the Philips Pronto, Marantz RC5000 and Onkyo CHAD:
• While holding [LIGHT], [LEFT] and [RIGHT] at the same time:
• Press [MUTE]
• Press [CH+]
• Press [MUTE]
• Press [CH+]
• Press [VOL−]
• Release the [LEFT] and [RIGHT] keys before releasing [LIGHT].
Commands are:
• [LEFT] = Left
• [RIGHT] = Right
• [VOL+] = Rotate
• [VOL−] = Down
• [CH+] = New Game
• [CH−] = Pause
• [MUTE] = Exit
On the Marantz RC5200 and RC9200:
• While holding [LIGHT], [LEFT] and [RIGHT] at the same time:
• Press [VOL+]
• Press [VOL−]
• Press [VOL+]
• Press [VOL−]
RC: Philips Pronto & Marantz RC5000 Unofficial FAQ
15
• Press [MUTE]
• Release the [LEFT] and [RIGHT] keys before releasing [LIGHT].
Commands are:
• [MENU LEFT] = Left
• [MENU RIGHT] = Right
• [MENU UP] = Rotate
• [MENU DOWN] = Down
• [CH+] = New Game
• [CH−] = Pause
• [MUTE] = Exit
On the Yamaha RAV−2000:
• While holding [LIGHT], [LEFT] and [RIGHT] at the same time:
• Press [POWER]
• Press [STANDBY]
• Press [POWER]
• Press [STANDBY]
• Press [VOL−]
• Release the [LEFT] and [RIGHT] keys before releasing [LIGHT].
Commands are:
• [LEFT] = Left
• [RIGHT] = Right
• [VOL+] = Rotate
• [VOL−] = Down
• [MUTE] = Pause
• [STANDBY] = New Game
• [POWER] = Exit
On the Philips ProntoPro:
• While holding [LIGHT], [FAR LEFT] and [CENTER LEFT] at the same time:
• Press [MUTE]
• Press [CH+]
• Press [MUTE]
• Press [CH+]
• Press [VOL−]
• Release the [FAR LEFT] and [CENTER LEFT] keys before releasing [LIGHT].
Commands are:
• [FAR LEFT] = Left
• [FAR RIGHT] = Right
• [CENTER LEFT] = Down
• [CENTER RIGHT] = Rotate
• [CH+] = New Game
• [CH−] = Pause
• [MUTE] = Exit
For the bonus game on the Philips ProntoPro:
RC: Philips Pronto & Marantz RC5000 Unofficial FAQ
16
• While holding [LIGHT], [CENTER RIGHT] and [FAR RIGHT] at the same time:
• Press [MUTE]
• Press [CH+]
• Press [MUTE]
• Press [CH+]
• Press [VOL−]
• Release the [CENTER RIGHT] and [FAR RIGHT] keys before releasing [LIGHT].
Commands are:
• Touch Screen to Select Square
• [CH+] = New Game
• [MUTE] = Exit
A4−05 In the Macro Menu, why does the left hard button read "OPEN"? Can I change this?
This is actually covered in both the Pronto and ProntoEdit manuals, however it still seems to be easily
overlooked. When in the Macro side of the remote, the left and right hard buttons are dedicated to
macro−based functions and cannot be user defined, even in ProntoEdit.
What do they do? Well, hold down the "OPEN" button while selecting a macro to list its contents.
You'll find the left button now reads "CLOSE" (to close the macro), while the right reads "PLAY" (to
run through it). When editing a macro these buttons also perform the same functions, but change to
more important ones when the Device Menu is opened. They will then read "DEVICE" (to add a
screen jump to that device) and "ACTION" (to create an alias to the device's action list, which is
normally run each time it is selected).
Note that beginning with RC5000 firmware APP v5.0, the left/right hard buttons can now be assigned
to any function. This has not been added to any other remote.
A4−06 Why doesn't the backlight come on when I set the arrow all the way to the left, as described in
the manual?
This tip applies only to European Pronto remotes:
This isn't a firmware or ProntoEdit bug, but rather a typo in the multi−language manual that ships with
the silver European Pronto. Although there is no light sensor, a substitute feature allows users to
configure the remote so the backlight either always comes on when a button is pressed, or only when
the backlight button is pressed. In the manual, it says to move the arrow to the far left in order for the
backlight to automatically activate. This is incorrect −− you should set it all the way to the right.
Setting it to the left will ensure the Pronto never turns the backlight on by itself.
For more information on the light sensor, please see section A2−09.
A4−07 Why do my Device and Macro Menu buttons not work?
This tip applies only to the Marantz series of remotes:
The default setup as of APP v5.0 is to disable both the Device and Macro Menu buttons. To fix, hold
down the icon of the remote for three seconds, scroll to the second panel, and press the two buttons at
the top of the screen that say "Show Macro" and "Show Device", so that they read "Hide Macro" and
"Hide Device". This cannot be done in RC5000 Setup.
However, if your configuration is marked as "Write Protected" in RC5000 Setup's "System Properties"
RC: Philips Pronto & Marantz RC5000 Unofficial FAQ
17
screen, you will not be given the option to show the Device or Macro Menus in the Setup Menu. First
unselect this option in RC5000 Setup, then download the file to your remote and follow the previous
directions.
A4−08 What happened to my Mode button?
There are two reasons why the Mode button might not be showing on your remote:
1. It has been hidden in the remote’s setup menu. Hold the icon of the remote for three seconds and scroll
to the second screen. If you see a "Mode Menu" button with an X though it, press it to remove the X.
The mode button will be restored.
2. If you don’t see the mode menu setup button as described above, then your configuration has been
marked as "write−protected" in ProntoEdit. Open your CCF in ProntoEdit, click on the plus sign next
to "HOME" and then double−click on "System Properties". Make sure the "configuration is
write−protected" option is not selected, then save and download your CCF to the remote. If you still do
not see the mode button follow the directions in the previous step.
If you have a Marantz RC5200 or RC9200, then the procedure to re−enable the mode menu is slightly
different, Assuming you've already checked that the CCF is not marked "write−protected", press the
region where the mode menu used to reside for five seconds to enter the setup menu.
A4−09 What happened to the Macro Menu's REC command?
This tip applies only to the Philips Pronto TS−1000 and Marantz RC5000 remotes:
Beginning with Pronto firmware APP v4.8b13t and RC5000 APP v4.84, the REC command as
described in the manual has been renamed to EDIT. This is merely a cosmetic change prompted by the
addition of the timer feature in the Pronto and continued in the RC5000.
RC: Philips Pronto & Marantz RC5000 Unofficial FAQ
18
Visit our new website!
Unofficial Philips Pronto & Marantz RC5000 FAQ
Section A5: Hardware Questions:
Batteries & Docking Station
A5−01 Should I buy the docking station for my remote?
The answer to this question is completely dependant on your pocketbook. Although it seems that
you’ll save money by not needing to replace alkaline batteries, the cost of the docking station is far
greater than the lifetime cost of batteries the remote would ever use.
The docking station is a convenience item (no worrying about how much you use the remote or when
to replace the batteries) and a stylish place to store your remote when not in use.
A5−02 Why does the remote appear to behave erratically when battery power is still 50%?
The Pronto does not actually like low battery levels and may begin to behave quite erratically when
levels are less than 50% −− even though the low battery caution does not appear until far lower. If
remaining power is less than half and you are experiencing problems, I recommend replacing the
batteries or recharging the remote immediately.
A5−03 How often should I recharge the remote?
The rechargeable battery pack uses NiMH batteries, which are much less likely to develop a "memory"
problem than the older NiCad style. I have been using one remote since 1998 and it has sat on the
charger almost every night since then without any noticeable effect on battery life (and yes, I’ve had it
off long enough to know!)
Whenever you feel like recharging the remote, do so.
A5−04 Why does my rechargeable battery read only half full even when I know it's full?
This is a known issue on the remote control. If you're sure the battery is fully charged − you've put it
on the charger but it stops charging after a few minutes, remove the battery from the remote and then
put it back. It should now read full. This condition appears to be triggered by letting the battery levels
get fairly low. Instead, always keep your remote topped up every few days. Since it uses a NiMH
battery, "memory" effects are very minimal and you should not see any degradation in performance.
If this does not correct your problem, clean the battery's power contacts with an abrasive erasor, along
with the internal battery compartment contacts. You can also try bending the remote's contacts
outwards further (but be careful, they can snap off).
A5−05 Why is my desktop charger's light blinking?
This text does not apply to the Philips ProntoPro, Marantz RC5200, RC9200, or Yamaha RAV−2000:
The blinking light indicates that there is a bad connection between the charger and the remote control.
RC: Philips Pronto & Marantz RC5000 Unofficial FAQ
19
Often, this is not actually the case. Many brand new Pronto owners report this problem during the first
few charges, but find it disappears after a short time. Give it a week or two, the problem should stop.
If you experience this for a longer time span, try pressing the RESET button on the back of the remote.
You may also try reseating the battery. Both of these solutions have been found to also correct another
situation where the remote insists the battery is dead even when it is fully charged.
If your problem continues, try cleaning the remote and battery pack's contacts with an abrasive erasor.
The following applies to the remote models excluded above:
Like with the older dock design, a blinking light on the dock for the ProntoPro or RAV−2000 indicates
some sort of problem. This could be a charging problem or a communications problem.
If your remote is not taking a charge, take a close look at the fine pins on the docking station and
ensure that none are bent, covered in dirt or corroded. Also look at the remote's connector for similar
problems. Blowing out both connectors with compressed air may help the problem. Also ensure that
you are docking the remote correctly, and not forcing it.
A few individuals (including myself) have discovered a ProntoPro, left sitting in the charging station,
with the charger's lights blinking. The remote has become extremely hot to the touch and the charger
will not shut off. No permanent damage has occurred from this experience, and the remote does not
appear to get hot enough to cause a hazard, however if this occurs you should immediatly remove it
from the charger and allow it to cool. In my case, the problem happened once and has not repeated in
several years since.
A5−06 I already have a docking station, can I buy another rechargeable battery?
This tip only applies to black & white remotes:
The answer is yes −− see the price list posted in section A6. Unfortunately, you may pay nearly as
much as the street price for the battery and station. Remember that you can use your own rechargeable
AA batteries, albeit not with the docking station.
A5−07 My ProntoPro's docking station is dead. Help!
This tip only applies to docking stations with a multi−pin latching connector:
First, make sure that the basics are covered: that your AC/DC converter is operating properly, that the
cables and connectors are good, and that you have the remote seated properly in the station. If
everything checks out, then an internal fuse might have blown.
Remove the four screws hidden under the station's feet, and gently pry the top case half off of the
bottom. There are three plastic latches that need to be detached before the two halves will separate.
The fuse is found in the top left corner of the circuit board. It is 125 volts, 1/2 amp. Remove it and take
it to an electronics repair shop to find an exact replacement.
RC: Philips Pronto & Marantz RC5000 Unofficial FAQ
20
Find your universal remote control solution at AVsmarts.com!
Unofficial Philips Pronto & Marantz RC5000 FAQ
Section A6: Hardware Questions:
Diagnosis and Repair
A6−01 My remote is dead! What can I try to fix it?
If your remote refuses to start or is displaying a black or garbled screen, take the batteries out and
leave them out overnight. Then, in the morning, put them back. The remote should reboot as normal.
If it does not, then try leaving them out for at least a day. If this still does not work your remote may
need to go back to Philips for repair.
A6−02 My remote is rebooting all the time... help!
If you are having an intermittant problem where the remote will reboot now and again, ensure that you
are using the latest firmware version, as this was an issue on early releases. There are also some other
reasons as to why your remote could be rebooting:
• Your CCF file has incompatible features. This is especially true if you downloaded a current
geration RC5000 Setup to your Pronto TSU2000 with ProntoEdit v2.0. See if the emulator does the
same thing. If problems continue, see if the default CCF file will still cause the remote to reboot.
• You have an invalid or corrupt IR code. If this happens on particular button pushes, try re−learning
those codes. If your remote reboots while learning the code, then check the Remote Central file area
for codes to your device. As with the above tip, try getting the remote to reboot with the factory
default CCF file.
• Your firmware needs updating again. Try flashing the firmware several times in a row.
• Your remote is defective. The newer firmware update files for black and white remotes were
designed to allow for higher tolerances from the remote's hardware. However, it does not correct the
problem in all cases. If you are unable to get your remote control to stop randomly rebooting, contact
the manufacturer for a replacement.
If your remote is rebooting constantly, see the FAQ below on Hyperterminal.
A6−03 What can I do if the remote will not power up and I hear 4 beeps?
This usually indicates that the CCF file is corrupt. To correct this you can try downloading your file
again from ProntoEdit. Otherwise, you must re−flash the firmware using the TOOLS | UPDATE
PRONTO menu option in ProntoEdit (or TOOLS | UPDATE RC5000 in RC5000 Setup) while the
remote is connected to your PC.
You may experience this problem without ever having connected the remote to your computer. The
solution is still the same: you must update your remote via the PC software.
RC: Philips Pronto & Marantz RC5000 Unofficial FAQ
21
A6−04 How do I connect to the remote with Hyperterminal?
If your remote is constantly rebooting every few seconds, as in after you "CANCELLED" a CCF
download in ProntoEdit, you can fix it via this method:
1. Connect your remote to your PC.
2. Open a terminal program (such as HyperTerminal, which is included with Windows).
3. Connect to the serial (COM) port your remote is hooked up to at 115200 baud, 8 data bits, 1 stop bit
and no flow control.
4. Hit the reset button on the back of your remote control. On the terminal program you should start to
see numbers such as "00 02 04", etc.
5. Hit the [ESC] key on your keyboard. A prompt, CABERNET> should appear.
6. Type dl ccf followed by return. You should see a slowly growing string of C's.
7. While those C's are appearing, download your CCF file to the remote using the XModem protocol
(Transfer −> Send File).
8. When the download has finished, type go followed by the return key on your keyboard.
Your remote should now work correctly. This problem can also sometimes be fixed by attempting to
upgrade the firmware while the remote reboots, however it may take many attempts to catch the
remote at the right instant.
A6−05 What can I do if my buttons stop working?
There have been a few cases where people have reported that after a period of proper functionality
some buttons eventually stop working. This can be fixed temporarily by hitting the reset button on the
back of the Pronto.
This problem was discovered to be a bug and has been fixed on the most current software releases.
However, if upgrading your remote is not an option at this time you will need to disable the remote's
audio feedback. You can accomplish this by going into the setup menu (press and hold the remote icon
for three seconds) and setting the touch and button volumes to 'X'.
A6−06 I've broken the LCD screen and it's out of warranty. Can I replace it?
This tip only applies to black & white remotes:
The answer is yes! The so−called "good" Pronto screens are made by Samsung and are available over
the web. Some valid Samsung LCD screen part numbers for the TS−1000/TSU2000/RC5000/RC5000i
are:
• Samsung UG−24U01−WGHT3−A (on some original Prontos)
• Samsung UC−24U01−WGHT3−B (on some original Prontos)
• Samsung UG−24U01−WGHT3−C (on some original Prontos)
• Samsung UG−24U01−WGHT3−G (verified functional)
• Samsung UG−24U01−WGHT3−L (verified functional)
One source to purchase some of these models is http://www.earthlcd.com. (The cost is approximately
$39 at last check.)
Here's how to replace the screen (instructions provided by Aaron Macpherson):
1. The Pronto case is held together by three screws. Two are under the battery compartment and the third
is under the label on the back, centered, close to the bottom. The location of this third screw can be
found by running your fingernail near the bottom edge of the label and feeling for an indentation. The
RC: Philips Pronto & Marantz RC5000 Unofficial FAQ
22
tip of a knife can be used to pierce the label to give you access to the screw. The socket on the screws
is a T6 or T7 Torx. Torx drivers are similar to Hex (Allen wrench) but have a star−like tip. Torx are
available at most hardware stores (or in gift tool sets that you never really looked at).
2. Remove the three screws and gently work the case apart. Mine hung up on the rubber block that is the
base for the five white push buttons. Be patient. Some of the components in the Pronto are sensitive to
Electro Static Discharge (ESD). Make sure you are grounded before touching the inside of the unit.
Use the same precautions that you would use to change out a board in your computer.
3. Now you have access to the Printed Circuit Board (PCB). Two more screws need to be removed to
separate the PCB from the case. Be careful here, there is a flat−cable (flex cable) that attaches the
screen to the PCB. Lay the PCB and the top case out so that you can unplug the cable from the PCB.
The connector on the PCB has two semicircular tabs on either side of the cable. With moderate
pressure, slide the two tabs away from the connector until they stop (about 2mm). The cable should
easily slide out now.
4. The screen is held in place with two more screws through a plastic support bezel. Remove the bezel
and screen. There are some small hook features in the bezel that hold the screen in place so you will
need to gently pop it out.
5. Now you are ready to reverse this process and reassemble your remote with a replacement screen. Be
sure the flat−cable is well seated in the PCB connector before sliding the two semicircular tabs back in
place. Make sure the cable is out of the way of the Left and Right buttons when you reassemble the
PCB to the case. Your may need to bend it into an "S" or "W" shape. You can practice with the old
screen if you like. Be careful to not over−tighten the screws during reassembly.
Note: depending on the screen model you receive, some small cuts may need to be made in the Pronto
case to clear newly arranged components on the LCD. A single edged razor or Exacto knife can be
used to make these cuts. Be sure everything clears the case before tightening all screws!
A6−07 Why does the screen's contrast keep changing?
On all black and white models, the LCD screen's contrast will become darker as the screen warms up,
either by using the remote or by external sources such as your hand. Although this can be annoying,
you may be able to find a contrast level that is acceptable for both "cold" and "warm" states.
A6−08 Can I buy spare parts for the Pronto?
This tip applies only to the Philips Pronto TS−1000 and TSU2000 remotes:
The following is a list of spare parts that you can purchase direct from Philips (no information is yet
available for Marantz or Yamaha). Prices posted do not include shipping or tax; call 1−800−835−3506
to order.
• Serial Cable (p/n 310420050961) − $10.78
• Rechargable Battery (p/n 310420050971) − $45.26
• AA Battery Insert (p/n 310420414501) − $4.00
• Battery Cover (p/n 310420414491) − $4.00
• Manual (p/n 86224050006) − $35.00
• New LCD Screen − $99.00 (Call 1−800−300−9013; includes return shipping and installation in your
remote).
A6−09 What's that buzzing sound I can hear?
RC: Philips Pronto & Marantz RC5000 Unofficial FAQ
23
This tip does not apply to the Philips ProntoPro:
The very faint buzzing sound is made by the inverter, part of the circuitry that generates the higher
voltage needed for the display's EL backlight from the low voltage provided by the internal battery.
This is completely normal, there is nothing to worry about. You need to be in a very quiet environment
to hear it. All similar backlights used in other devices such as watches and palmtops make the same
sound.
A6−10 What else can I do to troubleshoot random problems?
In addition to the tips mentioned above, if you're running older firmware you should ensure that IR
code labels do not contain spaces. These are not the actual button labels, but rather the internal code
label that reads, normally, "LEARNED". So, instead of "TV − Power On" you could use
"TV−PowerOn".
Other suggested troubleshooting tips include replacing the batteries, re−flashing the firmware,
uploading and downloading your CCF file again, and ensuring that you are running the most recent
firmware revision.
Worse comes to worse, sometimes gently shaking or tapping the remote can help things.
RC: Philips Pronto & Marantz RC5000 Unofficial FAQ
24
Visit our new website!
Unofficial Philips Pronto & Marantz RC5000 FAQ
Section B1: Working With ProntoEdit:
General Description
B1−01 Briefly, what does the software allow me to do?
Philips ProntoEdit, Marantz Touch Screen Setup, CHAD Edit and RAVedit are software packages that
allow users to design layouts, program macros or timers, insert customized bitmaps, archive, merge
and share files, or learn IR codes. Unlike the design options available on the base remote, the PC
software allows you to create almost anything you want −− your imagination is the limit.
B1−02 Is there editing software available other than ProntoEdit?
Yes, Stewart Allen has developed a Java−based editing package named Tonto. Tonto works with all
Pronto remote models and will run on Windows, Linux and Mac OSX. To download Tonto or learn
more, visit http://giantlaser.com/tonto/.
B1−03 Where can I download the software?
All three software packages along with many additional utilities and configurations are available on
Remote Central in the file area.
However, if you are unable to download from there, you can download ProntoEdit from
http://www.pronto.philips.com, Touch Screen Setup from http://www.marantz.com, CHAD Edit from
http://www.chadremote.com, or RAVedit from http://www.yamaha.com.
B1−04 Can I take screen captures of my file?
Yes! While in the Emulator, press the "Print Screen" key on your keyboard. A file of what was
showing on the Pronto's display will be saved to c:\prontoscreens, as pronto0.bmp. Each time you
press "Print Screen" the filename will increment, however if you restart the Emulator it will again start
over at "0". The standard Windows practice of copying your entire desktop − Emulator graphics and
all − to the clipboard will also apply.
B1−05 How can I change the program that opens CCF files?
This applies to anyone who works with multiple CCF−handling programs. The last software version
you installed will always open CCF files when double−clicked on. To change this behavior, simply
re−install the program you would rather have open CCF files. Note that there is no way to associate
one program with a specific remote's CCF files, so if you open files designed with one remote in mind
into another remote's package, you may receive a 'corrupt file' error message.
B1−06 I'm getting an "Invalid Configuration File Version", "File is not a valid configuration" or
"CCF file is invalid or corrupt" message. What can I do?
If you are encountering the second or third error message listed above in the ProntoEdit, Marantz
RC: Philips Pronto & Marantz RC5000 Unofficial FAQ
25
RC5000 Setup or RAVedit programs when trying to load CCF files downloaded from the Internet, you
need to upgrade your software to the latest version. The most current releases are listed previously in
this FAQ. Also, remember that you must first decompress a CCF file from the archive ZIP file before
you can load it. For software issues, keep reading.
Marantz RC5000, RC5000i, RC5200 & RC9200 users:
Always check your remote's firmware version by holding the icon of the remote for three seconds,
then scrolling to panel number three. If it is older than the versions listed in the FAQ you will need to
flash−update your remote to the latest revision. To do this, download and install Touch Screen Setup
v1.0.14, then use the TOOLS − UPDATE FIRMWARE command. Be sure to select the correct remote
model. Upon loading other remotes' CCF files, any timers, beep tone commands or database codes will
be stripped out.
If you are using RC5000 Setup v1.02.3 or earlier:
♦ Compatible with files from RC5000 Setup v1.02.3 or earlier.
♦ Not compatible with files from RC5000 Setup v2.0 or newer.
To use newer RC5000 Setup files you must download, install and use TouchScreen Setup
v1.0.14.
♦ Not compatible with RCEdit "large screen" files.
See the above instructions for newer RC5000 Setup files.
♦ Compatible with files from ProntoEdit v1.05 or earlier.
♦ Not compatible with files from ProntoEdit v2.0 or newer.
See the above instructions for newer RC5000 Setup files.
♦ Not compatible with ProntoProEdit files.
See the above instructions for newer RC5000 Setup files.
♦ Not compatible with RAVedit files.
See the above instructions for newer RC5000 Setup files.
♦ Not compatible with CHAD Edit files.
See the above instructions for newer RC5000 Setup files.
If you are using RC5000 Setup v2.0 or newer:
♦ Compatible with all RC5000 Setup files.
♦ Compatible with files from ProntoEdit v1.05 or earlier.
♦ Not compatible with Touch Screen Setup "large screen" files.
To use Touch Screen Setup "large screen" files you must download, install and use
TouchScreen Setup v1.0.14.
♦ Not compatible with files from ProntoEdit v2.0 or newer.
Will crash upon loading newer ProntoEdit files. To work with these files see the above
instructions for Touch Screen Setup files.
♦ Not compatible with ProntoProEdit files.
See the above instructions for Touch Screen Setup files.
♦ Not compatible with RAVedit files.
See the above instructions for Touch Screen Setup files.
♦ Not compatible with CHAD Edit files.
See the above instructions for Touch Screen Setup files.
If you are using RCEdit (Touch Screen Setup) v1.0.14 or newer:
♦ Compatible with all RC5000 Setup files.
♦ Compatible with all ProntoEdit files.
♦ Compatible with all ProntoProEdit files (some limitations apply).
♦ Compatible with all RAVedit files.
RC: Philips Pronto & Marantz RC5000 Unofficial FAQ
26
♦ Compatible with all CHAD Edit files.
All Philips Pronto users:
Always check your remote's firmware version by holding the icon of the remote for three seconds,
then scrolling to panel number three. If it is older than the versions listed in the FAQ you will need to
flash−update your remote to the latest revision. To do this, download and install ProntoEdit v4.0, then
use the TOOLS − UPDATE FIRMWARE command. Be sure to select the correct remote model. Upon
loading Marantz CCF files, multiple jumps, page history commands and custom scroll arrows will be
stripped out.
If you are using ProntoEdit v1.05:
♦ Compatible with files from ProntoEdit v1.05 or earlier.
♦ Not compatible with files from ProntoEdit v2.0 or newer.
To use newer ProntoEdit files you must download, install and use ProntoEdit v4.0.
♦ Not compatible with ProntoProEdit files.
See the above instructions for newer ProntoEdit files.
♦ Compatible with files from RC5000 Setup v1.02.3 or earlier.
♦ Not compatible with files from RC5000 Setup v2.0 or newer.
See the above instructions for newer ProntoEdit files.
♦ Not compatible with Touch Screen Setup "large screen" files.
See the above instructions for newer ProntoEdit files.
♦ Not compatible with RAVedit files.
See the above instructions for newer ProntoEdit files.
♦ Not compatible with CHAD Edit files.
See the above instructions for newer ProntoEdit files.
If you are using ProntoEdit v2.0:
♦ Compatible with all ProntoEdit files.
♦ Not compatible with ProntoProEdit files.
To use ProntoProEdit files you must download, install and use ProntoEdit v4.0.
♦ Compatible with files from RC5000 Setup v1.02.3 or earlier.
♦ Not compatible with files from RC5000 Setup v2.0 or newer.
See the above instructions for ProntoProEdit files.
♦ Not compatible with Touch Screen Setup "large screen" files.
See the above instructions for ProntoProEdit files.
♦ Compatible with all RAVedit files.
♦ Compatible with all CHAD Edit files.
If you are using ProntoProEdit v3.2.0:
♦ Compatible with all ProntoProEdit files.
♦ Compatible with all ProntoEdit files.
♦ Compatible with all RC5000 Setup files.
♦ Not compatible with Touch Screen Setup "large screen" files.
To use Touch Screen Setup "large screen" files you must download, install and use ProntoEdit
v4.0.
♦ Compatible with all RAVedit files.
♦ Compatible with all CHAD Edit files.
If you are using ProntoEdit v4.0:
♦ Compatible with all ProntoProEdit files.
RC: Philips Pronto & Marantz RC5000 Unofficial FAQ
27
♦ Compatible with all ProntoEdit files.
♦ Compatible with all RC5000 Setup files.
♦ Compatible with Touch Screen Setup "large screen" files (screens will be truncated).
♦ Compatible with all RAVedit files.
♦ Compatible with all CHAD Edit files.
All Yamaha RAV−2000 users:
No new firmware upgrades have yet been released.
If you are using RAVedit v1.0:
♦ Compatible with all RAVedit files.
♦ Compatible with all ProntoEdit files.
♦ Not compatible with ProntoProEdit files.
To use ProntoProEdit files you must download and install ProntoEdit v4.0, load the file you
wish to use, then save as "BWOld Pronto Configuration". The file, if small enough, can now
be used with RAVedit.
♦ Compatible with all RC5000 Setup files.
♦ Not compatible with Touch Screen Setup "large screen" files.
See above instructions for ProntoEdit, but instead download Touch Screen Setup v1.0.14.
Screens will be truncated.
♦ Compatible with all CHAD Edit files.
All Onkyo CHAD Edit users:
No new firmware upgrades have yet been released.
If you are using CHAD Edit v1.0.0:
♦ Compatible with all RAVedit files.
♦ Compatible with all ProntoEdit files.
♦ Not compatible with ProntoProEdit files.
To use ProntoProEdit files you must download and install ProntoEdit v4.0, load the file you
wish to use, then save as "BWOld Pronto Configuration". The file, if small enough, can now
be used with RAVedit.
♦ Compatible with all RC5000 Setup files.
♦ Not compatible with Touch Screen Setup "large screen" files.
See above instructions for ProntoEdit, but instead download Touch Screen Setup v1.0.14.
Screens will be truncated.
♦ Compatible with all RAVedit files.
If your remote has the most recent firmware and your ProntoEdit version is also up−to−date, be aware
that this problem can randomly occur after any CCF file download. To fix it, simply download the file
again.
B1−07 Can I use Pronto NG .PCF files? How about .ICF and .NCF files?
The simple answer is: no! Philips Pronto NG and ProntoPro NG .PCF files are not compatible or
exportable to the .CCF file format. However, you MAY be able to use some of their elements.
First, infrared hex codes from .PCF files may work correctly on regular Pronto remotes. But, since
ProntoEdit NG has been known to slightly modify codes, don't be surprised if some don't work
correctly, or at all.
Second, you should be able to borrow any .BMP graphics contained in a .PCF file. To do so, take the
RC: Philips Pronto & Marantz RC5000 Unofficial FAQ
28
PCF file and rename it to .ZIP − so "myfile.pcf" would become "myfile.zip". You can now open the
file as an archive, and save any images you like out of the "graphics" directory. Note that the Pronto
NG's black and white .BMP images are in 16−shades and may have a transparancy color, while the
original Pronto can only use 4 shades with no transparancy.
Finally, color .PNG files designed for the ProntoPro NG may contain 24−bit color .BMP or .PNG
graphics, which cannot be directly used by the Pronto or ProntoPro (which supports 256 colors). These
image files can be converted to appropriate .BMP formats using various image editing programs, but
note that the ProntoPro NG supports "alpha blend transparancies", something not supported by the
regular Pronto or ProntoPro, and any designs using that capability may not look correct after
conversion.
ProntoNEO .NCF and iPronto .ICF files work similarly to .PCF files: rename them to .ZIP, extract any
images you like, then convert them to an appropriate 4−shade or 256−color .BMP format for importing
into ProntoEdit.
RC: Philips Pronto & Marantz RC5000 Unofficial FAQ
29
Take a Test Drive at www.harmonyremote.com today!
Unofficial Philips Pronto & Marantz RC5000 FAQ
Section B2: Working With ProntoEdit:
Software & Firmware
B2−01 What are the current software versions?
Current PC software versions as of April 17, 2004:
US Pronto TS−1000: ProntoEdit v4.0.5
US Pronto TSU2000: ProntoEdit v4.0.5
US ProntoPro TSU6000: ProntoEdit v4.0.5
European Pronto RU890: ProntoEdit v4.0.5
European Pronto RU940: ProntoEdit v4.0.5
European Pronto RU970: ProntoEdit v4.0.5
Marantz RC5000/RC5000i: Touch Screen Setup v2.0.4
Marantz RC5200/9200: Touch Screen Setup v2.0.4
Onkyo CHAD USR−5RF: CHAD Edit v1.0.0
Yamaha RAV−2000: RAVedit v1.0.0
B2−02 What are the current firmware versions?
Hold down the icon of the Pronto/RC5000 on your remote for three seconds to get to the Setup menu.
Screen number three contains the version numbers of the firmware contained on your particular remote.
Current firmware versions as of July 1, 2004:
US Pronto TS−1000: App v4.85 / Sys v3.62
US Pronto TSU2000: APP v5.3 / Sys v4.8
US ProntoPro TSU6000: APP v1.4 / Sys v1.4
European Pronto RU890: App v4.85 / Sys v3.62
European Pronto RU940: App v4.86 / Sys v4.8
European Pronto RU970: App v1.4 / Sys v1.4
Marantz RC5000: App v5.2 / Sys v4.92
Marantz RC5000i: App v5.1 / Sys v4.91
Marantz RC5200: App v1.4.1 / Sys v1.3.2
Marantz RC9200: App v1.2.2 / Sys v1.3.1
Onkyo CHAD USR−5RF: App v1.2 / Sys v1.2
Yamaha RAV−2000: App v1.0 / Sys v1.0
All remotes use their own firmware update files. You cannot load the firmware from one remote to
another. Be sure when updating that you select the correct model.
Always check what version of firmware your remote has and compare it to what the PC offers before
attempting to upgrade. Very often remotes direct from the factory will have a newer firmware version
than is available to download.
RC: Philips Pronto & Marantz RC5000 Unofficial FAQ
30
B2−03 What are the differences between the various firmware & software versions?
For the most part, both software packages are identical. However, Philips and Marantz have
individually seen fit to include a number of proprietary features which can only be used on their
models.
All Philips Pronto Models:
• Custom Beeps −− allow for the creation of songs and sound effects which can be run from timers,
during macros or just for fun.
• Timers −− allow for the creation of timers which run a macro at a preconfigured time. This allows for
the automation of system functions which do not themselves have timed capabilities.
Philips Pronto TSU2000 & ProntoPro TSU6000:
• Code Database −− includes a built−in preprogrammed code database licensed from UEI (makers of
the One For All line of remote controls). Note that this database is NOT included with the 2mb RU940
European Pronto.
All Marantz RC5000 Models:
• Jumps in Macros −− any number of panel jumps can be placed in a macro sequence, allowing the
remote to display various screens while a macro is running. This can also be used for the creation of
crude animations.
• Panel Memory −− users can configure any button to scroll to the last 5 previously accessed panels, or
forwards the same number again.
• Custom Scroll Arrows −− the up/down scroll arrows can have any bitmap assigned to them. This can
also be used to effectively hide them, while still having the functionality available to users who know
they're there.
• Disable Device & Macro Menus −− configurable from the remote, the Device and Macro Menus may
be disabled. Note that this does not allow for any additional user screen space.
• Configure Left & Right Buttons in the Macro Menu −− instead of being configured solely for
macro functions, the left and right hard buttons can now be assigned to any function in the Macro
Menu, as they can be in the Device Menu.
Marantz RC5200 & RC9200:
• Supports a larger editable screen −− these sport a compact static interface that allows for a 240x270
pixel editable screen region, instead of the normal 240x219.
Onkyo CHAD USR−5RF:
• Functionally identical to Pronto TSU2000 −− but features a brand new user interface and RF
capabilities.
Yamaha RAV−2000:
• Functionally identical to Pronto TSU2000 −− but features a brand new user interface.
B2−04 I'm told the software will not work with Windows XP. Is this true?
Although Marantz claims that Touch Screen Setup will not work with Microsoft Windows XP, that is
incorrect. They will not provide support for any issues encountered while running under Windows XP,
however the software should work without issue. This information applies to all recent software
versions describer earlier.
RC: Philips Pronto & Marantz RC5000 Unofficial FAQ
31
BlueDo.com − The Best Remotes, The Best Service, The Best Prices!
Unofficial Philips Pronto & Marantz RC5000 FAQ
Section B3: Working With ProntoEdit:
Remote Communications
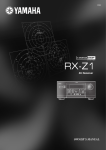
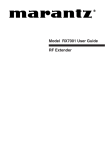
B3−01 Where can I get a serial cable for the Pronto?
All shipping remotes include one in the base package. If you don't want to wait you can use a Kodak
DC210 digital camera cable or you can wire your own using the diagram below:
More information on working with Macintosh computers can be found later in this document.
Note that the pinout is NOT the same as the cable that comes with Home Theater Master products.
B3−02 What does "Invalid Software Version" mean, and what can I do about it?
There are several versions of the Pronto software designed for various OEM customers, each one
slightly different. When you download a software update intended for another version of your remote
the above message will be displayed. Your only option is to get a software upgrade created for the
specific version of your remote and use that to update instead.
Although in the past the firmware for the Pronto could be cross−loaded on the Marantz RC5000, this is
not the case any more. Please do NOT upgrade the RC5000 with Pronto software or the Pronto
with RC5000 software.
If you have already flashing another model's firmware, you are likely receiving the error message
above. You should instead flash your remote back to its proper firmware program with either RC5000
Setup or ProntoEdit and the most recent firmware update file.
Always check what version of firmware your remote has and compare it to what the PC offers before
attempting to upgrade. Very often remotes direct from the factory will have a newer firmware version
than is available to download.
B3−03 What can I do if the remote will not power up and I hear 4 beeps?
RC: Philips Pronto & Marantz RC5000 Unofficial FAQ
32
This usually indicates that the CCF file is corrupt. To correct this you can try downloading your file
again from ProntoEdit or RC5000 Setup. Otherwise, you must re−flash the firmware using the TOOLS
| UPDATE PRONTO menu option in ProntoEdit (or TOOLS | UPDATE RC5000 in RC5000 Setup)
while the remote is connected to your PC.
You may experience this problem without ever having connected the remote to your computer. The
solution is still the same: you must update your remote via the PC software.
B3−04 Can I make ProntoEdit, Touch Screen Setup, CHAD Edit or RAVedit work on a Macintosh
Computer?
Yes! First, make a serial cable as per the diagram earlier in this document. If you made the PC version,
use a standard DB−9 to Mac DIN8 adapter to connect it to the serial port on your Macintosh.
The following information was submitted by Ladd Morse:
How to Use Virtual PC on your Macintosh for Flawless Pronto Upload/Download. One person's setup
that works; your mileage may vary.
Computer: Power Mac 8500 with XLR8 466 MHz G3 upgrade card
OS: Mac OS 9.0.4
Virtual PC: Version 3.0.1 running Windows 95
Mac Serial Port−to−Pronto Interface Cable: Kodak Part Number 1008473 (for
DC20/DC25/DC200/DC200 Plus/DC210/DC210 Plus/DC215)
After installing Pronto Edit 1.5 onto my "C" drive in Virtual PC, the following adjustments were
required for proper ProntoEdit/Pronto communication:
Virtual PC preferences:
• Select COM port used (in my case, COM 1)
• Ensure COM 1 is set to "Mac Serial Port"
• Enable checkbox "non−modem device"
In Windows 95:
• Open up Windows "System Control Panel" (Path: My Computer:
• Control Panels: System)
• Click on "Device Manager" tab
• Select "Ports"
• Select Port used by Pronto (in my case, COM 1)
• Click on "Port Settings" Tab
• Change "Bits/Sec" setting to 2400
None of the above work? The following manual method may help:
• Use Zterm to upload the CCF file from your Pronto to your Mac.
• Set Zterm to use 115200 baud, 8 bits, no parity, 1 stop bit.
• Hold the Left and Right buttons on the pronto while inserting the Pronto cable quickly. You may
notice a bad connection if you insert the cable more slowly.
• Type "ul ccf" followed by ENTER.
• Select Xmodem receive.
• The Pronto should then send the CCF and you'll see the Xmodem progress bar.
• Bring the CCF into ProntoEdit under VirtualPC.
RC: Philips Pronto & Marantz RC5000 Unofficial FAQ
33
• Customize it.
• Now download the CCF back to your pronto by typing "dl ccf" and pressing ENTER.
B3−05 Can I hook the Pronto up to a USB port?
The answer is yes, however there are some conditions. First, the USB emulator you purchase must be
able to emulate a serial (COM) port between 1 and 4 − many prefer to operate as "COM 12" or
something, but ProntoEdit will not work with that. Ideally it should function as COM 1. Secondly,
some USB adaptors are known not to work − this includes the Keyspan USB−to−PDA adapter.
However, the Keyspan USB−to−Serial adaptor does work.
B3−06 Why can't I get my computer to talk to the Pronto?
There are several causes. But first, when you receive the "Pronto not connected or not responding"
message, click on the "Details" button. This will list all found COM ports and what the error message
was.
If the message is "Access denied (in use by another application?)", that means another program is
using the port. A common culprit here is the Palm HotSync software. Disable it and then try again.
If the error is "Opened but no response from Pronto", you can check several things:
1. Ensure the COM port is functional. Try something else out on it.
2. If nothing else will work, the port may not be configured correctly in your system BIOS or Windows.
Its IRQ may be shared by another device, such as a modem. By default COM 1 and 3 use IRQ 4, while
COM 2 and 4 use IRQ 3. However, since COM ports cannot actually share IRQs with anything else,
you will either have to disable one of the shared COM ports or set one to another IRQ. If you have an
older AT−based system, the port may be configured correctly but may not be connected inside the
system. If using a notebook, make sure the port in question is not configured to "IR" mode, since that
disables the physical port and/or may interfere with others.
3. If the port works but ProntoEdit just can't seem to see it, make sure you're using COM 1. Many users
have found that trying to use any other port has failed if COM 1 itself is not in use. It is possible to use
other COM ports, but the ports before it should be "busy" or "in−use" by other applications.
RC: Philips Pronto & Marantz RC5000 Unofficial FAQ
34
Find your universal remote control solution at AVsmarts.com!
Unofficial Philips Pronto & Marantz RC5000 FAQ
Section B4: Working With ProntoEdit:
Learning & Infrared
B4−01 How can I tell whether my learned codes are "clean" or not?
"Unclean" infrared commands not only take up more of the Pronto's memory than is necessary, but
will often not work correctly. The device may sense the command twice, a button may not repeat when
held, or the code may simply not work at all. By viewing the hex display of a particular signal in
ProntoEdit, one can determine whether the signal is clean or not.
First, the easiest way to identify a poorly learned code is if it is much longer than other codes learned
for the same device. Though some devices can actually use two different formats for different groups
of commands (some long, some short), the general rule of thumb is that an abnormally long code is a
bad code.
For this example we will use Sony codes. Although the format of other brands will be different, the
same principles apply. To view the hex of a particular code, double−click on the button in ProntoEdit,
then double−click on the command (often labeled "Learned"). If a particular set of four digits (usually
at the end) are duplicated elsewhere in the code, it is most likely an unclean learn.
For instance, this is a very dirty code. Notice the repetition of "0452" (the lead out) and how the code
seems to just cut off. This was probably learned by just "pressing" the button rather than holding it
until the remote beeped:
0000
0018
0018
0018
0018
0018
0018
0067
0018
0018
0018
0018
0452
0018
0034
0018
0018
0018
0018
0060
0030
0000
0018
0018
0018
0018
0018
0018
0060
0030
0018
0018
0018
0018
0018
0018
0018
0018
0018
0018
0018
0018
0018
0018
0018
0018
0018
0018
0018
0018
0018
0018
0452
0018
0018
0018
0018
0018
0018
0060
0030
0018
0018
0018
0018
0018
0018
0018
0018
0018
0018
0018
0018
0018
0018
0018
0018
0018
0018
0018
0018
0018
0018
0018
0018
0018
0018
0018
0018
0018
0018
0452
0018
0018
0018
0018
0018
0060
0030
0018
0018
0018
0018
0018
0018
0018
0018
0018
Now here's a somewhat dirty code. Notice the repetition of "0452":
0000
0030
0018
0018
0067
0018
0018
0018
000b
0018
0018
0018
000d 0018 0018 0018 0018 0018 0018 0018 0018 0018 0018 0018 0018
0018 0018 0018 0018 0018 0018 0452 0060 0018 0018 0018 0018 0018
0018 0018 0018 0018 0018 0018 0018 0030 0018 0018 0018 0018 0018
0452
And, finally, here's a clean code. Notice how "0452" only appears once, at the end:
0000 0067 0000 000d 0060 0018 0018 0018 0018 0018 0018 0018 0018 0018 0018 0018
0018 0018 0018 0018 0030 0018 0018 0018 0018 0018 0018 0018 0018 0452
Generally, the shorter the code the better. But there are exceptions. ProntoEdit is known to improperly
learn a number of specific brands, resulting in exceptionally short codes that don't work at all. In this
and most other cases, it is best to learn with the base Pronto itself and not through ProntoEdit.
RC: Philips Pronto & Marantz RC5000 Unofficial FAQ
35
B4−02 Why won't my codes repeat when held down?
When teaching your commands, you should hold the original button down until the Pronto finishes
learning. Do not simply press the button. If you do, the code will learn and will seem to work, but as it
was not seen as a repeating code it will not continue to transmit when held down.
Even if your commands don't need to be repeating, you should still hold the button down when
learning as this ensures that a clean hex code is captured (see above).
B4−03 What does 0000, 8000, etc. mean in a hex code?
The first four digits of a hex code reference the type of code that is to follow:
0000 − Raw oscilated learned code (also sometimes RC6A codes).
0100 − Raw unmodulated learned code.
5000 − RC5 codes.
5001 − RC5x codes.
6000 − RC6 codes.
7000 − Non−standard format database codes (all models).
8000 − Internal database codes (some models).
9000 − Automatically detected database codes (some models).
9001 − Yamaha code format (RAV−2000 only).
B4−04 Why can't I get the Pronto to learn a particular device?
There are a number of factors that can affect the learning process. A large list of IR learning tips
written to help you troubleshoot difficult codes can be found on the Remote Central website.
One of the first things you can try if you are using ProntoEdit to learn codes is to only use the remote's
built−in learning function. Several brands of equipment are known to not learn accurately via
ProntoEdit. If you are still having problems you could always check if someone else has posted a CCF
that supports your device. It need not match your exact model number: often very little changes
between models.
B4−05 Why won't my buttons work twice in a row?
This is actually caused by the design of your equipment. Your original remote sends a "parity" or
"toggle bit", which changes from "0" to "1" between each press. This means there are essentially two
codes attached to each button −− and a learning remote can only capture one of them. More
information can be found on the Remote Central website.
With the latest firmware release the Pronto & RC5000 can now learn and operate some toggle−bit IR
code formats automatically, however there is no way to access this function manually. To work around
this on other devices you will need to tack on a "do nothing" code to the end of each real code to clear
your device's buffer. What can that code be? Anything that doesn't affect regular operation. It may be
hard to find such a command.
You could also try creating two pages for every one you have now, each one with a different toggle
code. Then, at the end of each code add a jump to the other panel.
B4−06 How can I copy the IR code from one button to another?
You can copy an entire list of actions by holding the SHIFT key as you drag, with the mouse, the
button containing the new commands overtop of the target button.
RC: Philips Pronto & Marantz RC5000 Unofficial FAQ
36
If you wish to copy just an IR hex code from one button to another, but not the rest of the action list,
the exact method depends on the software version you're using.
ProntoEdit v1.05 or earlier & RC5000 Setup:
1. Double−click on the old "source" button.
2. Double−click on the code entry (typically "[C] Learned").
3. Hit CTRL−C on your keyboard.
4. Press CANCEL, CANCEL.
5. Double−click on the new "target" button.
6. Press "RC5/6". Press OK.
7. Double−click on the new "[C] RC5 0 0" entry.
8. Hit CTRL−V on your keyboard. On this screen you may change the code label if you like, however
this is not necessary.
9. Press OK two times and you're done.
ProntoEdit v2.0, ProntoProEdit, Touch Screen Setup, RAVedit and CHAD Edit:
1. Double−click on the old "source" button.
2. Double−click on the code entry (typically "[C] Learned").
3. Press the "View IR" button.
4. In the lower window, right−click over the hex code and pick "Select All".
5. Hit CTRL−C on your keyboard.
6. Press CANCEL, CANCEL.
7. Double−click on the new "target" button.
8. Press "Set IR".
9. In the preprogrammed code entry region, change the "Brand" to anything. The "ViewIR" button
should light up.
10. Press the "View IR" button.
11. In the lower window, right−click over the hex code and pick "Select All".
12. Hit CTRL−V on your keyboard. Due to a bug in ProntoEdit 2.0, do not change the code label.
13. Press OK two times and you're done.
Remember that in ProntoEdit 2.0 you must make a change to the pronto.ini file before you can modify
hex codes. See elsewhere in this FAQ for instructions.
ProntoEdit v4.0 and newer:
1. Double−click on the old "source" button.
2. Double−click on the code entry (typically "[C] Learned").
3. Press the "View IR" button (you should only have to do this once each time you start ProntoEdit).
4. In the lower window, right−click over the hex code and pick "Select All".
5. Hit CTRL−C on your keyboard.
6. Press CANCEL, CANCEL.
7. Double−click on the new "target" button.
8. Press "Set IR".
9. If hex code already exists in the lower window, right−click over it and pick "Select All".
10. Hit CTRL−V on your keyboard.
11. Press OK two times and you're done.
B4−07 What is the password for the rcir.mdb infrared database file?
This tip applies only to ProntoEdit v1.05 or older:
RC: Philips Pronto & Marantz RC5000 Unofficial FAQ
37
The password is 75a9024024cd1. You will need to use Microsoft Access 97 or newer to access the file.
What you can do with it is create a database of infrared codes that are always available. However, this
is a lot of work and most people who try decide it is not worth the effort.
Note that this feature has been removed in all current versions of ProntoEdit, ProntoProEdit and
RAVedit.
B4−08 Why won't just tapping the button always work?
IR Codes sent from a macro are always sent a small number of times. The reason for this is that some
equipment needs to receive the same code a few times in succession before it will respond. That's why
just tapping the button during normal use may not work −− the Pronto only has enough time to send
the code once or twice before your finger is lifted, which is not enough time for the equipment to
consider it valid.
Try creating a new button containing several aliases to the button with the IR code you're having
trouble with. In addition, some equipment still may require even a longer "hold" time for macros. As
there is no way to set the length of time a code is sent, you will need to experiment with aliasing the
same code several times. If this does not work you can try hacking the code in IR Tool (more help on
that may be obtained on Remote Central's Pronto Forum).
RC5000 Users: In addition, the firmware included with RC5000 Setup v2.0 and newer has changed
the minimum number of signal repeats to fewer than employed in earlier versions of the software.
Owners of Sony and Mitsubishi equipment may discover that they need to "hold" the button instead of
merely tapping it before their equipment will respond. The simple solution to this is to make the button
into a fake macro. Macros always send each command a minimum number of times, so by inserting a
0.1 second delay before each signal you can operate more reliably and still maintain "quick touch"
buttons.
To avoid the 0.1 second delay, do the same thing but with an empty button:
1. Create a button somewhere in your configuration, but do not assign any command to it.
2. Before each of the troublesome buttons, add an alias to this new button.
Now, each time you press the button, the remote will completely ignore the first step −− since the
aliased button does nothing −− but still send the second step, your signal, the proper number of times.
Note that repeating codes (buttons that hold down, such as 'fast forward') will no longer operate in that
manner. When this problem is finally fixed you can remove all aliases to the fake button and restore
repeating codes simply by deleting the empty button.
B4−09 "Test IR" doesn't always work right. Why?
The "Test IR" function, and sending of signals to the real Pronto while the emulator is running,
operates most reliably when the Pronto's screen is active. However, it is suggested that you do not use
this function for timing macros and other functions since it does not accurately reflect how the Pronto
will truly operate.
RC: Philips Pronto & Marantz RC5000 Unofficial FAQ
38
Find your remote control solution at AVsmarts.com!
Unofficial Philips Pronto & Marantz RC5000 FAQ
Section B5: Working With ProntoEdit:
Discrete Codes
B5−01 What are discrete codes?
Discrete codes are versions of toggle codes that only perform one function. For instance, a "POWER"
button on a remote would be a toggle in that when it is used the current power state is reversed. If your
device is on, it turns off. If it's off, it turns on. A "discrete" code would be a signal that ONLY turns
the device on or off. If it is already on it remains so. These are most often used to ensure your home
theater components stay completely in sync for powering on and off and changing device inputs.
Such specialized and otherwise hidden codes may also be available for direct access to other "toggled"
or "rotating" functions such as television inputs, receiver soundfield settings and on−screen display
modes.
Unfortunately, many devices or entire brands do not have discrete on/off codes. To control such
devices discretely with the Pronto you could look into the popular SmartLinc and HouseLinc systems,
as they often provide proprietary methods of accomplishing this. If you have a device that does not
have a remote controllable power switch, you could plug it into your receiver's switched outlets (if it
has them) so that when the receiver is off, it is off. Or invest in X−10, which are power control
modules with have specific on and off commands.
B5−02 How do I find or create them?
Mostly by a lot of hard work. Often a remote that came with a single model of a component may have
a few discrete codes that could be used on other similar models. Or, as with many of the ones on this
site, the actual structure of an IR code is analyzed and then changed to see what the resulting code
does. There are utilities in the Pronto File Area that can assist with this, such as IR Tool and
ProntoUtil.
But first, you should check the File Archives at Remote Central to determine if your device −− or even
if your brand −− has discrete functionality available. By now, discrete codes for most common devices
−− if they exist −− have been found.
Finally, there's a forum on Remote Central designed to specifically help users locate discrete codes.
B5−03 How can I use them?
In ProntoEdit, discrete codes are stored as hex. This means that a "power on" command for a Sony
receiver would look like:
0000 0066 0000 000d 005f 0018 0018 0018 0030 0018 0030 0018 0030 0018 0018 0018
0030 0018 0018 0018 0018 0017 0018 0018 0018 0017 0018 0018 002f 0429
To use them the entire string must be copied. For complete help on how to use discrete codes with
buttons that do not have an existing IR code or those that already do, plus a quick list of devices that
RC: Philips Pronto & Marantz RC5000 Unofficial FAQ
39
are known to lack discrete codes, please see this page on Remote Central.
The most common places discrete codes are employed are in automatic input switch macros assigned
to devices or system power macros. For instance, if you have discrete codes each time you change the
Pronto from "VCR 1" to "DVD" you can have the remote automatically set the inputs on both the
television and receiver. This is great for other family members who may have difficulty keeping both
the television and receiver in sync.
RC: Philips Pronto & Marantz RC5000 Unofficial FAQ
40
BlueDo.com − The Best Remotes, The Best Service, The Best Prices!
Unofficial Philips Pronto & Marantz RC5000 FAQ
Section B6: Working With ProntoEdit:
Managing CCF Files
B6−01 What are CCF files?
CCF files are used with the ProntoEdit and RC5000 Setup packages. They include a full configuration
for the remote control, including layout, IR codes, macros, graphics and more. These can be shared
between all Pronto and RC5000 users running the most recent software and firmware.
B6−02 What does 'CCF' stand for?
It stands for 'Cabernet Configuration File'. 'Cabernet' was the original codename for the Pronto while it
was in development. When it was renamed the 'Pronto', the CCF file extension stuck.
B6−03 How can I get rid of the "+" symbol before device names?
This tip applies only to ProntoEdit v2.0 or newer:
As described in the previous question, the "+" symbol indicates that the device "needs programming"
on TSU2000 and TSU6000 models. That results in the remote requesting a preset code for each device
the first time it is selected during normal operation. Unfortunately, this setting resets each time your
file is downloaded. What's more, each new device added in ProntoEdit 2.0 employs this "feature".
To correct this problem:
1. Make sure that "Developer Mode" is enabled (download Pronto.ini Workshop from the file area to
make this configuration change).
2. In ProntoEdit, right−click over each device name and unselect the "needs programming" option.
B6−04 What do the short letter designations ([C], [D] etc.) mean?
Here is a complete list of what functions each letter code references:
[A] is an alias to a device's action list.
[B] is an alias to another LCD button.
[C] is learned/hex code for infrared signals (command).
[D] is a delay.
[J] is a page jump. (RC5000)
[K] is an alias to a hard key.
[S] is a beep (sound). (Pronto)
[T] is a timer. (Pronto)
B6−05 What do all the symbols before device or page names mean?
Here is a complete list of what each symbol references:
RC: Philips Pronto & Marantz RC5000 Unofficial FAQ
41
− indicates a "Separator" – a line before it on the Device Menu.
* indicates that the device is "Read Only" and cannot be modified.
+ indicates a device that "Needs Programming". On the TSU2000, the first time such a device is
selected the user will be asked whether they want to assign a preprogrammed code. The device must
be configured with the UDB (Universal DataBase) for this to work.
(xxx) Any device name in brackets is a template and will not show during normal use. Such devices
are only available as a choice when adding a new device on the basic remote.
[xxx] A page name in square brackets indicated that the panel is "Hidden" – better described as a
"non−scrolling" page.
<xxx> A device or macro group shown in angled brackets indicates that that group is a Timer group.
This is only useful or changable in the Macro section and means that any blank buttons edited in that
group will be a timer, rather than a macro.
B6−06 Why can't I open the CCF file I downloaded?
All CCF files located on Remote Central are stored in the "ZIP" file format. These must be
decompressed before you can use them with ProntoEdit. Windows 98 has full ZIP compatibility
built−in, meaning you only have to double−click on the file to decompress them. Other PC users can
download PKZIP for Windows, while Macintosh users can use StuffIt Expander.
If these programs claim a file is corrupt or cannot be opened, check the file size to ensure it matches
what is listed in the File Archive. If it does not, try a new software package to download with, or use
one of the provided alternate download methods. All files in the Archive have been verified to
decompress properly.
B6−07 How can I best merge CCF files?
If you'd like to add a device (or several) from another CCF to your own:
1. Open the source CCF file that contains that device.
2. Delete everything from that file except that device. Make sure you remove macro groups and home
panels as well. But do not delete any panels that the device you want aliases to! If you do, the copied
device will not work.
3. Save that as a new file −− for example, "temporary.ccf".
4. Load your own CCF file. When prompted, select "replace".
5. Now, open the file you just saved but when prompted select "merge" instead of replace.
The reason for opening your own file and then the one you saved is that the currently opened file is the
one that maintains all remote settings. If you merge your file into someone else's you will instead
receive their settings.
B6−08 With ProntoEdit v4.0, why can't I modify the gallery files?
For some reason, when installing ProntoEdit v4.0 the gallery.ccf files are marked as "read only". This
prevents you from deleting or making changes to them. To correct the issue, using Windows Explorer
right−click on the filename, select "Properties", and then unselect the "Read Only" option under
"Attributes". You will now be able to edit the file.
Also, make sure that you are modifying the right gallery file: each remote control type in ProntoEdit
RC: Philips Pronto & Marantz RC5000 Unofficial FAQ
42
v4.0 has its own gallery.ccf file in a separate directory. Also note that when you have the RU890 type
of remote selected, the gallery file the program mistakenly uses is from the TS1000 directory, not the
one stored in the RU890 directory.
RC: Philips Pronto & Marantz RC5000 Unofficial FAQ
43
Take a Test Drive at www.harmonyremote.com today!
Unofficial Philips Pronto & Marantz RC5000 FAQ
Section B7: Working With ProntoEdit:
Designing Layouts
B7−01 Why won't my panels or buttons show? (or How can I preview my CCF file without learning
any IR codes?)
Buttons will not show in the emulator or on the Pronto without a valid action (which can be an IR
code, a jump command, a delay or an alias). Entire panels will not show without at least one active
button. This is due to the "template" feature in the Pronto that allows users to customize their remotes
without a computer, and hide buttons and panels they do not wish to see.
You must first add something to each button before you can see what the panels look like. If you just
want to preview the CCF this can be easily done by adding a 0.1 second delay as your action. Later, if
you learn your IR codes using the Pronto, it will overwrite the delay action with the new code.
Remember, even if your panels appear blank in regular "USE" mode, you will still be able to see
everything in the "LABEL" or "LEARN" modes.
B7−02 Why doesn't my home panel look or act like I designed it to?
You must disable automatic aliases by renaming the first home panel to something other than 'home'
(such as 'Home' −− note the capital) or by removing the "HOME panels are write protected" option
under the System Properties screen in ProntoEdit.
Note the following:
• Renaming the home panel to "Home" and leaving the "write protected" option enabled will force the
Pronto to boot up to the first home panel each time. NOT renaming the panel will force the Pronto to
generate it's own home panels based on your buttons −− not a good thing if you have a custom panel.
• Removing the "write protection" option will force the Pronto to boot up to the first panel of the first
device, no matter what the home panel is labeled. The Pronto will not generate its own aliases.
In the default Pronto configuration, home panel buttons link to a device's action list then jump to a
page in that device. To duplicate this with your own home panel buttons you must manually add both
an alias to the device (it's action list), then add a page jump to any panel in the device.
B7−03 How do I copy a device, panel or button from one file to another?
ProntoEdit uses its own clipboard. This means that you cannot copy items between two concurrent
sessions of ProntoEdit. However, you can still copy between multiple files in a single instance, even
though the software only allows you to have one file open at a time.
1. In ProntoEdit, open the CCF file that contains the device, panel or button you want to copy.
2. Highlight the device or panel in the left "Configuration View" window, or the button or frame in the
right "Panel View" window.
RC: Philips Pronto & Marantz RC5000 Unofficial FAQ
44
3. Press CTRL−C to copy.
4. Open your CCF file and select "replace" when prompted.
5. Click once where you would like to paste the item you copied.
6. Hit CTRL−V on your keyboard to paste. If it did not end up exactly where you wanted you can drag it
to a new location.
Note that you will have to perform all of these steps for each device, panel or button you want to copy.
If you are planning on moving a lot of material, look at the section earlier in this FAQ that describes
how to merge files.
B7−04 How can I design my CCF so when I make changes I don't need to relearn my remotes?
If you plan on radically redesigning your CCF at any point in the future, you may want to design your
CCF file so you never have to re−learn infrared signals. For that, you should create a "dummy" device
that is comprised of nothing but plain buttons. You can learn your infrared panels there. Then, when
designing your main interface, alias those buttons to the real codes as stored in the dummy device.
That way the actual IR codes are always available when you change or add new buttons.
One caveat: this method uses more memory than storing each infrared code directly on the button.
B7−05 How do I add plain text to panels?
The best way to do this is to add a frame and double click the frame to enter "label" mode. Any text
you enter will be placed in the center of the frame, which you may then resize to the proper width and
height. Once you're done you may move the frame around as you wish. Ensure that when you enter
text you also select a FONT size, otherwise nothing will show. Currently there is no line break option
to easily enter multiple lines of text, so for now you will need to use multiple frames −− one per line.
B7−06 Can I add more FONTs to the Pronto?
No, you can't add new type styles to the Pronto. You could instead create a custom BMP file using the
FONT you want and import that −− but be warned that full−screen bitmaps use a lot of memory.
Although new typefaces aren't available, there are hidden FONT sizes that can be enabled. By default,
ProntoEdit has 10, 14, and 18 point sizes available. But the remote actually contains 8, 10, 12, 14, 16,
and 18 point versions. To enable them, edit the file pronto.ini (which is located in your root Windows
directory −− typically c:\windows). Currently, it will look like this:
[FONTs]
0 = pronto,
1 = pronto,
2 = pronto,
3 = pronto,
4 = pronto,
5 = pronto,
8
10, *
12
14, *
16
18, *
[ccf]
size = 380
[version]
symbols = 1
...But you can change it to this (note the new *'s −− or for an automated method download Pronto.ini
Workshop):
RC: Philips Pronto & Marantz RC5000 Unofficial FAQ
45
[FONTs]
0 = pronto,
1 = pronto,
2 = pronto,
3 = pronto,
4 = pronto,
5 = pronto,
8, *
10, *
12, *
14, *
16, *
18, *
[ccf]
size = 380
[version]
symbols = 1
Note that part of the TSU2000's INI file will look like:
[ccf]
size = 380
universal_size = 960
While that part of the RC5000i's INI file will look like:
[ccf]
size = 1404
The settings for ProntoProEdit must be edited in the Windows Registry. Using regedit, go to
HKEY_CURRENT_USER\Software\Philips Electronics N.V.\ProntoEdit\3.2.0\Settings
Change the keys FONT0, FONT1, FONT2, FONT3, FONT4 and FONT5 so that they each have a
comma, space and asterisk after the FONT size. For instance:
FONT4 = "pronto, 16"
should look like
FONT4 = "pronto, 16, *"
For Yamaha RAVedit, only point sizes 16 and 18 must be enabled. Following the instructions for
ProntoProEdit, you'll find the appropriate keys stored in
HKEY_CURRENT_USER\Software\Yamaha\RAVedit\1.0.0\Settings
There are two limitations. First, symbols are ONLY available for 10, 14 and 18 point sizes. That
means you cannot use arrow keys, transport icons or other special characters with these newly added
sizes. Secondly, you cannot create new FONT sizes not already listed in this file. Some users have
tried adding 6 and 20 point typefaces. While this will work in the emulator it will not work on the
physical remote.
B7−07 How can I group buttons together?
First, you need to "Add Frame" (ALT−A) while on a panel. Then, you may either:
RC: Philips Pronto & Marantz RC5000 Unofficial FAQ
46
a) While the new frame is selected, "Add Button" (ALT−K). This will add a button to the frame, but it
will of course have no icon. You can also hold down "Alt" and drag an existing button on top of
another to copy just the icon.
b) Copy/Cut (CTRL−C/CTRL−X) an existing button from a panel, select the frame you want to copy
to, then paste (CTRL−V). Repeat until finished.
Once you have all buttons in the frame and the frame is resized to encompass them, you may change
the background color if desired.
Grouping buttons like this will make moving groups −− such as transport or menu controls −− far
easier. You may also copy and paste the entire frame intact with all included buttons in a single motion
rather than manually performing the same step on multiple objects. Remember that you must leave
some frame "white space" to click on to move, otherwise you will move the contents of the frame
rather than the frame itself.
B7−08 Can I create a "back" button to return to the last page accessed?
For the RC5000, yes −− see the section later in the FAQ that describes how to use the "Page History"
feature. But for all Pronto users, the quick answer is no −− there is no way to assign that function to a
button. However, there is a workaround you can try.
The Pronto is divided up into three sections: Macro, Home and Device. Each time you switch between
those sections you go back to the last page accessed −− so, using this, you can simulate a back
function for commonly used commands. For instance, take a "Lighting" button.
From each panel under the Device side of the remote, jump to a new panel on the Macro side. From
there, you can press the Device button to return back to the page you came from. There is no way to
create this on a user−customized button; you must press the Device menu.
One other method you can try is using the brute−force technique. Create a Lighting panel for each and
every panel you call it from. The only difference between these panels would be the "back" button,
which returns only to the panel it was called from. This requires a lot of time to configure and is very
memory wasteful, so it should only be used as a last resort of if you only need to create a small number
of panels.
B7−09 Can I create multiple text lines on a single button or otherwise position text?
Unfortunately the answer is no on both points − a single button or frame cannot hold more than one
line of text, and all text must be positioned dead center.
Multiple lines can be simulated using several stacked frames or buttons, and horizontal positioning can
be roughly tailored by adding blank spaces before or after the characters. Otherwise, customized text
will have to be created in a bitmap editing mode and exported in a "hard" state − meaning that
ProntoEdit wouldn't be able to edit it. In addition, creating text as a bitmap will occupy much more
memory than the same text in a frame or button. Remember that the Pronto's default FONT is
available as "Pronto" on a system with ProntoEdit or RC5000 Setup installed.
B7−10 How do I define a custom grid?
• Create your own special grid for a single panel. Remember that you must first display a grid (ALT−D)
before you may edit it. To begin with you may wish to use the "Auto Grid" feature.
• Save your grid to one of the 10 available slots by going to the SETTINGS menu and selecting "Set
Default Grid". Grid 0 is always the default shown.
RC: Philips Pronto & Marantz RC5000 Unofficial FAQ
47
• Any options set under the SETTINGS menu −− such as "snap to grid" will be the program defaults.
Any options set via right−clicking over a panel or using the keyboard shortcuts will only be active for
that panel while it is open.
B7−11 What keyboard shortcuts are there?
A number of quick keyboard action are available:
• Copy an image from one button to another by holding down the ALT key. This only copies
images, not actions, text or colors.
• Copy an image, colors and text size from one button to another by holding down the SHIFT and
ALT keys. This does not copy actions.
• Copy actions from one button to another by holding down the SHIFT key. This copies the entire
action list, including codes, aliases and delays.
• Duplicate a button by holding down the CTRL key. This copies everything, including actions, text
and colors.
• Hold the SHIFT key to create a blank panel instead of one with the default design.
• Move buttons with the cursor keys. This is much easier than trying to align buttons with the mouse.
You can hold the the SPACEBAR when moving to jump in 10−pixel increments. Hold SHIFT to
expand/contract the top−left of a frame, or CTRL for the bottom right.
• Move items around the action list by holding CTRL and using the keyboard's cursor keys.
RC: Philips Pronto & Marantz RC5000 Unofficial FAQ
48
Check out the new One For All Kameleon.
Unofficial Philips Pronto & Marantz RC5000 FAQ
Section B8: Working With ProntoEdit:
Macros
B8−01 What are macros? How are they different from regular commands?
In the remote industry, macros are a series of commands sent from only one button. For instance, a
macro could turn on your television and receiver, set the receiver to the "TV" input and then switch the
TV to channel 25. Whatever you want to automate, a Macro can do it.
The way the Pronto is designed, there is no difference between a regular command and a macro.
Every button on the Pronto is a macro, it's just the most only have one command.
B8−02 What would a macro for a system on/off button look like?
As always, the exact appearance of a macro will of course be dependant on your exact equipment.
However, for an example, a System On macro for a system with discrete codes may look like:
[B] TV − Main − On
[B] Receiver − Main − On
[D] Delay 0.5
[B] TV − Keypad − Tuner
[B] Receiver − Inputs − TV
Jump: TV − Keypad
An example with the same components, but for "System Off":
[B] Receiver − Main − Off
[B] TV − Main − Off
Of course, if one of your commonly used devices does not have discrete codes your macros will either
be much simpler, or much more difficult. Experimentation is the key to successful macros.
B8−03 How can I get the Pronto to "hold" a button for several seconds in a macro?
Basically, there is no particularly easy way. However, a workaround is available that involves splitting
the signal up (thanks to Eric Johnson):
1. Learn the desired button by briefly tapping it on the original remote. Do not hold down the button as is
generally recommended.
2. Learn the same signal a second time – but this time start pressing the button on your original remote
before pointing it at the Pronto/RC5000. Then, while continuing to hold the button, have the Pronto to
learn the signal and wait until it is finished. I recommend the "duck blind" method for this. That way,
the Pronto will learn the repeat portion of the signal, but not the preamble.
RC: Philips Pronto & Marantz RC5000 Unofficial FAQ
49
3. Create a macro that looks like this:
[C] Signal Beginning
[C] Signal Repeat
[C] Signal Repeat
[C] Signal Repeat
[xxx]
[C] Signal Repeat
Add the signal repeat command as many time as is required to reach the desired transmission time.
Quite a few repeats may be required.
B8−04 How can I enter multiple digits on a single button, say for a favorite channel icon?
It seems that when people encounter this problem they immediately forget that the Pronto is a
macro−based remote. Which means more than one command per button. The majority of users attempt
to learn the sequence of numbers off of the original remote −− say "53" in one shot. You can't do that
as the Pronto is only able to learn one command at a time.
Instead, you need to create a macro to duplicate the exact steps you yourself would take to enter that
channel in. While you could re−learn each digit over and over again for each icon, that is both a waste
of time and space. Now that we know what aliases are (see previous question) we can instead use that
function to create the macro. So, what you basically need to do is alias to each button on your
TV/VCR/SAT keypad. For instance, a macro in ProntoEdit to select channel 255 using aliases may
look like this:
[B] DSS − Keypad − 2
[B] DSS − Keypad − 5
[D] 0.1 sec
[B] DSS − Keypad − 5
[B] DSS − Keypad − Enter
It's that simple. But what, you may ask, is that 0.1 second delay doing in there? Well, depending on the
specific device you're controlling, it may require a short pause between each digit before it can sense
them as individual commands. More often (and shown above), a delay may be required between digits
that are the same. If the delay were removed from the above sample, the DSS may only sense that you
entered channel "25".
B8−05 Can I use more than one page jump in a macro?
Currently for the Pronto, the answer is no. You can only have one page jump, which is performed after
all other commands. Note that aliases to a button with a page jump will not perform the jump.
However, the new RC5000 software allows for any number of jumps in a macro. These can be used to
create crude animation, provide status updates on what's happening in long macros, or anything else
you can think of. Note that if you alias to a button containing jumps, all page jumps will be performed.
This means that macro will now end on the last page specified in the source button. If you would like
to return to the page you called the alias from, follow the alias in the action list with a jump back to
your starting screen.
B8−06 Can I have delays shorter than 0.1 seconds?
This tip does not apply to RC5000 Setup:
RC: Philips Pronto & Marantz RC5000 Unofficial FAQ
50
If you're using the Philips Pronto, the answer is yes. Using the "beep" function you can essentially
create delays as short as 0.001 seconds. Add a new beep where you would like to assign the delay,
making sure the duty cycle is set to 0 (no sound). Since the Marantz RC5000 does not support custom
beeps you will be limited to a minimum delay time of 0.1 seconds.seconds.nbsp;
B8−07 Can I change the default delay time from 0.1 seconds?
For ProntoEdit v1.05 or earlier and all versions of RC5000 Setup, yes! You can change the default
delay time from 0.1 seconds to anything you like by holding down the SHIFT key as you click on the
"DELAY" button. Enter in a new number, then hit ENTER to set.
For all newer versions of the software, you must edit the system registry. This is not very easy, so I've
modified Pronto.ini Workshop so that it lets you change the default delay under all newer software
versions.
B8−08 Why aren't the commands I assigned to each device being sent when I use my custom Home
panel?
When you create your own Home Panel icons, it is not enough to merely jump to a page if you want to
also transmit the commands you assigned to each device for each time you select that device from the
Device Menu. You must also create an alias to the device on your home panel icons to transmit any
assigned signals.
B8−09 Why are some of my macro commands not being received?
The most likely reason is these is too little space between your commands. Some devices may require
a delay of 0.1 seconds to 0.5 seconds between each consecutive command. In addition, many devices
are "blind" to signals for the first few seconds after powering on, especially televisions. You may want
to turn the television on first, then have the macro address the rest of your devices, and finally go back
to the television to change inputs.
B8−10 How can I handle switching Video Inputs?
The best solution is to find an IR code that switches you directly to the input you are interested in
using (these are called "discrete" codes and are explained later). Some devices respond to these codes
even though the remote they shipped with only had an input toggle button. You should search the file
area at http://www.remotecentral.com to see if your device has these IR codes, or if other special tips
are available.
Unfortunately, many devices do not have direct input codes. For these devices you will need a
different workaround.
One trick is to find something that changes the TV (or other device) to a known state. On some TVs,
entering a channel number (e.g. '2','enter' or 'channel+') always takes you to the tuner input ('TV'), even
when you have a video input selected. This means you can create action lists (macros) to take you to
specific inputs. For example, create a button with just '2','enter' on it, and call it 'TV'. Create another
with '2','enter','input' and label it 'Video 1'. Create another which contains '2','enter','input','input' and
call it 'Video 2'.
For devices that do not have discrete codes and also have no workarounds there is no way to fully
automate your system.
RC: Philips Pronto & Marantz RC5000 Unofficial FAQ
51
Find your universal remote control solution at AVsmarts.com!
Unofficial Philips Pronto & Marantz RC5000 FAQ
Section B9: Working With ProntoEdit:
Custom Bitmaps
B9−01 Where would I use bitmap files?
All buttons on the Pronto are actually bitmap icon files. This means you may change buttons so they
look exactly as you want. Many users have gone to the effort of creating entire new graphical
environments, however this can take many many hours of time to design and refine.
A simpler use of bitmap files would be to add a manufacturer's logo to your pages, add a photo of a
small one or convert a favorite channel button's image so it looks like the station's logo.
B9−02 How can I create my own bitmaps?
You must use a bitmap editing package, such as PhotoShop, Corel Photo−Paint, Paint Shop Pro,
Irfanview, or even MS Paint. These all will allow you to edit bitmaps on a pixel−level and modify
them to meet your own needs. Unfortunately, the quality of work will depend solely on how familiar
you are with these packages and your own skill level. So, to begin with it is recommended you start off
with someone else's bitmaps and try to modify them to suit your own needs.
Bitmaps can be any size from 1x1 pixel up to 240x219 pixels, but must be saved in Windows .BMP
format and contain no more than 256 colors.
Since the software for BWremotes will roughly convert 256 colors down to the BW Pronto's 4, it is
recommended you do this beforehand in the bitmap editing software, using "dithering", for best results.
The RGB values for the 4−color palette are:
Black
Dark Gray
Light Gray
White
000
085
170
255
000
085
170
255
000
085
170
255
Note that the actual remote will not display grayshades exactly as shown on your computer. Thus, it is
best to create graphics that do not require the user to discern the difference between dark gray and
black, or light gray and white. ProntoEditPro can accept full−color images that will appear on your
computer as they would on the remote.
To change the icon of a button in ProntoEdit v1.05 and earlier or RC5000 Setup, double−click on it
and select the "Active Icons" tab. You'll see two windows labeled "Unselected" and "Selected", each
with a preview of the icon assigned. "Unselected" is how the button will normally look, and "Selected"
is how it will look when pressed or running a macro. To load a new icon, click the "LOAD" button and
locate your image. To save the existing icon to disk for modification, click on "SAVE". Remember
that both buttons must be the same physical dimensions.
RC: Philips Pronto & Marantz RC5000 Unofficial FAQ
52
The "Inactive Icon" tab is of no use to the majority of users, so you should either assign the same icons
as on the Active tab or delete the icons assigned. However, note that you should not store "old" icons
here −− a button will take the physical size of the smallest bitmap assigned, meaning larger graphics
could appear truncated (see below).
To change the icon of a button in ProntoEdit v2.0 or newer, ProntoEditPro and RAVedit,
double−click on it and select the "Icons" tab. You'll see four windows labeled "Unselected Active",
"Selected Active", "Unselected Inactive" and "Selected Active". "Unselected" is how the button will
normally look while "Selected" is how it will look when pressed or running a macro. "Active" are the
icons that will appear during normal use, while "Inactive" are those that appear only when a button has
no function and you are programming on the remote −− PC software users should ignore the two
"Inactive" states and either assign the same image as "Active" or no images at all. To change a bitmap,
right−click over the existing image and select "Load", then locate your image. To save an existing icon
to disk, right−click and select "Save". You can quickly load an image onto a blank position by
double−clickig on the square, or save an existing image by double−clicking over it.
B9−03 Can I use transparent or animated bitmap files?
Currently the answer is no, you can't. The only provisions are for "active" and "inactive" icons on a
single button. Though transparency is an oft requested function, Philips has not announced any plans
to include this in the near future.
B9−04 Why are my bitmaps/icons truncated?
When assigning a bitmap, you must change both the Active and Inactive designations. Though the
Inactive setting will most likely never be used or seen, your button will appear truncated (chopped off)
if the Inactive icon is physically smaller than the active icon. You may also fix the problem by deleting
icons associated with the Inactive state.
The smallest bitmap assigned to any of the four states will translate to the physical size of the button.
B9−05 How can I create a really large gallery file?
By default ProntoEdit and RC5000 Setup will only allow you to save files up to the maximum size that
the remote can hold − either 380KB, 460KB, 960KB, 1404KB or 6144KB. However, if you'd like to
create a REALLY large gallery file you can.
For ProntoEdit v2.0 and earier and RC5000 Setup:
1. Using Notepad or another text editor, open c:\windows\pronto.ini (or for an automated method
download Pronto.ini Workshop).
2. Change the line that reads size=xxx (where xxx is one of the numbers mentioned above) so that it
reads size=9000.
3. Restart the software package. Open gallery.ccf, edit it or merge in other files, then save and exit.
4. Edit c:\windows\pronto.ini so that it again reads size=xxx (where xxx is the original number).
5. Load the software package once more and your new gallery file will be active.
Note: if you're running ProntoEdit v2.0, ignore the universal_size=960 line.
ProntoProEdit and RAVedit store this setting in the registry, so you will need to download Pronto.ini
Workshop as linked to above.
B9−06 How can I best create color graphics for the ProntoPro?
RC: Philips Pronto & Marantz RC5000 Unofficial FAQ
53
For the most part, the procedures to creating graphics for the ProntoPro and RC9200 is similar to that
of the black and white models: they're just in color. You'll still need a bitmap editing program and
perhaps even something else to initially create the shapes in, such as Adobe Illustrator or
CorelDRAW. Take the shape, convert it to bitmap, size appropriately, then convert to 256 colors. For
specific tips on creating the best graphics possible, view this separate document created specifically
for ProntoPro and RC9200 owners.
B9−07 How do I convert color CCF graphics to black and white?
Although ProntoEdit will automatically convert color graphics to grayshades when you re−save a
color file in black and white mode, the results are generally not optimal. One option is to make use of a
real bitmap editing program’s converter, which should do a much better job of dithering. To complete
this task you’ll need to download the "CCF Tools" program, which includes "CCF Decompiler" and
"CCF Compiler".
First, load up CCF Decompiler and run your file through it. You’ll get a new directory that contains all
of that file’s images in regular .BMP format.
Next, you’ll need to make use of a bitmap editing program with a "batch processing" mode. All
programs operate differently, so you may need to read your software’s manual in order to figure out
how this works. I use Corel PHOTO−PAINT, which requires me to save a script (or macro) with all of
the necessary steps required to properly convert a file, and then run batch mode on the desired files.
Tip: don’t merely have the software convert to 4 colors, have it convert to the Pronto’s specific
4−color palette. You can obtain this palette from any Pronto screenshot or saved BWfile.
After all images have been converted, run your file through CCF Compiler, which will merge all of the
new graphics into a new file. You can now load the file back into ProntoEdit − which will still be in
color mode − and then re−save it as black and white.
B9−08 Is it possible to change system−level bitmaps, such as the device bar and Home icon
background?
Yes, however it is not easy and you will need to REALLY want to change those items to make the
whole process worthwhile.
Eigeny Oulianov has created a command−line program called "ImgRep" (find it in the file area),
which can be used to replace any of the built−in bitmaps with ones of your own choosing. When run,
the program extracts the system−level bitmaps from the firmware update file included with Philips
ProntoEdit or Marantz Touch Screen Setup.
Modify the extracted bitmaps, and then run the program again − it will create a new firmware update
file incorporating your graphics. Run the generated update program to copy the bitmaps to your
remote, and enjoy!
Full instructions on how to use ImgRep are included with the download. Another program, called
"FONTRep", can also be used to modify the Pronto's default FONT.
RC: Philips Pronto & Marantz RC5000 Unofficial FAQ
54
The home for award winning remotes!
Unofficial Philips Pronto & Marantz RC5000 FAQ
Section B10: Working With ProntoEdit:
Memory Optimization
B10−01 How can I optimize memory usage?
1. Don't learn a signal more than once −− even through the Pronto stores internal aliases to identical hex
codes, learned signals rarely learn exactly the same twice. Instead, store only a single instance of a
signal and alias all others to it. This is especially helpful when creating favorite channel macros, as
described above.
2. Ensure all learned IR codes are clean −− this is hard to ensure for some devices, however any hex
code that is very long or is longer than others for a particular device is most likely not a clean learn.
Also, if the last four digits (for example say 03f7) are duplicated elsewhere in the code chances are it is
not clean. For more details, view the specific FAQ for this in section B2.
3. Standardize on one button style −− using a different button style for each device results in high
memory usage with no gains. Instead, settle on a single design and limit the number of button
shapes/sizes as much as possible.
4. Don't use separate "selected" button icons −− that doubles the memory occupied by a button style.
Instead, have only the FONT color change when the button is selected.
5. Remove inactive button icon assignments −− don't store a separate button style for inactive buttons −−
if you are using ProntoEdit they will never be used. You may instead assign the "active" button style,
or for further memory savings completely delete them.
6. Reduce the number of separate panels −− just creating a blank panel uses up a moderate amount of
memory. Keep the number of "waste" panels to a minimum. Don't store panels you don't need in your
CCF file. If you are trying to put a 300 disc CD collection in your remote, try to keep usage to one
panel per disc. Finally, keeping separate panels with codes to alias your real buttons to may make for
good design, however it is not memory efficient.
7. Don't use full−screen bitmaps −− a single 240x219 full−screen bitmap requires a lot of memory. If
you're running low, keep these to a minimum. Background with large solid color areas can be memory
optimized by saving only the portion of the bitmap that has data into separate frames (left, top, right,
bottom) and then creating a regular frame to fill in the center.
8. Delete template devices −− if you started with the default CCF from the stock Pronto, there are a
number of devices at the end of the device list with names in square brackets. These are template
devices and may be deleted to save memory. Remember, you may always access them again from the
sample CCF as included with ProntoEdit.
B10−02 What are aliases and how are they used?
Aliases allow you to refer to an action list that has already been defined elsewhere in the remote. For
RC: Philips Pronto & Marantz RC5000 Unofficial FAQ
55
example, if you wanted to create a few buttons that went directly to favorite stations using your DSS
receiver (see question below) you would otherwise have to store the actual IR codes multiple times for
each macro. This would be both slow and a waste of valuable memory.
Instead, using aliases you merely store pointers to a single numeric keypad. In effect, an alias is a
placeholder that allows you to say "use that command from over there". But why would you want to?
a) It saves memory. An alias is more compact than an entire action list or even just one learned IR
code. Although ProntoEdit will detect and compact identical hex codes, codes are rarely learned
exactly the same twice in a row. That means all would be stored separately.
b) If you want to share a CCF, using aliases −− rather than storing the same IR codes multiple times
−− makes it much easier for other people to adopt your setup. In the DSS example, if channel buttons
use aliases and someone has an RCA receiver rather than a Sony, all they would need to do is learn the
Sony codes on the numeric pad and all channel buttons would work without further effort.
To create an alias, click on the ALIAS button under a button's Action list, then navigate the panel tree
and select the button to alias to. All commands under that button will be referenced except for the page
jump. Aliasing to a device will reference that device's action list (for instance switching receiver inputs
each time it is selected).
B10−03 General ProntoEdit & RC5000 Setup Tips
Tip 1) Label your learned IR codes if you have several in an activity list. Just double click on the
Learned item and then click on the text in the lower left of the "IR Sequence Edit Box", standard
keyboard pops up.
Tip 2) Those with Pioneer DVD players may have stumbled into this one: the player wants an "Are
You Sure" confirmation whenever you hit stop. So, you have to hit stop twice. But if you have a power
down macro the power off wants a stop confirmation as well. So, add a STOP followed by Power
toggle for power off and it works very nicely.
Tip 3) If you start a new Home Panel and are using the auto−home panel generation feature, the order
of how buttons are drawn is the order they will be mapped to devices. You can change this order with
the "Move to Back" and "Move to Front" commands. If you don't want a device to show up on the
home panel, drag the device to the bottom of the list and don't provide enough buttons to reach it.
Tip 4) If you rename panels/buttons/devices/macros all references to the item are kept intact. If you
drag a panel from one device or macro to another, references are also kept intact. If you cut and paste
it to a different panel/device/macro the references are destroyed.
Tip 5) When using full screen backgrounds you may encounter a problem where once you select the
background you can't select anything else on the panel. There is a shortcut key for "Next Sibling"
which is simply a period (.). You can also use the tab key for selecting the next button/frame, while
hitting ESC will unselect the current selection and allow you to click on other buttons.
Tip 6) When adding a panel, the default layout that appears is stored in the file device.ccf. Similar
defaults are stored in home.ccf, macro.ccf and gallery.ccf. Any changes to these files will be reflected
each time you add a new panel. To ignore these settings and add a blank panel hold down the SHIFT
key.
B10−04 What exactly does the "CCF Optimizer" utility do?
The Pronto supports two kinds of bitmaps: normal, and compressed. Normally, ProntoEdit will not
RC: Philips Pronto & Marantz RC5000 Unofficial FAQ
56
compress any of a CCF's bitmaps. With "CCF Optimizer", you can compress each and every bitmap in
your file. While this has the benefit of increasing available free memory, the downside is that it takes
longer for the Pronto to decompress the images before displaying them, adding noticable delays to
each page switch.
RC: Philips Pronto & Marantz RC5000 Unofficial FAQ
57
Sponsored Links
Unofficial Philips Pronto & Marantz RC5000 FAQ
Section B11: Working With ProntoEdit:
Other Functions
B11−01 What is mouse mode for?
It is for controlling the Philips DVX−8000, a convergence product that combines a computer system,
receiver, DVD player and line double in a single package. It can also be used in combination with
Philips' infrared keyboard for controlling your current PC with the Pronto.
You can also use mouse mode as a "clean the screen" button. The only way to exit mouse mode is by
pressing the backlight button.
B11−02 Why do my custom beeps not make any sound?
First, custom beeps cannot be used on the RC5000, even when running the latest firmware. They will
be stripped out when downloading to the remote.
Basically, a beep tone cannot be set to a 100% duty cycle, since on a square wave 100% duty cycle
results in a flat line. Set the duty cycle (volume) to no more than 75%.
B11−03 How do I use and activate timers?
In ProntoEdit or RAVedit: A timer can be configured to run at a certain time on certain days. If the
"Weekly" option is not configured the timer will only run for 7 days, unselecting each day as it is run.
As long as a timer has enough information −− time, days, action to run −− it is active on the remote.
You do not need to press the button to activate it, and there is no way to disable a timer once it is set
without modifying the program.
On the remote: in ProntoEdit or RAVedit, create a new Macro Group on the Macro side of the
remote. Right−click over the new group's name and select "Is TimerGroup". Then, create a few panels
and add blank buttons on them. Now, each time you select "EDIT" from the Pronto's Mode Menu and
then select a button under that group, you can create a new timer and configure it to do whatever you
like. In addition, as long as the button is located under the Macro Menu and is the only function for
that button, you may edit it on the remote even if it is not located in a "TimerGroup". Since timers can
only hold one alias, you should create the macro for the timer to run somewhere else on the remote and
alias the timer to that. Note that timers cannot be used on the RC5000.
B11−04 Why won't my timers change to a new page?
A timer is nothing more than an alias that runs at a certain time. If you recall, aliases cannot execute
page jumps. Thus, timers cannot execute page jumps. Timers are completely separate from the button
they are stored on, so page jumps configured there will not do anything.
B11−05 Can I password protect pages?
RC: Philips Pronto & Marantz RC5000 Unofficial FAQ
58
Although the answer is "no", this function can be easily simulated.
1. First, hide all pages you want to password protect. This will mean that you can only access them with
a direct link from another button.
2. Next, create a new panel with a keypad on it. Have only one of those button link to "correct panel 2".
Have the rest link to "incorrect panel 2" −− except for the first panel, all password panels should also
be hidden.
3. On "correct panel 2" once again only have one button that leads to "correct panel 3", and have the rest
lead to "incorrect panel 3". All buttons from "incorrect panel 2" will also lead to "incorrect panel 3".
The reason for this is so the user has no idea when they enter an incorrect number.
4. Continue doing this for however many digits you want the password to be in length.
5. On the very last panel, link the correct button to the panel you wanted to keep secret.
If you want, you can get fancy and have asterisks (*) appear at the top of the screen as each digit is
entered.
One major caveat is that hidden panels are not strictly hidden. They are really "scroll−through" panels.
This means if every panel under a device or macro group is hidden, you will still be able to access the
very first panel. Also, if you return to a device where the last panel accessed was hidden, you will still
be able to access it.
B11−06 On Marantz remotes, how can I use the page memory feature?
In RC5000 Setup v2.0 and newer or Touch Screen Setup, the backwards/forwards page jump feature is
selectable from the top of the JUMP menu. Note that you can jump back to a maximum of the last 5
pages, and forwards to a maximum of 9. By using this function in macros you can automate jumping
back several pages after stepping the user through a number of questions. This feature is not available
for the Pronto or other models.
B11−07 Can I use the built−in database codes with my own custom files?
Yes, but only with remotes that originally feature a built−in database − these entries will not function
on other models. If you want to create a device that uses a specific component, you can merely use
ProntoEdit's "Set IR" function to assign the proper codes. But if you're designing layouts for other
users to set their own brands with, you can assign the appropriate database functions to each button
using the "Non Applicable" brand name, which contains all possible functions. To duplicate the
Pronto's "Would you like to program this device?" message, right−click over the device name and
select "Needs Programming".
RC: Philips Pronto & Marantz RC5000 Unofficial FAQ
59
Sponsored Links
Unofficial Philips Pronto & Marantz RC5000 FAQ
Section B12: Working With ProntoEdit:
Problem Diagnosis
B12−01 Why do my RF codes not work?
First, be sure that you’ve set the IDs on the receiver and in ProntoEdit so they both match.
Next, when aliasing codes, the RF setting must be configured on the device that contains the source
code, not just the device that contains the alias. So, if the RF device "television" has a button that
aliases to the IR device "VCR", then the aliased code will still be transmitted in IR, even though the
button is under an RF device. The source code’s transmission preference is always maintained.
B12−02 What happens if I get a "Configuration is xx% too big to fit in Pronto" error message?
If you create a CCF file (such as a gallery) that is too large to fit into the Pronto − or more technically
accurate, bigger than the maximum size specified in the pronto.ini file − you will not be able to save
the file. Instead, ProntoEdit will return with the message "Error saving file.ccf, configuration is xx%
too big to fit in Pronto". Unless you are using ProntoEdit v4.0.3 or newer, whatever you do, don't
exit ProntoEdit!
Since ProntoEdit starts saving the file before checking how big it will be, the file you tried to save over
has already been deleted (and is 0 bytes in length). That means that the ONLY available copy of your
work is the one currently open in ProntoEdit. Now, it is possible to get around this problem by
changing the SIZE= value in the pronto.ini file (see earlier in the FAQ for specific directions on how
to do this for the creation of a large gallery file), but ProntoEdit must be restarted before such changes
take effect. If you do that, you will completely lose that file.
No matter what, some of your work is going to be lost. What you must now do is delete enough panels
or devices from the current open configuration until ProntoEdit successfully saves the file. After that,
if you still want to create a larger file, you may exit the software and modify the configuration file.
Note that even if you do this the Pronto itself will not be able to hold a configuration larger than the
original value for your model − don't try. To be safe, always return the pronto.ini file back to its
original settings before working on a file that will be sent to your remote.
B12−03 Why does the emulator complain that it "Can't open configuration file"?
In Windows NT/2000/XP it is possible to disable "8.3 filenames". 8.3 filenames are a holdback from
the old MS−DOS days, where filenames couldn't be longer than 8 characters, plus a 3 character
extension. With the advent of long filenames ("My Accounts for 2001.xls"), there is no longer any
reason to keep filenames short. Which is why some users decide to disable the old−fashioned 8.3
filename compatibility mode.
However, while ProntoEdit will work fine with long filenames, ProntoEdit's emulator cannot. For
example, the filename
RC: Philips Pronto & Marantz RC5000 Unofficial FAQ
60
My Pronto Configuration.ccf
would need to look like
mypron~1.ccf
to the emulator. However, if you disable short filenames, the file looks like
My Pront.ccf
...which does not exist. To solve this problem you must either re−enable 8.3 filenames, or keep your
filenames shorter than 8 characters in length, with no spaces.
B12−04 Why does the alias list show strange symbols? (Plus other FONT troubleshooting.)
It has been found that the appearance of strange symbols under only the alias list is caused by a bug in
one of the library files installed by Microsoft Internet Explorer 5.0 and 5.5. The solution for 5.0 users
is to upgrade to version 5.01, which you may download from Microsoft's Windows Update web site.
IE5.5 users cannot easily fix this problem, though installing an older version of comctl32.dll may
work.
This has been fixed in ProntoEdit v4.0 and newer.
Another FONT problem may occur under Windows XP, 2000 or NT −− after installing ProntoEdit no
symbols will appear correctly on any screen. The solution is to reboot your computer, which will
finalize installation.
Other FONT issues may be caused by a corrupt or missing FONT file. If you can access a FONT
named "Pronto" from your word processor −− and it looks like the Pronto's text −− everything should
be working in ProntoEdit. If it is instead missing from both your word processor and the Windows
FONT Manager you may need to reinstall ProntoEdit, or manually install the FONT file (pronto.ttf)
which should be located in c:\windows\FONTs\.
B12−05 Why does ProntoEdit not install correctly or give strange errors right after installation when
I try to run it?
The self−installing ProntoEdit download (earlier than version 4.0) does not have any internal CRC
checking – thus if you had a corruption problem while downloading, the package will still merrily
install invalid files, causing the program to run incorrectly. The solution to this problem is simple:
download the file again. Also, ensure the file saved to your hard drive is of appropriate size.
B12−06 Why does ProntoEdit crash when learning IR codes in Windows XP, 2000 or NT?
This is a known condition in most installations of Windows XP, Windows 2000 or Windows NT 4.0.
Some systems may be able to learn codes successfully (particularly under Windows XP), however for
the rest there are no known fixes. The best solution is to download your unpopulated CCF file to the
remote, and then learn all IR codes on it. When finished, upload the file back to the computer.
B12−07 I'm getting an error with MFC42.DLL. What can I do?
If you receive the error "PRONTOEDIT.EXE is linked to missing export MFC42.DLL:6880" then one
of two things is wrong.
First, you must make sure that all programs are closed. Hit <CTRL> <ALT> <DEL> all at once and
RC: Philips Pronto & Marantz RC5000 Unofficial FAQ
61
END TASK each item on the list except for Explorer and Systray.
Next, go to a DOS Prompt (Command Prompt) and type:
• cd\windows\system (press ENTER)
• ren mfc42.dll mfc42_orig.dll (press ENTER)
• exit (press ENTER)
If this does not work you must "Restart in MS−DOS mode" and perform the above steps.
Now, reinstall ProntoEdit.
The problem should now be corrected, however if it is not then you may have multiple copies of the
MFC42.DLL file. Use the Start Menu's "Find − Files or Folders" options to search and obtain a list of
all MFC42.DLL files. Rename them one by one using the above method (substituting the correct
directory/folder) until the error with ProntoEdit stops.
B12−08 In ProntoEdit v2.0, why can't I edit hex codes?
In ProntoEdit v2.0, you can't edit, copy or paste IR hex codes − the window is grayed out. To fix that
you must edit the c:\windows\pronto.ini file with a text editor, such as Notepad (or for an automated
method download Pronto.ini Workshop). Then, under the [version] section, add this line:
developer=1
Save, and restart ProntoEdit. You will now be able to copy, paste and otherwise massage IR hex codes
in whatever way you like. You'll also notice that this adds a fourth button, "Advanced", which allows
you to create RC5/6 codes, plus the device name right−click menu option "needs programming". If
you find this screen too large on your system − it doesn't fit vertically − you must either switch to a
higher resolution screen, or change from "Large FONTs" (125%) down to "Small FONTs" (100%)
under your system display properties.
This has been fixed in ProntoEdit 3.0 and newer.
B12−09 Why can't I change IR code labels?
This is a known issue with ProntoEdit 2.0 and many recent versions of the software. All IR code labels cannot
be changed − attempting to do so may result in no label at all. In turn, having no label may also result in the
Emulator crashing when working with that page, however the actual remote will not have such a problem.
Note that this does not affect button labels − just the internal infrared code labels.
Although some versions appear to let you change labels, it does in fact not work.
This has been fixed in ProntoEdit 4.0.3 and newer.
B12−10 I'm getting a "none or invalid pronto.ini file" error message.
This error is caused by having a previous version of ProntoEdit or RC5000 Setup installed on your
system and installing ProntoEdit v2.0. During the ProntoEdit installation process, instead of replacing
or modifying an existing copy of the pronto.ini file with a single new configuration line, the program
does nothing − and thus crashes when you try to load up the software.
To fix, you must edit the c:\windows\pronto.ini file with a text editor, such as Notepad (or for an
automated method download Pronto.ini Workshop). Then, under the [ccf] section, add this line:
RC: Philips Pronto & Marantz RC5000 Unofficial FAQ
62
universal_size=960
Keep the "size=380" line as is. While you're in there, I strongly suggest making the change described
just further up this page in FAQ section B11−08. Save your changes and you'll now be able to use
ProntoEdit v2.0. If you have a problem with the pronto.ini file being "read only", then you may have
installed Marantz Touch Screen Setup, which does strange things to your pronto.ini file. The
Pronto.ini Workshop utility linked to earlier will correct that issue.
This is no longer a problem with ProntoEdit v3.0 and newer.
RC: Philips Pronto & Marantz RC5000 Unofficial FAQ
63