1
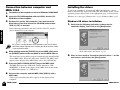
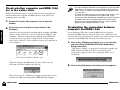
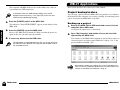
UIB-01
Installation Manual
© Zoom Corporation
Reproduction of this manual, in whole or in part, by any means, is
prohibited.
Safety Precautions
Disregarding instructions printed
here incurs the risk of death or
Warning severe injury to persons.
Disregarding instructions printed
here incurs the risk of injury to
Caution persons and/or damage to
peripheral equipment.
Please observe the following safety tips and
precautions to ensure hazard-free use of the
UIB-01.
■ Handling
● Before installing the UIB-01 in the
Warning MRS-1044, be sure to turn the MRS1044 off and disconnect the AC
adapter from the outlet.
● Before handling the UIB-01, touch a
Caution grounded metal surface or take other
measures to discharge any buildup
of static electricity. Otherwise static
discharge can damage the UIB-01 or
MRS-1044.
● The UIB-01 is a precision product.
Caution Do not subject it to strong force when
installing it in the MRS-1044. To
prevent the possibility of damage,
take care not to drop it and protect it
from shocks.
● Only install the UIB-01 according to
Caution the instructions in this manual. Any
damage or malfunction arising from
improper installation is not covered
by the warranty.
● Never attempt to modify this product
Caution in any way. Any damage or
malfunction arising from
modification attempts is not covered
by the warranty
2
ZOOM UIB-01
■ Malfunction
If there is any malfunction or other sign of a
problem, immediately turn off the MRS1044, disconnect the AC adapter from the
outlet, and remove the UIB-01.
Note the model number, serial number,
symptoms, as well as name of the dealer
where the product was purchased, and contact
Zoom Corporation, providing your name,
address, and telephone number.
Software License
The CD-ROM supplied with this product
contains software programs (hereafter called
"the software") required to use the product.
Zoom Corporation grants you the right to
use the software, provided that you agree
with all conditions listed below. Using the
software is considered acceptance of this
agreement.
●
Zoom Corporation holds the copyright to
the software and the accompanying
documentation, and all associated rights.
All rights revert to Zoom Corporation.
●
Unauthorized redistribution, sale, leasing,
renting, alteration, and reverse engineering
of the software is prohibited.
●
The software may not be used for purposes
that infringe on the copyright of third
parties. Zoom Corporation does not bear
liability for cases where the software is
used for any such purpose.
●
Zoom Corporation does not bear liability
for any damages or claims from third
parties arising from the use of the software,
whether directly or indirectly. If the
contents of a hard disk are lost due to use
of the software, Zoom Corporation does
not accept any claims for restoring or
preserving such contents.
●
Features and specifications of the software
and the contents of the documentation may
be changed in future without notice.
Contents
Safety Precautions / Software License
Introduction
• • • • • • • • • • • • • • • • • • • • • • • •
2
4
About the UIB-01 • • • • • • • • • • • • • • • • • • • • • • • • • • • • • • • • • • • • • • • • • • • • • • • • • • 4
Operation Environment • • • • • • • • • • • • • • • • • • • • • • • • • • • • • • • • • • • • • • • • • • • • 5
Explanations in the manual • • • • • • • • • • • • • • • • • • • • • • • • • • • • • • • • • • • • • • • 5
• • • • • • • • • • • • • • • • • • • • • • • • • • • • • • • • • • • • • • • • • • • • • • • • • • • • • • • • •
Contents
Safety Precautions / Software License
In this manual, important information that is
intended to prevent the danger of injury to
persons and damage to equipment is marked
with special symbols. The meaning of these
symbols is explained below.
Preparations
• • • • • • • • • • • • • • • • • • • • • • • • • • • • • • • • • • • • • • • • • • • • • • • • • • • • • • • • 6
Installing the UIB-01 • • • • • • • • • • • • • • • • • • • • • • • • • • • • • • • • • • • • • • • • • • • • • • • 6
Connection between computer and MRS-1044 • • • • • • • • • • • • • • • • • 8
Installing the driver • • • • • • • • • • • • • • • • • • • • • • • • • • • • • • • • • • • • • • • • • • • • • • • • 9
Windows 98 driver installation • • • • • • • • • • • • • • • • • • • • • • • • • • • • • • • • • • • • • • 9
Windows Me driver installation • • • • • • • • • • • • • • • • • • • • • • • • • • • • • • • • • • • 13
Windows 2000 driver installation • • • • • • • • • • • • • • • • • • • • • • • • • • • • • • • • • • 15
Check whether computer and MRS-1044 are in the online state • 18
Terminating the connection between computer and MRS-1044 • • 19
UIB-01 Applications • • • • • • • • • • • • • • • • • • • • • • • • • • • • • • • • • • • • • • • • • • • • • • 21
Project backup / restore • • • • • • • • • • • • • • • • • • • • • • • • • • • • • • • • • • • • • • • • • 21
Backing up a project • • • • • • • • • • • • • • • • • • • • • • • • • • • • • • • • • • • • • • • • • • • • • 21
Restoring a project • • • • • • • • • • • • • • • • • • • • • • • • • • • • • • • • • • • • • • • • • • • • • • • 22
Returning the MRS-1044 to the factory default condition • • • • • 24
Formatting the hard disk of the MRS-1044 • • • • • • • • • • • • • • • • • • • • • • • • 24
Using the Factory Recorvery Tool • • • • • • • • • • • • • • • • • • • • • • • • • • • • • • • • • 25
Using the Audio File Manager • • • • • • • • • • • • • • • • • • • • • • • • • • • • • • • • • • • 26
Installing the software • • • • • • • • • • • • • • • • • • • • • • • • • • • • • • • • • • • • • • • • • • • • 26
Starting the Audio File Manager • • • • • • • • • • • • • • • • • • • • • • • • • • • • • • • • • • • 26
Reference Information
• • • • • • • • • • • • • • • • • • • • • • • • • • • • • • • • • • • • • • • • • • 28
MRS-1044 hard disk contents • • • • • • • • • • • • • • • • • • • • • • • • • • • • • • • • • • • 28
Contents of the supplied CD-ROM • • • • • • • • • • • • • • • • • • • • • • • • • • • • • 29
Troubleshooting • • • • • • • • • • • • • • • • • • • • • • • • • • • • • • • • • • • • • • • • • • • • • • • • • • 31
• Microsoft and Windows are registered trademarks of Microsoft
Corporation in the U.S.A. and in other countries.
• Apple and the Apple logo are registered trademarks of Apple Computer.
• Macintosh is a registered trademark of Apple Computer.
• Pentium is a registered trademark of Intel Corporation.
• All other trademarks, product names, and company names are the property
of their respective owners.
ZOOM UIB-01
3
Introduction
Thank you for selecting the ZOOM USB Interface Board UIB-01
(hereafter called the "UIB-01"). To ensure correct use of this product,
please read and follow all instructions contained in this manual.
About the UIB-01
●
Project backup/restore
You can copy any project of the MRS-1044 to the hard disk of the
computer. This is convenient for creating backups of important
projects. A backed-up project can be restored to the MRS-1044 at any
time.
The UIB-01 has the following hardware and software requirements.
●
Computer
Windows computer running Windows 98/Me/2000 and equipped with
a USB connector (Pentium 166 MHz or higher recommended)
●
Free hard disk space
100 MB or more (plus space for converted data etc.)
●
RAM
32 MB or more
* The Apple Macintosh series of computers are not supported.
●
Introduction
Introduction
The UIB-01 is a Windows compatible USB interface board designed for
installation in the ZOOM MultiTrak Recording Studio MRS-1044
(hereafter called "MRS-1044"). When the UIB-01 is installed in the
dedicated slot of the MRS-1044, data exchange between a computer and
the MRS-1044 becomes possible, and the following functions are
available.
Operating Environment
Supported operating systems
• Microsoft® Windows® 98 (hereafter called "Windows 98")
• Microsoft® Windows® Millennium Edition (hereafter called
"Windows Me")
• Microsoft® Windows® 2000 Professional (hereafter called "Windows
●
●
●
4
V-take/audio file conversion
Using the software on the supplied CD-ROM, you can convert any
V-take of the MRS-1044 into a WAV file, or convert existing
WAV/AIFF files into V-takes of the MRS-1044.
MRS-1044 initialization
The supplied CD-ROM contains data about the factory default settings
of the MRS-1044. Using software also contained on the CD-ROM, you
can reset the MRS-1044 at any time to the factory default condition.
System update
When there are operating system upgrades for the MRS-1044 in future,
you can simply copy the relevant system files from the computer to the
MRS-1044, to update the system.
ZOOM UIB-01
2000")
●
Other requirements
• CD-ROM drive x 1
• USB cable x 1
NOTE
Even when the above requirements are met, correct operation on
all types of computers is not assured. Depending on individual
specifications and system conditions, there may be cases where
incompatibilities exist.
Explanations in the manual
Most explanations in this manual apply equally to all supported operating
systems (Windows 98/Windows Me/Windows 2000). In general,
explanations are based on Windows 98, and exceptions are noted when
there are differences for the other operating systems.
ZOOM UIB-01
5
Preparations
This section describes how to install the UIB-01 in the MRS-1044, and
how to install the driver software on the computer. These steps are
required before the UIB-01 can be used.
2.
Installing the UIB-01
The UIB-01 is designed for installation in the side panel slot of the MRS1044.
1.
Correct
Remove the two screws that fasten the cover of the side
panel slot, and remove the cover.
These screws will be used to fasten the UIB-01.
Incorrect
3.
6
ZOOM UIB-01
Preparations
Preparations
Before installing the UIB-01 in the MRS-1044, be
sure to turn the MRS-1044 off and disconnect the
Warning AC adapter from the outlet.
With the populated side of the UIB-01 board (the side with
IC chips and other components) facing downwards, push
the UIB-01 fully into the slot.
Align the board with the rails of the slot, and make sure that it clicks
into place. If the board does not go all the way in, check whether the
UIB-01 has not been inserted upside down, and whether it is
properly aligned with the rails.
Use the screws removed in step 1 to fasten the UIB-01.
ZOOM UIB-01
7
Connection between computer and
MRS-1044
1. Turn power to the computer on and start Windows 98/Me/2000.
2. Insert the CD-ROM supplied with the UIB-01 into the CDROM drive of the computer.
3.
To allow the computer to recognize the MRS-1044 properly, a driver
must be installed. The steps for installing the driver differ for the various
operating systems. Please refer to the appropriate page, as shown below.
Windows 98 → this page / Windows Me → p.13 / Windows 2000 → p.15
Windows 98 driver installation
1.
Verify that the following indication is shown on the
computer display, then click on the [Next] button.
Preparations
Preparations
Double-click on the "My Computer" icon and check the
drive letter of the drive where the CD-ROM (volume label
"UIB_01_CD") is inserted.
In the following explanation, the drive will be called "E", but this
may be different for your computer.
Installing the driver
For systems running Windows 98 or Windows 2000, the CD-ROM
drive letter will be required when installing the driver software. Make
a note of the drive letter.
4.
8
While holding down the [CLEAR] key of the MRS-1044, press
the [POWER] switch on the rear panel to turn the MRS-1044 on.
This starts up a special utility program contained in the internal ROM
of the MRS-1044. When the indication "ROM UTY MRS-1044"
appears on the display of the MRS-1044, release the [CLEAR] key.
5.
Press the [AUTO PUNCH IN/OUT] key of the MRS-1044.
The MRS-1044 goes into USB mode, and the indication "USB
WORKING" is shown on the display of the MRS-1044. In this mode,
the MRS-1044 operates as a USB device.
6.
Connect the computer and the MRS-1044 (UIB-01) with a
USB cable.
A message for installing the driver appears on the display of the
computer.
ZOOM UIB-01
* If the indication is not shown → p.31
2.
Place a check mark in "Search for the best driver..." on the
next screen, and click on the [Next] button.
ZOOM UIB-01
9
3.
10
5.
After a while, the following screen will be shown. Click on
the [Finish] button.
6.
After a while, the following screen will be shown. Click on
the [Next] button.
7.
Place a check mark in "Search for the best driver..." on the
next screen, and click on the [Next] button (same as step 2).
8.
Place a check mark in "Specify a location " on the next
screen, enter "[CD-ROM drive letter]:\", and click on the
[Next] button (same as step 3).
Preparations
Preparations
4.
Place a check mark in "Specify a location " on the next
screen, enter "[CD-ROM drive letter]:\", and click on the
[Next] button.
The following example uses the drive letter "E".
Verify that the following indication is shown, and click on
the [Next] button.
ZOOM UIB-01
ZOOM UIB-01
11
9.
Verify that the following indication is shown, and click on
the [Next] button.
Windows Me driver installation
1.
Verify that the following indication is shown on the computer
display. Then place a check mark in "Automatic search for
...", and click on the [Next] button.
Preparations
Preparations
10. After a while, the following screen will be shown. Click on
the [Finish] button.
* If the indication is not shown → p.31
2.
After a while, the following screen will be shown. Click on
the [Finish] button.
This completes the driver installation. Proceed to p.18 to check
whether the driver has been correctly installed.
12
ZOOM UIB-01
ZOOM UIB-01
13
3.
Windows 2000 driver installation
1.
Verify that the following indication is shown on the
computer screen, and click on the [Next] button.
Preparations
Preparations
4.
After a while, the following screen will be shown. Place a
check mark in "Automatic search for...", and click on the
[Next] button.
After a while, the following screen will be shown. Click on
the [Finish] button.
* If the indication is not shown → p.31
2.
On the next screen, place a check mark in "Search for a
suitable driver...", and click on the [Next] button.
This completes the driver installation. Proceed to p. 18 to check
whether the driver has been correctly installed.
14
ZOOM UIB-01
ZOOM UIB-01
15
On the next screen, place a check mark in "Specify a
location", and click on the [Next] button.
5.
Verify that the following indication is shown, and click on
the [Next] button.
4.
Enter "[CD-ROM drive letter]:\", and click on the [OK]
button.
The following example uses the drive letter "E".
6.
After a while, the following screen will be shown. Click on
the [Finish] button.
Preparations
Preparations
3.
This completes the driver installation. Proceed to the next page to
check whether the driver has been correctly installed.
16
ZOOM UIB-01
ZOOM UIB-01
17
Check whether computer and MRS-1044
are in the online state
• The volume label for the MRS-1044 recognized as local disk differs
depending on the operating system. In Windows 98, the volume
label is shown as "None" and in Windows Me and Windows 2000
as "Local Disk".
• The driver installation process must only be carried out once. The
next time you start up the MRS-1044 in USB mode, simply
connect the USB cable between the MRS-1044 and the computer,
and MRS-1044 and the computer will be automatically online.
• When wishing to uninstall (delete) the driver, use the "UNINST"
program on the supplied CD-ROM (→ p.30).
Perform the following steps to verify that the driver has been properly
installed and that the computer and MRS-1044 are in the online state
(communication is possible).
Double-click on the "My Computer" icon to open the
window.
2.
Verify that a new local disk has been added to "My
Computer".
If the driver has been properly installed and the computer and MRS1044 are in the online state, a new local disk will be added to "My
Computer". This drive represents the hard disk in the MRS-1044
recognized as local one by the computer. In the example shown
below, this is "Drive F". (The actual drive letter may be different on
your computer.)
Terminating the connection between
computer and MRS-1044
Preparations
Preparations
1.
If you unplug the USB cable or turn the MRS-1044 off while the
computer and MRS-1044 are still in the online state, malfunction may
occur and files may be damaged. To terminate the connection between the
computer and the MRS-1044, always use the following steps.
1.
Click on the "USB Storage Unplug" icon in the task tray,
and select [Stop ZOOM USB-ATA/ATAPI Bridge Mass
Storage Controller].
"USB Storage Unplug" is a program for setting the computer and
MRS-1044 to the offline state. The icon for the program
automatically appears in the task tray when the online state is
established.
2.
Click on the [OK] button in the dialog box that appears.
* If no new local disk is shown → p.31
When the computer and MRS-1044 are in the online state, the
following icon will be added to the task tray.
This icon accesses the "USB Storage Unplug" program that serves to
terminate the USB connection between MRS-1044 and computer.
18
ZOOM UIB-01
ZOOM UIB-01
19
UIB-01 Applications
The computer and MRS-1044 are now in the offline state, and you
can terminate the USB connection.
This section describes the various uses of the UIB-01.
Project backup/restore
In the offline state, the "USB Storage Unplug" icon should
disappear from the task tray. If not, right-click on the icon and
select [End of USB Storage Unplug].
3.
5.
Press the [ENTER] key of the MRS-1044.
Power to the MRS-1044 is turned off. When you turn the power on
again in this state, the unit starts up normally.
If necessary, disconnect the USB cable.
This procedure must be followed every time you wish to terminate
the USB connection between the computer and the MRS-1044 to
turn the MRS-1044 off.
Backing up a project
1.
Start up the MRS-1044 in USB mode and connect it to the
computer with a USB cable.
Verify that the online state is established.
2.
Open "My Computer" and double-click on the local disk
representing the MRS-1044.
The contents of the MRS-1044 hard disk are shown. Project data are
stored separately in folders named "PROJxxx" (where "xxx" is the
project number from 000 - 999).
NOTE
20
ZOOM UIB-01
UIB-01 Applications
Preparations
4.
Push the [POWER] switch of the MRS-1044.
The indication "PowrOFF ENT/EXIT" appears on the display of the
MRS-1044.
You can copy a project from the MRS-1044 recognized as a local disk to
the hard disk of the computer, for creating a backup. A backed-up project
can be restored to the MRS-1044 at any time.
Other folders and files are used by the system of the MRS-1044.
Take care not to accidentally delete these. For information on the
contents of the MRS-1044 hard disk, see p. 28.
ZOOM UIB-01
21
3.
Select the folder of the project you want to back up, and
select [Copy] from the [Edit] menu on the menu bar.
4.
Open the destination drive/folder and select [Paste] from
the [Edit] menu on the menu bar.
Restoring a project
Select the folder for the project you want to restore, and
select [Copy] from the [Edit] menu on the menu bar.
4.
Open "My Computer" and double-click on the local disk
representing the MRS-1044.
5.
Select [Paste] from the [Edit] menu on the menu bar.
UIB-01 Applications
UIB-01 Applications
Backup of the project data is now complete. If necessary, back up
other projects in the same way.
3.
The project is restored to the hard disk on the MRS-1044. If
necessary, restore other projects in the same way. If a folder with the
same name as the folder selected for restore already exists on the
hard disk of the MRS-1044, the following indication appears.
You can restore projects backed up on the hard disk of the computer to
the internal hard disk of the MRS-1044.
22
1.
Start up the MRS-1044 in USB mode and connect it to the
computer with a USB cable.
Verify that the online state is established.
2.
Open the drive/folder where the project backup data are
stored.
ZOOM UIB-01
If you click on the [Yes to All] button, existing data on the hard disk
of the MRS-1044 will be overwritten by the restored project data.
(V-take files for which no restore data are present will remain
unchanged.)
ZOOM UIB-01
23
Returning the MRS-1044 to the factory
default condition
The supplied CD-ROM contains complete data about the factory default
settings of the MRS-1044. Using the application program "Factory
Recovery Tool", you can automatically copy these data to the hard disk of
the MRS-1044, thereby restoring the MRS-1044 to the factory default
condition.
Formatting the hard disk of the MRS-1044
4.
Using the Factory Recovery Tool
The supplied Factory Recovery Tool application program can be used to
copy the factory default setting data to the hard disk of the MRS-1044.
Start up the MRS-1044 with formatted hard disk in USB
mode, and connect it to the computer with a USB cable.
Verify that the online state is established.
2.
Insert the supplied CD-ROM into the CD-ROM drive of the
computer, and double-click on "My Computer".
NOTE
3.
Double-click on the "UIB_01_CD" icon in "My Computer".
4.
Double-click on the "FactRcvr" icon.
The Factory Recovery Tool starts up.
UIB-01 Applications
1.
2.
3.
Verify that the MRS-1044 is turned off. While holding down
the [CLEAR] key of the MRS-1044, press the [POWER]
switch on the rear panel to turn the unit on.
5.
Open the [FACTORY CD DRIVE] pull-down menu, and
specify the CD-ROM drive letter.
6.
Open the [MRS-1044 DRIVE] pull-down menu, and specify
the drive letter of the MRS-1044 recognized as a local hard
disk.
Verify that "ROM UTY MRS-1044" is shown on the display
of the MRS-1044, and press the [MARK] key.
After a while, the indication "Format? ENTER" appears on the
display of the MRS-1044.
7.
Click on the [EXECUTE] button at the right of the screen.
The data copy process starts. The copy progress is indicated by the
bar under the screen.
Press the [ENTER] key to execute the formatting process.
Formatting of the internal hard disk of the MRS-1044 begins. When
formatting is complete, the indication "Format Done" appears on the
display of the MRS-1044.
8.
When the copy process is completed, click on the [CLOSE]
box.
The Factory Recovery Tool terminates.
To abort the formatting, press the [POWER] switch instead of the
[ENTER] key, and then press the [ENTER] key or the [EXIT] key.
Formatting is canceled and the MRS-1044 is turned off.
24
ZOOM UIB-01
NOTE
UIB-01 Applications
1.
Before copying data to the hard disk of the MRS-1044, the hard disk must
be formatted (initialized).
• Use this function with care. When you execute the formatting
process, all contents of the MRS-1044 will be lost.
• Perform formatting of the hard disk of the MRS-1044 only
according to the following steps.
• Never format the hard disk of the MRS-1044 using regular
Windows commands. If the hard disk was formatted by the
computer as a regular hard disk, it cannot be used by the MRS1044.
When formatting is complete, press the [POWER] switch of
the MRS-1044 and then the [ENTER] key.
Power to the MRS-1044 is turned off.
• The copy process takes about 10 minutes. During this interval, you
can abort the process by clicking on the [ABORT] button shown on
the screen.
• While the data are being copied, do not operate any of the keys
and switches of the MRS-1044.
ZOOM UIB-01
25
NOTE
(2)
• To return the MRS-1044 to the factory condition, be sure to use
the Factory Recovery Tool. Simply copying the FACDAT folder to
the MRS-1044 will not perform a restore, and the MRS-1044 will
not operate normally.
(1)
Using the Audio File Manager
Installing the software
1.
2.
3.
26
Insert the supplied CD-ROM into the CD-ROM drive of the
computer, and double-click on the "UIB_01_CD" icon in
"My Computer".
Click on the "UTY" folder, and select [Copy] from the [Edit]
menu on the menu bar.
Open the destination drive/folder and select [Paste] from
the [Edit] menu on the menu bar.
The "UTY" folder with the Audio File Manager is copied to the hard
disk.
(3)
(4)
(5)
(1) Tree view : Shows all drives connected to the computer as well as
any network drives in a tree configuration. From this view, you can
select a project in the MRS-1044.
(2) Track/V-take window : The track/V-take configuration of the
currently selected project can be checked here. At V-take positions
where audio data are recorded, a button with the name of the V-take is
shown.
(3) V-Take → Wav button : Clicking on this button will cause the audio
data of the V-take selected in the track/V-take window (2) to be
exported to a WAV file (file extension: WAV).
Starting the Audio File Manager
(4) Wav/AIFF → V-Take button : Clicking on this button will cause the
audio data of a WAV file (file extension: WAV) or AIFF file (file
extension: AIF) to be imported to the V-take selected in the track/Vtake window (2).
1.
(5) Exit button : Shuts down the Audio File Manager program.
Open the copied "UTY" folder and double-click on the
"TakeWave" icon.
The Audio File Manager program starts up. The program has the
following main functions.
ZOOM UIB-01
UIB-01 Applications
UIB-01 Applications
The CD-ROM supplied with the UIB-01 also contains the "Audio File
Manager" application program that serves for exchanging audio data
between the computer and the MRS-1044. Using this program, you can
convert any V-take of the MRS-1044 into a WAV file, or convert existing
WAV/AIFF files into V-takes of the MRS-1044.
This section contains a simple description of the Audio File Manager. For
details on using the program, please refer to the Operation Manual that is
supplied as a PDF file in the same "UTY" folder as the Audio File
Manager. This software may be periodically updated without notice.
To obtain the latest information, please visit the web site of Zoom
Corporation (http://www.zoom.co.jp).
2.
To terminate the Audio File Manager, click on the [Exit]
button.
ZOOM UIB-01
27
Reference Information
MRS-1044 hard disk contents
●
This section describes the contents of the internal hard disk of the MRS1044 that can be checked from the computer.
Open "My Computer" and double-click on the MRS-1044 recognized as
local hard disk. This will display the contents of the disk.
SYSTEM.ZEX file
MRS-1044 system file
●
CURSNGNO.INI file
Last edited project number data
●
PATCH.DAT file
Effect patch data used for new projects
●
RHYTHM.SEQ file
Rhythm pattern and rhythm song data used for new projects
NOTE
The various files and folders are as follows.
PROJxxx folders
Data for each project are stored in folders named according to this
convention. The "xxx" part stands for the project number from 000 999. A project folder contains the following files.
MRKSCENE.INI : Marker and scene setting data
PATCH.DAT : Effect patch setting data
RHYTHM.SEQ : Rhythm song and rhythm pattern data
*.DAT : Individual track/V-take audio data
SONGDATA.INI : Other setting data
●
Reference Information
Reference Information
●
• Except for projects, do not unnecessarily delete or overwrite files or
folders. Otherwise the MRS-1044 may cease to function properly.
• Never alter the names of folders or files except for projects. Project
folders must be named according to the "PROJxxx" convention
(where the "xxx" part is the project number from 000 - 999). If the
folder has a different name, it will not be recognized as a MRS1044 project.
Contents of the supplied CD-ROM
This section lists the contents of the supplied CD-ROM. You can display
the contents by inserting the supplied CD-ROM into the CD-ROM drive
of the computer, opening "My Computer" and double-clicking on the
"UIB_01_CD" icon.
SOUNDS folder
This folder contains drum kit and bass program data. The folder
comprises the following files.
*.DRM : Drum kit sound data
*.BAS : Bass program sound data
The contents of the folders and files on the CD-ROM is as follows.
28
ZOOM UIB-01
ZOOM UIB-01
29
Troubleshooting
●
FACDAT folder
This folder contains the data for returning the MRS-1044 to the factory
default settings.
●
UTY folder
This folder contains the "Audio File Manager" software for exchanging
audio data between the computer and the MRS-1044. For information
on use of the software, see p.26.
●
●
UNINST file
This is the software for uninstalling the installed driver. To uninstall,
double-click on this file and follow the instructions that appear on the
screen.
Other files
These are various files and software components installed together with
the driver.
The software and other files included on the supplied CD-ROM may be
periodically updated without notice. To obtain the latest information,
please visit the web site of Zoom Corporation (http://www.zoom.co.jp).
■ Computer and UIB-01 (MRS-1044) are connected by USB
cable, but "Add (Found) New Hardware Wizard" does not
appear on the screen.
• Check whether "USB WORKING" is shown on the display of the
MRS-1044, indicating that it is functioning as a USB device.
• Check whether the USB cable has been connected properly. If yes,
unplug the USB cable and then plug it in again.
• If the driver has already been installed, the "Add (Found) New
Hardware Wizard" screen will not appear.
■ The hard disk of the MRS-1044 is not recognized by the
computer.
• Check whether "USB WORKING" is shown on the display of the
MRS-1044, indicating that it is functioning as a USB device.
• Check whether the USB cable has been connected properly. If yes,
unplug the USB cable and then plug it in again.
• Use the uninstaller on the supplied CD-ROM (file name: UNINST →
p.30) to uninstall the driver and then install the driver once more.
Troubleshooting
Reference Information
●
FACTRCVR file
This is the software for copying the data in the FACDAT folder to the
hard disk of the MRS-1044 (Factory Recovery Tool). For information
on use of the software, see p.25.
If installation of the UIB-01 does not seem to have been successful, or if
there are problems during operation, check the following points first.
■ When USB cable is unplugged, computer operation
becomes instable.
If the connection is interrupted without first setting the computer and
MRS-1044 to the off-line state, computer operation may become
instable. Before interrupting the connection, be sure to set the devices
to the offline state (→ p.19.)
■ A disk utility of the computer detects errors on the hard
disk of the MRS-1044.
Utilities such as Scandisk may detect apparent errors even if there is in
fact no problem with the hard disk of the MRS-1044. There is no need
for repair or other countermeasures.
30
ZOOM UIB-01
ZOOM UIB-01
31
ZOOM CORPORATION
NOAH Bldg., 2-10-2, Miyanishi-cho, Fuchu-shi, Tokyo 183-0022,
Japan
PHONE: +81-42-369-7116 FAX: +81-42-369-7115
Web Site: http://www.zoom.co.jp
Printed in Japan UIB-01-5000-1