1
LED PROJECTOR USER MANUAL
IMPORTANT SAFEGUARDS:
.llEVERoperatethisapplianceifithasadamagedcordorplug.ilitisnotworkingproperly,if
When using electrical produds, especiallywhen children are present, basic safety tr€cautionsshould
always be followed, including the following:
ithasbeen dropped ordamaged, ordropped into watc. Retum ittoSl Products Service
Centerfor examination and repair.
Keep cord away from heated surfaces.
NEVER drop or insert any object into any opening.
READAtt INSTRUCTIONS
-
.
.
. D0l{0Toperatewhereaerosol(spray)produdsareb€ingusedorrlrereoxygenisbeing
administered.
. D0 N0Ioperate under blanketorpillow. Excessive heating can occurand causefire,
electric shock or injuryt0 persons.
. D0 NOT carrythis appliance by the power cord or use cord as handle.
. Todisconnect,tulnallcontrolstothe'offposition,thenremoveplugfromoutlet.
. This appliance is designed for personal, non-professional useonly.
. D0NOTuseoutdoors.
. D0 NOT look directly into the projector lens while projector turned on, doing so may
BEFORE USING
the risk ofelectric shock:
Always unplug the appliance from the electrical outlet immediately after using rnd before
cleaning.
DANGER
To reduce
.
. D0 NOT reach for an appliance that has fallen into water. Unplug it immediately.
. D0 NOT use while bathing or in shower.
. D0 N0T place or store appliance where it can fall or be pulled into tub or sinL
. D0 NOT place in or drop into water or other liquid.
. NEVERusepinsorothermetallicfastenerswiththisappliance.
. Keep dry- D0 NOToperate in wet or moist condition
WARNING To reduce the risk of burns, fire, electric shock or injury to persons:
. Anapplianceshouldneverbeleftunattendedwhenpluggedin.Unplugftomortletrrlren
not in use and before putting on ortaking off par$ or atta(hmenB.
. Close supervision is necessary when this appliance is used by, on or near children, imalils
or disabled persons.
. Use this appliance only for its intended use described in this manual. Do not use
a
a
a
-
is
ouse severe eyedamage.
hcting
List:
t C20 LID projector 'l pc
Poreradaptor 1 pc
Lens covu 1 pc
Itree.in-one AVcable 1 pc
as
attachments not recommended bysupplier; specifically any attachments not
ptovided with the unit.
lhernunuall
pc
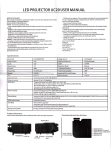
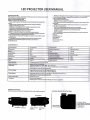
Specifications
Product Name
Led proiector
lmageSystem
LCD
Resolution
QVGA
l{orninal Briqhtness
400 lumen(max)
Lamp
LED
Color
16770K
Aspect Ratio
4:3
osationlode
Manual
Contrast
3fi):l
Proiettkrn Elisterl(e
3.54-l 2.7 feet
Picture Size
I 7 C6Tinches
PmerConsumptilo
28W
Weight
0.831bs.
Supported External Storaqe
500G
Power Adaptor
12V-24
)tze
lnput terminal
I 2V
OutDut terminal
Speaker (2.0w x I ), earphone
5upported Audio Form: MP3, WtA, AAC, FLAC, APE
Multiaudio-eff ect:7 mode of audio-effect plus SRS I{OWand
Breaking point continuous playsupported
Audio play
power input, AV lN, USB,
SD Card
Picture display
Supported static picture fi le: JPEG,BMP,GIF,PNG,TIF
support a variety of slide transition special efficacy.
Video display
Supported video fi le format: RMVB/R M/AVt I Mp 4 I
Breaking point continuous playsupported
AVIN audio display
PAL&NTSC format
Text Read
TXT
ASF I
SRS WOW
HD
MOV/M KV etc.
text fi le supported
Breaking point continuous display& Background music supported
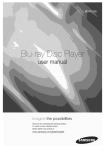
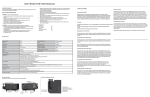
Product Structure:
Notes: Please do not block the ventilation holes while using the projector.
SD
Function lntroduction for Keys:
interface
2. Confirm
3.
Power indicator
12V DC in
USB AV
input
lnterface
1.
Ventilation
hole
Power
/
Menu
Left/Volume+/Forward
4. Right/Volume C/Backward
5. lnput Source
6. BacUReturn
UrlryGuldc
PonfrgOilurdOFF
Standby Status: After the proj€ctor ls powered though adapt$ the indicator lamp will flash, then enters
standby status.
Power on: Press the power button, the indicator lamp will be slidy on after a quick flash,the projector start
work;
Powroff:
-:
Press the power
button,the indicator lamp will
status,disconnect the power cable, then the projector
is
be stf.{ityon after a quick flash and enters standby
off.
&-
tq
Dependingonthe distance betweenthe prolector and the s&n or the proiection wall, the proiection
17 to 67
,i.
After powered on,putthe proiector at a certain place withinil. distance scale, and then rotate the lens
rt
to make the picture
lrnage slze ranges from
inches,
<tea.
Howtoplry
Press the tlnputr keyto enterthe input source
to confirm the input source you need. '
Video can be directly broadcasted through the video
card, first press tLeftr,rRightt key to choose the formats
play the content.
How to set up Longpress rEntert to enterthe setting up
factory settings',rSoftware updater can be adiusted here.
then pressrEntert Key
lf signal source comes from USB/SD
VideorPicture, then press'Enterr to
such as tOSD languqger,tRestore
t:i
.
itt.
,i
ril
fl
:-l!.-:
ta.
ir,i
;i