1
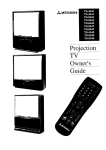
_= MITSUBISHI
Projection
Television
Owner' s
Guide
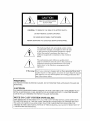
RISK OF ELECTRIC SHOCK
DO NOT OPEN
CAUTION:
TO REDUCE THE RISK OF ELECTRIC SHOCK,
DO NOT REMOVE COVER (OR BACK).
NO USER-SERVICEABLE
PARTS INSIDE.
REFER SERVICING TO QUALIFIED SERVICE PERSONNEL.
The lightning flash with arrowhead
symbol, within
an equilateral
triangle, is intended to alert the user
to the presence of uninsulated
"dangerous voltage"
within the product's enclosure that may be of
sufficient magnitude
to constitute a risk of electric
shock.
The exclamation
point within an equilateral
triangle is intended to alert the user to the presence
important
operating and maintenance
(servicing)
instructions
in the literature
accompanyinlg the
appliance.
_Warning:
of
Don't leave stationary
images, such as those generated
from stock
market reports or video games, on-screen £or more than 10 minutes.
Still patterns can scar the Projection TV causing permanent
damage to the picture tubes.
"WARNING:
TO PREVENT
MOISTURE.
FIRE OR SHOCK
HAZARD,
DO NOT EXPOSE
THIS APPLIANCE
TO R,_IN OR
CAUTION:
TO PREVENT ELECTRIC SHOCK HAZARD, DO NOT USE THIS UNIT'S _POLARIZED) PLUG
WITH AN EXTENSION
CORD, RECEPTACLE
OR OTHER OUTLET UNLESS THE BLADES
(',AN BE FULLY INSERTED TO PREVENT BLADE EXPOSURE.
NOTE
TO CATV SYSTEM
INSTALLER:
THIS REMINDER
IS PROVIDED TO CALL THE CATV SYSTEM INST__J_LER'S ATTENTION
TO ARTICLE 820-40 O]_ THE NEC THAT PROVIDES GUIDELINES
FOR PROPER GROUNDING AND, IN PARTICULAR,
SPECIFIES
THAT THE CABLE GROUND SHALL BE CONNECTED TO THE GROUNDING
SYSTEM OF THE BUILDING, AS CLOSE TO THE POINT OF
CABLE ENTRY AS PRACTICAL.
_
Table
MITSUBISHI
OWNER'S
of Contents
GUIDE
Important
Preface:
Safeguards
Welcome
Summary
...............................................................
to Mitsubishi
of Special
Unpacking
Your
What's
in Each
Some
Conventions
Chapter
1: Getting
.............................................
5
............................................
6
TV ...........................................
7
Features
Projection
Chapter
Used
to Know
.......................................................
8
in this
9
Your
Overview
of the
Control
Panel
Overview
of the
Remote
Control
Getting
Remote
Chapter
Overview
Guide
..............................
Projection
TV ............
12
.....................................
15
Your Projection
TV ......................
of the Back Pane] ..............................................
Basic Connections
11
........................................
ready to use the remote
centrol
....................
control
buttons
and functions
.......................
2: Connecting
3
15
17
23
24
.............................................................
26
Projection TV + antenna or cable without a
decoder box ..............................................................
27
Projection TV + cable with
a decoder box ...........................................................
28
Projection TV + separate UHF aml VHF antennas...
Projection TV + VCR + antenna or cable without
a decoder box ...........................................................
Projection TV + VCR + cable with
a decoder box ...........................................................
Projection TV + home theater receiver
(A/V receiver) ..........................................................
Projection TV + audio system .....................................
Projection TV + Mitsubishi produc, ts that have A/V
Network terminals
..................................................
40
3: Operating
TV .........................
43
Getting Started .................................................................
Using the remote control .............................................
Turning the Projection TV on/off ................................
Selecting the input source ..........................................
Changing channels .......................................................
Understanding
the on-screen menus .........................
Setting the clock ...........................................................
Memorizing
channels ...................................................
Adding and deleting channels ....................................
Setting the A/V Network .............................................
Aligning the colors .......................................................
Renaming the inputs ...................................................
Selecting the menu language
....................................
44
45
49
50
51
54
55
57
58
59
60
61
62
Chapter
Your
Projection
30
31
34
37
39
Using video mute .........................................................
Using the power restore
feature
..................................
Choosing
an advanced
PIP function
............................
Adjusting
the sound ......................................................
Adjusting
the picture
...................................................
Using the closed caption
decoder
...............................
63
64
65
66
68
70
Using the Advanced
Features
.........................................
Setting
the timer ...........................................................
Using the parental
lock ...............................................
Using the Super
Quick View tuning
..........................
Using home theater
......................................................
72
73
74
76
77
Chapter
4: Using
the
Understanding
Features
the On-Screen
..............................
Displays
79
..........................
80
Using the Off-Timer
..........................................................
Setting
the off-timer
. ...................................................
Changing
or canceling
the off-timer
...........................
81
82
83
Using the Picture-in-Picture
(PIP) Mode ........................
Selecting the PIP image ...............................................
Selecting the source .....................................................
Selecting the channel ...................................................
Exchanging
the PIP image .........................................
Moving the PIP image .................................................
Freezing the PIP image ...............................................
Using the Snap-shot feature ........................................
Using the Replay feature ..............................................
84
85
86
86
87
87
88
89
90
Using
91
Chapter
the Active A/V Network
5: Troubleshooting
Using
the
Caution
Calling
Appendix:
Parental
Index
Warranty
2
Special
VCR
tray
Feature
..........................
..................................................
...........................................................
98
and Care ..............................................................
for Service
...........................................................
Automatic
Procedure
for the
Lock ...........................................................................
..........................................................................................
.........................................................
Table of Contents
Inside
95
99
100
101
103
back
cover
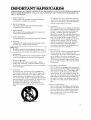
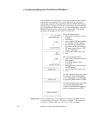
IMPORTANT
PLEASE READ ALL THESE
FOR FUTURE REFERENCE.
THE TV RECEIVER.
1.
SAFEGUARDS
INSTRUCTIONS
REGARDING
YOUR TV RECE1RrER AND RETAIN
FOLLOW ALL WARNINGS AND INSTRUCTIONS
MARKED ON
Read Instructions
All the safety and operating instructions
read before the appliance is operated.
2.
Retain Instructions
The safety and operating instructions
retained
for future reference.
should
should be
3.
Heed Warnings
All warnings on the appliance
and in the operating
instructions
should be adhered to.
4.
Follow instructions
All operating and use instructions
5.
should be followed.
Cleaning
Unplug this TV receiver from the wall outlet
cleaning. Use a damp cloth for cleaning.
before
l, Warning:
Do not use liquid or aerosol cleaners to clean your
TV. Cleaners may permanently
damage your screen.
6.
7.
Attachments
Do not use attachments
receiver manufacturer
not recommended
by the TV
as they may cause hazards.
Water and Moisture
Do not use this TV receiver
near water
-- for ex-
ample, near a bath tub, wash bowl, kitchen sink, or
laundry tub, in a wet basement,
or near a swimming
poo!, and the like.
8.
An appliance and cart combination
should be
moved with care. Quick stops, excessive force,
and unewm surfaces may cause the appliance
and cart combination
to overturn.
be
Accessories
Do not place this TV receiver on an unstable
cart,
stand, tripod, bracket, or table. The TV receiver may
fhl[, causing serious injury to a child or adult, and
serious damage to the appliance. Use only with a
cart, stand, tripod, bracket, or table recommended
by
t]ae manufacturer,
or sold with the TV receiver. Any
mounting of the appliance should follow the
manufacturer's
instructions,
and should use a
mounting accessory recommended
by the manufacturer.
9.
Ventilation
Slots and openings in the cabinet are provided
for ventilation
and to ensure reliable operation
of the TV receiver and to protect it from overheating, and these openings must not be
blocked or covered. The openings should never
be blocked by placing the 'IV receiver on a bed,
sofa, rug, or other similar surface. This TV
receiver should never be placed near or over a
radiator or heat register. '['his TV receiver
should not be placed in a built-in installation
such as a bookcase or rack unless proper
ventilation
is provided or the manufacturer's
instructions
have been adhered to.
10. Power Sources
This TV receiw_r should be operated only from
the type of power source indicated on the
marking label. If you are not sure of the type of
power supply to your home, consult your
appliance dealer or local power company. For
TV receivers intended to operate from battery
power, or other sources, refer to the operating
instructions.
11. Grounding
or Polarization
This TV receiver is equipped with a polarized
alternating-current
line plug (a plug having one
blade wider than the other). This plug will fit
into the power outlet only one way. This is a
safety feature. If you are unable to insert the
plug fully into the outlet, try reversing
the plug.
If the plug should still t'ail to fit, contact your
electrician
to replace your obsolete outlet. Do
not defeat the safety purpose of the polarized
plug.
12. Power-Cord Protection
Power-supply
cords should be routed so that
they are not likely to be walked on or pinched
by items placed upon o_:against them, paying
particular
attention
to cords at plugs, convenience receptacles,
and the point where they
exit from the appliance.
3
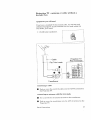
13. Lightning
For added protection for this TV receiver during a
lightning storm, or when it is left unattended
and
unused for long periods of time, unplug it from the
wall outlet and disconnect the antenna
or cable
system. This will prevent damage to the TV
receiver due to lightning
and power-line surges.
14. Power Lines
An outside antenna
system should not he located
in the vicinity of overhead power lines or other
electric light or power circuits, or where it can fall
into such power lines or circuits. When installing
an outside antenna
system, extreme care should
be taken to keep from touching such power lines
or circuits as contact with them might be fatal.
15. Overloading
Do not overload wall outlets and extension
cords
as this can result in a risk of fire or electric shock.
16. Object and Liquid Entry
Never push objects of any kind into this TV
receiver through openings as they may touch
dangerous
voltage points or short-out
parts that
could result in a fire or electric shock. Never spill
liquid of any kind on the TV receiver.
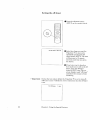
17. Outdoor Antenna Grounding
If an outside antenna or cable system is connected
to the TV receiver, be sure the antenna
or cable
system is grounded so as to provide some protection against voltage surges and built-up static
charges.
Section 810 of the National Electrical
Code, ANSI/
NFPA No.70, provides information
with regard to
proper grounding
of the mast and supporting
structure,
grounding
of the lead-in wire to an
antenna discharge unit, size of grounding
conductors, location of antenna
discharge unit, connection to grounding
electrodes,
and requirements
for
the grounding
electrode.
EXAMPLE
OF ANTENNA
GROUNDING
._NNA
LEAD IN WIRE
DISCHARGE
(NEC
SECTION
UNIT
8!0-20)
GROUNDING
CONDUCTORS
_(NEC
SECTION8!0-21)
ELECTRODE
NEC
-- NATIONAL
ELECTRICAL
CODE
(NEC
ART 250,
SYSTEM
PART
H)
18. Servicing
Do not attempt
to service this TV receiver
yourself as opening or removing covers may
expose you to dangerous
voltage or other
hazards. Refer all servicing to qualified service
personnel.
19. Damage Requiring
Service
Unplug this TV receiw._r l'rom the wall outlet
and refer servicing to qualified service personnel under the following conditions:
(a) When the power-supply
cord or plug is
damaged.
(b) If liquid has been slpilled, or objects haw_
fallen into the TV receiver.
(c) If the TV receiver
or water.
has been exposed
to rain
(d) If the TV receiver does not operate normally
by following the operating instructions.
Adjust only those controls that are covered
by the operating in,_tructions as an improper
adjustment
of other controls may result in
damage and will often require extensive
work by a qualified technician
to restore the
TV receiver to its normal operation.
(e) If the TV receiver has been dropped or the
cabinet has been damaged.
(f) When the TV receiver exhibits a distinct
change in performance
--- this indicates a
need for service.
20. Replacement
Parts
When replacement
parts are required, be sure
the service technician
has used replaceraent
parts specified by the manufacturer
or have the
same characteristics
as the original pan;.
Unauthorized
substitutions
may result i[n fire,
electric shock or other hazards.
21. Safety Check
Upon completion of any service or repairs to this
TV receiver, ask the service technician
to
perform safety checks to determine
that the TV
receiver is in safe operating condition.
_Warning:
Do not leave stationary
images, such as stock
market reports or video games, on-screen for
more than 10 minutes.
Still patterns
such as
these can scar the TV, causing permanent
damage to the picture tubes.
Welcome
PREFACE
to Mitsubishi
Congratulations
on your purchase of a Mitsubishi Projection TV.
Your Projection TV is designed for superb viewing pleasure as well
as continued reliability.
To familiarize
you with your Projection TV and owner's guide, we
suggest that you read through the preface, which provides tlhe
following important
information:
0
Summary
of SpecialFeatures
0
Unpacking
0
What's
in Each
0
Some
Conventions
Your
Projection
TV
Chapter
Used
in this
Guide
Mitsubishi
has strived to create your Projection TV so that it will
bring you years of viewing enjoyment.
Similarly, your owner's
guide is designed with a "user friendly" philosc,phy that will help
you take advantage
of all of your equipment's
ihatures.
Once again,
Mitsubishi!
thank
you for selecting
our product
and welcome
to
€ Summary
of Special
Features
Your top-rated
Mitsubishi
• 181-Channel
Capacity
ensuring your continued
continue to expand.
Projection
TV delivers:
--- programs up to 181 channels,
viewing pleasure as cable services
• Two-Speaker
Sound System
produces clear stereo sound.
--- a special
speaker
system
that
• Expanded
Sound Capability
--- allows you to connect the
Projection TV to an external audio system for enhanced listening pleasure.
In addition
Projection
features:
to the standard
features
found on most advanced
TVs, Mitsubishi
is proud
to offer the following distinctive
Remote
Control with TV/VCR/CABLE
Function
--- uses a
single remote control transmitter
for t:he television, certain
Mitsubishi VCRs, and also some VCRs and cable boxes of other
manufacturers.
• On-Screen
Displays
.... appear whenever you adjust your
Projection TV, showing you the status of your Projection TV's
various functions.
• On-Screen
Menu --- simplifies
easy to follow instructions.
the television's
• Closed Caption Decoder
.... supplies
along with the regular broadcasts.
features
with
you the text information
Extended
Data Services
-- (also _mown as "XDS:,") allows
broadcasters
to supply you _th the time of day, channel information, and program information.
You: can display this information on-screen.
• Picture-in-Picture
Mode
sources at the same time.
--- allows you to view two different
• Active A/V Network
.... allows you to perform many of the
commonly used features of your system at the press of just one
button.
Each of these features will be explained in more detail in Chapter
3, "Operating
Your Projection TV," and Chapter 4, "Using the
Special Features."
6
Preface:
Welcome
to Mitsubishi
Unpacking
Your
Projection
TV
What you will find
As you unpack your new Projection TV, please check to be sure that
along with the Projection TV, the following items are included:
•
•
•
•
•
•
an owner's guide containing
a warranty,
a registration
card,
a remote control transmitter,
a set of two AA size batteries
for the remote control,
an A/V network cable, and
a belt to hold your VCR on the VCR tray.
(The VS-6041 does not haw_ a belt or a VCR tray.)
A few suggestions
Before you hook up your new Projection
minutes to:
TV, please
take a few
O
Complete the registration
card. The registration
card asks for
the Projection TV's serial number, which you'll find on the back
of the unit.
O
Keep the box and packing
materials
for future
use.
File your sales receipt.
O
Place the Projection TV on a stable
lighting to do the hook-up.
Unpacking
Your Projection
TV
surfac.e with sufficient
7
What's
in Each
Chapter
Here's
what you will find in this owner's
guide:
Chapter 1, "Getting
to Know Your Projection
TV," introduces
you to the location and functions of the buttons and controls of your
Projection TV.
Chapter 2, "Connecting
connect a VCR, antenna,
Projection TV.
Your Projection
TV," explains how to
decoder box and other equipment
to your
Chapter 3, "Operating
Your Projection
TV," provides the stepby-step instructions
you need in order to use your Projection TV.
Chapter 4, "Using the Special Features,"
some of the special features of the Projection
Chapter
5, "Troubleshooting,"
may have along with suggestions
The appendix
lock.
explains
8
Preface:
Welcome
procedure
for the parental
index at the back: of the book.
to Mitsubishi
how to use
summarizes
the problems you
for remedying these problems.
an automatic
You'll also find a detailed
explains
TV.
t Some
Conventions
Used
in this
Guide
Mitsubishi has gone to great; effort to provide users with an easy-tofollow, useful owner's guide. You will find that different types of
information
are treated in different ways.
Users should read information
labeled Important
and i!nformation
that is boxed and labeled Warning.
The owner's guide uses these
terms sparingly, and all information
highlighted
in this manner
should be read carefully.
main
topic or task [
€ Basic
l list of related
topics or tasks
[
[related
topics or tasks
]
Conn_tions
oj_oa
_
TV ÷_t,,nna
haw __._
_m
_ cable _thout.
_1
_u_. y_ _lll ._ _,_
..............
[&
- F_t Twn _e_
4)
1
"rran_e_r
%.
I
I[O,O,.etc.
This cue indicates information
critical to the operation of your
new Projection TV.
This cue alerts you to information describing dangerous
situations
that could ruin your
equipment
or cause electrical
shock.
Some Conventions
Used in tlhis Guide
The st_p-by-step
instructions
on how to accomplish a
particular
task are signaled
by white numbers on a black
background.
9
CHAPTER
Getting
toONEKnow
Your Projection
TV
Now that you've unpacked your Projection TV, read through the
safety information,
and glanced at the overview explaining how
this owner's guide is organized, it's time to become familiar with
the buttons and controls you'll !be using when you operate the
Projection TV. This chapter will introduce t:he range of opti.ons
available when using the buttons on the remote control or on the
control panel of the Projection TV. It also offers some general
guidelines for using the remote control.
Most functions can be controlled by using either the control panel
or the remote control, but certain specialized :Functions require the
use of one or the other. This chapter, which will familiarize
you
with the full range of button functions, contains the following
sections:
0
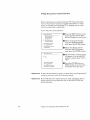
Overview
of the
Control
Panel
Overview
of the
Remote
Control
Overview
of the
Control
Panel
(6
VS-4541/4542
I
s,;_o
]
VS-5041/5042
II
II
_r
_,
•
",
•
•
",
r--n
VS-6041
power button (POWER)
Use this button to turn the Projection TV on or off. When you
turn the Projection TV on, the power indicator will light, in
green.
volume controls
(VOL)
Press the • button to turn up the volume
turn down the volume.
6)
12
and the • button
to
channel
controls
(CHANNEL)
Use the • button to switch to a channe| with a higher number
and the • button to switch to a channel[ with a lower number.
Chapter
1: Getting
to Know Your Projection
TV
®
@
input button (INPUT)
Use either button to select the input
• Antenna A,
• Antenna B, or
• External
1, 2 or 3.
source to be viewed:
audio and video controls
These buttons are used in pairs to adjust features of the image
or sound (other than volume) with a r_wo-step process: using the
AUDIO or VIDEO buttons to select a function, and then using
the ADJUST
buttons
to adjust
the function.
audio function
button (AUDIO)
the following audio functions:
- stereo/SAP/mono,
-bass,
- treble,
- balance,
- surround off/simulate/hall,
- speaker on/off, or
- monitor out variable/fixed.
.... Use to select one of
video
--- Use to select one of
function
button
(VIDEO)
the following video functions:
- tint,
- color,
- contrast,
- brightness,
- sharpness,
- notch filter on/off,
- color temperature
high/middle/low,
- closed captioning.
or
adjust buttons
(ADJUST)
--- AYter selecting the audio or
video function, use either the up or the down button to
adjust the function you've selected. These buttons can be
used to:
- turn the function on or off (e.g., notch filter),
- increase or decrease the function (e.g., color),
- shift from one end of a scale to the other (e.g., balance), or
- select a position (e.g., stereo).
The adjust buttons
screen menu.
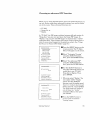
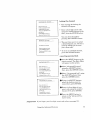
Overview
of the Control
are also used to select an item fi'om the on-
Panel
13
Overview
of the
Control
Panel
(c.ont.)
®
A/V reset button (A/V RESET)
Press to reset all audio and video functions to their normal
level or setting except for' volume, reception mode (Stereo/SAP/
Mono), monitor out (variable!fixed)
and closed captioning.
®
test button
This button is used to make sure that your Projection
three picture tubes are perfectly aligned.
®
TV's
audio input terminals
Use to connect the audio output from a VCR or other equipment.
video input terminal
Use to connect the video output from a standard
another component to the Projection '1%_.
VCR or
S-VIDEO input terminal
Use to connect the video output of a Super VHS (S-VHS) VCR
to the Projection TV. If you connect S-VHS VCR to this terminal, EXT-3 will automatically
be the input for viewing an
S-VHS VCR.
power / program
timer indicator
This indicator lights up in green when you turn the :Projection
TV on. It lights up in red when the Projection TV is programmed to turn on at a particular
time. If the Projection TV is
programmed
to turn on and is already turned on, the indicator
will light up in orange.
14
Chapter
1: Getting
to Know Your Projection
TV
Overview
of the
Remote
Control
Getting
ready
installing
the batteries
O
to use
Take the box containing
bag.
the remote
control
two AA size batteries
Remove the back cover of the remote
direction of the arrow.
from the packing
conl:ro] by pushing
Load the batteries
as indicated in the ill_Lstration, making
that they are positioned correctly (+ to +, and - to -).
in the
O
Replace
the back cover of the remote
control.
O
O
For best results,
Overview
sure
use Duracell
of the Remote
AA (MN1500)
Control
batteries.
15
Getting
some
ready
to use
the remote
control
(cont.)
dos and don'ts
To ensure that your remote
follow these guidelines:
control
will co_tinue
working
properly,
• Don't press two or more buttons at the _,;ame time, unless
specifically instructed
to do so in this owner's guide.
• Don't allow the remote control to get wet or become heated.
• Avoid dropping the remote control on a hard surface.
• When cleaning the remote control, don't use any harsh chemicals. Use only a soft, slightly moistened cloth.
general
instructions
When using the remote control to operate
or cable box, follow these procedures:
O
Be within
O
Point the top of the remote
Press
guidelines
20 feet of the desired
the appropriate
for using
toward
batteries
The following section explains more about
available when using the remote control.
Chapter
1: Getting
the equipment.
or sequerLce of buttons.
• Don't use a new battery with an old one.
• Don't heat, take apart, or throw batteries
16
TV, VCR
equipment.
control
button
the Projection
to Know Your Projection
into a fire.
the range
TV
of options
Remote
control
buttons
and
functions
q
"rv
C_
CABLE
VCR-A
VCR-B
CC) _--__.3
C..._
O REC
STOP
1
PAUSE
© __®
@
REW
MUTE
PLAY
SQV
QV
VOLUME
®
®
@.
@
®
MENU
/"_ """_
Q.. %)
op
@
©
FF
INPUT
CANCEL
CHANNEL
DISPLAY
HOME
C_) (CD CC3 q.._--_
QUICK
PROGRA
VCR/TV
OF:F-T
@
-4ZD
C/dANNEL
@
Q ® ,:b
® ® ,:b
SOURCE
_)--
i
Overview
of the Remote
Control
17
Remote
control
buttons
and functions
(conlL.)
Q
select buttons
Use these buttons to select the component you wish to operate:
the Projection TV, an cable box, or a VCR. These are also used
to set up your remote control for your particular brand of VCR.
®
VCR buttons
The remote control is pre-set to operate Mitsubishi VCRs, and
it can also operate VCRs from other manafacturers.
The PLAY
button is also used with the Active A/V Network. (See "Using
the Active A/V Network Feature," page 91.)
®
power button (POWER)
Use this to turn the Projection TV on or off. When you turn the
Projection TV on, the power indicator wi]] light in green.
®
mute control
(MUTE)
Use this button to turn the sound off completely
its original volume.
or re_,store it to
®
super quick view button (SQV)
Press this button to view the channels that you have programmed into super quick view memory
®
quick view button (QV)
Press this button to instantly
switch to the channel that you
memorized
as the quick _iew clhannel. (See page 53.)
®
volume control
(VOLUME)
Press the top part of the button to tur_ up the volume; press
the bottom part of the button to turn down the volume.
®
input button (INPUT)
Use to select the input source you wish to watch:
• Antenna A,
• Antenna B, or
• External
1, 2 or 3.
®
channel
control
(CHANNEL)
Press the top part of the button to change to a channel with a
higher number; press the bottom part tc change to a channel
with a lower number.
enter button (ENTER)
Use this button after selecting a channel number or after
selecting an item from the on-screen menu system. YOU will
also use this button with the PIP function.
18,
Chapter
1: Getting
to Know Your Projection
TV
©
audio and video controls
These buttons are used in pairs to adjust features of the image
or sound (other than volume) with a two-step process: using the
AUDIO or VIDEO buttons to select a function, and then using
the up/down adjust buttons or rightJ]eft buttons to adjust it.
audio function
button (AUDIO)
the following audio fhnctions:
- stereo/SAP/mono,
- bass,
- treble,
- balance,
- surround,
- speaker on/off, or
- monitor out variable/fLxed.
--- Use to select one of
video function
button
(VIDE())
the following video fianctions:
- tint,
--- Use to select one of
- color,
-
contrast,
brightness,
sharpness,
notch filter on/off,
color temperature
:high/middle/low,
closed captioning.
or
up/down adjust buttons,
right/left
buttons
--- After
selecting the audio or video function, use either the up
(right) or the down (left) button 1;oadjust the function you've
selected. These buttons can be used to:
-
turn the function on or off (e.g.. notch filter),
increase or decrease the function (e.g., color),
shift from one end of a scale to the other (e.g., balance),
select a position (e.g., stereo).
You will also use the adjust
screen menus.
@
@
buttons
to select items
or
on the on-
menu button
(MENU)
Use this button to display the on-screen menu system,
gives you access to your Projection 'r_Ps features.
which
cancel button
(CANCEL)
This button is used to cancel a channel number, to erase the
parental lock code, to clear a channel from super quick view
memory, and to clear the settings of c,n-screen menus.
Overview
of the Remote
Control
19
Remote
@
control
buttons
display button (DISPLAY)
Use to view an on-screen summary
and the display related to Extended
(_) home button (HOME)
Press to return to regular
displays and menus.
®
and functions
(cont.)
of the current TV settings
Data Services (XDS).
TV viewing
fi,om the on-screen
quick program button (QUICK PROGRAM)
Use this button to perform automated
programming
operations
with both your Projection TV and your Mitsubishi VCR. When
you press this button, your' Projection TV will switch to the
External-1
input, your VCR will turn on, and the VCR's "Program to record" menu will appear. When you are finished
programming
your VCR, press this button again; your VCR will
turn off and your Projection TV will return to its previous state.
If you press this button while the Projectfon TV is locked, or
while using the television's
menus, then the VCR will turn on,
but the Prqjection TV will not switch inputs.
_Important:
You must have connected
feature to work correctly.
number buttons
Use these buttons
parental
your VCR with the A/V Network
(0-9)
to select a channel
Chapter
and to enter
the
lock code.
@J off-timer
button
(OFF-T)
Use this button to program
matically at a later time.
20
number
for this
1: Getting
the Projection
to Know Your Projection
TV to turn off auto-
TV
®
picture-in-picture
Use these buttons
features.
controls
to control the special
picture-in-picture
(PIP)
• PIP button
(PIP) --- Press this button to begin displaying
the reduced PIP image or cancel it. This button carl also be
used with the Active A!V Network features. (See page 91.)
• channel
button (CHANNEL)
--- Press this button
change the channel of the reduced PIP image.
to
• source
button
(SOURCE)
--- Press this button to switch
the source of the reduced PIP image between the q_V and the
external inputs.
pause button
(PAUSE)
--- Press this button to freeze the
reduced PIP image or to return the image to a "live" picture.
You can also use this button with the advanced PIP functions.
• enter button (ENTER) --- Press this button
the reduced PIP image and the main image.
to exchange
• adjust (up/down)
buttons,
right/left
buttons
--- Press
these buttons to move the reduced PIP image on the screen.
Overview
of the Remote
Control
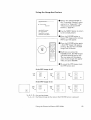
21
A
(_HAPTER
Connecting
TWO
Your
Projection
TV
This chapter offers step-by-step
instructions
for completing
most common hook-ups. It contains the following sections:
0
Overview
0
Basic
of the
Connections
Back
Panel
the
Overview
of the
Back
Panel
I
MONITOR
f TUNE'R
ANT-A
A
U
D
VHF/UHF
I
O
(75f_)
OU'[ _UT
6)
6)
6)
antenna
Connect
terminals
(ANT-A, ANT-B)
cable antennas
or VHF/UHF antennas
here.
video monitor/tuner
output terminal
Use these terminals
to "send out" the TV's video signal
VCR, a Home Theater receiver, etc.
audio monitor/tuner
output terminals
Use these terminals
to "send out" the TV's audio sigT_al to a
VCR, a Home Theater receiver, etc.
(_) S-VIDEO input terminal
Use these terminals
to "bring in" a Sloper VHS (S-VHS)
from a VCR or disc player into the Projection TV.
_Important:
24
to a
If' you connect Super VHS equipment,
the input for viewing your VCR.
Chapter
2: Connecting
Your Projection
signal
E)[T-1 will automatically
TV
be
®
®
video input terminals
Use these terminals
to "bring :in" a video signal
another component into the Projection TV.
Active
A/V Network
terminal
Use this terminal to connect
network terminals.
Mitsubishi
products
audio
input
terminals
Use these terminals
to "bring in" an audio
other equipment
into your Projection
TV.
Overview
of"the Back Panel
from a VCR or
signal
that have A/V
from
a VCR
or
25
Basic
Connections
This section explains the basic connections you will need to make
between your Projection TV, antennas,
and VCR. You will see there
are different connections shown depending upon whether you have
a decoder box and the type of antenna you are using. Choose the
type of connection for the type of equipment
you have.
If you are having difficulty making the connections to your Projection TV, you may want to contact your Mitsubishi dealer or your
local cable company.
This
section
explains:
• Projection
TV + antenna
• Projection
TV + cable
•
TV + separate
Projection
or cable
with a decoder
UHF
l* Warning:
26
and
VHF
antennas,
or cable
without
TV + VCR + antenna
• Projection
TV + VCR + cable
• Projection
TV + home
theater
receiver
•
TV + audio
system,
and
Projection
You must connect
Picture-In-Picture
Chapter
with
2: Connecting
a decoder
products
a VCR to see two active
(PIP).
You should unplug your Projection
before connecting
them.
a decoder
box,
box,
• Projection
coder box,
° Projection
TV + Mitsubishi
work terminals.
_>Important:
without
a de-
box,
(A/V receiver),
that have
A/V Net-
images when using
TV and any other components
Your Projection
I
I
TV
Projection
TV + antenna
decoder
box
equipment
or cable
without
a
you will need
If you have a standard
75-ohm coaxial
additional equipment.
If your antenna
twin leads), you'll need:
cable: you will not need
has two leads (called flat
• 1 75-300 ohm transformer.
Cable
Projection TV
Rear Terminals
-- Flat Twin Leads
O
,mn_R
v_ec,
®
[
o
e_].2
O_PUT
£x'T4
_nput
Trans oto_rmer
connecting
O
Push or screw the end of' the cable onto the ANT-A terminal
the Projection TV.
connecting
O
a cable
an antenna
Use a screwdriver
with
to connect
Push or screw the transformer
Projection TV.
Basic Connections
on
fiat twin leads
the leads to the transformer.
onto the ANT-A terminal
on the
27
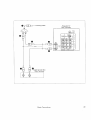
ProjectionTV
equipment
+ cable
with
a decoder
box
you will need
Use this hook-up if you do not need a decoder box to de,';cramble
basic cable channels, but you need a decoder box to descramble
premium cable channels. This hook-up will allow you to use your
Projection TV's advanced channel changing features, such as super
quick view, while watching basic cable channels.
To complete
need:
the hook-up,
• 1 two-way
splitter,
3 lengths
cables.
of 75-ohm
you'll
and
coaxial
Procedure
O
Connect
splitter.
the incoming
cable to the IN terminal
on the two-way
0
Connect
splitter;
terminal
a coaxial cable to one of the OUT terminals
on the
connect the other end of tt:ds cable to the ANT-A
on the back of the Projection TV.
0
Connect the second coaxial cable to the second OUT terminal
on the splitter; connect the other end of this cable to the IN
terminal on the decoder box.
Connect the third coaxial cable to the OUT terminal on the
back of the decoder box, and the other end of this cable to the
ANT-B terminal on the back of the Projection TV.
28
Chapter
2: Connecting
Your Projectio_
TV
O r_--
Incoming Cable
Projection TV
Rear Terminals
'I....
O
CABLES
----
0
O!
0
Cable Decoder Box
Rear Terminals
OUT
Basic Connections
29
Projection
TV+
equipment
If UHF
separate
UHF
and
VHF
antennas
you will need
and VHF
signals
are
brought
into your
home
with
two
separate
antennas,
you'll need I;o combine
the antennas
in order to
connect
them to the Projection
TV. To do this you will need a UHF/
VHF combiner.
(There
are different
combiners
for diff;arent
kinds of
leads.
biner
Check with
you need.)
Pictured
standard
To connect
your
Connect
O
Press
TV.
electronics
UHF
the antenna
the combiner
and VHF antennas
for the
kind
of com-
to your Projection
leads to the UHF/VHF
combiner.
UHF Antenna
(Channels 14-69)
|\|
.......
\ \".\\
I
\\_
Flat Twin Lead Flat Twin Lead
External
Antenna
or Cable
Projection TV
Rear Terminals
300 Ohm to
0
o7oSmObhi
nmr
919Q i
t_P •
Back
30
Chapter
2: Connecting
TV:
onto the ANT-A 1;erminal on the Projection
VHF Antenna
(Channels 2-13)
\\
store
to the right is a
combiner.
separate
_]l
local
Your
Side
Projectioa
TV
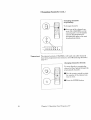
Projection
TV + VCR
decoder
box
equipment
+ antenna
or cable
without
a
you will need
You may want to connect a VCR along with your antennas
or cable.
To complete this hook-up, you may need the following equipment:
1 length
of coaxial
cable,
1 set of RCA pin-type
cables,
audio
1 RCA pin-type video cable, (if
connecting
a standard
VCR), or
1 Super Video cable (S-VHS) for
Super VHS VCRs.
Basic Connections
31
Projection
TV + VCR
decoder
box (cont.)
+ antenna
or cable
without
a
procedure
O
Connect
terminal
the incoming (',able or antenna
on the VCR.
O
Connect; one end of a coaxial
terminal on the VCR.
to the ANTENNA
cable to the ANTENNA
IN
OUT
Connect the other end of the cable to the ANT-A terminal
the Projection TV.
O
_Important:
Connect an RCA pin-type video cable to the VIDE{) OUT
terminal on the back of the VCR. Connect the other end of this
cable to the VIDEO INPUT terminal
on the back c,f the television.
If you are connecting a Super VHS (S-VHS) VCR, use a Super
Video cable instead of an RCA pin-type video cable. Connect a
Super Video cable to the S.-VIDEO OUT terminal on the VCR.
Connect the other end of this cable to the S-VIDEO INPUT terminal on the back of the Projection TV.
O
Connect a set of RCA pin-type audio cables to the .AUDIO OUT
terminals
on the back ,of the VCR. Use the red cable to connect
the right (R) channel and the white cable for connecting
the left
(L) channel.
Connect the other ends of this cable to the AUDIO
terminals
on the back of the Projection TV.
32
on
INPUT
_Important:
If your VCR is monaural (non-stereo),
you only need to connect a
single RCA pin-type audio cable. Connect the cable to the VCR,
then connect the other end to the L (LEF] _) audio input on the back
of the Projection TV.
_Important:
If your VCR has a video channel switch,
your VCR's owner's guide for details.
,_et it to "OFF/AV."
See
O
Start
O
Use the INPUT button on your Projection TV's remote control
to select the correct input. If you connected the VCR to EXT-1,
select EXT-1; if you connected the VCR to EXT-2, select EXT-2.
Chapter
playing
a tape on youc VCR.
2: Connecting
Your Projection
TV
VCR Rear
O
@
Incoming Cable
or Antenna
IN
Antenna
--4)
O
:_
OUT
VCR
Rear Terminals
Cable
Red Lead
Connect either one _
Projection TV Rear Terminals
MONITOR
/TUNER
S-
b,
VIDEO
.....
V
I
D
o
E-::l_]:>_
O
- c_-_>I_
Yellow Lead
_ u
D
I
O
F
OOTPUT
INPUT
Red Lead
O
_VVhite
Lead
Basic Connections
33
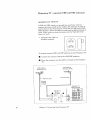
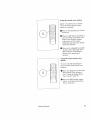
Projection
equipment
TV
+ VCR
+ cable
with
a decoder
you will need
This hook-up will allow you to record
viewing another channel.
To complete
need:
• 4 lengths
1 two-way
scrambled
of coaxial
while
cable,
splitter,
1 set of RCA pin-type
cables,
audio
1 RCA pin-type video cable, (if
connecting
a standard VCR), or
1 Super Video cable (S-VHS)
Super VHS VCRs.
Chapter
channels
the hook-up, you will
OUT
34
box
2: Connecting
Your
for
Projection
T'V
OUT
procedure
(See illustration
on the following
page.)
O
Connect
splitter.
the incoming
cable to the IN terminal
on the two-way
O
Connect
splitter,
terminal
a coaxial cable to one of the GUT terminals
on the
connect the other end of this cable to the ANT-A
on the back of the Projection TV.
Connect a second coaxial cable to the other OUT te_:minal on
the splitter; connect the other end of this cable to the IN
terminal on the decoder box.
O
Connect the third coaxial cable to the OUT terminal on the
back of the decoder box:, connect the other end of this cable to
the ANTENNA-IN
terminal on the back of the VCR.
Connect the fourth coaxial cable to one of the ANTENNA-OUT
terminals
on the back of the VCR. Connect the other end of this
cable to the ANT-B terminal on the back of the Projection TV.
Connect an RCA pin-type video cable to the VIDEO OUT
terminal on the back of the VCR. Connect the other end to the
VIDEO INPUT terminal on the back c,f the Projection TV.
_Important:
If you are connecting
a Super VtIS (S-VHS) VCR, use a Super
Video cable instead of an RCA pm-type video cable. Connect a
Super Video cable to the S-VIDEO OUT terminal on the VCR.
Connect the other end of this cable to the S-VIDEO INPUT terminal on the back of the Projection TV.
O
Connect a set of RCA pin-type audio cables to the AUDIO OUT
terminals
on the back of the VCR. Use the red cable to connect
the right (R) channel and the white cable for connecting the left
(L) channel.
O
Connect the other ends of this cable to the AUDIO INPUT
terminals
on the back of the Projection TV.
>Important:
If your VCR is monaural (non-stereo),
you will only connect a single
RCA pin-type audio cable. Connect the cable to the VCR, then
connect the other end to the L (LEFT) audio input on the back of
the Projection TV.
_Important:
If your VCR has a video channel switch,
your VCR's owner's guide for details.
Basic Connections
set it to "OFFiAV."
See
35
Projection
(cont.)
TV +VCR
+ cable
with
a decoder
0
Start playing
@
Use the INPUT button on your Projection TV's remote control
to select the correct input. If you connected the VCR to EXT-1,
select EXT-1; if you connected the V CR to EXT-2, select EXT-2.
a tape on your VCR
Incoming
Cable
O
Cables
VCR Rear
VCR Rear Terminals
IN
Antenna
0
©
L-Red
OUT
Lead
r.m-!>----
O
Connect
either one_
__
Cable
Projection
TV Rear Terminals
@.EC
,'TUNER
VIDEO
I
D
Vellow
Lead
o
O
ANT A
White Lead ---_
=:[_>
u
D
i
o
_5
O
Red Lead
EXT-2
OU
36
box
Chapter
TpU_
J
IN
EXT4
pUT
2: Connecting
Your Projection
TV
....
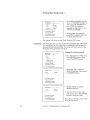
Projection
TV + home
(A/V receiver)
equipment
theater
receiver
you will need
To hook up a home theater
• 1 set of RCA pin-type
cables,
receiver,
you will need:
audio
2 RCA pin-type video cables (if
connecting a standard
VCR), or
1 Super Video cable (S-VHS) and
1 RCA pin-type video cable for a
Super VHS home theater receiver.
procedure
(Please see the
0
illustration
page.)
TV.
Connect one end of a video cable to the VIDEO OUTPUT
terminal of the home theater receiver. Connect the other end of
this cable to the EXT-1 VIDEO INPUT terminal on the back of
the Projection
Important:
next
Connect one end of a video cable to the TV VIDEO INPUT
terminal of the home theater receiver. Connect the other end of
this cable to the VIDEO TUNER OUTPUT terminal on the
back of the Projection
O
on the
TV.
If you are connecting
a Super VHS (S-VI-]S_ VCR, connect a Super
Video cable to the S-VIDEO OUTPUT terminal of the home theater
receiver. Connect the other end of this cable to the EXT-1
S-VIDEO INPUT terminal on the back of the Projection TV.
Basic Connections
37
Projection
TV + home
(A/V receiver)
(cont.)
0
receiver
Connect a set of audio cables to the TV AUDIO IN£UT terminal of the home theater receiver. Use the red cable 1;oconnect
the right (R) channel
(L) channel.
O
theater
and the white
cable for connec.ting
the left
Connect the other ends of this cable to the left and Hght AUDIO TUNER OUTPUT terminals
on the back of the Projection
TV.
0
Home theater receiver rear panel
i p] =lt]l_l'.,l.l
®®@@
TAP[-
AUX
I
VCR1
Connect
either one
t
i
VCR2
VI'R1
O;T
MONITOR
0
I
® _1---
0
'®4®®o®.So®
@®®'
pLAY
PHONO
White
Y
Lead
TAPE
AUX
]11
_
"
vc_, v,_ _??.L,t._t!i,,,,,,
'
O
Red Lead
Projection TV Rear Panel
NETWORK
AONITOR
0
White
TUNER
Lead---
0
\_,_,'1
.,,4: S
Red Lead
.....
:
_
I¢_ ',J
--
OUTPUT
38
Chapter
2: Connecting
Yore: Projection
TV
Projection
TV + audio
equipment
you will need
To hook up an audio
system
system,
you will need:
• 1 set of RCA pin audio cables.
procedure
0
Connect the audio cables to the
AUDIO MONITOR OUTPUT
terminals
on the back of the
Projection TV. Use the red cable
to connect the right (R) channel
and the white cable to connect
the left (L) channel.
Connect the other ends of these cables to the AUX IN terminals
on the back of the audio system.
O
Turn off the television's
speakers. Tc do this, press the AUDIO
function button on the control panel or remote control until you
see the SPEAKER display. Set the speakers to "External" by
pressing the adjust (up/down) or right/left, buttons. See "Adjusting the sound," page 66.
O
Set the audio
system's
input to the AUX position.
Audio System Rear Terminals
_-
White Lead
f
I_
AUX
Red Lead O
Projection TV Rear Terminals
ACTIVE
NETWORK
',%_.°.__
L
_---
White Lead
@1
,D
E
A
, U
D
O
----_-
Red Lead
\t.._!
Basic Connections
EXT2
E_T _
_r_pU_
--
39
Projection
AN Network
TV
+ Mitsubishi
terminals
products
that
have
The A/V Network is a special system that Mitsubishi
developed to
make it easier to use many products together. When the supplied
cable is connected between two Mitsubishi
products with the A!V
Network, you can point the remote control at one product and it
will "pass" the remote control command to the other.
equipment
you will need
• 1 A/V network cable (included
with the Projection TV).
procedure
O
Connect one end of an A/V network cable to the ACTIVE
NETWORK terminal on the back of 'the Projection [I57.
O
Connect
terminal
network
AiV
the other end of this cable to the A/V NETWORK IN
on the back of a Mitsubishi component that has A/V
terminals.
You can now point your component remote (such as a VCR
remote) directly at the television. The A/V cable will "pass" the
remote commands to the component,,
>Important:
40
The method of connecting
the A/V netwerk can change, depending
on which components
you have and the way you plan to use your
equipment.
More detailed information
is contained in the owner's
guide of each particular
Mitsubishi
component.
Chapter
2: Connecting
Your
Projection
TV
Mitsubishi
component
rear panel
0
Projection TV rear panel
(_
MONITOR
ACTIVE
NETWORK
VlSDEO I_.
V
D
E
,'TUNER
_
I
VNFtUHF
ANT-A
I
_
ol
EXT-2
OUTPUT
DUAO
EXT-1
INPUT
Basic Connections
41
_CHAPTER
Operating
•
THREE
Your
Projection
T_
:Now that your Projection TV is connected to the cable, antenna,
or
external components,
it's time to enjoy yo'_r equipment.
This
chapter will explain how to operate the Projection TV, first focusing
on functions that are basic and easy and then explainilng some
advanced features.
This chapter
0
Getting
0
Using
explains:
Started
the
Advanced
Features
Getting
Started
This section is designed to get you started enjoying your new
Projection TV. If you follow these procedures
one by one, you will
soon begin discovering everything
your' television can do.
You'll find information
• Using
the remote
• Turning
control,
the Projection
• Selecting
the
input
• Changing
channels,
• Understanding
• Setting
the
the
TV on/off,
source,
on-screen
channels,
• Adding
and
deleting
• Setting
the A/V Network,
the
• Renaming
• Selecting
the
inputs,
the menu
video
• Using
the power
language,
mute,
restore
• Choosing
an advanced
• Adjusting
the
sound,
• Adjusting
the
picture,
Chapter
channels,
colors,
• Using
• Using
menus,
clock,
• Memorizing
• Aligning
44
on:
the closed
3: Operating
caption
feature,
PIP function,
and
decoder.
Your Projection
TV
Using
the
operating
remote
control
Mitsubishi
components
Your remote control unit comes programmed
to operate Mitsubishi
Projection TVs and VCRs. The select buttons (across the top of the
remote control) determine which component the remote control will
operate.
The following buttons
•
•
•
•
•
•
•
•
•
•
are available
VCRs
or cable
TV:
• menu button
° cancel button
power button
pause button
mute control
super quick view button
quick view button
volume control
input button
channel control
enter button
audio and video controls
operating
when using this Projection
•
•
•
•
•
•
•
boxes
display button
hom_ button
off-timer button
number buttons
PIP controls
PLAY button
quick program button
from
other
manufa_cturers
The remote control is pre-set to operate Mitsubishi VCRs, but it
can also operate VCRs from other manufacturers
as well. If you
have a VCR 5"om another manufacturer,
or if you have a cable box,
you should "set up" the remote control.
Each layer (CABLE,
box or a VCR.
setting
O
VCR-A ,or VCR-B) can be set for either
up the remote
control
to operate
your
a cable
VCR
Turn off your VCR.
Press one of the select buttons across the top of the remote
control to choose the layer that you want to "set up." You can
choose between VCR-A, VCR-B or CABLE.
O
While holding in the POWER button o_ the remote control,
enter the code number listed in the chart on the following page
for your brand of VCR. Be sure to enter both digits of the code
number. If more than one number is listed, try the first one.
Release
the POWER
button.
Press the POWER button again. Your VCR should turn on. If
the VCR _urns on, your remote control :is now set to operate
your VCR.
Getting
Started
45
Using
the
remote
control
(cont.)
If your VCR does not turn on, repeat the instructions,
trying
each code number listed for your brand of VCR. If none of these
code numbers work, try each number, 01 through 20.
If your VCR is this
brand...
...enter
this code
If your VCR is this
•..enter
this code
brand...
Mitsubishi
(A)
0]
Phil[ps
03, 10, 11
Mitsubishi
(B)
02
Quasar
03
Canon
03
RCA
08, 13, 20
Emerson
04, 05
Sanyo
14
Funai
06
Scot
15
GE
03
Sharp
16
Goldstar
07
Sony
17, 18
Hitachi
08
Sylvania
03, 10, 11
JVC
09
Symphonic
06
Magnavox
03, 10, 11
Teknika
04, 06
Multitech
06
Toshiba
15
12
Totevision
O7
03
Zenith
19
NEC
Panasonic
Philco
setting
O
03, 10
up the remote
Turn offyour
control
to operate
your
cable
box
cable box.
Press one of the select buttons across the top of l:he remote
control to choose the layer that you want to "set up." You can
choose between VCR-A, VCR-B or CABLE.
O
While holding in the POWER bul:ton on the remote control,
enter the code number listed in the chart on the following page
for your brand of cable box. Be sure to enter both di_ts of the
number. If more than one number is listed, try the first one.
0
Release
the POWER
button.
Press the POWER button again. Your cable box should turn on.
If the cable box turns on, your remote control is now set to
operate your cable box.
If your cable box does not turn on, repeat the in,_tructions
abow_, trying each number listed fc,r your brand of cable box. If
none of these numbers work, try each number, 51 through 99.
46
Chapter
3: Operating
Your
p
°
.
rojectmn
_CV
If your cable box is
...enter
this brand...
Zenith
55.56
61,62,82
Pioneer
64,65,84
Important:
this code
Tocom
67, 68, 72
Panasonic
63, 70
Macom
54,57,58,59,60,85,87
Oak
...enter
this brand...
52,53,69
G.I.
S.A.
If your cable box is
51
Hamlin
Jerrold
this code
'71
Philips
73, 74, 75, 76, 77,
93, 94, 95, 96, 97, 98, 99
79
Regency
66,86,88,89,91,92
Sometimes manufacturers
will change their products, or they may
use more than one code. If tlhis is the case, your remote may not be
able to operate your VCR or cable box.
P>Important:
Each layer (CABLE,
box or a VCR.
D Important:
When you replace the batteries
will return to its initial setting.
using
your
remote
VCR-A or VCR-B) can be set for either
control
in your remote
to operate
After you have set up your remote control
of VCR, you can use the remote to operate
your
control,
a cable
the remote
VCR
for your particular
your VCR.
brand
_]P Use the select buttons across the top of the remote control to
choose the layer you "set up" to operate the VCR: VCR-A,
VCR-B or CABLE.
Point the remote
buttons.
control
at the VCR and press the desired
If you are using a Mitsubishi VCR, you will be able to use all of the
buttons on the remote control to operate your VCR except for
MUTE, VOLUME and the PIP function tmttons.
If you are using another brand of VCR, you can use the POWER,
CHANNEL,
REC, STOP, PAUSE, REW, PLAY and FF buttons to
operate your VCR.
Getting
Started
47
Using
using
the
your
remote
remote
control
control
(cont.,)
to operate
your
cable
box
After you have set up your remote control for your particular
brand
of cable box, you can use the remote to operate your cable box.
0
Use the select buttons across the top of the remote control to
choose the layer you "set up" to operate the cable box: VCR-A,
VCR-B or CABLE.
O
Point the remote
buttons.
control
at the cable box and press
Only the POWER and CHANNEL
operating your cable box.
48
Chapter
3: Operating
buttons
Your Proiection
TV
the desired
can be used. when
Turning
_>Important:
the Projection
Before using the remote
the TV SELECT button.
control
'IT on/off
to operate
the Projection
TV, press
Use the POWER button on either the control panel or the remote
control to turn the Projection TV on and off. The power indicator
will light up in green when you turn the _I_ on.
Important:
Even with the power turned off, there is a small current that
continues to flow into the Projection TV. This maintains
any
changes to the settings and operates the built-in clock and timing
functions. Unplugging
the set will erase these settings, requiring
you to set them again. Unplug tlhe Projection TV only when it won't
be used for a long time.
VS-4541,
VS-4542
@ ®®®
]
VS-5041,
VS-6041
@@@@@@@
@@@@@@@
Getting
Started
L_I
j-/
VS-5042,
@ ®®®
49
Selecting
the
input
source
Press the input button (INPUT) on the control panel or on the
remote control to select the input source you wish to view: Ant-A,
Ant-B, Ext-1, Ext-2 or Ext-3.
INPUT
0
(Z)
C_
_)
CZD
c;,O O (Dc:::_
cmO
c:_O 00 (D
0
INPUT
--[@@@
50
Chapter
3: Operating
Your Projection
@@
TV
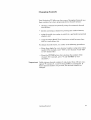
Changing
channels
Your Projection TV offers you tbur ways of changing
their numbers have been programmed
into channel
• selecting a channel
scan feature,
• directly
accessing
sequentially
a channel
channels
memory:
using the automatic
by pressing
the number
channel
buttons,
• using the quick view option to switch
channel, and
to a particular
• using the Super Quick View function
nels on a user-chosen
list.
to switch between
To change
channels
faster,
use either
once
memorized
chan-
of the following' procedures:
• Enter three digits for every channel number, using zeros where
needed. (For example, enter "004" to view channe'l 4 and "028"
to view channel 28.)
• Press the ENTER button after selecting the number of the
channel. (For example, press "4" and "ENTER" to view
channel 4.)
_Important:
Cable stations channel numbers 0 and greater than 1_26 are unassigned. TV stations 0, 1 and 7(1 through 999 are unassigned.
If
these channel numbers are pressed, the channel remains unchanged.
Getting
Started
51
Changing
channels
(cont.)
changing
channels
sequentially
_o
!ooo
i
To change
0
0 Press one of the channel controls (CH, CHJ2qNEL)
on the
control panel or on the remote
control. The Projection TV
automatically
goes to the next
broadcasting
station.
....
L_
channels:
_
]
bImportant:
The channel controls (CHANNEL) will work only after channels
have been programmed
into memory. (See "Memorizing
channels,"
page 57.)
changing
channels
directly
To move directly _o a particular
channel without going through
programmed
channels:
898
O Use the remote control to select
the number of the channel you
want to view.
oooo:
oooo_
_o
52
Chapter
3: Operating
the
Your Projection
Press
TV
the ENTER
button.
using the
quick
view
option
Quick view allows you to memorize a particular
channel then
switch to it quickly.
O Tune to the channel
memorize.
you wish to
O Press £ne QV button for about 3
seconds. When you release the
button, the channel number
will appear on the screen,
indicating that you ]have memorized that channel.
0
After you've changed to another
channel, press the quick view
(QV) button to immediately
return to Lhe memorized
channel.
using the super
option
To view
grammed
memory:
O
quick
selected
channels
into super quick
view
proview
Enter the desired channels into
Super Quick View inemory.
(See "Using the Super Quick
View tuning," page 76.)
Press 'the SQV button repeatedly to view the desired channels in sequence.
Getting
Started
53
Understanding
the
on-screen
menus
One of the distinctive features of this Projection TV is an on-screen
menu system that provides step-by-step
instructions
for using some
of the Projection T_Ys special capabilities.
When using any of the on-screen
mind:
• The on-screen
minutes.
• Unavailable
menus
menu
menus,
keep the following in
will clear if no item is selected
items
are indicated
within
5
in light blue.
• Some on-screen menu items must be set before other items are
available. For example, "Set the timer" will only be available if
"Set the clock" has been set.
• You can exit the on-screen menus any time by pressing the
MENU button repeatedly.
You will then return to regular TV
_iewing.
• You can also exit the on-screen
button on the remote control
54
Chapter
3: Operating
menus
Your Projection
TV
by pressing
the HOME
Setting
the
clock
Your Projection TV contains an internal
clock to indicate the
current time. If there is a broadcaster
in your area that: is sending
the current time along with its regular broadcast
signal, then your
Projection TV can automatically
set its clock with this signal.
Otherwise,
you can set the clock yourself.
O Press the MENU button on the
remote control. The TV Main
Menu will appear on the screen.
TV Main Menu
Your choices
are:
•
Set-Up
First Time
Customize
Viewing
Advanced
Features
Use ADJUST
Then press
Press
O Select "First Time Set-Up"
using the ADJUST buttons;
then, press the ENTER button.
to select.
ENTER.
MENU
to exit menus.
You will see the "First Time
Set-Up" screen. Select "Set the
clock" using the ADJUST
buttons; then, press the ENTER
button.
First Time Set-Up
•
Set the clock
Memorize
channels
Add/delele
ohannets
Set A/V Network
Align colors
Use ADJUST
Then press
Press
to select.
ENTER.
MENU
TV Main
to return to
Menu.
Set the clock
•
Auto clock
On
Day
- -
Clock
Time
Daylight
Atlantic
savings
Use ADJUST
Then press
Press
using
-zone
On
On
Day
Monday
Clock
t 0:00 am
zone
Atlantic
savings
Use ADJUST
Then press
MENU
On
to select.
ENTER.
Use the ADJUST b_attons to
select the "Time zone" you are
in; then, press the ENTER
button. The available time
zones are: Atlantic, Eastern,
Central, Mountain,
Pacific,
Alaska and Hawaii
Io return to
First Time Set-Up
Getting
• Set "Auto clock" to "On" using
the ADJUST buttons; press the
ENTER button.
Menu.
Auto clock
Press
setting
to return to
Set the clock
Daylight
clock
ENTER.
MENU
Time
automatic
to select.
First Time Set-Up
•
If you want your Projection TV
to set its clock automatically,
use _;he ADJUST buttons to set
"Auto clock" to "On"; if you
want to set the clock yourself,
set "Auto clock" to "Off."
Started
Menu.
55
Setting
the
clock
(cont.)
If you follow daylight savings
time, set "Daylight savings" to
"C)n" using the ADJUST buttons. If you do not follow
daylight savings time set it to
"Off." Press ENTER.
Set the clock
•
Auto clock
On
Day
Monday
Clock
10:00 am
Time zone
Eastern
Daylight
savings
Use ADJUST
Then
On
to select.
press ENTER.
Press
MENU
• At this point, you have prepared the Projection TV to set
its clock automatically.
to return 1o
First Time Set-Up
Menu,
The screen will return
D Important:
to the "First Time Set-Up"
menu.
The Projection TV can only set the clock automatically
when there
is a broadcaster
in :your area that is sending the current time via
Extended Data Services (XDS). The clock will start just after the
Projection TV receives the time data.
setting
Set the clock
•
Auto clock
--
Clock
--
Time zone
--
to select.
Then
press ENTER.
Press
MENU
to return to
F:irsl Time Set-Up
Menu.
o' Select the "Day" using the
ADJUST buttons. Then, press
the ENTER button.
Set the clock
•
yourself
• Set "Auto clock" to "Off' using
the ADJUST buttons. Then,
press the ENTER button.
--
savings
Use ADJUST
clock
Off
Day
Daylight
the
Day
Monday
Clock
- -
Use ADJUST
to select.
Then press ENTER.
Press
MENU
to relum
First Time Set-Up
to
Menu.
" Set the "Clock" using the
ADJUST buttons.
Set the clock
•
Day
Monday
Clock
10:00 am
Use ADJUST
to select.
Then
press ENTER.
Press
MENU
to return to
First Time Set-Up
56
Chapter
Menu,
3: Operating
'o After you haw.' set the "Day"
and "Clock," press the ENTER
button to start the clock.
The screen will return
'rime Set-Up" menu.
Your Projection
TV
to the "Firs
Memorizing
channels
You can use the menus to automatically
memorize the charmels
your Projection TV can receive. Once channels are memorized, you
can scan through them using the CHANNEL buttons.
First Time Set-Up
Set the clock
•
Memorize
channels
Add/delete
Set AN
channels
Network
Align colors
Use ADJUST
Then press
Press
to select.
ENTER.
MENU
TV Main
O Select "First Time Set-Up"
using the ADJUST buttons;
then, press ENTER.
1o return to
Select "Memorize channels"
using the ADJUST buttons;
then, press ENTER.
Menu.
Memorize
channels
On which
input
would you
O
like to memorize?
•
O Press the MENU button on the
remote control. The TV Main
Menu will appear on the screen.
Ant-A
Use ADJUST
press
Press
to select.
ENTER.
MENU
to return to
First Time Set-Up
Memorize
What
Menu.
channels
is connected
to
choose the terminal you connected your antenna or cable to:
Antenna A (Ant-A) ,or Antenna
B (Ant-B). If you connected an
antenna to each terminal,
then
you should memorize the
channels for one antenna now,
and for the other antenna later.
Press ENTER.
Ant-B
Then
Use the ADJUST buttons
to
your TV on Ant-A?
•
Cable
antenna
Indoor!outdoor
Use ADJUST
Then
press
Press
antenna
1o select.
ENTER.
MENU
to return to
First Time
Set-Up
Memorize
channels
Now memorizing
stations
Menu,
all the
you can receive
on Ant-A.
Channel
004
Not in memory
Please
stand-by.
To cancel
press
_Important:
memorizalion.
CANCEL.
O
Use the ADJUST
buttons
choose the type of antenna
connected: a cable antenna
an indoor/outdoor
antenna.
Then,
to
you
or
press ENTER.
You will see a message that
charmel memorization
is in
progress. A channel being
added to memory will be labeled
"In memory." Channels not
being added are labeled "Not in
memory." You may stop channel
memol_zation
at any time by
pressing CANCEL.
The channel controls will work only after ,channels have been
memorized. After memorization,
use the channel buttons to automatically advance to the next memorized channel. Use the number
buttons to select individual channels.
Getting
Started
57
Adding
and
deleting
channels
After all available channels have been memorized automatically,
channels with weaker signals can be added or deleted by using the
following procedure.
O Press the MENU button on the
remote control. The TV Main
First Time Set-Up
Set the clock
Memorize
Menu will appear
channels
_. Add/delete
O ;Select "First Time Set-Up"
"using the ADJUST buttons;
then, press ENTER.
Set A/V Network
Align colors
Use ADJUST
Then
to select.
press ENTER.
Press
MENU
to return
to
O ;Select "Add/delete channels"
•asing the ADJUST buttons;
then, press ENTER.
TV Main Menu.
Add/delete
Either "In memory" or
"Not in memory" will
appear.
on the screen.
channels
channels
Antenna
Ant-A
Channel
006
In memory
Use ADJUST
another
O The "Add/delete channels"
screen will appear. Select the
channel you would like to add
or delete using the ADJUST
buttons.
to select
channet.
Press
CANCEL
Press
MENU
to delete.
to return to
First Time Set-Up
Menu.
If a channel is labeled "in
:memory," use the CANCEL
button to remove it from
memory. If a channel is labeled
"not in memory," use the
ENTER button to add it to
memory
When you are finished adding
and deleting channels, press
the HOME button to return to
normal
Important:
TV viewing.
In this menu, you can also use the CHANNEL
channels.
You can switch between the antennas
(Antenna
by pressing the input: button (INPUT).
58
Chapter
3: Operating
Your Projection
TV
buttons
to change
A and Antenna
B)
Setting
the A/V Network
The A/V Network is a system that Mitsubishi developed to make it
easier to operate many products together. When the A/V Network
is connected between two Mitsubishi product,, you can point the
remote control at one product and i_ will "pass" _he remote control
command to the other. To set up the A/V Network:
O Press tlhe MENU button on the
remote control. The Main Menu
F{rst Time Set-Up
Set the clock
Memorize
II_ Set NV
will appear
channels
Addldetete
Network
O Select "'Firs_ Time Set-Up"
using the ADJUST bu_ttons;
then, press ENTER.
Align colors
Use ADJUST
to select
"Then press ENTER.
Press
MENU
on the screen.
channels
to return
to
O Use ADJUST to select "Set A/V
Network"; then, pres,,_ ENTER.
TV Main Menu.
Set A/V Network
_'
Off
Basic
Active
Use ADJUST
Then
press
Press
MENU
First Time
to select,
ENTER.
0 Use the ADJUST buttons to
select "Active," "Basic," or "Off."
Check. the rear terminals
of
your VCR, then use the ('hart
below to determine how you
should set your Projection TV.
to return to
Set-Up
Menu.
If your VCR has a rear
terminal
that reads:
A/V Network
O Press the ENTER or MF,NU
button 1:oreturn to the "First
Time Set-Up" menu.
...and you have seL your
VCR to:
...then
set your Projection
TV to:
-
Basic
Active
A/V Network
Off
Basic
Active
A/V Network
Active
Active
-
Off
Does not have an A/V
Network
rear terminal
If you are not sure how to set your VCR's A/V Network
refer to your VCR's owner's guide.
setting,
_Important:
The A/V Network can still be used to pass remote control signals
even when the Projection TV's "A/V Network" setting i,_"Off."
_Important:
If you do not use the A/V Network system, set "A/V NeLwork" to
"Off." If you don't, channel selecLion may ,_ot work correctly.
_Important:
If you are using a Mitsubishi VCR with A!V Network or Active A!V
Network, you should have connected it to the External
1
(EXT-1) input of your Projection TV.
Getting
Started
59
Aligning
the
colors
Your Mitsubishi Projection TV has three picture tubes and large
diameter lenses which are aligned to project light beams on the
screen. Each picture tube projects only one color; red, green or blue.
For the best picture, the three colors should be aligned at the
center of screen. Here is the procedure for aligning the color beams.
First
O Press the MENU button on the
remote control The Main Menu
will appear on the screen.
l'ime Set-Up
Set the clock
Memorize
channels
Add/delete
channels
Select "First Time Set-Up"
using the ADIrUST buttons;
tlhen, press the ENTER button.
Set A/V Network
•
AI,gn colors
Use ADJUST
Then press
Pres',_ MENU
TV Main
to select.
ENTER.
to return to
O _,elect "Align eolo:rs using the
ADJUST buttons; press ENTER.
Menu.
Al_g_n colors
Press VIDEO
to select
Red or blue.
Then on
each
screen
ADJUST
The "Align co]Lors" screen will
appear. Press VIDEO to select a
color to align: red. or blue.
press
until the
crosshairs
appear
Press MENU
white.
Use the ADJUST buttons to
align the color you selected (red
or blue) with the green lines.
When they are aligned, the
green line will turn white.
to return to
Firsl Time Set-Up
Menu.
<--- Red -->
Next, use the VIDEO button to
select the other color (red or
blue). Use the ADJUST buttons
_:oalign the colored lines with
the green lines.
O
.After aligning both the red and
blue lines, press the MENU
button to return to the "First
Time Set-Up"
6O
menu.
_>Important:
You can also use the TEST button
the "Align colors" screen or return
>Important:
The cross-bar pattern is intended for use only as an alignment aid.
It should not be left on for a long period of time, since it can damage the picture tubes.
_Important:
The alignment
can change over time and may need to be adjusted.
If you notice a change in the color quality of the picture, cheek the
aligmnent with the test pattern and readjust as required.
Chapter
3: Operating
on the control panel to display
to the normal picture.
Your Projection
TV
Renaming
the
inputs
This feature allows you to rename the exr_ernal inputs. For example, you might want to name one input "VCR" and another input
"DISC." The name you give the inputs will appear on the on-screen
display.
TV Main
O Press the MENU button on the
remote control. The TV Main
Menu will appear on the screen.
Menu
Your choices
are:
First Time Set-Up
),
Customize
Viewing
Advanced
Features
Use ADJUST
to select.
Then
press ENTER.
Press
MENU
Customize
_,
O Select "Customize Viewing"
using the .M:)JUST buttons;
then, press ENTER.
to exit menus.
Viewinq
Rename
Select
theinputs
Language
Use Video
mute
Use Power
restore
Use Advanced
Use ADJUST
Use the ADJUST buttons to
select the input (Ext-1, Ext-2 or
Ext-3) you want to rename.
TheE, press ENTER.
PIP
to select.
Then press ENTER.
Press
MENU
TV Main
to return to
Menu.
Rename
Set the ne.w name using the
ADJUST buttons and the
ENTER button.
the inputs
Input label
New name
Ext-1
.....
Ext-2
.....
You can rename the inputs
using letters (A-Z), numbers
(0-9), or symbols (:/. , ( ) ! " # $
% & ' h,lank + ; < = > ? blank -).
Ext-3
Use ADJUST
to select.
Then press ENTER.
Press
MENU
Customize
Rename
to return
Viewing
to
Menu.
the inputs
Input label
New
Ext-1
Use ADJUST
Then press
Press
to select.
ENTER.
MENU
Customize
Getting
O You will see the "Customize
Viewing" screen. Select "Rename t:he inputs" using the
ADJU_,T buttons; then, press
ENTER.
to return to
Viewing
Started
Menu.
name
When you press the CANCEL
button while setting the name,
the cursor will move one position to the left. You can clear
the entire name by pressing
CANCEL when the cursor is at
the left-most position.
After you have finished naming
the inputs, press the MENU
button; the screen will return to
the "C ust omize Viewing" menu.
61
Selecting
the
menu
language
This Projection TV allows you to display the on-screen
one of three languages:
English, Span!ish, or French.
Customize
Viewing
Rename
•
Select
the inputs
Language
Use Video
q[])Press the MENU button on the
remote control. The TV Main
Menu will appear on the screen.
restore
Use Advanced
Use ADJUST
Press
PIP
to select.
ENTER.
MENU
O Select "Custor_ize Viewing"
using the ADJUST buttons;
then, press ENTER.
to return to
TV Main Menu.
Select "Select Language" using
the ADJUST butt_ms; then,
press ENTER.
O Use the ADJUST buttons to
select the lan_,_age you want.
Se ect Langua,qe
•
Eny[ish
Spanish
French
Use ADJUST
Then
Press
press
Chapter
to select.
O Press the EN_?ER or MENU
button to return to the "Customize ViewirLg" menu.
ENTER,
MENU
Customize
62
in
mute
Use Power
Then press
menus
to return to
Viewing
Menu.
3: Operating
Your Projection
TV
Using
video
mute
When you use the video mute function, your Projection TV will
display a blue screen whenever it is receiving a very weak TV
signal or a weak signal from a VCR. The sound is also turned off. If
there is a case where you might wish tc t13zviewing a weak signal,
you can turn the video mute off,
Cuslomize
VJewinq
Rename
Select
_'
the inputs
Language
Use Video
mute
Use Power
restore
Use Advanced
Use ADJUST
Then
Press
PIP
to seleat.
MENU
to return to
Selecl: "Use Video mute" using
the ADJUST buttons; then,
press the ENTER button.
Menu,
Use Video
mute
O Use
the ADJUST buttons to
select "Automatic" to turn video
mute on or "Off' to turn video
mute off.
I_ Automatic
Off
Use ADJUST
Then press
to select,
ENTER.
MENU
Customize
Getting
O Select "Customize Viewing"
using the ADJUST buttons;
then, press the ENTER button.
press ENTER.
TV Main
Press
q[]}Press the MENU button on the
remote control. The TV Main
Menu will appear on the screen.
to return to
Viewing
Started
Menu,
Press the ENTER or MENU
button to return to the "Customize Viewing" menu.
63
Using
the
power
restore
feature
When this feature is used, the Projection TV will automatically
turn on when electric current is supplied. This feature is useful
when, for example, your Projection TV is plugged into an outlet
that you control with a wall switch.
To use the power restore
Customize
Viewing
Rename
the inputs
feature:
O Press the MENU button on the
remote control. The TV Main
F.Eenu will appear
Seqect Language
Use Videe
•
Use Power
restore
Use Advanced
Use ADJUST
Then press
Press
to select.
to return to
Select "Use Power restore"
using the ADJUST buttons;
then, press the ENTER button.
Menu.
Use Power restore
•
Select "Customize Viewing"
using the ADJUST buttons;
then, press the ENTER button.
PIP
ENTER.
MENU
TV Main
O The
Off
Use ADJUST
Press
screen
to select.
Press the ENTER button or
MENU button to return to the
"Customize Viewing" menu.
press ENTER.
MENU
Customize
64
"Use Power restore"
will appear. Use the ADJUST
buttons to select either "On" or
"Off."
On
Then
on the screen.
mute
to return to
Viewing
Menu.
') Important:
In order for this feature to work, you must leave :your Projection
turned on when you turn off the electric current.
[:>Important:
Even when the power restore feature is used, unplugging
the set
requires that you reset functions such as the built-in clock and
timing functions.
Chapter
3: Operating
Your Projection
TV
TV
Choosing
an advanced
PIP
fuvLction
When you are using the PIP feature, there are special functions you
can use. Before using these advanced fur_.ctions, you need to choose
one in the menu. These advanced functions are:
• TV Still,
• Snap-shot,
• Replay.
or
In "TV Still," the PIP image switches between still and moving. In
"Snap-shot,"
you can view and move tile frozen PIP iraage. In
"Replay," you can view still PIP images in sequence for a "strobe"
animation
effect. These images will appear in sets of three (from a
total of seven stored images) at the speed you select. IiSee "Using
the Picture-in-Picture
(PIP) Mode," page 84.)
Customize
Select
Press the MENU button on the
remote control. The TV Main
Menu will appear on the screen.
Viewing
Rename
the inputs
Language
Use Videe
mute
Use Power restore
•
Use Adwmced
Use ADJUST
Select "Customize
Viewing"
using the ADJUST buttons;
then, press the ENTER button.
PIP
to select.
Then press ENTER
Press
MENU
to return to
O Select "Use Advanced PIP i'
using the ADJUST buttons;
then, press the ENTER button.
TV Main Menu.
Use Advanced
PIP
O
•
Current
setting
:
TV Stil;
Use ADJUST
to select,
Then
press ENTER.
Press
MENU
Customize
to return to
Viewing
Use Advanced
Curren:
Menu.
PIP
setting:
Replay
•
Replay
speed
Use ADJUST
Use the ADJUST
buttons
to
select the advanced feature
would like to use: TV Still,
Snap-shot or Replay. Then,
press ENTER.
you
When you select "Replay," the
next option will be "Replay
speed." Use the ADJUST
buttons to set the replay speed
fl'om 1-9. (1=short interval and
9=long interval?_ Press ENTER.
_[he main image will replay in
sets of three in a "strobe"
: 1
to select.
animation
effect at the speed
you selected.
Then press ENTER
Press
MENU
Customize
Getting
to return to
Viewing
Started
Menu.
O Press the MENU button
return to the "Customize
Viewing" menu.
to
65
Adjusting
the
sound
You can adjust all of your Projectic_n TV's sound flmctions by using
a pair of buttons; you select a function with the AUDIO button,
then adjust the function with the ADJUST buttons oi" right/left
buttons. You use the ADJUST buttons to:
• select a position (e.g., stereo),
• increase or decrease the function (e.g., bass), or
• shift from one end of a scale to the other (e.g., balance).
After adjusting the sound, an on-screen
function and level you've selected.
what
you'll
display
will indicate
the
adjust:
"Listen to: Stereo/SAP/Mono"
allows you to change the audio
reception mode to stereo, separate audio programming
(SAP), or
monaural (mono), depending on the type of broadcast
you are
receiving. As you select the reception mode, remember the following:
• The "Stereo"
broadcasts.
setting
allows you to receive
both mono and stereo
The separate audio programmin_ ("SAP") setting offers you the
option of listening to either of two separate audio programs. For
example, a station may broadcast
news, weather., or a foreign
language soundtrack
on the SAP program.
The "Mono" setting reduces unwanted background
noise when
the Projection TV is receiving a weak stereo broadcast
signal.
When you use the "Mono" setting, you will hear the broadcast
in
monaural even when the broadcast
signal is in stereo.
[_ Important
An on-screen display appears when programs are broadcast in
stereo or when separate audio programming
(SAP) is available.
"Bass" controls
"Treble"
"Balance"
speakers.
66
Chapter
the volume
controls
adjusts
the volume
of low frequency
of high frequency
the level of sound between
3: Operating
Your Projection
TV
sound.
sound.
the left and right
"Surround:Off/Simulate/Hall"
allowsyouto simulateor expand
stereosound.
• "Off' doesnotchangethe sound.
• "Simulate"givesyoua pseudo-stereo
effectwhenreceiving
monauralsoundbroadcasts.
• "Hall" makesstereosoundseemwiderandextendaround
behindyou.
"Speaker:On/Off'turns theTV speakersonor off.Setto"On"for
normaloperation.Setto"Off' if youconnected
yourTV to anaudio
system.
"Monitorout:Variable!Fixed"letsyouset;upthe TVforusewith a
hometheaterreceiveror audiosystem.Choose'_¢ariable"
whenyou
wishto usethe televisionremotecontrolforsuchfunctionsas
volumeandmute.Choose"Fixed"if youconnected a home theater
receiver or audio system. This lets you control functions
volume and mute through the receiver or audio system.
adjusting
the audio
such as
functions
_z
m__
o c_ o
0
g8
_jOOc_
C]
o o o L]
Getting
Started
0 Use t:he AUDIO button on the
remote control or on the control
pane] to select one of the
functions.
Use the up/down or right/left
buttons on the remote control
the ADJUST buttons on the
control panel to adjust the
function.
or
67
Adjusting
the
picture
You can adjust all of your Projection TV's picture functions by
using a pair of buttons: you select a function with the VIDEO
button and you adjust the function with the up/down buttons, left!
right buttons, or ADJUST buttons. You use these buttons to:
•
•
•
•
turn a function on or off (e.g. notch filter),
shift from one end of a scale to the other (e.g., tint),
increase or decrease the function (e.g., color),
select a position (e.g., color temperature).
After adjusting the picture, an on-screen
function and level you've selected.
what
you'll
display will indicate
the
adjust:
"Tint" adjusts the proportion
delicate tones of color.
of red to green that determines
"Color" determines
the intensity
"Contrast"
the level of _hite-to-black
controls
"Brightness"
controls
"Sharpness"
adjusts
of the color.
ir the picture.
the light level of the image
the detail
the
and clarity
"Notch filter: On/off' is used in special
striped or checked patterns.
on screen.
of the picture.
cases to stabilize
"Color temp(erature):
Low!Middle/:High"
relative warmth of the picture.
the color of
is used to change
the
" C_-_(closed
captioning):
1/2/3/4!Text l/Text 2/Text 3/Text 4/
When muting/Off'
is used to display the text infbrmation
on the TV
screen. For details, see "Using the closed caption decoder," on page
70.
68
Chapter
3: Operating
Your Projection
TV
adjusting
the video
functions
O Use the VIDEO button on the
remote: control or on the control
panel to select one of the
functions
O Use the up/down buttons or
righ*Jleft buttons oil the remote
controlL or the ADJUST buttons
on the control panel to adjust
the thnction.
Getting
Started
69
Using
the
closed
caption
decoder
Many broadcasters
now supply closed captioning information
along
with their regular broadcasts.
Your Projection TV can decode that
information
and display it on your TV so,teen.
There are two types of captioning tlhat broadcasters
can send:
"standard"
and "text." Standard
captioning is relal_ed to the program that is being shown. Standard
captioning usually follows the
dialogue of the characters
on-screen.
Text captioning does not usually relate to the prod,Tam being
shown. It often contains information
such as weatlher or news. Text
captioning
watching.
often block,'; out your view of the program
Your Projection TV can decode
signals and four different "text
channel. However, each station
two captioning signals, or none
To use the closed caption
you are
four different "standard
captioning"
captioning" signals on each TV
may be broadcasting
only one or
at all.
decoder:
Press the VIDEO button on the
remote control or on the control
panel until the closed
captioning
( [7_ ) display
appears on the screen.
Press up/down buttons or right!
left buttons on the remote
control or ADJUST buttons on
the control panel to select the
captioning signal you wish to
display:
[C_
1/[_
2/
_C--] 3/[_J4/C_
Text 1/
_C_ Text 2/[_,_Text
3/
Text 4/[cc-]V_hen
muting/Off.
You can choose to display one of
four "st;andard captioning" signals
(indicated by the symbol []_
and
a aumber), to display one of four
"text captioning" siga_als (indicated
by t:he word "Text" and a number),
to dilsplay captions when muting,
or to turn the captions off.
If you select "When muting," the standard
captioning
will appear whenever you use the ]VIUTE button.
70
Chapter
3: Operating
Your Projection
TV
signal
[_
1
usesfor
closed
captioning
Closed captioning was initially designed so that those with hearing
difficulties can enjoy viewing television moire, However, closed
captioning can also be used in other ways, such as:
• helping children learn to read,
• learning a foreign language, and
• using the television without disturbing
_Important:
others.
If you cannot display any captions on the screen, please keep in
mind that not all broadcasters,
video tapes, or laserdiscs
supply
closed caption signals.
Additionally,
captions will not appear if you are playing a tape or
laser disc on a VCR or Laser Disc player that cannot decode closed
caption signals; if you are playing a video tape that is worn or
deteriorated;
or if you are switching from STILL mode er SEARCH
mode to PLAY mode on a Laser Disc player that cannot decode
closed captioned signals when using these :Features.
Getting
Started
71
€ Using
the Advanced
Features
This section explains how to use some of the more advanced
tions. You'll learn about:
• Setting
72
the
timer,
• Using
the parental
• Using
the Super
• Using
home
Chapter
lock,
Quick
View
tuning,
theater.
3: Operating
Your Projection
TV
and
func-
Setting
the
timer
This special feature allows you to program the Projection
turn on automatically
at a preset time. To set the timer:
T'v" Main
O Press the MENU button on the
remote control. The TV Main
Menu will appear on the screen.
Menu
Your choices
First Time
are:
Set-Up
Customize
Viewing
_" Advanced
geatures
Use ADJUST
to select.
Then
Select "Advanced Features"
using the ADJUST buttons;
then, press the ENTER button.
press ENTER,
Press
MENU
Advanced
to exit menus.
You will see the "Advanced
Features" screen. Select "Set
Features
_, Set the timer
Use parental
Use Supe"
the timer" using the ADJUST
buttons; then, press the ENTER
buttoJ_.
lock
Quick
View
Use Home Theater
Use ADJUST
to select.
Then
press ENTER.
Press
MENU
TV Main
to return to
Menu.
O Use tlhe ADJUST buttons and
the ENTER button to set Day,
Start time, Input and Channel.
Set the timer
I_
TV to
Day
--
Start time,
- -
Input
- -
Channel
- -
Use ADJUST
to select.
Then
press ENTER.
Press
MENU
Advanced
After setting the timer, make sure
that the program timer indicator
is lit up. The indicator will light in
orange when the TV is turned on,
and light in red when the TV is
turned off. The indicator will not
light up when using l:he :menus, or
when yc,u have locked the TV.
'to return to
Features
Menu.
When you press the CANCEL
button while setting the timer, the
cursor will move to the previous
item. To clear the timer, press the
CANCEL button witlh the cursor
at the "Day" position.
>Important:
When the timer turns the Projection TV on, the display will flash
as a warning. If you do not press a TV function button for about 5
minutes, the Projection TV will automatically
turn off. Press a TV
function button (such as the display but_.onl to keep the Projection
on and turn off the flashing display.
Using
the Advanced
Features
73
Using
the parental
lock
This special feature locks the entire
prevent others from watching it.
Advanceo
O
Features
Set the timer
•
Use parental
O
View
Use Home Theater
press ENTER.
Press
MENU
to return
to
Lockthe
Advanced
Features
O
Select "Lock the TV" or "Lock
lock
TV
Use ADJUST
the channel" using the ADJUST
buttons; then, press the ENTER
button.
to select.
press ENTER.
Press
MENU
Advanced
_>Important:
Select
Select "Use parental lock" using
the ADJUST buttons; then,
press ENTER.
Lock Ihe channel
Then
Press the MENU button. The
TV Main Menu will appear.
O
TV Main Menu.
•
to
u si:ag the ADJUST buttons;
tlhen, press ENTER
to select.
Then
Use Parental
channel
lock
Use Super Quick
Use ADJUST
TV or one particular
to return to
Features
Menu.
If you turn the parental
will see a lock message
channel.
lock on, you cannot use the timer and you
when you try to use a locke(] TV or locked
locking
Use Parental
lock
(TV)
the TV
The message
will appear.
for locking the TV
Now, the lock is off.
Enter
your personal
using
NUMBER
Then press
Enter a four-di_t
secret code
us:[ng the number buttons (0-9);
7:hen press the LN3 E button.
code
buttons.
ENTER
to turn
the lock on.
Press
MENU
Advanced
to return to
Features
Parenta_ lock
You can clear the code by
pressing the C,_d_CEL button.
Menu.
(TV)
W:aen you set "]Lock the TV" to
"on," you will see a message the
next time you turn the television on asking you to enter your
secret code. If you don't enter
the correct code within five
mi nutes, the TV will turn off.
This 1-V is locked.
Enter
your personal
using
NUMBER
Then press
code
buttons.
ENTER
to view
this TV
74
Chapter
3: Operating
Your
Projection
TV
Use Parental
lock
locking
(Channel)
• The message for locking
channel will appear.
Now, the lock is off.
Enter
your personal
using
NUMBER
Then press
• Enter a four-digit secret ,code
using the number buttons (0-9);
then, press the ENTER button.
to turn
the lock on.
Press
MENU
Advanced
to return to
Features
the
code
buttons.
ENTER
the channel
Menu.
You can clear the code by
pressing: the CANCEL button.
Parental
lock
(Channel)
This Channel
is locked.
Enter
your personal
using
NUMBER
Then press
The next time you try to select
a locked channel, you will see a
message asking you to enter
your secret code.
code
buttons.
ENTER
• To view an unlocked channel,
press the channel buttons.
to view
this channel.
canceling
Use
Parental
lock
parental
O Press the MENU button on the
remote control. The Main Menu
(TV)
will appear
your personal
code
using NUMBER buttons.
Then press
ENTER
on the screen.
Select "Advanced Features"
using the ADJUST buttons;
then, press the ENTER button.
Now, the lock is on.
Enter
lock
to turn
the lock off.
Press
MENU
Advanced
Use Parental
O Selecl: " Us_.parental lock" using
the ADJUST buttons; then,
press the ENTER button.
to _eturn to
Features
lock
Menu
Using t:he ADJUST buttons,
select the lock you want to
cancel; Lhen, press ENTER.
(Channel)
Now, the lock is on.
Enter
your personal
using
NUMBER
Then
press
code
Enter the four digits of your
secre% code using the number
buttons (0--9); press ENTER.
buttons.
ENTER
to turn
the lock off.
Press
MENU
Advanced
_Important:
to return to
Features
Menu.
Press the MENU buLton to
return 1;othe "Advanced Features" menu.
If you forget your four-digit
Using the Advanced
Features
secret
code please
see page 101.
75
Using
the
Super
Quick
View
tuning
Super-Quick-View
allows you to cycle through a lisl: of up to ten
numbers by using the SQV button. You can use the menu system to
add channels to and remove channels :From the list.
Advanced
O Press the MENU button on the
remot:e control. The TV Main
Menu will appear on the screen.
Features
Set the timer
Use parental
•
lock
Use Super
Quick
Use Home
Theater
Use ADJUST
Then press
Press
Seltect "Advanced Features"
using the ADJUST buttons;
then, press the ENTER button.
to select.
ENTER.
MENU
TV Main
View
to return to
Menu.
Sei[ect "Use Super Quick View"
using the ADJUST buttons;
then, press the ENTER button.
Use Super Quick View
Use the ADJUST buttons to
select a position in the list;
then, press the ENTER button.
Use ADJUST
Then press
Press
to select.
ENTER.
MENU
Advanced
to return to
Features
Use Super Quick
•
Ant-A
Channel
- - -
Use ADJUST
to select.
press ENTER.
Press
CANCEL
Press
MENU
Advanced
to clear.
to return to
Features
Use Super Quick
Ant-A
Channel
003
Use ADJUST
Press
Menu.
Use the ADJUST buttons,
CHANNEL buttons or number
buttons to add a channel to the
list; then, press ENTER.
View
Input
Then
Use the ADJUST buttons to
,;elect an input. Press ENTER.
View
Input
Then
•
Menu,
Repeat the steps above to add as
many channels as you want to the
Super Quick View memory.
to select.
press ENTER,
MENU
Advanced
to return to
Features
Menu.
Press the MElt3 button to
return to the "Advanced Features" menu.
_>Important:
76
You can clear each setting
CANCEL button.
Chapter
3: Operating
Your
(input
or channel)
Projection
TV
by pressing
the
Using
home
theater
Use this feature if you connected a Home Theater
set your Projection TV to external (EXT-1).
Advanced
O
Features
Set the timer
Use parental
Use Super
Use ADJUST
to select.
Use Home
lets you
all input
switching
from
a Home
Theater
Receiver.
Press
ENTEF1 to continue.
Press
MENU
Select "Use Home theater"
using the ADJUST button;
the_a, press the ENTER button.
O
The message explaining this
feature will appear. If you want
to continue, press ENTER.
to return to
Features
Menu.
Use Home theater
Before
O
theater
This feature
Advanced
Select "Advanced Featares"
using the ADJUST buttons;
then, press the ENTER button.
to return to
Menu.
control
O
ENTER.
MENU
TV Main
cn the screen.
View
Theater
Press
It will
Press the MENU b_tton on the
remote control. The TV Main
Menu will appear
lock
Quick
I_ Use Home
Then press
Receiver.
using
Another message will appear.
Press ENTER to tam home
this mode,
theater on; the "Advanced
Features"
screen will appear.
make sure y,_u have
a Home Theater
Receiver
connected.
Press
ENTER
to confirm,
or press MENU
Advanced
for
Features
Menu.
After turning home theater on,
you will see a message the next
time you select L se Home
thea_er.
Use Home tneater
This TV is set-up
for
use with a Home Theater
Receiver.
Press
CANCEL
for normal
press
MENO
Advanced
_Important:
To turn this feature
CANCEL button.
to reset it
use, or
off, press the
to return to
Features
Menu.
When you use this feature:
• the input source will be fixed to exte:mal 1 (EXT-].),
• the input button will switch between antennas
A and B, and
• all input switching should be controlled by a Home T!heater
Receiver. (See your Home Theater Receiver's Owner's Guide for
nmre information.)
Using
the Advanced
Features
77
CHAPTER
Using
the FOUR
Special
Features
In addition to the basic and advanced fanctions explained in the
previous chapter, this Projection TV offers the user several special
features not generally available on other brand Projecl_ion TVs.
This chapter will explain how to use these distinctive features. It
contains the following topics:
0
Understanding
0
Using
the Off-Timer
Using
the Picture-in-Picture
Using
the Active
0
the
On-Screen
A/V Network
Displays
(PIP)
Mode
Feature
Understanding
the
On-Screen
Displays
Your Projection TV provides an on-screen summary
of the current
settings for the Projection TV or cable channels, as well as the
information
related to Extended Data Services (XDS). XDS allows
broadcasters
to supply you with the current time, channel information, and program information.
To view this inforraation,
press the
DISPLAY button on the reraote control repeatedly.
This section
describes the displays in the order that they occur.
Ant-A 023 ESPN
Stereo & SAP SQV
A 023
Thursday
10:23 am
Ext-1
S-VIDEO
A 023
Thursday
10:23 am
network name
program name
I
I
The first setting shows:
• input source (antenna,
channel
number),
• call letters,
• stereo and/or SAP are available
fc,r reception on this channel,
• this channel is programmed
into super quick view memory,
• PIP input source (when a PIP
iraage is showing),
• current day of the week, and
• time.
The second setting shows:
• input source (external source or
input name),
• an S-VHS cable has been
conn ected,
• PIP input source (when selecting PIP image I,
• current day of the week, and
• time.
The third setting shows you where
the network name and program
name will appear' if a broadcaster
is s_pplying information
via XDS.
The third setting shows you where
the program description will
appear if a broadcaster
is supplying that information
via XDS.
I
_Important:
80
program description
If the broadcaster
is not supplying
information
via XDS, then an
error message
will appear.
:"No name available,"
":No description
available").
Additionally,
the "call letters"
will not appear.
Chapter
4: Using
the Special Featvxes
Using
the
Off-Timer
This special function allows you to set the Projection TV to turn off
automatically
You can set the Projection TV to turn off after a
period of time ranging from 10 to 120 mirLutes (2 hours). In this
section you'll learn:
•
Setting
• Changing
the
off-timer,
or canceling
Using the Off-timer
and
the off-timer.
81
Setting
the
off-timer
O Press the offtimer
button
(OFF-T) on the remote control.
saaO
TV Off timer 120 min.
e
Select how long :you want the
Projection TV to stay on by
repeatedly
pressing the offtimer button (OFF-T). The time
will decrease, in 10 minute
intervals each time you press
the button.
O If you later want to check on
how much time is left in the offtimer, press the off-timer
button (OFF--T) once. The onscreen display reads "off-timer"
and shows the amount of time
remaining.
D Important:
During
the last minute
before the Projection
"Off-timer
1 min." will flash in red to remind
is set.
TV Off timer
82
Chapter
1 min.
4: Using the Special
Features
TV is set to turn off,
you. that the off-timer
Changing
or canceling
TV Off timer
Using the Off-timer
10 min.
the
off-tiraer
0
Press the off-timer button
(OFF-T) on the remote control.
An on-screen display will
indicate the amount of time
remaining
until the Projection
TV will turn off.
O
Continue pressing the off-timer
button (OFF-T) repeatedly
to
change 1:he remaining
time or
cancel[ the off-timer. ']?he offtimer is canceled when ....
appears instead of the remaining time.
83
Using
the
Picture-in-Picture
(PIP)
Mode
One of the special features of this Projection TV is the picture-inpicture (PIP) mode, which allows you to view two different sources
at the same time. In this section you'll learn about:
• Selecting
the PIP
• Selecting
the
source,
• Selecting
the
channel,
• Exchanging
• Moving
[>Important:
84
the PIP
the PIP
• Freezing
image,
the
image,
image,
PIP image,
• Using
the
Snap-shot
• Using
the Replay
feature,
and
feature.
You must have a VCR connected to the Projection
different live action pictures when using PIP.
Chapter
4: Using
the
Special
Features
TV to see two
Selecting
the
PIP
image
0
© C-_
Ol
oo o 0
SOS
Select the number of the TV
channel you want to view by
using the channel control
(CHANNEL).
O Press the PIP button. A reduced
image will appear in the bottom
right corner of the screen.
,o00©
Ant-A 023 ESPN
Stereo & SAP SQV
A 023
Ant-A 023 ESPN
Stereo & SAP SQV
A 023
Using the Picture-in-Picture
Press the PIP button again; the
size of the reduced image will
change.
O Press the PIP button once again
to cancel the PIP image.
(PIPI Mode
85
Selecting
the
source
@___
0
O
Turn your VCR on and select a
channel on the VCR that is
different than the channel you
see on your TV screen.
0
Press the source button
(SOURCE) on the remote
control repeatedly
to select the
source of the PIP image: TV or
External.
o
0
888
I
0
OOO
O The PIP image will change
follows.
as
_i TV -* Ext-1-* Ext-2 --* Ext-3-_
E>Important:
To change the input of"the background
(main) image, press the
input button (INPUT) on the control panel or on the remote control.
Selecting
the
channel
Press the PIP channel button
(CHANNEL) on the remote control
to change the channel of the PIP
image.
_Important:
86
When the source of the main image, and the PIP image is the TV,
the PIP channel button will change the channels of both the main
image and the PIP image.
Chapter
4: Using the Special
Features
Exchanging
the PIP
image
Press the ENTER button to
exchange the sources of tlhe
background
image and the reduced image,.
Ant-A 023 ESPN
Ext-1
Stereo & SAP SOY
A 023
Moving
the
PIP
image
Press the up/down buttons or
right!left buttons to move the
reduced image to your desired
position.
O O O
'_
_©O'D
Using
the Picture-in-Picture
(PIP) Mode
87
Freezing
the
Use Advanced
_. Current
PIP
image
O Select "Use Advanced PIP" in
the "Customize Viewing" menu
and set it to "TV Still." (See
"Choosing an advanced PIP
function," page 65.)
PIP
setting
:
TV Still
Use ADJUST
Then press
Press
MffNU
Customize
to setect.
O Use the MENU button
to the normal picture.
ENTER,
to return
Viewing
to
to return
Menu.
£ress the PAUSE button to
freeze the reduced image on the
screen.
Press PAUSE again to return
tlhe image to eL"live" picture.
oOQOo_
_:_OOO
_O
_Important:
UI
Ol
When you press the pause button while viewing
the PIP image will appear and be frozen.
disappears
after a
few seconds
88
Chapter
4: Using the Special
Features
the normal
pictur_
Using
the
Snap-shot
Use Advanced
_. Current
feature
O Select "Use Advanced PIP" in
the "Customize Viewing" menu
and set it to "Snap-shot." (See
"Choosing an advanced PIP
function, '_'page 65.)
PIP
setting
Snap-shot
Use ADJUST
to select.
O Use the MENU button
to the normal picture.
Then press ENTER.
Press
MENU
Customize
to return to
Viewing
to :return
Menu.
Press the PAUSE button; a
frozen PIP image and a moving
PIP image will appear.
O Press the PAUSE button again;
a third PIP image will appear,
moving. The previous two PIP
images will be frozen.
Each time you press the
PAUSE button, the PIP images
will shift upwards one by ,one.
The top image will disappear
and a fro_,en image will appear
when you press PAUSE.
oOOO
To cancel the PIP image, press
the PIP button once.
if the PIP image
PAUSE
©
[]
[]
is off
[]
[]
PAUSE
©
PAUSE
©
[]
[]
©
_3
c
B
if the PIP image
PAUSE
is on
[]
PAUSE
©
PAUSE
©
[]
*A, B, C, D: the moving image
*a, b, c, d: the frozen image at the instant
Using the Picture-in-Picture
the PAUSE', button
(PIP) Mode
v_q
Eq
D]
D
is pressed.
89
Using
the Replay
Use Advanced
•
Featur_
O Select "Use Advanced
PIP
Current
setting
:
Replay
speed
: 1
Replay
Use ADJUST
Then press
Press
to select.
to return to
Viewing
Use Advanced
Current
,_et the replay speed between
(short interval) and 9 (long
interval).
ENTER.
MENU
Customize
Menu.
Use the MENU button
to the normal picture.
PIP
speed
Use ADJUST
O
: 1
to select.
Then press ENTER.
Press
MENU
Customize
to retun
to return to
Viewing
Menu.
Press the pause button
(PAUSE). The main image will
be frozen and replayed in
sequence for a "strobe" animation effect. These images will
appear in sets of three (from a
1;otal of seven stored images) at
l_he speed you. select.
Each time you press the
PAUSE button, the PIP images
will shift upwards one by one.
O To cancel the PIP image, press
the PIP button once.
,_QOOi
_030_
%]
*al - a7 " sampled
PAUSE
PAUSE
PAUSE
PAUSE
©
-%]
%]
90
Chapter
1
setting:
Replay
Replay
PIP" in
the "Customi::e Viewing" menu
and set it to "Replay." (See
"Choosing an advanced PIP
fhnction," pa%e 65.)
4: Using the Special
Feal;ures
PAUSE
A
frozen images
PAUSE
Using
the Active
AN Network
Feature
This A/V Network is a special
your Projection TV and your
you connect tile A/V Network,
the Projection TV, and it will
the other components.
feature that makes it easier to use
other A/V components
together. When
you can poinl; the remote control at
"pass" the remote control command to
Additionally, you will gain even more benefits if you have a Mitsubishi VCR equipped for the Active A/V Network. The Active A/V
Network allows you to perform many of the commonly used features of your system at the press of just one button.
This section
Network.
before
will explain
the various
features
of the Active A/V
you begin
You must have connected an A/V Network cable from the Active
A/V Network terminal of your Projection TV to the A/V Network
IN terminal of your VCR. See "TV + Mitsubishi products that
have A/V Network terminals,"
page 40.
• You must have connected
your Projection TV.
1 (EXT-1) of
° You must have set your Projection
to "Active" or "Basic." See "Setting
T_Ps "A/V Network" setting
the A!V Network," page 59.
• Your VCR's remote
"VCR-A."
(if any) should be set to
contrvl
• Your VCR's video mute
what
the Active
The Active AIV Network
switch
setting
AN Network
VCR's Quick Program
PIP commands.
_>Important:
your VCR to External
makes
should be turned
ON.
does
it easier
and Play commands
and faster
to use the
and the Projection
When using the Active A/V :Network, you should always
remote control at your Projection TV.
Using
the Active A/V Network
Feature
TV's
point your
91
using
the quick
program
button
(QUICK
PROGRAM)
When you press QUICK PROGR_-M to begin programming
your
VCR:
• Active A/V Network will turn o:n your VCR and bring it to the
"Program to Record" screen. If 1;he VCR's clock ha,_ not been set,
you will see the "Set the clock" screen. (See your VCR's Owner's
Guide for information
about setting the clock.)
• Active A/V Network will turn on your Projection TV (if it is off),
and switch the Projection TV to EXT-1.
You can program
Projection TV.
your VCR by pointing
your remote
control at the
When you press QUICK PROGRAM to end programming
your
VCR:
• Active A/V Network will turn offyour VCR (unless a tape is
currently
playing or recording).
• Active A/V Network will return your Projection TV to the
channel it was on before, or turn :it off (if it was off originally).
using
the
PLAY
button
(AUTO
PI[_kY)
When you press PLAY on the remote,:
• Active A/V Network will turn your VCR on and begin playing
the tape (if any).
• Active A/V Network will turn your Projection TV on and switch
it to EXT-1.
When you turn your Projection TV off:
• Your VCR will turn off, unless :it iis playing
using
_Important:
the PIP button
(TWO TUNER
or recording.
PIP)
You must be watching a broadcast
channel on Antenna-A or
Antenna-B
to use the Active A/V Network PIP function correctly.
When you press the PIP button on the remote to bring up a PIP
image:
• Your VCR will automatically
turn on.
• You can see the VCR's picture in the small PIP image.
92
Chapter
4: Using
the
Special
Features
While the PIP image is on the screen:
• The PIP function buttons (SOURCE, VCR-CH, ENTER, right/
left, adjust up/down, PAUSE) will all work as they do with
standard
PIP.
• The CHANNEL and number buttons (10-911will automatically
control the small PIP image. You cannot change channels on the
main image.
When you press the PIP button on the remote to turn off the PIP
image:
• CHANNEL, the number buttons, and all other functions will
work normally again.
_>Important:
If you turn off the Projection TV while it is set to EXT-1, it will
return to the last channel you viewed on Antenna-A or AzLtenna-B
when you turn the Projection TV back on.
_Important:
If you leave the Projection TV turned on, set to EXT-1, but the
Projection TV is not receiving a signal on EXT-1, it will automatically turn off after five minutes. (If you use a TV menu during this
time, the Projection TV will turn off five minutes after you stop
using the menus.)
_>Important:
If you turn the Projection TV's Home Theater feature on, then the
Projection TV's A/V Network setting will automatically
be set to
"Off." You will not be able to use the Active L_V Network features
QUICK PROGRAM, AUTO PLAY or TWO TUNER PIP. ]if you
want to use the Active A/V Network features, set Home Theater to
"OFF" and A/V Network to "Active".
_>Important:
You should not press the PIP button while you are watching a
channel that is not receiving any broadcasts.
You will not. be able to
see the small PIP image, and you will not be able to change channels on the main image. You may need to _u_.moff the Projection TV
and turn it back on, change to a channel that is receiving a broadcast, and begin again.
Using
the Active A/V Network
Feature
93_
_
CHAPTER
FIVE
Troubleshooting
Even though you're now familiar with the basic and advanced
operations
of the Projection rKV, you may run into trouble from time
to time as you become accustomed
to the Projection TV. This
chapter offers solutions to some of the common problem'_ you may
encounter. We suggest that you consult this chart before contacting
a Mitsubishi service representative.
Troubleshooting
Possible
Problems
The remote
work.
You can't access a channel.
96
installed
•
For
Solutions
Check that the batteries
control doesn't
The Projection TV takes
several seconds to respond
to button commands.
(cont.)
are
correctly.
More
Information
See "Getting ready to use
the remote control" in
Chapter 1 for an explanation
of how to install batteries
in
the remote control.
Check that the select button
is set to TV.
See "Remote control buttons
and functions" in Chapter 1,
which expi[ains where the
select buttons are located.
Be sure that you are pointing the top of the remote
control toward the Projection TV from a distanc.e of no
more than 20 feels.
See "Getting ready to use
the remote control" in
Chapter 1, which contains
pointers for u,;ing the remote
control.
Use the ENTER
See "Changing channels" in
Chapter 3, which explains
the function of the ENTER
button.
button
to
avoid delays.
Be sure that the channel you
want to view is programmed
into memory.
See "Memorizing channels"
in Chapter 3, which explains
how to prcgram channels
into the Projection TV's
memory.
Check that the Projection
TV is tuned to the correct
input source (antenna)
for
that channel.
See "Selecting the input
source" in Chapter 3, which
explains how to change the
input source.
Chapter
5: Troubleshooting
Possible
Problems
•
Solutions
For More
Information
On-screen displays appear
each time you adjust a
function.
•
This is part of the normal
operation of the Projection
TV.
See "Understanding[
the OnScre_en Displays" in Chapter
4 for a full explanation
of
the on-screen displays.
There's no sound even when
tlhe volume is turned up.
•
Check that the MUTE
button isn't on.
See "Remote
You forget the code you used
to set the parental lock.
•
You can't program the
Projection TV to turn on
automatically.
Use the alternate
procedure
that doesn't require the use
of the code.
The Projection
locked.
image
match
on screen.
There is a large black
rectangle on the screen.
the
•
TV may be
See the Appendix ,"Automat:ic Procedure for the
Parenl_al Lock."
See "Using the parental
lock" under "Using the
Advanced Features" in
The Projection TV's reception mode may be set to
"separate
audio program"
(SAP).
The Projection TV has been
set to "text" mode, but there
is no text information
being
broadcast.
Troubleshooting
buttons
and functions" in Chapter 1,
which explains the location
and function of the MUTE
button.
Chapter
The sound doesn't
control
3.
See "Adjusting the sound" in
Chapter 3, which explains
how to select the appropriate reception mode.
•
See "Using the closed
caption decoder" under "Getting star_ed" in chapter 3.
97
Using
the VCR
tray
Your Mitsubishi
Projection TV has a built-in VCR tray for your
convenience.
(If you do not need the tray, remove it by loosening
the screws.)
To use the tray:
Fix the VCR to the tray by
passing the belt t]hrough the
hole on the Ul0_perside of the
legs.
\
"Warning:
To make sure the VCR is stable
TV as shown in the illustration.
at all times,
fix il; to the Projection
O Join the belt together
shown.
as
BELT
Do not place a VCR over 16kg (351b) on the tray.
Do not place more than one VCR on the tray.
Take the VCR off the tray before moving tile Projection TV.
For keeping set from toppling under the influence of earthquake or the other emergency, fix the set using the clamp
attached on the set back as shown.
98
Chapter
5:
Troubleshooting
Caution
"Warning:
_Important:
and care
Don't leave stationary
images, such as those generated fl:om stock
market reports or video games, on-screen for more than :tO rainutes. Still patterns can scar the Projection _]W causing permanent
damage to the picture tubes.
If you plan to place speakers next to the Projection TV, make sure
they are magnetically
shielded. Ordinary speakers will cause
distortion in the picture due to their stror._g magnets. This distortion, however, will not harm the picture t_abes.
For maximum enjoyment and safe operatmn of' your MITSUBISHI
Color Projection TV, please read the "IM]?ORTANT SAFEGUARDS" carefully and apply them properly.
_>Important:
To keep your TV from toppling in the event of an earthquake,
you
can use the clamp attached to the back of the television to secure it
to the wall. Simply run a cord or rope through the clamp: then
attach the rope to the wall directly behind the television.
Calling
for service
If you are unable to correct
consult your MITSUBISHI
Warranty
Service Center.
Do not adjust
Do not remove
any controls
the protective
a problem with your Projection TV,
dealer or MITSUBISHI
Auth,_rized
not described
in this owner's
_,_ide.
back cover of tlhis unit.
If you see the ]bllowing display on your screen, you should not
change any settings. This is a special display used by the factory.
)"
Initial
E2RESET
Hotel
: Off
CCD
: On
Auto clock
: On
Call letr.
Net name
: On
:On
Prog name
: On
Prog descr
: On
If this display appears, make sure that all of the on/off settings are
the same as the illustrations
above and then turn the Projection TV
off. If any of the settings are different than the illustration
above,
turn the Projection TV off and consult your MITSUBISH]: dealer or
MITSUBISHI
Authorized
Warranty
Service Center.
Troubleshooting
99
ku-toma-tic
APPENDIX
Procedure
Cut along dotted
for the Parental
Lock
101
line and file after reading.
After you lock the TV, you will need the secret
code in order
to:
• view the locked TV, or
• cancel the lock.
If you forget the code, you can view the locked TV without, entering
the code. To do this, simply press the buttons on your remote
labeled "QV" and "9" at the same time.
{>Important:
Unlocking with this procedure is only temporary.
completely, follow the procedure below:
To cancel the lock
O
Press the "QV" button and the "9" button, on the remote control
at the same time. This will allow you to turn on a locked TV.
O
Press the MENU button to view the main menu. Use the
ADJUST button to select "Advanced Features."
Press ENTER.
0
Use the ADJUST
ENTER.
button
to select "Use Parental
Lock." Press
Use the ADJUST
button
to select "Lock the TV." Press
Press the "QV" button and the "9" button on the remote
at the same time. This will turn off the lock.
ENTER.
control
Index
A
A/V Network
connection
........................
40
setting ..............................
A/V reset button ..................
Active A/V Network
terminal ............................
using ...................................
adding channels ..................
adjust buttons ......... 13, 19,
advanced features ...............
59
14
aligning the colors ...............
antenna connection ....... 27,
antenna terminals
..............
audio controls ................ 13,
audio input terminals
... 14,
audio output terminals
.......
audio system, connection ....
auto play ..............................
60
31
24
19
25
24
39
92
25
58
21
72
B
back panel, overview ........... 24
Basic Connections
............... 26
batteries
guidelines .........................
16
installing ..........................
15
buttons, remote control ....... 17
C
cable box
codes .................................
47
connection
.................. 28, 34
cable connection ............ 27, 31
cancel button .......................
19
caption, closed ..................... 70
c_ution and care .................. 99
CC ........................................
70
channel
button ...............................
21
control .........................
12, 18
!rocking ......................
75, 101
channels
adding and deleting ......... 58
,changing ...........................
51
memorizing
......................
57
clock, setting ........................
55
closed caption decoder,
using .................................
colors, aligning ....................
Connecting Your
Projection TV ...................
connection
A/V network .....................
antenna
...................... 27,
audio system ....................
basic ..................................
cable ...........................
27,
decoder box ................. 28,
home theater receiver ......
UHF/VHF antennas
........
VCR ............................
control panel, overview
I
70
60
23
40
31
39
26
L
31
34
37
30
M
31, 34
....... 12
D
decoder box
codes .................................
connection .................. 28,
deleting channels ................
display button .....................
Important
Safeguards ........... 3
input button .................. 13, 18
input, selecting .................... 50
inputs, :renaming ................. 61
installing the batteries
....... 15
4:7
34
58
20
language, menu ................... 62
lock ...............................
74, 101
memorizing
channels ..........
menu button ........................
menu language ....................
menus, understanding
........
mute control ........................
mute, video ..........................
57
19
62
54
18
63
N
number
buttons
....................
20
O
E
enter button ................... 18, 21
espafiol .................................
62
F
features
advanced
..........................
72
special ...............................
'79
summary of special ............ 6
frangais ................................
62
front panel, overview .......... 12
G
Getting Started ................... 44
Getting to Know Your Projection TV ..............................
11
H
home button
........................
20
home theater receiver, connection ....................................
37
home theater, using ............ 77
off-timer ................................
off-timer button ...................
on-screen displays,
understanding
..................
on-screen menus, understanding ......................................
on/off, turning your TV .......
Operar_ir.g Your
Projection TV ...................
Overview of the Back
Panel ................................
Overview of the Cont:rol
Panel ..................................
Overview of the Remote
Control ..............................
81
20
80
54
49
43
24
12
15
P
parental lock ............... 74, 101
pause button ........................
21
picture, adjusting ................ 68
picture-m-picture
controls .. 21
103
PIP
source button ........................ 21
button...............................
21 special features ................... 7c
choosing
an advanced
summary
.............................
€
thnction.........................
65 SQV button ........................... 18
exchanging.......................
87 super quick view button ..... 1_
freezing.............................
88 super quick view
moving..............................
87
using ............................ 53, 7{
replay ...............................
90
selecting...........................
85
selectingthe source.........86 T
snap-shot..........................
89 test button ........................... 1,
twotuner..........................
92 time, setting ........................ 5_
using.................................
84 timer, setting ....................... 7'
play,auto.............................
92 tray, VCR ............................. 9[
................... 9_
powerbutton.................
12,18 troubleshooting
TV
powerindicator...................
14
connecting
........................
2,"
powerrestore.......................
64
getting to know ................ 11
Preface...................................
5
locking ......................
74, 10]
programtimer indicator.....14
operating
unpacking
Q
quick program .....................
quick program button .........
quick view button ................
quick view, using .................
QV button ............................
92
20
18
53
18
R
rear panel, overview ...........
remote control
buttons and functions ......
overview ...........................
using .................................
renaming the inputs ...........
replay ...................................
24
17
15
45
61
90
S
S-VIDEO input
terminal ....................... 14, 24
Safeguards,
Important
.......... 3
select buttons ....................... 18
service ..................................
99
setting the clock ................... 55
setting the timer .................. 73
snap-shot
..............................
89
sound, adjusting ................... 66
104
Index
..........................
...........................
4_
U
UHF/VHF, connection
........ 31
understanding
the on-screen
displays ............................
8_
Unpacking
Your
Projection TV ..................... '
V
VCR
buttons .............................
codes .................................
connection .................. 31,
tray ...................................
video controls ................ 13,
video input terminal ..... 14,
video mute ...........................
video output terminals ........
volume control ............... 12,
W
Welcome to Mitsubishi
.........
1_
4_
3_
9_
1_
2,_
6:
2,
11
MITSUBISHI
PROJECTION TELEVISION
LIMITED WARRANTY
MITSUBISHI
ELECTRONICS
MITSUBISHI
Audio/Video
a. Paris.
The lenticular
AMERICA,
Dealer,
should
INC.
it prove
(i.e. front picture)
("MELA")
defective
screen
warrants
by reason
is warranted
to the original
of improper
against
defects
purchaser
workmanship
in materials
of this television
that if purchased
from an authorized
and/or material:
and workma
lship
warranted
for a period of one year from the date of the original purchase
at retail. We will repair or replace,
the part. Parts used for replacement
are wan-anted
for the remainder
of the original warranty period.
for a period
at our option,
of 30 days. All other parts
an 3,defective
pan: without
are
charge
for
b. Labor. For 30 days after the original purchase at retail, we will repair or replace, at our option, the l,znticular screen if it proves defective. For all other
parts, we will provide the labor for a warranty repair by an authorized MITSUBISHI service center without charge fo one year from the date or original
purchase at retail.
c. Notice.
1.
To obtain
warranty
service,
you
must notify
an authorized
MITSUBISHI
service
center
of any defec_
within
the applicable
warranty
time period.
TO OBTA1N WARRANTY SERVICE:
a. Contact your nearest authorized MITSUBISHI service center whose name and address can be obtained from your MITSUBISHI deaer or by writing or
calling MELA at the address and telephone number provided below.
b. Warranty service will be provided in your home or, if required, at an authorized service shop, provided that yoLr television is located within the
geographic territory customarily covered by an authorized MITSUBISHI service center. If not, you must either deliver your television to an authorized service
location a_ your own expense, or pay for any travel and/or transportation costs the service center may charge to and from your home. Actual service labor will
be provided without charge.
c. Proof of purchase date from an authorized MITSUBIS HI dealer is required when requesting warranty service. Present your sales receipt or other
document which establishes proof and date of purchase. THE RETURN OF THE OWNER REGISTRATION CARD IS NOT A CONDITION OF WARRANTY (2OVERAGE. However, please return the Owner Registration Card so that we can contact you should a question of safety arise which could affect
you.
2.
THIS
WARRANTY
MITSUBISH[
service
DOES
center;
NOT COVER
physical
abuse
damage
caused
to, or misuse
by: modification,
of, the product;
alteration,
operation
freight damage; or any damage caused by acts of God such as; lightning
or fluctuation
installation,
adjustment
of user controls,
external antenna systems, service of products
(set-up)
and aser-required
maintenance.
Consult
the operating
instructions
furnished
repair
in a manner
in electrical
purchased
with
or service
contrary
of the prcduct
by anyone
to the instructions
which
UNDER
NO CIRCUMSTANCES
CONSEQUENTIAL
DAMAGES.
SHALL
WHETHER
MELA
BE LIABLE
ARISING
TO PURCHASER
OLIT OF BREACH
than an authorized
the product;
power. This warramy also excludes
all costs arising from
or serviced outside the U.S._.,
initial technical
adjustments
the product
for ir formation
regarding
3. ANY EXPRESS
WARRANTY
NOT PROVIDED
HEREIN, AND ANY REMEDY
WH1CH, BUT FOR THIS PROVISION,
IMPLICATION
OR OPERATION
OF LAW. IS HEREBY
EXCLUDED
AND DISCLAIMED.
Till:! IMPLIED
WARRANTIES
AND OF FITNESS
FOR ANY PARTICULAR
PURPOSE
ARE EXPRESSLY
LIMITED
TO A TERM OF ONE YEA R.
4.
other
accompany
OR ANY
OF WARRANTY.
OTHER
BREACH
PERSON
FOR ANY
OF CONTRAC'I;
user controls.
MIGHT ARISF_ BY
OF MERC ?IANTABILITY
INCIDENTAL,
SPECIAL
5. Some states do not allow limitations on how long an implied warranty lasts, or the exclusion or limitation of incidental, special, or consequential
so the above limitations or exclusions may not apply to you.
6.,
This
warranty
7._O]_EFORE
gives you specific
REQUESTING
legal rights,
SERVICE,
problem persists, contact your nearest
information,
please call 800-332-2119,
please
]HIS
CUSTOMER
STREET
PORTION
the instruction
booklet
AMERICA,
v,hich vary' from
to insure
of authorized
proper
state to state.
installation
MITSUBISHI
Service
INC.
FOR YOUR RECORDS
and correct
Center(s).
customer
control
I[ you are unable
adjustment.
to obtain
If the
this
MITSUBISHI
SERIAL
NO.
ADDRESS
STATE
(
)
ZIP
PURCHASE
DATE
/
MO
PLACE
damages,
NAME
CITY
PHONE
review
MITSUBISHI
Dealer for name(s)
or write us at the address below.
MITSUBISHI
ELECTRONICS
P.O. Box 5025
Norcross, GA 30091-5025
RETAIN
and you may also have other rights
OF PURCHASE
OR
OR OTHERWISE.
/
DAY
YR