1
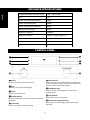
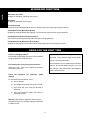
English Operation / Installation Manual Microwave Oven RO-M3411-ST Rinnai Corporation TABLE OF CONTENTS English Page 1 - 16 Safety warnings --------------------------------------------------------------------------------------------------------------------------2 Appliance specifications ---------------------------------------------------------------------------------------------------------------6 Control panel -----------------------------------------------------------------------------------------------------------------------------6 Guide to the appliance -----------------------------------------------------------------------------------------------------------------7 Microwave functions --------------------------------------------------------------------------------------------------------------------8 Using for the first time ------------------------------------------------------------------------------------------------------------------8 Operation ----------------------------------------------------------------------------------------------------------------------------------9 Maintenance and Care-----------------------------------------------------------------------------------------------------------------13 Troubleshoot ------------------------------------------------------------------------------------------------------------- ----------------14 Installation ----------------------------------------------------------------------------------------------------- ---------------------------15 IMPORTANT Please paste the serial number labels enclosed with the packaging on your warranty card to register your product warranty. Please contact your local Rinnai Customer Care Centre should you require further assistance. Version: 2013 03 1 English CONTENTS English SAFETY WARNINGS Please read this user manual thoroughly before attempting to use appliance for the first time. This manual contains important information on safe installation, use and care of the appliance. Do keep these instructions for reference and pass them on to future user. Unpacking Do not use the appliance if there are obvious signs of transportation damage. If the power supply cord is damaged, it must be replaced by the manufacturer, its service agent or qualified technician to avoid hazard. Ensure that young children do not play with plastic bag packaging. For the user This appliance is for home food preparation only and should be used only for heating, cooking and defrosting food and beverage. It is not suitable for commercial, laboratory use or heating therapeutic devices. This appliance is not intended for use by young children. Older children or infirm persons may use the appliance without supervision when adequate instructions are given and they are able to use the microwave in a safe way and understand the hazards of improper use. Always open the microwave oven door carefully as hot steam may escape. Accessible surfaces may become hot when in grill mode with or without microwave function. Cookware, grilling rack and turntable may become hot during use. Always use heatresistant oven gloves to avoid burns. Be careful when removing a lid or cover from cookware to avoid steam burns. Do not use full power to warm empty cookware. Do not force the turntable to rotate by hand. This may cause malfunctioning. Do not use the oven cavity for storage purposes. Do not obstruct air vents located on the ovens. Never use a high pressure cleaner or steam cleaner to clean the appliance. The steam could reach the electrical components and result in a short circuit. To reduce the risk of fire in the oven cavity: a) Do not overcook food. b) Do not heat oil or fat for deep frying. Do not leave the food unattended when cooking with oils as these can be a fire hazard if overheat. The door safety lock prevents the microwave oven from operating when the door is open. Do not tamper with them, or operate this appliance with the door open as this can result in microwave leakage and cause hazard to the user. c) Do not leave the oven unattended when reheating or cooking food in disposable containers made of plastic, paper or other combustible materials. It is particularly important that the oven door closes properly. Do not operate the microwave if d) Remove wire twist-ties from paper or plastic bags before placing bag in the oven. a) door is warped b) door hinges and latches are loose or broken e) Do not heat undiluted alcohol in the microwave oven as this can easily ignite. c) door seals and oven cavity are buckled or deformed f) d) holes and cracks are visible in the door or oven interior walls Warning: Operating the appliance with this type of damage will result in microwave leakage and present a hazard to user. If smoke or ignition is observed inside the cooking compartment, keep oven door closed. Switch off and unplug the appliance immediately. Do not open the door until the smoke has dispersed. g) Always keep the inside of the oven clean. Build-up grease may overheat and cause smoke or ignite. 2 Before setting up the appliance, check it for external visible damage. Do not install or attempt to use a damaged appliance. Do not operate the microwave if the door, hinges or door seals are damaged. Operating the appliance will result in microwave energy leakage and may cause hazard to the user. Ensure that the power supply cord does not run under the oven and is free from heat source or sharp objects. The appliance is a high voltage appliance. Never remove the casing as this will result in microwave energy leakage and may cause hazard to the user. Before connecting the appliance to the power mains, make sure that the voltage and frequency corresponds to the rating as shown on the rating plate attached to the appliance. Installation and repair should only be attempted by qualified technician. It is dangerous to modify any part of this appliance. Tampering with electrical connections or mechanical parts can cause operation faults and may put the user at risk. Multiple plugs and extension cables must not be used. Overloading is dangerous and may cause a fire hazard. Always disconnect the power supply cord before carrying out any cleaning or maintenance work on the appliance. Disposal The electrical safety of this appliance can only be guaranteed if the appliance is correctly earthed. Use an electrical connector with earth that is correct for your location. The electrical connection of this appliance must be connected to earth (where applicable): Green & Yellow=EARTH; Blue=NEUTRAL; Brown=LIVE. The basic safety requirement should be tested and inspected by a qualified technician. The manufacturer cannot be held liable for any damages due to inadequate earthing system. This appliance and its packaging are environmentally friendly and recyclable. Please help us to care for the environment by disposing the packaging in a proper manner and recycling any old appliances. Before disposing an old appliance, disconnect it from the power supply and cut the power supply cord to prevent hazards. The manufacturer will not be held liable for any damages resulting from improper installation nor failure to adopt proper safety measures during installation and operational use of the appliance. Microwave Cooking Advice GENERAL NOTES DO NOT DO Eggs Do not cook eggs in shells, hard or soft-boiled eggs in the microwave oven as they may explode. Puncture the egg yolks before cooking, cover and allow standing time of at least one minute before removing utensil cover. Foods with peel or skin Foods with peel or skins such as potatoes, tomatoes, sausages, apples may burst during cooking. Pierce skins before cooking. This will allow steam to escape and prevent the food from bursting. Baby food Do not heat baby food in original jars. Transfer baby food to small dish and heat carefully, stirring often. Do not overheat baby bottles. Only heat till warm. Remove the screw cap and teat before warming the baby bottles. After warming, shake bottle thoroughly. Do check the temperature before serving to prevent burns. 3 English Technical safety Do not cook or heat up food and liquids in sealed containers/cans as pressure can build up and they may explode posing a severe risk of injury. Remove food from sealed containers/cans. Transfer to suitable utensil/dish. Popcorn Do not use regular brown bags, plastic bags or glass bowl to pop popcorn. Use specially bagged popcorn for the microwave oven. Do not exceed the maximum time indicated on popcorn package. Do not heat longer than the recommended time. Microwave heating of liquids such as soups, beverages, sauces etc can result in delayed eruptive boiling. The boiling point of the liquid may be reached without evident production of bubbles. The liquid does not boil evenly throughout. “Boiling delay” can cause a sudden build-up of bubbles when the container is removed from the microwave or shaken. This could lead to sudden boil over of the hot liquid resulting in danger of burning. Select the appropriate cooking time and power level. If you are unsure, begin with low power level and cooking time, slowly increase the setting until the food is sufficiently heated throughout. Stir the liquid before and during cooking. After heating, allow to stand in the oven for a short time. Exercise caution when handling the container. Always place utensil/dish. Check that the utensil/dish is not larger in size than the turntable. Check that utensils are suitable for microwave cooking before using them. Narrow strips of aluminum foil may be used to shield food from overheating. Keep to smaller pieces of aluminium foil. Keep aluminium foil clear of cavity walls (minimum 1” between foil and cavity to avoid sparks. English Canned foods Liquids and beverages Turntable Utensils Aluminium foil Do not operate the microwave oven without the turntable in place. Do not cook, reheat or defrost food directly on the turntable for cooking. Do not use containers made from metal, aluminium foil, lead crystal glassware or bowls with metallic trim. These items could be damaged or cause a fire hazard. Avoid using containers with restrictive openings (narrow necks). Do not use too much aluminium foil or sparkling may occur. 4 food in suitable To cook or defrost food in a microwave oven, the microwave energy must be able to pass through the cooking utensils to penetrate the food. The material and shape of containers affect cooking results and durations. Heat distribution is more even in round/oval shaped containers than in square/oblong containers as the food in the corners tend to overcook. Below is a general guide to selecting suitable utensil: Utensil Microwave Grill Convection Combination Heat–Resistant Glass Yes Yes Yes Yes Non Heat–Resistant Glass No No No No Heat–Resistant Ceramics Yes Yes Yes Yes Microwave–Safe Plastic Dish Yes No No No Kitchen Paper Yes No No No Metal Tray No Yes Yes No Metal Rack No Yes Yes No Aluminum Foil & Foil Container No Yes Yes No Note: Always check manufacturer’s instructions on utensils/cookware before using them. Microwave cooking tips Place the thickest parts of food towards the outside of the dish. Use a microwave-safe lid or microwave-safe cling wrap to cover the food during cooking. Covering the food speeds up the cooking process and prevents food from drying out. Note: Do not use a cover if cooking food coated with breadcrumbs, or cooking food with a crisp finish. It is advisable to turn, rearrange or stir food during cooking to ensure even heating. Always stir or turn food from the outside towards the middle, as food heats more quickly from the outside. Food with thick peel or skin must be pierced before cooking to allow steam to escape and prevent the food from bursting. Standing time is necessary after cooking to enable the heat to disperse evenly throughout the food. Chilled food will take longer to cook than food at room temperature. Always ensure that food is sufficiently cooked or reheated. If in doubt that a sufficiently high temperature has been reached, continue reheating for a little longer. The cooking time must be increased with increased amount of food placed. Example, four sausages will take longer to cook than two. Defrosting Remove the food from its packaging and place in a microwave-safe utensil/dish. Do not cover the food. To defrost meat, unpack the frozen food and place it on an upturned utensil/dish so that the meat juice can run off and be collected. Turn halfway through defrosting. Fish does not need to be fully defrosted before cooking. Defrost so that the surface is sufficiently soft to take herbs and seasoning. 5 English Suitable cooking utensils for microwave ovens English APPLIANCE SPECIFICATIONS Voltage and frequency of power supply 220V – 240V / 50Hz Fuse 13A Power consumption (Microwave) 1400W Power consumption (Grill) 1250W Power consumption (Convection) 2050W Microwave Power output 900W Operation Frequency 2450MHz Appliance dimension 595(W) x 527(D) x 460(H) mm Cut-out dimension 560 (W) x 505(D) x 455(H) mm Volume 34 litres Weight Approximately 25.4 kg CONTROL PANEL ❺ ❶ ❷ ❹ ❻ ❸ ❼ ❽ ❾ ❶ Power ❻ Pause/Cancel Press key to select microwave power level Press key to clear current settings before next programme. Press once to pause cooking. Press twice to cancel current program. Press and hold to set child lock. ❷ Grill Press key to set a grill cooking program ❼ Start/Quick Start Press key to start cooking program or set quick start cooking program ❸ Clock Press key to set oven clock ❽ Time Selector ❹ Display Screen Rotary selector to enter cooking time. Electronic cooking time, power level, indicators and time of day display ❾ Menu/Temp./ Weight Selector Rotary selector to set the weight, temperature or select auto-menu ❺ Convection Press key to program convection cooking 6 English GUIDE TO THE APPLIANCE Fixing the turntable ① Door safety lock ② Oven window ③ Turntable support / roller ring Turntable ④ Turntable ⑤ Grilling rack ⑥ Universal pan Turntable support / roller ring ⑦ Control panel Turntable shaft Accessories provided: Turntable (one pc) Turntable support (one pc) Grilling rack (one pc) Universal pan (one pc) Waveguide cover (Warning: Do not remove) 1. Place the turntable support on the cavity bottom. 2. Place the turntable on the turntable support. Check that the turntable hub is well secured in the turntable shaft (see arrow). Notes: Do not place the turntable upside down. Do not turn the turntable manually as this could damage the drive motor. Both turntable and turntable support must be used during cooking. Utensils and dishes must be placed on this turntable during cooking. 7 English MICROWAVE FUNCTIONS Microwave solo mode Suitable for defrosting, reheating and cooking. Grill mode Suitable for grilling thin cuts of meat. Convection mode Heated air is circulated throughout the oven cavity to brown and crisp food evenly and quickly. Combination mode (Microwave & Grill) Suitable for browning dishes with toppings. The microwave cooks the food, the grill browns it. Combination mode (Preheat & Convection) This function combines preheating and convection cooking operations. Combination mode (Microwave & Conection) Suitable for fast cooking via microwave function while giving the food a brown outer crisp. USING FOR THE FIRST TIME Remove packaging material When the microwave oven with grill function is Ensure that all packaging material is removed before using the appliance for the first time. first used, it may produce slight burning smell. This is a normal phenomenon. We recommend you to operate the grill without Pre-cleaning the oven cavity and accessories food for 20 minutes when using the oven for Clean the oven cavity and supplied accessories thoroughly before use. the first time. This phenomenon will disappear after a period of using. Check the damage appliance for externally visible Do not operate the microwave oven if a) door is warped b) door hinges and latches are loose or broken c) door seals and oven cavity are buckled or deformed d) holes and cracks are visible in the door or oven interior walls Warning: Operating the appliance with this type of damage will result in microwave leakage and present a hazard to user. 8 Note : Each time cooking programme ends, the oven produces a beep signal sound and ‘End’ is displayed on the screen. The signal continues to sound every two minutes. Open the oven door or press PAUSE/CANCEL key to cancel the signal sound. Setting the clock This oven can be set in a 12 hour or 24 hour mode. Press and hold CLOCK key for approximately 3 seconds to set 12 hour mode. “Hr12” is displayed on the screen. Press CLOCK key again to set 24 hour mode. “Hr24” is displayed on the screen. Rotate TIME selector to set present hour. Press CLOCK key to enter. Press PAUSE/CANCEL key to stop programme during operation. Clear the display setting before starting a new programme. Press PAUSE/CANCEL key to reset current setting. Grill mode Grill cooking is suitable for thin slices of meat, steaks, chops, kebabs, sausages and small pieces of chicken. It is also suitable for sandwiches and au gratin dishes. The maximum cooking time is 95 minutes. Suppose you want to program grill cooking for 12 minutes. Rotate TIME selector to set present minute. Press CLOCK key to enter. Microwave solo mode Microwave cooking allows you to customize cooking power and time. Select a power level by pressing the POWER key. See the table below. The maximum cooking time is 95 minutes. Suppose you want to cook at 80% power Level for 5 minutes. Open the door and place the utensil/dish on the turntable. Close the door. Press POWER key to set the desired power level (P-80 is displayed in the window). Press Open the door and place the food onto the Grill rack. Close the door. Press GRILL key. Rotate TIME selector to set the cooking time (12 :00 is displayed in the window). Press START/QUICK START key to start operation. After the cooking time ends, beep signal sounds and ‘End’ is displayed. Note : Press PAUSE/CANCEL key to stop programme during operation. Clear the display setting before starting a new programme. Press PAUSE/CANCEL key to reset current setting. Power level Power range 1 time 100%(P100) High Preheat the grill before use. 2 times 80%(P-80) Med-High 3 times 60%(P-60) Medium Use the universal pan as a drip pan to food juices and fat drip from food. 4 times 40%(P-40) Low-Med 5 times 20%(P-20) Low 6 times 0%(P-00) Nil POWER key Set the cooking time using the TIME selector (05 :00 is displayed in the window) Press START/QUICK START key to start operation. After the cooking time ends, beep signal sounds and ‘End’ is displayed. Tip : 9 English OPERATION English Combination mode (Microwave and Grill) This program uses a combination of grill and microwave power. The maximum cooking time is 95 minutes. Suppose you want to set combination cooking for 15 minutes. Open the door and place food onto the Grill rack. Close the door. Press GRILL key to select desired combination programme. Press GRILL key Combi 2 times 3 times Cooking period Grill COMB1 30% 70% fish, potatoes or au gratin COMB2 55% 45% pudding, omelette, baked potatoes, poultry Rotate TIME selector to set the cooking time. (15:00 is displayed in the window) Press START/QUICK START key to start operation. After the cooking time ends, beep signal sounds and ‘End’ is displayed. Note: Press PAUSE/CANCEL key to stop programme during operation. Clear the display setting before starting a new programme. Press PAUSE/CANCEL key to reset current setting. Preheating the grill during Combination mode (Microwave and Grill) cooking is not required. Press START/QUICK START key to start operation. After the cooking time ends, beep signal sounds and ‘End’ is displayed. Press START/QUICK START key to enter. Rotate MENU/TEMP./WEIGHT selector to set the temperature (170℃ is displayed in the window) Press START/QUICK START key to start operation. The default auto preheat time is 30 minutes. Beep alert sounds when the set temperature is reached. Open the door and place the utensil/dish on the turntable. Close the door. Rotate TIME selector to set the cooking time (20:00 is displayed in the window) Press Start/Quick Start key to start operation. After the cooking time ends, beep signal sounds and ‘End’ is displayed. Note : Convection mode Hot air is circulated throughout the oven cavity to brown and crisp food evenly and quickly. The oven can be programmed from 110℃~200℃. The maximum cooking time is 95 minutes. Suppose you want to set convection cooking for 30 minutes at 180℃. Open the door and place the utensil/dish on the turntable. Close the door. Press CONVECTION key once. ‘CONV’ appears in display screen. Press START/QUICK START key to enter. Rotate TIME selector to set the cooking time (30:00 is displayed in the window) Combination mode (Preheat + Convection) Your oven can be programmed to combine preheating and convection cooking operations. Suppose you want to preheat to 170℃and set convection cooking for 20 minutes. Press CONVECTION key. ‘CONV’ appears in display screen. Suitable dishes Micro Rotate MENU/TEMP./WEIGHT selector to set the temperature (180℃ is displayed in the window) 10 The default auto preheat time is 30 minutes. When the temperature reaches the set preheat temperature, the countdown in the display stops and a signal sounds every 5 seconds. If the oven door is not opened within 30 minutes, the programme stops automatically and ‘End’ is displayed. Menu Cooking mode Potato (230g/each) Microwave Coffee (200ml/cup) Microwave Popcorn (99g) Microwave Auto Reheat (g) Microwave Press CONVECTION key twice. ’CONV’ appears in display screen. Press START/QUICK START key to enter. Spaghetti (g) Microwave Pizza (g) Convection Rotate MENU/TEMP./WEIGHT selector to set cooking temperature: 110℃,140℃ or 170℃ Chicken (g) Microwave + Convection Use TIME selector to set the cooking time (24:00 is displayed in the window) Cake (475g) Convection Speed Defrost Microwave Press START/QUICK START key to start operation. After the cooking time ends, beep signal sounds and ‘End’ is displayed. Note : During ‘Chicken’ menu cooking, the oven pauses and produces beep alerts to signal users to turn food over. Press START/QUICK START key to resume. We recommend you to preheat the oven before baking the cake. Quick Start This feature starts the oven at full power. You can add cooking time during cooking. The maximum time is 10minutes. Open the door and place the utensil/dish on the turntable. Close the door. Weight Defrost Press START/QUICK START key to set the cooking time. Each press increases the cooking time by 1 minute. The default setting is 30 seconds. Weight Defrost can defrost food according to the weight you entered. The weight range is 100g to 1800g. The oven auto-start at full power. Suppose you want to set the oven to Weight Defrost for 200g food. Menu Cook You can choose from 9 automatic programmes. These programmes are weight dependent. You enter the weight or quantity of the food, and the cooking duration is automatically calculated. Open the door and place the utensil/dish on the turntable. Close the door. Rotate MENU/TEMP./WEIGHT selector to select WEI. ADJ. Press START/QUICK START key to enter. Open the door and place the utensil/dish on the turntable. Close the door. Rotate MENU/TEMP./WEIGHT selector to select weight. Rotate MENU/TEMP./WEIGHT selector to select menu. Press START/QUICK START key to start operation. Press START/QUICK START key to enter. Rotate MENU/TEMP./WEIGHT selector to enter units. After the cooking time ends, beep signal sounds and ‘End’ is displayed. Press START/QUICK START key to start operation. Note: 11 During defrosting process, the oven pauses and produces reminder alerts to turn food over. Press START/QUICK START key to resume. English Combination mode (Microwave + Convection) This oven has three pre-programmed settings making it easy to cook automatically with both convection heat and microwave. Suppose you want to set cooking for 25 minutes on 170℃. English Multi-stage Cooking Your oven can be programmed up to 3 stages. Suppose you want to set the following cooking program. Microwave cooking (100%) Grill cooking Open the door and place the utensil/dish on the turntable. Close the door. Speed Defrost Speed defrost can defrost food according to the time you entered. The maximum time is 95 minutes. Suppose you want to defrost food for 20 minutes. Open the door and place the utensil/dish on the turntable. Close the door. Rotate TIME selector to set the cooking time Press GRILL key. ‘2S’ is displayed in the window. Rotate MENU/TEMP./WEIGHT selector and select JET. DEFROST. Press START/QUICK START key to enter. Rotate MENU/TEMP./WEIGHT selector and select time. Press START/QUICK START key to start operation. Press POWER key to set power 100%. ‘1S’ is displayed in the window. Rotate TIME selector to set the cooking time Press START/QUICK START key to start operation. After the cooking time ends, beep signal sounds and ‘End’ is displayed. Note: Note: 1S, 2S or 3S will be displayed in window according to different stage setting. Quick start, menu cook, speed defrost, weight defrost, preheat and convection cooking mode cannot be set in a multi-stage cooking program. Child Lock The child lock can be activated to prevent the oven being switched off intentionally by young children. All controls are disabled when the child lock is activated. During defrosting process, the oven pauses and produces reminder alerts to turn food over. Press START/QUICK START key to resume. After the cooking time ends, beep signal sounds and ‘End’ is displayed. To stop the oven during operation i) Press PAUSE/CANCEL key You can restart the oven by pressing START/QUICK START key. Press PAUSE/CANCEL key to reset the current programme. To activate the child lock, press and hold PAUSE/CANCEL key for approximately 3 seconds. The oven beeps and the child lock symbol appears in display screen. To deactivate the child lock, press and hold PAUSE/CANCEL key for approximately 3 seconds. The oven beeps and the child lock symbol goes off. ii) Open the door You can restart the oven by closing the door and pressing START/QUICK START key. Press PAUSE/CANCEL key to reset the current programme. Cooling Feature This appliance is equipped with an integral fan which turns on automatically when the oven is hot. The fan switches off automatically when the oven is sufficiently cooled down. 12 Disconnect the power supply cord before carrying out any cleaning or maintenance activities. Cleaning the Oven Interior The oven interior can get hot during use. Ensure that the oven has sufficiently cooled down before carrying out cleaning activities. Keep the oven cavity, door and door seal surfaces clean. Food residues, spill overs and grease splatters stained on the oven walls, door seal and door surface reduce the efficiency of the oven and may cause hazards to user. The oven interior and door can be cleaned using a damp cloth. Mild detergent may be used if the oven gets very dirty. Avoid the use of abrasive cleaners as they may stain, streak or dull the door surface. For stainless steel surfaces, always wipe in the direction of the grain so as not to scratch the surface. For tougher stains, use a specific nonabrasive product (please observe the manufacturer’s instructions). Clean the front and knobs using non-abrasive cleaning agents and sponges. Wipe dry with a soft cloth after cleaning. Open the door before cleaning to deactivate the control panel. Keep the control panel dry. Wipe the panel with a soft, damp cloth. Avoid using excessive amount of water. Keep the ventilation openings free from water seepage and small particles. Oven light Do not attempt to replace the oven light by a nonqualified person. Please contact your local Rinnai Customer Care Service for service. To loosen stubborn deposits, boil a cup of water in the microwave oven for 2 – 3 minutes. To remove odors from the oven interior, boil a cup of water with a few spoonful of lemon juice for 5-minutes. Cleaning the Accessories Stains on the grill element may cause smoke or unpleasant odor. Ensure that the oven cavity has cooled down sufficiently and then wipe off the stains before the next use. Turntable and support Always keep the roller ring clean so that the turntable can turn smoothly and avoid excessive noise. The door should be kept clean at all times and checked regularly for any damage. Wash with mild soapy water and dry thoroughly. Avoid water or small particles penetration into small vents in the appliance. Fit the turntable in proper position after cleaning. See “Fixing the Turntable” in this manual. To avoid the turntable from breaking: Warning: Do not remove the waveguide cover inside the oven cavity. Before cleaning the turntable with water, leave the turntable to cool. Never use a high pressure cleaner or steam cleaner to clean the appliance. The steam could reach the electrical components and result in a short circuit. Do not place anything hot on a cold turntable. Do not place anything cold on a hot turntable. Grilling rack Cleaning the Oven Exterior The outside can be easily cleaned with mild detergent and warm water. Wipe dry with a lintfree cloth. Avoid using corrosive or abrasive products that could damage the surface. Wash and dry the grilling rack after each use. It can be washed by hand or dishwasher. Soak in hot soapy water to remove stubborn grease. Clean with brush or sponge. For purchase of spare parts, please check with your local Rinnai Customer Care Centre. 13 English MAINTENANCE AND CARE English TROUBLESHOOT Condensation build-up on oven door In case of minor faults or problems with the appliance operation, please check the following instructions to see if you could resolve the problem before calling for technician service. The appliance does not work Check that the main switch is turned on and the plug is properly inserted in the electrical outlet. Check if the circuit breaker is in working order. Check that the appliance door is closed properly. Check that the START/QUICK START key has been pressed. If the problem persists despite observing the above checks, please contact your local Rinnai Customer Care Centre for assistance. For service calls under warranty, please note that it is necessary to product your proof of purchase and valid warranty card. The display does not light up Check that the control panel is programmed correctly. The turntable does not turn smoothly Check that the contact area between the turntable and the turntable support are clean. Food is not properly cooked, heated or defrosted Check if the correct power level was correctly selected and suitable for the food quantity. Check if the programme was interrupted and was not completed. Oven switches off during a programme Check if the ventilation openings are blocked. Remove any objects if necessary. Do not attempt to repair the appliance or remove the casing as this will result in microwave energy leakage and may cause hazard. Please contact your local Rinnai Customer Care Centre for service. Oven light is not working Steam or water droplets may form on the door during the cooking cycle. This is due to condensation from the heat of the food. This is not a problem or fault with your oven and does not affect the safety of the appliance. Do not attempt to replace the oven light by a nonqualified technician. Please contact your local Rinnai Customer Care Service for service. 14 Installation must be performed by qualified personnel only. The manufacturer declines all responsibility for improper installation and does not accept responsibility for appliance warranty in the event of damage caused by incorrect installation. Remove all packing materials and accessories supplied. Operation of the oven may cause interference to your radio, TV or similar equipment. Place the oven as far away possible from these electronic equipment. Check that the appliance is free from damage. Do not operate the microwave oven if:- The column unit must have the following dimension: a) door is warped b) door hinges and latches are loose or broken c) door seals and oven cavity are buckled or deformed d) holes and cracks are visible in the door or oven interior walls If there is any damage, do not operate the appliance. Please contact your local Rinnai Customer Service for assistance. Fit the appliance in appropriate cabinet This appliance is designed to be built into a column unit. Ensure that the air vents are not obstructed or blocked by objects. If air vents are blocked during operation, the oven may overheat and this may lead to malfunctioning. The oven should be installed on a flat, level surface able to withstand the weight of the appliance and its contents. The oven must be in a stable position to avoid the possibility of causing noise vibration. The panels of the adjacent cabinets must be made of heat-resistant material. Keep the oven away from heat and water source. Exposure to heat and water can lower the oven efficiency and lead to malfunctioning. Ventilation 15 To ensure adequate ventilation, a minimum ventilation gap of 45mm is required from the back of appliance to cabinet wall. English INSTALLATION Connecting the supply cable to the power mains Install a standardized plug corresponding to the load indicated on the rating label attached to the appliance. If the appliance is being directly connected to the power mains supply, an omnipolar circuit breaker must be installed with a minimum gap of 3mm between the contacts, suitable for the load indicated and complying with current electrical regulations (the earthing wire must not be interrupted by the circuit breaker). The supply cable must not come into contact with surfaces 0 with temperatures higher than 50 C. The installer must ensure that the correct electrical connection has been made and that it is compliant with local safety regulations. English Securing the appliance Fit the appliance into column unit until the front frame of the oven is aligned to the cupboard opening. Ensure the appliance is stable and not leaning. Do not crush the power supply cord. Fix the oven in position with 4(four) 3 x 20mm screws provided. The fixing points are located on the top and bottom corners of the oven. Do not over tighten screws. Check that it is correctly aligned. Check that the door is free to open and close. Connect the power supply cord. Turn on the power mains. The appliance must only be operated when it has been built in to avoid electric shock hazard. Before connecting to the power supply, ensure that: Secure appliance to housing unit using 4(four) Screws ST3x20 mm. The appliance is correctly and efficiently earthed. The socket can withstand the maximum power of the appliance, and voltage within the value range indicated on the rating label attached to the appliance. The basic safety requirement should be tested by a qualified technician. Multiple plugs and extension cables must not be used. Overloading is dangerous and may cause a fire hazard. Once the appliance has been installed, the power supply and electrical socket must be easily accessible. The installer must ensure that the correct electrical connection has been made and that it is compliant with local safety regulations. The manufacturer declines any liability should these safety measures not be observed. 16 Rinnai Customer Care Centres China |中国 Guangzhou Rinnai Gas & Electric Room 2805, No.31 Jianghe Building, Tianshou Road, Guangzhou, China 广州林内燃具电器有限公司 中国广州天河区天寿路 31 号江河大厦 2805 室 Tel 电话 : (86) 20 3821 7976 Email 邮箱 : [email protected] URL 网址 : www.gzrinnai.com.cn Philippines Mitsui Industia Corporation 10 Buenaventura St., Cor MacArthur Highway, Dalandan Valenzuela City, Philippines Tel : (63) 2 292 9177 / 292 9179 Fax : (63) 2 292 8187 Indonesia Customer Care of PT. Rinnai Indonesia Jl. Raya Pejuangan No.21, Komp. Ruko Sastra Graha No.11 -13 Jakarta 11530 Tel : (62) 0800 1 889 889 (toll free) / 0815 112 99999 (SMS Center) Email : [email protected] URL : www.rinnai.co.id Singapore Rinnai Holdings (Pacific) Pte Ltd 47 Tannery Lane #05-01/02, Elite Industrial Building II, Singapore 347794 Tel : (65) 6748 9478 Fax : (65) 6745 9240 Email : [email protected] URL : www.rinnai.sg Macau |澳門 Fu Lei (Leong Si) Trading Limited Avenida do Almirante Lacerda No. 14-14C, Edf. Industrial Iao Son 11-And-A, Macau 冨利(粱氏)貿易有限公司 澳門提督馬路 14-14C,祐順工業大厦 11 樓 A Tel 电话 : (853) 2822 0889 Fax 传真 : (853) 2822 2733 URL 网址 : www.rinnai.com.hk/mo Thailand | ประเทศไทย Rinnai (Thailand) Co., Ltd. 61/1 Soi Kingkaew 9, Kingkaew Rd. Racha Thewa, Bangphli, Samutprakarn 10540, Thailand บริ ษทั ริ นไน (ประเทศไทย) จำกัด เลขที่ 61/1 ซอยกิ่งแก้ว 9 ถนนกิ่งแก้ว ตำบลรำชำเทวะ อำเภอบำงพลี จังหวัดสมุทรปรำกำร ประเทศไทย 10540 Tel : (66) 2 3124330-40 Email : [email protected] URL : www.luckyflame.co.th Malaysia Rinnai (M) Sdn Bhd D2-3-G & D2-3-1, Block D2, Pusat Perdagangan Dana 1, Jalan PJU 1A/46, 47301 Petaling Jaya, Selangor Darul Ehsan, Malaysia Tel : (60) 3 7832 0037 / 7832 0038 / 7832 0039 Fax : (60) 3 7832 0036 URL : www.rinnai.com.my Myanmar | ျမန္မာ Myanmar Kowa International Co., Ltd No.199, Ground Floor, 34th Street (Upper Block), Kyauktada Township, Yangon, Myanmar အမွတ္ (၁၉၉)၊ ၃၄ လမ္း ( )၊ ေက်ာက္တံတားၿမိဳ႕နယ္၊ ရန္ကုန္ၿမိဳ႕။ Tel ဖုန္း : (95-1) 245925 / 246304 / (95-9) 7300 7773 Fax ဖက္(စ္) : (95-1) 245925 Email အီးေမးလ : [email protected] Vietnam | Việt Nam Rong Viet Commerce Company Limited 120 3/2 Street, Ward 12, District 10, Ho Chi Minh City, Vietnam Công Ty TNHH Thương Mại Rồng Việt 120 Đường 3/2, Phường 12, Quận 10, TP. Hồ Chí Minh, Việt Nam Tel : (84) 8 3862 3409 Fax : (84) 8 5404 1964 Email : [email protected] URL : www. rongviet-rinnai.com