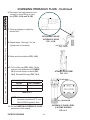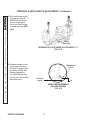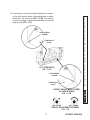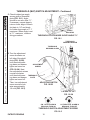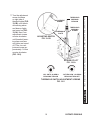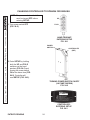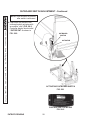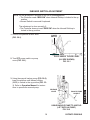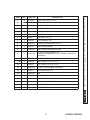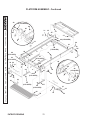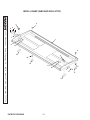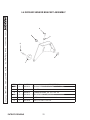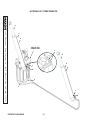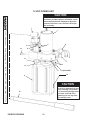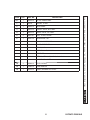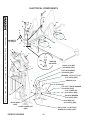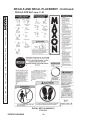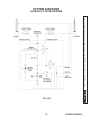
1
MAINTENANCE MANUAL
FOR
WHEELCHAIR LIFT MODEL NO.
• WL7-vers. C
• WL7-vers. C-1K
DOT-Public Use Lift
PATENTS PENDING
© MAXON Lift Corp. 2011
MP-11-03
JULY 2011
PATENTS PENDING
11921 Slauson Ave.
Santa Fe Springs, CA. 90670
LIFT CORP.
WARRANTY/ RMA POLICY & PROCEDURE
CUSTOMER SERVICE:
TELEPHONE (562) 464-0099 TOLL FREE (800) 227-4116
FAX: (888) 771-7713
NOTE: Download the latest version of manuals from the Maxon
Mobility website at www.maxonmobility.com.
MOBILITY WARRANTY
LIFT WARRANTY
Type of Warranty:
Full Parts and Labor
Term of Warranty:
3 years from ship date or 18,000 lift/lower cycles
This warranty shall not apply unless the product is installed, operated and maintained in accordance with MAXON Lift’s specifications as set forth
in MAXON Lift’s Installation, Operation and Maintenance manuals. This warranty does not cover normal maintenance or adjustments, damage or
malfunction caused by improper handling, installation, abuse, misuse, negligence, or carelessness of operation. In addition, this warranty does not
cover equipment that has had unauthorized modifications or alterations made to the product.
MAXON agrees to replace any components which are found to be defective during the first 3 years of service, or 18,000 lift/lower cycles, whichever
occurs first, and will reimburse for labor based on MAXON’s Mobility Warranty Flat Rate Schedule.
All warranty repairs must be performed by an authorized MAXON Mobility warranty facility. For any repairs that may exceed $500, including parts and
labor, MAXON’s Technical Service Department must be notified and an “Authorization Number” obtained. All repairs must be completed using genuine
MAXON replacement parts.
All claims for warranty must be received within 30 Days of the repair date, and include the following information:
1. Wheelchair Lift Model Number and Serial Number
2. Number of “LIFTS” displayed on the Lift Controller
3. End User information, name and phone number
4. Detailed Description of Problem
5. Corrective Action Taken, and Date of Repair
6. Parts used for Repair, Including MAXON Part Number(s)
7. MAXON R.M.A. # and/or Authorization # if applicable (see below)
8. Person contacted at MAXON, if applicable
9. Claim must show detailed information, i.e. Labor rate and hours of work performed
Warranty claims can also be placed on-line at www.maxonlift.com. Online claims will be given priority processing.
All components may be subject to return for inspection, prior to the claim being processed. MAXON products may not be returned without prior written
approval from MAXON’s Technical Service Department. Returns must be accompanied by a copy of the original invoice and are subject to a credit
deduction to cover handling charges and any necessary reconditioning costs. Unauthorized returns will be refused and become the responsibility
of the returnee.
Any goods being returned to MAXON Lift must be pre-approved for return, and have the R.M.A. number written on the outside of the package in plain
view, and returned freight prepaid. All returns are subject to a 15% handling charge if not accompanied by a detailed packing list.
MAXON’s warranty policy does not include the reimbursement for travel time, towing, vehicle rental, service calls, oil, batteries or loss of income due to
downtime. Fabrication or use of non Maxon parts, which are available from MAXON, is also not covered.
MAXON Mobility’s Flat Rate Labor Schedule takes into consideration the time required for diagnosis of a problem.
All returned Lifts are subject to inspection and a 15% restocking fee. Any returned Lifts or components that have been installed or not returned in new
condition will be subject to an additional reworking charge which will be based upon the labor and material cost required to return the Lift or component
to new condition.
PURCHASE PART WARRANTY
Term of Warranty: 1 Year from Date of Purchase.
Type of Warranty: Part replacement only
MAXON will guarantee all returned genuine MAXON replacement parts upon receipt and inspection of parts and original invoice.
All warranty replacements parts will be sent out via ground freight. If a Rush Shipment is requested, all freight charges will be billed to the requesting
party.
Defective Parts requested for return must be returned within 30 days of the claim date for consideration to:
MAXON Lift Corp.
10321 Greenleaf Ave., Santa Fe Springs, CA 90670
Attn: RMA#__
TABLE OF CONTENTS
SAFETY SUMMARY ............................................................................................................. 6
WARNINGS ........................................................................................................................... 6
LIFT COMPONENTS & TERMINOLOGY.............................................................................. 8
MAINTENANCE SCHEDULE ............................................................................................. 10
CHECKING HYDRAULIC FLUID LEVEL .............................................................................11
CHANGING HYDRAULIC FLUID ........................................................................................ 12
ADJUSTMENTS.................................................................................................................. 15
THRESHOLD (MAT) SWITCH ADJUSTMENT ................................................................... 15
CHANGING CONTROLLER TO SPANISH OR ENGLISH .................................................. 24
OUTBOARD SWITCH ADJUSTMENT ................................................................................ 26
STOW SWITCH ADJUSTMENT.......................................................................................... 31
FLOOR POSITION ADJUSTMENT ..................................................................................... 34
INBOARD SWITCH ADJUSTMENT ................................................................................... 39
3” GROUND SWITCH ADJUSTMENT ............................................................................... 41
PARTS BREAKDOWN ....................................................................................................... 48
MAIN ASSEMBLY-1 ............................................................................................................. 48
PINCH SHIELDS ................................................................................................................. 49
MAIN ASSEMBLY-2 ............................................................................................................. 50
LH PLATFORM CLOSER .................................................................................................... 54
INROLL SUPPORT BRACKET ........................................................................................... 58
MAIN ASSEMBLY-3 ............................................................................................................. 60
RH PLATFORM CLOSER ................................................................................................... 64
MAIN ASSEMBLY-4 ............................................................................................................. 66
PLATFORM ASSEMBLY ..................................................................................................... 68
INROLL RAMP (INBOARD ROLLSTOP) ............................................................................ 74
PATENTS PENDING
LH GROUND SENSOR BRACKET ASSEMBLY ................................................................. 76
RH GROUND SENSOR BRACKET ASSEMBLY ................................................................ 77
HYDRAULIC COMPONENTS ............................................................................................ 78
12 VDC POWER UNIT ........................................................................................................ 80
ELECTRICAL COMPONENTS ........................................................................................... 82
DECALS AND DECAL PLACEMENT ................................................................................ 86
DECALS FOR WL7-vers. C................................................................................................. 87
DECALS FOR WL7-vers. C-1K ........................................................................................... 88
SERIAL PLATE & CONTROLLER ....................................................................................... 90
ANTI-SLIP & SAFETY STRIPING ....................................................................................... 91
TROUBLESHOOTING ........................................................................................................ 94
CONTROLLER DISPLAY READINGS ................................................................................ 94
DIAGNOSTIC MODE ........................................................................................................ 100
DC RELAY READINGS ..................................................................................................... 104
SYSTEM DIAGRAMS ....................................................................................................... 105
HYDRAULIC SYSTEM DIAGRAM .................................................................................... 105
ELECTRICAL SYSTEM DIAGRAM ................................................................................... 106
PATENTS PENDING
SAFETY SUMMARY
Comply with the following WARNINGS and safety precautions while maintaining the Wheelchair Lift. See Operator’s Manual for operating safety requirements.
WARNINGS
!
WARNING
11921 Slauson Ave. Santa Fe Springs, CA. 90670 (800) 227-4116 FAX (888) 771-7713
1.
Read and understand the instructions in this Maintenance Manual before performing
maintenance on the Lift.
2.
Before operating the Lift, read and understand the operating instructions contained in the
Operator’s Manual.
3.
Comply with all WARNING and instruction decals attached to the Lift.
4.
Consider the safety and location of bystanders and location of nearby objects when operating the Lift. Stand to one side of platform while operating the Lift.
5.
Do not allow untrained persons to operate the Lift.
6.
Do not stand, or allow obstructions, under the platform when lowering the Lift. Be sure
your feet are clear of the Lift.
7.
Keep fingers, hands, arms, legs, and feet clear of moving Lift parts (and platform
edges) when operating this unit.
8.
Wear appropriate safety equipment, such as protective eyeglasses, faceshield and clothing
while performing maintenance on the Lift and handling the vehicle battery. Debris from cutting and drilling, and contact with battery acid, may injure eyes and exposed skin.
9.
Be careful working by a vehicle battery. Make sure the work area is well ventilated and
there are no flames or sparks near the battery. Never lay objects on the battery that can
short the terminals together. If battery acid gets in your eyes, immediately seek first aid. If
acid gets on your skin, immediately wash it off with soap and water.
10.
If an emergency situation arises (vehicle or Lift) while operating the Lift, immediately release the hand pendant switch.
11.
A correctly installed Lift operates smoothly and reasonably quiet. The only noticeable noise,
during Lift operation, is from the pump unit while the platform is raised and folded. Listen
for scraping, grating and binding noises and correct the problem before continuing to operate the Lift.
12.
Keep decals clean and legible. If decals are illegible or missing, replace them. Free replacement decals are available from Maxon Customer Service.
13.
Use only Maxon Authorized Parts for replacement parts. Order replacement parts from:
MAXON LIFT CORP. - Customer Service
11921 Slauson Ave., Santa Fe Springs, CA 90670
Phone: (800) 227-4116
Email: [email protected]
Provide the Lift model and serial number information with your order.
PATENTS PENDING
6
7
11921 Slauson Ave. Santa Fe Springs, CA. 90670 (800) 227-4116 FAX (888) 771-7713
THIS PAGE INTENTIONALLY LEFT BLANK
PATENTS PENDING
LIFT COMPONENTS & TERMINOLOGY
10
INBOARD
6
RIGHT
11
4
11921 Slauson Ave. Santa Fe Springs, CA. 90670 (800) 227-4116 FAX (888) 771-7713
10
6
7
12
8
5
2
9
1
LEFT
12
3
LIFT COMPONENTS (SEE TABLE 9-1)
FIG. 8-1
PATENTS PENDING
8
OUTBOARD
NAME
1
THRESHOLD PLATE
2
OUTBOARD ROLLSTOP
3
PLATFORM
4
HANDRAILS
5
INBOARD ROLLSTOP
6
HYDRAULIC CYLINDER
7
HYDRAULIC POWER
UNIT (COVER IS
SHOWN)
8
LIFT CONTROLLER
(BRAIN BOX)
9
BASE
10
THRESHOLD WARNING
BEACON
11
THRESHOLD WARNING
ALARM
12
PLATFORM LIGHTS
DESCRIPTION
Detects if a portion of Lift is occupied during “UP/
DOWN” operation between vehicle floor and the
ground.
Barrier to prevent the wheelchair from rolling off of
the platform. Provides entry/exit ramp for platform
on the ground.
Contains the wheelchair and occupant during “UP/
DOWN” operation between vehicle floor and the
ground.
(Left/Right) Provides a hand hold for the Lift
occupant.
Barrier to prevent the wheelchair from rolling off
inboard side of platform. Provides bridge between
platform and threshold.
(Left/Right) Telescoping steel tube and rod,
pressurized by hydraulic fluid, that folds and unfolds
the Lift and moves the Lift up and down.
Contains motorized hydraulic pump, manually
operated backup pump, fluid lines, and controls to
operate the hydraulic cylinders.
Electronic device that controls and monitors Lift
operation and the interlock connection with the
vehicle.
Structure that secures Lift to the vehicle floor.
Flashing red light indicates threshold is occupied by
a person or object when the platform is below floor
level. Indicates outboard rollstop is open if platform
is at floor level.
Audible alarm sounds when threshold is occupied
by a person or object when the platform is below
floor level. Indicates outboard rollstop is open if
platform is at floor level.
Illuminates the platform when ready to load at floor
level and during “UP/DOWN” operation between
vehicle floor and the ground.
TABLE 9-1
9
PATENTS PENDING
11921 Slauson Ave. Santa Fe Springs, CA. 90670 (800) 227-4116 FAX (888) 771-7713
ITEM
MAINTENANCE SCHEDULE
NOTE: The Lift controller counts the number of cycles & lifts over the lifetime of the Lift.
One CYCLE is counted each time the Lift is unfolded from the stowed position to
floor level, lowered to the ground, raised to floor level, and then stowed. One LIFT
is counted each time the Lift is lowered from floor level to the ground, and raised
back to floor level. Read the LIFTS and CYCLES counts from the Lift controller display window periodically so you know when to do the maintenance checks
listed below.
EVERY 500 LIFTS
11921 Slauson Ave. Santa Fe Springs, CA. 90670 (800) 227-4116 FAX (888) 771-7713
Visually check the Lift for bent, broken, or worn out parts, and broken welds.
Check the electrical wiring for worn insulation, and the terminals for corrosion
and secure fit. Apply dielectric grease to connections if needed.
Check for loose fasteners (nuts, bolts, screws & rivets). Also, check cotter pins, clevis
pins, retaining ring pins & retaining rings for noticeable wear and damage.
Check that all decals are in place, undamaged, and legible (see PARTS BREAKDOWN, DECALS).
Check that all anti-slip and safety striping is in place and undamaged (see PARTS
BREAKDOWN, ANTI-SLIP & SAFETY STRIPING).
EVERY 2500 CYCLES
Visually inspect the latch solenoids. If necessary, replace both latch solenoids P/N
266955-01 (see PARTS BREAKDOWN, ELECTRICAL COMPONENTS, Item 19).
Apply multi-use teflon spray lubricant to the inboard rollstop spring lock & the plunger
switch spring on the Lift.
EVERY 5000 LIFTS
Replace both platform light bulbs P/N 906475-01 (see PARTS BREAKDOWN, ELECTRICAL COMPONENTS, Items 26A & 27A).
EVERY 10000 LIFTS
Check both hydraulic cylinders for leaks. If a film of hydraulic fluid is visible on cylinder
seals, Lift can still be operated. However, if fluid is dripping from the cylinders, replace
them (see PARTS BREAKDOWN, HYDRAULIC COMPONENTS, Item 8).
NOTE: To confirm compliance with Federal Motor Vehicle Safety Standard 403, refer to
the COMPLETED LIFT INSTALLATION CHECKLIST in the Installation Manual.
PATENTS PENDING
10
CHECKING HYDRAULIC FLUID LEVEL
Keep dirt, water and other contaminants from entering the hydraulic system. Before opening the hydraulic fluid reservoir filler cap, drain plug and
hydraulic lines, wipe off contaminants that can get in the openings. Also,
protect the openings from accidental contamination.
1. Check the hydraulic fluid
level in reservoir as follows.
PUMP COVER
2. Raise and stow platform.
3. Unbolt the pump cover as
shown in FIG. 11-1. Observe
the fluid level at the decal on
pump reservoir. Fluid level
should be in the MIN-MAX
range shown on decal (FIG.
11-2).
SCREWS
UNBOLTING/BOLTING PUMP COVER
(LH PUMP SHOWN)
FIG. 11-1
4. Pull out filler cap (FIG. 11-2). Fill the
reservoir with hydraulic fluid (TABLE
11-1) to level shown in FIG. 11-2. Reinstall filler cap (FIG. 11-2).
RECOMMENDED HYDRAULIC FLUID
BRAND
PART NUMBER
ROSEMEAD
THS FLUID 17111
EXXON
UNIVIS HVI 26
FILLER CAP
TABLE 11-1
NOTE: If the expected seasonal
temperatures are below
20°F, use MIL-H-5606G
hydraulic fluid.
RESERVOIR
5. Bolt on the pump cover as shown
in FIG. 11-1. Tighten the 5/16”-18
cover screws until snug.
HYDRAULIC FLUID LEVEL
(LH PUMP SHOWN)
FIG. 11-2
11
PATENTS PENDING
11921 Slauson Ave. Santa Fe Springs, CA. 90670 (800) 227-4116 FAX (888) 771-7713
! CAUTION
CHANGING HYDRAULIC FLUID
1. Make sure power switch (FIG. 12-1) is
turned on. Then, lower platform to the
ground (FIG. 12-1).
POWER SWITCH
11921 Slauson Ave. Santa Fe Springs, CA. 90670 (800) 227-4116 FAX (888) 771-7713
LIFT AT GROUND LEVEL
(RH SIDE SHOWN)
FIG. 12-1
PUMP COVER
2. Unbolt the pump cover as shown
in FIG. 12-2.
SCREWS
UNBOLTING PUMP COVER
(LH PUMP SHOWN)
FIG. 12-2
PATENTS PENDING
12
Keep dirt, water and other contaminants
from entering the hydraulic system. Before opening the hydraulic fluid reservoir
filler cap, drain plug and hydraulic lines,
wipe off contaminants that can get in
the openings. Also, protect the openings
from accidental contamination.
3. On the cylinder farthest from the pump,
disconnect high pressure (HP) hose from
elbow fitting on the cylinder (FIGS. 13-1A
and 13-1B).
DISCONNECTING HP
HYDRAULIC HOSE
FIG. 13-1B
4. Place the open end of the hose in a
3-gallon bucket.
FIG. 13-1A
5. To run the hydraulic pump, press
the UP switch on the hand pendant (FIG. 13-2). Hold the UP
switch and listen for sounds of
cavitation in the pump. Release
the UP switch when the pump
starts to cavitate.
UP
HAND PENDANT
FIG. 13-2
13
PATENTS PENDING
11921 Slauson Ave. Santa Fe Springs, CA. 90670 (800) 227-4116 FAX (888) 771-7713
CAUTION
CHANGING HYDRAULIC FLUID - Continued
6. Reconnect the high pressure hose
securely to elbow fitting on cylinder (FIGS. 14-1A and 14-1B).
11921 Slauson Ave. Santa Fe Springs, CA. 90670 (800) 227-4116 FAX (888) 771-7713
7. Clean up dripped or spilled hydraulic fluid.
RECONNECTING HP
HYDRAULIC HOSE
FIG. 14-1B
8. Repeat steps 3 through 7 for the
cylinder next to the pump.
FIG. 14-1A
9. Raise and stow platform (FIG. 14-2).
10. Pull out filler cap (FIG. 14-3). Fill the
reservoir with hydraulic fluid (TABLE
14-1) to level shown on decal (FIG.
14-3). Reinstall filler cap (FIG. 14-3).
STOWED PLATFORM
FIG. 14-2
FILLER CAP
RECOMMENDED HYDRAULIC FLUID
BRAND
PART NUMBER
ROSEMEAD
THS FLUID 17111
EXXON
UNIVIS HVI 26
TABLE 14-1
NOTE: If the expected seasonal temperatures are below 20°F, use
MIL-H-5606G hydraulic fluid.
RESERVOIR
HYDRAULIC FLUID LEVEL
(LH PUMP SHOWN)
FIG. 14-3
11. Do the CHECKING HYDRAULIC FLUID
procedure in this manual.
PATENTS PENDING
14
ADJUSTMENTS
NOTE: Do this procedure if structure of the Lift is undamaged and:
• The controller reads “MAT ERR” when the threshold plate is unoccupied
and platform is below floor level.
• The threshold warning beacons and threshold warning alarm are on
when threshold is unoccupied and platform is below floor level.
• The threshold warning beacons and threshold warning alarm will not turn on
when threshold is occupied and platform is below floor level.
• The threshold (MAT) switch (or switches) or threshold plate is removed &
replaced.
The adjustment is done correctly if:
• The controller does not read “MAT ERR” when the threshold plate is unoccupied and platform is below floor level.
• The threshold warning beacons and threshold warning alarm turn on when
threshold is occupied and platform is below floor level.
1. Make sure power switch
is turned on. Lower Lift to
the ground (FIG. 15-1).
POWER SWITCH
LIFT AT GROUND LEVEL
FIG. 15-1
15
PATENTS PENDING
11921 Slauson Ave. Santa Fe Springs, CA. 90670 (800) 227-4116 FAX (888) 771-7713
THRESHOLD (MAT) SWITCH ADJUSTMENT
THRESHOLD (MAT) SWITCH ADJUSTMENT - Continued
2. Set inside slope angle
of threshold plate to 7.1°
MAXIMUM as follows.
Center angle indicator on the inside slope
of threshold plate (FIG.
16-2).
11921 Slauson Ave. Santa Fe Springs, CA. 90670 (800) 227-4116 FAX (888) 771-7713
ANGLE
INDICATOR
THRESHOLD PLATE INSIDE SLOPE ANGLE 7.1°
FIG. 16-2
3. Measure distance from
upper edge of threshold plate to vehicle floor
as shown in FIG. 16-1.
Distance should be
1/4” MAXIMUM at any
point across the width of
threshold plate.
THRESHOLD
PLATE
VEHICLE
FLOOR
1/4”
HEIGHT MEASUREMENT
(RH SIDE SHOWN)
FIG. 16-3
PATENTS PENDING
16
11921 Slauson Ave. Santa Fe Springs, CA. 90670 (800) 227-4116 FAX (888) 771-7713
4. If necessary, turn threshold plate adjustment screws
on the right and left sides of threshold plate to adjust
distance to 1/4” maximum (FIG. 17-1B). Turn screws
counter-clockwise to raise and clockwise to lower the
edge of plate (FIG. 17-2).
ADJUSTMENT
SCREW
THRESHOLD
PLATE
LIFT THRESHOLD
FIG. 17-1A
ADJUSTMENT
SCREW
THRESHOLD
PLATE
HEIGHT ADJUSTMENT SCREW
(LH SIDE SHOWN)
FIG. 17-1B
CCW - RAISE
CW - LOWER
HEIGHT ADJUSTMENT SCREWS
FIG. 17-2
17
PATENTS PENDING
THRESHOLD (MAT) SWITCH ADJUSTMENT - Continued
11921 Slauson Ave. Santa Fe Springs, CA. 90670 (800) 227-4116 FAX (888) 771-7713
5. Check inside slope angle
across width of threshold
plate (FIG. 18-1). Angle
should be no more than 7.1°.
If necessary, repeat steps to
raise or lower edge of threshold plate to 1/4” and check
for inside slope angle of 7.1°
maximum. When angle is set
at 7.1° maximum, continue
doing procedure.
ANGLE
INDICATOR
THRESHOLD PLATE INSIDE SLOPE ANGLE 7.1°
FIG. 18-1
THRESHOLD
WARNING BEACON
THRESHOLD
WARNING ALARM
6. Turn the adjustment
screw clockwise on
left side of threshold
plate (FIG. 18-2B),
until threshold warnADJUSTMENT
ing alarm and beacon
SCREW
lights are turned on
(FIG. 18-2A). Next,
turn adjustment screws
counter-clockwise
until threshold warn- THRESHOLD
ing alarm and beacon
PLATE
lights are turned off.
Then, turn adjustment
ADJUSTING SWITCH
screw counter-clockFIG. 18-2B
wise approximately
1/4-turn (FIG. 18-3).
LH SIDE OF LIFT
FIG. 18-2A
CW - UNTIL ALARM &
BEACONS TURN ON
1/4-TURN CCW - ALARM &
BEACONS TURN OFF
THRESHOLD SWITCH ADJUSTMENT SCREWS
FIG. 18-3
PATENTS PENDING
18
ADJUSTMENT
SCREW
THRESHOLD
PLATE
THRESHOLD
WARNING
BEACON
THRESHOLD
WARNING
ALARM
ADJUSTING SWITCH
FIG. 19-1B
RH SIDE OF LIFT
FIG. 19-1A
CW - UNTIL ALARM &
BEACONS TURN ON
1/4-TURN CCW - ALARM &
BEACONS TURN OFF
THRESHOLD SWITCH ADJUSTMENT SCREWS
FIG. 19-2
19
PATENTS PENDING
11921 Slauson Ave. Santa Fe Springs, CA. 90670 (800) 227-4116 FAX (888) 771-7713
7. Turn the adjustment
screw clockwise
on right side of
threshold plate (FIG.
19-1B), until threshold warning alarm
and beacon lights
are turned on (FIG.
19-1A). Next, turn
adjustment screws
counter-clockwise
until threshold warning alarm and beacon lights are turned
off. Then, turn adjustment screw approximately 1/4-turn
counter-clockwise
(FIG. 19-2).
THRESHOLD (MAT) SWITCH ADJUSTMENT - Continued
11921 Slauson Ave. Santa Fe Springs, CA. 90670 (800) 227-4116 FAX (888) 771-7713
8. Put 25-pound weight
on threshold plate (FIG.
20-1). The warning alarm
and beacon lights should
turn on. If alarm and beacon lights don’t come on,
alternately turn left side
and right side adjustment
screws clockwise until
alarm & beacon lights are
turned on.
25 POUND WEIGHT ON THRESHOLD PLATE
FIG. 20-1
9. Move 25-pound weight to
several different places
across threshold plate
(FIG. 20-1). Alarm and
beacon lights should turn
on with load anywhere on
threshold plate.
PATENTS PENDING
20
NOTE: The platform tilt adjustment is important for operation of the outboard
rollstop and for keeping platform level when it reaches the ground. The
lift mounting surface must be parallel to the ground and rigid enough to
remain parallel during the adjustment process. Platform must be empty
during adjustment. Lift mounting surface must be parallel to ground and
bed height must be 29”. Vehicle floor height, Lift and stiffness of the vehicle suspension may change the angle of platform on the ground.
NOTE: Do this procedure if structure of the Lift is undamaged and:
• Outboard rollstop will not open completely when platform reaches the
ground.
• Bottoms of the vertical arms touch the ground before outboard rollstop.
• Platform is sloped down excessively toward the outboard rollstop.
The adjustment is done correctly if:
• Outboard rollstop opens completely when platform reaches the ground.
• Outboard rollstop will touch the ground before bottoms of vertical arms.
• Platform will slope down a little toward the outboard rollstop.
POWER
SWITCH
1. Make sure power switch
(FIG. 21-1) is turned on.
VERTICAL ARM
(RH SHOWN)
GROUND
2. Lower platform to just
above the ground with
enough room to place a
1/4” steel flat under bottom of LH and RH vertical arms
(FIG. 21-1). Then, lower platform until outboard rollstop is all
the way open and vertical arms rest on the 1/4”
flats.
1/4” FLAT
PLATFORM AT GROUND LEVEL WITH VERTICAL
ARMS RESTING ON FLATS
FIG. 21-1
21
PATENTS PENDING
11921 Slauson Ave. Santa Fe Springs, CA. 90670 (800) 227-4116 FAX (888) 771-7713
PLATFORM TILT ADJUSTMENT
PLATFORM TILT ADJUSTMENT - Continued
3. Check for gap between tilt adjuster
screw and striker or between striker
and vertical arm (FIG. 22-2). If gap is
between striker and vertical arm, push
striker against vertical arm.
GAP
STRIKER
11921 Slauson Ave. Santa Fe Springs, CA. 90670 (800) 227-4116 FAX (888) 771-7713
SET SCREW
VERTICAL
ARM
GAP BETWEEN TILT ADJUSTMENT SCREW
& STRIKER (RH SIDE OF PLATFORM SHOWN)
FIG. 22-2
PATENTS PENDING
22
4. Turn tilt adjustment screws
clockwise on right and left sides
of platform (FIG. 23-1) until adjuster strikers are snug against
vertical arms (FIG. 23-2).
RH
ADJUSTMENT
SCREW
LH
ADJUSTMENT
SCREW
PLATFORM
INBOARD ROLLSTOP
(HELD DOWN)
OUTBOARD ROLLSTOP
(REF)
PLATFORM TILT ADJUSTMENT SCREWS
(BACK VIEW OF PLATFORM SHOWN)
FIG. 23-1
NO GAP
STRIKER
SET SCREW
VERTICAL
ARM
GAP BETWEEN TILT ADJUSTMENT SCREW
& STRIKER (RH SIDE OF PLATFORM SHOWN)
FIG. 23-2
23
PATENTS PENDING
11921 Slauson Ave. Santa Fe Springs, CA. 90670 (800) 227-4116 FAX (888) 771-7713
NOTE: To gain access to adjust tilt adjustment
screws, release inboard rollstop and
hold in down position
CHANGING CONTROLLER TO SPANISH OR ENGLISH
NOTE: The power switch on the Lift
must be turned OFF before
entering SETUP.
UP
1. Turn power switch OFF
(FIG. 24-2).
FOLD
11921 Slauson Ave. Santa Fe Springs, CA. 90670 (800) 227-4116 FAX (888) 771-7713
HAND PENDANT:
ENTERING SETUP
FIG. 24-1
POWER
SWITCH
CONTROLLER
(REF)
2. Enter SETUP by holding
both the UP and FOLD
switches on the hand
pendant (FIG. 24-1) and
turning the power switch
ON at the same time (FIG.
24-2). Controller will
read SETUP (FIG. 24-3).
TURNING POWER SWITCH ON/OFF
(LH PUMP SHOWN)
FIG. 24-2
SETUP
CONTROLLER:
ENTERING SETUP
FIG. 24-3
PATENTS PENDING
24
FOLD
HAND PENDANT:
CHANGING SETUP MODE
FIG. 25-1
LANGUAGE: ENGLISH
CONTROLLER: LANGUAGE
SETTING (ENGLISH OR SPANISH)
FIG. 25-2
NOTE: After you exit SETUP, the controller readings will be displayed
in the language you selected.
4. Push the UP switch or DOWN
switch to change from ENGLISH
to SPANISH (or from SPANISH
to ENGLISH) (FIGS. 25-2 and
25-3).
UP
DOWN
HAND PENDANT:
CHANGING THE SETTING
FIG. 25-3
5. Push and release the FOLD
switch (FIG. 25-1) three
times to exit SETUP (FIG.
25-4).
MAXON LIFT CORP.
CONTROLLER:
EXITING SETUP
FIG. 25-4
25
PATENTS PENDING
11921 Slauson Ave. Santa Fe Springs, CA. 90670 (800) 227-4116 FAX (888) 771-7713
3. Push and release the FOLD
switch (FIG. 25-1). Controller should be in the
LANGUAGE mode (FIG.
25-2).
OUTBOARD SWITCH ADJUSTMENT
NOTE: Do the following procedure to ensure outboard roll stop is fully closed
before platform can be raised or lowered. This procedure must be done
before the 3” SWITCH ADJUSTMENT (MANDATORY).
11921 Slauson Ave. Santa Fe Springs, CA. 90670 (800) 227-4116 FAX (888) 771-7713
1. Using the hand held control
(FIG. 26-1), raise or lower the
platform to a comfortable working position (FIG. 26-2). Refer
to Operation Manual for operating instructions.
HAND HELD CONTROL
FIG. 26-1
PLATFORM AT COMFORTABLE
WORKING POSITION
FIG. 26-2
PATENTS PENDING
26
OUTBOARD
ROLL STOP
OUTBOARD
SWITCH
ACTUATOR
ACTUATOR
SCREW
JAM NUT
(NOT SHOWN)
3. Ensure outboard roll stop
is fully closed (FIG. 27-1).
LOOSENING ACTUATOR SCREW
FIG. 27-1
27
PATENTS PENDING
11921 Slauson Ave. Santa Fe Springs, CA. 90670 (800) 227-4116 FAX (888) 771-7713
2. On the left side of the platform, loosen jam nut and
screw on outboard switch
actuator enough to reposition actuator (FIG. 27-1).
OUTBOARD SWITCH ADJUSTMENT - Continued
NOTE: Hold actuator in position
after switch is activated.
11921 Slauson Ave. Santa Fe Springs, CA. 90670 (800) 227-4116 FAX (888) 771-7713
4. Push down on actuator until
outboard switch activates with
an audible “click” (FIG. 28-1).
Controller display should read
“OUTBD SW” as shown in
FIG. 28-2.
OUTBOARD
SWITCH
ACTUATOR
ACTIVATING OUTBOARD SWITCH
FIG. 28-1
OUTBD SW
CONTROLLER: OUTBD SW
FIG. 28-2
PATENTS PENDING
28
OUTBOARD
ROLL STOP
OUTBOARD
SWITCH
ACTUATOR
JAM NUT
(NOT SHOWN)
ACTUATOR
SCREW
LH SKI
LIFTING LH SKI TO DEACTIVATE
OUTBOARD SWITCH
FIG. 29-1
6. Tighten actuator screw
securely (FIG. 29-1).
UP
CONTROLLER: UP
FIG. 29-2
DOWN
CONTROLLER: DOWN
FIG. 29-3
29
PATENTS PENDING
11921 Slauson Ave. Santa Fe Springs, CA. 90670 (800) 227-4116 FAX (888) 771-7713
5. While holding actuator,
push up on LH ski until
outboard switch gives
an audible “click” (FIG.
29-1). Switch should be
deactivated and controller
display should read “UP”
or “DOWN” as shown in
FIGS. 29-2 or 29-3.
OUTBOARD SWITCH ADJUSTMENT - Continued
7. Attempt to open outboard roll
stop (FIG. 30-1). Outboard
roll stop should remain closed
and locked in position.
OUTBOARD
ROLL STOP
11921 Slauson Ave. Santa Fe Springs, CA. 90670 (800) 227-4116 FAX (888) 771-7713
OUTBOARD
SWITCH
ACTUATOR
JAM NUT
(NOT SHOWN)
ACTUATOR
SCREW
OUTBOARD ROLL STOP IN CLOSED POSITION
FIG. 30-1
8. Tighten jam nut securely (FIG.
30-1).
PATENTS PENDING
30
NOTE: Do this procedure if structure of the Lift is undamaged and:
• Controller reads FOLD or UNFOLD when platform is stowed or has settled
on the latches.
• Vehicle will not move because interlock conditions are not being met.
• The STOW switch is removed & replaced.
The adjustment is done correctly if:
• Platform stows tight.
• Controller reads STOWED* when platform is stowed or has settled on the
latches.
• Vehicle interlock conditions are met and the vehicle will move.
1. Make sure power switch (FIG. 31-1)
is turned on. Stow the Lift (FIG. 31-1).
POWER
SWITCH
STOWED LIFT
(LIFT WITH LH PUMP)
FIG. 31-1
31
PATENTS PENDING
11921 Slauson Ave. Santa Fe Springs, CA. 90670 (800) 227-4116 FAX (888) 771-7713
STOW SWITCH ADJUSTMENT
STOW SWITCH ADJUSTMENT - Continued
! CAUTION
11921 Slauson Ave. Santa Fe Springs, CA. 90670 (800) 227-4116 FAX (888) 771-7713
To prevent possible injury, stay clear of
the Lift when the controller repressurizes the hydraulic system. The system
will repressurize every 5 minutes after
the Lift is turned ON. If necessary, turn
the Lift OFF and then ON again to continue the adjustment.
RELEASE
VALVE
NOTE: When the power switch is
turned on, you have 5 minutes
to do the adjustment before
the controller repressurizes
hydraulic system and stows
the Lift.
BACKUP PUMP
HANDLE
USING BACKUP PUMP TO UNFOLD
(LIFT WITH LH PUMP)
FIG. 32-1
2. To open the release valve (FIG. 32-1),
turn the backup pump handle counterclockwise.
LIFT RESTING ON
LATCHES
FIG. 32-2
NOTE: The STOW switch adjustment
screw is always on the same
side of the Lift as the pump
cover (FIG. 32-3).
ADJUSTMENT
SCREW
RH PUMP
LH PUMP
LOCATION OF ADJUSTMENT SCREW
FIG. 32-3
PATENTS PENDING
32
ADJUSTMENT
SCREW
JAM NUT
LIFT TO
REMOVE
COVER
LH TOWER
(LIFT WITH LH PUMP)
FIG. 33-1A
4. Loosen jam nut (FIG. 33-1B)
on the STOW switch adjustment screw. Next, turn adjustment screw counter-clockwise
(CCW) (FIG. 33-2) until controller reads UNFOLD. Turn
adjustment screw clockwise
(CW) (FIG. 33-3) until controller reads STOWED*. Then,
turn the adjustment screw 1/2
turn CW (FIG. 33-4).
STOW SWITCH ADJUSTMENT
FIG. 33-1B
UNFOLD
CCW
ADJUST SO CONTROLLER READS “UNFOLD”
FIG. 33-2
STOWED*
CW
ADJUST SO CONTROLLER READS “STOWED* ”
FIG. 33-3
5. Use the hand pendant to stow Lift
(FIG. 29-3). Make sure the platform
is stowed tightly. Repeat adjustment
steps 1 through 4 if necessary.
6. When adjustment is complete, tighten
jam nut on the adjustment screw
(FIG. 33-1B).
+ 1/2-TURN CW
ADJUSTMENT SCREW
FIG. 33-4
7. Reinstall cover on tower (FIG. 33-1A).
33
PATENTS PENDING
11921 Slauson Ave. Santa Fe Springs, CA. 90670 (800) 227-4116 FAX (888) 771-7713
3. Remove cover from top of tower
(FIG. 33-1A).
FLOOR POSITION ADJUSTMENT
NOTE: Do the following procedure to ensure the inboard rollstop rests on threshold
plate when platform is at vehicle floor level.
1. Unfold the platform until the
lights illuminate at floor level or
raise the platform to floor level
as shown in FIG. 34-1A.
THRESHOLD
PLATE
INBOARD
ROLLSTOP
11921 Slauson Ave. Santa Fe Springs, CA. 90670 (800) 227-4116 FAX (888) 771-7713
PLATFORM
LIGHT
INBOARD ROLLSTOP RESTING
ON THRESHOLD PLATE
FIG. 34-1B
PLATFORM AT FLOOR LEVEL
(LH SIDE SHOWN)
FIG. 34-1A
2. Inspect the threshold plate. The inboard rollstop should rest on threshold plate as shown in FIG. 34-1B.
PATENTS PENDING
34
THRESHOLD
PLATE
INBOARD
ROLLSTOP
INBOARD ROLLSTOP WITH GAP
BETWEEN THRESHOLD PLATE
FIG. 35-1
NOTE: The power switch on the Lift
must be turned OFF before
entering SETUP.
POWER
SWITCH
CONTROLLER
(REF)
4. Turn power switch OFF (FIG. 35-2).
TURNING POWER SWITCH ON/OFF
(LH PUMP SHOWN)
FIG. 35-2
35
PATENTS PENDING
11921 Slauson Ave. Santa Fe Springs, CA. 90670 (800) 227-4116 FAX (888) 771-7713
3. If the inboard rollstop does not rest on the
threshold plate (FIG. 35-1), go to
INSTRUCTION 4.
FLOOR POSITION ADJUSTMENT - Continued
5. Enter SETUP by holding both
the UP and FOLD switches on
the hand pendant (FIG. 36-1)
and turning the power switch
ON at the same time (FIG. 322). Controller will read SETUP
(FIG. 36-2).
UP
FOLD
11921 Slauson Ave. Santa Fe Springs, CA. 90670 (800) 227-4116 FAX (888) 771-7713
HAND PENDANT:
ENTERING SETUP
FIG. 36-1
SETUP
CONTROLLER:
ENTERING SETUP
FIG. 36-2
6. Push and release the FOLD
switch (FIG. 36-3) two times
to access the FLOOR POS
setting (FIG. 36-4).
FOLD
HAND PENDANT:
CHANGING SETUP MODE
FIG. 36-3
FLOOR POS: 345
CONTROLLER:
SETTING FLOOR POSITION
(EXAMPLE READING SHOWN)
FIG. 36-4
PATENTS PENDING
36
UP
DOWN
HAND PENDANT:
CHANGING THE SETTING
FIG. 37-1
FLOOR POS: 350
CONTROLLER:
SETTING FLOOR POSITION
(EXAMPLE READING SHOWN)
FIG. 37-2
8. Push and release the FOLD
switch (FIG. 37-3) to exit
SETUP (FIG. 37-4).
FOLD
HAND PENDANT:
CHANGING SETUP MODE
FIG. 37-3
MAXON LIFT CORP.
CONTROLLER:
EXITING SETUP
FIG. 37-4
37
PATENTS PENDING
11921 Slauson Ave. Santa Fe Springs, CA. 90670 (800) 227-4116 FAX (888) 771-7713
7. To close the gap between inboard
rollstop and threshold plate, push the
DOWN switch from 5 to 10 times (FIG.
37-1). The FLOOR POS number displayed on the controller (FIG. 37-2) will
decrease by 1 each time you push the
DOWN button. To reverse the position
setting, push the UP switch 1 or more
times (FIG. 37-1). The FLOOR POS
number displayed on the controller (FIG.
37-2) will increase by 1 each time you
push the UP button.
FLOOR POSITION ADJUSTMENT - Continued
9. Lower the platform until the inboard
rollstop is in the up and locked position. Next, raise the platform to floor
level (FIG. 38-1A). Verify that the
inboard rollstop rests on threshold
plate as shown in FIG 38-1B. If necessary, repeat this entire procedure.
THRESHOLD
PLATE
INBOARD
ROLLSTOP
11921 Slauson Ave. Santa Fe Springs, CA. 90670 (800) 227-4116 FAX (888) 771-7713
PLATFORM
LIGHT
INBOARD ROLLSTOP RESTING
ON THRESHOLD PLATE
FIG. 38-1B
PLATFORM AT FLOOR LEVEL
(LH SIDE SHOWN)
FIG. 38-1A
PATENTS PENDING
38
NOTE: Do this procedure if structure of the Lift is undamaged and:
• The Controller reads “IBRS SW” when Inboard Rollstop is locked in the up
position.
• Inboard Switch is removed & replaced.
The adjustment is done correctly if:
• The Controller does not read “IBRS SW” when the Inboard Rollstop is
locked in the up position.
1. Position the platform at floor level
(FIG. 39-1).
POWER
SWITCH
PLATFORM AT FLOOR LEVEL
(LH SIDE SHOWN)
FIG. 39-1
2. Turn OFF power switch on pump
cover (FIG. 39-1).
3. Using the manual backup pump (FIG. 39-2),
lower the platform until inboard rollstop
(IBRS) is locked in the up position (FIG. 331). Refer to Operation Manual for instructions to operate the manual pump.
RELEASE
VALVE
BACKUP PUMP
HANDLE
USING BACKUP PUMP TO UNFOLD
(LIFT WITH LH PUMP)
FIG. 39-2
39
PATENTS PENDING
11921 Slauson Ave. Santa Fe Springs, CA. 90670 (800) 227-4116 FAX (888) 771-7713
INBOARD SWITCH ADJUSTMENT
INBOARD SWITCH ADJUSTMENT - Continued
4. Push the inboard rollstop back
against the lock as if a wheelchair is pushing on the rollstop
(FIG. 40-1).
11921 Slauson Ave. Santa Fe Springs, CA. 90670 (800) 227-4116 FAX (888) 771-7713
IBRS
PUSH IBRS
AGAINST LOCK
PLATFORM BELOW FLOOR LEVEL,
WITH IBRS UP (LH SIDE SHOWN)
FIG. 40-1
5. On the inboard rollstop switch,
loosen screws (1) and (2) one-half
turn (FIG. 40-2B). Next, rotate
switch bracket clockwise until the
switch activates with an audible
“click”. Then tighten screws (1)
and (2) securely.
SCREW (2)
SCREW (1)
SWITCH
(REF)
SWITCH
BRACKET
POWER SWITCH
CUT-AWAY OF
VIEW IBRS SWITCH
FIG. 40-2B
6. Turn ON power switch on pump
cover (FIG. 40-2A). Then raise
(UP) the platform to floor level
(FIG. 32-1). Verify that “INBD
SW” is not displayed on the lift
controller. If necessary repeat
this procedure.
PLATFORM BELOW FLOOR LEVEL,
WITH IBRS UP (LH SIDE SHOWN)
FIG. 40-2A
PATENTS PENDING
40
1. Using the hand held control
(FIG. 41-1), raise or lower the
platform to a comfortable working position (FIG. 41-2). Refer
to Operation Manual for operating instructions.
HAND HELD CONTROL
FIG. 41-1
2. On the right side of the
platform, loosen jam nut
on 3” ground switch adjustment screw. Then, turn adjustment screw clockwise
until the switch activates
with an audible “click”
(FIG. 41-3).
PLATFORM AT COMFORTABLE
WORKING POSITION
FIG. 41-2
JAM NUT
ADJUSTMENT
SCREW
TURNING RH
GROUND SWITCH
FIG. 41-3
41
PATENTS PENDING
11921 Slauson Ave. Santa Fe Springs, CA. 90670 (800) 227-4116 FAX (888) 771-7713
3” GROUND SWITCH ADJUSTMENT
3” GROUND SWITCH ADJUSTMENT - Continued
3. On the left side of the platform,
loosen jam nut on 3” ground
switch adjustment screw. Next,
turn adjustment screw clockwise
until the switch activates with an
audible “click” (FIG. 42-1). Then
turn screw approximately 1/2turn clockwise.
ADJUSTMENT
SCREW
11921 Slauson Ave. Santa Fe Springs, CA. 90670 (800) 227-4116 FAX (888) 771-7713
JAM NUT
TURNING LH GROUND SWITCH
FIG. 42-1
4. Lift the 3” ground bracket
to deactivate switch (FIG.
42-2). The display on Controller should read “3 IN SW”
(FIG. 42-3).
3” GROUND BRACKET, LH SIDE
FIG. 42-2
3 IN SW
CONTROLLER: 3 IN SW
FIG. 42-3
PATENTS PENDING
42
NOTE: If Controller does not
read UP or DOWN, repeat steps 3 through 5.
3” GROUND BRACKET, LH SIDE
FIG. 43-1
UP
CONTROLLER: UP
FIG. 43-2
DOWN
CONTROLLER: DOWN
FIG. 43-3
43
PATENTS PENDING
11921 Slauson Ave. Santa Fe Springs, CA. 90670 (800) 227-4116 FAX (888) 771-7713
5. Release the 3” ground bracket
(FIG. 43-1). Controller should
read UP or DOWN (FIGS. 43-2
and FIG. 43-3).
3” GROUND SWITCH ADJUSTMENT - Continued
6. Repeat steps 4 and 5 to ensure adjustment is done correctly. Then turn screw clockwise 1 full turn and tighten
jam nut (FIG. 44-1).
ADJUSTMENT
SCREW
JAM NUT
11921 Slauson Ave. Santa Fe Springs, CA. 90670 (800) 227-4116 FAX (888) 771-7713
ADJUSTMENT SCREW & JAM NUT, LH SIDE
FIG. 44-1
7. On the right side of the
platform, turn ground
switch adjustment screw
counter-clockwise to deactivate the switch (FIG.
44-2). Next, turn adjustment screw clockwise until
switch activates with an
audible “click” (FIG. 44-3).
Then, turn screw approximately 1/2-turn clockwise.
ADJUSTMENT
SCREW
TURNING GROUND SWITCH CCW, RH SIDE
FIG. 44-2
ADJUSTMENT
SCREW
TURNING RH GROUND SWITCH
FIG. 44-3
PATENTS PENDING
44
3 IN SW
3” GROUND BRACKET, RH SIDE
FIG. 45-1
CONTROLLER: 3 IN SW
FIG. 45-2
9. Release the 3” ground bracket (FIG.
45-3). Controller should read UP or
DOWN (FIGS. 45-4 and FIG. 45-5).
UP
CONTROLLER: UP
FIG. 45-4
3” GROUND BRACKET, RH SIDE
FIG. 45-3
DOWN
NOTE: If Controller does not read
UP or DOWN, repeat
steps 7 through 9.
CONTROLLER: DOWN
FIG. 45-5
45
PATENTS PENDING
11921 Slauson Ave. Santa Fe Springs, CA. 90670 (800) 227-4116 FAX (888) 771-7713
8. Lift the 3” ground bracket to deactivate
switch (FIG. 45-1). The display on Controller
should read “3 IN SW” (FIG. 45-2).
3” GROUND SWITCH ADJUSTMENT - Continued
10. Repeat steps 7 and 8 to
ensure adjusment is done
correctly. Then turn screw
clockwise 1 turn and tighten
jam nut (FIG. 46-1).
ADJUSTMENT
SCREW
JAM NUT
11921 Slauson Ave. Santa Fe Springs, CA. 90670 (800) 227-4116 FAX (888) 771-7713
ADJUSTMENT SCREW & JAM NUT, RH SIDE
FIG. 46-1
11. Lower the platform to ground
level until outboard rollstop fully
opens (FIG. 46-2). Then hold out
board ramp open (FIG. 46-2).
PLATFORM AT GROUND LEVEL WITH
OUTBOARD ROLLSTOP OPEN
(RH SIDE SHOWN)
FIG. 46-2
12. Raise the platform. Platform
should stop moving up a short
distance above the ground.
When platform stops, measure the distance between
load carrying surface of platform and the ground (FIG.
46-1). Distance should be 3” or
less.
PATENTS PENDING
3”
PLATFORM 3” ABOVE GROUND
FIG. 46-1
46
47
11921 Slauson Ave. Santa Fe Springs, CA. 90670 (800) 227-4116 FAX (888) 771-7713
THIS PAGE INTENTIONALLY LEFT BLANK
PATENTS PENDING
PARTS BREAKDOWN
MAIN ASSEMBLY-1
REFER TO
PINCH SHIELDS
11921 Slauson Ave. Santa Fe Springs, CA. 90670 (800) 227-4116 FAX (888) 771-7713
8
(2 PLACES)
6
5
9
(2 PLACES)
7
3
10
(2 PLACES)
2
4
1
4
1
SEE PLATFORM ASSY
ITEM
QTY.
1
2
2
1
PART NO.
DESCRIPTION
261321
SPACER
265038-03
SHAFT, 36” LG. (FOR 30” WIDE PLATFORM)
265038-04
SHAFT, 39” LG. (FOR 33” WIDE PLATFORM)
265038-05
SHAFT, 40” LG. (FOR 34” WIDE PLATFORM)
3
1
266545-08
BEARING, 3/8” I.D. X 1/2” LG.
4
2
905005
RETAINING RING, 3/4”
5
1
267592-02
SPRING (WASHER), WAVE, 3/8” I.D.
6
1
900723-07
SHOULDER SCREW, 3/8” X 1-1/4” LG.
7
1
903402-08
FLAT WASHER, 3/8”
8
2
905342-07
SPACER, NYLON, 1/4” I.D.X 1/2” O.D. X 1/2”
9
2
901000
NYLON NUT, 1/4”-20
10
2
900005-8
BUTTON SCREW, 1/4”-20 X 2
PATENTS PENDING
48
1
4
2
4
4
1
3
2
4
3
4
3
3
4
ITEM
QTY.
PART NO.
DESCRIPTION
1
2
267968-01
PINCH SHIELD, PLASTIC (LH SIDE OF VERT.-ARM)
2
2
267968-02
PINCH SHIELD, PLASTIC (RH SIDE OF VERT.-ARM)
3
8
902000-5
FLAT WASHER, #10
4
8
904002-2
RIVET, 3/16” DIA. X 9/16” LG.
49
PATENTS PENDING
11921 Slauson Ave. Santa Fe Springs, CA. 90670 (800) 227-4116 FAX (888) 771-7713
PINCH SHIELDS
MAIN ASSEMBLY-2
5
9A
11921 Slauson Ave. Santa Fe Springs, CA. 90670 (800) 227-4116 FAX (888) 771-7713
9A
8
2
9
5
12
13
3A
CYLINDER
(REF) SEE
HYDRAULIC
COMPONENTS
12
1
3
5
4
3C
3B
16
REFER TO
ELECTRICAL
COMPONENTS
6
15
1
11
14
9B
18
17
16
REFER TO LH
PLATFORM
CLOSER
SECTION
5
7
10
1
(6 PLACES)
MAIN FRAME,
LH SIDE
(REF)
PATENTS PENDING
50
QTY.
PART NO.
DESCRIPTION
1
9
904002-2
RIVET, 3/16” DIA X 0.55” LG.
2
2
900009-3
CAP SCREW, 5/16”-18 X 3/4” LG, GRADE 8
3
1
266755-01
HANDRAIL ASSEMBLY, LH
3A
1
904004-3
RIVET, 5/32” DIA. X 0.550” LG.
3B
1
905019
CAP
3C
1
905314-01
BUMPER
4
1
901001
LOCK NUT, 5/16”-18
5
4
902000-7
FLAT WASHER, 5/16”
6
2
900023-11
PAN HEAD SCREW, #8-32 X 2” LG.
7
2
265072
SELF LUBE BEARING
8
1
266642-01
PIN, LOWER ARM-VERTICAL ARM
9
1
267115-01
VERTICAL ARM ASSEMBLY, LH
(COMES WITH BEARINGS, SET SCREWS, & CABLE TIE
HOLDERS)
9A
2
265017
SELF LUBE BEARING
9B
2
903004-1
SET SCREW, 3/8”-16 X 3/8” LG.
10
1
903002-1
SET SCREW, 1/4”-20 X 1/2” LG.
11
1
266961-01
COVER, VERTICAL ARM - HANDRAIL
12
2
905005
RETAINING RING, 3/4”
13
1
266644-01
PIN
14
1
266960-02
GAS SPRING, 130 LBS. PRESSURE
15
1
900062-1
SHOULDER SCREW, 5/16” DIA. X 1/4” LG.
16
2
901016-2
LOCK NUT, 1/4”, THIN HEAD
17
2
901006
LOCK NUT, #8-32
18
1
902000-2
FLAT WASHER, 1/4”
51
PATENTS PENDING
11921 Slauson Ave. Santa Fe Springs, CA. 90670 (800) 227-4116 FAX (888) 771-7713
ITEM
MAIN ASSEMBLY-2 - Continued
NOTE: The keyed end of pin, item 22, must engage the
keyway on the ILAPS switch (position sensor).
E-ring, item 37, is required to secure pin to tower.
Cylinder must be secured to the pin with set
screw, item 10. Use threadlocking compound,
such as Blue Loctite, to secure the set screw.
E-RING
(REF)
CYLINDER
(REF)
11921 Slauson Ave. Santa Fe Springs, CA. 90670 (800) 227-4116 FAX (888) 771-7713
PIN
(REF)
ILAPS SWITCH
(REF)
SET SCREW
(REF)
30
33
34
25
29
26
29A
24
29B
28 34
29C
25
24
CYLINDER
(REF) SEE
HYDRAULIC
COMPONENTS
27
33
29A
36
REFER TO
ELECTRICAL
COMPONENTS
23
19
20
21
35A
REFER TO LH
PLATFORM
CLOSER
SECTION
33
34
10
(REF)
35
35A
32
(6 PLACES)
37
22
31
(6 PLACES)
MAIN FRAME,
LH SIDE
(REF)
PATENTS PENDING
52
QTY.
19
1
900062-4
SHOULDER SCREW, 5/16” DIA. X 5/8” LG.
20
1
905009-01
SPACER, NYLON, 1/4”
21
1
902000-8
FLAT WASHER, 5/16”
22
1
267758-01
PIN (KEYED FOR ILAPS SWITCH)
23
2
901002
LOCK NUT, 3/8”-16
24
2
266596-01
SPACER
25
2
902013-11
FLAT WASHER, 3/8”
26
2
900014-4
CAP SCREW, 3/8”-16 X 1” LG, GRADE 8
27
1
266642-02
PIN, UPPER ARM-TOWER
28
1
903002-7
SET SCREW, 1/4”-20 X 3/8” LG.
29
1
266609-01
UPPER ARM ASSEMBLY (BEARINGS INCLUDED)
29A
4
265072
SELF LUBE BEARING
29B
1
901005
HEX NUT, 5/16”-18, GRADE 8
29C
1
903006-1
SET SCREW, 5/16”-18 X 1” LG.
30
1
266641-01
PIN, UPPER ARM
31
6
905056
CLAMP
32
6
902000-5
FLAT WASHER, #10
33
3
902004-02
FENDER FLAT WASHER, 11/32”
34
3
900001-11
BUTTON SCREW, 5/16”-18 X 5/8” LG.
35
1
266611-01
LOWER ARM ASSEMBLY LH (BEARINGS INCLUDED)
4
265072
SELF LUBE BEARING
36
1
267623-01
VINYL CAP
37
1
905138-09
E-RING, EXT. (5/8” SHAFT DIA.) (FOR ILAPS SWITCH PIN)
35A
PART NO.
DESCRIPTION
53
PATENTS PENDING
11921 Slauson Ave. Santa Fe Springs, CA. 90670 (800) 227-4116 FAX (888) 771-7713
ITEM
LH PLATFORM CLOSER
1
5
1A
6
REFER TO INROLL
SUPPORT BRACKET
1C
1B
5
11921 Slauson Ave. Santa Fe Springs, CA. 90670 (800) 227-4116 FAX (888) 771-7713
22
1A
6
20
9
23
5
6
18
20
REFER TO
ELECTRICAL
COMPONENTS
10
18
19
12
2
16
3
9
6
18
24
7
11
13
14
2
REFER TO PLATFORM
CLOSER ARM
25
15
19
PATENTS PENDING
8
21
19
17
9
9
4
INROLL RAMP
SPRING (REF)
54
QTY.
PART NO.
DESCRIPTION
REF
1
267500-02
INROLL RAMP ARM MAIN ASSY (LH PLATFORM CLOSER)
1
1
267552-01
INROLL LOCK BRACKET ASSEMBLY
1A
2
905004-01
RETAINING RING, 1/4”
1B
1
267577-02
PIN, 1/4” X 2-13/32” LG.
1C
1
267450-02
ROLLER, 2-1/8” LG.
2
2
902000-4
FLAT WASHER, #8
3
1
900719-04
BUTTON SCREW, 1/4”-20 X 5/8” LG.
4
1
267546-01
LOWER LINK
5
3
900719-03
BUTTON SCREW, 1/4”-20 X 1/2” LG.
6
4
903402-07
FLAT WASHER
7
1
903412-01
FLAT WASHER, 1/4” STAINLESS STEEL
8
1
267561-01
INROLL RAMP LOCK LINK
9
4
266719-03
NUT, SWIVEL 1/2” HEX, THIN, 1/4” LG.
10
1
267551-01
LINK WELDMENT
11
1
267550-01
ROD END, 5/16” X 2” LG. (THREADED 5/16”-18)
12
1
267423-01
GAS SPRING (45 LBS. PRESSURE)
13
1
900727-05
SHOULDER SCREW, 5/16” X 3/4” LG.
14
1
901016-2
THIN HEX NUT, 1/4”-20
15
1
267482-01
SPACER
16
1
902000-8
FLAT WASHER, 5/16”
17
1
900062-3
SHOULDER SCREW, 5/16” X 1/2” LG.
18
3
904004-3
RIVET, 5/32” DIA. X .550” LG.
19
3
906414-01
CABLE CLAMP
20
2
905005
RETAINING RING, 3/4”
21
1
265036
PIN, 2-3/8” LG.
22
1
266626-01
ROLLER
23
1
266616-01
BRACKET, KNUCKLE SUPPORT
24
1
267453-011
BARREL NUT, 1/4”-20 X 3/4’” LG.
25
2
903402-10
FLAT WASHER, NYLON, 11/32” I.D. X 7/8” O.D.
55
PATENTS PENDING
11921 Slauson Ave. Santa Fe Springs, CA. 90670 (800) 227-4116 FAX (888) 771-7713
ITEM
PLATFORM CLOSER ARM
1
11
12
8
4
10
3
9
7
4
13
(2 PLACES)
6
(2 PLACES)
5
11921 Slauson Ave. Santa Fe Springs, CA. 90670 (800) 227-4116 FAX (888) 771-7713
56
PATENTS PENDING
3
2
QTY.
PART NO.
DESCRIPTION
1
REF
267622-01
PLATFORM CLOSER ARM ASSEMBLY
2
1
905004-02
RETAINING RING, 1/2”
3
2
908062-06
SELF LUBE BEARING
4
2
265017
SELF LUBE BEARING
5
1
267753-01
SWITCH/SPRING ASSEMBLY
6
2
900722-02
BUTTON SCREW, 10-24 X 3/8” LG.
7
1
267565-02
INROLL LOCK WELDMENT
8
1
900726-02
CAP SOCKET SCREW, 5/16” X 1/2” LG.
9
1
903114-01
HEX NUT, 5/16”-18
10
1
901016-2
HEX NUT, 1/4”-20
11
1
267479-01
INROLL RAMP SPRING
12
1
900062-4
SHOULDER SCREW, 5/16” X 5/8” LG.
13
2
903401-01
EXTERNAL TOOTH WASHER, 3/16”
57
11921 Slauson Ave. Santa Fe Springs, CA. 90670 (800) 227-4116 FAX (888) 771-7713
ITEM
PATENTS PENDING
INROLL SUPPORT BRACKET
11
2
1
3
4
5
58
PATENTS PENDING
10
6
9
2
3
8
7
11921 Slauson Ave. Santa Fe Springs, CA. 90670 (800) 227-4116 FAX (888) 771-7713
9
QTY.
PART NO.
DESCRIPTION
1
REF
267549-01
INROLL SUPPORT BRACKET
2
2
901016-2
HEX NUT, 1/4”-20
3
2
903409-01
WASHER
4
1
903402-02
FLAT WASHER
5
1
267456-01
LOCK SPRING PIN
6
1
267560-01
LOCK SPRING
7
1
900719-03
BUTTON SCREW, 1/4”-20 X 1/2” LG.
8
1
900719-06
BUTTON SCREW, 1/4”-20 X 7/8” LG.
9
2
905004-01
RETAINING RING, 1/4”
10
1
267577-01
ROLLER PIN, 1/4” X 1-1/2” LG.
11
1
267450-01
INROLL RAMP ROLLER
59
11921 Slauson Ave. Santa Fe Springs, CA. 90670 (800) 227-4116 FAX (888) 771-7713
ITEM
PATENTS PENDING
MAIN ASSEMBLY-3
5
2
11921 Slauson Ave. Santa Fe Springs, CA. 90670 (800) 227-4116 FAX (888) 771-7713
4
9A
2B
7
9
2A
2C
12
6
13
5
8
3A
16
3C
3
10
11
12
15
2A
1
5
SEE HYDRAULIC
COMPONENTS
14
3B
10
3D
17
REFER TO
ELECTRICAL
COMPONENTS
9B
16
5
REFER TO RH
PLATFORM CLOSER
MAIN FRAME,
RH SIDE
(REF)
5
PATENTS PENDING
60
PART NO.
DESCRIPTION
1
2
900009-3
CAP SCREW, 5/16”-18 X 3/4” LG, GRADE 8
2
1
266609-01
UPPER ARM ASSEMBLY (BEARINGS INCLUDED)
2A
4
265072
SELF LUBE BEARING
2B
1
901005
HEX NUT, 5/16”-18, GRADE 8
2C
1
903006-1
SET SCREW, 5/16”-18 X 1” LG.
3
1
266756-01
HANDRAIL ASSEMBLY, RH
3A
1
904004-3
RIVET, 5/32” DIA. X 0.550” LG.
3B
1
905019
CAP
3C
1
905314-01
BUMPER
3D
1
908066-01
GROMMET
4
3
901001
LOCK NUT, 5/16”-18
5
7
902000-7
FLAT WASHER, 5/16”
6
1
906414-01
CABLE CLAMP
7
1
904004-3
RIVET, 5/32” DIA. X 0.550” LG.
8
1
902000-4
FLAT WASHER, #8
9
1
267115-02
VERTICAL ARM ASSEMBLY, RH (COMES WITH BEARINGS, SET
SCREWS, & CABLE TIE HOLDERS)
9A
2
265017
SELF LUBE BEARING
9B
2
903004-1
SET SCREW, 3/8”-16 X 3/8” LG.
10
3
904004-2
RIVET, 3/16” DIA. X 0.565” LG.
11
1
266961-01
COVER, VERTICAL ARM - HANDRAIL
12
2
905005
RETAINING RING, 3/4”
13
1
266644-01
PIN
14
1
266960-02
GAS SPRING, 130 LBS. PRESSURE
15
1
900062-1
SHOULDER SCREW, 5/16” DIA. X 1/4” LG.
16
2
901016-2
LOCK NUT, 1/4”, THIN HEAD
17
2
901006
LOCK NUT, #8-32
61
PATENTS PENDING
11921 Slauson Ave. Santa Fe Springs, CA. 90670 (800) 227-4116 FAX (888) 771-7713
ITEM QTY.
MAIN ASSEMBLY-3 - Continued
30
31
29
26
11921 Slauson Ave. Santa Fe Springs, CA. 90670 (800) 227-4116 FAX (888) 771-7713
25
24
25
32
30
35
24
31
SEE HYDRAULIC
COMPONENTS
28
23
39
34
20
19
REFER TO
ELECTRICAL
COMPONENTS
33
36A
37
30
18
31
36
27
(5 PLACES)
36A
38
MAIN FRAME,
RH SIDE
(REF)
22
(5 PLACES)
30
31
21
(5 PLACES)
PATENTS PENDING
62
QTY.
PART NO.
DESCRIPTION
18
1
902000-2
FLAT WASHER, 1/4”
19
1
900062-4
SHOULDER SCREW, 5/16” DIA. X 5/8” LG.
20
1
905009-01 SPACER, NYLON, 1/4”
21
5
905056
CLAMP
22
5
902000-5
FLAT WASHER, #10
23
2
901002
LOCK NUT, 3/8”-16
24
2
266596-01 SPACER
25
2
902013-11
FLAT WASHER, 3/8”
26
2
900014-4
CAP SCREW, 3/8”-16 X 1” LG, GRADE 8
27
5
904002-2
RIVET, 3/16” DIA. X 0.55” LG.
28
1
267623-01 VINYL CAP
29
1
266641-01 PIN, UPPER ARM
30
4
902004-2
FENDER FLAT WASHER, 11/32”
31
4
900001-11
BUTTON SCREW, 5/16”-18 X 5/8” LG.
32
1
903002-7
SET SCREW, 1/4”-20 X 3/8” LG.
33
1
903002-1
SET SCREW, 1/4”-20 X 1/2” LG.
34
2
REF
PAN HEAD SCREW, #8-32 X 2” LG. (PART OF LAMP ASSY)
35
1
266642-01 PIN, LOWER ARM-VERTICAL ARM
36
1
266611-02
LOWER ARM ASSEMBLY, RH
36A
4
265072
SELF LUBE BEARING
37
2
265072
SELF LUBE BEARING
38
1
266641-02 PIN, LOWER ARM-TOWER
39
1
266642-02 PIN, UPPER ARM-TOWER
63
PATENTS PENDING
11921 Slauson Ave. Santa Fe Springs, CA. 90670 (800) 227-4116 FAX (888) 771-7713
ITEM
RH PLATFORM CLOSER
12
10
14
10
17
5
6
15
1A
1A
64
PATENTS PENDING
7
16
11921 Slauson Ave. Santa Fe Springs, CA. 90670 (800) 227-4116 FAX (888) 771-7713
1
8
4
3
11
9
2
13
9
QTY.
PART NO.
REF
1
268815-01
RH PLATFORM CLOSER
1
1
268812-01
ARM (RH PLATFORM CLOSER)
2
265017
BEARING, SELF-LUBE, 3/4” DIA. X 1/4” LG.
2
1
268814-01
ARM (DUMMY ROLLER)
3
1
266616-01
BRACKET, KNUCKLE SUPPORT
4
1
266719-03
SWIVEL NUT, 1/2” HEX, 1/4”-20
5
1
267423-01
GAS SPRING
6
1
267482-01
SPACER, 5/16” DIA. X 3/16” LG.
7
1
900062-3
SHOULDER SCREW, 1/4”-20, 5/16” X 1/2” LG. SHOULDER
8
1
900719-03
BUTTON SCREW, 1/4”-20 X 1/2” LG.
9
2
905004-01
RETAINING RING, 1/4”
10
2
905005
RETAINING RING, 3/4”
11
1
266626-02
ROLLER, 1.17” WIDE
12
1
267577-01
ROLLER PIN, 1/4” X 1-1/2” LG.
13
1
267450-01
INROLL RAMP ROLLER
14
1
265036
PIN, SNAP RING
15
1
901016-2
LOCK NUT, THIN HD, 1/4”-20
16
1
902008
FLAT WASHER, 5/16”
17
1
903402-07
FLAT WASHER, NYLON, 5/16” X 1/2” O.D.
1A
DESCRIPTION
65
PATENTS PENDING
11921 Slauson Ave. Santa Fe Springs, CA. 90670 (800) 227-4116 FAX (888) 771-7713
ITEM
MAIN ASSEMBLY-4
SEE ELECTRICAL
COMPONENTS
11921 Slauson Ave. Santa Fe Springs, CA. 90670 (800) 227-4116 FAX (888) 771-7713
6
7
22
25
24
3
13
12
10
8 10
11
1
22
2
15
8 25
14
9
10
16
HANDLE (REF)
- SEE 12 VDC
POWER UNIT
18
16
17
18
4
21
23A
19
5
20
23D
(BOTTOM)
23
17
20
23B
(3 PLACES)
23A
23C
(3 PLACES)
23E
(4 PLACES)
PATENTS PENDING
20
66
11
10
2
4
20
23F
(6 PLACES)
7 6
15
21
19
QTY.
1
2
900733-02
FLANGE SCREW, 5/16”-18 X 1/2” LG.
2
4
902000-7
FLAT WASHER, 5/16”
3
1
267972-01
COVER ASSEMBLY, LH
267973-01
COVER ASSEMBLY, RH
4
2
268832-02
POLYESTER (1” X 2” PIECE)
269180-01
MAIN FRAME (FOR 30” WIDE PLATFORM)
269180-02
MAIN FRAME (FOR 33” WIDE PLATFORM)
269180-03
MAIN FRAME (FOR 34” WIDE PLATFORM)
5
1
PART NO.
DESCRIPTION
6
2
266852-01
LATCH SUPPORT PIN
7
2
908027-01
SLEEVE BEARING, 1/2” I.D.
8
2
902013-13
FLAT WASHER, 1/2”
9
1
266569-02
LATCH ASSEMBLY, RH
10
4
901001
LOCK NUT, 5/16”-18
11
4
900000-3
HEX BOLT, 5/16”-18 X 3/4” LG, GRADE 8
12
2
904000-1
RIVET, BLIND, 1/8” DIA. X 1/2” LG.
13
1
267470-01
LIGHT MOUNT BRACKET, LH
14
1
267470-02
LIGHT MOUNT BRACKET, RH
15
2
902000-2
FLAT WASHER, 1/2”
16
2
900005-3
BUTTON SCREW, 1/4”-20 X 3/4” LG.
17
2
267506-01
LINK
18
2
908073-01
SPRING
19
2
903006-1
SET SCREW, 5/16”-18 X 1” LG.
20
4
904711-08
COTTER PIN
21
2
908073-01
SPRING
22
2
267210-01
TOWER COVER
269181-01
THRESHOLD PLATE, 30”
269181-02
THRESHOLD PLATE, 33”
269181-03
THRESHOLD PLATE, 34”
23
1
23A
2
269186-01
SET SCREW, 1/2”-20 X 3/4” LG. (WITH VIBRA-TITE)
23B
3
905314-04
BUMPER WITH WASHER
23C
3
904004-3
RIVET, 5/32” DIA. X 0.550” LG.
23D
2
096046-10
RUBBER SEAL, ADHES. BACK, 8” LG.
23E
4
096025-10
TAPE, ANTISLIP 2”W, BLK 25 LG.
23F
6
908108-10
PLUG, BUTTON HEAD, 1” HOLE
24
1
266569-01
LATCH ASSEMBLY, LH
25
2
905128-03
ROLL PIN, 1/8” DIA. X 1/2” LG.
67
PATENTS PENDING
11921 Slauson Ave. Santa Fe Springs, CA. 90670 (800) 227-4116 FAX (888) 771-7713
ITEM
PLATFORM ASSEMBLY
19
20
(6 PLACES)
ANTISLIP
TAPE (REF)
REFER TO
INROLL RAMP
11921 Slauson Ave. Santa Fe Springs, CA. 90670 (800) 227-4116 FAX (888) 771-7713
10
18
(2 PLACES)
14
17
(3 PLACES)
9
3
16
(3 PLACES)
15
(8 PLACES)
10
7
7
1
(3 PLACES)
3
11
9
6
11
5
8
13
2
2
4
12
8
PATENTS PENDING
68
REF
QTY.
1
PART NO.
11921 Slauson Ave. Santa Fe Springs, CA. 90670 (800) 227-4116 FAX (888) 771-7713
ITEM
DESCRIPTION
269200-01
PLATFORM ASSY, 30” W X 53” LG.
269200-02
PLATFORM ASSY, 33” W X 53” LG.
269200-03
PLATFORM ASSY, 34” W X 53” LG.
1
3
903721-06
RIVET, 0.16X.5 - .63
2
2
265057
BUSHING, STOP ACTUATOR
3
2
265062
BEARING SELF LUBE, 1” DIA. X 3/8” LG.
4
1
269192-01
TORSION SPRING, RH
5
1
269192-02
TORSION SPRING, LH
6
1
266311-01
COLLAR STOP ACTUATOR
7
2
268225-01
PLATFORM STOP
8
2
269027-01
SWIVEL HEX NUT, 1/2” (THIN HEAD)
9
2
266725-01
PLATFORM ADJUSTER STRIKER
10
2
266893-03
FLANGE BEARING, 3/8” I.D. X 3/4” LG.
11
2
267172-06
SNAP-IN BEARING, 7/16”
12
1
269025-02
SKI, WELDMENT, RH
13
1
269025-01
SKI, WELDMENT, LH
14
1
267574-01
TORSION SPRING, INROLL RAMP
15
8
901000
NYLON NUT, 1/4”-20
16
3
267555-01
LOWER TORSION SPRING BLOCK
17
3
267554-01
UPPER TORSION SPRING BLOCK
18
2
267587-01
PUSH RETAINER, 3/16” DIA. SHAFT
19
1
267576-01
TORSION SPRING ROLLER
20
6
900044-6
SOCKET SCREW, 1/4”-20 X 1” LG.
69
PATENTS PENDING
PLATFORM ASSEMBLY - Continued
39
42 (3 PLACES)
44
40
11921 Slauson Ave. Santa Fe Springs, CA. 90670 (800) 227-4116 FAX (888) 771-7713
31
35
45
37
38
37
29
39
40 (8 PLACES)
33
29
39
38
44
(7 PLACES)
28
40
(3 PLACES)
35
33
41
(4 PLACES)
43
(2 PLACES)
31
44
32 22
21
44
40
30
40
28
23
26
30
42
(3 PLACES)
28
39
36
43
(2 PLACES)
21
34
45
25
(4 PLACES)
24
(4 PLACES)
27
21
23
26
PATENTS PENDING
22
21
34
70
32
QTY.
PART NO.
DESCRIPTION
21
4
903402-12
FLAT WASHER, NYLON, .51” I.D. X 1-1/4” O.D.
22
2
903409-02
FENDER WASHER, 0.344 X 3/4” O.D., SS
23
2
269029-01
SPACER, SWIVEL NUT
24
4
900722-08
BUTTON SCREW, 10-24 X 1-1/4” LG.
25
4
903401-01
WASHER, EXTERNAL TOOTH, 3/16”
26
2
900013-2
BUTTON HEAD SCREW, 5/16”-18 X 3/4” LG.
27
1
269170-02
PLATFORM CABLE COVER, RH
28
1
269170-01
PLATFORM CABLE COVER, LH
29
2
903010-01
SET SCREW, SELF-LOCKING, CUP PT, 1/2”-20
30
2
267487-01
BEARING, SLEEVE, 3/8” O.D. X 1/4” LG. (SS)
31
2
900009-6
CAP SCREW, 5/16”-18 X 1-1/2” LG, GR8
32
2
901016-3
LOCK NUT, THIN HEAD, 1/4”-20
33
2
900725-04
HEX SKT HD SCREW, FLANGED, 1/4”-20 X 1” LG.
34
2
900021-11
FLAT HEAD SOCKET SCREW, 5/16”-18 X 1-1/8”
35
2
901002
NYLON NUT, 3/8”-16
36
1
908176-03
SPRING, EXT. .38 O.D. X .048 X 3 LG, SS
37
2
900064-06
BUTTON SCREW, 3/8”-16 X 1-1/4” LG.
38
2
902013-11
FLAT WASHER, 3/8”
39
4
901001
LOCK NUT, 5/16”-18
40
14
905070-01
CABLE TIE HOLDER, 2-WAY, HEAVY DUTY
41
4
901200-01
SET SCREW, CONE PT, 5/16”-24 X 5/16” LG.
42
6
903406-04
SHIM, SHOULDER SCREW, .31, .03 THK.
43
4
908082-02
BUSHING, NYLON .63
44
10
903721-03
RIVET, 5/32” DIA. X .550” LG.
45
2
900719-05
BUTTON SCREW, 1/4”-20 X 3/4”, SS
71
PATENTS PENDING
11921 Slauson Ave. Santa Fe Springs, CA. 90670 (800) 227-4116 FAX (888) 771-7713
ITEM
PLATFORM ASSEMBLY - Continued
54
(2 PLACES)
52
REFER TO LH GROUND
SENSOR BRACKET
ASSEMBLY
11921 Slauson Ave. Santa Fe Springs, CA. 90670 (800) 227-4116 FAX (888) 771-7713
46
47
52
48
53
(2 PLACES)
49
54
(2 PLACES)
50
55
(4 PLACES)
58
(2 PLACES)
60
55 (2 PLACES)
61
(2 PLACES)
57
51
52
48
59
57
48
52
54
(2 PLACES)
50
62
48
49
47 46
REFER TO RH GROUND
SENSOR BRACKET
ASSEMBLY
56
PATENTS PENDING
72
QTY.
46
2
903412-01
FLAT WASHER, 1/4”, SS
47
2
903402-06
FLAT WASHER, NYLON, .26 I.D. X .69 O.D.
48
4
903402-13
FLAT WASHER, NYLON, .39”I.D. X .75” O.D.
49
2
908176-02
SPRING, EXT. .38 O.D. X .048, SS
50
2
096028-10
TRIM MOLDING
269201-01
PLATFORM, 30 X 53” WIDE
269201-02
PLATFORM, 33 X 53” WIDE
269201-03
PLATFORM, 34 X 53” WIDE
51
1
PART NO.
DESCRIPTION
52
4
908082-01
BUSHING, NYLON .5
53
4
900709-13
PAN HEAD SCREW, SS, 4-40 X .88
54
6
903411-01
FLAT WASHER, #4, SS
55
6
903108-01
NYLON NUT, 4-40, SS
269030-01
OUTBOARD ROLLSTOP, 30” WIDE
269030-02
OUTBOARD ROLLSTOP, 33” WIDE
269030-03
OUTBOARD ROLLSTOP, 34” WIDE
56
1
57
2
902013-09
FLAT WASHER, 1/4”
58
2
900709-18
PAN HEAD SCREW, 4-40 X 1-3/4” LG.
59
1
269048-01
ACTUATOR, OUTROLL RAMP SWITCH
60
1
900713-06
BUTTON SCREW, 6-32 X 1/2” LG.
61
2
903446-01
FLAT WASHER, #6
62
1
903119-01
HEX NUT, 6-32
73
11921 Slauson Ave. Santa Fe Springs, CA. 90670 (800) 227-4116 FAX (888) 771-7713
ITEM
PATENTS PENDING
INROLL RAMP (INBOARD ROLLSTOP)
4
5
6
7
1
8
9
2
3
10
12
11
12
9
8
7
10
11
6
11921 Slauson Ave. Santa Fe Springs, CA. 90670 (800) 227-4116 FAX (888) 771-7713
74
PATENTS PENDING
2
3
1
QTY.
REF
PART NO.
DESCRIPTION
267618-01
INROLL RAMP (INBOARD ROLLSTOP), 30” WIDE
267618-02
INROLL RAMP (INBOARD ROLLSTOP), 33” WIDE
267618-03
INROLL RAMP (INBOARD ROLLSTOP), 34” WIDE
2
2
900005-1
BUTTON SCREW, 1/4”-20 X 3/8” LG.
3
4
900722-02
BUTTON SCREW, 10-24 X 3/8” LG.
4
1
267465-01
LOCK ROLLER BUSHING
5
1
900725-01
FLANGE SCREW, 1/4”-20 X 3/8” LG.
6
2
900062-3
SHOULDER SCREW, 5/16” X 1/2” LG.
7
2
905332-01
SPACER, 3/4” O.D. x 1/2” LG.
8
2
902000-2
FLAT WASHER, 1/4”
9
2
901016-2
LOCK NUT, THIN, 1/4”-20
10
2
267477-01
SLIDE, INROLL RAMP
11
2
261319
GUIDE, PLATFORM FRONT W/CHAIR
12
2
905323-02
RUBBER WASHER, 3/8” X 13/16” X 15/16” THK.
75
PATENTS PENDING
11921 Slauson Ave. Santa Fe Springs, CA. 90670 (800) 227-4116 FAX (888) 771-7713
ITEM
LH GROUND SENSOR BRACKET ASSEMBLY
4
11921 Slauson Ave. Santa Fe Springs, CA. 90670 (800) 227-4116 FAX (888) 771-7713
2
3
5
2
1
ITEM
QTY.
PART NO.
REF
1
269035-01
GROUND SENSOR BRACKET ASSEMBLY , LH
1
1
269051-01
ROLLER
2
2
908094-01
FLANGE BEARING, 3/8” I.D. X 3/4” LG.
3
1
903130-01
HEX HEAD JAM NUT, 1/4”-20
4
1
900719-04
BUTTON SCREW, 1/2”-20 X 5/8” LG.
5
1
903719-05
RIVET, 1/4” DIA. X 1/2”-5/8”
PATENTS PENDING
DESCRIPTION
76
4
2
3
2
1
5
ITEM
QTY.
PART NO.
DESCRIPTION
REF
1
269035-01
GROUND SENSOR BRACKET ASSEMBLY , LH
1
1
269051-01
ROLLER
2
2
908094-01
FLANGE BEARING, 3/8” I.D. X 3/4” LG.
3
1
903130-01
HEX HEAD JAM NUT, 1/4”-20
4
1
900719-04
BUTTON SCREW, 1/2”-20 X 5/8” LG.
5
1
903719-05
RIVET, 1/4” DIA. X 1/2”-5/8”
77
PATENTS PENDING
11921 Slauson Ave. Santa Fe Springs, CA. 90670 (800) 227-4116 FAX (888) 771-7713
RH GROUND SENSOR BRACKET ASSEMBLY
HYDRAULIC COMPONENTS
8
5
SEE 12 VDC
POWER UNIT
7
8
4
78
PATENTS PENDING
6
1
8A
2
3
1
8A
11921 Slauson Ave. Santa Fe Springs, CA. 90670 (800) 227-4116 FAX (888) 771-7713
4
QTY.
1
2
906718-01
ELBOW, 90° O-RING, SAE#6 - JIC#4 MALE
2
1
267742-01
HOSE ASSEMBLY, 30” LG. (1/8” I.D.), JIC#4
3
1
267743-01
HOSE ASSEMBLY, 68” LG. (1/8” I.D.), JIC#4
4
2
905024
ELBOW FITTING, MALE #10-32 - 1/4”, BARB
5
1
224370-23
HOSE, PLASTIC, 1/4” X 56” LG. (1/8” I.D.)
6
1
224370-24
HOSE, PLASTIC, 1/4” X 91” LG. (1/8” I.D.)
7
2
906767-01
UNION ELBOW, 1/4” O.D. TUBE
8
1
269310-01
HYD. CYLINDER, (MATCHED PAIR, 1-1/2” X 19” STROKE,
REFER TO NOTE)
1
269309-01
FLOW CONTROL VALAVES (MATCHED PAIR, REFER TO
NOTE)
8A
PART NO.
DESCRIPTION
NOTE: For Lift to operate correctly, cylinders must match. If one cylinder needs
replacement, both must be replaced with a matched set. If a flow control
valve must be replaced, a matched set is required to replace that valve
in both cylinders.
79
PATENTS PENDING
11921 Slauson Ave. Santa Fe Springs, CA. 90670 (800) 227-4116 FAX (888) 771-7713
ITEM
12 VDC POWER UNIT
CAUTION
The pressure relief valve, item 8, is adjusted at
the factory and fitted with an anti-tamper seal to
discourage adjustment. Attempts to adjust the
pressure relief valve can cause the Lift to operate incorrectly.
7
11921 Slauson Ave. Santa Fe Springs, CA. 90670 (800) 227-4116 FAX (888) 771-7713
1
8
5
3
4
10
11
9
12
13
2
14 (2 PLACES)
16
6
CAUTION
A small amount of torque is
required for tightening the hex
nut on cartridge valve, Items 3
& 4. Torque the cartridge valve
hex nut to 30 LB.-IN. Overtightening hex nut may damage cartridge valve.
15
PATENTS PENDING
80
QTY.
PART NO.
DESCRIPTION
REF
1
268154-01
12 VDC POWER UNIT
1
1
265118
MOTOR, 12 VDC
2
1
269036-01
GEAR PUMP
3
1
268212-01
POPPET VALVE, NC 2-WAY
4
1
268213-01
SPOOL VALVE, NC 2-WAY
5
2
268211-01
COIL, 10 VDC, SPADE
6
1
268167-01
RESERVOIR, 2 QT.
7
1
268210-01
MANUAL HAND PUMP
8
1
268895-01
FILLER-BREATHER
9
1
268166-01
ELBOW, 3/8”
10
1
265131
NEEDLE VALVE, MANUAL
11
1
280806-01
BREATHER
12
2
906741-01
FITTING, STRAIGHT, O-RING #6 & JIC #4
13
1
908016-01
RUBBER GROMMET
14
2
906806-01
PLUG, O-RING
15
1
267965-01
PUMP HANDLE
16
1
906730-01
LABEL, MIN/MAX FILL LEVEL
81
11921 Slauson Ave. Santa Fe Springs, CA. 90670 (800) 227-4116 FAX (888) 771-7713
ITEM
PATENTS PENDING
ELECTRICAL COMPONENTS
15
12
15
16
22
19
18
20
23
21
11921 Slauson Ave. Santa Fe Springs, CA. 90670 (800) 227-4116 FAX (888) 771-7713
25A
23
CONNECTS
TO ITEM 2
25
26A
14
3 4
24
24
6
26
8
17
2
5
19A
TUBULAR
SOLENOID
19
7
#10-24 LOCK NUT
(6 PLACES) (REF)
13
#10 FLAT WASHER
(4 PLACES) (REF)
WASHER, 1/4”X9/16” X1/16”
(8 PLACES) (REF)
1
GROUND LUG
11 (2 PLACES)
5/16” EXT. TOOTH WASHER
(2 PLACES) (REF)
5/16”-18 HEX NUT
(4 PLACES) (REF)
9A
10
#6 LOCK WASHER
(2 PLACES) (REF)
#6-32 HEX NUT
(4 PLACES) (REF)
WHITE WIRE
(REF)
12VDC POWER UNIT
(REF)
PATENTS PENDING
#10-24 X 5/8” LG. BUTTON
SCREW (6 PLACES) (REF)
82
QTY.
1
1
267751-01
PUMP HARNESS, WL-7, C
2
1
269301-01
CONTROLLER ASSY, WL-7, C
3
1
906588-01
ROCKER SWITCH, WITH LEGEND
4
1
906462-01
FUSE WITH FUSE HOLDER
5
1
267748-01
TRANSDUCER ASSY, 0-2000 PSI
6
1
268031-01
EXTENSION HARNESS
7
1
283697-01
WIRE ASSY, (FUSE-TO-DC RELAY)
8
1
267941-01
WIRE ASSY, (FUSE-TO-ROCKER SWITCH)
267969-01
DC RELAY ASSY (LH PUMP) (INCLUDES SCREWS, NUTS & WASHERS)
9
1
267969-02
DC RELAY ASSY (RH PUMP) (INCLUDES SCREWS, NUTS & WASHERS)
267915-01
DC RELAY, 100 AMP
267907-01
ILAPS SWITCH ASSY, (LH PUMP)
267907-02
ILAPS SWITCH ASSY, (RH PUMP)
9A
10
1
PART NO.
DESCRIPTION
1
11
2
268152-02
LUG COVER, RED (POWER CABLE)
12
1
268093-01
WIRE ASSY, 10” LG. (18 GA BLACK)
13
1
267942-02
CABLE ASSEMBLY, 2 GA (16” LG.)
14
1
251871-06
CABLE ASSEMBLY, 2 GA, 48” LG. (GROUNDING CABLE)
15
2
267471-01
STEADY BURN LAMP (RED BEACON ASSEMBLY)
16
1
266922-01
ELECTRIC SIREN
17
1
267753-01
INROLL RAMP (INBD ROLLSTOP) SWITCH & SPRING ASSEMBLY
18
1
266926-01
WIRE ASSEMBLY, 5” LG.
19
2
266955-01
TUBULAR SOLENOID
1
266562-01
SOLENOID SPRING
20
1
266881-01
WATERTIGHT SWITCH
267944-01
MAIN HARNESS (LH PUMP)
21
1
267944-02
MAIN HARNESS (RH PUMP)
19A
22
1
266929-01
SEATBELT HARNESS
23
2
266899-01
CABLE ASSEMBLY
24
2
266881-02
WATERTIGHT SWITCH
25
1
267911-02
LAMP ASSEMBLY WITH HARDWARE, RIGHT
1
906475-01
BULB (AUTOMOTIVE TYPE 1156)
1
267911-01
LAMP ASSEMBLY WITH HARDWARE, LEFT
1
906475-01
BULB (AUTOMOTIVE TYPE 1156)
25A
26
26A
83
PATENTS PENDING
11921 Slauson Ave. Santa Fe Springs, CA. 90670 (800) 227-4116 FAX (888) 771-7713
ITEM
ELECTRICAL COMPONENTS - Continued
31
29
32
84
PATENTS PENDING
32
28
27
33
34
11921 Slauson Ave. Santa Fe Springs, CA. 90670 (800) 227-4116 FAX (888) 771-7713
30
QTY.
PART NO.
DESCRIPTION
27
1
267616-01
RAMP SWITCH WIRE ASSEMBLY
28
1
269202-01
CABLE ASSEMBLY, PLATFORM
29
1
269060-02
HAND PENDANT, ARMORED
30
1
267355-01
HOOK (PENDANT CABLE STORAGE)
31
1
268039-01
BRACKET, PENDANT HOLDER
32
2
269033-01
SWITCH ASSY (GROUND SWITCH, 5-1/2” LG. WIRING)
33
1
269064-01
SWITCH ASSY (OUTBOARD SWITCH, 7-1/2” LG. WIRING)
34
1
269045-01
SWITCH ASSEMBLY, OUTROLL STOP
85
PATENTS PENDING
11921 Slauson Ave. Santa Fe Springs, CA. 90670 (800) 227-4116 FAX (888) 771-7713
ITEM
DECALS AND DECAL PLACEMENT
DECAL ”D”
DECAL “O”
DECAL “K”
DECAL “A”
DECAL “B”
11921 Slauson Ave. Santa Fe Springs, CA. 90670 (800) 227-4116 FAX (888) 771-7713
DECAL “F”
DECAL “L”
DECAL “M”
DECAL “I”
DECAL“J”
DECAL“N”
DECAL “C”
DECAL
“E”
DECAL“N”
DECAL “H”
FIG. 86-1
All WARNING, CAUTION, and OPERATION decals provided with Wheelchair Lift must always be
in place on the Lift and vehicle (see FIG. 73-1), and
must always be legible. If decals are missing or illegible, get free replacement decals from:
MAXON Lift Corp. - Customer Service
11921 Slauson Ave., Santa Fe Springs, CA 90670
Phone: (800) 227-4116 FAX: (888) 771-7713
E-mail: [email protected]
PATENTS PENDING
86
11921 Slauson Ave. Santa Fe Springs, CA. 90670 (800) 227-4116 FAX (888) 771-7713
DECALS FOR WL7-vers. C
DECAL SET P/N 268302-01
FIG. 87-1
87
PATENTS PENDING
DECALS AND DECAL PLACEMENT - Continued
DECALS FOR WL7-vers. C-1K
11921 Slauson Ave. Santa Fe Springs, CA. 90670 (800) 227-4116 FAX (888) 771-7713
DECAL SET P/N 268302-03
FIG. 88-1
PATENTS PENDING
88
DECAL “J”
DECAL “I”
DECAL “A”
DECAL “C”
DOOR
CABLE HOOK
DECAL “B”
DECALS AND HAND PENDANT
MOUNTING ON VEHICLE
FIG. 89-1
DECAL “A”
P/N 268303-01
DECAL SET FOR WL7-vers.C-1K
P/N 267620-04
FIG. 89-3
DECAL SET FOR WL7-vers.C
P/N 267620-02
FIG. 89-2
89
PATENTS PENDING
11921 Slauson Ave. Santa Fe Springs, CA. 90670 (800) 227-4116 FAX (888) 771-7713
HAND PENDANT &
HANGER MOUNTING
SERIAL PLATE & CONTROLLER
CONTROLLER OVERLAY
P/N 267630-01
11921 Slauson Ave. Santa Fe Springs, CA. 90670 (800) 227-4116 FAX (888) 771-7713
FIG. 90-1
SERIAL PLATE
P/N 905246-8
FIG. 90-2
PATENTS PENDING
90
ANTI-SLIP & SAFETY STRIPING
YELLOW TAPE
(BOTTOM-ROLLSTOP)
P/N 905293-17
ANTI-SLIP TAPE
(ROLLSTOP)
P/N 096020-13
ANTI-SLIP TAPE
P/N 096024-10
ANTI-SLIP TAPE
P/N 096025-10
ANTI-SLIP TAPE
P/N 096013-10
YELLOW TAPE
(OUTBOARD)
P/N 905293-11
YELLOW TAPE
(OUTBOARD)
P/N 905293-14
ANTI-SLIP TAPE
(ROLLSTOP)
P/N 096020-13
YELLOW TAPE
P/N 905293-11
YELLOW TAPE
(INBOARD)
P/N 905293-16
YELLOW TAPE
P/N 905293-14
YELLOW TAPE
(INBOARD & OUTBOARD)
P/N 905293-13
FIG. 91-1
91
PATENTS PENDING
11921 Slauson Ave. Santa Fe Springs, CA. 90670 (800) 227-4116 FAX (888) 771-7713
(30” WIDE PLATFORM)
ANTI-SLIP & SAFETY STRIPING - Continued
(33” WIDE PLATFORM)
YELLOW TAPE
(BOTTOM-ROLLSTOP)
P/N 905293-18
11921 Slauson Ave. Santa Fe Springs, CA. 90670 (800) 227-4116 FAX (888) 771-7713
ANTI-SLIP TAPE
(ROLLSTOP)
P/N 096020-14
ANTI-SLIP TAPE
P/N 096024-11
ANTI-SLIP TAPE
P/N 096025-11
ANTI-SLIP TAPE
P/N 096013-11
YELLOW TAPE
(OUTBOARD)
P/N 905293-11
YELLOW TAPE
(OUTBOARD)
P/N 905293-14
ANTI-SLIP TAPE
(ROLLSTOP)
P/N 096020-14
YELLOW TAPE
P/N 905293-11
YELLOW TAPE
(INBOARD)
P/N 905293-16
YELLOW TAPE
P/N 905293-14
FIG. 92-1
PATENTS PENDING
92
YELLOW TAPE
(INBOARD & OUTBOARD)
P/N 905293-15
YELLOW TAPE
(BOTTOM-ROLLSTOP)
P/N 905293-18
ANTI-SLIP TAPE
(ROLLSTOP)
P/N 096020-15
ANTI-SLIP TAPE
P/N 096025-12
ANTI-SLIP TAPE
P/N 096024-12
ANTI-SLIP TAPE
P/N 096013-11
YELLOW TAPE
(OUTBOARD)
P/N 905293-11
YELLOW TAPE
(OUTBOARD)
P/N 905293-14
ANTI-SLIP TAPE
(ROLLSTOP)
P/N 096020-15
YELLOW TAPE
P/N 905293-11
YELLOW TAPE
(INBOARD)
P/N 905293-16
YELLOW TAPE
P/N 905293-14
YELLOW TAPE
(INBOARD & OUTBOARD)
P/N 905293-19
FIG. 93-1
93
PATENTS PENDING
11921 Slauson Ave. Santa Fe Springs, CA. 90670 (800) 227-4116 FAX (888) 771-7713
(34” WIDE PLATFORM)
TROUBLESHOOTING
CONTROLLER DISPLAY READINGS
The controller (FIG. 94-1) may display any of the following readings while the Lift is
operating. Some of the readings indicate normal operation, but some indicate trouble with
the Lift or vehicle.
11921 Slauson Ave. Santa Fe Springs, CA. 90670 (800) 227-4116 FAX (888) 771-7713
READINGS
DISPLAYED HERE
LIFT CONTROLLER DISPLAY
FIG. 94-1
STOWED* (Stowed Star):
Lift is operating normally and the controller (FIG. 94-1) is receiving the interlock signal
from the vehicle. The platform has folded, passed the stow switch, and is stowed. The
hydraulic system pressure is above 900 PSI and the Lift interlock signal is being sent to the
vehicle.
STOWED.* (Stowed Dot Star): Lift is operating normally and the controller (FIG. 94-1)
receives the interlock signal from the vehicle. The platform folded, passed the stow switch,
and is stowed. The hydraulic system pressure is below 900 PSI. If the vehicle engine is running, the controller recharges hydraulic system pressure every 5 minutes, the dot (.) will
clear and controller (FIG. 94-1) will read STOWED*.
STOWED (Stowed): Lift is operating normally and the controller (FIG. 94-1) receives
the interlock signal from the vehicle, but the Lift is not generating the signal for the vehicle
interlock. The platform folded, passed the stow switch, and is stowed. The hydraulic system
pressure is above 900 PSI. If vehicle interlock uses the absence of the Lift interlock signal
and prevents the vehicle from being moved (Lift stowed improperly), the vehicle is unable
to move until it receives the Lift interlock signal.
Corrective action:
1. Make sure the stow switch is adjusted correctly. If required, do the STOW
SWITCH ADJUSTMENT in this manual. With the platform resting on the
latches, the stow switch must be closed.
2. If the adjustment does not solve the problem, check the wire that sends the Lift
interlock signal to the vehicle interlock (see ELECTRICAL SYSTEM DIAGRAM).
PATENTS PENDING
94
Corrective action:
1. Make sure the stow switch is adjusted correctly. If required, do the STOW SWITCH
ADJUSTMENT in this manual. With the platform resting on the latches, the stow
switch must be closed.
2. If the adjustment does not solve the problem, check the wire that sends the Lift
interlock signal to the vehicle interlock (see ELECTRICAL SYSTEM DIAGRAM).
INBRD SW:
The inboard rollstop is not completey closed and locked in position, or the inboard rollstop
switch is always open.
Corrective action:
1. Close the inboard rollstop. Make sure closing mechanism is working correctly.
2. If problem remains, do the following. With inboard rollstop open, push the switch
actuator mechanism. If the INBRD SW reading clears, the wiring connections and
switch are good. Do the INBOARD SWITCH ADJUSTMENT. If a different error
message appears, i.e. ANG SEN, troubleshoot as instructed.
3. Check for cracks in the switch body and for loose spade terminals. Replace switch
if damaged.
4. If the controller (FIG. 94-1) still reads INBRD SW, replace the controller.
OUTBD SW:
The outboard rollstop is not closed completely and locked in position, or the outboard rollstop switch is not functioning correctly.
Corrective action:
1. With the platform open and off the ground, manually lower the outboard rollstop.
The controller should read OUTBD SW. Next, manually raise the outboard rollstop
to the up and locked position. The OUTBD SW reading should clear when the
outboard rollstop is up and locked. If the reading does not clear when outboard
rollstop opens and closes:
• Check and repair switch wiring
• Replace switch or magnet
2. Check if the magnets are missing or fouled with debris. If missing, replace the
magnet(s). If magnets are fouled, clean off the debris.
3. If the controller (FIG. 94-1) still reads OUTBD SW, replace the controller.
95
PATENTS PENDING
11921 Slauson Ave. Santa Fe Springs, CA. 90670 (800) 227-4116 FAX (888) 771-7713
STOWED. (Stowed dot):
Lift is operating normally and the controller (FIG. 94-1) is receiving the vehicle’s interlock
signal, but the Lift is not generating the interlock signal for the vehicle interlock. The platform folded, passed the stow switch, and is stowed. The hydraulic system pressure is
below 900 PSI. If the vehicle engine is running, the controller recharges hydraulic system
pressure every 5 minutes, the “.” (dot) will go away and controller (FIG. 94-1) will read
STOWED. If the vehicle interlock uses the absence of the Lift interlock signal and prevents the vehicle from being moved (Lift stowed improperly), the vehicle is unable to move
until it receives the Lift interlock signal.
CONTROLLER DISPLAY READINGS - Continued
MATT ERR:
The Lift’s threshold plate sensed pressure while the platform was unfolded and more than
1” below the vehicle floor. There may be a load or occupant on it, or it may need to be adjusted.
11921 Slauson Ave. Santa Fe Springs, CA. 90670 (800) 227-4116 FAX (888) 771-7713
Corrective action:
1. Make sure the THRS (MAT) switch is adjusted correctly. If required, do the THRESHOLD (M AT) SWITCH ADJUSTMENT in this manual.
2. If adjustment does not solve the problem, do the following. Push the actuator lever
on each of the 2 MAT switches (one at a time). If the MAT ERR reading appears
while pushing on the actuator and clears when releasing the actuator, then the wiring connections and switch are good.
3. If the controller (FIG. 94-1) still reads MAT ERR, replace the controller.
LOCK ERR:
Lift is not stowed, and the interlock signal from the vehicle does not reach the controller. For
the vehicle interlock to send a signal to the Lift, the vehicle transmission must be in park
or neutral, emergency or service brakes must be set, and Lift switch or other controls (as
equipped) must be set correctly. Lift will operate until stowed. The Lift cannot operate until it
receives the interlock signal from the vehicle.
CAUTION
To prevent a constant “LOCK ERR”, never
connect the brown interlock wire with the
white (red-striped) interlock wire.
Corrective action:
1. Check all the conditions, controls, and settings on the vehicle interlock and then
check the interlock connections to the Lift (see ELECTRICAL SYSTEM DIAGRAM).
2. Disconnect the vehicle interlock wire (white with red stripe) from the vehicle interlock
wiring harness (see ELECTRICAL SYSTEM DIAGRAM). (The vehicle interlock wire
is on the same side as the pump.) Connect the wire to ground. If the LOCK ERR
reading is gone from the controller (FIG. 94-1), the Lift interlock is operating correctly. The vehicle interlock needs to be repaired.
LOCKED:
This is a normal reading on the controller (FIG. 94-1) if the Lift is stowed and vehicle is being driven. It indicates the Lift cannot be operated because it is not receiving an interlock
signal from the vehicle. The vehicle normally sends the interlock signal to the Lift when vehicle transmission is in park or neutral, emergency or service brakes are set, and Lift switch
or other controls (as equipped) are set correctly. For the Lift to operate, the controller must
display STOWED (see STOWED*, STOWED.*, and STOWED).
PATENTS PENDING
96
FOLD. (Fold dot):
The platform does not pass the “Fold” switch, and the platform remains in position. The
controller (FIG. 94-1) looks for a pressure reading that indicates an occupant is on the platform (50+ lbs). The platform must travel an adequate distance for the controller (measures
hydraulic system pressure (PSI)) to determine if the platform can be folded. If the Lift stops
folding in the middle of the platform occupant sensing area, the controller prevents the platform from folding. The platform must unfold completely to continue operating.
Corrective action:
Unfold the platform completely to floor level. The controller allows the platform to be folded
and stowed.
UNFOLD. (Unfold dot):
The platform does not pass the “Fold” switch, and the platform remains positioned. The
controller (FIG. 94-1) looks for a pressure reading that indicates an occupant is on the platform (50+ lbs). The controller prevents the platform from folding, allowing it only to unfold.
The platform must unfold completely to continue operating the Lift.
Corrective action:
Unfold the platform completely to floor level. The controller allows the platform to be folded
and stowed.
UNFOLD. OCCUPIED (Unfold dot Occupied):
Platform is occupied (50+ lbs. on platform) when trying to fold the platform.
Corrective action:
1. Remove occupant (or load) from platform.
2. If there is no occupant or load, go to diagnostic mode on the controller (see DIAGNOSTICS) and read the hydraulic system pressure reading (PSI). It should read between 170PSI to 230PSI. If it is within range, the platform occupied pressure setting
must be changed in the controller.
3. If it is not within range, do the FLOOR POSITION ADJUSTMENT procedure.
97
PATENTS PENDING
11921 Slauson Ave. Santa Fe Springs, CA. 90670 (800) 227-4116 FAX (888) 771-7713
STOW SW:
The “Stow” switch is normally closed when the Lift is not stowed. This reading indicates the
stow switch is broken or the wiring is disconnected or damaged.
CONTROLLER DISPLAY READINGS - Continued
SEAT BLT:
For units equipped with a seat belt, seat belt is unbuckled.
11921 Slauson Ave. Santa Fe Springs, CA. 90670 (800) 227-4116 FAX (888) 771-7713
Corrective action:
1. Buckle and unbuckle the seat belt. If the controller reads SEAT BLT when seat
belt is unbuckled and clears when seat belt is buckled, the wiring connections and
switch are good.
2. If the reading does not change, replace the seat belt.
OCCUPIED:
There may be a load or occupant on the platform when the controller (FIG. 94-1) looks for
a pressure reading that indicates a load/occupant on the platform (50+ lbs).
Corrective action:
1. Remove load or occupant from the platform.
2. If there is no load or occupant, go to diagnostic mode on the controller (see DIAGNOSTICS) and check the hydraulic system pressure reading (PSI). It should read
between 170PSI to 230PSI. If reading is not within range, change the pressure
transducer.
3. If the controller (FIG. 94-1) still reads OCCUPIED, replace the controller.
ANG SEN:
The controller is not receiving a signal from the angle sensor (ILAPS switch).
Corrective action:
1. Check for disconnected or damaged ILAPS switch wiring.
2. Check for loosened ILAPS switch mounting plate and shaft connection.
3. If wiring is okay and switch is mounted tight, replace ILAPS switch.
PSI SEN:
The pressure transducer reading is not within the acceptable range of hydraulic system
pressure (PSI) for the function that Lift is performing.
Corrective action:
1. Check for disconnected or damaged pressure transducer wiring.
2. Ensure pressure transducer wiring is not routed next to the electric motor or wiring
that carries high-current.
PATENTS PENDING
98
LOW BAT:
Battery voltage is below 12.2 volts. Controller allows the Lift to operate until battery voltage
drops below 11.9 volts.
Corrective action:
1. Start the vehicle to charge battery.
2. If that does not help, check if the battery is bad.
3. If the battery is OK, check to see if it is charging.
4. If battery is not charging, make sure the power cable and ground cable are in good
condition, and the connections on both ends are clean and tight.
CHRG BAT:
This reading appears when the platform is being raised or lowered and the battery voltage is below 11.9 volts. The controller will only allow the platform to be raised, folded, and
stowed until battery is re-charged.
Corrective action:
1. Start the vehicle to charge battery.
2. If that does not help, check if the battery is bad.
3. If the battery is okay, check to see if it is charging.
4. If battery is not charging, make sure the power cable and ground cable are in good
condition, and the connections on both ends are clean and tight.
99
PATENTS PENDING
11921 Slauson Ave. Santa Fe Springs, CA. 90670 (800) 227-4116 FAX (888) 771-7713
NOTE: Battery isolator devices, in the power supply circuit for the Lift, can drop
enough voltage to produce a fault reading on the controller. MAXON recommends that a battery isolator should not be used in the power supply circuit
for the Lift.
DIAGNOSTIC MODE
CAUTION
! CAUTION
Leaning on any part of the Lift
while doing this procedure could
result in personal injury and affect
some of the diagnostic readings on
the controller.
11921 Slauson Ave. Santa Fe Springs, CA. 90670 (800) 227-4116 FAX (888) 771-7713
To display diagnostic readings on the controller:
• If the platform is positioned above floor level
(FIG. 100-1), press the UP button on the hand
pendant (FIG. 100-2) rapidly 11 times.
PLATFORM ABOVE FLOOR
LEVEL (STOWED)
FIG. 100-1
UP
HAND PENDANT
FIG. 100-2
• If the platform is positioned below floor level
(FIG. 100-3), press the FOLD button on the
hand pendant (FIG. 100-4) rapidly 11 times.
PLATFORM BELOW FLOOR LEVEL
FIG. 100-3
FOLD
HAND PENDANT
FIG. 100-4
PATENTS PENDING
100
READINGS
DISPLAYED HERE
LIFT CONTROLLER DISPLAY
FIG. 101-1
The controller (FIG. 101-1) will display the following readings. Push the button once for
each reading.
1. Battery voltage (FIG. 101-2).
DOWN
V:12.68
EXAMPLE CONTROLLER
DIAGNOSTIC READING
FIG. 101-2
2. Lift current (FIG. 101-3).
DOWN
A:2.40
EXAMPLE CONTROLLER
DIAGNOSTIC READING
FIG. 101-3
101
PATENTS PENDING
11921 Slauson Ave. Santa Fe Springs, CA. 90670 (800) 227-4116 FAX (888) 771-7713
Once the diagnostic readings appear on the controller (FIG. 101-1), you can scroll
through the readings. If you pushed the UP button to get to the diagnostic mode, use
the UP button to scroll through the readings. If you pushed the FOLD button to get to
the diagnostic mode, use the FOLD button to scroll through the readings.
DIAGNOSTIC MODE - Continued
3. Internal volts (FIG. 102-1).
DOWN
V+12.22
11921 Slauson Ave. Santa Fe Springs, CA. 90670 (800) 227-4116 FAX (888) 771-7713
EXAMPLE CONTROLLER
DIAGNOSTIC READING
FIG. 102-1
4. Hydraulic pressure (FIG. 102-2).
DOWN
PSI:200
EXAMPLE CONTROLLER
DIAGNOSTIC READING
FIG. 102-2
5. Average pre-fold pressure (FIG. 102-3).
DOWN
AVE:315
EXAMPLE CONTROLLER
DIAGNOSTIC READING
FIG. 102-3
PATENTS PENDING
102
Electrical overload error codes are not displayed
when the controller is in diagnostic mode. They
are only displayed on the controller when an
electrical overload error occurs while operating
the Lift. Each function of the Lift is assigned a
limit on how much electrical current it can draw.
If the electrical current goes over the limit, the
controller stops the Lift to prevent damage. The
controller display will show which Lift function
was operating at the time of the electrical overload. The controller display will flash between
ERROR: OVERLOAD! (FIG. 103-1) and an
11-digit code (i.e. 00100000000) (see FIG. 103-2
& TABLE 103-1). A “1” in the output code means
that a specific function was on when the electrical overload occurred, and “0” means that a specific function was off when the electrical overload
occurred.
ERROR: OVERLOAD!
EXAMPLE CONTROLLER
ERROR CODE READING
FIG. 103-1
00100000000
EXAMPLE CONTROLLER
ERROR CODE READING
FIG. 103-2
LIFT FUNCTIONS
NOT USED
NOT USED
RAISE (UP)
VALVE 2
(DOWN/UNFOLD)
EXTRA OUTPUT
VALVE 1
(DOWN/UP)
VISUAL
AUDIO
PLATFORM LIGHTS
TRANSDUCER
UNLATCH
ELECTRICAL OVERLOAD “ERROR” CODE
READINGS ON THE CONTROLLER
CODE DIGITS
0
0
1
0
0
0
0
0
0
0
0
EXAMPLE ELECTRICAL OVERLOAD CODE SHOWN FOR
RAISE FUNCTION
TABLE 103-1
103
PATENTS PENDING
11921 Slauson Ave. Santa Fe Springs, CA. 90670 (800) 227-4116 FAX (888) 771-7713
ELECTRICAL OVERLOAD ERRORS
DC RELAY READINGS
11921 Slauson Ave. Santa Fe Springs, CA. 90670 (800) 227-4116 FAX (888) 771-7713
The DC Relay (FIG. 104-1) is a
solid-state device for switching DC
load current of up to 100 amps. Unlike a motor start switch (relay), the
RED LED
DC Relay uses only a few milliamps
of current and has LED’s to indicate
normal operation or fault conditions
(FIG. 104-1 and TABLE 104-1).
When the power switch on the Lift
is turned on, it checks for power-related faults before applying power to GREEN LED
the Lift. If a fault is detected, the DC
Relay will not apply power to the Lift,
and the green LED or red LED will
indicate the applicable fault (TABLE
104-1).
DC RELAY
POWER OUTPUT
(REF)
POWER INPUT
(REF)
NOTE: A fast flash is 5 flashes per second.
A slow flash is 1 flash per second.
ITEM
1
2
FIG. 104-1
READING
CAUSE
Battery power is connected to input of
Green LED and Red LED flash on the relay. To save power, relay enters
for .5 second
sleep mode until power is turned on at
the Lift.
Power switch was turned on at the Lift.
Green LED on
Relay output is on.
3
Green LED flashing fast
Voltage is above 16.5 V.
4
Green LED flashing slowly
Voltage is below 8.0 V.
5
Red LED flashing fast
Over current.
6
Red LED flashing slowly
High temperature (over 100° C).
7
Red LED displays 3 short flashes Short in FET.
8
Red LED displays 2 short flashes Open in FET.
TABLE 104-1
PATENTS PENDING
104
11921 Slauson Ave. Santa Fe Springs, CA. 90670 (800) 227-4116 FAX (888) 771-7713
SYSTEM DIAGRAMS
HYDRAULIC SYSTEM DIAGRAM
FIG. 105-1
105
PATENTS PENDING
SYSTEM DIAGRAMS - Continued
ELECTRICAL SYSTEM DIAGRAM
11921 Slauson Ave. Santa Fe Springs, CA. 90670 (800) 227-4116 FAX (888) 771-7713
FIG. 106-1
PATENTS PENDING
106