1
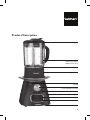
SSB1U
Congratulations on the purchase of your new Cuisinart Soup Maker.
For over 30 years Cuisinart’s aim has been to produce the very finest
kitchen equipment, so that cooks at home as well as professional chefs
have the tools to express their creativity.
All Cuisinart products are engineered for exceptionally long life, and
designed to be easy to use as well as to give excellent performance day
after day. That is why they have come to be regarded as the defining
machines in their field by chefs across the world.
To learn more about new products we are launching, register for our
free Cuisinart newsletter, simply visit our website www.cuisinart.co.uk
and refer to the club section.
Whatever you cook, cook it better with Cuisinart.
3
Contents
Product Description . . . . . . . . . . . . . . . . . . . . . . . . . . 5
Safety Cautions . . . . . . . . . . . . . . . . . . . . . . . . . . . . . 6
The Soup Maker . . . . . . . . . . . . . . . . . . . . . . . . . . . . 9
A
B
C
D
E
F
Glass Jar . . . . . . . . . . . . . . . . . . . . . . . . . . . . . . . . . . . . . 9
- Fitting . . . . . . . . . . . . . . . . . . . . . . . . . . . . . . . . . . . . 9
- Removing . . . . . . . . . . . . . . . . . . . . . . . . . . . . . . . . . . 9
Lid & Measuring Cup . . . . . . . . . . . . . . . . . . . . . . . . . . . . . 10
Control Panels . . . . . . . . . . . . . . . . . . . . . . . . . . . . . . . . . 10
- Power Button . . . . . . . . . . . . . . . . . . . . . . . . . . . . . . . 10
- Timer Control . . . . . . . . . . . . . . . . . . . . . . . . . . . . . . . 11
- Temperature Control . . . . . . . . . . . . . . . . . . . . . . . . . . . . 11
- Stir Button . . . . . . . . . . . . . . . . . . . . . . . . . . . . . . . . . 12
- Blending Function . . . . . . . . . . . . . . . . . . . . . . . . . . . . . 12
Making Soup . . . . . . . . . . . . . . . . . . . . . . . . . . . . . . . . . . 13
Blending Cold Ingredients . . . . . . . . . . . . . . . . . . . . . . . . . . . . 14
Hints & Tips . . . . . . . . . . . . . . . . . . . . . . . . . . . . . . . . . . . 15
Care & Maintenance . . . . . . . . . . . . . . . . . . . . . . . . . 16
Self Clean Feature . . . . . . . . . . . . . . . . . . . . . . . . . . 16
UK Guarantee . . . . . . . . . . . . . . . . . . . . . . . . . . . . 17
UK After Sales Service . . . . . . . . . . . . . . . . . . . . . . . . 18
4
Product Description
Lid with removable measuring cup
Glass Jar
1750 ml (Cold Use)
1400 ml (Soup Use)
Non-Stick Heating Plate
Jar Collar
On/Off
Control Blender Function
Stir Button
Housing Base
Timer Control
Heat Control
Non-Slip Rubber Feet
5
Carefully read all the instructions before using the appliance and keep in a
safe place for future reference
Safety Cautions
Always follow these safety cautions when using this appliance to avoid personal injury
or damage to the appliance. This appliance should be used only as described within this
instruction book.
nE
nsure
all packaging materials and any promotional labels or stickers are removed
from the Soup Maker before first use.
nA
lways inspect the appliance before use for noticeable signs of damage. Do not use
if damaged, or if the appliance has been dropped. In the event of damage, or if the
appliance develops a fault, contact the Cuisinart Customer Care Line (See “UK After
Sales Service” section).
nD
o not use this appliance if the lead is damaged. In the event of lead damage discontinue
use immediately. If the lead is damaged it must be replaced with a special lead available
from the manufacturer or its service agent (See “UK After Sales Service”).
nW
hilst in use the surfaces will become extremely hot. Do not touch hot surfaces.
Always use handles.
nU
nplug from the mains when not in use and before cleaning. Allow to cool before
cleaning the appliance. To disconnect, press On/Off button and then remove the plug
from the mains.
nT
his appliance should not be used by adults or children whose lack of experience,
product knowledge or disability might cause a hazard, unless they have been correctly
instructed and are adequately supervised.
nC
hildren should always be supervised to ensure that they do not play with this
product.
nD
o not use any accessories or attachments with this appliance other than those
recommended by Cuisinart.
nT
o protect against fire, electric shock or personal injury, do not immerse cord, plug
or unit in water or other liquids.
n I f motor stalls, switch off and unplug from the mains. Leave for 30 seconds and switch
plug and appliance back on.
6
nD
o
not leave the lead hanging over the edge of a kitchen table or worktop. Avoid
contact between the lead and hot surfaces.
nF
or indoor use only.
nF
or domestic use only.
nT
his appliance should be used only for preparation of drinks / food as described
within the instructions for use that accompany it. Please retain these instructions for
future reference.
nA
lways ensure that your hands are dry before removing the plug from the mains
outlet. Never pull the plug out of the mains outlet by its lead.
nT
o avoid injury or possible fire, do not cover the appliance when in use.
n I f this appliance is used for re-heating foods, also ensure the food is piping hot before
eating.
nD
o not connect this appliance to an external timer or remote control system.
nT
his appliance complies with the basic requirements of Directives 04/108/EEC
(Electromagnetic Compatibility) and 06/95/EEC (Safety of domestic electrical
appliances).
nW
ARNING: A
cut off plug inserted into a 13 amp socket is a serious safety hazard.
Ensure the cut off plug is disposed of safely.
nW
ARNING: Polythene bags over the product or packaging may be dangerous. To
avoid danger of suffocation, keep away from babies and children. These bags are not
toys.
The temperature of all surfaces marked with this symbol will be very
hot when the appliance is in use, DO NOT TOUCH these surfaces as
possible injury could occur. Allow to cool completely before handling this
appliance.
The symbol
on the product or on its packaging indicates that this product may
not be treated as household waste. Instead it should be handed over to the applicable
collection point for the recycling of electrical and electronic equipment.
7
By ensuring this product is disposed of correctly, you will help prevent potential negative
consequences for the environment and human health, which could otherwise be caused
by inappropriate waste handling of this product. For more detailed information about
the recycling of this product, please contact your local council office or your household
waste disposal service.
8
The Soup Maker
A
Glass Jar
Before first use, clean the glass jar thoroughly (see cleaning & maintenance section for
more information).
Fitting
nP
osition jar unit on the motor housing so that the arrow on the jar collar is level with
the arrow on the housing unit (fig. 1). Push the jar down into place (fig. 2).
fig. 1
fig. 2
N.B. Take care when placing the jar unit on the housing base as incorrect positions may damage
the interlock switches.
Removing
Switch the Soup Maker off and unplug from the mains outlet. Lift the jar unit up and
away from the housing base, holding the handle only. Do not twist the jar.
Caution: The heating element is hot when the Soup Maker is in heat mode, do not
touch the underside of the collar.
9
B
Lid & Measuring Cup
nT
o
remove the lid from the glass jar, grip the edges of the lid firmly with one hand
and lift upwards. When you have added the required food to the blender jar, place
lid on jar before heating and blending. To replace, simply position over the jar and
press down firmly (ensure the pouring spout on the jar is covered by the protrusion
on the lid).
n To remove the measuring cup from the lid, lift up and away. To replace, position the
cup over the lid, aligning with the corresponding grooves in the lid.
WARNING: Steam will escape around the measuring cup when the Soup Maker is in
heat mode, this is normal, but handle with care – steam can burn. Always ensure the lid
and cup are replaced before blending.
C
Control Panels
Power Button
n Plug the Soup Maker into the mains outlet, the power button (on/off) will flash. Press
once and the light will become static; the Soup Maker is now in ‘stand-by’ mode.
n If the on/off button is pressed whilst in ‘stand-by’ mode, the Soup Maker will revert
back to dormant with the on/off button flashing. Any settings entered will be
cancelled.
nT
he only way to turn the flashing on/off button off is to unplug the Soup Maker from
the mains.
10
Timer Control
n When the Soup Maker is in ‘stand-by’ mode the cooking time can be set by either
pressing the + or - buttons, if the ‘-’ button is pressed at this stage, 30 minutes will
be displayed on the digital display, this is the maximum cooking time. If the ‘-’ button
is pressed at any other time, the cooking time will be reduced in one minute increments.
n The ‘+’ button increases the cooking time in 1 minute increments.
N.B. Pressing any of the buttons will be accompanied by an audible sound.
N.B. The cooking time can be increased or decreased by pressing the ‘+’ and ‘-’
buttons at any time during the heating or cooking cycle.
Temperature Control
n The Soup Maker will start its heating or cooking cycle when the temperature is
selected to either high, low or simmer.
N.B. The temperature can be changed at any time during the heating or cooking
cycle.
11
Stir Button
n The stir function can be operated at any time during the heating or cooking cycle,
it can also be operated in ‘stand-by’ mode when ingredients are being added to the
glass jar.
n It is recommended that you use the stir function while frying or sautéing onions,
garlic or other base ingredients at the start of your recipe.
n It is not ideal to use the stir button to blend the soup but it can be used if you require
chunky soup.
Blending Function
n For safety, the blending function only works when the cooking or heating process
has completed.
n The heater can also manually be turned off by pressing the heat button currently in
use (this will be illuminated) or alternatively pressing the on/off (power button).
n If the on/off power button is used to turn off the heater, the Soup Maker will switch off
completely and will have to be re-started for blending.
n If you are blending hot ingredients do not exceed speed 2; speed 1 is sufficient.
N.B. Do not blend for longer than three minutes. This is the maximum running time
for the motor.
12
D
Making Soup
n Place the housing base onto a flat, sturdy surface.
n Assemble the Soup Maker jar and plug into a suitable mains outlet.
n Press the on/off button to set the Soup Maker to ‘standby’ mode.
n Select the required time, this can be adjusted throughout the cooking
process, but a
time must be selected to start the heater initially.
n To fry ingredients such as onions or garlic, add butter or oil first before switching on
heat mode.
n Make sure you place the butter on the heating plate rather than the blades. Select
low heat setting to melt butter. If frying onions and garlic, add and cook until
softened, replacing lid.
nT
he appliance may smoke a little and release a slight odour during first use, this is
normal.
nT
o mix the onions or garlic, use the stir button on the control panel.
nA
dd the remaining ingredients (vegetables, stock and seasoning etc) and set on a high heat
and bring to the boil.
nW
hen making soup, only fill the contents of the glass jar to 1400 ml mark. Once
boiled reduce heat to simmer, set timer and leave to cook.
N.B. The heater works with a thermostat and so heat will increase or decrease
accordingly and bubbles will become bigger or smaller during cooking.
nW
hen cooking time has finished the Soup Maker will beep 4 times.
nT
o blend soup, use the blend function; this can only be used once the heat mode
and timer has been exited. When ready, simply blend soup on level 1 until desired
consistency is achieved and serve.
13
Warning: When cooking or blending with hot liquid it is essential the lid and cup
are left on the blender to prevent harm to self.
E
Blending Cold Ingredients
The blender can also be used as a standard blender to blend cold ingredients and crush
ice.
nP
lace the housing base onto a flat, sturdy surface.
n Assemble the jar; place on the base and plug into a suitable mains outlet.
nA
dd all necessary ingredients into the glass jar and replace the lid. You may add more
ingredients during blending by lifting the measuring cup in the lid and dropping ingredients through the opening in the lid.
N.B. The maximum fill for cold ingredients is 1750 ml.
nT
urn the blender control dial to your desired speed or use the pulse function. Turn
the blender control dial to ‘off’ when the desired consistency is reached.
nU
nplug the appliance immediately after use.
nD
o not store food or liquid in the glass jar. Empty and clean thoroughly after use.
nD
o not overload the Soup Maker. If the motor stalls, turn the Soup Maker off
immediately, unplug the unit and carefully remove a portion of the food, then
continue.
14
F
Hints & Tips
nA
dd butter or oil to heating plate and allow to melt before frying vegetables.
n If soup recipes call for cheese or cream to be added at the end of the recipe, don’t
allow to boil. Most soup will actually be hot enough to melt the cheese using just the
stir function rather than adding more heat.
nT
o make low fat soups, use low fat fromage frais instead of crème fraîche or soured
cream.
n I f your soup is too thick, thin with a little water or semi-skimmed milk when blending.
Do not exceed 1.4L.
n If you are making tomato soup and your tomatoes are too pale and under ripe, add
1tbsp of tomato purée to add colour and flavour.
n Cut most foods into cubes approximately 1.5-2.5cm to achieve a more uniform result. Cut all cheese into pieces no larger than 1.5cm.
nU
se measuring cup in the lid to measure liquid ingredients such as alcohol. Always
replace after ingredients have been added.
nW
hen chopping fresh herbs, garlic, onion, zest, breadcrumbs, nuts and spices make
sure the glass jar and cutting assembly are completely dry.
n I f food tends to stick to the sides of the glass jar when blending, pulse in short
bursts.
nP
ulses should be short bursts. Space the pulses so the blades stop rotating between
pulses.
nD
on’t over process foods. This appliance will achieve most desired results in seconds
not minutes.
nF
or frozen drinks, chill all ingredients before blending.
n I f foods do not seem to be blending smoothly, use the pulse function to chop then
blend continuously.
nE
nsure you add oil or butter to the non-stick plate before you turn the heater on.
n I f in any doubt about what’s happening, switch off the Soup Maker and refer to this
IB.
15
Care & Maintenance
nA
lways unplug the appliance from the mains outlet before cleaning.
nB
efore first use and after every use, clean each part thoroughly.
nP
eriodically check all parts before reassembly. If any part is damaged
or jar is chipped or cracked, DO NOT USE THE SOUP MAKER.
nC
AUTION: Blade is very sharp. Handle with care.
nD
o not clean the lid or rubber seal in a dishwasher, they are not dishwasher safe.
nW
ipe the motor base clean with a damp cloth to remove any residue, and dry
thoroughly. Do not use abrasive cleaners on the housing base. Apply any cleaning
agent to the cloth, not the base.
nN
ever submerge the motor base in water or other liquid, or place in a dishwasher.
nM
ake sure all the parts are clean and dry before storing.
nN
ever wrap the cord around the outside of the Soup Maker.
nN
ever immerse the plug, lead or housing in water or any other liquid.
n Never immerse the glass jar in water straight after heating; allow it to cool down
first.
Self Clean Feature
nT
o
clean the Soup Maker quickly and easily, simply add approximately 0.5L of water
and a little washing up liquid to the glass jar. Set the timer for two minutes and
press the simmer button. When the water is hot turn the heater off; blend liquid
on speed 1 for 1 minute. Repeat using clean water. This may help release any food
that maybe on the underside of the blades. Alternatively, wash the glass jar in warm
soapy water. Rinse and dry thoroughly. The glass jar can also be placed upside
down in the dishwasher (ensure you remove lid and measuring cup as these parts
are not dishwasher safe).
nE
nsure the glass jar is thoroughly dry before use.
16
Guarantee
nT
his Cuisinart appliance is guaranteed for domestic consumer use for 3 years.
nT
he guarantee covers defects under normal use from date of purchase and ceases
to be valid in the event of alteration or repair by unauthorized persons.
the appliance does not perform satisfactorily due to defects of material or manufacture, it will be repaired or replaced by the manufacturer (see ‘UK After Sales
Service’ section for details).
nT
his guarantee is only valid in the United Kingdom (including Northern Ireland,
Republic of Ireland, the Channel Islands and the Isle of Man).
nN
o responsibility will be accepted for any damage caused in transit.
nA
charge may be made if goods are returned outside the relevant guarantee period
or if the product is returned unnecessarily.
nT
he manufacturer reserves the right to amend terms and specifications without
prior notice.
nT
his guarantee in no way affects your statutory rights.
n I f
17
UK After Sales Service
For further advice on using your Cuisinart Soup Maker and other products in the
Cuisinart range, contact the Cuisinart Customer Care Line on 0870 240 6902 (09:00
to 17:00 hrs Monday to Friday) or alternatively, email your enquiry to support@
cuisinart.co.uk.
In Guarantee
Firstly, please call the Cuisinart Helpline 0870 240 6902.
Return the product to the Cuisinart Service Centre at the following address:
Cuisinart Service Centre
P.O. Box 506
WIGAN
WN1 9AA
Enclose your name and address, together with proof of purchase and details of the
fault. Cuisinart will either repair or replace the product, as appropriate.
Out of Guarantee
Contact the Cuisinart Customer Care Line on 0870 240 6902 (09:00 to 17:00 hrs
Monday to Friday) or, alternatively, email your enquiry to [email protected]
for details of the standard repair or replacement charge. If you wish to proceed with
the repair or replacement, return the product to the Cuisinart Service Centre at the
following address:
Cuisinart Service Centre
P.O. Box 506
WIGAN
WN1 9AA
Enclose your name, address and contact number along with details of the fault.
18
19
E IB-9/256
Version no.: SSB1U IB-9/256
Size : 148mm(W) X 210mm(H)
Material: 157gam art paper for whole book
Coating: waterbase varnishing for whole book
Color (Front): 4C (CMYK)
(Back): 1C+1C(Black)
Co-ordinator : Astor You
Date: 28/07/09
XieFaXing Des cription : IB-9/256
OPERATOR: Xu
XieFaXing Code : E-IB-9/256
PANTONE 8501 C
21