1
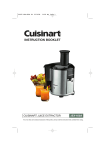
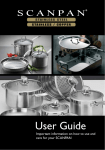
S A V O R
T H E
G O O D
INSTRUCTION BOOKLET
Cuisinart® Soup Maker
L I F E
SSB-1A
SSB1U
For your safety and continued enjoyment of this product, always read the instruction book carefully before using.
IMPORTANT SAFEGUARDS
When using electrical appliances, basic safety precautions should always be followed including
the following:
1. Read all instructions, product labels and warnings before using
this Soup Maker.
2. Do not touch hot surfaces; carry the unit by handles. Always use oven mitts when handling
hot material, and allow metal parts to cool before cleaning. Allow the Soup Maker to cool
thoroughly before putting in or taking off parts.
3. When unit is not in use and before cleaning, unplug the Soup Maker from wall outlet.
Let the Soup Maker cool down thoroughly before assembling or disassembling it.
4. To protect against risk of electrical shock, do not immerse the appliance or plugs in water
or other liquids.
5. Close supervision is always necessary when this or any appliance is used near children or
incapacitated persons.
6. Do not allow anything to rest on the power cord. Do not plug in cord where people may
walk or trip on it. Unplug this Soup Maker from the wall outlet before you go out for a trip
or long excursion.
7. Do not operate this or any appliance with a frayed or damaged cord, or plug, or after the
appliance malfunctions or is dropped or has been damaged in any manner. Take appliance
to the nearest authorized service facility for examination, repair or electrical or mechanical
adjustment.
8. Do not let the cord dangle over the edge of a table or counter or touch hot surfaces. Do
not place on an unsteady or cloth-covered surface.
9. Avoid contact with moving parts.
10. Do not use attachments not recommended by the manufacturer. They may cause fire,
electric shock or injury.
11. Do not use outdoors or for commercial purposes.
12. Do not place the appliance near a hot gas or electric burner, or in a
heated oven.
13. Keep power cord away from the hot surface of this Soup Maker. Do not put any flammable
object on the hot surface of this Soup Maker.
14. Place this Soup Maker a minimum of 5cm away from wall or any other object.
15. Do not use this Soup Maker for other than its intended use.
16. When plugging or unplugging this Soup Maker, be sure not to touch
the plug blades with your fingers.
17. To unplug, press and hold the Stop/Pause button for 1 to 3 seconds, grip plug and pull
from wall outlet. Never pull on the cord.
18. If electric circuit is overloaded with other appliances, your Soup Maker may not operate
properly. This Soup Maker should be operated on a separate electrical circuit from other
operating appliances.
19. Extreme caution must be used when moving an appliance containing hot oil or other hot liquids.
20. Always attach plug to appliance first, then plug cord into the wall outlet. To disconnect, turn
any control to “off”, then remove plug from wall outlet.
2
21. This appliance is not intended for use by persons (including children) with reduced
physical, sensory or mental capabilities, or lack of experience and knowledge, unless they have been given supervision or instruction concerning use of the appliance by a per son responsible for their safety.
22. Children should be supervised to ensure that they do not play with the appliance.
23. Appliances are not intended to be operated by means of an external timer or separate
remote-control system.
SAVE THESE INSTRUCTIONS
FOR HOUSEHOLD USE ONLY
Special Cord Set Instructions
A short power supply cord is provided to reduce the risks resulting from becoming entangled in
or tripping over a longer cord.
Longer extension cords are available and may be used if care is exercised in their use.
If a long extension cord is used, the marked electrical rating of the extension cord must be at
least as great as the electrical rating of the appliance, and the longer cord should be arranged
so that it will not drape over the countertop or tabletop where it can be tripped over or pulled on
by children.
Contents
Product Description . . . . . . . . . . . . . . . . . . . . . . . . . . . . . . . . . . . . . . . . . . . . . . . . . . . . . . . . 4
The Soup Maker . . . . . . . . . . . . . . . . . . . . . . . . . . . . . . . . . . . . . . . . . . . . . . . . . . . . . . . . . . . 5
A Glass Jar Assembly. . . . . . . . . . . . . . . . . . . . . . . . . . . . . . . . . . . . . . . . . . . . . . . . . . . . . . 5
- Fitting. . . . . . . . . . . . . . . . . . . . . . . . . . . . . . . . . . . . . . . . . . . . . . . . . . . . . . . . . . . . . . . .5
- Removing. . . . . . . . . . . . . . . . . . . . . . . . . . . . . . . . . . . . . . . . . . . . . . . . . . . . . . . . . . . . .5
B Lid & Measuring Cup. . . . . . . . . . . . . . . . . . . . . . . . . . . . . . . . . . . . . . . . . . . . . . . . . . . . . 5
C Control Panels. . . . . . . . . . . . . . . . . . . . . . . . . . . . . . . . . . . . . . . . . . . . . . . . . . . . . . . . . . 6
- Power Button . . . . . . . . . . . . . . . . . . . . . . . . . . . . . . . . . . . . . . . . . . . . . . . . . . . . . . . . . 6
- Timer Control. . . . . . . . . . . . . . . . . . . . . . . . . . . . . . . . . . . . . . . . . . . . . . . . . . . . . . . . . .6 - Temperature Control. . . . . . . . . . . . . . . . . . . . . . . . . . . . . . . . . . . . . . . . . . . . . . . . . . . . . 6
- Stir Button. . . . . . . . . . . . . . . . . . . . . . . . . . . . . . . . . . . . . . . . . . . . . . . . . . . . . . . . . . . .6 - Blending Control. . . . . . . . . . . . . . . . . . . . . . . . . . . . . . . . . . . . . . . . . . . . . . . . . . . . . . . 6
D Making Soup. . . . . . . . . . . . . . . . . . . . . . . . . . . . . . . . . . . . . . . . . . . . . . . . . . . . . . . . . . . . 7
E Blending Cold Ingredients. . . . . . . . . . . . . . . . . . . . . . . . . . . . . . . . . . . . . . . . . . . . . . . . . . 7
F Hints & Tips. . . . . . . . . . . . . . . . . . . . . . . . . . . . . . . . . . . . . . . . . . . . . . . . . . . . . . . . . . . . . 8
Care & Maintenance. . . . . . . . . . . . . . . . . . . . . . . . . . . . . . . . . . . . . . . . . . . . . . . . . . . . . . . . . 8
Self Clean Feature. . . . . . . . . . . . . . . . . . . . . . . . . . . . . . . . . . . . . . . . . . . . . . . . . . . . . . . . . . 9
Warranty. . . . . . . . . . . . . . . . . . . . . . . . . . . . . . . . . . . . . . . . . . . . . . . . . . . . . . . . . . . . . . . . 10
3
Product Description
Lid with removable measuring cup
Glass Jar Assembly includes:
Glass Jar
1750 ml (Cold Use) / 1400 ml (Soup Use)
Non-Stick Heating Plate
Jar Collar
Motor Base
On/Off
Blending Control
Stir Button
Timer Control
Heat Control
Non-Slip Rubber Feet
4
The Soup Maker
A Glass Jar Assembly
efore first use, clean the glass jar thoroughly (see cleaning & maintenance section for more
B
information).
he glass Jar assembly is one complete unit which includes glass jar, handle, cooking plate
T
and collar.
Fitting
Position jar unit on the motor base so that the arrow on the jar collar is level with the arrow on
the housing unit (fig. 1). Push the jar down into place (fig. 2).
Glass Jar
Assembly
Motor
Base
fig. 1
fig. 2
N.B. Take care when placing the glass jar assembly on the motor base as incorrect positions
may damage the interlock switches.
Removing
Switch the Soup Maker off and unplug from the mains outlet. Lift the Glass Jar Assembly up
and away from the motor base, holding the handle only. Do not twist the jar.
Caution: The heating element is hot when the Soup Maker is in heat mode, do not touch the
underside of the collar.
B Lid & Measuring Cup
o remove the lid from the glass jar assembly, grip the edges of the lid firmly with one hand
T
and lift upwards. When you have added the required food to the blender jar, place lid on jar
before heating and blending. To replace, simply position over the jar and press down firmly
(ensure the pouring spout on the jar is covered by the protrusion on the lid).
o remove the measuring cup from the lid, lift up and away. To replace, position the cup over
T
the lid, aligning with the corresponding grooves in the lid.
5
WARNING: Steam will escape around the measuring cup when the Soup Maker is in heat
mode, this is normal, but handle with care – steam can burn. Always ensure the lid and cup are
replaced before blending.
C Control Panels
Power Button
Plug
the Soup Maker into the mains outlet, the power button (on/off) will flash. Press once and
the light will become static; the Soup Maker is now in ‘stand-by’ mode.
If the on/off button is pressed whilst in ‘stand-by’ mode, the Soup Maker will revert
back to dormant with the on/off button flashing. Any settings entered will be
cancelled.
he only way to turn the flashing on/off button off is to unplug the Soup Maker from the
T
mains.
Timer Control
hen the Soup Maker is in ‘stand-by’ mode the cooking time can be set by either pressing
W
the + or - buttons, if the ‘-’ button is pressed at this stage, 30 minutes will be displayed on the
digital display, this is the maximum cooking time. If the ‘-’ button is pressed at any other time,
the cooking time will be reduced in one minute increments.
The ‘+’ button increases the cooking time in 1 minute increments.
N.B. Pressing any of the buttons will be accompanied by an audible sound.
N.B. The cooking time can be increased or decreased by pressing the ‘+’ and ‘-’
buttons at any time during the heating or cooking cycle.
Temperature Control
The Soup Maker will start its heating or cooking cycle when the temperature is
selected to either high, low or simmer.
N.B. The temperature can be changed at any time during the heating or cooking cycle.
Stir Button
he stir function can be operated at any time during the heating or cooking cycle, it can also
T
be operated in ‘stand-by’ mode when ingredients are being added to the glass jar.
is recommended that you use the stir function while frying or sautéing onions, garlic or other
It
base ingredients at the start of your recipe.
It is not ideal to use the stir button to blend the soup but it can be used if you require chunky
soup.
Blending Control
The blending control runs from 1, a low speed, through to 4, the highest speed. Select desired
speed by twisting the dial clockwise, reduce speed by twisting the dial anticlockwise, or pulse
twisting the dial to the ‘pulse’ setting.
or safety, the blending control only works when the cooking or heating process has comF
pleted.
6
he heater can also manually be turned off by pressing the heat button currently in use (this
T
will be illuminated) or alternatively pressing the on/off (power button).
If the on/off power button is used to turn off the heater, the Soup Maker will switch off
completely and will have to be re-started for blending.
If you are blending hot ingredients do not exceed speed 2; speed 1 is sufficient.
hen blending cold ingredients, start at low speed and increase up to level 4 until desired
W
consistency is reached.
N.B. Do not blend for longer than three minutes. This is the maximum running time for the
motor.
D Making Soup
Place the motor base onto a flat, sturdy surface.
Position the Glass Jar Assembly onto the motor base and plug into a suitable mains outlet.
Press the on/off button to set the Soup Maker to ‘standby’ mode.
Select
the required time, this can be adjusted throughout the cooking process, but a time
must be selected to start the heater initially.
fry ingredients such as onions or garlic, add butter or oil first before switching on heat
To
mode.
Make
sure you place the butter on the heating plate rather than the blades. Select
low heat setting to melt butter. If frying onions and garlic, add and cook until
softened, replacing lid.
The appliance may smoke a little and release a slight odour during first use, this is normal.
To mix the onions or garlic, use the stir button on the control panel.
dd the remaining ingredients (vegetables, stock and seasoning etc) and set on a high heat
A
and bring to the boil.
hen making soup, only fill the contents of the glass jar to 1400 ml mark. Once boiled reduce
W
heat to simmer, set timer and leave to cook.
.B. The heater works with a thermostat and so heat will increase or decrease
N
accordingly and bubbles will become bigger or smaller during cooking.
When cooking time has finished the Soup Maker will beep 4 times.
o blend soup, use the blending control; this can only be used once the heat mode and timer
T
has been exited. When ready, simply blend soup on level 1 until desired
consistency is achieved and serve.
Warning: When cooking or blending with hot liquid it is essential the lid and cup are left on the
blender to prevent harm to self.
E Blending Cold Ingredients
The blender can also be used as a standard blender to blend cold ingredients and crush ice.
Place the motor base onto a flat, sturdy surface.
Position the Glass Jar Assembly on the base and plug into a suitable mains outlet.
7
dd all necessary ingredients into the glass jar and replace the lid. You may add more ingreA
dients during blending by lifting the measuring cup in the lid and dropping ingredients through
the opening in the lid.
N.B. The maximum fill for cold ingredients is 1750 ml.
urn the blender control dial to your desired speed or use the pulse function. Turn the blender
T
control dial to ‘off’ when the desired consistency is reached.
Unplug the appliance immediately after use.
Do not store food or liquid in the glass jar. Empty and clean thoroughly after use.
o not overload the Soup Maker. If the motor stalls, turn the Soup Maker off
D
immediately, unplug the unit and carefully remove a portion of the food, then continue.
F Hints & Tips
Add butter or oil to heating plate and allow to melt before frying vegetables.
If soup recipes call for cheese or cream to be added at the end of the recipe, don’t allow to
boil. Most soup will actually be hot enough to melt the cheese using just the stir function
rather than adding more heat.
To make low fat soups, use low fat fromage frais instead of crème fraîche or soured cream.
If your soup is too thick, thin with a little water or semi-skimmed milk when blending. Do not
exceed 1.4L.
If you are making tomato soup and your tomatoes are too pale or under ripe, add 1tbsp of
tomato purée to add colour and flavour.
ut most foods into cubes approximately 1.5-2.5cm to achieve a more uniform result. Cut all
C
cheese into pieces no larger than 1.5cm.
se measuring cup in the lid to measure liquid ingredients such as alcohol. Always replace
U
after ingredients have been added.
hen chopping fresh herbs, garlic, onion, zest, breadcrumbs, nuts and spices make sure the
W
glass jar and blades are completely dry.
If food tends to stick to the sides of the glass jar when blending, pulse in short bursts.
Pulses should be short bursts. Space the pulses so the blades stop rotating between pulses.
on’t over process foods. This appliance will achieve most desired results in seconds not
D
minutes.
For frozen drinks, chill all ingredients before blending.
If foods do not seem to be blending smoothly, use the pulse function to chop then blend continuously.
Ensure you add oil or butter to the non-stick plate before you turn the heater on.
If in any doubt about what’s happening, switch off the Soup Maker and refer to this IB.
Care & Maintenance
Always unplug the appliance from the mains outlet before cleaning.
8
Before first use and after every use, clean each part thoroughly.
eriodically check all parts before reassembly. If any part is damaged or jar is chipped or
P
cracked, DO NOT USE THE SOUP MAKER.
C
AUTION: Blade is very sharp. Handle with care.
o clean the complete Glass Jar Assembly (glass jar, cooking plate and collar) follow ‘Self
T
Clean Feature’ below or wash in a bowl of hot soapy water.
To clean the lid and measuring cup, wash in hot soapy water.
ipe the motor base clean with a damp cloth to remove any residue, and dry thoroughly. Do
W
not use abrasive cleaners on the housing base. Apply any cleaning agent to the cloth, not the
base.
Never submerge the motor base in water or other liquid, or place in a dishwasher.
Make sure all the parts are clean and dry before storing.
Never wrap the cord around the outside of the Soup Maker.
Never immerse the plug, lead or housing in water or any other liquid.
Never immerse the glass jar in water straight after heating; allow it to cool down first.
Self Clean Feature
T
o clean the Soup Maker quickly and easily, simply add approximately 0.5L of water and
a little washing up liquid to the glass jar. Set the timer for two minutes and press the
simmer button. When the water is hot turn the heater off; blend liquid on speed 1 for 1 minute. Repeat using clean water. This may help release any food that maybe on the underside of the blades. Alternatively, wash the glass jar in warm soapy water. Rinse and dry
thoroughly.
Ensure the glass jar is thoroughly dry before use.
9
WARRANTY
Three-Year Limited Warranty
This warranty supersedes all previous warranties on the Cuisinart® Automatic Soup Maker. This
warranty is available to consumers only. You are a consumer if you own a Cuisinart® Automatic
Soup Maker that was purchased at retail for personal, family, or household use. This warranty
is not available to retailers or other commercial purchasers or owners. We warrant that your
Cuisinart® Soup Maker will be free of defects in material or workmanship under normal home
use for three years from the date of original purchase. We suggest that you complete and return
the enclosed product registration card promptly to facilitate verification of the date of original
purchase. However, return of this product registration card does not eliminate the need for the
consumer to maintain the original proof of purchase in order to obtain the warranty benefits. In
the event that you do not have proof of purchase, the purchase date for purposes of this warranty will be the date of manufacture.
If your Cuisinart Automatic Soup Maker should prove to be defective within the warranty period,
we will repair it, or if we think necessary, replace it. To obtain warranty service, please register
your warranty online at
www.cuisinart.com.au
or
Call toll-free
1800 808 971 (AUST), 0800 435 000 (NZ),
or
Send to
Cuisinart Australia
Reply Paid 1115
Pymble BC NSW 2073
or
Cuisinart New Zealand
44 Apollo Drive Mairangi Bay
Auckland New Zealand
This warranty expressly excludes any defects or damages caused by accessories, replacement
parts, or repair service other than those that have been authorized by Cuisinart.
This warranty does not cover any damage caused by accident, misuse, shipment or other than
ordinary household use.
10
11
Coffeemakers
Food
Processors
Toaster Ovens
Blenders
Cookware
Ice Cream
Makers
Cuisinart offers an extensive assortment of top quality products to make life in the
kitchen easier than ever. Try some of our other countertop appliances and
cookware, and Savor the Good Life.
www.cuisinart.com.au
©2010 Cuisinart
Cuisinart® is a registered trademark of Cuisinart
150 Milford Road
East Windsor, NJ 0850
1-800-726-0190
Cuisinart Australia
24 Salisbury Road
Asquith NSW 2077
Cuisinart New Zealand
44 Apollo Drive Mairangi Bay
Auckland, New Zealand
Printed in China
Any trademarks or service marks of third parties used herein are
the trademarks or service marks of their respective owners.
IB-9/426