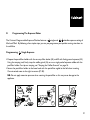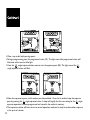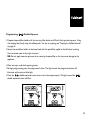
1
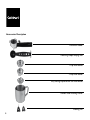
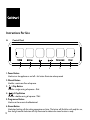
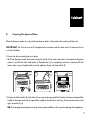
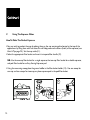
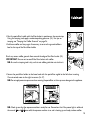
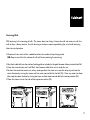
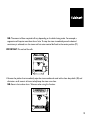
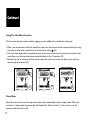
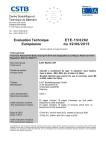
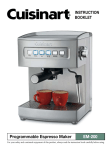
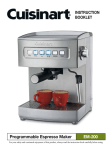
Espresso Maker
EM200U
Congratulations on your purchase of the Cuisinart Espresso Maker.
For over 30 years Cuisinart’s aim has been to produce the very finest kitchen
equipment so that cooks at home as well as professional chefs have the tools to
express their creativity.
All Cuisinart products are engineered for exceptionally long life, and designed to be
easy to use as well as to give excellent performance day after day. That is why they
have come to be regarded as the defining machines in their field by chefs across the
world.
Whatever you cook, cook it better with Cuisinart.
Contents
Product Description . . . . . . . . . . . . . . . . . . . . . . . . . . . . . . . . . . . . . . . . . . . . . . . 5
Accessories Description . . . . . . . . . . . . . . . . . . . . . . . . . . . . . . . . . . . . . . . . . . . . . . 6
Safety Cautions . . . . . . . . . . . . . . . . . . . . . . . . . . . . . . . . . . . . . . . . . . . . . . . . . . . 7
Instructions For Use . . . . . . . . . . . . . . . . . . . . . . . . . . . . . . . . . . . . . . . . . . . . . . . 10
A
Control Panel . . . . . . . . . . . . . . . . . . . . . . . . . . . . . . . . . . . . . . . . . . . . . . . 10
B
Preparing The Espresso Maker . . . . . . . . . . . . . . . . . . . . . . . . . . . . . . . . . . . . 11
C
Using The Espresso Maker . . . . . . . . . . . . . . . . . . . . . . . . . . . . . . . . . . . . . . . 14
How To Make The Perfect Espresso . . . . . . . . . . . . . . . . . . . . . . . . . . . . . . . . . . . 14
Texturing Milk . . . . . . . . . . . . . . . . . . . . . . . . . . . . . . . . . . . . . . . . . . . . . . . . 17
Using The Hot Water Function . . . . . . . . . . . . . . . . . . . . . . . . . . . . . . . . . . . . . . 20
Sleep Mode . . . . . . . . . . . . . . . . . . . . . . . . . . . . . . . . . . . . . . . . . . . . . . . . . . 20
D Programming The Espresso Maker . . . . . . . . . . . . . . . . . . . . . . . . . . . . . . . . . 21
Programming Single Espresso . . . . . . . . . . . . . . . . . . . . . . . . . . . . . . . . . . . . . . . 21
Programming Double Espresso . . . . . . . . . . . . . . . . . . . . . . . . . . . . . . . . . . . . . 23
Resetting The Factory Setting . . . . . . . . . . . . . . . . . . . . . . . . . . . . . . . . . . . . . . . 24
E
Hint & Tips . . . . . . . . . . . . . . . . . . . . . . . . . . . . . . . . . . . . . . . . . . . . . . . . . 25
Achieving The Perfect Espresso . . . . . . . . . . . . . . . . . . . . . . . . . . . . . . . . . . . . . 25
Cleaning & Maintenance . . . . . . . . . . . . . . . . . . . . . . . . . . . . . . . . . . . . . . . . . . . . 27
Cleaning The Filters, Portafilter Holder & Brew Head . . . . . . . . . . . . . . . . . . . . . . . 27
Cleaning The Outer Housing/Cup Warming Plate . . . . . . . . . . . . . . . . . . . . . . . . . . 27
Cleaning The Grate On The Drip Tray . . . . . . . . . . . . . . . . . . . . . . . . . . . . . . . . . 28
Cleaning The Drip Tray . . . . . . . . . . . . . . . . . . . . . . . . . . . . . . . . . . . . . . . . . . . 28
Cleaning The Steam Wand . . . . . . . . . . . . . . . . . . . . . . . . . . . . . . . . . . . . . . . . . 28
De-scaling . . . . . . . . . . . . . . . . . . . . . . . . . . . . . . . . . . . . . . . . . . . . . . . . . . . . . . 30
UK Guarantee . . . . . . . . . . . . . . . . . . . . . . . . . . . . . . . . . . . . . . . . . . . . . . . . . . . 31
UK After Sales Service . . . . . . . . . . . . . . . . . . . . . . . . . . . . . . . . . . . . . . . . . . . . . 32
Recipes . . . . . . . . . . . . . . . . . . . . . . . . . . . . . . . . . . . . . . . . . . . . . . . . . . . . . . . . 33
Product Description
2 Litre Water Reservoir (not shown)
Cup Warming Plate
Control Panel
Steam/Hot Water Control Dial
Brew Head
Portafilter Holder
Steam/Hot Water Arm
Removable Drip Tray With Grate
Accessories Description
Portafilter Holder
Measuring Scoop/Tamping Tool
1 Cup Filter Basket
2 Cup Filter Basket
Easy Serving Espresso Soft Pod Filter Basket
Stainless Steel Frothing Pitcher
Cleaning Pins
Carefully read all the instructions before using the appliance and keep in a safe place for future
reference.
Safety Cautions
Always follow these safety cautions when using this appliance to avoid personal injury or damage to the
appliance. This appliance should be used only as described within this instruction book.
ß
Ensure all packaging materials and any promotional labels or stickers are removed from the appliance before
first use.
ß
Always inspect the appliance before use for noticeable signs of damage. Do not use if damaged, or if the
appliance has been dropped. In the event of damage, remove the plug from the mains then contact the
Cuisinart Helpline (see “UK After Sales Service” section).
ß
Do not use this appliance if the lead is damaged. In the event of a damaged lead discontinue use immediately.
Contact the Cuisinart Helpline. (See “UK After Sales Service”).
ß
Unplug from the mains when not in use and before cleaning. Allow to cool before cleaning the appliance.
To disconnect, push the Power button to switch the appliance off, and then remove the plug from the mains
outlet. Never pull the plug out of the mains outlet by its lead.
ß
This appliance should not be used by adults or children whose lack of experience, product knowledge or
disability might cause a hazard, unless they have been correctly instructed and are adequately supervised.
ß
Children should always be supervised to ensure that they do not play with this product.
ß
Do not leave the appliance un-attended when in use.
ß
Do not use any accessory or attachments with this appliance other than those recommended by
Cuisinart.
ß
Do not place the appliance on or near a hot gas or electric burner or in a heated oven.
ß
To protect against fire, electric shock or personal injury, do not immerse cord, plug or unit in water or other
liquids.
ß
To avoid injury or possible fire, do not cover the appliance when in use.
ß
Do not leave the lead hanging over the edge of a kitchen table or worktop. Avoid contact between the lead
and hot surfaces.
ß
For indoor use only.
ß
For domestic use only.
ß
This appliance should be used only for making hot coffee as described within the “Instructions For Use”
section. Please retain these instructions for future reference.
ß
Always ensure that your hands are dry before removing the plug from the mains outlet.
ß
Do not connect this appliance to an external timer or remote control system.
ß
No repair should be carried out by the user. In case of fault, contact the Cuisinart Helpline, (See ‘UK After
Sales Service’ section).
ß
This appliance complies with the basic requirements of Directives 04/108/EEC (Electromagnetic Compatibility)
and 06/95/EEC (Safety of domestic electrical appliances) amended by Directive 93/68/EEC (CE Marking).
ß
WARNING: A cut off plug inserted into a 13 amp socket is a serious safety (shock) hazard. Ensure the
cut off plug is disposed of safely.
ß
WARNING: Polythene bags over the product or packaging may be dangerous. To avoid danger of suffocation,
keep away from babies and children. These bags are not toys.
The symbol
on the product or on its packaging indicates that this product may not be treated as
household waste. Instead it should be handed over to the applicable collection point for the recycling of
electrical and electronic equipment.
By ensuring this product is disposed of correctly, you will help prevent potential negative consequences for
the environment and human health, which could otherwise be caused by inappropriate waste handling of this
product. For more detailed information about the recycling of this product, please contact your local council
office or your household waste disposal service.
Safety During Use
ß
Do not touch hot surfaces. Use handles and knobs.
ß
Always fill the water reservoir first, then plug into a suitable power outlet. To disconnect, push the ‘Power’
button to switch off the appliance, then remove the plug from the power outlet.
ß
Never use warm or hot water to fill the water tank; use cold water only. Do not use any other liquid.
ß
Never use the appliance without water in the tank.
ß
Ensure the portafilter holder is firmly secured when using the machine.
ß
Never remove the portafilter holder during the brewing operation as the machine will be under pressure.
ß
Liquids will reach to approximately 90˚C. Ensure safety when pouring hot beverages.
WARNING: Scalding may occur portafilter is removed when the appliance is in use.
Instructions For Use
A
Control Panel
1
2
3
4
5
6
1. Power Button
Used to turn the appliance on and off – this button illuminates when pressed.
2. Manual Button
Used for a continuous flow of espresso.
3. 1-Cup Button
Used for a single serving of espresso - 45ml.
4. 2-Cup Button
Used for a double serving of espresso - 90ml.
5. Programme Button
Used to set the amount of coffee desired.
6. Steam Button
Used when frothing milk for making cappuccinos or lattes. The button will flash blue until ready for use,
then the light around the button will stay illuminated to indicate the steam function is ready.
10
B
Preparing The Espresso Maker
Place the Espresso maker on a dry, stable worktop or other surface where the machine will be used.
IMPORTANT: For first time use or if the appliance has not been used for some time, it is important that it
is rinsed as follows:
ß
Ensure the drip tray and grate are in place.
ß
To fill the Espresso maker with water, simply lift the lid of the water reservoir at the top of the Espresso
maker (1) and fill with fresh cold water or filtered water (2) or completely remove the reservoir, fill with
water under a tap and replace back onto the appliance firmly and close the lid (3).
1
2
3
ß
Fit the portafilter holder (4) with either the one cup, two cup or pod filter basket and secure the portafilter
handle to the brew head, with the portafilter angled to the left when inserting. Once inserted, move to the
right to secure (5) (6).
NB: Do not apply excessive pressure when securing the portafilter as this may cause damage to the appliance.
11
5
4
6
ß Insert the power cord into a suitable mains outlet. Press the power button once to turn the espresso
maker on (7). The light around the power button will stay illuminated; this is to indicate that your espresso
maker is on (8).
ß
The manual
and
buttons will flash to indicate the appliance is heating up.
B: Before turning on the appliance, ensure that the steam/hot water control dial is in the ‘O’ position.
N
If the Steam/Hot Water Dial is not in the centre position, the manual and steam buttons will flash until the
dial is returned back to the centre position.
7
12
8
ß
Place a large jug or container under both pouring spouts (9). Press the manual button (10) and allow the
water to run through for approximately 5 to 10 seconds.
B: If the water reservoir is empty, the unit will not function and the manual,
N
flash until the reservoir is filled.
9
and
buttons will
10
13
C
Using The Espresso Maker
How To Make The Perfect Espresso
ß You may wish to preheat the cups by placing them on the cup warming plate located at the top of the
appliance or by filling them with hot water, this will help preserve the crema (froth) of the espresso (see
Hints & Tips page 25). Set the cups aside (11).
ß Select the appropriate filter basket and insert it into portafilter handle (12).
NB: Use the one-cup filter basket for a single espresso, the two-cup filter basket for a double espresso,
and pod filter basket for an Easy Serving Expresso pod.
ß Using the measuring scoop, place the ground coffee in the filter basket holder (13). Use one scoop for
one cup and two scoops for two cups, or place espresso pod in the pod filter basket.
13
11
14
12
ß Rest the portafilter handle with the filter basket in position on the countertop.
Using the tamping tool, apply a moderate packing pressure (14). For tips on
tamping, see “Tamping the Coffee Grounds” on page 26.
ß Add more coffee and tamp again if necessary, to ensure the ground coffee is
level to the top of the Portafilter holder.
14
Brush any excess coffee grounds from around the edge of the filter basket (15).
IMPORTANT: Ensure not to overfill the filter basket with coffee.
NB: Ensure the tamping tool is dry so that wet coffee grinds do not stick to it.
15
ß Secure the portafilter holder to the brew head with the portafilter angled to the left when inserting.
Once inserted, move to the right to secure (16-17).
NB: Do not apply excessive pressure when securing the portafilter as this may cause damage to the appliance.
16
17
B: Check to see that the espresso machine is ready for use. Remember that if the power light is solid and
N
the manual, and
are solid, the espresso machine is on and is heating up and ready to brew coffee.
15
ß Press the preferred button – manual for a continuous pour (18), the
the
double espresso for 90ml. (20).
18
19
single espresso for 45ml (19) or
20
NB: When using the manual operation you must press the button once to start the pour and again to
stop the pour. However, with the
single and
double espresso operations you need only press
these buttons once to start the espresso pour and the programme will automatically stop the pour at the
pre programmed level.
ß Check the colour of the espresso flow. The ideal flow should be dark and caramel with reddish reflections.
ß Serve espresso immediately.
ß After each use remove the portafilter handle from the brew head (21).
ß Discard the used coffee grinds or pod/pods from the filter basket ensuring to place the portafilter holder
into lock position when discarding grinds so basket stays in place (22).
21
16
22
Texturing Milk
Milk texturing is the steaming of milk. The steam does two things; it heats the milk and mixes air with the
milk to form a foamy texture. As with learning to make an espresso, perfecting the art of milk texturing
takes time and practice.
ß Determine how much milk is needed based on the number of cups being made.
NB: Keep in mind that the volume of milk will increase during the texturing.
ß Pour fresh, cold milk into the stainless frothing pitcher included in the pack, between halway to two thirds full.
ß Press the steam button and it will flash, then become solid when unit is ready for use.
ß To clear the steam/hot water arm of any water, position the steam arm over the drip tray, activate the
steam function by turning the steam and hot water control dial to the left (23). Once any water has been
clear stop the steam function by turning the steam and hot water control dial to the center position (24).
ß Move the steam arm to the side of the espresso machine (25).
23
24
25
17
ß Place the steam arm into the pitcher filled with milk so that the nozzle is approximately 1.5cm below the
surface.
ß Activate the steam function by turning the steam and hot water control dial to the
setting (26).
ß Angle the pitcher so that the steam wand is resting on the spout of the pitcher and lower the pitcher
until the tip of the steam nozzle is just below the surface of the milk. This will start to create a whirlpool
action in the milk (27).
26
27
28
NB: Do not allow the steam to spurt unevenly or it will create aerated froth/large bubbles. If this is
happening, raise the pitcher so that the steam nozzle is lowered further into the milk.
ß As the steam heats and textures the milk, the level of the milk in the pitcher will begin to rise. As this
happens, follow the level of the milk by lowering the pitcher, always keeping the tip of the steam nozzle
just below the surface.
ß Once the foam is created, raise the pitcher until the steam nozzle is in the centre of the milk (28).
18
N
B: The amount of foam required will vary depending on the drinks being made. For example, a
cappuccino will require more foam than a latte. To stop the steam immediately, once the desired
consistency is achieved, turn the steam and hot water control dial back to the center position (29).
IMPORTANT: Do not boil the milk.
29
ß Remove the pitcher then immediately wipe the steam nozzle and wand with a clean damp cloth (30) and
eliminate a small amount of steam to help keep the steam arm clean.
NB: Steam is hot and can burn. Take care when using this function.
30
19
Using The Hot Water Function
The hot water function can be used for topping up your coffee and is suitable for making tea.
ß Place a cup or container under the steam/hot water arm and activate the hot water function by turning
the steam and hot water control dial to the hot water setting (31).
ß Once you have dispensed the required amount of hot water into the cup or container, to stop the hot
water flow, turn the steam/hot water control dial back to the ‘O’ position (32).
ß Remove the cup or container and ensure the steam/hot water arm is over the drip tray to catch any
remaining drips of water (33).
31
32
33
Sleep Mode
After 30 minutes of non-use the espresso machine will automatically switch to sleep mode. When the
machine is in sleep mode the power light will slowly flash. After a further 1½ hours of non-use, the
espresso machine will turn off.
20
D
Programming The Espresso Maker
The Cuisinart Programmable Espresso Machine features a
single and
double espresso setting of
45ml and 90ml. By following a few simple steps, you can pre-programme your perfect serving size down to
the millilitre.
Programming
Single Espresso
ß Prepare the portafilter holder with the one cup filter basket (34) and fill with finely ground espresso (35).
Using the tamping tool, firmly tamp the coffee grinds (36), or use a single pod of espresso coffee with the
pod filter holder. For tips on tamping, see “Tamping the Coffee Grounds” on page 26.
ß Secure the portafilter holder to the brew head with the portafilter angled to the left when inserting.
Once inserted, move to the right to secure (37-38).
NB: Do not apply excessive pressure when securing the portafilter as this may cause damage to the
appliance.
34
35
36
21
37
38
ß Place a cup under both pouring spouts.
ß To begin programming press the programme button (39). The light around the programme button will
illuminate with a constant blue light.
ß Press the
single espresso button once to start the espresso pour (40). The light around the
single espresso button will flash.
39
40
ß Allow the espresso to pour until it reaches your desired level. Once that is reached, stop the espresso
pour by pressing the
single espresso button. A beep will signify that the new setting for the
single
espresso operation has been programmed and stored in the machine’s memory.
ß The espresso machine will then return to normal operation mode and is ready to make another espresso
at the push of a button.
22
Programming
Double Espresso
ß Prepare the portafilter holder with the two cup filter basket and fill with finely ground espresso. Using
the tamping tool, firmly tamp the coffee grinds. For tips on tamping, see “Tamping the Coffee Grounds”
on page 26.
ß Secure the portafilter holder to the brew head with the portafilter angled to the left when inserting.
Once inserted, move to the right to secure.
NB: Do not apply excessive pressure when securing the portafilter as this may cause damage to the
appliance.
ß Place two cups under both pouring spouts.
ß To begin programming press the programme button. The light around the programme button will
illuminate with a constant blue light.
ß Press the
double espresso button once to start the espresso pour. The light around the
double espresso button will flash.
23
ß Allow the espresso to pour until it reaches the desired level. Once that is reached, stop the espresso
pour by pressing the
double espresso button. A beep will signify that the new setting for the
double espresso operation has been programmed and stored in the machine’s memory.
ß The espresso machine will then return to normal operation mode and is ready to make another espresso
at the push of a button.
Resetting The Factory Settings
To revert to the original factory settings:
ß Press the programme button once.
ß Press and hold down the manual button and programme button.
ß Continue holding down manual and programme buttons for approximately 3 seconds or until you hear 2
beeps. When you hear the 2 beeps, the light around the
and
buttons will flash, and after that,
the programme light becomes solid. The espresso machine has now returned to the original factory
settings and the next time the single or double espresso functions are used the espresso pours will be
45ml and 90ml.
ß The espresso machine will then return to normal operation mode and is ready to make another espresso
at the push of a button.
24
E
Hints & Tips
Achieving The Perfect Espresso
It is generally agreed that there are four basic elements to achieve the perfect cup of espresso:
Coffee
ß While the bulk of the liquid is water, all of the flavour should be from the coffee. To achieve the same
great quality of coffee you receive at a coffee shop, you need to use the same quality beans.
ß If you choose to grind your own beans, buy the beans fresh and whole, with an approximate two-week
supply at a time for maximum freshness.
ß Once the coffee bean is broken, it loses it flavour very quickly. If it is not practical to buy smaller supplies,
we recommend you separate larger amounts of beans and store them in airtight containers in a cool, dry
area. They should not be kept for longer than 1 month as flavour will be reduced.
Grind
ß The grind of the coffee is critical for correct flavour extraction. If using pre-ground coffee, be sure to
purchase an espresso grind that is specifically for espresso/cappuccino machines.
ß If the grind is too fine, over extraction and bitterness will occur with a spotted and uneven crema on the
top.
ß If the grind is too coarse, the water will pass through too rapidly and there will be an in-sufficient amount
of crema on the top of the espresso.
25
Tamping the Coffee Grounds
ß If you choose to use ground espresso instead of pods, tamping the coffee is a very important part of the
coffee making process.
ß Use the scoop supplied to fill the filter basket, then using the tamping tool (flat end of the measuring
scoop), tamp (press down) down the grounds with moderate pressure.
ß Add more coffee and tamp again if necessary to bring coffee to level.
ß Do not overfill the filter basket. The ground coffee should be tamped with moderate pressure. If the
coffee is not tamped securely, there is a chance that the water will flow through the coffee too rapidly and
the coffee will be under-extracted.
N.B: If the coffee is tamped too firmly, the water will flow through the coffee too slowly and the coffee
will be over-extracted.
Water
ß When brewing espresso, ensure the water flows through the filter at the correct pace. The water flow
can be adjusted by varying the pressure with which the coffee is tamped (pressed down) in the filter, or by
altering the grind of the coffee.
ß If the speed of the water flow is too slow, the coffee will be over-extracted and will be very dark and
bitter, with a spotted and un-even crema (froth) on the top.
ß If the speed of the water flow is too fast, the coffee will be under-extracted and the supreme flavour will
not develop. The coffee will be diluted and there will be an in-sufficient amount of crema on the top.
26
Cleaning & Maintenance
ß Before first use and after every use, clean each part thoroughly.
ß Always unplug the appliance from the mains outlet before cleaning.
ß Never submerge the motor base in water or other liquid, or place in a dishwasher
ß To clean, simply wipe with a clean damp cloth and dry before storing.
ß Make sure all the parts are clean and dry before storing.
ß Never wrap the cord around the outside of the Espresso Machine.
ß Never immerse the plug, lead or housing in water or any other liquid.
Cleaning The Filters, Portafilter Holder & Brew Head
ß The stainless steel filters and portafilter holder should be rinsed under water immediately after use to
remove all coffee particles. You may also use a cleaning pin to clear the opening.
ß Periodically run water through the machine with the portafilter holder in place, but without any ground
coffee, to rinse out any excess coffee particles.
ß The inside of the brew head should be wiped with a damp cloth to remove any coffee particles.
Cleaning The Outer Housing/Cup Warming Plate
ß The outer housing and cup warming plate can be cleaned with a soft, damp cloth.
ß Do not use any scouring agents or harsh cleaners.
27
Cleaning The Grate On The Drip Tray
ß The grate should be removed, emptied and cleaned frequently, particularly
when the drip tray is full.
ß The grate can be washed in warm soapy water and rinsed thoroughly. Use
a non-abrasive washing liquid (do not use abrasive cleaners, pads or cloths
which can scratch the surface).
Cleaning The Drip Tray
ß The drip tray can be removed after the grate is removed and then cleaned
with a soft, damp cloth (do not use any scouring agents or harsh cleaners).
NB: Do not clean any of the parts or accessories in the dishwasher.
Cleaning The Steam Wand
ß The steam arm should always be cleaned after steaming milk.
ß Wipe the steam arm with a damp cloth then with the steam arm placed
back over the drip tray.
ß To clean any remaining milk from inside the steam arm, turn the hot water
control dial to the hot water setting for a few seconds.
28
ß Ensure the steam and hot water control dial is in the off position. Press the power button off, unplug the
power cord and allow the machine to cool.
ß If the steam arm remains blocked, use one of the cleaning pins to clear the opening.
29
De-scaling
ß It is strongly recommended that you de-scale the appliance from time to time. The frequency depends
upon the hardness of your tap water and how often you use the appliance.
To De-scale
ß Un-plug the appliance and fill the water reservoir completely with a mixture of 1/3 white vinegar and 2/3
water and switch the appliance on. One cycle should be sufficient to de-scale the appliance.
ß Remove the portafilter holder, plug the machine back in and push the power button on ensuring the
steam/hot water control dial is turned to the off position.
ß Place a large container under the brew head and steam arm.
ß When the brewing temperature is reached, the heating light will switch off.
ß Push the manual button and let half of the mixture run through the brew head.
ß Press the steam button and it will flash, then become solid when unit is ready for use.
ß Activate the steam function by turning the steam and hot water control dial to the
setting and allow
the remaining mixture run through the steam arm.
ß When the mixture stops running, push the power button to switch the appliance off.
ß After de-scaling, repeat the above cycle once more using cold tap water.
30
UK Guarantee
ß This Cuisinart appliance is guaranteed for domestic consumer use for 3 years.
ß The guarantee covers defects under normal use from date of purchase and ceases to be valid in the event
of alteration or repair by unauthorised persons.
ß If the appliance does not perform satisfactorily due to defects of material or manufacture, it will be
repaired or replaced by the manufacturer (see UK After Sales Service for details).
ß This guarantee is only valid in the United Kingdom and Eire (includes Channel Islands and Isle of Man).
ß No responsibility will be accepted for any damage caused in transit.
ß A charge may be made if goods are returned outside the relevant guarantee period or if the product is
returned unnecessarily.
ß The manufacturer reserves the right to amend terms and specifications without prior notice.
ß This guarantee in no way affects your statutory rights.
31
UK After Sales Service
For further advice on using your Cuisinart Espresso Maker and other products in the Cuisinart range,
contact the Cuisinart Customer Care Line on 0870 240 6902 (09:00 to 17:00 hrs Monday to Friday) or
alternatively, email your enquiry to [email protected].
In Guarantee
Firstly, please call the Cuisinart Helpline 0870 240 6902.
Return the product to the Cuisinart Service Centre at the following address:
Cuisinart Service Centre
P.O. Box 506
WIGAN
WN1 9AA
Enclose your name and address, together with proof of purchase and details of the fault. Cuisinart will
either repair or replace the product, as appropriate.
Out of Guarantee
Contact the Cuisinart Customer Care Line on 0870 240 6902 (09:00 to 17:00 hrs Monday to Friday) or,
alternatively, email your enquiry to [email protected] for details of the standard repair or
replacement charge. If you wish to proceed with the repair or replacement, return the product to the
Cuisinart Service Centre at the following address:
Cuisinart Service Centre
P.O. Box 506
WIGAN
WN1 9AA
Enclose your name, address and contact number along with details of the fault.
32
Recipes
Classic Espresso . . . . . . . . . . . . . . . . . . . . . . . . . . . . . . . . . . . . . . . . . . . . . . . . . . . . . . . 34
Americano . . . . . . . . . . . . . . . . . . . . . . . . . . . . . . . . . . . . . . . . . . . . . . . . . . . . . . . . . . . 35
Espresso Macchiato . . . . . . . . . . . . . . . . . . . . . . . . . . . . . . . . . . . . . . . . . . . . . . . . . . . . . 36
Cappuccino . . . . . . . . . . . . . . . . . . . . . . . . . . . . . . . . . . . . . . . . . . . . . . . . . . . . . . . . . . 37
Café Latte . . . . . . . . . . . . . . . . . . . . . . . . . . . . . . . . . . . . . . . . . . . . . . . . . . . . . . . . . . . . 38
Mochaccino . . . . . . . . . . . . . . . . . . . . . . . . . . . . . . . . . . . . . . . . . . . . . . . . . . . . . . . . . . . 39
Café Mocha . . . . . . . . . . . . . . . . . . . . . . . . . . . . . . . . . . . . . . . . . . . . . . . . . . . . . . . . . . . 40
33
Classic Espresso
Makes 1 serving (45ml)
1 measured scoop finely ground espresso or 1 espresso pod
Water
ß Press the power button of the Cuisinart® Espresso Maker to turn the machine on. The lights around the
power, manual, single
and double
espresso buttons will illuminate and when they stop blinking,
the machine has been warmed and is ready to use.
ß Place the one-cup filter basket in the portafilter holder.
ß Spoon the espresso grounds into the basket. Using the tamping tool, lightly press down on the grounds
and clean any excess from the rim.
ß Secure the portafilter holder in place.
ß Place a suitable espresso cup underneath the brew head and press the
single espresso button.
Espresso will begin to brew.
ß When 45ml have been brewed the machine will stop.
34
Americano
Makes 1 serving (175-235ml)
1 measured scoop finely ground espresso or 1 espresso pod
175-235ml hot water
ß Press the power button of the Cuisinart® Espresso Maker to turn the machine on. The lights around the
power, manual, single
and double
espresso buttons will illuminate and when they stop blinking,
the machine has been warmed and is ready to use.
ß Place the one-cup filter basket in the portafilter holder.
ß Spoon the espresso grounds into the basket. Using the tamping tool, lightly press down on the grounds
and clean any excess from the rim.
ß Secure the portafilter holder in place.
ß Place a 175-235ml cup or mug on the drip tray and underneath the steam arm. Turn the steam/hot water
dial to the hot water setting
.
ß Allow water to flow into the cup/mug until it is about 2⁄3 full and turn dial back to off position. Press the
power button to turn the espresso maker off.
ß Push the power button back on and place the cup/mug with the hot water in underneath the brew head
and press the
single espresso button.
ß Espresso will begin to brew. When 45ml have been brewed the machine will stop.
35
Espresso Macchiato
Makes 1 serving (45ml)
15ml skimmed milk
1 measured scoop finely ground espresso or 1 espresso pod
Water
ß Pre-chill the frothing pitcher.
ß Press the power button of the Cuisinart® Espresso Maker to turn the machine on. The lights around the
power, manual, single
and double
espresso buttons will illuminate and when they stop blinking,
the machine has been warmed and is ready to use.
ß Place the one-cup filter basket in the portafilter holder. Spoon the espresso grounds into the basket.
Using the tamping tool, lightly press down on the grounds and clean any excess from the rim.
ß Secure the portafilter holder in place.
ß Press the steam button and once the light stops blinking, it is ready for use. Turn the steam/hot water dial
to the steam setting.
ß Pour the milk into the pre-chilled frothing pitcher. Hold the pitcher in one hand and place it under the
steam arm so the bottom of the arm is just below the surface of the milk. Once the milk begins to
increase in volume, lift the pitcher higher so the steam wand is immersed further into the milk.
ß Move the pitcher up and down a couple of times to achieve a nice foam.
ß Place an espresso cup underneath the brew head and press
single espresso button.
ß Espresso will begin to brew. When 45ml ounces have been brewed the machine will stop.
ß Using a large spoon, gently pour 1 tbsp of the frothed milk on top of the espresso.
36
Cappuccino
Makes 1 serving (100ml)
30-45ml skimmed milk
1 measured scoop finely ground espresso or 1 espresso pod
Water
ß Pre-chill the frothing pitcher.
ß Press the power button of the Cuisinart® Espresso Maker to turn the machine on. The lights around the
power, manual, single
and double
espresso buttons will illuminate and when they stop blinking,
the machine has been warmed and is ready to use.
ß Place the one-cup filter basket in the portafilter holder. Spoon the espresso grounds into the basket.
Using the tamping tool, lightly press down on the grounds and clean any excess from the rim.
ß Secure the portafilter holder in place.
ß Press the steam button and once the light stops blinking, it is ready for use. Turn the steam/hot water dial
to the steam setting.
ß Pour the milk into the pre-chilled frothing pitcher. Hold the pitcher in one hand and place it under the
steam arm so the bottom of the arm is just below the surface of the milk. Once the milk begins to
increase in volume, lift the pitcher higher so the steam wand is immersed further into the milk.
ß Move the pitcher up and down a couple of times to achieve a nice foam. Reserve steamed/frothed milk.
ß Place one espresso cup underneath the brew head and press the
single espresso button, wait for the
machine to re-warm, if necessary.
ß Espresso will begin to brew. When 45ml have been brewed the machine will stop.
ß Using a large spoon, gently pour 2-3 tbsp of the frothed milk on top of the espresso.
37
Café Latte
Makes 1 serving (165ml)
120ml skimmed milk
1 measured scoop finely ground espresso or 1 espresso pod
Water
ß Pre-chill the frothing pitcher.
ß Press the power button of the Cuisinart® Espresso Maker to turn the machine on. The lights around the
power, manual, single
and double
espresso buttons will illuminate and when they stop blinking,
the machine has been warmed and is ready to use.
ß Place the one-cup filter basket in the portafilter holder. Spoon the espresso grounds into the basket.
Using the tamping tool, lightly press down on the grounds and clean any excess from the rim.
ß Secure the portafilter holder in place.
ß Press the steam button and once the light stops blinking, it is ready for use. Turn the steam/hot water dial
to the steam setting.
ß Pour the milk into the pre-chilled frothing pitcher. Hold the pitcher in one hand and place it under the
steam arm so the bottom of the arm is just below the surface of the milk. Once the milk begins to
increase in volume, lift the pitcher higher so the steam wand is immersed further into the milk.
ß Move the pitcher up and down a couple of times to achieve a nice foam. Reserve steamed/frothed milk.
ß Place one glass cup underneath the brew head and press the
single espresso button, wait for the
machine to re-warm, if necessary.
ß Espresso will begin to brew. When 45ml have been brewed the machine will stop.
ß Slowly pour the steamed milk into the glass to the top
38
Mochaccino
Makes 1 serving (165ml)
30ml skimmed milk
1 measured scoop finely ground espresso or 1 espresso pod
Water
2 tablespoons chocolate syrup
Bittersweet chocolate, shaved or unsweetened cocoa powder, for garnish (optional)
ß Pre-chill the frothing pitcher.
ß Press the power button of the Cuisinart® Espresso Maker to turn the machine on. The lights around the
power, manual, single
and double
espresso buttons will illuminate and when they stop blinking,
the machine has been warmed and is ready to use.
ß Place the one-cup filter basket in the portafilter holder. Spoon the espresso grounds into the basket.
Using the tamping tool, lightly press down on the grounds and clean any excess from the rim.
ß Secure the portafilter holder in place.
ß Press the steam button and once the light stops blinking, it is ready for use. Turn the steam/hot water dial
to the steam setting.
ß Pour the milk into the pre-chilled frothing pitcher. Hold the pitcher in one hand and place it under the
steam arm so the bottom of the arm is just below the surface of the milk. Once the milk begins to
increase in volume, lift the pitcher higher so the steam wand is immersed further into the milk.
ß Move the pitcher up and down a couple of times to achieve a nice foam. Reserve steamed/frothed milk.
ß Place one glass cup underneath the brew head and press the
single espresso button, wait for the
machine to re-warm, if necessary.
ß Espresso will begin to brew. When 45ml have been brewed the machine will stop.
ß Add the chocolate syrup and approximately 120ml of the steamed milk to the glass and stir.
ß Using a large spoon, gently pour 1-2 tbsp of the frothed milk on top of the espresso.
ß If desired, top with shaved chocolate or cocoa powder.
39
Café Mocha
Makes 1 serving (175ml ounces)
120ml skimmed milk
1 measured scoop finely ground espresso or 1 espresso pod
Water
1 tbsp chocolate syrup
60ml thick cream, whipped to a medium consistency
Bittersweet chocolate, shaved or unsweetened cocoa powder, for garnish (optional)
ß Pre-chill the frothing pitcher.
ß Press the power button of the Cuisinart® Espresso Maker to turn the machine on. The lights around the
power, manual, single
and double
espresso buttons will illuminate and when they stop blinking,
the machine has been warmed and is ready to use.
ß Place the one-cup filter basket in the portafilter holder. Spoon the espresso grounds into the basket.
Using the tamping tool, lightly press down on the grounds and clean any excess from the rim.
ß Secure the portafilter holder in place.
ß Press the steam button and once the light stops blinking, it is ready for use. Turn the steam/hot water dial
to the steam setting.
ß Pour the milk into the pre-chilled frothing pitcher. Hold the pitcher in one hand and place it under the
steam arm so the bottom of the arm is just below the surface of the milk. Once the milk begins to
increase in volume, lift the pitcher higher so the steam wand is immersed further into the milk.
ß Move the pitcher up and down a couple of times to achieve a nice foam. Reserve steamed/frothed milk.
ß Place one glass cup underneath the brew head and press the
single espresso button, wait for the
machine to re-warm, if necessary.
40
ß Espresso will begin to brew. When 45ml have been brewed the machine will stop.
ß Fill a tall glass with the steamed milk, leaving approximately 5cm at the top. Add the espresso and
chocolate syrup.
ß Top the drink with approximately 2 tbsp of the whipped cream.
ß If desired, top with shaved chocolate or cocoa powder.
41
42
43
www.cuisinart.co.uk
E IB-8/279
Version no.: EM200U IB-8/279
Size : 180mm(W) X 180mm(H)
Material: 157gsm Gloss artpaper with waterbase varnishing for whole book
Coating: varnishing
Color (Front): 4C+1C(Black)
(Back): 1C+1C(Black)
Date: 19/07/08
Co-ordinator : Alice Chong/Jelly Gao
XieFaXing Des cription : IB-8/279
XieFaXing Code : E-IB-8/279
OPERATOR: Xu