1
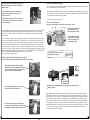
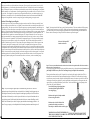
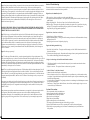
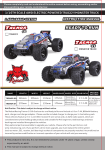
INSTRUCTION MANUAL
14 +
Redcat Getting Started
Section 1 : Preparing the Vehicle
WARNING – THIS IS NOT A TOY. THIS VEHICLE RUNS ON FLAMABLE NITRO FUEL AND SHOULD
NEVER BE OPERATED WITHOUT ADULT SUPERVISION. PRECAUTIONS SHOULD BE TAKEN PRIOR
TO RUNNING.A FIRE EXTINGUISHER SHOULD BE NEAR BY AND PROPER EXPERIENCE FOR
OPERATION IS A MUST.
Congratulations on your purchase of a Redcat Racing R/C Vehicle. This guide will help ensure you have as
much fun as possible with your new car or truck, with as little hassle as possible. Please read through this
guide thoroughly before attempting to run your new vehicle. It is very important you follow all of these steps,
especially the section on breaking in your motor. DO NOT ATTEMPT TO RUN YOUR VEHICLE WITHOUT
FIRST BREAKING IN THE MOTOR!
Step 2 : Next you will want to set your gear mesh. This is the play between the clutch bell on the motor a nd
the spur gear. To set this you loosen the 4 motor mount screws (pictured in step 3) and slide the motor into
the desired position. You want this to be as tight as possible, while still having a little bit of play between
the two gears. Experienced R/C drivers can set this by feel, but if you are just starting you can use a trick to
get it “just right.” Take a small piece of paper, and cut it into a ½ inch wide by 6 in long strip. With the
engine mount screws loose, take this piece of paper and slide it between the spur gear and the clutch bell
as shown below:
Things you will need before beginning:
Transmitter (Included with RTR Vehicles)
4-AA Alkaline Batteries for Vehicle*
8-AA Alkaline Batteries for Transmitter**
Glow Plug Igniter
Fuel Bottle
Nitro Fuel
4-Way Wrench
Mini Screwdriver Set
Air Filter Oil
After Run Oil
Blue Loctite
Scissors
Needle Nose Cutter
Push the engine into the clutch bell so that its tight against it and tighten the engine mount screws. When
finished, pull the strip of paper out. To make sure your mesh is set properly, keep your finger on the spur
gear and wiggle the clutch bell, there should be a little bit of play. If you roll the car on the ground, it should
roll freely. If this is not the case, repeat the above steps.
*Rechargeable batteries can be used in place of the standard alkaline. Using rechargeable batteries will save
you a lot of money in the long run and they are recommended.
*On some Redcat transmitters, there is a recharge jack and you can recharge your transmitter batteries directly
if you purchase the correct AC adapter.
Important Items For Running Your Model
Servo
(For The Vehicle)
1
Air Filter Oil
4-Way Wrench(small)
Scissors
Spur Gear
Clutchbell
(For The Transmitter)
Gear mesh procedure.Picture may
differ slightly from your vehicle.
Note:The clearance between the clutch bell and the spur gear must be approx.0.1mm
If the clearance is more than 0.2mm,normal performance of your spur gear maybe affected.
Glow Plug Ignitor Fuel Filler
Fuel Bottle
Tools Needed To Maintain Your Model
Hexagonal Screwdriver
Push motor until two gears sit tightly
together.Tighten the engine screws
by following step 3 below with blue
Loctite.
Receiver
Ni-Ca batteries 6V 500mA
or AA alkaline dry batteries
Transmitter
Insert a ½ inch piece of paper between
clutchbell and spur gear.
Remove the paper carefully and you
should have very little play between the
gears
Charger
Battery Case
Step 1 : The first thing you should do is unpack the box. Get everything together and out of the bags.You will
want to get batteries for everything. You will need 12 AA batteries, 8 for the radio and 4 for the vehicle.
If you purchased our Quick Start Kit, you will want to get the glow igniter out, and start charging it. You
should charge the glow plug igniter for a minimum of 8 hours before use. Install the batteries into the
radio. Install the batteries into the Vehicle. While doing this you will also want to i nstall the antenna
mast. Feed the receiver wire through the antenna tube and secure the tube into place before replacing the
receiver box cover. When installing the batteries into the vehicle, it is helpful to tape them in place, or use
a rubber band to hold them in place. If one should come loose while you are driving the vehicle, you could
lose control!
4-Way Wrench(large)
Needle Nose Cutter
Mini Screwdriver
Curve Cutter
Step 3 : You should now inspect your vehicle and Loctite all screws that screw into metal. Nitro engines
create a lot of vibrations, and any screws going into metal WILL vibrate loose! You can purchase Loctite
from any hobby store, automotive store, or even any of the major chain discount stores. You want to use
blue Loctite. It is colored based on strength, blue is not that strong, so you will be able to get screws out
if need be. Do not use red Loctite! You want to pay extra attention to any of the screws related to the
drive-train, such as the motor mount screws. These screws go through the most stress and WILL vibrate
Loose without Loctite. While you have your motor mount screws out/loose, you will want to set the
gear mesh. This is described in step 2 above.
4 engine screws.Use blue colored
Loctite.
Please note that the bottom screw
placement on your vehicle may be
sightly different than pictured.
Bottom view of vehicle engine screws
2
Loctite the grub screws(also known as set screws)
These are located on the center drive shaft on all
Redcat vehicles.
Section 2 : Check Radio Settings
Locate the center drive shafts and you will see a
small screw.You should remove those screws
and use blue loctite.
T he radio guides are specific per model so simply click on the image of the radio that you received with
your vehicle if you are unsure of the controls. For the most part though, most radios that Redcat ships are
very straightforward and have only a few controls.
Not doing this can cause loss of the screw and the
vehicle will not run as these grub screws keep the
drive shafts in place
S tep 2: Basic controls can be seen below.
S tep 1 : Redcat radio systems differ per vehicle. We have made an online guide that is available by going
here: www.redcatracing.com/radioguide.html
Check Steering Performance
Operate the steering wheel to assure the front wheels move correctly
Left
Step 4 : Some Redcat Racing vehicles are shipped with wheels that are not yet installed. You should install all
four wheels using the supplied wheel wrench. Tighten the wheels by hand. Do not use a torque wrench or
powered tool of any kind. For vehicles where the wheels are installed,make sure the wheel nuts are firmly
tightened by hand.
Step 5 : For the final step in this section, you will need to oil your foam air filter. Remove the air filter housing
from the engine. Take the foam air filter out of the housing. There are several methods to oil an air filter, but
this one is easiest, and the least messy : Take a small plastic bag and spray or add a few drops to the bag. Drop
the filter in the bag and rub it around inside the oil. The air filter should be fairly oily but not to where the oil
is concentrated in one spot. If it gets too oily, you can dab it with a paper towel. If you are unsure of how much
oil to use, it is best to have enough oil on the form air filter to where, by squeezing it with your hand, the oil will
not drip. You can purchase air filter oil at most hobby shops. YOU DO NOT WANT TO RUN THE VEHICLE
WITHOUT THE FOAM AIR FILTER OILED as this can cause dirt, to enter the
carburetor which can cause engine failure.
Right
Left
Centre
Left
Right
Right
The front wheel movement is
controlled by the steering
wheel on the remote control
If the movement is opposite,
you can switch the steering
switch on the remote to the
reverse mode position.
Gently lift up the front wheels while
adjusting the steering trim.
Some Redcat Racing vehicles use different types of air filters.
You can see them below for instructions which will be specific to your model.
The foam in this image needs to be removed
which is easily done by hand.Simply remove both
pieces of foam and oil the filters and then insert
the filters back into the plastic housing.
Brake
Forward
Brake
Forward
Neutral
Perform throttle trim adjustments to provide quick and smooth brake and
running response.
Pictured to the right is Redcats other air filter.
Remove the plastic cover picture here.
Plastic cover installed
Under the plastic housing is a form filter that
is easilily removable by sliding it off.Oil the filter
and install the foam and replace the plastic cover.
Step 3 : Perform a range test. With the engine off, power up the radio and vehicle. Have a friend hold the
vehicle and walk as far away as you plan on driving the vehicle.Test the steering and throttle, to make sure
both are responsive at this distance. It is important that you are using alkaline fully charged new batteries.
If you find that your controls are not functioning properly while standing next to the vehicle or within a
few feet, you should check all connections leading to the receiver box pictured below along with making
sure your batteries are firmly seated in the remote control and the vehicle. It is a very good idea, if using
standard double A batteries to either tape the batteries together or use a rubber band for the vehicle batteries.
It is very easy for the batteries to pop loose or lose connection while driving which could cause loss of
control to the vehicle and cause damage.
Plastic cover removed
3
4
IMPORTANT: There are multiple radio frequencies that are used on RC vehicles. Make 100% sure that before
you switch on your radio, that there are no other RC vehicles being operated in the area. By switching on your
radio while another vehicle is being operated on the same frequency can cause damage to that vehicle or injury
to others in the area. When 2 radios are being operated on the same frequency and within range,the vehicle
will not know which radio is controlling it and usually causes the vehicle to run out of control.
NOTE: Always turn the remote control power on before the vehicle.
Pictured below is a standard nitro engine with all parts labeled for better understanding
Glow Plug
Cylinder Head
Combustion Chamber
Pullstart
Piston
Carburetor
Mixture needle
Exhaust Port
The radio receiver is located in the receiver box
on the car.There are usually 3 outlets that
connections are plugged into.These are labeled
as Channel 1,Channel 2 and Battery.Make
sure all are seated correctly and firmly in place.
Idle Screw
Throttle Linkage
Crankcase
The receiver also houses a crystal.The crytal frequency will match to the
crystal in your remote.You can always change these with another frequency
if you have another car on the same one.
Precaution: If your vehicle glitches (a sporadic movement of the vehicle without any use of the remote
control) you should first make sure that nobody else is on the same frequency as you. If no others were on
the same frequency, you should take the vehicle to a clear area or field where they are no electrical power
lines. Power lines, cell towers and other things can cause interference with your vehicle and you should
always test your vehicle prior to running to make sure these things don't exist.
Section 3 : Getting to Know Your Engine
Before you fire up your vehicle and break in your motor, you should familiarize yourself with it.
Understanding your motor and how it works, will make it much easier to tune, maintain, and keep it running
at maximum efficiency for a long time.
Pictured below is a typical nitro racing engine.Your engine may be
smaller or slightly different, but they all work in basically the same way.
Crankshaft
Cylinder Head - This sits on top of the case, and helps to dissipate heat.
Case- Houses all the internal components of the engine.
Crankshaft- The crankshaft is connected to the connecting rod and piston, and gets spun by the up and
down movement of the piston. The flywheel and clutch bell sit on the crankshaft and all of them spinning
together is what turn the gears of the transmission.
Piston - The piston is precisely fitted with the sleeve of the motor to create compression needed for the
fuel to combust. It moves up and down inside the sleeve, turning the crankshaft.
Connecting Rod - This is what connects the piston to the crankshaft.
Glow Plug - This is what is used to start the combustion process in your motor. It sits on top of the
combustion chamber in the middle of the Head. An element inside of it glows red hot when a current is put
through it, which sparks the fuel. This element is powered by your glow igniter. If this element burns out,
the engine will not start. This will be the most replaced part on your vehicle.
Carburetor- The carburetor is what controls the speed of your motor. It intakes air and fuel into the Engine.
The carburetors main job is to control the mixture of air and fuel as it enters the engine.You control this
mixture through the needle adjustments on the carburetor. The optimal air and fuel ratio rarely changes,
however changes in Temperature, Altitude, and Humidity all can effect this mixture. For example, when it is
cold outside there are more air molecules per square inch than there are when its warmer out. To correct this
you would need to adjust your mixture so that it allows more fuel to counter the increase in air molecules. In
order to do this you would richen your needle. Some people call richening, “Fattening.” If
Low Speed Needle
Idle Screw
High Speed Needle
5
High Speed Needle (HSN) - The High Speed Needle is used to control the mixture of fuel and air when the
carburetor is open from partial throttle to Full throttle.
Low Speed Needle (LSN) - The Low Speed Needle is used to control the mixture of fuel and air when the
carburetor is at idle to partial throttle.
Idle Screw- The idle screw controls how much fuel and air the carburetor lets into the engine while you are
in neutral. You want to set this as low as possible while still allowing the engine to idle for a good amount
of time.
Air Filter Housing - This houses the air filter and funnels air into the carburetor.
Air Filter- This protects your engine from dust and harmful debris. It should be cleaned and oiled, or replaced
often. Any dirt or fine dust entering the engine can cause performance loss or irreversible damageThe air filter.
can look clean to the eye, but still contain harmful microscopic dust that can harm the engine. Err on the side
caution when deciding when to clean your air filter. It can be oiled using air filter oil from a hobby shop. Air
of filter oil for off-road motorcycles and ATVs will also work,and can be purchased from most Motorcycle
and ATV stores.
6
Adjusting your Needles
To adjust your needles you will need to know a few terms. If you want to Lean your motor (lean = less fuel
reaching the motor), you will need to adjust the needles clockwise. To Richen (rich = more fuel reaching the
motor) or Fatten your motor you will want to turn the needles counter clockwise. Adjustments to your needles
should be made in very fine increments. I would suggest thinking of your needle as a clock. There are 12 hours
on your clock. For example if you want to lean your top end needle one hour, you would turn the screw in,
or clockwise, one twelfth of a turn. You should make adjustments in one hour increments and NO MORE!
Getting a nice long flat head screwdriver can go along way in making turning your engine easier.
Section 4 : Breaking in your Engine
The break in process is fairly time consuming, but please make sure to follow all the steps carefully. Out of
the box, the piston sits inside the sleeve very tightly.You need to break this in so that the piston and sleeve fit
together perfectly. The only way to do this is to get the engine up to operating temperature, and allowing it to
cool back down. These nitro motors run on compression, which requires a very precise fit between the piston
and sleeve. The whole point of the break in process is to allow your piston and sleeve to seat together, reaching
running temperature, with lots of lubrication, then allowing it to cool back down to room temperature. The
piston and sleeve fit together best at around 200 degrees to 215 degrees Fahrenheit. It is not necessary but
highly recommended to use a temperature gun during the break in process,but if you have one, by all means
use it. You can use the “spit method” if you don't have a temperature gauge. To do the spit method you take
a drop of spit or water and place it on top of the cooling head. The spit/water should evaporate within 3-5
seconds. It should not pop or sizzle. If it does, than your engine is running too hot. If it takes longer to than
3-5 seconds, your engine is running to cold. You do not have to complete the break in process all in one
session, but you must complete each individual step. Before you start, It is a good idea to take the glow plug
out and pull the starter easily until the piston reaches the bottom of the stroke (place where piston is before it
starts to return to the top of the head) and make a mark on the flywheel so you know where bottom dead center
(BDC) is because when you put the glow plug back into the engine you need a reference point. You will need
something to place the car on during the break-in process that allows the wheels to be off of the ground. You
can use pretty much anything such as a cement block, toolbox or whatever you have around the garage.
Step 2 : You must prime the fuel lines to get fuel into the carburetor. There are a number of different ways
to do this, but the easiest way is as follows: Hold your finger on the exhaust pipe opening and pull the
pull starter until you see fuel traveling through the fuel line. Stop when the fuel gets to the carburetor.
Remove the air filter and put 2 drops of fuel in the carburetor to prime the engine.
Insert
a few
drops
fuel
Insert
a few
drops
of of
fuel
into
carburetor
into
thethe
carburetor
Step 3 : Turn on your radio and turn the switch to the vehicle to the on position. Re-Check the controls to
make sure there is no interference.
Put your glow plug igniter on the glow plug and pull the starter using a short quick motion. (Do not force or
pull the pull cord all the way out as this can damage the engine and pull start mechanism).
The engine should start in a few pulls. If engine feels very hard to pull it may be hydro locked. This is
when there is too much fuel in the engine meaning the engine is flooded. To fix this, take the glow plug
out with a cross wrench, turn the car upside down and pull the starter a few times to get the excess fuel out
of the engine. Put the glow plug back in, put the igniter back on the plug and try to start again. Once the
engine fires up, you may need to adjust your idle screw. You do not want the tires to be spinning at this
point, if they are, turn the idle down.
Step 1 : Get your fuel and glow igniter ready. We recommend using 20% nitro fuel. This can be
purchased at any of the major hobby shops. Any brand will work , although I would suggest using one
with a higher oil content if you want your engine to last the longest it possibly can. You will need to use
a fuel bottle to fill the tank of your vehicle. Squeeze all of the air out of your fuel bottle and stick it in
your gallon or quart of fuel. Release the fuel bottle and it will create a vacuum effect filling your fuel
bottle. Now fill the tank of your vehicle. Your glow igniter should have been charging for at least 8 – 10
hours.To stop your engine, you should pinch the fuel line leading the carburetor until the engine is off.
7
Insert a fully charged glow plug igniter
into the top of the engine and attach
it to the glow plug.
Make sure the igniter is firmly attached
before starting the vehicle.
Make sure the vehicle is lifted off the
ground and is sitting on a toolbox or
other object so that the wheels can freely spin.
WARNING:DO NOT HAVE THE WHEELS TOUCHING THE GROUND.SOMETIMES
THE CAR COULD BE SET INCORRECTLY AND CAUSE THE CAR TO MOVE ON ITS
OWN WHEN FIRST STARTED.
8
Step 4 : Now that your engine is idling, you want to let it do so for an entire fuel tank. Make sure your tank is
completely filled, and then let the car run till it is almost out of gas. It is best not to let the engine run
completely out of gas, because it causes the engine to run lean for a split second when it runs out of fuel. At
this early stage of your engines life, it is best not to do this. You may need to adjust the idle slightly so the car
stays running. The engine should be revving smoothly and wheels should NOT be spinning. If wheels are
spinning you must adjust the idle to the point that the wheels do not spin. It is normal for fuel to drip from the
exhaust during break in. When the tank is almost empty, shut the engine off by pinching the fuel line. Move
the flywheel so that the piston is at Bottom Dead Center (BDC). Allow the engine to cool for at least 15
minutes before moving to step 5.
WARNING: THE ENGINE, EXHAUST AND OTHER PARTS OF THE VEHICLE ARE HOT AFTER
RUNNING.DO NOT TOUCH ANY OF THESE COMPONENTS IMMEDIATLEY AFTER RUNNING.
PERMIT THEM TO COOL DOWN FIRST.
Step5: For this step, you will actually be driving the vehicle. Fill the tank with fuel. Start up the engine and
drive it in figure eight patterns. Do not use more than ¼ throttle during this step. Continue driving the car
in a figure eight until the fuel runs out You want to make sure the engine still sounds like it is running very
rich. It will have a “sputtering” sound to it, and it should be blowing lots of thick smoke out of the exhaust
pipe. In addition to thick smoke, it is common for excess fuel to come out of the exhaust pipe. Many
beginners are concerned when they see so much fuel coming out of the pipe, but do not worry. When the
vehicle runs out of gas, return the piston to Bottom Dead Center (BDC) immediately. Allow the engine to
cool for 15 minutes.
Step6: For this step, repeat step 5.
Step 7 : For this step, fill the tank with fuel, start the engine and again drive in figure eight patterns. This
time you can bring the car up to ½ throttle. You will notice that the idle of the engine may start to go up. This is
due to the engine breaking in and causing less resistance on the piston and sleeve. You may need to turn the
idle down a bit. You should still pay close attention to the amount of smoke the pipe is putting out.It should
still have lots of thick smoke. When the tank runs out, make sure to return the piston to Bottom Dead Center
immediately. Let the engine cool for 15 minutes.
Step8: This is your final step in the break in process. Fill the tank up with fuel, and start the engine. You will
be driving the vehicle in straight lines this time, from idle to ¾ throttle. Try to use the full range of throttle,
idle to ¾ throttle. Try to use the full range of throttle, going slowly from no throttle to ¾. After this tank runs
out, again return the piston to BDC, and let it cool for 15 minutes. After the engine cools you may now run
it normally!
Your engine is now broken in, but it will not be the last time you need to adjust it. Keeping it tuned properly is
an ongoing process. Depending on how often the weather changes where you live, you may need to adjust
them slightly each time you run. Congratulations on breaking in your motor, and have fun with your new
Nitro R/C vehicle!
It may be necessary to perform some after run maintenance to your engine if you plan on storing the vehicle
for a long time. Unburnt fuel inside the engine can cause corrosion which can damage the internal
components of the engine. It is recommended to run the engine out of fuel, and to add after run oil if the
engine is going to sit for a long period of time. This is not necessary if you are running the engine often.
9
Section 5:Troubleshooting
This section will go over some of the most common problems you may experience as a newcomer to the hobby,
and some of the most common fixes for these problems.
Engine Starts, but immediately stalls :
1 )Idle set too low – Adjust your idle screw so the engine idles higher.
2 )Low Speed Needle needs Adjustment – The engine could be getting flooded with fuel, lean the low speed
needle slightly.
3 )Engine not getting fuel – Check to see if any of your fuel lines have holes in them.
4 )Bad glow plug – If the engine dies right after you take the glow igniter off, it is possible it is the plug
causing it. Try starting the car and leaving the glow igniter on for a moment. If the engine no
longer stalls, the glow plug needs replacement.
Engine is slow, or has slow acceleration :
1)Clutch slipping – Replace clutch shoes
2)Engine not tuned properly – The engine could be running to lean or too rich. Return needles to factory
settings and start over
3)Glow plug foul or worn out – Replace the glow plug.
Engine stalls during normal driving :
1)Out of fuel, hole in fuel line – The engine could be running out of fuel. Refill the tank and check for
holes in the fuel lines.
2)Carburetor not adjusted properly – Return the needle settings to factory settings and start from scratch.
This could be from the high speed needle running to lean.
Engine is overheating, or blows little smoke from the exhaust :
1 )The high speed needle is too lean, fatten this setting until you see smoke come from the exhaust
under acceleration.
2 )Engine is worn out – The engine will start to run hotter as it gets older.
Vehicle “Glitches” or has lack of control :
1 .Batteries in radio dead – Replace radio batteries
2 .Receiver batteries are low or loose – Replace the receiver pack batteries, or check to make sure they
are in place. Using a rubber band or tape to hold the batteries in place will prevent them from getting
knocked loose during running.
3 .Crystals or Receiver damaged – Fuel getting on the receiver can damage it, and hard impacts can cause
the crystals to be damaged.
4 .Interference – Things such as chain link fences, electrical lines, and other people using r/c cars can
cause conflicts, try a different area.
Section 6:Precautions
1)Never operate the vehicle in crowded areas.
2)Always operate the vehicle with the body on.
3)Do not handle nitro fuel near open flames.
4)Store fuel in a cool, dark place.
5)Keep fuel away from children.
6)Only run the engine in a well ventilated area.
7)The engine, pipe, and other moving parts of the vehicle get very hot.
8)Always check to make sure no one else is operating a R/C vehicle on the same frequency.
9)If the vehicle stops responding to you, discontinue use immediately, until you find the cause
of the problem.
10