1
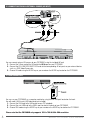
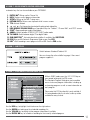
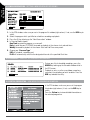
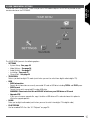
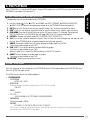
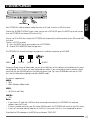
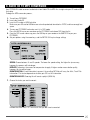
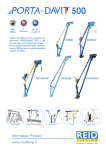
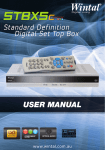
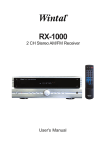
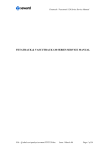
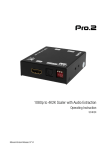
PD1200HD USER MANUAL w w w.w i n t a l.c o m.a u W I N TA L PD120 0 H D U SE R M A N UA L Contents 1. Introduction 1.1 Main functions 1.2 What’s Included 1.3 REMOTE CONTROL 2. CONNECTIONS 2.1 Connecting to a TV (AV OUTPUT) 2.2 CONNECTING VIA HDMI 2.3 CONNECTING FROM AN EXTERNAL SOURCE (AV INPUT) 2.4 VGA CONNECTION 3. GENERAL SETUP 3.1 PICTURE SETTINGS 3.2 CHANNEL SETTINGS 3.3 Function Settings 3.4 PC/ VGA Settings 3.5 OSD Settings 4. DIGITAL TV 4.1 DVB-T Set UP 4.1.1 First Time Installation 4.2 DVB-T - basic remote Control operation 4.3 DVB-T - Subtitles 4.4 DVB-T - electronic Program Guide (EPG) 4.4.1 New Reservation - Setting a new scheduled recording 4.4.2 Schedule - View list of scheduled recordings 4.4.3 Detail Descriptor - VIEW MOre programme information 4.5 DVB-T HOME MENU/ SETTINGS 4.5.1 SYSTEM SETUP 4.5.2 Video Settings 4.5.3 AUDIO Settings 4.5.4 installation 4.5.5 Channel Edit 5. PVR FUNCTIONALITY 5.1 Recording 5.2 Playback 6. DVD PLAYBACK 6.1 DVD - basic remote Control operation 6.2 DVD - SETUP MENU 7. SD/USB PLAYBACK 8. Game Player 9. AUDIO CD to MP3 conversion 10. RECHARGEABLE BATTERY 11. SPECIFICATIONS 12. TROUBLESHOOTING 4 4 4 6 7 7 7 8 8 9 9 9 10 10 11 12 12 12 13 13 13 14 14 14 15 16 16 17 17 18 20 20 20 21 21 21 23 24 25 27 27 28 3 1. Introduction 1.1 Main functions Your PD1200HD integrates DVD, High Definition DVB-T into one set, supports USB and SD card playback, 8-bit game feature, AV input/output, VGA input and HDMI output for DVB-T and more. 1. 12.3 inch TFT (16:9), resolution (1280 x RGB x 800 pixels). 2. European Standard High Definition DVB-T Digital TV signal receiving, Compliant with MPEG2 and MPEG4 H.264 norms, HDMI output resolution Support: 1920 x 1080i, 1920 x 720p, 720 x 576p, 720 x 576i; Advance HD AVC/MPEG-2/VC-1 decoder; H.264/AVC main and profile to level 4.1; VC-1 advanced profile@level3 level2; MPEG2 MP@ML, MP@HL 3. Compatible with DVD/MPEG4/SVCD/CVD/VCD/CD/MP3, support disc DVD-R, DVD+R, DVD-RW, DVD+RW,CD-R, CD-RW 4. DVB-T HDMI signal output, let you enjoy AV entertainment with high quality image 5. AV In allows you to use the Wintal PD1200HD as an external monitor 6. Supports MPEG4 file playback, DIVX4.X/ DIVX5.X 7. Support 8-bit NES game playback via .NES files on CD or SD/USB 8. Super powerful ESP (Electronic Shock Protection) 9. High energy Polymer Lithium-Ion Battery 10.VGA input function, the player can be used as a monitor of computer (Optional VGA to mini-vga cable) 11.180 degree swivel screen 12.PVR function (Personal Video Recorder), DVB-T original code TS (Transport Stream) recording. It can record the current DVB-T programs into the MPEG2 format file and save it on either SD or USB. 1.2 What’s Included ▪▪ ▪▪ ▪▪ ▪▪ 4 1x Remote control 3.5mm to 3x RCA Composite AV lead Game CD with 300 games Joystick ▪▪ ▪▪ ▪▪ ▪▪ Mini antenna with magnetic base Earphones Car cigarette charger lead Power supply: 13.5V 2.5A Remote Control Audio/Video Cables CD with 300 Games Joystick Mini antenna Earphones Car Power Adaptor AC/DC Adaptor W I N TA L PD120 0 H D U SE R M A N UA L 5 1.3 REMOTE CONTROL 6 W I N TA L PD120 0 H D U SE R M A N UA L 2. CONNECTIONS 2.1 Connecting to a TV (AV OUTPUT) You can connect your PD1200HD to a big screen TV using the included 3.5mm to 3x RCA lead. 1. Connect the 3.5mm end of the AV lead to the AV Out port on your PD1200HD 2. Connect the YELLOW/ RED/ WHITE RCA ends to the corresponding ports on your television 3. Switch to your TVs AV channel to view your PD1200HD (please refer to your TV manual for further information) Please note that this mode is only available when in DVD MODE. 2.2 CONNECTING VIA HDMI You can connect your PD1200HD to a HD TV using any HDMI lead (not included) 1. Connect one end of your HDMI lead to the DVB-HDMI OUT port on your PD1200HD 2. Connect the other end to your HDMI enabled TV. 3. Choose DVB mode using the MODE key on your remote or the MODE key located on the PD1200HD. Please note that HDMI output only works when watching DVB digital TV. 7 2.3 CONNECTING FROM AN EXTERNAL SOURCE (AV INPUT) You can connect external AV sources to your PD1200HD using the included AV lead. 1. Connect the 3.5mm end of the AV lead to the AV In port on your PD1200HD 2. Connect the YELLOW/ RED/ WHITE RCA ends to the corresponding AV out ports on your external device such as a DVR, Video Camera etc. 3. Choose AV mode using the MODE key on your remote or the MODE key located on the PD1200HD. 2.4 VGA CONNECTION You can use your PD1200HD as a computer monitor by using the mini-VGA port located on the back. You will need a VGA to mini-USB video lead (not included). 1. Connect the VGA lead to the VGA output on our PC/ notebook 2. Connect the mini-USB end to the VGA In port located at the back of your PD1200HD 3. Choose VGA mode using the MODE key on your remote or the MODE key located on the PD1200HD. Please note that the PD1200HD only supports 1024 x 768 @ 60Hz VGA resolution. 8 W I N TA L PD120 0 H D U SE R M A N UA L 3. GENERAL SETUP Press the MENU key on your remote or on the PD1200HD to bring up the general setup menu where you can set the following options: 1. PICTURE SETTINGS 2. CHANNEL SETTINGS 3. FUNCTION SETTINGS 4. PC/ VGA SETTINGS 5. OSD SETTINGS To toggle between options use the left and right arrow keys on the remote control or on the PD1200HD. 3.1 PICTURE SETTINGS Use the up and down arrow keys to select an option and the left and right arrow keys to make your adjustment. Contrast/ Brightness/ Hue/ Saturation/ Sharpness: Adjust from 0 to 100 Color Temp.: NORMAL/ WARM/ COOL SCALE: 16:9 Widescreen/ 4:3/ Zoom Picture Mode: User/ Standard/ Movie/ Vivid 3.2 CHANNEL SETTINGS The Channel settings window does not have adjustable options as it refers analogue tuner settings. Your PD1200HD has an integrated HD digital tuner. Please refer to “4.1.1 FIRST TIME INSTALLATION” on page 12 for information on setting up channels in DVB-T mode. 9 3.3 Function Settings Use the up and down arrow keys to select an option and the left and right arrow keys to make your adjustment. LTI: Improves the picture brightness level CTI: Improves the picture colour definition BLE: Enhances the black/ contrast levels DNR: Dynamic Noise Reduction 3.4 PC/ VGA Settings Please note that the PC/ VGA settings can only be accessed when there is an active VGA connection. Use the up and down arrow keys to select an option and the left and right arrow keys to make your adjustment. Contrast/ Brightness/ H-POSITION/ V-POSITION/ CLOCK/ PHASE : Adjust from 0 to 100 H-Position allows you to adjust the horizontal position of the VGA input V-Position allows you to adjust the vertical position of the VGA input 10 W I N TA L PD120 0 H D U SE R M A N UA L SCALE: FULL/ CENTRE AUTO ADJUST: Automatically adjust the screen resolution to match the VGA source Color Temp.: NORMAL/ WARM/ COOL/ SRGB/ USER USER-R/ USER-G/ USER-B: Allows you to adjust the Red/ Green/ Blue colour levels when Color Temp is set to USER. 3.5 OSD Settings The OSD Settings screen allows you to adjust various On-Screen-Display related options. Language: Choose from English/ German/ French/ Spanish/ Italian/ Portuguese/ and Chinese H-Position: Adjust the horizontal position of the OSD menu V-Position: Adjust the vertical position of the OSD menu Duration: Adjust how long the OSD menu remains on screen (from 0 to 60 seconds) Halftone: Adjust the OSD menu transparency from 0 (opaque) to 100 (transparent) Memory Recall: Press the right arrow key to revert OSD settings back to their factory defaults OSD Size: Increase or decrease OSD size 11 4. DIGITAL TV DVB-T HD DIGITAL TV 4.1 DVB-T Set UP Your PD1200HD comes with an integrated HD digital tuner, allowing you to receive high definition digital broadcasts, as well as Standard definition broadcasts. 1. Use either the included portable mini-antenna or a flylead to connect the PD1200HD to your wall point. 2. Press the MODE key on the unit or on your remote and use the arrow keys to choose DVB from the on screen menu. 3. Press ENTER to confirm your selection. Please note: For best performance, make sure you connect your PD1200HD to a wall antenna outlet. 4.1.1 First Time Installation The first time you enter DVB mode, you will be greeted with the First Installation screen. OSD LANGUAGE: Default is ENGLISH COUNTRY: Default is AUSTRALIA TIME ZONE: Choose the time zone that matches your state/ territory. LCN (Logical Channel Numbering): Ensure this is set to ON so that channels are listed in a logical order. Once you have entered your choices, select START and press the ENTER/ OK key to confirm your selection. Your PD1200HD will start automatically scanning for channels. Please be patient as this may take a while. Once the scanning process is complete, you can browse through the different channels using the up or down keys on your remote or the up or down keys on the unit itself. 12 W I N TA L PD120 0 H D U SE R M A N UA L denotes keys that are also available on your PD1200HD. 1. ENTER/ OK▲: Brings up the Channel list 2. INFO: Displays current program information 3. SETUP▲: Brings up the DVB-T setup menu 4. RETURN/ EXIT▲: Returns one step back while in menu screens 5. TTX: Activate Teletext 6. and : Fast forward and rewind while playing back video files 7. RED/ GREEN/ YELLOW/ BLUE keys: Operational keys for “Teletext”, “Channel Edit”, and “EPG” screens 8. STOP▲: Stop recording or media file playback 9. AUDIO▲: Switch between STEREO/ LEFT/ RIGHT audio modes 10.TV/ RADIO: Switch between digital TV or digital Radio 11.SUB (SUBTITLE)▲: Activate/ deactivate subtitles if available. See SUBTITLES. 12.EPG: Bring up the Electronic Programme Guide screen. See EPG. 13.REC▲: Start recording current program to SD or USB. See the PVR section. DVB-T HD ▲ DIGITAL TV 4.2 DVB-T - basic remote Control operation 4.3 DVB-T - Subtitles Switch between Standard/ Teletext/ Off You can change the active subtitle language, if the current program supports it. 4.4 DVB-T - electronic Program Guide (EPG) While in DVB-T mode, press the GOTO/ EPG key on your remote to bring up the EPG screen. The Electronic Program Guide gives you immediate access to channel program information, including up and coming programs as well as more information on each program. Please note that EPG functionality is only available if it is being broadcast by the channel, and may not be available for every channel. Use the RED key: to highlight the left column or the right column. Use the GREEN key: to bring up the scheduled recordings list. Use the YELLOW key: to display further program information if available. Use the ENTER/ OK key: to schedule a recording for the currently selected program. 13 4.4.1 New Reservation - Setting a new scheduled recording DVB-T HD DIGITAL TV 1. In the EPG window, make sure you are in the program list window (right column). If not, use the RED key to switch. 2. Select the program which you’d like to schedule a recording or playback. 3. Press the OK key to bring up the “New Reservation” window. 4. In Running Mode, choose; One Time to record the program as a once off. Daily if you’d like your PD1200HD to record or playback at the chosen start and end times. Weekly to record or playback at the chosen Start and End Times every week. 5. Choose your “Reserve Type” REC will schedule a recording and PLAY will automatically switch to the designated channel at the specified Start time. 4.4.2 Schedule - View list of scheduled recordings To view your list of scheduled recordings, press the GREEN key to bring up the Schedule window while in the EPG screen. To delete an entry, use the up and down arrow keys and select the recording you wish to delete. Press the RED key to delete the entry. 4.4.3 Detail Descriptor - VIEW MOre programme information In the EPG window, make sure you are in the program list window (right column). If not, use the RED key to switch. Press the Yellow key to view detailed information on the selected programme. DVB-T HD To enter the DVB-T HOME menu , make sure you are in DVB mode and press the SETUP key located on your remote and also on the PD1200HD. DIGITAL TV 4.5 DVB-T HOME MENU/ SETTINGS The HOME MENU presents the following options: ▪▪ SETTINGS ▪▪ System Setup - See page 16 ▪▪ Video Settings - See page 16 ▪▪ Audio Settings - See page 17 ▪▪ Installation - See page 17 ▪▪ Channel Edit - See page 18 ▪▪ TELEVISION Returns you back to digital TV mode (useful when you want to switch from digital radio to digital TV) ▪▪ DISK ▪▪ DISK Information Reveals disk information on currently connected SD card or USB drive including TOTAL and FREE space. ▪▪ DISK Format Format the currently connected SD card or USB drive. WARNING: Please note that this will ERASE all data on your USB drive or SD card. ▪▪ Upgrade STB If you have a firmware upgrade file, copy it to either a USB drive or SD card and choose this option to initiate the upgrade process. ▪▪ RADIO Takes you to digital radio mode (useful when you want to switch from digital TV to digital radio) ▪▪ PLAYSTATION Use for recorded PVR files. See “5.2 Playback” on page 20. 15 4.5.1 SYSTEM SETUP DVB-T HD DIGITAL TV In DVB mode, > press the SETUP key to bring up the HOME MENU > choose SETTINGS and then > SYSTEM SETUP Press the ENTER/ OK key to enter a sub menu. Use the RETURN/EXIT key to go back one step within the menu screen. ▪▪ OSD LANGUAGE: Default language is English ▪▪ Country: Default country is Australia ▪▪ LCN (Logical Channel Numbering): LCN allows for channels to be ordered in a logical manner. Turn this setting On or Off. Recommended setting is On. ▪▪ Time Zone: Choose your Time Zone based on your State/ Territory. You can also toggle Day Light Savings (Summer Time) on or off. ▪▪ Change Password: Set a new password for parental guidance and other password related actions. Default password is 1234 Super user password is: 0786 ▪▪ Parental Control: ▪▪ MENU LOCK: On / Off You can apply password protection to the Menu settings to limit unauthorised access. ▪▪ Parental Guide: Set the parental guide level for controlling what TV content is available for viewing. Options: BLOCK ALL/ BLOCK G/ BLOCK PG/ BLOCK M/ BLOCK MA/ BLOCK AV/ BLOCK R/ NO BLOCK ▪▪ SYSTEM INFORMATION: Useful for viewing hardware and software versions. ▪▪ FACTORY RESET: Reset all DVB settings back to their factory defaults. 4.5.2 Video Settings In DVB mode, > press the SETUP key to bring up the HOME MENU > choose SETTINGS and then > VIDEO SETTINGS Press the ENTER/ OK key to enter a sub menu. Use the RETURN/EXIT key to go back one step within the menu screen. ▪▪ TV SYSTEM: Choose from PAL or NTSC. Australian TV broadcast system is PAL. ▪▪ HD OUTPUT: Choose the HD resolution for the DVB-T HDMI output when connected to a HD TV via HDMI. 16 W I N TA L PD120 0 H D U SE R M A N UA L Options are: AUTO ▪▪ 576i/ 480i ▪▪ 576p/ 480p ▪▪ 720p ▪▪ 1080i DVB-T HD DIGITAL TV ▪▪ Please make sure you select the correct resolution that matches the resolution supported by your HD TV. If you accidentally select an unsupported resolution and are unable to get a picture on your TV, just lower the resolution on your PD1200HD to match your TV. ▪▪ SCREEN RATIO: ▪▪ 4:3 ▪▪ 16:9 (Widescreen) ▪▪ ASPECT CONVERSION: ▪▪ Letterbox: This will display widescreen pictures with black bars on top and bottom ▪▪ Pan Scan: Automatically adjusts picture to fit full screen and eliminate black bars ▪▪ Ignore: Will not convert aspect ratio of broadcast program 4.5.3 AUDIO Settings In DVB mode, > press the SETUP key to bring up the HOME MENU > choose SETTINGS and then > AUDIO SETTINGS Press the ENTER/ OK key to enter a sub menu. Use the RETURN/EXIT key to go back one step within the menu screen. ▪▪ LR MODE: ▪▪ ▪▪ ▪▪ STEREO: Output stereo audio from both left and right channels Left: Output mono audio from left channel only Right: Output mono audio from right channel only 4.5.4 installation In DVB mode, > press the SETUP key to bring up the HOME MENU > choose SETTINGS and then > INSTALLATION Press the ENTER/ OK key to enter a sub menu. Use the RETURN/EXIT key to go back one step within the menu screen. 17 ▪▪ MANUAL SEARCH: DVB-T HD DIGITAL TV Manual search is ideal for when you need to fine tune a channel to get the best possible reception or if you’d like to add a newly launched SD or HD channel which wasn’t available upon initial auto scan. You can search via channel number, or frequency. ▪▪ ▪▪ CHANNEL NUMBER SEARCH: Choose the channel number from the drop down list. The frequency will adjust to match the channel number. FREQUENCY SEARCH: Input the exact frequency in 00 KHz’s. Choose START to bring up the Manual Search window and press ENTER/ OK again to initiate the manual search. ▪▪ AUTO SEARCH: Auto search will automatically scan all channels and frequencies and will save all channels found, including digital radio channels. Please note that running AUTO SEARCH will overwrite your existing channels. Once you confirm your choice, please wait until the scanning process is complete. 4.5.5 Channel Edit In DVB mode, > press the SETUP key to bring up the HOME MENU > choose SETTINGS and then > CHANNEL EDIT Press the ENTER/ OK key to enter a sub menu. Use the RETURN/EXIT key to go back one step within the menu screen. In the channel edit menu, you are able to mark your favourite channels, lock channels, move channels and delete channels. 18 W I N TA L PD120 0 H D U SE R M A N UA L The default mode in the channel edit window is Favourites. Notice that on the top of the screen it will indicate “Add To Fav 1”. If you press the RED key it will move on to the next group (“Add to Fav 2”) and another press will move on to the third group (“Add To Fav 3”). DVB-T HD You can set your favourite channels into 3 different groups (FAV 1, FAV 2, FAV 3) which can then easily be accessed using the TITLE/ FAV key on your remote or the TITLE key on the PD1200HD. DIGITAL TV ▪▪ FAVOURITE: To add a channel to the selected favourite group (FAV 1, FAV 2, FAV 3): 1.Use the and arrow keys to choose your channel 2.Press the ENTER/ OK key to mark the channel with a symbol. You can mark multiple channels with the ENTER/ OK key. 3.Once done, press the RETURN/ EXIT key and choose YES to confirm your choice. To return back to favourite mode, press the RED key. ▪▪ LOCK You can lock channels to prevent access to them. To initiate lock mode, press the GREEN key. 1.Use the and arrow keys to choose your channel 2.Press the ENTER/ OK key to mark the channel with a symbol. You can mark multiple channels with the ENTER/ OK key. 3.Once done, press the RETURN/ EXIT key and choose YES to confirm your choice. ▪▪ MOVE You can move channels to sort and rearrange the channel order to your liking. To initiate move mode, press the YELLOW key. 1.Use the and arrow keys to choose your channel 2.Press the ENTER/ OK key to mark the channel with a symbol. 3.Use the and arrow keys to choose where you’d like to move your channel to in the list and press the ENTER/ OK key. 4.Repeat steps 1 to 3 until your channels are in the order you like. 5.Once done, press the RETURN/ EXIT key and choose YES to confirm your choice. ▪▪ DELETE You can delete channels from the channel list. To initiate delete mode, press the BLUE key. 1.Use the and arrow keys to choose your channel 2.Press the ENTER/ OK key to mark the channel with a symbol. You can mark multiple channels with the ENTER/ OK key. 3.Once done, press the RETURN/ EXIT key and choose YES to confirm your choice. 19 5. PVR FUNCTIONALITY PVR FUNCTIONALITY Your PD1200HD can act as a Personal Video Recorder and allow you to record digital TV broadcasts to either a USB flash drive or SD card. Please note: Recording only works for DVB mode. 5.1 Recording Connect either a; ▪▪ flash drive to the USB port on your PD1200HD ▪▪ SD card to the CARD (SD/MMC) slot. While on the channel you wish to record, press the REC key on your remote control or on the PD1200HD to start the recording. You will notice a recording timer appear on screen. To stop the recording, press the STOP key on your remote or on the PD1200HD. Your recording will be saved on to your SD card of USB flash drive. To schedule automatic recordings so that your PD1200HD records your favourite shows, please refer to the “4.4.1 New Reservation - Setting a new scheduled recording” on page 14. Warning: To ensure the best performance and to avoid any recording errors please make sure of the following: 1. That your USB flash drive or SD card has been formatted as FAT32 2. If you are using a USB flash drive, make sure it is USB2.0 3. Your SD card has a minimum rated speed of 150x. 4. Write protection on your SD card is not activated 5. There is enough space on your flash drive/ SD card 5.2 Playback While in DVB mode; 1. Press SETUP on either your remote or on the PD1200HD 2. Use the right arrow key to select “PLAYSTATION” and then Video 3. Use the file browser to locate your recording and select your file using the ENTER/ OK key to begin playback. You can also delete selected files when in the file browser. With the file you wish to delete highlighted, press the RED key on your remote and select OK on the confirmation box. You may need to exit and re-enter the PLAYSTATION mode to see the changes. Please note: We recommend using the PLAYSTATION mode for playback of PVR files only. Please refer to “7. SD/ USB Playback” on page 23 for more information. 20 W I N TA L PD120 0 H D U SE R M A N UA L 6. DVD PLAYBACK Your PD1200HD is a full featured DVD player. To enter DVD mode press the MODE key on your remote or on the PD1200HD and choose DVD from the list. denotes keys that are also available on your PD1200HD. 1. Use the standard PLAY, STOP, REWIND, FAST FORWARD, PREVIOUS CHAPTER, NEXT CHAPTER buttons located on your remote or on the PD1200HD to control playback 2. GO TO : Press this key to be able to input specific chapter, title, and time information to skip to 3. OSD▲: Press this key to bring up playback info (ie. current chapter, track, subtitle, angle and more.) 4. DVD MENU: Pressing this key will take you to the DVD menu screen if it’s available. If playing back VCD2.0/ SVCD discs, the DVD MENU key will toggle PBC ON or OFF (sequential playback). 5. REPEAT▲: Chooses the repeat mode (OFF/ CHAPTER/ TITLE/ REPEAT ALL) 6. A-B: Put a certain section of playback in repeat. Press A-B once to mark the beginning, and again to mark the end. Your PD1200HD will then loop the beginning and the end segments. 7. ANGLE: Pressing the ANGLE key will switch between available angles on the DVD. *Feature must be available on your DVD. 8. SUB (SUBTITLE)▲: Switch between available subtitle languages. *Feature must be available on your DVD. When an audio CD is inserted, the SUB key brings up the RIP CD function. 9. AUDIO▲: Switch between available audio languages. *Feature must be available on your DVD. 10.RETURN▲: Skip back one level within menus. DVD PLAYER 6.1 DVD - basic remote Control operation ▲ 6.2 DVD - SETUP MENU Press the setup key on your remote or on the PD1200HD while in DVD mode to bring up the DVD SETUP menu. Press the SETUP key again to exit. The SETUP menu presents the following options: ▪▪ SYSTEM SETUP ▪▪ TV SYSTEM - NTSC/ PAL/ AUTO ▪▪ AUTO PLAY Enable or disable automatic playback once a CD/ DVD is inserted - ON/ OFF ▪▪ VIDEO - S-VIDEO ▪▪ TV TYPE - 4:3 PAN SCAN/ 4:3 LETTERBOX/ 16:9 WIDESCREEN ▪▪ PASSWORD Default password is 0000 ▪▪ RATING - KID SAFE/ G / PG/ PG13/ PG-R/ R/ NC-17/ ADULT Please note, in order to change the Parental lock settings, you must unlock the system by inputting the password in the PASSWORD setting above. 21 ▪▪ DVD PLAYER 22 DEFAULT - Restore Restore settings back to factory defaults ▪▪ LANGUAGE SETUP ▪▪ OSD LANGUAGE - ENGLISH/ GERMAN/ SPANISH/ FRENCH/ PORTUGUESE/ ITALIAN Change the On Screen Display language for the DVD SETUP menu. ▪▪ AUDIO LANGUAGE CHINESE/ ENGLISH/ JAPANESE/ FRENCH/ SPANISH/ PORTUGUESE/ LATIN/ GERMAN Extra audio languages must be present on your DVD. ▪▪ SUBTITLE LANGUAGE CHINESE/ ENGLISH/ JAPANESE/ FRENCH/ SPANISH/ PORTUGUESE/ GERMAN/ OFF Subtitles must be present on your DVD. ▪▪ MENU LANGUAGE CHINESE/ ENGLISH/ JAPANESE/ FRENCH/ SPANISH/ PORTUGUESE/ GERMAN/ LATIN Extra menu languages must be present on your DVD. ▪▪ DIVX VOD This screen contains your DivX registration number to playback purchased DIVX content on your PD1200HD. Please visit www.divx.com/vod and register using your unique registration code. ▪▪ DIVX LANGUAGE CENTRAL EU/ CYRILLIC/ WESTERN EU/ GREEK/ TURKISH/ HEBREW/ WESTERN EU ISO/ CENTRAL EU ISO If subtitles on your DIVX files are showing incorrectly, choose a different DIVX subtitle character encoding suitable for your DIVX file. ▪▪ AUDIO SETUP ▪▪ KEY #/ +4/ +2/ 0/ -2/ -4/ b ▪▪ VIDEO SETUP ▪▪ BRIGHTNESS 0/ 2/ 4/ 6/ 8/ 10/ 12 ▪▪ CONTRAST 0/ 2/ 4/ 6/ 8/ 10/ 12 ▪▪ HUE -6/ -4/ -2/ 0/ +2/ +4/ +6 ▪▪ SATURATION 0/ 2/ 4/ 6/ 8/ 10/ 12 ▪▪ SHARPNESS 0/ 2/ 4/ 6/ 8 ▪▪ DE-INTERLACE 0/ 2/ 4/ 6 The “DE-INTERLACE” setting affects DIVX file playback. W I N TA L PD120 0 H D U SE R M A N UA L To enter the SD/USB PLAYBACK screen, make sure you are in DVD MODE (press the MODE key on your remote or on the PD1200HD and choose DVD from the list). SD/ USB Your PD1200HD is able to playback media files from an SD card, as well as a USB flash drive. PLAYBACK 7. SD/USB PLAYBACK If there’s no CD or DVD disc inserted, the PD1200HD will automatically read the contents of your SD card or USB flash drive. If there’s a CD/DVD inserted, 1. Press the MEDIA key on your remote or on the PD1200HD 2. Choose READ USB/CARD from the pop menu. The PD1200HD will automatically begin to playback any audio files located on your SD/USB. MUSIC PHOTOS GAMES MOVIES To move to Photo, Games or Video mode, use the Left or Right keys until the buttons on the bottom of the screen are highlighted. Press OK when you have highlighted your choice. If you are not able to make a selection, please make sure that your SD/USB contains that particular content type. Eg. If your SD/USB does not have any .NES files, you will not be able to highlight and select GAMES mode. The formats supported are: AUDIO: ▪▪ MP3 ▪▪ WMA (Windows Media Audio) VIDEO: ▪▪ AVI (DivX 4 and 5 files) PHOTOS: ▪▪ JPG Notes: ▪▪ If you have an SD card and a USB flash drive connected simultaneously, the PD1200HD will read and playback from the SD card. ▪▪ If there’s no media present on your SD card or USB flash drive, the PD1200HD will remain on the DVD screen ▪▪ If you can’t see some audio or video files in the file list, it may mean that it is in an unsupported file format. To exit back to DVD mode press the MEDIA key and choose “READ DVD” 23 8. Game Player You can play 8-bit NES games with the PD1200HD. GAME PLAYER To begin playing games off the included game CD, make sure you are in DVD MODE (press the MODE key on your remote or on the PD1200HD and choose DVD from the list). ▪▪ Insert the included game CD ▪▪ Insert the included joystick to the game controller USB port ▪▪ Once the game CD has loaded and shown on screen, use the and keys to browse through the different pages. There are 30 pages in total and 10 games per page. ▪▪ Once you find the game that you like, press the corresponding number for your game using the remote. For example, pressing the “7” key on your remote when on PAGE 1 of the game menu will load the game “Bomb Jack”. You can also load games from an SD card or USB flash drive. See 7. SD/ USB Playback on page 23 for more information. 24 W I N TA L PD120 0 H D U SE R M A N UA L 9. AUDIO CD to MP3 conversion 1. Turn off your PD1200HD 2. Insert your Audio CD 3. Insert an SD card or a USB flash drive Make sure your SD card or USB drive are not write-protected, formatted as FAT32, and have enough free space. 4. Turn on your PD1200HD and make sure it is in DVD mode. Press the MODE key on your remote or on the PD1200HD and choose DVD from the list. 5. Once the DVD screen comes up, press the SUB key on your remote or the SUBTITLE key on your PD1200HD. 6. Set your options using the arrow keys, and the ENTER/ OK key to change settings AUDIO RIPPING Your PD1200HD is able to convert audio tracks from Audio CDs to MP3 files straight onto your SD card or USB flash drive. To begin the MP3 conversion process, SPEED: Choose between 1x and 2x speeds. The lower the speed setting, the higher the rip accuracy, however, the process will take longer. BITRATE: Determines the amount of compression to apply. A higher number means better quality, however, file size will be larger. CREATE ID3 TAG: If track information is present, the resulting MP3 files will carry the Artist, Track Title information. This feature depends on whether your CD has this information. CREATE PLAYLIST: Choosing this will create a playlist (M3U file) 7. Choose the tracks you want to convert Remove the check mark “” from tracks that you don’t want converted. 25 8. Chose START and press the ENTER/ OK key to begin the operation. AUDIO RIPPING You can also view a summary of the ripping process including the total tracks that will be converted, total play time as well as total file size. Once the conversion process has begun, you can view the progress for the current track as well as the overall progress. You are also able to change the ripping speed from this screen. You can also choose CANCEL to return back to the OPTIONS screen. 9. Once the process is finished, you will find your audio tracks in a folder on your SD card or USB flash drive. You can then play these MP3 files on your PD1200HD (See 7. SD/ USB PLAYBACK on page 23), PC, MP3 player and more. 26 W I N TA L PD120 0 H D U SE R M A N UA L 10. RECHARGEABLE BATTERY Your PD1200HD has a built-in Polymer Li-Ion battery that can be charged as long as your PD1200HD is plugged into a power source. ▪▪ When the LED is lit RED it means a HIGH CHARGE (1.2A) ▪▪ When the LED is lit ORANGE it means a LOW CHARGE (0.4A) If the PD1200HD is OFF while plugged in, the battery will be charged at HIGH CHARGE. If it is On, the battery will be charged at LOW CHARGE. Please keep this mind when charging, as having your PD1200HD off while plugged in will greatly speed up the charge time. 11. SPECIFICATIONS DVD VIDEO DVD AUDIO Specifications DVB-T TUNER DVB-T DECODER Video D/A Converter: Horizontal Resolution: Frequency Response: Dynamic Range: Audio D/A Converter: TFT Panel: Signal System: Power Source: Power Consumption: Weight: Dimensions (L x W x H): RF Input Connector: Frequency Range: Waveform: Demodulation: FEC: Guard: Mode: Video Standard: Video Resolution: Audio Standard: 10bit 500 line 20Hz ~ 20KHz 80dB 96kHz/ 24bit 12.3” (16:9) 1280x800 PAL/ NTSC/ AUTO Input: 100-240V 50/60Hz Output: DC 13.5V 20W 2.20kg 315 x 246 x 50mm F-TYPE, IEC169-2, FEMALE VHF: 174~230 MHz UHF: 470~862 MHz COFDM 16QAM, 64QAM 1/2, 2/3, 3/4, 5/6, 7/8 1/4, 1/8, 1/16, 1/32 2K, 8K MPEG-2: MP@ML, MP@HL H.264/AVC: [email protected], [email protected],3.2 VC-1: AP@L3,L2 720p/ 1080i MPEG-1 and 2. Layer I and II MPEG-4 HE-AAC 27 12. TROUBLESHOOTING 1. Can’t read SD cards/ USB flash drives ▪▪ Make sure your SD card or USB flash drive has been inserted correctly. ▪▪ Make sure your media is formatted as FAT32. ▪▪ If the PD1200HD is not recognising your USB drive, please make sure you do not have an SD card connected at the same time. 2. Can’t read some CDs/ DVDs ▪▪ Make sure there are no scratches on your discs. Try wiping them with a clean moist cloth. ▪▪ Try using another brand of blank media. DVD-R media are generally easier to read and load. 3. Can’t use the remote control ▪▪ Make sure the battery in your remote has not gone flat. Replace it with a new one. ▪▪ Make sure you are pointing towards the IR sensor located on the front of your PD1200HD. 4. Can’t watch DVB-T ▪▪ Make sure you are in an area that receives good TV signals. ▪▪ Instead of the included mini-antenna, connect your PD1200HD to a dedicated antenna outlet on the wall. ▪▪ Make sure you have scanned channels - See page 12. 5. Can’t get any picture via AV out when watching DVDs ▪▪ Make sure the output setting matches that of your TV (PAL or NTSC). Change it in the SETUP menu - See page 21. 6. Can’t see all my files on SD/ USB ▪▪ Your PD1200HD has support for a limited number of file types. It will only show the file types it supports when browsing a directory on your SD card or USB drive. 7. Problem with some video files - sound but no picture ▪▪ The MPEG4 AVI extension is a container format. Meaning although two files will have the same .avi extension, they very well may be encoded completely different. Video playback on your PD1200HD is designed for 640 x 480 resolution MPEG4 files and may not play files with larger resolution. 8. Being asked for a password when trying to playback certain DVD movies ▪▪ You will be prompted for a password if you have activated parental guidance and the movie you are trying to watch is rated higher than the allowed rating in your setup. Either input your password (default password is 0000) or turn off the parental guidance in the RATING menu under DVD SETUP `- See page 21. 28 W I N TA L PD120 0 H D U SE R M A N UA L TOMER CUS CA R E CE N T R E CUSTOMER CARE CENTRE THIS PRODUCT IS WARRANTED FOR 12 MONTHS FROM THE DATE OF PURCHASE. Subject to the conditions of this warranty, the Customer Care Centre will perform necessary service on the product without charge for parts, or labour if, in the opinion of the manufacturer/ manufacturer’s agent, the product is found to be faulty within the warranty period. This warranty only applies if the product has been installed and used in accordance with the manufacturer’s recommendations (as noted in the operating instructions) under normal use and reasonable care. The warranty covers normal domestic use only and does not cover damage, malfunction or failure resulting from use of incorrect voltage, accident, misuse, neglect, build-up of dirt or dust, abuse, misadjustment of customer controls, mains supply problems, thunderstorm activity, infestation by insects or vermin, tampering or repair by unauthorised persons (including unauthorised alterations), exposure to abnormally corrosive conditions or any foreign object or matter having entered the product. If warranty service is required you should: Telephone the Customer Care Centre on 1300 662 946 Provide a copy of your purchase receipt that shows retailers identity and date of purchase. Send or bring the product to your Customer Care Centre. Please note that freight to and/or from your Customer Care Centre must be arranged by you. The warranties hereby conferred do not extend to any costs associated with the delivery, handling, freighting or transportation of the product or any part thereof or replacement of and do not extend to any damage or loss occurring during, or associated with transit. THIS WARRANTY CARD AND THE PURCHASE DOCKET (OR SIMILAR PROOF OF PURCHASE) SHOULD BE RETAINED BY THE CUSTOMER AT ALL TIMES TROUBLE SHOOTING HELP LINE 1300 662 946 Customer Care Centre 562 Spencer Street, West Melbourne VICTORIA 3003 w w w.w i n t a l.c o m.a u W I N TA L PD120 0 H D U SE R M A N UA L