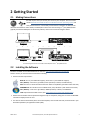
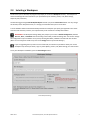
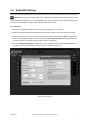
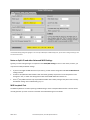
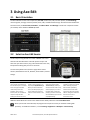
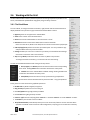
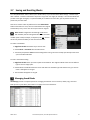
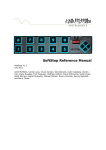
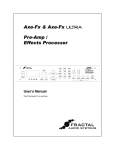
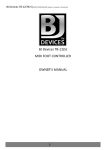
1
Axe-Edit 1.0 Operation Manual 1 Introduction 1.1 Thank You for Choosing Fractal Audio Systems We created this application for you, the Axe-Fx community. It is our commitment to provide you with the best in musical instrument processors and products. Axe-Edit is free, bound only by the terms of the EULA, offered to help you get the most from your Axe-Fx. We appreciate your patience, feedback, and support as we strive to make our products the best they can be. Thank you also to our dedicated team of beta testers. Your tireless dedication is a pillar of our community. Special thanks to Sean Strickland, Steve Oldridge, Scott Peterson, Patrick Voes, Antoine Rachlin, Jake Paland, Brian Stegall, Jason Marr, Buddy Gill, Jason Marr, Jochen and Friedlieb with G66.eu, our many artists, and you. 1.2 Before you Begin Although Axe-Edit is tested extensively, it is a young application at version 1.0. We recommend that if possible, you backup any custom presets and settings before using this software with your Axe-Fx II, Ultra, or Standard. If you are using the Axe-Fx II, you might simply use the onboard backup ROM to create a backup copy of your own presets (see your manual for details). Ultra or Standard users can dump presets manually to a SysEx utility. Don’t worry if you can’t do this; one of the first steps in using the application will typically back up all of your user presets to your computer hard drive. If you are upgrading from a beta version to the 1.0 release, it is strongly recommended that you uninstall the previous version before installing Axe-Edit 1.0 DRAFT v0.51 Fractal Audio Systems | Axe-Edit Operation Manual 2 2 Getting Started 2.1 Making Connections Axe-Edit requires that you connect your Axe-Fx to your computer. Axe-Fx II owners should download and install the Axe-Fx II USB driver for their operating system and verify that the Axe-Fx II is successfully connected to the computer via USB (see the rd driver documentation for more details). Standard/Ultra owners must connect using a 3 party MIDI Interface (typically the M-Audio MIDIsport 2x2 Anniversary Edition). Refer to the connection diagrams below: Connection Diagrams for Axe-Fx II via USB and Standard/Ultra via a 3rd party MIDI Interface 2.2 Installing the Software Axe-Edit is available as a free download from our web site: http://www.fractalaudio.com/axe-edit Check to ensure you have the latest version before installing. Review minimum requirements: MAC OS: 10.5.7+ (2×4 USB Audio support); OS X: 10.4.2+ (2×2 USB Audio support). CPU / Memory: Intel Core 2 @ 1.6GHz (or PPC equivalent) or better, 512+MB memory. USB: There are no caveats with OS X other than USB 2.0 compatibility (all modern Macs offer this). WINDOWS OS: 32 or 64 bit versions of Windows XP, Vista, Windows 7 (with latest Service Pack). CPU / Memory: Intel Core 2 @ 1.6GHz (or AMD equivalent) or better; 512+MB RAM. USB: Chipset dated Jan 2006 or later. (See http://www.ayre.com/usb-192-windows.htm ). Double click the installer file and proceed through the steps to completion, being sure to review the README information displayed near the end. If it does not launch automatically when the install completes, start Axe-Edit manually. It will be found in your Start Menu (Windows) or Applications folder (Mac). DRAFT v0.51 Fractal Audio Systems | Axe-Edit Operation Manual 3 2.3 Selecting a Workspace The first time you run Axe-Edit, the program will prompt you to select a Workspace directory. The workspace is where Axe-Manage will store and look for your personal files (such as banks, presets, cabs, block settings, temporary files, and more). Axe-Edit will suggest using Fractal Audio/Workspace beneath your personal Documents folder. You may change this location, but for best performance, it is strongly recommended that you use a local drive. A set of subfolders will be created automatically beneath the workspace you specify (The appendix covers these structures and what they contains.) It is important that you do not delete or modify these folders. IMPORTANT: The Workspace Settings dialog also prompts you to select a Default Configuration, whether Axe-Fx II, Ultra, or Standard. Choose according to the model you will be working with. You can later change the configuration of your installation at any time by selecting SETTINGS | CONFIG in the Axe-Edit main window. (Note: You can change the model at any time via the Config submenu of Axe-Edit Settings.) If you are upgrading from a previous version of Axe-Edit, the installer may be able to detect your current workspace and, should you choose, copy any assets (banks, presets, cabs, block settings) to a new location. To set your Workspace and Default, press the Save Changes button. Select Workspace Settings DRAFT v0.51 Fractal Audio Systems | Axe-Edit Operation Manual 4 2.4 Audio/MIDI Settings Axe-Edit must also be setup with the correct Input and Output ports to communicate with your connected Axe-Fx Reminder: Axe-Fx II Users must have the Axe-Fx II USB Driver Installed for the correct ports to be available rd in the Input/Output dropdowns. Your 3 party MIDI Interface, used to connect an Axe-Fx Ultra or Standard, may also require driver installation. Please see the manufacturer’s documentation. To set MIDI Ports: Bring up the Audio/MIDI Settings from the settings menu (highlighted in blue, below). Select the appropriate MIDI Input and MIDI Output ports based on how you have your Axe-Fx connected. Once you select the correct ports, your Axe-Fx should be detected automatically. The Status message at the bottom of the Audi/MIDI Settings screen will change from Status: Not Connected to show details about your connected hardware, including the model, firmware version, and SysEx ID. If you see Hardware Not Detected or another error, check settings and press the Test Connection button. If you experience continued difficulty connecting, please see Troubleshooting on p. x. Making Audio MIDI Settings DRAFT v0.51 Fractal Audio Systems | Axe-Edit Operation Manual 5 The Audio Midi Settings dialog with highlights on the correctly set MIDI Input and MIDI Output ports, plus the status message indicating an AxeFx II has been discovered. Notes on SysEx ID and other Advanced MIDI Settings Typically, no other setting changes are required on the Audio/MIDI Settings screen. In some cases, however, you may need to modify the default settings: If you have changed the MIDI Channel of your Axe-Fx, you will need to change Axe-Edit’s Axe-Fx MIDI Channel setting to match. An Axe-Fx Ultra/Standard with firmware older than 10.02 generally requires the “Pre 10.02 SysEx ID” to be changed to “125,” to match the setting found under UTILITY:MIDI:SYSEX ID on the Axe-Fx. Some 3 party MIDI Interfaces may require different Buffer Size or Delay settings if they don’t work correctly with default settings. See Troubleshooting on p x.x rd MIDI Loopback Test The MIDI Loopback test is used only during troubleshooting to check a computer MIDI Interface. The test should normally fail when you have an Axe-Fx connected. See troubleshooting for more details. DRAFT v0.51 Fractal Audio Systems | Axe-Edit Operation Manual 6 3 Using Axe-Edit 3.1 Basic Orientation The Axe-Edit Suite has two main components, Axe-Edit, used to view, edit, and save presets, and Axe-Manage, used to organize, manage, and share presets, banks, cabs, and effect block settings. Axe-Edit is further divided into functional areas, the Control Unit, Grid Editor, and Effects Editor. Axe-Manage is launched in a separate window (or windows) and is detailed in Section 4, below. 3.2 Select an Axe-Edit Source The first step to using Axe-Edit is to select a source. Your source selection tells Axe-Edit where to look for presets to open and edit. Once you select a Source, any preset within that source may be opened for editing with just one or two clicks. The source dropdown menu (shown at right) offers several choices, detailed below: Axe-Fx, Bank File, Preset Folder, and AxeChange. Axe-Fx Bank File Preset Folder Axe-Change When you select the Axe-Fx source, presets are read directly from the memory of a connected Axe-Fx. Changes are likewise saved directly back to the hardware. See Sync Axe-Fx Presets, below, for an additional step that is required when working with the Axe-Fx source. A Bank is a bundle of 128 presets stored on your computer in one file (example: MyShowBank.syx). When you select the Bank File source, Axe-Edit prompts you to select a valid bank. Presets are read from and saved back to this file. Axe-Edit can open individually saved preset files (example: “Studio Lead.syx”). When you choose the Preset Folder source, Axe-Edit prompts you to select the folder which contains the preset(s) you want to work with and automatically opens the first one (alphabetically). Axe-Change is our online preset repository. It works like a remote folder containing the presets that have been uploaded by members of the Fractal Audio Community. Note: Axe-Change is offline as of Aug 2011. Watch our web site for news on its imminent re-launch. Additional detail about the current source will be shown directly above the main Preset Name Area. When you exit and restart Axe-Edit, the program will re-open the source you had been working with previously. To disable this behavior, un-check Settings : Application : Workspace : Smart Startup. DRAFT v0.51 Fractal Audio Systems | Axe-Edit Operation Manual 7 3.3 Sync Axe-Fx Presets Whenever you start Axe-Edit and select the Axe-Fx source, it is recommended that you sync the software to your connected hardware. This quick process allows Axe-Edit to display preset names correctly in its Preset Selector Menu, so you can select entries by their names instead of their numbers. When you Sync, Axe-Edit receives preset data from the Axe-Fx, downloading to a local cache and storing it on your computer (Workspace: Axe-Fx: Bank A, B or C). The Sync utility also offers the option to backup your presets to Workspace: Utilities : Backups. The sync process is one way from the hardware to the software; it never modifies your Axe-Fx. The Sync and Backup Dialog To sync, click on the Preset Selector Menu. Choose Sync Banks from Hardware… Select desired options and press the SYNC button. Syncing Axe-Edit also makes preset names available to Axe-Manage. Likewise, Axe-Manage operations which retrieve preset data from the Axe-Fx will also Sync Axe-Edit. Presets can also be synced individually by retrieving them to edit or requesting them through Axe-Manage. Why Are My Preset Names Grayed Out? Preset data is cached to be retained even after you quit 1 Axe-Edit , but Axe-Fx preset names and icons are grayed out each time you exit and re-start the program. This is to remind you to re-sync to get the latest data while still providing names from the last sync as a point of reference. In many cases, you will have made no changes outside of Axe-Edit, so the grayed names offer a perfectly viable way to work even without re-syncing. It is always possible, however, that the presets in a connected Axe-Fx may have been modified while it was disconnected, in which case a resync upon launching Axe-Edit could be critical. 1 Grayed and Synced (aka “Known”) Presets It is also possible to manually delete the preset files in the cache, located in the Workspace beneath the Axe-Fx node. DRAFT v0.51 Fractal Audio Systems | Axe-Edit Operation Manual 8 3.4 Select a Preset for Editing Once you have selected a source, you are ready to load and edit presets from within that source. There are three ways to load presets in Axe-Edit: 1. 2. 3. The Up and Down arrow buttons advance to the next and previous presets in the current source The Preset Selector Menu lists presets in the current source for direct selection. (Note that Axe-Fx presets 000-383 are subdivided into three banks, a distinction which does not appear at all on the hardware) Preset numbers may be entered directly after clicking the Preset Number Area of the main display. 3.5 Editing: Basic Parameter Changes Once a preset is loaded, it will appear in the Grid Editor. Selecting a block highlights its outline and displays its parameters in the Effect Editor. In the example below, the AMP1 block is selected. Note also the icon and name of the effect shown in the upper left of the editor panel when it is selected. Use the mouse to edit any knob, switch, list box, or control. Sound changes are heard on the Axe-Fx in realtime. You can also click in the box above a knob to enter parameter values numerically from the keyboard. Double click any knob to set it to its default value. Page Select Buttons (shown at left) enable full access to effects with too many parameters to fit on a single screen. The example here shows buttons for the five pages of the AMP block of the Axe-Fx II. DRAFT v0.51 Fractal Audio Systems | Axe-Edit Operation Manual 9 3.6 Working with the Grid The Axe-Edit Grid Editor makes it possible to perform all of the grid operations possible on the Axe-Fx, with additional capabilities like copy/paste, drag and drop, and more. 3.6.1 The Block Menu To insert a block, or change one block into another, right/control-click the desired location to display the Block menu (shown at right) and select the desired block or action. Bypass Bypasses or un-bypasses the selected block Shunt inserts a shunt at the selected location Delete removes the selected block or shunt and leaves a “hole” Disconnect removes all connector cables both to and from the block. Note: As on the Axe-Fx, blocks in the first/last rows remain connected to input/output. Edit Cut/Copy/Paste perform the actions you would expect. It is even possible to copy and paste blocks from one preset to another! Settings enables you to save to or recall from your library of saved effect block settings. See section x.x below for more on this feature. Amp through Wah provide direct access to insert any block at any location. To change one block into another, just insert the new over the existing. You will also find dedicated buttons left of the grid for key actions. Shunt, Bypass, and Delete perform the same functions as the corresponding menu items. Clicking Delete with no selection will clear the entire preset. Initialize returns the selected block to default settings. Clicking Initialize with no selection will initialize the entire preset. Undo/Redo provide some level of “oops” protection for grid operations. Please note that these will NOT work for parameter edits – only grid operations. Finally, there are some shortcuts for grid/block operations: Double-click any block to bypass/un-bypass it. Drag and drop any block to move it on the grid. Hold ALT/Option during Drag and Drop to SWAP Hold Control during Drag and Drop to COPY Control + C/X/V work for Cut/Copy/Paste. Control + I = Initialize. Control + Z = Undo. Control + Y = Redo. The Delete key can be used to remove a block. Row/column handles (shown below) allow you to move entire rows/columns at once. Note that these operations will break certain connector cable configurations, requiring you to recreate them manually. DRAFT v0.51 Fractal Audio Systems | Axe-Edit Operation Manual 10 3.6.2 Creating Connector Cables Axe-Edit allows you to create connector “cables” between grid blocks using drag and drop. To create a connection between blocks, mouse over the starting block to reveal its connector, shown as a small circle at the edge of the block. Note: You can also click on a block and click the “Cable” button left of the grid. Drag to the grid space or block you want to connect to. As on the Axe-Fx, the block or space must be in the next column to the right. Release the mouse button to create the connector cable. If you connected to an empty grid location, a shunt will be created automatically. You can also make straight runs through multiple columns. 3.6.3 Removing Connector Cables To remove a cable, mouse directly over it. Click and drag to break the connection. Release the mouse button and the cable will be removed. Remember, there are also Block Menu and Grid button shortcuts to disconnect all cables in and out of a selected block. DRAFT v0.51 Fractal Audio Systems | Axe-Edit Operation Manual 11 3.7 Saving and Recalling Blocks The “Save/Recall Block” feature allows you to build a library of your favorite effect block settings—whether amps, cabs or effects—and then recall these at any time in any preset. You might, for example, have a favorite WAH that you like to use again and again, or a particular AMP you’ve dialed in to taste. Now, you can place these into any preset with just a few clicks. Note: This is similar to but very different from the Global Blocks feature of the Axe-Fx II. Here, there is no link between the original and the library entry. This is more of an imprint than an original. Note: Modifier assignments and settings will be saved with the block, but the settings behind internal controllers modifier (such as LFOs, Envelope, or Sequencer) will not. A future version may include the ability to save internal controllers. To create a saved block: Right/Control Click the block that you want to save. Choose Blocks > Save Block from the Block menu You will be prompted to name the block setting before saving. The name will help you identify it later when you use the Recall function. To recall a saved block setting: Right/Control Click where you want to place the saved block. This might be a block of the same or different type or even an empty space. Choose Blocks > Recall Block from the menu. Drill down into the block type and click the entry you want to recall. It will appear on the grid. The new block will appear on the grid. Managing Saved Blocks Axe-Manage provides a complete system for managing saved blocks. You can rename, delete, copy, share and back up items in your library. See section x.x on page x for more information. DRAFT v0.51 Fractal Audio Systems | Axe-Edit Operation Manual 12 3.8 Working with Modifiers Modifiers link Axe-Fx parameters to controllers, allowing sound features to be automated or remotely controlled in real-time. Axe-Edit provides a complete editor for modifiers, allowing you to not only select sources but edit mappings and other settings as well. Just as on the Axe-Fx itself, the modifier symbol indicates those parameters which can have modifiers. It appears on knobs, switches, dropdown menus, and sliders. When a modifier is assigned to a parameter, the symbol not only changes like it does on the Axe-Fx, but also changes color, glowing yellow. The illustration below shows how modifiers appear on an Axe-Edit knob and a dropdown. To create, view, or edit a modifier, right/control click on the modifier symbol in Axe-Edit to show the Parameter Modifier dialog. Here, you will find the familiar controls and display from the Axe-Fx Modifier screen. The graph accurately shows curves as you dial in Start, Mid, End, and Slope. IMPORTANT The modifier “dot,” which shows the current value of a modifier’s source, does not accurately reflect what actual modifier values or action in the Axe-Fx. Depending on the source, the dot may or may not move on the screen in Axe-Edit, but even if it does it will not be in sync with the hardware. If you need to watch the dot to create your preset, look at the Axe-Fx! 3.9 Controllers The controllers button to the left of the grid loads an editor panel where all of the Internal Controllers of the Axe-Fx can be viewed and edited for the current preset. You’ll find LFOs, ADSRs, Sequencer, Envelope, and (for the Axe-Fx II) Manual, with all their parameters. DRAFT v0.51 Fractal Audio Systems | Axe-Edit Operation Manual 13 4 Saving Changes Coming Soon DRAFT v0.51 Fractal Audio Systems | Axe-Edit Operation Manual 14 5 Axe Manage Coming Soon DRAFT v0.51 Fractal Audio Systems | Axe-Edit Operation Manual 15 Appendix 5.1 Uninstalling Previous Versions To uninstall a previous version of Axe-Edit, simply delete Axe-Edit from your Applications folder (Mac) or use the uninstaller provided in Control Panel/Add Remove Programs (Windows). You may also wish to remove the Settings File, which stores custom information about your installation. Mac: ~/Library/Preferences/Fractal Audio/Axe-Edit.settings Windows: C:\Documents and Settings\<username>\Application Data\Fractal Audio\Axe-Edit\Axe-Edit.settings You may wish to remove or rename an older workspace directory, where user files such as banks, presets, settings, and cabs will be found. These are typically found in the /Fractal Audio/ folder beneath your personal documents directory. 5.2 The Workspace The structure of the workspace, found in the Fractal Audio folder of your documents, is as follows. You should not delete or rename folders in the workspace, but it is possible to create subdirectories, either through finder/explorer or using Axe-Manage. Folder AxeChange /Cabs /Blocks /Keepers /Presets AxeEdit /Banks /Cabs /Blocks /Presets AxeFx /Bank A /Bank B /Bank C /User Cabs CnP Temp Utilities /Backups /Cache /Favorites /Limbo /Snapshots DRAFT v0.51 Notes The folder beneath which all Axe-Change related files and folders exist. The folder beneath which all Axe-Edit-related files and folders exist. The folder beneath which all Axe-Fx-related files and folders exist. Not a user folder. Used for temp files during copy/paste operations. Not a user folder. Used for temp files. The folder beneath which all Utilities-related files and folders exist. Home to Bank Backups created by Axe-Edit (“Sync & Backup”) (“Copy to Backups”) Not used by the current version of Axe-Edit Fractal Audio Systems | Axe-Edit Operation Manual 16