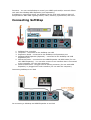
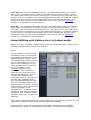
Download SoftStep Reference Manual

Transcript
SoftStep Reference Manual
SoftStep V1.2
July 2011
Keith McMillen, Conner Lacy, Chuck Carlson, Nick Bonardi, Justin Catalana, Dennis
Cao, Diane Douglas, Tom Ferguson, Matthew Hettich, David Hishinuma, Sarah Howe,
Keith Johnson, Daniel McAnulty, Michael McHam, Danny Piccione, Dennis Saputelli,
and Barry Threw
Copyright 2007-2011 Keith McMillen Instruments a wholly owned subsidiary of
Kesumo LLC. All rights reserved. Made in USA.
No part of this manual may be reproduced or transmitted in any form or for any
purpose without the express written permission of the copyright holders.
The content of this manual is furnished for informational use only, is subject to
change without notice, and should not be construed as a commitment by Keith
McMillen Instruments. Every effort has been made to ensure that the information in
this manual is accurate. No warranties, express or implied, are made with regard to
the quality, suitability or accuracy of this document. Keith McMillen Instruments
reserves the right to change the contents of this document and/or the associated
products at any time without the provision of prior notice to specific persons or
organizations. Keith McMillen Instruments shall not be held liable for damages of any
kind arising from the use, or the inability to use this product or its documentation,
even if the possibility of such damage is known.
Product and brand names contained in this document are used for identification
purposes only. Keith McMillen Instruments, the Keith McMillen Instruments Logo, the
SoftStep and SoftStep logo are trademarks of Kesumo LLC. Apple, Finder,
GarageBand, Mac, MacBook, Macintosh, Mac OS and QuickTime are trademarks of
Apple Inc, registered in the U.S. and other countries. Windows is a registered
trademark of Microsoft Corporation in the United States and other countries. Intel is
a registered trademark of Intel Corporation or its subsidiaries in the United States
and other countries. SONiVOX is the brand name trademark of Sonic Network, Inc.
VST and ASIO are trademarks and software of Steinberg Media Technologies GmbH.
ReWire, Recycle and REX2 are trademarks of Propellerhead Software AB. All other
product and company names are trademarks or registered trademarks of their
respective holders. All other names and designations of companies, products,
trademarks, or brands used in this document are the registered property of their
respective holders.
Table of Contents
1. Welcome ................................................................................... 4
1. Questions or Feedback? Contact Us! ............................................ 4
2. Before Getting Started............................................................... 4
1. System Requirements................................................................ 4
2. What's in the SoftStep Package................................................... 4
3. SoftStep Hardware .................................................................... 5
1. Practical Applications ................................................................. 5
4. Connecting SoftStep .................................................................. 6
5. SoftStep MIDI Expander ............................................................ 7
6. Getting Started.......................................................................... 8
1. Downloading the Software.......................................................... 8
1. Updating the Software ............................................................ 9
2. Updating the Firmware............................................................ 9
7. Quick Start Guide ...................................................................... 9
1. Standalone............................................................................... 9
2. Using the SoftStep Editor to Program the SoftStep .......................11
1. Modlines ..............................................................................12
2. LEDs and Display ..................................................................14
3. Saving .................................................................................15
8. SoftStep Editor ........................................................................ 16
1. The Basics ..............................................................................17
2. Ports ......................................................................................18
1. HOSTED MODE .....................................................................18
2. STANDALONE MODE ..............................................................19
3. Standalone vs. Hosted ..............................................................19
4. Main Window Overview .............................................................20
5. Saving Scenes .........................................................................21
1. Managing Scenes and Presets .................................................22
2. Factory Scene Library ............................................................23
1. Hosted Mode......................................................................23
2. Standalone Mode................................................................25
6. Scenes ...................................................................................28
7. Setlist ....................................................................................29
8. Settings..................................................................................29
9. Sensor View ............................................................................32
10. SoftStep Keys..........................................................................33
1. Modulation ...........................................................................34
11. Nav Pad..................................................................................37
12. Preset Modulation ....................................................................40
9. Sending Program Changes to the SoftStep .............................. 41
10. Setting Up an Expression Pedal ............................................... 41
11. Appendix ................................................................................. 42
1. SoftStep Sources .....................................................................42
2. SoftStep Parameter Destinations ................................................45
3. Using SoftStep with Ableton Live (in Hosted mode).......................47
12. Glossary .................................................................................. 51
13. Troubleshooting ...................................................................... 54
1. DAW/Host Application Trouble ...................................................54
2. Display Trouble........................................................................55
3. Noise Trouble ..........................................................................56
4. Connectivity Trouble.................................................................57
Welcome
Thank you from Keith McMillen Instruments! We are excited to welcome you to the
world of SoftStep, the world's most expressive foot controller.
Questions or Feedback? Contact Us!
If at any time you have any questions, please contact us:
Web: www.keithmcmillen.com
Forum: forum.keithmcmillen.com
Email: [email protected]
Before Getting Started
There are a few things that you need to know before you start using your SoftStep.
• When you first receive your SoftStep, please check the SoftStep downloads
for the latest firmware and applications: http://www.keithmcmillen.com/
softstep/downloads/
• Keith McMillen Instruments cannot be held liable for damage
resulting from installation and operation errors or improper use.
System Requirements
We recommend the following for using the SoftStep applications:
MAC:
• An Intel Core 2 Duo 2.3GHz or greater Mac OS 10.5 or later
• 90 MB free hard disk space
WINDOWS:
• Windows XP, or Windows 7
• Intel Core 2 processor or greater
• 1GB of RAM with 50 MB free hard disk space
What's in the SoftStep Package
When you open up the box you should
find:
•
•
•
•
1 SoftStep
1 USB A-to-B cable (15ft.)
1 SoftStep Protective Sleeve
1 1/8" to 1/4" expression pedal
adapter
• SoftStep MIDI Expander
(optional)
◦ 1 USB A-to-B Mini USB
4-pin cable (15ft.)
◦ 1 USB power plug
◦ 1 USB A-to-B cable (6ft.)
SoftStep Hardware
The SoftStep is the world's lightest, smallest, and most expressive foot controller. It
weighs about 566 grams and is 105mm x 450mm x 24mm. The key pads are about
40mm X 40mm. The Nav Pad diamond is about 50mm X 50mm.
SoftStep is powered by USB and has a
1/8" port for an expression pedal
(volume pedals are not supported).
Make sure your expression pedal has
a 3 wire (stereo) connection. SoftStep
ships with a 1/4" to 1/8" adapter so
you can connect your 1/4" expression
pedal to the expression port on the
SoftStep.
There is also an Expansion port for the SoftStep MIDI Expander (sold separately) to
enable use without a computer to control your MIDI synth and/or rack. Power can
also be supplied through the expansion port.
SoftStep has blue electroluminescent backlighting for easy visibility on stage. There
is a 4 character, user programmable, alphanumeric display and 10 bi color, user
programmable LEDs for visual feedback.
The SoftStep is rubberized with a carbon fiber back for maximum strength and
stability.
Each key is responsive to 5 degrees of control: X-axis, Y-axis,
clockwise rotation, counter-clockwise rotation, and pressure. These
control sources are mappable to any MIDI or OSC destination.
Practical Applications
SoftStep is an extremely flexible controller with many possible applications. You can
use it with computer software to control effects, looping, sample triggering, etc.. Or
use it with a DAW to set panning and mix levels, or trigger punch-ins and transport
functions. You can use SoftStep to control your MIDI synth and/or external effects
rack with the SoftStep MIDI Expander (sold separately).
In addition to controlling sound, the SoftStep can be used with anything that will
accept MIDI or OSC data: lighting effects, video, robotics, pyrotechnics, and more.
Connecting SoftStep
1.
2.
3.
4.
SoftStep foot controller
Computer - connected to the SoftStep via USB
Expression Pedal - connected to the SoftStep via Expression port
SoftStep MIDI Expander (Optional) - connected to the SoftStep via USB
Expansion port
5. Effects Processor - connected to the MIDI Expander via MIDI cable (for use
with MIDI Expander). You can also connect to an interface that is connected
to the computer (for use with computer).
6. Musical Instrument - Plugged into an effects processor (for use with MIDI
Expander) or plugged into audio interface (for use with the computer).
Connecting SoftStep to an iPad
Or connecting a SoftStep and MIDI Expander to an iPad:
SoftStep MIDI Expander
The SoftStep MIDI Expander
enables you to use SoftStep
with your hardware MIDI
devices. Plug your MIDI
devices into the SoftStep MIDI
Expander and you're ready to
send and receive MIDI data
(with or without a computer).
Setup A:
Connect the “Expand” port on SoftStep
to the “to SoftStep Expand” port on
the SoftStep MIDI Expander using the
USB A-to-B mini cable. Connect the
MIDI Expander to the USB power
supply using the USB A-to-B cable.
Setup B:
Connect the “Expand” port on SoftStep
to the “to SoftStep Expand” port on
the SoftStep MIDI Expander using the
USB A-to-B cable. Connect SoftStep to
the USB power supply using the USB
A-to-B cable.
Setup C:
Connect the “Expand” port on SoftStep
to the “to SoftStep Expand” port on
the SoftStep MIDI Expander using the
USB A-to-B mini cable. Connect
SoftStep to a computer using the USB
A-to-B cable. (There is no need to use
the USB power supply.)
Getting Started
Thanks again for purchasing SoftStep, now lets get started. Before you begin
working with your SoftStep, please make sure to do all of the following in this
order:
1. Download the SoftStep Music Applications
from: http://www.keithmcmillen.com/softstep/downloads/
2. Install onto your computer:
1. for mac: Install using the .dmg file. Once installed keep everything
in the SoftStep folder as is so that the applications can access
everything they need to run.
2. for windows: Unzip the file and move the entire SoftStep directory
into your Program Files directory. Make sure you keep all the folders
and files in their original locations so that the applications can access
everything they need to run.
3. Check to see if you need a firmware update and update your firmware if
needed.
4. Plug the SoftStep into your computer via USB
5. Try out the factory-installed SoftStep scenes (see the Standalone chapter
below to view guides for these scenes).
6. If you want to create your own scenes, open up the SoftStep Editor or the
SoftStep Easy Editor. Use this manual as a reference for the SoftStep Editor.
The SoftStep Easy Editor's documentation is included in the SoftStep Music
Applications version 1.2 download.
If you experience any problems or have questions regarding the SoftStep install
process, please reference the chapters devoted to them. If you continue to
experience difficulties, consult the troubleshooting chapter. If these problems still
persist, e-mail us at [email protected] outlining the problems you're
experiencing. The more detailed you are in describing your problem (information
about your computer, the software you're running, the circumstances around the
issue), the more easily we will be able to help you.
Downloading the Software
Make sure to download the latest version of the software
at: http://www.keithmcmillen.com/softstep/downloads/
Once the software has finished downloading, install using the .dmg file (mac) or
unzip it and drag-and-drop the entire "SoftStep" folder into your Program Files folder
(windows).
The SoftStep folder contains the SoftStep Editor, a folder containing your presets,
several other useful applications with their documentation, and a version notes file
containing information about the current version's updates.
IMPORTANT: Do not remove or change the locations of any files or folders
inside the SoftStep directory.
Updating the Software
After downloading an upgrade from the SoftStep downloads site, install it using the
.dmg file (mac) or unzip it and drag and drop the entire "SoftStep" folder into
your "Program Files" folder (windows). You can keep the old version if you'd like, it
will cause no problems or conflicts with the newer version. If you do keep your old
versions, make sure to update any shortcuts you have created so that they link to
the correct version. If you decide to delete your old version, remember to save your
presets. See the Managing Presets chapter of the manual for more information on
how to transfer your presets to a new version.
Updating the Firmware
Make sure the software and the firmware versions are compatible with each
other.
Note: If you used the Mac version 1.099 or RC1 please archive or delete them before
updating to version 1.1 or 1.2 so you don't accidentally launch either of these older
versions (particularly important if your firmware is not VK1 or higher).
The SoftStep Editor version 1.2 automatically updates
your SoftStep's firmware if it is not compatible.
When the application prompts you to perform this
update click the "update" button and wait until it is
finished before continuing.
Quick Start Guide
The SoftStep can operate in two different modes. It can be used in HOSTED mode
with the SoftStep Editor open in Hosted mode or it can be used in STANDALONE wich
requires no application (or even without a computer if used with the SoftStep MIDI
Expander). If using Standalone mode you can use the SoftStep Editor to alter or
create your own scenes if necessary.
Standalone
With your SoftStep equipped with firmware version VK2, there will be some initial
factory settings already downloaded to your SoftStep. These settings come in the
form of several different banks (programs/settings/presets/etc...) that we call
scenes. A scene encompasses 1 set of instructions (MIDI mappings) for all the keys.
You can use the east and west corners of the diamond-shaped Nav Pad to scroll
through these scenes. When scrolling through the scenes you will see the scene
abbreviation appear on the alpha numeric display to the left of the Nav Pad. These
are the factory-installed default scenes that are available when using the SoftStep
standalone:
PRGM = Program Change - This scene allows you to select programs 0 - 127 over
MIDI Channel 1. The top and bottom keys of the Nav Pad let you scroll through
decades (10's). Then step on one of the 10 keys to determine the last digit (0-9).
This sends out the program change message.
TOGL = Toggles - This scene makes each key a toggle switch triggered by Foot On.
It sends these toggles out CC #s 20-29. The LED indicates whether the toggle is off
or on.
NOTE = Notes - This scene triggers MIDI notes 60 - 69 (C4 - A4). The note on
message is triggered by a foot on and the note off message is triggered when you
take your foot off. Velocity is 127.
PRES = Pressure Live - This scene uses the pressure of your foot on each key to
send out values on CC #s 110 - 119.
11RK = ElevenRack Control - This scene works with an Avid Eleven Rack
Processor. You will need the MIDI Expander in order to connect. The top row
toggles effects and the bottom row modulates the effects’ parameters. Keys 1 and 3
use pressure on the top of the key to increase the value and pressure on the bottom
of the key to decrease the value. For instant gratification, try this scene with the
Eleven Rack’s factory preset program #3 - “A4 Subway God”.
POD = Line6 Pod Control - This scene works with most Line6 processors. You will
need the MIDI Expander in order to connect. The top row toggles effects and the
bottom row modulates the effects’ parameters. Keys 1 and 3 use pressure on the
top of the key to increase the value and pressure on the bottom of the key to
decrease the value. For instant gratification, try this scene with the Line6 Pod’s
factory preset program #30 - “8C Vibro Blues”.
Each scene above also includes a MIDI mapping for an expression pedal if you have
one plugged into your SoftStep. On all scenes the expression pedal is mapped to CC
#7 (volume).
LIVE = Ableton Live Control - This scene works with our custom
Ableton Live script. You can find this script and instructions for
installing in the SoftStep Music Applications version 1.2 software
package. It will be in a folder called “Extras”. If used with this script
this scene will automatically perform transport functions and control
volume faders for tracks. If you have an expression pedal plugged in
this will automatically control send volumes for tracks.
Using the SoftStep Editor to Program the SoftStep
There may come a time that the factory scenes available on the SoftStep do not
meet your needs or you want to change a few things to suite you better. At this
point you'll want to use the SoftStep Editor in Standalone mode so that you can edit
the scenes or program new ones. You might also at some point wish to take
advantage of all the features that are available to you in Hosted mode.
You can also use the SoftStep Easy Editor if you just want 1 simple scene that sends
out CC messages. See the SoftStep Easy Editor Reference Manual for guidance when
using that application.
Below is a quick explanation of the main things you'll want to edit with the SoftStep
Editor. The pictures in this chapter are taken in Standalone mode to show the things
that are unavailable when using the application as an editor for Standalone. All
things grayed out in the pictures are available when in Hosted mode.
When you open the SoftStep Editor make sure the SoftStep connected light comes on
in the bottom right corner of the main window.
If you are prompted to perform a firmware update
click the "update" button and wait until it is finished
before continuing.
To alter the settings for a key select which scene you want to edit from the scene
drop-down menu and open up a modulation window for one of the keys. Or if you
want to make a brand new scene just open up one of the modulation windows for
one of the keys.
Each key has 6 rows called modlines. Each row can use a different data source from
the key so that you can have up to six simultaneous data streams for each key. Let's
just start with 1 for now.
Modlines
on/off - click on the circle to enable the modulation line and it will show a light bluegreen color. When disabled, the modline on/off appears dark.
mode (not available in Standalone) - this refers to the mode for the initial
value (the value you want your source to start at) which is how often you want an
initial value to be sent (if at all):
• None - the initial value is never sent out
• Once - initial value is sent out only the first time that scene is recalled in a
given session (session meaning from the time you open the application until
the time you close the application). Every other time the scene is recalled it
will recall whatever that modline's state was the last time you were in the
scene.
• Always - the initial value is sent out every time the scene is recalled
init-val (not available in Standalone) - the initial value. This is the starting value of
the source in the absence of any raw data. The mode (defined above) dictates
when the initial value is sent.
sources - Choose what data source will control the modline. The source determines
the behavior of the SoftStep key pad when you step on it. Click on the box and a list
of sources will pop up in a scroll menu. For a complete list of sources and how they
work, see the SoftStep Sources in the Appendix.
raw (not shown in Standalone) - The value coming directly from the source is
displayed here (in Hosted mode).
gain - this is the first place where you can use math to modify the signal. Whatever
number is put in the gain box is used to multiply the value coming from the source.
offset - set a number to add to the value after it has been multiplied by the gain
value.
result (not shown in Standalone) - the resulting value of the source modified by gain
and offset (in Hosted mode).
table - after going through the gain and offset the data is entered into the selected
lookup table, and used to plot the index on a chart. There are a number of table
options, each which will affect the modulation differently as it changes value over
time. The "Lin" table (Linear) does not modify the result. There are also two toggle
options: Toggle and Toggle 127. These either toggle between 0 and 1 or 0 and
127 when a value above 0 is received by the table. We have also added 3 counter
options: Counter Inc, Counter Dec, and Counter Set (only available in Hosted
mode). These allow you to count through a specified range of values using the Key
Counter in the top left corner of the modulation window.
min / max - these allow you to constrain the data values between a minimum and a
maximum number. A higher minimum number than maximum will not invert the
output. If you wish to invert the output try using a gain of -1 and an offset of 127.
slew - The slew value represents the number of milliseconds that it will take to get
to the target value. Use slew to smooth out data when it jumps from one number to
another. The larger the slew, the slower the result will respond to the source.
parameter destination - Click on the drop-down menu to see the many options
available: Note Set, Note Live, CC, Bank, Program, OSC (Open Sound Control), Pitch
Bend, MMC, Aftertouch, Poly Aftertouch, GarageBand, and HUI. These options are
further customizable by selecting the the note, velocity or control change, or the
channel # on which to send the data out. For a complete explanation of parameter
destinations see the SoftStep Parameter Destinations list in the Appendix. OSC,
Aftertouch, Poly Aftertouch, GarageBand, HUI, Y Inc Set, and X Inc Set are currently
only available in Hosted mode.
device/route - this is where you select the port that you want all of your MIDI
messages to go out through. If you'd like to send your data out through the
SoftStep MIDI Expander then you would want to choose "SoftStep Expander" as your
device.
For Standalone mode, if you want to send your data out to other applications on
your computer (Ableton Live, Logic, Digital Performer, etc...) then you'll select
"SSCOM Port 1".
For Hosted mode you'll want to use the "SoftStep Share" device (for Mac users) as
your output device to send data to other applications on your computer. For
Windows users in Hosted mode you will have to set up an inter-application MIDI
bus. We recommend using MIDI Yoke which is available to download for free
at http://www.midiox.com/
For more detailed information about the SoftStep's ports please read the Ports
chapter of this Manual.
output (not shown in Standalone) - this displays what data is being sent out through
the device you've selected.
You can also program your LEDs and
alphanumeric display to react to data from the
modlines. There is a green LED and a red LED
for each key. There are drop down menus for
each color and on each modline so that you
can select what you want the LED to do.
LEDs and Display
None - the light will not come on when you select none.
True - the light will come on when the output of the key is above 0.
False - the light will come on when the output of the key is 0.
Flash True - the light will flash repeatedly when the output of the key is above 0.
Flash False - the light will flash repeatedly when the output of the key is 0.
Flash Fast True - the light will flash quickly when the output of the key is above 0.
Flash Fast False - the light will flash quickly when the output of the key is 0.
Blink True - the light will blink once when the output of the key goes above 0.
Blink False - the light will blink once when the output of the key goes to 0.
Off - turns the LED off.
Above the LED menus you can select what information you want to see on the
alphanumeric display. First decide which display mode you want to use:
None - selecting this mode will cause the 4 letter display box to show the scene's 4
letter display when using that key, instead of the key name or prefix.
Always - selecting this mode will display the key name whenever that key is the
most recently activated key. In this mode the prefix is not used.
Once (not available in Standalone) - selecting this mode will display the key name
once at the moment it is activated and will then show the prefix and parameter
value.
Initial/Return (not available in Standalone) - selecting this mode will display the
key name when the key is selected but not active, and will display the prefix and
parameter value when in use. This mode only works well for continuously changing
sources, not for toggles. When the display is showing a source value and the slew
causes the output to persist after the foot is off the key, the display will no longer be
updated, even though the parameter is still being altered. Initial/Return is only
available as a mode for the keys, not the Nav Pad.
Immed Param - stands for immediate parameter. This will show the prefix and
parameter value when that key is the currently activated key. The key name doesn't
ever show up in this mode.
The dots to the right of the LED menus allows you to select which modline will be
used with the prefix when in Initial/Return or Immed Param mode.
The reminder field next to that is just so you can make a little note to yourself
about the modline you just created. This note serves no purpose except to just
remind you about what that modline is for.
Saving
After setting up all of your key's modulation windows save everything into a scene.
The upper left corner of the main
window is where you will find the save
button for your scenes.
Click the Save button and type what you want its name to be in the Scene
Name box.
In the picture to the left, if I were to click "save", my
old scene saved under scene 3 "Toggles" would be
replaced with the latest adjustments, and scene 3
would be renamed "ProgramChange."
Instead, change the scene number to a blank
"unnamed" slot (in this case "20") and type in a new
name in the "Scene Name" field. This enables you to
save multiple custom scenes.
Now that you are done making a scene, you easily recall it by selecting it from the
drop down menu, scrolling to the correct number in the number box to the right, or
hitting the increment/decrement box to the right of that.
If you edit a preset after saving or recalling it the number of the key
modulation window that you edited will begin to blink red.
You can also revert to your last saved setting by clicking the "revert"
button next to the "save" button.
When saving a scene be sure to give your scene a 4 letter name for the alphanumeric
display so that you have a way of knowing which scene you are on just by looking at
the SoftStep.
Also note that there is the option to save your scene
to a slot for use in the other mode (Standalone or
Hosted). When saving from Hosted mode to
Standalone mode be sure to check your scene
settings to make sure everything transferred. If you
have used features that don't exist in Standalone
mode they will revert to their default state and you
will need to select an alternative.
If you are in Standalone mode and you want to download your scenes to your
SoftStep for use without the application, put them in your setlist and click the
"download" button. Make sure to save all of your changes before clicking download.
For more information see the Saving Scenes chapter of this manual.
The information presented in this chapter has been somewhat limited in order to get
you started as quickly as possible. The discovery of more features and greater
possibilities awaits in the following pages of this manual. Also check out the
troubleshooting chapter if you are experiencing any problems.
SoftStep Editor
SoftStep is not your typical foot controller. Using the SoftStep with the SoftStep
Editor allows you the ability to create powerful control parameters in a simple, user
friendly way.
The SoftStep Editor works with the SoftStep hardware controller to manipulate
sensor data that gives the player a nearly infinite degree of control and possibility.
The SoftStep multitouch controller has 10 key pads, each with Sensor Key
Technology enabling 5 degrees of freedom that are unique to each key. These
parameters include X, Y, Clockwise Rotation, Counter Clockwise Rotation and
Pressure. These sources can be mapped to destinations up to six times for each key
providing the possibility of a dense data source from a single motion of the foot.
To begin using the SoftStep Editor, plug in the controller via USB and open it up.
Be sure to wait until the application fully loads and the SoftStep connected light
comes on in the bottom right corner of the main window before you begin to use the
application.
The SoftStep Editor version 1.2 automatically updates
your SoftStep's firmware if it is not compatible.
When the application prompts you to perform this
update click the "update" button and wait until it is
finished before continuing.
The Basics
The SoftStep Editor is set up so that when you first open it you see an arrangement
similar to the arrangement of the SoftStep itself. The main controls for each key pad
are all laid out with the controls for the diamond-shaped Nav Pad on the right. The
keys and the Nav Pad all have their own modulation window where the sources,
visible from the sensor view application, can be mapped to various MIDI destinations
of your choosing using the modlines. Each modulation window contains 6 modlines.
This means that you can control 6 different messages per key. After setting up your
modlines you can save all of this information into scenes from the main window.
Additionally, you can move from scene to scene in whatever order you choose by
using the setlist. The x-axis of the diamond-shaped Nav Pad is set to scroll through
the scenes in the setlist. In Hosted Mode, each time you come back to any scene it
will remember where you were in that scene last time you were there so you can pick
right back up where you left off. For example, let's say that for one scene you have
all of your program change messages set up. After editing your program changes
with the foot controller you go to a different scene, one that is set up to control a
looper, after turning on some loops you can go back to the program change scene it
will remember what the last program change message you sent out was. Also when
you go back to the looper it will remember which loops you turned on last time you
were in that scene. By tapping either up/down on the Nav Pad the last data sent
from that scene will be displayed in the alpha numeric display until you press another
key.
The SoftStep Editor also provides you with the ability to alter the sensitivity settings
for the keys and the Nav Pad. Accessible from the main window, the settings window
also lets you set up a MIDI input device for use with the SoftStep MIDI Expander and
calibrate an expression for use with the SoftStep's expression port. MIDI input can
then be used as sources in the key's modulation windows and the Preset Modulation
window, also accessible from the Main window. You can use Preset Modulation to
allow other MIDI controllers to change scenes.
The SoftStep Editor also has the ability to turn into an editor for Standalone mode,
which allows you to download all of your presets to the SoftStep hardware for use
without the application or even without the computer if you have a SoftStep MIDI
Expander. The features available in Standalone mode are a bit different than the
features available in Hosted mode. For an explanation about the differences between
Hosted and Standalone, see the Standalone Vs. Hosted chapter of this manual.
Ports
The SoftStep communicates with the computer via USB on 2 MIDI ports. The
function of these ports will change when you select Standalone or Hosted mode:
SSCOM Port 1 and SSCOM Port 2
In the application's main window, in the bottom on the right side of the screen is a
drop-down menu for selecting the Main USB Port that the application will look to for
raw data from the SoftStep. The application should automatically select the SoftStep
device after the application fully loads but if not you can select it yourself here:
If you can't find "SoftStep" in the list even though your SoftStep is plugged in via
USB, consult the Troubleshooting chapter on Connectivity Trouble.
HOSTED MODE
In Hosted mode, SSCOM Port 1 is the port on which data from the SoftStep travels
to and from the application. The SoftStep Editor uses this data and molds it into
something you can use for your own purposes. You will need to use a virtual MIDI
Port to communicate from the SoftStep application to other applications on your
computer.
Mac
The SoftStep Share Port is available as a virtual MIDI port after opening the
SoftStep application. This is our own inter-application MIDI Bus. Use SoftStep Share
as your device to route data to other applications on your computer. You may also
use the IAC Driver Bus, which is Apple's inter-application MIDI Bus. To use these
set the device/route to "SoftStep Share" or "IAC Driver Bus" in each key's modline.
You will need to set other applications to receive data only from SoftStep Share or
IAC Driver Bus and not SSCOM Port 1 so that the raw sensor data does not get
mixed up with the data you are trying to send from the SoftStep Music Application.
Windows
Windows does not come with a built-in MIDI bus but you can download one for free
online. We recommend using MIDI Yoke. You can download that from here:
http://www.midiox.com/
Run the installer file. If you are running Windows 7 you will most likely need to
disable or turn off the UAC (User Account Control) in Control Panel on your computer
in order for the installation to work. Here is a link where you can find instructions for
doing this:
http://www.mydigitallife.info/2008/12/30/how-to-disable-and-turn-off-uac-inwindows-7/
After MIDI Yoke successfully installs on your computer the "Out to MIDI Yoke: [1-8]"
device will automatically appear in your device/route list in your key's modlines.
You will need to set other applications to receive data only from the MIDI Yoke
devices and not SSCOM Port 1 so that the raw sensor data does not get mixed up
with the data you are trying to send from the SoftStep application.
STANDALONE MODE
The SoftStep Editor in Standalone mode becomes the Standalone Editor. When you
use Standalone mode, "SSCOM Port 1" now becomes the input for user MIDI data to
and from SoftStep. In this mode you need to set the device/route to SSCOM Port 1
in each key's modline and make sure that other applications use SSCOM Port 1 for
MIDI Input.
Note to Windows users: variations on how SSCOM Port 1 is displayed in other
applications sometimes occurs. It might appear as just "SSCOM" or on XP
computers, "USB Audio Device (1)".)
To talk to external hardware with the SoftStep MIDI Expander in both Hosted and
Standalone modes, set the device/route to "SoftStep Expander" in each key's
modline. This may also appear as "SSCOM Port 2" in other applications.
Note to Windows users: Variations such as "MIDIOUT2 (SSCOM)" or "USB Audio
Device (2)" often show up in other applications.
Standalone vs. Hosted
There are a few important differences to be aware of when choosing whether to use
the SoftStep Editor in Hosted mode or in Standalone mode. The major difference is
that Hosted mode requires that the SoftStep be connected to your computer with the
SoftStep Editor running, while Standalone mode allows you to use the SoftStep
without running the application (or even without a computer if you have a SoftStep
MIDI Expander).
Another important difference is that when using the application as an editor in
Standalone mode the visual feedback available to you in the sensor view and
modlines is unavailable. You'll notice that the sensor view button is grayed out and
you cannot view the raw data coming in through the modline like you can in Hosted
mode.
Selecting which output device to use to send MIDI data is a bit different in
Standalone mode. Since the data will be coming directly from the SoftStep, which
has only two ports, inter-application ports become unavailable and unnecessary in
Standalone mode. Select "SSCOM Port 1" (SoftStep's Port 1) as the device/route to
send data through to applications on your computer. This can appear as "USB Audio
Device (1)" on some Windows computers. Select "SoftStep Expander" (SSCOM Port
2) as your device to send data out through the SoftStep MIDI Expander. SSCOM 2
can appear as "MIDIOUT2 (SSCOM)" or "USB Audio Device (2)" on some Windows
computers. For more information on ports and devices in Hosted mode and
Standalone mode see the Ports chapter and the device/route definition in the
Modulation chapter of this manual.
The state recall feature that allows you to change scenes and return to them and find
everything how you left it is not available in Standalone mode. So in Standalone
mode, the LED data and Toggle states will not be remembered as you move between
scenes. Anytime you go back to a scene that you have previously sent data from,
that scene will load as though it were the first time you've selected it after plugging
the SoftStep in.
You will also find that Standalone mode does not support the full list of sources and
parameter destinations. In Standalone mode, the sources list does not include MIDI
Input, rotation, rot relative, top, bottom, the trigger latch sources, or Nav Y.
Parameter destinations do not include OSC,GarageBand, HUI, Aftertouch, Poly
Aftertouch, Y Inc Set, or X Inc Set.
Main Window Overview
When you open the SoftStep application the following window will pop up. This
image shows the use of one of the main factory presets:
A brief overview of the main window is as follows:
The shadowed box seen above holds 10 blocks that correspond to the 10 button keys
on the SoftStep hardware. Each numbered box holds the mappings that pertain to
that key. These mappings can be edited by clicking the "open" box within each
key. In Hosted mode, when you step on each key a blue background will appear
around the corresponding block (as shown above on key 1).
To the right of the numbered pads are 4 dark grey boxes that
mirror what is displayed on the LED display on the SoftStep
controller. Under that is the control for the Nav Pad. This allows
you to control the settings for the diamond-shaped pad on the
right side of the SoftStep.
The top left corner of the main window is where you save and select scenes. Under
the scenes control is the setlist control which allows you to put the scenes in an
order that is useful for performances. The order that you save your scenes while you
are programming your SoftStep might not be the order you want to use during
performance. This way you can navigate through the scenes in whatever order you
choose and you can choose only the ones you need.
The display text field lets you set a scene abbreviation. This is what the
alpha numeric display on the SoftStep will show when you navigate
through the scenes.
The open preset mod button allows you to open a window where you can use the
MIDI input sources to control scene changes instead of using the side buttons of the
Nav Pad.
Under the preset mod control is where you can open the settings window and select
presets for it. The settings window is where you set how the application will scale
and accept data from the controller. The settings window is also where you set up
an OSC port and declare MIDI Input channels.
You can also select whether you want to use the application as the
host or as an editor for using the SoftStep standalone. Selecting
Hosted will allow you to work with the application and all of the
functionality that comes along with it, including visual feedback so you
can see how the raw data from the SoftStep is being put to use.
Hosted requires that you keep the application running in the
background while using the SoftStep.
Selecting Standalone makes the application work as an editor that you use to
program the SoftStep. The download button becomes available when in Standalone
so that when you are finished setting everything up the way you want you can click
"download" and then exit the application and use the SoftStep without it. Make sure
to save all of your scenes and add them to your setlist before clicking download. For
more information on the differences between Hosted and Standalone see the
Standalone vs. Hosted chapter of this manual.
In Hosted mode, you will find the sensor view button active in the
bottom left corner. When clicked, another app called Sensor View
will open up. This will show you exactly how the controller is
sensing data when you step on the keys.
Saving Scenes
After setting up all of your key's modulation windows save everything into a scene.
The upper left corner of the main
window is where you will find the save
button for your scenes.
Click the Save button and type what you want its name to be in the Scene
Name box.
In the picture to the left, if I were to click "save", my
old scene saved under scene 3 "Toggles" would be
replaced with the latest adjustments, and scene 3
would be renamed "ProgramChange."
Instead, change the scene number to a blank
"unnamed" slot (in this case "4") and type in a new
name in the "Scene Name" field. This enables you to
save multiple custom scenes.
Tip: After clicking in the preset number box, you can then use the up/down arrows
on your computer keyboard to scroll up or down to unnamed slots. You can also
type in the number you wish to scroll to. Then hit enter and your scene or preset
will save.
Now that you are done making a scene, you easily recall it by selecting it from the
drop down menu, scrolling to the correct number in the number box to the right, or
hitting the increment/decrement box to the right of that.
If you edit a preset after saving or recalling it the number of the key
modulation window that you edited will begin to blink red.
You can also revert to your last saved setting by clicking the "revert"
button next to the "save" button.
When saving a scene be sure to give your scene a 4 letter name for the alphanumeric
display so that you have a way of knowing which scene you are on just by looking at
the SoftStep.
Also note that there is the option to save your scene
to a slot for use in the other mode (Standalone or
Hosted). When saving from Hosted mode to
Standalone mode be sure to check your scene
settings to make sure everything transferred. If you
have used features that don't exist in Standalone
mode they will revert to their default state and you
will need to select an alternative.
If you are in Standalone mode and you want to download your scenes to your
SoftStep for use without the application, put them in your setlist and click the
"download" button. Make sure to save all of your changes before clicking download.
Managing Scenes and Presets
When you save scenes this information is stored in a folder within the SoftStep
directory. You're going to want to be aware of how to retrieve your presets so that
you can save them and transfer them if you upgrade to newer versions of the
software. Be sure you don't rename or tamper with the files that are inside the
Presets folder.
Transferring presets between versions 1.1 and 1.2 of the software requires a specific
process because Presets are formatted differently before version 1.2. To simplify this
process we have included the SoftStep Scene Converter and Scene Librarian. Follow
the steps below to convert your presets from version 1.1 to version 1.2:
1. open the SoftStep Converter app
2. click "choose source" and navigate to your presets folder from version 1.1 (this
should not be moved into the SoftStep 1.2 directory)
3. click the "convert" button and wait until the converting process is finished.
4. exit the Converter
5. open the SoftStep Librarian app (this might take a bit of time to load)
6. click "open" and navigate to your 1.1_Converted_Presets folder which is in the
SoftStep 1.2 directory (on Windows it is inside the SoftStep Converter folder).
7. choose the scene you want to transfer to the new Scene list, pick a slot number,
and click "insert". This will not write over existing scenes in the destination list, it
will just move the slots down.
8. repeat step 7 as needed for additional scenes. You can switch between Hosted
mode and Standalone mode as well.
9. exit the SoftStep Librarian
10. open the SoftStep application to view and check your transferred scenes
For more information about the Converter and the Librarian, see the SoftStep Scene
Librarian Reference Manual.
Factory Scene Library
The SoftStep application comes with a number of scene presets already saved.
These are the scenes available from the Scene Library list in the top left corner of
the main window:
Hosted Mode
Init - This scene loads the Init presets for all of the keys and the Nav Pad. This
provides you with a "clean slate" where you would want to start from if you were
going to make your own presets from scratch.
Program Change - This scene allows you to select programs 0 - 127 over MIDI
Channel 1. The top and bottom keys of the Nav Pad let you scroll through decades
(10's). Then step on one of the 10 keys to determine the last digit (0-9). This sends
out the program change message. Program Change messages will be routed out
through a virtual MIDI bus (SoftStep Share for Mac/MIDI Yoke for Windows) and the
MIDI Expander.
Toggles - This scene makes each key a toggle switch triggered by Foot On. It sends
these toggles out CC #s 20-29 on MIDI Channel 1 through both a virtual MIDI bus
(SoftStep Share for Mac/MIDI Yoke for Windows) and the MIDI Expander. The LED
indicates whether the toggle is off or on.
Notes - This scene triggers MIDI notes 60 - 69 (C4 - A4) on MIDI Channel 1 through
both a virtual MIDI bus (SoftStep Share for Mac/MIDI Yoke for Windows) and the
MIDI Expander. The note on message is triggered by a foot on and the note off
message is triggered when you take your foot off. Velocity is 127.
Pressure Live - This scene uses the pressure of your foot on each key to send out
values on CC #s 110 - 119 on MIDI Channel 1 through both a virtual MIDI bus
(SoftStep Share for Mac/MIDI Yoke for Windows) and the MIDI Expander.
ElevenRack Control - This scene works with an Avid Eleven Rack Processor. You
will need the MIDI Expander in order to connect. The top row toggles effects and the
bottom row modulates the effects’ parameters. Keys 1 and 3 use pressure on the
top of the key to increase the value and pressure on the bottom of the key to
decrease the value. For instant gratification, try this scene with the Eleven Rack’s
factory preset program #3 - “A4 Subway God”. The MIDI data is routed through
both a virtual MIDI bus (SoftStep Share for Mac/MIDI Yoke for Windows) and the
MIDI Expander.
Line6 Pod Control - This scene works with most Line6 processors. You will need
the MIDI Expander in order to connect. The top row toggles effects and the bottom
row modulates the effects’ parameters. Keys 1 and 3 use pressure on the top of the
key to increase the value and pressure on the bottom of the key to decrease the
value. For instant gratification, try this scene with the Line6 Pod’s factory preset
program #30 - “8C Vibro Blues”. The MIDI data is routed through both a virtual
MIDI bus (SoftStep Share for Mac/MIDI Yoke for Windows) and the MIDI Expander.
Ableton Live Control - This scene works with our custom Ableton Live script. You
can find this script and instructions for installing in the SoftStep Music Applications
version 1.2 software package. It will be in a folder called “Extras”. If using this
scene from Hosted mode make sure to adjust the control surface input port to
receive from your virtual MIDI bus (SoftStep Share for Mac/MIDI Yoke for Windows).
If used with this script this scene will automatically perform transport functions and
control volume faders for tracks. If you have an expression pedal plugged in this will
automatically control send volumes for tracks. This scene can also be mapped to
other things since it is just sending CC messages.
MMC - DAW Transport - This scene uses foot on triggers to send MMC messages
out. You would have to put in your own device ID for it to work whatever you wish
to send it to. The alpha numeric display shows you the intended function for each
key, not all keys are assigned to a function. The LEDs act as radio buttons for stop,
play, record, and pause. The LED's for rewind and fast forward turn on when you
step on the key and off when you lift your foot up.
Ableton Live Demo - This scene is for use with the Ableton Live Tutorial set
(Live_Example1_DrumLoops.zip) that comes with the SoftStep application package in
the "application_examples" folder. All of the keys control different parameters in the
Live set. Also check out the Using SoftStep with Ableton Live chapter of the
Appendix for more information on how this scene is used with the Live set.
Ableton Live Guitar FX Demo Looper - This scene is for use with the Ableton Live
Tutorial set (Live_Example2_GuitarFXLooper.zip) that comes with the SoftStep
application package in the "application_examples" folder. All of the keys control
different parameters in the Live set.
Logic Transport Demo (mac only) - This scene is for use with the Logic Transport
Tutorial file (logic_transport_tutorial.zip) that comes with the SoftStep application
package in the "application_examples" folder. All of the keys control transport
functions in the Logic project.
Mainstage Tutorial Video (mac only) - This scene was used to create the
Mainstage Tutorial Video for Hosted mode. Follow along with the video to map this
scene to functions in Mainstage.
Garageband Transport (mac only) - This scene works with the Garageband
parameter destinations for transport control in GarageBand. In order to use this
preset you will need to download Garage Remote. It's a free program that is added
to your system preferences that will receive MIDI data and translate for GarageBand.
You can download it here: http://www.muratnkonar.com/otherstuff/garageremote/
downloads.shtml
Pro Tools HUI - This scene is set up to use the HUI parameter destinations to
control transport functions in ProTools. See the HUI explanation in the SoftStep
Parameter Destinations chapter in the Appendix for more information.
Live Looper Template - This scene is set up for use with the Live Looper Template
set (Live_Looper_Template.zip). Keys 6-9 are mapped to control 4 loopers on 4
different tracks. Step on keys 6-9 to toggle loopers on 4 tracks back and forth
between record and play (then overdub and play). Hold down on the key pad for 1
second to stop the looper. Key 0 will clear all loopers. The volumes for each track
are controlled by keys 1-4. Key 5 is for tap tempo. Use the Nav Pad's top and
bottom pads to tap up and down through Ableton scenes.
Standalone Mode
Init - This scene loads the Init presets for all of the keys and the Nav Pad. This
provides you with a "clean slate" where you would want to start from if you were going
to make your own presets from scratch.
Program Change - This scene allows you to select programs 0 - 127 over MIDI
Channel 1. The top and bottom keys of the Nav Pad let you scroll through decades
(10's). Then step on one of the 10 keys to determine the last digit (0-9). This sends
out the program change message. Program Change messages will be routed out
through SSCOM Port 1 (USB) and the MIDI Expander.
Toggles - This scene makes each key a toggle switch triggered by Foot On. It sends
these toggles out CC #s 20-29 on MIDI Channel 1 through both SSCOM Port 1 (USB)
and the MIDI Expander. The LED indicates whether the toggle is off or on.
Notes - This scene triggers MIDI notes 60 - 69 (C4 - A4) on MIDI Channel 1 through
both SSCOM Port 1 (USB) and the MIDI Expander. The note on message is triggered
by a foot on and the note off message is triggered when you take your foot off.
Velocity is 127.
Pressure Live - This scene uses the pressure of your foot on each key to send out
values on CC #s 110 - 119 on MIDI Channel 1 through both SSCOM Port 1 (USB) and
the MIDI Expander.
ElevenRack Control - This scene works with an Avid Eleven Rack Processor. You will
need the MIDI Expander in order to connect. The top row toggles effects and the
bottom row modulates the effects’ parameters. Keys 1 and 3 use pressure on the top
of the key to increase the value and pressure on the bottom of the key to decrease the
value. For instant gratification, try this scene with the Eleven Rack’s factory preset
program #3 - “A4 Subway God”. The MIDI data is routed through both SSCOM Port 1
(USB) and the MIDI Expander.
Line6 Pod Control - This scene works with most Line6 processors. You will need the
MIDI Expander in order to connect. The top row toggles effects and the bottom row
modulates the effects’ parameters. Keys 1 and 3 use pressure on the top of the key to
increase the value and pressure on the bottom of the key to decrease the value. For
instant gratification, try this scene with the Line6 Pod’s factory preset program #30 -
“8C Vibro Blues”. The MIDI data is routed through both SSCOM Port 1 (USB) and the
MIDI Expander.
Ableton Live Control - This scene works with our custom Ableton Live script. You
can find this script and instructions for installing in the SoftStep Music Applications
version 1.2 software package. It will be in a folder called “Extras”. If used with this
script this scene will automatically perform transport functions and control volume
faders for tracks. If you have an expression pedal plugged in this will automatically
control send volumes for tracks. This scene can also be mapped to other things since
it is just sending CC messages.
MMC - DAW Transport - This scene uses foot on triggers to send MMC messages out.
You would have to put in your own device ID for it to work whatever you wish to send
it to. The alpha numeric display shows you the intended function for each key, not all
keys are assigned to a function. The LEDs act as radio buttons for stop, play, record,
and pause. The LED's for rewind and fast forward turn on when you step on the key
and off when you lift your foot up.
Key Commands - This is the scene that the SoftStep KeyWorx application uses.
Ableton Live Demo - This scene is for use with the Ableton Live Tutorial set
(Live_Example1_DrumLoops.zip) that comes with the SoftStep application package in
the "application_examples" folder. All of the keys control different parameters in the
Live set. Also check out the Using SoftStep with Ableton Live chapter of the Appendix
for more information on how this scene is used with the Live set.
Ableton Live Guitar FX Demo Looper - This scene is for use with the Ableton Live
Tutorial set (Live_Example2_GuitarFXLooper.zip) that comes with the SoftStep
application package in the "application_examples" folder. All of the keys control
different parameters in the Live set.
Logic Transport Demo (mac only) - This scene is for use with the Logic Transport
Tutorial file (logic_transport_tutorial.zip) that comes with the SoftStep application
package in the "application_examples" folder. All of the keys control transport
functions in the Logic project.
Mainstage Tutorial Video (mac only) - This scene was used to create the Mainstage
Tutorial Video for Hosted mode. Follow along with the video to map this scene to
functions in Mainstage.
Keyboard Demo - This scene is the scene used in the Keyboard video demo which
can be viewed here: http://www.keithmcmillen.com/softstep/videos/ Keys 6, 7, and 8
are program changes and keys 9 and 0 hold notes which can be used for starting
patterns on keyboards. Key 1 is used for pitch bend. The rest of the keys send out
CC#s which can be used to alter parameters on keyboards that can be programmed to
receive them.
iPad Demo - Korg iMS-20 - This scene is used in the iPad video demo which can be
viewed here: http://www.keithmcmillen.com/softstep/videos/ It works with the Korg
iMS-20 iPad app. This should automatically work and sounds best when used with the
iMS-20 preset called "Bass 4".
Eventide - TimeFactor - If you own an Eventide TimeFactor you can use this scene
along with the Program Change scene to control it. Check out the "Extras" folder in
the SoftStep directory and find the "Eventide_TimeFactor.zip". Unzip this and you will
find a folder with a couple of documents and 2 sysex files. Read the instructions for
loading up one of the sysex files to your TimeFactor and be sure to back up your
previous settings. After this you can control the TimeFactor with the SoftStep!
AxeFX Ultra Control - Use this scene along with the Program Change scene to control
the AxeFX Ultra. You may need to restore your system settings on your AxeFX in
order for this scene to function. We have also included a folder with a sysex file for the
AxeFX Ultra and some instructions in the "Extras" folder in the SoftStep directory which
will get you off to an even better start with this scene as well. It is always best to back
up your previous AxeFX settings before dumping our sysex file onto it.
Scenes
The SoftStep Editor lets you set up how you want each key to function and save and
recall them all in a chosen scene. After you name and save your scene you can add it
to the setlist.
One of the great things about scenes in Hosted mode is that the state of the scene is
remembered even if you change to a new scene. When you go back to that scene
again you can pick back up where you left off. This state recall feature has not been
implemented in Standalone mode.
You can use the setlist to pick which scenes you want to use and in what order you
want them to occur. Additionally, the Nav Pad is automatically set up to scroll through
the scenes that are listed in the setlist.
In Hosted mode you can program the keys to recall initial states. These initial states
will be how they start out in any given session the first time the scene is recalled
(when you start the application or first turn on the SoftStep). You can also select
whether or not you want the initial states to be used every time you select that scene,
only the first time, or never. (see the key's modulation chapter for more information
on init values and init modes).
Setlist
From the main window of the SoftStep
software find the setlist menu right under
where you save your scenes and click the
"open" button.
The Setlist window will open up. You'll see
an array of text fields and number boxes
with little circles in front of them. Using
the circle buttons in front of each line you
can turn on or off a scene that you choose
to put in the text field. Choose which
scene to use by selecting it from the dropdown menu when you click inside the text
field, scrolling through the numbers, or
pressing the inc/dec buttons on the right
hand side.
The order of scenes listed in the set list will
be the order of scenes when you scroll
through them with the left and right arrows
of the Nav Pad.
In Standalone mode the setlist will be
limited to 16 scenes. The scenes that are
not in the setlist will not be downloaded to
the SoftStep.
Settings
The settings window allows you to edit sensitivity parameters for each key, set up a
MIDI Input device, an OSC (Open Sound Control) port, and calibrate an expression
pedal.
On the left side of the window are the Keys settings:
rotation slew (not available in
Standalone) - rotation plots the location
of your foot on the key around a dial
that goes from 0-127 which is then
available as a source for data mapping.
The rotation slew setting allows you to
add slew while scrolling through the dial
values, allowing you to slow down the
rotation.
dead X - when using the X Increment
source, this parameter designates the
width of the horizontal dead zone, which
indicates how much more weight to one
side you need to be pushing down to
begin incrementing or decrementing.
accel X - when using the X Increment
source, this is how fast the inc/dec for
the horizontal plane moves. The higher
the value, the faster you'll move from
one side to the other.
dead Y - when using the Y Increment
source, this parameter designates the
width of the vertical dead zone, which
indicates how much more weight to the
top or bottom you need to be pushing
down to begin incrementing or
decrementing.
accel Y - when using the Y Increment source, this is how fast the inc/dec for the
vertical plane moves. The higher the value, the faster you'll move from one side to the
other
on thresh - here you can set the pressure value at which the "foot on" source will
register. If set to 10 the pressure of your foot on the key has to reach a value of 10
before the "foot on" trigger is sent.
off thresh - here you can set the pressure value at which the "foot off" source will
register. If set to to 5, the pressure of your foot on the key would have to be 5 or
lower for the "foot off" trigger to register. Make sure this is lower than the "on"
threshold.
delta (not available in Standalone) - If there is a positive change in pressure greater
than the delta value it sends the delta trigger value that you can use as a modulation
source.
multiple key mode enable - turn this on to be able to use two keys at a time - one
per foot. The SoftStep automatically determines the key you mean to press and
disallows adjacent keys from accidentally firing while your foot is applying pressure to
one key. Normal setting (off) allows just one key at a time to be active.
EL On/Off - This turns the blue electro-luminescent backlighting on and off on the
SoftStep.
Scene Change On/Off (standalone mode only) - Turning the Scene Change option off
makes it so the Nav Pad no longer changes scenes when you step on the sides of it.
Instead of changing scenes the Nav Pad will send out the pressure for each corner on
separate CC#s.
global gain - amplifies all incoming data from each key. Adjust this first before
adjusting the on/off thresholds. This scales all of the sensor data from the SoftStep
keys and can make the SoftStep more or less responsive to pressure.
Nav Pad:
on thresh N, S, E, W - just like for the regular keys you can set the sensitivity for the
"foot on" threshold for the four directions of the Nav Pad. If set to 7, you would have
to put enough pressure on the key for it to register a value of 7 before the "foot on"
trigger is sent.
off thresh N, S, E, W - just like for the regular keys you can set the sensitivity for the
"foot off" threshold for the four directions of the Nav Pad. If set to 7, the pressure
value would have to be 7 or lower for the "foot off" trigger to register. Make sure
these are lower than the "on" thresholds.
Y accel - when using the Nav Y Inc-Dec source, this is how fast the inc/dec for the
vertical plane moves. The higher the value, the faster you'll increment or decrement
through the values.
Sensor Response - here you can select what type of key response you would like to
use for your SoftStep. The SoftStep has 4 pressure sensors for each key. Maximum
mode uses the largest of the 4 values. Average averages together all 4 values. The
sensor response is useful for the Foot On and Pressure sources. The X and Y sources
are determined differently and aren't affected by the sensor response setting.
The right side of the window is where
you save and recall presets. Be sure to
save your Settings preset here as it is
not saved with scenes. You can also set
up a MIDI Input device, OSC output, and
calibrate an expression pedal. In
Standalone mode, MIDI Input and OSC
are disabled.
MIDI Input:
enable - turn on or off lines that receive
MIDI Input data.
device - set which MIDI port the MIDI
Input data is coming from.
channel - set which channel the MIDI
Input data is coming from.
parameter - choose between note,
controller, or program change for what
type of data is coming in.
# - if you chose note or controller for your parameter then you can choose which
control number or note value the data is for.
value - shows the data coming in from the MIDI Input device.
OSC (Open Sound Control):
IP - select the IP address for where the OSC will be sent to.
port - select which port the OSC output will be sent to.
Pedal Calibration:
If you have a pedal plugged into the expression port on the SoftStep, here is where
you can calibrate it. Clicking pedal calibration will open up this window:
Prior to calibrating you will see a plain
linear table. Press the start button to
calibrate and follow the on-screen
instructions to calibrate your pedal.
Move your foot from heal to toe at the
rate of the progress bar.
You can always hit the blue reset button
to go back to the linear table or press
start again to re-calibrate. The test
value shows the calibrated data from
your pedal as you use the expression
pedal.
You can set a pedal smoothing value. The trade off is smoothness vs. speed. The
higher the value the more smoothing, the lower the value the less smooth. If the
expression pedal value jumps around increase the smoothing.
The pedal calibration will be remembered between sessions. So every time you open
up the SoftStep application the last pedal calibration table will be recalled.
Sensor View
Sensor View can be opened from the SoftStep Editor in the bottom left corner. Sensor
View will not respond unless the SoftStep Editor is open and in Hosted mode. When
using the application in Hosted mode, the sensor view window gives you visual
representations of the sensor data coming from the SoftStep.
Each key displays live pressure, a rotation dial, xy latch, pressure latch, inc/dec, and
foot on/foot off information.
Notice in the screenshot above that some of the keys have at one time been activated
but are not currently activated. The latch indications and the inc/dec and dial
indicators are right where they were left. The only thing that doesn't latch is the dark,
circular ("live") indicator. Key 6 is in use, which is why it is outlined in blue and
displaying sensor data in the "live" display.
1 = pressure latch - this shows the pressure of your
foot on the key. This shows the latching feature which
means that when you release the key, this value will
stay where you left it.
2 = foot on/foot off - this shows you whether or not
the key is active. The foot on indicator will light up
when a key is in use (as seen above on key 6 above).
You can set the on and off pressure thresholds in the
settings window (see the settings chapter of this
manual for more info).
3 = rotation - the rotation dial plots where your foot is
on the SoftStep around a dial that you can rotate. If
your foot pressure is weighted towards the bottom left
corner of the key the rotation dial will be turned all the
way down. You can then turn it all the way up by
rolling the pressure of your foot around the key to the
bottom right corner.
4 = live - the live display gives real-time readings of non-latching parameters:
pressure, x, and y.
5 = inc/dec - this shows your foot incrementing and decrementing through the
horizontal and vertical planes of the key. Step a few times on one side of the key and
see the value increment or decrement at a speed determined by the acceleration
setting in the settings window ("accel x" & "accel y" - see the settings chapter of this
manual for more information). You can also hold pressure onto one side and it will inc
or dec smoothly towards one side. These values will show up in the modlines as "X
Increment" and "Y Increment". You can also set a dead zone in the settings window.
6 = xy latch - this shows your foot's x and y axis position on a key. Latch indicates
that when you release the key, this value will stay where you left it.
Tip: A good technique for getting the X (horizontal pressure) sources to respond is to
put your foot down on the center of the key and just move your knee from side to
side. A good Y (vertical pressure) technique is similar, put your foot down on the key
with your heel up, lock your ankle and move your knee outward and then back in
towards you.
SoftStep Keys
In the main window of the SoftStep Editor, there are 10 blocks that correspond to each
pad on the SoftStep controller. Shown below is a labeled close up of Key 6.
display - the dark grey display box shows the 4 letter key name. These 4 letters will
show up in the alpha-numeric display of the SoftStep if the display mode for that key is
set to Always, Once (shows only once), or Initial Return. For more information on
display modes see the Modulation chapter below.
copy - the copy function allows you to copy settings from one key to another. Clicking
the copy button on one key will change the copy buttons on all other keys into paste
buttons. You can then click to paste the settings into that key. When you are done
copying settings, click on the copy button again to return the buttons to read "copy".
LED Status - the circle in the bottom right corner of the box mirrors the LED status on
the SoftStep controller. These LEDs are user assignable.
Open - Clicking this box brings up the modulation window for that individual key,
allowing you to edit the parameters in the preset (shown below).
Modulation
Upon opening the modulation window, you will be confronted with an array of six
identical "modlines" (Zoomed in below) that can be arranged differently for each key.
There are six modlines that can assign six data sources from an individual key to
output different types of messages.
Let's take a closer look at the options available in every modline:
on/off - click on the circle to enable the modulation line and it will show a light bluegreen color. When disabled, the modline on/off appears dark.
mode (not available in Standalone) - this refers to the mode for the initial value
which is how often you want the initial value to be sent:
• None - the initial value is never sent out
• Once - initial value is sent out only the first time that scene is recalled in a
given session (session meaning from the time you open the application until
the time you close the application). Every other time the scene is recalled it
will recall whatever that modline's state was the last time you were in the
scene.
• Always - the initial value is sent out every time the scene is recalled
init-val (not available in Standalone) - the initial value. This is the starting value in the
absence of any raw data from the source. The mode (defined above) dictates when
the initial value is used. Something similar can be achieved in Standalone mode by
using the Init source on a separate modline. The Init source coupled with an offset
allows you to send out any number you want every time you first enter a scene. (see
the Init source definition in the SoftStep Sources List).
sources - Choose what data source will control the modline. Click on the box and
many sources will pop up in a scroll menu. Each source uses data differently. Some
sources send values from 0-127 and some send only 0-1. For a complete list of
sources and an explanation of the behavior each one exhibits see the SoftStep Sources
in the Appendix.
raw (not shown in Standalone) - The value coming directly from the source is
displayed here.
gain - this is the first place where you can use math to modify the data signal from the
source. Whatever number is in the gain box is used to multiply the raw value coming
from the source. For example if the source is X live, clicking on the gain number box
and typing "2" will double whatever value is received from the controller.
offset - set a number to add to the raw value after it has been multiplied by the gain
value.
result (not shown in Standalone) - the resulting value of the source modified by gain
and offset.
table - the result value is entered into the selected lookup table, and used to plot the
index on a chart. There are a number of table options, each which will affect the
modulation differently as it changes value over time. There are also two toggle
options: Toggle and Toggle 127. These either toggle between 0 and 1 or 0 and 127
when a value above 0 is received by the table. We have also added 3 counter
options: Counter Inc, Counter Dec, and Counter Set (only available in Hosted
mode).
These allow you to count through a specified range of values
using the Key Counter in the top left corner of the
modulation window. In the key counter you can set the min
and max values and whether or not the number will wrap.
You can also reset it by clicking the little circular arrow
button.
min / max - These allow you to constrain the data values between a minimum and a
maximum number. If the min is set to 10 and the max is set to 15, then the output
cannot be less than 10 or more than 15.
slew - The slew value represents the number of milliseconds that it will take to get to
the target value. Use slew to smooth out data when it jumps from one number to
another. The larger the slew, the slower the result will respond to the source.
parameter destination - Finally the exciting part! Click on the drop-down menu to
see the many options available: Note Set, Note Live, CC, Bank, Program, OSC (Open
Sound Control), Pitch Bend, MMC, Aftertouch, Poly Aftertouch, GarageBand, and HUI.
These options are further customizable by selecting the the note, velocity, control
change, etc..., or the channel # you wish to send the data out. For a complete
explanation of parameter destinations see the SoftStep Parameter Destinations in the
Appendix. OSC, Aftertouch, Poly Aftertouch, GarageBand, HUI, Y Inc Set, and X Inc
Set are only available in Hosted mode.
device/route - this is where you select the port that you want all of your MIDI
messages to go out through. If you'd like to send your data out through the SoftStep
MIDI Expander then you would want to choose "SoftStep Expander" as your device.
For Standalone mode, if you want to send your data out to other applications on your
computer (Ableton Live, Logic, Digital Performer, etc...) then you'll select "SSCOM Port
1".
For Hosted mode you'll want to use the "SoftStep Share" device (for Mac users) as
your output device to send data to other applications on your computer.
For Windows users in Hosted mode you will have to set up an inter-application MIDI
bus. We recommend using MIDI Yoke which is available to download for free
at http://www.midiox.com/
For more detailed information about the SoftStep's ports please read the Ports chapter
of this Manual.
output (not shown in Standalone) - this displays what data is being sent out to the
device you've selected.
On the right side of the modulation window is
where you can set display information for the
LED lights and the 4 letter alphanumeric display
screen on the SoftStep.
The top row contains the settings for the
alphanumeric display screen. Setting the
display mode is key for controlling this
behavior. There are 5 modes: None, Always,
Once, Initial/Return, Immed Param.
Display Modes:
None - selecting this mode will cause the 4 letter display box to show the scene's 4
letter display when using that key, instead of the key name or prefix.
Always - selecting this mode will display the key name whenever that key is the most
recently activated key.
Once (not available in Standalone) - selecting this mode will display the key name
once at the moment it is activated and will then show the prefix and parameter value.
Initial/Return (not available in Standalone) - selecting this mode will display the key
name when the key is selected but not active, and will display the prefix and
parameter value when in use. This mode only works well for continuously changing
sources, not for toggles or triggers. When the display is showing a source value and
the slew causes the output to persist after the foot is off the key, the display will no
longer be updated, even though the parameter is still being altered. Initial/Return is
only available as a mode for the keys, not the Nav Pad.
Immed Param - stands for Immediate parameter. This will show the prefix and
parameter value when that key is the currently activated key. The key name doesn't
ever show up in this mode.
The little button at the end of the modlines next to the reminder text fields are for
selecting which modline's parameter will follow the prefix if you're in "Initial/Return" or
"Immed Param" mode.
LEDs:
The green and red LED modes are also very useful. You can set the key to show you a
red light or a green light in certain circumstances. There are several different modes
for each light:
None - the light will not come on in this mode
True - the light will come on when the output of the key is above 0
False - the light will come on when the output of the key is 0
Flash True - the light will flash repeatedly when the output of the key is above 0
Flash False - the light will flash repeatedly when the output of the key is 0
Flash Fast True - the light will flash quickly when the output of the key is above 0
Flash Fast False - the light will flash quickly when the output of the key is 0
Blink True - the light will blink once when the output of the key goes above 0
Blink False - the light will blink once when the output of the key goes to 0
Off - turns the LED off
The reminder field next to that is just so you can make a little note to yourself about
the modline you just created. This note serves no purpose except to just remind you
about what that modline is for.
Nav Pad
The diamond-shaped pad on the right side of the SoftStep is called the Nav Pad. The
Nav Pad by default is hard coded for the x-axis (left and right sides of the pad) to scroll
through scenes in the setlist. This means that you only have access to editing the y-axis
(top and bottom sides of the pad).
Tip: In Standalone mode there is a way to turn off scene changing and instead just get
pressure data from each corner. In the settings window you can tun Scene Changing
on or off. Set this to off and you will get pressure coming in on CC #s: CC 80 (left
side), CC 81 (right side), CC 82 (top), and CC 83 (bottom). If you do decide to turn
scene changing off but still wish to be able to change scenes on your SoftStep you can
do this by sending program change messages to your SoftStep. See the Sending
Program Changes to the SoftStep chapter of this manual for more information.
In the application you can open up the Nav Pad modulation window by
clicking the "open" button in the diamond-shaped box.
After clicking on it, the following window will pop up:
The first choice to make in the Nav Pad modulation window should be deciding which
mode you want the Nav Pad to operate in; modline mode or program change mode.
Modline mode enables you to use the modulation window to choose your own sources
and destinations like you would normally do. Program Change mode disables editing
and hard codes the y-axis (top and bottom) of the Nav Pad to count through numbers 0
through 12 which represent decades for values 0-120. A value is not sent out until one
of the numbered key's that uses the source "Nav Yx10 & Key" is pressed. This means
the count will be treated as the digit for the ten's place. For example: if you use the Nav
N (north/top) pad to increment up to count 4, this will enable the 40's decade. Use this
in conjunction with the Source "Nav Yx10 & Key" on the numbered pads so that you can
then select any number as the last digit. So after counting up to the 40's decade,
stepping on key 5 would output 45. This is implemented in the "Program Change.. "
factory preset. (See Factory Presets).
In Hosted mode, the y-axis (top or bottom pads) will show you the last value sent out
from the scene on the alphanumeric display if the north or south pads are stepped on
once. If stepped on a second time you will see the scene display name show up on the
alphanumeric display. You can also assign the y-axis of the Nav Pad to do other things.
As you can see the outline is very similar to the modulation windows for each of the 10
keys. (see the SoftStep Keys chapter for a more detailed explanation of the modline
functions.)
The main difference is the circle under the header "Y counter".
This means that the Nav Pad value will count through the min
and max values. Enable the "wrap" button and this will allow the
counter to go bac to the min after it reaches the max. For
example, if your min is set to 5 and max set to 120, stepping on
the pad again when the value is 120 will set it back to 5. You
can reset the counter by clicking on the little circling arrow.
Another difference is Initial/Return and Once are not available as display modes in the
Nav Pad modulation window. Also the sources for the Nav Pad are different:
Nav Y (not available in Standalone mode) - This counts through the range of numbers
set in the counter. The Nav Pad's North/top pad increments the counter while the
South/bottom pad decrements the counter.
Nav Y Decade (in Standalone mode this behavior is essentially what program change
mode does) - This will count through the range of numbers set in the counter in
"decades" and doesn't send the number out until one of the numbered key's is pressed.
This means the count will be treated as the diget for the ten's place. For example: if
you use the Nav N pad to increment up to count 4, this will enable the 40's decade. Use
this in conjunction with the Source "Nav Yx10 & Key" on the numbered pads so that you
can then select any number as the last digit. So after counting up to the 40's decade,
stepping on key 5 would output 45. This is implemented in the "Program Change.. "
factory presets. (See Factory Presets).
Nav Y Inc-Dec - Putting pressure on the Nav N pad will increment the value up to 127,
putting pressure on the Nav S pad will decrement the value down to 0. You can change
the speed at which these values increment and decrement in the settings window by
adjusting the "Y accel" setting. (see the Y accel definition for the Nav Pad in the Settings
chapter for more information).
Nav N Foot On (not available in Standalone mode) - Outputs a 1 when the Nav N pad is
being pressed, and a 0 when not in use.
Nav S Foot On (not available in Standalone mode) - Outputs a 1 when the Nav S pad is
being pressed, and a 0 when not in use.
Nav N Foot Off (not available in Standalone mode) - Outputs a 0 when the Nav N pad is
being pressed, and a 1 when not in use.
Nav S Foot Off (not available it Standalone mode) - Outputs a 0 when the Nav S pad is
being pressed, and a 1 when not in use.
Nav N Trig (not available in Standalone mode) - Sends pressure value out if foot on is
held for 500ms on the North/top end of the Nav Pad. The value goes back to 0 after
100ms.
Nav N Trig Fast (not available in Standalone mode) - Sends pressure value out as soon
as you step on the Nav N pad, then goes back to 0 after 100ms.
Nav N Trig Dbl (not available in Standalone mode) - Sends pressure value after 2
quick, consecutive steps on the Nav N pad, then goes back to 0 after 100ms.
Nav N Trig Long (not available in Standalone mode) - Sends pressure value out after 1
second of holding down the Nav N pad, then goes back to 0 after 100ms.
Nav S Trig (not available in Standalone mode) - Sends pressure value out if foot on is
held for 500ms on the South/bottom end of the Nav Pad. The value goes back to 0 after
100ms.
Nav S Trig Fast (not available in Standalone mode) - Sends pressure value out as soon
as you step on the Nav S pad, then goes back to 0 after 100ms.
Nav S Trig Dbl (not available in Standalone mode) - Sends pressure value after 2 quick,
consecutive steps on the Nav S pad, then goes back to 0 after 100ms.
Nav S Trig Long (not available in Standalone mode) - Sends pressure value out after 1
second of holding down the Nav S pad, then goes back to 0 after 100ms.
Pedal - after calibrating a pedal from the Settings window, you will be able to use an
expression pedal plugged into the expression port on the SoftStep. The data will come
through to this source if selected.
Init (standalone mode only) - Use this source to send an initial value every time the
scene is selected. You can use the offset function in the modline to send out any value
between 0 and 127.
Tip: Set this up as a separate modline going to the same parameter destination as
another modline to get an initial starting value for that destination. It can also be
useful for initializing a program change message when switching scenes.
The Hosted mode version of this would be to use the init mode and values which are
grayed out when in Standalone mode. For more information see the Modulation
chapter of this manual and view the "mode" and "init-val" definitions.
MIDI A...H (not available in Standalone mode) - These receive the values from the
lettered MIDI Inputs in the settings window.
Preset Modulation
MIDI input can be used as sources in the Preset Modulation window. You can use Preset
Modulation to allow other MIDI controllers to change scenes or presets for the keys or
Nav Pad. The Preset Modulation window opens when you click on the "open preset mod"
button from the main window of the SoftStep Editor. This feature is not available in
Standalone mode.
The sources that are available are MIDI Input
sources A-H. These refer to the MIDI Inputs
that you can set up from the settings
window. The picture to the right shows the
MIDI Input setup from the settings window.
You can choose the device the MIDI Input is
coming from, the channel, what type of data
parameter it is and the parameter number
(CC number, Program Change number, Note
Number, etc...). The numbers in the "value"
column show the data coming in. This
number would also be displayed in the "raw"
column in the preset mod window.
Preset modulation works very similarly to key modulation. You can set a gain and an
offset, put the data through a table, then set your min and max, and send it out to a
destination.
The destinations that are available in Preset Modulation can increment or decrement a
scene or preset. The inc and dec destinations will see a change from 0 to 1 as the cue to
perform the increment or decrement. The destinations that do not say inc or dec will
just go directly to the slot number that corresponds with the number from the source.
Sending Program Changes to the SoftStep
You can send program change messages to your SoftStep as an alternate way to change
scenes on your SoftStep.
If you are sending these program changes through SSCOM Port 1 through the USB
connection from a computer then the SoftStep will receive program change messages on
any MIDI channel.
If you are sending program changes through the MIDI Input of a SoftStep MIDI
Expander then the SoftStep will only receive these messages through MIDI channel 16.
Setting Up an Expression Pedal
First make sure you have an expression pedal with a 3 wire connection (a stereo jack).
Along with the SoftStep we ship a 1/4in to 1/8in adapter that you can use to connect
your 1/4in expression pedal to the expression port on the SoftStep.
The first thing you will probably want to do is calibrate your Pedal:
Pedal Calibration:
If you have a pedal plugged into the expression port on the SoftStep, here is where you
can calibrate it. Clicking pedal calibration will open up this window:
Prior to calibrating you will see a
plain linear table. Press the start
button to calibrate and follow the
on-screen instructions to calibrate
your pedal. Move your foot from
heal to toe at the rate of the
progress bar.
You can always hit the blue reset
button to go back to the linear
table or press start again to recalibrate. The test value shows the
calibrated data from your pedal as
you use the expression pedal.
You can set a pedal smoothing value. The trade off is smoothness vs. speed. The
higher the value the more smoothing, the lower the value the less smooth. If the
expression pedal value jumps around increase the smoothing.
The pedal calibration will be remembered between sessions. So every time you open up
the SoftStep application the last pedal calibration table will be recalled. You can also
calibrate your pedal in Standalone mode.
Now that you’ve calibrated the pedal you need to open up one of the
modulation windows (any key’s modulation window or the one for the Nav
Pad will work). Select “pedal” as the source and then choose your
parameter destination to send the data out as a CC, Note, OSC, etc... Be
sure to also select the correct device/route. The SoftStep Expander will
send the data out through the SoftStep MIDI expander’s MIDI Out port.
If in Hosted mode and you would like to send the data out to another
application use SoftStep Share (for Mac) or MIDI Yoke (for Windows). If
in Standalone mode and you’d like to send the data to another application
use SSCOM port 1. For more information about port selections see the
Ports chapter.
Below is an example of how I would set up a modline to send it's data out on CC# 7 to
the SoftStep Expander:
Appendix
SoftStep Sources
The following SoftStep sources are available in every key's modulation line:
Pressure Live - This value corresponds to the overall pressure sensed by the key (a
higher value indicates more pressure applied). The value resets back to 0 when the key
is depressed. There are 4 pressure sensors in each corner of every key. Depending on
the sensor response mode you are in (average or maximum), which is selectable in the
settings window of the application, the pressure data from the 4 sensors will either be
averaged together or the maximum pressure will be used. (See also the settings
chapter of this manual).
X Live - This value corresponds to the overall pressure in the X-axis or horizontal
direction of the key. Applying more pressure to the right side of the key increases the
value, while pressure to the left decreases. The raw value resets back to 63 (centroid
value between 0 and 127) when the key is depressed.
Y Live - This value corresponds to the overall pressure in the Y or vertical direction of
the key. Applying more pressure to the top of the pad increases the value, while
pressure to the bottom decreases. The raw value resets back to 63 (centroid value
between 0 and 127) when the key is depressed.
Pressure Latch - This value corresponds to the overall pressure sensed by the key (a
higher value indicates more pressure applied). The term "latch" indicates that after the
foot is taken off, the last recorded value still remains and will not be reset back to 0
(unlike Pressure Live).
X Latch - This value corresponds to the overall pressure in the X or horizontal direction
of the key. Applying more pressure to the right side of the key increases the value,
while pressure to the left decreases. The term "latch" indicates that after the foot is
taken off, the last recorded value still remains and will not be reset back to 0 (unlike X
Live).
Y Latch - This value corresponds to the overall pressure in the Y or vertical direction of
the key. Applying more pressure to the top of the pad increases the value, while
pressure to the bottom decreases. The term "latch" indicates that after the foot is taken
off, the last recorded value still remains and will not be reset back to 0 (unlike Y Live).
X Increment - This value corresponds to the horizontal plane in an increment/
decrement style. Step a few times on the right side of the key and see the value
increment by different amounts corresponding to the pressure, also try stepping a few
times on the left and see the value decrement. You can also hold pressure onto one side
and it will inc or dec smoothly towards one side. You can change the acceleration of the
incrementing and decrementing in the settings window under the "accel x" parameter
(see the settings chapter of this manual for more info).
Y Increment - This value corresponds to the vertical plane in an increment/decrement
style. Step a few times on the top of the key and see the value increment by different
amounts corresponding to the pressure, also try stepping a few times toward the bottom
and seeing the value decrement. You can also hold pressure at the top or bottom and it
will inc or dec smoothly towards the top or bottom. You can change the acceleration of
the incrementing and decrementing in the settings window under the "accel y"
parameter (see the settings chapter of this manual for more info).
Rotation (not available in Standalone) - With your foot pushing down on the SoftStep
controller, roll the pressure of your foot in a clockwise or counter clockwise oriented
movement and watch the values change.
Rot Relative (not available in Standalone) - no matter where you put your foot initially
you'll get an output of 63 (the center of the dial) and then if you rotate your foot
clockwise from that the value will go up. If you rotate your foot counter-clockwise from
that the value will go down.
Foot On - 1 indicates the foot is on (true) 0 indicates foot off (false). The foot on and
off thresholds are adjustable in the settings window. If a pressure value above the foot
on threshold is applied to a key, a foot on will register. (See also the settings chapter of
this manual for more information on foot on/off thresholds).
Foot Off - Opposite logic to Foot On. 1 indicates foot off (true), 0 indicates foot on
(false). If a pressure value below the foot off threshold is applied to a key, a foot off will
register.
Top - The top source responds like Foot On but only when you are stepping on the top
half of the SoftStep key pad. When your foot is pressing down on the top you will get a
1, when you release your foot the value will return to 0.
Bottom - The bottom source responds like Foot On but only when you are stepping on
the bottom half of the SoftStep key pad. When your foot is pressing down on the
bottom you will get a 1, when you release your foot the value will return to 0.
Wait Trig (not available in Standalone) - Trig is short for trigger. Triggers the pressure
value if foot on is held for 500ms. The value goes back to 0 after 100 ms.
Fast Trig (not available in Standalone) - Triggers the pressure value as soon as you
step on the key then goes back to 0 after 100ms.
Dbl Trig - Short for double trigger, the pressure value is triggered after two
quick impulsive steps on the key. The value goes back to 0 after 100ms.
Long Trig - Triggers the pressure value after 1 second of holding down pressure on the
key. The value goes back to 0 after 100ms.
Off Trig (not available in Standalone) - as soon as a foot off is received after stepping
on a key, a 1 is sent out for 100ms before returning to 0.
Delta Trig (not available in Standalone) - measures change in pressure. If pressure
greater than the delta setting in the settings window occurs, then you'll get a trigger.
(See the settings chapter of this manual for more information).
Wait Trig Latch (not available in Standalone) - Same as Wait Trig but the value doesn't
go back to 0 after the trigger
Fast Trig Latch (not available in Standalone) - Same as Fast Trig but the value doesn't
go back to 0 after the trigger
Dbl Trig Latch (not available in Standalone) - Same as Dbl Trig but the value doesn't
go back to 0 after the trigger
Long Trig Latch (not available in Standalone) - Same as Long Trig but the value
doesn't go back to 0 after the trigger
Pedal - This value comes from an expression pedal when connected to the SoftStep's
expression port (next to the USB port). The pedal can be calibrated in the settings
window of the application. See the settings chapter of this manual for more information
on pedal calibration.
Init (standalone mode only) - Use this source to send an initial value every time the
scene is selected. You can use the offset function in the modline to send out any value
between 0 and 127.
Tip: Set this up as a separate modline going to the same parameter destination as
another modline to get an initial starting value for that destination. It can also be
useful for initializing a program change message when switching scenes.
The Hosted mode version of this would be to use the init mode and values which are
grayed out when in Standalone mode. For more information see
the Modulation chapter of this manual and view the "mode" and "init-val" definitions.
Nav Y (not available in Standalone) - This source looks to the Nav Pad's y-axis as it
counts through the range of numbers set in the counter. The Nav Pad's North/Top pad
increments the counter while the South/bottom pad decrements the counter.
Nav Y x 10 & Key - This unique source works with the Nav Y Decade source for the Nav
Pad. It takes the number you are at from the Nav Pad's counter, multiplies it by 10 and
adds the Key number to that number. No value is sent out until the last digit is selected
with the key. Stepping on the top of the Nav Pad increments the tens digit of the value,
similarly the bottom of the Nav Pad decrements the tens digit. The final value is
achieved after stepping on one of the 10 pads if they are using this source, indicating the
ones digit. For example, step on the top pad 14 times to increment the counter to 14,
then hit the number 2 key, and the final value will be 142. Use this setting to reach
larger numbers quickly. The "Program Change..." factory scenes are set up to take
advantage of this source to quickly select program changes.
Any Key Value - This value corresponds to which of the 10 keys is stepped on.
Stepping on key 7 gives the raw value of 7, stepping on key 2 gives the value of 2. For
Example: If you use Any Key Value on key 1's modline and you press on key 3, a 3 will
be output from key 1's modline.
Prev Key Value - This setting remembers the order of which pads you pressed down on
and outputs the last key, not the current. If you step on key 2 then key 8, the value
output would be 2.
This Key Value - This source will output whatever key value you are on whenever you
step on it. For example, if I am in the key 7 modulation window and I choose This Key
Value as a source, stepping on all other key won't trigger any value except when step on
key 7, and the value "7" will appear.
Key 1...10 Pressed - This source will send out a 1 if you step on the key that
corresponds with whatever "Key [#] Pressed" source you choose. For example, if you
select "Key 4 Pressed" as your source a 1 will output if you step on key 4. This is
extremely useful for programming the LEDs.
Other Key Pressed - When selecting this as a source for a key, stepping on any key
other than the one you selected this source for will output a 1. For example: If key 4 is
set to Other Key Pressed stepping on key 1,2,3,5,6,7,8,9, or 0 will output a 1. Stepping
on key 4 would output a 0.
Mod 1...6 Output - This setting takes the output value from any of the other modlines
as the raw value of its own.
MIDI A...H (not available in Standalone) - These receive the values from the lettered
MIDI Inputs in the settings window
SoftStep Parameter Destinations
Note Set - When you select Note as your parameter destination any number above 0
will send a note on message and a 0 will send a note off message. After selecting Note
as your destination you will have the ability to control the note number, the velocity, and
the channel number you're sending it out on.
Note Live - This is similar to Note Set except that the value from the source will
determine what note is being triggered. This destination does not work well with the
trigger sources. Try setting up Pressure Live as the source for this Parameter
Destination. You'll notice that the "note field" next to the parameter destination menu
changes with the pressure live. Next to the Note you can set the Velocity and the
channel number for the data to go out to.
CC - (Control Change) This will send out any number from 0-127. After selecting CC
you'll be able to set the control number and the channel number that you want your
value sent out on.
Bank - Sends out any number from 0-127. After selecting Bank you can set the channel
number you want to send your value out on.
Program - This will receive numbers to be used as program change messages. After
selecting Program you will be able to choose which channel the program change
message is sent out on.
OSC (not available in Standalone) - (Open Sound Control) Sends out any number from
0-127. After selecting OSC you can set the route name for your values. In the settings
window you can set the OSC IP address and port. Note: do not use port 8400. This
port is used for communication between Sensor View (now a separate app) and the
SoftStep application.
Pitch Bend - Sends out values between 0 and 127, with 63 as the center value for 0
pitch bend. The synth you send it to will determine the range. After selecting the Pitch
Bend you can set the channel number for your value to output on.
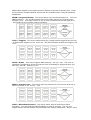
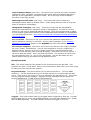
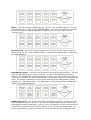
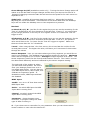
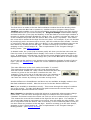
MMC - (MIDI Machine Control) You can use this to control DAWs. The number next to
the Parameter Destination menu will be the device ID for your message to output on.
Next to that is where you can select what type of message you're sending (stop, play,
deferred play, fast forward, rewind, punch in, punch out, pause).
Aftertouch (not available in Standalone) - Sends out values from 0-127 for the
pressure amount. After selecting Aftertouch you can select the channel number for your
pressure amount to go out on.
Poly Aftertouch (not available in Standalone) - Sends out values from 0-127 for the
pressure amount. After selecting Poly Aftertouch you can select the note number and
the channel number for your pressure amount to go out on.
GarageBand - This parameter destination allows you to control transport functions in
GarageBand. In order to use this you'll need to download Garage Remote. It's a free
program that is added to your system preferences that will receive MIDI data and
translate for GarageBand. You can download it here: http://www.muratnkonar.com/
otherstuff/garageremote/downloads.shtml
HUI (not available in Standalone) - HUI (Human User Interface) is a midi mapping
protocol used for a hardware control surface to communicate with DAW (digital audio
workstation) software. This communication protocol allows the SoftStep to control the
DAW's transport as well as individual track functions such as fader volume, mute, solo,
and record enable. HUI is selectable from the parameter destination menu in a
modulation line. Once HUI is selected as a parameter destination, the menu to the right
will let you chose which HUI command you would like to send. The transport functions
such as play, stop, fast forward and rewind are global controls. The individual track
controls such as fader volume, record enable, solo and mute are targeted at tracks 1-8
in whichever bank of 8 tracks is currently selected.
To setup your SoftStep to send HUI messages to Pro Tools: Open the SoftStep
application before you open Pro Tools. Once Pro Tools is open, navigate to the Setup
drop down menu at the top of your screen and select Peripherals. When the Peripherals
window opens, select Midi Controllers. You will want to add a HUI controller, so for #1
under Type chose HUI. Once HUI is selected, you much change Receive From to receive
midi from the SoftStep, so go ahead and select SoftStep Share or another MIDI Bus
(Windows users might be using MIDI Yoke). You don't have to worry about the Send To
menu, since we are only listening to HUI messages coming in and not sending HUI
messages out. If for some reason you do not see SoftStep Share (or MIDI Yoke) as a
menu item in the receive from list, go back to the Setup menu and select midi, then midi
input devices. Make sure SoftStep Share is checked so Pro Tools can use its midi
information. If SoftStep Share still does not appear in Midi Input Devices, you might
want to try restarting the SoftStep application.
Thats it, Pro Tools is now ready to receive HUI commands directly from the SoftStep.
You can now either build your own custom HUI control layouts, or select the Pro Tools
HUI Template from one of the built in presets. If you would like to use the Pro Tools HUI
Template, please refer to the back of this manual where there is a further description on
the Pro Tools HUI Template.
Note about HUI track control banks: HUI track control is grouped into banks of 8 tracks.
The 8 tracks which are currently selected will be highlighted with blue rectangles. If you
want to control more than 8 tracks, you must use one of the bank select messages to
move to the next or previous bank of 8 tracks. This gives you the ability to make control
assignments targeted at the track number inside the currently selected bank. For
example; when you have a HUI record enable command being sent to track 1, this will
record enable the first track in whichever bank of 8 tracks you have currently selected.
This is very useful for navigating through a larger session with more than 8 tracks.
Y Inc Set (not available in Standalone mode) - This destination allows you to set the
state of the Y Increment source, which you can then use on another modline. This is
very useful when setting up an initial value for the Y Increment source, the initial value
can be set up to go straight to the Y Inc Set destination and then on a separate modline
you can use the Y Increment source which will receive its initial state from the other
modline and start from the number specified by the "init-val" (see the Modulation
chapter for an explanation of Initial Values).
X Inc Set - (not available in Standalone mode) - This destination allows you to set the
state of the Y Increment source, which you can then use on another modline. This is
very useful when setting up an initial value for the Y Increment source, the initial value
can be set up to go straight to the Y Inc Set destination and then on a separate modline
you can use the Y Increment source which will receive its initial state from the other
modline and start from the number specified by the "init-val" (see the Modulation
chapter for an explanation of Initial Values).
Using SoftStep with Ableton Live (in Hosted mode)
Ableton Live is an incredibly versatile performance and composition environment and the
SoftStep integrates easily into the Live universe.
Setup:
For the SoftStep to communicate
with Ableton Live on a Macintosh,
all modulation destinations in the
SoftStep program must be set to
the SoftStep Share device (for mac
users). Windows does not come
with a built-in MIDI bus, so you
must download one and use that
as your destination. See
the Ports chapter for more
information. Then in Ableton,
select the Live drop-down menu
and select Preferences. Click on
the tab that says MIDI Sync.
Under Midi Ports, you should see a
line that says "SoftStep Share"
with 3 On/Off buttons to the right.
Turn all 3 of these buttons on so
that they show up yellow. The rest
of this window can be configured to
match your setup, or left
completely off. All Ableton needs
to know to work with the SoftStep
software is that it needs to listen
for data coming in on this internal
MIDI bus.
If you wish to follow along, unzip the "Live_Example1_DrumLoops.zip" file which is in the
"application_examples" folder of the SoftStep application package.
This includes a Live Set with some samples and effects created to be controlled by
SoftStep factory preset 12, called Ableton Live Demo. The preferences and MIDI
assignments are already setup. If you do not already own a copy of Ableton Live, then
go to:
http://www.ableton.com/downloads/
Here, you can download a free trial version of Live version 8. Follow their installation
instructions and then open our file Live_Example1_DrumLoops.als.
Background on Ableton Live:
An Ableton Live file (called a set) is built around audio samples called clips. A Set has
two environments - the Session view and the Arrangement view. This example is
concerned with the Session view, which holds clips in a grid of slots. Vertical columns
(tracks) can hold as many audio clips as you want, but only one can be played back at a
time. Horizontally, you can have as many tracks playing back as you like.
For example, if you wanted a drum loop and a bass loop to play back together, you
would make two tracks - let's call them Beats and Bass. Then you would click and drag
your drum loop into slot one of the Beats track, and the bass line into slot 1 of the Bass
track. Then you can play those back using the play button in the left corner of each clip
- or you can start them both at the same time by clicking the play button in slot 1 of the
Master track on the far right.
If you wanted the drum beat to change but the bass line to continue, you would drag
your second drum loop to slot 2 of the Beats track and click its play button. The first
drum beat will stop when it gets to the end of the current bar and the second beat will
start looping.
To record a new clip into a slot, assign your audio input/output devices in the
preferences window, then arm the track by clicking the record button at the
bottom.
Now all of the little stop/play buttons in each slot will turn into circles,
signifying that recording is enabled. When you click one of these circles,
playback of any other active tracks will start and a clip will be created in that
slot for you and recording will begin.
On the left side of the screen one can select devices (Audio effects, plugins,
MIDI effects and instruments) by clicking and dragging them to a track. The
example Set has one track set up with a lowpass filter, delay and reverb. The
lowpass filter and the reverb have both been bypassed by clicking the power
button in the top left corner of each module, this allows dry audio to pass
through.
Assigning Live functions to the SoftStep:
Live accepts continuous controller data, midi note on/off data and pitchbend
data, so in the SoftStep application in the destination menu for each modline
you would select Note, CC or Pitchbend. Live has many continuous
parameters (such as wet/dry on the reverb and delay) and their ranges
automatically default to 0-127, just like the non-triggered SoftStep sources.
Live also has many useful triggered functions (such as play, stop and record
on each slot, or the bypass button on each device) and these can also be
easily assigned to the SoftStep keys.
To view MIDI assignments in Live, click the MIDI button in the top right corner of the
screen.
All the parameters that may be assigned to MIDI control will light up blue, and a list will
appear showing what you have already assigned. All of these highlighted parameters
can be assigned to the SoftStep.
To make a new assignment, set up the modline in the SoftStep software first. Then,
while in Live in the MIDI assignment view, click on any parameter that is highlighted
blue that you would like to assign to that modline. Now press the desired key on the
SoftStep and as soon as Live receives a MIDI message, the desired parameter will
always be controlled from that MIDI source.
In Live_Example1_DrumLoops:
In Factory Preset 12 (Ableton Live Demo) SoftStep keys 6-10 are assigned to trigger
(and retrigger) the 5 clips located on track 1, slots 1-5. In the modline, I have selected
"Foot On" for my source, which outputs a 1 when I press that key. The gain has been
changed to 127 so that when I press the key, the modline outputs 127. When I take my
foot off, that key outputs a 0, but clip launch buttons in Live do not respond to 0 so the
clip will continue to loop until I trigger a different one using a different key. If I press
the same key again, the clip will start looping from the beginning again. Or, I can stop
playback altogether by pressing Key 1. This is also set up with a Foot-On source and a
gain of 127, but its destination is the stop button at the bottom of track 1. These
modlines are sending out note numbers on channel 1 with the modline value (0 or 127)
setting the note's velocity.
Any Note-On message (a note with a velocity greater than 0) can be assigned to Live's
triggers. A continuous controller destination would have the same function, but for Live
to recognize it as an on-trigger, the controller value must be 127 (not just greater than
0.) This is easily setup in the SoftStep application by using a gain value of 127, as in this
example, or using the table Toggle 127. Every time this table receives a 1 after a 0 it
toggles back and forth between outputting 0 and 127. For more on this method, see
Factory Preset 3: Ableton Live Loops.
Key 2 and Key 3 have been set up to control the Wet/Dry parameter and the bypass
button in Live's Auto-Filter and Reverb devices respectively. Both of their top modlines
have their source set to Pressure Live. This is being scaled and sent out as continuous
controller values to the filter frequency (like a Wah pedal) and to the reverb Wet/Dry
amount. Modline 2 sends the Foot-On source through a gain value of 127 to control the
bypass button on each module. This way, when you take your foot off of the key, the
device is bypassed.
Key 4's modline is setup using a continuous controller destination too, but its source is
Y-Increment. It is controlling the Delay device's Wet/Dry amount, but unlike the
previous 2 keys, when you take your foot off of Key 4, the Delay's parameters will stay
where you left them and the device does not turn off because we have not assigned the
bypass button.
Last but not least, Key 5 uses the Foot-On source and Note destination to tap in a
tempo. This was set up by clicking the MIDI assign button in Live as usual, and then
clicking on the TAP button in the top left corner of the screen.
Tapping Key 5 four times will set the tempo for all samples to play back. It can be
changed in real time for interesting dynamic effects.
There are many, many more functions in Live that can be assigned in creative ways to
SoftStep sources, for more ideas you can download the Ableton Live manual here:
http://www.ableton.com/pages/downloads/manuals
And be sure to watch for more examples on our website in the future!
Glossary
The SoftStep manual uses much vocabulary that is specific to the SoftStep and the
SoftStep Application. When skimming through the manual as most people do instead of
reading everything, you might come across a word that confuses you because it was
initially defined earlier. Instead of having to go in search of the explanation you can just
look for our quick definition of the word here. There are also several links on words like
this that will bring you here to the glossary for more information.
alphanumeric display - the 4 letter display on the SoftStep just to the right of the
numbered key pads.
DAW - stands for Digital Audio Workstation. A computer application that allows you to
record, edit, and playback audio and MIDI. For example; Ableton Live, Logic, Cubase,
Pro Tools, Digital Performer, etc...
decade - in reference to incrementing and decrementing in decades with the y-axis of
the Nav Pad. A decade is the number in the tens diget. A wider range of numbers can
be reached by incrementing and decrementing in decades and using the numbered keys
to fill in the last digit of the number.
destination - see parameter destination
device - the Port on which the MIDI data will travel. Be sure to use the same device as
the MIDI Input for whatever you are sending the data to.
false - in reference to programming the LEDs false means 0. When the LED state is set
to false the LED will light up when a modline outputs a 0
firmware - firmware is software that is programmed into the memory contained in a
hardware device. We provide users with firmware updates from time to time in order to
improve performance and add features. Sometimes a firmware update will be required
when a new software version is released in order to keep the SoftStep compatible with
the software.
host application - if using the SoftStep with an application on your computer (other
than the SoftStep application) this application can be referred to as the host application.
Hosted mode - running the SoftStep Application in Hosted mode gives you access to all
of the features the application has to give, but means that the SoftStep application must
be open in the background in order to send programmed data.
HUI - stands for Human User Interface. This refers to a data paradigm that some DAWs
recognize to control things like transport functions (stop, play, record enable, rewind,
etc...).
init (modline) - abbreviation of the word initial. This refers to the initial value and
mode for the initial value in a modline of the SoftStep application. Setting an initial
value for a modline allows you to begin a scene with that modline set to a certain
number. The mode determines how often an initial value is used. Practical application:
if you assigned a modline to control a volume level and wanted to start with the volume
all the way up you might set an init value at 127.
init (preset or scene) - all presets for each key pad, the Nav Pad, the settings window,
and the Preset Modulation window contain one init preset which you can use as a blank
slate for the creation of a new preset from scratch.
init (source) - This source is available in Standalone mode and offers an alternate way
to initialize values since setting a modline with an initial value is not available in
Standalone mode. You can use the Init source with an offset on an additional modline
for a key pad to send out the offset value to any parameter destination when you enter
the scene.
key - refers to one of the numbered pads on the SoftStep. The word key is used to
refer to these instead of pad in order to differentiate them from the Nav Pad. They
aren't referred to as buttons because they are much more than just on/off switches.
key-lockout - The SoftStep is programmed to only recognize one key press at a time so
that accidentally triggering an adjacent key is not possible while another key is in use.
We call this key-lockout mode and this can be turned off from the settings window by
selecting "multiple key mode enable".
latch - refers to a type of data source from the SoftStep that stays in place after
releasing a key. For example, X Latch stays where you left the pressure of your foot in
the x-axis after releasing the key as opposed to X Live which returns to 63 every time
your foot is released.
LED - each numbered key on the SoftStep has a green and a red light next to the upper
right hand corner. These can be programmed to turn on, to flash at two possible
speeds, or blink once. The green and red LEDs can be combined to make yellow for an
additional state.
live - refers to a type of data source from the SoftStep that does not stay where you
leave it. For example, Pressure Live will return to 0 when you release your foot from a
key.
MIDI Bus (inter-application) - a special MIDI port within the computer that you can
use to route MIDI data from one application to another.
MMC - stands for MIDI Machine Control. This refers to a data paradigm that some
DAWs recognize to control transport functions (stop, play, record, pause, rewind, etc...).
modline - a single line of logic available in the modulation windows for SoftStep keys
and the Nav Pad. This is where you set up the data that you want to send out from the
SoftStep.
modulation window - there is a modulation window for each key, the Nav Pad, and
also one for preset control. This is where you set up what data you want to send out
with the SoftStep using the modlines. The 10 key pads have 6 different modlines each
for sending out up to 6 different types of data per key.
Nav Pad - the diamond-shaped pad on the right side of the SoftStep is referred to as
the Nav Pad. There are 4 points of pressure on this pad, North, South, East, and West.
OSC - stands for Open Sound Control. It is a format for messaging among computers,
sound synthesizers, and other multimedia devices that are optimized for modern
networking technology.
pad - In this manual the word pad is used mostly to refer to the Nav Pad. The word key
is used for the numbered pads in order to differentiate.
parameter destination - This is the type of data that you want to send out. Control
Changes messages, Program Change messages, MMC, OSC, etc... are all parameter
destinations.
port - The SoftStep hardware has 2 ports: One for the SoftStep to send up through USB
to the computer (port 1) and one for sending data through the SoftStep MIDI Expander.
You can think of these ports as roads on which data travels, each road going
somewhere different. In Hosted mode you need a MIDI Bus to send Data to other
applications. We include our own MIDI Bus in the mac version called SoftStep Share.
preset - a set of saved modulation settings for keys. Presets for each key can then be
saved together in a scene.
scene - A scene determines which preset for each key you are using and what Nav Pad
preset you are using with them. Other similar terms used by other foot controllers could
be: bank, program, set, cue, preset, etc... We call ours a scene to differentiate it from
other functions that use similar names within the application.
scene abbreviation - this refers to the 4 letters that are saved with each scene that
show up on the SoftStep's alpha numeric display when scrolling through scenes. These
four letters are typed into the box labeled "display" in the Main window of the SoftStep
application next to the scene menu.
setlist - this contains the chosen scenes that you can then scroll through using the
SoftStep Nav Pad's x-axis. This way when you're performing a show you don't have to
scroll through all of your scenes to find the one you want to use. In Standalone mode
the setlist is currently limited to 16 scenes.
slew - Slew uses the output of a modline as a target value. Each new value output from
a modline becomes the new target value, and the slew time (ms) sets the time it takes
for the current output value of a modline to move to its new target value.
source - refers to the different ways the sensor data from the SoftStep keys are
interpreted. These sources are presented visually in the sensor view window. Pressure
Live, X Live, Y Increment, Foot On, etc... are examples of sources.
SSCOM - This is what the SoftStep ports are called.
Standalone mode - putting the application in this mode allows you to use the
application as an editor and then download your settings to the SoftStep so you can use
it without the application.
state recall - When moving between presets, state recall retains the state (or current
parameter values of inc/dec, led, rotation, latching, etc...) of a particular scene. When
the user changes these parameters, then navigates away from a scene, and
subsequently returns to it, these parameter values are recalled.
threshold - A numerical boundary point or dividing line. A threshold creates a switch,
where as soon as the incoming data goes above this threshold number, one thing
happens, but as soon as it crosses back something else happens.
toggle - refers to data which goes back and forth between 2 different numbers every
time you step on a key. For example; If using the toggle 127 table used with Foot On as
the source in the SoftStep modlines for keys, the first time you step on the key the
output will be 127 and when you step on the key again the output will go back to 0. You
can continue stepping on the key and it will go back and forth between the 2 outputs.
trigger - refers to one of the sources that go from zero to a positive number when you
step on a key.
true - in reference to programming the LEDs true means 1. When the LED state is set
to true the LED will light up when a modline outputs a 1.
x-axis - this is the horizontal plane of the SoftStep's keys and the Nav Pad. Shifting the
weight of your foot from side to side will cause the x-axis data to increase and decrease.
y-axis - this is the vertical plane of the SoftStep's keys and the Nav Pad. Shifting the
weight of your foot up and down will cause the y-axis data to increase and decrease.
Troubleshooting
Make sure the software and the firmware versions are compatible with each
other.
Note: If you used the Mac version 1.099 or RC1 please archive or delete them before
updating to version 1.1 so you don't accidentally launch either of these older versions
(particularly important if your firmware is not VK1 or higher).
In the SoftStep Editor version 1.2 you will be prompted to update your firmware if one is
needed when you open up your application. Be sure to click update if prompted. The
VK2 firmware will be sent down to your SoftStep.
If you are having trouble of any kind make sure you double check the following before
moving on to the chapters below that address specific problems:
1. With your SoftStep plugged in check Audio MIDI Setup's MIDI view and make
SoftStep's SSCOM icon is active (not grayed out). If it is not active try these:
1. Unplug your SoftStep and plug it back in.
2. Unplug your SoftStep, restart your computer, and plug your SoftStep
back in.
3. Try a different USB cable
2. Make sure you are using the correct firmware. The firmware version will flash on
the SoftStep display just after you've plugged it in. VK2 is the firmware version
that goes with software version 1.2.
3. Make sure your SoftStep application is in the same directory with your presets
folder. It's best to keep the SoftStep directory as is after downloading so that
everything that is relevant to the version you downloaded stays together. You
can make an alias or shortcut and then put that wherever you wish.
4. Delete your SoftStep Preferences folder: "/__User__/Library/Preferences/
SoftStep Folder/" then restart your computer
DAW/Host Application Trouble
If you are having problems getting a DAW or other host application (Ableton Live, Logic,
Digital Performer, Mobius, GarageBand, etc...) to "learn" the correct MIDI information
that you are trying to send with your SoftStep make sure you double check and try out
the following:
1. Make sure the SoftStep application is communicating with the SoftStep. Check
the Sensor View screen to make sure you can see the interface reacting to your
interactions with the SoftStep. If you do not see anything responding to your
foot presses check out the Connectivity Trouble headline of this Troubleshooting
chapter and then come back to this headline if you still experience problems
getting MIDI into your other application.
2. If in Hosted mode, check that in the SoftStep application you are using either
SoftStep Share or a MIDI Bus (IAC Driver Bus or MIDI Yoke) as the device/route
in the modulation windows of all the keys. See the Port chapter of this manual
for instructions on using MIDI Yoke. If in Standalone mode, make sure your
device/route is set to SSCOM Port 1 (sometimes called "USB Audio Device (1)" in
Windows XP) and that your selected MIDI Input in your DAW is set to SSCOM
Port 1 also.
3. Make sure you open up your host application after you open up the SoftStep
application. If you are using SoftStep Share as your device, the host application
will not be able to find it unless the SoftStep application is open. Some
applications do not automatically update their Port list after a new device has
become available.
4. Now that you have the data outputting from the SoftStep application, if you're in
Hosted mode make sure that you understand that Port 1 of the SoftStep will also
still be sending raw sensor data for the SoftStep application to mold. Because
both Port 1 and SoftStep Share (or your MIDI Bus) will be sending information at
the same time you will need to filter out Port 1 from being seen by your DAW.
For more information on the Ports of SoftStep check out the Ports chapter of
this manual.
To filter out Port 1
from your DAW or
host application you
can usually find a
preferences or MIDI
settings menu
somewhere where
you can select which
MIDI Inputs you
want to be
available. Here is a
screenshot of
Ableton Live's MIDI
Preferences menu:
5.
6. If your host application does not give you the ability to filter out or select a
specific MIDI Input device (like Logic or Mainstage) you could either select your
MIDI data manually instead of using the learn function, or you can try this:
When in Learn mode instead of pressing on the key on the SoftStep
foot controller, go to the SoftStep application's modulation window for
the key you want to be "learned" and wiggle the output number box
toward the end of the modline. This will send out just the data you
want the learn function to receive from the application and will prevent
Logic from being confused by the data coming from Port 1. Then when
you're out of learn mode you can step on the keys all you want.
Display Trouble
If you are having problems getting the alpha numeric display and LEDs to respond to
display changes from the Application try this:
1. If your computer's language settings are set to something other than English:
1. Set the language to English in the "System preferences /
Language&Text".
2. Restart your computer to make the change take effect.
3. With the SoftStep disconnected delete the SSCOM icon in the Audio MIDI
setup utility.
4. Plug in the SoftStep and the SSCOM icon appears with the English
named ports "Port 1".
5. Set the language back to the language you had it set to before in
"System Preferences / Language&Text".
6. Restart your computer one more time for the changes to take effect.
2. Make sure you have the latest firmware installed on your SoftStep. The current
latest firmware that goes with software version 1.2 is VK2.
3. If using multiple USB devices, unplug ALL of them, then restart the computer,
then try plugging in the SoftStep by itself. If that works, add the other devices
back in one by one to see if there is a conflict.
4. If using multiple USB devices, use a powered usb hub. If a device like a printer
or webcam is taking too much power, this could interfere with USB
communication.
5. Update your Mac OS to the latest version.
Noise Trouble
If you are experiencing noise or hum in your audio setup that you believe is caused by
the SoftStep check to see if this is due to the Electro-Luminescent (EL) backlighting of
the SoftStep by going into the Settings window of the SoftStep application and set the
EL to off. If this makes the audio noise stop then what you'll want to do is adjust the
grounding of your audio set up. Here are a few suggestions that could help you to be
able to use the SoftStep with the EL on:
1. Try using a powered USB Hub for the SoftStep. Having the SoftStep separated
from audio device plugged into USB could help because something else could
hoarding the power or the computer might not be providing enough. Having a
separate powered USB hub ensures the SoftStep is getting the correct amount of
power.
2. If you are using a laptop try using it without the power charger plugged into the
laptop.
3. Make sure all power for your audio setup is coming from the same wall socket.
Using 2 different sockets can sometimes cause hum in cases like this because
different power sources can be producing slightly different amounts of AC.
Here is a diagram of a good way to set up that likely won't have grounding problems:
black connections are power cables
blue connections are audio cables
green connections are USB cables
Note: Everything is connected to the same power outlet. The laptop in the picture is
not hooked up to power because often a power charger connected to a laptop will be a
source of noise. If using a desktop computer that requires power to turn on, you'll want
it plugged into the power strip.
Connectivity Trouble
If you are having trouble with the SoftStep staying connected on your computer try the
following:
1. Make sure you plug the SoftStep in before opening the SoftStep application.
2. If using multiple USB devices, unplug ALL of them, then restart the computer,
then try plugging in the SoftStep by itself. If that works, add the other devices
back in one by one to see if there is a conflict.
3. If using multiple USB devices, use a powered USB hub. If a device like a printer
or webcam is taking too much power, this could interfere with USB
communication.
4. Open Applications>Utilities>Disk Utility. Select your hard drive and click on
"Repair Disk Permissions." This has solved connectivity issues before.
5. Try reseting the PRAM.
1. Shut down the computer.
2. Locate the following keys on the keyboard: Command, Option, P, and R.
You will need to hold these keys down simultaneously in step 4.
3. Turn on the computer.
4. Press and hold the Command-Option-P-R keys. You must press this key
combination before the gray screen appears.
5. Hold the keys down until the computer restarts and you hear the startup
sound for the second time.
6. Release the keys.
6. Try reseting the System Management Controller.
http://support.apple.com/kb/HT3964?viewlocale=en_US
Press Command + Option + Escape to force quit any application that is not
responding.
Put your Mac to sleep by choosing the Apple (?) menu from the upper-left menu
bar and then choosing Sleep. Wake the computer after it has gone to sleep.
Restart your Mac by by choosing the Apple (?) menu from the upper-left menu
bar and then choosing Restart.
Shut down your Mac by by choosing the Apple (?) menu from the upper-left
menu bar and then choosing Shut Down.
Then to reset SMC. Procedure varies from computer to computer, but all steps
are listed at the link above. For Macbook Pro:
Shut down the computer.
Plug in the MagSafe power adapter to a power source, connecting it to the Mac if
its not already connected.
On the built-in keyboard, press the (left side) Shift-Control-Option keys and the
power button at the same time.
Release all the keys and the power button at the same time.
Press the power button to turn on the computer. Note: The LED on the MagSafe
power adapter does not change states or temporarily turn-off when you reset the
SMC.
If you still have questions please visit the SoftStep user forum at
forum.keithmcmillen.com or feel free to e-mail support at [email protected]