1
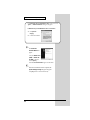
To resize thickness, move all items on the front cover to left or right
Information
When you need repair service, call your nearest EDIROL/Roland Service Center or authorized EDIROL/Roland distributor
in your country as shown below.
AUSTRALIA
EDIROL Australia Pty. Ltd.
72 Central Avenue
Oak Flats NSW 2529
AUSTRALIA
TEL: (02) 4257 9091
http://www.edirol.com.au
EUROPE
EDIROL (Europe) Ltd.
BRAZIL
HUNGARY
Tom Lee Music Co., Ltd.
Service Division
Roland Brasil Ltda
Intermusica Ltd.
Rua San Jose, 780 Sala B
Parque Industrial San Jose
Cotia - Sao Paulo - SP, BRAZIL
TEL: (011) 4615 5666
Warehouse Area ‘DEPO’ Pf.83
H-2046 Torokbalint, HUNGARY
TEL: (23) 511011
22-32 Pun Shan Street, Tsuen
Wan, New Territories,
HONG KONG
TEL: 2415 0911
INDIA
Rivera Digitec (India) Pvt. Ltd.
409, Nirman Kendra Mahalaxmi
Flats Compound Off. Dr. Edwin
Moses Road, Mumbai-400011,
INDIA
TEL: (022) 493 9051
INDONESIA
PT Citra IntiRama
Deutschland
TEL: 0700 33 47 65 20
France
TEL: 0810 000 371
Italia
TEL: 02 93778329
J1. Cideng Timur No. 15J-150
Jakarta Pusat
INDONESIA
TEL: (021) 6324170
U. S. A. / CANADA
Cosmos Corporation
EDIROL Corporation North
America
425 Sequoia Drive, Suite 114
Bellingham, WA 98226
U. S. A.
TEL: (360) 594-4276
FAX: (360) 594-4271
http://www.edirol.com/
KOREA
1461-9, Seocho-Dong,
Seocho Ku, Seoul, KOREA
TEL: (02) 3486-8855
MALAYSIA
BENTLEY MUSIC SDN BHD
140 & 142, Jalan Bukit Bintang
55100 Kuala Lumpur, MALAYSIA
TEL: (03) 2144-3333
PHILIPPINES
G.A. Yupangco & Co. Inc.
AFRICA
339 Gil J. Puyat Avenue
Makati, Metro Manila 1200,
PHILIPPINES
TEL: (02) 899 9801
EGYPT
SINGAPORE
Al Fanny Trading Office
CRISTOFORI MUSIC PTE
LTD
9, EBN Hagar A1 Askalany Street,
ARD E1 Golf, Heliopolis,
Cairo 11341, EGYPT
TEL: 20-2-417-1828
Blk 3014, Bedok Industrial Park E,
#02-2148, SINGAPORE 489980
TEL: 6243-9555
REUNION
TAIWAN
Maison FO - YAM Marcel
ROLAND TAIWAN
ENTERPRISE CO., LTD.
25 Rue Jules Hermann,
Chaudron - BP79 97 491
Ste Clotilde Cedex,
REUNION ISLAND
TEL: (0262) 218-429
Room 5, 9fl. No. 112 Chung Shan
N.Road Sec.2, Taipei, TAIWAN,
R.O.C.
TEL: (02) 2561 3339
SOUTH AFRICA
THAILAND
That Other Music Shop
(PTY) Ltd.
11 Melle St., Braamfontein,
Johannesbourg, SOUTH AFRICA
P.O.Box 32918, Braamfontein 2017
Johannesbourg, SOUTH AFRICA
TEL: (011) 403 4105
Theera Music Co. , Ltd.
330 Verng NakornKasem, Soi 2,
Bangkok 10100, THAILAND
TEL: (02) 2248821
VIETNAM
Saigon Music
17 Werdmuller Centre,
Main Road, Claremont 7708
SOUTH AFRICA
138 Tran Quang Khai St.,
District 1
Ho Chi Minh City
VIETNAM
TEL: (08) 844-4068
P.O.BOX 23032, Claremont 7735,
SOUTH AFRICA
TEL: (021) 674 4030
AUSTRALIA/
NEW ZEALAND
Paul Bothner (PTY) Ltd.
NEW ZEALAND
ASIA
CHINA
Roland Shanghai Electronics
Co.,Ltd.
Roland Corporation Ltd.
32 Shaddock Street, Mount Eden,
Auckland, NEW ZEALAND
TEL: (09) 3098 715
5F. No.1500 Pingliang Road
Shanghai, CHINA
TEL: (021) 5580-0800
CENTRAL/LATIN
AMERICA
Roland Shanghai Electronics
Co.,Ltd.
(BEIJING OFFICE)
ARGENTINA
10F. No.18 Anhuaxili
Chaoyang District, Beijing,
CHINA
TEL: (010) 6426-5050
CHILE
Comercial Fancy II S.A.
Rut.: 96.919.420-1
Nataniel Cox #739, 4th Floor
Santiago - Centro, CHILE
TEL: (02) 688-9540
MEXICO
Casa Veerkamp, s.a. de c.v.
MIDDLE EAST
Roland Ireland
Audio House, Belmont Court,
Donnybrook, Dublin 4.
Republic of IRELAND
TEL: (01) 2603501
Viale delle Industrie 8,
20020 Arese, Milano, ITALY
TEL: (02) 937-78300
URUGUAY
Musicland Digital C.A.
Av. Francisco de Miranda,
Centro Parque de Cristal, Nivel
C2 Local 20 Caracas
VENEZUELA
TEL: (212) 285-8586
EUROPE
AUSTRIA
Roland Austria GES.M.B.H.
Siemensstrasse 4, P.O. Box 74,
A-6063 RUM, AUSTRIA
TEL: (0512) 26 44 260
JORDAN
AMMAN Trading Agency
Tecnologias Musica e Audio,
Roland Portugal, S.A.
Cais Das Pedras, 8/9-1 Dto
4050-465 PORTO
PORTUGAL
TEL: (022) 608 00 60
LEBANON
Piata Libertatii 1,
RO-4200 Gheorgheni
TEL: (066) 164-609
Chahine S.A.L.
Gerge Zeidan St., Chahine Bldg.,
Achrafieh, P.O.Box: 16-5857
Beirut, LEBANON
TEL: (01) 20-1441
MuTek
QATAR
Badie Studio & Stores
P.O. Box 62,
Doha, QATAR
TEL: 423554
SPAIN
Roland Electronics
de España, S. A.
SWEDEN
KUWAIT
Abdullah Salem Street,
Safat, KUWAIT
TEL: 243-6399
FBS LINES
FRANCE
245 Prince Mohammad St.,
Amman 1118, JORDAN
TEL: (06) 464-1200
Easa Husain Al-Yousifi
ROMANIA
Calle Bolivia 239, 08020
Barcelona, SPAIN
TEL: (93) 308 1000
Roland Scandinavia As,
Filial Finland
8 Retzif Ha’aliya Hashnya St.
Tel-Aviv-Yafo ISRAEL
TEL: (03) 6823666
PORTUGAL
Nordhavnsvej 7, Postbox 880,
DK-2100 Copenhagen
DENMARK
TEL: (039)16 6200
FINLAND
ISRAEL
Halilit P. Greenspoon &
Sons Ltd.
UL. Gibraltarska 4.
PL-03664 Warszawa POLAND
TEL: (022) 679 44 19
3-Bogatyrskaya Str. 1.k.l
107 564 Moscow, RUSSIA
TEL: (095) 169 5043
4, Rue Paul Henri SPAAK,
Parc de l'Esplanade, F 77 462 St.
Thibault, Lagny Cedex FRANCE
TEL: 01 600 73 500
No.41 Nike St., Dr.Shariyati Ave.,
Roberoye Cerahe Mirdamad
Tehran, IRAN
TEL: (021) 285-4169
P. P. H. Brzostowicz
RUSSIA
Roland France SA
MOCO, INC.
POLAND
Houtstraat 3, B-2260, Oevel
(Westerlo) BELGIUM
TEL: (014) 575811
Roland Scandinavia A/S
IRAN
Lilleakerveien 2 Postboks 95
Lilleaker N-0216 Oslo
NORWAY
TEL: 273 0074
BELGIUM/HOLLAND/
LUXEMBOURG
Roland Benelux N. V.
DENMARK
Radex Sound Equipment Ltd.
17, Diagorou Street, Nicosia,
CYPRUS
TEL: (02) 66-9426
Roland Italy S. p. A.
Roland Scandinavia Avd.
Kontor Norge
VENEZUELA
CYPRUS
ITALY
NORWAY
Francisco Acuna de Figueroa 1771
C.P.: 11.800
Montevideo, URUGUAY
TEL: (02) 924-2335
Moon Stores
No.16, Bab Al Bahrain Avenue,
P.O.Box 247, Manama 304,
State of BAHRAIN
TEL: 211 005
IRELAND
Av. Toluca No. 323, Col. Olivar
de los Padres 01780 Mexico D.F.
MEXICO
TEL: (55) 5668-6699
Todo Musica S.A.
BAHRAIN
Corniche Road, Aldossary Bldg.,
1st Floor, Alkhobar,
SAUDI ARABIA
Roland Scandinavia A/S
SWEDISH SALES OFFICE
P.O.Box 2154, Alkhobar 31952
SAUDI ARABIA
TEL: (03) 898 2081
Danvik Center 28, 2 tr.
S-131 30 Nacka SWEDEN
TEL: (08) 702 0020
SYRIA
SWITZERLAND
Technical Light & Sound
Center
Roland (Switzerland) AG
Musitronic AG
GERMANY
UKRAINE
Roland Elektronische
Musikinstrumente HmbH.
TURKEY
TIC-TAC
Barkat Muzik aletleri ithalat
ve ihracat Ltd Sti
Oststrasse 96, 22844 Norderstedt,
GERMANY
TEL: (040) 52 60090
Mira Str. 19/108
P.O. Box 180
295400 Munkachevo, UKRAINE
TEL: (03131) 414-40
GREECE
UNITED KINGDOM
155, New National Road
Patras 26442, GREECE
TEL: (061) 043-5400
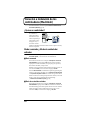
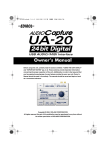
Thank you, and congratulations on your choice of the UA-20.
SAUDI ARABIA
Khaled Ebn Al Walid St.
Bldg. No. 47, P.O.BOX 13520,
Damascus, SYRIA
TEL: (011) 223-5384
STOLLAS S.A.
Music Sound Light
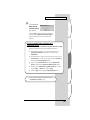
Owner’s Manual
Bedienungsanleitung
Mode d’emploi
Manuale d’uso
Manual del usuario
aDawliah Universal
Electronics APL
Gerberstrasse 5, Postfach,
CH-4410 Liestal, SWITZERLAND
TEL: (061) 927-8383
Lauttasaarentie 54 B
Fin-00201 Helsinki, FINLAND
TEL: (9) 682 4020
Owner’s Manual
Studio 3.4 114 Power Road
London W4 5PY
U. K.
TEL: +44 (0)20 8747 5949
FAX:+44 (0)20 8747 5948
http://www.edirol.com/europe
HONG KONG
Siraselviler Caddesi Siraselviler
Pasaji No:74/20
Taksim - Istanbul, TURKEY
TEL: (0212) 2499324
Roland (U.K.) Ltd.
U.A.E.
Atlantic Close, Swansea
Enterprise Park, SWANSEA
SA7 9FJ,
UNITED KINGDOM
TEL: (01792) 700139
Zak Electronics & Musical
Instruments Co. L.L.C.
Zabeel Road, Al Sherooq Bldg.,
No. 14, Grand Floor, Dubai, U.A.E.
TEL: (04) 3360715
Instrumentos Musicales S.A.
Av.Santa Fe 2055
(1123) Buenos Aires
ARGENTINA
TEL: (011) 4508-2700
As of June 1, 2002 (EDIROL-1)
02903634
1*KGS
Before using this unit, carefully read the sections entitled:
“USING THE UNIT SAFELY” (P. 3, 4) and “IMPORTANT
NOTES” (P. 5, 6). These sections provide important
information concerning the proper operation of the unit.
Additionally, in order to feel assured that you have gained a
good grasp of every feature provided by your new unit, this
manual should be read in its entirety. The manual should be
saved and kept on hand as a convenient reference.
Copyright © 2002 ROLAND CORPORATION
All rights reserved. No part of this publication may be
reproduced in any form without the written permission of
ROLAND CORPORATION.
TO RESIZE THICKNESS, MOVE ALL ITEMS ON THE FRONT COVER TO LEFT OR RIGHT
For EU Countries
This product complies with the requirements of European Directive 89/336/EEC.
For the USA
FEDERAL COMMUNICATIONS COMMISSION
RADIO FREQUENCY INTERFERENCE STATEMENT
This equipment has been tested and found to comply with the limits for a Class B digital device, pursuant to Part 15 of the
FCC Rules. These limits are designed to provide reasonable protection against harmful interference in a residential
installation. This equipment generates, uses, and can radiate radio frequency energy and, if not installed and used in
accordance with the instructions, may cause harmful interference to radio communications. However, there is no guarantee
that interference will not occur in a particular installation. If this equipment does cause harmful interference to radio or
television reception, which can be determined by turning the equipment off and on, the user is encouraged to try to correct the
interference by one or more of the following measures:
– Reorient or relocate the receiving antenna.
– Increase the separation between the equipment and receiver.
– Connect the equipment into an outlet on a circuit different from that to which the receiver is connected.
– Consult the dealer or an experienced radio/TV technician for help.
This device complies with Part 15 of the FCC Rules. Operation is subject to the following two conditions:
(1) This device may not cause harmful interference, and
(2) This device must accept any interference received, including interference that may cause undesired operation.
Tested To Comply With FCC Standards
FOR HOME OR OFFICE USE
Unauthorized changes or modification to this system can void the users authority to operate this equipment.
This equipment requires shielded interface cables in order to meet FCC class B Limit.
For Canada
NOTICE
This Class B digital apparatus meets all requirements of the Canadian Interference-Causing Equipment Regulations.
AVIS
Cet appareil numérique de la classe B respecte toutes les exigences du Règlement sur le matériel brouilleur du Canada.
For the USA
DECLARATION OF CONFORMITY
Compliance Information Statement
Model Name :
Type of Equipment :
Responsible Party :
Address :
Telephone :
UA-20
USB Audio Interface
Edirol Corporation North America
425 Sequoia Drive, Suite 114, Bellingham, WA 98226
(360) 594-4276
USING THE UNIT SAFELY
The
symbol alerts the user to important instructions
or warnings.The specific meaning of the symbol is
determined by the design contained within the
triangle. In the case of the symbol at left, it is used for
general cautions, warnings, or alerts to danger.
Used for instructions intended to alert
the user to the risk of death or severe
injury should the unit be used
improperly.
Used for instructions intended to alert
the user to the risk of injury or material
damage should the unit be used
improperly.
* Material damage refers
other adverse effects
respect to the home
furnishings, as well
animals or pets.
The
symbol alerts the user to items that must never
be carried out (are forbidden). The specific thing that
must not be done is indicated by the design contained
within the circle. In the case of the symbol at left, it
means that the unit must never be disassembled.
to damage or
caused with
and all its
to domestic
001
• Before using this unit, make sure to
read the instructions below, and the
Owner’s Manual.
..................................................................................................
002a
• Do not open or perform any internal
modifications on the unit.
..................................................................................................
003
• Do not attempt to repair the unit, or
replace parts within it (except when
this manual provides specific instructions directing you to do so). Refer all
servicing to your retailer, the nearest
EDIROL/Roland Service Center, or an
authorized EDIROL/Roland
distributor, as listed on the "Information"
page.
..................................................................................................
004
• Never use or store the unit in places
that are:
• Subject to temperature extremes
(e.g., direct sunlight in an enclosed
vehicle, near a heating duct, on top
of heat-generating equipment); or
are
• Damp (e.g., baths, washrooms, on
wet floors); or are
• Humid; or are
• Exposed to rain; or are
• Dusty; or are
• Subject to high levels of vibration.
The ● symbol alerts the user to things that must be
carried out. The specific thing that must be done is
indicated by the design contained within the circle. In
the case of the symbol at left, it means that the powercord plug must be unplugged from the outlet.
007
• Make sure you always have the unit
placed so it is level and sure to remain
stable. Never place it on stands that
could wobble, or on inclined surfaces.
..................................................................................................
010
• This unit, either alone or in combination with an amplifier and
headphones or speakers, may be
capable of producing sound levels that
could cause permanent hearing loss.
Do not operate for a long period of
time at a high volume level, or at a
level that is uncomfortable. If you
experience any hearing loss or ringing
in the ears, you should immediately
stop using the unit, and consult an
audiologist.
..................................................................................................
011
• Do not allow any objects (e.g.,
flammable material, coins, pins); or
liquids of any kind (water, soft drinks,
etc.) to penetrate the unit.
..................................................................................................
..................................................................................................
3
012d
• Immediately turn the power off, and
request servicing by your retailer, the
nearest EDIROL/Roland Service
Center, or an authorized EDIROL/
Roland distributor, as listed on the
"Information" page when:
• Objects have fallen into, or liquid
has been spilled onto the unit; or
• The unit has been exposed to rain
(or otherwise has become wet); or
• The unit does not appear to operate
normally or exhibits a marked
change in performance.
..................................................................................................
013
..................................................................................................
104
• Try to prevent cords and cables from
becoming entangled. Also, all cords
and cables should be placed so they
are out of the reach of children.
..................................................................................................
106
• Never climb on top of, nor place heavy
objects on the unit.
..................................................................................................
108c
• Disconnect all cords coming from
external devices before moving the
unit.
..................................................................................................
118
• In households with small children, an
adult should provide supervision until
the child is capable of following all the
rules essential for the safe operation of
the unit.
• Should you remove the optical
connector caps, make sure to put them
in a safe place out of children's reach,
so there is no chance of them being
swallowed accidentally.
..................................................................................................
..................................................................................................
014
• Protect the unit from strong impact.
(Do not drop it!)
..................................................................................................
023
• DO NOT play a CD-ROM disc on a
conventional audio CD player. The
resulting sound may be of a level that
could cause permanent hearing loss.
Damage to speakers or other system
components may result.
..................................................................................................
4
IMPORTANT NOTES
291a
In addition to the items listed under “USING THE UNIT SAFELY” on page 3, please read and
observe the following:
Power Supply
Maintenance
307
401a
• Before connecting this unit to other devices,
turn off the power to all units. This will help
prevent malfunctions and/or damage to
speakers or other devices.
• For everyday cleaning wipe the unit with a
soft, dry cloth or one that has been slightly
dampened with water. To remove stubborn
dirt, use a cloth impregnated with a mild,
non-abrasive detergent. Afterwards, be sure
to wipe the unit thoroughly with a soft, dry
cloth.
Placement
351
• Using the unit near power amplifiers (or
other equipment containing large power
transformers) may induce hum. To alleviate
the problem, change the orientation of this
unit; or move it farther away from the source
of interference.
402
352a
553
• This device may interfere with radio and
television reception. Do not use this device in
the vicinity of such receivers.
• Use a reasonable amount of care when using
the unit’s buttons, sliders, or other controls;
and when using its jacks and connectors.
Rough handling can lead to malfunctions.
352b
• Noise may be produced if wireless communications devices, such as cell phones, are
operated in the vicinity of this unit. Such
noise could occur when receiving or initiating
a call, or while conversing. Should you
experience such problems, you should
relocate such wireless devices so they are at a
greater distance from this unit, or switch
them off.
354a
• Do not expose the unit to direct sunlight,
place it near devices that radiate heat, leave it
inside an enclosed vehicle, or otherwise
subject it to temperature extremes. Excessive
heat can deform or discolor the unit.
355
• To avoid possible breakdown, do not use the
unit in a wet area, such as an area exposed to
rain or other moisture.
• Never use benzine, thinners, alcohol or
solvents of any kind, to avoid the possibility
of discoloration and/or deformation.
Additional Precautions
556
• When connecting / disconnecting all cables,
grasp the connector itself—never pull on the
cable. This way you will avoid causing shorts,
or damage to the cable’s internal elements.
558a
• To avoid disturbing your neighbors, try to
keep the unit’s volume at reasonable levels.
You may prefer to use headphones, so you do
not need to be concerned about those around
you (especially when it is late at night).
559a
• When you need to transport the unit, package
it in the box (including padding) that it came
in, if possible. Otherwise, you will need to use
equivalent packaging materials.
562
• Use a cable from Roland to make the
connection. If using some other make of
connection cable, please note the following
precautions.
• Some connection cables contain resistors.
Do not use cables that incorporate resistors
for connecting to this unit. The use of such
cables can cause the sound level to be
extremely low, or impossible to hear. For
information on cable specifications, contact
the manufacturer of the cable.
5
IMPORTANT NOTES
Handling CD-ROMs
801
• Avoid touching or scratching the shiny
underside (encoded surface) of the disc.
Damaged or dirty CD-ROM discs may not be
read properly. Keep your discs clean using a
commercially available CD cleaner.
Copyright
851
• Unauthorized recording, distribution, sale,
lending, public performance, broadcasting, or
the like, in whole or in part, of a work
(musical composition, video, broadcast,
public performance, or the like) whose
copyright is held by a third party is
prohibited by law.
853
• Do not use this unit for purposes that could
infringe on a copyright held by a third party.
We assume no responsibility whatsoever with
regard to any infringements of third-party
copyrights arising through your use of this
unit.
6
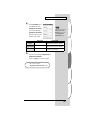
Contents
USING THE UNIT SAFELY........................................................................ 3
IMPORTANT NOTES ................................................................................. 5
Contents .................................................................................................... 7
Features of the UA-20............................................................................. 10
Awesome, high-quality, 24-bit sound ............................................................... 10
Mic/guitar input................................................................................................... 10
Direct Monitor function....................................................................................... 10
WDM/ASIO 2.0 drivers included...................................................................... 10
MIDI IN/OUT interface ...................................................................................... 10
Check the contents of the package ...................................................... 12
Names of things and what they do ....................................................... 13
Block diagram ....................................................................................................... 15
Getting Connected and Installing Drivers (Windows)......................... 16
What is a driver?................................................................................................... 16
Advanced mode and Standard driver mode.................................................... 16
Installing the special driver................................................................................. 17
Installing the OS-standard driver ...................................................................... 31
Settings and checking .......................................................................................... 36
Getting Connected and Installing Drivers (Macintosh)....................... 42
What is a driver?................................................................................................... 42
Advanced mode and Standard driver mode.................................................... 42
Installing the special driver................................................................................. 43
Installing the ASIO driver ................................................................................... 51
Installing the OS-standard driver ...................................................................... 53
UA-20 application guide......................................................................... 56
Basic use ................................................................................................................. 56
Recording a guitar or bass................................................................................... 57
Recording from a mic........................................................................................... 58
Recording from a keyboard ................................................................................ 59
Recording an analog signal from an audio device .......................................... 60
Recording a MIDI device..................................................................................... 61
Digitally recording the output of the UA-20 on an MD ................................. 62
Adjusting the audio latency ................................................................................ 63
Using ASIO Direct Monitor ................................................................................ 64
Troubleshooting ..................................................................................... 66
Problems related to the USB driver ................................................................... 66
Problems when using the UA-20........................................................................ 70
Deleting the special driver .................................................................................. 79
7
Contents
Deutsch
Anschlüsse herstellen und Treiber installieren (Windows)................ 82
Was ist ein Treiber? .............................................................................................. 82
Erweiterter Modus und Standardtreiber-Modus............................................. 82
Installation des speziellen Treibers.................................................................... 83
Einstellungen und Überprüfung ........................................................................ 99
Anschlüsse herstellen und Treiber installieren (Macintosh)............ 105
Was ist ein Treiber? ............................................................................................ 105
Erweiterter Modus und Standardtreiber-Modus........................................... 105
Installation des speziellen Treibers.................................................................. 107
Installation des ASIO-Treibers ......................................................................... 116
UA-20 application guide....................................................................... 118
Regelung der Audio-Latenz.............................................................................. 118
Verwendung des ASIO Direct Monitor........................................................... 119
Fehlerbehebung.................................................................................... 121
Probleme in Verbindung mit dem USB-Treiber ............................................ 121
Français
Installation des pilotes et connexions (Windows)............................. 125
Qu'est-ce qu'un pilote ?...................................................................................... 125
Mode Avancé et mode Standard...................................................................... 125
Installation du pilote spécial ............................................................................. 126
Configuration et contrôle .................................................................................. 140
Installation des pilotes et connexions (Macintosh)........................... 146
Qu'est-ce qu'un pilote ?...................................................................................... 146
Mode Avancé et mode Standard...................................................................... 146
Installation du pilote spécial ............................................................................. 147
Installation du pilote ASIO ............................................................................... 155
UA-20 application guide....................................................................... 157
Réglage de la latence audio............................................................................... 157
Utilisation d’ASIO Direct Monitor................................................................... 158
En cas de problème.............................................................................. 160
Problèmes liés au pilote USB ............................................................................ 160
Italiano
Collegamenti e installazione dei driver (Windows) ........................... 164
Definizione di un driver .................................................................................... 164
Modo driver Advanced e Standard ................................................................. 164
Installazione del driver speciale ....................................................................... 165
Configurazione e verifica .................................................................................. 179
Collegamenti e installazione dei driver (Macintosh) ......................... 185
Definizione di un driver .................................................................................... 185
Modo driver Advanced e Standard ................................................................. 185
Installazione del driver speciale ....................................................................... 186
Installazione del driver ASIO ........................................................................... 194
UA-20 application guide....................................................................... 196
Regolazione della latenza audio....................................................................... 196
Uso di ASIO Direct Monitor ............................................................................. 197
Ricerca e soluzione dei problemi........................................................ 199
Problemi relativi al driver USB......................................................................... 199
8
Contents
Español
Conexión e instalación de los controladores (Windows) ................. 203
¿Qué es un controlador? .................................................................................... 203
Modo avanzado y Modo de controlador estándar ........................................ 203
Instalación del controlador especial ................................................................ 204
Configuración y comprobación ........................................................................ 218
Conexión e instalación de los controladores (Macintosh) ............... 224
¿Qué es un controlador? .................................................................................... 224
Modo avanzado y Modo de controlador estándar ........................................ 224
Instalación del controlador especial ................................................................ 225
Instalación del controlador ASIO..................................................................... 233
UA-20 application guide....................................................................... 235
Ajuste del tiempo de recuperación de datos .................................................. 235
Utilización de ASIO Direct Monitor (Monitor directo ASIO) ...................... 236
Resolución de problemas .................................................................... 238
Problemas relacionados con el controlador USB ........................................... 238
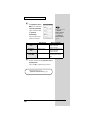
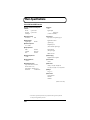
Main Specifications .............................................................................. 242
9
Features of the UA-20
Thank you, and congratulations on your choice of the UA-20. The UA-20 is a USB
audio interface that can be connected to your computer by a single USB cable,
allowing you to record and play back audio data in high-quality digital form.
Awesome, high-quality, 24-bit sound
You can use your computer to digitally record and play back unbelievably highquality audio in 24-bit format.
*
Your application must support 24-bit audio data.
Mic/guitar input
The high-impedance inputs allow not only mic but also guitar or bass to be
connected directly. RCA phono-type output jacks and a digital output jack (optical)
are also provided.
Direct Monitor function
The Direct Monitor function allows the input signal from each input jack to be
directly monitored in real time from headphones or the analog outputs, without
routing the audio through your computer application. You can also switch the
monitor function on/off from an ASIO 2.0 compatible application.
WDM/ASIO 2.0 drivers included
You can enjoy high performance when using WDM-compatible applications such
as SONAR, and ASIO-compatible applications such as Cubase and Logic. Of course
you can also use the UA-20 with applications that support MMD (Windows) or
SoundManager (Mac OS).
*
Roland will provide no guarantee or support regarding operation with sequencer software or
audio editing software made by another manufacturer. Please contact the manufacturer of the
software you are using.
MIDI IN/OUT interface
A set of MIDI IN/OUT connectors is provided for easy connection with MIDI
devices.
10
Features of the UA-20
What is USB?
USB stands for Universal Serial Bus. It is a new interface used to connect various
peripheral devices to a computer.
USB allows more than one peripheral device to be connected via a single USB cable,
and also allows data to be transmitted more rapidly than conventional serial ports.
Peripherals can also be connected or disconnected with the power turned on, and
the computer will automatically recognize the peripheral that has been plugged in.
(Some peripherals may require settings or other operations to be performed.)
204
* Microsoft and Windows are registered trademarks of Microsoft Corporation.
206e
* Screen shots in this documents are reprinted with permission from Microsoft Corporation.
ADD
* Windows® XP is known officially as: “Microsoft® Windows® XP operating system.”
206f
* Windows® 2000 is known officially as: “Microsoft® Windows® 2000 operating system.”
206g
* Windows® Me is known officially as: “Microsoft® Windows® Millennium Edition operating
system.”
206c
* Windows® 98 is known officially as: “Microsoft® Windows® 98 operating system.”
207
* Apple and Macintosh are registered trademark of Apple Computer, Inc.
209
* MacOS is a trademark of Apple Computer, Inc.
220
* All product names mentioned in this document are trademarks or registered trademarks of their
respective owners.
231
* OMS is a registered trademark of Opcode Systems, Inc.
232
* FreeMIDI is a trademark of Mark of the Unicorn, Inc.
ADD
* ASIO is trademark of Steinberg Media Technologies AG.
11
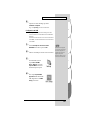
Check the contents of the package
● UA-20
fig.UA-20
● USB cable
Use this to connect the USB connector of your computer with the USB connector of
the UA-20. For details on connections and driver installation, refer to Getting
Connected and Installing Drivers (Windows ➝ p. 16 or Macintosh ➝ p. 42).
* Please use only the included USB cable. If you require a replacement due to loss or damage,
please contact a “EDIROL/Roland Service Center” listed in the “Information” section at the
end of this manual.
● CD-ROM
This contains the driver required in order to use the UA-20.
● Owner’s Manual
This is the manual you are reading. Please keep it on hand for reference.
12
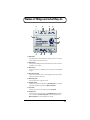
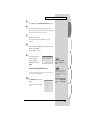
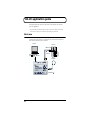
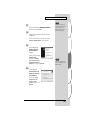
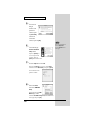
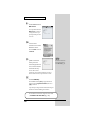
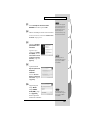
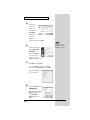
Names of things and what they do
fig.04-1
2
3
4
5
1
6
7
8
9
10
11
12
1. USB indicator
This will light when you use the USB cable to connect the UA-20 to your computer,
and the computer has recognized the UA-20.
2. USB connector
Audio signals and MIDI signals can be transferred when the UA-20 is connected via
a USB cable to your computer.
3. MIDI connector
Connect these connectors to a MIDI device (such as a sequencer) to exchange MIDI
messages.
4. Digital output connector
Connect a coaxial cable here when you want to digitally output an audio signal to
a digital recorder such an MD or DAT.
5. Master output jacks
These are output jacks for analog audio signals.
6. Headphone volume
This adjusts the volume that is output from the Headphone jack. It is not possible
to adjust the volume that is output from the Master output jacks.
7. Input volume
This adjusts the volume at which the input signal from Input jacks.
8. Headphone jack
A set of headphones can be connected here. The Headphone jack will output the
same sound as that of the Master output jacks. Sound will be output from the
Master output jacks even when headphones are connected.
13
Names of things and what they do
9. ADVANCE (mode select) switch
This switches the operating mode.
On (Advanced mode)
The driver included with the UA-20 will be used to record/play/edit audio on
sequencer software or waveform editing software with high audio quality and
stable timing. Using the dedicated driver provided on the included CD-ROM, you
will be able to record, play, and edit audio on your sequencer or waveform editing
application with high quality and stable timing. Normally, you should use this.
Off (Standard Driver mode)
Select this mode when using applications that use the audio driver included with
your operating system, and utilize functionality specific to your operating system.
10. Input monitor switch
This selects whether or not the signal input to the input jacks will be output to the
headphone jack and the master output jacks.
ON
AUTO
OFF
The input signal from the Input jacks will be output to
the Headphone jack and the Master output jacks.
Settings or operations in an ASIO 2.0 compatible application such as Cubase will be able to control the monitoring
setting.
The input signal from the Input jacks will not be output
to the Headphone jack or the Master output jacks.
11. Input select switch
Set this as appropriate for the device that is connected to the input jacks.
LINE
GUITAR
MIC
When connecting an audio source or MIDI sound module
via an analog audio connection
When connecting a guitar
When connecting a dynamic mic
* The miniature mics (condenser mics) included with
some computers or sound cards are not supported.
12. Input jacks
These are input jacks for analog audio signals. You can connect dynamic mics,
guitars, or audio devices. You must set the Input select switch to the position
appropriate for the device you have connected.
If you connect a guitar or mic only to the L jack or R jack, the signal will be
monaural.
14
Names of things and what they do
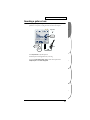
Block diagram
fig.04-3
15
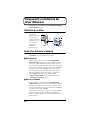
Getting Connected and Installing
Drivers (Windows)
If you are using a Macintosh computer, please proceed to Getting Connected and
Installing Drivers (Macintosh) (p. 42).
What is a driver?
fig.05-1e_50
A “driver” is software that
transfers data between the
UA-20 and application
Application
USB port
software running on your
computer, when your
USB
USB cable
driver
computer and the UA-20
are connected by a USB
Computer
cable. The driver sends
data from your
application to the UA-20, and from the UA-20 to your application.
UA-20
Advanced mode and Standard driver mode
The UA-20 has two operating modes, Advanced mode and Standard driver
mode, and a different driver is used by each mode.
■ Advanced mode
The UA-20 will operate in this mode when the rear panel ADVANCE (mode select)
switch is turned ON. The special driver included on the CD-ROM will be used,
allowing audio to be recorded/played/edited with high quality and stable timing.
In Advanced mode, audio signals can be transferred between the UA-20 and the
computer at a resolution of 24 bits and sampling frequencies of 44.1 kHz. Select this
mode if you are using an application that allows high-quality audio recording/
playback/editing, such as an application that supports 24 bit audio (e.g., the
Cakewalk series or Cool Edit) or an ASIO-compatible application (e.g., Cubase
VST or Logic Audio). (➝ Installing the special driver (p. 17))
■ Standard driver mode
The UA-20 will operate in this mode when the rear panel ADVANCE (mode select)
switch is turned OFF. The standard USB audio driver included with Windows will
be used. In standard driver mode, audio signals are transferred between the UA-20
and the computer at a resolution of 16 bits and sampling frequencies of 44.1 kHz.
Select this mode if you are using an application that uses Window’s own
functionality, such as an application that uses the computer’s CD-ROM drive to
play back CD-audio, or an application that uses the software synthesizer included
with Windows.
The standard driver that is included with Windows does not support ASIO.
(➝ Installing the OS-standard driver (p. 31))
* If you want to use MIDI, use Advanced mode.
16
Getting Connected and Installing Drivers (Windows)
English
Switching between Advanced mode and Standard driver mode
If you first install both the special driver and the standard driver, you will be able
to switch between Advance and Standard driver modes by operating the UA-20's
ADVANCE (mode select) switch.
* In order for the setting of the ADVANCE (mode select) switch to take effect, you must
exit all sequencer software and other applications that use the UA-20, and re-connect the
UA-20.
Deutsch
Installing the special driver
The installation procedure will differ depending on your system.
Please proceed to one of the following sections, depending on the system you use.
• Windows XP/2000 users .................................(p. 17)
• Windows Me/98 users.....................................(p. 29)
■ Windows XP/2000 users
Français
The CD-ROM contains two types of driver for Windows XP/2000.
Normally, you should use the WDM driver.
WDM driver
You should use this driver if you have specified WDM driver mode for SONAR or
a similar application. This will provide the highest-quality audio performance.
* It is not possible to use 24-bit audio with applications that do not support a WDM driver
mode, such as Cool Edit or Media Player.
Italiano
MME driver
This driver allows you to use 24-bit audio even from applications that do not have
a WDM driver mode, such as Cool Edit. It is not possible to use the MME driver
from WDM driver mode of an application such as SONAR.
Español
* It is not possible to install both the WDM driver and the MME driver. You must select
one beforehand, and install only that driver. If after installing one of these drivers you
decide to change drivers, you must first delete the already-installed driver and then
install the new driver. (➝ Deleting the special driver (p. 79))
* The WDM driver and the MME driver can be installed using the same procedure.
17
Getting Connected and Installing Drivers (Windows)
Windows XP users
1
With the UA-20 disconnected, start up Windows.
Disconnect all USB cables except for a USB keyboard and USB
mouse (if used).
2
Open the System Properties dialog box.
1.
Click the Windows start menu, and from the menu,
select Control Panel.
2.
In “Pick a category”, click “Performance and
Maintenance”.
3.
In “or pick a Control Panel icon”, click the System
icon.
fig.2-1
3
If you are using Windows XP
Professional, you must log on
using a user name with an
administrative account type
(e.g., Administrator). For
details on user accounts,
please consult the system
administrator of your
computer.
Depending on how your
system is set up, the System
icon may be displayed directly
in the Control Panel (the
Classic view). In this case,
double-click the System icon.
Click the Hardware tab,
and then click [Driver
Signing].
Open the Driver Signing
Options dialog box.
fig.2-2
4
Make sure that “What
action do you want
Windows to take?” is
set to “Ignore”.
If it is set to “Ignore”,
simply click [OK].
If it is not set to “Ignore”,
make a note of the current
setting (“Warn” or “Block”). Then change the setting to
“Ignore” and click [OK].
After installing the driver, restore the original setting.
(➝ If you changed “What action do you want Windows to
take?” (p. 23))
18
If you changed “What action
do you want Windows to
take?” in step 4, you must
restore the previous setting
after you have installed the
driver. (➝ If you changed
“What action do you want
Windows to take?” (p. 23))
Getting Connected and Installing Drivers (Windows)
5
6
English
Click [OK] to close the System Properties dialog box.
Exit all currently running software (applications).
Also close any open windows. If you are using virus checking
or similar software, be sure to exit it as well.
7
Prepare the CD-ROM.
8
Deutsch
Insert the CD-ROM into the CD-ROM drive of your
computer.
Click the Windows start button. From the menu that
appears, select “Run...”
Open the “Run...” dialog box.
9
In the dialog box that
appears, input the
following into the
“Open” field, and click
[OK].
If you are using the MME
driver, input MME instead of
WDM.
Français
fig.2-3_30
* The drive name “D:” may be different for your system. Specify the
drive name of your CD-ROM drive.
fig.2-4_30
The SetupInf dialog box will
appear.
You are now ready to install the
driver.
Español
10
In this manual, the location of
folders and files is given in
terms of the file path, using \ as
the delimiter.
For example,
USB_XP2K\SETUPINF.EXE
indicates the SETUPINF.EXE
file found in the USB_XP2K
folder.
Italiano
D:\Driver\USB_XP2K\WDM\SETUPINF.EXE
19
Getting Connected and Installing Drivers (Windows)
11
12
Set the UA-20’s ADVANCE (mode select) switch
to the ON position.
Use the USB cable to connect the UA-20 to your
computer.
This unit is equipped with a
protection circuit. A brief
interval (a few seconds) after
connecting a USB connector is
required before the unit will
operate normally.
Near the task bar, your computer will indicate “Found New
Hardware”. Please wait.
fig.2-6
13
The Found New
Hardware Wizard will
appear.
Make sure that the screen
indicates “EDIROL UA-20
(WDM)”, select “Install
from a list or specific
location (Advanced)”, and
click [Next].
In the case of the MME driver,
make sure that “EDIROL
UA-20 (MME)” is displayed.
fig.2-7
14
The screen will indicate
“Please choose your
search and installation
options”.
Select “Don’t search. I will
choose the driver to
install”, and click [Next].
fig.2-8_20
15
20
Make sure that the
“Model” field indicates
“EDIROL UA-20
(WDM)”, and click
[Next]. Driver
installation will begin.
In the case of the MME driver,
make sure that “EDIROL
UA-20 (MME)” is displayed.
Getting Connected and Installing Drivers (Windows)
English
If the “What action do you want Windows to take?” setting was not set
to “Ignore”, a “Hardware Installation” dialog box will appear.
Click [Continue Anyway].
2.
Continue the installation.
1.
Click [OK].
2.
When the “Found New Hardware
Wizard” appears, click [Finish].
3.
Perform the installation as described
in the “Troubleshooting” section
on Device Manager shows “?”, “!”, or “USB Composite
Device” (p. 68).
Français
If “What action do you want Windows to take?” is set to “Block”
fig.2-9_30
The Insert Disk dialog
box will appear.
Click [OK].
The Insert Disk dialog may
not appear. In that case,
proceed to step 17.
Italiano
16
fig.2-10_30
17
The Files Needed
dialog box will appear.
Input the following into
the “Copy files from”
field, and click [OK].
D:\Driver\USB_XP2K\WDM
If you are using the MME
driver, input MME instead of
WDM.
* The drive name “D:” may be different for your system. Specify the
drive name of your CD-ROM drive.
21
Español
1.
Deutsch
If “What action do you want Windows to take?” is set to “Warn,”
Getting Connected and Installing Drivers (Windows)
If the “What action do you want Windows to take?” setting was not set to
“Ignore”, a “Hardware Installation” dialog box will appear.
If “What action do you want Windows to take?” is set to “Warn”,
1.
Click [Continue
Anyway].
2.
Continue the installation.
fig.2-11_20
3
The Found New
Hardware Wizard will
appear.
Verify that “EDIROL UA-20
(WDM)” or “EDIROL UA20 (MME)” is displayed,
and click [Finish].
Wait until “Found New Hardware” appears near the taskbar.
4
When driver installation has been completed, the
System Settings Change dialog box will appear.
Click [Yes]. Windows will restart automatically.
22
Getting Connected and Installing Drivers (Windows)
If you changed “What action do you want Windows to take?”
1.
If you are using Windows XP Professional, log on to Windows using
the user name of an administrative account (e.g., Administrator).
2.
Click the Windows start menu, and from the menu, select Control
Panel.
3.
English
If you changed the What action do you want Windows to take? setting,
restore the original setting after Windows restarts.
In “Pick a category”, click “Performance and Maintenance”.
In “or pick a Control Panel icon”, click the System icon. The System
Properties dialog box will appear.
5.
Click the Hardware tab, and then click [Driver Signing]. The Driver
Signing Options dialog box will appear.
6.
Return the What action do you want Windows to take? setting to the
original setting (either “Warn” or “Block”), and click [OK].
7.
Click [OK]. The System properties dialog box will close.
Français
4.
Deutsch
* Depending on how your system is set up, the System icon may be displayed
directly in the Control Panel (classic view). In this case, double-click the
System icon.
Español
Italiano
Next, you need to make the driver settings.
(➝ Settings and checking (p. 36))
23
Getting Connected and Installing Drivers (Windows)
Windows 2000 users
1
With the UA-20 disconnected, start up Windows.
Disconnect all USB cables except for a USB keyboard and USB
mouse (if used).
2
3
Log on to Windows as a user with administrative
privileges (such as Administrator).
Open the System Properties dialog box.
Click the Windows Start button, and from the menu that
appears, select Settings | Control Panel. In Control Panel,
double-click the System icon.
If the UA-20 is already
connected to your computer
and a message of “Add New
Hardware Wizard” is
displayed, go to the included
CD-ROM folder named
DRIVER\USB_XP2K\WDM or
DRIVER\USB_XP2K\MME,
open the file Readme_e.htm,
and read the
“Troubleshooting” section
entitled “You attempted to
install using the above
procedure, but were not able
to.”.
fig.05-2e_30
4
Click the Hardware tab,
and then click [Driver
Signature].
Open the Driver Signing
Options dialog box.
fig.05-3e_30
5
Make sure that “File
signature verification” is
set to “Ignore”.
If it is set to “Ignore”, simply
click [OK].
If it is not set to “Ignore”, make
a note of the current setting
(“Warn” or “Block”). Then
change the setting to “Ignore”
and click [OK].
After installing the driver, restore the original setting.
(➝ If you changed “File signature verification” (p. 28))
24
If you changed “File
signature verification” in
step 5, you must restore the
previous setting after you have
installed the driver. (–> If you
changed “File signature
verification” (p. 28))
Getting Connected and Installing Drivers (Windows)
6
7
English
Click [OK] to close the System Properties dialog box.
Exit all currently running software (applications).
Also close any open windows. If you are using virus checking
or similar software, be sure to exit it as well.
8
Insert the CD-ROM into the CD-ROM drive of your
computer.
Click the Windows Start button. From the menu that
appears, select “Run...”
Open the “Run...” dialog box.
fig.05-5e_30
10
In the dialog box that
appears, input the
following into the
“Open” field, and click
[OK].
D:\DRIVER\USB_XP2K\WDM\SETUPINF.EXE
In this manual, the location of
folders and files is given in
terms of the file path, using \ as
the delimiter. For example,
WDM\SETUPINF.EXE
indicates the SETUPINF.EXE
file found in the WDM folder.
Français
9
If you are using the MME
driver, input MME instead of
WDM.
Italiano
* The drive name “D:” may be different for your system. Specify the
drive name of your CD-ROM drive.
fig.05-6e_30
11
Deutsch
Insert the CD-ROM.
The SetupInf dialog box
will appear.
12
Español
You are now ready to install
the driver.
Set the UA-20’s ADVANCE (mode select) switch to
the ON position.
25
Getting Connected and Installing Drivers (Windows)
13
Use the USB cable to connect the UA-20 to your
computer.
If the “File signature verification” setting was not set
to “Ignore”, a “Digital Signature Not Found” dialog
box will appear.
This unit is equipped with a
protection circuit. A brief
interval (a few seconds) after
connecting a USB connector is
required before the unit will
operate normally.
If “File signature verification” is set to “Warn,”
1.
Click [Yes].
2.
Continue the installation.
If “File signature verification” is set to “Block”
1.
Click [OK].
2.
When the “Found New
Hardware Wizard”
appears, click [Finish].
3.
Perform the installation as
described in the
“Troubleshooting” section on Device Manager
shows “?”, “!”, or “USB Composite Device”
(p. 68).
fig.05-8e_30
14
The Insert Disk
dialog box will
appear.
Click [OK].
26
If the Insert Disk dialog box
does not appear, please read
The “Insert Disk” dialog box
does not appear (p. 68).
Getting Connected and Installing Drivers (Windows)
15
The Files Needed
dialog box will appear.
If you are using the MME
driver, input MME instead of
WDM.
In the Copy files from
field, type the folder name
that is shown in the dialog
box, and click [OK].
English
fig.05-9e_30
D:\DRIVER\USB_XP2K\WDM
Deutsch
* The drive name “D:” may be different for your system. Specify the
drive name of your CD-ROM drive.
If the “File signature verification” setting was not set
to “Ignore”, a “Digital Signature Not Found” dialog
box will appear.
1.
Click [Yes].
2.
Continue the installation.
Français
If “File signature verification” is set to “Warn,”
fig.05-10e_30
16
The “Find New Hardware
Wizard” may be displayed.
Italiano
Verify that “EDIROL UA-20
(WDM)” or “EDIROL UA-20
(MME)” is displayed, and click
[Finish].
If the “Find New Hardware
Wizard” dialog box is not displayed, proceed to step 18.
fig.05-11e_30
The System Settings
Change dialog box
may appear.
Español
17
Click [Yes]. Windows
will restart automatically.
If the System Settings Change dialog box does not appear,
restart Windows from the Start menu.
27
Getting Connected and Installing Drivers (Windows)
If you changed “File signature verification”
If you changed the “File signature verification” setting in step 5, restore the
original setting after Windows restarts.
1.
After Windows restarts, log in to Windows as a user with administrative
privileges, (such as Administrator).
2.
In the Windows desktop, right-click the My Computer icon, and from the
menu that appears, select Properties. The System Properties dialog box will
appear.
3.
Click the Hardware tab, and then click [Driver signature]. The Driver
Signing Options dialog box will appear.
4.
Return the “File signature verification” setting to the original setting (either
“Warn” or “Block”), and click [OK].
5.
Click [OK]. The System Properties dialog box will close.
Next, you need to make the driver settings.
(➝ Settings and checking (p. 36))
28
Getting Connected and Installing Drivers (Windows)
Disconnect all USB cables other than those for a USB
keyboard or USB mouse.
2
Exit all currently running software (applications).
Also, close any open windows. If you are using a virus
checker or similar software, be sure to exit this as well.
3
Prepare the CD-ROM.
If the UA-20 is already
connected to your computer
and a message of “Add New
Hardware Wizard” is
displayed, go to the CD-ROM
folder named
DRIVER\USB_ME98, open the
file Readme_e.htm, and read
the “Troubleshooting”
section entitled “You
attempted to install using
the above procedure, but
were not able to.”.
Insert the CD-ROM into the CD-ROM drive of your
computer.
4
Click the Windows Start button. From the menu that
appears, select Run....
Français
Open the Run... dialog box.
fig.05-13e_30
In the dialog box that
appears, input the
following into the
“Open” field, and click
[OK].
D:\DRIVER\USB_ME98\SETUPINF.EXE
* The drive name “D:” may be different depending on your system.
Type the name of your CD-ROM drive.
fig.05-14e_30
6
In this manual, the location of
folders and files is given in
terms of the file path, using \ as
the delimiter. For example,
USB_ME98\SETUPINF.EXE
indicates that the
SETUPINF.EXE file is located
in the USB_ME98 folder.
Open the SetupInf dialog
box.
Español
5
You are now ready to install
the driver.
7
Deutsch
With the UA-20 disconnected, start up Windows.
Italiano
1
English
■ Windows Me/98 users
Set the UA-20’s
ADVANCE (mode select) switch to the ON position.
29
Getting Connected and Installing Drivers (Windows)
8
Use the USB cable to connect the UA-20 to your
computer.
fig.05-15e_30
9
If you are using
Windows 98, an
Insert disk
dialog box will
appear.
Click [OK].
fig.05-16e_30
10
D:\DRIVER\USB_ME98
* The drive name “D:” may be different depending on your system.
Type the name of your CD-ROM drive.
Once the driver has been installed, the New Hardware
Found dialog box will close.
In the SetupInf dialog box, click [OK]. The SetupInf dialog
box will close.
Next, you need to make the driver settings.
(➝ Settings and checking (p. 36))
30
If you are using Windows 98
and the Insert disk dialog box
dose not appear, please read
The “Insert Disk” dialog box
does not appear (p. 68).
The New Hardware
Found dialog box will
appear.
In the Copy files from
field, type the folder name
that is shown in the
SetupInf dialog box, and click [OK].
11
This unit is equipped with a
protection circuit. A brief
interval (a few seconds) after
connecting a USB connector is
required before the unit will
operate normally.
If the New Hardware Found
dialog box does not appear, reinstall the driver using the
same procedure as described
in The “Insert Disk” dialog
box does not appear (p. 68).
Getting Connected and Installing Drivers (Windows)
English
Installing the OS-standard driver
The procedure for installation and settings will depend on
your system.
Proceed to the appropriate section as follows.
• Windows XP/2000 users ...................(p. 31)
• Windows Me users .............................(p. 32)
• Windows 98 users...............................(p. 33)
With the UA-20 disconnected, start up Windows.
Disconnect all USB cables except for a USB keyboard and USB
mouse (if used).
Exit all currently running software (applications).
3
4
Place the UA-20’s ADVANCE (mode select) switch
in the OFF position.
Use the USB cable to connect the UA-20 to your
computer.
The UA-20 will be detected automatically, and the driver will
be installed.
5
Français
If you are using a virus checker or similar software, be sure to
exit it as well.
If you are using Windows XP,
the installation has been
completed when the message
near the taskbar saying that
“Found New Hardware” has
disappeared.
Italiano
2
When installation is complete, restart Windows.
Next, you will need to make the driver settings.
(➝ Settings and checking (p. 36))
This unit is equipped with a
protection circuit. A brief
interval (a few seconds) after
connecting a USB connector is
required before the unit will
operate normally.
31
Español
1
Deutsch
■ Windows XP/2000 users
Getting Connected and Installing Drivers (Windows)
■ Windows Me users
1
With the UA-20 disconnected, start up Windows.
Disconnect all USB cables except for a USB keyboard and USB
mouse (if used).
2
Exit all currently running software (applications).
If you are using a virus checker or similar software, be sure to
exit it as well.
3
4
Place the UA-20’s ADVANCE (mode select) switch
in the OFF position.
Use a USB cable to connect the UA-20 to your
computer.
fig.05-23e_30
5
This unit is equipped with a
protection circuit. A brief
interval (a few seconds) after
connecting a USB connector is
required before the unit will
operate normally.
Windows will detect the
UA-20, and the “Add
New Hardware Wizard”
dialog box will appear.
Make sure that Automatic
search for a better driver (Recommended) is selected, and
click [Next].
6
7
Driver detection will begin.
When the driver has been found, driver installation
will begin.
fig.05-24e_30
8
Once the driver has been
installed, a dialog box
will inform you of this.
Click [Finish].
32
Depending on your system, a
certain amount of time may be
required for the device to be
detected after the driver has
been installed.
Getting Connected and Installing Drivers (Windows)
Restart Windows.
English
9
Next, you will need to make the driver settings.
(➝ Settings and checking (p. 36))
■ Windows 98 users
With the UA-20 disconnected, start up Windows.
Disconnect all USB cables except for a USB keyboard and USB
mouse (if used).
Exit all currently running software (applications).
If you are using a virus checker or similar software, be sure to
exit it as well.
4
Set the UA-20’s ADVANCE (mode select) switch to
the OFF position.
Use a USB cable to connect the UA-20 to your
computer.
This unit is equipped with a
protection circuit. A brief
interval (a few seconds) after
connecting a USB connector is
required before the unit will
operate normally.
Italiano
3
fig.05-25e_30
5
USB composite device
will be detected
automatically, and the
“Add New Hardware
Wizard” dialog box will
appear. Click [Next].
Français
2
If this dialog box does not
appear, refer to “Find new
hardware wizard” does not
execute automatically (p. 66).
33
Español
1
Deutsch
The USB composite device driver is installed first, then the
USB audio device driver is installed. Use the following
procedure to install the drivers.
Getting Connected and Installing Drivers (Windows)
fig.05-26e_30
6
When “What do you want
Windows to do?” appears,
select “Search for the best
driver for your device
(Recommended)”, and
click [Next].
fig.05-27e_30
7
A dialog box like the one
shown will appear.
Check CD-ROM drive, and
click [Next]
If the display indicates “Can't
find an updated driver for
this device”, check “Updated
driver”, and click [Next].
fig.05-28e_30
8
A dialog box like the one
shown will appear.
Click [Next].
9
File (driver) copying will begin.
If the Windows CD-ROM is not inserted in the
CD-ROM drive, a “Insert Disk” dialog box may
appear. In this case, insert the Windows CD-ROM
into the CD-ROM drive and click [OK].
fig.05-30e_30
10
When installation of the
USB Composite Device
driver is completed, a
dialog box like the one
shown here will appear.
Click [Finish].
34
Depending on your system,
the Driver location may differ
from the illustration, but this is
not a problem.
Getting Connected and Installing Drivers (Windows)
fig.05-33e_30
Next, the USB audio
device will be detected
automatically, and the
“Add New Hardware
Wizard” dialog box will
appear.
English
11
Click [Next], and proceed
with the installation in the same way as in steps 8–11 (p. 34).
12
Deutsch
fig.05-34e_30
When installation of the
USB audio device driver
is complete, a dialog box
like the one shown here
will appear.
Installation of the USB composite device driver and
USB audio device driver has been completed.
Restart Windows.
Italiano
Next, you will need to make the driver settings.
(➝ Settings and checking (p. 36))
Español
13
Français
Click [Finish].
35
Getting Connected and Installing Drivers (Windows)
Settings and checking
■ Specifying the audio and MIDI input/output
destination
Windows XP/2000/Me users
1
Open Control Panel.
Click the Windows Start button, and from the menu that
appears, select Settings | Control Panel.
Windows XP
Click the Windows start button, and from the menu that
appears, select Control Panel.
2
Open the Sounds and Audio Devices Properties
dialog box (or in Windows 2000/Me, Sounds and
Multimedia Properties).
Depending on how your
system is set up, the Sounds
and Audio Devices icon may
be displayed directly in the
Control Panel (the Classic
view). In this case, doubleclick the Sounds and Audio
Devices icon.
Windows XP
In “Pick a category” click “Sound, Speech, and Audio
Devices”. Next, in “or pick a Control Panel icon”, click the
sounds and Audio Devices icon.
Windows 2000/Me
In Control Panel, double-click the Sounds and Multimedia
icon to open the “Sounds and Multimedia Properties”
dialog box.
3
36
Click the Audio tab.
If the Sound and Multimedia
icon is not displayed, click
“Show all control panel
options” in the frame at the
left.
Getting Connected and Installing Drivers (Windows)
For MIDI music playback,
click the ▼ located at the
right of [Default device] (or
in Windows 2000/Me,
[Preferred device]), and
select the following from the
list that appears.
EDIROL UA-20 IN
EDIROL UA-20 MIDI OUT
Standard driver mode
EDIROL UA-20 (Windows XP)
USB Audio Device (Windows 2000/Me)
EDIROL UA-20 (Windows XP)
USB Audio Device (Windows 2000/Me)
MIDI cannot be handled when using
Standard Driver mode.
Français
Close the Sounds and Audio Devices Properties
dialog box.
Click OK to complete the settings.
Proceed to the next section.
➝ Volume Control setting (p. 40)
Italiano
5
Advanced mode
EDIROL UA-20 OUT
Deutsch
Sound
playback
Sound
recording
MIDI music
playback
For details on Advanced
mode and Standard Driver
mode, refer to Advanced
mode and Standard driver
mode (p. 16).
Español
4
English
fig.2-28_30
37
Getting Connected and Installing Drivers (Windows)
Windows 98 users
1
Open Control Panel.
Click the Windows Start button, and from the menu that
appears, select Settings | Control Panel.
2
Open the Multimedia Properties dialog box.
In Control Panel, double-click the Multimedia icon to open
the “Multimedia Properties” dialog box.
3
4
Click the Audio tab.
Specify the “Preferred
device”.
Click the Playback field and
Recording field, make the
following selections from the
list that appears, and click
[Apply].
Advanced mode
Playback
Recording
5
38
EDIROL UA-20 Out
EDIROL UA-20 In
Click the MIDI tab.
Standard driver
mode
USB Audio Device
USB Audio Device
For details on Advanced
mode and Standard Driver
mode, refer to Advanced
mode and Standard driver
mode (p. 16).
Getting Connected and Installing Drivers (Windows)
Set “MIDI output”.
For details on Advanced
mode and Standard Driver
mode, refer to Advanced
mode and Standard driver
mode (p. 16).
Select [Single instrument],
and choose one of the
following from the list that
appears, and click [Apply].
Standard driver mode
MIDI cannot be handled when
using Standard Driver mode.
Close the Multimedia Properties dialog box.
Français
Click [OK] to complete the settings.
This completes MIDI and audio input/output destination
settings. If you installed the standard Windows driver, make
settings for the Windows volume control.
Proceed to the next section. ➝ Volume Control setting (p. 40)
Italiano
7
Advanced mode
EDIROL UA-20 MIDI OUT
Deutsch
MIDI output
Español
6
English
fig.2-29_30
39
Getting Connected and Installing Drivers (Windows)
■ Volume Control setting
If you installed the standard Windows driver, set the
Windows volume control.
1
Open the Volume Control.
Click the Windows Start button, and select Programs |
Accessories | Entertainment | Volume Control.
2
Raise or lower the slider to adjust the volume of the
UA-20.
If you have installed the Standard driver, the UA-20 can use
the Windows volume control to adjust the output volume.
Items that can be set
CD Player
WAVE
SW Synth
Controls the volume of “audio CDs” on the
internal CD-ROM drive of the computer. (*1)
Controls the volume of sound output from
the “EDIROL UA-20” audio output device.
Digital output and analog output will
change.
Controls the volume of the software synthesizer built into Windows.
* 1 If the CD playback volume does not change when you adjust this
control, then change the WAVE volume. If you are using Windows
2000 and the CD Player is not displayed, check “Enable digital
music CDs for this CD playback device” in Digital CD
Playback.
➝ When playing audio CDs from the computer’s internal
CD-ROM drive, or using the UA-20 to play game music
(Standard driver mode only) (p. 41)
40
If the Volume Control is not
installed on your computer,
use the Control Panel icon
Add or Remove Programs to
install it. For details on
installation, refer to the
Windows manual or Help.
You will be able to use the
UA-20 at the best audio quality
if you set the Volume Control
volume to the maximum
setting.
If Mute is checked or if the
slider is lowered all the way,
no sound will be output from
the UA-20.
Getting Connected and Installing Drivers (Windows)
English
When playing audio CDs from the computer’s internal CD-ROM drive, or using
the UA-20 to play game music (Standard driver mode only)
1.
Open the System Properties dialog box.
Select Start | Settings | Control Panel, and in the Control Panel, double-click
the System icon.
(Windows XP– Click the Windows start button, and from the menu that
appears, select Control Panel.)
2.
Open the Device Manager.
Click the Hardware tab, and click the Device Manager button.
3.
Open the CD-ROM drive’s Properties.
In CD-ROM drive, double-click the CD-ROM drive that you are using. In
Digital CD Playback, check the “Enable digital CD audio for this CD-ROM
device” item.
Deutsch
Windows XP/2000 users:
1.
Open System Properties.
Select Start | Settings | Control Panel, and in Control Panel, double-click the
System icon.
2.
Open the CD-ROM drive’s Properties.
Double-click the CD-ROM icon, and then double-click the CD-ROM drive that
you are using.
3.
Click the Properties tab, and in Digital CD Playback, check the “Enable
digital CD audio for this CD-ROM device” item.
Français
Windows Me users:
1.
Open the Multimedia Properties dialog box.
Select Start | Settings | Control Panel, and in Control Panel, double-click the
Multimedia icon.
2.
Click the Music CD tab, and check the “Enable digital CD audio for this
CD-ROM device” item.
Italiano
Windows 98 users:
Español
* Depending on your system, playback may still not be possible. For details, please contact the
manufacturer of your computer. If you are using a PC-card (PCMCIA) type CD-ROM
drive, playing back WAVE data from a CD-ROM or playing an audio CD may cause
interrupted sound, or possibly no sound at all.
41
Getting Connected and Installing
Drivers (Macintosh)
If you are using a Windows computer, please proceed to Getting Connected and
Installing Drivers (Windows) (p. 16).
What is a driver?
fig.05-1e_50
A “driver” is software that
transfers data between the
Application
USB port
UA-20 and application
software running on your
USB
USB cable
driver
computer, when your
computer and the UA-20
Computer
UA-20
are connected by a USB
cable. The driver sends data from your application to the UA-20, and from the
UA-20 to your application.
Advanced mode and Standard driver mode
The UA-20 has two operating modes, Advanced mode and Standard driver
mode, and a different driver is used by each mode.
■ Advanced mode
The UA-20 will operate in this mode when the rear panel ADVANCE (mode select)
switch is turned ON. The special driver included on the CD-ROM will be used,
allowing audio to be recorded/played/edited with high quality and stable timing.
In Advanced mode, audio signals can be transferred between the UA-20 and the
computer at a resolution of 24 bits and sampling frequencies of 44.1 kHz.
Select Advanced mode if you are using an application that is able to record/
playback/edit high-quality audio, such as a 24 bit audio application or an ASIOcompatible application such as Cubase VST, Logic Audio, and Metro.
In Advanced mode, the UA-20 cannot play back audio data (audio CDs or warning
sounds) from the Macintosh sound manager.
(➝ Installing the special driver (p. 43))
■ Standard driver mode
The UA-20 will operate in this mode when the rear panel ADVANCE (mode select)
switch is turned OFF. The standard USB audio driver included with MacOS will be
used. In standard driver mode, audio signals are transferred between the UA-20
and the computer at a resolution of 16 bits and sampling frequencies of 44.1 kHz.
Select this mode if you are using an application that uses MacOS’s own
functionality, such as an application that uses the computer’s CD-ROM drive to
play back CD-audio, or an application that uses the software synthesizer included
with MacOS. The standard driver included with MacOS does not support ASIO.
Note also that the use of Mac OS 8.6 is not supported.
(➝ Installing the OS-standard driver (p. 53))
42
Getting Connected and Installing Drivers (Macintosh)
English
Switching between Advanced mode and Standard driver mode
If you first install both the special driver and the standard driver, you will be able
to switch between Advance and Standard driver modes by operating the UA-20's
ADVANCE (mode select) switch.
* In order for the setting of the ADVANCE (mode select) switch to take effect, you must
exit all sequencer software and other applications that use the UA-20, and re-connect the
UA-20.
Deutsch
Installing the special driver
You must install the MIDI driver even if you will be using only audio on the UA-20.
Be sure to install the MIDI driver.
Use either OMS or FreeMIDI as the MIDI driver.
If you are using OMS ................................................... (p. 44)
If you are using FreeMIDI............................................ (p. 48)
Français
* Either OMS or FreeMIDI must be installed in your Macintosh, as appropriate for the
sequencer software you are using.
* If the power of the UA-20 is turned on, a message like the following will appear when
the Macintosh is started up. Perform the steps described below as appropriate for the
message that is displayed.
Español
Italiano
If the screen indicates:
“Driver required for USB device ‘unknown device’ is not available. Search for
driver on the Internet?”
➝ click [Cancel].
If the screen indicates:
“Software required for using device ‘unknown device’ cannot be found.
Please refer to the manual included with the device, and install the necessary
software.”
➝ click [OK].
43
Getting Connected and Installing Drivers (Macintosh)
■ Installing the UA-20 driver (OMS)
Use the following procedure to install the UA-20 driver.
The included UA-20 OMS driver is an add-on module for
using the UA-20 with OMS. In order for you to use it, OMS
must already be installed on the hard disk from which
you started up.
OMS can be found in the OMS
Driver folder within the Driver
E folder of the CD-ROM.
If you would like to learn more about OMS, refer to
OMS_2.3_Mac.pdf in the OMS Driver folder within the
Driver E folder of the CD-ROM. You will need the Adobe
Acrobat Reader in order to view OMS_2.3_Mac.pdf.
* Disconnect the UA-20 from the Macintosh before you perform the
installation.
1
Exit all currently running software (applications).
If you are using a virus checker or similar software, be sure to
exit this as well.
2
Prepare the CD-ROM.
Insert the CD-ROM into the CD-ROM drive.
3
4
Double-click the UA-20 OMS Driver-E Installer icon
(found in the Driver E–OMS Driver folder of the
CD-ROM) to start up the installer.
Verify the Install Location, and click [Install].
fig.03-scdrv2Z.e
5
If a message like
the following is
displayed, click
[Continue].
The other currently
running applications will exit, and installation will continue.
6
A dialog box will indicate Installation completed.
Click [Restart] to restart your Macintosh.
44
The indication for the
installation location will differ
depending on your system.
Make sure that the startup disk
for the system you are using is
selected.
Getting Connected and Installing Drivers (Macintosh)
OMS settings
4
From the CD-ROM, drag the
Driver E–OMS Driver–
Settings folder into the
Opcode–OMS folder on the
hard disk of your Macintosh to
copy it there.
In the Opcode-OMS
Application folder where you
installed OMS, double-click
OMS Setup to start it up.
fig.03-omsusb1a.e
If a dialog box
like the one
shown here
appears, click
[Turn It Off]. A
confirmation
dialog box will
then appear, so
click [OK].
Español
5
Deutsch
3
Use the USB cable to connect the UA-20 to your
computer.
This unit is equipped with a
protection circuit. A brief
interval (a few seconds) after
connecting a USB connector is
required before the unit will
operate normally.
Français
2
Set the UA-20’s ADVANCE (mode select) switch to
the ON position.
Italiano
1
English
To check the OMS settings, you will first need to connect a
MIDI sound module to the UA-20's MIDI OUT connector.
For details on connecting a MIDI sound module, refer to the
owner's manual for your MIDI sound module.
45
Getting Connected and Installing Drivers (Macintosh)
fig.03-omsusb2.e
6
The Create a New
Studio Setup dialog
box will appear.
Click [Cancel]. If you
accidentally clicked OK,
click [Cancel] in the next
screen.
7
Choose “Open” from the File menu.
From the Settings folder that you copied in step 3, select the
UA-20 USB file, and click [Open].
fig.50
A screen like the one shown
here will appear.
fig.51e
8
From the Edit menu, select
OMS MIDI Setup.
In the OMS MIDI Setup dialog
box that appears, check Run
MIDI in background, and click
[OK].
fig.52E
9
From the File menu,
choose Make Current.
If you are unable to select
Make Current, it has already
been applied, and you may
continue to the next step.
46
We recommend that you turn
off AppleTalk, by selecting
Chooser from the Apple
menu.
Getting Connected and Installing Drivers (Macintosh)
fig.03-omsusb07
Verify that MIDI
transmission and reception
can be performed correctly.
English
10
From the Studio menu, choose
Test Studio.
11
When you move the
mouse cursor near the
sound generator icon, the
cursor will change to a shape.
If the UA-20 does not produce
sound, refer to No sound
(p. 70).
Exit OMS Setup.
Italiano
From the File menu, choose [Quit]. If the AppleTalk
confirmation dialog box appears, click [OK] to close the
dialog box.
This completes connections for the UA-20 and Macintosh,
and installation of the MIDI driver.
Next, you need to install the ASIO driver.
(➝ Installing the ASIO driver (p. 51))
Español
12
Français
Click on the sound generator
icons that are encircled in the
illustration shown at right. If
sound is heard from the
sound module, the settings
are correct.
Deutsch
fig.54
47
Getting Connected and Installing Drivers (Macintosh)
■ Installing the UA-20 driver (FreeMIDI)
Use the following procedure to install the UA-20 driver. The
included UA-20 FreeMIDI driver is an add-on module for
using the UA-20 with FreeMIDI. In order to use it, FreeMIDI
must be installed on the hard disk from which you started
up.
* Disconnect the UA-20 from the Macintosh before beginning the
installation.
1
Exit all currently running software (applications).
If you are using a virus checker or similar software, be sure to
exit this as well.
2
Prepare the CD-ROM.
Insert the CD-ROM into the CD-ROM drive.
3
4
Double-click the UA-20 FM Driver - E Installer icon
(found in the Driver E - FreeMIDI folder of the
CD-ROM) to start up the installer.
Verify the Install Location, and click [Install].
fig.3-2_40
5
If a message like
the following is
displayed, click
[Continue].
The other currently
running applications will exit, and installation will continue.
6
48
A dialog box will indicate Installation completed.
Click [Restart] to restart your Macintosh.
Getting Connected and Installing Drivers (Macintosh)
FreeMIDI settings
4
5
6
From the CD-ROM, copy the Driver E - FreeMIDI
Driver - Settings folder onto the hard disk of your
Macintosh.
Open the FreeMIDI Applications folder from the
location into which you installed FreeMIDI, and
double-click the FreeMIDI Setup icon to start it up.
When “OMS is installed on this computer...”
appears, click [FreeMIDI].
The first time the software is started up, a dialog box
saying “Welcome to FreeMIDI!” will appear.
Click [Continue].
8
9
When the FreeMIDI Preferences dialog box appears,
click [Cancel].
Español
7
Deutsch
3
Use the USB cable to connect the UA-20 to your
computer.
This unit is equipped with a
protection circuit. A brief
interval (a few seconds) after
connecting a USB connector is
required before the unit will
operate normally.
Français
2
Set the UA-20’s ADVANCE (mode select) switch to
the ON position.
Italiano
1
English
To check the FreeMIDI settings, you will first need to connect
a MIDI sound module to the UA-20's MIDI OUT connector.
For details on connecting a MIDI sound module, refer to the
owner's manual for your MIDI sound module.
When the About Quick Setup dialog box appears,
click [Cancel].
From the File menu, choose Open.
49
Getting Connected and Installing Drivers (Macintosh)
10
11
Select UA-20 USB from the Settings folder you
copied in step 3, and click [Open].
Verify that MIDI transmission and reception occur
correctly.
From the MIDI menu, choose Check Connections.
fig.fm2
12
The mouse cursor will
change to the shape of a
keyboard. Click the sound
generator icons encircled in
the diagram at right.
If you hear sound, MIDI
messages are being sent from
the Macintosh to the sound module.
13
14
Once again choose the MIDI menu command Check
Connections to end the test.
From the File menu, choose Quit to exit FreeMIDI
Setup.
This completes connections for the UA-20 and Macintosh,
and installation of the MIDI driver.
Next you will install the ASIO driver.
(➝ Installing the ASIO driver (p. 51))
50
If the UA-20 does not produce
sound, refer to No sound
(p. 70).
Getting Connected and Installing Drivers (Macintosh)
In Advanced mode, the UA-20 cannot play back audio data
from the Macintosh’s sound manager (such as audio CDs and
alert sounds).
The ASIO driver of the UA-20 supports the following audio
input/output channels.
ASIO (Steinberg Audio Stream
In/Out Interface)
This is an audio interface
standard promoted by the
Steinberg Corporation. When
the UA-20 is used with ASIOcompatible software, the
synchronization precision will
be improved, allowing a more
sophisticated music
production environment.
Deutsch
You must install the MIDI driver even if you will be using
only audio on the UA-20. Be sure to install the MIDI driver
before you install the ASIO driver.
This section explains how to install the ASIO driver that
allows the UA-20 to be used by your sequencer software or
audio editing software. For details on installation and settings
of the ASIO driver, be sure to also read the Driver E–ASIO
Driver–Setting ASIO Driver-E.HTM document on the
CD-ROM.
English
Installing the ASIO driver
• Audio input .......24/16 bit1 stereo ch. (2 monaural chs.)
• Audio output.....24/16 bit1 stereo ch. (2 monaural chs.)
Français
Here we will explain how to install the ASIO 1.0 16 bitcompatible driver.
If your ASIO-compatible software supports ASIO 2.0 or recording/
playback of 24 bit audio data, using the following drivers will provide a
higher quality environment.
24 bit compatible
Driver to use
✕
✕
❍
❍
✕
❍
✕
❍
UA-20 ASIO 1.0 16 bit
Italiano
ASIO-compatible software
ASIO2.0-compatible
Español
UA-20 ASIO 1.0 24 bit
UA-20 ASIO 2.0 16 bit
UA-20 ASIO 2.0 24 bit
51
Getting Connected and Installing Drivers (Macintosh)
ig.05-21e_30
1
2
3
52
From the Driver E–
ASIO Driver folder
of the CD-ROM,
copy [UA-20
ASIO1.0 16bit] to the [ASIO Drivers] folder within
the ASIO Drivers folder of the ASIO-compatible
software you are using (e.g., Cubase VST, Logic
Audio, Digital Performer, Metro, or SPARK LE).
Start up your ASIO-compatible software (e.g., Cubase
VST, Logic Audio, Digital Performer, Metro, or
SPARK LE).
Open the Audio setting dialog box of your ASIOcompatible software, and select [UA-20 ASIO 16bit]
as the ASIO Device.
The Audio setting dialog box
will be named differently
depending on your software.
For details refer to the manual
of your software.
Getting Connected and Installing Drivers (Macintosh)
Installing the OS-standard driver
2
With the UA-20 disconnected, start up Mac OS.
English
1
Exit all currently running software (applications).
If you are using a virus checker or similar software, be sure to
exit it as well.
fig.05-35e_30
Deutsch
After starting up Mac OS, select
Apple System Profiler from the
Apple menu.
The “Apple System Profiler” dialog box will appear.
6
7
Set the UA-20’s ADVANCE (mode select) switch to
the ON position.
Use the USB cable to connect the UA-20 to your
computer.
This unit is equipped with a
protection circuit. A brief
interval (a few seconds) after
connecting a USB connector is
required before the unit will
operate normally.
Italiano
5
Click the Devices and Volumes tab.
Wait for approximately five seconds.
The UA-20 will use the driver included with Mac OS.
While you are waiting, the screen display will not change, but
the UA-20 is being detected. Do not touch the mouse or
keyboard.
Español
4
Français
3
53
Getting Connected and Installing Drivers (Macintosh)
fig.05-37e_30
8
In order to check that
detection has been
completed, once again go
to “Apple System
Profiler”, and select
“Update all
information” from the Commands menu.
In the USB area, three audio devices will be displayed.
If these are displayed correctly, driver installation has
succeeded. In the File menu, click Quit to close “Apple
System Profiler”.
If they are not displayed correctly, disconnect the UA-20,
wait for about ten seconds, and then repeat the procedure
from step 2.
Next, you will need to make the driver settings.
■ Settings the sound input/output
fig.05-44e_30
1
From the Apple menu, select
Control Panel – Sound.
The Sound dialog box will appear.
fig.05-45e_30
2
54
Click the Speakers tab or
Speaker Settings.
The main volume slider will
not move.
Getting Connected and Installing Drivers (Macintosh)
Test signals will be output from the
UA-20; left first, then right, as
indicated in the screen.
In the Sound dialog box, click the Input tab.
In Choose a source for sound input (Device), select USB
audio.
* Do not check “Play sound through output device”.
fig.05-49e_30
When you are finished
making settings, close the
Sound dialog box.
Français
5
If USB audio is not displayed,
close the “Sound” dialog box,
and disconnect the UA-20’s
USB cable from the Macintosh.
Perform the driver installation
(p. 53) once again.
From the File menu, select Quit.
Italiano
4
The output volume of the UA20 cannot be adjusted with the
Mac OS sound dialog box.
Make volume adjustments
through other means, such as
on the speaker system you are
using.
Deutsch
With the volume turned down
on the UA-20 and on your
peripheral audio equipment,
click [Start Test].
Español
3
English
xfig.05-46e_30
55
UA-20 application guide
This chapter explains the various ways the UA-20 can be connected, and introduces
some of its applications.
* To prevent malfunction and/or damage to speakers or other devices, always turn down the
volume, and turn off the power on all devices before making any connections.
Basic use
As shown in the diagram, you can connect headphones or monitor speakers, and
monitor the playback sound from your application or the sound from the instrument or
audio device to which the UA-20 is connected.
fig.basic.e
Computer
Stereo set
LINE IN, AUX IN
Audio cable
USB
port
USB cable
Stereo
Headphones
PHONES
Signal flow
56
UA-20 application guide
Recording a guitar or bass
English
When you play your guitar along with audio data from your computer to record your
performance on a sequencer, only the guitar will be recorded on the computer.
fig.guitar.e
Signal flow
Turn on if you
want to monitor.
Deutsch
Adjust the
input level.
Guitar
Set this to
GUITAR.
Français
Use the Input volume to adjust the input level.
Check the input level on the application that you are using.
Español
Italiano
If you turn the input monitor switch to ON, the sound will be output from the
headphone jack and the master output jacks.
57
UA-20 application guide
Recording from a mic
fig.mic.e
Signal flow
Adjust the
input level.
Turn on if you
want to monitor.
Microphone
Set this to
MIC.
fig.mic-con.e
Use the Input volume to adjust the input level.
Check the input level on the application that you are using.
If you turn the input monitor switch to ON, the sound will be output from the
headphone jack and the master output jacks.
* Howling could be produced depending on the location of microphones relative to speakers.
This can be remedied by:
1. Changing the orientation of the microphone(s).
2. Relocating microphone(s) at a greater distance from speakers.
3. Lowering volume levels.
58
UA-20 application guide
Recording from a keyboard
English
Here’s how you can send a keyboard performance as audio data to your computer, and
record it on sequencer software.
fig.keyboard.e
Signal flow
Deutsch
Adjust the
input level.
Turn on if you
want to monitor.
Set this to
LINE.
OUTPUT
Français
Keyboard
The sound that is input to Input jack L(MONO) will be recorded on the left channel, and
the sound that is input to R jack will be recorded on the right channel.
Use the Input volume to adjust the input level.
Check the input level on the application that you are using.
Español
Italiano
If you turn the input monitor switch to ON, the sound will be output from the
headphone jack and the master output jacks.
59
UA-20 application guide
Recording an analog signal from an audio device
fig.aux.e
Signal flow
Adjust the
input level.
Turn on if you
want to monitor.
Set this to
LINE.
LINE OUT
Stereo Set
The sound that is input to Input jack L(MONO) will be recorded on the left channel, and
the sound that is input to R jack will be recorded on the right channel.
Use the Input volume to adjust the input level.
Check the input level on the application that you are using.
If you turn the input monitor switch to ON, the sound will be output from the
headphone jack and the master output jacks.
Be careful of looped connections
fig.loop.e
Loop Connection
UA-20
LINE IN
LINE OUT
Stereo Set
(cassette player)
LINE OUT
LINE IN
If the UA-20 is connected as shown above to a device that outputs (“thru-s”) the input
audio (such as a cassette player that is in recording mode), turning on the Input
monitor switch will cause the sound to loop between the UA-20 and the other device,
causing oscillation and producing an unexpectedly high volume. Be aware that such
connections may cause the system to malfunction, or your speakers to be damaged.
60
UA-20 application guide
Recording a MIDI device
fig.digital.e
MIDI Keyboard
MIDI OUT
MIDI IN
English
MIDI cable
MIDI Sound Module
USB cable
Deutsch
USB
port
Signal flow
Computer
Español
Italiano
Français
The MIDI messages from a MIDI keyboard connected to the MIDI IN connector can be
sent via the UA-20 to sequencer software on your computer.
The MIDI messages from the sequencer software on your computer can be sent for
playback to a sound module connected to MIDI OUT.
61
UA-20 application guide
Digitally recording the output of the UA-20
on an MD
Make connections as shown in the diagram.
fig.MD.e
Optical digital
cable
DIGITAL
INPUT
MD
Signal flow
* The UA-20 does not support audio formats of professional digital devices.
On the UA-20, the input from the input jacks cannot be output directly to the Digital
output connector. The Digital output connector will always output only the audio
signal from the computer.
62
UA-20 application guide
Adjusting the audio latency
English
When using the UA-20 in Advanced mode, you can change the driver settings to adjust
the latency of the audio. To adjust the latency, change the Buffer Size in the driver
settings dialog box.
* Latency is the time delay from when an application plays back audio data until the sound is
actually heard from an audio device such as the UA-20.
2
As described in “Opening the special driver settings dialog box (p. 65)”,
open the “Driver Settings” dialog box.
Deutsch
1
Adjust the driver buffer size.
The following setting will produce the shortest latency.
Windows:
Set “Audio Buffer Size” to the far left (Min).
Macintosh:
Set “Buffer Size” to the far left (Min).
4
Click [OK] to close the driver settings dialog box.
Français
3
Restart the application that is using the UA-20.
If you are using an application that has a function for testing audio devices, get it to
perform its tests.
Italiano
Play back audio data on your application.
If interruptions occur in the sound, repeat this procedure, and gradually increase the
buffer size specified in step 2 until interruptions no longer occur.
* Depending on the application you are using, there may be a buffer size or latency
adjustment function among the audio settings of the application as well. For details, refer to
the operation manual for your application.
Español
5
63
UA-20 application guide
Using ASIO Direct Monitor
If you are using the UA-20 from an ASIO2.0-compatible application in Advanced
mode, the UA-20’s Input monitor switch can be controlled automatically from the
application.
1
2
As described in “Opening the special driver settings dialog box (p. 65)”,
open the “Driver Settings” dialog box.
Make the following settings.
Check the “Use ASIO Direct Monitor” check box.
3
Click [OK] to close the driver settings dialog box.
* Depending on your application, there may also be an ASIO Direct Monitor setting among the
audio settings of your application. For details, refer to the operation manual for your
application.
* When using ASIO Direct Monitor, monitoring may switch on/off at unexpected times,
depending on the application settings and on the recording procedure. If this occurs, uncheck
the check box in step 2 to disable ASIO Direct Monitor.
64
UA-20 application guide
Opening the special driver settings dialog box
1.
Open the “Control Panel” and double-click “EDIROL UA-20”.
2.
The “EDIROL UA-20 Driver Settings” dialog box will appear.
English
If using the WDM driver on Windows XP/2000:
* In Windows XP, click “Switch to classic view” to switch the display to the classic view.
EDIROL UA-20 will not be displayed unless the classic view is selected.
Open the “Control Panel”, and double-click “System”.
2.
Click the “Hardware” tab, and click the [Device Manager] button.
3.
Double-click “Sound, Video, and Game Controllers”.
4.
Double-click “EDIROL UA-20”.
5.
Click the “Properties” tab, and in the “Multimedia Devices” area, double-click
“Audio Devices”.
6.
Select “EDIROL UA-20”, and click the [Properties] button.
7.
Click the [Settings] button, and the “EDIROL UA-20 Driver Settings” dialog box
will appear.
Français
1.
Deutsch
If using the MME driver on Windows XP/2000:
1.
Open the “Control Panel”, and double-click “Sound and Multimedia”. (In the
case of Windows 98, double-click “Multimedia”.)
2.
Click the “Devices” tab, and double-click “Audio Devices”.
3.
Select “EDIROL UA-20 Audio”, and then click the [Properties] button to open
Properties.
4.
Click the [Settings] button, and the “EDIROL UA-20 Driver Settings” dialog box
will appear.
Italiano
If using Windows Me/98:
Español
If using Macintosh:
Open the ASIO Control Panel from the Audio Settings dialog box of your ASIOcompatible application. The name of the Audio Settings dialog box and the procedure
for opening the ASIO Control Panel will differ depending on your application. For
details, refer to the operation manual for your application.
65
Troubleshooting
Troubleshooting
If an unexpected problem occurs while using the UA-20, read this chapter first. It
contains numerous tips for resolving problems.
If you are using Windows or Macintosh for the first time, and as a result find it difficult
to follow the procedural explanations, please refer to the manuals that came with your
computer or operating system.
Problems common to Windows and Macintosh
Problems occurring only in Windows
Problems occurring only in Macintosh
Problems related to the USB driver
An “Unknown driver found” dialog box appears, and
you are unable to install the driver
“Find new hardware wizard” does not execute
automatically
“Find new hardware wizard” ends before the process is
completed
66
•
It may take about 15 seconds (or more) after the USB cable is connected for the
UA-20 to be detected.
•
Is the USB cable connected correctly?
Make sure that the UA-20 and your computer are correctly connected via a USB cable.
•
Is USB enabled on your computer?
Refer to the operation manual for your computer, and make sure that USB is enabled.
•
It has been found that in some cases, not all of the Windows 98 files required to
support audio via USB are installed when a computer is shipped.
Please contact the manufacturer of your computer.
Does your computer meet the USB specifications?
If you are using a computer that does not fulfill the electrical requirements of the USB
specifications, operation may be unstable. In this case, you may be able to solve the
problem by connecting a USB hub.
•
Does “Unknown device” appear for “Other device” or “Universal serial bus
controller”?
Use the following procedure to delete “Other device” (Universal Serial Bus Controller)
“Unknown device”, and then restart your computer.
1.
In the Windows Control Panel, double-click System. The System
Properties dialog box will appear.
2.
Click the Device Manager tab.
3.
Double-click “Other device” or “Universal Serial Bus Controller” to
display a list of devices.
4.
From the list, select the unknown device and click [Delete].
5.
In the dialog box that asks you to confirm the deletion, click [OK].
6.
Verify that “Other device” or “Unknown device” is not displayed in the list,
and click [Close] to close the dialog box.
Deutsch
•
English
Troubleshooting
Français
“Found unknown device” appears even though you
installed the driver
If your computer or USB hub has two or more USB connectors, and you connect the
UA-20 to a USB connector to which the UA-20 has never been connected before, the
“Unknown device” dialog box may appear even on a computer onto which you have
already installed the driver.
Italiano
Refer to Getting Connected and Installing Drivers (Windows) (p. 16), and install the
driver once again. This is not a malfunction.
Driver is not installed correctly
As described in Deleting the special driver (p. 79), delete the USB audio device driver
that is installed in your computer, and then install the UA-20 driver once again as
described in Getting Connected and Installing Drivers (Windows) (p. 16). Also check
whether there is an “Unknown device” in “Other devices” or “Universal Serial Bus
Controller”.
Español
If you find one, delete it.
67
Troubleshooting
Can’t install/delete/use the driver in Windows XP/2000
•
Did you log on to Windows as a user with administrative privileges?
In order to install/delete/re-install the driver in Windows XP/2000, you must be
logged into Windows as a user with administrative privileges, such as Administrator.
For details, please contact the system administrator for your computer system.
•
Did you make “Driver Signing Options”?
In order to install/re-install the driver, you must make “Driver Signing Options”.
(Windows XP ➝ p. 18, Windows 2000 ➝ p. 24)
Windows XP/2000 displays a “Hardware Installation” or
“Digital Signature Not Found” dialog box
•
Did you make “Driver Signing Options”?
In order to install/re-install the driver, you must make the settings described in “Driver
Signing Options”.
(Windows XP ➝ p. 18, Windows 2000 ➝ p. 24)
Device Manager shows “?”, “!”, or “USB Composite
Device”
The “Insert Disk” dialog box does not appear
Use the following procedure to re-install the driver.
68
1.
Turn off the power of your computer, and start up Windows with all USB
cables disconnected (except for keyboard and mouse).
2.
After Windows restarts, use a USB cable to connect the UA-20 to your
computer.
3.
Click the Windows [Start] button, and from the menu that appears, choose
Settings | Control Panel.
4.
Double-click the System icon. The System Properties dialog box will
appear.
5.
Click the Device Manager tab.
6.
Check whether you can see an indication of “?Composite USB Device”,
“?USB Device”, “!USB Device”, or “USB composite device” displayed
below “Sound, Video, and Game Controllers”, “Other Devices”, or
“Universal Serial Bus Controller”. If you find any such indication, select it
and click [Delete].
7.
A dialog box will ask you to confirm deletion of the device. Verify the
contents of the dialog box, and then click [OK]. In the same way, delete all
indications of “?Composite USB Device”, “?USB Device”, “USB Device”,
and “USB composite device” that you find.
8.
If you find EDIROL UA-20 with a yellow “!” or a red “?” displayed beside it,
delete this in the same way.
9.
When you have finished deleting the unwanted devices, click [OK] in the
System Properties dialog box.
English
Troubleshooting
10. Turn off the power of the UA-20, then delete the driver. (➝ Deleting the
special driver (p. 79))
Deutsch
11. Restart Windows. Then install the driver once again. (➝ Getting Connected
and Installing Drivers (Windows) (p. 16)).
Español
Italiano
Français
* If the problem still occurs after you have taken the above measures, please refer also to the
Readme file for the USB driver. The Readme file is on the CD-ROM.
69
Troubleshooting
Problems when using the UA-20
Operating system becomes unstable
•
Operation becomes unstable when the computer is started up with the UA-20
already connected
Please start up your computer with the UA-20 disconnected, and then connect the
UA-20. On a computer that uses a USB keyboard, starting up the computer with the
UA-20 already connected may cause operation to become unstable. In this case, start up
the computer with the UA-20 disconnected, and then connect the UA-20.
No sound
•
Have you specified the MIDI data output destination for your operating system?
You must specify the UA-20 as the audio data output destination for your computer.For
details on how to make this setting, refer to Settings and checking.
(Windows, Settings and checking (p. 36)/
Macintosh, OMS settings (p. 45), FreeMIDI settings (p. 49))
•
In your playback software, have you specified the audio data output
destination?
For some software, such as Cool Edit Pro LE, you will need to specify the UA-20 as the
output destination for audio data. For details on the procedure for making settings,
refer to the owner's manual for your software.
•
Are you running multiple applications?
If multiple applications are running simultaneously, an error message may appear. If
this occurs, click [OK] and exit the other applications.
Even if an application window is closed, it is still running if it appears in the taskbar. Be
sure to exit unneeded applications displayed in the taskbar.
70
•
Was the driver installed correctly?
In order for you to play back audio data via the UA-20, the driver must be installed. For
installation and settings, refer to “Getting Connected and Installing Drivers”.
(Windows, p. 16 / Macintosh, p. 42).
•
Is your computer in Suspend or Sleep mode?
If so, get your computer to resume normal operation, then exit all applications that are
using the UA-20. Next, turn the UA-20’s power off, then switch it on again.
•
Did you reconnect the USB cable?
Exit all applications that are using the UA-20, and exit all applications that are using the
UA-20, and re-connect the UA-20.
•
Have you selected “Game compatible device” or “Voice modem” as the output
for the audio track?
If game compatible device or voice modem (the actual name will depend on the
computer you are using) is selected for the audio track of your software, the audio track
may not play back. Do not select these devices as the port.
Is OMS/FreeMIDI set correctly?
As described in OMS settings (p. 45) or FreeMIDI settings (p. 49), check the OMS or
FreeMIDI settings. Also make sure that the device for MIDI IN/OUT is correctly
selected in the MIDI settings of your MIDI sequencer software.
•
Is the OMS setup enabled?
If a diamond-shaped symbol is not displayed at the left edge of the title area in the OMS
setup window, the setup is not enabled. From the OMS File menu, choose “Make
Current”. (OMS settings (p. 45))
•
Are you attempting to play back an audio CD using your computer's CD player?
(Standard driver mode)
If you want to play an audio CD from your computer's internal CD-ROM drive, refer to
When playing audio CDs from the computer’s internal CD-ROM drive, or using the
UA-20 to play game music (Standard driver mode only) (p. 41).
•
Are the volume control faders raised? (Standard Driver mode/Windows XP/2000
WDM driver)
Adjust the volume of the faders as described in Volume Control setting (p. 40).
Deutsch
•
Français
Has your computer been set to enter Sleep mode?
If your computer enters Sleep mode, exit the software you are using, and then restart
your computer. We recommend that you set your computer to not use Sleep mode.
Italiano
•
English
Troubleshooting
Can’t play back / record MIDI
Has the MIDI device you are using been set correctly?
In order to record/play MIDI tracks using the UA-20, you must correctly install the
UA-20 driver (Getting Connected and Installing Drivers (Windows) (p. 16)).
Also make sure that the input port and output port are set as follows in your software.
INPUT port
EDIROL UA-20 MIDI IN
Español
•
OUTPUT port
EDIROL UA-20 MIDI OUT
71
Troubleshooting
•
Has the MIDI device you are using been selected correctly?
Select [UA-20 MIDI IN/OUT] as the MIDI output device.
•
Are the track outputs set correctly?
MIDI tracks to which no MIDI playback device is assigned will not be heard. If you
want to play back a MIDI track, you must make sure that the MIDI device you want to
use is displayed in your software as the MIDI output port. For details, refer to the
owner’s manual for your software.
Interrupted notes or delays occur during MIDI playback
•
In Windows XP, enable background processing.
Make the following settings so that MIDI processing will occur smoothly.
1.
Click the Windows start button, and from the menu that appears, select
Control Panel.
2.
In “Pick a category”, click “Performance and Maintenance”.
3.
In “or pick a Control Panel icon”, click the System icon.
4.
Click the Advanced tab.
5.
At the right of the Performance field, click [Settings]. The Performance
Options dialog box will appear.
6.
Click the Advanced tab.
7.
In the Processor Scheduling field, select
“Background services”, and click [OK].
8.
In the System Properties dialog box,
click [OK].
The System Properties dialog box will
close.
fig.2-30
72
Troubleshooting
Distortion occurs in the sound from devices connected
to the input jacks
English
If you are inputting audio from Input jacks, use the UA-20 Input volume to reduce the
input level.
•
Is the headphone volume set appropriately?
Turn the knob clockwise to adjust the volume.
•
Is the Input monitor switch turned on?
•
Is the Input select switch set correctly?
Deutsch
Sound from devices connected to the input jack is not
heard in the headphones
•
Are you using a cable that has a built-in resistor?
Use a cable without a built-in resistor (e.g., Roland PCS series).
•
Is the Input volume raised appropriately?
Turn the knob clockwise to adjust the volume.
Français
Volume from a device connected to the input jacks is
too low
Connect your guitar to input jack L.
•
Set the Input select switch to GUITAR.
Español
•
Italiano
Guitar sound is too weak
73
Troubleshooting
Noise is heard during audio playback
•
Is a mic or guitar still connected?
If a mic or guitar is connected to the UA-20, disconnect the mic or guitar, and turn the
input sensitivity knob all the way to the left.
Disconnect any audio devices you are not using.
•
Noise is sometimes heard in the line input or mic input.
If a USB-compatible MIDI sound module and the UA-20 are connected via USB to the
same computer, and the outputs of the MIDI sound module are connected to the line
input jacks of the UA-20, noise from your computer may be heard via the MIDI sound
module from the UA-20, depending on the computer you are using. If this occurs, you
can either connect the MIDI sound module and the UA-20 in parallel using a selfpowered hub, or connect the MIDI sound module via its serial or MIDI interface.
•
Are two or more audio devices such as the UA-20 or a mixer connected to your
computer?
Try connecting only a single UA-20 unit, and check whether the noise disappears. If
numerous audio devices are connected to a computer, noise may occur depending on
your system. In such cases, connect only the UA-20 to your computer.
•
Does your sequencer software support ASIO 2.0?
If your ASIO-compatible software does not support ASIO 2.0, it will not operate
correctly if you use [UA-20 ASIO2.0 16bit] or [UA-20 ASIO2.0 24bit] as the ASIO
driver.
In this case, select either [UA-20 ASIO1.0 16bit] or [UA-20 ASIO1.0 24bit] as the ASIO
driver.
74
•
Does your sequencer software support 24-bit audio?
If your ASIO-compatible software does not support 24-bit audio input/output, it will
not operate correctly if you select [UA-20 ASIO1.0 24bit] or [UA-20 ASIO2.0 24bit] as
the ASIO driver. In this case, select either [UA-20 ASIO1.0 16bit] or [UA-20 ASIO2.0
16bit] as the ASIO driver.
•
Is the UA-20 connected to a USB hub?
Try connecting the UA-20 directly to the USB connector of the Macintosh itself.
Are you using a USB device other than the UA-20?
Try turning off the power of all USB audio devices other than the UA-20.
•
In some cases, you may also be able to solve this problem by grounding the
chassis of your computer, or the grounding connector of the AC power supply
plug of your computer. In addition, you can check whether any devices that
produce a strong magnetic field are located nearby, such as a television or
microwave oven.
•
Also check the troubleshooting item Sound is interrupted during audio playback
(p. 75)
Deutsch
•
English
Troubleshooting
Are many applications running on your computer?
If you use many applications or start up other applications during playback, playback
may be interrupted, depending on your computer system. Please exit unneeded
applications, and try again. If this does not resolve the problem, try restarting your
computer.
•
Graphic accelerators may cause noise to be heard during audio playback.
Use the following procedure to turn the graphic accelerator “Off”.
1.
In the Windows Control Panel, double-click Display to open the Display
Properties dialog box, and click the Settings tab.
2.
Click Advanced, and in the properties that appear, click the Performance
tab.
For Windows XP, click Advanced, and then click the Troubleshoot tab.
Italiano
•
Français
Sound is interrupted during audio playback
3.
Set the Hardware acceleration slider to None, and click [OK].
4.
In the Display Properties dialog box, click [OK] to close the dialog box. Then
restart your computer.
Español
For Windows 2000, click Advanced, and then click the Troubleshooting tab.
75
Troubleshooting
•
Try using the following procedure to change your disk drive settings.
The following setting item may not exist on some computers.
1.
In the Windows Control Panel, double-click System.
2.
Click the Device Manager tab.
3.
Double-click Disk Drives to see the list of devices.
4.
From the list, select GENERIC IDE DISK TYPE??, and click Properties to
access the GENERIC IDE DISK TYPE?? Properties dialog box.
*
5.
Click the Settings tab, place a check mark in the check box for the DMA
option, and click [OK] to close the dialog box.
*
6.
Depending on your system, a DMA Settings dialog box may appear. Check the
contents, and click either [OK] or [Cancel].
In the System Properties dialog box, click [OK] to close the dialog box. Then
restart your computer.
•
Try installing more memory.
Installing more memory will increase the performance of your computer. For details on
how to install more memory, refer to the operation manual for your computer.
•
Does your computer satisfy the requirements of the USB standard?
If you are using a computer (such as a computer that you yourself assembled) that does
not satisfy the electrical requirements of the USB specifications, you may experience
interruptions in the audio. If this occurs, you may be able to solve the problem by
connecting a USB hub that contains its own power supply.
•
On some computers, audio playback may be interrupted due to the Power
Management settings in the Control Panel.
The Power Supply Properties that you see when you double-click Power
Management will differ depending on your computer system. One example is given
below, but you should also refer to the operation manual for your computer. Some
computers may not have all of the following setting items.
1.
76
In the ?? field of GENERIC IDE DISK TYPE??, there will be a number that
differs depending on your computing environment.
Click the Windows Start button, and select Settings | Control Panel to open
the Control Panel.
3.
Click the Device Manager tab.
4.
Double-click System Devices to display the list of devices.
5.
From the list, select Advanced Power Management Support. Then click
Properties to open the Advanced Power Management Support Properties
dialog box.
6.
Click the Settings tab, and in Troubleshooting, place a check in the check
box for Don’t Poll Power Supply Status. Then click [OK].
7.
In the System Properties dialog box, click [OK].
8.
Restart Windows.
Deutsch
In Control Panel, double-click System to open the System Properties
dialog box.
If you are using the special driver, you can solve this problem in the “EDIROL
UA-20 Driver Settings” dialog box. For details, refer to the section “Something is
wrong with playback; sound is interrupted or notes are missing” within the
Readme_e file located in the folder in which you installed the CD-ROM.
In Chooser of the Apple menu, set AppleTalk to “Inactive”.
(This setting is not changed as a result of turning off AppleTalk, as requested
by OMS when sequencer software is started up. You must change the setting
yourself using the “Chooser”.)
•
In the “Memory” Control Panel, set Virtual Memory to “Off”.
•
Depending on the way in which you connect to the Internet, use the UA-20
with the following settings.
Italiano
•
Français
Depending on the virtual memory setting or network-related settings, noise may occur.
Please make the following settings before use.
If you connect to the Internet via a LAN cable
Use while the LAN cable is connected.
If you connect to the Internet via the internal modem port, or are not connected
to the Internet
In the “TCP/IP” Control Panel, set “Connect via” to “PPP”.
After you have made the settings, restart your Macintosh.
*
Do not use software that accesses the network (such as a Web browser) at the same time that
you are using sequencer software or audio editing software.
Español
•
2.
English
Troubleshooting
77
Troubleshooting
•
Try increasing the Buffer Size in the ASIO Driver control panel.
The name of the settings dialog box will differ depending on your software.
* If you change the buffer size, you must exit the software and then restart it.
* Roland can make no guarantee of, nor provide support regarding the operation of sequencer
software and audio editing software made by another manufacturer. Please contact the
manufacturer of the software you are using.
Playback or recording halts midway through, and then
becomes impossible
•
Was a heavy processing load experienced while using the UA-20, such as
accessing the CD-ROM drive or a network?
If an operation involving a heavy processing load is performed while the UA-20 is in
use, it may not operate correctly. If this occurs, stop playback/recording, and then try
resuming playback/recording. If you are still unable to play back/record, exit all
applications that use the UA-20, switch off the UA-20, then turn it on again.
Recording produces a silent (blank) file
•
Try setting the bit rate to “16 bit or higher”.
If you are using Windows 98 Second Edition and your recording software is set to a bit
rate setting of 8 bits, a silent file may be created, effectively making recording
impossible. If this occurs, set the bit rate to “16 bit or higher”, and you will be able to
record normally.
•
Is the Recording source select switch set correctly?
•
In your operating system, is the audio data input destination set correctly?
•
On your recording software, is the audio data input destination set correctly?
Game background music does not play
•
78
Does the game use an audio CD for background music? (Standard driver mode)
If the game uses an audio CD for background music, refer to When playing audio CDs
from the computer’s internal CD-ROM drive, or using the UA-20 to play game
music (Standard driver mode only) (p. 41).
Troubleshooting
Deleting the special driver
English
If you were unable to install the special driver according to the procedure given, the
UA-20 may not be recognized correctly by the computer. In this case, use the following
procedure to delete the special driver, and then follow the procedure in Getting
Connected and Installing Drivers (Windows, p. 17; Macintosh, p. 43) to install the
driver once again.
Windows XP/2000 users
With all USB cables disconnected, start Windows. (USB keyboard and USB
mouse excepted)
2.
Log on to Windows under a user name belonging to the Administrator group,
such as “Administrator”.
3.
Turn on the UA-20's ADVANCE (mode select) switch.
4.
After connecting the UA-20 to your computer via a USB cable, turn on the
power of the UA-20.
5.
Exit all applications before deleting the driver.
6.
Open the Control Panel, and double-click System.
In Windows XP, click “Switch to classic view” to switch the display to the
classic view. EDIROL UA-20 will not be displayed unless the classic view is
selected.
7.
Click the Hardware tab, and in the “Device Manager” area, click [Device
Manager].
8.
Double-click “Sound, Video, and Game Controllers” to view the list of
devices.
9.
From the list, click “EDIROL UA-20 (WDM)” or “EDIROL UA-20 (MMX)” to
select it. Then right-click, and from the menu that appears, select “Delete”.
*
Italiano
*
Français
1.
Deutsch
In order to delete (uninstall) the driver, a user with administrative privileges such as
Administrator must be logged onto Windows. For details, contact the system
administrator of your computer.
If “EDIROL UA-20 (WDM)” or “EDIROL UA-20 (MMX)” does not appear in
the list, refer to the “Can’t install/delete/use the driver in Windows XP/
2000” section (p. 68) in “Troubleshooting”.
Español
10. A dialog box will ask you to confirm that you want to delete the device. Verify
the contents of the dialog box, and click [OK].
11. Close the Device Manager window, and click [OK] in System Properties.
12. Disconnect the USB cable from the UA-20.
13. Restart Windows.
79
Troubleshooting
Windows Me/98 users
1.
With all USB cables disconnected, start up Windows. (USB keyboard and USB
mouse excepted)
2.
Turn on the UA-20's ADVANCE (mode select) switch.
3.
After connecting the UA-20 to your computer via a USB cable, turn on the
power of the UA-20.
4.
Exit all applications before deleting the driver.
5.
Open the Control Panel, and double-click System.
*
Depending on the state of your computer, System may not appear in the Control
Panel. In this case, click “Show all control panel options”.
6.
Click the Device Manager tab.
7.
Double-click “Sound, video, and game controllers” to see a list of devices.
8.
From the list, click “EDIROL UA-20” to select it, and click [Remove].
9.
A dialog box will appear, asking you to confirm that you want to delete the
driver. Verify the contents, and click [OK].
10. Click [Close] to close System Properties.
11. Disconnect the USB cable from the UA-20.
12. In Control Panel, click Folder Options and then click the Display tab. (In
Windows 98, click Start ➝ Settings➝Folder Options)
13. In Advanced settings of the View tab, remove the check mark for “Hide
protected operating system files (Recommended)”, click “Show hidden
files and folders”, and then click [OK]. (In Windows 98, this will be “Show
all files”.)
14. Click Start ➝ Find ➝ Files or folders.
15. In “Search location”, select “Local hard drive”. Then in “Name of file or
folder”, type “*0005.*” and click [Begin search].
16. Of the files that are found, delete the five files Rdas0005.DLL,
Rddp0005.dat, Rddv0005.drv, Rdvx0005.vxd, and Rdwm0005.sys. If the
list shows Rdif0005.inf or RolandRDIF0005.INF, delete these files as well.
*
Never delete any file other then the files specified here.
17. Restart Windows.
80
Troubleshooting
3.
Delete UA-20 from the OMS Folder inside the System folder, or drag UA-20
Driver from the FreeMIDI Folder to the trash.
4.
Drag the ASIO driver that you installed in Installing the ASIO driver (p. 51)
into the trash to delete it.
5.
Restart the Macintosh.
Deutsch
From the system extensions folder, drag “USB UA-20 Driver” into the trash
to delete it.
Français
2.
Italiano
Disconnect the USB cable (by which the UA-20 is connected) from your
Macintosh.
Español
1.
English
Macintosh users
81
Anschlüsse herstellen und Treiber
installieren (Windows)
Wenn Sie einen Macintosh-Computer verwenden, lesen Sie bitte unter Anschlüsse
herstellen und Treiber installieren (Macintosh) (S. 105) weiter.
Was ist ein Treiber?
fig.05-1e_50
Ein ”Treiber” ist Software,
die Daten zwischen dem
UA-20 und
Application
USB port
Anwendungssoftware auf
Ihrem Computer
USB
USB cable
driver
überträgt, wenn Ihr
Computer und das UA-20
Computer
UA-20
mit einem USB-Kabel
miteinander verbunden
sind. Der Treiber überträgt die Daten der Anwendung an das UA-20 sowie die
Daten vom UA-20 an die Anwendung.
Erweiterter Modus und Standardtreiber-Modus
Das UA-20 verfügt über zwei Betriebsmodi, den Erweiterten Modus und den
Standardtreibermodus, und von jedem Modus wird ein anderer Treiber verwendet.
■ Erweiterter Modus
Das UA-20 befindet sich in diesem Modus, wenn der Schalter ADVANCE
(Modusauswahl) an der Rückseite auf ON gestellt wird. Es wird der spezielle
Treiber verwendet, der sich auf der CD-ROM befindet. Dieser Treiber ermöglicht
die Aufnahme/Wiedergabe/Bearbeitung von Audio mit hoher Qualität und
stabilem Timing. Im erweiterten Modus können die Audiosignale zwischen dem
UA-20 und dem Computer mit einer Auflösung von 24 Bit und einer SamplingFrequenz von 44,1 kHz übertragen werden. Wählen Sie diesen Modus, wenn Sie
eine Anwendung verwenden, die Audio mit hoher Qualität aufnehmen/
wiedergeben/editieren kann, wie z.B. eine Anwendung, die 24-Bit-Audio
unterstützt (z.B. die Cakewalk-Serie oder Cool Edit) oder eine ASIO-kompatible
Anwendung (z.B. Cubase VST oder Logic Audio). (➝ Installation des speziellen
Treibers (S. 83))
■ Standardtreiber-Modus
Das UA-20 befindet sich in diesem Modus, wenn der Schalter ADVANCE
(Modusauswahl) an der Rückseite auf OFF gestellt wird. Es wird der StandardUSB-Audiotreiber verwendet, der in Windows enthalten ist. Im StandardtreiberModus werden Audiosignale zwischen dem UA-20 und dem Computer mit einer
Auflösung von 16 Bit und mit Sampling-Frequenzen von 44,1 kHz übertragen.
82
Anschlüsse herstellen und Treiber installieren (Windows)
English
Wählen Sie diesen Modus, wenn Sie eine Anwendung nutzen, die die Windowseigenen Funktionen einsetzt, wie z.B. eine Anwendung, die das CD-ROMLaufwerk des Computers verwendet, um CD-Audio wiederzugeben oder eine
Anwendung, die den Software-Synthesizer nutzt, der in Windows enthalten ist.
Der Standardtreiber, der mit Windows ausgeliefert wird, unterstützt ASIO nicht.
(➝ Installing the OS-standard driver (S. 31))
* Stellen Sie den erweiterten Modus ein, wenn Sie MIDI verwenden möchten.
Deutsch
Umschalten zwischen dem erweiterten Modus und dem Standardtreiber-Modus
Nachdem Sie sowohl den speziellen Treiber als auch den Standardtreiber installiert
haben, können Sie zwischen dem erweiterten und Standardtreiber-Modus
umschalten, indem Sie den Schalter ADVANCE (Modusauswahl) des UA-20
verwenden.
* Damit die Einstellung des Schalters ADVANCE (Modusauswahl) wirksam wird, müssen
Sie die gesamte Sequenzer-Software und andere Anwendungen beenden, von denen das
UA-20 verwendet wird, das UA-20 ausschalten und anschließend erneut einschalten.
Installation des speziellen Treibers
Français
Die Vorgehensweise bei der Installation hängt von Ihrem System ab.
Bitte lesen Sie abhängig von dem von Ihnen verwendeten System in einem der
folgenden Abschnitte weiter.
• Windows XP/2000-Anwender .......................(S. 83)
• Windows Me/98-Anwender...........................(S. 97)
■ Windows XP/2000-Anwender
Italiano
Die CD-ROM enthält zwei Treiberarten für Windows XP/2000.
Normalerweise sollten Sie den WDM-Treiber verwenden.
WDM-Treiber
Sie sollten diesen Treiber verwenden, wenn Sie für SONAR oder eine ähnliche
Anwendung den WDM-Treibermodus angegeben haben. Damit erhalten Sie die
bestmögliche Audioperformance.
Español
* 24-Bit-Audio kann mit Anwendungen, die den WDM-Treiber-Modus nicht unterstützen,
wie z.B. Cool Edit oder Media Player nicht verwendet werden.
83
Anschlüsse herstellen und Treiber installieren (Windows)
MME-Treiber
Dieser Treiber ermöglicht es Ihnen, 24-Bit-Audio auch von Anwendungen aus zu
verwenden, die über keinen WDM-Treiber-Modus verfügen, wie z.B. Cool Edit. Es
ist nicht möglich, den MME-Treiber mit dem WDM-Treibermodus einer
Anwendung, wie z.B. SONAR, zu verwenden.
* Es ist nicht möglich, beide Treiber, den WDM- und den MME-Treiber, zu installieren.
Sie müssen einen Treiber auswählen und dürfen nur diesen Treiber installieren. Wenn
Sie sich nach Installation eines Treibers dafür entscheiden, den Treiber zu wechseln,
müssen Sie zuerst den bereits installierten Treiber löschen und anschließend den neuen
Treiber installieren. (➝ Deleting the special driver (S. 79))
* Der WDM-Treiber und der MME-Treiber können mit Hilfe des gleichen Verfahrens
installiert werden.
Windows XP-Anwender
1
Starten Sie Windows, wobei das UA-20 ausgesteckt
ist.
Stecken Sie alle USB-Kabel außer der USB-Tastatur und der
USB-Maus aus (falls vorhanden).
2
Öffnen Sie das Dialogfeld Systemeigenschaften.
1.
Klicken Sie auf die Windows-Schaltfläche [Start] und
wählen Sie im daraufhin angezeigten Menü
Systemsteuerung.
2.
Klicken Sie in “Wählen Sie eine Kategorie” auf
“Leistung und Wartung”.
3.
84
Klicken Sie in “oder wählen Sie ein
Systemsteuerungssymbol” auf das Symbol System.
Wenn Sie Windows XP
Professional verwenden,
müssen Sie sich mit einem
Benutzernamen vom Typ
Administrationskonto (zum
Beispiel Administrator)
anmelden. Einzelheiten zu
Benutzerkonten erfahren Sie
vom Systemadministrator
Ihres Computers.
Abhängig von der
Konfiguration Ihres Systems
kann es vorkommen, dass das
Symbol System sofort in der
Systemsteuerung (in der
klassischen Anzeige) angezeigt
wird. Doppelklicken Sie in
diesem Fall auf das SystemSymbol.
Anschlüsse herstellen und Treiber installieren (Windows)
fig.2-1
Klicken Sie auf die
Registerkarte Hardware
und klicken Sie
anschließend auf
[Treibersignierung].
English
3
Öffnen Sie das Dialogfeld
Treibersignaturoptionen.
Wenn “Ignorieren”
eingestellt ist, klicken Sie
einfach auf [OK].
Wenn “Ignorieren” nicht
eingestellt ist, notieren Sie sich die aktuelle Einstellung
(“Warnen“ oder “Sperren“). Anschließend ändern Sie die
Einstellung auf “Ignorieren” und klicken auf [OK].
Nachdem Sie den Treiber installiert haben, stellen Sie die
ursprünglichen Einstellungen wieder her.
(➝ Wenn Sie “Wie soll Windows vorgehen?” geändert
haben (S. 90))
5
Wenn Sie “Wie soll Windows
vorgehen?” in Schritt 4
geändert haben, müssen Sie
die vorherigen Einstellungen
wieder herstellen, nachdem
Sie den Treiber installiert
haben. (➝ Wenn Sie “Wie
soll Windows vorgehen?”
geändert haben (S. 90))
Klicken Sie auf [OK], um das Dialogfeld
Systemeigenschaften zu schließen.
6
Beenden Sie alle aktuell ausgeführten Programme
(Anwendungen).
Español
Schließen Sie außerdem alle noch geöffneten
Programmfenster. Wenn Sie ein Virenschutzprogramm oder
ähnliche Software verwenden, müssen Sie diese ebenfalls
beenden.
7
Français
Prüfen Sie, ob “Wie soll
Windows vorgehen?”
auf “Ignorieren”
eingestellt ist.
Italiano
4
Deutsch
fig.2-2
Halten Sie die CD-ROM bereit.
Legen Sie die CD-ROM in das CD-ROM-Laufwerk Ihres
Computers ein.
85
Anschlüsse herstellen und Treiber installieren (Windows)
8
Klicken Sie auf die Windows-Schaltfläche Start.
Wählen Sie im daraufhin angezeigten Menü die
Option “Ausführen...”.
Öffnen Sie das Dialogfeld Ausführen....
fig.2-3_30
9
Geben Sie im
angezeigten Dialogfeld
Folgendes in das Feld
“Öffnen” ein und
klicken Sie auf [OK].
Wenn Sie den MME-Treiber
verwenden, geben Sie MME
anstatt von WDM ein.
D:\Driver\USB_XP2K\WDM\SETUPINF.EXE
* Der Laufwerknamen “D:” kann auf Ihrem System anders lauten.
Geben Sie statt dessen den Laufwerknamen Ihres CD-ROMLaufwerks an.
fig.2-4_30
10
Das Dialogfeld SetupInf wird
angezeigt.
In diesem Dokument wird die
Position der Ordner und
Dateien als Dateipfade unter
Verwendung von \ als
Trennzeichen angegeben.
Zum Bsp. informiert Sie
USB_XP2K\SETUPINF.EXE
darüber, dass die Datei
SETUPINF.EXE im Ordner
USB_XP2K befindet.
Jetzt kann der Treiber installiert
werden.
11
12
Bringen Sie den Schalter ADVANCE
(Modusauswahl) des UA-20 in die Position ON.
Verwenden Sie das USB-Kabel, um das UA-20 an
Ihren Computer anzuschließen.
Der Computer zeigt neben der Task-Leiste folgende Meldung
an: “Neue Hardware gefunden”. Bitte warten Sie.
86
Dieses Gerät ist mit einem
Schutzschaltkreis ausgestattet.
Nach dem Anschluss eines
USB-Steckers benötigt das
Gerät eine kurze Zeitspanne
(einige Sekunden), bis es den
normalen Betrieb aufnimmt.
Anschlüsse herstellen und Treiber installieren (Windows)
fig.2-6
fig.2-7
14
Bei Verwendung des MMETreibers sollten Sie
sicherstellen, dass
"EDIROL UA-20 (MME)"
angezeigt wird.
Im Bildschirm wird
folgende Meldung
angezeigt: “Wählen Sie
die Such- und
Installationsoptionen”.
Français
Wählen Sie “Nicht suchen,
sondern den zu
installierenden Treiber selbst wählen”, und klicken Sie auf
[Weiter].
fig.2-8_20
Prüfen Sie, ob das Feld
“Modell”
“EDIROL UA-20 (WDM)”
anzeigt und klicken Sie
auf [Weiter]. Die
Installation des Treibers
beginnt.
Bei Verwendung des MMETreibers sollten Sie
sicherstellen, dass
”EDIROL UA-20 (MME)”
angezeigt wird.
Español
15
Deutsch
Prüfen Sie, ob der
Bildschirm “EDIROL
UA-20” anzeigt, wählen Sie
“Software von einer Liste
oder bestimmten Quelle
installieren (für fortgeschrittene Benutzer)” und klicken
Sie auf [Weiter].
English
Der Assistent für das
Suchen neuer
Hardware erscheint.
Italiano
13
87
Anschlüsse herstellen und Treiber installieren (Windows)
Wenn die Einstellung für “Wie soll Windows vorgehen?” nicht
“Ignorieren” lautet, wird das Dialogfeld “Hardware-Installation”
angezeigt.
Wenn für Wie soll Windows vorgehen? “Warnen” aktiviert wurde,
1.
klicken Sie auf [Trotzdem
fortsetzen].
2.
Setzen Sie die Installation fort.
Wenn für “Wie soll Windows vorgehen?” “Sperren” aktiviert
wurde,
1.
klicken Sie auf [OK].
2.
Wenn der Assistent für das Suchen
neuer Hardware erscheint, klicken
Sie auf [Beenden].
3.
Führen Sie die Installation aus, wie
im Abschnitt “Fehlerbehebung” in Im Geräte-Manager wird “?”,
“!”, oder “USB-Verbundgerät” angezeigt (S. 123) beschrieben.
fig.2-9_30
16
Das Dialogfeld Diskette
einlegen wird
angezeigt.
Klicken Sie auf [OK].
88
Das Dialogfeld Diskette
einlegen wird eventuell nicht
angezeigt. Arbeiten Sie in
diesem Fall mit Schritt 17
weiter.
Anschlüsse herstellen und Treiber installieren (Windows)
17
Das Dialogfeld
Benötigte Dateien wird
angezeigt. Geben Sie im
angezeigten Dialogfeld
Folgendes in das Feld “Dateien kopieren von” ein
und klicken Sie auf [OK].
D:\Driver\USB_XP2K\WDM
English
fig.2-10_3
Wenn Sie den MME-Treiber
verwenden, geben Sie MME
anstatt WDM ein.
Deutsch
* Der Laufwerknamen “D:” kann auf Ihrem System anders lauten.
Geben Sie statt dessen den Laufwerknamen Ihres CD-ROMLaufwerks an.
Wenn “Wie soll Windows vorgehen?” nicht auf “Ignorieren” gesetzt wurde, wird
das Dialogfeld “Hardware-Installation” angezeigt.
1.
klicken Sie auf
[Trotzdem fortsetzen].
2.
Setzen Sie die Installation
fort.
Français
Wenn für Wie soll Windows vorgehen? “Warnen” aktiviert wurde,
fig.2-11_20
Italiano
Der Assistent für das
Suchen neuer
Hardware erscheint.
Prüfen Sie, ob “EDIROL
UA-20 (WDM)” oder
“EDIROL UA-20 (MME)”
angezeigt wird und klicken Sie auf [Beenden].
Warten Sie, bis die Meldung “Neue Hardware gefunden” in
der Nähe der Task-Leiste angezeigt wird.
Español
3
89
Anschlüsse herstellen und Treiber installieren (Windows)
4
Nachdem der Treiber installiert wurde, wird das
Dialogfeld Geänderte Systemeinstellungen
angezeigt.
Klicken Sie auf [Ja]. Windows startet anschließend
automatisch neu.
Wenn Sie “Wie soll Windows vorgehen?” geändert haben
Wenn Sie die Einstellung “Wie soll Windows vorgehen?” geändert haben,
müssen Sie die ursprüngliche Einstellung nach dem Neustart von Windows
wiederherstellen.
1.
Wenn Sie Windows XP Professional verwenden, melden Sie sich in
Windows mit dem Benutzernamen eines Administrationskontos an
(z.B. Administrator).
2.
Klicken Sie auf die Windows-Schaltfläche[Start] und wählen Sie im
daraufhin angezeigten Menü Systemsteuerung.
3.
Klicken Sie in “Wählen Sie eine Kategorie” auf “Leistung und
Wartung”.
* Abhängig von der Konfiguration Ihres Systems kann es vorkommen, dass das
Symbol System sofort in der Systemsteuerung (in der klassischen
Anzeige) angezeigt wird. Doppelklicken Sie in diesem Fall auf das SystemSymbol.
4.
Klicken Sie in “oder wählen Sie ein Systemsteuerungssymbol” auf
das Symbol System. Daraufhin werden die Systemeigenschaften
angezeigt.
5.
Klicken Sie auf die Registerkarte Hardware und klicken Sie anschließend
auf [Treibersignierung]. Daraufhin werden die
Treibersignaturoptionen angezeigt.
6.
Stellen Sie die ursprünglichen Einstellungen für “Wie soll Windows
vorgehen?” wieder her (entweder "Warnen" oder "Sperren") und
klicken Sie auf “OK”.
7.
Klicken Sie auf [OK]. Das Dialogfeld Systemeigenschaften wird
geschlossen.
Als nächstes nehmen Sie die Einstellungen für den Treiber vor.
(➝ Einstellungen und Überprüfung (S. 99))
90
Anschlüsse herstellen und Treiber installieren (Windows)
Stecken Sie alle USB-Kabel außer der USB-Tastatur und der
USB-Maus aus (falls vorhanden).
2
3
Melden Sie sich in Windows als Benutzer mit
Administratorrechten an (z.B. als Administrator).
Öffnen Sie das Dialogfeld Systemeigenschaften.
Klicken Sie in Windows auf Start und wählen Sie im
daraufhin angezeigten Menü Einstellungen Systemsteuerung. Doppelklicken Sie in der
Systemsteuerung auf das System-Symbol.
fig.05-2e_30
4
Klicken Sie auf die
Registerkarte Hardware
und klicken Sie
anschließend auf
[Treibersignierung].
Deutsch
Starten Sie Windows, wobei das UA-20 ausgesteckt
ist.
Wenn das UA-20 bereits mit
Ihrem Computer verbunden
ist und der Assistent “Neue
Hardware hinzufügen”
angezeigt wird, wechseln Sie
in den CD-ROM-Ordner mit
dem Namen
DRIVER\USB_XP2K\WDM
oder
DRIVER\USB_XP2K\MME,
öffnen die Datei
Readme_e.htm und lesen
den Abschnitt
"Troubleshooting"
(Fehlerbehebung) mit dem
Titel “You attempted to
install using the above
procedure, but were not
able to”. (Ein
Installationsversuch mit
oben beschriebenem
Verfahren ist
fehlgeschlagen)
Français
1
English
Windows 2000-Anwender
Italiano
Öffnen Sie das Dialogfeld
Treibersignaturoptionen.
fig.05-3e_30
Stellen Sie sicher, dass für
“Dateisignaturverifizierung” “Ignorieren”
aktiviert ist.
Español
5
91
Anschlüsse herstellen und Treiber installieren (Windows)
Wenn “Ignorieren” eingestellt ist, klicken Sie einfach auf
[OK].
Wenn “Ignorieren” nicht eingestellt ist, notieren Sie sich die
aktuelle Einstellung ("Warnen" oder "Sperren").
Anschließend ändern Sie die Einstellung auf “Ignorieren”
und klicken auf [OK].
Nachdem Sie den Treiber installiert haben, stellen Sie die
ursprünglichen Einstellungen wieder her.
(➝ Wenn Sie “Dateisignaturverifizierung” geändert
haben (S. 96))
6
7
Wenn Sie die Einstellung
"Dateisignaturverifizierung"
in Schritt 5 geändert haben,
müssen Sie die früheren
Einstellungen wieder
herstellen, nachdem Sie den
Treiber installiert haben.
(–> Wenn Sie
“Dateisignaturverifizierung”
geändert haben (S. 96))
Klicken Sie auf [OK], um das Dialogfeld
Systemeigenschaften zu schließen.
Beenden Sie alle aktuell ausgeführten Programme
(Anwendungen).
Schließen Sie außerdem alle noch geöffneten
Programmfenster. Wenn Sie ein Virenschutzprogramm oder
ähnliche Software verwenden, müssen Sie diese ebenfalls
beenden.
8
Legen Sie die CD-ROM ein.
Legen Sie die CD-ROM in das CD-ROM-Laufwerk Ihres
Computers ein.
9
Klicken Sie auf die Windows-Schaltfläche Start.
Wählen Sie im daraufhin angezeigten Menü die
Option "Ausführen...".
Öffnen Sie das Dialogfeld Ausführen... .
fig.05-5e_30
10
Geben Sie im
angezeigten Dialogfeld
Folgendes in das Feld
"Öffnen" ein und klicken
Sie auf [OK].
D:\DRIVER\USB_XP2K\WDM\SETUPINF.EXE
92
In diesem Dokument wird
die Position der Ordner und
Dateien als Dateipfade unter
Verwendung von \ als
Trennzeichen angegeben.
WDM\Setupinf.exe
informiert Sie z.B. darüber,
dass sich Setupinf.exe im
Ordner WDM befindet.
Wenn Sie den MME-Treiber
verwenden, geben Sie MME
anstatt von WDM ein.
Anschlüsse herstellen und Treiber installieren (Windows)
English
* Der Laufwerknamen "D:" kann auf Ihrem System anders lauten.
Geben Sie statt dessen den Laufwerknamen Ihres CD-ROMLaufwerks an.
fig.05-6e_30
11
Das Dialogfeld SetupInf
wird angezeigt.
Français
Verwenden Sie das USB-Kabel, um das UA-20 an
Ihren Computer anzuschließen.
Dieses Gerät ist mit einem
Schutzschaltkreis ausgestattet.
Nach dem Anschluss eines
USB-Steckers benötigt das
Gerät eine kurze Zeitspanne
(einige Sekunden), bis es den
normalen Betrieb aufnimmt.
Italiano
13
Bringen Sie den Schalter ADVANCE (Modusauswahl)
des UA-20 in die Position ON.
Español
12
Deutsch
Jetzt kann der Treiber
installiert werden.
93
Anschlüsse herstellen und Treiber installieren (Windows)
Wenn in für "Dateisignaturverifizierung" nicht
"Ignorieren" aktiviert wurde, erscheint die Meldung
"Digitalsignatur nicht gefunden".
Wenn für "Dateisignaturverifizierung" "Warnen"
aktiviert ist,
1.
klicken Sie auf [Ja].
2.
Setzen Sie die Installation
fort.
Wenn für "Dateisignaturverifizierung" "Sperren"
aktiviert ist,
1.
klicken Sie auf [OK].
2.
Wenn der Assistent für
das Suchen neuer
Hardware erscheint,
klicken Sie auf
[Beenden].
3.
Führen Sie die Installation aus, wie im Abschnitt
"Fehlerbehebung" in Im Geräte-Manager wird
“?”, “!”, oder “USB-Verbundgerät” angezeigt
(S. 123) beschrieben.
fig.05-8e_30
14
Das Dialogfeld
Diskette einlegen
wird angezeigt.
Klicken Sie auf [OK].
94
Wenn das Dialogfeld Diskette
einlegen nicht angezeigt wird,
lesen Sie bitte Das Dialogfeld
“Diskette einlegen” wird
nicht angezeigt (S. 123)
Anschlüsse herstellen und Treiber installieren (Windows)
15
Das Dialogfeld
Benötigte Dateien
wird angezeigt.
Wenn Sie den MME-Treiber
verwenden, geben Sie MME
anstatt von WDM ein.
Geben Sie im Feld Dateien
kopieren von den Namen
des Ordners ein, der im
Dialogfeld angezeigt wird und klicken Sie auf [OK].
English
fig.05-9e_30
D:\DRIVER\USB_XP2K\WDM
Deutsch
* Der Laufwerknamen "D:" kann auf Ihrem System anders lauten.
Geben Sie statt dessen den Laufwerknamen Ihres CD-ROMLaufwerks an.
Wenn in für "Dateisignaturverifizierung" nicht
"Ignorieren" aktiviert wurde, erscheint die Meldung
"Digitalsignatur nicht gefunden".
1.
klicken Sie auf [Ja].
2.
Setzen Sie die Installation
fort.
Français
Wenn für "Dateisignaturverifizierung" "Warnen"
aktiviert ist,
Das Dialogfeld "Neue
Hardware gefunden" wird
eventuell angezeigt.
Prüfen Sie, ob "EDIROL UA-20
(WDM)" oder "EDIROL UA-20
(MME)" angezeigt wird und
klicken Sie auf [Beenden].
Wenn der Assistent für das Suchen neuer Hardware nicht
angezeigt wird, arbeiten Sie mit Schritt 18 weiter.
Español
16
Italiano
fig.05-10e_30
95
Anschlüsse herstellen und Treiber installieren (Windows)
fig.05-11e_30
17
Möglicherweise wird
das Dialogfeld
Geänderte
Systemeinstellungen angezeigt.
Klicken Sie auf [Ja]. Windows startet anschließend
automatisch neu.
Wenn das Dialogfeld Geänderte Systemeinstellungen
nicht erscheint, starten Sie Windows über das Start-Menü
neu.
Wenn Sie “Dateisignaturverifizierung” geändert
haben
Wenn Sie die Einstellungen für “Dateisignaturverifizierung” in Schritt 5 geändert
haben, stellen Sie die ursprünglichen Einstellungen nach dem Neustart von
Windows wieder her.
1.
Nach dem Neustart von Windows melden Sie sich in Windows als Benutzer
mit Administratorrechten an (wie z.B. Administrator).
2.
Klicken Sie auf dem Windows Desktop mit der rechten Maustaste auf das
Symbol Arbeitsplatz und wählen Sie im daraufhin angezeigten Menü
Eigenschaften. Daraufhin wird das Dialogfeld Systemeigenschaften
angezeigt.
3.
Klicken Sie auf die Registerkarte Hardware und klicken Sie anschließend auf
[Treibersignierung]. Daraufhin werden die Treibersignaturoptionen
angezeigt.
4.
Stellen Sie die ursprünglichen Einstellungen für
“Dateisignaturverifizierung” wieder her (entweder “Warnen” oder
“Sperren”), und klicken Sie auf [OK].
5.
Klicken Sie auf [OK]. Das Dialogfeld Systemeigenschaften wird
geschlossen.
Als nächstes nehmen Sie die Einstellungen für den
Treiber vor.
(➝ Einstellungen und Überprüfung (S. 99))
96
Anschlüsse herstellen und Treiber installieren (Windows)
Stecken Sie alle USB-Kabel außer der USB-Tastatur und der
USB-Maus aus (falls vorhanden).
Beenden Sie alle aktuell ausgeführten Programme
(Anwendungen).
Schließen Sie außerdem alle noch geöffneten
Programmfenster. Wenn Sie ein Virenschutzprogramm oder
ähnliche Software verwenden, müssen Sie diese ebenfalls
beenden.
3
Halten Sie die CD-ROM bereit.
Legen Sie die CD-ROM in das CD-ROM-Laufwerk Ihres
Computers ein.
4
Klicken Sie auf die Windows-Schaltfläche Start.
Wählen Sie im daraufhin angezeigten Menü die
Option Ausführen....
Français
2
Wenn das UA-20 bereits mit
Ihrem Computer verbunden
ist und der Assistent “Neue
Hardware hinzufügen”
angezeigt wird, wechseln
Sie in den Ordner auf der
CD-ROM mit dem Namen
DRIVER\USB_ME98, öffnen
die Datei Readme_e.htm
und lesen den Abschnitt
“Troubleshooting”
(Fehlerbehebung) mit dem
Titel “You attempted to
install using the above
procedure, but were not
able to”. (Ein
Installationsversuch mit
oben beschriebenem
Verfahren ist
fehlgeschlagen)
Öffnen Sie das Dialogfeld Ausführen... .
fig.05-13e_30
5
Geben Sie im
angezeigten Dialogfeld
Folgendes in das Feld
“Öffnen” ein und
klicken Sie auf [OK].
D:\DRIVER\USB_ME98\SETUPINF.EXE
Deutsch
Starten Sie Windows, wobei das UA-20 ausgesteckt ist.
In diesem Dokument wird die
Position der Ordner und
Dateien als Dateipfade unter
Verwendung von \ als
Trennzeichen angegeben.
USB_ME98\SETUPINF.EXE
informiert Sie z.B. darüber,
dass sich SETUPINF.EXE im
Ordner USB_ME98 befindet.
Italiano
1
English
■ Windows Me/98-Anwender
* Der Laufwerknamen “D:” kann auf Ihrem System anders lauten.
Geben Sie statt dessen den Namen Ihres CD-ROM-Laufwerks ein.
6
Español
fig.05-14e_30
Öffnen Sie das Dialogfeld
SetupInf.
Jetzt kann der Treiber
installiert werden.
97
Anschlüsse herstellen und Treiber installieren (Windows)
7
8
Bringen Sie den Schalter ADVANCE (Modusauswahl)
des UA-20 in die Position ON.
Verwenden Sie das USB-Kabel, um das UA-20 an
Ihren Computer anzuschließen.
fig.05-15e_30
9
Wenn Sie
Windows 98
verwenden,
wird das
Dialogfeld Diskette einlegen angezeigt.
Klicken Sie auf [OK].
fig.05-16e_30
10
D:\DRIVER\USB_ME98
* Der Laufwerknamen “D:” kann auf Ihrem System anders lauten.
Geben Sie statt dessen den Namen Ihres CD-ROM-Laufwerks ein.
Nachdem der Treiber installiert wurde, wird das
Dialogfeld Neue Hardware gefunden geschlossen.
Klicken Sie im Dialogfeld SETUPINF auf [OK]. Das
Dialogfeld SetupInf wird geschlossen.
Als nächstes nehmen Sie die Einstellungen für den Treiber vor.
(➝ Einstellungen und Überprüfung (S. 99))
98
Wenn Sie Windows 98
verwenden und das Dialogfeld
Diskette einlegen nicht
angezeigt wird, lesen Sie bitte
Das Dialogfeld “Diskette
einlegen” wird nicht
angezeigt (S. 123).
Das Dialogfeld Neue
Hardware gefunden
wird angezeigt.
Geben Sie im Feld Dateien
kopieren von den Namen
des Ordners ein, der im
Dialogfeld SetupInf gezeigt wird und klicken Sie auf [OK].
11
Dieses Gerät ist mit einem
Schutzschaltkreis ausgestattet.
Nach dem Anschluss eines
USB-Steckers benötigt das
Gerät eine kurze Zeitspanne
(einige Sekunden), bis es den
normalen Betrieb aufnimmt.
Wenn das Dialogfeld Neue
Hardware gefunden nicht
angezeigt wird, installieren Sie
den Treiber neu, wobei Sie die
Schritte befolgen wie in Das
Dialogfeld “Diskette
einlegen” wird nicht
angezeigt (S. 123)
beschrieben.
Anschlüsse herstellen und Treiber installieren (Windows)
Einstellungen und Überprüfung
English
■ Angabe des Audio- und MIDI-Eingabe/
Ausgabeziels
Windows XP/2000/Me-Anwender
2
Öffnen Sie das Dialogfeld Eigenschaften von
Sounds und Audiogeräte (bzw. in Windows 2000/
Me Eigenschaften von Sounds und Multimedia).
Windows XP
Klicken Sie in “Wählen Sie eine Kategorie” auf “Sounds,
Sprachein-/ausgabe und Audiogeräte”. Klicken Sie danach
in “oder wählen Sie ein Systemsteuerungssymbol” auf
das Symbol Sounds und Audiogeräte.
Windows 2000/Me
Doppelklicken Sie in der Systemsteuerung auf das Symbol
[Sounds und Multimedia], um das Dialogfeld
Eigenschaften für Sounds und Multimedia zu öffnen.
3
Klicken Sie auf die Registerkarte Audio.
Abhängig von der
Konfiguration Ihres Systems
kann es vorkommen, dass das
Symbol Sounds und
Audiogeräte sofort in der
Systemsteuerung (in der
klassischen Anzeige) angezeigt
wird. In diesem Fall
doppelklicken Sie auf das
Symbol Sounds und
Audiogeräte.
Wenn Sie das Symbol für
Sounds und Multimedia nicht
finden, klicken Sie auf Alle
Optionen der
Systemsteuerung anzeigen
am linken Rand der
Systemsteuerung.
Español
Windows XP
Klicken Sie in Windows auf Start und wählen Sie im
daraufhin angezeigten Menü Systemsteuerung.
Français
Klicken Sie in Windows auf Start und wählen Sie im
daraufhin angezeigten Menü Einstellungen Systemsteuerung.
Deutsch
Öffnen Sie die Systemsteuerung.
Italiano
1
99
Anschlüsse herstellen und Treiber installieren (Windows)
fig.2-28_30
4
Klicken Sie bei MIDIMusikwiedergabe auf das
▼, das sich rechts von
[Standardgerät] befindet
(bzw. in Windows 2000/Me
rechts von [Bevorzugtes
Gerät] und wählen Sie
folgende Option aus der
angezeigten Liste aus.
AudioWiedergabe
Audioaufnahme
MIDIMusikwiedergabe
5
Erweiterter Modus
EDIROL UA-20 OUT
EDIROL UA-20 IN
EDIROL UA-20 MIDI OUT
Standardtreiber-Modus
EDIROL UA-20 (Windows XP)
USB-Audiogerät (Windows 2000/Me)
EDIROL UA-20 (Windows XP)
USB-Audiogerät (Windows 2000/Me)
MIDI kann nicht verarbeitet werden,
wenn der Standardtreiber-Modus
verwendet wird.
Schließen Sie das Dialogfeld Eigenschaften von
Sounds und Audiogeräte.
Klicken Sie auf [OK], um die Konfiguration
abzuschließen.
Wechseln Sie zum folgenden Abschnitt.
➝ Einstellung der Lautstärke (S. 103)
100
Weitere Informationen zum
Erweiterten Modus und zum
Standardtreiber-Modus
erhalten Sie unter Erweiterter
Modus und StandardtreiberModus (S. 82).
Anschlüsse herstellen und Treiber installieren (Windows)
Windows 98-Anwender
English
Öffnen Sie die Systemsteuerung.
Klicken Sie in Windows auf Start und wählen Sie im
daraufhin angezeigten Menü Einstellungen Systemsteuerung.
2
Öffnen Sie das Dialogfeld Eigenschaften für
Multimedia.
Geben Sie das “Bevorzugte
Gerät” an.
Wählen Sie in den Listen der
Felder Wiedergabe und
Aufnahme folgende Optionen
und klicken Sie auf
[Übernehmen].
Erweiterter Modus
Wiedergabe
Aufnahme
5
EDIROL UA-20 OUT
EDIROL UA-20 In
Weitere Informationen zum
Erweiterten Modus und zum
Standardtreiber-Modus
erhalten Sie unter Erweiterter
Modus und StandardtreiberModus (S. 82).
StandardtreiberModus
USB Audiogerät
USB Audiogerät
Italiano
4
Klicken Sie auf die Registerkarte Audio.
Klicken Sie auf das Register MIDI.
Español
3
Deutsch
Doppelklicken Sie in der Systemsteuerung auf das Symbol
[Multimedia], um das Dialogfeld Eigenschaften für
Multimedia zu öffnen.
Français
1
101
Anschlüsse herstellen und Treiber installieren (Windows)
fig.2-29_30
6
Konfigurieren Sie die
“MIDI-Ausgabe” .
Wählen Sie [Einzelnes
Instrument], wählen Sie eine
der folgenden Optionen aus
der angezeigten Liste und
klicken Sie auf [Anwenden].
MIDIAusgabe
7
Erweiterter Modus
EDIROL UA-20 MIDI OUT
Weitere Informationen zum
Erweiterten Modus und zum
Standardtreiber-Modus
erhalten Sie unter Erweiterter
Modus und StandardtreiberModus (S. 82).
Standardtreiber-Modus
MIDI kann nicht verarbeitet
werden, wenn der
Standardtreiber-Modus
verwendet wird.
Schließen Sie das Dialogfeld Eigenschaften für
Multimedia.
Klicken Sie auf [OK], um die Konfiguration abzuschließen.
Damit ist die Konfiguration des MIDI- und Audio-Eingabe/
Ausgabeziels abgeschlossen. Wenn Sie den Windows-Treiber
installiert haben, stellen Sie die Windows-Lautstärkeregelung
entsprechend ein.
Wechseln Sie zum folgenden Abschnitt.
➝ Einstellung der Lautstärke (S. 103)
102
Anschlüsse herstellen und Treiber installieren (Windows)
1
Öffnen Sie die Lautstärkeregelung.
Klicken Sie auf die Windows-Schaltfläche Start und wählen
Sie Programme | Zubehör | Unterhaltungsmedien |
Lautstärkeregelung.
2
Sie können den Regler nach oben oder nach unten
verschieben, um die Lautstärke des UA-20
anzupassen.
Wenn die Lautstärkeregelung
auf Ihrem Computer nicht
installiert ist, verwenden Sie
das Symbol Software in der
Systemsteuerung, um sie zu
installieren. Nähere
Informationen zur Installation
erhalten Sie im
Benutzerhandbuch für
Windows oder in der
Windows-Hilfe.
Nachdem Sie den Standard-Treiber installiert haben, kann
vom UA-20 die Lautstärkeregelung von Windows genutzt
werden, um die Ausgabelautstärke zu regeln.
Deutsch
Nachdem Sie den Standard-Windows-Treiber installiert
haben, stellen Sie die Windows-Lautstärkeregelung
entsprechend ein.
English
■ Einstellung der Lautstärke
SW Synth
* 1 Wenn die Wiedergabelautstärke der CD durch das Verstellen der
Regler nicht verändert wird, sollten Sie die WAVE-Lautstärke
verändern. Wenn Sie mit Windows 2000 arbeiten und “CDWiedergabe” nicht angezeigt wird, aktivieren Sie die Option in
Digitale CD-Wiedergabe, “Digitale CD-Wiedergabe für
den CD-Player aktivieren”, wie im folgenden Hinweis
beschrieben.
➝ Beim Abspielen von Audio-CDs mit dem internen CDROM-Laufwerk des Computers oder wenn das UA-20 für
die Wiedergabe der Musik von Spielen verwendet wird
(nur Standardtreiber-Modus) (S. 104)
Sie können das UA-20 mit
optimaler Audioqualität
verwenden, wenn Sie die
Lautstärkeregelung in die
maximale Position bringen.
Wenn “Ton aus” aktiviert ist
oder wenn der Schieberegler
ganz unten ist, wird aus dem
UA-20 kein Sound
ausgegeben.
Italiano
WAVE
Passt die "CD-Audio"-Lautstärke des
internen CD-ROM-Laufwerks Ihres
Computers an. (*1)
Passt die Lautstärke an, die vom AudioAusgabegerät "EDIROL UA-20" ausgegeben
wird. Die Digitalausgabe und die analoge
Ausgabe werden hiermit geändert.
Passt die Lautstärke des SoftwareSynthesizer an, der in Windows integriert ist.
Español
CDWiedergabe
Français
Konfigurierbare Optionen
103
Anschlüsse herstellen und Treiber installieren (Windows)
Beim Abspielen von Audio-CDs mit dem internen CD-ROM-Laufwerk des
Computers oder wenn das UA-20 für die Wiedergabe der Musik von Spielen
verwendet wird (nur Standardtreiber-Modus)
Windows XP/2000-Anwender:
1.
Öffnen Sie das Dialogfeld Systemeigenschaften.
Wählen Sie Start | Einstellungen | Systemsteuerung und doppelklicken Sie
in der Systemsteuerung auf das Symbol System.
(Windows XP– Klicken Sie auf die Windows-Start-Schaltfläche und wählen
Sie aus dem angezeigten Menü die Systemsteuerung.)
2.
Öffnen Sie den Geräte-Manager.
Klicken Sie auf die Registerkarte Hardware und anschließend auf GeräteManager.
3.
Öffnen Sie die Eigenschaften des CD-ROM-Laufwerks.
Doppelklicken Sie unter dem Symbol CD-ROM-Laufwerke auf das CD-ROMLaufwerk, das Sie verwenden. Aktivieren Sie unter Digitale CD-Wiedergabe
die Option “Digitale CD-Wiedergabe für den CD-Player aktivieren”.
Windows Me-Anwender:
1.
Öffnen Sie die Systemeigenschaften.
Wählen Sie Start | Einstellungen | Systemsteuerung und doppelklicken Sie
in der Systemsteuerung auf das Symbol System.
2.
Öffnen Sie die Eigenschaften des CD-ROM-Laufwerks.
Doppelklicken Sie auf das Symbol CD-ROM und doppelklicken Sie
anschließend auf das CD-ROM-Laufwerk, das Sie verwenden.
3.
Klicken Sie auf das Register Eigenschaften und aktivieren Sie unter Digitale
CD-Wiedergabe die Option “Digitale CD-Wiedergabe für dieses Gerät
aktivieren”.
Windows 98-Anwender:
1.
Öffnen Sie das Dialogfeld Eigenschaften für Multimedia.
Wählen Sie Start | Einstellungen | Systemsteuerung und doppelklicken Sie
in der Systemsteuerung auf das Symbol Multimedia.
2.
Klicken Sie auf das Register Musik-CD und aktivieren Sie die Option
"Digitale CD-Wiedergabe für dieses CD-Gerät aktivieren".
* Es kann vorkommen, dass abhängig von Ihrem System die Wiedergabe trotzdem nicht
möglich ist. Einzelheiten hierzu erfahren Sie vom Herstellers Ihres Computers. Wenn Sie
ein CD-ROM-Gerät vom Typ PC-Card (PCMCIA) verwenden, kann die Wiedergabe von
WAVE-Daten oder einer Audio-CD auf dem CD-ROM-Gerät dazu führen, dass der Sound
unterbrochen wird oder kein Sound erklingt.
104
Anschlüsse herstellen und Treiber
installieren (Macintosh)
English
Wenn Sie einen Windows-Computer verwenden, lesen Sie bitte Anschlüsse
herstellen und Treiber installieren (Windows) (S. 82).
Was ist ein Treiber?
fig.05-1e_50
Deutsch
Ein "Treiber" ist Software,
die Daten zwischen dem
Application
USB port
UA-20 und
Anwendungssoftware auf
USB
USB cable
driver
Ihrem Computer überträgt,
wenn Ihr Computer und
Computer
UA-20
das UA-20 mit einem USBKabel miteinander verbunden sind. Der Treiber überträgt die Daten der
Anwendung an das UA-20 sowie die Daten vom UA-20 an die Anwendung.
Erweiterter Modus und StandardtreiberModus
Français
Das UA-20 verfügt über zwei Betriebsmodi, den Erweiterterten Modus und den
Standardtreibermodus, und von jedem Modus wird ein anderer Treiber
verwendet.
■ Erweiterter Modus
Español
Italiano
Das UA-20 befindet sich in diesem Modus, wenn der Schalter ADVANCE
(Modusauswahl) an der Rückseite auf ON gestellt wird. Es wird der spezielle
Treiber verwendet, der sich auf der CD-ROM befindet. Dieser Treiber ermöglicht
die Aufnahme/Wiedergabe/Bearbeitung von Audio mit hoher Qualität und
stabilem Timing.
Im erweiterten Modus können die Audiosignale zwischen dem UA-20 und dem
Computer mit einer Auflösung von 24 Bit und einer Sampling-Frequenz von
44,1 kHz übertragen werden.
Wählen Sie den Erweiterten Modus, wenn Sie eine Anwendung verwenden, die
Audio mit hoher Qualität aufnehmen/wiedergeben/bearbeiten kann, wie z.B. eine
24-Bit-Audio-Anwendung oder eine ASIO-kompatible Anwendung wie Cubase
VST, Logic Audio und Metro.
Im erweiterten Modus kann das UA-20 keine Audiodaten (Audio-CDs oder
Warntöne) mit dem Macintosh Sound Manager wiedergeben.
(➝ Installation des speziellen Treibers (S. 107))
105
Anschlüsse herstellen und Treiber installieren (Macintosh)
■ Standardtreiber-Modus
Das UA-20 befindet sich in diesem Modus, wenn der Schalter ADVANCE
(Modusauswahl) an der Rückseite auf OFF gestellt wird. Es wird der StandardUSB-Audiotreiber verwendet, der in MacOS enthalten ist. Im StandardtreiberModus werden Audiosignale zwischen dem UA-20 und dem Computer mit einer
Auflösung von 16 Bit und mit Sampling-Frequenzen von 44,1 kHz übertragen.
Wählen Sie diesen Modus, wenn Sie eine Anwendung nutzen, die die MacOSeigenen Funktionen einsetzt, wie z.B. eine Anwendung, die das CD-ROMLaufwerk des Computers verwendet, um CD-Audio wiederzugeben, oder eine
Anwendung, die den Software-Synthesizer nutzt, der in MacOS enthalten ist. Der
Standardtreiber, der mit MacOS ausgeliefert wird, unterstützt ASIO nicht.
Beachten Sie auch, dass Mac OS 8.6 nicht unterstützt wird.
(➝ Installing the OS-standard driver (S. 53))
Umschalten zwischen dem erweiterten Modus und dem Standardtreiber-Modus
Nachdem Sie sowohl den speziellen Treiber als auch den Standardtreiber installiert
haben, können Sie zwischen dem erweiterten und Standardtreiber-Modus
umschalten, indem Sie den Schalter ADVANCE (Modusauswahl) des UA-20
verwenden.
* Damit die Einstellung des Schalters ADVANCE (Modusauswahl) wirksam wird, müssen
Sie die gesamte Sequenzer-Software und andere Anwendungen beenden, von denen das
UA-20 verwendet wird, das UA-20 ausschalten und anschließend erneut einschalten.
106
Anschlüsse herstellen und Treiber installieren (Macintosh)
Installation des speziellen
Treibers
English
Sie müssen den MIDI-Treiber auch dann installieren, wenn
Sie auf dem UA-20 nur Audio verwenden. Installieren Sie
unbedingt den MIDI-Treiber.
Verwenden Sie entweder OMS oder FreeMIDI als
MIDI-Treiber.
Wenn Sie OMS verwenden ......................................... (S. 107)
Wenn Sie FreeMIDI verwenden ................................. (S. 112)
Deutsch
* Entsprechend der von Ihnen verwendeten Sequenzer-Software
muss auf Ihrem Macintosh entweder OMS oder FreeMIDI
installiert sein.
* Wenn das UA-20 eingeschaltet wird, wird eine Nachricht ähnlich der folgenden
angezeigt, wenn der Macintosh hochgefahren wird. Gehen Sie abhängig von der
angezeigten Nachricht vor wie nachfolgend beschrieben.
■ Installation des UA-20-Treibers (OMS)
OMS befindet sich im
Ordner OMS Driver, der
sich im Ordner Driver E auf
der CD-ROM befindet.
Español
Installieren Sie den UA-20-Treiber wie anschließend
beschrieben.
Der UA-20 OMS-Treiber im Lieferumfang ist ein Add-OnModul für die Verwendung des UA-20 mit OMS. Damit Sie
dieses Modul verwenden können, muss OMS auf der
Festplatte, von der der Computer gestartet wird, bereits
installiert sein.
Italiano
Français
Wenn die Meldung lautet:
“Driver required for USB device 'unknown device' is not available. Search for
driver on the Internet?”
➝ klicken Sie auf [Cancel].
Wenn die Meldung lautet:
“Software required for using device 'unknown device' cannot be found.
Please refer to the manual included with the device, and install the necessary
software”.
➝ klicken Sie auf [OK].
Wenn Sie mehr über OMS erfahren möchten, lesen Sie bitte
die Datei OMS_2.3_Mac.pdf im Ordner OMS Driver, der sich
im Ordner Driver E auf der CD-ROM befindet. Sie benötigen
den Adobe Acrobat Reader, um OMS_2.3_Mac.pdf anzeigen
zu können.
* Trennen Sie das UA-20 vom Macintosh, bevor Sie die Installation
ausführen.
107
Anschlüsse herstellen und Treiber installieren (Macintosh)
1
Beenden Sie alle aktuell ausgeführten Programme
(Anwendungen).
Wenn Sie ein Virenschutzprogramm oder ähnliche Software
verwenden, müssen Sie diese ebenfalls beenden.
2
Halten Sie die CD-ROM bereit.
Legen Sie die CD-ROM in das CD-ROM-Laufwerk ein.
3
4
Doppelklicken Sie auf das Symbol UA-20 OMS
Driver-E Installer (das sich im Ordner Driver E-OMS
Driver auf der CD-ROM befindet), um das
Installationsprogramm zu starten.
Prüfen Sie den Installationsort und klicken Sie auf
[Install]
fig.03-scdrv2Z.e
5
Falls eine
Nachricht wie
abgebildet
angezeigt wird,
klicken Sie auf
[Continue].
Alle anderen aktuell ausgeführten Anwendungen werden
anschließend beendet und die Installation wird fortgesetzt.
6
Ein Dialogfeld zeigt Folgendes an: Installation
completed.
Klicken Sie auf [Restart] , um den Macintosh neu zu starten.
108
Der Installationsort ist je nach
System unterschiedlich.
Achten Sie darauf, dass das
Startlaufwerk für das System
ausgewählt ist, das Sie
verwenden.
Anschlüsse herstellen und Treiber installieren (Macintosh)
OMS-Einstellungen
4
Ziehen Sie den Ordner Driver
E-OMS Driver-Settings auf
der CD-ROM in den Ordner
Opcode–OMS auf der
Festplatte Ihres Macintosh, um
ihn zu kopieren.
Deutsch
Français
3
Verwenden Sie das USB-Kabel, um das UA-20 an
Ihren Computer anzuschließen.
Dieses Gerät ist mit einem
Schutzschaltkreis ausgestattet.
Nach dem Anschluss eines
USB-Steckers benötigt das
Gerät eine kurze Zeitspanne
(einige Sekunden), bis es den
normalen Betrieb aufnimmt.
Doppelklicken Sie im Ordner
Opcode-OMS Application, in
dem Sie OMS installiert haben,
auf OMS Setup, um die
Installation zu starten.
Italiano
2
Bringen Sie den Schalter ADVANCE (Modusauswahl)
des UA-20 in die Position ON.
Español
1
English
Bevor Sie die OMS-Einstellungen prüfen können, müssen Sie
ein MIDI-Soundmodul mit dem MIDI OUT-Anschluss des
UA-20 verbinden.
Weitere Informationen zum Anschluss eines MIDISoundmoduls erhalten Sie im Benutzerhandbuch für Ihr
MIDI-Soundmodul.
109
Anschlüsse herstellen und Treiber installieren (Macintosh)
fig.03-omsusb1a.e
5
Wenn ein
Dialogfeld
ähnlich dem
abgebildeten
Dialogfeld
angezeigt wird,
klicken Sie auf
[Turn It Off].
Anschließend wird ein Dialogfeld für die Bestätigung
angezeigt. Klicken Sie hier auf [OK].
fig.03-omsusb2.e
6
Das Dialogfeld Create
a New Studio Setup
wird angezeigt.
Klicken Sie auf [Cancel].
Wenn Sie versehentlich
auf OK geklickt haben,
klicken Sie im nächsten Bildschirm auf [Cancel].
7
Wählen Sie “Open” im Menü File.
Wählen Sie im Ordner Settings , den Sie in Schritt 3 kopiert
haben, die Datei UA-20 USB, und klicken Sie auf [Open].
fig.50
Ein Dialogfeld ähnlich dem
hier gezeigten Dialogfeld
wird angezeigt.
110
Wir empfehlen Ihnen,
AppleTalk zu deaktivieren,
indem Sie im Apfelmenü den
Chooser auswählen.
Anschlüsse herstellen und Treiber installieren (Macintosh)
fig.51e
Wählen Sie im Menü Edit
die Option OMS MIDI
Setup.
English
8
Aktivieren Sie im daraufhin
angezeigten Dialogfeld OMS
MIDI Setup die Option Run
MIDI in background und klicken Sie auf [OK].
fig.52E
Wählen Sie im Menü File
die Option Make Current.
Deutsch
9
Wenn Sie die Option Make
Current nicht auswählen
können, wurde sie bereits
angewendet und Sie können
mit dem nächsten Schritt
weiterarbeiten.
10
Français
fig.03-omsusb07
Prüfen Sie, ob die MIDIÜbertragung und der
MIDI-Empfang fehlerfrei
funktionieren.
Italiano
Wählen Sie im Menü Studio
die Option Test Studio.
fig.54
Wenn Sie den Mauszeiger
über das SoundgeneratorSymbol bewegen, ändert
sich der Mauszeiger zu
einem .
Wenn das UA-20 keinen
Sound ausgibt, lesen Sie bitte
No sound (S. 70).
Español
11
Klicken Sie auf die
Soundgeneratorsymbole, die
in der Abbildung rechts mit
einem Kreis markiert wurden. Wenn das UA-20 Sound
ausgibt, wurden die Einstellungen korrekt vorgenommen.
111
Anschlüsse herstellen und Treiber installieren (Macintosh)
12
Beenden Sie OMS Setup.
Wählen Sie im Menü File die Option [Quit]. Klicken Sie im
Dialogfeld AppleTalk Confirmation auf [OK], um das
Dialogfeld zu schließen.
Damit wurden die Anschlüsse des UA-20 und des Macintosh
sowie die Installation des MIDI-Treibers fertiggestellt.
Als nächstes muss der ASIO-Treiber installiert werden.
(➝ Installation des ASIO-Treibers (S. 116))
■ Installation des UA-20-Treibers (FreeMIDI)
Installieren Sie den UA-20-Treiber wie anschließend
beschrieben. Der UA-20 FreeMIDI-Treiber im Lieferumfang
ist ein Add-On-Modul für die Verwendung des UA-20 mit
FreeMIDI. Damit Sie dieses Modul verwenden können, muss
FreeMIDI auf der Festplatte installiert sein, von der Sie
den Computer gestartet haben.
* Trennen Sie das UA-20 vom Macintosh, bevor Sie die Installation
ausführen.
1
Beenden Sie alle aktuell ausgeführten Programme
(Anwendungen).
Wenn Sie ein Virenschutzprogramm oder ähnliche Software
verwenden, müssen Sie diese ebenfalls beenden.
2
Halten Sie die CD-ROM bereit.
Legen Sie die CD-ROM in das CD-ROM-Laufwerk ein.
3
112
Doppelklicken Sie auf das Symbol UA-20 FM
Driver-E Installer (das sich im Ordner
Driver E - FreeMIDI auf der CD-ROM befindet),
um das Installationsprogramm zu starten.
Anschlüsse herstellen und Treiber installieren (Macintosh)
Prüfen Sie den Installationsort und klicken Sie auf
[Install]
English
4
fig.3-2_40
Falls eine
Nachricht wie
abgebildet
angezeigt wird,
klicken Sie auf
[Continue].
Deutsch
5
Alle anderen aktuell ausgeführten Anwendungen werden
anschließend beendet und die Installation wird fortgesetzt.
Italiano
Français
Ein Dialogfeld zeigt Folgendes an: Installation
completed. Klicken Sie auf [Restart] , um den
Macintosh neu zu starten.
Español
6
113
Anschlüsse herstellen und Treiber installieren (Macintosh)
Einstellungen für FreeMIDI
Bevor Sie die FreeMIDI-Einstellungen prüfen können,
müssen Sie ein MIDI-Soundmodul mit dem MIDI OUTAnschluss des UA-20 verbinden.
Weitere Informationen zum Anschluss eines MIDISoundmoduls erhalten Sie im Benutzerhandbuch für Ihr
MIDI-Soundmodul.
1
2
3
4
5
6
Bringen Sie den Schalter ADVANCE (Modusauswahl)
des UA-20 in die Position ON.
Verwenden Sie das USB-Kabel, um das UA-20 an
Ihren Computer anzuschließen.
Kopieren Sie den Ordner Driver - FreeMIDI Driver Settings auf der CD-ROM auf die Festplatte Ihres
Macintosh.
Öffnen Sie den Ordner FreeMIDI Applications an
dem Ort, an dem Sie FreeMIDI installiert haben, und
doppelklicken Sie auf das Symbol FreeMIDI Setup ,
um die Installation zu starten.
Wenn “OMS is installed on this computer...”
angezeigt wird, klicken Sie auf [FreeMIDI].
Wenn die Software zum ersten Mal gestartet wird,
wird das Dialogfeld “Welcome to FreeMIDI!”
angezeigt.
Klicken Sie auf [Continue].
7
114
Wenn das Dialogfeld FreeMIDI Preferences
angezeigt wird, klicken Sie auf [Cancel].
Dieses Gerät ist mit einem
Schutzschaltkreis ausgestattet.
Nach dem Anschluss eines
USB-Steckers benötigt das
Gerät eine kurze Zeitspanne
(einige Sekunden), bis es den
normalen Betrieb aufnimmt.
Anschlüsse herstellen und Treiber installieren (Macintosh)
11
English
10
Wählen Sie im Menü File die Option Open.
Wählen Sie UA-20 USB im Ordner Settings, den Sie
in Schritt 3 kopiert haben, und klicken Sie auf Open.
Prüfen Sie, ob die MIDI-Übertragung und der MIDIEmpfang fehlerfrei erfolgen.
Deutsch
9
Wenn das Dialogfeld About Quick Setup angezeigt
wird, klicken Sie auf [Cancel].
Wählen Sie im Menü MIDI die Option Check Connections.
fig.fm2
12
Der Mauszeiger nimmt die
Gestalt eines Keyboards an.
Klicken Sie auf die
Soundgenerator-Symbole,
die in der Abbildung rechts
mit einem Kreis
gekennzeichnet wurden.
Wenn das UA-20 keinen
Sound ausgibt, lesen Sie bitte
No sound (S. 70).
Français
8
14
Wählen Sie im Menü MIDI erneut den Befehl Check
Connections, um den Test zu beenden.
Wählen Sie im Menü File die Option Quit, um
FreeMIDI Setup zu beenden.
Damit wurden die Anschlüsse des UA-20 und des Macintosh
sowie die Installation des MIDI-Treibers fertiggestellt.
Español
13
Italiano
Wenn Sie Sound hören, werden MIDI-Nachrichten vom
Macintosh an das UA-20 gesendet.
Als nächstes muss der ASIO-Treiber installiert werden.
(➝ Installation des ASIO-Treibers (S. 116))
115
Anschlüsse herstellen und Treiber installieren (Macintosh)
Installation des ASIO-Treibers
Sie müssen den MIDI-Treiber auch dann installieren, wenn
Sie auf dem UA-20 nur Audio verwenden. Installieren Sie
unbedingt den MIDI-Treiber, bevor Sie den ASIO-Treiber
installieren.
In diesem Abschnitt wird erläutert, wie der ASIO-Treiber
installiert wird, der die Verwendung des UA-20 durch Ihre
Sequenzer-Software oder Audio-Bearbeitungssoftware
ermöglicht. Einzelheiten zur Installation und zu den
Einstellungen des des ASIO-Treibers erhalten Sie im
Dokument Driver E - ASIO - Setting ASIO Driver-E, das sich
auf der CD-ROM befindet.
Das UA-20 kann im erweiterten Modus Audiodaten vom
Soundmanager des Macintosh nicht wiedergeben (wie z.B.
Audio-CDs und Warntöne).
Der ASIO-Treiber des UA-20 unterstützt folgende
Audioeingangs-/Ausgangskanäle.
ASIO (Steinberg Audio Stream
In/Out-Schnittstelle)
Dieser AudioSchnittstellenstandard wird
von der Steinberg Corporation
gefördert. Wenn das UA-20
mit ASIO-kompatibler
Software verwendet wird, ist
die Synchronisation präziser
und erlaubt Ihnen die
Erstellung einer komplexeren
Musikproduktionsumgebung.
• Audioeingang .... 24/16 Bit1 Stereokanal
(2 monaurale Kan.)
• Audioausgang.... 24/16 Bit1 Stereokanal
(2 monaurale Kan.)
Nachfolgend wird erläutert, wie der ASIO 1.0 16-Bitkompatible Treiber installiert wird.
Wenn Ihre ASIO-kompatible Software ASIO 2.0 oder die Aufnahme und
die Wiedergabe von 24-Bit Audiodaten unterstützt, erhalten Sie bei
Verwendung der folgenden Treiber eine qualitativ hochwertigere
Umgebung.
ASIO-kompatible Software
116
ASIO 2.0-kompatibel
24 Bit-kompatibel
Zu verwendende Treiber
✕
✕
❍
❍
✕
❍
✕
❍
UA-20 ASIO 1.0 16 Bit
UA-20 ASIO 1.0 24 Bit
UA-20 ASIO 2.0 16 Bit
UA-20 ASIO 2.0 24 Bit
Anschlüsse herstellen und Treiber installieren (Macintosh)
fig.05-21e_30
Öffnen Sie in Ihrer ASIO-kompatiblen Software das
Dialogfeld Audioeinstellungen und wählen Sie als
[ASIO-Gerät ] die Option [UA-20 ASIO 16bit] aus.
English
Deutsch
Der Name des Dialogfelds für
die Audioeinstellungen hängt
von Ihrer Software ab.
Einzelheiten finden Sie in
Ihrem Softwarehandbuch.
Français
3
Starten Sie Ihre ASIO-kompatible Software (z.B.
Cubase VST, Logic Audio, Digital Performer, Metro
oder SPARK LE).
Italiano
2
Kopieren Sie vom
Ordner Driver
E–ASIO Driver auf
der CD-ROM
[UA-20 ASIO1.0 16bit] in den Ordner [ASIO
Drivers] innerhalb des Ordners ASIO Drivers der
ASIO-kompatiblen Software, die Sie verwenden
(z.B., Cubase VST, Logic Audio, Digital Performer,
Metro oder SPARK LE).
Español
1
117
UA-20 application guide
Regelung der Audio-Latenz
Bei Verwendung des UA-20 im Erweiterten Modus können Sie die
Treibereinstellungen anpassen, um die Latenz des Sounds anzupassen. Um die Latenz
anzupassen, ändern Sie die Puffergröße im Dialogfeld für die Treibereinstellungen.
* Latenz ist die zeitliche Verzögerung zwischen dem Abspielen von Audiodaten durch die
Anwendung und der tatsächlichen Wiedergabe aus einem Audiogerät, wie z.B. dem UA-20.
1
2
Öffnen Sie das Dialogfeld “Treibereinstellungen”, wie in “Öffnen des
Dialogfelds für die Einstellungen des speziellen Treibers (S. 120)”
beschrieben.
Regulieren Sie die Puffergröße des Treibers.
Folgende Einstellung erzeugt die kürzeste Latenz.
Windows:
Verstellen Sie die “Audio Buffer Size” (Audiopuffergröße) ganz nach links (Min).
Macintosh:
Verstellen Sie die “Buffer Size” (Puffergröße) ganz nach links (Min).
3
4
Klicken Sie auf [OK], um das Dialogfeld für die Treibereinstellungen zu
schließen.
Starten Sie die Anwendung, von der das UA-20 verwendet wird, neu.
Wenn Sie ein Programm benutzen, das eine Funktion zum Testen des Audiogerätes
enthält, sollten Sie diese Funktion einsetzen.
5
Spielen Sie die Audiodaten in ihrer Anwendung ab.
Wenn der Sound unterbrochen wird, wiederholen Sie diese Schritte und erhöhen dabei
allmählich die Puffergröße, die in Schritt 2 angegeben wird, bis keine
Unterbrechungen mehr auftreten.
* Abhängig von der von Ihnen verwendeten Anwendung ist es möglich, dass die
Audioeinstellungen der Anwendung ebenfalls über eine Funktion für die Regelung der
Puffergröße oder Latenz besitzen. Einzelheiten finden Sie im Handbuch für Ihre
Anwendung.
118
UA-20 application guide
Wenn Sie das UA-20 von einer ASIO 2.0-kompatiblen Anwendung aus im Erweiterten
Modus einsetzen, kann der Input Monitor-Schalter des UA-20 automatisch von der
Anwendung aus gesteuert werden.
Nehmen Sie die folgenden Einstellungen vor.
Deutsch
2
Öffnen Sie das Dialogfeld “Treibereinstellungen”, wie in “Öffnen des
Dialogfelds für die Einstellungen des speziellen Treibers (S. 120)”
beschrieben.
Aktivieren Sie das Kontrollkästchen “Use ASIO Direct Monitor”.
Klicken Sie auf [OK], um das Dialogfeld für die Treibereinstellungen zu
schließen.
* Abhängig von Ihrer Anwendung können auch die Audioeinstellungen Ihrer Anwendung eine
Option für die Einstellung des ASIO Direct Monitors enthalten. Einzelheiten finden Sie im
Handbuch für Ihre Anwendung.
Italiano
* Bei der Verwendung des ASIO Direct Monitor kann Monitoring unerwartet eingeschaltet/
ausgeschaltet werden, abhängig von den Anwendungseinstellungen und dem
Aufnahmeverfahren. Wenn dies geschieht, deaktivieren Sie das Kontrollkästchen in
Schritt 2, um ASIO Direct Monitor zu deaktivieren.
Español
3
Français
1
English
Verwendung des ASIO Direct Monitor
119
UA-20 application guide
Öffnen des Dialogfelds für die Einstellungen des
speziellen Treibers
Bei Verwendung des WDM-Treibers unter Windows XP/2000:
1.
Öffnen Sie die “Systemsteuerung” und doppelklicken Sie auf “EDIROL UA-20”.
2.
Daraufhin wird das Dialogfeld “EDIROL UA-20 Treibereinstellungen”
angezeigt.
* Unter Windows XP klicken Sie auf “Zur klassischen Anzeige umschalten”, um zur
klassischen Anzeige umzuschalten. EDIROL UA-20 wird erst angezeigt, nachdem die
klassische Anzeige aktiviert wurde.
Bei Verwendung des MME-Treibers unter Windows XP/2000:
1.
Öffnen Sie die “Systemsteuerung” und doppelklicken Sie auf “System”.
2.
Klicken Sie auf die Registerkarte “Hardware” und anschließend auf “[GeräteManager]”.
3.
Doppelklicken Sie auf “Audio-, Video- und Gamecontroller”.
4.
Doppelklicken Sie auf das Symbol “EDIROL UA-20”.
5.
Klicken Sie auf die Registerkarte “Eigenschaften” und doppelklicken Sie im
Bereich “Multimedia-Geräte” auf “Audiogeräte”.
6.
Wählen Sie "EDIROL UA-20" und klicken Sie auf die Schaltfläche
[Eigenschaften].
7.
Klicken Sie auf die Schaltfläche [Einstellungen] und das Dialogfeld “EDIROL
UA-20 Treibereinstellungen” wird angezeigt.
Bei Verwendung von Windows Me/98:
1.
Öffnen Sie die "Systemsteuerung" und doppelklicken Sie auf “Sounds und
Multimedia”. (Unter Windows 98: doppelklicken Sie auf “Multimedia”.)
2.
Klicken Sie auf die Registerkarte "Geräte" und doppelklicken Sie auf “AudioGeräte”.
3.
Wählen Sie “EDIROL UA-20 Audio” und klicken Sie anschließend auf die
Schaltfläche [Eigenschaften], um die Eigenschaften zu öffnen.
4.
Klicken Sie auf die Schaltfläche [Einstellungen] und das Dialogfeld
“EDIROL-UA-20 Treibereinstellungen” wird angezeigt.
Bei Verwendung eines Macintosh:
Öffnen Sie das ASIO Control Panel im Dialogfeld Audio Settings Ihrer ASIOkompatiblen Anwendung. Der Name des Dialogfelds für die Audioeinstellungen und
die Vorgehensweise beim Öffnen des ASIO Control Panel hängt von Ihrer Software ab.
Einzelheiten finden Sie im Handbuch für Ihre Anwendung.
120
English
Fehlerbehebung
Fehlerbehebung
Wenn während der Verwendung des UA-20 unerwartete Probleme auftreten, lesen Sie
bitte zunächst dieses Kapitel. Hier finden Sie eine Vielzahl von Tipps für die Lösung
von Problemen.
Deutsch
Wenn Sie mit Windows oder mit dem Macintosh zum ersten Mal arbeiten und daher
Schwierigkeiten haben, die Erklärungen zu verstehen, lesen Sie bitte im
Benutzerhandbuch Ihres Computers oder Ihres Betriebssystems nach.
Probleme, die unter Windows und auf dem Macintosh häufig auftreten
Probleme, die nur unter Windows auftreten
Probleme, die nur auf dem Macintosh auftreten
Français
Probleme in Verbindung mit dem USB-Treiber
Ein Dialogfeld mit den Angaben “Unbekanntes Gerät
gefunden” wird angezeigt, und Sie können den Treiber
nicht installieren
Italiano
Der Assistent “Neue Hardware gefunden” startet nicht
automatisch
•
Nachdem das USB-Kabel angeschlossen wurde, dauert es ca. 15 Sekunden
(oder länger), bis das UA-20 erkannt wird.
•
Ist das USB-Kabel richtig angeschlossen?
Prüfen Sie, ob das UA-20 und der Computer vorschriftsmäßig durch das USB-Kabel
verbunden sind.
•
Wurde USB auf Ihrem Computer aktiviert?
Lesen Sie im Benutzerhandbuch Ihres Computers nach und stellen Sie sicher, dass USB
aktiviert wurde.
Español
Der Assistent “Neue Hardware gefunden” endet, bevor
der Prozess abgeschlossen ist
121
Fehlerbehebung
•
In manchen Fällen kann es vorkommen, dass bei Auslieferung Ihres PCs
eventuell nicht alle Windows 98-Dateien installiert sind, die für die Unterstützung
von Audio über USB erforderlich sind.
Bitte wenden Sie sich diesbezüglich an den Hersteller Ihres Computers.
•
Entspricht Ihr Computer den USB-Spezifikationen?
Wenn Sie einen Computer verwenden, der die elektrischen Anforderungen der USBSpezifikationen nicht erfüllt, kann es während des Betriebs zu Instabilität kommen. In
solchen Fällen können Sie das Problem möglicherweise lösen, indem Sie einen USB-Hub
anschließen.
•
Wird “Unbekanntes Gerät” für “Anderes Gerät" oder "Universeller Serieller Bus
Controller” angezeigt?
Gehen Sie wie folgt vor, um "Anderes Gerät" (Universeller Serieller Bus Controller),
"Unbekanntes Gerät" zu löschen und starten Sie anschließend den Computer neu.
1.
Doppelklicken Sie in Windows in der Systemsteuerung auf das SystemSymbol. Daraufhin wird das Dialogfeld Systemeigenschaften angezeigt.
2.
Klicken Sie auf die Registerkarte Geräte-Manager.
3.
Doppelklicken Sie auf Andere Geräte oder “Universelle Serielle Bus
Controller”, um eine Liste der Geräte zu erhalten.
4.
Wählen Sie das unbekannte Gerät aus der Liste und klicken Sie auf
[Entfernen].
5.
Klicken Sie in dem Dialogfeld, das Sie dazu auffordert, das Entfernen zu
bestätigen, auf [OK].
6.
Prüfen Sie, ob die Liste kein “Anderes Gerät” oder “Unbekanntes Gerät”
enthält und klicken Sie auf [Schließen], um das Dialogfeld zu schließen.
“Unbekanntes Gerät gefunden” wird angezeigt, obwohl
Sie den Treiber installiert haben
Wenn Ihr Computer oder USB-Hub mit zwei oder mehr USB-Anschlüssen ausgerüstet
ist und Sie das UA-20 an einen USB-Anschluss anschließen, an den das UA-20 zuvor
niemals angeschlossen wurde, wird eventuell das Dialogfeld “Unbekanntes Gerät”
angezeigt, obwohl der zugehörige Treiber bereits auf Ihrem Computer installiert ist.
Lesen Sie Abschnitt Anschlüsse herstellen und Treiber installieren (Windows)
(S. 82) und installieren Sie den Treiber erneut. Hierbei handelt es sich nicht um einen
Fehler.
Der Treiber wurde nicht korrekt installiert
Gehen Sie vor wie in Deleting the special driver (S. 79) beschrieben, um den USBAudiogeräte-Treiber zu löschen, der auf Ihrem Computer installiert ist, und installieren
Sie den UA-20-Treiber anschließend erneut, wie in Anschlüsse herstellen und Treiber
installieren (Windows) (S. 82) beschrieben. Prüfen Sie auch, ob ein “Unbekanntes
Gerät” in “Andere Geräte” oder “Universeller Serieller Bus Controller”. vorhanden
ist.
Wenn Sie eines dieser Geräte finden, löschen Sie es.
122
Fehlerbehebung
•
Haben Sie sich in Windows als Benutzer mit Administratorrechten angemeldet?
Um den Treiber unter Windows XP/2000 zu installieren/zu löschen/neu zu
installieren, müssen Sie in Windows als Benutzer mit Administratorrechten angemeldet
sein, wie z.B. als Administrator. Einzelheiten hierzu erfahren Sie vom
Systemadministrator Ihres Computers.
•
Haben Sie die “Treibersignatureinstellungen” vorgenommen?
Damit Sie den Treiber installieren bzw. neu installieren können, müssen Sie die
Optionen für die “Treibersignaturverifizierung” konfigurieren.
English
Der Treiber kann unter Windows XP/2000 nicht
installiert/gelöscht/verwendet werden
Deutsch
((Windows XP ➝ S. 85, Windows 2000 ➝ S. 91)
Windows XP/2000 zeigt das Dialogfeld “HardwareInstallation” oder “Digitalsignatur nicht gefunden” an
Haben Sie die “Treibersignatureinstellungen” vorgenommen?
Damit Sie den Treiber installieren/neu installieren können, müssen Sie die in
“Treibersignaturoptionen” beschriebenen Schritte ausführen.
Français
((Windows XP ➝ S. 85, Windows 2000 ➝ S. 91)
Im Geräte-Manager wird “?”, “!”, oder “USBVerbundgerät” angezeigt
Das Dialogfeld “Diskette einlegen” wird nicht angezeigt
1.
Schalten Sie Ihren Computer aus und starten Sie Windows, wobei alle USBKabel ausgesteckt sind (außer Tastatur und Maus).
2.
Verwenden Sie nach dem Neustart von Windows ein USB-Kabel, um das UA20 an Ihren Computer anzuschließen.
3.
Klicken Sie in Windows auf Start und wählen Sie im daraufhin angezeigten
Menü Einstellungen - Systemsteuerung.
4.
Doppelklicken Sie auf das Symbol System. Daraufhin wird das Dialogfeld
Systemeigenschaften angezeigt.
5.
Klicken Sie auf die Registerkarte Geräte-Manager.
Italiano
Gehen Sie wie folgt vor, um den Treiber neu zu installieren.
Español
•
123
Fehlerbehebung
6.
Prüfen Sie, ob “?USB-Verbundgerät”, “?USB-Gerät”, “!USB-Gerät”, oder
“USB-Verbundgerät” unterhalb von “Audio-, Video- und
Gamecontroller”, “Andere Geräte”, oder “Universeller Serieller BusController” angezeigt wird. Wenn Sie einen derartigen Eintrag finden,
wählen Sie ihn aus und klicken auf [Entfernen].
7.
Daraufhin wird ein Dialogfeld angezeigt, in dem Sie gebeten werden, das
Entfernen des Geräts zu bestätigen. Prüfen Sie die Angaben und klicken Sie
auf [OK]. Löschen Sie auf die gleiche Weise alle Einträge mit der Bezeichnung
“?USB-Verbundgerät”, “?USB-Gerät”, “USB-Gerät” und “USBVerbundgerät”, die Sie finden können.
8.
Wenn Sie einen EDIROL UA-20 USB-Treiber mit einem gelben “!” oder roten
“?” daneben sehen, löschen Sie auch diesen Eintrag.
9.
Nachdem Sie die unerwünschten Geräte endgültig entfernt haben, klicken Sie
in den Systemeigenschaften auf [OK].
10. Schalten Sie das UA-20 aus und löschen Sie anschließend den Treiber.
(➝ Deleting the special driver (S. 79))
11. Starten Sie Windows neu. Installieren Sie anschließend den Treiber erneut.
(➝ Anschlüsse herstellen und Treiber installieren (Windows) (S. 82)).
* Wenn das Problem immer noch auftritt, nachdem Sie die oben genannten Maßnahmen
ergriffen haben, lesen Sie bitte auch die Readme-Datei für den USB-Treiber. Die ReadmeDatei befindet sich auf der CD-ROM.
124
Installation des pilotes et connexions
(Windows)
English
Si vous utilisez un Macintosh, reportez-vous à la section Installation des pilotes et
connexions (Macintosh) (p. 146).
Qu'est-ce qu'un pilote ?
fig.05-1e_50
USB port
USB cable
Deutsch
Un “pilote” est un logiciel
qui sert à transférer les
données entre l'UA-20 et
Application
le logiciel tournant sur
votre ordinateur, lorsque
USB
driver
votre ordinateur et
l'UA-20 sont reliés par un
Computer
câble USB. Le pilote
transmet les données de
l'application à l'UA-20 et vice-versa.
UA-20
Mode Avancé et mode Standard
Français
L’UA-20 possède deux modes de fonctionnement, Avancé et Standard ; un pilote
différent est nécessaire pour chaque mode.
■ Mode Avancé
Italiano
L’UA-20 fonctionne dans ce mode lorsque le commutateur ADVANCED DRIVER
est placé sur ON. Le pilote spécial fourni sur le CD-ROM est utilisé, permettant
d’enregistrer, de lire et de modifier les données audio avec une haute qualité et un
timing stable. En mode Standard, les signaux audio sont transférés entre l’UA-20 et
l’ordinateur à une résolution de 24 bits et à une fréquence de 44,1 kHz. Choisissez
ce mode si vous utilisez une application permettant des opérations audio de haute
qualité, supportant l’audio 24 bits (Cakewalk, Cool Edit, etc.) ou une application
compatible ASIO (Cubase VST, Logic Audio, etc.). (➝ Installation du pilote
spécial (p. 126))
■ Mode Standard
Español
L’UA-20 fonctionne dans ce mode lorsque le commutateur ADVANCED DRIVER
est placé sur OFF. Le pilote audio USB standard livré avec Windows est utilisé. En
mode Standard, les signaux audio sont transférés entre l’UA-20 et l’ordinateur à
une résolution de 16 bits et à une fréquence d’échantillonnage de 44,1 kHz.
Sélectionnez ce mode si vous utilisez une application qui utilise les fonctionnalités
propres à Windows, comme une application qui utilise le lecteur de CD-ROM pour
jouer des CD audio, ou une application qui utilise le synthétiseur logiciel inclus
dans Windows.
Le pilote standard inclus dans Windows ne prend pas en charge ASIO.
(➝ Installing the OS-standard driver (p. 31))
* Si vous voulez travailler en MIDI, utilisez le mode Avancé.
125
Installation des pilotes et connexions (Windows)
Basculement entre mode Avancé et mode Standard
Si vous installez à la fois le pilote spécial et le pilote standard, vous aurez la
possibilité de basculer entre les modes Standard et Avancé en agissant sur le
commutateur ADVANCED DRIVER de l’UA-20.
* Pour que le réglage du commutateur ADVANCED DRIVER prenne effet, vous devez
quitter les logiciels de type séquenceur ou toute autre application utilisant l’UA-20, puis
reconnecter ce dernier.
Installation du pilote spécial
La procédure d’installation dépend de votre système d’exploitation.
Veuillez lire la section qui vous concerne.
• Windows XP/2000 ...........................................(p. 126)
• Windows Me/98 ..............................................(p. 138)
■ Windows XP/2000
Le CD-ROM contient deux types de pilote pour Windows XP/2000.
En principe, vous utiliserez le pilote WDM.
Pilote WDM
Ce pilote est recommandé pour le mode WDM dans le cadre d’une application
SONAR ou équivalente. Il fournit une qualité sonore optimale.
* Il n’est pas possible de travailler en 24 bits avec des applications qui ne supportent pas
WDM, comme Cool Edit ou le Lecteur multimédia.
Pilote MME
Ce pilote vous permet de travailler an audio 24 bits, même à partir d’applications
ne supportant pas WDM, comme Cool Edit. Il n’est pas possible d’utiliser le pilote
MME en mode WDM depuis une application comme SONAR.
* D’autre part, les deux pilotes (WDM et MME) ne peuvent être installés tous les deux.
Vous devez en sélectionner un et n’installer que celui-ci. Si, après avoir installé l’un des
deux pilotes, vous souhaitez changer de pilote, il vous faudra d’abord supprimer le pilote
déjà installé avant de procéder à une nouvelle installation. (➝ Deleting the special
driver (p. 79))
* Les procédures d’installation des pilotes WDM et MME sont identiques.
126
Installation des pilotes et connexions (Windows)
Débranchez tous les câbles USB, à l’exception de ceux du
clavier et de la souris (le cas échéant).
2
Ouvrez la boîte de dialogue Propriétés Système.
1.
Cliquez sur le menu Démarrer de Windows, puis dans
le menu qui s’affiche, choisissez Panneau de
configuration.
2.
Dans “Choisissez une catégorie”, cliquez sur
“Performances et maintenance”.
3.
Dans “ou choisissez une icône du Panneau de
configuration”, cliquez sur l’icône Système.
fig.2-1
3
Si vous utilisez Windows XP
Professional, vous devez
ouvrir une session avec un
nom d’utilisateur disposant
des droits d’administrateur.
Pour plus de détails sur les
comptes utilisateur, veuillez
prendre contact avec
l’administrateur système de
votre ordinateur.
Selon la configuration de votre
ordinateur, l’icône Système
s’affiche peut-être dans le
Panneau de configuration
(Vue classique). Dans ce cas,
cliquez deux fois sur l’icône
Système.
Cliquez sur l’onglet
Matériel, puis cliquez
sur [Signature du
pilote].
Deutsch
L’UA-20 étant débranché, démarrez Windows.
Français
1
English
Windows XP
Ouvrez la boîte de dialogue
Options de signature des
pilotes.
Vérifiez que le
paramètre “Que voulezvous faire ?” est défini
sur “Ignorer”.
Si ce paramètre est réglé sur
“Ignorer”, cliquez sur [OK].
S'il n’est pas défini sur
“Ignorer”, notez le
paramètre indiqué ("Avertir" ou "Bloquer"). Choisissez
ensuite “Ignorer” et cliquez sur [OK].
Après avoir installé le pilote, restaurez le paramètre d'origine.
(➝ Si vous avez modifié “Que voulez-vous faire ?”
(p. 132))
Si vous avez modifié "Que
voulez-vous faire ?" à l’étape
4, vous devez restaurer le
réglage précédent après
installation du pilote. (➝ Si
vous avez modifié “Que
voulez-vous faire ?” (p. 132))
127
Español
4
Italiano
fig.2-2
Installation des pilotes et connexions (Windows)
5
Cliquez sur [OK] pour fermer la boîte de dialogue
Propriétés système.
6
Quittez tous les logiciels (applications) actifs.
Fermez également toutes les fenêtres éventuellement
ouvertes. Si vous utilisez un anti-virus, quittez-le également.
7
Munissez-vous du CD-ROM.
Introduisez-le dans le lecteur de CD de votre ordinateur.
8
Cliquez sur le bouton Démarrer de Windows. Dans le
menu qui s’affiche, sélectionnez “Exécuter...”.
Ouvrez la boîte de dialogue “Exécuter...” (voir ci-dessous).
fig.2-3_30
9
Dans la boîte de
dialogue qui s’affiche,
tapez ce qui suit dans
le champ “Ouvrir”,
puis cliquez sur [OK].
Si vous utilisez le pilote
MME, tapez MME à la
place de WDM.
D:\Driver\USB_XP2K\WDM\SETUPINF.EXE
* La lettre du lecteur “D:” n’est pas forcément celle de votre
ordinateur. Tapez la lettre affectée au lecteur de CD de votre
ordinateur (par exemple, E: ou F:).
fig.2-4_30
10
La boîte de dialogue SetupInf
s'affiche.
Vous êtes maintenant prêt à
installer le pilote.
128
Dans ce document,
l’emplacement des dossiers et
des fichiers est donné en
termes de chemin, avec \
comme délimiteur.
Par exemple,
USB_XP2K\SETUPINF.EXE
signifie le fichier
SETUPINF.EXE se trouvant
dans le dossier USB_XP2K.
11
12
Placez le commutateur ADVANCED DRIVER de
l’UA-20 sur la position ON.
Cet appareil est équipé d'un
circuit de protection. Lors de la
connexion au port USB,
attendez quelques secondes
avant d'utiliser l'appareil.
English
Installation des pilotes et connexions (Windows)
Utilisez le câble USB pour connecter l'UA-20 à
l’ordinateur.
fig.2-6
13
La boîte de dialogue
Assistant ajout de
nouveau matériel
s'affiche.
Vérifiez que l’écran indique
“EDIROL UA-20”
sélectionnez “Installer à
partir d’une liste ou d’un
emplacement spécifique
(Avancé)” puis cliquez sur [Suivant].
Dans le cas du pilote MME,
vérifiez que “EDIROL UA-20
(MME)” s'affiche.
fig.2-7
Italiano
L’écran indiquera
“Veuillez choisir vos
options de recherche
et d’installation”.
Sélectionnez “Ne pas
rechercher. Je vais
choisir le pilote à
installer”, puis cliquez sur
[Suivant].
Español
14
Français
Deutsch
Près de la barre des tâches, votre ordinateur indique
“Nouveau matériel détecté”. Veuillez patienter.
129
Installation des pilotes et connexions (Windows)
fig.2-8_20
15
Vérifiez que le champ
“Modèle” indique
“EDIROL SD-20” puis
cliquez sur [Suivant].
L’installation du pilote
commence.
Dans le cas du pilote MME,
vérifiez que “EDIROL UA-20
(MME)” s'affiche.
Si le paramètre “Que voulez-vous faire?” n'est pas défini sur “Ignorer”,
la boîte de dialogue “Installation du matériel” s'affiche.
Si “Que voulez-vous faire ?” est défini sur “Avertir”
1.
Cliquez sur [Continuer].
2.
Poursuivez l’installation.
Si “Que voulez-vous faire ?” est défini sur “Bloc”
1.
Cliquez sur [OK].
2.
Lorsque l’“Assistant ajout de
nouveau matériel” s’affiche, cliquez
sur [Terminer].
3.
Procédez à l’installation comme
décrit à la section “En cas de problème” (voir Est-ce que le
Gestionnaire de périphériques affiche “?”, “!”, ou “USB
Composite” ? (p. 162)).
fig.2-9_30
16
La boîte de dialogue
Insérez le disque
s'affiche.
Cliquez sur [OK].
130
La boîte de dialogue Insérez le
disque ne s'affiche pas. Dans
ce cas, passez à l’étape 17.
Installation des pilotes et connexions (Windows)
17
La boîte de dialogue
Fichiers nécessaires
s'affiche. Tapez ce qui
suit dans le champ
“Copier les fichiers
depuis”, puis cliquez sur [OK].
D:\Driver\USB_XP2K\WDM
English
fig.2-10_30
Si vous utilisez le pilote MME,
tapez “MME” à la place de
“WDM”.
Deutsch
* La lettre du lecteur “D:” n’est pas forcément celle de votre
ordinateur. Tapez la lettre affectée au lecteur de CD de votre
ordinateur (par exemple, E: ou F:).
Si le paramètre “Que voulez-vous faire ?” n'est pas défini sur “Ignorer”,
la boîte de dialogue “Installation du matériel” s'affiche.
1.
Cliquez sur
[Continuer].
2.
Poursuivez
l’installation.
Français
Si “Que voulez-vous faire ?” est défini sur “Avertir”,
La boîte de dialogue
Assistant ajout de
nouveau matériel
s'affiche.
Vérifiez que “EDIROL
UA-20 (WDM)” ou
“EDIROL UA-20 (MME)” est affiché, puis cliquez sur
[Terminer].
Attendez que “Nouveau matériel détecté” s’affiche près de
la barre des tâches.
Español
3
Italiano
fig.2-11_20
131
Installation des pilotes et connexions (Windows)
4
Une fois l’installation du pilote terminée, la boîte de
dialogue Modification des paramètres système
s’affiche.
Cliquez sur [Oui]. Windows redémarre automatiquement.
Si vous avez modifié “Que voulez-vous faire ?”
Si vous avez modifié “Que voulez-vous faire ?” restaurez le paramètre
d’origine après le redémarrage de Windows.
1.
Si vous utilisez Windows XP Professional, vous devez ouvrir une
session avec un nom d’utilisateur disposant des droits
d’administrateur.
2.
Cliquez sur le menu Démarrer de Windows, puis dans le menu qui
s’affiche, choisissez Panneau de configuration.
3.
Dans “Choisissez une catégorie”, cliquez sur “Performances et
maintenance”.
* Selon la configuration de votre ordinateur, l’icône Système s’affiche peutêtre dans le Panneau de configuration (Vue classique). Dans ce cas,
cliquez deux fois sur l’icône Système.
4.
Dans “ou choisissez une icône du Panneau de configuration”,
cliquez sur l’icône Système. La boîte de dialogue “Propriétés système”
s'affiche.
5.
Cliquez sur l’onglet Matériel, puis cliquez sur [Signature du pilote]. La
boîte de dialogue Options de signature du pilote s'affiche.
6.
Restaurez le paramètre “Que voulez-vous faire ?” (“Avertir” ou
“Bloquer”), puis cliquez sur [OK].
7.
Cliquez sur [OK]. La boîte de dialogue Propriétés Système se ferme.
Vous devez ensuite procéder à la configuration du pilote.
(➝ Configuration et contrôle (p. 140))
132
Installation des pilotes et connexions (Windows)
L’UA-20 étant débranché, démarrez Windows.
Débranchez tous les câbles USB, à l’exception de ceux du
clavier et de la souris (le cas échéant).
2
3
Ouvrez une session Windows en tant qu’utilisateur
doté de droits d’administration (Administrateur, par
exemple).
Ouvrez la boîte de dialogue Propriétés Système.
Cliquez sur le bouton Démarrer de Windows, puis dans le
menu qui s’affiche, choisissez Paramètres | Panneau de
configuration. Dans Panneau de configuration, cliquez
deux fois sur l'icône Système.
Si l'UA-20 est déjà connecté à
votre ordinateur et que le
message "Assistant ajout de
nouveau matériel" s'affiche,
accédez au dossier du
CD-ROM appelé
DRIVER\USB_XP2K\WDM
ou
DRIVER\USB_XP2K\MME,
ouvrez le fichier
Readme_e.htm et lisez la
section “Troubleshooting”
intitulée “You attempted to
install using the above
procedure, but were not
able to”. (Vous avez essayé
d'installer à l'aide de la
procédure ci-dessus, mais
avez échoué).
Deutsch
1
English
Windows 2000
fig.05-2e_30
Cliquez sur l’onglet
Matériel, puis cliquez sur
[Signature des pilotes].
Français
4
Ouvrez la boîte de dialogue
Options de signature des
pilotes.
Assurez-vous que l'option
“Vérification des
signatures de fichiers” est
définie sur “Ignorer”.
Si ce paramètre est réglé sur
“Ignorer”, cliquez sur [OK].
S'il n’est pas défini sur
“Ignorer”, notez le paramètre
indiqué (“Avertir” ou “Bloquer”). Choisissez ensuite
“Ignorer” et cliquez sur [OK].
Après avoir installé le pilote, restaurez le paramètre d'origine.
(➝ Si vous avez modifié l’option “Vérification de la
signature des fichiers” (p. 137))
Español
5
Italiano
fig.05-3e_30
133
Installation des pilotes et connexions (Windows)
6
Cliquez sur [OK] pour fermer la boîte de dialogue
Propriétés système.
7
Quittez tous les logiciels (applications) actifs.
Fermez également toutes les fenêtres éventuellement
ouvertes. Si vous utilisez un anti-virus, quittez-le également.
8
Si vous avez modifié "Vérifier
la signature des fichiers" à
l’étape 5, vous devez restaurer
le réglage précédent après
installation du pilote. (–> Si
vous avez modifié l’option
“Vérification de la signature
des fichiers” (p. 137))
Insérez le CD-ROM.
Introduisez-le dans le lecteur de CD de votre ordinateur.
9
Cliquez sur le bouton Démarrer de Windows. Dans le
menu qui s’affiche, sélectionnez “Exécuter...”.
Ouvrez la boîte de dialogue “Exécuter...” (voir ci-dessous).
fig.05-5e_30
10
Dans la boîte de
dialogue qui s’affiche,
tapez ce qui suit dans le
champ “Ouvrir”, puis
cliquez sur [OK].
D:\DRIVER\USB_XP2K\WDM\SETUPINF.EXE
* La lettre du lecteur “D:” n’est pas forcément celle de votre
ordinateur. Tapez la lettre affectée au lecteur de CD de votre
ordinateur (par exemple, E: ou F:).
fig.05-6e_30
11
La boîte de dialogue
SetupInf s'affiche.
Vous êtes maintenant prêt à
installer le pilote.
12
134
Placez le commutateur ADVANCED DRIVER de
l’UA-20 sur la position ON.
Dans ce document,
l’emplacement des dossiers et
des fichiers est donné en
termes de chemin, avec \
comme délimiteur. Par
exemple,
WDM\SETUPINF.EXE signifie
le fichier SETUPINF.EXE se
trouvant dans le dossier WDM.
Si vous utilisez le pilote MME,
tapez MME à la place de WDM.
13
Utilisez le câble USB pour connecter l'UA-20 à
l’ordinateur.
Si l’option “Vérification de la signature des pilotes”
n’a pas été définie sur “Ignorer”, une boîte de
dialogue “Signature numérique introuvable”
s’affiche.
Cet appareil est équipé d'un
circuit de protection. Lors de la
connexion au port USB,
attendez quelques secondes
avant d'utiliser l'appareil.
English
Installation des pilotes et connexions (Windows)
1.
Cliquez sur [Oui].
2.
Poursuivez l’installation.
Deutsch
Si “Vérification des signatures des fichiers” est
défini sur “Avertir”
Cliquez sur “[OK].
2.
Lorsque l’“Assistant
ajout de nouveau
matériel” s’affiche,
cliquez sur [Terminer].
3.
Procédez à l’installation
comme décrit à la section “En cas de
problème” (voir Est-ce que le Gestionnaire de
périphériques affiche “?”, “!”, ou “USB
Composite” ? (p. 162).
Italiano
1.
Français
Si “Vérification des signatures des fichiers” est défini
sur “Bloquer”
14
La boîte de dialogue
Insérez le disque
s'affiche.
Cliquez sur [OK].
Si la boîte de dialogue Insérez
le disque ne s’affiche pas, lisez
la section La boîte de
dialogue “Insérez le disque”
ne s’affiche pas (p. 162)
135
Español
fig.05-8e_30
Installation des pilotes et connexions (Windows)
fig.05-9e_30
15
La boîte de dialogue
Fichiers nécessaires
s'affiche.
Dans le champ Copier les
fichiers depuis, tapez le
nom du dossier indiqué
dans la boîte de dialogue, puis cliquez sur [OK].
D:\DRIVER\USB_XP2K\WDM
* La lettre du lecteur “D:” n’est pas forcément celle de votre
ordinateur. Tapez la lettre affectée au lecteur de CD de votre
ordinateur (par exemple, E: ou F:).
Si l’option “Vérification de la signature des pilotes”
n’a pas été définie sur “Ignorer”, une boîte de
dialogue “Signature numérique introuvable”
s’affiche.
Si “Vérification des signatures des fichiers” est
défini sur “Avertir”
1.
Cliquez sur [Oui].
2.
Poursuivez l’installation.
fig.05-10e_30
16
La boîte de dialogue
“Assistant Nouveau
matériel détecté” peut
s'afficher.
Vérifiez que “EDIROL UA-20
(WDM)” ou “EDIROL UA-20
(MME)” est affiché, puis
cliquez sur [Terminer].
Si la boîte de dialogue “Assistant ajout de nouveau
matériel” ne s’affiche pas, passez à l’étape 18.
136
Si vous utilisez le pilote MME,
tapez MME à la place de WDM.
Installation des pilotes et connexions (Windows)
fig.05-11e_30
La boîte de dialogue
Modification des
paramètres système
peut s'afficher.
English
17
Deutsch
Cliquez sur [Oui]. Windows redémarre automatiquement.
Si la boîte de dialogue Modifier les paramètres système ne
s’affiche pas, redémarrez Windows vous-même (menu
Démarrer).
Si vous avez modifié l’option “Vérification de la
signature des fichiers”
Une fois Windows redémarré, ouvrez une session Windows avec des
privilèges d’administration, (par exemple, en ouvrant une session
Administrateur).
2.
Sur le bureau Windows, cliquez avec le bouton droit de la souris sur l’icône
Poste de travail puis, dans le menu qui s’affiche, sélectionnez Propriétés. La
boîte de dialogue Propriétés Système s'affiche.
3.
Cliquez sur l’onglet Profils matériels, puis cliquez sur [Signature des
pilotes]. La boîte de dialogue Options de signature du pilote s'affiche.
4.
Restaurez l’option “Vérification de la signature des fichiers” à sa valeur
d’origine (“Warn” ou “Block”), puis cliquez sur [OK].
5.
Cliquez sur [OK]. La boîte de dialogue Propriétés Système se ferme.
Italiano
1.
Français
Si vous avez modifié l’option “Vérification de la signature des fichiers” à l’étape
5, restaurez le paramètre d’origine après le redémarrage de Windows.
Español
Vous devez ensuite procéder à la configuration du pilote.
(➝ Configuration et contrôle (p. 140))
137
Installation des pilotes et connexions (Windows)
■ Windows Me/98
1
L’UA-20 étant débranché, démarrez Windows.
Débranchez tous les câbles USB, à l’exception de ceux du
clavier et de la souris.
2
Quittez tous les logiciels (applications) actifs.
Fermez également toutes les fenêtres éventuellement
ouvertes. Si vous utilisez un anti-virus, quittez-le également.
3
Munissez-vous du CD-ROM.
Introduisez-le dans le lecteur de CD de votre ordinateur.
4
Si l'UA-20 est déjà connecté à
votre ordinateur et que le
message "Assistant ajout de
nouveau matériel" s'affiche,
accédez au dossier du
CD-ROM appelé
DRIVER\USB_ME98, ouvrez
le fichier Readme_e.htm et
lisez la section
“Troubleshooting” intitulée
“You attempted to install
using the above procedure,
but were not able to”. (Vous
avez essayé d'installer à l'aide
de la procédure ci-dessus, mais
avez échoué).
Cliquez sur le bouton Démarrer de Windows. Dans le
menu qui s’affiche, sélectionnez Exécuter....
Ouvrez la boîte de dialogue Exécuter... (voir ci-dessous).
fig.05-13e_30
5
Dans la boîte de
dialogue qui s’affiche,
tapez ce qui suit dans le
champ “Ouvrir”, puis
cliquez sur [OK].
D:\DRIVER\USB_ME98\SETUPINF.EXE
* La lettre du lecteur “D:” n’est pas forcément celle de votre
ordinateur. Tapez la lettre de votre lecteur de CD-ROM (par
exemple E: ou F:).
fig.05-14e_30
6
Ouvrez la boîte de
dialogue SetupInf.
Vous êtes maintenant prêt à
installer le pilote.
7
138
Placez le commutateur
ADVANCED DRIVER de l’UA-20 sur la position ON.
Dans ce document,
l’emplacement des dossiers et
des fichiers est donné en
termes de chemin, avec \
comme délimiteur. Par
exemple,
USB_ME98\SETUPINF.EXE
signifie que le fichier
SETUPINF.EXE se trouve
dans le dossier USB_ME98.
Si vous utilisez
Windows 98,
une boîte de
dialogue
Insérez le disque s’affiche.
Cliquez sur [OK].
fig.05-16e_30
10
La boîte de dialogue
Nouveau matériel
détecté s'affiche.
Dans le champ Copier les
fichiers depuis, tapez le
nom du dossier indiqué
dans la boîte de dialogue SetupInf, puis cliquez sur [OK].
D:\DRIVER\USB_ME98
* La lettre du lecteur “D:” n’est pas forcément celle de votre
ordinateur. Tapez la lettre de votre lecteur de CD-ROM (par
exemple E: ou F:).
11
Si vous utilisez Windows 98
et que la boîte de dialogue
Insérez le disque ne s'affiche
pas, veuillez lire la section La
boîte de dialogue “Insérez
le disque” ne s’affiche pas
(p. 162).
Si la boîte de dialogue
Nouveau matériel détecté ne
s’affiche pas, réinstallez le
pilote à l’aide de la procédure
décrite à la section La boîte de
dialogue “Insérez le disque”
ne s’affiche pas (p. 162) .
Italiano
9
Deutsch
fig.05-15e_30
Cet appareil est équipé d'un
circuit de protection. Lors de la
connexion au port USB,
attendez quelques secondes
avant d'utiliser l'appareil.
Français
Utilisez le câble USB pour connecter l'UA-20 à
l’ordinateur.
Une fois le pilote installé, la boîte de dialogue
Nouveau matériel détecté se ferme.
Dans la boîte de dialogue SetupInf, cliquez sur [OK]. La boîte
de dialogue SetupInf se ferme.
Vous devez ensuite procéder à la configuration du pilote.
(➝ Configuration et contrôle (p. 140))
Español
8
English
Installation des pilotes et connexions (Windows)
139
Installation des pilotes et connexions (Windows)
Configuration et contrôle
■ Spécification de la destination d'entrée/
sortie audio et MIDI
Windows XP/2000/Me :
1
Ouvrez le Panneau de configuration.
Cliquez sur le bouton Démarrer de Windows, puis dans le
menu qui s’affiche, choisissez Paramètres | Panneau de
configuration.
Windows XP
Cliquez sur le bouton Démarrer de Windows, puis dans le
menu qui s’affiche, choisissez Panneau de configuration.
2
Ouvrez la boîte de dialogue Propriétés sons et
périphériques multimédia (avec Windows 2000/Me,
Propriétés Son et multimédia).
Selon la configuration de votre
ordinateur, l’icône Sons et
périphériques audio s’affiche
peut-être dans le Panneau de
configuration (Vue classique).
Dans ce cas, cliquez deux fois
sur l’icône Sons et
périphériques audio.
Windows XP
Dans “Choisissez une catégorie”, cliquez sur “Son, voix et
périphériques audio”. Dans “ou choisissez une icône du
Panneau de configuration”, cliquez sur l’icône Sons et
périphériques audio.
Windows 2000/Me
Dans le Panneau de configuration, cliquez deux fois sur
l'icône Sons et Multimédia pour ouvrir la boîte de dialogue
“Propriétés de Sons et multimédia”.
3
140
Cliquez sur l'onglet Audio.
Si l’icône Sons et multimédia
n’est pas affichée, cliquez sur
Afficher toutes les options
du Panneau de configuration
sur le cadre de gauche.
Installation des pilotes et connexions (Windows)
Pour Lecture MIDI, cliquez
sur le ▼ situé à droite de
[Périphérique par défaut]
(avec Windows 2000/Me,
[Périphérique par défaut]),
puis sélectionnez ce qui suit
dans la liste qui s’affiche.
EDIROL UA-20 IN
EDIROL UA-20 MIDI OUT
Mode Standard
EDIROL UA-20 (Windows XP)
USB Audio Device (Windows 2000/Me)
EDIROL UA-20 (Windows XP)
USB Audio Device (Windows 2000/Me)
Les fonctions MIDI ne peuvent être
utilisées en mode standard.
Français
Fermez la boîte de dialogue Propriétés Son et
périphériques multimédia.
Cliquez sur [OK] pour terminer les réglages.
Passez à la section suivante.
➝ Réglages du Contrôle du volume (p. 144)
Italiano
5
Mode Avancé
EDIROL UA-20 OUT
Deutsch
Son
Lecture
Son
Enregistrement
Lecture MIDI
Pour plus d'informations sur le
mode Avancé et le mode
Standard, reportez-vous à la
section Mode Avancé et
mode Standard (p. 125).
Español
4
English
fig.2-28_30
141
Installation des pilotes et connexions (Windows)
Windows 98
1
Ouvrez le Panneau de configuration.
Cliquez sur le bouton Démarrer de Windows, puis dans le
menu qui s’affiche, choisissez Paramètres | Panneau de
configuration.
2
Ouvrez la boîte de dialogue Propriétés de
Multimédia.
Dans le Panneau de configuration, cliquez deux fois sur
l'icône Multimédia pour ouvrir la boîte de dialogue
Propriétés de multimédia.
3
4
Cliquez sur l'onglet Audio.
Spécifiez votre
“Périphérique par défaut”.
Cliquez dans les champs
Lecture et Enregistrement,
effectuez vos choix dans la liste
qui s'affiche, puis cliquez sur
[Appliquer].
Lecture
Enregistrement
5
142
Mode Avancé
EDIROL UA-20 Out
EDIROL UA-20 In
Cliquez sur l'onglet MIDI.
Mode Standard
Périphérique audio
USB
Périphérique audio
USB
Pour plus d'informations sur le
mode Avancé et le mode
Standard, reportez-vous à la
section Mode Avancé et
mode Standard (p. 125).
Installation des pilotes et connexions (Windows)
Spécifiez la “Sortie
MIDI”.
Sortie MIDI
Mode Standard
Les fonctions MIDI ne peuvent
être utilisées en mode standard.
Fermez la boîte de dialogue Propriétés de
Multimédia.
Français
Cliquez sur [OK] pour confirmer.
La définition des paramètres de destination d’entrée et de
sortie audio et MIDI est terminée. Si vous avez installé le pilote
Windows standard, réglez le volume Windows.
Passez à la section suivante. ➝ Réglages du Contrôle du volume (p. 144)
Italiano
7
Mode Avancé
EDIROL UA-20 MIDI OUT
Pour plus d'informations sur le
mode Avancé et le mode
Standard, reportez-vous à la
section Mode Avancé et
mode Standard (p. 125).
Deutsch
Sélectionnez [Instrument
unique], choisissez un
instrument dans la liste qui
s’affiche, puis cliquez sur
[Appliquer].
Español
6
English
fig.2-29_30
143
Installation des pilotes et connexions (Windows)
■ Réglages du Contrôle du volume
Si vous avez installé le pilote Windows standard, réglez le
volume Windows.
1
Ouvrez le Contrôle du volume.
Cliquez sur le bouton [Démarrer] de Windows, puis
sélectionnez Programmes | Accessoires | Divertissement |
Contrôle du volume.
2
Montez ou baissez le curseur pour régler le volume de
l’UA-20.
Si l’option de contrôle du
volume n’est pas installée sur
votre ordinateur, utilisez
l’icône du Panneau de
configuration Ajout/
Suppression de
programmes pour l’installer.
Pour plus de précisions sur
l'installation, consultez le
manuel de l'utilisateur de
Windows ou l'Aide.
Si vous avez installé le pilote standard, le volume de l’UA-20
peut être réglé à l’aide du Contrôle du volume Windows.
Options pouvant être activées
Lecteur de CD
WAVE
SW Synth
Contrôle le volume des CD audio lus par le
lecteur de CD-ROM de l’ordinateur. (*1)
Règle le volume de sortie du périphérique
audio de sortie "EDIROL UA-20". Les sorties
numériques et analogiques sont affectées.
Règle le volume du synthétiseur logiciel
intégré à Windows.
* 1 Si le volume de lecture des CD n'est pas modifié en réglant ce
volume, utilisez le volume WAVE. Si vous utilisez Windows 2000
et que Lecteur CD ne s’affiche pas, activez l’option “Permettre
aux CD audio numériques d'être utilisés par le
périphérique de lecture” dans Lecture CD numérique.
➝ Lecture de CD audio depuis le lecteur de CD-ROM de
l’ordinateur, ou utilisation de l’UA-20 pour
l’environnement sonore des jeux (mode Standard
seulement) (p. 145)
144
Vous obtiendrez la meilleure
qualité audio avec l'UA-20 en
réglant le volume à son
maximum.
Si Muet est coché, ou si le
curseur est au plus bas, aucun
son ne sortira de l'UA-20.
Installation des pilotes et connexions (Windows)
English
Lecture de CD audio depuis le lecteur de CD-ROM de l’ordinateur, ou utilisation
de l’UA-20 pour l’environnement sonore des jeux (mode Standard seulement)
1.
Ouvrez la boîte de dialogue Propriétés Système.
Sélectionnez Démarrer | Paramètres | Panneau de configuration et, dans le
Panneau de configuration, cliquez deux fois sur l’icône Système.
(Windows XP– Cliquez sur le bouton Démarrer de Windows, puis dans le
menu qui s’affiche, choisissez Panneau de configuration).
2.
Ouvrez le Gestionnaire de périphériques.
Cliquez sur l’onglet Matériel, puis sur le bouton Gestionnaire de
périphériques.
3.
Ouvrez les Propriétés du lecteur de CD-ROM.
Cliquez deux fois sur le CD audio que vous utilisez. Dans Lecture CD
numérique , activez l’option “Lecture numérique pour les CD audio sur ce
lecteur CD-ROM”.
Deutsch
Windows XP/2000/XP :
1.
Ouvrez les Propriétés système.
Sélectionnez Démarrer | Paramètres | Panneau de configuration et, dans le
Panneau de configuration, cliquez deux fois sur l’icône Système.
2.
Ouvrez les Propriétés du lecteur de CD-ROM.
Cliquez deux fois sur l’icône CD-ROM, puis cliquez deux fois sur le lecteur de
CD-ROM que vous utilisez.
3.
Cliquez sur l’onglet Propriétés puis, dans Lecture CD numérique, activez
l’option “Lecture numérique pour les CD audio sur ce lecteur CD-ROM”.
Français
Windows Me :
1.
Ouvrez la boîte de dialogue Propriétés de Multimédia.
Sélectionnez Démarrer | Paramètres | Panneau de configuration et, dans le
Panneau de configuration, cliquez deux fois sur l’icône Multimédia.
2.
Dans CD audio, activez l’option “Lecteur CD-ROM par défaut pour les
CD audio”.
Italiano
Windows 98 :
Español
* Selon votre système, des problèmes de lecture peuvent subsister. Pour plus de détails,
contactez le fabricant de votre ordinateur. Si vous utilisez un lecteur de CD-ROM de type
PCMCIA, la lecture des données WAVE d’un CD-ROM ou d'un CD audio sur ce lecteur
peut interrompre le son ou le supprimer totalement.
145
Installation des pilotes et connexions
(Macintosh)
Si vous utilisez Windows, reportez-vous à la section Installation des pilotes et
connexions (Windows) (p. 125).
Qu'est-ce qu'un pilote ?
fig.05-1e_50
Un “ pilote" est un logiciel
qui sert à transférer les
Application
USB port
données entre l'UA-20 et le
logiciel tournant sur votre
USB
USB cable
driver
ordinateur, lorsque votre
ordinateur et l'UA-20 sont
Computer
UA-20
reliés par un câble USB. Le
pilote transmet les données de l'application à l'UA-20 et vice-versa.
Mode Avancé et mode Standard
L’UA-20 possède deux modes de fonctionnement, Avancé et Standard ; un pilote
différent est nécessaire pour chaque mode.
■ Mode Avancé
L’UA-20 fonctionne dans ce mode lorsque le commutateur ADVANCED DRIVER
est placé sur ON. Le pilote spécial fourni sur le CD-ROM est utilisé, permettant
d’enregistrer, de lire et de modifier les données audio avec une haute qualité et un
timing stable.
En mode Standard, les signaux audio sont transférés entre l’UA-20 et l’ordinateur à
une résolution de 24 bits et à une fréquence de 44,1 kHz.
Sélectionnez le mode Avancé si vous utilisez une application capable d’enregistrer,
de lire et de modifier de l’audio haute qualité, comme les applications 24 bits et
celles compatibles avec ASIO comme Cubase VST, Logic Audio et Metro.
En mode Avancé, l’UA-20 ne peut pas lire les données audio (CD audio et sons
d’avertissements) à partir du gestionnaire de sons du Macintosh.
(➝ Installation du pilote spécial (p. 147))
■ Mode Standard
L’UA-20 fonctionne dans ce mode lorsque le commutateur ADVANCED DRIVER
est placé sur OFF. Le pilote audio USB standard livré avec MacOS est dans ce cas
utilisé. En mode Standard, les signaux audio sont transférés entre l’UA-20 et
l’ordinateur à une résolution de 16 bits et une fréquence d’échantillonnage de
44,1 kHz. Sélectionnez ce mode si vous utilisez une application qui utilise les
fonctionnalités de MacOS, comme une application qui utilise le lecteur de CD-ROM
pour jouer des CD audio, ou une application qui utilise le synthétiseur logiciel
inclus dans MacOS. Le pilote standard inclus dans MacOS ne prend pas en charge
ASIO.
Notez par ailleurs que Mac OS 8.6 n’est pas supporté.
(➝ Installing the OS-standard driver (p. 53))
146
Installation des pilotes et connexions (Macintosh)
English
Basculement entre mode Avancé et mode Standard
Si vous installez à la fois le pilote spécial et le pilote standard, vous aurez la
possibilité de basculer entre les modes Standard et Avancé en agissant sur le
commutateur ADVANCED DRIVER de l’UA-20.
* Pour que le réglage du commutateur ADVANCED DRIVER prenne effet, vous devez
quitter les logiciels de type séquenceur ou toute autre application utilisant l’UA-20, puis
reconnecter ce dernier.
Deutsch
Installation du pilote spécial
Vous devez installer le pilote MIDI même si vous ne travaillez qu'avec de l'audio.
N'oubliez pas d'installer le pilote MIDI.
Utilisation d’OMS ou de FreeMIDI comme pilote MIDI.
Si vous utilisez OMS .................................................... (p. 148)
Si vous utilisez FreeMIDI ............................................ (p. 152)
Français
* OMS ou FreeMIDI doit être installé sur votre Macintosh, selon le logiciel séquenceur
utilisé.
* Si l'UA-20 est allumé, un message similaire à celui présenté ici s'affiche à la mise sous
tension du Macintosh. Suivez une des procédures décrites ci-après, selon le message qui
s'affiche.
Español
Italiano
Si l'écran affiche :
“Driver required for USB device ‘unknown device’ is not available. Search for
driver on the Internet?”
➝ Cliquez sur [Annuler].
Si l'écran affiche :
“Software required for using device ‘unknown device’ cannot be found.
Please refer to the manual included with the device, and install the necessary
software” (Reportez-vous au manuel livré avec le périphérique et installez les
logiciels nécessaires).
➝ Cliquez sur [OK].
147
Installation des pilotes et connexions (Macintosh)
■ Installation du pilote UA-20 (OMS)
Procédez comme suit pour installer le pilote UA-20.
Le pilote OMS UA-20 est un module supplémentaire fourni
pour pouvoir faire fonctionner l'UA-20 avec OMS. Pour
pouvoir l'utiliser, OMS doit déjà être installé sur le disque
de démarrage.
OMS se trouve dans le dossier
OMS Driver du dossier
Driver E sur le CD-ROM.
Pour plus d'information sur OMS, veuillez lire le document
“OMS_2.3_Mac.pdf” (manuel au format Acrobat) situé dans
le dossier “OMS Driver” du dossier Driver E sur le CD-ROM.
Pour pouvoir lire OMS_2.3_Mac.pdf, vous aurez besoin
d'Adobe Acrobat Reader.
* Débranchez l'UA-20 du Macintosh avant d'effectuer l'installation.
1
Quittez tous les logiciels (applications) actifs.
Si vous utilisez un anti-virus, quittez-le également.
2
Munissez-vous du CD-ROM.
Insérez le CD-ROM dans le lecteur de CD-ROM.
3
4
Cliquez deux fois sur l'icône UA-20 OMS Driver-E
Installer (dans le dossier Driver E–OMS Driver du
CD-ROM) pour lancer l'installeur.
Vérifiez l’emplacement de l’installation et cliquez
sur [Install].
fig.03-scdrv2Z.e
5
Si un message du
type suivant
s’affiche, cliquez
sur [Continuer].
Les autres
applications actives se ferment et l’installation continue.
148
L'emplacement d’installation
dépend de votre système
d’exploitation. Assurez-vous
que le disque de démarrage du
système que vous utilisez est
sélectionné.
Installation des pilotes et connexions (Macintosh)
English
Une boîte de dialogue s’affiche : Installation
completed.
Cliquez sur [Redémarrer] pour redémarrer le Macintosh.
Paramètres OMS
Pour vérifier les paramètres OMS, vous devez d'abord
connecter un module de sons MIDI à la prise MIDI OUT de
l'UA-20.
Pour plus d'informations sur la connexion d'un module de
sons MIDI, reportez-vous à la documentation de votre
module de sons MIDI.
4
Français
3
Utilisez le câble USB pour connecter l'UA-20 à
l’ordinateur.
Cet appareil est équipé d'un
circuit de protection. Lors de la
connexion au port USB,
attendez quelques secondes
avant d'utiliser l'appareil.
Depuis le CD-ROM, faites
glisser le dossier Driver
E-OMS Driver– Settings vers
le dossier Opcode–OMS du
disque dur du Macintosh pour
le copier.
Italiano
2
Placez le commutateur ADVANCED DRIVER de
l’UA-20 sur la position ON.
Dans le dossier Opcode-OMS
Application où vous avez
installé OMS, cliquez deux fois
sur OMS Setup pour le lancer.
Español
1
Deutsch
6
149
Installation des pilotes et connexions (Macintosh)
fig.03-omsusb1a.e
5
Si une boîte de
dialogue
similaire à celle
présentée ici
s'affiche, cliquez
sur [Turn It Off].
Une boîte de
confirmation
s'affiche, cliquez sur [OK].
fig.03-omsusb2.e
6
La boîte de dialogue
Create a New Studio
setup s'affiche.
Cliquez sur [Annuler]. Si
vous avez cliqué sur OK
par erreur, cliquez sur
[Cancel] dans la boîte suivante.
7
Choisissez Open dans le menu File.
Dans le dossier Settings que vous avez copié à l'étape 3,
sélectionnez le fichier UA-20 USB, puis cliquez sur [Open].
fig.50
Un écran similaire à celui
présenté ici s'affiche.
fig.51e
8
Dans le menu Edit,
sélectionnez OMS MIDI
Setup.
Dans la boîte de dialogue OMS
MIDI Setup qui s'affiche,
sélectionnez Run MIDI in background (Lancer MIDI en tâche
de fond), puis cliquez sur [OK].
150
Nous vous recommandons de
désactiver AppleTalk, en
ouvrant le Sélecteur dans le
menu Apple.
Installation des pilotes et connexions (Macintosh)
fig.52E
Dans le menu File,
sélectionnez Make
Current (Rendre actif).
English
9
Si vous ne pouvez pas
sélectionner Make Current,
cela signifie qu'il est déjà
activé et que vous pouvez
passer à l'étape suivante.
10
Deutsch
fig.03-omsusb07
Vérifiez que l'envoi et la
réception MIDI
fonctionnent correctement.
Dans le menu Studio,
sélectionnez Make Current
(Rendre actif).
11
Lorsque vous déplacez le
pointeur de la souris sur
l'icône du générateur de
sons, il se transforme en .
Si l'UA-20 ne produit aucun
son, reportez-vous à la section
No sound (p. 70).
Quittez OMS Setup.
Dans le menu File, choisissez [Quit]. Si la boîte de dialogue
AppleTalk confirmation s'affiche, cliquez sur [OK] pour la
fermer.
Español
12
Italiano
Cliquez sur les icônes du
générateur de sons entourées
d'un cercle dans l'illustration
ci-contre. Si du son est
audible depuis l’UA-20, les
paramètres sont corrects.
Français
fig.54
Les procédures de connexion de l'UA-20 au Macintosh et
d'installation du pilote MIDI sont terminées.
Vous devez ensuite procéder à l'installation du pilote ASIO.
➝ Installation du pilote ASIO (p. 155)
151
Installation des pilotes et connexions (Macintosh)
■ Installation du pilote UA-20 (FreeMIDI)
Procédez comme suit pour installer le pilote UA-20. Le pilote
UA-20 FreeMIDI est un module supplémentaire fourni pour
pouvoir faire fonctionner l'UA-20 avec FreeMIDI. Pour
pouvoir l'utiliser, FreeMIDI doit déjà être installé sur le
disque de démarrage.
* Débranchez l'UA-20 du Macintosh avant d'effectuer l'installation.
1
Quittez tous les logiciels (applications) actifs.
Si vous utilisez un anti-virus, quittez-le également.
2
Munissez-vous du CD-ROM.
Insérez le CD-ROM dans le lecteur de CD-ROM.
3
4
Cliquez deux fois sur l'icône UA-20 FM Driver - E
Installer (dans le dossier Driver E - FreeMIDI du
CD-ROM) pour lancer l'installeur.
Vérifiez l’emplacement de l’installation et cliquez
sur [Install].
fig.3-2_40
5
Si un message du
type suivant
s’affiche, cliquez
sur [Continuer].
Les autres
applications actives se ferment et l’installation continue.
6
152
Une boîte de dialogue s’affiche : Installation
completed. Cliquez sur [Redémarrer] pour
redémarrer le Macintosh.
Installation des pilotes et connexions (Macintosh)
Paramètres FreeMIDI
4
5
6
Deutsch
3
Utilisez le câble USB pour connecter l'UA-20 à
l’ordinateur.
Cet appareil est équipé d'un
circuit de protection. Lors de la
connexion au port USB,
attendez quelques secondes
avant d'utiliser l'appareil.
Depuis le CD-ROM, copiez le dossier Driver
E - FreeMIDI Driver - Settings sur le disque
dur du Macintosh.
Français
2
Placez le commutateur ADVANCED DRIVER de
l’UA-20 sur la position ON.
Ouvrez le dossier FreeMIDI Applications à
l'emplacement où vous avez installé FreeMIDI, puis
cliquez deux fois sur l'icône FreeMIDI Setup pour le
lancer.
Quand “OMS is installed on this computer...” (OMS
est installé sur cet ordinateur) s'affiche, cliquez sur
[FreeMIDI].
Italiano
1
English
Pour vérifier les paramètres FreeMIDI, vous devez d'abord
connecter un module de sons MIDI à la prise MIDI OUT de
l'UA-20.
Pour plus d'informations sur la connexion d'un module de
sons MIDI, reportez-vous à la documentation de votre
module de sons MIDI.
Au premier lancement du logiciel, une boîte de
dialogue “Welcome to FreeMIDI!” s'affiche.
7
Español
Cliquez sur [Continue].
Quand la boîte de dialogue FreeMIDI Preferences
s'affiche, cliquez sur [Cancel].
153
Installation des pilotes et connexions (Macintosh)
8
9
10
11
Quand la boîte de dialogue About Quick Setup
s'affiche, cliquez sur [Cancel].
Dans le menu File, sélectionnez Open.
Sélectionnez UA-20 USB dans le dossier Settings que
vous avez copié à l'étape 3, puis cliquez sur [Open].
Vérifiez que l'envoi et la réception MIDI fonctionnent
correctement.
Dans le menu MIDI, sélectionnez Check Connections.
fig.fm2
12
Le pointeur de la souris
prend la forme d'un clavier.
Cliquez sur les icônes du
générateur de sons
entourées d'un cercle dans
l'illustration ci-contre.
Si vous entendez du son, cela
signifie que les messages MIDI sont envoyés du Macintosh
vers l'UA-20.
13
14
Si l'UA-20 ne produit aucun
son, reportez-vous à la section
No sound (p. 70).
Choisissez à nouveau la commande MIDI Check
Connections pour terminer le test.
Dans le menu File, choisissez Quit pour quitter
FreeMIDI Setup.
Les procédures de connexion de l'UA-20 au Macintosh et
d'installation du pilote MIDI sont terminées.
Vous devez ensuite procéder à l'installation du pilote ASIO.
➝ Installation du pilote ASIO (p. 155)
154
Installation des pilotes et connexions (Macintosh)
En mode Avancé, l'UA-20 ne peut jouer des données audio
avec le gestionnaire de sons du Macintosh (comme les
CD audio et des sons d'alarmes).
Le pilote ASIO de l’UA-20 supporte les canaux d’entrée/
sortie audio suivants.
ASIO (Steinberg Audio
Stream In/Out Interface)
Il s’agit d’un standard
d’interface audio proposé
par Steinberg Corporation. Si
l'UA-20 est utilisé avec un
logiciel compatible ASIO, la
précision de la
synchronisation est
améliorée, ce qui procure un
excellent environnement de
production musicale.
Deutsch
Vous devez installer le pilote MIDI même si vous ne travaillez
qu'avec de l'audio. N'oubliez pas d'installer le pilote MIDI.
avant d'installer le pilote ASIO.
Cette section explique comment installer le pilote ASIO pour
permettre à votre UA-20 d’utiliser votre logiciel séquenceur
ou votre logiciel audio. Pour plus de détails sur l’installation
et la configuration du pilote ASIO, lisez également le
document Driver E–ASIO Driver–Setting ASIO DriverE.HTM présent sur le CD-ROM.
English
Installation du pilote ASIO
• Entrée audio .....24/16 bits1 canal stéréo (2 canaux mono)
• Sortie audio ......24/16 bits1 canal stéréo (2 canaux mono)
Français
La section suivante explique comment installer le pilote 1.0
16 bits, compatible ASIO.
Si le logiciel au standard ASIO supporte ASIO 2.0 ainsi que
l’enregistrement et la lecture des données audio 24 bits, les pilotes suivants
vous procurent un environnement de meilleure qualité.
Pilote à utiliser
✕
✕
❍
❍
✕
❍
✕
❍
UA-20 ASIO 1.0 16
UA-20 ASIO 1.0 24
UA-20 ASIO 2.0 16
UA-20 ASIO 2.0 24
Español
Compatibles 24 bits
Italiano
Logiciels compatibles ASIO
Compatibles ASIO 2.0
155
Installation des pilotes et connexions (Macintosh)
fig.05-21e_30
1
2
3
156
A partir du dossier
Driver E–ASIO
Driver du CD-ROM,
copiez [UA-20
ASIO1.0 16bit] dans le dossier [ASIO Drivers] du
dossier ASIO Drivers du logiciel ASIO que vous
utilisez (Cubase VST, Logic Audio, Digital Performer,
Metro, SPARK LE, etc.).
Démarrez votre logiciel compatible ASIO (Cubase
VST, Logic Audio, Digital Performer, Metro, SPARK
LE, etc.).
Ouvrez la boîte de dialogue des réglages audio
du logiciel compatible ASIO, puis sélectionnez
[UA-20 ASIO 16bit] comme périphérique ASIO.
La boîte de dialogue des
réglages audio portera un
nom différent selon le
logiciel utilisé. Pour plus de
détails, reportez-vous au
manuel du logiciel.
UA-20 application guide
Si vous utilisez l’UA-20 en mode Avancé, vous pouvez modifier les réglages du pilote
pour contrôler la latence de l’audio. Pour agir sur cette latence, modifiez la valeur de
Buffer Size dans la boîte de dialogue de configuration du pilote.
English
Réglage de la latence audio
1
2
Comme expliqué à la section “Ouverture de la boîte de dialogue des
paramètres du pilote spécial (p. 159)”, ouvrez la boîte de dialogue “Driver
Settings”.
Modifiez la taille des buffers du pilote (buffer size).
Deutsch
* Latence : intervalle de temps entre le moment où une application lit des données audio et le
moment où ces données audio sont jouées par un appareil audio comme l’UA-20.
Les réglages suivants permettre de réduire la latence au minimum.
Windows :
Réglez “Audio Buffer Size” au maximum vers la gauche (Min).
3
4
Français
Macintosh :
Réglez “Buffer Size” au maximum vers la gauche (Min).
Cliquez sur [OK] dans la boîte de dialogue.
Redémarrez l’application qui utilise l’UA-20.
Lisez des données audio depuis votre application.
Si le son s’interrompt par instants, répétez cette procédure et augmentez petit à petit
Buffer size (taille des buffers) spécifié à l’étape 2, jusqu’à ce que le son ne s’interrompe
plus.
* Selon l’application que vous utilisez, les réglages de buffer size et latency peuvent être
également accessibles par les paramètres audio de l’application. Pour plus de détails,
reportez-vous au manuel de l’application.
Español
5
Italiano
Si votre application dispose d’une fonction de test, utilisez-la.
157
UA-20 application guide
Utilisation d’ASIO Direct Monitor
Si vous utilisez l’UA-20 avec une application compatible ASIO2.0 en mode Avancé , le
commutateur de contrôle d’entrée peut être réglé automatiquement depuis
l’application.
1
2
Comme expliqué à la section “Ouverture de la boîte de dialogue des
paramètres du pilote spécial (p. 159)”, ouvrez la boîte de dialogue “Driver
Settings”.
Effectuez les réglages suivants.
Activez l’option “Use ASIO Direct Monitor”.
3
Cliquez sur [OK] dans la boîte de dialogue.
* Selon votre application, vous pouvez effectuer ce réglage ASIO Direct Monitor dans les
paramètres audio de l’application elle-même. Pour plus de détails, reportez-vous au manuel de
l’application.
* Si vous utilisez ASIO Direct Monitor, le contrôle d’entrée peut s’interrompre inopinément,
selon les réglages de l’application et de la procédure d’enregistrement. Si tel est le cas, cliquez
à nouveau sur l’option de l’étape 2 pour désactiver ASIO Direct Monitor.
158
UA-20 application guide
English
Ouverture de la boîte de dialogue des paramètres
du pilote spécial
Avec le pilote WDM et Windows XP/2000 :
1.
Ouvrez le “Panneau de configuration” et cliquez deux fois sur l'icône
“EDIROL UA-20”.
2.
La boîte de dialogue “EDIROL UA-20 Driver Settings” s’affiche.
* Avec Windows XP, cliquez sur “Switch to classic view” pour passer en mode Vue
classique. EDIROL UA-20 ne s'affichera pas si la vue classique n'est pas activée.
Ouvrez le Panneau de configuration et cliquez deux fois sur l'icône Système.
2.
Cliquez sur l’onglet Matériel, puis sur le bouton Gestionnaire de périphériques.
3.
Cliquez deux fois sur Contrôleurs son, vidéo et jeux.
4.
Cliquez deux fois sur EDIROL UA-20.
5.
Cliquez sur l’onglet Propriétés et, dans la zone Périphériques multimédia,
cliquez deux fois sur Périphériques audio.
6.
Sélectionnez EDIROL UA-20 et cliquez sur le bouton [Propriétés].
7.
Cliquez sur le bouton [Settings], la boîte de dialogue EDIROL UA-20 Driver
Settings s’affiche.
1.
Ouvrez le “Panneau de configuration” et cliquez deux fois sur l'icône “Sons et
multimédia”. (Avec Windows 98, cliquez deux fois sur Multimédia.)
2.
Cliquez sur l’onglet Périphériques et cliquez deux fois sur Périphériques audio.
3.
Sélectionnez EDIROL UA-20 Audio et cliquez sur le bouton [Propriétés] pour la
boîte de dialogue des propriétés.
4.
Cliquez sur le bouton [Settings], la boîte de dialogue EDIROL UA-20 Driver
Settings s’affiche.
Avec un Macintosh :
Ouvrez le tableau de bord ASIO depuis la boîte de dialogue Audio Settings de votre
application compatible ASIO. Le nom de cette boîte de dialogue et la procédure
d’ouverture du tableau de bord ASIO dépendent de votre application. Pour plus de
détails, reportez-vous au manuel de l’application.
159
Español
Avec Windows Me :
Italiano
Français
1.
Deutsch
Avec le pilote MME et Windows XP/2000 :
En cas de problème
En cas de problème
Si un problème inattendu se produit avec l'UA-20, veuillez lire ce chapitre. Il contient
de nombreuses solutions aux problèmes les plus courants.
Si vous utilisez Windows ou le Macintosh pour la première fois et que vous avez du mal
à suivre ces explications, veuillez vous reporter à la documentation livrée avec
l’ordinateur ou le système d’exploitation.
Problèmes communs à Windows et au Macintosh
Problèmes spécifiques à Windows
Problèmes spécifiques au Macintosh
Problèmes liés au pilote USB
Une boîte de dialogue “Périphérique inconnu détecté”
s’affiche et vous empêche d’installer le pilote
L’“Assistant ajout de nouveau matériel” ne s’exécute
pas automatiquement
L’“Assistant ajout de nouveau matériel” s’interrompt
avant la fin du processus
•
15 secondes (ou plus) s’écoulent entre le branchement du câble ISB et la
détection de l’UA-20.
•
Le câble USB est-il correctement branché ?
Vérifiez que l'UA-20 et l'ordinateur sont correctement reliés par le câble USB.
•
USB est-il actif sur votre ordinateur ?
Reportez-vous à la documentation de votre ordinateur et vérifiez qu’USB est bien
activé.
•
Il est notoire que, dans certains cas, des fichiers de Windows 98 requis pour
l’audio par connexion USB ne sont pas installés d’origine.
Veuillez vous renseigner auprès du constructeur de l'ordinateur.
160
•
“Périphérique inconnu” s'affiche à la place de “Autres périphériques” ou de
“Contrôleur USB” ?
Appliquez la procédure suivante pour supprimer “Autres périphériques” (Contrôleur
USB) “Périphérique inconnu”, puis redémarrez votre ordinateur.
1.
Dans le Panneau de configuration de Windows, cliquez deux fois sur l'icône
Système. La boîte de dialogue Propriétés Système s'affiche.
2.
Cliquez sur l'onglet Gestionnaire de périphériques.
3.
Cliquez deux fois sur “Autres périphériques” ou “Contrôleur USB” pour
obtenir la liste des périphériques.
4.
Dans la liste, sélectionnez le périphérique inconnu et cliquez sur [Supprimer].
5.
Dans la boîte de dialogue de confirmation de suppression, cliquez sur [OK].
6.
Vérifiez que la liste n'affiche pas Autres périphériques ou Périphérique
inconnu et cliquez sur [Fermer] pour fermer la boîte de dialogue.
Deutsch
Votre ordinateur répond-il aux normes USB ?
Si vous utilisez un ordinateur qui ne satisfait pas aux besoins électriques des
spécifications USB, son fonctionnement peut être instable. Dans de tels cas, vous
pouvez résoudre le problème en connectant un répartiteur USB (hub).
“Périphérique inconnu détecté” s’affiche alors que vous
avez installé le pilote
Si votre ordinateur ou répartiteur USB est équipé de deux connecteurs USB (ou plus) et
que vous connectez l'UA-20 à un connecteur USB auquel l’appareil n’a jamais été
connecté, la boîte de dialogue "Périphérique inconnu" risque de s'afficher, même si le
pilote a déjà été installé sur votre ordinateur.
Français
•
English
En cas de problème
Italiano
Reportez-vous à la section Installation des pilotes et connexions (Windows) (p. 125)
pour réinstaller le pilote. Il ne s'agit pas d'un dysfonctionnement.
Le pilote n’est pas correctement installé
Utilisez la procédure décrite dans Deleting the special driver (p. 79) pour supprimer
le pilote de périphérique audio USB de votre ordinateur, et installez à nouveau les
pilotes de l'UA-20 comme décrit dans Installation des pilotes et connexions
(Windows) (p. 125). Vérifiez également si “Périphérique inconnu” est indiqué dans
“Autres périphériques” ou “Contrôleur USB”.
Español
Si vous trouvez un “Périphérique inconnu”, supprimez-le.
161
En cas de problème
Impossible d’installer/désinstaller/utiliser le pilote avec
Windows XP/2000
•
Avez-vous ouvert une session Windows en tant qu’utilisateur doté de privilèges
d’administration ?
Pour pouvoir installer, supprimer ou réinstaller le pilote sous Windows XP/2000, vous
devez avoir ouvert une session en tant qu’utilisateur doté de privilèges administratifs,
comme Administrateur. Pour plus de détails, consultez votre responsable système.
•
Avez-vous réglé les “Options de signature des pilotes” ?
Pour pouvoir installer ou réinstaller un pilote, vous devez configurer les “Options de
signature des fichiers”.
(Windows XP ➝ p. 127, Windows 2000 ➝ p. 133)
Windows XP/2000 affiche une boîte de dialogue
“Installation du matériel” ou “Signature numérique
introuvable”
•
Avez-vous réglé les “Options de signature des pilotes” ?
Pour pouvoir installer ou réinstaller le pilote, vous devez configurer les Options de
signature des fichiers.
(Windows XP ➝ p. 127, Windows 2000 ➝ p. 133)
Est-ce que le Gestionnaire de périphériques affiche “?”,
“!”, ou “USB Composite” ?
La boîte de dialogue “Insérez le disque” ne s’affiche pas
Appliquez la procédure suivante pour réinstaller le pilote.
162
1.
Eteignez l’ordinateur, débranchez tous les câbles USB (sauf ceux du clavier et
de la souris) et rallumez-le.
2.
Une fois Windows démarré, branchez l’UA-20 à l’ordinateur à l’aide d’un
câble USB.
3.
Cliquez sur le bouton [Démarrer] de Windows, puis dans le menu qui
s’affiche, choisissez Paramètres | Panneau de configuration.
4.
Cliquez deux fois sur l’icône Système. La boîte de dialogue Propriétés
Système s'affiche.
5.
Cliquez sur l'onglet Gestionnaire de périphériques.
6.
Regardez si s’affiche “?Périphérique USB Composite”, “?Périphérique
USB”, “!Périphérique USB” ou “Périphérique USB composite” sous
“Contrôleurs son, vidéo et jeux”, “Autres périphériques” ou “Contrôleur
USB”. Si c’est le cas, sélectionnez la ligne concernée et cliquez sur
[Supprimer].
7.
Une boîte de dialogue vous demande de confirmer la suppression. Lisez le
message et cliquez sur [OK]. De la même façon, supprimez les lignes
“?Périphérique USB composite”, “?Périphérique USB”, “Périphérique
USB” ou “Périphérique USB composite” éventuellement présentes.
8.
Si vous voyez le pilote USB EDIROL UA-20 précédé d’un “!” jaune ou d’un
“?” rouge, supprimez-le également.
9.
Lorsque vous avez fini de supprimer les périphériques indésirables, cliquez
sur [OK] dans la boîte de dialogue Propriétés Système.
English
En cas de problème
10. Eteignez l’UA-20, puis supprimez le pilote. (➝ Deleting the special driver
(p. 79))
Deutsch
11. Redémarrez Windows. Installez à nouveau le pilote. (➝ Installation des
pilotes et connexions (Windows) (p. 125))
Español
Italiano
Français
* Si le problème persiste, reportez-vous au fichier Readme du pilote USB. Ce fichier se trouve
sur le CD-ROM.
163
Collegamenti e installazione dei
driver (Windows)
Per gli utenti Macintosh, fare riferimento alla sezione Collegamenti e installazione
dei driver (Macintosh) (pag. 185).
Definizione di un driver
fig.05-1e_50
Un “driver” è un
programma che trasferisce
i dati tra l’UA-20 e il
programma utilizzato sul
computer attraverso un
cavo USB. Il driver
trasmette i dati
dall’applicazione
all’UA-20 e viceversa.
Application
USB port
USB
driver
USB cable
Computer
UA-20
Modo driver Advanced e Standard
L’UA-20 offre la possibilità di utilizzare due modi operativi, modo Advanced e
modo Standard, ciascuno dei quali utilizza un driver diverso.
■ Modo Advanced
Per impostare questo modo sull’UA-20, spostare l’interruttore ADVANCE
(selezione del modo) sul pannello posteriore in posizione ON. Verrà utilizzato il
driver speciale contenuto nel CD-ROM che consente di registrare, riprodurre e
editare l’audio ottenendo qualità e timing ottimali. Nel modo Advanced, i segnali
audio vengono trasferiti tra l’UA-20 e il computer ad una risoluzione di 24 bit e con
una frequenza di campionamento di 44.1 kHz. Selezionare questo modo se si
utilizza un’applicazione che permette di effettuare operazioni di registrazione,
riproduzione e editing di alta qualità, come ad esempio un’applicazione che
supporta l’audio 24 bit, ad esempio la serie Cakewalk o Cool Edit, o
un’applicazione ASIO compatibile, ad esempio Cubase VST o Logic Audio.
(➝ Installazione del driver speciale (pag. 165))
■ Modo driver Standard
Per impostare questo modo sull’UA-20, spostare l’interruttore ADVANCE
(selezione del modo) sul pannello posteriore in posizione OFF. Verrà utilizzato il
driver audio standard USB fornito con Windows. Nel modo Standard, i segnali
audio vengono trasferiti tra l’UA-20 e il computer ad una risoluzione di 16 bit e con
una frequenza di campionamento di 44.1 kHz.
Selezionare questo modo se si utilizza un’applicazione che utilizza le funzionalità
Windows, ad esempio un’applicazione che utilizza il lettore CD-ROM per
riprodurre un CD audio, o un’applicazione che utilizza il sintetizzatore software
fornito con Windows.
164
Collegamenti e installazione dei driver (Windows)
Il driver standard fornito con Windows non supporta ASIO.
(➝ Installing the OS-standard driver (pag. 31))
English
* Per utilizzare la funzionalità MIDI, attivare il modo Advanced.
Attivazione dei modi driver Advanced e Standard
Se sono stati installati entrambi i driver, quello speciale e quello standard, si potrà
passare dall’uno all’altro modo azionando l’interruttore di selezione ADVANCE
dell’UA-20.
Deutsch
* Per rendere effettiva l’impostazione dell’interruttore ADVANCE, è necessario chiudere
tutti i software sequencer e le altre applicazioni che utilizzano l’UA-20 e ricollegare
l’apparecchio.
Installazione del driver speciale
Français
La procedura d’installazione dipenderà dal sistema utilizzato.
Passare ad una delle sezioni seguenti a seconda del sistema utilizzato.
• Utenti Windows XP/2000 ...............................(pag. 165)
• Utenti Windows Me/98...................................(pag. 177)
■ Utenti Windows XP/2000
Il CD-ROM contiene due tipi di driver per Windows XP/2000.
Si dovrebbe utilizzare il driver WDM.
* Non è possibile utilizzare l’audio 24 bit con applicazioni che sono sprovviste di un modo
driver WDM, come Cool Editor o Lettore multimediale.
Driver MME
Il driver permette di utilizzare l’audio a 24 bit anche con applicazioni che sono
sprovviste di un modo driver WDM, come Cool Edit. Non è possibile utilizzare il
driver MME a partire dalla modalità driver WDM di un’applicazione come SONAR.
Español
* Non è possibile installare entrambi i driver WDM e MME. Sarà necessario sceglierne
uno e installare solo quello. Se dopo aver installato uno dei driver, si decide di cambiarlo,
sarà prima necessario cancellare quello già installato e quindi installare quello nuovo.
(➝ Deleting the special driver (pag. 79))
Italiano
Driver WDM
Utilizzare questo driver se è stato specificato il modo WDM per SONAR o
applicazioni simili. L’audio ottenuto sarà in questo caso quello ottimale.
* I driver WDM e MME possono essere installati seguendo la stessa procedura.
165
Collegamenti e installazione dei driver (Windows)
Utenti Windows XP
1
Dopo aver scollegato l’UA-20, avviare Windows.
Scollegare tutti i cavi USB, ad eccezione della tastiera e del
mouse USB, se utilizzati.
2
Aprire la finestra di dialogo Proprietà del sistema.
1.
In Windows, fare clic sul menu Start e nel menu
selezionare Pannello di controllo.
2.
In “Scegliere una categoria”, fare clic su “Prestazioni
e manutenzione”.
3.
In “o un’icona del Pannello di controllo”, fare clic
sull’icona Sistema.
fig.2-1
3
Se si utilizza Windows XP
Professional, è necessario
collegarsi come un nome
utente dotato di privilegi
amministrativi, ad esempio
come Administrator. Per
maggiori informazioni sugli
account degli utenti, contattare
l’amministratore del sistema.
A seconda di come il sistema è
configurato, l’icona Sistema
potrebbe essere visualizzata
direttamente nel Pannello di
controllo (visualizzazione
classica). In tal caso fare
doppio clic sull'icona Sistema.
Fare clic sulla scheda
Hardware e poi sul
pulsante [Firma driver].
Aprire la finestra di dialogo
Opzioni firma driver.
fig.2-2
4
Accertarsi che
“Scegliere una delle
seguenti opzioni” sia
impostato su “Ignora”
Se è attivata l’opzione
“Ignora” fare clic su [OK].
Se non è impostata su
“Ignora” prendere nota
dell’impostazione corrente (di avviso o di blocco). Modificare
quindi l’impostazione su “Ignora” e fare clic su [OK]
Dopo aver installato il driver, ripristinare l’impostazione
d’origine.
(➝ Se è stato modificato il parametro “Scegliere una delle
seguenti opzioni” (pag. 171))
166
Se al passo 4il parametro
“Scegliere una delle
seguenti impostazioni” è
stato modificato, dopo aver
installato il driver è necessario
ripristinare l’impostazione
d’origine. (➝ Se è stato
modificato il parametro
“Scegliere una delle
seguenti opzioni” (pag. 171))
Collegamenti e installazione dei driver (Windows)
5
6
English
Fare clic su [OK] per chiudere la finestra di dialogo
Proprietà del sistema.
Chiudere tutti i programmi in corso di esecuzione.
Chiudere anche le altre finestre aperte. Se si utilizza un
programma antivirus o simile, accertarsi che sia anch’esso
chiuso.
7
Deutsch
Preparare il CD-ROM.
Inserire il CD nell’unità CD-ROM del computer.
8
Fare clic sul pulsante Start di Windows. Nel menu
visualizzato, selezionare “Esegui”.
Aprire la finestra di dialogo “Esegui...” .
Se si utilizza il driver MME,
immettere MME invece di
WDM.
D:\Driver\USB_XP2K\WDM\SETUPINF.EXE
* L’identificativo dell’unità “D:” potrebbe essere diverso da quello del
sistema utilizzato. In questo caso specificare il nome dell’unità
CD-ROM utilizzata.
fig.2-4_30
10
Appare la finestra di dialogo
SetupInf.
In questo manuale, la
posizione delle cartelle e dei
file è indicata nel percorso del
file utilizzando il carattere \
come delimitatore.
Ad esempio,
USB_XP2K\SETUPINF.EXE
indica che il file Setupinf.exe
si trova nella cartella
USB_XP2K.
È ora possibile installare il driver.
167
Italiano
Nella finestra di
dialogo che appare,
immettere quanto
segue nel campo
“Apri” e fare clic su
[OK].
Español
9
Français
fig.2-3_30
Collegamenti e installazione dei driver (Windows)
11
12
Impostare l’interruttore ADVANCE (selezione del
modo) dell’UA-20 in posizione ON.
Utilizzare il cavo USB per collegare l’UA-20 al
computer.
Nella barra delle applicazioni verrà visualizzato il messaggio
“Trovato nuovo hardware”. Attendere qualche minuto.
Questo apparecchio è
provvisto di un circuito di
protezione. È necessario
aspettare qualche secondo
dopo aver inserito un
connettore USB prima che
l’apparecchio funzioni
normalmente.
fig.2-6
13
Verrà visualizzata la
finestra di dialogo
Installazione guidata
nuovo hardware.
Accertarsi che sullo
schermo appaia
“EDIROL UA-20 (WDM)”,
selezionare “Installa da un
elenco o percorso
specifico (per utenti esperti)” e fare clic su [Avanti].
fig.2-7
14
La finestra visualizzerà
il seguente messaggio
“Selezionare le opzioni
di ricerca e di
installazione”.
Selezionare “Non
effettuare la ricerca. La
scelta del driver da installare verrà effettuata
manualmente”, e fare clic su [Avanti].
168
Se si tratta del driver MME,
accertarsi che “EDIROL UA-20
(MME)” sia visualizzato.
Collegamenti e installazione dei driver (Windows)
Accertarsi che il campo
“Modello” visualizzi
“EDIROL UA-20
(WDM)” e fare clic su
[Avanti]. La procedura
di installazione del
driver verrà avviata.
Se si tratta del driver MME,
accertarsi che “EDIROL UA-20
(MME)” sia visualizzato.
Deutsch
15
English
fig.2-8_20
Se l’impostazione “Scegliere una delle seguenti opzioni” non è stata
impostata su “Ignora”, comparirà il messaggio “Installazione guidata
hardware”.
1.
Fare clic su [Continuare].
2.
Continuare l’installazione.
Français
Se “Scegliere una delle seguenti opzioni” è impostato su “Avvisa”.
1.
Fare clic su [OK].
2.
Quando appare la finestra
“Installazione guidata nuovo
hardware”, fare clic su [Fine].
3.
Eseguire l’installazione come
descritto nella sezione “Troubleshooting”, La finestra Gestione
periferiche visualizza “?”, “!”, or “Periferica USB composita”
(pag. 201).
Italiano
Se “Scegliere una delle seguenti opzioni” è impostato su “Blocca”
16
Viene visualizzata la
finestra di dialogo
Inserire il disco
Fare clic su [OK].
Viene visualizzata la finestra
di dialogo Inserire il disco.
In questo caso passare al
passo 17.
169
Español
fig.2-9_30
Collegamenti e installazione dei driver (Windows)
fig.2-10_30
17
Viene visualizzata la
finestra di dialogo
Richiesta file Immettere
quanto segue nel campo
“Copia file da” e fare clic su [OK].
D:\Driver\USB_XP2K\WDM
Se si utilizza il driver MME,
immettere MME invece di
WDM.
* L’identificativo dell’unità “D:” potrebbe essere diverso da quello del
sistema utilizzato. In questo caso specificare il nome dell’unità
CD-ROM utilizzata.
Se l’impostazione “Scegliere una delle seguenti opzioni” non è stata impostata
su “Ignora” comparirà il messaggio “Installazione guidata hardware”.
Se “Scegliere una delle seguenti opzioni” è impostato su
“Avvisa”
1.
Fare clic su
[Continuare].
2.
Continuare
l’installazione.
fig.2-11_20
3
Verrà visualizzata la
finestra di dialogo
Installazione guidata
nuovo hardware.
Accertarsi che “EDIROL UA-20 (WDM)” o “EDIROL UA-20
(MME)” sia visualizzato e fare clic su [Fine].
Attendere fino a quando nella barra delle applicazioni non
appare il messaggio “Trovato nuovo hardware”.
4
Alla fine dell’installazione del driver, comparirà la
finestra di dialogo Modifica impostazioni di
sistema.
Fare clic su [Sì]. Windows verrà riavviato automaticamente.
170
Collegamenti e installazione dei driver (Windows)
English
Se è stato modificato il parametro “Scegliere una delle seguenti
opzioni”
1.
Se si utilizza Windows XP Professional, collegarsi con un nome utente
dotato di privilegi di tipo amministrativo (ad esempio Administrator).
2.
In Windows, fare clic sul menu Start e nel menu selezionare Pannello di
controllo.
3.
In “Scegliere una categoria”, fare clic su “Prestazioni e
manutenzione”.
Deutsch
Se l’impostazione Scegliere una delle seguenti opzioni è stata modificata,
ripristinare il parametro d’origine dopo aver riavviato Windows.
4.
In “o un’icona del Pannello di controllo”, fare clic sull’icona Sistema.
Viene visualizzata la finestra di dialogo Proprietà del sistema.
5.
Fare clic sulla scheda Hardware e poi sul pulsante [Firma driver]. Verrà
visualizzata la finestra di dialogo Opzioni firma driver.
6.
Ripristinare l’impostazione Scegliere una delle seguenti opzioni al
valore d’origine (di avviso o di blocco) e fare clic su [OK].
7.
Fare clic su [OK]. La finestra di dialogo Proprietà di sistema si chiude.
Français
* A seconda di come il sistema è configurato, l’icona Sistema potrebbe essere
visualizzata direttamente nel Pannello di controllo (visualizzazione
classica). In tal caso fare doppio clic sull'icona Sistema.
Español
Italiano
Successivamente sarà necessario configurare il driver.
(➝ Configurazione e verifica (pag. 179))
171
Collegamenti e installazione dei driver (Windows)
Utenti Windows 2000
1
Dopo aver scollegato l’UA-20, avviare Windows.
Scollegare tutti i cavi USB, ad eccezione della tastiera e del
mouse USB, se utilizzati.
2
3
Collegarsi a Windows con i privilegi di un
amministratore, ad esempio come Administrator.
Aprire la finestra di dialogo Proprietà del sistema.
In Windows, fare clic sul pulsante Start e nel menu
selezionare Impostazioni | Pannello di controllo. Nel
Pannello di controllo, fare doppio clic sull'icona Sistema.
Se l’UA-20 è già collegato al
computer e appare il
messaggio “Installazione
guidata nuovo hardware”,
aprire sul CD-ROM la cartella
denominata
DRIVER\USB_XP2K\WDM o
DRIVER\USB_XP2K\MME,
aprire il file Readme_e.htm, e
leggere la sezione
“Troubleshooting” intitolata
“You attempted to install
using the above procedure,
but were not able to.”
fig.05-2e_30
4
Fare clic sulla scheda
Hardware e poi sul
pulsante [Firma driver].
Aprire la finestra di dialogo
Opzioni firma driver.
fig.05-3e_30
5
Accertarsi che “Verifica
firma file” sia impostato su
“Ignora”.
Se è attivata l’opzione
“Ignora” fare clic su [OK].
Se non è impostata su “Ignora”
prendere nota
dell’impostazione corrente (di
avviso o di blocco). Modificare
quindi l’impostazione su “Ignora” e fare clic su [OK]
Dopo aver installato il driver, ripristinare l’impostazione
d’origine. (➝ Se è stata modificata l’impostazione
“Verifica firma file” (pag. 176))
172
Se “Verifica firma file” è
stato modificato al passo 5,
si dovrà ripristinare
l’impostazione d’origine
dopo aver installato il driver.
(–> Se è stata modificata
l’impostazione “Verifica
firma file” (pag. 176))
Collegamenti e installazione dei driver (Windows)
6
7
English
Fare clic su [OK] per chiudere la finestra di dialogo
Proprietà del sistema.
Chiudere tutti i programmi in corso di esecuzione.
Chiudere anche le altre finestre aperte. Se si utilizza un
programma antivirus o simile, accertarsi che sia anch’esso
chiuso.
8
Fare clic sul pulsante Start di Windows. Nel menu
visualizzato, selezionare “Esegui”.
Aprire la finestra di dialogo “Esegui...”.
fig.05-5e_30
10
Nella finestra di dialogo
che appare, immettere
quanto segue nel campo
“Apri” e fare clic su
[OK].
D:\DRIVER\USB_XP2K\WDM\SETUPINF.EXE
In questo manuale, la
posizione delle cartelle e dei
file è indicata nel percorso del
file utilizzando il carattere \
come delimitatore. Ad
esempio, WDM\Setupinf.exe
indica che il file Setupinf.exe
si trova nella cartella WDM.
Se si utilizza il driver MME,
immettere MME invece di
WDM.
Italiano
9
* L’identificativo dell’unità “D:” potrebbe essere diverso da quello del
sistema utilizzato. In questo caso specificare il nome dell’unità
CD-ROM utilizzata.
fig.05-6e_30
Appare la finestra di
dialogo SetupInf.
Español
11
È ora possibile installare il
driver.
12
Français
Inserire il CD nell’unità CD-ROM del computer.
Deutsch
Inserire il CD-ROM.
Impostare l’interruttore ADVANCE (selezione del
modo) dell’UA-20 in posizione ON.
173
Collegamenti e installazione dei driver (Windows)
13
Utilizzare il cavo USB per collegare l’UA-20 al
computer.
Se l’impostazione “Verifica firma file” non è stata
impostata su “Ignora”, verrà visualizzato il
messaggio “Firma digitale non trovata”.
Questo apparecchio è
provvisto di un circuito di
protezione. È necessario
aspettare qualche secondo
dopo aver inserito un
connettore USB prima che
l’apparecchio funzioni
normalmente.
Se “Verifica firma digitale” è impostato su
“Avvisa”,
1.
Fare clic su [Sì].
2.
Continuare
l’installazione.
Se “Verifica firma digitale” è impostato su “Blocca”,
1.
Fare clic su [OK].
2.
Quando appare la finestra
“Installazione guidata
nuovo hardware”, fare
clic su [Fine].
3.
Eseguire l’installazione
come descritto nella sezione
“Troubleshooting”, La finestra Gestione
periferiche visualizza “?”, “!”, or “Periferica
USB composita” (pag. 201).
fig.05-8e_30
14
Viene visualizzata la
finestra di dialogo
Inserire il disco
Fare clic su [OK].
174
Se la finestra di dialogo
Inserire il disco non appare,
leggere la sezione La finestra
di dialogo “Inserire il disco”
non appare (pag. 201)
Collegamenti e installazione dei driver (Windows)
15
Viene visualizzata la
finestra di dialogo
Richiesta file
Se si utilizza il driver MME,
immettere MME invece di
WDM.
Nel campo Copia file da,
immettere il nome della
cartella visualizzato nella
finestra di dialogo e fare clic su [OK].
English
fig.05-9e_30
D:\DRIVER\USB_XP2K\WDM
Deutsch
* L’identificativo dell’unità “D:” potrebbe essere diverso da quello del
sistema utilizzato. In questo caso specificare il nome dell’unità
CD-ROM utilizzata.
Se l’impostazione “Verifica firma file” non è stata
impostata su “Ignora”, verrà visualizzato il
messaggio “Firma digitale non trovata”.
1.
Fare clic su [Sì].
2.
Continuare
l’installazione.
Français
Se “Verifica firma digitale” è impostato su
Avvisa,”
Potrebbe essere
visualizzata la finestra di
dialogo “Installazione
guidata nuovo
hardware”.
Accertarsi che “EDIROL UA-20
(WDM)” o “EDIROL UA-20
(MME)” sia visualizzato e fare clic su [Fine].
Se la finestra di dialogo “Nuovo componente hardware
individuato” non è visualizzata, passare al passo 18.
Español
16
Italiano
fig.05-10e_30
175
Collegamenti e installazione dei driver (Windows)
fig.05-11e_30
17
Viene visualizzata la
finestra di dialogo
Modifica
impostazioni di
sistema.
Fare clic su [Sì]. Windows verrà riavviato automaticamente.
Se la finestra di dialogo Modifica impostazioni di sistema
non appare, riavviare Windows dal menu Start.
Se è stata modificata l’impostazione “Verifica firma file”
Se l’impostazione “Verifica firma file” è stata cambiata al passo 5, ripristinare
l’impostazione originale dopo aver avviato Windows.
1.
Dopo aver riavviato Windows, collegarsi a Windows come un utente dotato
di privilegi di amministrazione, ad esempio come Administrator.
2.
Sul desktop di Windows, fare clic con il pulsante destro del mouse su Risorse
del computer e nel menu visualizzato selezionare Proprietà. Viene
visualizzata la finestra di dialogo Proprietà del sistema.
3.
Fare clic sulla scheda Hardware e poi sul pulsante [Firma driver]. Verrà
visualizzata la finestra di dialogo Opzioni firma driver.
4.
Ripristinare l’impostazione “Verifica firma file” al valore d’origine(“Avviso”
o “Blocca”), e fare clic su [OK].
5.
Fare clic su [OK]. La finestra di dialogo Proprietà del sistema si chiude.
Successivamente sarà necessario configurare il driver.
(➝ Configurazione e verifica (pag. 179))
176
Collegamenti e installazione dei driver (Windows)
Scollegare tutti i cavi USB ad eccezione della tastiera e del
mouse.
2
Chiudere tutti i programmi in corso di esecuzione.
Chiudere anche le altre finestre aperte. Se si utilizza un
programma antivirus o simili, accertarsi che sia anch’esso
chiuso.
3
Se l’UA-20 è già collegato al
computer e appare il
messaggio “Installazione
guidata nuovo hardware” ,
aprire sul CD-ROM la cartella
denominata
DRIVER\USB_ME98, aprire il
file Readme_e.htm e leggere
la sezione
“Troubleshooting” intitolata
“You attempted to install
using the above procedure,
but were not able to.”
Preparare il CD-ROM.
Inserire il CD nell’unità CD-ROM del computer.
4
Fare clic sul pulsante Start di Windows. Nel menu
visualizzato, selezionare Esegui….
Français
Aprire la finestra di dialogo Esegui....
fig.05-13e_30
Nella finestra di dialogo
che appare, immettere
quanto segue nel campo
“Apri” e fare clic su
[OK].
D:\DRIVER\USB_ME98\SETUPINF.EXE
* L’identificativo dell’unità “D:” potrebbe essere diverso da quello del
sistema utilizzato. Immettere l'identificativo dell'unità CD-ROM.
fig.05-14e_30
6
In questo manuale, la
posizione delle cartelle e dei
file è indicata nel percorso del
file utilizzando il carattere \
come delimitatore. Ad
esempio,
USB_ME98\SETUPINF.EXE
indica che il file Setupinf.exe
si trova nella cartella
USB_ME98.
Aprire la finestra di
dialogo SetupInf.
Español
5
Deutsch
Dopo aver scollegato l’UA-20, avviare Windows.
Italiano
1
English
■ Utenti Windows Me/98
È ora possibile installare il
driver.
177
Collegamenti e installazione dei driver (Windows)
7
8
Impostare l’interruttore ADVANCE (selezione del
modo) dell’UA-20 in posizione ON.
Utilizzare il cavo USB per collegare l’UA-20 al
computer.
fig.05-15e_30
9
Se si utilizza
Windows 98,
verrà
visualizzato il
messaggio Inserire il disco.
Fare clic su [OK].
fig.05-16e_30
10
D:\DRIVER\USB_ME98
* L’identificativo dell’unità “D:” potrebbe essere diverso da quello del
sistema utilizzato. Immettere l'identificativo dell'unità CD-ROM.
Una volta che il driver è stato installato, la finestra
Trovato nuovo hardware si chiude.
Nella finestra di dialogo SetupInf, fare clic su [OK]. La
finestra di dialogo SetupInf si chiude.
Successivamente sarà necessario configurare il driver.
(➝ Configurazione e verifica (pag. 179))
178
Se si utilizza Windows 98 e il
messaggio Inserire il disco
non appare, leggere il punto
La finestra di dialogo
“Inserire il disco” non
appare (pag. 201)
Appare la finestra di
dialogo Trovato
nuovo hardware.
Nel campo Copia file da,
immettere il nome della
cartella visualizzato nella
finestra di dialogo SetupInf e fare clic su [OK].
11
Questo apparecchio è
provvisto di un circuito di
protezione. È necessario
aspettare qualche secondo
dopo aver inserito un
connettore USB prima che
l’apparecchio funzioni
normalmente.
Se la finestra di dialogo Nuovo
componente hardware
individuato non appare,
reinstallare il driver seguendo
la stessa procedura descritta
nella sezione La finestra di
dialogo “Inserire il disco”
non appare (pag. 201)
Collegamenti e installazione dei driver (Windows)
Configurazione e verifica
English
■ Indicazione della destinazione audio e
MIDI d’ingresso/uscita
Utenti Windows XP/2000/Me
1
Aprire il Pannello di controllo.
Windows XP
In “Scegliere una categoria”, fare clic su “Suoni, voce e
periferiche audio”. Successivamente in “o un’icona del
Pannello di controllo”, fare clic sull’icona Suoni e
periferiche audio.
Windows 2000/Me
Nel Pannello di controllo, fare doppio clic sull’icona Suoni
e multimedia per aprire la finestra “Proprietà suoni e
multimedia”.
3
Français
Aprire la finestra di dialogo Proprietà – Suoni e
periferiche audio (oppure in Windows 2000/Me,
Proprietà – Suoni e multimedia ).
Se l’icona Suoni e multimedia
non appare, fare clic su
“Visualizza tutte le opzioni
del pannello di controllo” nel
riquadro sul bordo sinistro.
Fare clic sulla scheda Audio.
Español
2
A seconda di come il sistema
è configurato, l’icona Suoni e
periferiche audio potrebbe
essere visualizzata
direttamente nel Pannello di
controllo (visualizzazione
classica). In tal caso fare
doppio clic sull'icona Suoni e
periferiche audio.
Italiano
Windows XP
In Windows, fare clic sul pulsante Start e nel menu
selezionare Pannello di controllo.
Deutsch
In Windows, fare clic sul pulsante Start e nel menu
selezionare Impostazioni | Pannello di controllo.
179
Collegamenti e installazione dei driver (Windows)
fig.2-28_30
4
Per Riproduzione musica
MIDI, fare clic su ▼ a destra
di [Periferica predefinita]
(oppure in Windows 2000/
Me, [Periferica
preferenziale]), e
selezionare quanto segue
nell’elenco visualizzato.
Riproduzione
suoni
5
Modo Advanced
EDIROL UA-20 OUT
Registrazione
suoni
EDIROL UA-20 IN
Riproduzione
musica MIDI
EDIROL UA-20 MIDI OUT
Modo driver Standard
EDIROL UA-20 (Windows XP)
Periferica audio USB
(Windows 2000/Me)
EDIROL UA-20 (Windows XP)
Periferica audio USB
(Windows 2000/Me)
Il modo driver Standard non
permette la gestione dei dati
MIDI.
Chiudere la finestra di dialogo Proprietà – Suoni e
periferiche audio.
Fare clic su OK per completare le impostazioni.
Passare alla sezione successiva.
➝ Impostazioni Controllo volume (pag. 183)
180
Per maggiori informazioni
sul modo driver
Advanced e Standard,
fare riferimento alla
sezione Modo driver
Advanced e Standard
(pag. 164).
Collegamenti e installazione dei driver (Windows)
Utenti Windows 98
Aprire il Pannello di controllo.
English
1
In Windows, fare clic sul pulsante Start e nel menu
selezionare Impostazioni | Pannello di controllo.
2
Aprire la finestra di dialogo Proprietà multimediali.
Nelle caselle di riepilogo a
discesa Riproduzione e
Registrazione, selezionare le
opzioni sotto indicate e fare clic
su [Applica].
Modo Advanced
Riproduzione
Registrazione
5
EDIROL UA-20 Out
EDIROL UA-20 In
Per maggiori informazioni
sul modo driver
Advanced e Standard,
fare riferimento alla
sezione Modo driver
Advanced e Standard
(pag. 164).
Modo driver
Standard
Periferica audio USB
Periferica audio USB
Français
Specificare la “Periferica
preferenziale”.
Italiano
4
Fare clic sulla scheda Audio.
Fare clic sulla scheda MIDI.
Español
3
Deutsch
Nel Pannello di controllo, fare doppio clic sull’icona
Multimedia per aprire la finestra Proprietà multimediali .
181
Collegamenti e installazione dei driver (Windows)
fig.2-29_30
6
Impostare l’“Uscita
MIDI”.
Selezionare [Strumento
singolo], scegliere una delle
seguenti opzioni nell’elenco
visualizzato e fare clic su
[Applica].
Uscita MIDI
7
Modo Advanced
EDIROL UA-20 MIDI OUT
Per maggiori informazioni
sul modo driver
Advanced e Standard,
fare riferimento alla
sezione Modo driver
Advanced e Standard
(pag. 164).
Modo driver Standard
Il modo driver Standard non
permette la gestione dei dati MIDI.
Chiudere la finestra di dialogo Proprietà
multimediali.
Fare clic su [OK] per completare le impostazioni.
La configurazione delle destinazioni audio e MIDI di ingresso/
uscita è giunta al termine. Se è stato installato il driver standard di
Windows, impostare il controllo volume di Windows.
Passare alla sezione successiva.
➝ Impostazioni Controllo volume (pag. 183)
182
Collegamenti e installazione dei driver (Windows)
■ Impostazioni Controllo volume
Fare clic sul menu Start di Windows, selezionare Programmi
| Accessori | Svago | Controllo volume.
2
Spostare lo slider verso l’alto o verso il basso per
regolare il volume dell’UA-20.
Se il Controllo volume non è
stato installato sul computer,
fare clic sull’icona
Installazione applicazioni nel
Pannello di controllo per
installarlo. Per ulteriori
informazioni sull’installazione,
fare riferimento al manuale di
Windows o alla Guida in linea.
Se è stato installato il driver standard, l’UA-20 potrà utilizzare
il controllo volume di Windows per regolare il volume di
uscita.
Elementi che possono essere configurati
Lettore CD
WAVE
SW Synth
Controlla il volume dei CD musicali nell’unità
CD-ROM interna del computer. (*1)
Controlla il volume dell’output audio
proveniente dalla periferica di uscita audio
“EDIROL UA-20”. L’uscita digitale e quella
analogica cambiano.
Regola il volume del sintetizzatore software
incorporato in Windows.
Per poter ottenere la migliore
qualità audio possibile
sull’UA-20, regolare il
Controllo volume al massimo.
Se è selezionata la casella
Disattiva o lo slider è al
minimo, l’UA-20 non emetterà
alcun suono.
Español
Italiano
* 1 Se il volume di riproduzione del CD non cambia dopo aver
regolato questo controllo, cambiare il volume WAVE. Se si utilizza
Windows 2000 e Lettore CD non è visualizzato, selezionare la voce
“Abilita riproduzione audio su questo dispositivo
CD-ROM” in Riproduzione CD digitale.
➝ Riproduzione dei CD audio a partire dal CD-ROM del
computer o quando si utilizza l’UA-20 per riprodurre la
musica di videogiochi (solo modo driver Standard)
(pag. 184)
Deutsch
Aprire il Controllo volume.
Français
1
English
Se è stato installato il driver standard di Windows, impostare
il controllo volume di Windows.
183
Collegamenti e installazione dei driver (Windows)
Riproduzione dei CD audio a partire dal CD-ROM del computer o quando si
utilizza l’UA-20 per riprodurre la musica di videogiochi (solo modo driver
Standard)
Utenti Windows XP/2000:
1.
Aprire la finestra di dialogo Proprietà del sistema.
Selezionare Start | Impostazioni | Pannello di controllo e nel Pannello di
controllo, fare doppio clic sull’icona Sistema.
(Windows XP– Fare clic sul pulsante Start e nel menu selezionare Pannello di
controllo.)
2.
Fare clic sulla scheda Gestione periferiche.
Fare clic sulla scheda Hardware e quindi sul pulsante Gestione periferiche.
3.
Aprire la scheda Proprietà dell’unità CD-ROM.
Nell’unità CD-ROM fare doppio clic sull’unità CD-ROM utilizzata. In
Riproduzione CD digitale, selezionare la casella “Abilita riproduzione audio
su questa periferica CD-ROM”.
Utenti Windows Me:
1.
Aprire Proprietà di sistema.
Selezionare Start | Impostazioni | Pannello di controllo e nel Pannello di
controllo, fare doppio clic sull’icona Sistema.
2.
Aprire la scheda Proprietà dell’unità CD-ROM.
Fare doppio clic sull’icona CD-ROM e successivamente doppio clic sull’unità
CD-ROM utilizzata.
3.
Fare clic sulla scheda Proprietà e in Riproduzione CD digitale, selezionare la
casella “Abilita riproduzione audio su questo dispositivo CD-ROM”.
Utenti Windows 98:
1.
Aprire la finestra di dialogo Proprietà multimediali.
Selezionare Start | Impostazioni | Pannello di controllo e nel Pannello di
controllo, fare doppio clic sull’icona Multimedia.
2.
Fare clic sulla scheda CD musica e selezionare la casella “Abilita
riproduzione audio su questa periferica CD-ROM”.
* A seconda del sistema utilizzato, potrebbero esserci ancora dei problemi con la riproduzione.
Per maggiori informazioni, contattare il fabbricante del computer. Se si utilizza un’unità
CD-ROM di tipo PC-card (PCMCIA), la riproduzione di dati WAVE a partire da un
CD-ROM o la riproduzione di un CD audio potrebbe provocare interruzioni dell’audio o
addirittura nessun audio.
184
Collegamenti e installazione dei
driver (Macintosh)
English
Per gli utenti Windows, fare riferimento alla sezione Collegamenti e installazione
dei driver (Windows) (pag. 164).
Definizione di un driver
fig.05-1e_50
USB port
USB cable
Deutsch
Un “driver” è un
programma che trasferisce i
Application
dati tra l’UA-20 e il
programma utilizzato sul
USB
driver
computer attraverso un
cavo USB. Il driver
Computer
trasmette i dati
dall’applicazione all’UA-20 e viceversa.
UA-20
Modo driver Advanced e Standard
L’UA-20 offre la possibilità di utilizzare due modi operativi, modo Advanced e
modo Standard, ciascuno dei quali utilizza un driver diverso.
■ Modo Advanced
Italiano
Français
Per impostare questo modo sull’UA-20, spostare l’interruttore ADVANCE
(selezione del modo) sul pannello posteriore in posizione ON. Verrà utilizzato il
driver speciale contenuto nel CD-ROM che consente di registrare, riprodurre e
editare l’audio ottenendo qualità e timing ottimali.
Nel modo Advanced, i segnali audio vengono trasferiti tra l’UA-20 e il computer ad
una risoluzione di 24 bit e con una frequenza di campionamento di 44.1 kHz.
Selezionare questo modo se si utilizza un’applicazione in grado di registrare,
riprodurre, editare audio di qualità elevata, come ad esempio un programma
audio a 24 bit o un’applicazione ASIO compatibile come Cubase VST, Logic
Audio e Metro.
Nel modo Advanced, non è possibile riprodurre dati audio, CD audio o segnali di
avvertimento, sull’UA-5 a partire dal gestore di suoni Macintosh.
(➝ Installazione del driver speciale (pag. 186))
■ Modo driver Standard
Español
Per impostare questo modo sull’UA-20, spostare l’interruttore ADVANCE
(selezione del modo) sul pannello posteriore in posizione OFF. Verrà utilizzato il
driver audio standard USB fornito con MacOS. Nel modo Standard, i segnali audio
vengono trasferiti tra l’UA-20 e il computer ad una risoluzione di 16 bit e con una
frequenza di campionamento di 44.1 kHz. Selezionare questo modo se si utilizza
un’applicazione che utilizza le funzionalità Macintosh, ad esempio un’applicazione
che utilizza il lettore CD-ROM per riprodurre un CD audio, o un’applicazione che
utilizza il sintetizzatore software fornito con MacOS. Il driver standard fornito con
MacOS non supporta ASIO.
Si ricorda inoltre che l’uso di Mac OS 8.6 non è supportato.
(➝ Installing the OS-standard driver (pag. 53))
185
Collegamenti e installazione dei driver (Macintosh)
Attivazione dei modi driver Advanced e Standard
Se sono stati installati entrambi i driver, quello speciale e quello standard, si potrà
passare dall’uno all’altro modo azionando l’interruttore di selezione ADVANCE
dell’UA-20.
* Per rendere effettiva l’impostazione dell’interruttore ADVANCE, è necessario chiudere
tutti i software sequencer e le altre applicazioni che utilizzano l’UA-20 e ricollegare
l’apparecchio.
Installazione del driver speciale
È necessario installare il driver MIDI anche se si utilizzerà solo l’audio dell’UA-20.
Non dimenticare di installare il driver MIDI.
Utilizzare come driver MIDI OMS o FreeMIDI.
Se si utilizza OMS ......................................................... (pag. 187)
Se si utilizza FreeMIDI ................................................. (pag. 191)
* Sul Macintosh deve essere stato installato OMS or FreeMIDI a seconda del software
sequencer utilizzato.
* Se l’UA-20 è acceso, comparirà un messaggio, come quello sotto illustrato, quando viene
avviato il Macintosh. Seguire una delle procedure sotto indicate a seconda del messaggio
visualizzato.
Se appare il seguente messaggio:
“Driver required for USB device ‘unknown device’ is not available. Search for
driver on the Internet?”.
➝ fare clic su [Cancel.]
Se appare il seguente messaggio:
“Software required for using device ‘unknown device’ cannot be found.
Please refer to the manual included with the device, and install the necessary
software”.
➝ fare clic su [OK].
186
Collegamenti e installazione dei driver (Macintosh)
Seguire la procedura sotto indicata per installare il driver
UA-20.
Il driver UA-20 OMS è un modulo aggiuntivo che permette di
utilizzare l’UA-20 con OMS. Per poterlo utilizzare, OMS deve
essere già stato installato sul disco fisso di avvio.
L’applicazione OMS si trova
nella cartella OMS Driver
all’interno della cartella
Driver E del CD-ROM.
Deutsch
Per avere maggiori informazioni sul software OMS,
consultare il file OMS_2.3_Mac.pdf che si trova nella cartella
OMS Driver all’interno della cartella Driver E sul CD-ROM.
Per poter aprire il file OMS_2.3_Mac.pdf è necessario Adobe
Acrobat Reader.
* Scollegare l’UA-20 dal Macintosh prima di eseguire l’installazione.
1
English
■ Installazione del driver UA-20 (OMS)
Chiudere tutti i programmi in corso di esecuzione.
Se si utilizza un programma antivirus o simili, accertarsi che
sia anch’esso chiuso.
Français
Preparare il CD-ROM.
Inserire il CD-ROM nell’unità CD-ROM.
4
Fare doppio clic sull’icona UA-20 OMS Driver-E
Installer, che si trova nella cartella Driver E-OMS
Driver del CD-ROM, per avviare il programma
d’installazione.
Controllare la destinazione dell'installazione e fare
clic su [Install].
fig.03-scdrv2Z.e
5
Se appare un
messaggio come
quello sotto
indicato, fare clic
su [Continue].
La posizione di installazione
cambia a seconda del sistema
utilizzato. Accertarsi che il
disco di avvio del sistema
utilizzato sia selezionato.
Español
3
Italiano
2
Le applicazioni in corso di esecuzione verranno chiuse e
l’installazione proseguirà.
187
Collegamenti e installazione dei driver (Macintosh)
6
Verrà visualizzata una finestra di dialogo indicante
Installation completed.
Fare clic su [Restart] per riavviare il Macintosh.
Impostazioni OMS
Per controllare le impostazioni OMS sarà necessario
innanzitutto collegare un modulo sonoro MIDI al connettore
MIDI OUT dell’UA-20.
Per maggiori informazioni sul collegamento del modulo
sonoro MIDI, fare riferimento al manuale utente del modulo
sonoro MIDI.
1
2
3
4
188
Impostare l’interruttore ADVANCE (selezione del
modo) dell’UA-20 in posizione ON.
Utilizzare il cavo USB per collegare l’UA-20 al
computer.
Dal CD-ROM, selezionare
e trascinare la cartella
Driver E–OMS Driver –
Settings nella cartella
Opcode–OMS sul disco fisso
del Macintosh per copiarvela.
Nella cartella Opcode-OMS
Application dove è stato
installato OMS, fare doppio clic
su OMS Setup per avviarlo.
Questo apparecchio è
provvisto di un circuito di
protezione. È necessario
aspettare qualche secondo
dopo aver inserito un
connettore USB prima che
l’apparecchio funzioni
normalmente.
Collegamenti e installazione dei driver (Macintosh)
fig.03-omsusb1a.e
English
Se compare una
finestra di
dialogo come
quella illustrata,
fare clic su [Turn
It Off]. Verrà
visualizzata una
finestra di
dialogo di conferma; fare clic su [OK].
fig.03-omsusb2.e
6
Verrà visualizzata la
finestra di dialogo
“Create a New Studio
Setup”.
Si consiglia di disattivare
AppleTalk selezionando
Chooser nel menu Apple.
7
Français
Fare clic su [Cancel]. Se si
è premuto
accidentalmente il pulsante, fare clic su [Cancel] nella
finestra successiva.
Deutsch
5
Selezionare “Open” nel menu File.
Nella cartella Settings copiata al passo 3, selezionare il file
UA-20 USB e fare clic su [Open].
fig.50
Italiano
Verrà visualizzata una
finestra di dialogo simile a
quella illustrata.
8
Español
fig.51e
Nel menu Edit selezionare
OMS MIDI Setup.
Nella finestra di dialogo OMS
MIDI Setup visualizzata,
selezionare Run MIDI in background e fare clic su [OK].
189
Collegamenti e installazione dei driver (Macintosh)
fig.52E
9
Nel menu File selezionare
Make Current.
Se non è possibile selezionare
Make Current, vuol dire che
è stata già attivata e si può
quindi passare all’operazione
successiva.
fig.03-omsusb07
10
Accertarsi che la
trasmissione e la ricezione
MIDI siano corrette.
Nel menu Studio selezionare
Test Studio.
fig.54
11
Quando il cursore del
mouse passa vicino
all’icona del generatore di
suoni, il cursore assumerà
la forma di una nota .
Fare clic sulle icone del
generatore di suoni evidenziate nella figura a destra. Se
l’UA-20 emette dei suoni, le impostazioni sono corrette.
12
Chiudere OMS Setup.
Nel menu File selezionare [Quit]. Se appare la finestra di
dialogo di conferma AppleTalk confirmation, fare clic su
[OK] per chiuderla.
La procedura per collegare l’UA-20 e il Macintosh ed eseguire
l’installazione del driver MIDI è giunta al termine.
Successivamente sarà necessario configurare il driver ASIO.
(➝ Installazione del driver ASIO (pag. 194))
190
Se l’UA-20 non emette alcun
suono, fare riferimento alla
sezione No sound (pag. 70).
Collegamenti e installazione dei driver (Macintosh)
■ Installazione del driver UA-20 (FreeMIDI)
English
Seguire la procedura sotto indicata per installare il driver
UA-20. Il driver UA-20 FreeMIDI in dotazione è un modulo
aggiuntivo che permette di utilizzare l’UA-20 con FreeMIDI.
Per poterlo utilizzare, FreeMIDI deve essere già stato
installato sul disco fisso di avvio.
* Scollegare l’UA-20 dal Macintosh prima di eseguire l’installazione.
1
Chiudere tutti i programmi in corso di esecuzione.
2
Deutsch
Se si utilizza un programma antivirus o simili, accertarsi che
sia anch’esso chiuso.
Preparare il CD-ROM.
Inserire il CD-ROM nell’unità CD-ROM.
4
Fare doppio clic sull’icona UA-20 FM
Driver - E Installer, che si trova nella cartella
Driver E - FreeMIDI del CD-ROM, per avviare il
programma d’installazione.
Français
3
Controllare la destinazione dell'installazione e fare
clic su [Install].
fig.3-2_40
Se appare un
messaggio come
quello sotto
indicato, fare clic
su [Continue].
Italiano
5
6
Español
Le applicazioni in corso di esecuzione verranno chiuse e
l’installazione proseguirà.
Verrà visualizzata una finestra di dialogo indicante
Installation completed. Fare clic su [Restart] per
riavviare il Macintosh.
191
Collegamenti e installazione dei driver (Macintosh)
Impostazioni FreeMIDI
Per controllare le impostazioni FreeMIDI sarà necessario
innanzitutto collegare un modulo sonoro MIDI al connettore
MIDI OUT dell’UA-20.
Per maggiori informazioni sul collegamento del modulo
sonoro MIDI, fare riferimento al manuale utente del modulo
sonoro MIDI.
1
2
3
4
5
6
Impostare l’interruttore ADVANCE (selezione del
modo) dell’UA-20 in posizione ON.
Utilizzare il cavo USB per collegare l’UA-20 al
computer.
Dal CD-ROM, copiare la cartella Driver E – FreeMIDI
Driver - Settings sul disco fisso del Macintosh.
Aprire la cartella FreeMIDI Applications dove è stata
eseguita l’installazione FreeMIDI e fare doppio clic
sull’icona FreeMIDI Setup per avviare l’applicazione.
Quando appare il messaggio “OMS is installed on
this computer...”, fare clic su [FreeMIDI].
Al primo avvio di FreeMIDI, comparirà la finestra di
dialogo “Welcome to FreeMIDI!”.
Fare clic su [Continue].
7
8
9
192
Nella finestra di dialogo FreeMIDI Preferences, fare
clic su [Cancel].
Nella finestra di dialogo About Quick Setup, fare clic
su [Cancel].
Nel menu File selezionare Open.
Questo apparecchio è
provvisto di un circuito di
protezione. È necessario
aspettare qualche secondo
dopo aver inserito un
connettore USB prima che
l’apparecchio funzioni
normalmente.
Collegamenti e installazione dei driver (Macintosh)
11
Selezionare UA-20 USB nella cartella Settings
copiata al passo 3 e fare clic su [Open].
English
10
Controllare che l’invio e la ricezione MIDI siano
corrette.
Nel menu MIDI selezionare Check Connections.
Se l’audio viene emesso, vuol
dire che i messaggi MIDI sono inviati dal Macintosh
all’UA-20.
14
Scegliere di nuovo il comando Check Connections
nel menu MIDI per concludere il test.
Nel menu File, scegliere Quit per uscire da FreeMIDI
Setup.
La procedura per collegare l’UA-20 e il Macintosh ed eseguire
l’installazione del driver MIDI è giunta al termine.
Italiano
13
Se l’UA-20 non emette alcun
suono, fare riferimento alla
sezione No sound (pag. 70).
Français
Il cursore del mouse
assumerà la forma di una
tastiera. Fare clic sulle icone
del generatore di suoni
evidenziate nella figura a
destra.
Successivamente sarà necessario installare il driver ASIO.
(➝ Installazione del driver ASIO (pag. 194))
Español
12
Deutsch
fig.fm2
193
Collegamenti e installazione dei driver (Macintosh)
Installazione del driver ASIO
È necessario installare il driver MIDI anche se si utilizzerà
solo l’audio dell’UA-20. Non dimenticare di installare il
driver MIDI prima di installare il driver ASIO.
In questa sezione viene spiegato come installare il driver
ASIO per poter utilizzare l’UA-20 con il software sequencer o
un software di editing audio. Per maggiori informazioni
sull’installazione e le impostazioni del driver ASIO, accertarsi
di leggere anche il documento Driver E–ASIO Driver–
Setting ASIO Driver-E.HTM sul CD-ROM.
In modo Advanced, l’UA-20 non è in grado di riprodurre dati
audio attraverso il gestore di suoni del Macintosh, come ad
esempio un CD audio o segnali di avvertimento.
Il driver ASIO dell’UA-20 supporta i seguenti canali di
ingresso/uscita audio.
ASIO (Steinberg Audio Stream
In/Out Interface)
È un’interfaccia audio
standard sviluppata dalla
Steinberg Corporation. Se
l’UA-20 è utilizzato con un
software ASIO compatibile, la
precisione di sincronizzazione
sarà maggiore e si tradurrà in
un risultato musicale più
accurato.
• Ingresso audio.... 24/16 bit 1 canale stereo
(2 canali monofonici)
• Uscita audio........ 24/16 bit 1 canale stereo
(2 canali monofonici)
Nella sezione che segue verrà spiegato come installare il
driver ASIO 1.0 16 bit compatibile.
Se il programma ASIO compatibile supporta ASIO 2.0 o la registrazione/
riproduzione di dati audio a 24 bit, l’uso dei seguenti driver permetterà di
avere risultati di migliore qualità.
Software ASIO compatibile
194
ASIO2.0 compatibile
24 bit compatibile
Driver da utilizzare
✕
✕
❍
❍
✕
❍
✕
❍
UA-20 ASIO 1.0 16 bit
UA-20 ASIO 1.0 24 bit
UA-20 ASIO 2.0 16 bit
UA-20 ASIO 2.0 24 bit
Collegamenti e installazione dei driver (Macintosh)
ig.05-21e_30
Aprire la finestra di configurazione Audio del
programma ASIO compatibile e selezionare
[UA-20 ASIO 16bit] come ASIO Device.
English
Deutsch
Il titolo della finestra di
configurazione Audio dipende
dal software utilizzato. Per
maggiori informazioni fare
riferimento al manuale utente
del software.
Français
3
Avviare il software ASIO compatibile, ad esempio
Cubase VST, Logic Audio, Digital Performer, Metro o
SPARK LE.
Italiano
2
Dalla cartella Driver
E–ASIO Driver sul
CD-ROM, copiare
[UA-20 ASIO1.0
16bit] nella cartella [ASIO Drivers] a sua volta
all’interno della cartella ASIO Drivers del software
ASIO compatibile utilizzato, ad esempio Cubase VST,
Logic Audio, Digital Performer, Metro o SPARK LE.
Español
1
195
UA-20 application guide
Regolazione della latenza audio
Quando si utilizza l’UA-20 in modo Advanced, è possibile cambiare le impostazioni
del driver per regolare la latenza dell’audio. Per regolare la latenza, modificare le
dimensioni del buffer nella finestra di dialogo delle impostazioni.
* La latenza è l’intervallo di tempo che intercorre tra il momento in cui i dati audio vengono
riprodotti da un’applicazione e quello in cui sono emessi da un dispositivo audio come
l’UA-20.
1
2
Come descritto nella sezione “Apertura della finestra di dialogo delle
impostazioni del driver speciale (pag. 198)”, aprire la finestra di dialogo
relativa alle impostazioni del driver.
Regolare le dimensioni del buffer del driver.
La seguente impostazione specifica la latenza più corta.
Windows:
Impostare “Dimensioni buffer audio” completamente a sinistra (Min).
Macintosh:
Impostare “Buffer Size” completamente a sinistra (Min).
3
4
Fare clic su [OK] per chiudere la finestra di dialogo delle impostazioni del
driver.
Riavviare l’applicazione che utilizza l’UA-20.
Se si utilizza un’applicazione provvista di una funzione per provare i dispositivi audio,
utilizzarla per effettuare le prove.
5
Riprodurre i dati audio con l’applicazione.
Se l’audio viene interrotto, ripetere la procedura e aumentare gradatamente le
dimensioni del buffer specificate al passo 2 fino a quando non si verificano più
interruzioni.
* A seconda dell’applicazione utilizzata, potrebbe essere disponibile una funzionalità di
regolazione relativa alle dimensioni del buffer o alla latenza tra le impostazioni audio. Per
maggiori informazioni fare riferimento al manuale utente del software.
196
UA-20 application guide
Uso di ASIO Direct Monitor
Impostare i seguenti parametri.
Deutsch
2
Come descritto nella sezione “Apertura della finestra di dialogo delle
impostazioni del driver speciale (pag. 198)”, aprire la finestra di dialogo
relativa alle impostazioni del driver.
Selezionare la casella di controllo “Use ASIO Direct Monitor”.
Fare clic su [OK] per chiudere la finestra di dialogo delle impostazioni del
driver.
* A seconda dell’applicazione utilizzata, tra le impostazioni audio potrebbe essercene una
relativa a ASIO Direct Monitor. Per maggiori informazioni fare riferimento al manuale
utente del software.
Italiano
* Quando si utilizza ASIO Direct Monitor, il monitoraggio potrebbe attivarsi o disattivarsi
inaspettatamente, a seconda delle impostazioni dell’applicazione e della procedura di
registrazione. In questo caso, deselezionare la casella di controllo al passo 2 per disattivare
ASIO Direct Monitor.
Español
3
Français
1
English
Se si utilizza l’UA-20 a partire da un’applicazione ASIO2.0 compatibile in modo
Advanced, l’interruttore di controllo dell’input dell’UA-20 può essere controllato
automaticamente dall’applicazione.
197
UA-20 application guide
Apertura della finestra di dialogo delle
impostazioni del driver speciale
Se si utilizza il driver WDM in Windows XP/2000:
1.
Nel Pannello di controllo, fare doppio clic su “EDIROL UA-20”.
2.
Verrà visualizzata la finestra di dialogo “EDIROL UA-20 Driver Settings”.
* In Windows XP, fare clic su “Passa alla visualizzazione classica” per attivare la
visualizzazione classica. EDIROL UA-20 verrà visualizzato solo dopo aver attivato la
visualizzazione classica.
Se si utilizza il driver MME in Windows XP/2000:
1.
Nel “Pannello di controllo” fare doppio clic su “Sistema”.
2.
Fare clic sulla scheda “Hardware” e quindi sul pulsante [Gestione periferiche].
3.
Successivamente, fare doppio clic su “Controller audio, video e giochi”.
4.
Fare doppio clic su “EDIROL UA-20”.
5.
Fare clic sulla scheda “Proprietà” e nella zona “Periferiche multimediali” fare
doppio clic su “Periferiche audio”.
6.
Selezionare “EDIROL UA-20” e fare clic sul pulsante [Proprietà].
7.
Fare clic sul pulsante [Impostazioni] e verrà visualizzata la finestra di dialogo
“EDIROL UA-20 Driver Settings”.
Se si utilizza Windows Me/98:
1.
Nel “Pannello di controllo” fare doppio clic su “Suoni e multimedia”. (In
Windows 98, fare doppio clic su “Multimedia”.)
2.
Fare clic sulla scheda “Periferiche” e fare doppio clic su “Periferiche audio”.
3.
Selezionare “EDIROL UA-20 Audio” e fare clic sul pulsante [Proprietà] per
visualizzare le proprietà.
4.
Fare clic sul pulsante [Impostazioni] e verrà visualizzata la finestra di dialogo
“EDIROL UA-20 Driver Settings”.
Se si utilizza Macintosh:
Aprire il pannello di controllo ASIO nella finestra di dialogo Audio Settings
dell’applicazione ASIO compatibile. Il nome della finestra di dialogo Audio Settings e
la procedura per aprire il Pannello di controllo ASIO potrebbero differire a seconda
dell’applicazione utilizzata. Per maggiori informazioni fare riferimento al manuale
utente del software.
198
English
Ricerca e soluzione dei problemi
Ricerca e soluzione dei problemi
Se nell’usare l’UA-20 si dovessero incontrare dei problemi, leggere questo capitolo.
Contiene vari consigli per la risoluzione dei problemi.
Deutsch
Se si utilizza Windows o Macintosh per la prima volta, e si incontrano dei problemi per
capire le spiegazioni, fare riferimento al manuale fornito con il computer o il sistema
operativo.
Problemi comuni a Windows e a Macintosh
Problemi che si verificano solo in Windows
Problemi che si verificano solo in Macintosh
Français
Problemi relativi al driver USB
Viene visualizzato un messaggio di tipo “Trovato driver
sconosciuto” e non si riesce ad installare il driver
Italiano
“Installazione guidata nuovo hardware” non si avvia
automaticamente
•
Potrebbe essere necessario attendere 15 secondi o più dopo aver collegato il
cavo USB prima che l’UA-20 venga rilevato.
•
Il cavo USB è collegato correttamente?
Accertarsi che l’UA-20 e il computer siano collegati correttamente tramite il cavo USB.
•
La porta USB è stata attivata sul computer?
Fare riferimento al manuale utente del computer e accertarsi di aver attivato la
porta USB.
•
Si è notato che, in alcuni casi, non tutti i file Windows 98 necessari per
supportare l’audio sulla porta USB sono installati sul computer al momento
della consegna all’utente.
Accertarsene presso il costruttore del computer.
Español
“Installazione guidata nuovo hardware” termina prima
che la procedura venga conclusa completamente
199
Ricerca e soluzione dei problemi
•
Il computer soddisfa le specifiche tecniche USB?
Se si utilizza un computer che non soddisfa le specifiche elettriche previste per poter
utilizzare l’USB, la macchina potrebbe diventare instabile. In questo caso il problema
potrebbe essere risolto collegando un hub USB.
•
È visualizzato “Periferica sconosciuta” sotto “Altre periferiche” o “Controller
USB (Universal Serial Bus)”?
Seguire la procedura sotto illustrata per cancellare “Altre periferiche”, Controller USB,
“Periferica sconosciuta” e riavviare il computer.
1.
Nel Pannello di controllo di Windows, fare doppio clic sull'icona Sistema.
Viene visualizzata la finestra di dialogo Proprietà del sistema.
2.
Fare clic sulla scheda Gestione periferiche.
3.
Fare doppio clic su “Altre periferiche” o “Controller USB (Universal Serial
Bus)” per visualizzare l’elenco delle periferiche.
4.
Nell’elenco, selezionare la periferica sconosciuta e fare clic su [Elimina].
5.
Nella finestra di dialogo di conferma della cancellazione, fare clic su [OK].
6.
Accertarsi che “Altre periferiche” o “Periferica sconosciuta” non sia
visualizzato nella lista e fare clic su [Chiudi] per chiudere la finestra di
dialogo.
Viene visualizzato il messaggio “Periferica sconosciuta”
anche se il driver è stato installato
Se il computer o l’hub USB è provvisto di due o più connettori USB e l’UA-20 è collegato
ad un connettore USB al quale non era mai stato collegato prima, potrebbe apparire il
messaggio “Periferica sconosciuta” anche se il driver corrispondente è già stato
installato.
Fare riferimento alla sezione Collegamenti e installazione dei driver (Windows)
(pag. 164) e reinstallare il driver. Non si tratta di un malfunzionamento.
Il driver non è installato correttamente
Seguire la procedura descritta nella sezione Deleting the special driver (pag. 79) per
eliminare il driver della periferica audio USB e reinstallare il driver UA-20 secondo
quanto descritto nella sezione Collegamenti e installazione dei driver (Windows)
(pag. 164). Verificare inoltre se “Periferica sconosciuta” è visualizzato in “Altre
periferiche” o “Controller USB (Universal Serial Bus)”.
Se si trova uno di questi messaggi, cancellarlo.
200
Ricerca e soluzione dei problemi
•
Ci si è collegati a Windows come utenti dotati di privilegi di amministratore?
Per poter installare, cancellare o reinstallare il driver sotto Windows XP/2000, è
necessario essere collegati a Windows con i privilegi di un amministratore. Per
maggiori informazioni, contattare l’amministratore del sistema del computer.
•
Sono state impostate le “Opzioni firma driver”?
Per poter installare o cancellare il driver, è necessario configurare l’impostazione
“Opzioni firma driver”.
English
Impossibile installare/cancellare/usare il driver sotto
Windows XP/2000
Deutsch
(Windows XP ➝ pag. 166, Windows 2000 ➝ pag. 172)
Windows XP/2000 visualizza una finestra di dialogo
“Installazione hardware” o “Firma digitale non trovata"
Sono state impostate le “Opzioni firma driver”?
Per poter installare o reinstallare il driver, è necessario configurare le impostazioni
“Opzioni firma driver”.
Français
(Windows XP ➝ pag. 166, Windows 2000 ➝ pag. 172)
La finestra Gestione periferiche visualizza “?”, “!”, or
“Periferica USB composita”
La finestra di dialogo “Inserire il disco” non appare
1.
Spegnere il computer e avviare Windows con tutti i cavi USB scollegati, ad
eccezione della tastiera e del mouse.
2.
Dopo aver riavviato Windows, utilizzare un cavo USB per collegare l’UA-20
al computer.
3.
In Windows, fare clic sul pulsante [Start] e nel menu selezionare
Impostazioni | Pannello di controllo.
4.
Fare doppio clic sull’icona Sistema. Viene visualizzata la finestra di dialogo
Proprietà del sistema.
5.
Fare clic sulla scheda Gestione periferiche.
6.
Controllare se l’indicazione “?Periferica USB composita”, “?Periferica
USB”, “!Periferica USB”, o “Periferica USB composita” appare in
“Controller audio, video e giochi”, “Altre periferiche”, o “Controller Usb
(Universal Serial Bus)”. Se una di queste indicazioni è visualizzata,
selezionarla e fare clic su [Elimina].
Italiano
Seguire la procedura sotto indicata per reinstallare il driver.
Español
•
201
Ricerca e soluzione dei problemi
7.
Un messaggio chiederà di confermare la cancellazione della periferica.
Controllare il contenuto della finestra e fare clic su [OK]. Allo stesso modo,
cancellare tutte le indicazioni di “?Periferica USB composita”, “?Periferica
USB”, “Periferica USB” e “Periferica USB composita” eventualmente
visualizzate.
8.
Se accanto al driver USB EDIROL UA-20 appare un “!” giallo o un “?” rosso,
cancellare la periferica.
9.
Dopo aver cancellato tutte le periferiche che presentano dei problemi, fare clic
su [OK] nella finestra Proprietà del sistema.
10. Spegnere l’UA-20 e cancellare il driver. (➝ Deleting the special driver
(pag. 79))
11. Riavviare Windows. Reinstallare quindi il driver. (➝ Collegamenti e
installazione dei driver (Windows) (pag. 164)).
* Se il problema persiste dopo aver effettuato le operazioni di cui sopra, consultare anche il file
Readme relativo al driver USB. Il file Readme si trova sul CD-ROM.
202
Conexión e instalación de los
controladores (Windows)
English
Si es usuario de Macintosh, consulte el apartado Conexión e instalación de los
controladores (Macintosh) (pág. 224).
¿Qué es un controlador?
fig.05-1e_50
Deutsch
Un “controlador” es
software que transfiere
datos entre el UA-20 y el
Application
USB port
software de aplicación que
esté ejecutando en su
USB
USB cable
driver
sistema, cuando el sistema
y el UA-20 están
Computer
UA-20
conectados por un cable
USB. El controlador
transfiere datos de la aplicación al UA-20 y del UA-20 a la aplicación.
Modo avanzado y Modo de controlador estándar
Français
El UA-20 tiene dos modos operativos, el Modo avanzado y el Modo de
controlador estándar, y cada uno utiliza un controlador diferente.
■ Modo avanzado
Italiano
El UA-20 funcionará en este modo si se dispone el Interruptor de selección de
modo ADVANCE del panel posterior en ON. Este modo utiliza el controlador
especial que se encuentra en el CD-ROM, con el que podrá grabar, reproducir y
editar audio de alta calidad y a tiempo estable. En el Modo avanzado, las señales de
audio se transfieren entre el UA-20 y el PC con una resolución de 24 bits y unas
frecuencias de sampling de 44,1 kHz. Seleccione este modo si está utilizando una
aplicación que permite grabar, reproducir y editar audio de alta calidad, como una
aplicación que da soporte a audio de 24 bits (por ejemplo, la serie Cakewalk o Cool
Edit) o una aplicación compatible con ASIO (por ejemplo, Cubase VST o Logic
Audio). (➝ Instalación del controlador especial (pág. 204))
■ Modo de controlador estándar
Español
El UA-20 funcionará en este modo si se dispone el Interruptor de selección de
modo ADVANCE del panel posterior en OFF. Este modo utiliza el controlador de
audio USB estándar propio de Windows. En el modo de controlador estándar, las
señales de audio se transfieren entre el UA-20 y el PC con una resolución de 16 bits
y unas frecuencias de sampling de 44,1 kHz.
Seleccione este modo si está utilizando una aplicación que se sirve de los recursos
propios de Windows, como una aplicación que utiliza la unidad de CD-ROM del
PC para reproducir audio de CD o una aplicación que utiliza el sintetizador de
software integrado en Windows.
203
Conexión e instalación de los controladores (Windows)
El controlador estándar integrado en Windows no da soporte a ASIO.
(➝ Installing the OS-standard driver (pág. 31))
* Si desea utilizar MIDI, establezca el Modo avanzado.
Pasar del Modo avanzado al Modo de controlador estándar y viceversa
Si primero instala tanto el controlador especial como el controlador estándar, podrá
pasar del Modo avanzado al Modo de controlador estándar y vicerversa mediante
el Interruptor de selección de modo ADVANCE del UA-20.
* Para que lo dispuesto en el Interruptor de selección de modo ADVANCE surta efecto,
debe salir de todo software secuenciador y de todas las aplicaciones que utilicen el UA-20,
apagar el UA-20 y luego volverlo a encender.
Instalación del controlador especial
El procedimiento de instalación variará en función del sistema.
Pase a uno de los siguientes apartados, en función del sistema que utilice.
• Usuarios de Windows XP/2000 .................. (pág. 204)
• Usuarios de Windows Me/98...................... (pág. 216)
■ Usuarios de Windows XP o 2000
El CD-ROM contiene dos tipos de controladores para Windows XP o 2000.
Generalmente, deberá utilizar el controlador WDM.
Controlador WDM
Debe utilizar este controlador si ha especificado la modalidad de controlador WDM
para SONAR o una aplicación similar. De este modo, obtendrá un rendimiento de
audio de mayor calidad.
* No se puede utilizar audio de 24 bits con aplicaciones que no soporten una modalidad de
controlador WDM, como Cool Edit o Media Player.
Controlador MME
Este controlador le permite utilizar audio de 24 bits incluso con aplicaciones que no
tengan modalidad de controlador WDM, como Cool Edit. No es posible utilizar el
controlador MME desde el modo de controlador WDM de una aplicación como
SONAR.
* No se puede instalar el controlador WDM y el MME a la vez. Debe seleccionar uno
previamente e instalar sólo ese controlador. Si después de instalar uno de estos
controladores decide cambiarlo, primero debe borrar el que ya esté instalado y, a
continuación, instalar el nuevo controlador. (➝ Deleting the special driver (pág. 79))
204
Conexión e instalación de los controladores (Windows)
Desconecte todos los cables USB excepto el del teclado USB y
el ratón USB (si se utilizan).
2
Abra el cuadro de diálogo Propiedades del sistema.
1.
Haga clic en el menú Inicio de Windows y seleccione
Panel de control.
2.
En “Elegir una categoría”, haga clic en “Rendimiento
y mantenimiento”.
3.
En “o elegir un icono del Panel de control”, haga clic
en el icono Sistema.
fig.2-1
3
Haga clic en la ficha
Hardware y, a
continuación, en [Firma
del controlador].
Si es usuario de Windows XP
Professional, debe iniciar la
sesión con un nombre de
usuario con algún tipo de
cuenta administrativa
(Administrador, por ejemplo).
Para obtener más detalles
sobre las cuentas de usuario,
consulte al administrador de
sistema de su PC.
En función de cómo tenga
configurado el sistema, puede
que el icono Sistema
aparezca directamente en el
Panel de control (en la Vista
clásica). En ese caso, haga
doble clic en el icono
Sistema.
Abra el cuadro de diálogo
Opciones de firma del
controlador.
Deutsch
Con el UA-20 desconectado, inicie Windows.
Français
1
English
Usuarios de Windows XP
Asegúrese de que
“¿Qué acción desea
que realice Windows?”
esté establecido en
“Ignorar”.
Si ya está establecido en
“Ignorar”, haga clic en
[Aceptar].
Si no está establecido en “Ignorar”, anótese la configuración
actual (“Avisar” o “Bloquear”). Luego cambie la
configuración a “Ignorar” y haga clic en [Aceptar].
Una vez haya instalado el controlador, restaure la
configuración original. (➝ Si ha modificado “¿Qué acción
desea que realice Windows?” (pág. 210))
Si ha modificado “¿Qué
acción desea que realice
Windows?” en el paso 4,
debe restaurar la
configuración anterior
después de instalar el
controlador. (➝ Si ha
modificado “¿Qué acción
desea que realice
Windows?” (pág. 210))
205
Español
4
Italiano
fig.2-2
Conexión e instalación de los controladores (Windows)
5
Haga clic en [Aceptar] para cerrar el cuadro de diálogo
Propiedades del sistema.
6
Salga de todo el software que se esté ejecutando
(aplicaciones).
Cierre cualquier ventana que esté abierta. Si utiliza un
programa antivirus o software similar, también debe cerrarlo.
7
Prepare el CD-ROM.
Inserte el CD-ROM en la unidad de CD-ROM del sistema.
8
Haga clic en el botón Inicio de Windows. En el menú
que aparece, seleccione “Ejecutar...”
Abra el cuadro de diálogo “Ejecutar...”.
fig.2-3_30
9
En el cuadro de
diálogo que aparece,
escriba lo siguiente en
el campo “Abrir” y
haga clic en [Aceptar].
Si pretende utilizar el
controlador MME, especifique
MME en lugar de WDM.
D:\Driver\USB_XP2K\WDM\SETUPINF.EXE
* El nombre de la unidad “D:” puede ser diferente para su sistema.
Especifique el nombre de su unidad de CD-ROM.
fig.2-4_30
10
Aparecerá el cuadro de
diálogo SetupInf.
Ahora puede instalar el
controlador.
206
En este manual, la ubicación
de las carpetas y archivos se
da en relación con la ruta del
archivo y se utiliza \ como
delimitador.
Por ejemplo,
USB_XP2K\SETUPINF.EXE
indica el archivo
SETUPINF.EXE que se
encuentra en la carpeta
USB_XP2K.
11
12
Sitúe el Interruptor de selección de modo
ADVANCE del UA-20 en la posición ON.
Utilice el cable USB para conectar el UA-20 al sistema.
Esta unidad viene equipada
con un circuito de protección.
Es necesario dejar pasar un
pequeño intervalo (de unos
segundos) después de
encender la unidad para que
ésta funcione correctamente.
English
Conexión e instalación de los controladores (Windows)
Cerca de la barra de tareas, el PC indicará “Hardware nuevo
encontrado”. Espere, por favor.
Asegúrese de que la
pantalla indique “EDIROL
UA-20 (WDM)”, seleccione
“Instalar desde una lista o
una ubicación específica
(Avanzada)” y haga clic en
[Siguiente].
fig.2-7
14
En caso de que utilice el
controlador MME, asegúrese
de que aparezca “EDIROL
UA-20 (MME)”.
La pantalla indicará
“Elija sus opciones de
búsqueda e
instalación”.
Français
Aparecerá el Asistente
para hardware nuevo
encontrado.
Italiano
13
Deutsch
fig.2-6
Seleccione “No buscar.
Elegiré el controlador que
deseo instalar” y haga clic
en [Siguiente].
15
Asegúrese de que el
campo “Modelo”
indique “EDIROL
UA-20 (WDM)” y haga
clic en [Siguiente].
Entonces empezará la
instalación del controlador.
En caso de que utilice el
controlador MME, asegúrese
de que aparezca “EDIROL
UA-20 (MME)”.
207
Español
fig.2-8_20
Conexión e instalación de los controladores (Windows)
Si no se ha establecido el valor de “¿Qué acción desea que realice
Windows?” en “Ignorar”, aparecerá el cuadro de diálogo “Instalación
de hardware”.
Si “¿Qué acción desea que realice Windows?” está establecido en
“Advertir”:
1.
Haga clic en [Continuar de todos
modos].
2.
Prosiga con la instalación.
Si “¿Qué acción desea que realice Windows?” está establecido en
“Bloquear”:
1.
Haga clic en [Aceptar].
2.
Cuando aparezca “Asistente para
hardware nuevo encontrado”,
haga clic en [Finalizar].
3.
Efectúe la instalación como se
describe en el apartado de “Resolución de problemas” acerca de
¿El administrador de dispositivos muestra “?”, “!” o
“Dispositivo USB Composite" (pág. 240).
fig.2-9_30
16
Aparecerá el cuadro de
diálogo Insertar disco.
Haga clic en [Aceptar].
208
Puede que el cuadro de
diálogo Insertar disco no
aparezca. En ese caso, prosiga
con el paso 17.
Conexión e instalación de los controladores (Windows)
17
Aparecerá el cuadro de
diálogo Archivos
necesarios. Especifique
lo siguiente en el campo
“Copiar archivos de” y haga clic en [Aceptar].
D:\Driver\USB_XP2K\WDM
Si pretende utilizar el
controlador MME, especifique
MME en lugar de WDM.
English
fig.2-10_30
Deutsch
* El nombre de la unidad “D:” puede ser diferente para su sistema.
Especifique el nombre de su unidad de CD-ROM.
Si no se ha establecido el valor de “¿Qué acción desea que realice Windows?” en
“Ignorar”, aparecerá el cuadro de diálogo “Instalación de hardware”.
1.
Haga clic en [Continuar
de todos modos].
2.
Prosiga con la
instalación.
Français
Si “¿Qué acción desea que realice Windows?” está establecido
en “Advertir”:
fig.2-11_20
Aparecerá el Asistente
para hardware nuevo
encontrado.
Italiano
3
4
Español
Compruebe que aparezca
“EDIROL UA-20 (WDM)” o
“EDIROL UA-20 (MME)” y
haga clic en [Finalizar].
Espere hasta que aparezca “Hardware nuevo encontrado”
cerca de la barra de tareas.
Una vez finalizada la instalación del controlador,
aparecerá el cuadro de diálogo Cambio de
configuración del sistema.
Haga clic en [Sí]. Windows se reiniciará automáticamente.
209
Conexión e instalación de los controladores (Windows)
Si ha modificado “¿Qué acción desea que realice Windows?”
Si ha modificado el valor para ¿Qué acción desea que realice Windows?,
restablezca la configuración original después de reiniciar Windows.
1.
Si es usuario de Windows XP Professional, debe iniciar la sesión de
Windows utilizando un nombre de usuario con algún tipo de cuenta
administrativa (Administrador, por ejemplo).
2.
Haga clic en el menú Inicio de Windows y seleccione Panel de control.
3.
En “Elegir una categoría”, haga clic en “Rendimiento y
mantenimiento”.
* En función de cómo tenga configurado el sistema, puede que el icono Sistema
aparezca directamente en el Panel de control (en la Vista clásica). En ese
caso, haga doble clic en el icono Sistema.
4.
En “o elegir un icono del Panel de control”, haga clic en el icono
Sistema. Aparecerá el cuadro de diálogo Propiedades del sistema.
5.
Haga clic en la ficha Hardware y, a continuación, en [Firma del
controlador]. Aparecerá el cuadro de diálogo Opciones de firma del
controlador.
6.
Restablezca la configuración de ¿Qué acción desea que realice
Windows? a la configuración original (“Advertir” o “Bloquear”) y haga
clic en [Aceptar].
7.
Haga clic en [Aceptar]. El cuadro de diálogo Propiedades del sistema
se cerrará.
A continuación, debe configurar el controlador.
(➝ Configuración y comprobación (pág. 218))
210
Conexión e instalación de los controladores (Windows)
Desconecte todos los cables USB excepto el del teclado USB y
el ratón USB (si se utilizan).
2
3
Abra Windows como usuario con privilegios
administrativos (como administrador, por ejemplo).
Abra el cuadro de diálogo Propiedades del sistema.
Haga clic en el botón Inicio y, en el menú que aparece,
seleccione Configuración | Panel de control. En Panel de
control, haga doble clic en el icono Sistema.
fig.05-2e_30
4
Haga clic en la ficha
Hardware y, a
continuación, haga clic en
[Firma de controlador].
Deutsch
Con el UA-20 desconectado, inicie Windows.
Si el UA-20 ya está conectado a
su PC y aparece un mensaje de
“Asistente para agregar
nuevo hardware”, vaya a la
carpeta del CD-ROM
denominada
DRIVER\USB_XP2K\WDM o
DRIVER\USB_XP2K\MME,
abra el archivo Readme_e.htm
y en “Troubleshooting”
(Resolución de problemas)
lea el apartado titulado “You
attempted to install using
the above procedure, but
were not able to” (“Ha
intentado instalar utilizando
el procedimiento de arriba
pero no ha podido”).
Français
1
English
Usuarios de Windows 2000
Abra el cuadro de diálogo
Opciones de firma del
controlador.
Asegúrese de establecer
“Verificación de la firma
de archivo” en “Ignorar”.
Si ya está establecido en
“Ignorar”, haga clic en
[Aceptar].
Si no está establecido en
“Ignorar”, anótese la
configuración actual (“Avisar” o “Bloquear”). Luego cambie
la configuración a “Ignorar” y haga clic en [Aceptar].
Una vez haya instalado el controlador, restaure la
configuración original.
(➝ Si ha modificado “Verificación de la firma del archivo”
(pág. 215))
Si ha modificado
“Verificación de la firma del
archivo” en el paso 5, debe
restaurar la configuración
anterior después de instalar el
controlador. (–> Si ha
modificado “Verificación de
la firma del archivo”
(pág. 215))
211
Español
5
Italiano
fig.05-3e_30
Conexión e instalación de los controladores (Windows)
6
Haga clic en [Aceptar] para cerrar el cuadro de
diálogo Propiedades del sistema.
7
Salga de todo el software que se esté ejecutando
(aplicaciones).
Cierre cualquier ventana que esté abierta. Si utiliza un
programa antivirus o software similar, también debe cerrarlo.
8
Inserte el CD-ROM.
Inserte el CD-ROM en la unidad de CD-ROM del sistema.
9
Haga clic en el botón Inicio de Windows. En el menú
que aparece, seleccione “Ejecutar...”
Abra el cuadro de diálogo “Ejecutar...”.
fig.05-5e_30
10
En el cuadro de diálogo
que aparece, escriba lo
siguiente en el campo
“Abrir” y haga clic en
[Aceptar].
D:\DRIVER\USB_XP2K\WDM\SETUPINF.EXE
* El nombre de la unidad “D:” puede ser diferente para su sistema.
Especifique el nombre de su unidad de CD-ROM.
fig.05-6e_30
11
Aparecerá el cuadro de
diálogo SetupInf.
Ahora puede instalar el
controlador.
12
212
Sitúe el Interruptor de selección de modo
ADVANCE del UA-20 en la posición ON.
En este manual, la ubicación
de las carpetas y archivos se
da en relación con la ruta del
archivo y se utiliza \ como
delimitador. Por ejemplo,
WDM\SETUPINF.EXE se
refiere al archivo
SETUPINF.EXE que se
encuentra en la carpeta
WDM.
Si pretende utilizar el
controlador MME, especifique
MME en lugar de WDM.
13
Utilice el cable USB para conectar el UA-20 al sistema.
Si la configuración de “Verificación de la firma del
archivo” no se ha establecido en “Ignorar”, aparecerá
el cuadro de diálogo “No se ha encontrado la firma
digital”.
Esta unidad viene equipada
con un circuito de protección.
Es necesario dejar pasar un
pequeño intervalo (de unos
segundos) después de
encender la unidad para que
ésta funcione correctamente.
English
Conexión e instalación de los controladores (Windows)
1.
Haga clic en [Sí].
2.
Prosiga con la instalación.
Deutsch
Si “Verificación de la firma del archivo” está
establecido en “Advertir”:
Haga clic en [Aceptar].
2.
Cuando aparezca
“Asistente para
hardware nuevo
encontrado”, haga clic en
[Finalizar].
3.
Efectúe la instalación como se describe en el
apartado de “Resolución de problemas”
acerca de ¿El administrador de dispositivos
muestra “?”, “!” o “Dispositivo USB
Composite" (pág. 240).
Italiano
1.
Français
Si “Verificación de la firma del archivo” está
establecido en “Bloquear”:
14
Aparecerá el cuadro
de diálogo Insertar
disco.
Haga clic en [Aceptar].
Si no aparece el cuadro de
diálogo Insertar disco,
consulte el apartado No
aparece el cuadro de diálogo
“Insertar disco” (pág. 241)
213
Español
fig.05-8e_30
Conexión e instalación de los controladores (Windows)
fig.05-9e_30
15
Aparecerá el cuadro de
diálogo Archivos
necesarios.
En el campoCopiar
archivos de, escriba el
nombre de la carpeta que
aparece en el cuadro de diálogo y haga clic en [Aceptar].
D:\DRIVER\USB_XP2K\WDM
* El nombre de la unidad “D:” puede ser diferente para su sistema.
Especifique el nombre de su unidad de CD-ROM.
Si la configuración de “Verificación de la firma del
archivo” no se ha establecido en “Ignorar”, aparecerá
el cuadro de diálogo “No se ha encontrado la firma
digital”.
Si “Verificación de la firma del archivo” está
establecido en “Advertir”:
1.
Haga clic en [Sí].
2.
Prosiga con la instalación.
fig.05-10e_30
16
Es posible que aparezca el
“Asistente para encontrar
nuevo hardware”.
Compruebe que indique
“EDIROL UA-20 (WDM)” o
“EDIROL UA-20 (MME)” y
haga clic en [Finalizar].
Si no aparece el cuadro de diálogo “Asistente para
encontrar nuevo hardware”, prosiga con el paso 18.
214
Si pretende utilizar el
controlador MME, especifique
MME en lugar de WDM.
Conexión e instalación de los controladores (Windows)
fig.05-11e_30
Puede que aparezca
el cuadro de diálogo
Cambio de
configuración del
sistema.
English
17
Deutsch
Haga clic en [Sí]. Windows se reiniciará automáticamente.
Si no aparece el cuadro de diálogo Cambio de configuración
del sistema, reinicie Windows desde el menú Inicio.
Si ha modificado “Verificación de la firma del
archivo”
Una vez haya reiniciado Windows, inicie la sesión en Windows como usuario
con privilegios administrativos (como Administrador).
2.
En el escritorio de Windows, haga clic con el botón secundario del ratón en el
icono Mi PC y, en el menú que aparece, seleccione Propiedades. Aparecerá el
cuadro de diálogo Propiedades del sistema.
3.
Haga clic en la ficha Hardware y, a continuación, haga clic en [Firma del
controlador]. Aparecerá el cuadro de diálogo Opciones de firma del
controlador.
4.
Vuelva a establecer la configuración original de “Verificación de firma del
controlador” (ya sea “Advertir” o “Bloquear”) y haga clic en [Aceptar].
5.
Haga clic en [Aceptar]. El cuadro de diálogo Propiedades del sistema se
cerrará.
Italiano
1.
Français
Si ha cambiado la configuración de “Verificación de la firma del archivo” en el
paso 5, restaure la configuración original después de reiniciar Windows.
Español
A continuación, debe configurar el controlador.
(➝ Configuración y comprobación (pág. 218))
215
Conexión e instalación de los controladores (Windows)
■ Usuarios de Windows Me/98
1
Con el UA-20 desconectado, inicie Windows.
Desconecte todos los cables USB excepto el del teclado USB y
el ratón USB.
2
Salga de todo el software que se esté ejecutando
(aplicaciones).
Cierre cualquier ventana que esté abierta. Si utiliza un
programa antivirus o software similar, también debe cerrarlo.
3
Prepare el CD-ROM.
Inserte el CD-ROM en la unidad de CD-ROM del sistema.
4
Si el UA-20 ya está conectado a
su PC y aparece el mensaje
“Asistente para agregar
nuevo hardware”, vaya a la
carpeta del CD-ROM
denominada
DRIVER\USB_ME98, abra el
archivo Readme_e.htm y en
“Troubleshooting”
(Resolución de problemas)
lea el apartado titulado “You
attempted to install using
the above procedure, but
were not able to” (“Ha
intentado instalar utilizando
el procedimiento de arriba
pero no ha podido”).
Haga clic en el botón Inicio de Windows. En el menú
que aparece, seleccione Ejecutar....
Abra el cuadro de diálogo Ejecutar....
fig.05-13e_30
5
En el cuadro de diálogo
que aparece, escriba lo
siguiente en el campo
“Abrir” y haga clic en
[Aceptar].
D:\DRIVER\USB_ME98\SETUPINF.EXE
* El nombre de la unidad “D:” pude ser diferente según su sistema.
Especifique el nombre de la unidad de su CD-ROM.
fig.05-14e_30
6
Abra el cuadro de
diálogo SetupInf.
Ahora puede instalar el
controlador.
216
En este manual, la ubicación
de las carpetas y archivos se da
en relación a la ruta del
archivo y se utiliza \ como
delimitador. Por ejemplo,
USB_ME98\SETUPINF.EXE
indica que el archivo
SETUPINF.EXE se encuentra
en la carpeta USB_ME98.
Conexión e instalación de los controladores (Windows)
9
Si utiliza
Windows 98,
puede que
aparezca el
cuadro de diálogo Insertar disco.
Haga clic en [Aceptar].
fig.05-16e_30
10
Aparecerá el cuadro de
diálogo Hardware
nuevo encontrado.
En el campo Copiar
archivos de, escriba el
nombre de la carpeta que
aparece en el cuadro de diálogo SetupInf y haga clic en
[Aceptar].
D:\DRIVER\USB_ME98
* El nombre de la unidad “D:” pude ser diferente según su sistema.
Especifique el nombre de la unidad de su CD-ROM.
11
Si utiliza Windows 98 y no
aparece el cuadro de diálogo
Insertar disco, lea el apartado
No aparece el cuadro de
diálogo “Insertar disco”
(pág. 241).
Si no aparece el cuadro de
diálogo Hardware nuevo
encontrado, vuelva a instalar
el controlador utilizando el
mismo procedimiento, tal
como se describe en el
apartado No aparece el
cuadro de diálogo “Insertar
disco” (pág. 241).
English
Deutsch
fig.05-15e_30
Français
Utilice el cable USB para conectar el UA-20 al sistema.
Esta unidad viene equipada
con un circuito de protección.
Es necesario dejar pasar un
pequeño intervalo (de unos
segundos) después de
encender la unidad para que
ésta funcione correctamente.
Italiano
8
Sitúe el Interruptor de selección de modo
ADVANCE del UA-20 en la posición ON.
Una vez se haya instalado el controlador, se cerrará el
cuadro de diálogo Hardware nuevo encontrado.
En el cuadro de diálogo SetupInf, haga clic en [Aceptar]. El
cuadro de diálogo SetupInf se cerrará.
Español
7
A continuación, debe configurar el controlador.
(➝ Configuración y comprobación (pág. 218))
217
Conexión e instalación de los controladores (Windows)
Configuración y comprobación
■ Especificación del destino de entrada/
salida de audio y MIDI
Usuarios de Windows XP/2000/Me
1
Abra el Panel de control.
Haga clic en el botón Inicio y, en el menú que aparece,
seleccione Configuración | Panel de control.
Windows XP
Haga clic en el botón Inicio de Windows y, en el menú que
aparece, seleccione Panel de control.
2
Abra el cuadro de diálogo Propiedades de sonidos
y dispositivos de audio (o Propiedades de sonidos
y multimedia, en Windows 2000 o ME).
Windows XP
En “Elegir una categoría”, haga clic en “Sonidos, voz y
dispositivos de audio”. A continuación, en “o elegir un
icono del Panel de control”, haga clic en el icono Sonidos y
dispositivos de audio.
Windows 2000/Me
En Panel de control, haga doble clic en el icono Sonidos y
multimedia para abrir el cuadro de diálogo “Propiedades de
sonidos y multimedia”.
3
218
Haga clic en la ficha Audio.
En función de cómo tenga
configurado el sistema, puede
que el icono Sonidos y
dispositivos de audio
aparezca directamente en el
Panel de control (en la Vista
clásica). En ese caso, haga
doble clic en el icono Sonidos
y dispositivos de audio.
Si no aparece el icono Sonido
y multimedia, haga clic en
“Mostrar todas las opciones
del Panel de control” que
aparece en el marco izquierdo
del panel.
Conexión e instalación de los controladores (Windows)
Grabación
de sonido
Reproducción
de música MIDI
EDIROL UA-20 IN
EDIROL UA-20 MIDI OUT
Modo de controlador estándar
EDIROL UA-20 (Windows XP)
Dispositivo de audio USB
(Windows 2000/Me)
EDIROL UA-20 (Windows XP)
Dispositivo de audio USB
(Windows 2000/Me)
No puede utilizarse MIDI en el Modo
de controlador estándar.
Cierre el cuadro de diálogo Propiedades de sonidos
y dispositivos de audio.
Haga clic en [Aceptar] para finalizar la configuración.
Prosiga con el siguiente apartado.
➝ Configuración del control de volumen (pág. 222)
Italiano
5
Modo avanzado
EDIROL UA-20 OUT
Français
Reproducción
de sonido
Para obtener información
detallada sobre el Modo
avanzado y el Modo de
controlador estándar,
consulte el apartado Modo
avanzado y Modo de
controlador estándar
(pág. 203).
Deutsch
Para la reproducción de
música MIDI, haga clic en ▼,
que aparece a la derecha de
[Dispositivo
predeterminado] (o
[Dispositivo preferido], en
Windows 2000 o Me) y
seleccione lo siguiente en la
lista que aparece.
Español
4
English
fig.2-28_30
219
Conexión e instalación de los controladores (Windows)
Usuarios de Windows 98
1
Abra el Panel de control.
Haga clic en el botón Inicio y, en el menú que aparece,
seleccione Configuración | Panel de control.
2
Abra el cuadro de diálogo Propiedades de
Multimedia.
En Panel de control, haga doble clic en el icono Multimedia
para abrir el cuadro de diálogo “Propiedades de
Multimedia”.
3
4
Haga clic en la ficha Audio.
Especifique el “Dispositivo
preferido”.
Haga clic en los campos
Reproducción y Grabación,
realice las siguientes selecciones
en la lista que aparece y haga
clic en [Aplicar].
Modo avanzado
Reproducción
Grabación
5
220
EDIROL UA-20 Out
EDIROL UA-20 In
Haga clic en la ficha MIDI.
Para obtener información
detallada sobre el Modo
avanzado y el Modo de
controlador estándar,
consulte el apartado Modo
avanzado y Modo de
controlador estándar
(pág. 203).
Modo de controlador
estándar
Dispositivo de audio USB
Dispositivo de audio USB
Conexión e instalación de los controladores (Windows)
Especifique la “Salida de
MIDI”.
Modo avanzado
Salida de
MIDI
Modo de controlador
estándar
No puede utilizarse MIDI en el
Modo de controlador estándar.
Français
Cierre el cuadro de diálogo Propiedades de
multimedia.
Haga clic en [Aceptar] para finalizar la configuración.
De este modo, se completa la configuración del destino de
entrada/salida de audio y MIDI. Si ha instalado el controlador
de Windows estándar, configure el control de volumen de
Windows.
Prosiga con el siguiente apartado.
➝ Configuración del control de volumen (pág. 222)
Italiano
7
EDIROL UA-20 MIDI OUT
Deutsch
Para obtener información
detallada sobre el Modo
avanzado y el Modo de
controlador estándar,
consulte el apartado Modo
avanzado y Modo de
controlador estándar
(pág. 203).
Seleccione [Instrumento
único], elija una de las
opciones siguientes en la lista
que aparece y haga clic en
[Aplicar].
Español
6
English
fig.2-29_30
221
Conexión e instalación de los controladores (Windows)
■ Configuración del control de volumen
Si ha instalado el controlador de Windows estándar,
configure el control de volumen de Windows.
1
Abra el Control de volumen.
Haga clic en el botón Inicio de Windows y seleccione
Programas | Accesorios | Entretenimiento | Control de
volumen.
2
Para ajustar el volumen del UA-20, suba o baje el
deslizador.
Si ha instalado el controlador estándar, el UA-20 podrá
utilizar el Control de volumen de Windows para ajustar el
volumen de salida.
Elementos que se pueden configurar
Reproductor
de CD
WAVE
Sintetizador
de software
Controla el volumen de los “CD de audio”
que se insertan en la unidad de CD-ROM
interna del PC. (*1)
Controla el volumen de salida de sonido del
dispositivo de salida de audio “EDIROL
UA-20”. La salida digital y la salida analógica
variarán.
Controla el volumen del sintetizador de
software integrado en Windows.
* 1 Si el volumen de reproducción del CD no cambia cuando ajuste
este control, cambie el volumen WAVE (Onda). Si está utilizando
Windows 2000 y el Reproductor de CD no aparece, seleccione el
elemento de Reproducción de CD digital “Habilitar los CD
de música digitales para este dispositivo de
reproducción de CD”.
➝ Reproducción de CD de audio en la unidad de CD-ROM
interna del PC o utilización del UA-20 para reproducir
música de juegos (sólo en Modo de controlador
estándar) (pág. 223)
222
Si no tiene el Control de
volumen instalado en su PC,
utilice el icono del Panel de
control Agregar o eliminar
una aplicación para
instalarlo. Para obtener más
detalles sobre la instalación,
consulte el manual de
Windows o la ayuda.
Si establece el volumen del
Control de volumen al
máximo, podrá utilizar el
UA-20 con la mejor calidad de
audio.
Si se encuentra seleccionada la
opción Mute (Silencio) o si el
deslizador está en la posición
más baja, el equipo UA-20 no
emitirá ningún sonido.
Conexión e instalación de los controladores (Windows)
English
Reproducción de CD de audio en la unidad de CD-ROM interna del PC o
utilización del UA-20 para reproducir música de juegos (sólo en Modo de
controlador estándar)
1.
Abra el cuadro de diálogo Propiedades del sistema.
Seleccione Inicio | Configuración | Panel de control y, en Panel de control,
haga doble clic en el icono Sistema.
(Windows XP– Haga clic en el botón Inicio de Windows y, en el menú que
aparece, seleccione Panel de control).
2.
Abra el Administrador de dispositivos.
Haga clic en la ficha Hardware y, a continuación, haga clic en el botón
Administrador de dispositivos.
3.
Abra las Propiedades de la unidad de CD-ROM.
En la unidad de CD-ROM, haga doble clic en la Unidad de CD-ROM que esté
utilizando. En Reproducción de CD digital, seleccione el elemento “Habilitar
el CD de sonido digital para este dispositivo de CD-ROM”.
Deutsch
Usuarios de Windows XP o 2000:
Abra las Propiedades del sistema.
Seleccione Inicio | Configuración | Panel de control y, en Panel de control,
haga doble clic en el icono Sistema.
2.
Abra las Propiedades de la unidad de CD-ROM.
Haga doble clic en el icono CD-ROM y haga doble clic en la unidad de
CD-ROM que esté utilizando.
3.
Haga clic en la ficha Propiedades y, en Reproducción de CD digital,
seleccione el elemento “Habilitar el CD de sonido digital para este
dispositivo de CD-ROM”.
Italiano
1.
Français
Usuarios de Windows Me:
1.
Abra el cuadro de diálogo Propiedades de
Multimedia.
Seleccione Inicio | Configuración | Panel de control y, en Panel de control,
haga doble clic en el icono Multimedia.
2.
Haga clic en la ficha Música de CD y seleccione el elemento “Habilitar el CD
de sonido digital para este dispositivo de CD-ROM”.
Español
Usuarios de Windows 98:
* Dependiendo del sistema que utilice, puede que la reproducción aún no sea posible. Para
obtener más detalles, póngase en contacto con el fabricante de su PC. Si está utilizando una
unidad de CD-ROM de tipo PC-Card (PCMCIA), la reproducción de datos WAVE (onda)
de un CD-ROM o la reproducción de un CD de audio puede provocar que el sonido se
interrumpa o que no se oiga ningún sonido.
223
Conexión e instalación de los
controladores (Macintosh)
Si es usuario de Windows, consulte el apartado Conexión e instalación de los
controladores (Windows) (pág. 203).
¿Qué es un controlador?
fig.05-1e_50
Un “controlador” es
software que transfiere
Application
USB port
datos entre el UA-20 y el
software de aplicación que
USB
USB cable
driver
esté ejecutando en su PC;
siempre que su PC y el
Computer
UA-20
UA-20 estén conectados
mediante un cable USB. El controlador transfiere datos de la aplicación al UA-20 y
del UA-20 a la aplicación.
Modo avanzado y Modo de controlador
estándar
El UA-20 tiene dos modos operativos, el Modo avanzado y el Modo de
controlador estándar, y cada uno utiliza un controlador diferente.
■ Modo avanzado
El UA-20 funcionará en este modo si se dispone el Interruptor de selección de
modo ADVANCE del panel posterior en ON. Este modo utiliza el controlador
especial que se encuentra en el CD-ROM, con el que podrá grabar, reproducir y
editar audio de alta calidad y a tiempo estable.
En el Modo avanzado, las señales de audio se transfieren entre el UA-20 y el PC con
una resolución de 24 bits y unas frecuencias de sampling de 44,1 kHz.
Seleccione el Modo avanzado si está utilizando una aplicación que permite grabar,
reproducir y editar audio de alta calidad, como una aplicación de audio de 24 bits
o una aplicación compatible con ASIO como Cubase VST, Logic Audio o Metro.
En el Modo avanzado, el UA-20 no puede reproducir datos de audio (como un CD
de audio o sonidos de aviso) desde el Macintosh Sound Manager.
(➝ Instalación del controlador especial (pág. 225))
■ Modo de controlador estándar
El UA-20 funcionará en este modo si se dispone el Interruptor de selección de
modo ADVANCE del panel posterior en OFF. Este modo utiliza el controlador de
audio USB estándar propio del sistema operativo Mac. En el modo de controlador
estándar, las señales de audio se transfieren entre el UA-20 y el PC con una
resolución de 16 bits y unas frecuencias de sampling de 44,1 kHz.
224
Conexión e instalación de los controladores (Macintosh)
English
Seleccione este modo si está utilizando una aplicación que se sirve de los recursos
propios del sistema operativo Mac, como una aplicación que utiliza la unidad de
CD-ROM del PC para reproducir audio de CD o una aplicación que utiliza el
sintetizador de software integrado en el sistema operativo Mac. El controlador
estándar que proporciona el sistema operativo Mac no da soporte a ASIO.
Tenga también en cuenta que no se da soporte a la utilización de Mac OS 8.6.
(➝ Installing the OS-standard driver (pág. 53))
Deutsch
Pasar del Modo avanzado al Modo de controlador estándar y viceversa
Si primero instala tanto el controlador especial como el controlador estándar, podrá
pasar del Modo avanzado al Modo de controlador estándar y vicerversa mediante
el Interruptor de selección de modo ADVANCE del UA-20.
* Para que lo dispuesto en el Interruptor de selección de modo ADVANCE surta efecto,
debe salir de todo software secuenciador y de todas las aplicaciones que utilicen el UA-20,
apagar el UA-20 y luego volverlo a encender.
Instalación del controlador especial
Français
Debe instalar el controlador MIDI aunque sólo pretenda utilizar audio en el UA-20.
Asegúrese de instalar el controlador MIDI.
Utilice OMS o FreeMIDI como controlador MIDI.
Si va a utilizar OMS ...................................................... (pág. 226)
Si pretende utilizar FreeMIDI ..................................... (pág. 230)
* Debe instalar OMS o FreeMIDI en su Macintosh, según el software secuenciador que vaya
a utilizar.
Italiano
* Si el UA-20 está encendido, cuando se inicie el Macintosh aparecerá un mensaje como
el siguiente. Realice los pasos que se describen a continuación según el mensaje que se
muestre.
Español
Si la pantalla indica:
“Driver required for USB device ‘unknown device’ is not available. Search for
driver on the Internet?”,
➝ haga clic en [Cancel].
Si la pantalla indica:
“Software required for using device ‘unknown device’ cannot be found.
Please refer to the manual included with the device, and install the necessary
software”,
➝ haga clic en [OK].
225
Conexión e instalación de los controladores (Macintosh)
■ Instalación del controlador del UA-20 (OMS)
Lleve a cabo el siguiente procedimiento para instalar el
controlador del UA-20.
El controlador OMS del UA-20 que se incluye es un módulo
añadido para utilizar el UA-20 con OMS. Para poder
utilizarlo, OMS ya debe estar instalado en el disco duro
desde el que haya iniciado la sesión.
OMS se encuentra en la
carpeta OMS Driver dentro
de la carpeta Driver E del
CD-ROM.
Si desea obtener más información sobre OMS, consulte el
manual OMS_2.3_Mac.pdf en la carpeta OMS Driver que se
encuentra dentro de la carpeta Driver E del CD-ROM.
Necesita Adobe Acrobat Reader para visualizar el archivo
OMS_2.3_Mac.pdf.
* Desconecte el UA-20 del Macintosh antes de realizar la instalación.
1
Salga de todo el software que se esté ejecutando
(aplicaciones).
Si utiliza un programa antivirus o software similar, también
debe cerrarlo.
2
Prepare el CD-ROM.
Inserte el CD-ROM en la unidad de CD-ROM.
3
4
Haga doble clic en el icono UA-20 OMS
Driver-E Installer (que se encuentra en la carpeta
Driver E-OMS del CD-ROM) para iniciar el programa
de instalación.
Verifique la ubicación de la instalación y haga clic
en [Install].
fig.03-scdrv2Z.e
5
Si aparece un
mensaje como el
siguiente, haga
clic en
[Continue].
Saldrá de todas las aplicaciones que se estén ejecutando y
seguirá la instalación.
226
La indicación de la ubicación
de instalación cambiará en
función de su sistema.
Asegúrese de que esté
seleccionado el disco de inicio
del sistema que está
utilizando.
Conexión e instalación de los controladores (Macintosh)
English
Aparecerá un cuadro de diálogo que indica
Installation completed.
Haga clic en [Restart] para reiniciar el Macintosh.
Configuración de OMS
Para comprobar la configuración de OMS, primero debe
conectar un módulo de sonido MIDI al conector MIDI OUT
del UA-20.
Para obtener información sobre cómo conectar un módulo de
sonido MIDI, consulte el manual del usuario de su módulo de
sonido MIDI.
4
Français
3
Utilice el cable USB para conectar el UA-20 al sistema.
Esta unidad viene equipada
con un circuito de protección.
Es necesario dejar pasar un
pequeño intervalo (de unos
segundos) después de
encender la unidad para que
ésta funcione correctamente.
En el CD-ROM, arrastre la
carpeta Driver E–OMS
Driver– Settings a la carpeta
Opcode–OMS del disco duro
del Macintosh para copiarla.
Italiano
2
Sitúe el Interruptor de selección de modo
ADVANCE del UA-20 en la posición ON.
En la carpeta Opcode-OMS
Application donde ha instalado
OMS, haga doble clic en OMS
Setup para iniciarlo.
Español
1
Deutsch
6
227
Conexión e instalación de los controladores (Macintosh)
fig.03-omsusb1a.e
5
Si aparece un
cuadro de
diálogo como
éste, haga clic en
[Turn It Off].
Aparecerá un
cuadro de
diálogo de
confirmación; haga clic en [OK].
fig.03-omsusb2.e
6
Aparecerá el cuadro de
diálogo Create a New
Studio Setup.
Haga clic en [Cancel]. Si,
por equivocación, hace
clic en OK, haga clic en
[Cancel] en la siguiente pantalla.
7
Elija “Open” en el menú File.
En la carpeta Settings que ha copiado en el paso 3,
seleccione el archivo UA-20 USB y haga clic en [Open].
fig.50
Aparecerá una pantalla como
la que se muestra aquí.
fig.51e
8
En el menú Edit, seleccione
OMS MIDI Setup.
En el cuadro de diálogo OMS
MIDI Setup que aparece,
marque Run MIDI in
background y haga clic en
[OK].
228
Es conveniente desactivar
AppleTalk, seleccionando
Chooser en el menú Apple.
Conexión e instalación de los controladores (Macintosh)
fig.52E
En el menú File, elija
Make Current.
English
9
Si no puede seleccionar Make
Current, significa que ya se
ha aplicado y puede
continuar con el siguiente
paso.
fig.03-omsusb07
Compruebe que la
transmisión y la recepción
MIDI se realicen
correctamente.
Deutsch
10
En el menú Studio, seleccione
Test Studio.
11
Cuando mueva el cursor
del ratón cerca del icono
del generador de sonido,
el cursor se convertirá en
una .
Si el UA-20 no emite ningún
sonido, consulte el apartado
No sound (pág. 70).
Salga de OMS Setup.
En el menú File, elija [Quit]. Si aparece el cuadro de diálogo
AppleTalk confirmation, haga clic en [OK] para cerrarlo.
Con esto finalizan las conexiones del UA-20 y el Macintosh y
la instalación del controlador MIDI.
Español
12
Italiano
Haga clic en los iconos del
generador de sonido rodeados por un círculo en la ilustración
que aparece a la derecha. Si el UA-20 emite sonido, la
configuración es correcta.
Français
fig.54
A continuación, debe instalar el controlador ASIO.
(➝ Instalación del controlador ASIO (pág. 233))
229
Conexión e instalación de los controladores (Macintosh)
■ Instalación del controlador del UA-20
(FreeMIDI)
Lleve a cabo el siguiente procedimiento para instalar el
controlador del UA-20. El controlador FreeMIDI del UA-20
que se incluye es un módulo añadido para utilizar el UA-20
con FreeMIDI. Para poder utilizarlo, FreeMIDI ya debe estar
instalado en el disco duro desde el que haya iniciado la
sesión.
* Desconecte el UA-20 del Macintosh antes de realizar la instalación.
1
Salga de todo el software que se esté ejecutando
(aplicaciones).
Si utiliza un programa antivirus o software similar, también
debe cerrarlo.
2
Prepare el CD-ROM.
Inserte el CD-ROM en la unidad de CD-ROM.
3
4
Haga doble clic en el icono UA-20 FM
Driver - E Installer (que se encuentra en la carpeta
Driver E - FreeMIDI del CD-ROM) para iniciar el
programa de instalación.
Verifique la ubicación de la instalación y haga clic
en [Install].
fig.3-2_40
5
Si aparece un
mensaje como el
siguiente, haga clic
en [Continue].
Saldrá de todas las
aplicaciones que se estén ejecutando y seguirá la instalación.
6
230
Aparecerá un cuadro de diálogo que indica
Installation completed. Haga clic en [Restart] para
reiniciar el Macintosh.
Conexión e instalación de los controladores (Macintosh)
Configuración de FreeMIDI
4
5
6
Desde el CD-ROM, copie la carpeta Driver
E - FreeMIDI Driver - Settings en el disco duro del
Macintosh.
Abra la carpeta FreeMIDI Applications desde la
ubicación en la que ha instalado FreeMIDI y haga
doble clic en el icono FreeMIDI Setup para iniciarlo.
Cuando aparezca “OMS is installed on this
computer...”, haga clic en [FreeMIDI].
La primera vez que inicie el software, aparecerá el
cuadro de diálogo “Welcome to FreeMIDI!” .
Haga clic en [Continue].
8
9
Cuando aparezca el cuadro de diálogo FreeMIDI
Preferences, haga clic en [Cancel].
Español
7
Deutsch
3
Utilice el cable USB para conectar el UA-20 al sistema.
Esta unidad viene equipada
con un circuito de protección.
Es necesario dejar pasar un
pequeño intervalo (de unos
segundos) después de
encender la unidad para que
ésta funcione correctamente.
Français
2
Sitúe el Interruptor de selección de modo
ADVANCE del UA-20 en la posición ON.
Italiano
1
English
Para comprobar la configuración de FreeMIDI, primero debe
conectar un módulo de sonido MIDI al conector MIDI OUT
del UA-20.
Para obtener información sobre cómo conectar un módulo de
sonido MIDI, consulte el manual del usuario de su módulo de
sonido MIDI.
Cuando aparezca el cuadro de diálogo About Quick
Setup, haga clic en [Cancel].
En el menú File, elija Open.
231
Conexión e instalación de los controladores (Macintosh)
10
11
Seleccione UA-20 USB en la carpeta Settings que ha
copiado en el paso 3 y haga clic en [Open].
Compruebe que la transmisión y la recepción MIDI se
realizan correctamente.
En el menú MIDI, seleccione Check Connections.
fig.fm2
12
El cursor del ratón se
convertirá en un teclado.
Haga clic en los iconos del
generador de sonido
rodeados por un círculo en
el diagrama de la derecha.
Si oye sonido, los mensajes
MIDI se están transmitiendo del Macintosh al UA-20.
13
14
Vuelva a elegir el comando Check Connections del
menú MIDI para finalizar la prueba.
En el menú File, seleccione Quit para salir de
FreeMIDI Setup.
Con esto finalizan las conexiones del UA-20 y el Macintosh y
la instalación del controlador MIDI.
A continuación, debe instalar el controlador ASIO.
(➝ Instalación del controlador ASIO (pág. 233))
232
Si el UA-20 no emite ningún
sonido, consulte el apartado
No sound (pág. 70).
Conexión e instalación de los controladores (Macintosh)
El controlador ASIO del UA-20 da soporte a los siguientes
canales de entrada/salida de audio.
• Entrada de audio ............. 24/16 bits1 canal estéreo
(2 canales monoaurales)
• Salida de audio ............. 24/16 bits1 canal estéreo
(2 canales monoaurales)
A continuación se detalla cómo instalar el controlador
compatible con ASIO 1.0 de 16 bits.
ASIO 1,0 UA-20 de 16
ASIO 1,0 UA-20 de 24
ASIO 2.0 UA-20 de 16
ASIO 2.0 UA-20 de 24
Español
✕
❍
✕
❍
Italiano
Si su software compatible con ASIO da soporte a ASIO 2.0 o a datos de
audio de grabación/reproducción de 24 bits, utilizando los siguientes
controladores conseguirá un entorno de mayor calidad.
Software compatible con ASIO.
Compatible con
Controlador a utilizar
Compatible con
24 bits
ASIO 2.0
✕
✕
❍
❍
Deutsch
En el Modo avanzado, el UA-20 no puede reproducir datos de
audio del Macintosh Sound Manager (como sonidos de alerta
o CD de audio).
ASIO (Steinberg Audio Stream
In/Out Interface o Interfaz de
entrada/salida de flujo de
audio Steinberg)
Es un estándar de interfaz de
audio promovido por
Steinberg Corporation.
Cuando se utiliza el UA-20 con
software compatible con ASIO,
se mejora la precisión de la
sincronización, lo cual permite
un entorno de producción de
música más sofisticado.
Français
Debe instalar el controlador MIDI aunque sólo pretenda
utilizar audio en el UA-20. Asegúrese de instalar el
controlador MIDI antes de instalar el controlador ASIO.
En este apartado se explica cómo instalar el controlador
ASIO, con el que su software secuenciador o software de
edición de audio podrá utilizar el UA-20 Para obtener más
información sobre la instalación y configuración del
controlador ASIO, lea el documento Driver E–ASIO
Driver–Setting ASIO Driver-E.HTM del CD-ROM.
English
Instalación del controlador ASIO
233
Conexión e instalación de los controladores (Macintosh)
fig.05-21e_30
1
2
3
234
De la carpeta Driver
E-ASIO Driver del
CD-ROM, copie
[UA-20 ASIO1.0
16bit] en la carpeta [ASIO Drivers] dentro de la
carpeta ASIO Drivers del software compatible con
ASIO que esté utilizando (por ejemplo Cubase VST,
Logic Audio, Digital Performer, Metro o SPARK LE).
Encienda el software compatible con ASIO (p. ej.,
Cubase VST, Logic Audio, Digital Performer, Metro o
SPARK LE).
Abra el cuadro de diálogo de configuración de audio
de su software compatible con ASIO y seleccione
[UA-20 ASIO 16bit] como ASIO Device.
El nombre del cuadro de
diálogo Audio setting variará
en función del software. Para
obtener más información,
consulte el manual del
software.
UA-20 application guide
Si utiliza el UA-20 en Modo avanzado, puede modificar la configuración del
controlador para ajustar el tiempo de recuperación de datos del audio. Para ajustar
el tiempo de recuperación de datos, modifique el tamaño del búfer en el cuadro de
diálogo de configuración del controlador.
English
Ajuste del tiempo de recuperación de datos
* El tiempo de recuperación de datos es el tiempo que transcurre desde que una aplicación
reproduce datos de audio hasta que se oye el sonido desde un aparato de audio como el UA-20.
2
Tal como se describe en “Apertura del cuadro de diálogo de
configuración del controlador especial (pág. 237)”, abra el cuadro de
diálogo “Configuración del controlador”.
Deutsch
1
Ajuste el tamaño del búfer del controlador.
La siguiente configuración producirá el tiempo de recuperación de datos más corto.
Macintosh:
Fije el “Buffer Size” lo más a la izquierda posible (Min).
Reinicie la aplicación que esté utilizando el UA-20.
Italiano
4
Haga clic en [Aceptar] para cerrar el cuadro de diálogo de configuración del
controlador.
Si la aplicación que utiliza cuenta con una función para comprobar los aparatos de
audio, ejecútela para que realice las pruebas pertinentes.
5
Reproduzca los datos en la aplicación.
Si se producen interrupciones en el sonido, repita el procedimiento y aumente
gradualmente el tamaño del búfer especificado en el paso 2 hasta que no se produzcan
más interrupciones.
* En función de la aplicación que utilice, es posible que en la configuración del audio de la
aplicación haya una función de ajuste del tamaño del búfer o del tiempo de
recuperación de datos. Para obtener más información, consulte el manual de la
aplicación.
235
Español
3
Français
Windows:
Fije el “Tamaño de búfer de audio” lo más a la izquierda posible (Min).
UA-20 application guide
Utilización de ASIO Direct Monitor
(Monitor directo ASIO)
Si utiliza el UA-20 desde una aplicación compatible con ASIO2.0 en Modo avanzado,
el interruptor INPUT MONITOR del UA-20 se puede controlar automáticamente desde
la aplicación.
1
2
Tal como se describe en “Apertura del cuadro de diálogo de
configuración del controlador especial (pág. 237)”, abra el cuadro de
diálogo “Configuración del controlador”.
Configúrelo de la siguiente manera:
Compruebe la casilla de verificación “Utilización de ASIO Direct Monitor”.
3
Haga clic en [Aceptar] para cerrar el cuadro de diálogo de configuración del
controlador.
* En función de la aplicación, es posible que en la configuración del audio de la aplicación haya
una opción de configuración de ASIO Direct Monitor. Para obtener más información,
consulte el manual de funcionamiento de la aplicación.
* Si utiliza ASIO Direct Monitor, es posible que la supervisión se active/desactive
inesperadamente, en función de la configuración de la aplicación y del procedimiento de
grabación. Si esto ocurre, desmarque la casilla de verificación del paso 2 para desactivar
ASIO Direct Monitor.
236
UA-20 application guide
English
Apertura del cuadro de diálogo de configuración
del controlador especial
Si utiliza un controlador WDM en Windows XP/2000:
1.
Abra el “Panel de control” y haga doble clic en “EDIROL UA-20”.
2.
Aparecerá el cuadro de diálogo “EDIROL UA-20 Driver Settings”.
* En Windows XP, haga clic en “Cambiar a vista clásica” para establecer la pantalla en
modo de vista clásica. EDIROL UA-20 no aparecerá si no selecciona la vista clásica.
2.
Haga clic en la ficha “Hardware” y, a continuación, haga clic en el botón
[Administrador de dispositivos].
3.
Haga doble clic en “Dispositivos de sonido, vídeo y juegos”.
4.
Haga doble clic en “EDIROL UA-20”.
5.
Haga clic en la ficha “Propiedades” y, en el área “Dispositivos multimedia”,
haga clic en “Dispositivos de audio”.
6.
Seleccione “EDIROL UA-20” y haga clic en el botón [Propiedades].
7.
Haga clic en el botón [Configuración] y aparecerá el cuadro de diálogo
“EDIROL UA-20 Driver Settings”.
Français
Abra el “Panel de control” y haga doble clic en “Sistema”.
1.
Abra el “Panel de control” y haga doble clic en “Sonidos y multimedia”.
(En caso de que utilice Windows 98, haga doble clic en “Multimedia”).
2.
Haga clic en la ficha “Dispositivos” y haga doble clic en “Dispositivos de
sonido”.
3.
Seleccione “EDIROL UA-20 Audio” y haga clic en el botón [Propiedades] para
abrir las propiedades.
4.
Haga clic en el botón [Configuración] y aparecerá el cuadro de diálogo
“EDIROL UA-20 Driver Settings”.
Italiano
Si utiliza Windows Me/98:
Si utiliza Macintosh:
Abra ASIO Control Panel del cuadro de diálogo Audio Settings de la aplicación
compatible con ASIO. El nombre del cuadro de diálogo de configuración del audio y el
procedimiento para abrir el ASIO Control Panel variarán en función de la aplicación.
Para obtener más información, consulte el manual de funcionamiento de la aplicación.
237
Español
1.
Deutsch
Si utiliza un controlador MME en Windows XP/2000:
Resolución de problemas
Resolución de problemas
Si sucede un problema inesperado mientras utiliza el UA-20, antes de nada lea este
capítulo. Contiene múltiples consejos para solucionar problemas.
Si utiliza Windows o Macintosh por primera vez y, como consecuencia de ello,
encuentra dificultades para seguir las explicaciones de procedimiento, consulte los
manuales de su PC o sistema operativo.
Problemas comunes a Windows y Macintosh
Problemas que sólo ocurren con Windows
Problemas que sólo ocurren con Macintosh
Problemas relacionados con el controlador
USB
Aparece un cuadro de diálogo con el mensaje
“Unknown driver found” (“Se ha encontrado un
controlador desconocido”) y no puede instalar el
controlador
“Find new hardware wizard” (“Asistente para encontrar
nuevo hardware”) no se ejecuta automáticamente.
El “Asistente para encontrar nuevo hardware” finaliza
antes de que se complete el proceso
•
Es posible que pasen 15 segundos (o incluso más) entre la conexión del cable
USB y la detección del UA-20.
•
¿El cable USB está conectado correctamente?
Asegúrese de que la unidad UA-20 y el PC están conectados correctamente a través de
un cable USB.
238
Se ha detectado que, en determinados casos, no todos los archivos de
Windows 98 necesarios para dar soporte a audio a través de USB están
instalados cuando el PC sale de fábrica.
Póngase en contacto con el fabricante del PC.
•
¿Cumple su PC las especificaciones USB?
Si utiliza un PC que no cumple con los requisitos eléctricos de las especificaciones USB,
el funcionamiento puede ser inestable. En estos casos, puede resolver el problema
conectando un concentrador USB.
•
¿Aparece el aviso “Dispositivo desconocido” en “Otros dispositivos” o
“Controlador de bus serie universal”?
Utilice el siguiente procedimiento para borrar “Otros dispositivos” (Controlador de bus
serie universal), “Dispositivo desconocido” y, a continuación, reinicie el sistema.
1.
En el Panel de control de Windows, haga doble clic en Sistema. Aparecerá
el cuadro de diálogo Propiedades del sistema.
2.
Haga clic en la ficha Administrador de dispositivos.
3.
Haga doble clic en “Otros dispositivos” o en “Controlador de bus serie
universal” para ver una lista de dispositivos.
4.
En la lista, seleccione el dispositivo desconocido y haga clic en [Quitar].
5.
En el cuadro de diálogo que le pide que confirme la eliminación, haga clic en
[Aceptar].
6.
Compruebe que en la lista no se visualice “Otros dispositivos” o
“Dispositivo desconocido” y haga clic en [Cerrar] para cerrar el cuadro de
diálogo.
Deutsch
•
Français
¿Puede utilizar el cable USB en su PC?
Consulte el manual de funcionamiento del PC y asegúrese de que puede utilizar el cable
USB.
Italiano
•
English
Resolución de problemas
Aparece “Se ha encontrado un dispositivo
desconocido” incluso cuando ha instalado el
controlador
Español
Si el PC o el concentrador USB tienen dos o más conectores USB y ha conectado el UA-20
a un conector USB al que no había estado conectado nunca el UA-20, es posible que
aparezca un cuadro de diálogo con el mensaje “Dispositivo desconocido”, incluso en
un sistema en el que ya se haya instalado el controlador.
Consulte el apartado Conexión e instalación de los controladores (Windows)
(pág. 203) y vuelva a instalar el controlador. Esto no significa que el funcionamiento
sea defectuoso.
239
Resolución de problemas
El controlador no se ha instalado correctamente
Tal como se describe en Deleting the special driver (pág. 79), elimine el controlador
del dispositivo de audio USB instalado en el sistema y vuelva a instalar el controlador
UA-20, tal como se describe en Conexión e instalación de los controladores
(Windows) (pág. 203). Asimismo, compruebe si hay algún elemento denominado
“Dispositivo desconocido” en “Otros dispositivos” o en “Controlador de bus serie
universal”.
Si encuentra uno, elimínelo.
No se puede instalar, eliminar o utilizar el controlador en
Windows XP o 2000
•
¿Ha iniciado Windows como usuario con privilegios administrativos?
Para poder instalar, eliminar o reinstalar el controlador en Windows XP o 2000, debe
iniciar Windows como usuario con privilegios administrativos, por ejemplo,
Administrador. Para obtener más información, consulte el administrador del sistema de
su PC.
•
¿Ha configurado las “Opciones de firma del controlador”?
Para instalar o reinstalar el controlador, debe configurar las “Opciones de firma del
controlador”.
(Windows XP ➝ pág. 205, Windows 2000 ➝ pág. 211)
Windows XP o 2000 muestran el cuadro de diálogo
“Instalación de hardware” o “No se ha encontrado la
firma digital”
•
¿Ha configurado las “Opciones de firma del controlador”?
Para instalar o reinstalar el controlador, debe configurar las “Opciones de firma del
controlador”.
(Windows XP ➝ pág. 205, Windows 2000 ➝ pág. 211)
¿El administrador de dispositivos muestra “?”, “!” o
“Dispositivo USB Composite"
240
Resolución de problemas
No aparece el cuadro de diálogo “Insertar disco”
2.
Después de haber iniciado Windows, utilice un cable USB para conectar el
UA-20 al sistema.
3.
Haga clic en el botón [Inicio] de Windows y, en el menú que aparece,
seleccione Configuración | Panel de control.
4.
Haga doble clic en el icono Sistema. Aparecerá el cuadro de diálogo
Propiedades del sistema.
5.
Haga clic en la ficha Administrador de dispositivos.
6.
Compruebe si aparecen indicaciones de “?Dispositivo USB Composite”,
“?Dispositivo USB”, “!Dispositivo USB” o “Dispositivo USB Composite”
bajo “Controladores de sonido, vídeo y juegos”, “Otros dispositivos” o
“Controlador de bus serie universal”. Si aparece alguna de estas
indicaciones, selecciónela y haga clic en [Eliminar].
7.
Aparece un cuadro de diálogo que le pedirá que confirme la eliminación del
dispositivo. Compruebe el contenido del cuadro de diálogo y haga clic en
[Aceptar]. Del mismo modo, si aparecen indicaciones de “?Dispositivo USB
Composite”, “?Dispositivo USB”, “Dispositivo USB” o “Dispositivo USB
Composite”, elimínelas.
8.
Si ve EDIROL UA-20 con un “!” amarillo o un “?”rojo al lado, elimínelo del
mismo modo.
9.
Cuando haya terminado de eliminar los dispositivos no deseados, haga clic en
[Aceptar] en el cuadro de diálogo Propiedades del sistema.
Deutsch
Apague el PC e inicie Windows con todos los cables USB desconectados
(excepto el del teclado y el ratón).
Français
1.
English
Utilice el siguiente procedimiento para volver a instalar el controlador.
Italiano
10. Corte la alimentación del UA-20 y, a continuación, elimine el controlador.
(➝ Deleting the special driver (pág. 79))
11. Reinicie Windows. Acto seguido, vuelva a instalar el controlador.
(➝ Conexión e instalación de los controladores (Windows) (pág. 203)).
Español
* Si el problema persiste después de haber realizado los pasos anteriores, consulte también el
archivo Léame del controlador USB. El archivo Léame se encuentra en el CD-ROM.
241
Main Specifications
UA-20: USB Audio/MIDI Interface
● Number of Audio Record/Playback
Channels
Record:
1 pair of stereo
Playback:
1 pair of stereo
Full duplex
● Interface
USB
Digital output
Optical Type
(conforms to S/P DIF)
● Signal Processing
PC interface:
24 bit
● Connectors
Input Jack (1/4 inch phone type) x 2
● Sampling Rate
Digital output:
44.1 kHz
● Nominal Input Level
-45 – -10 dBu
● Input Impedance
LINE:
GUITAR:
MIC:
Digital Out Connector
(Optical type)
Headphones Jack
(Stereo miniature phone type)
22 k ohms
470 k ohms
22 k ohms
● Nominal Output Level
-10 dBu
● Output Impedance
1 k ohms
● Residual Noise Level
(input terminated with 1 k ohm,
Master Volume = max.,
Input Monitor = off, IHF-A, typ.)
Master Out:
-105 dBu or less
Master Out Jack
(RCA phono type)
MIDI Connectors
● Power Supply
Supplied from the computer
● Current Draw
170 mA
● Dimensions
149 (W) x 110.5 (D) x 42.8 (H) mm
5-7/8 (W) x 4-3/8 (D) x 1-11/16 (H) inches
● Weight
210 g / 8 oz
● Accessories
Owner’s Manual
USB cable
CD-ROM
(0 dBu = 0.775 V rms)
962a
* In the interest of product improvement, the specifications and/or appearance of this unit
are subject to change without prior notice.
242
TO RESIZE THICKNESS, MOVE ALL ITEMS ON THE FRONT COVER TO LEFT OR RIGHT
For EU Countries
This product complies with the requirements of European Directive 89/336/EEC.
For the USA
FEDERAL COMMUNICATIONS COMMISSION
RADIO FREQUENCY INTERFERENCE STATEMENT
This equipment has been tested and found to comply with the limits for a Class B digital device, pursuant to Part 15 of the
FCC Rules. These limits are designed to provide reasonable protection against harmful interference in a residential
installation. This equipment generates, uses, and can radiate radio frequency energy and, if not installed and used in
accordance with the instructions, may cause harmful interference to radio communications. However, there is no guarantee
that interference will not occur in a particular installation. If this equipment does cause harmful interference to radio or
television reception, which can be determined by turning the equipment off and on, the user is encouraged to try to correct the
interference by one or more of the following measures:
– Reorient or relocate the receiving antenna.
– Increase the separation between the equipment and receiver.
– Connect the equipment into an outlet on a circuit different from that to which the receiver is connected.
– Consult the dealer or an experienced radio/TV technician for help.
This device complies with Part 15 of the FCC Rules. Operation is subject to the following two conditions:
(1) This device may not cause harmful interference, and
(2) This device must accept any interference received, including interference that may cause undesired operation.
Tested To Comply With FCC Standards
FOR HOME OR OFFICE USE
Unauthorized changes or modification to this system can void the users authority to operate this equipment.
This equipment requires shielded interface cables in order to meet FCC class B Limit.
For Canada
NOTICE
This Class B digital apparatus meets all requirements of the Canadian Interference-Causing Equipment Regulations.
AVIS
Cet appareil numérique de la classe B respecte toutes les exigences du Règlement sur le matériel brouilleur du Canada.
For the USA
DECLARATION OF CONFORMITY
Compliance Information Statement
Model Name :
Type of Equipment :
Responsible Party :
Address :
Telephone :
UA-20
USB Audio Interface
Edirol Corporation North America
425 Sequoia Drive, Suite 114, Bellingham, WA 98226
(360) 594-4276
To resize thickness, move all items on the front cover to left or right
Information
When you need repair service, call your nearest EDIROL/Roland Service Center or authorized EDIROL/Roland distributor
in your country as shown below.
AUSTRALIA
EDIROL Australia Pty. Ltd.
72 Central Avenue
Oak Flats NSW 2529
AUSTRALIA
TEL: (02) 4257 9091
http://www.edirol.com.au
EUROPE
EDIROL (Europe) Ltd.
BRAZIL
HUNGARY
Tom Lee Music Co., Ltd.
Service Division
Roland Brasil Ltda
Intermusica Ltd.
Rua San Jose, 780 Sala B
Parque Industrial San Jose
Cotia - Sao Paulo - SP, BRAZIL
TEL: (011) 4615 5666
Warehouse Area ‘DEPO’ Pf.83
H-2046 Torokbalint, HUNGARY
TEL: (23) 511011
22-32 Pun Shan Street, Tsuen
Wan, New Territories,
HONG KONG
TEL: 2415 0911
INDIA
Rivera Digitec (India) Pvt. Ltd.
409, Nirman Kendra Mahalaxmi
Flats Compound Off. Dr. Edwin
Moses Road, Mumbai-400011,
INDIA
TEL: (022) 493 9051
INDONESIA
PT Citra IntiRama
Deutschland
TEL: 0700 33 47 65 20
France
TEL: 0810 000 371
Italia
TEL: 02 93778329
J1. Cideng Timur No. 15J-150
Jakarta Pusat
INDONESIA
TEL: (021) 6324170
U. S. A. / CANADA
Cosmos Corporation
EDIROL Corporation North
America
425 Sequoia Drive, Suite 114
Bellingham, WA 98226
U. S. A.
TEL: (360) 594-4276
FAX: (360) 594-4271
http://www.edirol.com/
KOREA
1461-9, Seocho-Dong,
Seocho Ku, Seoul, KOREA
TEL: (02) 3486-8855
MALAYSIA
BENTLEY MUSIC SDN BHD
140 & 142, Jalan Bukit Bintang
55100 Kuala Lumpur, MALAYSIA
TEL: (03) 2144-3333
PHILIPPINES
G.A. Yupangco & Co. Inc.
AFRICA
339 Gil J. Puyat Avenue
Makati, Metro Manila 1200,
PHILIPPINES
TEL: (02) 899 9801
EGYPT
SINGAPORE
Al Fanny Trading Office
CRISTOFORI MUSIC PTE
LTD
9, EBN Hagar A1 Askalany Street,
ARD E1 Golf, Heliopolis,
Cairo 11341, EGYPT
TEL: 20-2-417-1828
Blk 3014, Bedok Industrial Park E,
#02-2148, SINGAPORE 489980
TEL: 6243-9555
REUNION
TAIWAN
Maison FO - YAM Marcel
ROLAND TAIWAN
ENTERPRISE CO., LTD.
25 Rue Jules Hermann,
Chaudron - BP79 97 491
Ste Clotilde Cedex,
REUNION ISLAND
TEL: (0262) 218-429
Room 5, 9fl. No. 112 Chung Shan
N.Road Sec.2, Taipei, TAIWAN,
R.O.C.
TEL: (02) 2561 3339
SOUTH AFRICA
THAILAND
That Other Music Shop
(PTY) Ltd.
11 Melle St., Braamfontein,
Johannesbourg, SOUTH AFRICA
P.O.Box 32918, Braamfontein 2017
Johannesbourg, SOUTH AFRICA
TEL: (011) 403 4105
Theera Music Co. , Ltd.
330 Verng NakornKasem, Soi 2,
Bangkok 10100, THAILAND
TEL: (02) 2248821
VIETNAM
Saigon Music
17 Werdmuller Centre,
Main Road, Claremont 7708
SOUTH AFRICA
138 Tran Quang Khai St.,
District 1
Ho Chi Minh City
VIETNAM
TEL: (08) 844-4068
P.O.BOX 23032, Claremont 7735,
SOUTH AFRICA
TEL: (021) 674 4030
AUSTRALIA/
NEW ZEALAND
Paul Bothner (PTY) Ltd.
NEW ZEALAND
ASIA
CHINA
Roland Shanghai Electronics
Co.,Ltd.
Roland Corporation Ltd.
32 Shaddock Street, Mount Eden,
Auckland, NEW ZEALAND
TEL: (09) 3098 715
5F. No.1500 Pingliang Road
Shanghai, CHINA
TEL: (021) 5580-0800
CENTRAL/LATIN
AMERICA
Roland Shanghai Electronics
Co.,Ltd.
(BEIJING OFFICE)
ARGENTINA
10F. No.18 Anhuaxili
Chaoyang District, Beijing,
CHINA
TEL: (010) 6426-5050
CHILE
Comercial Fancy II S.A.
Rut.: 96.919.420-1
Nataniel Cox #739, 4th Floor
Santiago - Centro, CHILE
TEL: (02) 688-9540
MEXICO
Casa Veerkamp, s.a. de c.v.
MIDDLE EAST
Roland Ireland
Audio House, Belmont Court,
Donnybrook, Dublin 4.
Republic of IRELAND
TEL: (01) 2603501
Viale delle Industrie 8,
20020 Arese, Milano, ITALY
TEL: (02) 937-78300
URUGUAY
Musicland Digital C.A.
Av. Francisco de Miranda,
Centro Parque de Cristal, Nivel
C2 Local 20 Caracas
VENEZUELA
TEL: (212) 285-8586
EUROPE
AUSTRIA
Roland Austria GES.M.B.H.
Siemensstrasse 4, P.O. Box 74,
A-6063 RUM, AUSTRIA
TEL: (0512) 26 44 260
JORDAN
AMMAN Trading Agency
Tecnologias Musica e Audio,
Roland Portugal, S.A.
Cais Das Pedras, 8/9-1 Dto
4050-465 PORTO
PORTUGAL
TEL: (022) 608 00 60
LEBANON
Piata Libertatii 1,
RO-4200 Gheorgheni
TEL: (066) 164-609
Chahine S.A.L.
Gerge Zeidan St., Chahine Bldg.,
Achrafieh, P.O.Box: 16-5857
Beirut, LEBANON
TEL: (01) 20-1441
MuTek
QATAR
Badie Studio & Stores
P.O. Box 62,
Doha, QATAR
TEL: 423554
SPAIN
Roland Electronics
de España, S. A.
SWEDEN
KUWAIT
Abdullah Salem Street,
Safat, KUWAIT
TEL: 243-6399
FBS LINES
FRANCE
245 Prince Mohammad St.,
Amman 1118, JORDAN
TEL: (06) 464-1200
Easa Husain Al-Yousifi
ROMANIA
Calle Bolivia 239, 08020
Barcelona, SPAIN
TEL: (93) 308 1000
Roland Scandinavia As,
Filial Finland
8 Retzif Ha’aliya Hashnya St.
Tel-Aviv-Yafo ISRAEL
TEL: (03) 6823666
PORTUGAL
Nordhavnsvej 7, Postbox 880,
DK-2100 Copenhagen
DENMARK
TEL: (039)16 6200
FINLAND
ISRAEL
Halilit P. Greenspoon &
Sons Ltd.
UL. Gibraltarska 4.
PL-03664 Warszawa POLAND
TEL: (022) 679 44 19
3-Bogatyrskaya Str. 1.k.l
107 564 Moscow, RUSSIA
TEL: (095) 169 5043
4, Rue Paul Henri SPAAK,
Parc de l'Esplanade, F 77 462 St.
Thibault, Lagny Cedex FRANCE
TEL: 01 600 73 500
No.41 Nike St., Dr.Shariyati Ave.,
Roberoye Cerahe Mirdamad
Tehran, IRAN
TEL: (021) 285-4169
P. P. H. Brzostowicz
RUSSIA
Roland France SA
MOCO, INC.
POLAND
Houtstraat 3, B-2260, Oevel
(Westerlo) BELGIUM
TEL: (014) 575811
Roland Scandinavia A/S
IRAN
Lilleakerveien 2 Postboks 95
Lilleaker N-0216 Oslo
NORWAY
TEL: 273 0074
BELGIUM/HOLLAND/
LUXEMBOURG
Roland Benelux N. V.
DENMARK
Radex Sound Equipment Ltd.
17, Diagorou Street, Nicosia,
CYPRUS
TEL: (02) 66-9426
Roland Italy S. p. A.
Roland Scandinavia Avd.
Kontor Norge
VENEZUELA
CYPRUS
ITALY
NORWAY
Francisco Acuna de Figueroa 1771
C.P.: 11.800
Montevideo, URUGUAY
TEL: (02) 924-2335
Moon Stores
No.16, Bab Al Bahrain Avenue,
P.O.Box 247, Manama 304,
State of BAHRAIN
TEL: 211 005
IRELAND
Av. Toluca No. 323, Col. Olivar
de los Padres 01780 Mexico D.F.
MEXICO
TEL: (55) 5668-6699
Todo Musica S.A.
BAHRAIN
Corniche Road, Aldossary Bldg.,
1st Floor, Alkhobar,
SAUDI ARABIA
Roland Scandinavia A/S
SWEDISH SALES OFFICE
P.O.Box 2154, Alkhobar 31952
SAUDI ARABIA
TEL: (03) 898 2081
Danvik Center 28, 2 tr.
S-131 30 Nacka SWEDEN
TEL: (08) 702 0020
SYRIA
SWITZERLAND
Technical Light & Sound
Center
Roland (Switzerland) AG
Musitronic AG
GERMANY
UKRAINE
Roland Elektronische
Musikinstrumente HmbH.
TURKEY
TIC-TAC
Barkat Muzik aletleri ithalat
ve ihracat Ltd Sti
Oststrasse 96, 22844 Norderstedt,
GERMANY
TEL: (040) 52 60090
Mira Str. 19/108
P.O. Box 180
295400 Munkachevo, UKRAINE
TEL: (03131) 414-40
GREECE
UNITED KINGDOM
155, New National Road
Patras 26442, GREECE
TEL: (061) 043-5400
Thank you, and congratulations on your choice of the UA-20.
SAUDI ARABIA
Khaled Ebn Al Walid St.
Bldg. No. 47, P.O.BOX 13520,
Damascus, SYRIA
TEL: (011) 223-5384
STOLLAS S.A.
Music Sound Light
Owner’s Manual
Bedienungsanleitung
Mode d’emploi
Manuale d’uso
Manual del usuario
aDawliah Universal
Electronics APL
Gerberstrasse 5, Postfach,
CH-4410 Liestal, SWITZERLAND
TEL: (061) 927-8383
Lauttasaarentie 54 B
Fin-00201 Helsinki, FINLAND
TEL: (9) 682 4020
Owner’s Manual
Studio 3.4 114 Power Road
London W4 5PY
U. K.
TEL: +44 (0)20 8747 5949
FAX:+44 (0)20 8747 5948
http://www.edirol.com/europe
HONG KONG
Siraselviler Caddesi Siraselviler
Pasaji No:74/20
Taksim - Istanbul, TURKEY
TEL: (0212) 2499324
Roland (U.K.) Ltd.
U.A.E.
Atlantic Close, Swansea
Enterprise Park, SWANSEA
SA7 9FJ,
UNITED KINGDOM
TEL: (01792) 700139
Zak Electronics & Musical
Instruments Co. L.L.C.
Zabeel Road, Al Sherooq Bldg.,
No. 14, Grand Floor, Dubai, U.A.E.
TEL: (04) 3360715
Instrumentos Musicales S.A.
Av.Santa Fe 2055
(1123) Buenos Aires
ARGENTINA
TEL: (011) 4508-2700
As of June 1, 2002 (EDIROL-1)
02903634
1*KGS
Before using this unit, carefully read the sections entitled:
“USING THE UNIT SAFELY” (P. 3, 4) and “IMPORTANT
NOTES” (P. 5, 6). These sections provide important
information concerning the proper operation of the unit.
Additionally, in order to feel assured that you have gained a
good grasp of every feature provided by your new unit, this
manual should be read in its entirety. The manual should be
saved and kept on hand as a convenient reference.
Copyright © 2002 ROLAND CORPORATION
All rights reserved. No part of this publication may be
reproduced in any form without the written permission of
ROLAND CORPORATION.