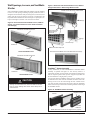
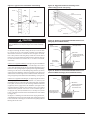
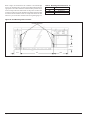
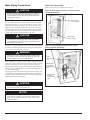
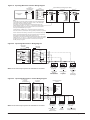
1
Installation Manual IM 1083 Group: Unit Ventilator Part Number: 106506250 Date: October 2013 Daikin Self-Contained Water Source Heat Pump Unit Ventilator Model ARQ - Standard Range Model ERQ - Extended Range Model GRQ - Geothermal Range R-410A Refrigerant, MicroTech II™ (“F” Vintage) C IMPORTANT! Before beginning installation, please read this publication in its entirety. Develop a thorough understanding before starting the installation procedure. This manual is to be used as a guide. Each installation is unique, so only general topics are covered. The order in which topics are covered may not be those required for the actual installation. ©2013 Daikin Applied • www.DaikinApplied.com • (800) 432-1342 Table of Contents Nomenclature.........................................................................4 Data Plate - Specific Information......................................................4 Data Plate Location..........................................................................5 Models ARQ, ERQ & GRQ Self-Contained Floor Unit Ventilator Installation ............................................................5 Water System Cleaning........................................................21 Make Piping Connections....................................................22 Water Coil Connections.............................................................22-23 System Balancing...........................................................................23 Receiving & Handling.......................................................................5 Visible Loss or Damage....................................................................5 Concealed Loss or Damage.............................................................5 Storage.............................................................................................5 Lifting Unit........................................................................................5 General Unit Data.............................................................................5 Making Control Connections...............................................24 MicroTech II Unit-Mounted DDC Control Components..............24-26 Safety.......................................................................................6 Electical Data........................................................................28 Size 024.........................................................................................28 Pre-Installation Considerations............................................6 Uncrate and Inspect the Unit Ventilator(s)........................................6 Typical Floor Unit Installation...........................................................7 Typical VentiMatic Shutter Installation..............................................7 Meeting IBC Seismic Requirements.................................................8 Wall Openings, Louvers & VenitMatic Shutter.....................9 Louver Installations with Typical Unit Arrangements..............10-12 16-5/8" Unit Depth..........................................................................10 21-7/8" Unit Depth..................................................................... 11-12 Typical Wiring Diagram........................................................27 DX Cooling with Electric Heat, Valve Control 460V, 3 Phase.........27 Size 040.........................................................................................28 Size 048.........................................................................................29 MicroTech II Unit Electical Connections...................... 30-31 MicroTech II Remote Wall-Mounted Sensor..............................32-35 ElectroMechanical Unit Wire Connections........................36 Installing (Optional) End Panel..................................... 37-38 Installing Louvers........................................................... 12-13 Piping Stub-up Details, 6' End Panel..............................................38 End Panel Assembly, 1" and 6" End Panel.....................................38 Installing the VentiMatic Shutter Assembly................. 14-15 Prepare Unit Ventilator for Start-up....................................39 Preparing to Move the Unit..................................................16 Post Installtion Checklist................................................................39 Oiling..............................................................................................39 Filters..............................................................................................39 Unit Ventilator Installation...................................................16 Before Sliding the Unit into Place...................................................16 Prepare for Start-up....................................................... 39-40 Removing Unit from Skid................................................................16 Installing Casters............................................................................16 Reversing Condensate Drain End..................................................17 Mounting Hole Locations & Dimensions....................................17-18 Operating Limits...................................................................19 Piping Considerations.........................................................20 IM 1083 Complete Check, Test and Start Procedure...................................40 Troubleshooting............................................................. 41-42 The in and outs of R-410A..............................................................41 Lubrication......................................................................................41 Charging.........................................................................................41 General Maintenance.....................................................................41 Troubleshooting Refrigeration Circuit.............................................42 Self-Contained WSHP Unit Ventilator Models ARQ, ERQ, GRQ Page 3 of 42 Table 1: Models ARQ, ERQ, GRQ Self-Contained Unit Ventilator (Floor Type) Data Plate - Specific Information Field 1 Model U 2 ARQ 3 4 5 6 7 8 9 10 11 12 13 14 15 6 024 H G 12 Z B1 AL 22 G B B 1 1. Product Category U = Unit Ventilator 2. Product Identifier* ARQ = SC - Standard Range WSHP 60°F EWT, Ultra Quiet ERQ = SC - Extended Range WSHP 50°F EWT, Ultra Quiet GRQ = SC - Geothermal Range WSHP 20°F EWT Ground Source, Ultra Quiet * End panels not included; Ordered as accessory, shipped separately boxed 3. Design Series 6 = F Design 4. Nominal Capacity, cubic feet per minute (cfm) 024 = 24,000 Btuh 040 = 40,000 Btuh 048 = 48,000 Btuh 5. Voltage, volts, phase, Hertz (v-Hz-ph) C =208-60-1 D =208-60-3 G = 230-60-1 H = 230-60-3 K = 460-60-3 6. Cooling Options G = Direct Expansion (DX) H = Direct Expansion (DX) with refrigerant relief valve 7. Heating Options 8. Hand Orientation [Right (RH) Left (LH)] Z = Not applicable 9. Controls (TC = Time Clock, CO2 = CO2 Sensor) Basic Stand-Alone w/o TC Basic Stand-Alone Master w/o TC Basic Stand-Alone Slave w/o TC Basic BACnet MS/TP w/o TC Basic LonMark SCC w/o TC Basic Metasys N2 Open w/o TC Basic Stand-Alone w/ TC Basic Stand-Alone Master w/ TC Basic Stand-Alone w/o TC w/CO2 Basic Stand-Alone Master w/o TC w/CO2 Basic Stand-Alone Slave w/o TC w/CO2 Basic BACnet MS/TP w/o TC w/CO2 Basic LonMark SCC w/o TC w/CO2 Basic Metasys N2 Open w/o TC w/CO2 Basic Stand-Alone w/ TC w/CO2 Basic Stand-Alone Master w/ TC w/CO2 Expanded Stand-Alone w/o TC Expanded Stand-Alone Master w/o TC Expanded Stand-Alone Slave w/o TC Expanded BACnet MS/TP w/o TC Expanded LonMark SCC w/o TC Expanded Metasys N2 Open w/o TC Expanded Stand-Alone w/ TC Expanded Stand-Alone Master w/ TC Page 4 of 42 Expanded Stand-Alone w/o TC w/CO2 Expanded Stand-Alone Master w/o TC w/CO2 Expanded Stand-Alone Slave w/o TC w/CO2 Expanded BACnet MS/TP w/o TC w/CO2 Expanded LonMark SCC w/o TC w/CO2 Expanded Metasys N2 Open w/o TC w/CO2 Expanded Stand-Alone w/ TC w/CO2 Expanded Stand-Alone Master w/ TC w/CO2 Leading Stand-Alone w/o TC Leading Stand-Alone Master w/o TC Leading Stand-Alone Slave w/o TC Leading BACnet MS/TP w/o TC Leading LonMark SCC w/o TC Leading Metasys N2 Open w/o TC Leading Stand-Alone w/ TC Leading Stand-Alone Master w/ TC Leading Stand-Alone w/o TC w/CO2 Leading Stand-Alone Master w/o TC w/CO2 Leading Stand-Alone Slave w/o TC w/CO2 Leading BACnet MS/TP w/o TC w/CO2 Leading LonMark SCC w/o TC w/CO2 Leading Metasys N2 Open w/o TC w/CO2 Leading Stand-Alone w/ TC w/CO2 Leading Stand-Alone Master w/ TC w/CO2 Electromech w/2-Pos Damper for Remote T'Stat Electromech w/2-Pos Damper w/Unit Mtd. ACO Electromech w/2-Pos Damper w/Unit Mtd. MCO 10. Discharge 00 = None 12 = Low Electric Heat, 3-element 13 = High Electric Heat, 6-element B1 = B2 = B3 = B4 = B5 = B6 = B7 = B8 = B9 = BA = BB = BC = BD= BE = BF = BG= E1 = E2 = E3 = E4 = E5 = E6 = E7 = E8 = E9 = EA = EB = EC = ED = EE = EF = EG = L1 = L2 = L3 = L4 = L5 = L6 = L7 = L8 = L9 = LA = LB = LC = LD = LE = LF = LG = 44 = 45 = 46 = AK= 21-7/8" Unit, Top Bar Grille Discharge AL = 16-5/8" Unit, Top Bar Grille Discharge AM= 21-7/8" Unit, Top Bar Grille Discharge, 2" Step AN= 21-7/8" Unit, Top Bar Grille Discharge AP = 21-7/8" Unit, Top Bar Grille, Full Adapter Back 11. Return Air (RA) / Outside Air (OA) 22 = RA Bottom Front / OA Rear Duct Collar 24 = Recircl RA Bottom Front - no RA/OA Dampers 12. Power Connection G = Box w/Switch 13. Color B = Putty Beige G = Soft Gray I = Antique Ivory W = Off White 14. SKU B = Standard Delivery 15. Product Style 1 Field-Installed Accessories may accompany Unit Ventilator(s), or may be shipped separately. These may include: Aluminum Louvers; Aluminum Grilles; Caster Kit; End Panels; Spare Filters; MicroTech II Remote Wall Sensors (temperature); End of Cycle DDC Valve. See instructions shipped with accessories and install according to these and the plans. Self-Contained WSHP Unit Ventilator Models ARQ, ERQ, GRQ IM 1083 Models ARQ, ERQ, GRQ SelfContained Floor Unit Ventilator Installation Figure 1: Data Plate Location Lifting Unit A forklift or other lifting device is needed to install this product. WARNING Make sure lifting equipment can handle the weight of the unit safely. Personal injury may result if improper lifting and moving methods are used. (See table 2 for approximate shipping weights) CAUTION Use 72" length forklift tines, short tines will damage the unit bottom. Improper handling can damage internal components. Do not stand the unit on end or stack (see figure 2 & 3) Figure 2: Stack Units Maximum 2 High as Shown Receiving & Handling This product was carefully packed and thoroughly inspected before leaving the factory. Responsibility for its safe delivery was assumed by the carrier upon acceptance of the shipment. Claims for loss or damage sustained in transit must therefore be made upon the carrier, as follows: 2 high Visible Loss or Damage Any external evidence of loss or damage must be noted on the freight bill or carrier’s receipt, and signed by the carrier’s agent. Failure to adequately describe such external evidence of loss or damage may result in the carrier’s refusing to honor a damage claim. The form required to file such a claim will be supplied by the carrier. Correct Lifting Points Incorrect Figure 3: Forklift Lifting Requirements Concealed Loss or Damage Concealed loss or damage means loss or damage which does not become apparent until the product has been unpacked. The contents may be damaged in transit due to rough handling even though the carton may not show external damages. When the damage is discovered upon unpacking, make a written request for inspection by the carrier’s agent within fifteen (15) days of the delivery date. File a claim with the carrier since such damage is the carrier’s responsibility. Storage If equipment is stored for any length of time before installation, it should remain in its shipping packaging in a clean, dry, climate controlled area. 4' 6' Unit Overall Dimensions (without end panels) 024 = 86"w × 30"h × 16⅝"d or (21⅞"d w/Adapter Back) 040 = 98"w × 30"h × 16⅝"d or (21⅞"d w/Adapter Back) 048 = 110"w × 30"h × 16⅝"d or (21⅞"d w/Adapter Back) Table 2: General Unit Data Models ARQ, ERQ, GRQ 024 040048 Nominal Airflow – CFM (L/S) 1000 (472) 1250 (590) 1500 (708) No. of Fans3 4 4 Room Dia. – In. (MM) 8.12 (206) 8.12 (206) 8.12 (206) Fan Data Width - In. (MM) 8.25 (210) 8.25 (210) 8.25 (210) Room Fan Motor Horse Power1/4 1/4 1/4 Nom. Size – In. (MM) 10 × 48½ × 1 (254 × 1232 × 25) 10 x 60½ × 1 (254 × 1537 × 25) 10 × 36½ × 1 (254 × 927 × 25) Filter Data Area – FT2 (M2) 3.37 (0.31) 4.20 (0.39) 5.08 (0.47) Quantity1 1 2 Approx. Ship Weight – Lbs. (KG) Refrigerant Charge – Oz. IM 1083 690 (310) 84 720 (325) 130 Self-Contained WSHP Unit Ventilator Models ARQ, ERQ, GRQ 760 (340) 100 Page 5 of 42 Safety Follow all safety codes. Wear safety glasses and work gloves. Use a quenching cloth for brazing operations. Have a fire extinguisher available. Follow all warnings and cautions in these instructions and attached to the unit. Consult applicable local building codes and National Electrical Codes (NEC) for special requirements. Recognize safety information. When you see a safety symbol on the unit or in these instructions, be alert to the potential for personal injury. Understand the meanings of the words DANGER, WARNING, and CAUTION. DANGER identifies the most serious hazards that will result in death or severe personal injury; WARNING means the hazards can result in death or severe personal injury; CAUTION identifies unsafe practices that can result in personal injury or product and property damage. Improper installation, adjustment, service, maintenance, or use can cause explosion, fire, electrical shock, or other conditions which may result in personal injury or property damage. This product must be installed only by personnel with the training, experience, skills, and applicable licensing that makes him/her “a qualified professional HVACR installer.” DANGER Disconnect all electrical power before servicing unit. Electrical shock will cause severe injury or death. WARNING Hazardous Voltage! Use copper conductors only. Unit terminals are not designed to accept other types of conductors. Failure to do so may cause damage to the equipment. CAUTION Personal injury hazard. Wear protective gloves to avoid possible cuts and abrasions from exposed edges. Avoid contact with sharp edges. WARNING Cleaning agents may cause serious damage to internal components, such as aluminum coils and electronic controls, etc. Do not operate unit ventilator while building maintenance cleaning agents are in use. Pre-Installation Considerations ■ Before beginning installation, please read this publication in its entirety. ■ Directions given in this bulletin for right and left sides assume a position facing the indoor side of the unit ventilator. ■ Before beginning installation, if provided, remove the protective plastic film covering the unit painted panels. WARNING Plastic packaging is a suffocation hazard, dispose of properly. Keep away from children. To be sure the correct unit ventilator(s) is/are installed in the correct location(s), the installer must check the packing list and unit identification/tagging number(s) against the plans. Further, the unit data plate, (see figure 1) located on the lower right end of the unit ventilator, contains specific information of standard components as listed in Table 1. Unit comes with an allen wrench and four (4) lagging washers in the envelope placed in the end compartment of the unit (figure 2). Install this product in accordance with good engineering practices and workmanship, following these general instructions, plus the jobspecific AAF®-HermanNelson® submittal drawings provided for specific dimensions, unit arrangements, controls and electrical details, pipe stub-up locations, etc. Applicable tools for lifting, hook-up of piping, electrical and insulation are required. Uncrate and Inspect the Unit Ventilator(s) Carefully remove the packaging, remaining alert to any signs of shipping damage. Be careful not to discard components that may be included with the packaging. (You may want to retain some or all of the packaging to provide jobsite unit location information and temporary protection for the unit ventilator after installation.) Be sure to dispose of plastic packaging and protective cardboard properly, in accordance with local recycling rules and guidelines. If unit is damaged, file a claim with the carrier. Notify the local AAF®HermanNelson Unit Ventilator representative immediately. Prior to unit installation, be sure that the exterior wall openings and louvers, as applicable, are ready and in accordance with the job plans. Figure 4: Shipping Envelope Contents - Located in right end compartment of unit WARNING “Polyolester Oil, commonly known as POE oil, is synthetic oil used in many refrigeration systems. POE oil, if ever in contact with PVC/CPVC, will coat the inside wall of PVC/CPVC pipe causing environmental stress fractures. Although there is no PVC/CPVC piping in this product, please keep this in mind when selecting piping materials for your application, as system failure and property damage could result.” Page 6 of 42 Self-Contained WSHP Unit Ventilator Models ARQ, ERQ, GRQ IM 1083 Pre-Installation Considerations – Typical Floor Unit Installation Figure 5: Typical Unit Ventilator Installation and Louver Details (see installation section for typical warnings and cautions) Internal Column For Wall Bracing (By Others) Screws or Bolts (by others) Refrigerant Pipe Tunnel Unit Gasket 1" End Panel w/Cut Out Lintel (by others) Weep Holes Unit Gasket Caulk Top And Two Sides Of Louver Unit Insulating Blanket Caulk Bird Screen Back Of Unit Unit Outside Air Opening Weep Holes Unit Bottom Gasket Seal Under Unit Sealed Mortar Bed Floor Typical VentiMatic™ Shutter Installation Figure 6: Typical VentiMatic Shutter Assembly Installation (see installation section for typical warnings and cautions) VentiMatic Shutter Assembly Building Wall Louver Outside Unit Ventilator Outdoor Air Opening Outside Roomside Roomside Typical VentiMatic louver installation with shelving. IM 1083 Self-Contained WSHP Unit Ventilator Models ARQ, ERQ, GRQ Page 7 of 42 Pre-Installation Considerations Meeting IBC Seismic Requirements Daikin unit ventilators can be specified, as follows, to meet International Building Code seismic requirements: In addition to all seismic requirements for IBC Certification listed elsewhere in the project specification, submittals for these units include: • All components included in these unit ventilators are designed, manufactured and independently tested, rated and certified to meet the seismic compliance standards of the International Building Code. 1. A Certificate of Compliance from the Independent Certifying Agency clearly indicating that components supplied on this project are included in the component manufacturer’s Certificate of Compliance. • Components designated for use in systems that are life safety, toxic, high hazard, combustible or flammable meet the on line, anchorage and load path requirements for life safety as defined in IBC sections 1621.1.6, 1621.3.3,1707.7.2. and IBC Commentary, Volume II, section 1621.1.6, IBC notes pertaining to the release of hazardous material. 2. Clear installation instructions including all accessory components that are part of the overall component installation. DETAIL Y • All components used as part of a system other than the above meet as a minimum, all load path and anchorage standards for components as outlined in IBC section 1621.3.3 & 1707.7.2. 1-1/2" O.D. galvanized steel pipe • All completed component assemblies are clearly labeled for field inspection. Seismic Compliance Labels include the manufacturer’s identification, designation of certified models, definitive information describing the product’s compliance characteristics, and the Independent Certifying Agency’s name and report identification. X Top mounting hole on unit frame Gasket on back of unit Building structure or support column * Note: Dimensions “X” and “Y” to be determined by installing contractor based on fit-up requirements of job. Figure 7: Typical IBC Seismic Installation *A Molly or Toggle bolt may be necessary if voids in the building structure or support columns are present. (4) - 3/8" galvanized nut with washer (by others), attach from inside unit end compartments. Tighten nut until steel pipe is compressed between unit and building structure or column. Lintel (by others) (4) - 1-1/2" O.D. x (dimension “X”), galvanized steel pipe (by others), gives rigidity to the unit in relation with the building structure (see detail). (4) - 3/8" diam. x (dimension “Y”) galvanized threaded rod (by others) - align with unit mounting holes, and set into building structure mortar or structural support column (see detail). Page 8 of 42 Self-Contained WSHP Unit Ventilator Models ARQ, ERQ, GRQ IM 1083 Wall Openings, Louvers, and VentiMatic Shutter Figure 9: Horizontal and Vertical Blade Louvers, Without Flanges With Grille or With Flange Without Grille Vertical Louver with Flange, without Grille Self-Contained Floor Models ARQ, ERQ, GRQ are typically installed in front of a wall opening containing a properly sized louver that is designed to let in outside air while preventing water (such as rain) from getting past the louver and into the unit itself. A weather-tight seal keeps unwanted air and moisture from entering the occupied space. See Figures 8 through 23, and table 1 for various louver details. Figure 8: Horizontal and Vertical Blade Louvers, Without Flange, (see Caution below for louver blade orientation and drainage) Bird Screen On Side Toward Unit Flange Outside Air Horizontal Louver without Flange, with Grille Flange Louver drain lip Outside Air Grille/Louver with weep hole Bottom Horizontal Blade Louver Rear of Horizontal Blade Louver with Birdscreens and Flange Bird Screen On Side Toward Unit VentiMatic™ Shutter Assembly Outside Air Vertical Blade Louver CAUTION Locate Drain Lip at bottom of vertical louver to allow proper drainage. For horizontal louvers, the louver blades should face down for proper drainage. Bird screen should always be on side toward unit. In many installations, an AAF®-HermanNelson® VentiMatic Shutter Assembly is specified. See figure 10. This one-way shutter is a continuously variable, gravity actuated, room exhaust vent that operates in direct response to positive static pressure. It opposes any airflow into the room and allows a slight positive pressure. It is important that the VentiMatic shutter and unit ventilator louvers are mounted on the same wall. This neutralizes the effect of the wind. Forcing excess air into the room through the unit ventilator louver overcomes the same wind pressure that works to keep the VentiMatic shutter closed. This prevents room air exhausting from the room through the VentiMatic shutter. Figure 10: VentiMatic Shutter Assembly VentiMatic Shutter Outside Louver Roomside Relief Air Note: Birdscreen and louver are shipped in one (1) piece. IM 1083 Self-Contained WSHP Unit Ventilator Models ARQ, ERQ, GRQ Page 9 of 42 Louver Installation With Typical Unit Arrangements – 16⅝" Unit Depth Figure 11: The 16⅝˝ (422mm) Deep Unit with Open Refrigerant Pipe Chase and Floor Level Outdoor Intake Louver Location Unit Refrigerant Piping Figure 13: Above Floor Level Outdoor Air Intake with Accessory Closed Refrigerant Pipe Chase Lintel (By Others) Insulated Closure Plate Accessory Unit Refrigerant Piping Intake Louver Lintel (By Others) Not Less Than 3" Not More Than 28" Louver 1" (25mm) Floor Line Sealed Cement Mortar; Pitch Away From Unit Sealed Cement Mortar; Pitch Away From Unit Provide Drainage Important: Gasket sealing surface is required. Figure 12: 16⅝" (422mm) Deep Unit with Open Refrigerant Pipe Chase & Above-Floor-Level Outdoor Intake Louver Application with Chased Wall Lintel (By Others) 1" (25mm) Floor Line Important: Gasket sealing surface is required. Figure 14: Floor Level Outdoor Air Intake With Window Below Unit Top and 9˝ “Finished” (Painted) Accessory (Insulated) Closed Refrigerant Pipe Chase Painted Insulated Closure Plate Accessory Unit Refrigerant Piping Sash Unit Refrigerant Piping Lintel (By Others) Louver Not Less Than 3" (76mm) Not More Than 21" (533mm) Sealed Cement Mortar; Pitch Away From Unit Provide Drainage Intake Louver 1" (25mm) Floor Line Important: Gasket sealing surface is required. Sealed Cement Mortar;Pitch Away From Unit 1" (25mm) Floor Line Important: Gasket sealing surface is required. CAUTION Accumulated moisture can cause property damage if not properly drained. Installing contractor must provide such drainage. Page 10 of 42 Self-Contained WSHP Unit Ventilator Models ARQ, ERQ, GRQ IM 1083 Louver Installation With Typical Unit Arrangements – 21⅞" Unit Depth Figure 15: 21⅞" (556mm) Deep Full Adapter Back Unit and Floor Level Outdoor Intake Louver Location Figure 17: 21⅞" (556mm) Partial Adapter Back Unit with Window Below Unit Top (2" Step-Down) and Floor Level Outdoor Intake Louver Location Unit Refrigerant Piping 2" Finished Step-Down Top Sash Lintel Unit Refrigerant Piping (By Others) Lintel Louver Field Supplied Water Piping 1" (25mm) (By Others) Floor Line Intake Louver Sealed Cement Mortar;Pitch Away From Unit Not More Than 28" Important: Gasket sealing surface is required. Figure 16: 21⅞" (556mm) Deep Full Adapter Back Unit with High Louver Application Lintel (By Others) Sealed Cement Mortar;Pitch Away From Unit Floor Line Important: Gasket sealing surface is required. Figure 18: 21⅞" (556mm) Deep Partial Adapter Back Unit with Open Refrigerant Pipe Chase and Floor Level Outdoor Intake Louver Location Unit Refrigerant Piping Louver Gasket Seal Sealed Cement Mortar; Pitch Away From Unit Not More Than 28"(711mm) Unit Refrigerant Piping Field Supplied Water Piping Lintel (By Others) Floor Line Field Supplied Water Piping Intake Louver Important: Gasket sealing surface is required. Not More Than 12" Sealed Cement Mortar;Pitch Away From Unit IM 1083 Self-Contained WSHP Unit Ventilator Models ARQ, ERQ, GRQ 1" (25mm) Floor Line Important: Gasket sealing surface is required. Page 11 of 42 Louver Installation With Typical Unit Arrangements – 21⅞" Unit Depth Figure 19: The 21⅞” (556mm) Deep Full Adapter Back Unit with Closed Refrigerant Pipe Chase, Ducted with Top Intake Window Sash “Goose Neck” Insulated Duct (By Others) Intake Louver Duct Collar (By AAF) Unit Refrigerant Piping Field Supplied Water Piping Floor Line Important: Gasket sealing surface is required. Installing Louvers Typical Installation Methods If the fresh air opening has not yet been made, see figures 9 through 16 for the recommended locations and the job-specific plans for the exact location. Follow local codes. Cut the wall opening so that it is slightly larger than the louver being installed. For dimensions, see Table 3. If the opening is already there, measure to be sure there is a minimum of 3/8" (9mm) clearance around all sides. For masonry installations, a lintel must be installed above all louvers. In thick wall applications, the portion of the wall between the louver and the unit is the outside air plenum. Line this plenum area with 3/8" (9 mm) mortar or other suitable material. In some applications, the job specifications require a metal sleeve connection between the louver and the unit. If using such a sleeve, properly caulk it to ensure a weathertight seal. This is critical in preventing freeze-ups, cold drafts, and air infiltration. Be sure the wall is smooth, square, and provides a suitable mating surface. Table 3: Recommended Wall Openings For Wall Louvers Maximum Number of VentiMatic Recommended VentiMatic Shutters Shutter(s) Wall Openings B C Which Can Be Mounted Air Capacity For Wall Louvers On Standard Louver Maximum L/s Length Height 24" Shutter 36" Shutter cfm 48" 51" 485⁄8" 107⁄8" 2 0 1000472 (1219) (1295) (1222) (267) 60" 63" (1524) (1600) 72" 75" (1829) (1905) 605⁄8" 107⁄8" (1527) (267) 725⁄8" 197⁄8" (1832)(495) 1 1 1250590 0 2 1500 708 Before setting the louver, construct a sloping, sealed cement mortar base to drain unwanted moisture to the outside, (see figure 20). Be sure the mortar base is 1" (25mm) thick at the unit and tapers toward the louver. The mortar at the unit also acts as a backing against which the open cell gasket of the unit itself can seal. This is critical in preventing water leaks and air leaks under the unit. Be sure the sealed cement mortar base is smooth and flush with the interior wall. If it is not possible to construct a sloping mortar base, then field-supplied flashing is required. See figure 21. The flashing should terminate flush with the exterior of the building. Place a bead of caulk under the flashing to prevent moisture from wicking back to the unit. Do not caulk the joint between the louver and the flashing. This joint is designed to let unwanted moisture escape. Figure 20: Typical Louver Installation with Sloping Sealed Cement Mortar Base Wall Louver Sealed Cement Mortar; Pitch Away From Unit No Caulk Unit Unit Gasket 1" (25mm) Floor Page 12 of 42 Self-Contained WSHP Unit Ventilator Models ARQ, ERQ, GRQ IM 1083 Figure 21: Typical Louver Installation with Flashing Louver Wall Figure 22: Suggested method for fastening louver (without flange) inside wall opening Unit Louver (Bird Screen Not Shown) Flashing (By Others) Unit Gasket Exterior No Caulk 1" (25mm) Caulk (By Others) Floor Angle Iron (by others) Room Side Wall Opening CAUTION Personal injury hazard. Wear protective gloves to avoid possible cuts and abrasions from exposed edges. Avoid contact with sharp edges. See figures 8 through 24. Before setting the louver, be sure the drain lip (vertical louver) are at the bottom, horizontal louver blades face down and the bird screen is towards the unit. See figures 23 and 24. Place a heavy bead of caulk along the top and the two vertical sides of the louver, leaving the bottom uncaulked so that if moisture gets into the area between the louver and the unit, it can drain to the outside, unrestricted. If the louver is supplied with flanges, (see figure 23) place an additional bead of caulk on the inside of the top and side flanges that come in contact with the building facade. Do not caulk the bottom flange. Place the louver in the opening and push it tight against the supplied building, fastening it to the exterior of the building using fasteners (by others) appropriate to the installation. Seal the top and sides with a waterproof caulk to make it weather-tight. Do not caulk the bottom of the louver; doing so might trap unwanted moisture behind the flange. (See figure 23) If the louver is supplied with no flanges, (see figure 24) place the louver in the opening so that it is recessed a minimum 1/16" (2mm) beyond the building facade or as directed in the architectural plans. If specified in the plans, secure the louver in the wall using mechanical fasteners (supplied by others) appropriate to the installation. (See figure 22 for suggested fastening). With the louver solidly in place, run a bead of caulk around the perimeter of the louver to seal it weather-tight. Do not plug the weep holes (horizontal louver) or the drip line (vertical louver). This might restrict the flow of unwanted moisture to the outside (see figure 24) See figure 21. If flashing was used instead of the sloping mortar base, caulk the flashing where it meets the inside of the opening between the louver and the unit. This helps prevent moisture from getting under the flashing and into the room. IM 1083 Figure 23: Vertical or Horizontal Blade Wall Intake Louver (Flanged) (Vertical Blade Shown) Caulk (top and 2 Sides) Lintels (By Others) Louvers Bird Screen Sealed Cement Mortar Pitched Away from Unit Toward Louver Drain Holes (Do Not Block) 1" Minimum Flange (4 Sides) Figure 24: Vertical or Horizontal Blade Wall Intake Louver (Recessed Without Flange) (Horizontal Blade Shown) Lintels (By Others) Louvers Bird Screen Sealed Cement Mortar Pitched Away from Unit Toward Louver Drain Holes (Do Not Block With Mortar or Caulking Materials Self-Contained WSHP Unit Ventilator Models ARQ, ERQ, GRQ 1" Minimum Page 13 of 42 Installing the VentiMatic Shutter Assembly Figure 26: Single VentiMatic Shutter & Wall Louver The AAF®-HermanNelson® VentiMatic Shutter Assembly is a one-way shutter. It is a continuously variable, gravity-actuated, room exhaust vent that operates in direct response to positive static pressure, opposing any airflow into the room resulting in a slight positive pressure. The VentiMatic Shutter Assembly is mounted on an installed wall louver. For larger units with 100% ventilation air dampers, two VentiMatic Shutters may be mounted side by side on the same louver. See figure 27. 41⁄8" (105mm) Outside When installing VentiMatic Shutter(s) on the wall louver, make sure all moving parts are free to operate unobstructed and placed level and plumb for proper operation. If optional steel interior wall grille is furnished, install as shown in Figure 25. Figure 25: Louver , VentiMatic Shutter, Interior Wall Grille Details, Dimensions 237⁄8" (606mm) or 357⁄8" (911mm) 2" (51mm) Decorative Exterior Grille Also Available (See Note 2, above) (Bird Screen not shown) Figure 27: Two VentiMatic Shutters & Wall Louver Aluminum Wall Louver Assembly with Bird Screen (See Note 1) Cement Mortar 7" (178mm) 3 3'' (76mm) Outside ⁄4" (19mm) Approx. B see table 4 Steel Interior Wall Grille (Optional) See Note 3 Bird Screen Steel VentiMatic Shutter Assembly B see table 4 103⁄8" (264mm) The size and appearance of the wall louvers with or without optional grilles used with the unit ventilator, and the VentiMatic Shutter, are identical. As Directed By Architect Aluminum Wall Louver Assembly With Bird Screen (See Note 1) 3" (76mm) Not Less Than 9" (229mm) VentiMatic Shutter Assembly C see table 4 125⁄8" (314mm) 103⁄8" (264mm) Center Cover Decorative Exterior Grille Also Available (See Note 2) (Bird Screen not shown) 3 Do Not Block Drain Holes With Caulk or Mortar ⁄4" (19mm) Approx. Cement Mortar Figure 28: Louver, VentiMatic Shutter, Interior Wall Grille Details, Dimensions Notes: 1. Horizontal blade wall louver shown. Vertical blade wall louver also available with Ventimatic shutter. 2. Optional exterior grille matches unit ventilator wall louver in material and design. Mounted on wall louvers. 3. Optional steel interior wall grille should be used to conceal the interior wall opening whenever the Ventimatic shutter is not located behind shelf cabinets. Hardware to mount the interior wall grille is not included. CAUTION For proper operation, the VentiMatic shutter assembly must be mounted on the same wall as the unit ventilator louvers to neutralize wind effect. Table 4: Recommended Wall Openings For Wall Louvers Maximum Number of VentiMatic Recommended VentiMatic Shutters Wall Openings B C Which Can Be Mounted For Wall Louvers On Standard Louver Length Height 24" Shutter 36" Shutter 48" 51" 485⁄8" 107⁄8" 2 0 (1219) (1295) (1222) (267) 60" 63" 605⁄8" 107⁄8" 1 1 (1524) (1600) (1527) (267) 5 7 72" 75" 72 ⁄8" 19 ⁄8" 0 2 (1829) (1905) (1832)(495) Page 14 of 42 Shutter(s) Air Capacity Maximum cfm L/s 1000472 1250590 1500 708 As Directed By Architect Cement Mortar 7" (178mm) 3/4" (19mm) Approx. Steel Interior Wall Grille (Optional) See Note 3 Bird Screen Not Less Than 9" (229mm) 12⅝" (314mm) C see table 4 3/4" (19mm) Approx. Cement Mortar Do Not Block Drain Holes With Caulk or Mortar Note: 1. Horizontal blade wall louver shown. Vertical blade wall louver also available. 2. The optional exterior grille shown mounted on the wall louver. 3. The optional steel interior wall grille is used to conceal the interior wall opening whenever the Ventimatic shutter is not located behind shelf cabinets. Hardware to mount the interior wall grille is not included. Self-Contained WSHP Unit Ventilator Models ARQ, ERQ, GRQ IM 1083 Installing VentiMatic™ Shutter Figure 29: Typical VentiMatic™ Shutter Assembly Installation Louver VentiMatic Shutter Assembly Building Wall The VentiMatic shutter assembly mounts on the same wall as the unit ventilator louver, to neutralize wind effect. Outside Closed Shelf Storage Cabinet with Slotted Kickplate Cabinet Slotted Kickplate Outside Roomside Roomside Typical VentiMatic louver installation with shelving. IM 1083 Self-Contained WSHP Unit Ventilator Models ARQ, ERQ, GRQ Page 15 of 42 Preparing to Move the Unit Move the unit ventilator to the correct location. See Table 2, page 5 for approximate shipping weights. Carefully remove unit ventilator from wood skid. Be sure to properly dispose of the skid in accordance with local recycling rules and guidelines. Removing Unit from the Skid Remove fasteners at each end which hold the unit to the skid and carefully slide the front of the unit off the skid (1). Tip unit forward until the bottom of the slotted front kickplate is resting on the floor (2). Lift rear of unit off of the skid by tipping unit forward while supporting the unit from the front, until it is possible to slide skid out from under the unit. GENTLY LOWER the rear of the unit to the floor (3). Unit Ventilator Installation Before setting the unit ventilator in position, be sure that field-supplied electrical connections are in place, de-energized and in accordance with the plans. Before Sliding the Unit into Place Sliding of this unit to the wall can be made easier with the assistance of Caster Kit P/N 105629001 (Figures 31). A piece of cardboard placed under the unit will make this job easier and reduce marring the floor. (Do not leave cardboard under unit after installation.) Be certain that the field-supplied electrical connections are in place, de-energized and in accordance with the plans. Installing Casters If the unit was ordered with the optional caster wheels, install them as follows: Figure 30: Removing Unit from Skid 1. Carefully slide the front of the unit off the front of the skid. 1. 2. 3. 4. Approx. 10" 5. 6. 7. 2. While supporting unit from the front, slowly tip unit forward until bottom of kickplate is resting on floor. Lift skid slightly and GENTLY lower the rear of the unit to the floor while pulling skid back (DO NOT LET THE UNIT DROP). Remove the left and right front access panels. With the one caster (left end), ensure the caster is fully up (turn bolt clockwise to raise, counterclockwise to lower). Locate in the left end compartment the slots and bolt location. Insert the tines of the caster channel into the slots. Securely bolt the front to the unit front rail. Repeat for the right caster wheels (2). Slowly engage the casters by lowering the bolt. Make all caster adjustments equally before raising the unit. When full engaged, the unit will roll forward up to the wall. When the unit is in position, reverse the procedure and remove the caster kit. Save the caster kit for future unit servicing or replacement. Figure 31: (Optional) Indoor Section Caster Installation Raises and lowers casters (two on compressor end of unit) Raises and lowers caster Kickplate Tip forward until kickplate rests on floor Caster mounting cut-out Counter-clockwise to lower Clockwise to raise Left Caster Right Caster Page 16 of 42 Self-Contained WSHP Unit Ventilator Models ARQ, ERQ, GRQ IM 1083 Reversing Condensate Drain End CAUTION Personal injury hazard. Wear protective gloves to avoid possible cuts and abrasions from exposed edges. Avoid contact with sharp edges. NOTICE The drain pan has two (2) connections on each end; a standard drain connection and an overflow connection. Models ARQ, ERQ and GRQ condensate drain connection is on the left end (with static equalizer cover). If the job dictates that the drain connection be made at the right end, perform the following procedure to change the drain connection from left to right end: 1. Remove the two screws holding the static equalizer cover in place (Figure 32). It will be necessary to cut the seal between the static equalizer cover and the drain pan. 2. Remove the upper plate and lower bracket from each end of the unit, as shown in figure 32. This is done by removing the screws in each with a 1/4 inch nut driver. Figure 32: Condensate Drain Pan Connection Located on Left End 3. Reinstall the brackets on the opposite end of the unit. 4. Reinstall the static equalizer cover into the right end drain pan and secure to the upper plate. Use silicone sealer and seal all gaps between the equalizer cover where it meets the drain pan 5. Verify the drain connection is open on the low (drain) right end only. The open drain connection stub-outs at the high end of the drain pan (left end), must be sealed water tight with silicone sealer or similar. To Clean the Drain Pan 1. Remove the shallow and deep upper plates from the unit (see figures 32 and 33). 2. Spray water into the drain pan on the high end to wash debris to the low end (drain end). 3. Remove any debris, making sure that the drain holes are not obstructed. 4. Wipe the drain pan with a cloth. 5. Reinstall the upper plates. Mounting Hole Locations & Dimensions Move the unit ventilator into position against the wall surface. Check to see that the unit ventilator is level from end to end and back to front. Using a 4' level is recommended. Figure 34: Setting The Unit Ventilator In Place Deep Upper Plate 1/4" Hex Head Screws Remove moldings behind unit Static Equalizer Cover Drain Pan CAUTION Overflow Connection Standard Drain Connection Figure 33: Right End of Drain Pan (Non- Drain End) Shallow Upper Plate Leakage of outdoor air wastes energy, causes drafts and erratic unit ventilator operation. Check the following details: At the correct unit ventilator location, examine the wall surface. Make sure that it is smooth, plumb, and perpendicular to the floor. The seals on the rear of the unit ventilator will take up the small irregularities found in normal masonry construction. If the wall is irregular or has mullions, install furring strips to provide a flush surface against which the unit ventilator can seal. If there are moldings on the floor/wall line, omit them behind the unit ventilator. Provide a sealing surface at the floor line. Install a seal pad under the unit to prevent air leakage. Install the unit ventilator against a wall made of non-combustible material, and on a floor made of non-combustible material. Floor must be level, unbroken and structurally strong to support the unit. CAUTION Drain Pan Unit must be anchored to an internal wall column or other suitable support (see figure 5, page 7) Right End Drain Pan Label IM 1083 Self-Contained WSHP Unit Ventilator Models ARQ, ERQ, GRQ Page 17 of 42 Refer to figure 35 and attach the unit ventilator to the wall through the four (4) mounting holes provided, using field-supplied fasteners appropriate to the wall construction and the washers provided in the brown envelope with these instructions. Envelope also contains allen wrench to provide access to unit. Push the unit ventilator tight to the wall structure so that the outdoor air seals are compressed. Secure the wall fasteners to prevent the unit ventilator from moving and tipping over Table 5: Mounting Holes Dimension “C” Unit Size C 024 60" (1524 mm) 040 72" (1829 mm) 048 84" (2134 mm) Figure 35: Unit Mounting Holes Locations Unit Mounting Holes 131/2″ 65/16″ 67/8″ Page 18 of 42 C 187/8″ Self-Contained WSHP Unit Ventilator Models ARQ, ERQ, GRQ IM 1083 Operating Limits Table 6: Air Limits - °F (English units) Standard Range Geothermal Range UnitsUnits CoolingHeatingCoolingHeating Min. Ambient Air50°F50°F40°F40°F Normal Ambient Air 80°F70°F 80°F70°F Max Ambient Air100°F 85°F100°F 85°F Min. Entering Air 1,250°F50°F50°F40°F Normal Entering Air db/wb 80/67°F70°F 80/67°F70°F Max Entering Air db/wb 1,2 100/83°F 80°F 100/83°F 80°F Table 7: Air Limits - °C (SI units) Min. Ambient Air Normal Ambient Air Max Ambient Air Min. Entering Air 1,2 Normal Entering Air db/wb Max Entering Air db/wb 1,2 Standard Range Geothermal Range UnitsUnits CoolingHeatingCoolingHeating 10°C 10°C 5°C 5°C 27°C 21°C 27°C 21°C 38°C 29°C 38°C 29°C 10°C 10°C 10°C 5°C 27/19°C 21°C 27/19°C 21°C 38/28°C 27°C 38/28°C 27°C Table 8: Water - °F (English units) Min. Entering Water 1,2 Normal Entering Water Max Entering Water Standard Range Geothermal Range UnitsUnits CoolingHeatingCoolingHeating 55°F55°F30°F20°F 85°F70°F77°F40°F 110°F90°F110°F90°F Additional Information For Initial Start-up Standard Range units Units are designed to start-up in an ambient of 50°F (10°C), with entering air at 50°F (10°C), with entering water at 70°F (21°C), with both air and water flow rates used in the ISO 13256-1 rating test, for initial start-up in winter. ote: This is not a normal or continuous operating N condition. It is assumed that such a start-up is for the purpose of bringing the building space temperature up to occupancy temperature setpoint. Geothermal Range units Geothermal heat pump unit ventilators are designed to start-up in an ambient of 40°F (5°C), with entering air at 40°F (5°C), with entering water at 25°F (-4°C), with both air and water at flow rates used in the ISO 13256-1 rating test, for initial start-up in winter. Note: This is not a normal or continuous operating condition. It is assumed that such a start-up is for the purpose of bringing the building space temperature up to occupancy temperature setpoint. Table 9: Water - °C (SI units) Standard Range Geothermal Range UnitsUnits Cooling Heating Cooling Heating Min. Entering Water 1,2 13°C 13°C -1°C -6°C Normal Entering Water29°C 21°C 25°C 4°C Max Entering Water43°C 32°C 43°C 32°C 1 At ISO 13256-1 flow rate. Maximum and minimum values may not be combined. If one 2 value is at maximum or minimum, the other two conditions may not exceed the normal condition for standard units. Extended range units may combine any two maximum or minimum conditions, but not more than two, with all other conditions being normal conditions. IM 1083 Self-Contained WSHP Unit Ventilator Models ARQ, ERQ, GRQ Page 19 of 42 Piping Considerations Figure 36: Condensate Disposal Trapping Detail 1. All units should be connected to supply and return piping in a two-pipe reverse return configuration. A reverse return system is inherently self-balancing and requires only trim balancing where multiple quantities of units with different flow and pressure drop characteristics exist in the same loop. Check for proper water balance by measuring differential temperature reading across the water connections. To insure proper water flow, the differential flow should be 10°F to 14°F (5°C to 8°C) for units in cooling mode. A direct return system may also work acceptably, but proper water flow balancing is more difficult to achieve and maintain. 2. The condenser water or loop piping can be steel or copper. 3. Supply and return runouts usually join the unit via short lengths of high pressure flexible hose which are sound attenuators for both unit operating noise and hydraulic pumping noise. One end of the hose should have a swivel fitting to facilitate removal for service. Hard piping can also be brought directly to the unit. This option is not recommended since no vibration or noise attenuation can be accomplished. The hard piping must have unions to facilitate unit removal. 4. Some flexible hose threaded fittings are supplied with sealant compound. If not, apply Teflon tape to assure a tight seal. Note: Do not over-torque fittings. The maximum torque without damage to fittings is 30 foot pounds. If a torque wrench is not available, use as a rule of thumb, finger-tight plus one quarter turn. Drain Pan (Left End) C A B 7/8" I.D. Clear Plastic Table 10: Condensate Drain Trap & Static Pressure Standard Static Pressure High Static A BC 1¼" 5/8" 2¾" 1½" 3/4" 3⅛" 9. Do not locate any point in the drain system above the drain connection of any unit. 10.Automatic flow controlled devices must not be installed prior to system cleaning and flushing. 11.A high point of the piping system must be vented. 12.Check local code for the need for dielectric fittings. 5. Supply and return shutoff valves are required at each conditioner. The return valve is used for balancing and should have a “memory stop” so that it can always be closed off but can only be reopened to the proper position for the flow required. 6. No unit should be connected to the supply and return piping until the water system has been cleaned and flushed completely. After the cleaning and flushing has taken place, the initial connection should have all valves wide open in preparation for water system flushing. 7. Condensate drain piping can be steel, copper or PVC or CPVC. 8. The condensate drain hose must be trapped. The hose must be pitched away from the unit not less than 1⁄4" per foot. The unit drain pan has a 7/8 inch O.D. drain connection to accommodate the condensate drain hose. Page 20 of 42 Self-Contained WSHP Unit Ventilator Models ARQ, ERQ, GRQ IM 1083 Water System Cleaning Figure 37: Connections for flushing system piping CAUTION Prior to first operation of any unit, the water circulating system must be cleaned and flushed of all construction dirt and debris. If the unit is provided with water shutoff valves, either electric or pressure operated, the supply and return run outs must be connected together at each unit location. This will prevent the introduction of dirt into the water circulating system. Additionally, pressure operated valves only open when the compressor is operating. NOTICE Return Runout Supply Runout Mains Flexible Hose Runouts Initially Connected Together It is Daikin’s policy not to make recommendations on water treatment. It is the responsibility of the user to check that the water supply to the units is free of contaminants or corrosive agents, chemicals or minerals. The general contractor or owner should contact a local water treatment company regarding water treatment. A fouled closed loop water system will lead to premature component failure. The system water piping must be thoroughly cleaned and flushed in order to remove dirt, chips or other foreign matter before connecting to the heat pumps or starting the system. Since the initial condition of the system water may be such that dirt or other foreign matter may clog or otherwise damage balancing and shutoff valves, it is recommended that these valves be omitted during the cleaning of the water system as outlined in the following procedure. The entire system should be filled with clean, fresh water and properly vented. Piping leaks should be repaired as early in this procedure as they are discovered. With valves positioned to bypass the heat pumps, heat rejector and the supplementary water heater, the pump should be started to circulate water through the system. Check strainers frequently and clean as often as needed. If the water is extremely dirty or murky, it is sometimes helpful to continuously flush, using the system pump, until the water being flushed out of the pipe loop has become clear. To flush in this manner requires care to be certain that make-up water is being added fast enough to replace what is being flushed out. This can be accomplished by opening the make-up water bypass valve around the automatic pressure reducer valve, adjusting the manual valve so that the pump suction pressure gauge continues to indicate the same positive pressure that existed before the manual drain and make-up valves were opened. Continue for at least two (2) hours. To complete the cleaning, fill the system with fresh water, adding a cleaning agent such as trisodium phosphate (TSP). Bypass valves at the heat rejector and supplementary water heater should be adjusted for normal operation. Disconnect all power to the heat rejector and heat pump so that they will not operate while the system is being cleaned. The cleaning solution should then be circulated throughout the system, with water heater controls temporarily adjusted to raise the solution temperature to about 105°F to 110°F. DO NOT allow the temperature to rise above 110°F, especially in systems using plastic pipe. Alternate operation of the primary and standby pumps, and circulate the warm solution for several hours. Then turn off the water heater and pump, completely drain the system and refill with fresh water. Repeat the cleaning process only if there is indication of foreign matter still in the system, or if a test of the water indicates that it is even slightly acid. The water should be slightly alkaline, with a pH no higher than 8.0 and no lower than 7.0, which is neutral. Traces of TSP or similar cleaning agent will tend to leave the water in a slightly alkaline condition provided all acid forming substances such as pipe coatings or flux have been properly cleaned out. A tight system requiring little or no make-up water, with neutral or slightly alkalline water, will remain in proper operating condition indefinitely. The addition of chromates or other corrosion inhibitors is NOT recommended, except when ethylene glycol is added for freeze protection. IN ALL CASES, A WATER QUALITY EXPERT SHOULD BE RETAINED TO MAKE A WATER ANALYSIS. Note: Contact a local water treatment company to confirm water clarity prior to unit operation. CAUTION Units must be checked for water leaks upon initial water system start-up. Water leaks may be a result of mishandling or damage during shipping. Failure by the installing contractor to check for leaks upon start-up of the water system could result in property damage. CAUTION Water/refrigerant heat exchanger fouling will interrupt water flow resulting in localized freezing. Install a 16-20 mesh strainer in the water line upstream of the exchanger. IM 1083 Self-Contained WSHP Unit Ventilator Models ARQ, ERQ, GRQ Page 21 of 42 Make Piping Connections CAUTION Be sure the hot and chilled water supply and return system are thoroughly flushed and cleaned before connecting piping to the unit ventilator. Debris in the lines can damage the unit. See "Water System Cleaning". Water Coil Connections Hook up water piping in accordance with Figure 38. Figure 38: Water Supply and Return Connections (Unit Size 040 & 048 Shown) For All Systems Water Return 3/4" FPT Fitting Be sure to install the control valve(s) on the correct unit ventilator. Indiscriminate mixing of valves in the field can result in valves improperly sized for the desired flow rate, which can result in poor operation and coil freezeups. Install control valve so there is at least 2" (51mm) minimum clearance to remove the actuator from the valve body. Be certain that the control valve is installed correctly, with its orientation vertical. Valves should be installed at least 5° off center. CAUTION Water Supply 3/4" FPT Fitting Be certain that the control valves are installed with the proper port orientation to provide proper flow and fail safe operation. Incorrect installation can result in improper unit operation, and/or the possibility of coil freeze-up. With future servicing considerations in mind, use standard, field-supplied shutoff valves and union connections; this permits easy removal of the coil or control valve if servicing is required. Figure 39: Typical Piping Through the Floor, Inside Cabinet (Unit Size 024 Shown) WARNING While brazing, have an extinguisher readily available. Wear appropriate eye and hand protection. Ensure all areas with shared ventilation have ample fresh air ventilation. Proper ventilation is required for brazing. When brazing, be sure to protect unit ventilator components from overheating damage (melting insulation, also damage to valves, wiring, electronics, sensors, etc.). Ensure proper insulation of supply and return piping. Proper insulation prevents loss of unit ventilator capacity, overheating of end compartment, and / or moisture dripping. The piping to and from the unit must be protected from outside air and freeze conditions. The piping must be suitably insulated for condensation or heat lose or gain. Penetrations entering the unit end compartments must be fitted/sealed for unit integrity. Heat Exchanger Coil Flexible Return Hose with Flow Controller/Ball Valve Flexible Supply Hose with Y-Strainer/Ball Valve CAUTION Failure to install water piping to coils properly can result in improper unit operation and coil freeze-ups. NOTICE Use piping shut off valves and connection unions for future servicing to the coil supply and return stubs, instead of hard piping. This permits easy removal of the coil or control valve if servicing is required. Page 22 of 42 Self-Contained WSHP Unit Ventilator Models ARQ, ERQ, GRQ IM 1083 Figure 40: Typical Piping Through Grommets in Back of Unit 4. 5. 6. 7 8. 9. System Balancing The recommended method, and the one most commonly used, for balancing a system is called "proportionate balancing." Figure 41 shows a water system consisting of reverse return mains feeding three branch mains. Branch A and Branch C are designed as reverse returns, while Branch B is designed as a direct return upfeed riser. Each of the branch circuits has a balancing valve in the line going back to the system return main. In addition, each unit has a balancing valve in its return line. The prescribed method of proporationate balancing is as follows: 1. 2. 3. Assume Coil A-1 has the lowest proportionate flow rate, A-2 the next lowest, and so on. Leaving the balancing valve to Coil A-1 wide open, begin to throttle the balancing valve on A-2 until the two coils have the same proportionate flow within an allowed tolerance. (This usually is set by the balancing contract at around 5 percent.) Proportionate balance now has been achieved between these two coils. Proceed to Coil A-3 and establish proportionate balance between it and Coil A-2 by the same procedure. Coil A-2 need not be read. It will change in direct proportion to the change in A-2 and will remain in balance with it. Adjust the balancing valve in Coil A-4 until it is in proportionate balance with Coil A-3. Likewise, bring Coil A-5 into proportionate balance with Coil A-4. This is the end of Branch A. All coils on this branch will be proportionately balanced and any increase or decrease in the total system GPM, or the branch, will increase or decrease the GPM at each coil proportionately. They will remain in balance with one another. By the same process, achieve a proportionate balance of all coils on Branches B and C. The next step is to balance the branches. To do this, select at random one coil on each of the three branches. Use the same procedure as for coil balancing and proportionately balance the branches against one another, using the selected coils. Note the balancing valve on the lowest proportionately flowing branch will be left wide open. The final step in the procedure is to adjust the flow from the pump to the system to bring all coils to their design flow rate. As was previously discussed, this can be done by imposing additional resistnace at the pump by means of a balancing valve and throttling the system back until the flow rates are equal to those called for by the design, or decreasing the output of the pump Open all valves fully. Beginning with Branch A, take readings to determine the GPM flowing to each unit in the branch. Determine the ratio of the actual/design flow for each of the coils in Branch A. This is called the proportionate flow rate. For instance, if Coil A-1 had a design flow rate of 10 GPM and the measured flow rate was 15 GPM, then its proportionate flow rate would be 1.5. Figure 41: Typical System Balancing Circuit Typical water system consisting of reverse return mains feeding branch circuits IM 1083 Self-Contained WSHP Unit Ventilator Models ARQ, ERQ, GRQ Page 23 of 42 Making Control Connections MicroTech II™ Unit Mounted DDC Control Components – Models ARQ, ERQ, and GRQ 1. MicroTech II Unit Ventilator Controller (UVC): (Located Beneath the Local User Interface Panel). Factory mounted and run tested, microprocessor-based DDC control device capable of complete Standalone unit control, Master/Servant control or incorporated into a building-wide network using an optional plugin communication module. The UVC contains a microprocessor that is preprogrammed with the application code required to operate the unit. The UVC supports up to 6 analog inputs, 12 binary inputs, and 9 binary outputs. The UVC EXP I/O board supports up to 4 additional analog inputs and 8 additional binary outputs. Master/Servant units have the controller factory configured and installed for a local peer-to-peer network between these units (network wiring between these units needs to be field installed). Optional network communication is provided via plugin communication modules that connect directly to the UVC. 2. Communication Module (optional): Plug-in network communication module that is attached to the UVC via a 12-pin header and 4 locking standoffs. Available communication modules: • Building Automation and Control Network (BACnet®) Master Servant/Token Passing (MS/TP) - Allows the UVC to interoperate with systems that use the BACnet (MS/TP) protocol with a conformance level of 3. Meets the requirements of ANSI/ ASHRAE 135-1995 standard for BACnet systems. (See IM 731 for specific installation instructions of BACnet module). • LonWorks® compliant Space Comfort Controller (SCC) – Supports the LonWorks SCC profile number 8500_10. (See IM 729 for specific installation instructions of LonWorks module). • Metasys N2® Open – Provides N2 Open network communication capability to the UVC. (See IM 730 for specific installation instructions of Metasys N2 module). 4. Tenant Override Switch: Provides a momentary contact closure that causes the unit to enter the “tenant override” operating mode for a set time period (default = 120 minutes). 5. Time Clock (TC) (optional on standalone units only): Factory mounted 7-day/24 hour, digital time clock with up to twenty (20) programs to sequence the unit ventilator through occupied and unoccupied modes in accordance with a user programmed time schedule. 6. External Signal Connection Plugs: (Located beneath the Local User Interface Panel), three (3) multi-pin plugs are factory provided and pre-wired with short wire whips that are capped (they must remain capped if not used). Provided for field wiring of : • Remote Wall-Mounted Temperature Sensor (optional accessory). • External Input Signals (by others): unoccupied, remote shutdown, ventilation lockout, dew point/humidity (night time operation), or exhaust interlock signals • External Output Options (by others): lights on/off, fault indication signal, exhaust fan on/off or auxiliary heat signal. 7. Motor Speed Transformer: (Located beneath the Local User Interface Panel). Multi-tap auto-transformer provides multiple fan motor speed control through the LUI. 8. Unit Main Power “On-Off” Switch (SW1): Disconnects the main power to the unit for servicing or when the unit is to be shut down for an extended period of time. Figure 43: Unit Main Power “On-Off” Switch (SW1) 3. Local User Interface (LUI): The LUI provides a unit mounted interface which indicates the current unit operating state and can be used to adjust the unit ventilator operating parameters (operating mode, temperature set points, fan speed and occupancy mode). The LUI features a 2-digit display, 7 keys (1 key is hidden), and 9 individual LED indicators. See “Local User Interface” for further details. Figure 42: MicroTech II Sensor and Component Locations (Top View) for AR, ER & GR Page 24 of 42 Self-Contained WSHP Unit Ventilator Models ARQ, ERQ, GRQ IM 1083 9.Fuse(s): Fan motor and controls have the hot line(s) protected by factory installed cartridge type fuse(s). 10. Control Transformer: 75 VA 24-volt NEC Class 2 transformer for 24 volt power supply. (Located behind the motor transformer). 11. Outdoor Air/Return Air Damper Actuator (A1): Direct coupled, floating point (tristate) actuator that spring returns the outdoor air damper to the closed position upon a loss of power. 12. Low Refrigerant Temperature Sensor (S4): The S4 sensor is provided on all units with a direct expansion (DX) cooling coil. It is located on the right hand side of the air coil “u-bend”. 13. Room Temperature Sensor (S1): The unit mounted sensor is located in the sampling chamber (front, center section) where room air is continuously drawn through for prompt response to temperature changes in the room. A Remote Wall Mounted Temperature Sensor is also available for remote room temperature sensing. (optional accessory). 14. Discharge Air Temperature Sensor (S2): The sensor is located on the second fan from the right to sense discharge air temperatures. Figure 44: MicroTech II Control Boards (with LonWorks Module Installed) Terminal Connections Plug-in Control Module 15. Outdoor Air Temperature Sensor (S3): The sensor is located in the outdoor air section of the unit before the outdoor air damper. With network applications, the unit mounted sensor can be overridden by a remote sensor through the network. 16. Outdoor Air Humidity Sensor (S8) (optional): Unit mounted humidity sensor for units using Expanded outdoor enthalpy economizer or Leading Edge indoor/outdoor, true enthalpy comparison economizer. The sensor is located in the outdoor air section of the unit before the outdoor air damper. With network applications, the unit mounted sensor can be overridden by a remote sensor through the network. 17. Room Humidity Sensor (S6) (optional): Unit mounted humidity sensor for units capable of active dehumidification or with units using Leading Edge indoor/outdoor, true enthalpy comparison economizer. The sensor is located in the sampling chamber (front, center panel) where room air is continuously drawn through for fast response to humidity changes in the room. With network applications, the unit mounted sensor can be overridden by a remote sensor through the network. 18. CO2 Sensor (S7) (optional): Unit mounted, single beam absorption infrared gas sensor with a sensing range of 0 – 2000 ppm and voltage output of 0 to 10 VDC (100 ohm output impedance). The Pitot Tube sensing device is located in the unit ventilator’s return air stream. The optional CO2 sensor is used with the UVC’s Demand Control Ventilation feature to vary the amount of outside air based on actual room occupancy. With network applications, the unit mounted sensor can be overridden by a remote sensor through the network. 19. Water Out Temperature Sensor (S9): The water out temperature sensor is factory wired. The sensor must be field-installed and insulated (by others) and located on the return connection of the plate heat exchanger. 20. Water Coil DX Temperature Sensor (S5): The S5 sensor is factory wired, installed and insulated. It is located on the lower left refrigerant line of the plate heat exchanger leading to the expansion valve. NOTICE Not all external signal options can be used simultaneously and may not be available on all software models. Refer to the “UVC Input and Output Tables” in IM 739 for available options. Figure 45: Top View - Local User Interface Compartment IM 1083 Self-Contained WSHP Unit Ventilator Models ARQ, ERQ, GRQ Page 25 of 42 Economizer Control Capabilities Basic – Compares the inside and outside air temperatures using item 16 (Room Temperature Sensor) and item 18 (Outdoor Air Temperature Sensor) to determine if outdoor air can be used for “free”, economizer cooling operation. Expanded - Compares the inside and outside air temperatures using item 16 (Room Temperature Sensor) and item 18 (Outdoor Air Temperature Sensor) and calculates the enthalpy of the outside air relative humidity using item 19 (Outdoor Air Humidity Sensor) to determine if outdoor air can be used for “free”, economizer cooling operation. Leading Edge – True enthalpy comparison economizer that compares the inside and outside air temperatures using item 16 (Room Temperature Sensor) and item 18 (Outdoor Air Temperature Sensor) and compares the enthalpy of the inside and outside air relative humidity using item 19 (Outdoor Air Humidity Sensor) and item 20 (Room Humidity Sensor) to determine if outdoor air can be used for “free”, economizer cooling operation. Local User Interface (LUI) The built-in LUI touch pad (See Figure 45, item 3) has a 2-digit LED display that indicates the current unit operating state. See OM for unit type, for details of operation. The touch pad will “digitally display”: • The room set point temperature • Current Room Temperature (With certain buttons held in place) • Any fault code for diagnostics at the unit (With certain buttons held in place) The LUI has a built in menu structure (Hidden Key and Password protected) with 7 keys (1 key is hidden) and 9 individual LED indicators to adjust the unit ventilator operating parameters shown below. Figure 46: Local User Interface (LUI) MicroTech II FAN ONLY TM HIGH COOL MED HEAT LOW AUTO AUTO MODE FAN FUNC ON/ STOP Operating Mode States (4) • Heat - Heating and economizer operation only • Cool – Cooling and economizer operation only • Fan Only – Fan operation only • Auto – Unit automatically switches between heating, cooling and economizer operation to satisfy the room load conditions. The current unit state is also displayed. Fan States (4) • High (constant speed - compressor on high stage) • Medium (constant speed - compressor on low stage) • Low (constant speed - compressor on low stage) • Auto (part load, variable air) – Varies the fan speed automatically to meet the room load conditions whether the unit is in heating, cooling or economizer mode. The current fan speed is also displayed. During low load or normal operation (about 60% of the time) the fans will operate at low speed. When the load increases to an intermediate demand the fans automatically shift to medium speed. At near design or design load conditions, the fans will operate on high speed. A 10-minute delay between speed changes is incorporated to minimize the awareness of these changes. The outdoor air damper will index based on the fan speed to maintain the required minimum cfm (cubic feet per minute) of ventilation air. Occupancy Modes (4) • Occupied – Normal, daytime operation where the unit maintains the room set point. • Unoccupied – Night set back operating mode in which the unit responds to a new room set point and cycles to maintain the condition. The fan comes on when heating or cooling is needed and runs until the load is satisfied. The outside air damper is closed during this mode. With direct expansion (DX) cooling units, when a cooling load is satisfied by the refrigerant system, the compressor is de-energized and the Unit Ventilator indoor fan continues to run for a fixed period of time to remove possible frost buildup on the evaporator coil. • Stand By Mode – The unit ventilator maintains the stand by mode set point temperature with the outside air damper closed. The fan runs continuously unless it is configured to cycle in response to the room load. • Bypass Mode – By depressing the Tenant Override Switch (Item 4) the unit is placed back into the Occupied Mode for a predetermined time (default of 120 minutes). This time can be set in 1-minute increments from 1 minute to 240 minutes through the Unit Ventilator Service Tool or a network. Page 26 of 42 Self-Contained WSHP Unit Ventilator Models ARQ, ERQ, GRQ IM 1083 IM 1083 Self-Contained WSHP Unit Ventilator Models ARQ, ERQ, GRQ DISCONNECT ALL ELECTRICAL POWER BEFORE SERVICING UNIT TO PREVENT INJURY OR DEATH DUE TO ELECTRICAL SHOCK. DANGER CAUTION USE COPPER CONDUCTORS ONLY. UNIT TERMINALS ARE NOT DESIGNED TO ACCEPT OTHER TYPES OF CONDUCTORS. FAILURE TO DO SO MAY DAMAGE THE EQUIPMENT. Figure 47: DX Cooling w/Electric Heat, Valve Control 460-Volt/3 Phase MicroTech II Wiring Diagram – Typical CAUTION Refer to unit wiring diagram located on inside of right front panel, for actual wiring. Improper wiring can cause equipment and property damage. Typical Wiring Diagram Page 27 of 42 Electrical Data Table 11: Model ARQ, ERQ, GRQ Electrical Data – Size 024 Voltage Range Room Compressor Heating Options Power Supply Voltage Fan Heater HeaterMaximum Auxiliary Heat Type Min.Max.FLA RLALRA kW Amps MCAFuse Refrigerant Heating 208/60/1 197 228 2.7 11.4 52.0 Low (3-elem.) 1 Electric Heat High (6-elem.) Refrigerant Heating 230/60/1 207253 2.7 11.4 52.0 1 Low (3-elem.) Electric Heat High (6-elem.) Refrigerant Heating 208/60/3 197 228 2.7 7.9 59.0 Low (3-elem.) 1 Electric Heat High (6-elem.) Refrigerant Heating 230/60/3 207253 2.7 7.9 59.0 1 Low (3-elem.) Electric Heat High (6-elem.) Refrigerant Heating 460/60/3 414506 2.7 3.9 29.7 1 Low (3-elem.) Electric Heat High (6-elem.) Notes: 1 Electric Heat Options are with Compressor FLA = Full Load Amps RLA = Rated Load Amps LRA = Locked Rotor Amps – – 1 7.0 25 8.0 16.0 – 7.7 15.3 – 8.0 16.0 – 7.7 15.3 – 7.7 38.5 76.9 – 33.3 66.7 – 22.2 44.4 – 19.2 38.5 – 9.6 65.0 113.1 17.0 58.6 100.3 12.6 40.3 68.1 12.6 36.6 60.7 7.6 19.6 70 125 25 60 110 20 45 80 20 40 70 15 20 15.319.231.6 35 MCA = Minimum Circuit Ampacity Table 12: Model ARQ, ERQ, GRQ Electrical Data – Size 040 Voltage Range Room Compressor Heating Options Power Supply Voltage Fan Heater HeaterMaximum Auxiliary Heat Type Min.Max.FLA RLALRA kW Amps MCAFuse Refrigerant Heating 208/60/1 197 228 2.7 18.6 96.0 Low (3-elem.) 1 Electric Heat High (6-elem.) Refrigerant Heating 230/60/1 207 253 2.7 18.6 96.0 Low (3-elem.) 1 Electric Heat High (6-elem.) Refrigerant Heating 208/60/3 197 228 2.7 15.0 88.0 Low (3-elem.) 1 Electric Heat High (6-elem.) Refrigerant Heating 230/60/3 207 253 2.7 15.0 88.0 Low (3-elem.) 1 Electric Heat High (6-elem.) Refrigerant Heating 460/60/3 414 506 2.7 6.8 44.0 Low (3-elem.) 1 Electric Heat High (6-elem.) Notes: 1 Electric Heat Options are with Compressor FLA = Full Load Amps RLA = Rated Load Amps LRA = Locked Rotor Amps Page 28 of 42 – – 26.0 40 10.0 20.0 – 9.6 19.2 – 10.0 20.0 – 9.6 19.2 – 9.6 48.1 96.2 – 41.7 83.3 – 27.8 55.5 – 24.1 48.1 – 12.0 86.0 146.1 26.0 78.0 130.1 21.5 56.1 90.8 21.5 51.5 81.6 11.2 26.2 90 150 40 80 150 35 60 100 35 60 90 15 30 19.224.141.3 45 MCA = Minimum Circuit Ampacity Self-Contained WSHP Unit Ventilator Models ARQ, ERQ, GRQ IM 1083 Electrical Data Table 13: Model ARQ, ERQ, GRQ Electrical Data – Size 048 Voltage Range Room Compressor Heating Options Power Supply Voltage Fan Heater HeaterMaximum Auxiliary Heat Type Min.Max.FLA RLALRA kW Amps MCAFuse Refrigerant Heating – – 32.2 50 208/60/1 197 228 2.7 23.6 96.0 Low (3-elem.) 12.0 57.7 104.3 1 Electric Heat High (6-elem.) 24.0 115.4 176.4 Refrigerant Heating – – 32.2 230/60/1 207253 2.7 23.6 96.0 1 Low (3-elem.) 11.6 50.0 94.7 Electric Heat High (6-elem.) 23.0 100.0 157.2 Refrigerant Heating – – 21.5 208/60/3 197 228 2.7 15.0 88.0 Low (3-elem.) 12.033.363.1 1 Electric Heat High (6-elem.) 24.0 66.6 104.7 Refrigerant Heating – – 21.5 230/60/3 207 253 2.7 15.0 88.0 Low (3-elem.) 11.5 28.9 57.5 1 Electric Heat High (6-elem.) 23.0 57.7 93.6 Refrigerant Heating – – 11.6 460/60/3 414506 2.7 7.1 41.0 1 Low (3-elem.) 11.5 14.4 29.6 Electric Heat High (6-elem.) 23.0 28.9 47.7 Notes: 1 Electric Heat Options are with Compressor FLA = Full Load Amps RLA = Rated Load Amps LRA = Locked Rotor Amps IM 1083 110 200 50 100 175 35 70 110 35 70 100 15 30 50 MCA = Minimum Circuit Ampacity Self-Contained WSHP Unit Ventilator Models ARQ, ERQ, GRQ Page 29 of 42 MicroTech II™ Unit Electrical Connections DANGER To avoid electrical shock, personal injury or death, be sure that field wiring complies with local and national fire, safety, and electrical codes, and voltage to the system is within the limits shown in the job-specific drawings and unit electrical data plate(s). WARNING Power supply to unit must be disconnected before making field connections. To avoid electrical shock, personal injury or death, be sure to rigorously adhere to field wiring procedures regarding proper lockout and tagout of components. See Table 11, 12 & 13, and Figure 47 and the job-specific electrical drawings before proceeding with field power and control wiring. See also the wiring diagram provided on the unit ventilator right front access panel. Unit ventilators equipped with an optional electric heating coil have electric heating coil power connections at right end only. 2. Confirm that power is de-energized and locked and tagged-out. 3. Plug in the unit control wiring male plug(s) into the appropriate female plug(s). Refer to Figures 49, 51, 52 & 53. • Plug in 4-pin (for MicroTech II and Electromechanical, see Figure 51). • 10-pin (MicroTech II only, see Figure 52). • 12-pin (MicroTech II only, see Figure 53). 4. Insert the main power wires into the main power On/Off switch terminal lugs (A, B and C). Note that terminal lug B, not used on single phase. Connect the Ground wire to the ground lug as shown in Figure 50. Tighten the terminal lugs securely. 5. Reinstall the cover plate on the main power wire trough. Note: For Electromechanical wiring (see page 36). Control connections for elecromechanical are made to the terminal block in the left end compartment. Figure 49: Control Wiring Plug Connections in Right End Compartment. Procedure 1. Provide power supply to right end compartment to match unit nameplate. CAUTION Use copper conductors only. Use of aluminum conductors may result in equipment failure and overheating hazards. All wiring in right hand compartment must be class 1. Figure 48: Electrical Power On/Off Switch Located Behind Front-Middle Access Panel in Wire Trough, with Power Entry accessed Behind Right-Front Access Panel Control wiring whips with caps located in the right front end compartment Figure 50: Electrical Power On/Off Switch for Power Wiring Connections Terminal lugs for main power wiring from unit, field connection by others A B Unit Main Power On/Off Switch C Grommeted Power Wire Entry Main Power On/Off Switch Ground Lug Note: B not used on single phase. Page 30 of 42 Self-Contained WSHP Unit Ventilator Models ARQ, ERQ, GRQ IM 1083 Figure 51: 4-pin Plug MicroTech II Control Wiring Diagram (4-pin) Male Connector Unit Ventilator Communication Module Optional Building Automation System (BAS) (4-pin) Female Connector BACnet ® Metasys ® LONWORKS ® Red 1 RT+ FTT–10 (B) N2+ Black 2 RT- FTT–10 (A) N2– GND 3 GND GND Note: The N2 Bus can use either solid or stranded wires of the following types: 3-wire twisted cable, 2 twisted-pair telephone cable, or two twisted pair with shield. The wiring is polarity sensitive. The polarity of the signal must always be maintained throughout the network. Always connect + to + and - to -. The shield connection must be continuous throughout the entire network and must be connected to earth ground at one (and only one) point. (By others) (By others) (By others) Use Belden 8471, NEMA Level 4, or Echelon-approved equivalent wire. Since the LONWORKS communication wiring is polarity insensitive, no polarity must be observed when making connections via the unshielded twisted-pair wiring. Wiring: Use twisted shielded pair (Connect Air W221P-2544 or equivalent). Daisy-chain and tie shield to earth ground at one point only. The polarity of the signal must always be maintained throughout the network. Always connect + to + and - to -. The shield connection must be continuous throughout the entire network and must be connected to earth ground at one (and only one) point. Figure 52: 10-pin Plug MicroTech II™ Wiring Diagram P6 (10-pin) Connector Unit Ventilator 601 602 603 604 605 606 608 610 xBO-2 Comm xBO-1 BO-6 BO-6 Comm 24vac Supply 24vac Comm P6 (10-pin) Connector 601A 602A 603A 604A 605A 606A 608A 610A Wire Caps Shield Note: Not all external input options are available for all models. External Output Option 1 Device (by others) External Output Option 2 Device (by others) External Output Option 3 Device (by others) Lights On/Offf Signal or Motorized Water Valve Open/Close Fault Indication or Pump Restart Signal Auxiliary Heat Signal or Exhaust Fan On/Off Signal Figure 53: 12-pin Plug MicroTech II™ Control Wiring Diagram P1 (12-pin) Connector Unit Ventilator P1 (12-pin) Connector GND AI-2 Comm AI-1 LED 896 GRN BLK WHT RED 896 GRN BLK WHT RED GND Comm BI-6 BI-5 BI-4 896 908 907 906 905 896 908A 907A 906A 905A Wire Caps Remote Wall Sensor (Option) Shield Setpnt Adjst. Comm Sensor LED Shield Note: Not all external input options are available for all models. IM 1083 1 5 6 4 3 2 External Input Option 3 Device (by others) External Input Option 2 Device (by others) Ventilation Lockout (default) or Exhaust Interlock Remote Shutdown Self-Contained WSHP Unit Ventilator Models ARQ, ERQ, GRQ External Input Option 1 Device (by others) Unoccupied (default) or Dewpoint Humidity Page 31 of 42 MicroTech II™ Remote Wall Mounted Sensor Figure 55: Correct Wall Sensor Locations = Correct Sensor Location WARNING Window Exposure Rigorously adhere to field wiring procedures regarding proper lockout and tagout of components. Window Exposure Unit WARNING Interior Wall To avoid electrical shock, personal injury or death: 1. Installer must be qualified, experienced technician. 2.Disconnect power supply before installation to prevent electrical shock and damage to equipment. 3. Make all connections in accordance with electrical wiring diagrams, and in compliance with national and local codes. Use copper conductors only. 4. Do not exceed ratings of the device. This is a low voltage device: Never apply more than 12VAC/VDC to any lead or damage will result. 5. Avoid locations where excessive moisture, corrosive fumes, or vibrations are present. Interior Wall Window Exposure Interior Wall Window Exposure Unit Figure 54: Basic Remote Wall Sensor Interior Wall Figure 56: Incorrect Unit and Wall Sensor Locations = Incorrect Sensor Location Window Exposure LED Unit Shelving File Cabinet Tenant Override Button Interior Wall Cubicle Wall Sensor When Using A Remote Wall Mounted Temperature Sensor NOTICE All MicroTech II equipped unit ventilators are provided as standard with a unit mounted space temperature sensor. The unit mounted temperature sensor is provided with a quick disconnect plug (white) located outside of box with numbered wires 101 and 102. When using a remote wall mounted temperature sensor the unit mounted temperature sensor quick disconnect plug must be separated so that the unit mounted sensor is disconnected from the UVC. Interior Wall Shelving Interior Wall Window Exposure Window Exposure Note: Avoid placing wall sensor near drafty areas such as doors or windows. Avoid external walls, or dead spots near exposed columns. Avoid direct sunlight on wall sensor. Table 14: Max Sensor Wire Length and Gauge Maximum sensor wire length for less than 1°F error GaugeLength 14 AWG 800 ft. (244 m) 16 AWG 500 ft. (152 m) Page 32 of 42 Unit If a decision is made to use a Remote Wall Mounted Temperature Sensor instead of the unit mounted room air sensor then placement of the Remote Wall Mounted Temperature Sensor is critical for proper room temperature sensing (see figures 55 and 56). The UVC is capable of using one of two remote wall mounted temperature sensors. Figure 59 shows a 4-wire connection (plus shield drain wire) (see table 14). It is recommended that additional wires be pulled to compensate for potential wire breakage or future options. The Basic Wall Mounted Temperature Sensor requires only 3-wires (plus shield drain wire) since the Basic Wall Mounted Temperature Sensor has no setpoint adjustment (see figure 59). Interior Wall 18 AWG 20 AWG 22 AWG 310 ft. (94 m) 200 ft. (61 m) 125 ft. (38 m) Self-Contained WSHP Unit Ventilator Models ARQ, ERQ, GRQ IM 1083 CAUTION Figure 59: Wall-Mounted Temperature Sensor Wiring for Basic Wall Sensor Static sensitive components. A static discharge while handling electronic circuit boards can cause damage to the components. Discharge any static electrical charge by touching the bare metal inside the main control panel before performing any service work. Never unplug any cables, circuit board terminal blocks, relay modules, or power plugs while power is applied to the panel. P1 Connector GND AI-2 Comm AI-1 LED Field Wiring Remote Mounted Temperature Sensor The low voltage field wiring connections have all been centrally located within the unit ventilator and are easily accessible. To simplify field connections, multi-pin plugs are factory provided and pre-wired with short wire whips (see figure 57). Each of the wires in these wire whips is capped and should remain capped if not used. The unit mounted temperature sensor is provided with a quick disconnect plug (white) with wires numbered 101 and 102, and must be separated so that the unit mounted sensor is disconnected from the UVC. This disables the unit mounted sensor (see figure 58). See Figures 59 and 60 for wiring the remote mounted temperature sensor to the unit control wiring. Wall Sensor (option) Unit Ventilator 896 GRN BLK WHT RED Wire Caps 1 5 6 4 3 2 Shield Setpt. Adj. Comm Sensor LED Factory Wiring Field Wiring (by Others) External Device (by Others) Figure 60: Wall Mounted Temperature Sensor Wiring for Expanded Wall Sensor BLK Figure 57: Wire whips with Caps for Field Wiring Remote Mounted Temperature Sensor Installing the Remote Mounted Temperature Sensor NOTICE The unit comes with a unit mounted sensor and does not require a remote wall mounted sensor. Wire Wips for Field Wiring with Caps (see the wiring diagram provided on the unit ventilator right front access panel) This describes the installation of the following three wall mounted sensor models: • P/N 111048101 – Basic • P/N 111048103 – Expanded ± 3oF setting Use the installation instructions included with the Remote wall sensor. Parts Included - All Models NOTICE All low voltage field wiring connections must be run in shielded cable with the shield drain wires connected as shown in the field wiring diagrams. Figure 58: Quick Disconnect Plug, Wires 101 & 102 for Unit Mounted Temperature Sensor Two pin plug for unit-mounted sensor • • • • • • pre-assembled sensor that includes: - large (50.8 x 101.6 mm [2 x 4 in.]) mounting base (1) - terminal block (1) - 1.5 mm (1/16 in.) cover screw (1) - end caps (2) alternate small (80 x 80 mm [3.15 x 3.15 in.]) mounting base (1) with attached terminal block (1) cover slider insert with printed logo for Daikin (1) No. 6-32 x 1 in. flat-head screw (2) No. 8 x 1.25 in. panhead tapping screw (2) hollow plastic wall anchor (2) Parts Included - 111048103 Only • alternate serrated setpoint dial (attached) • smooth setpoint dial (separate) Special Tools Needed • • • • IM 1083 .5 mm (1/16 in.) Allen wrench 7 mm (1/4 in.) flat-blade screwdriver hole saw with 35 mm (1-3/8 in.) blade (for surface mounting only) drill with 8 mm (5/16 in.) drill bit (for surface mounting only) Self-Contained WSHP Unit Ventilator Models ARQ, ERQ, GRQ Page 33 of 42 Mounting Figure 62: Surface Mounting Using Large Base The MicroTech II™ Wall Mount Sensor allows for two mounting methods: wallbox mounting and surface mounting. Note: Wallbox mounting requires the large mounting base. Use either the large or small mounting base for surface mounting. Performing Wallbox Mounting To perform wallbox mounting (Figure 61): 1. Slide the desired cover slider insert onto the cover until it snaps into place. 2. Remove the two endcaps from the mounting base. 3. Loosen the cover screw using a 1.5 mm (1/16 in.) Allen wrench and remove the sensor. 4. Pull the cable or wiring through the wallbox and mounting base. 5. Rotate the mounting base until one of the arrows on the base points up and the screw openings in the base align with the threaded holes in the wallbox. If necessary, reposition the cover screw above the arrow. 6. Fasten the base to the wallbox with the No. 6-32 x 1 in. screws provided. 7. Remove terminal block and wire to the appropriate terminals as shown in ”Wiring”. IMPORTANT 8. Install terminal block onto sensor with terminal 6 next to the edge of sensor. 9. Replace the sensor and tighten the cover screw. 10.Replace the two endcaps on the mounting base. Figure 61: Wallbox Mounting IMPORTANT 11. Install terminal block onto sensor with terminal 6 next to the edge of sensor. 12.Replace the sensor and tighten the cover screw. 13.Replace the two endcaps on the mounting base. Figure 63: Insert Wall Anchors Performing Surface Mounting Using Large Base To perform surface mounting using the large base. (Figure 62): 1. Slide the desired cover slider insert onto the sensor until it snaps into place. 2. Remove the two endcaps from the mounting base. 3. Loosen the cover screw using a 1.5 mm (1/16 in.) Allen wrench and remove the sensor. 4. Drill a 35 mm (1-3/8 in.) hole in the surface where the sensor will be mounted. 5. Pull the cable or wiring through the hole. Page 34 of 42 6. Rotate the mounting base until one of the arrows on the base points up. If necessary, reposition the cover screw above the arrow. Place the base against the wall, and mark the screw holes using the base as a template. 7. Drill two 8 mm (5/16 in.) holes at the markings. 8. Insert the hollow plastic wall anchors (Figure 62), position the base, and then drive the two pan-head tapping screws. 9. Pull the wiring through the mounting base. 10. Remove terminal block and wire to the appropriate terminals as shown in “Wiring”. Performing Surface Mounting Using Small Base To perform surface mounting using the small base (Figure 64): 1. Slide the desired cover slider insert onto the sensor until it snaps into place. 2. Remove the two endcaps from the mounting base. 3. Remove the cover screw using a 1.5 mm (1/16 in.) Allen wrench and discard it. Remove the sensor. 4. Remove and discard the terminal block from inside the sensor. 5. Drill a 35 mm (1-3/8 in.) hole in the surface where the sensor will be mounted. Self-Contained WSHP Unit Ventilator Models ARQ, ERQ, GRQ IM 1083 6. Pull the cable or wiring through the hole. 7. Place the small base against the wall, (with the arrow on the base pointing up) and mark the screw holes using the base as a template. 8. Drill two 8 mm (5/16 in.) holes at the markings. 9. Insert the hollow plastic wall anchors (Figure 64), position the base, and then drive the two pan-head tapping screws. 10. Pull the wiring through the mounting base. 11. Wire to the appropriate terminals to the small mounting base as shown in “Wiring”. 12. Snap the sensor into the small mounting base (cover screw is not required). Figure 66: 111048103 Sensor Wiring Figure 64: Surface Mounting Using Small Base Setup and Adjustments – Switching Setpoint Dials To switch setpoint dials: 1. Remove the sensor from the mounting base. 2. Rotate the smooth setpoint dial so that it points straight up. 3. As shown in Figure 67, insert the Allen wrench through the hole in the back of the printed wiring board (A) and push gently until the smooth setpoint dial is free. 4. Press the serrated setpoint dial into place on the sensor, making sure that the dial points straight up. 5. Replace the sensor on the mounting base. Figure 67: Removing the Standard Setpoint Dial Wiring Setpoint Dial NOTICE Shielded cable should always be used. However, shielded cable generally is not required, except in electrically noisy environments, such as near gas ignition systems, radar or magnetic resonance imaging equipment, etc. It is the responsibility of others to determine what constitutes an “electrically noisy” environment for each installation. Refer to table 14, page 32 for maximum wire length. A Figure 65: 111048101 Sensor Wiring Terminal Block on 111048101 Sensor Repairs and Replacement No repair options available. Call your local Daikin representative for sensor replacement. IM 1083 Self-Contained WSHP Unit Ventilator Models ARQ, ERQ, GRQ Page 35 of 42 ElectroMechanical Unit Wiring Connections CAUTION Refer to unit wiring diagram located on inside of right front panel, for actual wiring. Improper wiring can cause equipment and property damage. Electromechanical control connections are made to the terminals located behind the left-front access panel as shown in Figure 68. Refer to the wiring diagram (Figure 69) for wiring details and the wiring diagram provided with the unit. DANGER Figure 68: Thermostat Control Terminal Connections Located in Left Front Compartment Disconnect all electrical power before servicing unit to prevent injury or death due to electrical shock. CAUTION Terminal Connections for Electromechanical Controls Use copper conductors only. Unit terminals are not designed to accept other types of conductors. Failure to do so may damage the equipment. Legend Plug In Comp Tie Point Splice Optional Wiring Tap Conn. Wired by Others Term Conn.Factory Wired Capped Wire Ground Figure 69: Typical ElectroMechanical Wiring Diagram Model AR, Thermostat Control with Normally Open Heat, 460 Volt - 3Phase Page 36 of 42 Self-Contained WSHP Unit Ventilator Models ARQ, ERQ, GRQ IM 1083 Installing (Optional) End Panel End Panel Dimensions Figure 70: 1" (25mm) and 6" (152mm) End Panel Dimensions – ARQ, ERQ & GRQ Self-Contained Floor Unit Ventilators All Dimensions in Inches Top View 16⅝" (422mm) Deep End Panels 16 5/ 8" 16 5/ 8" (422mm) (422mm) End View With No Cut-out 16 5/ 8" 16 5/ 8" 1" 1" (422mm) 1" 1" (422mm) (25mm) (25mm) (25mm) (25mm) 19 5/ 8" 19 5/ 8" (498mm) (498mm) 19 5/ 8" 19 5/ 8" 1" 1" (498mm) 1" 1" (498mm) (25mm) (25mm) (25mm) (25mm) 21⅞" (556mm) Deep End Panels 21 7/ 8" 21 7/ 8" (556mm) (556mm) 27 7/ 8" 27 7/ 8" 27 7/ 8" (708mm) 27 7/ 8" (708mm) (708mm) (708mm) 27 7/ 8" 27 7/ 8" 27 7/ 8" (708mm) 27 7/ 8" (708mm) (708mm) (708mm) 21 7/ 8" 21 7/ 8" 1" 1" (556mm) 1" 1" (556mm)(25mm) (25mm) (25mm) (25mm) 28" 2 28" (711mm) (712 (711mm) (71 27 7/ 8" 27 7/ 8" 27 7/ 8" (708mm) 27 7/ 8" (708mm) (708mm) (708mm) Dashed lines indicate kickplate End View with 2½"x 7" (64mm x 178mm) Cut-out End View with 4" x 18" (102mm x 457mm) Cut-out End View with 4" x 22" (102mm x 559mm) Cut-out 7" 7" 1" 1" 7" 7" 1" 1" (178mm) (178mm) (25mm) (25mm) (178mm) (178mm) (25mm) (25mm) 7" 7" 1" 1" 7" 7" 1" 1" (178mm) (178mm) (25mm) (25mm) (178mm) (178mm) (25mm) (25mm) 2 1/ 2" 2 1/ 2" 2 1/ 2" 2 1/ 2" 7 (64mm) (64mm) 27 / 8" (64mm) (64mm) 27 7/ 8" (708mm) (708mm) 2 1/ 2"(64mm) 2 1/ 2"(64mm) 2 1/ 2"(64mm) 2 1/ 2"(64mm) 7 27 / 8" 27 7/ 8" 27 7/ 8" 27 7/ 8" (708mm) (708mm) (708mm) (708mm) 7" 7" 1" 1" 7" 7" 1" 1" (178mm) (178mm) (25mm) (25mm) (178mm) (178mm) (25mm) (25mm) 2 1/ 2"(64mm) 2 1/ 2"(64mm) 2 1/ 2"(64mm) 2 1/ 2"(64mm) 7 27 7/ 8" 27 / 8" 27 7/ 8" 27 7/ 8" (708mm) (708mm) (708mm) (708mm) 1" 1" 1" 1" 1" 1" 1" 1" (25mm) (25mm) (25mm) (25mm) 18" 18" 18" 18" (25mm) (25mm) (25mm) (25mm) 18" 18" 18" 18" 27 7/ 8" (457mm) (457mm) (457mm) (457mm) 27 7/ 8" 27 7/ 8" 27 7/ 8" 7/ 8" 7/ 8" (457mm) (457mm) (457mm) (457mm) 27 7/ 8" (708mm) 27 7/ 8" 27 27 (708mm) (708mm) (708mm) (708mm) (708mm) (708mm) (708mm) 1" 1" 1" 1" (25mm) (25mm) 18" 18" (25mm) (25mm) 18" 18" (457mm) (457mm) 7 27 7/ 8" (457mm) (457mm) 27 7/ 8" 27 / 8" (708mm) 27 7/ 8" (708mm) (708mm) (708mm) 4" 4" 4" 4" (102mm) (102mm) (102mm) (102mm) 4" 4" 4" 4" (102mm) (102mm) (102mm) (102mm) 4" 4" 4" 4" (102mm) (102mm) (102mm) (102mm) 1" 1" 1" 1" 1" 1" 1" 1" (25mm) (25mm) (25mm) (25mm) (25mm) (25mm) (25mm) (25mm) 22" 22" 22" 22" 27 7/ 8" 27 7/ 8" 22" 22" 27 7/ 8" 22" 22" 27 77/ 8" (559mm) (559mm) (559mm) (559mm) 7/ 8" 27 7/ 8" (708mm) 27 7/ 8" 27 27 / 8 " (708mm) (708mm) (708mm) (559mm) (559mm) (559mm) (559mm) (708mm) (708mm) (708mm) (708mm) 4" 4" 4" 4" (102mm) (102mm) (102mm) (102mm) 4" 4" 4" 4" (102mm) (102mm) (102mm) (102mm) 27 7/ 8" 27 7/ 8" (708mm) (708mm) 1" 1" 1" 1" (25mm) (25mm) (25mm) (25mm) 22" 22" 22" 22" 27 7/ 8" (559mm) (559mm) 27 7/ 8" (559mm) (559mm) 27 7/ 8" (708mm) 27 7/ 8" (708mm) (708mm) (708mm) 22" 22" (559mm (559mm 4"(102mm)4"(102mm) 4"(102mm)4"(102mm) 4"(102mm)4" 4"(102mm)4" 6" (152mm) End Panel Dimensions – Self-Contained Floor Unit Ventilator Top View End View With No Cut-out IM 1083 16 5/ 8" 16 5/ 8" (422mm) (422mm) 16 5/ 8" 16 5/ 8" (422mm) (422mm) 6" 6" 6" 6" (152mm) (152mm) (152mm) (152mm) 19 5/ 8" 19 5/ 8" (498mm) (498mm) 19 5/ 8" 19 5/ 8" (498mm) (498mm) 6" 6" 6" 6" (152mm) (152mm) (152mm) (152mm) 21 7/ 8" 21 7/ 8" (556mm) (556mm) 21 7/ 8" 21 7/ 8" (556mm) (556mm) 6" 6" 6" 6" (152mm) (152mm) (152mm) (152mm) 27" 27" 27" 27" (686mm) (686mm) (686mm) (686mm) 27" 27" 27" 27" (686mm) (686mm) (686mm) (686mm) 27" 27" 27" 27" (686mm) (686mm) (686mm) (686mm) 3" (76mm)3" (76mm) 3" (76mm)3" (76mm) 3" (76mm)3" (76mm) 3" (76mm)3" (76mm) 3" (76mm)3" (76mm) 3" (76mm)3" (76mm) Self-Contained WSHP Unit Ventilator Models ARQ, ERQ, GRQ 28" 2 28" (711mm) (712 (711mm) (71 Page 37 of 42 Installing (Optional) End Panel Figure 71: Piping Stub-Up Details, 6" End Panel Piping Stub-up Within Cabinet Piping Stub-up Within 6" End Panel End Panel 6" Application and Dimension Unit End Compartment Unit End Compartment 6 1 Wall Line 11½ 1 Note: Space available in left end compartment for piping stub-up. Stub-up, including unions and shutoff valves, must disconnect below floor line for unit installation and removal. Wall Line 10¾ 4 Left End of unit (Less end panel) Space available at left end of unit for piping stub-up when 6" end panel is used. End Panel Assembly Accessory end panels are shipped separately with hardware and kickplate. The final step of unit installation is attaching the end panels. End panels are required unless the unit has adjoining matching cabinets. 1. Refer to Figure 72 for a 1" thick end panel. Attach two (2) Tinnerman nuts to the top edge of the end panel and two (2) to the bottom end of the unit. Align the end panel with the front and top edges of the unit. Insert through upper mounting holes inside unit end compartment and thread into tinnerman clips on the end panel. Attach the end panel to the unit using four (4) 5/32" hex socket head fasteners provided. Figure 72: 1" End Panel 21⅞" Unit Projection Left End of unit (Less end panel) All dimensions in inches 2. Refer to Figure 73 for 6" thick end panel. a. Position bracket (YC1934) on wall so angle is 5" from end of unit and near bottom. b. Mark and drill required hole for device to fasten bracket to wall (not included). c. Attach the bracket to wall. d. Attach two (2) Tinnerman nuts to the top edge of the end panel and one (1) to the bottom front of the end frame. e. Align the end panel with the front and top edges of the unit. Attach end panel to the unit using three (3) 5/32 " hex socket head fasteners provided. Bracket should prevent movement of panel toward the unit when pressure is applied to the end panel. Figure 73: 6" End Panel with Provided Hardware 5¼" Adapter Back Painted Top (Option) 21⅞" Unit Projection 1/4"- 20 × 1/2" Screw 1/4"- 20 × 1/2" Screw & 1/4" Flat Washer Tinnerman Nut, Clip on End Panel Tinnerman Nut, Clip on End Panel End of Unit Angle Bracket Welded for Rigidity 1" End Panel 1/4"- 20 Tinnerman Nut, Clip over Lower Hole in Unit Corner Bracket 1/4"- 20 Tinnerman Nut, Clip over Lower Hole in Unit Base Steel Kickplate Page 38 of 42 1/4"- 20 × 1/2" Screw 5" Bracket YC1934 6" End Panel Oxford Brown Kickplate, Factory Assembled to Base of End Panel Self-Contained WSHP Unit Ventilator Models ARQ, ERQ, GRQ IM 1083 Prepare Unit Ventilator for Start-up Post Installation Checklist □ Unit securely fastened to wall □ Electrical hook-up complete; power, control, wall thermostat (if applicable) in accordance with unit wiring diagram(s) □ Air filter clean and in place □ All access and end panels in place and protective covering removed □ No debris, dust, dirt, or obstructions exist in front of the return air intake grille at the floor □ All installation work has been completed in accordance with applicable local, state and national codes □ □ □ CAUTION When oiling the middle fan shaft bearing DO NOT allow oil to drip down on the components located below the bearing. Figure 74: Fan Shaft Bearing(s) Oil Cup Location(s) Room Air Fan Shaft Bearing Unit Size 048 Bearing, Located Between First and Second Fan from Left End of Unit Room air fan shaft bearing oiled Left Front Access Panel Unit square and level and running smoothly and quietly No air infiltration □ Paint nicks and scratches touched up (as required) □ Access space provided for maintenance, service and unit removal □ □ Shipping carton replaced over unit for protection □ Owner or maintenance personnel instructed on proper operation and maintenance Owner or maintenance personnel provided with a copy of this manual and other manuals/documents shipped with the unit. Oiling Do not attempt to operate the unit fans until the room air fan shaft bearing has been oiled. Access to fan shaft bearing is through left top access door. Use a high grade SAE 20 or 30 nondetergent mineral oil. A few drops are sufficient. Do not over oil. Refer to Figure 74 for the oil point. Note: Unit size 048 has a fan shaft bearing located between the first and second fan from the unit left end that is required to be oiled. IM 1083 WARNING Turn off unit before servicing to avoid danger of injury from rotating fans. NOTICE Motor manufacturer recommends not oiling the room fan motor. Filter(s) AAF®-HermanNelson® single-use filters are standard on all units. Permanent wire mesh and renewable media filters are available in lieu of single-use filters. • Single-use filters feature Amerglas media. They are designed to be used once and discarded. • Permanent filters are metal filters that may be removed for cleaning and reused numerous times. • Renewable media filters (figure 75) consist of a heavy painted metal structural frame and renewable Amerglas media. Self-Contained WSHP Unit Ventilator Models ARQ, ERQ, GRQ Page 39 of 42 Prepare for Start-up Turn off the unit (fan speed switch or unit on/off switch is located behind the right front end compartment panel). Remove the center front panel, pull out the filter and replace with a clean filter. Replace the center panel and restart the unit. Filters should be replaced during the first week of placing into service to prevent dirt carry-over into the internals of the unit and back into the classroom (see figure 75). A periodic filter changeout program should be established. Filters should be checked monthly or more often if conditions indicate. Filters are included in all units. CAUTION Units must have a filter installed when operating. Operation without a filter can compromise unit performance due to build up of dust and dirt on components. CAUTION Dirty or clogged filters can impact unit performance, and damage the unit. Figure 75: Filter Installation Renewable Media (Single-use and Permanent Wire Mesh Filters Also Available.) Motor CAUTION Filter Electric heat units should ONLY use permanent wire mesh filters. Filters other than wire mesh are not intended for electric heat units, and can cause unit damage, property damage or personal injury. Complete Check, Test and Start Procedure Provide completed Check, Test and Start form to your local AAF®HermanNelson® representative and specifying engineer for verification that proper start-up was completed. The form is enclosed in the manila envelope located behind the left front access door. CAUTION Remove debris, dust, dirt, and any obstruction from the area in front of the return air intake grille at the floor. 1. Before proceeding, inspect the fan system, to verify that all parts are aligned properly and move freely. Inspect fans and fan discharge area for obstructions. Verify that power has been disconnected. Rotate the fan assembly manually. Check that a clean filter is installed and the area in front of unit ventilator is free of debris. All panels should be in place and properly fastened. Check for outdoor air leaks and condensation. Verify that the coil section is properly sealed using the insulating foam donuts supplied. 2. After the unit ventilator has been properly installed, activate unit electrical power and applicable refrigerant systems. 3. Using the applicable control, activate the unit ventilator. Depending on the operating mode selected, the dampers, fans, and other components should operate as needed. 4. Run the unit ventilator for ten minutes, listening and observing. Fans should be operating correctly and rotating in the proper direction, without unusual noise. Likewise, the unit should be free of sheet metal rattles and / or unusual noises. All panels should be in place and properly fastened. Check for air leaks and condensation. Compressor should run without noise. If noisy, check electrical phases to verify that the compressor is rotating correctly. Phase reversal can damage the compressor and void the warranty. Page 40 of 42 Installer/Owner’s Responsibility Protect your investment - read carefully Your Daikin express written limited warranty does not cover equipment failures that are caused by misuse, abuse, mis-installation, failure to maintain the unit, etc. Here are a few examples of the types of damage not covered by warranty: 1. Damage resulting from handling during transportation or installation. 2. Damage to compressor resulting from improper electrical phase hook up. 3. Progressive damage to unit from failure to check and test at startup. 4. Damage to electronic or electrical components from incorrect or fluctuating power supply, stray static electricity, or building automation network inputs. 5. Inaccessibility of unit for service or parts installation that prevents proper equipment operation. 6. Damage to aluminum coils and electronic controls, etc., resulting from operating the unit while building maintenance cleaning agents are in use. 7. Damage resulting from freezing water or condensate, inadequate or interrupted water supply, use of corrosive water, rearrangement of unit piping system, fouling or restriction of the water circuit by foreign material. 8. Damage caused by not cleaning or replacing filters. 9. Damage resulting from failure to keep evaporator coil and intake clean. 10. Damage caused by accident, alteration of the unit design or tampering. Please complete and return the Check, Test and Start document immediately to protect your warranty. Self-Contained WSHP Unit Ventilator Models ARQ, ERQ, GRQ IM 1083 General Maintenance Troubleshooting The in and outs of R-410A R-410A is a non-ozone depleting blend of two refrigerants - HFC-125 and HFC-32 in a fifty percent mixture. R-410A exhibits higher operating pressure and refrigeration capacity than R-22. R-410A is intended for use in new air conditioning applications that have traditionally been used HCFC-22 (R-22). Due to higher capacity and pressure of R-410A, it must not be used in existing R-22 systems. Although R-410A is non-flammable at ambient temperature and atmospheric pressure, it can become combustible under pressure when mixed with air. Note: R-410A should not be mixed with air under pressure for leak testing. Pressure mixtures of dry nitrogen and R-410A can be used for leak testing. Lubrication R-410A should be used only with polyester (POE) oil. The HFC refrigerant components in R-410A will not be compatible with mineral oil or alkylbenzene lubricants. R-410A systems will be charged with the OEM recommended lubricant, ready for use with R-410A. Charging Due to the zeotropic nature of R-410A, it should be charged as a liquid. In situations where vapor is normally charged into a system, a valve should be installed in the charging line to flash the liquid to vapor while charging. 1. Normal maintenance on all units is generally limited to filter changes. Units are provided with permanently lubricated motors and require no oiling even though oil caps may be provided. 2. Filter changes are required at regular intervals. The time period between changes will depend upon the project requirements. Check filters at 60-day intervals for the first year until experience is acquired. If light cannot be seen through the filter when held up to sunlight or a bright light, it should be changed. A more critical standard may be desirable. 3. The condensate drain pan should be checked annually and cleaned and flushed as required. 4. Record performance measurements of volts, amps, and water temperature differences (both heating and cooling). A comparison of logged data with start-up and other annual data is useful as an indicator of general equipment condition. 5. Periodic lockouts almost always are caused by air or water problems. The lockout (shutdown) of the unit is a normal protective result. Check for dirt in the water system, water flow rates, water temperatures, airflow rates (may be a dirty filter), and air temperatures. If the lockout occurs in the morning following a return from night setback, entering air below machine limits may be the cause. 6. Oil fan shaft bearing periodically. ake certain that the recycle or recovery equipment used is designed M for R-410A. The pressure of R-410A refrigerant is approximately 60 percent greater than that of R-22. Pressure gauges require a range up to 800 PSIG high side and 250 PSIG low side. Recovery cylinders require a 400 PSIG rating – do not put R-410A in a 300 PSIG rated cylinder . Note: The units are designed for the cooling mode of operation and fail safe to cooling. The reversing valve is energized for the heating mode of operation. All information above is based on ISO standard 13256-1 and tested at these conditions. WARNING Recycle/recovery equipment must be designated for R-410A. R-410A pressure is greater than R-22. Improper equipment can cause severe injury or death. IM 1083 Self-Contained WSHP Unit Ventilator Models ARQ, ERQ, GRQ Page 41 of 42 Table 15: Troubleshooting Refrigeration Circuit Super Heat Subcooling Air Temp Differential Water (loops) Temp Differential Safety Lock Out Low High Low Low Low Low Temp High High Normal High Normal High Pressure High High High High Normal Low High Low High Pressure Low Low Low Normal High High Low Low Temp Low Water Flow Heating Low Normal Low Normal Low Low High Low High Low Temp Low Water Flow Cooling High High High High Low Low High High Pressure High Air Flow Heating Low Low Low Low High Low Low Low Temp High Air Flow Cooling Low High Normal High Low Low Normal High Pressure High Water Flow Heating Normal Low Normal High Normal Normal Low High Pressure High Water Flow Cooling Low Low Low Low High Normal Low Low Temp TXV Restricted High Low High High Low Low Low Temp Head Pressure Suction Pressure Charge Undercharge System (Possible Leak) Low Low Overcharge System High Low Air Flow Heating Low Air Flow Cooling Symptom Compressor Amp Draw Normal Low Normal Low Daikin Training and Development Now that you have made an investment in modern, efficient Daikin equipment, its care should be a high priority. For training information on all Daikin HVAC products, please visit us at www.DaikinApplied.com and click on training, or call 540-248-9646 and ask for the Training Department. Warranty All Daikin equipment is sold pursuant to its standard terms and conditions of sale, including Limited Product Warranty. Consult your local Daikin Representative for warranty details. Refer to Form 933430285Y. To find your local Daikin Representative, go to www.DaikinApplied.com. Aftermarket Services To find your local parts office, visit www.DaikinApplied.com or call 800-37PARTS (800-377-2787). To find your local service office, visit www.DaikinAPcom or call 800-432-1342. This document contains the most current product information as of this printing. For the most up-to-date product information, please go to www.DaikinApplied.com. Products manufactured in an ISO Certified Facility. © 2013 Daikin Applied • www.DaikinApplied.com • (800) 432–1342 IM 1083 (10/13)