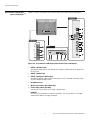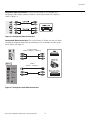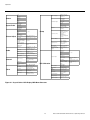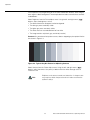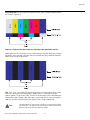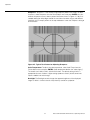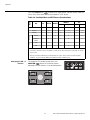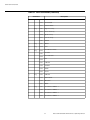
1
O W N E R ’S O P E R A T I N G M A N U A L
CR-26HD
CR-32HDi
High-Definition, Liquid-Crystal Display (LCD) Panels
with
ONE YEAR LIMITED WARRANTY
For LCD Displays
Congratulations on your purchase of a Runco video product and welcome to the Runco family! We believe Runco produces
“The World’s Finest Home Theater Products.” With proper installation, setup and care, you should enjoy many years of
unparalleled video performance.
This is a LIMITED WARRANTY as defined in the Magnuson-Moss Warranty Act. Please read it carefully and retain it with your
other important documents.
Y
WHAT IS COVERED UNDER THE TERMS OF THIS LIMITED WARRANTY:
EL
IM
IN
A
R
SERVICE LABOR: Runco will pay for service labor by a Runco Authorized Service Center when needed as a result of a
manufacturing defect for a period of one (1) year from the effective date of delivery to the end user.
PARTS: Runco will provide new or rebuilt replacement parts for the parts that fail due to defects in materials or workmanship
for a period of one (1) year from the effective date of delivery to the end user. Such replacement parts are then subsequently
warranted for the remaining portion (if any) of the original warranty period.
WHAT IS NOT COVERED UNDER THE TERMS OF THIS LIMITED WARRANTY:
Image retention on LCD display panels is specifically excluded from coverage under this Limited Warranty. Image retention or
staining of an image is the result of misuse of the product and therefore cannot be repaired under the terms of this Limited
Warranty.
Normal viewing material such as television/satellite broadcasts, videotape or DVDs (not put into pause for extended periods of
time) will not cause damage to your display under normal conditions. Many DVD players are also equipped with screen savers
for this reason.
PR
TO AVOID IMAGE RETENTION (Burn-in): Please ensure that still images are not left on your LCD display panel. Also
ensure that images displayed in the 4:3 aspect ratio mode (black or gray stripes, but no picture information is present on the
left and right edges of the screen) are used as infrequently as possible. This will prevent permanent retention on your LCD
display panel, which can be seen permanently under certain conditions once burn-in has occurred.
The types of images to avoid include video games, still images and computer screens with stationary tool bars and icons. (This
is why computers are equipped with screen savers – to prevent still images from burning into the monitor’s phosphors after
being displayed continuously for an extended period of time).
This Limited Warranty only covers failure due to defects in materials and workmanship that occur during normal use and does
not cover normal maintenance. This Limited Warranty does not cover cabinets or any appearance items; failure resulting from
accident, misuse, abuse, neglect, mishandling, misapplication, faulty or improper installation or setup adjustments; improper
maintenance, alteration, improper use of any input signal; damage due to lightning or power line surges, spikes and
brownouts; damage that occurs during shipping or transit; or damage that is attributed to acts of God. In the case of remote
control units, damage resulting from leaking, old, damaged or improper batteries is also excluded from coverage under this
Limited Warranty.
CAUTION: THIS LIMITED WARRANTY ONLY COVERS RUNCO PRODUCTS PURCHASED FROM RUNCO AUTHORIZED
DEALERS. ALL OTHER PRODUCTS ARE SPECIFICALLY EXCLUDED FROM COVERAGE UNDER THIS LIMITED
WARRANTY. MOREOVER, DAMAGE RESULTING DIRECTLY OR INDIRECTLY FROM IMPROPER INSTALLATION OR SETUP
IS SPECIFICALLY EXCLUDED FROM COVERAGE UNDER THIS LIMITED WARRANTY. IT IS IMPERATIVE THAT
INSTALLATION AND SETUP WORK BE PERFORMED ONLY BY AN AUTHORIZED RUNCO DEALER TO PROTECT YOUR
RIGHTS UNDER THIS WARRANTY. THIS WILL ALSO ENSURE THAT YOU ENJOY THE FINE PERFORMANCE OF WHICH
YOUR RUNCO PRODUCT IS CAPABLE WHEN INSTALLED AND CALIBRATED BY RUNCO AUTHORIZED PERSONNEL.
Runco CR-26HD/CR-32HDi Owner’s Operating Manual
iii
RIGHTS, LIMITS AND EXCLUSIONS:
Runco limits its obligations under any implied warranties under state laws to a period not to exceed the warranty period. There
are no express warranties. Runco also excludes any obligation on its part for incidental or consequential damages related to
the failure of this product to function properly. Some states do not allow limitations on how long an implied warranty lasts, and
some states do not allow the exclusion or limitation of incidental or consequential damages. So the above limitations or
exclusions may not apply to you. This warranty gives you specific legal rights, and you may also have other rights that vary from
state to state.
Y
EFFECTIVE WARRANTY DATE:
EL
IM
IN
A
R
This warranty begins on the effective date of delivery to the end user. For your convenience, keep the original bill of sale as
evidence of the purchase date.
IMPORTANT – WARRANTY REGISTRATION:
Please fill out and mail your warranty registration card. It is imperative that Runco knows how to reach you promptly if we
should discover a safety problem or product update for which you must be notified.
CONTACT A RUNCO AUTHORIZED SERVICE CENTER TO OBTAIN SERVICE:
PR
Repairs made under the terms of this Limited Warranty covering your Runco video product will be performed at the location of
the product, during usual working hours, providing location of product is within normal operating distance from a Runco
Authorized Service Center. In some instances it may be necessary for the product to be returned to the Runco factory for
repairs. If, solely in Runco’s judgment, location of product to be repaired is beyond normal operating distance of the closest
Runco Authorized Service Center, or the repair requires the unit be returned to the Runco factory, it is the owner’s
responsibility to arrange for shipment of the product for repair. These arrangements must be made through the selling Runco
Dealer. If this is not possible, contact Runco directly for a Return Authorization number and shipping instructions. Runco will
return product transportation prepaid in the United States, unless no product defect is discovered. In that instance, shipping
costs will be the responsibility of the owner.
COPYRIGHT AND TRADEMARKS:
© Copyright 2007 Runco International. This document contains proprietary information protected by copyright, trademark and
other intellectual property laws. All rights are reserved. No part of this manual may be reproduced by any mechanical,
electronic or other means, in any form, without prior written permission of the manufacturer.
Reflection, Enhanced GEN3, DHD, Vivix, Virtual Cinema, CineWide, AutoScope, O-Path, CinOptx, LiveLink, CSMS, SuperOnyx
and VirtualWide are trademarks of Runco International. All other trademarks and registered trademarks used in this document
are the property of their respective owners.
Runco International products are manufactured under one or more of the following patents: US. Patent 6755540 and Other
Patents Pending.
iv
Runco CR-26HD/CR-32HDi Owner’s Operating Manual
ADDITIONAL INFORMATION:
To locate the name and address of the nearest Runco Authorized Service Center, or for additional information about this
Limited Warranty, please call or write:
EL
IM
IN
A
R
Y
RUNCO INTERNATIONAL, INC.
Attn: Customer Service Department
2900 Faber Street
Union City, CA 94587
Ph: (510) 324-7777
Fax: (510) 324-9300
Toll Free: (800) 23-RUNCO
RUNCO VIDEO-PRODUCT INFORMATION
RETAIN THIS INFORMATION FOR YOUR RECORDS
_________________________________________________________
________________________________________
Model Purchased
Date
Serial Number
PR
____________________________________________________________________________________________________________
____________________________________________________________________________________________________________
Runco Authorized Dealer Name
____________________________________________________________________________________________________________
Address
____________________________________________
__________________
________________________
City
State/Province
Postal Code
____________________________________________
_______________________________________________________
Phone
Fax
Runco CR-26HD/CR-32HDi Owner’s Operating Manual
v
Important Safety Instructions
Thank you for your purchase of this quality Runco product! For best performance, please read this manual carefully as it is your
guide through the menus and operation.
1. Read these instructions.
2. Keep these instructions.
3. Heed all warnings.
4. Follow all instructions.
This symbol is intended to alert the user to the presence of
important operating and maintenance (servicing) instructions in the
literature accompanying the appliance.
EL
IM
IN
A
R
CAUTION:
TO REDUCE THE RISK OF ELECTRIC SHOCK
DO NOT REMOVE COVER (OR BACK)
NO USER SERVICEABLE PARTS INSIDE.
REFER SERVICING TO QUALIFIED
SERVICE PERSONNEL.
Y
CAUTION
RISK OF ELECTRIC SHOCK
DO NOT OPEN
WARNING
This symbol is intended to alert the user to the presence of
uninsulated “dangerous voltage” within the product’s enclosure
that may be of sufficient magnitude to constitute a risk of electric
shock.
5. Do not use this apparatus near water.
6. Clean only with a dry cloth.
7. Do not block any of the ventilation openings. Install in accordance with the manufacturer’s instructions.
8. Do not install near any heat sources such as radiators, heat registers, stoves, or other apparatus (including amplifiers) that
produce heat.
PR
9. Do not defeat the safety purpose of the polarized or grounding type plug. A polarized plug has two blades with one wider
than the other. A grounding type plug has two blades and a third grounding prong. The wide blade or the third prong is
provided for your safety. When the provided plug does not fit into your outlet, consult an electrician for the replacement of
the obsolete outlet.
10. Protect the power cord from being walked on or pinched particularly at plugs, convenience receptacles and the point
where they exit from the apparatus.
11. Only use the attachments/accessories specified by Runco.
12. Use only with a cart, stand, tripod, bracket or table specified by the manufacturer or sold with the apparatus.
When a cart is used, use caution when moving the cart/apparatus to avoid injury from tip-over.
13. Unplug this apparatus during lightning storms or when unused for long periods of time.
14. Refer all servicing to qualified service personnel. Servicing is required when the apparatus has been damaged in
any way, such as power supply cord or plug is damaged, liquid has been spilled or objects have fallen into the apparatus,
the apparatus has been exposed to rain or moisture, does not operate normally, or has been dropped.
vi
Runco CR-26HD/CR-32HDi Owner’s Operating Manual
Compliance Information
DECLARATION OF CONFORMITY:
Manufacturer’s Name: Runco International, a subsidiary of Planar Systems, Inc.
Manufacturer’s Address: 2900 Faber Street, Union City, CA 94587
Y
hereby declares that the products Model Numbers:
conform with the provisions of:
EL
IM
IN
A
R
CR-26HD, CR-32HDi
Council Directive 2004/108/EC on Electromagnetic Compatibility;
EN 55022 “Limits and methods of measurements of radio interference characteristics of information technology equipment”
1998;
EN 55024 “Limits and methods of measurements of immunity characteristics of information technology equipment” 1998;
Including:
• EN 61000-4-2 “Electromagnetic compatibility (EMC) Part 4: Testing and measurement techniques Section 2:
Electrostatic discharge immunity test”
• EN 61000-4-3 “Electromagnetic compatibility (EMC) Part 4: Testing and measurement techniques Section 3: Radiated,
Radio-Frequency, Electromagnetic Field Immunity Test”
• EN 61000-4-4 “Electromagnetic compatibility (EMC) Part 4: Testing and measurement techniques Section 4: Electrical
fast transient/burst immunity test”
PR
• EN 61000-4-5 "Electromagnetic compatibility (EMC) Part 4: Testing and measurement techniques Section 5: Surge
immunity test"
• EN 61000-4-6 "Electromagnetic compatibility (EMC) Part 4: Testing and measurement techniques Section 6: Conducted
disturbances induced by radio-frequency fields immunity test"
• EN 61000-4-8 "Electromagnetic compatibility (EMC) Part 4: Testing and measurement techniques Section 8: Conducted
disturbances induced by power frequency magnetic fields immunity test"
• EN 61000-4-11 "Electromagnetic compatibility (EMC) Part 4: Testing and measurement techniques Section 11: Voltage
dips, short interruptions and voltage variations immunity tests"
And:
• EN 61000-3-2 "Electromagnetic compatibility (EMC) Part 3, Section 2: Limits for harmonic current emissions (equipment
input current up to and including 16 A per phase)" 2000;
• EN 61000-3-3 "Electromagnetic compatibility (EMC) Part 3, Section 3: Limitations of voltage changes, voltage
fluctuations and flicker in public low-voltage supply systems, for equipment with rated current up to and including 16 A
and not subject to conditional connection" 1995;
Council Directive 2006/95/EC and amended by M1 and C1 on Low Voltage Equipment Safety;
EN 60950 “Safety of information technology equipment, including electrical business equipment”
The Technical Construction file required by this Directive is maintained at the corporate headquarters of Planar Systems, Inc.,
1195 NW Compton Drive, Beaverton, OR 97006.
Date of Declaration: October 2007
Runco CR-26HD/CR-32HDi Owner’s Operating Manual
vii
FCC PART 15:
NOTE: This equipment has been tested and found to comply with the limits for a Class B digital device, pursuant to Part 15 of
the FCC Rules. These limits are designed to provide reasonable protection against harmful interference in a residential
installation.
• Reorient or relocate the receiving antenna.
EL
IM
IN
A
R
• Increase the separation between the equipment and receiver.
Y
This equipment generates, uses and can radiate radio frequency energy and, if not installed and used in accordance with the
instructions, may cause harmful interference to radio communications. However, there is no guarantee that interference will not
occur in a particular installation. If this equipment does cause harmful interference to radio or television reception, which can be
determined by turning the equipment off and on, the user is encouraged to try to correct the interference by one or more of the
following measures:
• Connect the equipment into an outlet on a circuit different from that to which the receiver is connected.
• Consult the dealer or an experienced radio/TV technician for help.
INDUSTRY CANADA (ICES-003):
This Class B digital apparatus complies with Canadian ICES-003.
Cet appareil numérique de la classe B est conforme à la norme NMB-003 du Canada.
IMPORTANT RECYCLE INSTRUCTIONS
Lamp(s) inside this product contain mercury. This product may contain other electronic waste that can be
hazardous if not disposed of properly. Recycle or dispose in accordance with local, state, or federal Laws.
PR
For more information, contact the Electronic Industries Alliance at WWW.EIAE.ORG.
For lamp specific disposal information check WWW.LAMPRECYCLE.ORG.
DISPOSAL OF OLD ELECTRICAL AND ELECTRONIC EQUIPMENT (Applicable throughout the European
Union and other European countries with separate collection programs)
This symbol found on your product or on its packaging, indicates that this product should not be treated as
household waste when you wish to dispose of it. Instead, it should be handed over to an applicable collection
point for the recycling of electrical and electronic equipment. By ensuring this product is disposed of correctly,
you will help prevent potential negative consequences to the environment and human health, which could
otherwise be caused by inappropriate disposal of this product. The recycling of materials will help to conserve
natural resources. This symbol is only valid in the European Union. If you wish to discard this product, please
contact your local authorities or dealer and ask for the correct method of disposal.
viii
Runco CR-26HD/CR-32HDi Owner’s Operating Manual
1
Table of Contents
ONE YEAR LIMITED WARRANTY .................................................................................. iii
Important Safety Instructions ........................................................................................ vi
Compliance Information ............................................................................................... vii
1. Introduction ...............................................................................................................1
Y
About This Manual .......................................................................................................1
EL
IM
IN
A
R
Target Audience .....................................................................................................1
If You Have Comments About This Manual... ..........................................................1
Textual and Graphic Conventions ...........................................................................1
Using This Manual ........................................................................................................2
Description, Features and Benefits ...............................................................................3
Key Features and Benefits ......................................................................................3
Parts List ...............................................................................................................4
2. Controls and Functions ............................................................................................5
Crystal Series LCD Display at a Glance ........................................................................5
Controls and Indicators...........................................................................................5
Crystal Series LCD Display Inputs and Outputs.......................................................6
PR
Crystal Series LCD Display Remote Control .................................................................8
3. Installation ...............................................................................................................13
Remote Control ..........................................................................................................13
Battery Installation ................................................................................................13
Notes on Remote Control Operation .....................................................................13
Quick Setup ...............................................................................................................14
Installation Considerations ..........................................................................................15
Wall-Mounting the Crystal Series LCD Display ......................................................15
Ambient Light .......................................................................................................15
Other Considerations ............................................................................................15
Connections to the Crystal Series LCD Display ...........................................................16
Rear Connector Access........................................................................................16
Connecting the Crystal Series LCD Display to Source Components......................16
MONITOR OUT Connection..................................................................................20
Connecting Headphones ......................................................................................20
RS-232 Controller Connection ..............................................................................21
Runco CR-26HD/CR-32HDi Owner’s Operating Manual
ix
4. Operation .................................................................................................................23
Turning on the Power .................................................................................................23
Changing the OSD Language .....................................................................................23
Setting the PC Display Properties ...............................................................................24
Using the On-Screen Menus ......................................................................................25
Main Menu ...........................................................................................................27
Source .................................................................................................................27
Aspect Ratio ........................................................................................................27
Y
Picture Adjust .......................................................................................................29
EL
IM
IN
A
R
Audio ...................................................................................................................33
Channel ...............................................................................................................34
Timer ...................................................................................................................34
Setup....................................................................................................................35
ISF Calibration .....................................................................................................38
Using Picture-In-Picture (PIP) .....................................................................................41
Changing the PIP Position ....................................................................................42
Changing the PIP Size ..........................................................................................43
Changing the PIP Aspect Ratio .............................................................................43
Changing the PIP Image Mode .............................................................................43
Swapping the Main and PIP Images .....................................................................44
PR
Swapping the Main and PIP Audio Programs........................................................44
Stereo Sound/SAP .....................................................................................................45
5. Maintenance and Troubleshooting ........................................................................47
Cleaning .....................................................................................................................47
Cleaning the Display Panel Body and Remote Control ..........................................47
Cleaning the Screen..............................................................................................47
Cleaning the Vents................................................................................................47
Troubleshooting Tips ..................................................................................................47
6. Serial Communications ..........................................................................................49
RS-232 Connection and Port Configuration ...............................................................49
Serial Command Syntax .............................................................................................49
7. Specifications ..........................................................................................................53
Crystal Series LCD Display Specifications ...................................................................53
Crystal Series LCD Display Dimensions ......................................................................54
Computer/Video Signal Compatibility .........................................................................56
x
Runco CR-26HD/CR-32HDi Owner’s Operating Manual
1
List of Figures
2-1. Crystal Series LCD Display Controls and Indicators ......................................................5
2-2. Crystal Series LCD Display Rear-Panel Inputs and Outputs ..........................................6
2-3. Crystal Series LCD Display Remote Control..................................................................8
3-1. Antenna/Cable TV Connection ...................................................................................16
3-2. DVI Connections ........................................................................................................17
3-3. Analog RGB Connections...........................................................................................18
3-4. Component Video Connections..................................................................................19
3-5. Composite and S-Video Connections.........................................................................19
3-6. Monitor Output Connections ......................................................................................20
3-7. Connecting Headphones............................................................................................20
3-8. RS-232 Control System Connection...........................................................................21
4-1. Crystal Series LCD Display OSD Menu Structure........................................................26
4-2. Typical PLUGE Pattern for Adjusting Brightness .........................................................29
4-3. Typical Gray Bar Pattern for Adjusting Contrast ..........................................................30
4-4. Typical Color Bar Pattern for Adjusting Color Saturation and Tint................................31
4-5. Typical Test Pattern for Adjusting Sharpness..............................................................32
4-6. Crystal Series LCD Display Splash Screen..................................................................40
7-1. CR-26HD Dimensions ................................................................................................54
7-2. CR-32HDi Dimensions ...............................................................................................55
Runco CR-26HD/CR-32HDi Owner’s Operating Manual
xi
List of Figures
Notes:
xii
Runco CR-26HD/CR-32HDi Owner’s Operating Manual
1. Introduction
1.1
About This Manual
Runco has prepared this manual to help home theater installers and end users get the
most out of the Crystal Series LCD Display.
Target Audience
Y
This Owner’s Manual describes how to install, set up and operate the Runco CR-26HD
and CR-32HDi LCD Displays. Throughout this manual, the Runco CR-26HD and
CR-32HDi LCD Displays are referred to simply as the “Crystal Series LCD Display.”
EL
IM
IN
A
R
Runco has made every effort to ensure that this manual is accurate as of the date it was
printed. However, because of ongoing product improvements and customer feedback, it
may require updating from time to time. You can always find the latest version of this and
other Runco product manuals on-line, at www.runco.com.
Runco welcomes your comments about this manual. Send them to [email protected].
If You Have Comments
About This Manual...
Text Conventions: The following conventions are used in this manual, in order to clarify
the information and instructions provided:
Textual and Graphic
Conventions
• Remote control button identifiers are set in upper-case bold type; for example, “Press
EXIT to return to the previous menu.”
• Computer input (commands you type) and output (responses that appear on-screen) is
shown in monospace (fixed-width) type; for example: “To change the aspect ratio to
Letterbox, type [S4E0002.”
PR
• All keys with functional names are initial-capped, set in bold type and enclosed in angle
brackets. These keys are the following: <Enter>, <Spacebar>, <Control>, <Esc>
and <Tab>.
• <Enter> indicates that you may press either the RETURN or ENTER key on your
computer keyboard if it has both keys.
In addition to these conventions, underlining, boldface and/or italics are occasionally used
to highlight important information, as in this example:
Note
A carriage return must be used after each command or string.
Runco CR-26HD/CR-32HDi Owner’s Operating Manual
1
Introduction
Graphic Conventions: These symbols appear in numerous places throughout the
manual, to emphasize points that you must keep in mind to avoid problems with your
equipment or injury:
Note
NOTES emphasize text with unusual importance or special
significance. They also provide supplemental information.
Caution
CAUTIONS alert users that a given action or omitted action can
degrade performance or cause a malfunction.
Y
TIPS highlight time-saving short cuts and helpful guidelines for using
certain features.
EL
IM
IN
A
R
1.2
Using This Manual
Tip
WARNING
WARNINGS appear when a given action or omitted action can result
in damage to the equipment, or possible non-fatal injury to the user.
DANGER!
DANGER appears when a given action can cause severe injury or
death.
Use the following table to locate the specific information you need in this manual.
PR
If you need...
... Turn to page:
Information about obtaining service
iv
General information about the CR-26HD and
CR-32HDi LCD Displays
3
Installation instructions
13
First-time configuration instructions
23
Advanced configuration instructions
38
Troubleshooting tips
47
Specifications for the CR-26HD and CR-32HDi
LCD Displays
53
2
Runco CR-26HD/CR-32HDi Owner’s Operating Manual
Introduction
Runco presents the high performance CR-26HD and CR-32HDi LCD Displays, perfect for
those who demand our award-winning flat panel performance in a more intimate size than
we offer with our larger plasma monitors. The Crystal Series LCD Displays are ideal for
close-in viewing where picture quality remains a high priority, but larger displays cannot be
accommodated.
1.3
Description, Features
and Benefits
Y
The Crystal Series LCD Display CR-26HD and CR-32HDi LCD Displays incorporate the
superb Vivix™ digital video processing that produces outstanding picture quality with a
wide range of both standard and high definition source material. In addition, the
handsome, gloss black-finish television is engineered with ISF™ calibration standards for
the purest video performance.
EL
IM
IN
A
R
The CR-26HD and CR-32HDi LCD Displays also feature a built-in ATSC tuner that
receives terrestrial DTV broadcasts, in addition to an advanced, 185 channel, cable-ready
NTSC stereo tuner. The Crystal Series LCD Display offers PIP, PBP, closed captioning,
Parental Control (V-Chip) functionality and multi-language support. The display includes
an integrated stereo audio system incorporating surround sound technology with two-way
speakers and generous power amplification.
The advanced TFT active-matrix LCD display panel offers 1366 x 768 resolution and
includes Runco’s discrete aspect ratio control with VirtualWide™ mode to fill the 16:9
screen with standard 4:3 images without loss of picture quality. Also included are discrete
source, aspect ratio and power selection and an RS-232 interface for whole house or
automated control system integration.
The Crystal Series LCD Display is multimedia ready, with simple computer connections
making gaming, Internet browsing and other computer activities quick and easy.
The Crystal Series LCD Display offers these key features and benefits:
PR
• Native Resolution: 1366 x 768 (16:9 Native Aspect Ratio)
• Multiple Aspect Ratios with VirtualWide™ Mode
• Less than 4 inches thin
• DVI Input with High-bandwidth Digital Content Protection (HDCP)
• Built-in HDTV Tuner
• Exceptional detail and artifact-free video enhancement
• Runco video processing with 3:2 film detection circuitry
Runco CR-26HD/CR-32HDi Owner’s Operating Manual
3
Key Features and Benefits
Introduction
Parts List ➤
Your Crystal Series LCD Display is shipped with the following items. If any items are
missing or damaged, please contact your Runco dealer or Runco Customer Service at
(800) 23-RUNCO.
• CR-26HD or CR-32HDi LCD Display (with Table Stand)
• Remote Control Unit and two (2), AAA-size batteries
• AC Power Cord
• Warranty information and registration card
• Runco CR-26HD/CR-32HDi Owner’s Operating Manual (this document)
Optional Accessories:
PR
EL
IM
IN
A
R
Y
• Wall Mount kit
4
Runco CR-26HD/CR-32HDi Owner’s Operating Manual
2.
Controls and Functions
2.1
Crystal Series LCD
Display at a Glance
EL
IM
IN
A
R
Y
Figure 2-1 shows the locations of the Crystal Series LCD Display controls and indicators.
Right Side
TV/AV
1
2
3
8
5
PR
4
7
6
Figure 2-1. Crystal Series LCD Display Controls and Indicators
1. TV/AV Button (Input Source Selection)
2. MENU Selection Button
3. Volume Adjustment Buttons
4. Channel Selection Buttons
5. Remote Control Sensor
6. Power Button
7. Power Indicator
Lights red to indicate that the Crystal Series LCD Display is in standby mode; lights
green to indicate normal operation; flashes green when the Crystal Series LCD
Display receives a signal from the remote control.
8. Speakers
Runco CR-26HD/CR-32HDi Owner’s Operating Manual
5
Controls and Indicators
Controls and Functions
Crystal Series LCD Display ➤
Inputs and Outputs
Figure 2-2 shows the locations of the Crystal Series LCD Display inputs and outputs.
SERVICE
Left Side
17
EL
IM
IN
A
R
19
INPUT1
18
MONITOR-OUT
Y
16
15
14
Right Side
13
12
INPUT3
R S-VIDEO
Rear
1
11
ANT
2
VIDEO L
Audio
INPUT2
3
10
4
5 6
7
8
9
PR
Figure 2-2. Crystal Series LCD Display Rear-Panel Inputs and Outputs
1. INPUT 2 S-Video Input
Standard S-Video input for connecting a DVD player, satellite receiver or Super VHS
(S-VHS) VCR.
2. INPUT 2 Audio Input
3. INPUT 2 Composite Video Input
Standard composite video input for connecting a VCR, camcorder, laser disc player
or other composite video source.
4. Headphone Jack
5. Main Power Switch (CR-32HDi only)
6. Power Input (100 to 240 VAC)
Connect the Crystal Series LCD Display to power here.
7. RGB HD
A 15-pin VGA connection to a personal computer. The Crystal Series LCD Display
automatically detects the signal resolution.
6
Runco CR-26HD/CR-32HDi Owner’s Operating Manual
Controls and Functions
8. DVI/Computer Input (Digital)
HDCP-compliant digital video input for connecting a DVD player, personal computer
or HD tuner with a DVI or HDMI output.
Tip
For best results, do not run your DVD player in progressive mode.
9. Audio Input (RGB/DVI)
Connect the audio output from your RGB or DVI source here.
Y
10. ATSC DTV Input
75-ohm coaxial input for connecting a TV antenna or CATV system to the digital TV
tuner.
EL
IM
IN
A
R
11. INPUT 3 Component Video (RCA connectors)
Standard-definition (480i/576i) or high-definition (720p/1080i), YPrPb component
input. This is the input for component video from sources such as DVD players.
12. INPUT 3 Composite Video Input
13. INPUT 3 Audio Input
Connect the audio output from your Input 3 source here.
14. INPUT 1 COMPOSITE VIDEO INPUT
15. INPUT 1 Audio Input
Connect the audio output from your Input 1 source here.
16. INPUT1 S-Video Input
17. RS-232 CONTROL PORT
A male, 9-pin D-sub connector for interfacing with a PC or home theater
automation/control system.
PR
18. MONITOR-OUT (Audio)
19. MONITOR-OUT (Composite Video)
Runco CR-26HD/CR-32HDi Owner’s Operating Manual
7
Controls and Functions
2.2
Crystal Series LCD
Display Remote
Control
Figure 2-3 shows the Crystal Series LCD Display remote control, and the paragraphs that
follow describe its functionality.
OFF
ON
1
2
3
4
5
6
Y
1
EL
IM
IN
A
R
2
7
8
9
-
0
100
SOURCE
INPUT
1
SLEEP
INPUT
2
INPUT
3
TIMER
OFF
3
4
DVI
RGB
HD
SLEEP
MEMORY
CUST
ISF
NT
TV
ISF
DAY
5
ASPECT RATIO
6
ANA
LET
BOX
4X3
VWIDE
PR
CHANNEL UP
VOL -
8
10
12
MENU
ENTER
VOL +
CHANNEL DOWN
EXIT
ASPECT
SIZE
POSITION
PIP
P.MODE
S.SWAP
SWAP
TV/AV
HOLD
SUB PAGE
CANCEL
TEXT
S.MODE
SURRND
MTS/SAP
MUTE
REVEAL
SIZE
MIX
INDEX
FC1
FC2
FC3
FC4
7
9
11
Figure 2-3. Crystal Series LCD Display Remote Control
8
Runco CR-26HD/CR-32HDi Owner’s Operating Manual
Controls and Functions
1. OFF / ON
Use these buttons to turn the Crystal Series LCD Display on or off.
2. Numeric Buttons
Use these buttons to enter TV channel numbers or menu pass codes. Use the 100
button to enter channel numbers above 99. Use the - button to enter DTV
sub-channel numbers.
3. TIMER OFF Button
Press this button to set the sleep timer. Press it repeatedly to scroll through the
available options (Off, 10, 30, 60, 120 or 180 minutes).
4. Source Selection Buttons:
EL
IM
IN
A
R
Y
INPUT 1
Press this button to switch to Input 1.
INPUT 2
Press this button to switch to Input 2.
INPUT 3
Press this button to switch to Input 3.
DVI
Press this button to switch to the Digital Video input.
RGB HD
Press this button to switch to the RGB HD input.
TV
Press this button to switch to the Antenna/DTV/CATV input.
Input 1 and Input 2 have both S-Video and composite video
connectors. Input 3 has both component and composite video
connectors.
PR
Note
To specify which connection type you are using – or to switch from
one to the other if equipment is connected to both – use the Input
Selection menu under Setup (refer to Input Selection on page 37).
5. Memory Preset Buttons:
CUST
Press to recall settings for the current input from the “Custom” memory preset.
ISF NT (Night)
Press to recall settings for the current input from the “ISF Night” memory preset.
ISF DAY
Press to recall settings for the current input from the “ISF Day” memory preset.
Runco CR-26HD/CR-32HDi Owner’s Operating Manual
9
Controls and Functions
6. Aspect Ratio Selection Buttons:
ANA (Anamorphic)
For 16:9 DVDs or HDTV program material.
4X3 (Standard 4:3)
The input signal is scaled to fit 4:3 display mode in the center of the screen.
LETBOX (Letterbox)
Image in letterbox format is enlarged to fit 16:9 full screen display and the upper/lower
portions are “blanked off.”
Y
VWIDE (VirtualWide)
4:3 image is enlarged NON-linearly in horizontal direction to fit 16:9 full screen display.
EL
IM
IN
A
R
7. Arrow Buttons ( , , , )
Use these buttons to select items or settings, adjust settings, change TV channels or
adjust sound volume.
ENTER
Press to select a highlighted menu item or confirm a changed setting.
8. MENU
Press this button to access the on-screen display (OSD) controls, or to exit the
current menu and return to the previous one.
9. EXIT
Press this button to hide the OSD controls, or display program information (when
available) if the OSD controls are already hidden.
PR
10. Picture-In-Picture (PIP) Function Buttons
ASPECT
Press to change the aspect ratio of the PIP window from 4:3 to 16:9 or vice versa.
SIZE
Press to choose from three PIP window sizes.
POSITION
Press to choose the PIP window position (top left, top right, bottom left or bottom
right corner).
PIP
Press to change the PIP mode (picture-in-picture, picture-by-picture or off).
P.MODE
Press to recall settings for the PIP input from either the “ISF Night” or “ISF Day”
memory preset.
S.SWAP
Press to switch between the main and PIP audio programs.
SWAP
Press to swap the main and PIP windows.
TV/AV
Press to switch to a different PIP video source.
10
Runco CR-26HD/CR-32HDi Owner’s Operating Manual
Controls and Functions
11. Sound Control Buttons:
S.MODE
Press this button repeatedly to scroll through the available Equalizer presets
(CUSTOM, STANDARD, MUSIC, FILM or SPEECH).
SURRND (Surround)
Press this button to turn Surround Mode on or off.
Y
MTS/SAP (Multichannel Television Sound/Second Audio Program)
Press this button repeatedly to scroll through the available MTS settings (MONO,
STEREO, SAP or Mono+SAP).
EL
IM
IN
A
R
MUTE
Press this button to mute the audio output.
PR
12. Favorite Channel Selection Buttons
Use these buttons to select stored favorite channels. To store favorite channels,
select Favorite Channel from the Channel menu (described in Section 4).
Runco CR-26HD/CR-32HDi Owner’s Operating Manual
11
Controls and Functions
PR
EL
IM
IN
A
R
Y
Notes:
12
Runco CR-26HD/CR-32HDi Owner’s Operating Manual
3. Installation
3.1
Remote Control
To install batteries in the remote control:
Battery Installation
1. Slide the battery cover in the direction of the arrow and remove it.
EL
IM
IN
A
R
3. Slide the battery cover back on until it snaps into place.
Note
and
Y
2. Insert the included batteries. Ensure that the polarities correctly match the
markings inside the battery compartment.
1. Do not mix an old battery with a new one or different types of
batteries.
2. If you will not use the remote control for a long time, remove the
batteries to avoid damage from battery leakage.
• Do not drop the remote control or expose it to moisture or high temperature.
• The remote control may malfunction under a fluorescent lamp. If that occurs, move the
LCD display away from the fluorescent lamp.
Note
PR
• Make sure that there is nothing obstructing the infrared beam between the remote
control and the IR receiver on the LCD display.
The signal from the remote control can be reflected by walls or
other surfaces.
• If the effective range of the remote control decreases, or it stops working, replace the
batteries with new ones.
• Ambient conditions may possibly impede the operation of the remote control. If this
happens, point the remote control at the LCD display and repeat the operation.
Runco CR-26HD/CR-32HDi Owner’s Operating Manual
13
Notes on Remote Control
Operation
Installation
3.2
Quick Setup
Table 3-1 gives a quick overview of the Crystal Series LCD Display installation process.
The sections following this one provide detailed instructions.
Note
Installation should be performed by a qualified custom video
installation specialist.
Y
Table 3-1. Installation Overview
Procedure
PR
EL
IM
IN
A
R
Step
For Details, refer to
page...
1
Mount the Crystal Series LCD Display on a wall (optional)
15
2
Connect signal sources to the Crystal Series LCD Display
16
3
Connect external controller to RS-232 port (optional)
21
4
Apply power to the Crystal Series LCD Display
23
5
Change the OSD language
23
6
If using the Crystal Series LCD Display with a PC, adjust PC
display properties
24
27 through 37
7
Display calibration: adjust the following for each input;
save settings when finished:
• Brightness
• Contrast
• Color level
• Tint
• Input position
14
Runco CR-26HD/CR-32HDi Owner’s Operating Manual
Installation
Proper installation of your Crystal Series LCD Display will ensure the highest possible
picture quality. Whether you are installing the Crystal Series LCD Display temporarily or
permanently, you should take the following into account to ensure that it performs
optimally.
You can either place the Crystal Series LCD Display on a table or in an entertainment
center, or mount it on a wall.
3.3
Installation
Considerations
Wall-Mounting the Crystal
Series LCD Display
Note
EL
IM
IN
A
R
Runco recommends that this be done by a custom installation specialist.
Y
If you do decide to wall-mount the Crystal Series LCD Display, ensure that the wall-mount
bracket is installed according to the instructions included with it. The wall must be capable
of supporting a redundant weight factor three (3) times the weight of the display, or be
reinforced.
Use only the Runco-approved wall-mount kit designed for your
display.
In general, minimize or eliminate light sources directed at the display. Contrast ratio in your
images will be noticeably reduced if light directly strikes the display, such as when a shaft
of light from a window or floodlight falls on the image. Images may then appear washed
out and less vibrant.
Ambient Light
Other considerations and tips that can help improve your installation:
Other Considerations
• Keep the ambient temperature constant and below 35°C (95°F). Keep the display away
from heating and/or air conditioning vents. Changes in temperature may cause drifts in
the display circuitry, which may affect performance.
PR
• Keep the Crystal Series LCD Display away from devices that radiate electromagnetic
energy such as motors and transformers. Common sources of these include slide
projectors, speakers, power amplifiers and elevators.
Runco CR-26HD/CR-32HDi Owner’s Operating Manual
15
Installation
3.4
Connections to the
Crystal Series LCD
Display
Proceed as follows to connect the Crystal Series LCD Display to your video sources,
external controller(s) – if present – and AC power.
When connecting your equipment:
• Turn off all equipment before making any connections.
• Use the correct signal cables for each source.
• Ensure that the cables are securely connected. Tighten the thumbscrews on
connectors that have them.
To access the left rear connector panel, push down on the plastic clip holding the cover in
place. Then, pull firmly on the cable access cover to open it.
EL
IM
IN
A
R
Rear Connector Access ➤
Y
• Use the left audio input when connecting mono audio sources.
Connecting the Crystal ➤
Series LCD Display to
Source Components
Connect your video sources to the Crystal Series LCD Display as shown and described in
the sections that follow.
Antenna/Cable TV Connection: Connect your antenna or cable television source to the
ANT jack on the rear of the Crystal Series LCD Display; see Figure 3-1.
PR
INPUT3
Input Panel
or
Cable Television
Network
Figure 3-1. Antenna/Cable TV Connection
DVI Connections: The Crystal Series LCD Display has a DVI input for connecting a DVD
player, DTV decoder, personal computer or any other device with a DVI or HDMI output.
Connect such devices as shown in Figure 3-2.
Tip
Use the DVI inputs whenever possible. This ensures the highest
video quality because the signal is carried in the digital domain
throughout the entire signal path, from source component output
into the display.
16
Runco CR-26HD/CR-32HDi Owner’s Operating Manual
Installation
Note
This Crystal Series LCD Display supports the VESA Display Data
Channel (DDC) standard. This standard provides “Plug and Play”
capability; the display and a VESA DDC-compatible computer
communicate their setting requirements, allowing for quick and easy
setup.
In order for Plug and Play to work correctly, you must turn on the
display before you turn on the connected computer.
EL
IM
IN
A
R
Y
Rear of the Display
Audio Cable
PR
DVI-D Cable
or DVI-to-HDMI Cable
(sold separately)
Rear of the Display
1 2 3 4 5 6 7 8
9 10 11 12 13 14 15 16
17 18 19 20 21 22 23 24
Rear of the PC
Audio Cable
(Sold Separately)
DVI-D Cable (Sold Separately)
Figure 3-2. DVI Connections
Runco CR-26HD/CR-32HDi Owner’s Operating Manual
17
Installation
RGB Connections: The Crystal Series LCD Display has an RGB input for connecting a
personal computer; see Figure 3-3.
Rear of the Display
Rear of the PC
1 2 3 4 5 6 7 8
9 10 11 12 13 14 15 16
17 18 19 20 21 22 23 24
Y
Audio Cable
(Sold Separately)
EL
IM
IN
A
R
D-Sub 15 Pin Cable (Sold Separately)
Figure 3-3. Analog RGB Connections
Note
1. Refer to Computer/Video Signal Compatibility on page 56 for
a list of computer signals compatible with the Crystal Series LCD
Display. Use with signals other than those listed may cause some
functions not to work.
PR
2. Some Macintosh computers may require a Macintosh video
adapter. Contact your nearest authorized service center or dealer.
3. This Crystal Series LCD Display may not be able to display images
from notebook computers in simultaneous (CRT/LCD) mode.
Should this occur, switch the notebook computer to “CRT only”
mode. If you are unsure how to do this, refer to your notebook
computer’s user manual.
18
Runco CR-26HD/CR-32HDi Owner’s Operating Manual
Installation
Y
INPUT3
Component Video Connections: If you have a DVD player or DTV decoder with a
component (YPbPr) output, connect it to INPUT 3 of the Crystal Series LCD Display as
shown in Figure 3-4.
EL
IM
IN
A
R
Figure 3-4. Component Video Connections
Composite/S-Video Connections: The Crystal Series LCD Display has two (2) S-Video
and three (3) composite video inputs for connecting a VCR, camcorder, laser disc player
or DVD player; see Figure 3-5.
Input 2
S-Video
R
Audio
L
S-Video
(INPUT 1 or INPUT 2)
PR
INPUT1
Composite Video
(INPUT 1, INPUT 2 or INPUT 3)
Video
Figure 3-5. Composite and S-Video Connections
Runco CR-26HD/CR-32HDi Owner’s Operating Manual
19
Installation
MONITOR OUT ➤
Connection
The Crystal Series LCD Display has a monitor out feature for connecting a second VCR or
other auxiliary equipment. Connect the MONITOR OUT audio and video jacks to the audio
and video inputs of the VCR or other equipment as shown in Figure 3-6.
EL
IM
IN
A
R
Y
MONITOR OUT
You can route either the main or picture-in-picture (PIP) source signal to the monitor
outputs. For more information, refer to Monitor Out on page 37.
Figure 3-6. Monitor Output Connections
Connecting Headphones ➤
You can connect a set of headphones to the Crystal Series LCD Display to watch a
program without disturbing others. Connect them to the headphone output located at
INPUT 2; see Figure 3-7.
PR
Input 2
S-Video
R
Audio
L
Video
Figure 3-7. Connecting Headphones
20
Runco CR-26HD/CR-32HDi Owner’s Operating Manual
Installation
Use a “null-modem” RS-232 cable with a 9-pin female connector to connect a PC or
home theater control/automation system (if present) to the RS-232 port on the Crystal
Series LCD Display; see Figure 3-8.
For more information about using this connection, refer to Serial Communications on
page 49.
To PC or
Automation/
Control
System
EL
IM
IN
A
R
SERVICE
DB-9 Female
INPUT1
Connector Pin Assignments:
MONITOR-OUT
Y
(Left Side)
2
3
5
1, 4, 6, 7, 8, 9
Receive Data
Transmit Data
Ground
Not Connected
PR
Figure 3-8. RS-232 Control System Connection
Runco CR-26HD/CR-32HDi Owner’s Operating Manual
21
RS-232 Controller
Connection
Installation
PR
EL
IM
IN
A
R
Y
Notes:
22
Runco CR-26HD/CR-32HDi Owner’s Operating Manual
4. Operation
1. Turn on your source components.
2. Plug the female end of the power cord into the AC receptacle on the rear of the
Crystal Series LCD Display (AC 100V ~ 240V).
4.1
Turning on the Power
3. Connect the other end to your AC power source.
Y
4. Turn on the main power switch at the rear of the display (CR-32HDi only).
EL
IM
IN
A
R
5. The power indicator lights red to indicate that the Crystal Series LCD Display is in
“standby” mode.
6. Press the ON button on the remote control to
turn on the display (or press the power button
on the front of the display). The power
indicator flashes for a few seconds, then lights
solid green.
7. After a brief warm-up period (approximately
10 seconds), the Crystal Series LCD Display
will display an image.
OFF
ON
1
2
3
4
5
6
7
8
9
-
0
100
SOURCE
INPUT
1
INPUT
2
SLEEP
INPUT
3
TIMER
OFF
1. Press MENU.
PR
The Crystal Series LCD Display OSD language is initially set to English, but can also
display the menus in French, Spanish, Portuguese or German. To change the OSD
language:
2. Select Setup from the Main Menu.
3. Select OSD Language from the Setup Menu.
4. Press or to highlight the desired language and press ENTER. The change takes
effect immediately.
Runco CR-26HD/CR-32HDi Owner’s Operating Manual
23
4.2
Changing the OSD
Language
Operation
4.3
Setting the PC Display
Properties
To maximize image quality when using the Crystal Series LCD Display with a personal
computer, you may need to adjust the display properties of your PC video card. To do
this:
EL
IM
IN
A
R
Y
1. Choose Settings from the Windows Start
menu and click on “Control Panel.”
2. Double click on the Display icon.
3. Click the Settings tab on the display
dialog box.
PR
4. Adjust the resolution to 1024x768 pixels.
5. Click the Advanced button and click the
Monitor tab on the dialog box. Set the
vertical frequency to 60Hz and click OK.
24
Runco CR-26HD/CR-32HDi Owner’s Operating Manual
Operation
Note
1. The maximum available resolution and vertical frequency is
1024x768 at 75Hz or the maximum supported by your video
card, whichever is lower. You can get the best picture at
1024x768/60Hz.
2. The Crystal Series LCD Display supports 24-bit color
(16,777,216 possible colors).
1. Press MENU to display the Main Menu.
,
) on the remote
EL
IM
IN
A
R
2. To select a menu item, use the up- or down-arrow buttons (
control to highlight it.
Y
To use the on-screen menus:
3. Press ENTER or the right-arrow button ( ) to access that menu.
4. Use the up- or down-arrow buttons ( , ) to select the setting you want to change.
Then, press ENTER or the right-arrow button ( ).
5. Press the right- or left-arrow button (
,
) to change that setting.
6. To return to the previous menu, press MENU.
PR
The Crystal Series LCD Display OSD menus are arranged hierarchically, as shown in
Figure 4-1. Depending on the selected input source and/or signal characteristics, some
menu options may not be available.
Runco CR-26HD/CR-32HDi Owner’s Operating Manual
25
4.4
Using the On-Screen
Menus
Operation
Picture Adjust
Color Temp.
Backlight
Save Settings (not
available on RGB
input)
Restore Settings
(not available on
RGB input)
Balance
Equalizer
Audio
Surround
Audio Language
TV Speaker
Auto Tuning
Channel
Add/Erase
Favorite Channel
Time
On Timer
Off Timer
Caption
0 ... 100
Setup
Parental Control
5400, 6500, 8500 or
Custom
0, 5, 10, 15, 20, ... 100
Letterbox Mode
Custom
Input Selection
Custom, ISF Day, ISF
Night
Monitor Out
Overscan (not
available on RGB
input)
L10, L9, L8 ... 0 ... R8,
R9, R10
Standard, Music, Film,
Speech or Custom
(On/Off)
English, Français,
Español or Português
(On/Off)
AIR
CABLE
(STD / IRC / HRC)
Return
12:00 AM - 11:59 PM
Enable/Disable, Time,
Channel, Volume
Enable/Disable, Time
Off, 10, 30, 60, 120 or
180 minutes
Eastern, Central,
Mountain or Pacific
Picture Adjust
ISF Calibration
White Balance
Blue Enable
DNR
Gamma
PR
Timer
PC Mode Adjust
Sleep Timer
Time Zone
English, Français,
Español, Português
or Deutsch
Auto Adjust
H. Position
V. Position
H. Size
Phase
Factory Preset
Display (On/Off),
Mode, CC On Mute
(Yes/No)
Parental Lock
(On/Off), TV Rating,
Movie Rating,
Unrated
(Allow/Block),
Change PIN (default
is 0000)
Standard or Cinema
Fill
Input 1/Input 2:
Video or S-Video
Input 3: Video or
Component
Main or PIP: Video
H. Overscan, H.
Shift, V. Overscan,
V. Shift
Brightness
Contrast
Color
Tint
Sharpness
Y
Aspect Ratio
OSD Language
EL
IM
IN
A
R
Source
TV
Input 1
Input 2
Input 3
DVI
RGB
Anamorphic
Standard
Letterbox
VirtualWide
Brightness
Contrast
Color
Tint
Sharpness
Baud Rate
Command Ack
Factory Reset
Splash Duration
Color Temp.
Backlight
Save Settings (not
available on RGB
input)
R/G/B Gain
R/G/B Offset
(Enable/Disable)
0, 10, 20, ... 100
2.0, 2.2 or 2.4
115200, 19200,
9600 or 2400
(On/Off)
0 ... 100
5400, 6500, 8500 or
Custom
0, 5, 10, 15, 20, ... 100
ISF Night, ISF Day,
Custom
0, 1, 2, 3, ... 60
secs.
Figure 4-1. Crystal Series LCD Display OSD Menu Structure
26
Runco CR-26HD/CR-32HDi Owner’s Operating Manual
Operation
The Main Menu is the starting point for accessing all Crystal Series LCD Display functions.
(The ISF Calibration menu is not accessible until you enter a passcode.)
Main Menu
Runco CR-26HD
Source
Aspect Ratio
Picture Adjust
Audio
Channel
Timer
Setup
EL
IM
IN
A
R
From the Main Menu, select Source to choose a video signal source.
Y
ISF Calibration
The active source is indicated by a green square (■) to its left; in this example, TV is the
active source.
To change the aspect ratio (size and shape) of the projected image, select Aspect Ratio
from the Main Menu and press ENTER. Select the appropriate aspect ratio for the type of
program material being viewed; refer to Table 4-1.
Note
PR
The currently-selected aspect ratio is indicated by a green square (■) to its right; in this
example, Anamorphic is selected.
■
TV
Input1
Input2
Input3
DVI
RGB
Aspect Ratio
■
Anamorphic
Standard
Letterbox
VirtualWide
The aspect ratio selection persists until you change it. (It is not
saved independently for each input.)
Runco CR-26HD/CR-32HDi Owner’s Operating Manual
Source
27
Operation
Table 4-1. Aspect Ratio Settings
Aspect Ratio
Remote
Control
Key
Anamorphic
ANA
Description
EL
IM
IN
A
R
Y
16:9 Image on
16:9 Screen (Display)
Select Anamorphic to view
16:9 DVDs and HDTV
programs in their native
aspect ratio.
4:3 images are stretched
horizontally to fit a 16:9
display.
4:3 Image, stretched to fill
16:9 Screen (Display)
Standard
4X3
4:3 Image on
16:9 Screen (Display)
Letterbox
LET
BOX
PR
4:3 Image on
16:9 Display
(Letterbox aspect ratio)
VirtualWide
VWIDE
4:3 Image on
16:9 Screen (Display)
Standard 4:3 scales the
input signal to fit in the
center of a 16:9 display. 4:3
is the aspect ratio used by
computer monitors,
standard television
programming and most VHS
video cassettes.
Letterbox mode scales
(zooms in on) a 4:3 image
linearly (by the same amount
on all sides) to fill a 16:9
display.
Letterbox is best suited for
viewing LaserDisc movies or
non-anamorphic DVDs on a
16:9 screen.
VirtualWide scales a 4:3
image NON-linearly (more
on the sides than in the
center) to fit a 16:9 screen.
4:3 Image on
16:9 Display
with VirtualWide
28
Runco CR-26HD/CR-32HDi Owner’s Operating Manual
Operation
Use the controls in the Picture Adjust menu to calibrate your Crystal Series LCD Display
for optimum picture quality.
The Crystal Series LCD Display has been designed to incorporate setup and calibration
standards established by the Imaging Science Foundation (ISF). The ISF has developed
carefully crafted, industry-recognized standards for optimal video performance and has
implemented a training program for technicians and installers to use these standards to
obtain optimal picture quality from Runco video display devices. Accordingly, Runco
recommends that setup and calibration be performed by an ISF-certified installation
technician.
Y
All signal types require separate processing. Therefore, you need to calibrate each input
separately.
When you change a picture quality setting, save the change to a
preset afterwards. Otherwise, the change will be lost when a
different input is selected. (Picture quality settings are saved for
each input and resolution separately.) For information about
saving settings, refer to Save Settings (not available for RGB
input) on page 33.
EL
IM
IN
A
R
Note
Although it may be possible to obtain satisfactory picture quality using the naked eye and
regular program material, Runco recommends using the following calibration tools for best
results:
• External test pattern source – Ovation Multimedia, Digital Video Essentials or AVIA test
DVD or equivalent.
• A blue filter (provided with many test DVDs), for color level and tint adjustments.
Connect your test pattern source to the input that you are calibrating and proceed as
follows. Perform the adjustments in the order listed here.
PR
Brightness: On your external test pattern source, select a PLUGE pattern. (PLUGE is an
acronym for “Picture Line-Up Generation Equipment.”) Figure 4-2 shows a typical PLUGE
pattern.
Below Black
Above Black
Figure 4-2. Typical PLUGE Pattern for Adjusting Brightness
Runco CR-26HD/CR-32HDi Owner’s Operating Manual
29
Picture Adjust
Picture Adjust
Brightness
Contrast
Color
Tint
Sharpness
Color Temp.
Backlight
Save Settings
Restore Settings
Operation
PLUGE patterns vary but generally consist of some combination of black, white and gray
areas against a black background. The example above includes two vertical bars and four
shaded boxes.
Select Brightness from the Picture Adjust menu. Using the left- and right-arrow (
buttons, adjust the brightness so that:
)
• The darkest black bars disappear into the background.
• The dark gray areas are barely visible.
• The lighter gray areas are clearly visible.
• The white areas are a comfortable level of true white.
Y
• The image contains only black, gray and white (no color).
EL
IM
IN
A
R
Contrast: On your external test pattern source, select a stepped, gray-bar pattern like the
one shown in Figure 4-3.
PR
Figure 4-3. Typical Gray Bar Pattern for Adjusting Contrast
Select Contrast from the Picture Adjust menu. Using the left- and right-arrow (
)
buttons, adjust the contrast to a point just below which the white rectangle starts to
increase in size.
Note
Brightness and contrast controls are interactive. A change to one
may require a subtle change to the other in order to achieve the
optimum setting.
30
Runco CR-26HD/CR-32HDi Owner’s Operating Manual
Operation
EL
IM
IN
A
R
Y
blue
red
magenta
green
cyan
yellow
gray
Color Saturation: On your external test pattern source, select a color bar pattern like the
one shown in Figure 4-4.
Figure 4-4. Typical Color Bar Pattern for Adjusting Color Saturation and Tint
blue
red
magenta
green
cyan
PR
yellow
gray
Select Color from the Picture Adjust menu. While looking at the color bar pattern through
a blue filter, adjust the color saturation level until the outermost (gray and blue) color bars
appear to be a single shade of blue:
Tint: Tint or “hue” is essentially the ratio of red to green in the color portion of the image.
When tint is decreased, the image appears redder; when it is increased the image
appears greener. To set the tint, select Tint from the Picture Adjust menu. While looking at
the color bar pattern through a blue filter, adjust the tint level until the cyan and magenta
color bars (on either side of the green bar) appear to be a single shade of blue.
Note
Like the brightness and contrast controls, the color and tint controls
are interactive. A change to one may require a subtle change to the
other in order to achieve the optimum setting.
Runco CR-26HD/CR-32HDi Owner’s Operating Manual
31
Operation
EL
IM
IN
A
R
Y
Sharpness: “Sharpness” is the amount of high-frequency detail in the image. To adjust
sharpness, select Sharpness from the Picture Adjust menu and press ENTER. On your
external test pattern source, select a pattern like the one shown in Figure 4-5. Adjust as
needed, looking for white edges around the transitions from black to gray and different
sized lines in the “sweep” patterns at the top and bottom. Lower the sharpness setting to
eliminate them.
PR
Figure 4-5. Typical Test Pattern for Adjusting Sharpness
Color Temperature: To adjust the color temperature, select Color Temp. from the
Picture Adjust menu and press ENTER. (Color temperature defines the “color of gray.”)
The choices are 5400K, 6500K, 8500K and Custom. The default setting, 6500K, is
appropriate for most situations. Higher settings produce a “bluer” picture; lower ones
impart a reddish hue to the image.
Backlight: The Backlight control changes the apparent brightness of the displayed
image. Its effect is similar to that of a lamp intensity control on a projector.
32
Runco CR-26HD/CR-32HDi Owner’s Operating Manual
Operation
Save Settings (not available for RGB input): The Crystal Series LCD Display lets you
save image quality settings for each input and supported resolution to a preset. You can
recall this preset at a later time by simply pressing a button on the remote control or using
the Restore Settings menu command (see below).
You should save changes to any of the following settings to a preset; otherwise they will
be lost when a new input source or resolution is selected:
• Brightness
• Contrast
• Color saturation
• Tint
Y
• Sharpness
EL
IM
IN
A
R
• Gamma
• Color temperature and white balance
Restore Settings (not available for RGB input): To recall a preset, choose Restore
Settings from the Picture Adjust menu and select “Custom,” “ISF Day” or “ISF Night.” Or,
use the corresponding buttons on the remote control.
To adjust the Crystal Series LCD Display audio settings, select Audio from the Main Menu
and press ENTER.
Balance: To adjust the left/right speaker balance, select Balance from the Audio Menu
and press ENTER. Use the left- and/or right-arrow buttons to make one channel louder
than the other.
PR
Equalizer: The Crystal Series LCD Display has a five-band graphic equalizer that you can
use to boost or cut certain audio frequencies. To use it, select Equalizer from the Audio
menu and press ENTER. Select one of four equalizer presets – Standard (flat), Music, Film
or Speech – or select Custom to create your own according to taste. The five frequency
bands are 100, 300, 1000, 3000 and 10,000 Hertz (Hz).
Surround: The Crystal Series LCD Display has a “surround sound” mode that simulates a
multi-channel sound system. To use the surround mode, select Surround from the Audio
menu and set it to On.
Note
When Surround is set to On, the graphic equalizer is disabled.
Audio Language: Some digital TV broadcasts provide audio soundtracks in multiple
languages. If you are watching such a program, select Audio Language from the Audio
menu to choose a soundtrack language: English, Français, Español or Português.
TV Speaker: To disable the internal speakers, select TV Speaker from the Audio menu,
set it to Off and press ENTER. The effect is similar to using the MUTE button, except that
the Crystal Series LCD Display “remembers” this setting if you turn off the display, then
turn it back on.
Runco CR-26HD/CR-32HDi Owner’s Operating Manual
33
Audio
Audio
Balance
Equalizer
Surround
Audio Language
TV Speaker
Operation
Channel ➤
Channel
To set up the Crystal Series LCD Display channel tuner, select TV as the source. Then,
select Channel from the Main Menu and press ENTER.
Auto Tuning: To have the Crystal Series LCD Display automatically detect available TV or
CATV channels, select Auto Tuning and press ENTER.
Auto Tuning
Add/Erase
• Off-Air Channels: If you are using an off-air antenna, select AIR and press ENTER
again. The Crystal Series LCD Display searches all channel frequencies and adds a
channel to its memory when it detects a signal on that channel frequency. (This may
take a few minutes.)
Favorite Channel
EL
IM
IN
A
R
Y
• CATV Channels: If you are using cable, select CABLE and press ENTER. Then,
select STD and press ENTER again. The Crystal Series LCD Display searches all
channel frequencies and adds a channel to its memory when it detects a signal on that
channel frequency. (This may take a few minutes.) If Auto Tuning fails to detect any
CATV channels, select HRC or IRC and try again. (STD, HRC and IRC refer to different
sets of frequencies used by cable television providers. IRC stands for “Incrementally
Related Carrier;” HRC stands for “Harmonically Related Carrier.”)
Add/Erase: If Auto Tuning fails to detect a channel, select Add/Erase from the Channel
menu, then select Add to add it to the channel list. To erase the currently-selected
channel from the available channel list, select Add/Erase from the Channel menu, then
select Erase.
Favorite Channel: You can specify up to four channels as “favorite” channels that can be
accessed by pressing a single button on the remote, instead of manually entering the channel
number. To do this, select Favorite Channel from the Channel menu and press ENTER.
Use the up- or down-arrow button to select the memory location in which you want to
store the favorite channel. Then, use the left- or right-arrow button to specify the channel
number.
PR
To recall a favorite channel, press the corresponding button on the remote control (FC1,
FC2, FC3 or FC4).
Timer ➤
Timer
Time
On Timer
Off Timer
Sleep Timer
Time Zone
To set the Crystal Series LCD Display internal clock or configure the on/off timers, select
Timer from the Main Menu and press ENTER.
Time: To set the Crystal Series LCD Display internal clock, select Time from the Timer
menu and press ENTER. Use the up- or down-arrow button to select either the hour of
the day or the minute of the hour to set. Then, use the left- or right-arrow buttons to set
that component of the time. When finished, press MENU.
On Timer: Use the On Timer to turn the Crystal Series LCD Display on at a specific time
of day. You can also specify a channel and a volume level.
Off Timer: Use the Off Timer to turn the Crystal Series LCD Display off at a specific time
of day.
Sleep Timer: Use the Sleep Timer to turn off the Crystal Series LCD Display after a
specified interval.
To set the Sleep Timer:
• Select Sleep Timer from the Timer menu and press ENTER. Use the right- or left-arrow
button to select 10, 30, 60, 120 or 180 minutes. Then, press MENU.
– OR –
• Press the TIMER OFF button on the remote control repeatedly to select the desired
timer interval.
34
Runco CR-26HD/CR-32HDi Owner’s Operating Manual
Operation
Time Zone: To set the local (North American) time zone, select Time Zone from the Timer
menu and press ENTER. Use the up- or down-arrow button to select Eastern, Central,
Mountain or Pacific. Press ENTER to confirm your selection.
Use the controls in the Setup menu to perform advanced image quality adjustments and
access various other Crystal Series LCD Display features.
OSD Language: Select OSD Language from the Setup menu and press ENTER. Then,
use the up- or down-arrow buttons to select the OSD language (English, French, Spanish,
Portuguese or German). Press ENTER again to confirm your selection.
Setup
Setup
OSD Language
PC Mode Adjust
Caption
Y
PC Mode Adjust: To improve the quality of projected images from a computer or other
VESA-compliant, RGB source, select PC Mode Adjust and press ENTER.
Note
EL
IM
IN
A
R
• Auto Adjust: Auto Adjust automatically adjusts settings to optimize computer images.
To execute Auto Adjust on command, select Auto Adjust and press ENTER.
Auto Adjust may take some time to complete, depending on the
characteristics of the incoming signal.
• H Position: Use the up- or down-arrow buttons ( , ) to highlight H Position. Then,
use the right-arrow button ( ) to shift the image to the right; use the left-arrow button
(
) to shift the image to the left.
• V Position: Use the up- or down-arrow buttons ( ,
) to highlight V Position. Then,
use the right-arrow button (
) to shift the image up; use the left-arrow button (
) to
shift the image down.
• H Size: Use the up- or down-arrow buttons ( , ) to highlight H Size. Then, use the
right-arrow button (
) to increase the width; use the left-arrow button (
) to
decrease it.
PR
• Phase: Adjust the phase if the image shows shimmer or “horizontal” noise. Pixel phase
adjusts the phase of the pixel sampling clock relative to the incoming signal. The effect
of this control is similar to that of a tracking control on a VCR.
For best results, use a good test pattern such as a smooth gray consisting of a clear
pattern of black and white pixels, or a similar “half on, half off” graphic image. (You may
notice that you can stabilize the image at more than one point. Use either setting in this
case.)
To restore the factory-default Position, Size and Phase settings, select Factory Preset and
press ENTER.
Runco CR-26HD/CR-32HDi Owner’s Operating Manual
35
Parental Control
Letterbox Mode
Input Selection
Monitor Out
Overscan
Operation
Caption: Select Caption from the Setup menu to control the display of closed captions
when watching programs that contain them.
• Display: Select On or Off to control the display of closed captions.
• Mode: Select one of four captioning modes: CC1, CC2, CC3 or CC4. CC1 usually
contains the native-language captions; if a program is captioned in more than one
language, those captions are carried on CC2, CC3 or CC4.
Y
The Crystal Series LCD Display also supports “text mode” captioning; to use this
feature, select Text1, Text2, Text3 or Text4. The text modes, instead of displaying a
few lines of captions somewhere on the picture, take over all or half of the screen to
display scrolling text information. (The text modes are seldom used today, so most of
the time there is no information there to see.) The text field is sometimes used for
embedding Internet data (called Interactive TV Links, or ITV Links) in the captions.
EL
IM
IN
A
R
• CC On Mute: To have the Crystal Series LCD Display show captions when the audio
output is muted, set this option to Yes.
Parental Control: To block the display of television programs or movies based on their
ratings, select Parental Control from the Setup menu and press ENTER. Enter the default
Personal Identification Number (PIN) – 0000 – and press ENTER again.
• Parental Lock: This is the “master switch” for the parental controls. Set it to On on
Off.
PR
• TV Rating: Select TV Rating from the Parental Control menu to block television
programs carrying a given rating, to prevent children from watching programs that are
deemed inappropriate. These ratings and content labels have been established by the
United States Federal Communications Commission (FCC) to help parents and other
caregivers determine if a program is suitable for young viewers.
To block programs carrying a given rating, use the up- or down-arrow to select a
rating. Then, press the right-arrow button to require the PIN code to be entered to view
a program with that rating. A lock icon ( ) appears to indicate that the restriction is
active.
Table 4-2 describes the TV ratings and content categories. For more information, visit
http://www.fcc.gov/parents/parent_guide.html.
Table 4-2. FCC Ratings and Content Categories
Rating/Category
Description
TV-MA
Mature Audience Only - graphic violence, explicit sexual
content and/or offensive language.
TV-14
Parents strongly cautioned - intense violence, sexual
situations, coarse language and/or suggestive dialogue.
TV-PG
Parental guidance suggested - violence, sexual situations,
coarse language and/or suggestive dialogue.
TV-G
General audience - suitable for children and adults.
TV-Y7
Children 7 and up.
TV-Y
Suitable for all children.
FV
Fantasy violence or cartoon violence.
D
Sexual dialogue.
36
Runco CR-26HD/CR-32HDi Owner’s Operating Manual
Operation
Table 4-2. FCC Ratings and Content Categories (continued)
Rating/Category
Description
L
Offensive language
S
Sexual content
V
Violence
EL
IM
IN
A
R
Y
• Movie Rating: Select Movie Rating from the Parental Control menu to block movies
carrying a given rating, to prevent children from watching movies that are deemed
inappropriate. These ratings have been established by the Motion Picture Association
of America (MPAA) to help parents and other caregivers determine if a movie is suitable
for young viewers.
To block movies carrying a given rating, press the right-arrow button to require the PIN
code to be entered to view a movie with that rating. A lock icon ( ) appears to indicate
that the restriction is active.
For more information on movie ratings, please visit
http://www.mpaa.org/movieratings/.
• Unrated: To allow or block access to unrated content, select Unrated from the
Parental Control menu and select Allow or Block. Press ENTER to confirm your choice.
• Change PIN: The default PIN for accessing the parental controls or bypassing content
restrictions is 0000. Runco recommends changing this to something less obvious.
Letterbox Mode: Select Letterbox Mode from the Setup menu to change the
appearance of movies in Letterbox format.
PR
When you select Standard, the original Letterbox format of the source is maintained.
Black bars appear above and below the active image area.
When you select Cinema Fill, a 2.35 image is stretched vertically in both directions to fill a
16:9 display.
Input Selection: Input 1 and Input 2 have both S-Video and composite video
connectors. Input 3 has both component and composite video connectors.
To specify which connection type you are using – or to switch from one to the other if
equipment is connected to both – select Input Selection from the Setup menu and press
ENTER.
Monitor Out: If you have equipment connected to the MONITOR OUT, select Monitor Out
from the Setup menu to route either the main or PIP audio/video signals to that output.
Overscan (not available for RGB input): Overscan pushes the outside edge of the
active picture area of the video signal out beyond the edge of the display area.
Some television programs are produced based on the assumption that older television
sets may not display the outer edges of the broadcast picture area. Overscan effectively
trims away these inactive, outer edges and enlarges the remaining portion of the image to
fill the display area.
Use the on-screen slidebars to set the desired amount of horizontal and vertical overscan,
as well as horizontal and vertical image shift.
These settings only affect 480i source material. For HDTV, DVDs and other video sources,
Overscan is generally not necessary or desirable.
Runco CR-26HD/CR-32HDi Owner’s Operating Manual
37
Operation
ISF Calibration ➤
Use the ISF Calibration menu to perform advanced picture quality adjustments. This
menu should be used by ISF-certified technicians only.
ISF Calibration
Picture Adjust
Note
White Balance
You must enter a passcode to access the ISF Calibration menu.
Blue Enable
DNR
Picture Adjust: The controls in this menu are identical to those in the main Picture Adjust
menu, but are accessible only by entering the ISF Calibration menu passcode. This makes
it possible to restore the picture quality settings to what they were when the Crystal Series
LCD Display was installed, simply by recalling the “ISF Night” or “ISF Day” preset.
Gamma
Baud Rate
Command Ack
Factory Reset
Y
• Brightness: Refer to Brightness on page 29.
Splash Duration
EL
IM
IN
A
R
• Contrast: Refer to Contrast on page 30.
• Color: Refer to Color Saturation on page 31.
• Tint: Refer to Tint on page 31.
• Sharpness: Refer to Sharpness on page 32.
• Color Temp.: Refer to Color Temperature on page 32.
• Backlight: Refer to Backlight on page 32.
• Save Settings: For each input and supported resolution, the Crystal Series LCD
Display lets you save image quality settings as presets that you can recall at a later
time. You can create up to three presets – designated “Custom,” “ISF Day” and “ISF
Night” – per input and resolution.
You should save changes to any of the following settings to a preset; otherwise they
will be lost when a new input source or resolution is selected:
• Brightness
PR
• Contrast
• Color saturation
• Tint
• Sharpness
• Gamma
• Color temperature and white balance
To save image settings to a preset, select Save Settings from the ISF Calibration menu
and select “Custom,“ “ISF Day” or “ISF Night.”
38
Runco CR-26HD/CR-32HDi Owner’s Operating Manual
Operation
White Balance: To remove any trace of color from the white areas of the projected
image, choose White Balance from the Picture Adjust menu and press ENTER.
• Gain: Use the Gain controls to correct color imbalances in the bright areas of the
image. A good way to do this is to use a test pattern consisting mostly of solid white
areas, such as an 80 IRE “window” pattern. If the white areas contain traces of red,
green or blue, decrease the Gain for that color.
• Offset: Use the Offset controls in the White Balance sub-menu to correct color
imbalances in the dark areas of the image. A good way to do this is to use a test
pattern consisting mostly of dark gray areas, such as a 30 IRE “window” pattern. If the
gray areas contain traces of red, green or blue, decrease the Offset for that color.
Y
Any white balance adjustments you make here are automatically
stored as a “Custom” color temperature.
EL
IM
IN
A
R
Note
Blue Enable: Blue Enable removes all red and green color information from the image,
simulating a blue filter. You can use it instead of a blue filter when performing color and tint
adjustments.
DNR: To apply Digital Noise Reduction (DNR) to the input signal, select DNR from the ISF
Calibration menu. Noise reduction is useful for clearing up noisy RGB images such as
those from a PC. Adjust as desired using the left- or right-arrow buttons, keeping in mind
that reducing noise (which reduces high frequencies) may also “soften” the image.
Gamma: The Gamma control determines how gray shades are displayed between
minimum input (black) and maximum input (white) for all signals. A good gamma setting
helps to optimize blacks and whites while ensuring smooth transitions for the
“in-between” values utilized in other grays.
PR
Unlike brightness and contrast controls, Gamma allows you to lighten or darken the
overall tone of your images without changing the extremes. All images will be more vibrant
while still showing good detail in dark areas.
The default Gamma setting of 2.4 is appropriate for most typical home theater
environments.
Baud Rate: Select Baud Rate from the ISF Calibration menu to set the data transfer rate
of the Crystal Series LCD Display’s RS-232 SERVICE port. (This setting must match the
data rate of the device connected to the RS-232 input.)
Command Ack: The Command Ack setting enables or disables the echo of serial
commands at the source. When set to on, commands sent from the serial controller (PC
or control/automation system) are logged and/or displayed on-screen. If this is not
desired, set Command Ack to Off.
Runco CR-26HD/CR-32HDi Owner’s Operating Manual
39
White Balance
R Gain
100
G Gain
100
B Gain
100
R Offset
50
G Offset
50
B Offset
50
Operation
Factory Reset: To reset all Crystal Series LCD Display settings to their factory defaults,
select Factory Reset from the ISF Calibration menu and press ENTER. This command is
not undoable. Use it with caution!
Y
Splash Duration: Use Splash Duration to control how long the Crystal Series LCD
Display splash screen remains on-screen after power-up; see Figure 4-6. To prevent this
screen from appearing, set the Splash Duration to 0.
EL
IM
IN
A
R
CALIBRATED FOR:
John Doe By: Tinh Ho
CUSTOM BUILT BY:
PR
Figure 4-6. Crystal Series LCD Display Splash Screen
40
Runco CR-26HD/CR-32HDi Owner’s Operating Manual
Operation
To use PIP, press the PIP (
) button.
ASPECT
SIZE
POSITION
PIP
P.MODE
S.SWAP
SWAP
TV/AV
HOLD
SUB PAGE
CANCEL
TEXT
EL
IM
IN
A
R
Y
The PIP window appears inside the main image
window.
2. Press the (
Press PIP again to switch to side-by-side PIP
mode.
PR
Press PIP again to turn PIP off.
Runco CR-26HD/CR-32HDi Owner’s Operating Manual
41
4.5
Using
Picture-In-Picture (PIP)
Operation
Press the TV/AV button (
) to select a PIP signal source. For each source, Table 4-3
shows which of the other sources are available as a PIP source.
Table 4-3. Available Main and PIP Source Combinations
Main
INPUT3
TV
INPUT1
PC
INPUT2
VIDEO
COMPONENT
RGB
DVI
X
X
X
X
X
X
X
INPUT1
X
X
X
X
O
O
O
INPUT2
X
X
X
X
O
O
O
VIDEO
X
X
COMPONENT
X
O
RGB
X
DVI
X
X
X
X
O
O
O
X
X
X
O
O
O
O
X
X
O
O
O
O
O
O
X
PC
EL
IM
IN
A
R
INPUT3
TV
Y
PIP
Notes:
1. “O” means that that source is available as a PIP source when that input is selected; “X” means
that it is not.
2. The Crystal Series LCD Display cannot display the same source in both the main and PIP
windows, nor can it display RGB and component video simultaneously.
PR
Changing the PIP ➤
Position
To change the PIP window position, press the
POSITION (
) button on the remote control
repeatedly until the window is in the desired position.
3
2
4
1
42
ASPECT
SIZE
POSITION
PIP
P.MODE
S.SWAP
SWAP
TV/AV
HOLD
SUB PAGE
CANCEL
TEXT
Runco CR-26HD/CR-32HDi Owner’s Operating Manual
Operation
SIZE
POSITION
PIP
P.MODE
S.SWAP
SWAP
TV/AV
HOLD
SUB PAGE
CANCEL
TEXT
EL
IM
IN
A
R
To change the aspect ratio of the PIP window from 4:3
to 16:9 or vice versa, press the ASPECT (
)
button on the remote control.
Changing the PIP Size
ASPECT
Y
To change the PIP window size, press the SIZE
(
) button on the remote control repeatedly to
achieve the desired window size.
Refer to Table 4-1 for more information about aspect
ratios.
To recall settings for the PIP input from either the “ISF
Night” or “ISF Day” memory preset, press the
P.MODE (
) button on the remote control.
Choose ISF Day when there is a lot of ambient light.
Select ISF Night when there is low ambient light or at
night.
ASPECT
SIZE
POSITION
PIP
P.MODE
S.SWAP
SWAP
TV/AV
HOLD
SUB PAGE
CANCEL
TEXT
ASPECT
SIZE
POSITION
PIP
P.MODE
S.SWAP
SWAP
TV/AV
HOLD
SUB PAGE
CANCEL
TEXT
PR
To customize the ISF memory presets, refer to ISF
Calibration on page 38.
Runco CR-26HD/CR-32HDi Owner’s Operating Manual
43
Changing the PIP Aspect
Ratio
Changing the PIP Image
Mode
Operation
To swap the main and PIP images, press the SWAP
button on the remote control.
ASPECT
SIZE
POSITION
PIP
P.MODE
S.SWAP
SWAP
TV/AV
HOLD
SUB PAGE
CANCEL
TEXT
ASPECT
SIZE
POSITION
PIP
P.MODE
S.SWAP
SWAP
TV/AV
HOLD
SUB PAGE
CANCEL
TEXT
EL
IM
IN
A
R
Y
Swapping the Main and ➤
PIP Images
To swap the main and PIP audio programs, press the
S.SWAP button on the remote control.
PR
Swapping the Main and ➤
PIP Audio Programs
44
Runco CR-26HD/CR-32HDi Owner’s Operating Manual
Operation
The Crystal Series LCD Display supports Multichannel Television Sound (MTS), the
broadcast audio standard that allows transmission of both stereo and Secondary Audio
Program (SAP) content.
The SAP is usually a foreign-language translation. However, it can also be used for other
purposes such as Described Video Services (DVS), which provide descriptive narration of
key visual elements in programs for the benefit of the visually impaired.
HOLD
SUB PAGE
CANCEL
TEXT
S.MODE
SURRND
MTS/SAP
MUTE
REVEAL
SIZE
MIX
INDEX
FC1
FC2
FC3
FC4
Y
You can select sound options (Mono, Stereo, SAP or
Mono+SAP) depending on the broadcast signal by
pressing the MTS/SAP button on the remote control.
EL
IM
IN
A
R
• Choose Stereo for channels that are broadcasting
in stereo.
• Choose Mono for channels that are broadcasting in
mono, or if you are having difficulty receiving a
stereo signal.
• Choose SAP to listen to the Secondary Audio
Program.
• Choose Mono+SAP to listen to both the primary
and secondary audio programs (for example, when
a program has a DVS audio track).
Table 4-4 summarizes the audio broadcast modes supported by the Crystal Series LCD
Display.
Table 4-4. Compatibility with Stereo and SAP Audio Broadcasts
Receive Mode
PR
Broadcast Mode
Mono
Mono
Stereo
SAP
Mono+SAP
Mono
Mono
Mono
Mono
Mono
Stereo
Mono
Stereo
Mono+SAP
Mono
Mono
SAP
Mono+SAP
Stereo+SAP
Mono
Stereo
SAP
Mono+SAP
Stereo
Runco CR-26HD/CR-32HDi Owner’s Operating Manual
45
4.6
Stereo Sound/SAP
Operation
PR
EL
IM
IN
A
R
Y
Notes:
46
Runco CR-26HD/CR-32HDi Owner’s Operating Manual
5. Maintenance and Troubleshooting
Regular cleaning will extend the life and performance of the Crystal Series LCD Display.
Before cleaning, be sure to unplug the power cord from the power outlet.
Cleaning the Display
Panel Body and Remote
Control
Y
Do not under any circumstances use solvents such as benzene or thinner to clean the
Crystal Series LCD Display. Doing so may cause deterioration or peeling of paint from the
display or remote control unit.
5.1
Cleaning
EL
IM
IN
A
R
Wipe the display and remote control gently with a soft cloth. In case of excessive dirt
buildup, dampen a soft cloth with a diluted neutral cleaning detergent. Wring the cloth
thoroughly, then wipe the component and dry it with a dry soft cloth.
After dusting, wipe the screen gently using a soft cloth (cotton, flannel etc.). Do not use
tissue or coarse fabric. The screen surface is easily scratched; do not rub it or hit it with a
hard object.
Cleaning the Screen
If you clean the surface of the screen with a wet cloth, do not allow water droplets on the
surface to enter into the product; this may cause a malfunction.
As a general rule, use a vacuum cleaner about once a month to clean the vents on the
rear panel of the display of dust buildup (set the vacuum cleaner to its weakest setting
when doing this). If not removed, accumulated dust can cause the internal temperature to
increase, resulting in possible breakdown or fire.
PR
Table 5-1 provides some general guidelines for troubleshooting problems you may
encounter with the Crystal Series LCD Display. If you encounter an issue not described
here, please contact your Runco dealer or Runco Technical Support.
Table 5-1. Troubleshooting Chart
Symptom
The display does not turn on
after initial installation.
Possible Cause(s)
Solution
• The Crystal Series LCD
Display is not plugged in or
the AC outlet is not active.
• Ensure that the Crystal
Series LCD Display is
plugged in and that the AC
outlet is active.
• Replace the batteries.
• The remote control
batteries have run out.
The display is on, but there is
no picture or sound.
• Incorrect source selection.
• Source component is not
turned on.
• Source component is
connected incorrectly or
not at all.
• Select the correct source.
• Turn on the source
component.
• Check video and/or audio
connections to source
component.
Picture is okay, but there is no
sound.
• Audio output is muted.
• Press the MUTE button
on the remote control.
• Turn up the volume.
• Volume setting is too low.
Runco CR-26HD/CR-32HDi Owner’s Operating Manual
47
Cleaning the Vents
5.2
Troubleshooting Tips
Maintenance and Troubleshooting
Table 5-1. Troubleshooting Chart (continued)
Symptom
Possible Cause(s)
• Contrast is set too high.
• Lower the contrast setting.
Image appears “washed out”
and/or dark areas appear too
bright.
• Brightness is set too high.
• Lower the brightness
setting.
Black or white dots appear on
all channels or a specific
channel.
• Antenna or cable TV
source is connected
incorrectly or not at all.
• Broadcast signal is weak.
• Check the antenna or
cable TV connection.
Y
Image is too bright and/or
lacks definition in the bright
areas of the image.
EL
IM
IN
A
R
PR
Solution
• If using an off-air antenna,
adjust its position or
location.
Colors in the image are
swapped; for example, reds
appear blue or vice versa.
• The Red/Pr, Green/Y or
Blue/Pb outputs from the
source are connected to
the wrong inputs on the
Crystal Series LCD
Display.
• Ensure that the source
outputs are connected to
the correct Crystal Series
LCD Display input.
RGB images appear “noisy.”
• Clock and Phase settings
need adjustment.
• Manually adjust Clock and
Phase settings, or perform
an Auto-Adjust (refer to PC
Mode Adjust on
page 35).
“Out of range” appears
on-screen.
• The resolution and
frequency of the video
card in the computer are
not compatible with the
Crystal Series LCD
Display.
• Select a compatible
resolution and vertical
frequency (refer to
Computer/Video Signal
Compatibility on
page 56).
The image is too large or too
small.
• Image size needs
adjusting.
• Adjust the image size (refer
to PC Mode Adjust on
page 35).
Poor broadcast sound quality.
• The sound quality of a
stereo broadcast may be
unstable in an area with a
weak signal.
• Use the MTS/SAP button
on the remote control to
select mono.
48
Runco CR-26HD/CR-32HDi Owner’s Operating Manual
6. Serial Communications
To interface the Crystal Series LCD Display with a home theater automation/control
system or a PC running terminal emulation software, connect it to your control system or
PC as shown in Figure 3-8.
6.1
RS-232 Connection
and Port Configuration
Y
Configure the RS-232 controller or PC serial port as follows: no parity, 8 data bits, 1 stop
bit and no flow control. Set the baud rate to match that of the Crystal Series LCD Display
RS-232 port; the default baud rate is 115200.
EL
IM
IN
A
R
Table 6-1 lists the RS-232 command set. All commands are in ASCII format. A carriage
return is not required after a command.
When you send a valid command, the Crystal Series LCD Display executes it and
acknowledges it with a right-bracket character (]) followed by the four-digit numeric code
you sent; for example, ]0002. When you send an invalid command, the Crystal Series
LCD Display ignores it and returns -N/A instead of the four-digit code.
Table 6-1. Serial Commands
Command
[
S3A
Description
0###
Set audio volume to ### (=000-100)
Example: [S3A0075 sets volume to 75
+3A
Audio volume up
[
-3A
Audio volume down
[
S4A
PR
[
000#
Main input selection
0=TV
1=Input1
2=Input2
3=Input3
5=DVI
6=RGB
Example: [S4A0006 selects RGB
[
S4E
000#
Aspect ratio selection
0=Standard (4x3)
1=VirtualWide
2=Letterbox
3=Anamorphic
Example: [S4E0002 selects Letterbox
[
S4F
0101
Select Composite Video for Input1
0102
Select S-Video for Input1
0201
Select Composite Video for Input2
0202
Select S-Video for Input2
Runco CR-26HD/CR-32HDi Owner’s Operating Manual
49
6.2
Serial Command
Syntax
Serial Communications
Table 6-1. Serial Commands (continued)
Command
Description
0301
Select Composite Video for Input3
0303
Select Component Video for Input3
Example: [S4F0101 selects Composite video for Input1
S4G
000#
PIP Input selection
0=TV
1=Input1
2=Input2
3=Input3
5=DVI
6=RGB
EL
IM
IN
A
R
Y
[
Example: [S4G0003 selects Input3
[
SAB
000#
Power on/off control
0=standby, 1=on
Example: [SAB0001 turns unit on
[
SBA
000#
Picture mode selection
0=Custom
1=ISF Night
2=ISF Day
Example: [SBA0001 selects ISF Night
PR
[
SCA
000#
Caption on/off
0=off
1=on
Example: [SCA0000 turns caption off
[
+CB
TV channel up
[
-CB
TV channel down
[
SCC
000#
Favorite channel selection
1=FC1
2=FC2
3=FC3
4=FC4
Example: [SCC0002 selects favorite channel 2
[
SDA
000#
Set PIP mode
0=OFF
1=PIP
2=PBP
Example: [SDA0002 selects PBP
[
SDB
000#
Set PIP size
0=small
1=medium
2=large
Example: [SDB0001 selects medium PIP size
50
Runco CR-26HD/CR-32HDi Owner’s Operating Manual
Serial Communications
Table 6-1. Serial Commands (continued)
Command
Description
The following serial commands are meant to emulate buttons on the remote control. Each button
has its own serial command, so effectively it is as if you were using the IR remote only you’ll be
doing so via serial commands. These commands provide active OSD responses just like the IR
remote.
key
0002
OFF
0015
ON
0004
Number 1
0005
Number 2
0006
Number 3
0008
Number 4
0009
Number 5
0010
Number 6
0012
Number 7
0013
Number 8
0014
Number 9
PR
[
key
EL
IM
IN
A
R
[
Y
Each command begins with [key followed by the four-digit number of the button. No carriage
return is necessary. The response you receive from the unit if the command is valid will be a
right-bracket (]) followed by the four-digit numeric code you sent. (For example, the ‘ON’ command is [key0015; the response will be ]0015). All commands are in ASCII.
0017
Number 0
0035
Number 100
0023
Number “–”
[
key
0001
TIMER OFF
[
key
0105
INPUT1
0027
INPUT2
0028
INPUT3
0102
DVI
0101
RGB HD
0019
TV
0003
CUSTOM
0062
ISF NIGHT
0031
ISF DAY
0040
ANAMORPHIC
[
[
key
key
Runco CR-26HD/CR-32HDi Owner’s Operating Manual
51
Serial Communications
Table 6-1. Serial Commands (continued)
Command
4X3
0039
LETTERBOX
0126
VIRTUALWIDE
0007
Right-Arrow key
0016
Down-Arrow key
0018
Up-Arrow key
0011
Left-Arrow key
0046
ENTER
Y
key
0043
PR
EL
IM
IN
A
R
[
Description
[
key
0026
MENU
[
key
0100
EXIT
[
key
0063
PIP ASPECT RATIO
0047
PIP SIZE
0034
PIP POSITION
0032
PIP
0037
P.MODE
0052
S.SWAP
0033
SWAP
0036
TV/AV
0053
S.MODE
0054
SURROUND
0024
MTS/SAP
0091
MUTE
0057
FAVORITE CHANNEL 1
0045
FAVORITE CHANNEL 2
0044
FAVORITE CHANNEL 3
0055
FAVORITE CHANNEL 4
[
[
key
key
52
Runco CR-26HD/CR-32HDi Owner’s Operating Manual
7. Specifications
7.1
Crystal Series LCD
Display Specifications
Table 7-1 lists the Crystal Series LCD Display specifications.
1366 x 768 WXGA
Screen Size:
CR-26HD = 26 in. (diagonal)
CR-32HDi = 32 in. (diagonal)
Screen Aspect Ratio:
16:9
Available Aspect Ratios:
DTV Compatibility:
ISF Settings:
480i/p, 576i/p, 720p, 1080i
1000:1
Data/Graphics Compatibility:
Imagix Processing:
Inputs:
Up to 1024 x 768
3:2 pull down
Multiple input combinations with up to
(3) Composite, (2) S-Video, (1) Component, (1) DVI
w/HDCP, (1) RGB (15-pin D-sub), (1) RS-232,
(4) Audio (stereo RCA pairs), (1) RF Antenna
(1) Composite, (2) Audio (stereo RCA pair, 3.5-mm stereo
mini jack for headphones)
PR
Outputs:
Tuner:
4:3, Letterbox, 16:9 Anamorphic, VirtualWide™
Yes
Contrast Ratio:
Audio System:
EL
IM
IN
A
R
Native Resolution:
Y
Table 7-1. Crystal Series LCD Display Specifications
10W RMS x 2, L/R two-way Integrated Speaker System
NTSC/ATSC Stereo (PAL as monitor only), HDTV Ready,
PIP/PBP, Parental Control (V-Chip), Closed Caption
Discrete IR Control:
Source, power and aspect ratios
Power Requirements:
100 to 240 VAC, 50/60Hz
Power Consumption:
CR-26HD = 130W (443.7 BTUs/hour)
CR-32HDi = 180W (614.3 BTUs/hour)
Operating Environment:
40ºF to 95ºF (5ºC to 35ºC);
20% to 80% humidity (non-condensing)
Dimensions:
CR-26HD = see Figure 7-1
CR-32HDi = see Figure 7-2
Weight:
CR-26HD = 26.46 lbs. (12 kg)
CR-32HDi = 50.71 lbs. (23 kg)
Regulatory Approvals:
Complies with FCC, UL
Limited Warranty:
One (1) year parts and labor from the date of delivery to the
end user.
Specifications are subject to change without notice.
Runco CR-26HD/CR-32HDi Owner’s Operating Manual
53
Specifications
7.2
Crystal Series LCD
Display Dimensions
Figure 7-1 and Figure 7-2 show the Crystal Series LCD Display dimensions.
7.48 in. (190 mm)
3.46 in.
(88 mm)
PR
EL
IM
IN
A
R
3.94 in.
(100 mm)
Y
7.87 in.
(200 mm)
23.70 in. (602 mm)
26
.00
in.
0
(66
mm
)
27.00 in. (686 mm)
19.88 in. (505 mm)
Figure 7-1. CR-26HD Dimensions
54
Runco CR-26HD/CR-32HDi Owner’s Operating Manual
Specifications
8.27 in. (210 mm)
EL
IM
IN
A
R
3.86 in.
(98 mm)
Y
3.94 in.
(100 mm)
7.87 in.
(200 mm)
in.
.00
32
26.73 in. (679 mm)
)
mm
3
(81
31.69 in. (805 mm)
PR
23.03 in. (585 mm)
Figure 7-2. CR-32HDi Dimensions
Runco CR-26HD/CR-32HDi Owner’s Operating Manual
55
Specifications
7.3
Computer/Video Signal
Compatibility
The Crystal Series LCD Display can display video signals from a variety of computer
sources via its RGB and DVI inputs.
Table 7-2 lists the signal types that are compatible with the Crystal Series LCD Display,
and indicates which of those are VESA standards.
Table 7-2. Computer/Video Signal Compatibility Chart
SD
Horizontal
Frequency (kHz)
720x240
60i
59.94
15.75
720x480
60p
59.94
31.50
1280x720
60p
60.00
44.90
HD
1920x1080
60i
60.00
33.70
VESA
720x400
85
85.00
37.90
VESA
720x350
A
R
SD
HD
85.00
37.90
70
70.10
31.50
720x350
70
70.10
31.50
720x480
60
59.94
31.50
MAC
720x480
67
66.70
35.00
VESA
720x480
72
72.80
37.80
VESA
720x480
75
75.00
37.50
VESA
720x480
85
85.00
43.60
VESA
800x600
56
56.25
35.20
VESA
800x600
60
60.30
37.90
VESA
800x600
72
72.20
48.70
VESA
800x600
75
75.00
46.90
VESA
800x600
85
85.10
53.70
MAC
832x624
75
74.50
49.70
VESA
1024x768
60
60.00
48.40
MAC
1024x768
60
60.00
48.70
VESA
1024x768
70
70.10
56.50
IBM
1024x768
72
72.10
57.50
VESA
1024x768
75
75.00
60.00
MAC
1024x768
75
75.00
60.00
VESA
1024x768
85
85.00
68.70
IBM
EL
IM
VESA
IN
85
720x400
IBM
PR
Vertical
Frequency (Hz)
Mode
Y
Signal Type
Note: The Crystal Series LCD Display may not be able to display images from notebook computers
in simultaneous (CRT/LCD) mode. Should this occur, switch the notebook computer to “CRT only”
mode. If you are unsure how to do this, refer to your notebook computer’s user manual.
56
Runco CR-26HD/CR-32HDi Owner’s Operating Manual
SERIAL NUM BER
RUMA-011090
rev 10-22-07 v2.6
Runco International • 2900 Faber Street • Union City, CA 94587 • Ph (510) 324-7777 / (800) 23RUNCO / Fax (510) 324-9300
www.runco.com
Runco CL-810 Owner’s Operating Manual