1
r
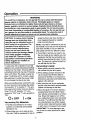
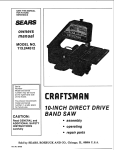
Save This Manual
For Future Reference
SEA/IS
owner's
manual
MODEL
NO.
113.177810
Serial
Number
Model and serial
numbers may be found
on the back of the motor
cover. You should
record both model and
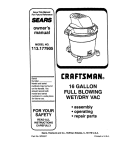
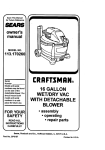
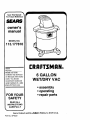
CRRFTSMRN
6 GALLON
WET/DRY VAC
serial numbers in a safe
)lace for future use.
FOR YOUR
SAFETY
• assembly
• operating
• repair parts
READ ALL
INSTRUCTIONS
CAREFULLY
Sears, Roebuck
Pa_ No. SP6022
end C.O.=Hf_ilHan
Estates,
IL. 60179 U.S.A.
r
FULL ONE YEAR WARRANTY
ON CRAFTSMAN
WET/DRY VACS
If within one year from the date of purchase, this Craftsman Wet/Dry Vac
fails due to a defect in material or worWnanship, Sears will repair it, free of
charge.
If this Craftsman
Wet/Dry
poses, this warranty
Vac is used for commercial
coverage
or rental pur-
applies for only 90 days from date of
purchase.
WARRANTY
SERVICE IS AVAILABLE BY SIMPLY CONTACTING
THE
NEAREST SEARS SERVICE CENTER/DEPARTMENT
THROUGHOUT
THE UNITED
STATES.
This Warranty
States.
applied
This warranty
gives you specific
only while this product
is used in the United
legal rights, end you may also have
other rights which vary from state to state.
•
Sears, Roebuck
and Co., D817 WA, Hoffman
Estates,
IL. 60179
IMPORTANTSAFETY INSTRUCTIONS
liquids, gases, or explosive dusts,
such as gasoline or other fuels, lighter
fluid, cleaners, oil- based paints, natu-
Safety Signal Words
DANGER: means if the safety information
is not followed someone will be seriously
ral gas, hydrogen, coal dust, magnesium dust, grain dust, or gun powder.
injured' or killed.
WARNING:
means if the safety informatlon is not followed someone could be
seriously injured or killed.
CAUTION: means if the safety information is not followed someone may be
injured.
for any flammable or combustible liquid.
Do not vacuum anything that is burning or
smoking, such as cigarettes, matches, or
hot ashes.
Do not _tacuum fireplace soot or ash. This
When using your Wet/Dry Vac, follow
basic safety precautions including the following.
is a very fine dust which will not be captured by the filter and may cause damage.
To avoid health hazards from vapors or
WARNING
do not vacuum toxic materials.
-Toroducedusts,
Do not use or store near hazardous materials.
the risk of fire, electric
injury:
Read and understand
• Do not usa Wet/Dry Vac as a sprayer
shock, or
•"
To avoid electric shock, do not expose to
rain. Store indoors.
Do not allow to be used as a toy. Close
this owner's man-
attention Is necessary when used by or
near children.
ual and all labels on the Wet/Dry Vac
before operating. Use only as described
In this manual. To avoid personal injury or
Do not use this Wet/Dry Vac with a torn
filter or without the filter installed except
damage to Wet/Dry Vac, use only Sears
Craftsman recommended accessories.
when vacuuming liquids as described in
the operation section of this manual.
Do not leave Wet/Dry Vac when plugged
Sparks inside the motor can ignite flammable vapors or dust. To avoid fire or
in. Unplug from outlet when not in use and
before sewicing. Turn off Wet/Dry Vac
before unplugging.
explosion:
° Do not vacuum, or use this Wet/Dry
Vac, near flammable
ol"combustible
2
To avoid injury from accidental starting,
To avoid falls, use extra care when clean-
unplug pow.er cord before changing or
cleaning filter.
Do not unplug by pulling on cord. To
ing on stairs.
This Wet/Dry Vac is double-insulated,
unplug, grasp the plug, not-the cord.
Do not use with damaged cord, plug or
other parts. If your Wet/Dry Vac is not
working as it should, has missing parts,
has been dropped, damaged, left outdoors, or dropped into water, return it to a
Sears Service Center.
Do not pull or carry by cord, use cord as
handle, close a door on cord, or pull cord
eliminating the need for a separate
grounding system. Use only identical
replacement parts. Read the instructions
for Servicing Double-lnsulated
Vacs before servicing.
Wet/Dry
Observe the following warnings that
appear on the motor housing of your Wet/
Dry Vac.
[_
around sharp edges or corners. Do not
run Wet/Dry Vac over cord. Keep cord
DOUBLE INSULATED
GROUNDING NOT REQUIRED
WHEN SERVICING USE ONLY
IDENTICAL REPLACEMENT PARTS
away from heated surfaces.
Do not handle plug or the Wet/Dry Vac
with wet hands.
WARNING:
To avoid electric
shock-
do not expose to rain - store
indoors.
Do not put any object into ventilation
openings. Do not vacuum with any ventilation openings blocked; keep free of
dust, lint, hair or anything that may reduce
air flow.
WARNING: For your own safety, read
and understand owner's manual. Do
Keep hair, loose clothing, fingers, and all
not pick up hot ashes, coals, toxic,
flammable or other hazardous mate-
parts of body away from openings and
moving parts.
riale. Do not use around
explosive
liquids or vapors.
SAVE THESE INSTRUCTIONS
The operation of any utility vac or blower
can result in foreign objects being blown
into the eyes, which can result in severe
Use only extension cords that are rated
for outdoor use. Extension cords in poor
condition or that are too small in wire size
eye damage. Always wear safety goggles
complying with ANSI Z87.1 (shown on
package) before commencing operation.
can pose fire and shock hazards. When
Safety Goggles are available
retail stores.
using an extension cord, be sure it is in
good condition. Using any extension cord
will cause some loss of power. To keep
the loss to a minimum, use the following
table to choose the minimum wire size
at Sears
extension cord.
To avoid hearing damage, wear ear protectors when using the vac for extended
hours or when, using it in a noisy area.
For dust operations, wear dust mask.
3
Extension
Cord Length
Gauge
(A.W.G.)
0-5O Ft.
50-100 Ft.
14
12
odwctfion
le_/{)ryy
V_-=_,isinteendead _
_wnerr's
?nousea-
_/Manual Contents
ttet-n
IM I:P.OIR_,ANT_NC_'rE
Pleasse
Rmad
C_armf_
Shoc_ks Arm CocTmmom - _mory
_r wneen t_,rr_'rv_
hu_midt_
of thee
_v.Toa re_,uc_et_e frrequJenL_yof
;hockss in _c_ur h_on'_e the _-_
rein-to add_lmo_ture
to -the_ir ,wit_ a
e h urmlidifii_r.
ac kin
Page
W_n_nty
Inf_orrn_ation .............................
- Sa_--_d
" Instru_cticons .................................
In_-or_uction ................................................
2
2
4
Ur_e.c:king _nd 'Checking
_---'arton _omtents
.............................
4
As_=-_rmbly ..................................................
4
Op_-r_tio n ..................................................
7
M_rr_anancee ............................................
9
Reo_Lir Part_ ..........................................
10
Chec;kimg
te entirire mo,'T,ter't_ o0f ca_rtcm.. __hec,_
Car om
Contents
A
em aggain_-_ _the .C_r[on. Counts
_rr,e_u_nitsm_y fn:_ucde _cc_s_ories
_rn.Ncotif'f
yc_ur Se_rs ._tcre
re danmaoe.:z_ or .rnlsssir_g.
Carrtor_
C;ontemts_
Descrript_io_.
'f" any
L_.s_
.............................
Qty./.
Vac A_ss_rntoly
..................................
"1
Hose _'As_rmbl_
...............................
"1
Casteer Fore, wt_tccragee ................
.4
C_LSteer...............................................
_4
Hose LLo_K ........................................
1
Owneers _amu_] .................................
-1
Filter_"
Nut:............................................
I
Fi_er ,r-_l_t_e
............................................
:I
Fi_,er: _R_:I ,-_tr_F_) .............................
:1
Fii_er cCa._e ............................................
1
F_T .....................................................
I_J_ity / N ._---.F--e......................................
Ext_nssi_m _Na_ds ............................. .2
"ter//Cmste
the auust._ru:m
Foot
A _merr bly"
uos_ide _:lo_wn _n thee
t_e ccas'_nr -feet
irr_o ttne m_m
6.'Turin
the a_ru,,mn upright.
o_f
., as s_ho_wn (4 pta_es)..
_on thine c_a_<-er foott untJ!il_
_oot iss
bDotTT:_rn_ of "th_dl.lsSt dIru_n.
"__he ccas_er _-=steer_.i_to t_e
aster ffo_.
_s
sP_vn
_c_ket
a_f
(z_ pt_m:_es).
, on thee c_s-_er u_tJi tthe_b_ll
_oot
am the
_r sterrm is ins_el't_
aall tlT_e _"e_, into
oc_k.et.:. Y_ wvill he_r thee b_all mnap
he socck_'_ amd the coaster _ill _wivml
/ wheen p_sit_ior_ng_
is c"_orr_=.
44
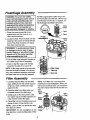
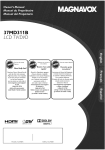
Float/Cage Assembly
WARNING:
For your own safety,
never connect plug to power source
outlet until all assembly steps are
the filter cage and the center ring of the
lid. Pry the tab out of the slot. Tilt the cage
and lift away from the lid. To replace, fol-
complete and you have read and
understood the safety and operation
instructions.
Do not operate vac
with any parts damaged or missing.
low float/cage
assembly
instructions.
Filter
1. Place the power assembly of vac
upside down into the drum or on a
clean smooth surface.
2. Locate the float. Place the float over the
Power
Assembly/Lid
-
Solid
End
opening in the center of the lid with the
words "This Side Towards Lid" laying
face down over the hole.
WARNING:
To avoid personal
or damage to vac
hands, fingers, or
objects out of the
when assembling
injury
be sure to keep
any other foreign
center opening
the float.
3. Line up filter cage tabs with the slots in
the center ring of the lid assembly.
4, Push on the filter cage until the tabs
snap into the slots for a secure fit.
NOTE: If
because
way, use
the blade
filter cage needs to be removed,
the float is placed in the wrong
a slotted screwdriver and insert
near one of the tabs between
(3)
(3)
Filter Assembly
1. Carefully
slide the filter over the filter
NOTE: Your filter has a red stripe that
cage, sliding it over the center ring covering the 3 slots until the filter stops
matches an in-store dlsplayer. When you
visit your local Sears store, just remember
against the lid.
the color of your stripe for the correct size
filter.
2. Place the hole in the filter plate over
threaded screw of the filter cage.
3. Gently push on the filter plate to seat
the rubber ring of the filter inside the circular channel of the filter plate.
Filter_
Nut "_
Plate
4, Place filter nut onto threaded screw and
tighten it down. Finger tighten only.
NOTE:
Lever of filter nut should be away
from plate as shown.
IMPORTANT:
Do not overtighten as this
may deform or crack the filter plate or filter
cage.
Stripe
Filter
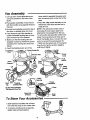
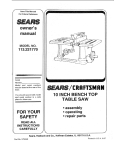
Vac Assembly
hose, which is opposite the swivel end,
into the vacuum port on the front of the
drum.
1. Line up motor cover label above vacuum port (located on the front of the
drum).
7. Place the utility nozzle securely on the
swivel end of the hose and the vac is
2. Place power assembly on top of drum
with the handles snug against the drum
channel.
ready for use.
NOTE: The swivel end of the hose is
removable if more hoses need to be
3. Be sure lid completely covers the top of
the drum so leakage does not occur.
attached for more length from the vac.
To remove the swivel portion of the hose,
4. Push down on top of the handles to
cause the flexible locking tabs to hook
onto the drum lip of the channel.
grasp the hose swivel and firmly pull it
out of the flexible hose. Connect the soft
5. l_ake sure that the locking tabs are
end of a second hose (accessory #9-
snapped in place to prevent the power
assembly from coming off. (See inset
17820) into the swivel end of the original
hose by forcing the sections together
until they fit tightly.
below)
6. Insert the flexible plastic end of the
Cord Wrap-........
Area •
Switch
Port
Power
Cord
Handle
Drum
Pull
Out
Flexible
Locking
Tab
Handle
Swivel
End UUIIty
Nozzle
Larger
Opening
•Drum
Sto
Tab
Drum
Power
Flexible
Locking Tabs
Do Not Force Flexible
Tab Beyond Stop Tab
Of Hose
To Store Your Accessories
1. Slide extension
handles and accesso-
ries over the rings on the caster feet.
2. To remove handles
and accessories,
lightly rotate and pull upward•
Lock
Operation
WARNING
To avoid fire or explosion,
do not operate
this vac in areas with flammable
gases, vapors or explosive duet in the air. Flammable gases or vapors
include but are not limited to; lighter fluid, solvent type cleaners, oil-base
paints, gasoline, alcohol or aerosol sprays. Explosive dusts include but are
not limited to; coal, magnesium, grain or gun powder. Do not vacuum explosive dust, flammable or combustible
liquids or hot ashes. Do not use this vac
as a sprayer for any flammable or combustible
liquid. To reduce the risk of
health hazards from vapors or dusts, do not vacuum toxic materials.
CAUTION:
damage
To reduce risk of hearing
wear ear protectors
empty the drum and clean the filter at
more frequent intervals to maintain
peak vac performance.
when
using the vac for extended hours or
when using it in a noisy area. The
operation of any utility vac can
result in foreign objects being
blown into the eyes, which can
result in severe eye damage. Always
wear safety goggles complying
with ANSI Z87.1 (shown on Package) before commencing
operation.
Safety Goggles are available at
Sears retail stores.
NOTE: A dry filter is necessary to pick up
dry material. If you use your vac to pick up
dust when the filter is wet, the filter will
clog quickly and be very difficult to clean.
3. If your filter is wet but you need to use
the vac to pick up dry material, you can
quickly dry the filter by running the vac
without hose attached for about 10 minutes. The clean air rushing through
To reduce the risk of electric shock, this
Vacuuming Liquids
appliance has a polarized plug (one blade
is wider than the other). This plug will fit in
a polarized outlet only one way. If the plug
1.When
of liq-
2.When picking up large amounts of liquid we recommend that the filter be
removed.
If the filter is not removed,
will become saturated
and misting
it
may
appear in the exhaust.
After you plug the power cord into the outlet, turn the unit on by pushing the switch
3. After using the vac to pick up liquids,
the filter must be dried to avoid possibte
from position "O" to position "1". The symbols used on the motor cover are interna-
mildew and damage
to the filter.
4. When the liquid in the drum reaches a
predetermined
level, the float mechanism will rise automatically to cut off airflow. When this happens, turn off the
"O" is the
symbol for "OFF" and "r' is the symbol for
"ON".
O= OFF I =ON
Vacuuming
picking up small amounts
uid the filter may be left in place.
does not fit fully in the outlet, reverse the
plug. If it still does not fit, contact a qualified electrician to install the proper outlet.
Do not change the plug in any way.
tional "On & Off" symbols.
the
vac will help dry the filter.
vac, unplug the power cord, and empty
the drum. You will know that the float
has risen because vac airflow ceases
Dry Materials
and the motor noise will become higher
in pitch, due to increased motor speed.
1. The filter must always be in correct
position to avoid leaks and possible
damage to vac.
IMPORTANT: To avoid damage to the
vac do not run motor with float in raised
2. When using your vac to pick up _/ery
fine dust, it will be necessary for you to
position.
7
Emptying
the Drum
Cord
accidental starting, unplug power
' cord
ARNING:
avoid injury
from
before To
emptying
the drum.
Wrap
When vacuuming is complete, unplug the
cord and wrap it around the handie,
!
1. To remove power assembly to empty
contents of drum, simply pull the flexible latches outward on each side of the
power assembly
drum.
to release from the
2. While holding the latches out, lift the
power assembly up and away from the
drum.
J
3. Lay power assembly
upside down on a.
clean area while emptying
changing filter.
drum or
4. Dump the drum contents into the proper
waste disposal container. Dump drum
contents opposite the vacuum
avoid spillage.
,
inlet to
i
WARNING: To avoid back injury or
falls, do not lift a vac heavy with liquid or debris. Scoop or drain
enough contents
vac light enough
out to make the
to lift comfortably.
Moving the Vac
1. Should it become necessary to pick the
vac up to move it, DO NOT pick the vac
up by the lid handles unless dust drum
is empty. To avoid dropping the vac
due to latches releasing or possible p_art
breakage, pick the vac up by the JiPof
the dust drum.
Maintenance
2. For best cloaning results due to accumulated dust, clean the filter in an open
Filter
dental starting, unplug power cord
I
ARNING: To avoid injury from accibefore changing or cleaning filter.
NOTE:
area. Cleaning SHOULD be done outdoors and not in the living quarters.
I
3. After filter removal from vac, remove
the dry debris by gently tapping the filter against the inside wall of your dust
drum. The debris will loosen and fall.
This filter is made of high quality
paper designed to stop very small particles of dust. The filter can be used for wet
or dry pick up. Handle the filter carefully
when removing to clean or installing it.
Creases in the filtei' pleats may occur
from installation but creases will not affect
the performance
4. For thorough cleaning of dry filter with fine
dust (no debris), run water through it as
described under "Wet Filter".
Wet Filter
of the filter.
After filter is removed, run water through
Cleaning
the filter from a hose or spigot. Take care
Your filter should be cleaned often to
maintain
that water pressure from the hose is not
strong enough to damage filter.
peak vac performance.
Installation
Be sure to dry the filter before storing or
picking
up dry debris.
IMPORTANT:
After cleaning, check
filter for tears or small holes. Do not
filter with holes or tears in it. Even a
hole can cause a lot of dust to come
Refer to page 5, "Filter Assembly".
the
use a
small
out of
Allow the filter to dry before reinstalling
and storing the vac.
Wet/Dry Vac
your vac. Replace it immediately.
Removal
To keep your Wet/Dry Vac looking its
best, clean the outside with a cloth damp-
To remove the filter for cleaning or
ened with warm water and mild soap.
replacement,
unscrew the filter nut from
the filter cage, remove filter plate and lift
off filter.
To clean the drum:
1. Dump debris out.
2. Wash drum thoroughly with warm water
and mild soap.
cage. It is there to help prevent your
fingers from getting into the blower
I
ARNING: Do not remove the filter
wheel.
IMPORTANT:
To avoid damage to the
blower wheel and motor, always reinstall
the filter before using the vac for dry
material pickup.
Dry Filter
1. Some removal of dry debris can be
accomplished without removing the filter from the vac. Slap your hand on top
of the power assembly while the vac is
turned off.
3.Wipe
I
out with dry cloth.
WARNING: To assure product
SAFETY and RELIABILITY,
repairs
and adjustment should be performed by Sears Service Centers,
always
parts.
using Sears replacement
NOTE: If your casters are noisy, you may
put a drop of oil on the roller shaft to make
them quieter.
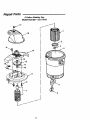
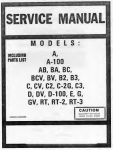
Repair Parts
6 Gallon Wet/dry Vac
Always
order by Part Number - Not by Key Number
Model Number 113.177810
WARNING
SERVICING
OF DOUBLE-INSULATED
In a double-insulated
instead of grounding.
WET/DRY
VAC
Wet/Dry Vac, two systems of insulation are provided
No grounding means is provided on s double-insulated
appliance, nor should a means for grounding be added. Servicing a double-.
insulated Wet/Dry Vac requires extreme care and knowledge of the system,
and should be done only by qualified service personnel. Replacement
parts
for a double-insulated
Wet/Dry Vac must be identical to the parts they
replace. Your double-insulated
Wet/Dry Vac is marked with the words "DOUBLE INSULATED"
and the symbol
marked on the appliance.
Key
No.
Accessories
J-_'-J(square
Part No.
1
2
3
4
5
9-17816
9-16937
9-16938
73347
825727
6
7
8
9
73137
509238
STD611007
820156-1
10
11
12
816345-1
15534-1
818413-5
13
14
15
818961
825723
822380-3
16
17
--
825640
73180
SP6022
within a square)
may also be
Description
t Filter (Red Stripe)
t Plate, Filter
t Nut, Filter
Drum, Dust
Caster Foot w/Storage
Caster _.
_'_1_)_ L
Cage/Float
* Screw, Pan Hd. Ty "AB" 10x3/4
Lid _,_
Nut, Hex Flange 1/4-20
Washer
_t_
Wheel, Blower
Spacer
Motor (includes Key No's 10 thru 13)
Cord w/Plug
Cover Motor
Switch Toggle
Owners Manual (Not illustrated)
included with unit but not listed above may be purchased at the hardware
department of most Sears retail stores.
t Stock Item - May Be Secured Through The Hardware Department Of Most Sears
Retail Stores
* Standard Hardware Item - May Be Purchased Locally.
10
Repair Parts
6 Gallon Wet/dry Vac
Model Number 113.177810
15_
11
6
J
J
11
For the repair or replacement parts you need
Call 7 am - 7 pro, 7 daysa week
1-8OO-366-PART
(1-800-366-7278)
For in-home major brand repair service
Call 24 hours a day,7 daysa week
1-8OO-4-REPAIR
(1-800-473-7247)
For the location of a
SearsRepair Service Center in your area
Call 24 hoursa day,7 days a week
1-800-488-1222
For information on purchasinga Sears
Maintenance Agreementor to inquire
about an existing Agreement
Call9 am - 5 pro, M0nday-Saturday
_-
1-800-827-6655
America's RepaJ[ S/_a/Lsts
The model and serial numbers
When requesting
service
following
information:
•
•
Product Type
Part Number
Sears,
PErt No. SP6022
will be found on the handle.
or ordering
*
•
parts,
always
provide
the
Model Number
Part Description
Roebuck and Co., Chicago,
Form No. SP6022
IL_ 60179 U.S.A.
Printed in U.S.A. 9/97