1
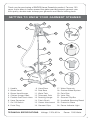
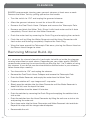
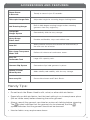
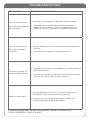
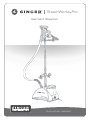
SteamWorks Pro
Garment Steamer
ON
OFF
instruction manual
IMPORTANT SAFETY Instructions
1. Read all instructions before using this product.
2. Use this product only as described in this manual. Other uses not recommended may
cause fire or electrical shock.
3. Do not immerse this product in water or any liquid; electric shock and injury could result.
4. Always unplug this appliance before coming into contact with liquid of any kind. This
includes filling and emptying the water tank.
5. Close supervision is necessary when the appliance is used near children.
6. Do not leave this appliance unattended while it is in operation.
7. This appliance operates using high heat and steam that can cause burns to skin. Use
caution around the Steam Head.
8. Do not touch the hot metal parts, hot water or steam to avoid burns.
9. Do not operate the steamer without filling the water reservoir. Always check the water
level before and during operation.
10. Do not lay the hose on the ground or wind it.
11. Do not direct steam at people or animals.
12. Do not steam clothing while it is being worn.
13. Do not pour water directly into the reservoir. Pour water only into the water tank.
14. Turn the appliance OFF and let cool before changing Steam Head attachments to
avoid burns.
15. The use of accessories or attachments not provided by SINGER Home Essentials may
result in fire, electric shock, or injury.
16. Never insert any objects into the tank or hose.
17. Keep the hose and steam head elevated above the tank.
18. Steam only in a vertical motion. Never use this appliance in a horizontal position.
19. Allow the appliance to cool completely for at least 30 minutes and drain the water tank
and water reservoir before storing.
20. Move the appliance by grasping the telescopic pole. Do not force the casters if they
are stuck. Turn off the unit, cool completely, drain the water tank and water reservoir
before inspecting the casters.
21. Unplug the unit from the outlet when not in use, when moving unit from one location
to another, and before cleaning.
22. Do not place the unit or any parts near an open flame, cooking or other heating appliance.
23. If the cord becomes damaged or the appliance has been dropped or damaged, do not
operate the product.
24. To avoid the risk of electrical shock, do not disassemble the steamer. Ship it to the
nearest authorized SINGER-approved service center for examination and repair.
Incorrect reassembly or repair can cause a risk of fire, electric shock, or injury while
the appliance is in use.
25. No detergent can be added into the water tank or it will cause damage. Distilled or
de-mineralized water is recommended.
26. Use this appliance indoors only.
SPECIAL INSTRUCTIONS:
To avoid a circuit overload, do not operate another high-wattage appliance on the same
circuit. If an extension cord is absolutely necessary, a 15-amp cord should be used. Cords
rated with less amperage may overheat. Use care to arrange the cord so that it cannot be
pulled or tripped over.
SAVE THESE INSTRUCTIONS
FOR HOUSEHOLD USE ONLY
2
Thank you for purchasing a SINGER Home Essentials product. For over 150
years, we’ve been in homes around the globe providing expert garment care
with quality, durable tools to keep your garments and fabrics looking fresh.
getting to know your garment steamer
2
3
15
4
1
14
13
16
20
5
19
12
22
21
16
10
11
6
23
8
9
17
7
18
1. Handle
2. Steam Head
3. Steam Head Hanger
4. Clothes Hanger Hook
5. Flexible Cool Touch Hose
6. Hose Connector 7. On/ Off Switch
8. Drain Plug
24
9. Hose Base
10. Pole Base
11. Water Tank
12. Telescopic Pole
13. Rotating Hanger
14. Fabric Brush
15. Crease Attachment
16. Garment Clips
Technical Specifications:
17. Water Reservoir
18. Casteer Wheel System
19. Pole Clips
20. Valve Cap
21. Garment Clip Bar
22. Handheld Steaming Board
23. Protective Glove
24. Power Indicator Light
Voltage: 120V, 60 Hz
Power: 1500 Watts
3
Assembly
Assembling Your Steamer
• Remove all packaging.
• Place the steamer base on the floor and remove the Water Tank.
• Insert the Telescopic Pole into the Pole Base and twist the ring clockwise to lock.
• Connect the Clothes Hanger Hook to the top of the Telescopic Pole as shown.
• Expand the Telescopic Pole by unlocking the clips and fully extending the
pole. Lock clips to secure.
• Attach the Cool Touch Hose by pushing the hose onto the Hose Base and
turning _ turn clockwise to lock.
• Hang the Steam Head on the Steam Head Hanger.
ON
OFF
ON
WARNING:
OFF
Always hang the Steam Head on the Steam Head Hanger when
not in use to prevent injury and surface damage.
Make sure the Telescopic Pole is fully extended during use to
ensure a smooth steam flow through the hose.
Do not pull the hose with excessive force or move it by pulling
on the hose. Damage or injury may result.
4
Crease Attachment Assembly and Use
• Turn the steamer off and wait until there is no steam coming from the Steam
Head. And it is completely cool to the touch.
• Connect the flute of the Crease Attachment to the pegs at the bottom of the
Steam Head.
• Push the Crease Attachment into place gently until it clicks?
• To use, place the fabric between the Steam Head and the Crease Attachment to
create the crease. Move the Steam Head in a vertical motion to press the crease.
Fabric Brush Assembly and Use
• Turn the steamer off and wait until there is no steam coming from the Steam
Head and it is completely cool to the touch.
• Insert the pegs on the Fabric Brush into the holes in the Steam Head.
• Steam as usual, using the Fabric Brush to smooth stubborn wrinkles.
5
Folding Hanger Assembly
• Secure the Steam Head Hanger assembly to the Telescopic Pole.
• Tilt the hook of the Rotating Hanger and insert it into the hole on the flat side
of the Steam Head Hanger. Press gently to lock.
• Pull the arm of the Rotating Hanger up until the sides are completely extended.
• Lock the horizontal bar in place by aligning the dots on the bar.
Garment Clips Assembly and Use
• Snap the Garment Clips into the holes on the horizontal bar of the Folding Hanger.
• Clip the Garment Clip Bar to the bottom of the Telescopic Pole.
• To use, hang the garment from the top clips and secure with the bottom clips,
pulling the garment taut to steam or crease.
WARNING: Always turn off the steamer before attaching
accessories to avoid injury.
6
Filling the Water Tank
• Turn the steamer off and unplug it.
• Remove the Water Tank by pulling upward on the handle.
• Unscrew the Valve Cap from the Water Tank, fill the tank with cool water,
and replace the Valve Cap. Do not use hot water. To prolong the life of your
steamer we recommend using distilled or de-mineralized water.
• The tank holds 2.5 Liters of water.
• Insert the Water Tank into the base, making sure the plug on the bottom of
the tank meets the post on the steamer base and fits securely in the cavity.
NOTE: Do not operate the steamer without water as this could cause damage
to the unit.
Never use water with additives, including scents, starches, or fabric conditioners,
as they can cause deposits to form in the steamer that can stain your clothing.
7
HOW TO STEAM
• Fill the Water Tank.
• Expand the Telescopic Pole by unlocking the clips and fully extending the
pole. Lock clips to secure.
• Plug in the power cord to a grounded electrical outlet and turn on the power
at the ON/OFF switch. The Power Indicator Light will glow.
• The unit will be ready to use in just 45 seconds.
• Hang the garment on the Rotating Hanger. You may also use a clean, rustfree clothes hanger, and place the hanger on the Clothes Hanger Hook.
• Place the protective glove on the hand that will be holding the garment.
• Hold the Steam Head with the steam vents pointing away from your body.
• Touch the Steam Head to the garment lightly, moving it in an up and down
vertical motion, beginning at the bottom of the garment and moving upward.
• Steam will rise along the inside and outside of the fabric to remove wrinkles.
Continue to steam the garment, smoothing with your free (gloved) hand.
• Repeat until fabric is wrinkle free.
• When finished, switch the power off at the On/Off Switch.
• Unplug the steamer.
• Hang the Steam Head on the Steam Head Hanger when not in use.
• Empty the Water Tank before storing.
ON
OFF
8
Steaming Tips:
• Do not allow kinks to form in the hose at any time.
• Certain draperies can be steamed while hanging.
• To remove stubborn wrinkles, the Fabric Brush may also be used.
NOTE: Do not operate the steamer without water as this could cause damage to
the unit.
Never use water with additives, including scents, starches, or fabric
conditioners, as they can cause deposits to form in the steamer that can stain
your clothing.
WARNING:
Operate the garment steamer on the floor at all times.
The hose may make a gurgling noise during use. This is normal
and is caused by condensation in the hose. Hold the hose up to
allow condensation to flow back into the tank.
NEVER steam a garment while it is being worn. Burns and injury
may result.
Pulling on a garment with too much force may cause the
garment steamer to tip.
Do not operate the garment steamer without water in the tank.
Do not operate the garment steamer for more than 3 hours at
a time.
Do not lift the garment steamer by the Water Tank handle.
Handheld Steaming Board
Use Steam Board for help with collars, pockets and every corner.
9
Cleaning
SINGER recommends cleaning your garment steamer at least once a week.
Remove the Water Tank by pulling upward on the handle.
• Turn the switch to “Off” and unplug the garment steamer.
• Allow the garment steamer to cool for at least 30 minutes.
• Remove the Cool Touch Hose. Collapse and remove the Telescopic Pole.
• Remove and drain the Water Tank. Rinse it with fresh water and let it drain
completely. Place it back on the Water Reservoir.
• Drain the water tank by removing the Drain Plug and emptying the contents.
• Flush the unit by filling the Water Reservoir and the Hose Connector with
fresh water and draining completely. Replace the Drain Plug.
• Wrap the hose around the Telescopic Pole once, placing the Steam Head on
the Steam Head Hanger to store.
Removing Mineral Build-Up
It is common for minerals found in hard water to build up inside the steamer,
causing intermittent or weak steam. Depending on your water quality, SINGER
recommends removing the mineral build-up after the first 1 to 2 weeks of using
this steamer. If you do not use de-mineralized or distilled water in your steamer,
follow these steps monthly.
• Turn the switch to “Off” and unplug the steamer.
• Remove the Cool Touch Hose. Collapse and remove the Telescopic Pole.
• Drain the Water Reservoir, and empty the water from the Water Tank.
• Prepare a solution of 1 cup vinegar and 1 cup water.
• Slowly pour the solution into the Hose Connector until the Water Reservoir is
about half full, near the top of the hose.
• Let the solution stand for about 40 minutes.
• Drain the solution by removing the Drain Plug and emptying the solution into a
sink or tub.
• Drain the solution from the Hose Connector by tilting the unit over a sink or tub
and pouring the water out.
• Pour clean water into the Hose Connector and Water Reservoir inlet and drain.
Repeat this step until the vinegar odor dissipates.
• Reassemble the unit.
10
Accessories and Features:
Steam Power
in Seconds
Ready to steam in just 45 seconds.
Telescopic Hanger Pole
Adjustable height for steaming longer clothing items.
360˚ Rotating Hanger
Built-in 360-degree rotating hanger makes steaming
garments from any angle easy.
Collapsible
Hanger System
Conveniently folds for easy storage.
Heavy Gauge
Fabric Hose
Durable and flexible, stays cool while in use.
Auto-Off
Safety feature switches the steamer off automatically if
the tank runs out of water.
Extra Large Transparent
Water Tank
Delivers 60 minutes of continuous steam.
Easy Fill
Removable Tank
Large 2.5L capacity tank.
Garment Clip System
Convenient clips hold garments in place.
Deluxe 4-Castor
Wheel System
Adds stability and mobility, rolls for easy storage.
Accessory Kit:
Crease Attachment and Fabric Brush.
Handy Tips:
• Do not touch the Steam Head to silk, velvet, or other delicate fabrics.
• Especially on delicate fabrics, test the heat setting in an inconspicuous place
(like an inside seam) before steaming the entire garment.
• Always consult the garment care label on a piece of clothing before steaming.
The
symbol indicates that the garment can be steamed, and the
symbol indicates that the garment should not be steamed.
• Heavier fabrics may require more steam.
11
troubleshooting
PROBLEM
The unit fails to steam
Two indicating lamps do
not illuminate
The unit fails to steam
Two indicating lights
illuminate
Excessive gurgling of
hose and steam nozzle
Steam is intermittent
REASON & SOLUTION
• Steamer is not plugged in - plug into electrical outlet
• Household circuit breaker/ground fault Interrupter is
tripped or fuse is blown - check the power outlet or if
further assistance is needed, call a qualified electrician
• Mineral build-up in the unit - follow the removing mineral
build-up
• The water tank is empty - refill the water tank
• Condensation in hose - some gurgling is a natural effect of
the steam process.
• For excessive gurgling, extend the hose vertically to allow
water to drain back into the water reservoir.
• Mineral build-up in the unit - it’s normal for the unit to
periodically stop steaming for a few seconds.
• If the steam stays off for longer periods, follow the
Removing Mineral Build-up procedure.
If troubleshooting does not solve the problem, please call SINGER at
1-800-4-SINGER or 1-800-474-6437.
12
SINGER® SEWING COMPANY LIMITED WARRANTY
STEAMWORKS PRO GARMENT STEAMER
IMPORTANT: SAVE THIS DOCUMENT AND KEEP IT IN A SAFE PLACE
What Does This Limited Warranty Cover?
The SINGER SteamWorks Pro Garment Steamer is warranted to be free from
defects in material and workmanship.
How Long Is This Limited Warranty?
The warranty for the GARMENT STEAMER’s wiring and electronic parts is for a
period of two (2) years from the date of purchase.
The warranty for all other parts of the GARMENT STEAMER is for a period of ninety
(90) days from the date of purchase.
What Will SINGER Do?
If the electronic parts and/or the other parts in the GARMENT STEAMER, after
inspection by SINGER, prove to be defective during the applicable warranty
period(s), the electronic parts and/or the other parts will be repaired or replaced at
SINGER’s option, without charge, except for any expense associated with sending
the GARMENT STEAMER to SINGER.
If SINGER sends a replacement GARMENT STEAMER, it will carry the remaining
warranty of the original GARMENT STEAMER.
Who Is Covered By This Limited Warranty?
This warranty may only be used by the original consumer owner of the GARMENT
STEAMER and may not be transferred or assigned.
What Are The Other Exclusions or Limitations?
• Service under this warranty may only be obtained within the 48 contiguous states,
Alaska, Hawaii and Canada.
• The GARMENT STEAMER is warranted only for normal household (noncommercial) use. This warranty does not cover defect(s) caused by abuse, lack of
maintenance or other neglect, failure to follow the care, cleaning or other instructions
for the GARMENT STEAMER, misuse, or events beyond our control.
• ANY IMPLIED WARRANTY APPLICABLE TO THE GARMENT STEAMER,
INCLUDING WITHOUT LIMITATION THE WARRANTIES OF MERCHANTABILITY
AND/OR FITNESS FOR A PARTICULAR PURPOSE, IS LIMITED IN DURATION
TO THE DURATION OF THIS WRITTEN WARRANTY. SINGER SHALL NOT BE
LIABLE FOR CONSEQUENTIAL ECONOMIC DAMAGES RESULTING FROM
BREACH OF THIS WARRANTY OR ANY IMPLIED WARRANTY.
• SINGER does not authorize any person to create for it any obligation or liability in
connection with the GARMENT STEAMER and any of its parts beyond those set
forth in this warranty.
• SINGER disclaims liability under this warranty for any damage or defect resulting
from the use of other than SINGER parts and SINGER approved service in the repair
and maintenance of the GARMENT STEAMER.
13
Does State Law Affect My Rights?
• This warranty gives you specific legal rights, and you may also have other rights
which vary from state to state.
• Some states do not allow limitations on how long an implied warranty lasts,
so the above limitation may not apply to you.
• Some states do not allow the exclusion or limitation of incidental or consequential
damages, so the above limitation or exclusion may not apply to you.
How Do I Get Service Under The Warranty?
Service under the warranty may be obtained by returning the GARMENT STEAMER with:
1.This original warranty document; and
2.Proof of purchase (such as the purchase receipt) to:
SINGER Sewing Company
ATTN: Service Department
1224 Heil Quaker Boulevard
LaVergne, TN 37068
What If I Have Questions About The Warranty?
If you have any questions regarding these warranties, please contact us:
SINGER Sewing Company 1-800-4-SINGER
E-mail: [email protected]
ATTN: Consumer Affairs (1-800-474-6437)
1224 Heil Quaker Boulevard
LaVergne, TN 37068
or through the Customer Service Area of our web site: www.singerco.com
SINGER® IS A REGISTERED TRADEMARK OF THE SINGER COMPANY LIMITED.
14