1
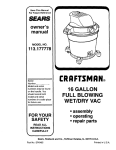
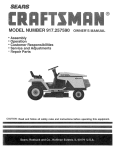
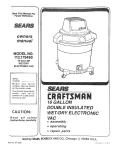
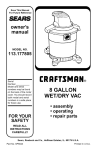
Save This Manual
For Future Reference
Sears
MODEL NO.
113.179881
Serial
number
Model
and
serial
number
may be found
on the motor cover.
You should record both
model
and
serial
number in a safe place
for future use.
16 ;ALL ON
WET-DR Y VA C
DOUBLE
INSULA
CAUTION:
Read
all
instructions
safety
carefully
TED
• assembly
• operating
• repair
Sold
by
Part No, 73265
SEARS,
ROEBUCK
AND
parts
CO., Chicago,
_L. 60584
U_S_A_
....
2
#k
FULL
ONE
YEAR
WARRANTY
ON
CRAFTSMAN
WET-DRY
VAC$.
If within one year from date of purchase, this Craftsman Wet-Dry Mac fails due to a defect in
material or workmanship, Sears will repair it, free of charge.
WARRANTY SERVICE iS AVAILABLE BY SIMPLY CONTACTING
THE NEAREST SEARS
STORE OR SERVICE CENTER THROUGHOUT
THE UNITED STATES.
This warranty gives you specific legal rights, and you may also have other rights which vary
from state to state.
SEARS,
ROEBUCK
AND
CO.,
SAFETY
Dept.
698/731A,
Sears
Tower,
Chicago,
IL 60684
iNSTRUCTiONS
Rules for Safe Operation
1. Know Your Vac
Read and understand the owners manual and
labels affixed to the vac. Learn its applications
and limitations as well as the specific potential
hazards peculiar to this vac.
2. This Vac is Double Insulated which eliminatesthe
need for a separate grounding system. If the use
of an extension cord is required be sure that it is in
good condition and meets the requirements as
listed below.
NOTE: The use of any Extension Cord will cause
some loss of power. To keep the loss to a
minimum and to prevent overheating and motor
burnout, use the table below for the MINIMUM
wire size Extension Cord.
Extension Cord Length
Wire Size
0 - 50 Feet
No. 14
50 - 100 Feet
No. 12
3. WARNING: To avoid fire or explosion caused by
the igniting of vapors or dust due to the arcing of
the motor brushes:
a. Do not operate this VAC in areas with
flammable
vapors
(such as lighter fluid,
cleaners, oil-base paints, gasoline or gasahol)
or explosive dust (such as coal, magnesium,
grain or gun powder) in the air.
b. Do not vacuum explosive dust, flammable or
combustible liquids or hot ashes.
c. Do not use VAC as a sprayer for any
flammable or combustible
liquid.
4 WARNING:
To avoid health hazards from
vapors or dusts, do not vacuum toxic materials.
5. Do not use VAC with torn filter. Replace filter if
torn.
6. WARNING: To avoid your hair or a small child's
hair from being pulled into your vac motor, keep
all hair away from the motor inlet located on top
of the vac.
7. Sears Service Center can repair your vac should
the need ever exist. However, if you choose to
service the vac yourself
please read and
understand
MAINTENANCE
instructions
before changing brush assembly.
WARNING: Taking apart this VAC can result in
dangerous electrical hazards if any leads (wires)
are pinched against metal surfaces when VAC is
put together again. Reassemble carefully.
8. Replace both brushes when either is worn to
about 1/4" in length or after about 500 operating
hours.
9. NOTE: Static Buid-up -- A stationary electrical
charge may sometimes build up around your
vac hose and housing. This is common in dry
areas and a slight shock may be gotten much the
same as walking across a carpet and touching a
wall switch. This is onlytemporaryand
does not
affect the use of the vac.
A special
2-1/2 inch diameter
hose and
extension handle kit which may reduce the
amount of static build up, Service Part Number
73100, can be purchased through your Sears
Service Department.
10. Plug VAC into 110-120v, outlet protected by 15
amp. fuse or circuit breaker.
11. Empty drum and clean filter often to keep motor
cool and running at its best.
WARNING: Unplug power cord before cleaning
or changing the filter.
12. Grasp plug to remove from wall socket, not by
pulling cord.
13. Don't use VAC unless filter is in correct position.
14. Don't oil or grease motor or blower bearings.
These are sealed bearings.
15. Make sure filter is dry for both dry vacuuming
and storing.
16. Use only recommended accessories.
17. Note the cautions and warnings that appear on
the motor housing and dust drum:
DOUBLE INSULATED
GROUNDING NOT REQUIRED
WHEN SERVICING USE ONLY
IDENTICAL REPLACEMENT PARTS
CAUTION:
Keep Filter clean.
WARNING: To avoid electrical shock do not expose
to rain. Store indoors.
WARNING:
For your own safety, read and
understand
Owner's Manual. Do not pick up
flammable materials, hot ashes or coals. Do not use
around explosive liquids or vapors.
WEAR
YOUR
The operation
of any utility vac can result in foreign
objects being blown into the eyes, which can result in
severe eye damage.
Always
wear safety goggles
complying
with ANSI Z87.1 (shown
on Package)
before commencing
operation.
Safety Goggles
are
available
at Sears retail or catalog
stores.
introduction
TWO
iMPORTANT
Second, on Static Electricity
When operating
this Vac a static charge may build
up around
the Vac, the Hose
and
Extension
Handles.
This also includes
the operator.
Contact
with any item with a lesser charge
will cause a
discharge
or balancing
of charges. Thus, creating a
very temporary
shock
to the operator
much like
walking across a carpet and touching
a wal! switch.
This is only temporary
and will not affect the use of
the Vac.
NOTES
First, on our Patented Air Bleed-Off
System. When
you turn your Vac on you will notice air blowing
out
of your Vac all around the lid. This is not a leak. This
Vac is designed
to bleed-off
additional
exhaust air
in this area. This is a Patented
Feature
which
increases
the performance
of this Vac.
CONTENTS
Rules for Safe Operation
.....................
Introduction
.................................
Unpacking
and Checking
Contents
Assembly
....................................
Operation
...................................
Maintenance
.................................
Optional
Accessories
........................
Repair Parts .................................
unpacking
and checking
contents
Model 113.179881 Wet-Dry Vac is shipped complete
but does not include
the optional
accessory
kit.
Available
accessories
can be found on page 8.
A
\
Open carton and remove all accessories
laying in
top of carton.
Check each item with the Carton
Contents
list
and
notify
your
Sears
Store
immediately
if any parts are missing.
CARTON
Key
A
B
C
D
E
F
CONTENTS
Description
Vac Assembly
.........................
Hose Assembly
(2-1/2" Dia.)
...........
Foot, Caster
...........................
Caster
................................
Nozzle, Rectangular
...................
Hose Strap ............................
Qty.
1
1
4
4
1
1
2
3
...........
3
4
5
6
8
9
assembly
WARNING:
For your own safety, never connect plug
to power source outlet until assembly
steps are
complete
and you have read and understand
the
safety and operation instructions.
Do not operate
VAC with any parts damaged or missing.
PUTTING
YOUR
VAC
TOGETHER
1. Remove lid assembly
from dust drum. Push down
on both handles at once, while pulling out on both
flexible
locking
tabs. With locking
tabs in "out"
position,
lift lid from drum.
NI
I
_
-OUT
FLEXIBLE
HANDLE __lD
FLEXIBLE
LOCKING
TAB
(
CASTER
2. Turn dust drum upside down. Insert caster feet
into holes in bottom
of drum and casters
into
holes in caster feet as shown. Be sure all parts are
seated.
CASTER
FOOT
DUST DRUM
PUSH
DOWN
3. Before replacing the lid check to see if filter
wing nut is tight, it should be tight enough that
filter cannot turn easily. Finger tight only.
4. Put the top back on the dust drum by lining up
the vacuuming
opening
of the top with the
drain of the dust drum and push down on both
handles at once. Make sure that the locking
tabs are snapped
in place to prevent
the lid
from coming
off.
4
5. Put one end of the swivel hose into the vacuumi ng
opening
directly
above the drain. Take the hose
strap and loop it around the hose about one foot
from the vacuuming
opening.
Then put the other end of the hose strap into the
keyhole
sl.ot just under the drain as shown.
When the vac is pulled around
by the hose, the
strap between the drum and the hose will help the
vac remain easy to handle.
LOOP HOSE
;TRAP AROUND j
HOSE BEFORE /
INSERTING IN
i
Put the utility nozzle on the other end of the hose
and your Vac is ready to use.
KEY HOLE
I
CONNECT HERE
FOR 2-1/2" HOSE
KEY HOLE
SLOT
operations
Using
your
1. Vacuuming
Vac
liquids
A. There are many methods of vacuuming
liquids
which wil! vary depending
on the conditions
you encounter.
You may have to experiment
with
your
vac
accessories
to
find
the
combination
best suited for your needs.
B. When vacuuming
large
volumes
of liquid,
usually
one
or more
fu!l
drums,
it
is
recommended
that you remove
the filter to
eliminate any misting which may result from a
saturated
filter.
C. When vacuuming
small amounts
of liquid it
will be best to leave the filter in place. When
the
filter
becomes
saturated
it will be
necessary for you to change to a dry filter or
dry out the current filter before proceeding.
To
aid drying a wet filter you may run the vac for
about 5 minutes with filter in place.
2. Draining
D. Your vac is equipped
with a float mechanism
which will rise automatically
to cut off suction
when the liquid in the drum reaches a certain
level. When
the float
rises the motor
will
develop
a higher
pitch
noise than normal
running.
Turn off the vac and empty the drum.
E. Once the filter becomes
wet you must dry it
before using the vac to pick up dry material
such as sawdust or before storing the vac for
future use. If you pick up sawdust
when the
filter is wet the sawdust will stick to the filter
and become
hard when the filter dries.
In
addition,
if you store the vac when the filter is
wet it wil! mildew and a very unpleasant
odor
will result.
F. Your
vac may be
explosive,
non-toxic
used to
liquids.
pick
the Drum
Your Vac has a drain for emptying
liquids. Just
unscrew
the drain cap and lift slightly.
The drain
cap has a retainer so that it can be put back on
quickly
and will not easily be lost.
\_/
DRA_N
up
non-
CORD WRAP
3. Dry Pick Up
NOTE:
When vacuuming
very fine sawdust
or
spackling
compound
from drywall
type material,
it will be necessary
for you to clean your filter at
frequent
intervals.
A. Always
use a dry filter
materials
like sawdust.
when
picking
ON-OFF
;WITCH
up dry
B. If you pick up sawdust or dry material when the
filter is wet it will clog the filter.
C. To aid drying a wet filter you may run the vac
for about 5 minutes
before using it to pick up
dry material.
D. Use your vac to pick up many non-explosive,
non-toxic,
materials
such
as sawdust,
woodchips
and shavings,
sand, gravel, even
nails.
4. Blowing
To use your
the opening
"Blowing".
/
BLOWING
OPENING
VACUUM
C
vac for blowing just put the hose into
on the top of your vac that says
5. On-Off-Switch
Your vac is turned ON or OFF by using
easily found on the Motor Cover.
6. Cord
theswitch
Wrap
When finished
using your vac, unplug
and wrap it around
the Motor Cover.
the cord
maintenance
INSTALLATION
FILTER
MAINTENANCE
WARNING
or cleaning
-- Unplug
filter.
power cord before changing
REMOVAL
To remove the old filter for cleaning
or replacement
remove the wing nut on the bottom plate of thefilter
and lift the filter off the wire guide.
__WING
NUT
To ensure a proper seal clean the lid area where the
filter will set. Slide the new filter over the wire guide
so that the threaded
part of the guide goes through
the hole in the bottom plate of the filter. Then run
wing nut down threads
finger tight only. Do not
overtighten
as this will cause deformation
or cracks
in the filter or end plates.
CLEANING
Your filter should be cleaned often to maintain peak
performance.
Dry filter before storing or picking up
dry debris.
Dry Filter
To remove dry debris gently tap the filter against the
inside wall of your waste container and the debris
will loosen and fall.
FILTER
WiNG
t
GUIDE
_FILTER
SEAT
ON LID
NUT
Wet Filter
To clean a wet filter you can run water from a garden
hose through
it. Take care that the water pressure
from the hose is not strong enough to damage the
filter.
REPLACING
iMPORTANT:
Dry the filter before storing
up dry debris. You may run the vac with
place to speed up drying. Check the filter
small holes. Even a small hole can cause
to come out of your vac. Do not use a filter
or tears in it. Replace it immediately.
!_,,
BRUSHES
NOTE:
Sears Service
Center can repair your vac
should the need ever exist. However,
if you choose
to service
the vac yourself
please
read and
understand
the maintenance
instructions
before
changing
brush assembly.
WARNUNG: Taking apart this VAC can result in a
dangerous electricam hazard if any leads (wires) are
pinched against metal surfaces or if insulating
parts
are not repmaced when VAC is put together again. To
avoid shock or fire, reassembie
carefully.
WARNING
on motor,
DOME SCREW
_DOME
I
(1) SCREW
(4) SCREWS--_
_MOTOR
A. If motor does not run check the plug and cord
and fuse or circuit
breaker
for faults
before
working
on the vac.
B. When brushes are worn to about 1/4" or after 500
operating
hours, they should be replaced.
C. Your vac motor has two brushes.
If either
to be replaced then both must be replaced
time.
or picking
the filter in
for tears or
a lot of dust
with holes
\
I
I
needs
at that
--unplug
power cord before working
blower, or changing
brushes.
TO REPLACE BRUSHES
ON MOTOR
replace both brushes at same time.
1. Remove screw
Dome.
holding
Dome
2. Remove
five screws
holding
shown. Remove Motor Cover.
you replace one brush holder
-- Be sure to
as shown.
Remove
Motor
Cover as
It will be easier if
at a time.
NOTE: To avoid crossing
brush wires connect
flag
terminal
to new brush as soon as it is removed from
old brush.
The brush and plastic holder are connected
and are
replaced
as a complete
unit.
3. Remove
Screw,
Retainer
and Brush
Holder
Assembly
as shown. Brush Holder Assembly
is
thrown
away after Flag Connector
is removed
from Brush Holder.
4. Connect
new brush holder to flag connector.
(Be
sure connectors
are put back together
the same
way they were taken off.) Putting connectors
on
wrong will cause damage to the motor. Replace
brush holder, retainer and screw.
5. Put the Motor
Cover
6. Put the Dome
back
back
on.
on.
NOTE: When new brushes are put in, the motor
may sound differently
for a while until the new
brushes are seated.
BRUSH AND
BRUSH HOLDER
\
RETAINER
SCREW .....
FLAG TERMINAL
COVER
Sears Wet-Dry Vac recommended
accessories
1
4
2-1/2"
DIAMETER
PLASTIC
For
large
debris,
the current
2-1/2"
diameter
accessories
shown
above
are available
at your
nearest Sears retail or catalog
order store.
1.9-16901
-- Round Brush for dusting.
2. 9-16964
-- Extension
handles for 2-1/2" hose.
Extends
work-area
range up to 46" more.
3. 9-16902
-Crevice
Tool
for
cleaning
Hard-to-reach
areas.
4. 9-178!8-Connector
ACCESSORIES
6. 9-16925 -- 14" Wide Nozzle with brush for large
area pick-up.
Gets dust and dirt from
bare
floo rs.
7.9-16978
-- Car Nozzle ideal for cleaning
the
inside of your car-picks up stones and dirt off
carpet; cleans ash tray without having to remove
tray.
ACCESSORY
SET
2-1/2" diameter
Extension
Hose and
Kit extends cleaning
reach up to 72".
9- 16919 -- 6 Piece Accessory
Set includes
(1)
Round
Brush,
(2) Two
Extension
Handles,
(3)
Crevice
Tool,
(6) 14" Wide Nozzle,
(5) Squeegee
Nozzle.
5. 9-17817
-14" Squeegee
Nozzle
for
wet
pick-up.
Complete
with
built-in,
flexible
squeegee blade to wipe clean and pick up water,
suds and other liquids.
The above recommended
accessories
and available
at the time of printing.
were
current
9_1690_5
_16909
9-16906
11/2'' DIAMETER
9-16907
HEAVY
DUTY
The current
1-1/2"
diameter
accessories
sho'wn
above are available
at your nearest
Sears catalog
order store.
9-16903
-Extension
handles
for 1-1/2"
hose.
Extends work area range up to 48" more.
9-16905 -- Round brush for dusting, great on stairs
and blinds. Soft bristles
pick up dirt from hard-toclean areas, convenient
angled neck.
9-16909 -- 1-1/2" diameter
extension
hose extends
cleaning
reach up to 10 Ft. Heavy Duty Plastic Hose
may be used with 1-1/2" metal accessories
or with
2-1/2" plastic accessories.
Adapters
included.
9-16907
-Squeegee
Complete
with built-in,
wipe clean and pick
liquids.
9-16908
METAL
ACCESSORIES
9-16906 -- Nozzle with brush for large area pick-up.
Gets dust and dirt from bare floors.
9-16904 -- Crevice tool cleans hard-to-reach areas.
Remove long-standing
dust from behind radiators,
under appliances,
beneath low-sitting
objects,
behind seats.
9-16908
--
Indoor/outdoor
11/2" DIAMETER
nozzle
for
wet pick-up.
flexible
squeegee
blade to
up water,
suds and other
8
type
carpet
ACCESSORY
nozzle.
SET
16911 -- Includes
10 foot
handle, carpet nozzle.
hose, two piece extension
The above recommended
and available
at the time
accessories
of printing.
were current
repair parts
PARTS
LnST FOR 16 GALLON
WET-DRY
VAC 113o179881
3
6
lo
7
8
t
9
Key
No.
Part No.
Description
1
2
3
28932
15531
23665
4
5
6
V26003
28891
STD600805
7
8
9
10
15539
STD600803
19552
25916
Frame
Ring, Pressure
Armature Assembly
(includes Key No. 2)
Brush Assembly
Retainer
*Screw, Pan Cross Type
8-32 x 1/2
Bracket, Bearing
*Screw,
Clip
Field
Pan Cross
Assembly
8-32 x 7/1(_
*Standard
Hardware
Item
-- May be Purchased
Loca!iy
\
35
/
10
PARTS
LIST FOR 16 GALLON
FIGUFIE
Key U
No. I Part No,
WET-DRY
VAC 113,179881
2
Part No.
Description
Description
=
STD600803
2
3
I 22209
I STD610803
4
I
*Screw,
7/16
Pan Cross
Cover Assembly
*Screw, Pan Cross
8 x 3/8
Dome
Type
BT
*Screw, Pan Cross
!0 x 5/8
Type
AB
Type
BT
5
73155
I STD611007
6
STD6!0605
*Screw, Pan Cross
6x 1/2
8
9
10
11
I
I
I
l
*Washer,
Washer,
Lever
12
I
STD551006
17787
22210-0!
24473
25996
V 19002
131
14
15
16
17
18
20432
! 22188-01
I 73120
I V 22215
I 73169
I STD510810
19 I 22212-01
20 I STD610807
21
22
23
24
25
26
I 73150
I 73166
I 20557-01
I 73147
I STD541625
I 73191
I
73187
73167
73102
STD611010
8-32 x
.t56 x .404 x .033
Spring
Bushing,
Snap
Motor Assembly
Screw, Pan Cross Type T
6-32 x 3/4
Switch
Bracket,
Switch
Tie, Cable
Gasket
Collector
Screw, Pan Rec. Hd. 8-32
xl
Ferrule
*Screw, Pan Cross
8 x 3/4
Type
*Standard
Hardware
Cap, Drain
Guide Assembly
Screw, Pan Cross
t0-24 x 1/2
34
35
36
37
38
39
22189
25969
STD541408
STD551008
28229-01
28963
Float Assembly
Gasket
40
41
42
43
44
45
46
47
20866
STD541031
15534
V 22220
22192
19693
STD375007
73165
STD600802
B
49
24464
STD610805
73265
Item --
1t
*Screw,
Pan Cross
No. 10x 1
73185
27726-01
20605
48
Hose Assembly
Strap, Hose
Nozzle, Rectangular
Filter Assembly
*Nut, Wing, 1/4-20
Drum Assembly
(Includes
Key No. 31)
Foot, Caster
Support,
Caster
Caster
May be Purchased
Foot
Type
AB
Type
T
*Nut, Lock 8-32
*Washer, 3/16 x 1/2 x 3/64
Nozzle
Lid Assembly
(Includes
Key No. 35)
Gasket
*Nut, Hex 5/16-18
Washer
Wheel Assembly
Spacer
Cord Assembly
*Connector
Handle
*Screw, Pan Cross
x 5/16
Clamp
*Screw, Pan Cross
8x 1/2
Owner's
Manual
(Not Illustrated)
Locally
8-32
Type
AB
WET_DRY
SERVICE
MODEL NO.
113.179881
113.178772
HOW TO ORDER
REPAIR PARTS
VA¢
Now that you have purchased
your Wet-Dry Vac, should a
need ever exist for repair parts or service, simply contact
any Sears Service Center and most Sears, Roebuck
and
Co. stores. See how to order repair parts below.
Model and serial number
of your Wet-Dry Vac.
may be found
WHEN ORDERING
REPAIR
FOLLOWING
INFORMATION:
PARTS,
on the Motor
ALWAYS
PART NUMBER
PART DESCRIPTION
MODEL NUMBER
113.179881 OR
113.178772
NAME OF ITEM
WET-DRY
VAC
GIVE
Cover
THE
All parts listed may be ordered
from any Sears Service
Center and most Sears stores. If the parts you need are not
stocked
locally,
your
order
will
be
electronically
transmitted
to a Sears Repair Parts Distribution
Center for
handling.
Sold
Part No. 73265
by SEARS,
ROEBUCK
AND
CO.,
Form No, SP4858=!
Chicago,
IL. 60684
Printed
U.S.A.
in U.S.A. 1!/85