1
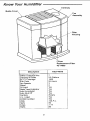
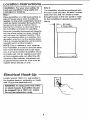
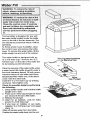
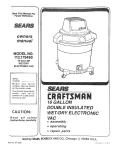
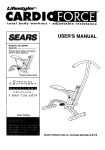
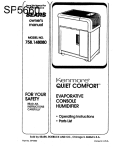
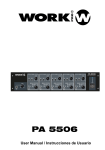
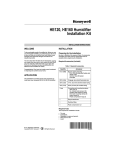
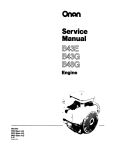
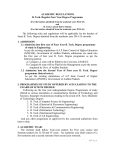
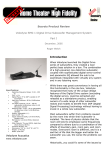
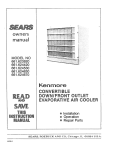
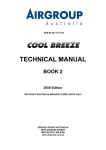
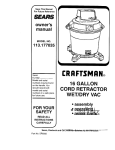
for Future
Reference
8EARS
owner's
manual
Model No.
758.144510
7 Gallon
®
QUIET COMFORT
FOR YOUR
SAFETY
READ ALL
INSTRUCTIONS
CAREFULLY
WHOLE HOUSE
HUMiDiFiER
7 Gallon Output
, Operating Instructions
• Parts List
J
Sears, Roebuck and Co., Hoffman Estates, IL 60179 U.S.A.
Part No. SP6054
Printedin Canada
Seam, Roebuck and Co., D/817 VAI Hoffman Estates, tL 60179
GENERAL SAFETY iNSTRUCTiONS
Safety Signal Words
4 Keep the humidifier clean,
DANGER: means if the safety information
is not followed someone wilt be seriously
injured or killed,
WARNING: means if the safety information is not followed someone could be
seriously injured or killed,
CAUTION: means if the safety information is net followed someone may be seriously injured.
1,To avoid fire or shock hazard, plug
humidifier directly into a 120V, A.C. electrical outlet. Do not use extension cords.
2. Keep the electric cord out of traffic
areas. To avoid fire hazard, never put
the electric cord under rugs, near heat
registers, radiators, stoves or heaters.
3. Always unplug the humidifier before
moving it, removing the housing section, before cleaning, or whenever the
humidifier is not in service.
5. Do not put foreign objects inside the
humidifier,
6. Never use your humidifierwhile any part
is missing or damaged in any manner.
7.To avoid electrical hazard or damage
to humidifier, do not tilt, jolt or tip
humidifier while unit is running,
8. To avoid damage to humidifier, unplug
humidifier, when water reservoir is
empty or when the humidifier is not in
use,
9. To avoid accidental electrical shock,
do not touch the cord or controls with
wet hands.
Table of Contents
WARNING: To reduce the risk of fire,
electric shock, or injury always unplug
before filling, servicing or cleaning.
HH
Warranty Information .............................
General Safety Instructions ..................
To Save a Service Call ..........................
Know Your Humidifier ............................
Humidifier Operations ............................
Assembly ...............................................
Location Instructions ...............................
Electrical Hook-Up .................................
To Save a Service
10. Note the warning label shown below
and on the humidifier,
2
2
2
3
4
4
5
5
Water Fill ............................................
6-7
Operating Humidifier Controls ............... 7
Using Your Humidifier ............................ 8
Operating Tips for Best Performance .... 8
Replacement and Care of Filters ...... 9-10
Cleaning of Humidifier ................... 11-t2
Troubleshooting ..................................
13
Repair Parts ................................... 14-15
Call
Check following if your humidifier will not
.operate.
1. Is power cord attached to outlet?
2. is there electrical power to outlet?
3. ls airflow control in operating position?
4. ts humidity control set high enough?
5. Is the cabinet setting on a tevel surface?
Know Your Humidifier
.....
Controls
Fan
Assem b_y
Housing
Filters
Replacement
42-14909
Description
Gallon Output/24 Hrs,
Capacity of Bottle
Sq. Ft, Coverage
Run Time
Fan Speeds
Filters
Fill Light
Water Level Indicator
Auto Humidistat
Auto Shut Off
Controls
U.L. Listed
AHAM Certified
Volts
Hertz
Amps
Watts
758.t 44510
7
2,5 Gallons
t 500
25 Hours
3
2
Yes
Yes
Yes
Yes
Rotary
Yes
Yes
120 A.C.
6O
1.14
65
Filter
water into the air_
Afterwate:r S added to the bottle the ill: in to soak up:the water and
ter s beg
becom e totally saturated in approximately 30 minutes. Air is drawn in from
the rear of the humidifier, then passes:
through the filters by means of a circulation fan. As air passes through the filters,
moisture is absorbed into the air and then
released through the top of the humidifier.
This moist air is released in the form of
vapor. No water droplets will enter the
home. All evaporation into the air takes
place in the humidifier, which means that
the residue left by evaporating water is not
passed into the home, but remains in the
filter.
CAUTION: Use only 42-14900 EPA
Registered Bacteriostat available
from SEARS Retail store. Under no
circumstances should you use water
treatment products designed for
Roto belt or Ultrasonic humidifiers.
.:.
_ o
iJryA
r _nters
Thmu-h
the
Rear
_,
1_
_.
_Jk..
:
i i i_ i i iHumidified Air is
.':_'_,:::
Then Released
_i_. i i i Through the Top
, T
,t
I
% t
CAUTION: Keep your humidifier
clean. While humidifiers do not
cause colds, some studies suggest
that dirty humidifiers can cause coldlike symptoms in some people. To
avoid this, we recommend you clean
your humidifier weekly with Humiditier Cleaner 42-14713 and use Bacteriostat 42-14900. These are available
at your local Sears store.
Assembly
Your new Sears Kenmore humidifier Js
completely assembled for you to use
Follow the instructions of this owner's
manual for proper usage,
Location Instructions
WARNING: For your own safety, do
not use humidifier if any parts are
damaged
ormiss!n .
Step 1
Place humidifier on a flat level surface in
area of house where most humidity is
needed, or one which would likely result in
moist air being circulated throughout the
house such as near a cold air return.
Placing the unit level is very important if
the humidifier is located on carpeting.
Moist air (humidity) produced wiil disperse
into the whole house, but area closest to
unit will have the highest humidity. If the
unit is positioned close to a window, condensation may form on _he window pane,
If this is not appropriate the unit should be
repositioned in another location.
NOTE: Due to release of coot, moist air
from humidifier, it is best to direct air away
from home thermostat and hot air registers. tt is best to position humidifier next to
an inside wall. Hot air registers and cold
air from outside wails can affect the efficiencies of the controls. Unit should not
be placed where warm air from a hot air
register blows directly on unit.
Electrical Hook-Up
Locate nearest _20V A.C. wall socket in
the location desired, preferably on inside
wall. Plug in the electrical cord.
or shock hazard, humidifier should
be plugged To
intoreduce
a 120VtheA.C.
WARNING:
riskoutlet.
of fire
Do not use extension cords.
i
iiii i
ii
iii
Step 2
The humidifier should be positioned with
the back (cord exit side), at teast 2 inches
away from the wall. Air needs to enter
through louvers in the rear panel in order
for the humidifier to operate at peak efficiency.
At Least
2" From Wall
• J,...:..::
"-,. i
_
Water Fill
WARNING: To reduce the risk of
shock, always unp ug:humtdifier
before_ cleaning, Or servicing.
Close the control cover. If controls
get wet let them dry completely and
have unit Checked by authorized
service personnel before plugging
in.
This humidifier is designed for use with
the water bottle located under the bottle
cover to the left of the fan assembly. The
unit should be positioned where it will be
operating.
To fill the whole house humidifier, close
the control cover and remove the bottle
cover. To remove the water bottle, lift the
bottle straight up and out of the cabinet
]-he water bottle is designed with an
"E-Z-Fill Side-Cap". Remove the "E-ZFill Side-Cap" on the side of the water bottle by twisting counterclockwise.
Turn Counterclockwise
Place the opening of the water botUe under
a water faucet (the bottle should fit under a
four-inch Oearance faucet). Fill with recommended mixture of cold water and Sears
BacterioStat #42:14900 only. Solid debris
could make the valve leak.
tnstall the "E-Z-Fill Side-Cap" by twisting
clockwise. Hand tighten only.
Check for possible leaks by performing
the following:
1. Grasp bottle handle and hold the bottle
Upright over a sink. :
2_ Press up on valve cap plungerfor about
one second to let out a littlewater.
3, ReleaSe the plunger.
i 4_ Listen for air bubbles. Look for leaks
around _E-Z-Fill Side-Cap".
:51 !f you:hear air bubbles or see leaks,
retighten "E-Z-Fill Side-Cap" and repeat
:
Steps "t-4_
Wipe off excess water from the bottle.
Position the water bottle back into the unit.
_
Valve
Cap Plunger
6
Grasp the water bottle handle, and lower
into the cabinet The "E-Z-Fill Side-Cap"
must be facing the center of the cabinet,
When positioned properly, the plunger wilt
open and water will ftow into the cabinet.
The water level will automatically remain at
approximately 1" until the bottle isempty.
The unit is now ready for operation.
Operating
Humidifier
Controls
Speed
The operating controls of your Kenmore
Quiet Comfort whole house humidifier are
located on the top right of the humidifier.
The controls are found under the smoked
control cover.
Humidity
Control
The higher the air flow speed, the more
water is evaporated and released into the
air. Low speed is the quietest and is provided for conditions that may not require
as high an evaporation rate.
Lift the control cover by placing your finger
in the round cutout and lifting. The cover
will stay open. Nov; you can clearly see the
control area. Familiarize yourself with the
controls and reference the diagram of the
control area for the correct naming used in
this manual:
To Operate
........
Fill Light
When the unit has a small amount of
water left in it, the fill light wilt come on
and the unit will automatically shut off.
Fan Control
Your Kenmore Quiet Comfort Whole
House humidifier has a three speed fan
contro[ switch. (Low, Medium and High)
The maximum humidity output is obtained
with the fan control on high.
the Controls
Control:
Adjust the amount of humidity depending
on your needs. The humidifier will turn on
and off as required to maintain level of
humidity selected. MEDIUM setting is recommended, but there are times when tow
or high amount of humidity may be preferred. For constant operation of humidifier, MAX allows for the maximum amount
of humidity to be evaporated into the air
continuously.
IMPORTANT: Water damage may result if
condensation starts to form on windows
or walls. Humidity Control setting should
be towered until condensation no longer
forms.
°l
/'/
".V
J,;
le
\
OMt, x
e_
SPEED
MI_D
O
RLIL
Humidifer Control
7
Using
Your Humidifier --
Step 1
Step 4
Be sure unit is full of water and plugged in.
If humidifier stops running, the humidity
lever is at the normal requirements for that
setting or it is adjusting tothe home conditions. The table below shows approximate
relative humidity percentages which correspond to the various settings of the
Humidity Control.
Step 2
Set the Fan selectionswitch to the desired
fan speed.
Step 3
Set Humidity Control to medium position.
NOTE: Humidifier should operate with
humidity control on the recommended
MEDIUM setting, if it does not, the humidity
is at a relatively high level. To test the unit
under this condition, turn Humidity Control
all the way to MAX and unit should begin to
operate. After unit has been tested, set
Humidity Control to MEDIUM or desired
level.
When Outdoor
Temperature is:
Recommended
Indoor Relative
Humidity is:
-10°F
0°F
10°F
20°F & above
20%
25%
30%
35%
Allow 24 hours for humidifier to adjust.
If humidity level in home is sufficient, the
humidifier will only operate with Humidity
Control set on maximum.
IMPORTANT: Water damage may result if
condensation starts to form on windows
or walls. Humidity Control setting should
be lowered until condensation no longer
forms.
HUMIDgTY
Operating Tips for Best Performance
1. Position the humidifier at least 2 inches
from any watt and away from any heat
registers,
2. Do not restrict airflow from entering or
exiting the humidifier.
:
3. Use Sears recommended bacteriostat
42_14900 t0 retard bacteria growth that
rni_ycause 0d0'rsand may be harmful to
your 5ealth.'
i .....
....
4. Regular cleaning as instructed in the
"Cleaning of Humidifier" section of this
manual is recommended.
5, Replacement of the evaporative wicking
filter at least once per humidification
season= or more depending on water
conditions inyour area.
....
8
Replacement
WARNING:
and Care of Filters
To reduce the risk of
shock or injury from moving
parts, always unplug humidifier
before removing or replacing any
parts.
CAUTION: To help retard bacteria
growth and keep maximum efficiency, the filters should be
replaced at least once a season, or
more often under hard water conditions. Use Sears recommended
replacement filter.
All filters may be rinsed in clear water
only. Take care not to damage paper.
To replace the evaporative wicking fillers
in your Kenmore Quiet Comfort Whole
House humidifier, follow the instructions
below.
1. Unplug humidifier,
and proceed to
clean,
Before removing the filters, we recommend moving the humidifier to an area
where floor coverings are not susceptible to water damage, i,e, kitchen or
bath areas,
2. To remove parts
Remove the water bottle cover, Lift the
fan assembly and set aside on a clean
flat surface. Remove the water bottle,
Lift and remove the fitter housing from
the cabinet and set to the side. The
paper filters are now accessible.
J
Replacement and Care of Filters (continued)
3i a_ Remove the two filters and dispose
proPerlY, i
b_ Ctean internat p_rts 0f humidifier
the "Cleaning
of Humidifier
of
per
``section
of your Owner's manual
c. Install new filters
inside the cabinet
with the glue beads on the fitter facing the center of the cabinet. The filters should set into the channel
areas inside the cabinet,
Make sure
t
the filters are resting on the floor of
the cabinet.
d, Return the filter housing
net. Position
to the cabi-
the filter housing
onto
the filters. AIige the back of the filter
housing over the filters and between
the rear ribs of the cabineL Place
the filter housing
down onto the fit-
ters, Make sure the filters
are cap-
tured inside the side flanges
filter housing,
e. Position fan assembly
of the
"Channel
onto the cabi-
net, Make sure the fan venturJ (lowest cylinder section below the fan) is
placed inside the filter housing. The
f.
left edge of the fan assembly
hous-
ing should
cabinet,
of the
Replace
rest in the groove
Cabinet
the water bottle and the
water bottle cover. The right edge of
the bottle cover will rest _n the
groove of the cabinet
above,
mentioned
g The unit is ready for use or t_ be
Stored away for next season.
10
Area"
Glue
Beads
Cleaning
CAUTION:
of Humidifier
To reduce
the risk of
Step
injury, fire or damage
to humidifier,
use only cleaners
specifically
recommended
for humidifiers.
Never
a, Remove
CAUTION:
Local
never
c. Remove
put hot
removing
flurnidifier
water purity may
Sears
at your
local
The cabinet
should
be empty, if any
water is in the cabinet,
replacement
f,
Sears store.
empty as nec-
essary
Proceed to"Bi-Weekly
Maintenance"
o_
"End of Season Maintenance"
Continue to clean cabinet and internal
pads as described
below
NOTE: If it is necessary
to use approved
bacteriostat,
fotlow ttle directions cor-
Step 3
Install new filters (purchase
rectly.
The bottle of the whoie house humidifier
evaporative
will
the water resero
on top of the cabinet and replace the
water bottle and water bottle cover The
voir should be empty and completely
dried out. To accomplish
this. use the following method:
a. A_low the humidifier
automatic
"OFF",
b. Unplug
WARNING:
shutoff
unit is ready for storage
_Jse,
to run until the
turns the humidifier
humidifier
If humidifier
unplugged,
fan could
housing
is removed.
c, Follow instructions
Remove Parts"
is not
]
1
start after
in step 2 below "To
d. After removing the parts, dry out the
bottom of the humidifier
cabinet,
e. Proceedto
"Bi-Weekly
Maintenance
"End of Season Maintenance".
the co_ec_
filter pads 42.-14909
ter housing
Reinstall the water level float
into the cabinet, Position the fan assenrbly
Step !
easier,
wicking
for your humidifier) into the location where
the old filters were positioned
Replace fit-
hold 2-I/2 gallons of water.
To make cleaning
Before
the internal parts of the
cabinet, we recommend
float.
e
filters. We als0 recommend
using a
EPA approved
bacteriostat,
42-14900
and humidifier
cleaner 42-14713,
available
the fitter housing
and
water damage, i.e., kitchen or bath
area.
d, Remove the filters and the water _evel
growth that may
be harmful
to your
use only
aside
moving the humidifier to an area where
floor coverings are not susceplib_e to
airborne
bacteria
may promote the
growth
of microorganisms
in the reservoir of a humidifier.
health,
the water bottle cover and the
b. Lift and _ernove the fan assembly
set aside.
vary from area to area and under certain conditions
water impurities
and
To retard bacteria
cause odors and
Parts
water bottle. Set parts
use flammable,
combustible
or poisonous
materials
to clean your
humidifier.
To avoid scalds
and
damage
to humidifier,
water in humidifier.
2
TO Remove
_ or
11
or operational
Cleaning of Humidifier (continued)
Bi-Weekly
Removing
Maintenance
Scale
1. Fill the water reservoir with one 8 oz.
cup of undiluted white v negar Let
solution stay 20 minutes.
2. Clean nit interior surfaces with soft
brush. Dampen soft cloth with undiluted
white vinegar and wipe outthe water
reservoir to remove scale
3. Rinse thoroughly withclean warm water
to remove scale and cleaning solution
before disinfecting the water reservoir.
4. Dust the fan assembly and outside surfaces with a soft cloth only.
Disinfecting
and
Water
Reservoir
------------
Rinse with water until bleach smelt is
gone. Allow unit to dry out completely.
3. Water bottle should be cleaned in same
manner.
End of Season
Maintenance
1, Follow bi=weekly maintenance instructions at end of humidification season or
when humidifier will not be used for at
least one week or more.
2. Remove and throw away filters.
3. Let humidifier dry completely before
storing. Do not store with water inside
cabinet or water bottle,
4. Store in cool, dry location.
5. Install new filters in clean humidifier
before next season begins.
Base
1. Fill water reservoir with I teaspoon
chlorine bleach in 1 gallon water. Let
solution stay 20 minutes, swishing
every few minutes. Wet all surfaces
normally exposed to water.
2. Emoty water reservoir after 20 minutes.
1:2
Troubleshooting
Trouble
Unit wilt not run.
Unit wil_ not shut off.
Unit will not dry out
completely
--.,.,.,,..,.,
Probable Cause
"
Remedy
o Humidity level is too high
- No power
Raise humidistat setting
• Check 120 volt power source
* Float is not free
• Free float from obstruction
• Water is present in the
system
, This is normal. A small
amount of water remains in
the cabinet.
• Allow unit to continue operation.
• High humidity or low
temperature resulting in
i
stow evaporation
Bottle continues to
empty.
Air is entering water reservoirs.
• Check "E-Z-Fill Side-Caps" to
Unit is not emptying.
Dirty filter
Reservoir cap plunger
missing post in bottom of
cabinet.
• Change to a fresh new fi}ter.
• Check orientation of bottle.
Reposition so that reservoir
cap plunger is depressed by
post in bottom of cabinet.
Unit runs and shuts
off before bottle is
* Humidity level is too high
empty
. Unit is not setup on a level
surface (Float will not
sense water at the rear of
the cabinet.
• ensure
tightness.
Check for
leak in water bottle.
• Are gaskets for "E-Z-Fill SideCaps" in place (see repair
parts fist).
, Raise humidistat setting (if
possible)
• Position unit level (Some carpet padding may allow unit to
set lower on the left side than
the right side due to the weight
of the water bottle on left side.
Install coasters under left casters.)
CAUTION: Use only 42-14900 EPA Registered Bacteriostat available from
Sears Retail store,
Use of other water treatment products may damage the filter elements.
Under no circumstances should you use water treatment products designed
for Roto belt or Ultrasonic humidifiers.
t3
Repair
Parts
Parts List For Sears Humidifiers
Model No. 758.144510
_6
/
22
t4
Repair Parts
.,
Parts List For Sears Humidifiers
Model No. 758.144510
Always order by part number.
Description
Part No.
i
10
11
i
i
_
12
13
14
15
16
17
18
19
20
21
22
23
24
25
26
27
28
29
30
31
32
825837
825809
822452-2
825857
I 825807
822406-1
816069-2
STD611007
823735
825848
822405-6
42-14909
825847
I 14909
822120
825867
823712-2
824101-1
STD610803
825806
823728
825855
13805-02
818983
825858
i 822419-2
819027
819026
821421-1
819024
824690
825849
821904
SP6054
Not by key number
Cover; Bottle
Lid Stationary
Cover Control
Knob
Label Control
Fan
Scr Pan Hd "AB" #6 x 1-3/4
Motor
* Scr. Pan Hd, Ty "AB ° 10 x 3/4
Support Motor
Housing Filter
1"Filter Evaporative
Rail Kick
Scr, Pan Hd. Ty "B" #4 x 5/8
Caster Twin Wheel
Cabinet
Float Water Level
Retainer Float
* Screw Pan Hd. Ty "AB" 8 x 3/8
Cover Electronics
Switch Micro
Retainer Micro Switch
Humidistat
Switch Three Speed
Light Pilot
Cap Valve
Stem Valve
Spring Valve
Ring "O"
Seal Valve
"E-Z-Fill Side*Cap"
Bottle
Cord w/Ptug
Owners Manual (Not Illustrated)
*Standard Hardware Item - May be purchased locally
1"Stock item - May be secured through the Hardware Department of most Sears retail
stores.
15
For the
Call 7 am - 7 pro, 7 days a week
1-800-366-PART
(1-800-366-7278)
For in-home major brand repair service
Call 24 hours a day, 7 daysa week
1-800-4-REPAIR
(1-800-473-7247)
For the location of a
Sears Repair Servi c e Center in your area
Call 24 hours a day, 7 days aweek
1-800-488-1222
For information ou purchasing a Sears
Maintenance Agreement or to inquire
about a, existing Agreement
Call 9 am - 5 pro, Monday-Saturday
1-800-827-6655
S£/ARS
America's R_p_r
Specialists
The model number will be found on the Humidifier Identification
label.
When requesting service or ordering parts, always provide the
following information:
• Product Type
• Part Number
o Model Number
. Part Description
© 1998 Emerson Electric Co.
Sears, Roebuck and Co., Hoffman Estates, 1L 60179 U.S.A.
Part No, SP6054
Form No SP6054-1
Printed in Canada 6/98