1
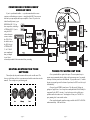
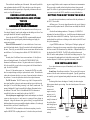
Concert Series Spatial Restoration Owners Installation Manual Congratulations on buying a truly unique enhancement to any quality car stereo system. If you’re super-impatient to hear the incredible improvement in stereo imaging, ambience and sound stage width possible with the ESP-2, skip to the next section (COMPRESSED POWER-USERS’ HOOK-UP INFO). Otherwise, we suggest you read the whole manual before proceeding. What you can expect from your AudioControl ESP-2: • The sensation of a larger space and wider sound field — wider than the physical dimensions of your vehicle. • Better imaging and defined placement of individual instruments. • An increased “sensation of stereo.” • Ease of control with a single unobtrusive dashboard adjustment (while the rest of the ESP-2 is mounted out of sight). • Highest quality because the ESP-2 is designed and built in the U.S.A. by an award-winning manufacturer. • Jealous friends, after they hear your car stereo system. ® making good stereo sound better® 22410 70th Ave. West • Mountlake Terrace, WA 98043 Phone 425-775-8461 • Fax 425-778-3166 www.audiocontrol.com - page 1 - ® COMPRESSED POWER-USERS HOOK-UP INFO If you’re a professional installer — or just hate manuals and have some experience with hooking up car stereos — simply hook the ESP-2 between your head unit’s pre-amp outputs and the power amplifier. Period. If you have an AudioControl Epicenter, it goes BEFORE the ESP-2. If you have an equalizer, it should go AFTER the ESP-2. If you’re using the ESP-2 with an electronic crossover such as the 2XS, 4XS or the built-in one in the EQX, they go AFTER the ESP2. See? This IS more complicated than you thought it was. Better relent and just read all of the instructions before proceeding. SPATIAL RESTORATION TONE SETTINGS These adjust only the spatial restoration effects, not the overall sound. The best way to find what you like is to experiment (and read the section later on in the manual). These settings are a good starting point. - page 2 - THINGS TO WATCH OUT FOR: • Your system should have good treble output. The most optimal set-up is separate tweeters mounted relatively high in the front passenger area: for example, at the top of the door panels or on the dashboard. If you just have two 6½” coaxials playing at your pant legs out of the bottom of your doors, the ESP-2 won’t do its job as dramatically. • You need a good STEREO sound source. The old proverb “Garbage in, garbage out” applies here. Lots of tape hiss or multipath-ridden FM will frankly be exaggerated by the ESP-2’s circuitry. It can’t take a tape with very little stereo separation and work wonders on it. Just thought we’d warn you. The ESP-2 is pretty amazing but it’s not a miracle worker. • Tone control and graphic equalizer settings can affect the ESP-2’s SPATIAL enhancement ability. More on this later. - page 3 - GETTING TO KNOW YOUR ESP-2 HOW TO INSTALL THE AUDIOCONTROL ESP-2 Before we dig into this, we want to give Professional Installers a plug. They can do a great job of installing the ESP-2. That’s not to say it’s not well within the abilities of a skilled do-it-yourselfer. We’re just pointing out that installers have a lot of experience, exactly the right tools and the ability to deal with those unpredictable noise bugs which slither into a lot of systems. Not to mention that having an Authorized United States AudioControl dealer install your ESP-2 will extend your One Year warranty to a full 5 YEARS! That said, we’ll proceed to... A. THE MOST IMPORTANT INSTRUCTION OF ALL Well, maybe not personally. But on a first-name basis, anyway. The ESP-2 Main Chassis. The first thing you notice is that there aren’t many controls on the ESP-2 Main Chassis; just some set and leave it Spatial Restoration tone controls. That’s because the main knob is on the Dashboard Restoration Control Unit. Along one side of the Main Chassis, you’ll see the Ground and +12 Volt terminals for power, and a terminal for remote activation of the ESP-2 when your head unit is turned on. On the other side of the Main Chassis are: 1. Left & right INPUTS 2. Left & right “THRU” outputs - (we’ll explain this one later) 3. Left & right RESTORED OUTPUTS 4. A socket for the Dashboard Restoration Control’s remote connection. On the top surface of the ESP-2 is: 1. A power LED. It’s handy for determining whether your power connections have been made correctly or as a very dim reading lamp if you like to hang out in your trunk. 2. BASS, MIDRANGE and TREBLE spatial restoration tone shaping adjustments. The Dashboard Restoration Control Unit. The control portion of the ESP-2 consists of a rotary SPATIAL Enhancement Control and an LED which tells you when the ESP-2 is operating. You must pull the knob “OUT” to turn on the ESP-2 restoration circuitry. The SPATIAL Enhancement knob controls the restorative action of the ESP2’s circuitry. The farther to the right it is turned, the greater the effect of the ESP2. The best way to find the optimum setting for you and your system is to experiment. - page 4 - Fill out the WARRANTY CARD and mail it in! It’s also critical that you keep your invoice or sales slip to establish the date when you purchased your ESP-2, and hence your warranty. It’s also good insurance proof should a car thief take a fancy to your system. Insurance companies are notably reluctant to believe something as esoteric as the ESP-2 was part of a system, since it doesn’t fall into any of their little pre-defined niches the way decks, amps and speakers do. B. PLACEMENT & MOUNTING OF THE ESP-2 MAIN UNIT Placement. Theoretically, you can place the ESP-2 anywhere that it can receive power. The most convenient places are under the dash, under the seats and in the trunk. If possible, we suggest you mount it close to the power amplifier(s), for ease of connecting power and remote turn-on wires. If this means trunk mounting, be sure to read the stiff lecture on cable quality on page 8, since interference can be induced over the long cable run between deck and ESP-2. Needless to say, make sure you can get at the power, restoration remote, inputs and outputs. While the ESP-2 has been designed with very rugged parts, and engineered in a manner which reduced physical circuit board stress, be sure to consider the following guidelines: • Avoid mounting the ESP-2 near a heater, in front of the firewall or anywhere else where it can get really hot. • The mounting location must be safe from water seepage. Lots of trunks have seal problems (poor gaskets, not sleek, furry mammals who balance beachballs and eat mackerel at the zoo). Check for old water stains. If you find any, put the ESP-2 somewhere else or re-gasket the trunk perimeter. • Make sure the ESP-2 can be firmly mounted without vibration. This protects connections from breakage and stress as well as the possibility of it coming UNattached when you blast over a speed bump. • Avoid any location where mounting screws may potentially pierce a gas tank (lots of which are in the vicinity of the trunk) or gas, brake or electrical lines. - page 5 - Mounting. The ESP-2 installs just like a power amplifier, secured by four screws and lock washers through the four slots in the unit’s base. You will need a screwdriver, pencil or other marking device, power drill and bits, one of which should be just less than the diameter of the mounting screws. Clear the area of impressionable children and maiden aunts who may react to colorful language. First place the ESP-2 in its mounting position and mark the four screw holes. Try to keep them to the outsides of the slots if possible. Now remove the ESP-2 and drill four small pilot holes. This will insure accuracy and guard against stripping out the larger holes to come. (If you’re mounting the unit on a carpeted surface, cut away small sections of the carpet and pad where each hole will be.) Now drill the larger holes. Replace the ESP-2 and secure tightly with four sheet metal screws and lock washers. C. PLACEMENT AND MOUNTING OF THE ESP-2 C. RESTORATION CONTROL The Restoration Control may be mounted under the dash using its own bracket or through the dash without the bracket. It should be within reach of the driver and where the indicator LED is plainly visible. Under-dash installation. The Restoration Control mounts with four screws which attach to the underside of the dashboard. You will need a screwdriver, pencil or other marking device, power drill and bits, one of which should be just under the diameter of the mounting screws. Since you’re going to need to slide in upside down to get a clear view of the nether parts of the dash, it’s handy to have a Faithful Assistant to hand you things. First slide into the car and place the Restoration Control in its potential mounting position (this is starting to sound kinky). Now ask for “Forceps” and then tell your assistant you’re just kidding and want the pencil instead. Mark the four holes and remove the Restoration Control. Drill four holes into the dashboard underside, replace the Control and secure it with four screws In-Dash installation. For that custom, finished look (or if under-dash mounting just isn’t practical), the Restoration Control can be mounted directly into the dashboard. We have provided an extra label and LED holder to make this easier. A medium screwdriver, pliers, and power drill with 9/32", 13/64" and 1/8" bits are required...along with some patience and delicacy. 1. You will need to disassemble the ESP-2 Restoration Control. First gently pull the LED assembly from its black plastic holder on the Restoration Control bracket. Do not remove the actual LED wires from its connector, if possible. 2. Next, remove the circuit board and rotary control from the bracket. Pull off the knob, then unscrew the lock nut and washer. 3. Using the supplied detection control label as a template, mark the holes in the mounting location. - page 6 - 4. Now take a deep breath and drill a 9/32" hole in the dashboard (if this is a burlwood Rolls Royce dash, you’re a very gutsy person). 5. Drill a 1/8" hole for the lock tab. Or remove the lock tab if you’re sure you can keep the circuit board from rotating. 6. Drill a 13/64" hole for the LED. 7. Apply the pressure-sensitive Detection Control label. 8. Remove the black plastic LED holder from the Restoration Control bracket and push it into the 13/64" hole. 9. Insert the rotary control/circuit board into the 9/32" hole, and the LED assembly into its black plastic holder. Make certain the red wire on the connector goes to the long lead of the LED if it has come off. 10. Check for any parts 9/32" of the LED wires or circuit 1/8" board touching metal and then replace the lock nut and washer and tighten securely. 11.Finally, put the knob back on. 12.Enjoy the applause and go buy your Fearless Assistant a beer, Pepsi, Yoohoo or diet Ginseng soda. 13 64 / " D. ESP-2 AUDIO WIRING Planning your hook-up strategy. Okay, time to trot out the flow charts and diagrams. Because there are several ways to hook up the ESP-2, depending on what the rest of your system is like and whether you choose to use the THRU connections. The simplest type of system is one with a tape deck and a single stereo power amplifier. In this case, the ESP-2 goes between the tape deck and the amplifier. Single Amplifier System - page 7 - System with The Epicenter If you’re also installing The Epicenter, it should come BEFORE the ESP-2 in the signal path. Any equalizer or crossover should be AFTER the ESP-2. Three-way System A simple bi-amp system splits the full-range output of your deck into high and low frequency bands and then routes them to separate amps. Because the ESP-2 works across the whole sound spectrum, it should be connected BEFORE the inputs of the electronic crossover. The ESP-2’s THRU connections. Along with the regular INPUTs and OUTPUTs, there are left and right THRU sockets. These are really two more OUTPUTs except that the ESP-2’s circuitry doesn’t effect their sound. This is so you can drive other sets of speakers where you don’t want the spatial restoration effect without resorting to “Y” cords. Thru Output System with 4XS - page 8 - Here’s an example using the 4XS where the ESP-2’s THRU outputs are also used: For those of you contemplating really gonzoid monstro systems with the 4XS or multiple combinations of crossovers and amps and signal processors, we suggest you consult your dealer or us here in the rainforest. There are billions and billions of possibilities. Type of wire. It is extremely important to use high quality cables for the audio signal wiring. Intense electromagnetic fields are generated in an automobile which can be picked up by car stereo wiring. The increased low level wiring present when using electronic signal processing and powerful amplifiers increases the chances of creating an “antenna” which feeds this interference directly into your system. There it can compete with your music as audible clicking, whining, ticking and buzzing. Theoretically, all RCA-type coax cables (like the ones you use to hook up your home stereo) are shielded to prevent interference. Unfortunately, cheapoid cables skimp on external shielding, since interference is not a problem in most home hi-fi hook-ups. Avoid the temptation to simply use “that old set of patch cords that came with my receiver” or super-cheap cables sold as accessories in TV or hardware stores. Consult with your AudioControl dealer to obtain high quality, well-shielded cables with securely fitting connectors on each end. For installations such as the “gonzoid system” example, you might even consider use of special audiophile hookup cables designed for high-end autosound use. Remember, it’s better to invest in good cables before installation, rather than try to trace interference once inferior cables are buried deep in your car’s interior. Audio wiring placement. Unlike speaker cables, which can be routed directly next to existing car wiring, we recommend that you route line level (coaxial) wiring between the head unit and the ESP-2 away from car wiring, amplifier power cables or speaker wires, if possible. This will help avoid noise induction problems, especially when you’re running cables from the head unit all the way back to the car’s trunk. Also keep connections between the ESP-2 and power amplifiers as short as possible to further minimize noise problems. The one exception to these precautions is the remote wire between the ESP-2 main unit and the remote Restoration Control. It only carries control voltages, not an audio signal and is not prone to interference. Just make sure it doesn’t rub against anything or is otherwise violated along the way. Actual audio connections. After all this preface, there really isn’t much to say. The signal from the head unit goes into the INPUT sockets on the ESP-2. Outputs to the equalizer take off of the OUTPUTS. Make sure these connections are really snug. If you need another set of outputs for speakers like subwoofers or rear satellites where you don’t want ambient effects, use the THRU output sockets. - page 9 - E. ESP-2 POWER WIRING IMPORTANT: Disconnect the negative terminal of your car’s battery before working on any electrical connections. Unless you want a little extra tingle in your life and/or a search for the fuse compartment under the dash. Type of wire. Both +12 and ground (-) connections to the ESP-2 should be made with multi-stranded wire no smaller than 16 gauge. The remote turn-on connection between the head unit and the ESP-2 can be made with thinner wire. Positive (+12V) connection. If the ESP-2 is being mounted near the power amp(s), you may simply make a connection from the amp’s +12V distribution block to the ESP2’s +12V terminal. If the ESP-2 is being dash-mounted, you may want to go directly to the battery. A fuse or circuit breaker never is a bad idea. Use at least a ½ amp rating. Ground connection. The hook-up most open to interpretation and possible problems is the ground connection. For best protection from noise, there should be ONE AND ONLY ONE ground path to the negative side of your vehicle’s electrical system. That means connecting the ground terminals of the head unit, ESP-2, and power amplifiers together and routing that common heavy gauge ground wire to someplace you’re SURE is actually part of the negative side of the car’s electrical system; if possible, the battery itself. The nearest piece of bare metal isn’t necessarily a true ground. If you’re in doubt, connect the car stereo system’s common ground directly to the battery’s negative terminal or where the battery’s negative grounding strap contacts the vehicle frame. Remote turn-on connection. Sounds titillating doesn’t it? Actually, what it means is that the ESP-2 is turned on by a control signal from the head unit. If you already have an amplifier in your system, it is the same wire used for the amp’s remote input. As with the addition of any additional components one should consider the use of a relay to turn on the multiple components. If you are a do-it-yourselfer and do not know how to use a turn-on relay, consult your Authorized AudioControl Dealer. F. A SHORT TEST RUN • First, re-connect the negative terminal of the car’s battery. • Next, make sure that any other dashboard equalizer loudness or tone controls are either switched out of the signal chain, or turned to their center (neutral position.) • Confirm that the three rotary controls on the top of the ESP-2 (BASS, MIDRANGE, TREBLE) are set in their center detent position. • Turn the ESP-2’s Spatial Restoration Control all the way to the LEFT (7 O’clock position) and pull the knob out. • Now pop in a tape or CD and turn the system up to a pleasant listening level. • Do you hear silence instead of sound? If so, check the wires from the head end unit to the ESP-2, or the ESP-2 to the power amplifier. • Make certain the knob is pulled out and rotate the ESP-2 Restoration Control to the right (toward MAX). Do you hear wonderfully wide stereo with the sound actually wider than the confines of the vehicle? If so, the basic connections have been made correctly. If you hear sound, but nothing different even though you’ve turned the - page 10- Restoration Control all the way up, check all connections including the one between the ESP-2 main chassis and the dashboard Control. Also check that you pulled out the knob on the dash control. If the LED is glowing brightly on the dash control and you do not hear a difference, check to see if you have used the THRU jacks by mistake. • Now with the restoration control cranked back to the left, rotate the head unit’s balance control to the far left. Does the sound in the car move to the left? If it heads to the starboard (right for you landlubbers), the RIGHT and LEFT inputs or outputs need to be checked at the ESP-2 and power amp(s). General practice is to use RED plugs for RIGHT and BLACK plugs for left. Make sure LEFT is LEFT all the way on through from the head unit to the power amplifier inputs. If the problem persists, tear your seats out, turn them the other way and only drive your car in reverse. G. ADJUSTING THE SPATIAL RESTORATION TONE G. SHAPING CONTROLS On the top of the ESP-2 are three “tone” controls. NOTE: They only affect the spatial restoration (ambience) effects added by the ESP-2, NOT the overall sound.They really have two different purposes: 1. They can be used to compensate for various speaker installations. If you have OK treble but not as good as we’ve recommended, you can adjust the TREBLE EQ on the ESP-2 control to boost the high-frequency ambient products. If the ESP2’s effect is not pronounced enough, kick up the MIDRANGE. If your system is really bass-heavy and the ESP-2’s effect sounds weird through the subwoofers, reduce the BASS, etc. 2. The EQ controls can be used purely to change the effect of the ESP-2. In other words, use your own taste. Go nuts! • Play the same tape or CD you did before. • One by one rotate each control all the way to the left and then all the way to the right to familiarize yourself with them. Make sure to return each control to the center detent position before experimenting with the next one. • Adjust them the way you think they sound best. This is purely subjective. The Autosound Police won’t come and arrest you no matter what setting you use. • Now, try some different tapes or CD’s or tune in a clear, strong FM station and experiment with the ESP-2 Restoration control to discover how much wider and more dramatic stereo can be. • Get out of your car and call at least three friends with car stereo systems that could benefit from an ESP-2 and extensively brag to them about how much better your system sounds. • If you’re still confused, here’s a good starting point to try. • • - page 11 - • This concludes the installation part of this manual. Stick around if possible for some explanations about how the ESP-2 does what it does, some of its superior technical features and other general topics. Regrettably, refreshments will not be served, even if you DO stick around. ing power supply like those used in computers and electronic test instrumentation. This power supply is optically isolated to keep this trash away from your audio signal. The result is very quiet operation and another car stereo headache gone. If your system is noisy after the ESP-2 is installed, it was noisy beforehand, too. GENERAL EXPLANATIONS, UNSOLICITED ADVICE AND OTHER TOPICS GETTING THE MOST FROM THE ESP-2 WHAT HAVE I BOUGHT? A DISCUSSION OF THE ESP-2’S TECHNOLOGY Yes, we’re proud of how the ESP-2 can enhance the stereo effect in your car. Even though “changing” sound is good, making sure that adding extra “boxes” into your signal chain doesn’t add noise is equally important. So not only does the ESP-2 contain SPATIAL restoration amplification and tone shaping, but also a special optically-isolated switching power supply for superior noise rejection. What is SPATIAL restoration? Let’s start with the basics. Stereo is composed of left and right channels. Most of the sound in the left and right channels is the same. This is why you can hit MONO on some cassette/tuners and not hear that much difference. You’re hearing what is called the LEFT PLUS RIGHT (L+R) signal. Obviously there IS a difference between stereo and mono. It’s the difference between left and right channels. We call that LEFT MINUS RIGHT (L-R). Sometimes the differences are obvious: If a guitar sound seems to be placed to the left in the sound field, you can bet there is more guitar in the left channel than the right. Not all of it but MORE. However, L-R has another purpose, too. It contains the SPATIAL cues which have been captured during recording or synthesized at the studio. This includes the echoes and reverberation which give you a sense of space and position in relation to the performers. It creates the spaciousness which sets stereo apart from mono. The ESP-2 in action. The ESP-2 creates a copy of the L-R component of the input signal, amplifies it, shapes its tonal contours and then injects it back into the main signal. It’s sort of like adding “seasoning” to the “bland”, normal sound. The amount of additional L-R signal is controlled by the Remote Restoration knob on the dashboard. The actual “flavor” of the additional SPATIAL information is controlled by the three tone control knobs on the top of the ESP-2. Noise rejection power supply design. From an audio standpoint, car electrical systems are about as quiet as a rock concert in a motorcycle factory during an earthquake. Along with alternator whine, ignition “ticking”, turn signal clicks and dash lamp dimmer buzz, some power amplifiers themselves add noise. (For a thorough discussion of this, send for our Technical Paper 103). While the ESP-2 will not contribute to this electronic cacophony, it must be capable of REJECTING everything thrown at it. It does this with a special switch- page 12 - As we said in the quick introduction, certain factors effect the performance of the ESP-2. These include: • Sufficient power. If a system is bogged down and on the verge of clipping, it cannot successfully reproduce much L-R, much less an extra healthy dose from the ESP-2. • Good treble and midrange transducers. The majority of L-R SPATIAL information lies from about 500Hz on up. A muffled system with indistinct sound will get a little better with the ESP-2 cranked up. If your only source of treble is speakers placed low on the doors or reflecting out of the back deck, the ESP-2 won’t do its job as dramatically. • A good STEREO sound source. The old proverb “Garbage in, garbage out” applies here. Some tapes (due to crummy cassette decks with poor separation) just don’t have as much L-R information as they should have. Multipath-ridden FM, on the other hand, has TOO MUCH. The ESP-2 will grab the interference and REALLY make it sound unpleasant. It will also do weird things to tape hiss. Tape hiss is composed of random particles of oxide which are mis-oriented. The ESP-2 considers that prime L-R (difference) signal and unfortunately “enhances” it. FOR INSTALLERS ONLY Yes, we know that means everyone will immediately read it. But there’s nothing secret here. Ground Loops. Ground loops are insidious. They are caused by the non-zero resistance of the wire used to interconnect the equipment. Typically, ground loops are created by a piece of equipment having multiple connections into the grounding system. The drawing below shows what happens. Generally, the audio wiring has higher resistance than the power wiring. Since the electrical system of the car uses the body/frame structure as it’s negative return, the non-zero (yes, it’s small, but not small enough!) resistance of the car body allows small voltage drops to be created between various points in the car body. - page 13 - Ground option switch. All of the above would suggest that we want total isolation between signal ground and power ground. In most cases you do. But occasionally (and with certain brands of head units and amps who will remain mentionless here), it is necessary to actually reduce the amount of isolation which we worked and slaved and strived to achieve with our optically isolated power supply. Inside the ESP-2 (see why this is in the installers-only section) is a 3position slide switch. In position 1 (all the way to the LEFT), it provides total isolation — infinite ohms with an optical isolator. In the center position, you get 200 ohms of isolation. In the almost-never-used (except with —oops we almost said that brand name) far RIGHT position 3, the signal and power supply grounds are combined. Use the switch as a last resort. Alternator whine can almost always be cured with proper grounding practices MISCELLANEOUS TROUBLESHOOTING NOTES • The LED on the dashboard Restoration Control will not light if the cable or LED wires are shorted anywhere. • The Control Knob won’t do zip if the cable is shorted, violated or partially disconnected. • Make sure that the THRU connections haven’t gotten mixed up with the OUTPUTs — you won’t get any SPATIAL RESTORATION effect out of them. • The ESP-2 won’t amaze you and your friends unless you pull the knob out to turn it on. • The ESP-2 does not work with the Epicenter dashboard remote. A BRAZEN PLUG FOR OTHER AUDIOCONTROL PRODUCTS If you like the ESP-2, you’ll love: • The EQXtm, a compact, 2-channel, audiophile-grade, digital-ready 13-band equalizer, line level preamplifier, bridging adaptor and programmable electronic crossover. Winner of the Autosound Grand Prix Award for Best Equalizer (in 1987, 1989 and 1990) as well as many other industry honors. • The EQLtm, 13-band equalizer with variable gain input line preamplifier. The same ultra-handy 6-band half-octave bass equalizer and 7-band octave stereo equalizer as the EQX. 1988 and 1991 Equalizer of the Year • The EQTtm, an amazing THIRD-OCTAVE mono equalizer that gives you the greatest possible tonal control over the entire frequency range. Thirty (count’em) 30 separate bands with Constant Q circuitry which minimizes adjacent band interaction. Are your ready for this? The EQT has won over a dozen awards and recognitions. - page 14 - • The legendary, car-shaking, THE EPICENTER just got better! More Bass Louder! That’s the new Epicenter. It puts the “woof” back in woofer. With good speakers, its effect is astonishing. Ask for a demo at your AudioControl dealer. • The 2XStm, 2-way 18dB/octave programmable electronic crossover with 18dB/ octave subsonic filter, output gain adjustment and bridging adaptor. (2 more awards.) • The 4XStm. This is more than just a double 2XS. It has so many features, we’d need another whole page to describe them. Yes, it is a 4-channel 2-way or 2-channel 3-way crossover with non-fading bass. But it allows up to five different frequency parameters to be customized for multi-speaker, multi-amp systems. If you’re into serious sound, check this one out. This gem has brought home Crossover of the Year three years in a row. • The Model 11tm, is our Image Amplifier for center channel applications. It is an ESP-2 plus provides a true center channel; amplified! Each of these components will deliver significant improvements in the sound of any car system and are part of the AudioControl Performance Match system. Check with your AudioControl dealer for the juicy details. ESP-2 SPECIFICATIONS All specifications are at 14.4 volts DC Total Harmonic Distortion . . . . . . . . . . . . . . . . . . . . . . . . . . . . . . . . . . . . 0.03% Signal to Noise Ratio (full output) . . . . . . . . . . . . . . . . . . . . . . . . . . . . . . -110dB Input Impedance . . . . . . . . . . . . . . . . . . . . . . . . . . . . . . . . . . . . . . . . . 20 KOhms Output Impedance . . . . . . . . . . . . . . . . . . . . . . . . . . . . . . . . . . . . . . . 150 Ohms Maximum Output Level . . . . . . . . . . . . . . . . . . . . . . . . . . . . . . . . . . . . . 9.5 volts Frequency Response . . . . . . . . . . . . . . . . . . . . . . . . . . . . ±0.5dB: 10Hz - 50KHz Power Supply . . . . . . . . . . . . . . . . . . . Transformer coupled, switching DC/DC . . . . . . . . . . . . . . . . . . . . . . . . . . . . . . . . . . . . . converter with optical isolation Current Draw (maximum) . . . . . . . . . . . . . . . . . . . . . . . . . . . . . . . . . . . . 250mA Size . . . . . . . . . . . . . . . . . . . . . . . . . . . . . . . . . . . . . . . . 1.20"H x 4.6"W x 5.7"D Ground Isolation Jumpers . . . . . . . . . . . . . . . . . . . . . . . . . . . . . . . . . . . . . . . Yes Country of Origin . . . . . . . . . . . . . . . . . . . . . . . . . . . . . . . . . . . . . . . . . . . . U.S.A ©1998 AudioControl. All rights reserved. AudioControl, The Epicenter, EQX, EQL, EQT, ESP-2, Model 11, 2XS, 4XS and Making Good Stereo Sound Better are trademarks of the AudioControl Division of Electronic Engineering and Manufacturning, Inc. - page 15 - AudioControl ESP-2 Limited Warranty People are scared of warranties. Lots of fine print, lots of non-cooperation, months of waiting around. . . Well don’t be scared of this warranty. It’s designed to make you rave about us to your friends. It’s a warranty that looks out for you and helps you resist the temptation to have your friend who is “good with electronics” try to repair your AudioControl ESP-2. So go ahead and read through this warranty, then enjoy your new component for a few days before sending in the warranty card and comments. “Limited” doesn’t mean anything ominous. The Federal Trade Commission tells all manufacturers to use the term to indicate certain conditions have to be met before they’ll honor the warranty. IF you honor these conditions, we will warrant all material and workmanship on your Concert Series ESP-2 for FIVE YEARS from the date of purchase if installed by an authorized AudioControl dealer, and will fix or replace it, at our option, during that time. For you “do-it-yourselfers”, we offer you the same warranty for one year. Here are the conditions that make this warranty conditional: 1. You have to fill out the warranty card and send it to us within 15 days after you purchased your ESP-2. 2. You must keep your sales slip or receipt so you have proof of when and where you bought your ESP-2. We’re not the only company to require this, so it’s a good habit to be in with any stereo purchase. 3. Your ESP-2 has to have been originally purchased from an authorized AudioControl dealer. You do not have to be the original owner to take advantage of the warranty, but the date of purchase is still important so be sure to get a copy of the sales slip from the original owner. 4. You cannot let anybody who isn’t; (a) The AudioControl Factory; (b) an authorized service center; or (c) someone authorized in writing by AudioControl, service your ESP-2. If anyone other than (a), (b), or (c) messes with your ESP-2, that voids the warranty. 5. The warranty is also void if the serial number has been altered or removed, or if the AudioControl ESP-2 is used improperly. Now, that sounds like a big loophole, but here is all we mean by it; unwarranted abuse is: (a) Physical damage (our mobile products are not meant to be used as jack stands for your car): (b) Improper connections. We have done the best we can to protect the inputs, however, 120 volts into the input jacks can fry the innards of the poor beasty: (c) Sadistic things. This is the best mobile product we know how to manufacture, but if you use it for the front bumper of your Baja bug and get it full of water and dirt, things will go wrong. Assuming you conform to numbers 1-5, and it isn’t all that hard to do, we get the option of deciding whether to fix your old unit or replace it with a new one. - page 16 - Legelese Section This is the only warranty given by AudioControl. This warranty gives you specific legal rights which vary from state to state. Promises of how well your ESP-2 will work are not implied by this warranty. Other than what we’ve covered in this warranty, we have no obligation, expressed or implied. Also, we will not be obligated for direct or indirect consequential damage to your system caused by hooking up the AudioControl ESP-2. Failure to send in a properly completed warranty card negates any service claim. ® making good stereo sound better® ® 22410 70th Ave. West • Mountlake Terrace, WA 98043 Phone 425- 775-8461 • Fax 425-4483166 • www.audiocontrol.com - page 17 -