1
Agilent 1100 Series
Diode Array and
Multiple Wavelength
Detectors
Reference Manual
A
Notices
© Agilent Technologies, Inc. 1995,
1996-2004
No part of this manual may be reproduced in
any form or by any means (including electronic storage and retrieval or translation
into a foreign language) without prior agreement and written consent from Agilent
Technologies, Inc. as governed by United
States and international copyright laws.
Manual Part Number
G1315-90005
Edition
Edition 05/2004
Printed in Germany
Agilent Technologies
Hewlett-Packard-Strasse 8
76337 Waldbronn
Software Revision
This guide is valid for A.01.xx revisions of
the Agilent 1100 Series Diode Array and
Multiple Wavelength Detectors software,
where xx refers to minor revisions of the
software that do not affect the technical
accuracy of this guide.
Warranty
The material contained in this document is provided “as is,” and is subject to being changed, without notice,
in future editions. Further, to the maximum extent permitted by applicable
law, Agilent disclaims all warranties,
either express or implied, with regard
to this manual and any information
contained herein, including but not
limited to the implied warranties of
merchantability and fitness for a particular purpose. Agilent shall not be
liable for errors or for incidental or
consequential damages in connection with the furnishing, use, or performance of this document or of any
information contained herein. Should
Agilent and the user have a separate
written agreement with warranty
terms covering the material in this
document that conflict with these
terms, the warranty terms in the separate agreement shall control.
Technology Licenses
The hardware and/or software described in
this document are furnished under a license
and may be used or copied only in accordance with the terms of such license.
Restricted Rights Legend
Software and technical data rights granted
to federal government customers include
only those rights customarily provided to
end user Customers of Software. Agilent
provides this customary commercial license
in Software and technical data pursuant to
FAR 12.211 (Technical Data) and FAR 12.212
(Computer Software) and, for Department of
Defense purchases, DFARS 252.227-7015
(Technical Data - Commercial Items) and
DFARS 227.7202-3 (Rights in Commercial
Computer Software or Computer Software
Documentation). If a federal government or
other public sector Customer has a need for
2
rights not conveyed under these terms, it
must negotiate with Agilent to establish
acceptable terms in a written agreement
executed by all relevant parties.
Safety Notices
CAUTION
A CAUTION notice denotes a hazard. It calls attention to an operating procedure, practice, or the like
that, if not correctly performed or
adhered to, could result in damage
to the product or loss of important
data. Do not proceed beyond a
CAUTION notice until the indicated
conditions are fully understood and
met.
WA R N I N G
A WARNING notice denotes a
hazard. It calls attention to an
operating procedure, practice, or
the like that, if not correctly performed or adhered to, could result
in personal injury or death. Do not
proceed beyond a WARNING
notice until the indicated conditions are fully understood and
met.
1100 Series DAD and MWD Reference Manual
In This Guide…
This manual contains information for using your Diode Array
and Multiple Wavelength Detectors.
1
Installing the Detector
How to install the detector
2
How to optmize the Detector
How to opimize the detector
3
Troubleshooting and Test Functions
The detector’s built-in troubleshooting and test functions
4
Repairing the Detector
Instructions on how to repair the detector
5
Identifying Parts and Materials
Detailed illustrations and listings for parts and materials
identification for the detector
6
Introduction to the Detector
An introduction to the detector, istrument overview, theory of
operation, external communication and internal connectors
7
Control Module Screens for Agilent 1100 DAD and MWD
This chapter is intended to introduce an operator to the screens
available for operation of the Agilent 1100 diode array detector
(DAD) with the Agilent 1100 control module.
8
Specifications
Performance specifications of the detector
Annex A
Safety Information
1100 Series DAD and MWD Reference Manual
3
4
1100 Series DAD and MWD Reference Manual
Contents
1
Installing the Detector
Site Requirements
14
Physical Specifications
16
Unpacking the Detector 17
Damaged Packaging 17
Delivery Checklist 17
Optimizing the Stack Configuration
Installing the Detector
22
Flow Connections to the Detector
2
20
25
How to optmize the Detector
Optimizing the Detector Performance
Optimization Overview
30
31
Optimizing for Sensitivity, Selectivity, Linearity and Dispersion
Flow Cell Path Length 33
Peak width (response time) 35
Sample and Reference Wavelength and Bandwidth 36
Slit Width 39
Optimizing Spectral Acquisition (DAD only) 42
Margin for Negative Absorbance 43
33
Optimizing Selectivity 44
Quantifying Coeluting Peaks by Peak Suppression 44
Ratio Qualifiers for Selective Detection of Compound
Classes 46
1100 Series DAD and MWD Reference Manual
5
3
Troubleshooting and Test Functions
Overview of the Detector’s Indicators and Test Functions
50
Status Indicators 51
Power Supply Indicator 51
Detector Status Indicator 51
Error Messages 53
Timeout 54
Shutdown 55
Remote Timeout 56
Synchronization Lost 57
Leak 58
Leak Sensor Open 60
Leak Sensor Short 61
Compensation Sensor Open 62
Compensation Sensor Short 63
Fan Failed 64
Open Cover 65
Cover Violation 66
Visible Lamp Current 67
Visible Lamp Voltage 68
Communication Error 69
Calibration Values Invalid 70
Diode Current Leakage 71
Holmium Oxide Test Failed 72
UV Lamp Current 73
UV Lamp Voltage 74
UV Ignition Failed 75
UV Heater Current 76
New Messages with the G1315B and G1365B detectors 77
Module Type Changed 78
Illegal Value From Temperature Sensor Mounted On The Fan
Assembly 80
6
1100 Series DAD and MWD Reference Manual
Illegal Value From „Air Inlet" Temperature Sensor
Heater Failed 82
Heater Power At Limit 83
Wavelength Recalibration
81
84
Test Functions 85
Holmium Oxide Test 86
Intensity Test 88
Cell Test 90
Dark-Current Test 91
Filter Test 93
4
Repairing the Detector
Introduction into Repairing the Detector
Using the ESD Strap 98
Overview of the Repairing of the Detector
96
99
Simple Repairs 101
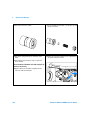
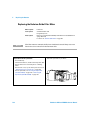
Exchanging a Lamp
102
Exchanging a Flow Cell
105
Repairing the Standard or Semi-Micro Flow Cell
108
Repairing the High Pressure Flow Cell 112
Replacing Capillaries on a Standard Flow Cell 114
Replacing Capillaries on a Semi-Micro and High Pressure Flow
Cell 119
Nano Flow Cell - Replacing or Cleaning 122
Cleaning or Exchanging the Holmium Oxide Filter
127
Correcting Leaks 130
Replacing Leak Handling System Parts 131
Cleaning or Replacing Coupling Lens Assembly
132
Cleaning or Replacing Cell Support Window
135
Exchanging Internal Parts 138
Removing the Top Cover and Foam
1100 Series DAD and MWD Reference Manual
140
7
Exchanging the Detector Main Board 143
Entering the Serial Number using the Control Module 146
Entering the Serial Number using the
Agilent ChemStation 147
Exchanging the Fan (G1315A/G1365A) 148
Replacing Fan Parts (G1315B/G1365B) 150
Removing the Optical Unit (G1315A/G1365A) 154
Removing the Optical Unit (G1315B/G1365B) 156
Exchanging the Source Lens (Achromat) Assembly 158
Replacing the Holmium Oxide Filter Motor 162
Exchanging the Power Supply 164
Exchanging the Leak Sensor 167
Replacing Status Light Pipe 170
Installing the Optical Unit (G1315A/G1365A) 171
Installing the Optical Unit (G1315B/G1365B) 173
Replacing the Foam and the Top Cover
175
Assembling the Main Cover 178
Replacing the Interface Board 179
Replacing the Detector’s Firmware 180
5
Identifying Parts and Materials
Overview of Main Assemblies
Optical Unit Assembly
Standard Flow Cell
184
186
Semi-Micro Flow Cell
188
High Pressure Flow Cell
Nano Flow Cells
190
192
Fan Assembly Parts
Holmium Oxide Filter
196
197
Coupling Lens Assembly
8
182
198
1100 Series DAD and MWD Reference Manual
Source Lens (Achromat) Assembly
Cell Support Assembly
Control Module
200
201
Sheet Metal Kit (G1315A/G1365A)
202
Sheet Metal Kit (G1315B/G1365B)
203
Plastic Parts
Foam Parts
204
205
Power and Status Light Pipes
Leak Parts
208
Cable Overview 210
Analog Cables 212
Remote Cables 215
BCD Cables 220
Auxiliary Cable 222
CAN Cable 223
External Contact Cable
RS-232 Cable Kit
LAN Cables
206
207
Accessory Kit
6
199
224
225
226
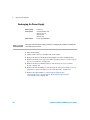
Introduction to the Detector
Introduction to the Detector
Optical System Overview
Electrical Connections
Instrument Layout
228
229
232
234
Early Maintenance Feedback (EMF)
EMF Counters 235
1100 Series DAD and MWD Reference Manual
235
9
Using the EMF Counters
Electronics
235
237
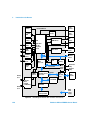
Detector Main Board (DAM/MWM)
Firmware Description
Firmware Updates
238
246
247
Raw Data Conversion to Absorbance 248
Rawdata File 251
Peak Detector 251
Spectra Acquisition Modes (DAD only) 252
Optional Interface Boards 253
BCD Board 253
LAN Communication Interface Board
255
Interfaces 256
Analog Signal Output 257
GPIB Interface 257
CAN Interface 257
Remote Interface 257
RS-232C 259
Setting the 8-bit Configuration Switch 261
GPIB Default Addresses 262
Communication Settings for RS-232C Communication
Forced Cold Start Settings 264
Stay-Resident Settings 265
The Main Power Supply Assembly
7
266
Control Module Screens for Agilent 1100 DAD and MWD
Major keys on the Agilent 1100 Control Module
Control Module - Unsupported Module
270
271
Screens available from the Analysis screen
10
263
272
1100 Series DAD and MWD Reference Manual
Screens available from the System screen
282
Screens available from the Records screen
284
Diagnostics and Tests
8
290
Specifications
Performance Specifications
A
296
Safety Information
General Safety Information
300
Lithium Batteries Information
303
Disposal of Mercury from Deuterium Lamp
Radio Interference
Sound Emission
UV-Radiation
304
305
306
307
Solvent Information
308
Declaration of Conformity for HOX2 Filter
Agilent Technologies on Internet
310
311
Index
1100 Series DAD and MWD Reference Manual
11
12
1100 Series DAD and MWD Reference Manual
Agilent 1100 Series Diode Array and Multiple Wavelength Detectors
Reference Manual
1
Installing the Detector
Site Requirements 14
Physical Specifications 16
Unpacking the Detector 17
Optimizing the Stack Configuration 20
Installing the Detector 22
Flow Connections to the Detector 25
Agilent Technologies
13
1
Installing the Detector
Site Requirements
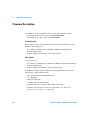
A suitable environment is important to ensure optimal performance of the
detector.
Power Consideration
The detector power supply has wide ranging capabilities and accepts any line
voltage in the range mentioned in Table 1. Consequently, there is no voltage
selector in the rear of the detector. There are also no externally accessible
fuses, because automatic electronic fuses are implemented in the power
supply.
WA R N I N G
To disconnect the detector from line, unplug the power cord. The power supply still
uses some power, even if the power switch on the front panel is turned off.
WA R N I N G
Shock hazard or damage of your instrumentation can result, if the devices are
connected to a line voltage higher than specified.
CAUTION
Make sure to have easy access to the power cable of the instrument, in order to
disconnect the instrument from line.
Power Cords
Different power cords are offered as options with the detector. The female end
of all power cords is identical. It plugs into the power-input socket at the rear
of the detector. The male end of each power cord is different and designed to
match the wall socket of a particular country or region.
14
1100 Series DAD and MWD Reference Manual
Installing the Detector
1
WA R N I N G
Never operate your instrumentation from a power outlet that has no ground
connection. Never use a power cord other than the Agilent Technologies power cord
designed for your region.
WA R N I N G
Never use cables other than the ones supplied by Agilent Technologies to ensure
proper functionality and compliance with safety or EMC regulations.
Bench Space
The detector dimensions and weight (see Table 1) allows you to place the
detector on almost any desk or laboratory bench. It needs an additional 2.5 cm
(1.0 inches) of space on either side and approximately 8 cm (3.1 inches) in the
rear for air circulation and electric connections.
If the bench should carry a Agilent 1100 Series system, make sure that the
bench is designed to bear the weight of all modules.
The detector should be operated in a horizontal position.
Environment
Your detector will work within the specifications at ambient temperatures and
relative humidity described in Table 1.
ASTM drift tests require a temperature change below 2 °C/hour (3.6 °F/hour)
over one hour period. Our published drift specification (refer also to
“Performance Specifications” on page 296) is based on these conditions.
Larger ambient temperature changes will result in larger drift.
Better drift performance depends on better control of the temperature
fluctuations. To realize the highest performance, minimize the frequency and
the amplitude of the temperature changes to below 1 °C/hour (1.8 °F/hour).
Turbulences around one minute or less can be ignored.
CAUTION
Do not store, ship or use your detector under conditions where temperature
fluctuations could cause condensation within the detector. Condensation will damage
the system electronics. If your detector was shipped in cold weather, leave it in its box
and allow it to warm up slowly to room temperature to avoid condensation.
1100 Series DAD and MWD Reference Manual
15
1
Installing the Detector
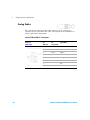
Physical Specifications
Table 1
Physical Specifications
Type
Specification
Weight
11.5 kg (26 lbs)
Dimensions
(width × depth × height)
345 × 435 × 140 mm
(13.5 × 17 × 5.5 inches)
Line voltage
100 – 120 or 220 – 240 VAC,
Line frequency
50 or 60 Hz ± 5 %
Power consumption (G1315/65B)
300 VA / 125 W / 427 BTU
Maximum
Ambient operating temperature
0 – 55 °C (32 – 131 °F)
.
Ambient non-operating temperature
-40 – 70 °C (-4 – 158 °F)
Humidity
< 95%, at 25 – 40 °C (77 – 104 °F)
Operating altitude
Up to 2000 m (6500 ft)
Non-operating altitude
Up to 4600 m (14950 ft)
Safety standards: IEC, CSA, UL, EN
Installation category II, pollution degree 2
16
Comments
± 10 %
Wide-ranging capability
Non-condensing
For storing the detector
1100 Series DAD and MWD Reference Manual
Installing the Detector
1
Unpacking the Detector
Damaged Packaging
If the delivery packaging shows signs of external damage, please call your
Agilent Technologies sales and service office immediately. Inform your service
representative that the detector may have been damaged during shipment.
CAUTION
If there are signs of damage, please do not attempt to install the detector.
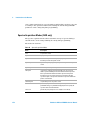
Delivery Checklist
Ensure all parts and materials have been delivered with the detector. The
delivery checklist is shown below. Please report missing or damaged parts to
your local Agilent Technologies sales and service office.
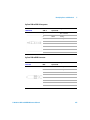
Table 2
Detector Checklist
Description
Quantity
Detector
1
Power cable
1
UV-lamp (Part number 5181-1530)
1
CAN cable (Part number 5181-1516)
1
Flow cell
As ordered
Reference Manual
1
Accessory kit (see Table 3)
1
1100 Series DAD and MWD Reference Manual
17
1
Installing the Detector
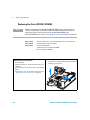
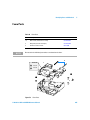
Detector Accessory Kit Contents
Table 3
Accessory Kit Contents (Part Number G1315-68705)
Description
Part Number
Quantity
Teflon Tubing flexible i.d. 0.8 mm (flow cell to waste),
re-order 5 m
5062-2462
2m
Corrugated tubing (to waste), re-order 5 m
5062-2463
1.2 m
Fitting male PEEK
0100-1516
2
Capillary column-detector
380 mm lg, 0.17 mm i.d. includes:
G1315-87311
1
Ferrule front SST
0100-0043
2
Ferrule back SST
0100-0044
2
Fitting SST
79814-22406
2
Hex key set 1 – 5 mm
8710-0641
1
Wrench open end 1/4 – 5/16 inch
8710-0510
1
Wrench open end 4 mm
8710-1534
1
ESD wrist strap
9300-1408
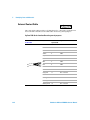
1
Fitting male
PEEK
Tubing
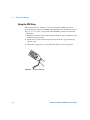
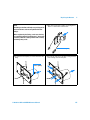
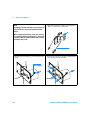
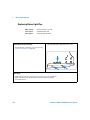
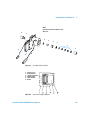
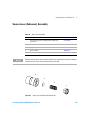
Figure 1
18
Waste Tubing Parts
1100 Series DAD and MWD Reference Manual
Installing the Detector
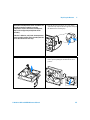
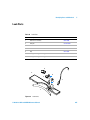
1
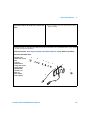
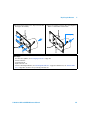
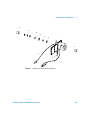
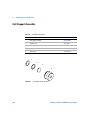
Ferrule front
This side is
preinstalled
Ferrule back
Fitting male SST
Capillary
Figure 2
Inlet Capillary (Column-Detector) Parts
1100 Series DAD and MWD Reference Manual
19
1
Installing the Detector
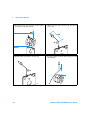
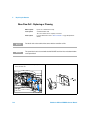
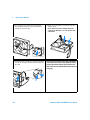
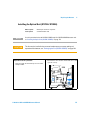
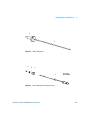
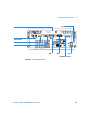
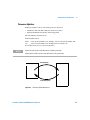
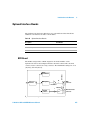
Optimizing the Stack Configuration
If your detector is part of a complete Agilent 1100 Series system, you can ensure
optimum performance by installing the following configuration. This configuration
optimizes the system flow path, ensuring minimum delay volume.
Solvent cabinet
Vacuum degasser
Pump
Control module
Autosampler
Column compartment
Detector
Figure 3
20
Recommended Stack Configuration (Front View)
1100 Series DAD and MWD Reference Manual
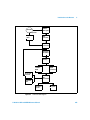
Installing the Detector
1
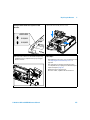
Remote cable
CAN Bus cable
CAN Bus cable
AC power
Analog
signal to
recorder
GPIB or LAN
to LC
ChemStation
Figure 4
Recommended Stack Configuration (Rear View)
1100 Series DAD and MWD Reference Manual
21
1
Installing the Detector
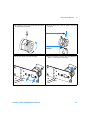
Installing the Detector
Preparations
Locate bench space
Provide power connections
Unpack the detector
Parts required
Detector
Power cord, for other cables see below and “Cable Overview” on page 210
ChemStation and/or Control Module G1323A/B
1 Install the LAN interface board in the detector (if required), see “Replacing
the Interface Board” on page 179.
2 Place the detector in the stack or on the bench in a horizontal position.
3 Ensure the line power switch at the front of the detector is OFF.
22
1100 Series DAD and MWD Reference Manual
Installing the Detector
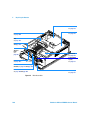
1
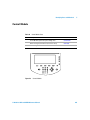
Status indicator
green/yellow/red
Line power switch
with green light
Figure 5
Front View of Detector
4 Connect the power cable to the power connector at the rear of the detector.
5 Connect the CAN cable to other Agilent 1100 Series modules.
6 If a Agilent ChemStation is the controller, connect either
• the GPIB cable to the detector or
• the LAN connection to the LAN interface board in the detector.
NOTE
If a Agilent 1100 DAD/MWD/FLD is in the system, the LAN/GPIB should be connected to
the DAD/MWD/FLD (due to higher data load).
7 Connect the analog cable(s) (optional).
8 Connect the APG remote cable (optional) for non-Agilent 1100 Series
instruments.
9 Turn on power by pushing the button at the lower left hand side of the
detector. The status LED should be green.
1100 Series DAD and MWD Reference Manual
23
1
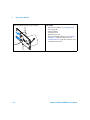
Installing the Detector
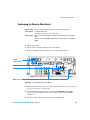
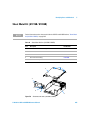
Security lever
Interface board
Analog signal
APG remote
RS-232C
CAN
GPIB
Power
Configuration switch
Figure 6
24
Rear View of Detector
NOTE
The detector is turned on when the line power switch is pressed and the green indicator
lamp is illuminated. The detector is turned off when the line power switch is protruding and
the green light is off.
WA R N I N G
To disconnect the detector from line, unplug the power cord. The power supply still
uses some power, even if the power switch at the front panel is turned off.
NOTE
The detector was shipped with default configuration settings. To change these settings see
“Setting the 8-bit Configuration Switch” on page 261.
1100 Series DAD and MWD Reference Manual
Installing the Detector
1
Flow Connections to the Detector
WA R N I N G
NOTE
Preparations
Detector is installed in the LC system.
Parts required
Other modules
Parts from accessory kit, see“Detector Accessory Kit Contents” on page 18.
Two wrenches 1/4 – 5/16 inch for capillary connections
When working with solvents please observe appropriate safety procedures (for
example, goggles, safety gloves and protective clothing) as described in the
material handling and safety data sheet supplied by the solvent vendor, especially
when toxic or hazardous solvents are used.
The flow cell is shipped with a filling of isopropanol (also recommended when the
instrument and/or flow cell is shipped to another location). This is to avoid breakage due to
subambient conditions.
1100 Series DAD and MWD Reference Manual
25
1
Installing the Detector
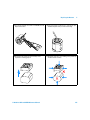
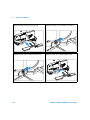
1 Press the release buttons and remove the front cover to
gain access to the flow cell area.
2 Press the release button and open the flow cell door.
3 Insert the flow cell and install the capillaries to the
capillary holder (top is inlet, bottom is outlet).
4 If another Agilent 1100 Series module is positioned on top
of the detector, route the tubing assembly waste from the
accessory kit behind the capillary holder and connect the
top end to the other module’s waste outlet.
To other module
To waste
26
1100 Series DAD and MWD Reference Manual
Installing the Detector
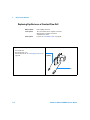
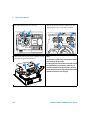
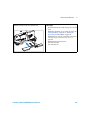
5 Assemble the column-detector capillary from the
accessory kit. One side is already factory-assembled
1
6 Connect the newly assembled fitting of the capillary to the
top fitting holder and the other end to the column.
Pre-assembled
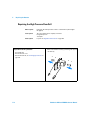
7 Assemble the waste tubing from the accessory kit.
1100 Series DAD and MWD Reference Manual
8 Connect the waste tubing to the bottom fitting holder and
a waste tubing to the leak outlet.
27
1
Installing the Detector
9 Remove the flow cell and establish a flow and observe for
leaks.
10 Insert the flow cell, close the cover and replace the front
cover.
The installation of the detector is now complete.
NOTE
The detector should be operated with the front cover in place to protect the flow cell area
against strong drafts from the ouside and to cover the deuterium lamp.
Some types of the Agilent deuterium lamps show a light ring during operation. This is not
harmful, refer to “UV-Radiation” on page 307.
28
1100 Series DAD and MWD Reference Manual
Agilent 1100 Series Diode Array and Multiple Wavelength Detectors
Reference Manual
2
How to optmize the Detector
Optimizing the Detector Performance 30
Optimization Overview 31
Optimizing for Sensitivity, Selectivity, Linearity and Dispersion 33
Optimizing Selectivity 44
Agilent Technologies
29
2
How to optmize the Detector
Optimizing the Detector Performance
The detector has a variety of parameters that can be used to optimize
performance. Depending on whether signal or spectral data need to be
optimized, different settings are recommended. The following sections
describe optimization for:
• signal sensitivity, selectivity and linearity,
• spectral sensitivity and resolution (DAD only), and
• disk space required for storing data.
NOTE
The information in this chapter should be seen as a basic introduction to diode array
detector technics. Some of these technics may not be available in the instrument firmware
or the user interfaces (Control Module and/or Agilent Chemstation).
How to Get the Best Detector Performance
The information below will guide you on how to get the best detector
performance. Follow these rules as a start for new applications. It gives
rules-of-thumb for optimizing detector parameters.
30
1100 Series DAD and MWD Reference Manual
How to optmize the Detector
2
Optimization Overview
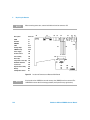
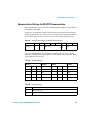
Table 4
Optimization Overview
Parameter
Impact
1 Selection of flow cell
• Choose flow cell according to used column, see Figure 7.
• peak resolution versus sensitivity
2 Connection of flow cell
• For flow rates from 0.5 ml/min connect column using the
zero-dead-volume fittings of the detector.
• For small column i.d. (e.g 1 mm) the inlet capillary of the micro flow cell
can be connected directly to the column.
• chromatographic resolution
3 Setting the peak width (response time)
• Use peak width according Figure 7 as starting point.
• Set the peak-width close to the width of a narrow peak of interest in
your chromatogram.
• peak resolution versus sensitivity versus
disk space
4 Setting wavelength and bandwidth
• Sample wavelength:
• Never miss a peak by the use of a browser wavelength like 250 nm
with 100 nm bandwidth.
• Select specific wavelength with reduced bandwidth if you need
selectivity, e.g. 250,10 nm and 360,100 nm as reference wavelength.
• Set the sample wavelength to a peak or valley in the spectrum to get
best linearity for high concentrations.
• Reference wavelength:
• Select the reference wavelength with broad bandwidth (30...100 nm)
wavelength range where your analytes have little or no absorbance
(e.g. sample at 254 nm, reference at 320 nm).
1100 Series DAD and MWD Reference Manual
• sensitivity versus selectivity
• sensitivity versus linearity
• baseline drift due to RI effects.
31
2
How to optmize the Detector
Table 4
Optimization Overview, continued
Parameter
Impact
5 Setting the slit width
• Use 4 nm slit for normal applications.
• Use narrow slit (e.g 1 nm) if your analytes have narrow absorbance
bands and for high concentrations.
• Use a wide slit (e.g. 16 nm) to detect very low concentrations.
• spectral resolution, sensitivity and
linearity.
• Optimizing spectral acquisition (DAD only)
• Select spectra acquisition mode according to your needs (see “Options
for storing spectra” on page 42).
• Set the spectral wavelength range (for colorless samples 190...400 nm
is sufficient).
• Set step to 4 nm for normal use; set small step (and slit width) if high
resolution of spectra with fine structure is wanted.
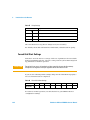
Typical column Typical peak
length
width
T<= 5 cm
0.025 min
10 cm
0.05 min
20 cm
0.1 min
>= 40 cm
0.2 min
Typical flow
rate
Internal column diameter
Figure 7
32
Recommended flow cell
500 nl
flow cell
Semi-mirco
flow cell
High pressure
flow cell for
pressures
above 100 bar
Standard
flow cell
0.01 ... 0.2
ml/min
0.2 ... 0.4
ml/min
0.4 ... 0.4
ml/min
1 ... 2 ml/min
0.5 ... 1 mm
2.1 mm
3.0 mm
4.6 mm
0.01 ... 5
ml/min
Choosing a Flow Cell
1100 Series DAD and MWD Reference Manual
How to optmize the Detector
2
Optimizing for Sensitivity, Selectivity, Linearity and Dispersion
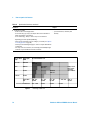
Flow Cell Path Length
Lambert-Beer’s law shows a linear relationship between the flow cell path
length and absorbance.
I
Absorbance = – log T = log ---0- = ε ⋅ C ⋅ d
I
where
T
is the transmission, defined as the quotient of the intensity of the
transmitted light I divided by the intensity of the incident light, I0,
ε
is the extinction coefficient, which is a characteristic of a given substance
under a precisely-defined set of conditions of wavelength, solvent,
temperature and other parameters,
C
is the concentration of the absorbing species (usually in g/l or mg/l), and
d
is the path length of the cell used for the measurement.
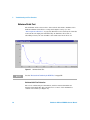
Therefore, flow cells with longer path lengths yield higher signals. Although
noise usually increases little with increasing path length, there is a gain in
signal-to-noise ratio. For example, in Figure 8 the noise increased by less than
10 % but a 70 % increase in signal intensity was achieved by increasing the
path length from 6 mm to 10 mm.
When increasing the path length, the cell volume usually increases — in our
example from 5 – 13 µl. Typically, this causes more peak dispersion. As
Figure 8 demonstrates, this did not affect the resolution in the gradient
separation in our example.
As a rule-of-thumb the flow cell volume should be about 1/3 of the peak
volume at half height. To determine the volume of your peaks, take the peak
width as reported in the integration results multiply it by the flow rate and
divide it by 3).
1100 Series DAD and MWD Reference Manual
33
2
How to optmize the Detector
Analysis of pesticide standard
Absorbance
6-mm optical path length
10-mm optical path length
Time (min)
Figure 8
Influence of Cell Path Length on Signal Height
Traditionally LC analysis with UV detectors is based on comparing
measurements with internal or external standards. To check photometric
accuracy of the Agilent 1100 DAD/MWD it is necessary to have more precise
information on path lengths of the flow cells.
The correct response is:
expected response * correction factor
Please find below the details of the Agilent 1100 DAD/MWD flow cells:
Table 5
Correction factors for Agilent 1100 DAD/MWD flow cells
Flow cell type
Cell volume
Part number
Path length
(nominal)
Path length
(actual)
Correction
factor
Standard flow cell
13 µl
G1315-60012
10 mm
9.80 ± 0.07 mm
10/9.8
Semi-micro flow cell
5 µl
G1315-60011
6 mm
5.80 ± 0.07 mm
6/5.8
80 Nanoliter flow cell kit
0.08 µl
G1315-68716
6 mm
6.00 ± 0.02 mm
6/6
500 Nanoliter flow cell kit
0.5 µl
G1315-68724
10 mm
10.00 ± 0.02 mm
10/10
High Pressure flow cell
1.7 µl
G1315-60015
6 mm
5.75 ± 0.07 mm
6/5.75
34
1100 Series DAD and MWD Reference Manual
How to optmize the Detector
2
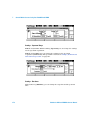
Peak width (response time)
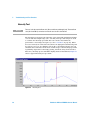
Response time describes how fast the detector signal follows a sudden change
of absorbance in the flow cell. The detector uses digital filters to adapt
response time to the width of the peaks in your chromatogram. These filters
do not affect peak area nor peak symmetry. When set correctly, such filters
reduce baseline noise significantly (see Figure 9), but reduce peak height only
slightly. In addition, these filters reduce the data rate to allow optimum
integration and display of your peaks and to minimize disk space required to
store chromatograms and spectra.
Unfiltered
Response time 0.05 min
Response time 0.1 min
Figure 9
Influence of Response Time on Signal and Noise
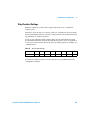
Figure 6 lists the filter choices of the detector. To get optimum results, set
peak width as close as possible to a narrow peak of interest in your
chromatogram. Response time will the be approximately 1/3 of the peak
width, resulting in less than 5 % peak-height reduction and less than 5 %
additional peak dispersion. Decreasing the peak width setting in the detector
will result in less than 5 % gain in peak height but baseline noise will increase
by a factor of 1.4 for a factor of 2 response-time reduction. Increasing peak
width (response time) by factor of two from the recommended setting
(over-filtering) will reduce peak height by about 20 % and reduce baseline
noise by a factor of 1.4. This gives you the best possible signal-to-noise ratio,
but may affect peak resolution.
1100 Series DAD and MWD Reference Manual
35
2
How to optmize the Detector
Table 6
Peak Width — Response Time — Data Rate
Peak Width
Response Time
Data Rate
0.01 min
0.2 s
20 Hz
0.02 min
0.5 s
10 Hz
0.05 min
1.0 s
5 Hz
0.10 min
2.0 s
2.5 Hz
0.20 min
4.0 s
1.25 Hz
0.40 min
8.0 s
0.6 Hz
0.80 min
16.0 s
0.3 Hz
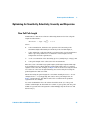
Sample and Reference Wavelength and Bandwidth
The detector measures absorbance simultaneously at wavelengths from 190 to
950 nm. Two lamps provide good sensitivity over the whole wavelength range.
The deuterium discharge lamp provides the energy for the UV range (190 to
400 nm) and the tungsten lamp emits light from 400 to 950 nm for the visible
and short wave near infrared.
If you know little about the analytes in your sample, use both lamps and store
all spectra over the full wavelength range. This provides full information but
fills up your disk space rather quickly. Spectra can be used to check a peak’s
purity and identity. Spectral information is also useful to optimize wavelength
settings for your chromatographic signal.
The detector can compute and store at run time up to 5 signals with these
properties:
• sample wavelength, the center of a wavelength band with the width of
sample bandwidth (BW), and optionally
• reference wavelength, the center of a wavelength band with the width of
reference bandwidth.
The signals comprises a series of data points over time, with the average
absorbance in the sample wavelength band minus the average absorbance of
the reference wavelength band.
36
1100 Series DAD and MWD Reference Manual
How to optmize the Detector
2
Signal A in the detector default method is set to sample 250,100, reference
360,100, that is, the average absorbance from 200 – 300 nm minus the average
absorbance from 300 – 400 nm. As all analytes show higher absorbance at
200 – 300 nm than at 300 – 400 nm, this signal will show you virtually every
compound which can be detected by UV absorbance.
Many compounds show absorbance bands in the spectrum. Figure 10 shows
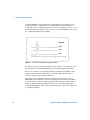
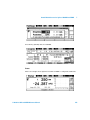
the spectrum of anisic acid as an example.
To optimize for lowest possible detectable concentrations of anisic acid, set
the sample wavelength to the peak of the absorbance band (that is, 252 nm)
and the sample bandwidth to the width of the absorbance band (that is,
30 nm). A reference of 360,100 is adequate. Anisic acid does not absorb in this
range.
If you work with high concentrations, you may get better linearity above
1.5 AU by setting the sample wavelength to a valley in the spectrum, like
225 nm for anisic acid.
Anisic acid
Absorbance (mAU)
sample wavelength 252 nm
Reference bandwidth 100 nm
30 nm
bandwidth
Reference wavelength 360
Wavelength (nm)
Figure 10
Optimization of Wavelength Setting
1100 Series DAD and MWD Reference Manual
37
2
How to optmize the Detector
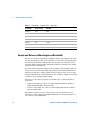
A wide bandwidth has the advantage of reducing noise by averaging over a
wavelength range — compared to a 4 nm bandwidth, the baseline noise is
reduced by a factor of approximately 2.5, whereas the signal is about 75 % of a
4-nm wide band. The signal-to-noise ratio for a 30 nm bandwidth is twice that
for a 4-nm bandwidth in our example.
Bandwidth
30 nm
12 nm
4 nm
Figure 11
Influence of Bandwidth on Signal and Noise
Because the detector averages absorbance values that are calculated for each
wavelength, using a wide bandwidth does not negatively impact linearity.
The use of a reference wavelength is highly recommended to further reduce
baseline drift and wander induced by room temperature fluctuations or
refractive index changes during a gradient.
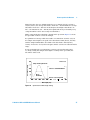
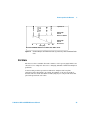
An example of the reduction of baseline drifts is shown in Figure 12 for
PTH-amino acids. Without a reference wavelength, the chromatogram drifts
downwards due to refractive index changes induced by the gradient. This is
almost completely eliminated by using a reference wavelength. With this
technique, PTH-amino acids can be quantified in the low picomole range even
in a gradient analysis.
38
1100 Series DAD and MWD Reference Manual
PTH-PHE
PTH-PRO
PTH-ARG
PTH-ALA
PTH-ASN
How to optmize the Detector
2
1 pmol each
Wavelength
267 nm
Reference 380 nm
Wavelength
267 nm
No reference
Time (min)
Grad.: 0.02 m KH2PO4/ACN from 12% ACN to 45% ACN in 12 min
Figure 12
Gradient Analysis of PTH-Amino Acids (1 pmol each), with and without Reference
Slit Width
The detector has a variable slit at the entrance of the spectrograph. This is an
effective tool to adapt the detector to changing demand of different analytical
problems.
A narrow slit provides spectral resolution for analytes with very fine
structures in the absorbance spectrum. An example of such a spectrum is
benzene. The five main absorbance bands (fingers) are only 2.5 nm wide and
just 6 nm apart from each other.
1100 Series DAD and MWD Reference Manual
39
2
How to optmize the Detector
16 nm
4 nm
1 nm
Figure 13
Benzene at 1, 4 and 16 nm slit width
A wide slit uses more of the light shining through the flow cell. This gives
lower baseline noise as shown in Figure 14.
Slit width 1 nm
Slit width 4 nm
Slit width 16 nm
Figure 14
Influence of the Slit Width on Baseline Noise
However, with a wider slit, the spectrograph’s optical resolution (its ability to
distinguish between different wavelengths) diminishes. Any photodiode
receives light within a range of wavelength determined by the slit width. This
explains why the fine spectral structure of benzene disappears when using a
16-nm wide slit.
40
1100 Series DAD and MWD Reference Manual
How to optmize the Detector
2
Furthermore, the absorbance is no longer strictly linear with concentration for
wavelengths at a steep slope of a compound’s spectrum.
Substances with fine structures and steep slopes like benzene are very rare.
In most cases the width of absorbance bands in the spectrum is more like
30 nm as with anisic acid (see Figure 10).
In most situations, a slit width of 4 nm will give the best results.
Use a narrow slit (1 or 2 nm) if you want to identify compounds with fine
spectral structures or if you need to quantify at high concentrations
(> 1000 mAU) with a wavelength at the slope of the spectrum. Signals with a
wide bandwidth can be used to reduce baseline noise. Because (digital)
bandwidth is computed as average of absorbance, there is no impact on
linearity.
Use a wide (8 or 16 nm) slit when your sample contains very small
concentrations. Always use signals with bandwidth at least as wide as the slit
width.
1100 Series DAD and MWD Reference Manual
41
2
How to optmize the Detector
Optimizing Spectral Acquisition (DAD only)
Storage of all spectra consumes a lot of disk space. It is very useful to have all
spectra available during optimization of a method or when analyzing unique
samples. However when running many samples of the same type, the large size
of data files with all spectra may become a burden. The detector provides
functions to reduce the amount of data, yet retaining the relevant spectral
information.
Options for storing spectra
None
Store signals only. No peak purity checks nor library search
features can be used for samples analyzed with this setting.
Apex
Only one spectrum per peak is stored; a peak must be higher than
the value entered in Threshold (see below).
Apex + baseline
Stores spectra for peaks > threshold at the top and at baseline
before and after each peak recommended minimum to do library
searches with baseline corrected spectra.
Apex + slope +baseline
Add spectra at the up and down slope; required to do a minimum
peak purity check.
All in peak
All spectra during all peak > Threshold are stored; required for a
full peak purity check.
Every 2nd spectrum
Only every second spectrum is stored, occupying only half the disk
space.
All
All spectra are stored.
Range
Only the wavelength range where the compounds in your sample absorb
contains information that is useful for purity checks and library searches.
Reducing the spectrum storage range saves disk space.
Step
Most substances have broad absorbance bands. Display of spectra, peak purity
and library search works best if a spectrum contains 5 to 10 data points per
width of the absorbance bands. For anisic acid (the example used before) a
step of 4 nm would be sufficient. However a step of 2 nm gives a better display
of the spectrum.
42
1100 Series DAD and MWD Reference Manual
How to optmize the Detector
2
Threshold
Sets the peak detector. Only spectra from peaks higher than threshold will be
stored when a peak-controlled storage mode is selected.
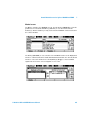
Margin for Negative Absorbance
The detector adjusts its gain during balance such that the baseline may drift
slightly negative (about -100 mAU). In some special case, for example, when
gradient with absorbing solvents are used, the baseline may drift to more
negative values.
Only for such cases, increase the margin for negative absorbance to avoid
overflow of the analog-to-digital converter.
1100 Series DAD and MWD Reference Manual
43
2
How to optmize the Detector
Optimizing Selectivity
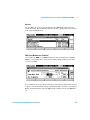
Quantifying Coeluting Peaks by Peak Suppression
In chromatography, two compounds may often elute together. A conventional
dual-signal detector can only detect and quantify both compounds
independently from each other if their spectra do not overlap. However, in
most cases this is highly unlikely.
With a dual-channel detector based on diode-array technology, quantifying
two compounds is possible even when both compounds absorb over the whole
wavelength range. The procedure is called peak suppression or signal
subtraction. As an example, the analysis of hydrochlorothiazide in the
presence of caffeine is described. If hydrochlorothiazide is analyzed in
biological samples, there is always a risk that caffeine is present which might
interfere chromatographically with hydrochlorothiazide. As the spectra in
Figure 15 show, hydrochlorothiazide is best detected at 222 nm, where
caffeine also shows significant absorbance. It would therefore be impossible,
with a conventional variable wavelength detector, to detect
hydrochlorothiazide quantitatively when caffeine is present.
44
1100 Series DAD and MWD Reference Manual
How to optmize the Detector
2
WL1 (204 nm, caffeine)
WL2 (222 nm, hydrochlorothiazide
WL3 (260 nm, reference to suppress
hydrochlorothiazide
WL4 (282 nm, reference to suppress caffeine
WL3
WL1
WL4
WL2
Wavelength (nm)
Figure 15
Wavelength Selection for Peak Suppression
With a UV-visible detector based on a diode array and the correct choice of a
reference wavelength setting, quantitative detection is possible. To suppress
caffeine, the reference wavelength must be set to 282 nm. At this wavelength,
caffeine shows exactly the same absorbance as at 222 nm. When the
absorbance values are subtracted from each another, any indication of the
presence of caffeine is eliminated. In the same way, hydrochlorothiazide can
be suppressed if caffeine is to be quantified. In this case the wavelength is set
to 204 nm and the reference wavelength to 260 nm. Figure 16 shows the
chromatographic results of the peak suppression technique.
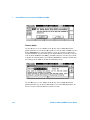
The trade-off for this procedure is a loss in sensitivity. The sample signal
decreases by the absorbance at the reference wavelength relative to the signal
wavelength. Sensitivity may be decreased by as much as 10–30 %.
1100 Series DAD and MWD Reference Manual
45
2
How to optmize the Detector
Figure 16
Hydrochlorothiazide
and caffeine
Wavelength 204 nm
No reference
Hydrochlorothiazide
and caffeine
Wavelength 222 nm
No reference
Hydrochlorothiazide
suppressed
Wavelength 204 nm
Reference 260 nm
Caffeine suppressed
Time (min)
Time (min)
Wavelength 222 nm
Reference 282 nm
Peak Suppression Using Reference Wavelength
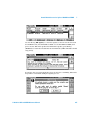
Ratio Qualifiers for Selective Detection of Compound Classes
Ratio qualifiers can be used where, in a complex sample, only one particular
class needs to be analyzed — a parent drug and its metabolites in a biological
sample, for example. Another example is the selective analysis of derivatives
after pre or postcolumn derivatization. Specifying a signal ratio that is typical
for the sample class is one way of selectively plotting only those peaks that are
of interest. The signal output remains at zero so long as the ratio is out of the
user-specified ratio range. When the ratio falls within the range, the signal
output corresponds to the normal absorbance, giving single, clear peaks on a
flat baseline. An example is shown in Figure 17 and Figure 18.
46
1100 Series DAD and MWD Reference Manual
How to optmize the Detector
2
Select 2 characteristic
wavelengths
Signal = WL1/WL2 20%
Scaled
o-Terphenyl
Biphenyl
WL2
WL1
Wavelength (nm)
Figure 17
Wavelength Selection for Ratio Qualifiers
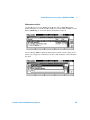
Signals at 250 nm
Biphenyl
o-Terphenyl
No selectivity
With ratio qualifier
250/222 nm = 3.5 20%
Time (min)
Figure 18
Selectivity by Ratio Qualifiers
In a four-component mixture, only biphenyl was recorded. The other three
peaks were suppressed because they did not meet the ratio-qualifier criterion
and therefore the output was set to zero. The characteristic wavelengths
249 nm (λ1) and 224 nm (λ2) were found from the spectra shown in Figure 17.
1100 Series DAD and MWD Reference Manual
47
2
How to optmize the Detector
The ratio range was set at 2 – 2.4 (2.2 ±10%). Only when the ratio between 249
and 224 nm was within this range, is the signal plotted. Of all four peaks, only
the third fulfilled the criterion (Figure 18). The others were not plotted.
48
1100 Series DAD and MWD Reference Manual
Agilent 1100 Series Diode Array and Multiple Wavelength Detectors
Reference Manual
3
Troubleshooting and Test Functions
Overview of the Detector’s Indicators and Test Functions 50
Status Indicators 51
Error Messages 53
Wavelength Recalibration 84
Test Functions 85
This chapter describes the detector’s built in troubleshooting and test
functions.
Agilent Technologies
49
3
Troubleshooting and Test Functions
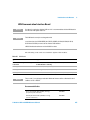
Overview of the Detector’s Indicators and Test Functions
Status Indicators
The detector is provided with two status indicators which indicate the
operational state (prerun, run, and error states) of the detector. The status
indicators provide a quick visual check of the operation of the detector (see
page 51).
Error Messages
In the event of an electronic, mechanical or hydraulic failure, the detector
generates an error message in the user interface. For each message, a short
description of the failure, a list of probable causes of the problem, and a list of
suggested actions to fix the problem are provided (see “Error Messages” on
page 53).
Wavelength Recalibration
Wavelength recalibration is recommended after repair of internal
components, and on a regular basis to ensure correct operation of the
detector. The detector uses the deuterium alpha and beta emission lines for
wavelength calibration (see “Wavelength Recalibration” on page 84).
Test Functions
A series of test functions are available for troubleshooting and operational
verification after exchanging internal components (see “Test Functions” on
page 85).
50
1100 Series DAD and MWD Reference Manual
Troubleshooting and Test Functions
3
Status Indicators
Two status indicators are located on the front of the detector. The lower left
indicates the power supply status, the upper right indicates the detector
status.
Status indicator
green/yellow/red
Line power switch
with green light
Figure 19
Location of Status Indicators
Power Supply Indicator
The power supply indicator is integrated into the main power switch. When
the indicator is illuminated (green) the power is ON.
Detector Status Indicator
The detector status indicator indicates one of four possible detector
conditions:
1100 Series DAD and MWD Reference Manual
51
3
Troubleshooting and Test Functions
• When the status indicator is OFF (and power switch light is on), the
detector is in a prerun condition, and is ready to begin an analysis.
• A green status indicator, indicates the detector is performing an analysis
(run mode).
• A yellow indicator indicates a not-ready condition. The detector is in a
not-ready state when it is waiting for a specific condition to be reached or
completed (for example, immediately after changing a set point), or while a
self-test procedure is running.
• An error condition is indicated when the status indicator is red. An error
condition indicates the detector has detected an internal problem which
affects correct operation of the detector. Usually, an error condition
requires attention (e.g. leak, defective internal components). An error
condition always interrupts the analysis.
52
1100 Series DAD and MWD Reference Manual
Troubleshooting and Test Functions
3
Error Messages
Error messages are displayed in the user interface when an electronic,
mechanical, or hydraulic (flow path) failure occurs which requires attention
before the analysis can be continued (for example, repair, or exchange of
consumables is necessary). In the event of such a failure, the red status
indicator at the front of the detector is switched on, and an entry is written
into the detector logbook.
This section describes the meaning of detector error messages, and provides
information on probable causes and suggested actions how to recover from
error conditions.
1100 Series DAD and MWD Reference Manual
53
3
Troubleshooting and Test Functions
Timeout
The timeout threshold was exceeded.
Probable Causes
• The analysis was completed successfully, and the timeout function
switched off the pump as requested.
• A not-ready state was present during a sequence or multiple-injection run
for a period longer than the timeout threshold.
Suggested Actions
✔ Check the logbook for the occurrence and source of a not-ready condition.
Restart the analysis where required.
54
1100 Series DAD and MWD Reference Manual
Troubleshooting and Test Functions
3
Shutdown
An external instrument has generated a shut-down signal (through CAN or
REMOTE lines).
The detector continually monitors the remote input connectors for status
signals. A LOW signal input on pin 4 of the remote connector generates the
error message.
Probable Causes
• Leak detected in an external instrument with a remote connection to the
system.
• Shut-down in an external instrument with a remote connection to the
system.
• The degasser failed to generate sufficient vacuum for solvent degassing.
Suggested Actions
✔ Fix the leak in the external instrument before restarting the pump.
✔ Check external instruments for a shut-down condition.
✔ Check the degasser for an error condition. Refer to the Reference Manual
for the Aligent 1100 Series vacuum degasser.
1100 Series DAD and MWD Reference Manual
55
3
Troubleshooting and Test Functions
Remote Timeout
A not-ready condition is still present on the remote input.
When an analysis is started, the system expects all not-ready conditions (e.g. a
not-ready condition during detector balance) to switch to run conditions
within one minute of starting the analysis. If a not-ready condition is still
present on the remote line after one minute the error message is generated.
Probable Causes
• Not-ready condition in one of the instruments connected to the remote line.
• Defective remote cable.
• Defective components in the instrument showing the not-ready condition.
Suggested Actions
✔ Ensure the instrument showing the not-ready condition is installed
correctly, and is set up correctly for analysis.
✔ Exchange the remote cable.
✔ Check the instrument for defects (refer to the instrument’s reference
documentation).
56
1100 Series DAD and MWD Reference Manual
Troubleshooting and Test Functions
3
Synchronization Lost
During an analysis, the internal synchronization or communication between
one or more of the modules in the system has failed.
The system processors continually monitor the system configuration. If one or
more of the modules is no longer recognized as being connected to the system,
the error message is generated.
Probable Causes
• CAN cable disconnected.
• Defective CAN cable.
• Defective main board in another module.
Suggested Actions
✔ Ensure all the CAN cables are connected correctly.
✔ Switch off the system. Restart the system, and determine which module or
modules are not recognized by the system.
✔ Ensure all CAN cables are installed correctly.
1100 Series DAD and MWD Reference Manual
57
3
Troubleshooting and Test Functions
Leak
A leak was detected in the detector.
The signals from the two temperature sensors (leak sensor and
board-mounted temperature-compensation sensor) are used by the leak
algorithm to determine whether a leak is present. When a leak occurs, the leak
sensor is cooled by the solvent. This changes the resistance of the leak sensor
which is sensed by the leak-sensor circuit on the detector main board.
Probable Causes
• Loose fittings.
• Broken capillary.
• Leaking flow cell.
Suggested Actions
✔ Ensure all fittings are tight.
✔ Exchange defective capillaries.
✔ Exchange flow cell components.
Additional Information
Detector leak error may be caused by the Aligent 1100 sampler. In each
sampler injection sequence, step# 2 ejects the mobile phase stored in the
metering head during the previous injection. This mobile phase is ejected
through the short plastic tube connected to port# 4 of the sampler switching
valve. The output of port# 4 is integrated into the sampler's contingency leak
drain system, which eventually terminates in the leak pan of the bottom
module of the stack - the detector. With normal injection volumes and run
times, the output of port# 4 is small, and evaporates right in the sampler leak
pan. However, the output of port# 4 is significant, and a substantial volume of
ejected mobile phase reaches the detector leak pan.
There are two possible fixes. Select the one which is most convenient.
1 The waste drain plumbing orientation, shown in step 4 on page 26,
eliminates the possibility of any leak drainage from above reaching the
detector leak pan. The leak drain for the detector can be connected to the
detector's leak drain fitting, and taken to waste separately.
2 If it is desired that the system has only one leak drain tube, then it's
possible in increase the length of the small plastic tube which is connected
58
1100 Series DAD and MWD Reference Manual
Troubleshooting and Test Functions
3
to port# 4 of the sampler switching valve. This tube can then be taken to
waste separately. The tube which normally serves as the detector cell outlet
tube can be used for this purpose.
1100 Series DAD and MWD Reference Manual
59
3
Troubleshooting and Test Functions
Leak Sensor Open
The leak sensor in the detector has failed (open circuit).
The current through the leak sensor is dependent on temperature. A leak is
detected when solvent cools the leak sensor, causing the leak sensor current to
change within defined limits. If the current falls outside the lower limit, the
error message is generated.
Probable Causes
• Leak sensor not connected to the detector main board.
• Defective leak sensor.
Suggested Actions
✔ Ensure the leak sensor is connected correctly.
✔ Exchange the leak sensor.
60
1100 Series DAD and MWD Reference Manual
Troubleshooting and Test Functions
3
Leak Sensor Short
The leak sensor in the detector has failed (short circuit).
The current through the leak sensor is dependent on temperature. A leak is
detected when solvent cools the leak sensor, causing the leak sensor current to
change within defined limits. If the current increases above the upper limit,
the error message is generated.
Probable Causes
• Defective leak sensor.
Suggested Actions
✔ Exchange the leak sensor.
1100 Series DAD and MWD Reference Manual
61
3
Troubleshooting and Test Functions
Compensation Sensor Open
The ambient-compensation sensor (NTC) on the detector main board in the
detector has failed (open circuit).
The resistance across the temperature compensation sensor (NTC) on the
detector main board is dependent on ambient temperature. The change in
resistance is used by the leak circuit to compensate for ambient temperature
changes. If the resistance across the sensor increases above the upper limit,
the error message is generated.
Probable Causes
• Defective detector main board.
Suggested Actions
✔ Exchange the detector main board.
62
1100 Series DAD and MWD Reference Manual
Troubleshooting and Test Functions
3
Compensation Sensor Short
The ambient-compensation sensor (NTC) on the detector main board in the
detector has failed (short circuit).
The resistance across the temperature compensation sensor (NTC) on the
detector main board is dependent on ambient temperature. The change in
resistance is used by the leak circuit to compensate for ambient temperature
changes. If the resistance across the sensor falls below the lower limit, the
error message is generated.
Probable Causes
• Defective detector main board.
Suggested Actions
✔ Exchange the detector main board.
1100 Series DAD and MWD Reference Manual
63
3
Troubleshooting and Test Functions
Fan Failed
The cooling fan in the detector has failed.
The hall sensor on the fan shaft is used by the detector main board to monitor
the fan speed. If the fan speed falls below two revolutions/second for more
than five seconds, the error message is generated.
Probable Causes
• Fan cable disconnected.
• Defective fan.
• Defective detector main board.
Suggested Actions
✔ Ensure the fan is connected correctly.
✔ Exchange fan.
✔ Exchange the detector main board.
64
1100 Series DAD and MWD Reference Manual
Troubleshooting and Test Functions
3
Open Cover
The top foam has been removed.
The sensor on the detector main board detects when the top foam is in place.
If the foam is removed, the fan is switched off, and the error message is
generated.
Probable Causes
• The top foam was removed during operation.
• Foam not activating the sensor.
Suggested Actions
✔ Replace the top foam.
✔ Exchange the foam.
1100 Series DAD and MWD Reference Manual
65
3
Troubleshooting and Test Functions
Cover Violation
The top foam has been removed.
The sensor on the detector main board detects when the top foam is in place.
If the foam is removed while the lamps are on (or if an attempt is made to
switch on the lamps with the foam removed), the lamps are switched off, and
the error message is generated.
Probable Causes
• The top foam was removed during operation.
• Foam not activating the sensor.
Suggested Actions
✔ Replace the top foam.
✔ Exchange the foam.
66
1100 Series DAD and MWD Reference Manual
Troubleshooting and Test Functions
3
Visible Lamp Current
The visible lamp current is missing.
The processor continually monitors the lamp current during operation. If the
current falls below the lower current limit, the error message is generated.
Probable Causes
• Visible lamp disconnected.
• Defective visible lamp.
• Defective detector main board.
• Defective power supply.
Suggested Actions
✔ Ensure the visible lamp connector is seated firmly.
✔ Exchange the visible lamp.
✔ Exchange the detector main board.
✔ Exchange the power supply.
1100 Series DAD and MWD Reference Manual
67
3
Troubleshooting and Test Functions
Visible Lamp Voltage
The visible lamp voltage is missing.
The processor continually monitors the voltage across the lamp during
operation. If the lamp voltage falls below the lower limit, the error message is
generated.
Probable Causes
• Defective detector main board.
• Defective power supply.
Suggested Actions
✔ Exchange the detector main board.
✔ Exchange the power supply.
68
1100 Series DAD and MWD Reference Manual
Troubleshooting and Test Functions
3
Communication Error
An internal communication error between the main processor and the
digital-signal processor has occurred.
Probable Causes
• Random communication error.
• Defective detector main board.
Suggested Actions
✔ Switch the detector off and on again at the power switch. If the error reoccurs,
exchange the detector main board.
1100 Series DAD and MWD Reference Manual
69
3
Troubleshooting and Test Functions
Calibration Values Invalid
The calibration values read from the spectrometer ROM are invalid.
After recalibration, the calibration values are stored in ROM. The processor
periodically checks if the calibration data are valid. If the data are invalid or
cannot be read from the spectrometer ROM, the error message is generated.
Probable Causes
• Defective detector main board.
• Defective optical unit.
Suggested Actions
✔ Exchange the detector main board.
✔ Exchange the optical unit.
70
1100 Series DAD and MWD Reference Manual
Troubleshooting and Test Functions
3
Diode Current Leakage
When the detector is switched on, the processor checks the leakage current of
each of the optical diodes. If the leakage current exceeds the upper limit, the
error message is generated.
Probable Causes
• Defective optical unit.
• Defective detector main board.
Suggested Actions
✔ Exchange the optical unit.
✔ Defective detector main board.
1100 Series DAD and MWD Reference Manual
71
3
Troubleshooting and Test Functions
Holmium Oxide Test Failed
The holmium oxide test in the detector has failed.
During the holmium test, the detector moves the holmium filter through the
light path while monitoring the detector signal response. As the edge of the
filter passes through the light path, the signal is interrupted. This is used to
determine the position of the filter, and whether the filter is moving correctly.
If the filter fails to move, the error message is generated.
Probable Causes
• Lamps switched off.
• Defective or dirty flow cell.
• Defective filter assembly.
• Defective achromat assembly.
• Defective optical unit.
Suggested Actions
✔ Ensure the lamps are switched on.
✔ Ensure the flow cell is inserted correctly, and is free from contamination
(cell windows, buffers etc.).
✔ Exchange the filter assembly.
✔ Exchange the achromat assembly.
✔ Exchange the optical unit.
72
1100 Series DAD and MWD Reference Manual
Troubleshooting and Test Functions
3
UV Lamp Current
The UV lamp current is missing.
The processor continually monitors the anode current drawn by the lamp
during operation. If the anode current falls below the lower current limit, the
error message is generated.
Probable Causes
• UV lamp disconnected.
• Defective UV lamp or non-Agilent lamp.
• Defective detector main board.
• Defective power supply.
Suggested Actions
✔ Ensure the UV lamp connector is seated firmly.
✔ Exchange the UV lamp.
✔ Exchange the detector main board.
✔ Exchange the power supply.
1100 Series DAD and MWD Reference Manual
73
3
Troubleshooting and Test Functions
UV Lamp Voltage
The UV lamp anode voltage is missing.
The processor continually monitors the anode voltage across the lamp during
operation. If the anode voltage falls below the lower limit, the error message is
generated.
Probable Causes
• Defective UV lamp or non-Agilent lamp.
• Defective detector main board.
• Defective power supply.
Suggested Actions
✔ Exchange the UV lamp.
✔ Exchange the detector main board.
✔ Exchange the power supply.
74
1100 Series DAD and MWD Reference Manual
Troubleshooting and Test Functions
3
UV Ignition Failed
The UV lamp failed to ignite.
The processor monitors the UV lamp current during the ignition cycle. If the
lamp current does not rise above the lower limit within 2 – 5 seconds, the
error message is generated.
Probable Causes
• Lamp not connected.
• Defective UV lamp or non-Agilent lamp.
• Defective detector main board.
• Defective power supply.
Suggested Actions
✔ Ensure the lamp is connected.
✔ Exchange the UV lamp.
✔ Exchange the detector main board.
✔ Exchange the power supply.
1100 Series DAD and MWD Reference Manual
75
3
Troubleshooting and Test Functions
UV Heater Current
The UV lamp heater current is missing.
During UV lamp ignition, the processor monitors the heater current. If the
current does not rise above the lower limit within one second, the error
message is generated.
Probable Causes
• UV Lamp not connected.
• Ignition started without the top foam in place.
• Defective UV lamp or non-Agilent lamp.
• Defective detector main board.
• Defective power supply.
Suggested Actions
✔ Ensure the UV lamp is connected.
✔ Replace the top foam, and turn on the lamp.
✔ Exchange the UV lamp.
✔ Exchange the detector main board.
✔ Exchange the power supply.
76
1100 Series DAD and MWD Reference Manual
Troubleshooting and Test Functions
3
New Messages with the G1315B and G1365B detectors
With the introduction of the G1315B DAD and the G1365B MWD a few new
messages have been added to address the additional heating control for
stabilization of the baseline in unstable environment.
1100 Series DAD and MWD Reference Manual
77
3
Troubleshooting and Test Functions
Module Type Changed
At switch-on, the detector has recognized a new configuration. Only G1315B
and G1365B detectors have built-in hardware for temperature control. The
type of the module changed from A to B or vice versa because the hardware
for the temperature control was either detected or not detected.
The parameter of the event determines the new module type:
0 means
G1315
no temperature hardware detected
1 means
G1315
temperature hardware detected
2 means
G1365
no temperature hardware detected
3 means
G1365
temperature hardware detected
Look at the product identifier to check if your detector is of type A (G1315A or
G1365A) or B (G1315B or G1365B) and proceed accordingly.
Type A, Parameter 0 or 2
Probable Causes
• Main board has been exchanged
Suggested Actions
✔ Power cycle the detector
Type B, Parameter 0 or 2
Probable Causes
• Defective or missing heater connector
Suggested Actions
✔ Ensure the connector to the detector main board is seated firmly and power
cycle the detector. At next switch-on you will get the same error message,
but with parameter 1 or 3 because the temperature hardware is detected
again (see below).
78
1100 Series DAD and MWD Reference Manual
Troubleshooting and Test Functions
3
Type B, Parameter 1 or 3
Probable Causes
• Detector has recognized the hardware for temperature control. This is
because the detector didn't find the temperature hardware at last
switch-on.
Suggested Actions
✔ Power cycle the detector.
1100 Series DAD and MWD Reference Manual
79
3
Troubleshooting and Test Functions
Illegal Value From Temperature Sensor Mounted On The Fan
Assembly
This temperature sensor delivered a value outside the allowed range. The
parameter of this event equals the measured temperature in 1/100 centigrade.
As a result the temperature control is switched off.
Probable Causes
• The sensor is defect
• Detector is exposed to illegal ambient conditions.
Suggested Actions
✔ Ensure the connector to the detector main board is seated firmly.
✔ Verify that the ambient conditions are within the allowed range.
✔ Exchange temperature sensor assembly.
80
1100 Series DAD and MWD Reference Manual
Troubleshooting and Test Functions
3
Illegal Value From „Air Inlet" Temperature Sensor
This temperature sensor (located on the detector main board) delivered a
value outside the allowed range. The parameter of this event equals the
measured temperature in 1/100 centigrade. As a result the temperature
control is switched off.
Probable Causes
• The sensor is defect
• Detector is exposed to illegal ambient conditions.
Suggested Actions
✔ Verify that the ambient conditions are within the allowed range.
✔ Exchange detector main board.
1100 Series DAD and MWD Reference Manual
81
3
Troubleshooting and Test Functions
Heater Failed
Every time the deuterium lamp or the tungsten lamp is switched on or off a
heater self-test is performed. If the test fails an error event is created. As a
result the temperature control is switched off.
Probable Causes
• Defective connector or cable.
• Defective heater.
Suggested Actions
✔ Ensure the connector to the detector main board is seated firmly.
✔ Exchange heater assembly.
82
1100 Series DAD and MWD Reference Manual
Troubleshooting and Test Functions
3
Heater Power At Limit
The available power of the heater reached either the upper or lower limit. This
event is sent only once per run. The parameter determines which limit has
been hit:
0 means upper power limit hit (excessive ambient temperature drop).
1 means lower power limit hit (excessive ambient temperature increase).
Probable Causes
• Ambient conditions have changed too much during the run, so that
optimum results may not be guaranteed.
Suggested Actions
✔ Verify that the reproducibility of your results is not affected
✔ Expose the detector to more stable ambient conditions.
1100 Series DAD and MWD Reference Manual
83
3
Troubleshooting and Test Functions
Wavelength Recalibration
The detector uses the alpha (656.1 nm) and beta (486 nm) emission lines of the
deuterium lamp for wavelength calibration. The sharp emission lines enable
more accurate calibration than is possible with holmium oxide. When
calibration is started, the 1-nm slit is moved into the light path automatically,
and the gain is set to zero. To eliminate effects due to absorbing solvents, the
test should be done with water in the flow cell. After calibration, the holmium
oxide test (see Figure “Holmium Oxide Test” on page 86) provides verification
of wavelength accuracy at three additional wavelengths. Wavelength
calibration should be done after maintenance of the flow cell, lamp exchange,
or after major repair, like processor board or optical unit exchange, see also
“Replacing the Detector’s Firmware” on page 180.
Figure 20
84
Wavelength Calibration
1100 Series DAD and MWD Reference Manual
Troubleshooting and Test Functions
3
Test Functions
Holmium Oxide Test
The built-in holmium oxide filter is used for verification of wavelength
accuracy at three additional wavelengths. The test evaluates the results
automatically, and provides a spectrum of the holmium oxide filter.
Intensity Test
The intensity test checks the lamp intensities (UV and visible lamps) over the
complete spectral range. The test evaluates the results automatically, and
provides an intensity spectrum.
Cell Test
The cell test compares the lamp intensities with and without flow cell
installed. The intensity ratio is an indicator of the amount of light absorbed by
the flow cell (e.g. contaminated or dirty cell windows).
Dark-Current Test
The dark-current test measures the leakage current from each optical diode.
The test evaluates the results automatically, and provides a graphical output
of the results.
Filter Test
The filter test checks the filter motor for correct movement, and checks the
absorbance of the holmium oxide filter in order to determine whether the
filter is dirty or contaminated.
1100 Series DAD and MWD Reference Manual
85
3
Troubleshooting and Test Functions
Holmium Oxide Test
The holmium oxide test uses three characteristic absorbance maxima of the
built-in holmium oxide filter to verify wavelength accuracy (see also
“Wavelength Recalibration” on page 84). When the test is started, the 1-nm slit
is moved into the light path automatically. To eliminate effects due to
absorbing solvents, the test should be done with water in the flow cell.
Figure 21
NOTE
Holmium Oxide Test
See also “Declaration of Conformity for HOX2 Filter” on page 310.
Holmium Oxide Test Evaluation
The test is evaluated by the instrument, and the measured maxima are
displayed automatically. The test fails if one or more of the maxima lies
outside of the limits (see Figure 22).
86
1100 Series DAD and MWD Reference Manual
Troubleshooting and Test Functions
Figure 22
3
Holmium Oxide Test Results
Test Failed
Probable Causes
• Absorbing solvent or air bubble in flow cell.
• Incorrect calibration
• Dirty or contaminated flow cell.
• Dirty or contaminated optical components (achromat, windows).
• Old or non-Agilent lamp.
Suggested Actions
✔ Ensure the flow cell is filled with water.
✔ Recalibrate (see “Wavelength Recalibration” on page 84) and repeat the
test.
✔ Run the cell test (see “Cell Test” on page 90). If the test fails, exchange the
flow cell windows.
✔ Clean optical components with alcohol and lint-free cloth.
✔ Exchange the UV lamp.
1100 Series DAD and MWD Reference Manual
87
3
Troubleshooting and Test Functions
Intensity Test
NOTE
The test ist for the standard flow cells (10 mm and 6 mm pathlength) only. The nano-flow
cells (80 nl and 500 nl) cannot be run with this test due to its low volume.
The intensity test measures the intensity of the deuterium and tungsten lamps
over the full wavelength range (190 – 950 nm). Four spectral ranges are used
to evaluate the intensity spectrum. The test is used to determine the
performance of the lamps and optics (see also “Cell Test” on page 90). When
the test is started, the 1-nm slit is moved into the light path automatically, and
the gain is set to zero. To eliminate effects due to absorbing solvents, the test
should be done with water in the flow cell. The shape of the intensity spectrum
is primarily dependent on the lamp, grating, and diode array characteristics.
Therefore, intensity spectra will differ slightly between instruments. Figure 23
shows a typical intensity test spectrum.
Figure 23
88
Intensity Test
1100 Series DAD and MWD Reference Manual
Troubleshooting and Test Functions
3
Intensity Test Evaluation
The Aligent ChemStation evaluates four spectral ranges automatically, and
displays the limits for each range, the measured intensity counts, and passed
or failed for each spectral range (see Figure 24).
Figure 24
Intensity Test Results
Test Failed
Probable Causes
• Absorbing solvent or air bubble in flow cell.
• Dirty or contaminated flow cell.
• Dirty or contaminated optical components (achromat, windows).
• Old or non-Agilent lamp.
Suggested Actions
✔ Ensure the flow cell is filled with water, and free from air bubbles.
✔ Run the cell test (see “Cell Test” on page 90). If the test fails, exchange the
flow cell windows.
✔ Clean optical components with alcohol and lint-free cloth.
✔ Exchange the lamp.
1100 Series DAD and MWD Reference Manual
89
3
Troubleshooting and Test Functions
Cell Test
The cell test measures the intensity of the deuterium and tungsten lamps over
the full wavelength range (190 – 950 nm), once with the flow cell installed, and
once with the flow cell removed. The resulting intensity ratio is a measure of
the amount of light absorbed by the flow cell. The test can be used to check for
dirty or contaminated flow cell windows. When the test is started, the 1-nm
slit is moved into the light path automatically, and the gain is set to zero. To
eliminate effects due to absorbing solvents, the test should be done with water
in the flow cell.
Cell Test Evaluation
The Aligent ChemStation calculates the intensity ratio automatically. The
intensity ratio (typically between 0.5 and 0.7) is dependent on the degree of
contamination of the flow cell windows, and on the type of flow cell used.
Figure 25
Cell Test Results
Test Failed (low ratio value)
Probable Causes
• Absorbing solvent or air bubble in flow cell.
• Dirty or contaminated flow cell.
Suggested Actions
✔ Ensure the flow cell is filled with water, and free from air bubbles.
✔ Exchange the flow cell windows.
90
1100 Series DAD and MWD Reference Manual
Troubleshooting and Test Functions
3
Dark-Current Test
The dark-current test measures the leakage current from each diode. The test
is used to check for leaking diodes which may cause non-linearity at specific
wavelengths. During the test, the slit assembly moves to the dark position,
cutting off all light falling onto the diode array. Next, the leakage current from
each diode is measured, and displayed graphically (see Figure 26). The leakage
current (represented in counts) for each diode should fall within the limits
(red bands) shown in the plot (see Figure 26).
Figure 26
Dark-Current Test
Dark-Current Test Evaluation
Figure 27
Dark-Current Test Results
1100 Series DAD and MWD Reference Manual
91
3
Troubleshooting and Test Functions
Test Failed
Probable Causes
• Defective optical unit.
Suggested Actions
✔ Exchange the optical unit.
92
1100 Series DAD and MWD Reference Manual
Troubleshooting and Test Functions
3
Filter Test
The filter test checks the correct operation of the filter assembly. When the
test is started, the holmium oxide filter is moved into position. During filter
movement, the absorbance signal is monitored. As the edge of the filter passes
through the light path, an absorbance maximum is seen. Once the filter is in
position, the absorbance maximum (of holmium oxide) is determined. Finally,
the filter is moved out of the light path. During movement, an additional
absorbance maximum is expected as the edge of the filter passes through the
light path. The test passes successfully, if the two maxima resulting from the
edge of the filter assembly (during filter movement) are seen, and the
absorbance maximum of holmium oxide is within the limits.
Filter Test Evaluation
Test Failed
Probable Causes
• Filter assembly (lever and filter) not installed.
• Defective filter motor.
Suggested Actions
✔ Install the filter assembly.
✔ Exchange the filter motor.
Holmium Oxide Maximum out of Limits
Probable Causes
• Holmium oxide filter not installed.
• Dirty or contaminated filter.
Suggested Actions
✔ Install the holmium oxide filter.
✔ Exchange the holmium oxide filter.
1100 Series DAD and MWD Reference Manual
93
3
94
Troubleshooting and Test Functions
1100 Series DAD and MWD Reference Manual
Agilent 1100 Series Diode Array and Multiple Wavelength Detectors
Reference Manual
4
Repairing the Detector
Introduction into Repairing the Detector 96
Overview of the Repairing of the Detector 99
Simple Repairs 101
Exchanging Internal Parts 138
Agilent Technologies
95
4
Repairing the Detector
Introduction into Repairing the Detector
Simple Repairs
The detector is designed for easy repair. The most frequent repairs such as
lamp change and flow cell change can be done from the front of the detector
with the detector in place in the system stack. These repairs are described in
“Simple Repairs” on page 101.
Exchanging Internal Parts
Some repairs may require exchange of defective internal parts. Exchange of
these parts requires removing the detector from the stack, removing the
covers, and disassembling the detector. The security lever at the power input
socket prevents that the detector cover is taken off when line power is still
connected. These repairs are described in “Exchanging Internal Parts” on
page 138.
96
WA R N I N G
To prevent personal injury, the power cable must be removed from the instrument
before opening the detector cover. Do not connect the power cable to the detector
while the covers are removed.
WA R N I N G
To prevent personal injury, be careful when getting in contact with sharp metal
areas.
WA R N I N G
When working with solvents please observe appropriate safety procedures (for
example, goggles, safety gloves and protective clothing) as described in the
material handling and safety data sheet supplied by the solvent vendor, especially
when toxic or hazardous solvents are used.
1100 Series DAD and MWD Reference Manual
Repairing the Detector
4
CAUTION
Electronic boards and components are sensitive to electronic discharge (ESD). In order
to prevent damage always use an ESD protection (for example, the ESD wrist strap
from the accessory kit) when handling electronic boards and components (see “Using
the ESD Strap” on page 98).
WA R N I N G
Eye damage may result from directly viewing the light produced by the deuterium
lamp used in this product. Always turn the deuterium lamp off before removing it.
Cleaning the Detector
The detector case should be kept clean. Cleaning should be done with a soft
cloth slightly dampened with water or a solution of water and mild detergent.
Do not use an excessively damp cloth allowing liquid to drip into the detector.
WA R N I N G
Do not let liquid drip into the detector. It could cause shock hazard and it could
damage the detector.
1100 Series DAD and MWD Reference Manual
97
4
Repairing the Detector
Using the ESD Strap
Electronic boards are sensitive to electronic discharge (ESD). In order to
prevent damage, always use an ESD strap supplied in the standard accessory
kit (see “Accessory Kit” on page 208) when handling electronic boards and
components.
1 Unwrap the first two folds of the band and wrap the exposed adhesive side
firmly around your wrist.
2 Unroll the rest of the band and peel the liner from the copper foil at the
opposite end.
3 Attach the copper foil to a convenient and exposed electrical ground.
Figure 28
98
Using the ESD Strap
1100 Series DAD and MWD Reference Manual
Repairing the Detector
4
Overview of the Repairing of the Detector
NOTE
With the introduction of the G1315B/G1365B DAD/MWD some of the metal plates look
different (no air openings) compared to the G1315A/G1365A DAD/MWD. The figures have
changed for specific repairs only.
Figure 29 shows the main assemblies and their locations.
1100 Series DAD and MWD Reference Manual
99
4
Repairing the Detector
Interface board,
see page 179
Main Board,
see page 143
Power supply,
see page 164
Fan,
see page 148
Lenses, see page 132
and page 158
Tungsten
lamp,
see
page 102
Optical unit,
see page 154
Leak handling
system,
see page 131
Deuterium lamp,
see page 102
Holmium oxide filter and cell support
window, see page 127 and page 135
Flow cell,
see page 105 and page 108
Figure 29
100
Leak sensor,
see page 167
Main Assemblies
1100 Series DAD and MWD Reference Manual
Repairing the Detector
4
Simple Repairs
On the following pages repairs are described that can be carried out without
opening the main cover.
Table 7
Simple Repairs
Procedure
Typical Frequency
Notes
Deuterium lamp or
tungsten lamp
exchange
If noise and/or drift exceeds your application limits or
lamp does not ignite.
An intensity test should be performed
after replacement.
Flow cell exchange
If application requires a different flow cell type.
A holmium or wavelength calibration
test should be performed after
replacement.
Flow cell parts
Cleaning or exchange
If leaking or if intensity drops due to contaminated flow
cell windows.
A pressure tightness test should be
done after repair.
Holmium oxide filter
Cleaning or exchange
If contaminated.
A holmium or wavelength calibration
test should be performed after
replacement.
Leak sensor drying
If leak has occurred.
Check for leaks.
Leak handling System
replacement
If broken or corroded.
Check for leaks.
Coupling lens
assembly cleaning or
exchange
If light throughput is low due to contaminations.
An intensity test should be performed
after replacement.
Cell support assembly
If light throughput is low due to contaminations.
An intensity test should be performed
after replacement.
1100 Series DAD and MWD Reference Manual
101
4
Repairing the Detector
Exchanging a Lamp
When required
If noise or drift exceeds application limits or lamp does not ignite
Tools required
Screwdriver POZI 1 PT3
Parts required
Longlife Deuterium lamp 2140-0813 (without black cover)
Longlife Deuterium lamp 5181-1530 (with black cover)
Deuterium lamp 2140-0590 (without black cover)
Tungsten lamp G1103-60001
Preparations for this procedure:
• Turn the lamp(s) off.
1 Press the release buttons and remove the front cover to
have access to the lamp area.
CAUTION:
If the detector has been in use, the lamp may be hot.
If so, wait five minutes until lamp cools off.
102
1100 Series DAD and MWD Reference Manual
Repairing the Detector
2 Disconnect lamp from the connector and unscrew the
lamp.
4 When replacing the vis-lamp, assure that the vis-lamp is
inserted as shown (flat edge towards the deuterium lamp opposite as in the figure).
1100 Series DAD and MWD Reference Manual
4
3 Remove the lamp. Do not touch the glass bulb with your
fingers.
5 Insert the lamp. Fix the screws and reconnect the lamp to
connector.
103
4
Repairing the Detector
6 Replace the front cover.
Next steps:
• Reset the lamp counter as described in the user
interface documentation.
• Turn the lamp on.
• Give the lamp 10 minutes to warm up.
• Perform an intensity test, see “Intensity Test” on
page 88.
104
1100 Series DAD and MWD Reference Manual
Repairing the Detector
4
Exchanging a Flow Cell
When required
If an application needs a different type of flow cell or the flow cell needs
repair.
Tools required
Two 1/4 inch wrenches for capillary connections
Parts required
Standard flow cell, 10 mm, 13 µl, 120 bar, G1315-60012
Semi-micro flow cell, 6 mm, 5 µl, 120 bar, G1315-60011
High pressure flow cell, 6 mm, 1.7 µl, 400 bar, G1315-60015
Nano flow cell, refer to “Nano Flow Cell - Replacing or Cleaning” on page 122
Preparations for this procedure:
• Turn the lamp(s) off.
1100 Series DAD and MWD Reference Manual
1 Press the release buttons and remove the front cover to
have access to the flow cell area.
105
4
Repairing the Detector
2 Press the release button and open the flow cell door.
3 Disconnect the cell inlet and the cell outlet capillary and
the waste capillary from the capillary holder.
4 Remove the flow cell by pressing the flow cell holder.
Note:
The label attached to the flow cell provides
information on part number, path length and
maximum pressure.
If you want to replace flow cell parts, see “Repairing
the Standard or Semi-Micro Flow Cell” on page 108
or “Repairing the Standard or Semi-Micro Flow
Cell” on page 108.
106
1100 Series DAD and MWD Reference Manual
Repairing the Detector
4
5 Insert the flow cell into the cell compartment and close the 6 Reconnect the waste capillary and the cell inlet and the
cell door.
cell outlet tubing to the capillary holder.
Note:
Next steps:
To check for leaks, establish a flow and observe the
flow cell (outside of the cell compartment) and all
capillary connections.
• Perform a wavelength calibration or holmium test (see
1100 Series DAD and MWD Reference Manual
•
“Holmium Oxide Test” on page 86), to check the correct
positioning of the flow cell.
Replace the front cover.
107
4
Repairing the Detector
Repairing the Standard or Semi-Micro Flow Cell
NOTE
When required
If the flow cell needs repair due to leaks or contaminations (reduced light
throughput)
Tools required
Two 1/4 inch wrenches for capillary connections
hexagonal key 4 mm
Tooth picks
Parts required
For parts, see “Standard Flow Cell” on page 186 and “Semi-Micro Flow
Cell” on page 188
The gaskets used in the standard and semi-micro flow cell are different.
Preparations for this procedure:
• Turn off the flow.
• Remove the front cover.
• Remove the flow cell, see “Exchanging a Flow Cell” on
1 Use a 4 mm hex key to unscrew the window assembly and
remove the gasket from the cell body.
page 105.
gasket
windows
assembly
108
1100 Series DAD and MWD Reference Manual
Repairing the Detector
4
2 Use a tooth pick to remove the quartz window from the
Note:
window assembly.
If you want to replace the gasket only, continue with
step 8.
Do not mix the gasket #6 and # 7. They are different
for standard and semi-mirco flow cell.
3 If the washers fall out of the window assembly, they must be inserted in the correct order with the Teflon® ring to prevent
any leaks from the flow cell window.
Orientation of Flow Cell Parts
NOTE
Gaskets # 6 and #7 have
different hole diameters
1 window screw
2 spring washers
3 compression washer
4 window holder
5 quartz window
6 gasket
7 gasket
8 window screw
contains items 2, 3, 4
and 5
9 flow cell
10 inlet capillary
11 outlet capillary
8
7
9
6
5
4
3
2
1
10
11
1100 Series DAD and MWD Reference Manual
109
4
Repairing the Detector
4 Assemble the washers and the window assembly in
5 Correct orientation of spring washers [2] is required.
correct order.
6 Press the Teflon® ring into the window assembly.
7 Press the window assembly onto the new or cleaned
quartz window.
110
1100 Series DAD and MWD Reference Manual
Repairing the Detector
8 Insert a new gasket [6, 7] and the window assembly [1]
into the cell body. Assure, that the gasket is on the bottom.
1
4
9 Using a 4-mm hex key, tighten the window screw hand
tight plus a quarter turn.
7
6
1
Do not mix the gasket #6
and # 7 (different hole
diameter)
Next steps:
•
•
•
•
•
Reconnect the capillaries, see “Exchanging a Flow Cell” on page 105.
Perform a leak test.
Insert the flow cell.
Replace the front cover
Perform a wavelength calibration, see “Wavelength Recalibration” on page 84 or holmium test, see “Holmium Oxide
Test” on page 86 to check the correct positioning of the flow cell.
1100 Series DAD and MWD Reference Manual
111
4
Repairing the Detector
Repairing the High Pressure Flow Cell
When required
If the flow cell needs repair due to leaks or contaminations (reduced light
throughput)
Tools required
Two 1/4 inch wrenches for capillary connections
hexagonal key 4 mm
Tooth picks
Parts required
For parts see “High Pressure Flow Cell” on page 190
Preparations for this procedure:
• Turn off the flow.
• Remove the front cover.
• Remove the flow cell, see “Exchanging a Flow Cell” on
page 105.
1 Remove the window assembly (1) and the gasket (2) from
the cell body.
1
2
2
112
1
1100 Series DAD and MWD Reference Manual
Repairing the Detector
If you want to replace the gasket only, continue with
step 8.
4
2 Use a tooth pick to remove the quartz window from the
window assembly.
3 If the washers fall out of the window assembly, they must be inserted in the correct order with the Teflon® ring to prevent
any leaks from the flow cell window.
Follow the procedure “Repairing the Standard or Semi-Micro Flow Cell” on page 108 for reassembling.
Orientation of Flow Cell Parts
1 window screw
contains items 2, 3, 4, 5
and 6
2 seal ring
3 quartz window
4 compression washer
5 spring washers
4 window holder
6 window screw
7 flow cell
8 inlet capillary
9 outlet capillary
6
5
4
2
3
2
7
1
8
9
1100 Series DAD and MWD Reference Manual
113
4
Repairing the Detector
Replacing Capillaries on a Standard Flow Cell
When required
If the capillary is blocked
Tools required
Two 1/4 inch wrenches for capillary connections
Wrench 4 mm for capillary connections
Screwdriver Pozi 1 PT3
Parts required
For parts see “Standard Flow Cell” on page 186
Preparations for this procedure:
• Turn off the flow.
• Remove the front cover.
• Remove the flow cell, see “Exchanging a Flow Cell” on
page 105.
1 Identify the inlet and outlet capillaries.
Inlet
capillary
Outlet capillary
114
1100 Series DAD and MWD Reference Manual
Repairing the Detector
Notes
The fittings at the flow cell body are special types for
low dead volumes and not compatible with other
fittings.
4
2 After replacing the outlet capillary, fix it handtight first.
Then do a 1/4 turn with a 4-mm wrench.
When retightening the fittings, make sure that they
are carefully tightened (handtight plus 1/4 turn with
a wrench). Otherwise damage of the flow cell body
or blockage may result.
Outlet capillary
3 To replace the inlet capillary, use a 4-mm wrench for the
fitting.
4 Unscrew the cell body from the heat exchanger and the
heat exchanger from the clamp unit.
Inlet capillary
1100 Series DAD and MWD Reference Manual
115
4
Repairing the Detector
5 Unscrew the fixing screw and unwrap the inlet capillary
from the grove in the flow cell body.
6 Take the new inlet capillary and bend it 90° about 35 mm
from its end.
Screw
35 mm
90°
Inlet capillary
with heat
7 Bend the caillary again by 90° as shown below.
8 Insert the capillary into the hole between fixing screw and
the inlet fitting.
90°
116
1100 Series DAD and MWD Reference Manual
Repairing the Detector
9 The capillary lays in the grove and should be tied around
the body (in the grove) 5 times.
4
10 Insert the fixing screw, so that the capillary cannot leave
the grove.
Screw
Inlet capillary
with heat
11 Fix the flow cell body to the heat exchanger.
12 Fix the inlet capillary to the flow cell body handtight first.
Then do a 1/4 turn with a 4-mm wrench.
IN
IN
OUT
1100 Series DAD and MWD Reference Manual
OUT
117
4
Repairing the Detector
13 Fix the new heat exchanger to the clamp unit.
Next steps:
• Reconnect the capillaries, see “Exchanging a Flow
Cell” on page 105.
• Perform a leak test.
• Insert the flow cell.
• Replace the front cover.
• Perform a wavelength calibration, see “Wavelength
Recalibration” on page 84 or holmium test, see
“Holmium Oxide Test” on page 86 to check the correct
positioning of the flow cell.
118
1100 Series DAD and MWD Reference Manual
Repairing the Detector
4
Replacing Capillaries on a Semi-Micro and High Pressure Flow
Cell
When required
If the capillary is blocked
Tools required
Two 1/4 inch wrenches for capillary connections
Wrench 4 mm for capillary connections
Screwdriver Pozi 1 PT3
Parts required
For parts see “Semi-Micro Flow Cell” on page 188
Preparations for this procedure:
• Turn off the flow.
• Remove the front cover.
• Remove the flow cell, see “Exchanging a Flow Cell” on
page 105.
1 Identify the inlet and outlet capillaries.
Inlet
capillary
Outlet capillary
1100 Series DAD and MWD Reference Manual
119
4
Repairing the Detector
Notes
The fittings at the flow cell body are special types for
low dead volumes and not compatible with other
fittings.
2 After replacing the outlet capillary, fix it handtight first.
Then do a 1/4 turn with a 4-mm wrench.
When retightening the fittings, make sure that they
are carefully tightened (handtight plus 1/4 turn with
a wrench). Otherwise damage of the flow cell body
or blockage may result.
Outlet capillary
3 To replace the inlet capillary, use a 4-mm wrench for the
fitting.
4 Unscrew the cell body from the heat exchanger and the
heat exchanger from the clamp unit.
Inlet capillary
120
1100 Series DAD and MWD Reference Manual
Repairing the Detector
5 Fix the new heat exchanger to the clamp unit and the heat
exchanger to the cell body.
4
6 Fix the inlet capillary to the flow cell body handtight first.
Then do a 1/4 turn with a 4-mm wrench.
Inlet capillary
Next steps:
•
•
•
•
•
Reconnect the capillaries, see “Exchanging a Flow Cell” on page 105.
Perform a leak test.
Insert the flow cell.
Replace the front cover.
Perform a wavelength calibration, see “Wavelength Recalibration” on page 84 or holmium test, see “Holmium Oxide
Test” on page 86 to check the correct positioning of the flow cell.
1100 Series DAD and MWD Reference Manual
121
4
Repairing the Detector
Nano Flow Cell - Replacing or Cleaning
When required
If parts are contaminated or leaky.
Tools required
Screwdriver POZI 1 PT3
Two 1/4 inch wrenches for capillary connections
Parts required
For parts identification refer to “Nano Flow Cells” on page 192 (80 nl and
500 nl).
NOTE
For details refer to the technical that comes with the nano-flow cell kit.
NOTE
The quartz block can be cleaned with alcohol. DO NOT touch the inlet and outlet windows
at the quartz block.
1 Disconnect the capillaries from the capillary holder and
remove the flow cell.
122
2 Unscrew the cell body from the holder.
1100 Series DAD and MWD Reference Manual
Repairing the Detector
4
3 Unscrew the capillaries from the flow cell. DO NOT use the
adapter at this time!
4 Using for example a toothpick, press on the plastic part
and slide the quartz body out of the cell housing.
5 The quartz body and the cell seal assembly can be
separated for cleaning purpose.
6 This figure shows the correct holding of the quartz body
and the cell seal assembly.
1100 Series DAD and MWD Reference Manual
123
4
Repairing the Detector
7 Replace the cell seal assembly onto the quartz body.
Always use a new seal assembly to exclude damage
during disassembling.
9 Insert the flow cell capillaries and tighten them
fingertight. Use the wrench and torque adapter as
described on page 126 and tighten the fittings alternately.
124
8 Slide the quartz body completely into the cell body to the
front stop (use for example a toothpick).
10 Reassemble the flow cell body to the holder.
1100 Series DAD and MWD Reference Manual
Repairing the Detector
11 Re-install the flow cell and connect the capillaries to the
union holder.
4
12 Perform a leak test with the flow cell outside of the
detector.
13 If no leak is observed, install the flow cell and you are
ready to work.
14 Make sure that the flow cell assembly is inserted correctly
and fits perfectly in the optical unit (especially when PEEK
capillaries are used).
IN
OUT
NOTE
The cell body can be fitted in two positions to allow the capillaries routed upwards or
downwards (depending on where the column is located). Route the capillaries directly
column (inlet) and waste assembly (outlet).
NOTE
With the instrument accessory kit comes a 4-mm wrench and with the Sealing Kit a special
adapter. Both together work as a torque wrench with pre-defined torque (maximum
allowed torque for the cell fittings is 0.7 Nm). It can be used to tight the capillary fittings at
the flow cell body. The wrench has to be plugged into the adapter as shown in Figure 30.
1100 Series DAD and MWD Reference Manual
125
4
Repairing the Detector
Adapter
Wrench
DO NOT press down
more than shown here
max
0.7 Nm
Figure 30
126
Wrench plus Torque Adapter
1100 Series DAD and MWD Reference Manual
Repairing the Detector
4
Cleaning or Exchanging the Holmium Oxide Filter
NOTE
When required
If holmium oxide filter is contaminated
Tools required
Screwdriver POZI 1 PT3
Screwdriver flat blade
Two 1/4 inch wrenches for capillary connections
A pair of tweezers
Parts required
Holmium oxide filter 79880-22711
See also “Declaration of Conformity for HOX2 Filter” on page 310.
Preparations for this procedure:
1 Unscrew the six screws and remove the flow cell cover.
• Turn off the flow.
• Remove the front cover.
• Remove the flow cell, see “Exchanging a Flow Cell” on
page 105.
1100 Series DAD and MWD Reference Manual
127
4
Repairing the Detector
2 If not already in this position, move the filter up.
3 While releasing the holder with a screwdriver, carefully
remove the holmium oxide filter using a pair of tweezers
covered with lint-free cloth or tape.
Note:
Do not scratch the holmium oxide filter.
4 While releasing the holder with a screw driver, carefully
insert the holmium oxide filter.
The holmium oxide filter can be cleaned with alcohol
and a lint-free cloth.
128
1100 Series DAD and MWD Reference Manual
Repairing the Detector
5 Replace the flow cell cover and fix the six screws.
4
Next steps:
• Perform a holmium oxide test, see “Holmium Oxide
•
•
•
1100 Series DAD and MWD Reference Manual
Test” on page 86 to check the proper function of the
holmium oxide filter.
Insert the flow cell, see “Exchanging a Flow Cell” on
page 105.
Replace the front cover.
Turn on the flow.
129
4
Repairing the Detector
Correcting Leaks
When required
If a leakage has occurred in the flow cell area or at the heat exchanger or at
the capillary connections
Tools required
Tissue
Two 1/4 inch wrenches for capillary connections
Parts required
None
1 Remove the front cover.
2 Use tissue to dry the leak sensor area and the leak pan.
3 Observe the capillary connections and the flow cell area for leaks and
correct, if required.
4 Replace the front cover.
Leak pan
Leak sensor assembly
Figure 31
130
Observing for Leaks
1100 Series DAD and MWD Reference Manual
Repairing the Detector
4
Replacing Leak Handling System Parts
When required
If the parts are corroded or broken
Tools required
None
Parts required
Leak funnel 5061-3356
Leak funnel holder 5041-8389
Leak tubing (120 mm) 0890-1711
1 Remove the front cover.
2 Pull the leak funnel out of the leak funnel holder.
3 Pull out the leak funnel with the tubing.
4 Insert the leak funnel with the tubing in its position.
5 Insert the leak funnel into the leak funnel holder.
6 Replace the front cover.
Leak funnel holder
Leak funnel
Leak tubing
Figure 32
Replacing Leak Handling System Parts
1100 Series DAD and MWD Reference Manual
131
4
Repairing the Detector
Cleaning or Replacing Coupling Lens Assembly
When required
The coupling lens assembly is located between the tungsten and the
deuterium lamp. It may be replaced when light transmission is reduced and a
lamp exchange or window cleaning does not improve the light throughput.
Tools required
Screwdriver POZI 1 PT3
hexagonal key 1.5 mm
A pointed pair of pliers
Parts required
Coupling lens assembly G1103-68001
Preparations for this procedure:
• Turn off the lamp(s).
1 Use the 1.5-mm hex key to loosen the setscrew that
secures the lens assembly.
If the detector was in use, the lamp may be hot. If
so, wait five minutes until lamp cools off.
• Remove the front cover.
• Remove both lamps, see “Exchanging a Lamp” on
page 102.
132
1100 Series DAD and MWD Reference Manual
Repairing the Detector
2 Carefully slide the lens assembly to the right into the
4
3 Remove the lens assembly completely.
deuterium lamp area by pushing it from the tungsten lamp
side with the hex key.
4 The assembly may be disassembled using a pair of pliers
to remove the retainer ring.
5 The lens may be cleaned or the complete assembly must
be exchanged.
Retainer ring
Washer
Lens support
Lens
Lens holder
1100 Series DAD and MWD Reference Manual
133
4
Repairing the Detector
6 Insert the rebuilt or new lens assembly and slide it into its 7 Align the lens assembly with the wall of the deuterium
holder.
area. Fix the setscrew that secures the lens assembly.
Next steps:
• Replace both lamps.
• Perform an intensity test to check the proper function.
• Replace the front cover.
134
1100 Series DAD and MWD Reference Manual
Repairing the Detector
4
Cleaning or Replacing Cell Support Window
When required
This window is located between the holmium oxide filter and the flow cell. It
may be replaced when the transmission of light is reduced and a lamp
exchange or a window cleaning does not improve the light throughput.
Tools required
Screwdriver POZI 1 PT3
hexagonal key 1.5 mm
Pointed pair of pliers
Parts required
Cell support window 79880-28111
Cell support window assembly G1315-65202
For others., see “Cell Support Assembly” on page 200
Preparations for this procedure are:
1 Unscrew the six screws and remove the flow cell cover.
• Turn off the lamp(s).
If the detector was in use, the lamp may be hot. If
so, wait 5 minutes until lamp cools.
• Remove the front cover.
• Remove the flow cell, see “Exchanging a Flow Cell” on
page 105.
1100 Series DAD and MWD Reference Manual
135
4
Repairing the Detector
2 If not already in this position, move the holmium oxide
filter down.
4 Carefully slide the assembly to the right into the flow cell
3 Use the 1.5-mm hex key to loosen the setscrew that
secures the cell support assembly.
5 Remove the cell support assembly completely.
compartment by pushing it from the holmium oxide filter
side.
136
1100 Series DAD and MWD Reference Manual
Repairing the Detector
6 The assembly may be disassembled using a pair of pliers
to remove the retainer ring. The window may be cleaned or
the complete assembly must be exchanged.
4
7 Insert the rebuilt or new assembly and slide it in until it is
stopped by the filter lever.
Retainer ring
Washer
Spectro window
Cell support
8 Leave slight clearance for movement of the filter lever
between both, the lens assembly and the filter lever, and
fix the setscrew.
Next steps:
• Perform a filter test to check the proper function.
• Replace the flow cell cover, see “Cleaning or
Exchanging the Holmium Oxide Filter” on page 127.
• Replace both lamps.
• Replace the front cover.
1100 Series DAD and MWD Reference Manual
137
4
Repairing the Detector
Exchanging Internal Parts
WA R N I N G
The following procedures require opening the main cover of the detector. Always
ensure the detector is disconnected from the line power when the main cover is
removed. The security lever at the power input socket prevents that the detector
cover is taken off when line power is still connected.
WA R N I N G
To disconnect the detector from line, unplug the power cord. The power supply still
uses some power, even if the switch on the front panel is turned off.
To prevent personal injury, be careful when getting in contact with sharp metal
areas.
When working with solvents please observe appropriate safety procedures (for
example, goggles, safety gloves and protective clothing) as described in the
material handling and safety data sheet supplied by the solvent vendor, especially
when toxic or hazardous solvents are used.
NOTE
The electronics of the detector will not allow operation of the detector when the top cover
and the top foam are removed. A safety light switch on the main board will inhibit the
operation of the fan immediately. Voltages for the other electronic components will be
turned off after 30 seconds. The status lamp will lit red and an error will be logged into the
logbook of the user interface. Always operate the detector with the top covers in place.
CAUTION
Electronic boards and components are sensitive to electronic discharge (ESD). In order
to prevent damage always use an ESD protection (for example, the ESD wrist strap
from the accessory kit) when handling electronic boards and components, see “Using
the ESD Strap” on page 98.
138
1100 Series DAD and MWD Reference Manual
Repairing the Detector
4
WA R N I N G
Eye damage may result from directly viewing the light produced by the deuterium
lamp used in this product. Always turn off the deuterium lamp before removing the
deuterium lamp.
NOTE
With the introduction of the G1315B/G1365B DAD/MWD some of the metal plates look
different (no air openings) compared to the G1315A/G1365A DAD/MWD. The figures have
changed for specific repairs only.
1100 Series DAD and MWD Reference Manual
139
4
Repairing the Detector
Removing the Top Cover and Foam
When required
For all repairs inside the detector
Tools required
Screwdriver POZI 1 PT3
Screwdriver
Parts required
Depends on the work inside and the following procedures
Preparations for this procedure:
•
•
•
•
140
Turn off the detector.
Disconnect the power cable.
Disconnect capillaries.
Remove detector from stack and place it on the working
bench.
1 Press the release buttons and remove the front cover.
Unclip the waste funnel assembly.
1100 Series DAD and MWD Reference Manual
Repairing the Detector
4
2 Install the ESD strap. If installed, unscrew and remove the 3 Move the power lock across the power inlet and lift the
interface board. Place the board on the ESD kit.
4 Lift the cover up and slide it towards the rear.
clips of the cover.
5 Unscrew the screws at the rear of the top plate, slide the
plate towards the front and remove it.
1100 Series DAD and MWD Reference Manual
141
4
Repairing the Detector
6 Disconnect the lamps from their connectors.
7 Remove the two lamp connectors towards the back by
depressing their connector tabs with a screwdriver.
8 While removing the top foam section completely, route the
lamp cables through the hole in the foam.
Note:
Do not connect a power plug to the detector module
after removing the top covers.
A safety light switch on the main board will turn off
fan (immediately) and electronics (after 30 s) to
avoid the operation with removed covers. An error
will be generated (status lamp will light red) and the
logbook will show an error message.
142
1100 Series DAD and MWD Reference Manual
Repairing the Detector
4
Exchanging the Detector Main Board
When required
If detector main board is defective or for repair on other assemblies
Tools required
Screwdriver POZI 1 PT3
Hexagonal wrenches 5 mm, 7 mm and 15 mm
Parts required
Detector main board (DAM) G1315-69540 (exchange assembly) for G1315A/B
DAD
Detector main board (MWM) G1365-69540 (exchange assembly) for G1365A/B
MWD
1 Turn off the lamp.
2 Switch off the module, and disconnect the cables.
3 Remove module from stack and place it on the working bench.
Analog
connector nuts
Remote
GPIB
Board recesses
Figure 33
Unscrew Connectors from Board
4 Remove the front cover, top cover and top foam section, see “Removing the
Top Cover and Foam” on page 140.
5 Use a 5-mm and 7-mm wrench to unscrew the REMOTE and the GPIB
connector and a 15-mm wrench to unscrew the nuts of the ANALOG
connectors.
6 Disconnect all connectors from the detector main board.
1100 Series DAD and MWD Reference Manual
143
4
Repairing the Detector
NOTE
When removing connectors, counter-hold with one hand on connector J13.
S1
Description
GPIB
J1
RS-232C
J2
REMOTE
J3
CAN
J6/7
Analog output
J4/5
SIMM memory
J8/9
Power supply
J10
Interface board
J13
Fan assembly
J16
Heater (B)
J17
Temperature sensor (B) J18
Holmium oxide filter
J19
Leak sensor
J21
Optical unit assembly
J22
Battery
BT1
Configuration switch
S1
Figure 34
NOTE
144
J1
J6
J7
J2
J3
J4
J5
Connector
J10
J8
J9
J13
BT1
J16
J17 J18
J19
J21
J22
Location of Connectors on Detector Main Board
Since board version -66540, the external memory slots (SIMM) have been removed. The
1 MB RAM is now on-board and not upgradeable (not required for any applications).
1100 Series DAD and MWD Reference Manual
Repairing the Detector
4
7 Remove the detector main board. Place the board on the ESD kit.
8 In most cases the RFI spring plate remains on the interface connectors of
the board. Carefully remove the spring plate and place it back into its
position in the instrument before installing a new board.
9 On the new board check the switch setting of address switch S1, see
“Setting the 8-bit Configuration Switch” on page 261.
NOTE
An incorrect switch setting (for example, TEST/BOOT) may cause the module to turn in a
basic mode (yellow or red flashing status light). In such a case turn off the module, reset
the address switches, and turn on the module again.
10 Install the new detector main board and reconnect the connectors. Assure
that the board is fitted correctly into the board recess in the rear panel.
11 Refit the screws at the REMOTE and GPIB connectors and the nuts of the
ANALOG connectors.
12 Reinstall the top foam section, top cover and front cover, see “Replacing the
Foam and the Top Cover” on page 175.
13 Replace detector into the stack and reconnect the cables.
NOTE
If a new detector main board is installed, update the serial number information of the
detector in the user interface, see procedure below.
14 Check the firmware revision of the module. If the firmware revision is older
than the current firmware revision of the module, update the firmware
using the standard firmware update procedure, see “Replacing the
Detector’s Firmware” on page 180.
NOTE
The G1315B DAD and the G1365B MWD require firmware revision 4.x or above (main and
resident).
1100 Series DAD and MWD Reference Manual
145
4
Repairing the Detector
Entering the Serial Number using the Control Module
1 Connect the control module to the detector. Turn on the detector.
2 In the control module, press System (F5), then Records (F4). Using the
up/down arrows, make sure that the detector is highlighted.
3 Press FW Update (F5). Now, press the m key. This will display a box which
says Update Enter Serial#.
4 Press Enter. This will display the box labeled Serial#.
5 Alphabetic characters and numbers are created using the up and down
arrows. In the box labeled Serial#, enter the 10-character serial number for
the detector. When the 10-character serial number is entered, press Enter
to highlight the complete serial number. Then, press Done (F6).
NOTE
For firmware revisions below A.02.00 it is important never to press Done if the Serial# box
is blank. In this case, the module can no longer be recognized by either the control module
or the Agilent ChemStation. The main board must then be replaced.
6 Turn the detector off, then on again. The Records screen should display the
correct serial number for this module.
7 If a Agilent ChemStation is also connected, restart the Agilent ChemStation
now as well.
146
1100 Series DAD and MWD Reference Manual
Repairing the Detector
4
Entering the Serial Number using the Agilent ChemStation
Module serial numbers are entered by typing specific commands in the
command line at the bottom of the main user interface screen.
1 To enter a module serial number, type the following command in the
command line (depends on the detector type, either DAD or MWD):
print sendmodule$(ldad, "ser YYYYYYYYYY")
print sendmodule$(lmwd, "ser YYYYYYYYYY")
Where:
YYYYYYYYYY is the 10-character serial number of the module in question.
NOTE
The first two characters are letters, which should be capitalized.
The reply line will respond with RA 0000 SER followed by the module serial
number you just entered.
2 Turn off thedetector, then on again. Then, restart the Agilent ChemStation.
If the serial number you have just entered is different than the original
module serial number, you will be given the opportunity to edit the
configure 1100 access screen during the restart of the Agilent ChemStation.
3 After start up, the serial number you have just entered can be seen under
the Instrument menu of the main user interface screen. The serial number
of the detector can also be seen by typing the following command into the
command line (depends on the detector type, either DAD or MWD):
print sendmodule$ (ldad, "ser?")
print sendmodule$ (lmwd, "ser?")
The reply line will give the module serial number.
1100 Series DAD and MWD Reference Manual
147
4
Repairing the Detector
Exchanging the Fan (G1315A/G1365A)
NOTE
Use this procedure for the the G1315A/G1365A only. For G1315B/G1365B detectors refer
to “Replacing Fan Parts (G1315B/G1365B)” on page 150.
When required
If the fan is defective or noisy
Tools required
Screwdriver POZI 1 PT3
Parts required
Fan assembly 3160-1016
Preparations for this procedure:
• Turn off the lamp.
• Switch off the detector, and disconnect the cables and
acpillaries.
• Remove detector from stack and place it on the working
bench.
• Remove front cover, top cover and top foam section, see
“Removing the Top Cover and Foam” on page 140.
148
1 Disconnect the connectors from the main board (fan J16)
and pull the fan assembly out of its location.
1100 Series DAD and MWD Reference Manual
Repairing the Detector
The fan must be installed in the correct orientation
(see arrow on the fan) to ensure optimum cooling
and operation of the detector. The direction of air
flow is from the front towards the rear.
4
The figure below shows the required air flow
direction.
AIRFLOW
G1315/65A
G1315/65B
2 Insert the fan assembly into its location and Reconnect
the connector to the main board (fan J16), see figure
below for location.
1100 Series DAD and MWD Reference Manual
Next steps:
• Reinstall the top foam section, top cover and front cover,
see “Replacing the Foam and the Top Cover” on
page 175.
• Replace the detector into the stack.
• Reconnect cables, capillaries and turn on detector
149
4
Repairing the Detector
Replacing Fan Parts (G1315B/G1365B)
NOTE
With the introduction of the G1315B/G1365B DAD/MWD a heater and a temperature
sensor was added to the standard fan assembly. Also the air flow direction is reversed
(now: rear to front). Use this procedure for the the G1315B/G1365B only. For
G1315A/G1365A detectors refer to “Exchanging the Fan (G1315A/G1365A)” on page 148.
When required
If the fan is defective or noisy, if the temperature sensor or the heater fails
Tools required
Screwdriver POZI 1 PT3, a pair of pliers
Parts required
Fan assembly 3160-1016,
Temperature sensor assembly G1315-60000,
Heater assembly G1315-60003
Preparations for this procedure:
• Turn off the lamp.
• Switch off the detector, and disconnect the cables and
capillaries.
• Remove detector from stack and place it on the working
bench.
• Remove front cover, top cover and top foam section, see
“Removing the Top Cover and Foam” on page 140.
150
1 Disconnect the connectors from the main board; fan (J16),
temperature sensor (J18) and heater (J17) and pull the fan
assembly out of its location.
1100 Series DAD and MWD Reference Manual
Repairing the Detector
The heater and temperature sensor assemblies are
clipped into the fan assembly. In case the
temperature sensor or the heater assembly fails,
they can be unclipped separately from the fan
assembly.
4
2 To unclip the heater from the fan, use a pair of pliers,
squeeze the clips and push them through the hole. Repeat
this with the three remaining clips.
If the fan is defective, unclip both, the temperature
sensor assembly and the heater assembly from the
fan as described in the next steps.
3 If required, remove the sensor out of its holder.
1100 Series DAD and MWD Reference Manual
4 To unclip the sensor holder from the fan, pull it carefully
from its position pushing into the direction the arrow
points to.
151
4
Repairing the Detector
5 To re-install the sensor holder (here shown with the
sensor), bring the holder into its position and slide it
carefully across the fan cable.
6 Clip the sensor carefully into its holder and route the
cables as shown.
Assure, that the fan rotates smoothly without any
scraping noise. Otherwise correct the position of the
sensor holder.
7 Position the heater assembly as shown and clip the heater
onto the fan. The cables should be oriented towards the
left corner.
The fan must be installed in the correct orientation
(see arrow on the fan) to ensure optimum cooling
and operation of the detector. The direction of air
flow is from the rear towards the front (see figure on
next page).
152
1100 Series DAD and MWD Reference Manual
Repairing the Detector
The figure below shows the required air flow
direction.
4
8 Insert the fan assembly into its location.
AIRFLOW
G1315/65A
G1315/65B
9 Reconnect the connectors to the main board (fan J16),
temperature sensor (J18) and heater (J17), see figure
below for location.
1100 Series DAD and MWD Reference Manual
Next Steps:
• Reinstall the top foam section, top cover and front cover,
see “Replacing the Foam and the Top Cover” on
page 175.
• Turn on the detector and prove, that the fan rotates
smoothly without any scraping noise. Otherwise repeat
step 5 and step 6 on page 152.
• Replace the detector into the stack.
• Reconnect cables, capillaries and turn on detector
153
4
Repairing the Detector
Removing the Optical Unit (G1315A/G1365A)
NOTE
NOTE
Use this procedure for the the G1315A/G1365A only. For G1315B/G1365B detectors refer
to “Removing the Optical Unit (G1315B/G1365B)” on page 156.
When required
For all repairs inside the optical unit
Tools required
Screwdriver POZI 1 PT3
Parts required
Optical unit G1315-69002 (exchange assembly) or
Individual parts depending on the following procedures
Use this procedure for the G1315A/G1365A only.
1 Turn off the lamp.
2 Switch off detector, and disconnect power cable.
3 Remove detector from stack and place it on working bench.
4 Remove front cover, top cover and top foam section, see “Removing the Top
Cover and Foam” on page 140.
5 Remove both lamps from the optical unit, see “Exchanging a Lamp” on
page 102 (G1315A/G1365A only!).
6 Remove flow cell, see “Exchanging a Flow Cell” on page 105.
7 Remove flow cell cover, see “Cleaning or Exchanging the Holmium Oxide
Filter” on page 127 (G1315A/G1365A only!).
154
1100 Series DAD and MWD Reference Manual
Repairing the Detector
10 Remove the two rubber shock absorbers.
4
11 Disconnect the SCI cable (J23) and the holmium oxide
filter motor (J19) from the detector main board.
12 Remove the optical unit from the instrument holding the
one hand at back of the heat sink.
1100 Series DAD and MWD Reference Manual
155
4
Repairing the Detector
Removing the Optical Unit (G1315B/G1365B)
NOTE
When required
For all repairs inside the optical unit
Tools required
Screwdriver POZI 1 PT3
Parts required
Optical unit G1315-69002 (exchange assembly) or
Individual parts depending on the following procedures
With the introduction of the G1315B/G1365B DAD/MWD the appearance of the z-plane
(front metal plane) has been changed (no holes any more) and an isolation seal between
the optical unit and the z-plane. Therefore, some of the figures may still show the old
appearance of the G1315A/G1365A. For G1315A/G1365A detectors refer to “Removing the
Optical Unit (G1315A/G1365A)” on page 154.
Preparations for this procedure:
• Turn off the lamp.
• Switch off detector, and disconnect power cable.
• Remove detector from stack and place it on working
bench.
• Remove front cover, top cover and top foam section, see
“Removing the Top Cover and Foam” on page 140.
156
1 .Loosen the screw on the left side of the z-plane and the
two screes near the hydraulic connection.
1100 Series DAD and MWD Reference Manual
Repairing the Detector
4
2 Remove the two rubber shock absorbers.
3 Slide the z-plane to the front and remove it from the
module.
4 Disconnect the SCI cable (J23) and the holmium oxide
filter motor (J19) from the detector main board.
5 Remove the optical unit from the instrument holding the
one hand at back of the heat sink.
1100 Series DAD and MWD Reference Manual
157
4
Repairing the Detector
Exchanging the Source Lens (Achromat) Assembly
NOTE
When required
The source lens (achromat) assembly might be cleaned or replaced when the
transmission of light is reduced and a lamp exchange or new spectro
windows do not improve the light throughput
Tools required
Screwdriver POZI 1 PT3
hexagonal key 1.5 mm
A pointed pair of pliers
Parts required
Source lens (achromat) assembly G1315-65201(includes filter lever
G1315-45001)
Spectro window 79880-28111
Filter lever G1315-45001
If the filter motor was removed, the filter lever should not be reused. Always use a new
filter lever to assure correct fit on the filter motor shaft.
Preparations for this procedure:
1 Place the optical unit on your bench.
• Turn off the lamp.
• Switch off detector and disconnect the power cable.
• Remove detector from stack and place it on the working
bench.
• Remove the front cover, top cover and top foam section,
see “Removing the Top Cover and Foam” on page 140.
• Remove the optical unit, see “Removing the Optical Unit
(G1315A/G1365A)” on page 154 or “Removing the
Optical Unit (G1315B/G1365B)” on page 156.
158
1100 Series DAD and MWD Reference Manual
Repairing the Detector
4
2 Pull the filter motor off the shaft. Keep the spring and the
lever fixture in a safe place. Remove the filter lever on the
other side.
3 Use the 1.5-mm hexagonal key to loosen the setscrew that
secures the source lens assembly.
4 Use the 1.5-mm hexagonal key to loosen the setscrew that
secures the cell support assembly.
5 Carefully slide the assembly to the right by pushing it from
the deuterium lamp side with a hexagonal wrench.
1100 Series DAD and MWD Reference Manual
159
4
Repairing the Detector
6 Remove the achromat assembly.
8 Remove the spring and the spectro window from the
holder.
7 Use a metal blade (12-mm width, 1-mm thick) to unscrew
the lens achromatic.
11 Replace the achromat assembly, move it completely into
the optical and fix the setscrew.
9 Clean (with alcohol and lint-free cloth) or replace the
spectro window.
Do not clean the achromatic lens with any liquid. To
clean use dry air only.
10 Replace all parts into the holder and tighten the lens
achromatic with the metal blade.
160
1100 Series DAD and MWD Reference Manual
Repairing the Detector
12 Before installing the filter motor, press the filter lever in
from the other side.
13 While counter-holding the filter lever, insert the filter
motor onto the filter shaft until it clicks into the final
position.
14 Slide in the cell support assembly until it is stopped by the
holmium filter. Leave about 0.2-mm clearance for
movement of the filter lever between both the lens
assembly and the filter lever, and fix the setscrew.
Next steps:
1100 Series DAD and MWD Reference Manual
4
• Check that the filter lever is moveable.
• Reinstall the optical unit, see “Installing the Optical Unit
(G1315A/G1365A)” on page 171 or “Removing the
Optical Unit (G1315B/G1365B)” on page 156.
• Reinstall the flow cell, see “Exchanging a Flow Cell” on
page 105.
• Reinstall the front cover, top cover and top foam section,
see “Exchanging the Detector Main Board” on page 143.
• Replace detector into the stack.
• Reconnect the cables and turn on the detector.
161
4
Repairing the Detector
Replacing the Holmium Oxide Filter Motor
NOTE
When required
If defective
Tools required
Screwdriver POZI 1 PT3
hexagonal key 3 mm
Parts required
Filter motor assembly G1315-68700 (includes filter lever G1315-45001 and
spring 1460-1510)
For others see “Holmium Oxide Filter” on page 197
If the filter motor was removed, the filter lever should not be reused. Always use a new
filter lever to assure correct fit on the filter motor shaft.
Preparations for this procedure:
1 Place the optical unit on your bench.
• Turn off the lamp.
• Switch off the detector, and disconnect the power cable.
• Remove detector from stack and place it on working
bench.
• Remove front cover, top cover and top foam section, see
“Removing the Top Cover and Foam” on page 140.
• Remove optical unit, see “Removing the Optical Unit
(G1315A/G1365A)” on page 154 or “Removing the
Optical Unit (G1315B/G1365B)” on page 156.
162
1100 Series DAD and MWD Reference Manual
Repairing the Detector
4
2 Pull the filter motor off the shaft. Keep the spring in a safe
place.
3 Before installing the filter motor, press the filter lever in
from the other side.
4 While counter-holding the filter lever, press the filter
motor onto the filter shaft until it clicks into the final
position.
Next steps:
1100 Series DAD and MWD Reference Manual
• Check that the filter lever is moveable.
• Reinstall the optical unit, see “Installing the Optical Unit
(G1315A/G1365A)” on page 171 or “Removing the
Optical Unit (G1315B/G1365B)” on page 156.
• Reconnect the filter motor cable to connector J18
(G1315/65A) or J19 (G1315/65B) on the detector main
board.
• Reinstall the front cover, top cover and top foam section,
see “Replacing the Foam and the Top Cover” on
page 175.
• Replace the detector into the stack.
• Reconnect the power cable and turn on detector.
163
4
Repairing the Detector
Exchanging the Power Supply
NOTE
When required
If defective
Tools required
Screwdriver POZI 1 PT3
Wrench 1/4 inch
Wrench 5 mm
Wrench 7 mm
Parts required
Power supply 0950-2528
The repair level of the power supply assembly is exchanging the complete assembly. No
serviceable parts are inside.
1 Turn off the lamp.
2 Switch off the detector, and disconnect the cables.
3 Remove the detector from the stack and place it on the working bench.
4 Remove the front cover, top cover and top foam section, see “Removing the
Top Cover and Foam” on page 140.
5 Remove the detector main board, see “Exchanging the Detector Main
Board” on page 143.
6 Remove the fan assembly, see “Exchanging the Fan (G1315A/G1365A)” on
page 148 or “Replacing Fan Parts (G1315B/G1365B)” on page 150.
7 Remove the optical unit, see “Removing the Optical Unit
(G1315A/G1365A)” on page 154 or “Removing the Optical Unit
(G1315B/G1365B)” on page 156.
164
1100 Series DAD and MWD Reference Manual
Repairing the Detector
5 Carefully remove the bottom foam part by sliding it out
towards the rear.
6 Unscrew the power supply at the rear of the module.
7 Press down the power switch light pipe to remove it from
the coupler.
8 Remove the power supply completely.
Re-use the coupler on the new power supply.
4
Power
switch light
pipe
Coupler
The repair level of the power supply assembly is exchange of the complete assembly. No serviceable parts
inside.
1100 Series DAD and MWD Reference Manual
165
4
Repairing the Detector
9 Insert the power supply into its location and fix it with the
screws at the rear panel.
10 Press down and clip in the power switch light pipe into the
power supply.
Power
switch light
pipe
11 Reinstall bottom foam part. Slide it in underneath the leak
drain.
166
Next steps:
• Reinstall the processor board, see “Exchanging the
Detector Main Board” on page 143.
• Reinstall the fan assembly, see “Exchanging the Fan
(G1315A/G1365A)” on page 148 or “Replacing Fan Parts
(G1315B/G1365B)” on page 150.
• Reinstall the optical unit, see “Installing the Optical Unit
(G1315A/G1365A)” on page 171 or “Removing the
Optical Unit (G1315B/G1365B)” on page 156.
• Reinstall the front cover, top cover and top foam section,
see “Replacing the Foam and the Top Cover” on
page 175.
• Replace detector into the stack.
• Reconnect the power cable and turn on the detector.
1100 Series DAD and MWD Reference Manual
Repairing the Detector
4
Exchanging the Leak Sensor
When required
If defective
Tools required
Screwdriver POZI 1 PT3
Parts required
Leak sensor assembly 5061-3356
WA R N I N G
Do not switch on the detector when the cover is removed.
CAUTION
Electronic boards and components are sensitive to electronic discharge (ESD). In order
to prevent damage always use an ESD protection (for example, the ESD wrist strap
from the accessory kit) when handling electronic boards and components, see “Using
the ESD Strap” on page 98.
1 Turn off the lamp.
2 Switch off the detector and disconnect the cables.
3 Remove detector from stack and place it on the working bench.
4 Remove the front cover, top cover and top foam section, see “Removing the
Top Cover and Foam” on page 140.
5 Remove the optical unit, see “Removing the Optical Unit
(G1315A/G1365A)” on page 154 or “Removing the Optical Unit
(G1315B/G1365B)” on page 156.
6 Disconnect the leak sensor cable from the detector main board (J21).
NOTE
On the G1315B DAD and G1365B MWD the leak sensor can be pulled out without the
removing the leak pan (the next steps describe the procedure for the G1315A/G1365A).
1100 Series DAD and MWD Reference Manual
167
4
Repairing the Detector
12 Remove the leak pan from the cabinet bottom.
13 Remove the leak sensor assembly from the leak pan.
14 Replace the leak sensor assembly into the leak pan.
15 Route the leak sensor cable through the z-plane.
168
1100 Series DAD and MWD Reference Manual
Repairing the Detector
16 Replace the leak pan into the cabinet bottom.
4
Next steps:
• Reconnect the leak sensor cable to the processor board
(J21).
• Replace the optical unit, see “Installing the Optical Unit
(G1315A/G1365A)” on page 171 or “Installing the
Optical Unit (G1315B/G1365B)” on page 173.
• Replace the front cover, top cover and top foam section,
see “Replacing the Foam and the Top Cover” on
page 175.
• Replace the detector into the stack.
• Reconnect the cables.
• Turn on the detector.
1100 Series DAD and MWD Reference Manual
169
4
Repairing the Detector
Replacing Status Light Pipe
When required
If part was broken or removed
Tools required
Screwdriver POZI 1 PT3
Parts required
Status light pipe 5041-8384
Preparations for this procedure:
1 The status light pipe is clipped into the top cover.
• Remove the front cover and top cover, see “Removing
the Top Cover and Foam” on page 140.
Next steps:
• Replace the top cover, see “Replacing the Foam and the Top Cover” on page 175.
• Replace the detector into the stack and reconnect the cables and capillaries.
• Turn on the detector.
170
1100 Series DAD and MWD Reference Manual
Repairing the Detector
4
Installing the Optical Unit (G1315A/G1365A)
When required
When repairs have been completed
Tools required
Screwdriver POZI 1 PT3
NOTE
Use this procedure for the the G1315A/G1365A only. For G1315B/G1365B detectors refer
to “Installing the Optical Unit (G1315B/G1365B)” on page 173
CAUTION
The fan must be installed in the correct orientation to ensure correct cooling and
operation of the detector, see “Exchanging the Fan (G1315A/G1365A)” on page 148.
Preparations for this procedure:
• The power supply, the fan and the processor board are
already installed.
1100 Series DAD and MWD Reference Manual
1 Check that the shock absorbers and the leak sensor cable
is placed correctly.
171
4
Repairing the Detector
2 Carefully insert the optical unit into the instrument holding
the one hand at back of the heat sink.
3 Reconnect the SCI cable (J23) and the holmium oxide filter
motor (J19) to the detector main board.
4 Replace the two rubber shock absorbers and reconnect
the ground connector.
Next steps:
NOTE
172
• Reinstall the fan assembly (J16). Ensure the correct
direction of air flow.
• Reinstall the flow cell cover, see “Cleaning or
Exchanging the Holmium Oxide Filter” on page 127.
• Reinstall the flow cell, see “Exchanging a Flow Cell” on
page 105.
• Reinstall the lamps, see “Exchanging a Lamp” on
page 102.
• Reinstall the front cover, top cover and top foam section,
see “Replacing the Foam and the Top Cover” on
page 175.
• Replace detector into the stack.
• Reconnect the power cable and turn on the detector.
If a new optical is installed, perform a “Wavelength Recalibration” on page 84 to add the
recalibration parameters into the detector main board’s memory after turning on the
detector.
1100 Series DAD and MWD Reference Manual
Repairing the Detector
4
Installing the Optical Unit (G1315B/G1365B)
When required
When repairs have been completed
Tools required
Screwdriver POZI 1 PT3
NOTE
Use this procedure for the the G1315B/G1365B only. For G1315A/G1365A detectors refer
to “Installing the Optical Unit (G1315A/G1365A)” on page 171.
CAUTION
The fan must be installed in the correct orientation to ensure correct cooling and
operation of the detector, see “Replacing Fan Parts (G1315B/G1365B)” on page 150.
Preparations for this procedure:
• The power supply, the fan and the processor board are
already installed.
1100 Series DAD and MWD Reference Manual
1 Check that the shock absorbers and the leak sensor cable
is placed correctly.
173
4
Repairing the Detector
2 Carefully insert the optical unit into the instrument holding
the one hand at back of the heat sink.
3 Reconnect the SCI cable (J23) and the holmium oxide filter
motor (J19) to the detector main board.
4 Replace the two rubber shock absorbers and reconnect
the ground connector.
Next steps:
NOTE
174
• Reinstall the fan assembly (J16). Ensure the correct
direction of air flow.
• Reinstall the flow cell cover, see “Cleaning or
Exchanging the Holmium Oxide Filter” on page 127.
• Reinstall the flow cell, see “Exchanging a Flow Cell” on
page 105.
• Reinstall the lamps, see “Exchanging a Lamp” on
page 102.
• Reinstall the front cover, top cover and top foam section,
see “Replacing the Foam and the Top Cover” on
page 175.
• Replace detector into the stack.
• Reconnect the power cable and turn on the detector.
If a new optical is installed, perform a “Wavelength Recalibration” on page 84 to add the
recalibration parameters into the detector main board’s memory after turning on the
detector.
1100 Series DAD and MWD Reference Manual
Repairing the Detector
4
Replacing the Foam and the Top Cover
When required
When all repairs have been completed
Tools required
Screwdriver POZI 1 PT3
Prerequisites
The detector is open and other procedures have been carried out
Preparations for this procedure:
• All the work within the module should be completed.
1100 Series DAD and MWD Reference Manual
1 Route the lamp connector cables through the hole in the
foam.
175
4
Repairing the Detector
2 Insert the foam and make sure that the foam is installed
correctly.
4 Reconnect the lamps.
3 Press the lamp cables into the foam channel and
reconnect the lamp connectors to the front panel.
5 Slide the top plate towards the rear and fix the top plate
screws.
Ensure correct
fit with Z-plane
176
1100 Series DAD and MWD Reference Manual
Repairing the Detector
6 Replace the cover.
8 Replace waste funnel assembly and the front panel.
4
7 If required, insert the interface board and fix the screws.
Next steps:
• Replace the detector into the stack.
• Reconnect the hydraulic connections
• Reconnect the power cable and turn on the detector.
1100 Series DAD and MWD Reference Manual
177
4
Repairing the Detector
Assembling the Main Cover
NOTE
WA R N I N G
When required
If cover is broken
Tools required
None
Parts required
Plastics kit 5062-8582 (includes base, top, left and right)
The plastics kit contains all parts, but it is not assembled.
In case you insert the left or right side in the opposite position, you may not be able
to remove the side from the top part.
1 Place the top part on the bench and insert the left and right
side into the top part.
2 Replace the cover.
3 Replace the detector into the stack and reconnect the cables and capillaries.
4 Turn on the detector.
178
1100 Series DAD and MWD Reference Manual
Repairing the Detector
4
Replacing the Interface Board
When required
For all repairs inside the detector or for installation of the board
Part required
Interface board (BCD) G1351-68701 with external contacts and BCD outputs,
see “BCD Board” on page 253
Interface board (LAN) see “LAN Communication Interface Board” on
page 255.
Tools required
None
1 Install the ESD strap. Move the power lock across the
power inlet.
2 If required, unscrew and remove the interface board. Place
the board on the ESD kit.
ESD strap
power lock
3 If required, insert the interface board and fix the screws.
Next steps:
• Remove the ESD strap.
• Reinstall the module into the stack.
1100 Series DAD and MWD Reference Manual
179
4
Repairing the Detector
Replacing the Detector’s Firmware
The installation of new firmware is required:
• if new version solves problems of currently installed version, or
• if after exchange of the detector main board (DAM or MWM) the version on
board is older than previous installed one.
To upgrade the detector’s firmware the following steps have to be performed:
1 Load the firmware into the detector, see help system of your user interface.
NOTE
The G1315B DAD and the G1365B MWD require firmware revision 4.x or above (main and
resident).
2 Perform a “Wavelength Recalibration” on page 84 to add the recalibration
parameters into the board’s memory.
NOTE
The wavelength recalibration should be performed after at least 10 minutes of warm-up
time of the lamp.
3 If detector main board was replaced, reenter the serial number information
of the module through the user interface, see “Entering the Serial Number
using the Control Module” on page 146 or “Entering the Serial Number
using the Agilent ChemStation” on page 147.
180
1100 Series DAD and MWD Reference Manual
Agilent 1100 Series Diode Array and Multiple Wavelength Detectors
Reference Manual
5
Identifying Parts and Materials
Overview of Main Assemblies 182
Optical Unit Assembly 184
Standard Flow Cell 186
Semi-Micro Flow Cell 188
High Pressure Flow Cell 190
Nano Flow Cells 192
Fan Assembly Parts 196
Holmium Oxide Filter 197
Coupling Lens Assembly 198
Source Lens (Achromat) Assembly 199
Cell Support Assembly 200
Control Module 201
Sheet Metal Kit (G1315A/G1365A) 202
Sheet Metal Kit (G1315B/G1365B) 203
Plastic Parts 204
Foam Parts 205
Power and Status Light Pipes 206
Leak Parts 207
Accessory Kit 208
Cable Overview 210
RS-232 Cable Kit 225
LAN Cables 226
Agilent Technologies
181
5
Identifying Parts and Materials
Overview of Main Assemblies
3
1
2
4
6
7
2
10
Figure 35
182
8
9
10
11
5
13
12
Overview of Main Assemblies
1100 Series DAD and MWD Reference Manual
Identifying Parts and Materials
Table 8
5
Main Assemblies
Item
Description
Part Number
1
Main board DAM for G1315A/B DAD (exchange assembly)
G1315-69540
Main board DAM for G1365A/B MWD (exchange assembly)
G1365-69540
Hexagonal nut for GPIB connector
0380-0643
Hexagonal nut for RS-232C connector
1251-7788
Nut for analog connector
2940-0256
Washer for analog connector
2190-0699
Cable CAN to Agilent 1100 Series modules
5181-1516
2
Power supply, for power and status light parts see page 206
0950-2528
3
Interface board BCD (BCD/external contacts)
G1351-68701
Fuse for BCD board, 250 mA (total of 4 are on the board)
2110-0004
LAN Communication Interface Board (G1369A)
G1369-60001
4
Fan assembly, for G1315B/G1365B heater and sensor see page page 196
3160-1016
5
Optical unit (exchange assembly), for additional optical unit parts, see page 184
G1315-69002
6
Longlife Deuterium lamp without counter (no mercury) (without black cover)
2140-0813
Longlife Deuterium lamp without counter (no mercury) (with black cover)
5181-1530
Deuterium lamp without counter (no mercury) (without black cover)
2140-0590
7
Tungsten lamp
G1103-60001
8
For details see page 186 for standard flow cell, page 188 for semi-micro flow cell, or
page 190 for high-pressure flow cell
9
Leak sensor assembly
10
Leak handling parts, see page 207
11
Front cover and plastic parts (housing), see page 204
12
Sheet metal parts, see page 202
13
Foam parts, see page 205
1100 Series DAD and MWD Reference Manual
5061-3356
183
5
Identifying Parts and Materials
Optical Unit Assembly
Table 9
Optical Unit Assembly
Item
Description
Part Number
1
Optical unit (exchange assembly)
G1315-69002
2
Semi-flow cell, 6 mm, 5 µl, maximum pressure 120 bar, see page 186
G1315-60011
2
Standard flow cell, 10 mm, 13 µl, maximum pressure 120 bar, see page 186
G1315-60012
2
High Pressure flow cell, 6 mm 1.7 µl, maximum pressure 400 bar, see page 190
G1315-60015
3
Longlife Deuterium lamp without counter (no mercury) (without black cover)
2140-0813
Longlife Deuterium lamp without counter (no mercury) (with black cover)
5181-1530
Deuterium lamp without counter (no mercury) (without black cover)
2140-0590
4
Tungsten lamp
G1103-60001
5
Inlet capillary, 380 mm lg, 0.17 mm i.d., 0.6 mm o.d., for details see page 208
G1315-87311
Zero dead volume fitting
0100-0900
6
Cable SCI - DAM
G1315-61604
7
Damping kit, includes 6 bumpers
G1315-68706
8
Flow cell door (seal included)
G1315-68707
Screws M3 for flow cell door (6 ×)
5022-2112
Plug hole for lamp housing
6960-0002
9
10, 11, Holmium oxide filter parts, see page 197
12
13
Spring, for other holmium oxide filter parts, see page 197
1460-1510
14
Coupling lens assembly, for other coupling lens assembly parts, see page 198
G1103-68001
15
Source lens (achromat) assembly, for other source lens assembly parts, see page 199
G1315-65201
16
Cell support assembly, for other cell support assembly parts, see page 200
G1315-65202
17
Sealing for G1315B/G1365B
G1315-47103
184
1100 Series DAD and MWD Reference Manual
Identifying Parts and Materials
5
13
9
12
7
14
1
15
16
4
3
8
2
7
6
11
10
5
17
Figure 36
Optical Unit Parts
1100 Series DAD and MWD Reference Manual
185
5
Identifying Parts and Materials
Standard Flow Cell
Table 10
Item
186
Standard Flow Cell Parts
Description
Part Number
Standard flow cell assembly, 10 mm, 13 µl,
maximum pressure 120 bar
G1315-60012
1
Window screw
79883-22402
2
Spring washers, pack of 10
5062-8553
3
Compression washer
79883-28801
4
Window holder
79883-22301
5
Quartz window
1000-0488
6
Gasket BACK (Teflon), 2.3 mm hole, outlet side
See kits below
7
Gasket FRONT (Teflon), 1.3 mm hole, inlet side
See kits below
8
Window assembly, comprises item 1, 2, 3, 4, 5
No part number
9
Capillary IN (0.17 mm, 590 mm lg) including heat exchanger
G1315-87321
10
Capillary OUT (0.17 mm, 200 mm lg)
G1315-87302
11
Clamp unit
G1315-84901
Screw M 2.5, 4 mm lg for cell body/clamp
0515-1056
Zero dead volume fitting
0100-0900
Cell repair kit STD, includes window screw kit, 4mm kexagonal
wrench and seal kit
G1315-68712
Seal kit BACK for STD flow cell, qty=12 of item 6
G1315-68711
Seal kit FRONT for STD flow cell, qty=12 of item 7
G1315-68710
Window screw kit, includes 2 quartz windows, 2 compression
washers, 2 window holders, 2 window screws and 10 spring
washers
79883-68703
1100 Series DAD and MWD Reference Manual
Identifying Parts and Materials
5
NOTE
Gaskets # 6 and #7 have different hole
diameters.
8
7
6
5
4
3
2
1
9
11
10
Figure 37
Standard Flow Cell Parts
1 - window screw
2 - spring washers
3 - compression washer
4 - window holder
5 - quartz window
6 - Gasket
Figure 38
Orientation of Spring Washers.
1100 Series DAD and MWD Reference Manual
187
5
Identifying Parts and Materials
Semi-Micro Flow Cell
Table 11
Item
188
Semi-Micro Flow Cell Parts
Description
Part Number
Semi-micro flow cell assembly, 6 mm, 5 µl,
maximum pressure 120 bar
G1315-60011
1
Window screw
79883-22402
2
Spring washers, pack of 10
5062-8553
3
Compression washer
79883-28801
4
Window holder
79883-22301
5
Quartz window
1000-0488
6
Gasket BACK (Teflon), 1.8 mm hole, outlet side
See kits below
7
Gasket FRONT (Teflon), 1.3 mm hole, inlet side
See kits below
8
Window assembly, comprises item 1, 2, 3, 4, 5
No part number
9
Capillary IN (0.12 mm, 290 mm lg) including heat exchanger
G1315-87325
10
Capillary OUT (0.12 mm, 200 mm lg)
G1315-87306
10
Capillary OUT (0.17 mm, 200 mm lg)
G1315-87302
11
Clamp unit
G1315-84901
Screw M 2.5, 4 mm lg for cell body/clamp
0515-1056
Zero dead volume fitting
0100-0900
Cell repair kit semi-micro, includes window screw kit, 4 mm
kexagonal wrench and seal kits
G1315-68713
Seal kit BACK for semi-micro flow cell, qty=12 of item 6
79883-68702
Seal kit FRONT for semi-micro flow cell, qty=12 of item 7
G1315-68710
Window screw kit, includes 2 quartz windows, 2 compression
washers, 2 window holders, 2 window screws and 10 spring
washers
79883-68703
1100 Series DAD and MWD Reference Manual
Identifying Parts and Materials
5
NOTE
Gaskets # 6 and #7 have different hole
diameters.
8
7
6
5
4
3
2
1
9
11
10
Figure 39
Semi-Micro Flow Cell Parts
1 - window screw
2 - spring washers
3 - compression washer
4 - window holder
5 - quartz window
6 - Gasket
Figure 40
Orientation of Spring Washers.
1100 Series DAD and MWD Reference Manual
189
5
Identifying Parts and Materials
High Pressure Flow Cell
Table 12
Item
190
Repair Parts: Micro Flow Cell Assembly
Description
Part Number
High pressure flow cell assembly, 6 mm, 1.7 µl,
maximum pressure 400 bar
G1315-60015
1
Window assembly, comprises items 2, 3, 4, 5 and 6
2
Seal ring
79883-27101
3
Quartz window
1000-0953
4
Compression washer
79883-28802
5
Spring washers (pack of 10)
5062-8553
6
Window screw
79883-22404
7
Capillary IN (0.12 mm, 290 mm lg) including heat exchanger
G1315-87325
8
Capillary OUT (0.12 mm, 200 mm lg)
G1315-87306
9
Clamp unit
G1315-84901
Screw M 2.5, 4 mm lg for cell body/clamp unit
0515-1056
Capillary (0.12 mm, 150 mm lg)
G1315-87312
Capillary (0.17 mm, 380 mm lg)
G1315-87311
Cell Repair Kit Agilent, includes 1 quartz window,
5 spring washers, 2 seal rings
79883-68700
1100 Series DAD and MWD Reference Manual
Identifying Parts and Materials
5
6
5
4
2
3
2
1
7
9
8
Figure 41
High Pressure Flow Cell Assembly Parts
1100 Series DAD and MWD Reference Manual
191
5
Identifying Parts and Materials
Nano Flow Cells
The following kits are available:
Table 13
Nano-flow cell kits
Description
Part number
500 nl Flow Cell Kit
includes Flow cell assembly (10 mm, 500 nl, 5 MPa) completely
assembled (includes items 1, 2, 3, 4, 10, 11, 12, 13, 14, 15, and 16)
G1315-68724
80 nl Flow Cell Kit
includes Flow cell assembly (10 mm, 500 nl, 5 MPa) completely
assembled (includes items 1, 2, 3, 4, 10, 11, 12, 13, 14, 15, and 16)
G1315-68716
Figure 42 shows all parts delivered with the nano-flow cell kits.
2
12
11
3, 4
1
3, 4
13
5
10
16
7
8
14
9
15
17
Figure 42
192
Content of kits
1100 Series DAD and MWD Reference Manual
Identifying Parts and Materials
5
Table 14 lists the generic parts for both nano-flow cells:
Table 14
Generic Parts
Item
Description
Part Number
3
Fitting Screw (for 4 mm wrench), QTY=2
(reorder 10/pk)
5063-6593
4
Cell ferrules are factory installed
5
PEEK fitting 1/32" (not attached to capillaries),
(reorder 10/pk)
5065-4422
Litetouch ferrules LT-100, (1/32" Ferrule and SS lock ring),
QTY=2
(reorder 10/pk)
5063-6592
8
Union Adjustment Tool, used for item #7
5022-2146
9
ZDV SS Union, no fitting, QTY=2
5022-2184
10
Torque Adapter
G1315-45003
14
Handle for clamp unit
G1315-84902
15
Clamp unit
G1315-84901
16
Screw M 2.5, 4 mm long for cell body/clamp
0515-1056
17
Wrench open end 4 mm (supplied with standard accessory kit
G1315-68705 of your detector)
8710-1534
7
1100 Series DAD and MWD Reference Manual
193
5
Identifying Parts and Materials
Table 15 lists the specific parts for the 500 nl flow cell.
Table 15
Item
194
Specific 500 nl Flow Cell Parts
Description
Part Number
500 nl Flow Cell Kit
G1315-68724
1
PEEK coated fused silica capillary Inlet (100 µm)
pre-mounted to cell, includes
Inlet capillary, 300 mm long, 100 µm i.d.
with pre-fixed ferrules (#4) and fittings (#3), plus one PEEK
Fitting FT (#5)
G1315-87333
2
PEEK coated fused silica capillary Outlet (100 µm)
pre-mounted to cell, includes
Outlet capillary, 120 mm long, 100 µm i.d.
with pre-fixed ferrules (#4) and fitting (#3), plus one PEEK
Fitting FT (#5)
G1315-87338
1
PEEK coated fused silica capillary Inlet (50 µm)
alternative, includes
Inlet capillary, 400 mm long, 50 µm i.d.
with pre-fixed ferrules (#4) and fittings (#3), plus one PEEK
Fitting FT (#5)
G1315-87323
2
PEEK coated fused silica capillary Outlet (50 µm),
alternative, includes
Outlet capillary, 120 mm long, 50 µm i.d.
with pre-fixed ferrules (#4) and fitting (#3), plus one PEEK
Fitting FT (#5)
G1315-87328
1
PEEK coated fused silica capillary Inlet (50 µm)
for earlier 500 nl version kits, includes
Inlet capillary, 400 mm long, 50 µm i.d.
with pre-fixed ferrules (#4) and fittings (#3), plus one PEEK
Fitting FT (#5)
G1315-87323
2
PEEK coated fused silica capillary Outlet (75 µm)
for earlier 500 nl version kits, includes
Outlet capillary, 700 mm long, 75 µm i.d.
with pre-fixed ferrules (#4) and fitting (#3), plus one PEEK
Fitting FT (#5)
G1315-68708
Sealing Kit, includes items #10, #12 (QTY=2) and #7 (QTY=5)
G1315-68715
1100 Series DAD and MWD Reference Manual
Identifying Parts and Materials
5
Table 16 lists the specific parts for the 80 nl flow cell.
Table 16
Item
Specific 80 nl Flow Cell Parts
Description
Part Number
80 nl Flow Cell Kit
G1315-68716
1
PEEK coated fused silica capillary Inlet (50 µm)
pre-mounted to cell, includes
Inlet capillary, 400 mm long, 50 µm i.d.
with pre-fixed ferrules (#4) and fittings (#3), plus one PEEK
Fitting FT (#5)
G1315-87323
2
PEEK coated fused silica capillary Outlet (50 µm)
pre-mounted to cell, includes
Outlet capillary, 120 mm long, 50 µm i.d.
with pre-fixed ferrules (#4) and fitting (#3), plus one PEEK
Fitting FT (#5)
G1315-87328
1
PEEK coated fused silica capillary Inlet (25 µm)
alternative, includes
Inlet capillary, 200 mm long, 25 µm i.d.
with pre-fixed ferrules (#4) and fittings (#3), plus one PEEK
Fitting FT (#5)
G1315-87313
2
PEEK coated fused silica capillary Outlet (25 µm)
alternative, includes
Outlet capillary, 600 mm long, 25 µm i.d.
with pre-fixed ferrules (#4) and fitting (#3), plus one PEEK
Fitting FT (#5)
G1315-87318
Sealing Kit 80 nl cell, includes items #10, #12 (QTY=2), #7
(QTY=5)and Lite Touch Sleeves (QTY=5)
G1315-68725
1100 Series DAD and MWD Reference Manual
195
5
Identifying Parts and Materials
Fan Assembly Parts
Table 17
Fan Assembly Parts
Item
Description
Part Number
1
Fan (for all DAD/MWDs)
3160-1016
2
Heater assembly (G1315/65B only)
G1315-60000
3
Temperature sensor assembly (G1315/65B only)
G1315-60003
4
Sensor holder (G1315/65B only)
G1315-22300
2
1
4
3
Figure 43
196
Fan Assembly Parts
1100 Series DAD and MWD Reference Manual
Identifying Parts and Materials
5
Holmium Oxide Filter
Table 18
NOTE
Holmium Oxide Filter Assembly Parts
Item
Description
Part Number
1
Holmium oxide filter motor assembly, includes items
2 and 4
G1315-68700
2
Holmium oxide filter lever
G1315-45001
3
Holmium oxide filter
79880-22711
4
Spring
1460-1510
When the filter motor has been removed, the filter lever should not be reused. Use always a
new filter lever to assure correct fit on the filter motor shaft.
3
1
2
4
Figure 44
Holmium Oxide Filter Parts
1100 Series DAD and MWD Reference Manual
197
5
Identifying Parts and Materials
Coupling Lens Assembly
Table 19
Item
Coupling Lens Assembly
Description
Part Number
Coupling lens assembly
G1103-68001
1
Retainer ring
2
Washer-spring wavy
3
Lens support
4
Lens
5
Lens holder
1
2
3
4
5
Figure 45
198
Coupling Lens Assembly Parts
1100 Series DAD and MWD Reference Manual
Identifying Parts and Materials
5
Source Lens (Achromat) Assembly
Table 20
Item
NOTE
Source Lens Assembly
Description
Part Number
Source lens (achromat) assembly includes a filter lever
G1315-45001
G1315-65201
1
Lens achromatic
1000-0486
2
Spring compression
1460-2255
3
Spectro window
79880-28111
4
Holder
When the filter motor has been removed, the filter lever should not be reused. Use always a
new filter lever to assure correct fit on the filter motor shaft.
4
3
2
1
Figure 46
Source Lens (Achromat) Assembly Parts
1100 Series DAD and MWD Reference Manual
199
5
Identifying Parts and Materials
Cell Support Assembly
Table 21
Item
Cell Support Assembly
Description
Part Number
Cell support assembly
G1315-65202
1
Retainer ring
0510-1638
2
Washer-spring wavy
3050-1591
3
Spectro window
79880-28111
4
Cell support
G1315-24701
1
2
3
4
Figure 47
200
Cell Support Assembly Parts
1100 Series DAD and MWD Reference Manual
Identifying Parts and Materials
5
Control Module
Table 22
Item
Cotrol Module Parts
Description
Part Number
Control Module, replacement part including cable
G1323-67001
Plastic Housing Kit, includes front, back and a clamp
5062-8583
CAN cable Agilent 1100 module to control module
G1323-81600
Figure 48
Control Module
1100 Series DAD and MWD Reference Manual
201
5
Identifying Parts and Materials
Sheet Metal Kit (G1315A/G1365A)
NOTE
For the information on the sheet metal kit for the G1315B and G1365B refer to “Sheet Metal
Kit (G1315B/G1365B)” on page 203.
Table 23
Sheet Metal Kit Parts (G1315A/G1365A)
Item
Description
Part Number
1
Sheet metal kit includes case and top cover
G1315-68701
2
Screws M3 for cover and flow cell door
5022-2112
3
Thumb screw for union holder
0515-2769
4
Zero dead volume fitting
0100-0900
5
Union holder clamp
G1315-05205
2
1
5
3
Figure 49
202
1
4
Sheet Metal Kit Parts (G1315A/G1365A)
1100 Series DAD and MWD Reference Manual
Identifying Parts and Materials
5
Sheet Metal Kit (G1315B/G1365B)
NOTE
For the information on the sheet metal kit for the G1315A and G1365A refer to “Sheet Metal
Kit (G1315A/G1365A)” on page 202.
Table 24
Sheet Metal Kit Parts (G1315B/G1365B)
Item
Description
Part Number
1
Sheet metal kit includes case, top cover and front
G1315-68721
2
Screws M3 for cover and flow cell door
5022-2112
3
Thumb screw for union holder
0515-2769
4
Zero dead volume fitting
0100-0900
5
Union holder clamp
G1315-05205
1
2
1
5
3
4
Figure 50
1
Sheet Metal Kit Parts (G1315B/G1365B)
1100 Series DAD and MWD Reference Manual
203
5
Identifying Parts and Materials
Plastic Parts
NOTE
Table 25
Plastics Parts
Item
Description
Part Number
1
Front cover
5062-8582
2
Plastics, includes base, sides and top
5062-8565
3
Name plate Agilent 1100 Series
5042-1381
4
Name plate Serial Number (w/o serial number)
5042-1314
For correct assembling of the top and sides, see “Assembling the Main Cover” on page 178.
2
3
1
4
Figure 51
204
Plastic Parts
1100 Series DAD and MWD Reference Manual
Identifying Parts and Materials
5
Foam Parts
Table 26
NOTE
Foam Parts
Item
Description
Part Number
1, 2
EPP foam kit, includes base and top
G1315-68722
3
Damper kit (includes 7 bumpers)
G1315-68706
4
Guides for interface board
5041-8395
Do not order the individual part numbers mentioned on the foam.
4
AIRFLOW
1
G1315/65A
G1315/65B
3
2
Figure 52
Foam Parts
1100 Series DAD and MWD Reference Manual
205
5
Identifying Parts and Materials
Power and Status Light Pipes
Table 27
Item
Power and Status Light Pipes
Description
Part Number
Power supply assembly
0950-2528
Screw M4 x 0.7, 8 mm lg, to fix power supply at rear panel
0515-0910
Washer
2190-0409
1
Power light pipe
5041-8382
2
Status light pipe
5041-8384
3
Power switch button
5041-8381
4
Coupler for power supply actuator
5041-8383
4
1
3
2
Figure 53
206
Power and Status Light Pipe
1100 Series DAD and MWD Reference Manual
Identifying Parts and Materials
5
Leak Parts
Table 28
Leak Parts
Item
Description
Part Number
1
Leak sensor assembly
5061-3356
2
Leak pan
G1315-45501
3
Leak funnel
5041-8388
4
Leak funnel holder
5041-8389
5
Clip
5041-8387
6
Corrugated tubing, 120 mm lg, re-order 5 m
5062-2463
7
Corrugated tubing, 120 mm lg, re-order 5 m
5062-2463
5
2
4
3
1
6
7
Figure 54
Leak Parts
1100 Series DAD and MWD Reference Manual
207
5
Identifying Parts and Materials
Accessory Kit
This kit contains some accessories and tools needed for the installation and
repair of the detector.
Table 29
Item
Accessory Kit Parts
Description
Part Number
Accessory kit
G1315-68705
Corrugated tubing (to waste), re-order 5 m
5062-2463
1
Teflon Tubing flexible i.d. 0.8 mm (flow cell to waste),
re-order 5 m
5062-2462
2
Fitting male PEEK, Qty=1
0100-1516
3
Capillary column – detector 380 mm lg, 0.17 i.d. includes items
4, 5 and 6 (not assembled)
G1315-87311
4
Ferrule front SST, qty=2
0100-0043
5
Ferrule back SST, qty=2
0100-0044
6
Fitting SST, qty=2
79814-22406
Hex key set 1 – 5 mm
8710-0641
Wrench open end 1/4 – 5/16 inch
8710-0510
Wrench open end 4 mm
8710-1534
ESD wrist strap
9300-1408
For item number refer to Figure 55 and Figure 56.
208
1100 Series DAD and MWD Reference Manual
Identifying Parts and Materials
5
2
1
Figure 55
4
Waste Tubing Parts
5
6
3
Figure 56
This end is
pre-installed
Inlet Capillary (Column-Detector) Parts
1100 Series DAD and MWD Reference Manual
209
5
Identifying Parts and Materials
Cable Overview
WA R N I N G
Never use cables other than the ones supplied by Aligent Technologies to ensure
proper functionality and compliance with safety or EMC regulations.
Table 30
Cables Overview
Type
Description
Part Number
Analog
cables
3390/2/3 integrators
01040-60101
3394/6 integrators
35900-60750
35900A A/D converter
35900-60750
General purpose (spade lugs)
01046-60105
3390 integrator
01046-60203
3392/3 integrators
01046-60206
3394 integrator
01046-60210
3396A (Series I) integrator
03394-60600
Remote
cables
3396 Series II / 3395A integrator, see page 217
210
3396 Series III / 3395B integrator
03396-61010
Agilent 1100 / 1050 modules / 1046A FLD
5061-3378
1046A FLD
5061-3378
35900A A/D converter
5061-3378
1090 liquid chromatographs
01046-60202
Signal distribution module
01046-60202
1100 Series DAD and MWD Reference Manual
Identifying Parts and Materials
Table 30
5
Cables Overview, continued
Type
Description
Part Number
BCD
cables
3396 integrator
03396-60560
General purpose (spade Lugs)
G1351-81600
Auxiliary
Agilent 1100 Series vacuum degasser
G1322-61600
CAN
cables
Agilent 1100 module to module, 0.5 m
5181-1516
Agilent 1100 module to module, 1 m
5181-1519
Agilent 1100 module to control module
G1323-81600
External
contacts
Agilent 1100 Series interface board to general purpose
G1103-61611
GPIB
cable
Agilent 1100 module to Agilent ChemStation, 1 m
10833A
Agilent 1100 module to Agilent ChemStation, 2 m
10833B
RS-232
cable
Agilent 1100 module to a computer
This kit contains a 9-pin female to 9-pin female Null
Modem (printer) cable and one adapter.
34398A
LAN cable
Cross-over network cable (shielded, 3 m long),
(for point to point connection)
5023-0203
Twisted pair network cable (shielded, 7 m long)
(for hub connections)
5023-0202
1100 Series DAD and MWD Reference Manual
211
5
Identifying Parts and Materials
Analog Cables
One end of these cables provides a BNC connector to be connected to
Agilent 1100 Series modules. The other end depends on the instrument to
which connection is being made.
Agilent 1100 to 3390/2/3 Integrators
Connector
01040-60101
Pin
3390/2/3
Pin
Agilent 1100
Signal Name
1
Shield
Ground
2
3
Not connected
Center
4
5
212
Signal +
Connected to pin 6
Shield
Analog -
6
Connected to pin 4
7
Key
8
Not connected
1100 Series DAD and MWD Reference Manual
Identifying Parts and Materials
5
Agilent 1100 to 3394/6 Integrators
Connector
35900-60750
Pin
3394/6
Pin
Agilent 1100
1
Signal Name
Not connected
2
Shield
Analog -
3
Center
Analog +
Pin
BNC
Pin
Agilent 1100
Signal Name
Shield
Shield
Analog -
Center
Center
Analog +
Agilent 1100 to BNC Connector
Connector
8120-1840
1100 Series DAD and MWD Reference Manual
213
5
Identifying Parts and Materials
Agilent 1100 to General Purpose
Connector
01046-60105
Pin
3394/6
Pin
Agilent 1100
1
214
Signal Name
Not connected
2
Black
Analog -
3
Red
Analog +
1100 Series DAD and MWD Reference Manual
Identifying Parts and Materials
5
Remote Cables
One end of these cables provides a Aligent Technologies APG (Analytical
Products Group) remote connector to be connected to Agilent 1100 Series
modules. The other end depends on the instrument to be connected to.
Agilent 1100 to 3390 Integrators
Connector
01046-60203
1100 Series DAD and MWD Reference Manual
Pin
3390
Pin
Agilent 1100
Signal Name
Active
(TTL)
2
1 - White
Digital ground
NC
2 - Brown
Prepare run
Low
7
3 - Gray
Start
Low
NC
4 - Blue
Shut down
Low
NC
5 - Pink
Not connected
NC
6 - Yellow
Power on
High
NC
7 - Red
Ready
High
NC
8 - Green
Stop
Low
NC
9 - Black
Start request
Low
215
5
Identifying Parts and Materials
Agilent 1100 to 3392/3 Integrators
Connector
01046-60206
4 - Key
Pin
3392/3
Pin
Agilent 1100
Signal Name
Active
(TTL)
3
1 - White
Digital ground
NC
2 - Brown
Prepare run
Low
11
3 - Gray
Start
Low
NC
4 - Blue
Shut down
Low
NC
5 - Pink
Not connected
NC
6 - Yellow
Power on
High
9
7 - Red
Ready
High
1
8 - Green
Stop
Low
NC
9 - Black
Start request
Low
Pin
3394
Pin
Agilent 1100
Signal Name
Active
(TTL)
9
1 - White
Digital ground
NC
2 - Brown
Prepare run
Low
3
3 - Gray
Start
Low
NC
4 - Blue
Shut down
Low
NC
5 - Pink
Not connected
NC
6 - Yellow
Power on
High
5,14
7 - Red
Ready
High
6
8 - Green
Stop
Low
1
9 - Black
Start request
Low
Agilent 1100 to 3394 Integrators
Connector
01046-60210
13, 15
216
Not connected
1100 Series DAD and MWD Reference Manual
Identifying Parts and Materials
NOTE
5
START and STOP are connected via diodes to pin 3 of the 3394 connector.
Agilent 1100 to 3396A Integrators
Connector
03394-60600
Pin
3394
Pin
Agilent 1100
Signal Name
9
1 - White
Digital ground
NC
2 - Brown
Prepare run
Low
3
3 - Gray
Start
Low
NC
4 - Blue
Shut down
Low
NC
5 - Pink
Not connected
NC
6 - Yellow
Power on
High
5,14
7 - Red
Ready
High
1
8 - Green
Stop
Low
NC
9 - Black
Start request
Low
13, 15
Active
(TTL)
Not connected
Agilent 1100 to 3396 Series II / 3395A Integrators
Use the cable 03394-60600 and cut pin #5 on the integrator side. Otherwise the
integrator prints START; not ready.
1100 Series DAD and MWD Reference Manual
217
5
Identifying Parts and Materials
Agilent 1100 to 3396 Series III / 3395B Integrators
Connector
03396-61010
Pin
33XX
Pin
Agilent 1100
Signal Name
9
1 - White
Digital ground
NC
2 - Brown
Prepare run
Low
3
3 - Gray
Start
Low
NC
4 - Blue
Shut down
Low
NC
5 - Pink
Not connected
NC
6 - Yellow
Power on
High
14
7 - Red
Ready
High
4
8 - Green
Stop
Low
NC
9 - Black
Start request
Low
13, 15
Active
(TTL)
Not connected
Agilent 1100 to HP 1050, HP 1046A or Agilent 35900 A/D Converters
Connector
5061-3378
218
Pin
HP 1050 / …
Pin
Agilent 1100
Signal Name
Active
(TTL)
1 - White
1 - White
Digital ground
2 - Brown
2 - Brown
Prepare run
Low
3 - Gray
3 - Gray
Start
Low
4 - Blue
4 - Blue
Shut down
Low
5 - Pink
5 - Pink
Not connected
6 - Yellow
6 - Yellow
Power on
High
7 - Red
7 - Red
Ready
High
8 - Green
8 - Green
Stop
Low
9 - Black
9 - Black
Start request
Low
1100 Series DAD and MWD Reference Manual
Identifying Parts and Materials
5
Agilent 1100 to HP 1090 LC or Signal Distribution Module
Connector
01046-60202
5 - Key
Pin
HP 1090
Pin
Agilent 1100
Signal Name
Active
(TTL)
1
1 - White
Digital ground
NC
2 - Brown
Prepare run
Low
4
3 - Gray
Start
Low
7
4 - Blue
Shut down
Low
8
5 - Pink
Not connected
NC
6 - Yellow
Power on
High
3
7 - Red
Ready
High
6
8 - Green
Stop
Low
NC
9 - Black
Start request
Low
Pin
Agilent 1100
Signal Name
Active
(TTL)
1 - White
Digital ground
2 - Brown
Prepare run
Low
3 - Gray
Start
Low
4 - Blue
Shut down
Low
5 - Pink
Not connected
6 - Yellow
Power on
High
7 - Red
Ready
High
8 - Green
Stop
Low
9 - Black
Start request
Low
Agilent 1100 to General Purpose
Connector
01046-60201
1100 Series DAD and MWD Reference Manual
Pin
Universal
219
5
Identifying Parts and Materials
BCD Cables
One end of these cables provides a 15-pin BCD connector to be connected to
the Agilent 1100 Series modules. The other end depends on the instrument to
be connected to
Agilent 1100 to General Purpose
Connector
G1351-81600
220
Wire Color
Pin
Agilent 1100
Signal Name
BCD Digit
Green
1
BCD 5
20
Violet
2
BCD 7
80
Blue
3
BCD 6
40
Yellow
4
BCD 4
10
Black
5
BCD 0
1
Orange
6
BCD 3
8
Red
7
BCD 2
4
Brown
8
BCD 1
2
Gray
9
Digital ground
Gray
Gray/pink
10
BCD 11
800
Red/blue
11
BCD 10
400
White/green
12
BCD 9
200
Brown/green
13
BCD 8
100
not connected
14
not connected
15
+5 V
Low
1100 Series DAD and MWD Reference Manual
Identifying Parts and Materials
5
Agilent 1100 to 3396 Integrators
Connector
03396-60560
1100 Series DAD and MWD Reference Manual
Pin
3392/3
Pin
Agilent 1100
Signal Name
BCD Digit
1
1
BCD 5
20
2
2
BCD 7
80
3
3
BCD 6
40
4
4
BCD 4
10
5
5
BCD0
1
6
6
BCD 3
8
7
7
BCD 2
4
8
8
BCD 1
2
9
9
Digital ground
NC
15
+5V
Low
221
5
Identifying Parts and Materials
Auxiliary Cable
One end of this cable provides a modular plug to be connected to the
Agilent 1100 Series vacuum degasser. The other end is for general purpose.
Agilent 1100 Series Degasser to general purposes
Connector
G1322-61600
222
Color
Pin
Agilent 1100
Signal Name
White
1
Ground
Brown
2
Pressure signal
Green
3
Yellow
4
Grey
5
DC + 5 V IN
Pink
6
Vent
1100 Series DAD and MWD Reference Manual
Identifying Parts and Materials
5
CAN Cable
Both ends of this cable provide a modular plug to be connected to Agilent 1100
Series module’s CAN-bus connectors.
Agilent 1100 module to module, 0.5 m
5181-1516
Agilent 1100 module to module, 1 m
5181-1519
Agilent 1100 module to control module
G1323-81600
1100 Series DAD and MWD Reference Manual
223
5
Identifying Parts and Materials
External Contact Cable
5
10
15
1
6
11
One end of this cable provides a 15-pin plug to be connected to Agilent 1100
Series module’s interface board. The other end is for general purpose.
Agilent 1100 Series Interface Board to general purposes
Connector
G1103-61611
224
Color
Pin
Agilent 1100
Signal Name
White
1
EXT 1
Brown
2
EXT 1
Green
3
EXT 2
Yellow
4
EXT 2
Grey
5
EXT 3
Pink
6
EXT 3
Blue
7
EXT 4
Red
8
EXT 4
Black
9
Not connected
Violet
10
Not connected
Grey/pink
11
Not connected
Red/blue
12
Not connected
White/green
13
Not connected
Brown/green
14
Not connected
White/yellow
15
Not connected
1100 Series DAD and MWD Reference Manual
Identifying Parts and Materials
5
RS-232 Cable Kit
This kit contains a 9-pin female to 9-pin female Null Modem (printer) cable
and one adapter. Use the cable and adapter to connect Aligent Technologies
instruments with 9-pin male RS-232 connectors to most PCs or printers.
Agilent 1100 module to PC
RS-232 Cable Kit 34398As
Instrument
PC
DCD
RX
TX
DTR
GND
DSR
RTS
CTS
RI
1
2
3
4
5
6
7
8
9
DB9
Male
DB9
Female
1100 Series DAD and MWD Reference Manual
1
2
3
4
5
6
7
8
9
DB9
Female
DCD
RX
TX
DTR
GND
DSR
RTS
CTS
RI
DB9
Male
225
5
Identifying Parts and Materials
LAN Cables
Recommended Cables
Table 31
226
Description
Part number
Cross-over network cable (shielded, 3 m long),
(for point to point connection)
5023-0203
Twisted pair network cable (shielded, 7 m long)
(for hub connections)
5023-0202
1100 Series DAD and MWD Reference Manual
Agilent 1100 Series Diode Array and Multiple Wavelength Detectors
Reference Manual
6
Introduction to the Detector
Introduction to the Detector 228
Optical System Overview 229
Electrical Connections 232
Instrument Layout 234
Early Maintenance Feedback (EMF) 235
Electronics 237
Detector Main Board (DAM/MWM) 238
Firmware Description 246
Raw Data Conversion to Absorbance 248
Optional Interface Boards 253
Interfaces 256
Setting the 8-bit Configuration Switch 261
The Main Power Supply Assembly 266
Agilent Technologies
227
6
Introduction to the Detector
Introduction to the Detector
The detector is designed for highest optical performance, GLP compliance and
easy maintenance. It includes the following features:
• long-life deuterium and tungsten lamps for highest intensity and lowest
detection limit over a wavelength range of 190–950 nm,
• no loss in sensitivity for up to five wavelengths simultaneous,
• programmable slit from 1–16 nm for complete optimization of sensitivity,
linearity and spectral resolution,
• optional flow-cell cartridges (standard 10 mm 13 µl, semi-micro 6 mm 5 µl,
80 nl, 500 nl, 10 mm, high pressure 10 mm 1.7 µl and prep-cells) are
available and can be used depending on the application needs,
• easy front access to lamps and flow cell for fast replacement, and
• built-in holmium oxide filter for fast wavelength accuracy verification,
• built-in temperature control for improved baseline stability (G1315B DAD
and G1365B MWD).
For specifications, see “Performance Specifications” on page 296.
228
1100 Series DAD and MWD Reference Manual
Introduction to the Detector
6
Optical System Overview
Optical System
The optical system of the detector is shown in Figure 57. Its illumination
source is a combination of a deuterium-arc-discharge lamp for the ultraviolet
(UV) wavelength range and a tungsten lamp for the visible (VIS) and
short-wave near-infrared (SWNIR) wavelength range. The image of the
filament of the tungsten lamp is focused on the discharge aperture of the
deuterium lamp by means of a special rear-access lamp design which allows
both light sources to be optically combined and share a common axis to the
source lens. The achromat (source lens) forms a single, focused beam of light
through the flow cell. Each cell room and lamp are separated by a quartz
window which can be cleaned or replaced. In the spectrograph, light is being
dispersed onto the diode array by a holographic grating. This allows
simultaneous access to all wavelength information
Cell suppor
window
Tungsten lamp
Flow cell
Coupling lens
Spectro len
Deuterium lamp
Slit
Achromat (source lens)
Diode array
Holmium oxide filter
Grating
Figure 57
Lamps
Optical System of the Detector
The light source for the UV-wavelength range is a deuterium lamp with a
shine-through aperture. As a result of plasma discharge in low-pressure
deuterium gas, the lamp emits light over the 190-nm to approximately 800-nm
1100 Series DAD and MWD Reference Manual
229
6
Introduction to the Detector
wavelength range. The light source for the visible and SWNIR wavelength
range is a low noise tungsten lamp. This lamp emits light over the wavelength
range 470 – 950 nm.
Achromat
(Source Lens)
The achromat receives the light from both lamps and focuses it so that the
beam passes through the flow cell.
Holmium Oxide
Filter
The holmium oxide filter is electromechanically actuated. During the holmium
filter test it moves into the light path.
Cell Support
Window
The cell support window assembly separates the holmium filter area from the
flow cell area.
Flow Cell
Compartment
The optical unit has a flow cell compartment for easy access to flow cells. A
variety of optional flow cells can be inserted using the same quick, simple
mounting system. The flow cell can be removed to check the optical and
electronic performance of the detector without having influences from the
flow cell.
Spectrograph
The spectrograph material is ceramic to reduce thermal effects to a minimum.
The spectrograph consists of the spectrograph lens, the variable entrance slit,
the grating and the photodiode array with front-end electronics. The
spectrograph lens refocuses the light beam after it has passed through the flow
cell. The sampling interval of the diode array is < 1 nm over the wavelength
range 190 – 950 nm. Depending on the wavelength this varies from 1.0 to 1.25
diodes per nanometer (for example a diode every 0.8 to 1 nm).
For a small wavelength range, the small non-linearity could be neglected. With
the wavelength range from 190 – 950 nm a new approach is required to
achieve wavelength accuracy over the full range. Each spectograph is
calibrated individually. The calibration data is stored in the spectrograph on
an EEPROM. Based on these data, the built-in processors calculate absorbance
data with linear intervals (1.0, 2.0, …) between data points. This results in an
excellent wavelength accuracy and instrument-to-instrument reproducibility.
Variable Entrance
Slit System
The micro-slit system makes use of the mechanical properties of silicon
combined with the precise structuring capabilities of bulk micro-machining. It
combines the required optical functions — slit and shutter — in a simple and
compact component. The slit width is directly controlled by the
micro-processor of the instrument and can be set as method parameter.
Grating
The combination of dispersion and spectral imaging is accomplished by using
a concave holographic grating. The grating separates the light beam into all its
component wavelengths and reflects the light onto the photodiode array.
230
1100 Series DAD and MWD Reference Manual
Introduction to the Detector
Diode Array
6
The diode array is a series of 1024 individual photodiodes and control circuits
located on a ceramic carrier. With a wavelength range from 190 – 950 nm the
sampling interval is < 1 nm.
1100 Series DAD and MWD Reference Manual
231
6
Introduction to the Detector
Electrical Connections
• The GPIB connector is used to connect the detector with a computer. The
address and control switch module next to the GPIB connector determines
the GPIB address of your detector. The switches are preset to a default
address (see “GPIB Default Addresses” on page 262) which is recognized
once after power is switched on.
• The CAN bus is a serial bus with high speed data transfer. The two
connectors for the CAN bus are used for internal Agilent 1100 Series
module data transfer and synchronization.
• Two independent analog outputs provide signals for integrators or data
handling systems.
• The interface board slot is used for external contacts and BCD bottle
number output or LAN connections.
• The REMOTE connector may be used in combination with other analytical
instruments from Aligent Technologies if you want to use features such as
start, stop, common shut down, prepare, and so on.
• With the appropriate software, the RS-232C connector may be used to
control the detector from a computer through a RS-232C connection. This
connector is activated and can be configured with the configuration switch
next to the GPIB connector (see “Communication Settings for RS-232C
Communication” on page 263). See your software documentation for
further information.
• The power input socket accepts a line voltage of 100 – 120 V or
220 – 240 V AC ± 10 % with a line frequency of 50 or 60 Hz. Maximum
power consumption is 300 VA/125 W. There is no voltage selector on your
detector because the power supply has a wide-ranging capability. There are
no externally accessible fuses, because automatic electronic fuses are
implemented in the power supply. The security lever at the power input
socket prevents that the detector cover is taken off when line power is still
connected.
WA R N I N G
232
Never use cables other than the ones supplied by Aligent Technologies to ensure
proper functionality and compliance with safety or EMC regulations.
1100 Series DAD and MWD Reference Manual
Introduction to the Detector
6
Security lever
Interface board
Analog signals
APG remote
RS-232C
CAN
GPIB
Power
Configuration switch
Figure 58
Electrical Connections
1100 Series DAD and MWD Reference Manual
233
6
Introduction to the Detector
Instrument Layout
The industrial design of the detector incorporates several innovative features.
It uses Agilent’s E-PAC concept for the packaging of electronics and
mechanical assemblies. This concept is based upon the use of expanded
polypropylene (EPP) layers of foam plastic spacers in which the mechanical
and electronic boards components of the detector are placed. This pack is then
housed in a metal inner cabinet which is enclosed by a plastic external
cabinet. The advantages of this packaging technology are:
• virtual elimination of fixing screws, bolts or ties, reducing the number of
components and increasing the speed of assembly/disassembly,
• the plastic layers have air channels molded into them so that cooling air can
be guided exactly to the required locations,
• the plastic layers help cushion the electronic and mechanical parts from
physical shock, and
• the metal inner cabinet shields the internal electronics from
electromagnetic interference and also helps to reduce or eliminate radio
frequency emissions from the instrument itself.
234
1100 Series DAD and MWD Reference Manual
Introduction to the Detector
6
Early Maintenance Feedback (EMF)
Maintenance requires the exchange of components which are subject to wear
or stress. Ideally, the frequency at which components are exchanged should be
based on the intensity of usage of the detector and the analytical conditions,
and not on a predefined time interval. The early maintenance feedback (EMF)
feature monitors the usage of specific components in the instrument, and
provides feedback when the user-selectable limits have been exceeded. The
visual feedback in the user interface provides an indication that maintenance
procedures should be scheduled.
EMF Counters
The detector provides two EMF counters for the lamps. The counters
increment increments with lamp use, and can be assigned a maximum limit
which provides visual feedback in the user interface when the limit is
exceeded. The counters can be reset to zero after the lamp is exchanged. The
detector provides the following EMF counters:
• Deuterium Lamp On-Time
• Tungsten Lamp On-Time
Using the EMF Counters
The user-settable EMF limits for the EMF counters enable the early
maintenance feedback to be adapted to specific user requirements. The useful
lamp burn time is dependent on the requirements for the analysis (high or low
sensitivity analysis, wavelength etc.), therefore, the definition of the maximum
limits need to be determined based on the specific operating conditions of the
instrument.
1100 Series DAD and MWD Reference Manual
235
6
Introduction to the Detector
Setting the EMF Limits
The setting of the EMF limits must be optimized over one or two maintenance
cycles. Initially, no EMF limit should be set. When instrument performance
indicates maintenance is necessary, take note of the values displayed by lamp
counters. Enter these values (or values slightly less than the displayed values)
as EMF limits, and then reset the EMF counters to zero. The next time the EMF
counters exceed the new EMF limits, the EMF flag will be displayed, providing
a reminder that maintenance needs to be scheduled.
236
1100 Series DAD and MWD Reference Manual
Introduction to the Detector
6
Electronics
The electronics are comprised of four main components:
• detector main board (DAM/MWM), see page 238.
• power supply, see page 266.
Optional:
• interface board (BCD/external contacts), see page 253.
• interface board (LAN), see page 255.
1100 Series DAD and MWD Reference Manual
237
6
Introduction to the Detector
Detector Main Board (DAM/MWM)
This board controls all information and activities of all assemblies within the
detector. Through interfaces (LAN, CAN, GPIB or RS-232C) connected to the
user interface, the operator enters parameters, changes modes and controls
the detector.
ASIC — Application Specific Integrated Circuit
The 304-pin application specific integrated circuit (ASIC) provides interfacing
to external devices through drivers, including LAN, GPIB, CAN, APG remote,
and RS-232C. It also provides generic functionality like PWM (pulse width
modulation) and digital encoder reading.
Main processor
The Motorola MC 68332 microprocessor acts as the main processor with a
clock frequency of 16 MHz. It exchanges data with the ASIC through the core
bus as well as with the PSRAM (pseudo-static random access memory) of
2 × 512 kilobyte, the flash EEPROM (electrically erasable programmable
read-only memory) of 1 MB and the 1 × 32 KB battery-backed
NV-RAM (non-volatile). Battery life is designed to last for more than 25 years
under normal operating conditions.
Control lines provide communication to the lamp supply section, which
controls the deuterium and tungsten lamps. The main processor is connected
to the SSP (signal and spectra processor) through an 8-bit parallel bus.
SSP — Signal and Spectra Processor
The SSP (signal and spectra processor) utilizing a dedicated ASIC and RAM of
3 × 128 KB, converts the 1024 raw data values to intensity and absorbance
values.
238
1100 Series DAD and MWD Reference Manual
Introduction to the Detector
6
Conversion and subsequent calculation to achieve absorbance values include
the following tasks:
• dark current correction,
• PDA (photo diode array) temperature compensation,
• absorbance calculation, and
• signal averaging.
SIMM Memory Module
The main board versions -66500, -66520 and -66530 provided 4 slots for
extended memory (up to 4 × 1 MB or up to 4 × 4 MB to accommodate more run
buffer (signal and spectral data). Only 1 MB was used (no need to upgrade for
any application). With main board version -66540 the slots were removed and
the 1 MB memory is now on-board (no upgrade possible)
Firmware
For an outline of the firmware, see “Firmware Description” on page 246. In
case you require exact mathematical equations for the transformation, see the
Understanding Your Agilent ChemStation handbook.
Leak Sensor
This block consists of a PTC for the leak detection and a NTC for the ambient
temperature compensation. A leak would cool down the PTC and this change
in resistance would generate a leak signal.
Fan Drive
The operation of the fan is controlled by the main processor and runs with
constant revolution. The fan produces a sense signal which is derived from the
revolution. This sense signal is used for diagnostics.
On-board Battery
An on-board lithium battery buffers the electronic memory when the module
is turned off.
For safety information on lithium batteries see “Lithium Batteries
Information” on page 303.
1100 Series DAD and MWD Reference Manual
239
6
Introduction to the Detector
Main Control
Functional Block
Status
Temp
sensor
4 control
LEDs
8-bit
switch
GPIB
driver
CAN
driver
DAM/MWM
“B”
Temp
Sensor
“B”
Heater
PWM drivers
ASIC
application
specific
integrated
circuit
Fan
sense
Holmium
motor
Motor driver
REMOTE
driver
Interface
board
RS-232C
driver
Main
processor
Safety
lock
Real
Control lines
Diagnostic data
PWM
drivers
Analog
out 1
Low pass
filters
& signal
conditioning
SSP
signal & spectra Serial bus
processor
Memory
Lamp
supply
block
PFP
function
block
Array
and slit
SSP ASIC
MPS
main
power
supply
SIMM
memory module
240
Deuterium
lamp
Tungsten
lamp
SSP RAM
Analog
out 2
Figure 59
Leak
sensor
Block Diagram Detector Main Controller Functionality
1100 Series DAD and MWD Reference Manual
Introduction to the Detector
6
SCI Board
The SCI (spectrograph connector interface), located on the optical unit
assembly is the interface between micro-slit, PDA and detector main board. In
addition, wavelength calibration data and manufacturing data from the
manufacturing process (for example, serial number, dates, and so on) are
stored in the EEPROM.
PDA Signal Conditioning Electronics
Data is transferred from the photodiode array (PDA) through the
spectrograph connector interface (SCI) board to the PDA signal conditioning
electronics. The PDA signal conditioning electronics adjusts the signal levels
to provide an appropriate output signal.
A/D Converter
The output signal from the PDA signal conditioning electronics is directed to
the 16-bit /160-kHz A/D converter. Multiplexing is used to monitor test signals
for diagnostic purposes including GND, reference voltage (Vref), and a ramp
signal. These signals are used to verify the front end electronics separately
from the PDA. The signal from the PDA temperature sensor is used for
temperature compensation.
PFP (PDA Front-end Processor)
The PFP on this board utilizing RAM of 3 × 32 KB and 1 × 8 KB and the EPLD
(electronically programmable logic device) forwards the data from the 16-bit
A/D converter. It provides timing and control for the photodiode readout and
the A/D conversion.
Analog Outputs
There are two independent analog outputs (0…1 V full scale). Digital data from
the ASIC is converted into a pulse-width modulated signal (PWM). The PWM
signal is then fed to an amplitude modulator, which precisely turns the
reference signal on and off. This signal then passes to a low-pass filter section.
1100 Series DAD and MWD Reference Manual
241
6
Introduction to the Detector
DAM/MWM
PFP functional block diagram
RAM
PFP
digital processor
Serial interface
PFP ASIC
EPLD
PDA address lines
Data bus
Control lines
EEPROM data bus
16 bit / 160 kHz
A/D converter
SCI board
DAM/MWM Control Function Block / SSP Processor
PDA control lines
PDA signal
Test signals,
GND, Vref
ramp
Figure 60
242
PDA
signal conditioning
electronics
PDA temperature sensor
Block Diagram PFP Functions
1100 Series DAD and MWD Reference Manual
Introduction to the Detector
6
Deuterium Lamp Filament Control
Before ignition, the deuterium lamp filament control circuit provides a
constant voltage of 2.5 VDC at approximately 6 A to the filament of the
deuterium lamp. The deuterium lamp filament control circuit is enabled by the
processor on the DAM board.
Deuterium Lamp Current Control
The deuterium lamp current control circuit comprises two parts. One part
generates an ignition pulse of 600 VDC for the lamp, resulting in lamp ignition.
After ignition this voltage is disabled. The other part is a constant current
source of 320 mA at an operating voltage of about 85 VDC for stable operating
conditions and light emission of the deuterium lamp. The deuterium lamp
current control circuit is supervised by the processor on the DAM board.
Igniting the Deuterium Lamp
The deuterium lamp is heated for several seconds prior to ignition. The
deuterium lamp current control circuit gives an ignition pulse to the lamp,
resulting in lamp ignition. The filament control circuit disables the filament
voltage if the lamp was ignited successfully.
If the deuterium lamp failed to ignite, the whole sequence is repeated after a
wait sequence for cooling down. If the deuterium lamp still does not ignite, an
error message occurs.
Tungsten Lamp Voltage Control
The tungsten lamp voltage is generated by the tungsten lamp voltage control
circuit which is enabled by the processor. This circuit provides a constant
voltage of 6 VDC to operate the tungsten lamp.
1100 Series DAD and MWD Reference Manual
243
6
Introduction to the Detector
Detector Main Board
Lamp Supply
Functional Block Diagram
Filament
Deuterium lamp
filament control
Shut down
Anode
Deuterium lamp
current control
Control bus
DAM/MWM Control Function Block
Deuterium
lamp sense
Tungsten lamp
voltage control
Diagnostic
A/D converter
Control bus
Figure 61
244
Block Diagram Lamp Supply Functions
1100 Series DAD and MWD Reference Manual
Introduction to the Detector
6
Diagnostic A/D Converter
The diagnostic A/D converter senses currents and voltages of the deuterium
and tungsten lamps and converts the analog signals into digital values. The
digital values are transferred via the control bus on the detector main board.
When values are outside the normal range, an appropriate error message is
generated and the lamps will be switched off.
Safety Switches
If the EPP foam is removed while the instrument is still on, the safety light
switches are activated and the deuterium lamp, the tungsten lamps and the
fan are switched off.
Interfaces
For detailed information on interfaces, see “Interfaces” on page 256.
Temperature Control
The G1315B/G165B detectors are equipped with a temperature control to
improve the baseline stability in unstable environments (e.g. strong variation
of the temperature due to air condition systems). A heater and a temperature
sensor assembly have been added and are controlled by the detector main
board and its firmware. The temperature at the fan is compared with a
temperature sensor on the main board. Depending on the difference the heater
in front of the fan is controlled. There are no parameters to be set for the
temperature control.
1100 Series DAD and MWD Reference Manual
245
6
Introduction to the Detector
Firmware Description
The firmware of the instrument consists of two independent sections:
• a non-instrument specific section, called resident system,
• an instrument specific section, called main system.
Resident System
This resident section of the firmware is identical for all Agilent 1100 series
modules. Its properties are:
• the complete communication capabilities (GPIB, CAN and RS-232C),
• memory management,
• ability to update the firmware of the ‘main system’.
Main System
Its properties are:
• the complete communication capabilities (GPIB, CAN, LAN and RS-232C),
• memory management,
• ability to update the firmware of the resident system.
In addition the main system comprises the instrument functions that are
divided into common functions like
• run synchronization through APG remote
• error handling,
• diagnostic functions,
• or module specific functions like
• internal events such as lamp control, filter movements,
• raw data collection and conversion to absorbance (see “Raw Data
Conversion to Absorbance” on page 248.
246
1100 Series DAD and MWD Reference Manual
Introduction to the Detector
6
Firmware Updates
Firmware updates can be done using your user interface:
• handheld control module with files from a PC-card or
• Agilent ChemStation with files from floppy disk
The file naming conventions are:
xxxx-vvv.DLB, where
xxxx
vvv
is the product number, for example, 1315 for the G1315A DAD, and
is the revision number, for example 104 is revision 1.04
For instructions refer to your user interface.
NOTE
Update of main system can be done in the resident system only.
Update of the resident system can be done in the main system only.
main FW update
Resident System
Main System
resident FW update
Figure 62
Firmware Update Mechanism
1100 Series DAD and MWD Reference Manual
247
6
Introduction to the Detector
Raw Data Conversion to Absorbance
The raw data flow (from the photodiode array) and conversion to absorbance
spectra for each data point is a multiple step process. This process is outlined
in this section. For exact mathematical equations for the transformation, see
the Understanding Your Agilent ChemStation handbook. Figure 63 shows the
firmware flow diagram.
Subtract Dark Signal
Raw data coming from the photodiode array via the signal conditioning
electronics (which includes a variable gain amplifier) are read from the A/D
converter. For details, see “A/D Converter” on page 241. These raw data are
intensity values of each photodiode of the array.
During a blank measurement a dark signal and electronic offset measurement
is performed for each diode on the photodiode array. This offset spectrum is
stored and subtracted from all subsequent intensity spectra to give dark signal
corrected intensity spectra.
Gain Correction
During a blank measurement every photodiode is assigned a gain value,
depending on the amount of light falling on the diode array. These gain values
are stored in a table. They are used to adjust the amplification factor in the
signal conditioning electronics. This process is used to adjust small signal
levels to the optimum range of the A/D converter.
The DSP firmware uses the gain table to adjust the dark signal corrected
intensity spectra.
248
1100 Series DAD and MWD Reference Manual
Introduction to the Detector
6
Subtract
dark signal
Raw data
Temperature
Temperatur
e filter
Gain
correction
Temperatur
ecorrection
Absorbance
calculation
Filtering
Spectra
runbuffer
DAD
Deuterium
line data
Signal
calculation
Wavelength
axis
linearization
Wavelength
calibration
table
Absorbance
spectra
Figure 63
LC signals
Firmware Flow Diagram
1100 Series DAD and MWD Reference Manual
249
6
Introduction to the Detector
Temperature Correction
The quantum efficiency of the photodiode array depends on the temperature
and is different for each wavelength. The temperature dependency follows a
monotone increasing function over the wavelength scale, which means it
increases with longer wavelengths (above 600 nm).
To correct the intensity spectrum for temperature effects, the temperature on
the photodiode array is averaged. With the help of a function, correction
factors for each wavelength are calculated. The temperature factors are used
to correct the intensity spectrum.
Temperature Filter
The temperature filter determines whether the temperature has been changed
significantly. Only in this case, temperature correction is applied.
Absorbance Calculation and Filtering
To form an absorbance spectrum, the logarithm of the blank medium’s
intensity spectrum is subtracted from the logarithm of the sample’s intensity
spectrum.
Spectral filtering is used for noise reduction. Spectra are taken at faster rates
than the corresponding integration time, set in the Agilent ChemStation’s user
interface. Absorbance values of all wavelength form one absorbance spectrum.
Spectra Runbuffer (DAD Only)
Absorbance spectra are intermediately stored here if the acquisition of spectra
is faster than the processing and data communication to the
Agilent ChemStation. Intensity values can also be stored for special purposes,
for example, diagnostic reasons.
Wavelength Axis Linearization,
Deuterium Line Data,
Wavelength Calibration Table
1024 photodiodes are located on the array to give a sampling interval of
nominal <1 nm in the UV wavelength range. In the visible and short wave near
infrared wavelength ranges, the sampling interval is slightly higher. To correct
for this optical non-linearity and to convert from discrete diode distances to a
250
1100 Series DAD and MWD Reference Manual
Introduction to the Detector
6
continuous, linear scale, an interpolation algorithm is applied. This algorithm
uses a wavelength calibration table and actual wavelength data, derived from
the deuterium emission lines at 486 nm and 656 nm.
Wavelength calibration is done for each individual spectrograph during the
production process. The individual calibration coefficients are stored in the
wavelength calibration table in an EEPROM (electrically erasable PROM),
which is part of the spectrograph electronics. Actually two sets of coefficients
are used, one set for the wavelength range below the second order filter,
located on the photodiode array, and one set for the upper wavelength range.
During each start-up of the spectrophotometer, each discrete wavelength
value is assigned a photodiode of the array.
Recalibration in the diagnostic section of your Agilent ChemStation software
can be performed to compensate for minor deviations from initial production
conditions. Recalibration is achieved using the deuterium line data, that is, the
exact positions of the deuterium emission lines at 486 nm and 656 nm. With
the user interface, the operator can include the new parameters in the
wavelength calibration table to calculate a table of correction coefficients
which are applied to each spectrum.
Rawdata File
The runbuffer within the detector is used for signal and spectra data only. If
the runbuffer is full, no further signal data are entered. This will guarantee
useful signal data but may cause loss of interesting spectral data. The
runbuffer can hold about 90 spectra depending on the settings and may be
expanded by additional memory on the detector main board (SIMM modules).
Peak Detector
The peak detector (PD) always uses signal A as the pilot signal. The PD is
adjusted by means of two setpoints: peakwidth and threshold. Both setpoints
are time-programmable. While the PD-threshold is a method parameter of its
own, the PD-peakwidth parameter is derived from the general peakwidth
(PKWD) parameter. At the start of the run, the value for the PD-peakwidth is
set equal to the PKWD setpoint. The peak detector recognizes changes in the
1100 Series DAD and MWD Reference Manual
251
6
Introduction to the Detector
slope of this signal (upslope, apex, downslope and baseline) and stores spectra
according to the operator’s instructions. During the run the PD-peakwidth
parameter can be changed by time-programming.
Spectra Acquisition Modes (DAD only)
The spectra acquisition mode allows automatic storage of spectra during a
run. The mode can be changed during the run by time-programming.
The modes in detail are:
Table 32
252
Spectra Acquisition Modes
Mode
Description
none
no spectra is stored
apex
top of peak spectra is stored
apex + baselines
last baseline spectrum before peak, top of peak spectrum and first
baseline spectrum after peak is stored.
apex + slopes
spectrum in peak upslope, at top of peak and in peak downslope is
stored.
apex + slopes + baselines
combined apex + slopes and apex + baselines.
all in peak
compared to storing all spectra periodically, only stores spectra
within a peak at doubled period. Starts with last baseline spectrum
before peak and ends with first baseline spectrum after peak. If
baseline spectra are not detected, the spectrum before the first
spectrum in peak or the spectrum after the last spectrum within the
peak is stored instead.
all 2nd in peak
only the 2nd spectra of a peak is stored.
all
periodically all spectra are stored. The period depends on the
peakwidth setting. For peakwidth setting=0 (narrowest peak), the
spectrum data rate would be 20 Hz.
all second
periodically every 2nd spectra is stored (50 % of mode all).
1100 Series DAD and MWD Reference Manual
Introduction to the Detector
6
Optional Interface Boards
The Agilent 1100 Series modules have one optional board slot that allows
addition of an interface board to the modules.
Table 33
Optional Interface Boards
Description
Part Number
BCD Board
G1351-68701
Fuse 250 mA (four are on the board)
2110-0004
LAN Communication Interface Board
G1369A or G1369-60001
BCD Board
The BCD board provides a BCD output for the bottle number of the
Agilent 1100 Series autosampler and four external contacts. The external
contact closure contacts are relay contacts. The maximum settings are: 30 V
(AC/DC); 250 mA (fused).
RFI filter
Board
identification
Processor
interface
12
BCD register
BCD
connector
+
External
contacts
Figure 64
250 mA
4x
RFI
filter
Line driver
External contact
connector
Block Diagram BCD Board
1100 Series DAD and MWD Reference Manual
253
6
Introduction to the Detector
There are general purpose cables available to connect the BCD output, see
“BCD Cables” on page 220 and the external outputs, see “External Contact
Cable” on page 224 to external devices.
Table 34
254
Detailed connector layout (1100)
Pin
Signal name
BCD digit
1
BCD 5
20
2
BCD 7
80
3
BCD 6
40
4
BCD 4
10
5
BCD 0
1
6
BCD 3
8
7
BCD 2
4
8
BCD 1
2
9
Digital ground
10
BCD 11
800
11
BCD 10
400
12
BCD 9
200
13
BCD 8
100
14
not connected
15
+5V
1100 Series DAD and MWD Reference Manual
Introduction to the Detector
6
LAN Communication Interface Board
NOTE
One board is required per Agilent 1100 stack. It is recommended to add the LAN board to
the detector with highest data rate.
NOTE
The LAN board can only be used together with:
a main board version G13XX-66520 (for G1315A, G1365A, G1314A, G1310A, G1311A,
G1312A and G1313A) or newer and on all other 1100 modules.
a DOS-ChemStation software revision A.06.01 or above.
The following cards can be used with the Agilent 1100 modules.
Table 35
LAN Boards
Type
Vendor
Supported networks
G1369A
G1369-60001
Agilent Technologies
Fast Ethernet, Ethernet/802.3, RJ-45 (10/100Base-TX)
recommended for re-ordering
J4106A (*)
Hewlett Packard
Ethernet/802.3, RJ-45 (10Base-T(
J4105A (*)
Hewlett Packard
Token Ring/802.5, DB9, RJ-45 (10Base-T)
J4100A (*)
Hewlett Packard
Fast Ethernet, Ethernet/802.3, RJ-45 (10/100Base-TX) + BNC (10Base2)
NOTE
These cards (*) may be longer orderable. Minimum firmware of these Hewlett Packard
JetDirect cards is A.05.05.
Recommended Cables
Cross-over network cable (shielded, 3 m long),
(for point to point connection)
5023-0203
Twisted pair network cable (shielded, 7 m long)
(for hub connections)
5023-0202
1100 Series DAD and MWD Reference Manual
255
6
Introduction to the Detector
Interfaces
The Agilent 1100 Series modules provide the following interfaces:
Table 36
Agilent 1100 Series Interfaces
Interface Type
Pumps
Autosampler
DA Detector
MW Detector
FL Detector
VW Detector
RI Detector
Thermostatted Vacuum
Column
Degasser
Compartment
CAN
Yes
Yes
Yes
Yes
Yes
No
GPIB
Yes
Yes
Yes
Yes
Yes
No
RS-232C
Yes
Yes
Yes
Yes
Yes
No
Remote
Yes
Yes
Yes
Yes
Yes
Yes
Analog
Yes
No
2×
1×
No
Yes*
Interface board
Yes
Yes
Yes
Yes
No
No
* The vacuum degasser will have a special connector for specific use. For details see description of main board.
• CAN connectors as interface to other Agilent 1100 Series modules,
• GPIB connector as interface to the Agilent ChemStation,
• RS-232C as interface to a computer,
• REMOTE connector as interface to other Agilent products,
• Analog Output connector(s) for signal output, and
• Interface slot for specific interfacing (external contacts, BCD, LAN and so
on).
For identification and location of the connectors Figure 6 on page 24.
WA R N I N G
256
Never use cables other than the ones supplied by Aligent Technologies to ensure
proper functionality and compliance with safety or EMC regulations, see “Cable
Overview” on page 210.
1100 Series DAD and MWD Reference Manual
Introduction to the Detector
6
Analog Signal Output
The analog signal output can be distributed to a recording device. For details
refer to the description of the module’s main board.
GPIB Interface
The GPIB connector is used to connect the module with a computer. The
address and control switches next to the GPIB connector determine the
GPIB address of your module. The switches are preset to a default address and
recognized by the operating software from Aligent Technologies.
Table 37
Default Addresses
Autosampler
28
Autosampler
28
Pump
22
RID
29
FLD
23
VWD
24
Autosampler (HP 1050)
18
Agilent 8453
25
Pump (HP 1050)
16
DAD/MWD
26
VWD (HP 1050)
10
Column Compartment
27
DAD (HP 1050)
17
CAN Interface
The CAN is an intermodule communication interface. It is a 2-wire serial bus
system supporting high speed data communication and real-time requirement.
Remote Interface
The APG remote connector may be used in combination with other analytical
instruments from Aligent Technologies if you want to use features such as
common shut down, prepare, and so on.
1100 Series DAD and MWD Reference Manual
257
6
Introduction to the Detector
Remote control allows easy connection between single instruments or systems
to ensure coordinated analysis with simple coupling requirements.
The subminiature D connector is used. The module provides one remote
connector which is inputs/outputs (wired-or technique).
To provide maximum safety within a distributed analysis system, one line is
dedicated to SHUT DOWN the system’s critical parts in case any module
detects a serious problem. To detect whether all participating modules are
switched on or properly powered, one line is defined to summarize the
POWER ON state of all connected modules. Control of analysis is maintained
by signal readiness READY for next analysis, followed by START of run and
optional STOP of run triggered on the respective lines. In addition, PREPARE
and START REQUEST may be issued. The signal level is defined as:
• standard TTL levels (0 V is logic true, + 5 V is false),
• fan-out is 10,
• input load is 2.2 kOhm against + 5 V, and
• outputs are open collector type, inputs/outputs (wired-or technique).
Table 38
Remote Signal Distribution
Pin
Signal
Description
1
DGND
Digital ground
2
PREPARE
(L) Request to prepare for analysis (for example, calibration,
detector lamp on). Receiver is any module performing
pre-analysis activities.
3
START
(L) Request to start run / timetable. Receiver is any module
performing run-time controlled activities.
4
SHUT DOWN
(L) System has serious problem (for example, leak: stops pump).
Receiver is any module capable to reduce safety risk.
5
258
Not used
6
POWER ON
(H) All modules connected to system are switched on. Receiver
is any module relying on operation of others.
7
READY
(H) System is ready for next analysis. Receiver is any sequence
controller.
1100 Series DAD and MWD Reference Manual
Introduction to the Detector
Table 38
6
Remote Signal Distribution, continued
Pin
Signal
Description
8
STOP
(L) Request to reach system ready state as soon as possible (for
example, stop run, abort or finish and stop injection). Receiver is
any module performing run-time controlled activities.
9
START REQUEST
(L) Request to start injection cycle (for example, by start key on
any module). Receiver is the autosampler.
RS-232C
The RS-232C connector is used to control the instrument from a computer
through RS-232C connection, using the appropriate software. This connector
can be activated by the configuration switch module next to the GPIB
connector.
The RS-232C is designed as DCE (Data Communication Equipment) with a
9-pin male SUB-D type connector. The pins are defined as follows:
Table 39
RS-232C Connection Table
Pin
Direction
Function
1
In
DCD
2
In
RxD
3
Out
TxD
4
Out
DTR
5
Ground
6
In
DSR
7
Out
RTS
8
In
CTS
9
In
RI
1100 Series DAD and MWD Reference Manual
259
6
Introduction to the Detector
Instrument
DCD
RX
TX
DTR
GND
DSR
RTS
CTS
RI
DB9
Male
Figure 65
260
PC
1
2
3
4
5
6
7
8
9
DB9
Female
1
2
3
4
5
6
7
8
9
DB9
Female
DCD
RX
TX
DTR
GND
DSR
RTS
CTS
RI
DB9
Male
RS-232 Cable
1100 Series DAD and MWD Reference Manual
Introduction to the Detector
6
Setting the 8-bit Configuration Switch
The 8-bit configuration switch is located next to the GPIB connector. Switch
settings provide configuration parameters for GPIB address, serial
communication protocol and instrument specific initialization procedures.
Factory setting is shown
for the diode array
detector or multiple
wavelength detector
Figure 66
Table 40
8-bit Configuration Switch
8-bit Configuration Switch
Mode Select
1
2
3
GPIB
0
0
RS-232C
0
1
Baud rate
Reserved
1
0
Reserved
TEST/BOOT
1
1
RSVD
4
5
6
7
Data
Bits
Parity
RSVD
RSVD
8
GPIB Address
SYS
FC
Switches 1 and 2 define which set of parameters (for example, for GPIB,
RS-232C, and so on) will be changed. Once the change has been completed, the
instrument must be powered up again in order to store the values in the
non-volatile memory.
1100 Series DAD and MWD Reference Manual
261
6
Introduction to the Detector
In the non-volatile memory, the parameters are kept, regardless of whether
you turn the instrument off and on again. They will be kept until the same set
of parameters is changed and the power is reset. All other previously stored
configuration settings will still remain in the non-volatile memory.
In this way, you can store more than one set of parameters using the same
8-bit configuration switch twice, for example, for both GPIB and RS-232C.
GPIB Default Addresses
If you just want to change the GPIB address and need a detailed procedure,
refer to the Installing Your Agilent ChemStation System handbook.
Default GPIB address is set to the following addresses:
Table 41
Default Addresses for Agilent Series 1100 Modules
Module
Address
Binary Address
Pump
22
00010110
FLD
23
00010111
VWD
24
00011000
Agilent 8453
25
00011101
DAD/MWD
26
00011010
Column compartment
27
00011011
Autosampler
28
00011100
RID
29
00011101
where 0 means that the switch is down and 1 means that the switch is up.
262
1100 Series DAD and MWD Reference Manual
Introduction to the Detector
6
Communication Settings for RS-232C Communication
The communication protocol used in this instrument supports only hardware
handshake (CTS/RTS).
Switches 1 in down and 2 in up position define that the RS-232C parameters
will be changed. Once the change has been completed, the instrument must be
powered up again in order to store the values in the non-volatile memory.
Table 42
Communication Settings for RS-232C Communication
Mode Select
1
2
3
RS-232C
0
1
Baud rate
4
5
6
7
Data
Bits
Parity
8
Use the following tables for selecting the setting which you want to use for
RS-232C communication. The number 0 means that the switch is down and 1
means that the switch is up.
Table 43
Baud Rate Settings
Switches
Baud Rate
3
4
5
0
0
0
0
0
0
0
Switches
Baud Rate
3
4
5
9600
1
0
0
9600
1
1200
1
0
1
14400
1
0
2400
1
1
0
19200
1
1
4800
1
1
1
38400
Table 44
Data Bit Settings
Switch 6
Data Word Size
0
7 Bit Communication
1
8 Bit Communication
1100 Series DAD and MWD Reference Manual
263
6
Introduction to the Detector
Table 45
Parity Settings
Switches
Parity
7
8
0
0
No Parity
1
0
Odd Parity
1
1
Even Parity
One start bit and one stop bit are always used (not selectable).
Per default, the module will turn into 19200 baud, 8 data bit with no parity.
Forced Cold Start Settings
Switches 1 and 2 do not force storage of this set of parameters in non-volatile
memory. Returning switches 1 and 2 to other positions (other than being both
up) will allow for normal operation.
CAUTION
Forced cold start erases all methods and data stored in the non-volatile memory.
Exceptions are diagnose and repair log books which will not be erased.
If you use the following switch settings and power the instrument up again, a
forced cold start has been completed.
Table 46
Forced Cold Start Settings
Mode Select
1
2
3
4
5
6
7
8
TEST/BOOT
1
1
0
0
0
0
0
1
To return to normal operation, set switches back to your GPIB or RS 232
configuration settings.
264
1100 Series DAD and MWD Reference Manual
Introduction to the Detector
6
Stay-Resident Settings
Firmware update procedures may require this mode in case of firmware
loading errors.
Switches 1 and 2 do not force storage of this set of parameters in non-volatile
memory. Returning switches 1 and 2 to other positions (other than being both
up) will allow for normal operation.
If you use the following switch settings and power the instrument up again,
the instrument firmware stays in the resident part, that is, it is not operable as
a detector. It only uses basic functions of the operating system for example, for
communication.
Table 47
Stay Resident Settings
Mode Select
1
2
3
4
5
6
7
8
TEST/BOOT
1
1
0
0
1
0
0
0
To return to normal operation, set switches back to your GPIB or RS-232C
configuration settings.
1100 Series DAD and MWD Reference Manual
265
6
Introduction to the Detector
The Main Power Supply Assembly
The main power supply comprises a closed assembly (no onsite repair
possibility).
The power supply provides all DC voltages used in the module except for the
voltages supplied by the lamp power supply to the deuterium and tungsten
lamps in the detectors. The line voltage can vary in a range from 100 – 120 or
220 – 240 volts AC ± 10 % and needs no manual setting.
M P S
+ 3 6 V
s u p p ly
lin e
v o lta g e
+ 2 4 V
s u p p ly
p rim a ry
c irc u its
se n se
+ 5 V
s w itc h in g
re g u la to r
lin e a r v o lta g e
re g u la to rs
Figure 67
WA R N I N G
266
+ 3 6 V (n o t u s e d )
+ 2 4 V / 4 .5 A
+ 5 V / 3 A
+ 1 5 V / .3 A
-1 5 V / .3 A
Main Power Supply (MPS) Blockdiagram
To disconnect the instrument from line, unplug the power cord. The power supply
still uses some power, even if the power switch on the front panel is turned off.
1100 Series DAD and MWD Reference Manual
Introduction to the Detector
6
No accessible hardware fuse is needed because the main power supply is safe
against any short circuits or overload conditions on the output lines. When
overload conditions occur, the power supply turns off all output voltages.
Turning the line power off and on again resets the power supply to normal
operation if the cause of the overload condition has been removed.
An over-temperature sensor in the main power supply is used to turn off
output voltages if the temperature exceeds the acceptable limit (for example, if
the cooling fan of the instrument fails). To reset the main power supply to
normal operating conditions, turn the instrument off, wait until it is
approximately at ambient temperature and turn the instrument on again.
The following table gives the specifications of the main power supply.
Table 48
Main Power Supply Specifications
Maximum power
300 VA / 130 W
Continuous output
Line Input
100 – 120 or 220 – 240 volts AC
± 10 %, line frequency of 50/60 Hz
Wide ranging
Output 1
+ 24 V / 4.5 A (maximum)
Output 2
+ 36 V / 2.5 A (maximum)
total power consumption of + 24 V
and + 36 V must not exceed 107 W.
Output 3
+5V/3A
Output 4
+ 15 V / 0.3 A
Output 5
- 15 V / 0.3 A
1100 Series DAD and MWD Reference Manual
267
6
268
Introduction to the Detector
1100 Series DAD and MWD Reference Manual
Agilent 1100 Series Diode Array and Multiple Wavelength Detectors
Reference Manual
7
Control Module Screens for Agilent
1100 DAD and MWD
Major keys on the Agilent 1100 Control Module 270
Control Module - Unsupported Module 271
Screens available from the Analysis screen 272
Screens available from the System screen 282
Screens available from the Records screen 284
Diagnostics and Tests 290
Agilent Technologies
269
7
Control Module Screens for Agilent 1100 DAD and MWD
Major keys on the Agilent 1100 Control Module
Table 49
NOTE
ESC
Return to previous screen and scroll through top layer views (Analysis, Settings)
m
Open context sensitive menus
i
Information/help
Enter
Store changed parameters or execute the choice from a pull-down menu
On/Off
Switch on lamp(s)
Start
Start a run
Plot
View the chromatogram
Views
Change between view of analysis - status - system screens
The screens shown on the next pages are based on the following firmware revisions:
For the operation of the G1315B DAD and G1365B MWD you require:
Minimum Control Module firmware revision B.01.04 (G1323B).
Minimum LC Module firmware revision 4.xx.
Some screens may differ slightly depending on the module type G1315A/B DAD or
G1365A/B MWD.
NOTE
270
In case the control module’s display seems to be frozen (hang-up due to a communication
problem on the CAN bus, unplug the control module from the LC module and reconnect.
1100 Series DAD and MWD Reference Manual
Control Module Screens for Agilent 1100 DAD and MWD
7
Control Module - Unsupported Module
In case the control module shows the following screen and the yellow LED on
the detector is not flashing, the used firmware in the Control Module is not
able to control the G1315B DAD or G1365B MWD. These detectors require
firmware revision B.01.04 or above (G1323B).
1100 Series DAD and MWD Reference Manual
271
7
Control Module Screens for Agilent 1100 DAD and MWD
Screens available from the Analysis screen
The Analysis screen
This is the wake-up screen, if the Agilent 1100 detector is the only configured
Agilent 1100 module. It is used to enter the most common detector method
parameters.
The m-key allows access to the context sensitive menu. Setup view leads you
to add sections for additional Agilent 1100 modules. Restart re-boots the
control module.
Lamp ON/OFF
Use the F8 key (On/Off) to turn on the lamp(s). If more than one module is
available, select the DAD or MWD from the pop-up menu.
272
1100 Series DAD and MWD Reference Manual
Control Module Screens for Agilent 1100 DAD and MWD
7
The lamp(s) can be selected individually.
Setup View
In the Setup view, e.g. another module can be added to the view.
1100 Series DAD and MWD Reference Manual
273
7
Control Module Screens for Agilent 1100 DAD and MWD
Here, e.g. the column compartment parameters are shown on the display as
well. The number of parameters on the display are restricted as additional
modules are added. Maximum 4 modules are shown automatically. If more
modules are in the system, you have to chose in Setup view.
With the Settings key you open a pull-down menu where you can select the
DAD modules.
Settings
Within the Settings you can change the DAD or MWD parameters and with a
different set of parameters available through the F1-5 keys. F7 key resets the
DAD or MWD to default values. F8 opens a window to turn on the lamps.
274
1100 Series DAD and MWD Reference Manual
Control Module Screens for Agilent 1100 DAD and MWD
7
Use the m-key for the context sensitive menu. The Status command pulls up a
monitor screen displaying signals and spectra as programmed. Reset will load
the DAD or MWD default parameters. Balance brings the baseline back to set
offset.
Use F1-key (More) opens a pull-down menu.
Selecting More and Settings pull down menu you can enter special DAD or
MWD setpoints.
1100 Series DAD and MWD Reference Manual
275
7
Control Module Screens for Agilent 1100 DAD and MWD
Selecting More and Signals C-E on the pull down menu you can enter
additional DAD or MWD signal parameters.
Settings - Timetable
With the F2 key (Timetable) you can list the timetable for the DAD or MWD.
Press F7 key (Insert) to add entries or F6 key (Delete) to remove entries.
276
1100 Series DAD and MWD Reference Manual
Control Module Screens for Agilent 1100 DAD and MWD
7
Press the F7 key (Insert) to add a timetable events. Use the F6 key (Done) to
view the entered lines of the timetable.
Use the m-key for the context sensitive menu. It gives you additional tools for
the timetable.
Settings - Analog
With the F3 key (Analog) you can change the settings for the analog outputs.
1100 Series DAD and MWD Reference Manual
277
7
Control Module Screens for Agilent 1100 DAD and MWD
Settings - Spectrum Range
FOR G1315A/B DAD: With the F4 key (Spectrum) you can change the settings
for the spectrum acquisition.
FOR G1365A/B MWD: You can change the settings for the spectrum
acquisition (STOP FLOW). The spectrum is started via “Sample, Holmium and
Dark Current Spectrum” on page 291.
Settings - Run times
With the F5 key (Runtimes) you can change the stop time and the post-run
time.
278
1100 Series DAD and MWD Reference Manual
Control Module Screens for Agilent 1100 DAD and MWD
7
Press F5 key (Views) and select Status.
Status
This is an example if an Agilent 1100 DAD or MWD is configured standalone.
1100 Series DAD and MWD Reference Manual
279
7
Control Module Screens for Agilent 1100 DAD and MWD
Signal plot
Press F6 key (Plot) to enter the plot screen (available also from the Analysis
and System screen). Here you can observe the online signal(s). To add
additional online signals (maximum 3), press F6 key (Select). If more than one
signal is configured (see next), use the 1-2-3 number key to switch between the
signals.
Press F6 key (Select). Here you can add additional online signals (maximum
are 3), press F6 key (Select). Additional signals could be also pressure or
temperature signals from other modules. Use the Right/Left arrows to switch
between Available and Selected Signals. Use the F8 key (Move) to enter
available signals into the box for selected signals or vice versa.
280
1100 Series DAD and MWD Reference Manual
Control Module Screens for Agilent 1100 DAD and MWD
7
Method screens
Use ESC to return to the Analysis screen. Use the F3 key (Method) to view the
parameters in a method and F8 key (Save As) to save the method in the
module(s). The PC-Card key is only active when a PCMCIA card is inserted in
the control module.
Use F2 key (PC-Card) to save a method on a PCMCIA card. Use the Right/Left
arrows to switch between PC-Card and Instrument window. Use the UP/Down
arrows to select the method. Use the F7/F8 keys (Copy) to enter available
signals into the box for selected signals or vice versa.
1100 Series DAD and MWD Reference Manual
281
7
Control Module Screens for Agilent 1100 DAD and MWD
Screens available from the System screen
System screen
Use the Esc key to receive Views on the F5 key. Choose System from the
pull-down menu. This screen shows the last activities in the system.
System - Control
Use the F1 key (Control) to select the FL-Detector. Here you receive
information about the not-ready conditions if needed. F2 key (Reset) does a
re-initialization of the DAD or MWD.
282
1100 Series DAD and MWD Reference Manual
Control Module Screens for Agilent 1100 DAD and MWD
7
System - Configuration
Use the Esc key to receive Views on the F5 key. Choose System from the
pull-down menu. Use the F2 key (Configure) to select the DAD or MWD. Here
you define further special setpoints for the DAD or MWD operation.
Use the F1 key (Interfaces) to access the interface settings (if required).
1100 Series DAD and MWD Reference Manual
283
7
Control Module Screens for Agilent 1100 DAD and MWD
Screens available from the Records screen
Records screen
Use the Esc key to receive Views on the F5 key. Choose System from the
pull-down menu. Use the F4 key (Records) to select the DAD or MWD. Errors
are reported either into the System Log (F2) or Error Log (F3).
System / Error Log
Use the F2 key (System Log) or F3 key (Error Log) to look for errors.
284
1100 Series DAD and MWD Reference Manual
Control Module Screens for Agilent 1100 DAD and MWD
7
Info Log
Use the m-key to receive a pop-up menu, Select Info Log. A list of the last
events are listed. For troubleshooting reasons they can be printed or saved to
a file on the PCMCIA card.
EMF (Early Maintenance Feedback)
Use the F1 key (EMF) to set EMF parameters. Choose menu item 1 (Setup
limits) to select lamp-on level for the UV and Vis lamp at which you want to
receive a warning.
If a set limit has been exceeded, a message box will pop up. This will not stop a
sequence or run (information only to plan maintenance activities). If you press
Reset, the limits will be removed. Ignore will continue to keep the EMF flag
set.
1100 Series DAD and MWD Reference Manual
285
7
Control Module Screens for Agilent 1100 DAD and MWD
Firmware Update
Use the Esc key to receive Views on the F5 key. Choose System from the
pull-down menu. Use the F3 key (Records) to select the DAD or MWD. Use the
F5 key (FW Update) to enter the Update section. If you want to update the
resident firmware (together with specific main firmware revisions), select the
a file from the PCMCIA card (RES_n_nn.DLB) and press execute. If you want
to update the main firmware, press F7 key (Transfer) to turn the module into
the resident mode (LED on module should blink yellow).
Use the Esc key to receive Views on the F5 key. Choose System from the
pull-down menu. Use the F3 key (Records) to select the Generic module. In
this screen the resident firmware revision is shown.
286
1100 Series DAD and MWD Reference Manual
Control Module Screens for Agilent 1100 DAD and MWD
7
Use the F5 key (FW Update) to enter the Update section. Select the file from
the PCMCIA card (1315-nnn.DLB for DAD or 1365-nnn.DLB for MWD) and
press execute. When the update has finished the update, press F7 key
(Transfer) to return the module into the normal mode (LED on module should
stay yellow).
If you have not saved your methods, please do it before continuing. Otherwise
they will be overwritten during the update process.
1100 Series DAD and MWD Reference Manual
287
7
Control Module Screens for Agilent 1100 DAD and MWD
Changing the serial number
In case the serial number of the module has to be added, use the m-key to open
the menu Enter Serial#. Choose System from the pull-down menu. Use the F3
key (Records) to select the DAD or MWD. Use the F4 key (Maint log) to view
and edit the maintenance logbook.
288
1100 Series DAD and MWD Reference Manual
Control Module Screens for Agilent 1100 DAD and MWD
7
Maintenance activities
Use the Esc key to receive Views on the F5 key. Choose System from the
pull-down menu. Use the F3 key (Records) to select the DAD or MWD. Use the
F4 key (Maint log) to view and edit the maintenance logbook.
Use the F7 key (Add) to add new maintenance activities. If an activity is not
listed, you can type the activity into the line “Add” using the control modules
key pad.
1100 Series DAD and MWD Reference Manual
289
7
Control Module Screens for Agilent 1100 DAD and MWD
Diagnostics and Tests
Tests screen
Use the Esc key to receive Views on the F5 key. Choose System from the
pull-down menu. Use the F3 key (Tests) to select the DAD or MWD. Several
tests are available to test the Agilent 1100 DAD or MWD. Additional test are
listed in the function box. Refer to “Troubleshooting and Test Functions” on
page 49 for more information on the tests.
Intensity Test
Use the F5 key (Intensity) to get the instrument profile (example with UV and
Vis lamp on).
290
1100 Series DAD and MWD Reference Manual
Control Module Screens for Agilent 1100 DAD and MWD
7
Wavelength Calibration
Use the F1 key (Calibrate) and then F8 key (Execute) to start the DAD or
MWD wavelength calibration (with water in the flow cell). If a deviation is
found, press Adjust.
Sample, Holmium and Dark Current Spectrum
Use the F2 key (Spectrum) to take a spectrum (sample, dark current or
holmium). Use the Left/Right arrow to move the curser within the spectrum to
find the wavelength of interest.
1100 Series DAD and MWD Reference Manual
291
7
Control Module Screens for Agilent 1100 DAD and MWD
Built-in Test Chromatogram (Simulation)
To start the built-in test chromatogram, use the F8 key (Execute) to enable the
simulation. Then press the m-key to open the pop-up menu. Select Start to
start a run (all modules in the Agilent 1100 system must be in ready state).
292
1100 Series DAD and MWD Reference Manual
Control Module Screens for Agilent 1100 DAD and MWD
7
Use the F6 key (Plot) to view the signal. A simulated chromatogram (4 peaks)
will repeat until the run is stopped. The signal is also available on the analog
output. A change of the peak width will change the retention times.
Slit Test
Use the F3 key (Slit Test) to test the movement of the electromechanical slit
assembly.
1100 Series DAD and MWD Reference Manual
293
7
294
Control Module Screens for Agilent 1100 DAD and MWD
1100 Series DAD and MWD Reference Manual
Agilent 1100 Series Diode Array and Multiple Wavelength Detectors
Reference Manual
8
Specifications
Performance Specifications 296
Agilent Technologies
295
8
Specifications
Performance Specifications
Table 50
296
Performance Specifications Agilent 1100 Series DAD and MWD
Type
Specification
Comments
Detection type
1024-element photodiode array
Light source
Deuterium and tungsten lamps
Wavelength range
190 – 950 nm
Short term noise
(ASTM)
Single and
Multi-Wavelengt
± 1 × 10⁻⁵ AU at 254 and 750 nm
See “” on page 297
Drift
2 × 10⁻³ AU/hr at 254 nm
See “” on page 297
Linear absorbance
range
> 2 AU (upper limit)
See “” on page 297
Wavelength accuracy
± 1 nm
Self-calibration with deuterium lines,
verification with holmium oxide filter
Wavelength bunching
1 – 400 nm
Programmable in steps of 1 nm
Slit width
1, 2, 4 , 8, 16 nm
Programmable slit
Diode width
< 1 nm
Flow cells
Standard: 13 µl volume, 10 mm cell
path length and 120 bar (1760 psi)
pressure maximum
Semi-Micro: 5 µl volume, 6 mm cell
path length and 120 bar (1760 psi)
pressure maximum
High pressure: 1.7 µl volume, 6 mm cell
path length and 400 bar (5880 psi)
pressure maximum
500 nano: 0.5 µl volume, 10 mm cell
path length and 50 bar (725 psi)
pressure maximum
See “Optimization Overview” on
page 31
1100 Series DAD and MWD Reference Manual
Specifications
Table 50
8
Performance Specifications Agilent 1100 Series DAD and MWD, continued
Type
Specification
Control and data
evaluation
Agilent ChemStation for LC
Analog outputs
Recorder/integrator: 100 mV or 1 V,
output range 0.001 – 2 AU, two
outputs
Communications
Controller-area network (CAN), GPIB,
RS-232C, APG Remote: ready, start,
stop and shut-down signals, LAN
optional
Comments
Safety and maintenance Extensive diagnostics, error detection
and display (through control module
and ChemStation), leak detection, safe
leak handling, leak output signal for
shutdown of pumping system. Low
voltages in major maintenance areas.
NOTE
GLP features
Early maintenance feedback (EMF) for
continuous tracking of instrument
usage in terms of lamp burn time with
user-settable limits and feedback
messages. Electronic records of
maintenance and errors. Verification of
wavelength accuracy with built-in
holmium oxide filter.
Housing
All materials recyclable.
ASTM: “Standard Practice for Variable Wavelength Photometric Detectors Used in Liquid
Chromatography”.
Reference conditions: cell path length 10 mm, response time 2 s, flow 1 ml/min LC-grade
Methanol, slit width 4 nm.
Linearity measured with caffeine at 265 nm.
For environmental conditions refer to “Environment” on page 15.
1100 Series DAD and MWD Reference Manual
297
8
298
Specifications
1100 Series DAD and MWD Reference Manual
Agilent 1100 Series Diode Array and Multiple Wavelength Detectors
Reference Manual
A
Safety Information
General Safety Information 300
Lithium Batteries Information 303
Disposal of Mercury from Deuterium Lamp 304
Radio Interference 305
Sound Emission 306
UV-Radiation 307
Solvent Information 308
Declaration of Conformity for HOX2 Filter 310
Agilent Technologies on Internet 311
Agilent Technologies
299
A
Safety Information
General Safety Information
The following general safety precautions must be observed during all phases of
operation, service, and repair of this instrument. Failure to comply with these
precautions or with specific warnings elsewhere in this manual violates safety
standards of design, manufacture, and intended use of the instrument. Aligent
Technologies assumes no liability for the customer’s failure to comply with
these requirements.
General
This is a Safety Class I instrument (provided with terminal for protective
earthing) and has been manufactured and tested according to international
safety standards.
This instrument is designed and certified as a general purpose laboratory
instrument for research and routine application only. It is not certified for
in-vitro or medical applications.
Operation
Before applying power, comply with the installation section. Additionally the
following must be observed.
Do not remove instrument covers when operating. Before the instrument is
switched on, all protective earth terminals, extension cords,
auto-transformers, and devices connected to it must be connected to a
protective earth via a ground socket. Any interruption of the protective earth
grounding will cause a potential shock hazard that could result in serious
personal injury. Whenever it is likely that the protection has been impaired,
the instrument must be made inoperative and be secured against any intended
operation.
Make sure that only fuses with the required rated current and of the specified
type (normal blow, time delay, and so on) are used for replacement. The use of
repaired fuses and the short-circuiting of fuseholders must be avoided.
300
1100 Series DAD and MWD Reference Manual
Safety Information
CAUTION
A
The operator of this instrument is advised that if the equipment is used in a manner not
specified in this manual, the protection provided by the equipment may be impaired.
Some adjustments described in the manual, are made with power supplied to
the instrument, and protective covers removed. Energy available at many
points may, if contacted, result in personal injury.
Any adjustment, maintenance, and repair of the opened instrument under
voltage should be avoided as much as possible. When inevitable, this should be
carried out by a skilled person who is aware of the hazard involved. Do not
attempt internal service or adjustment unless another person, capable of
rendering first aid and resuscitation, is present. Do not replace components
with power cable connected.
Do not operate the instrument in the presence of flammable gases or fumes.
Operation of any electrical instrument in such an environment constitutes a
definite safety hazard.
Do not install substitute parts or make any unauthorized modification to the
instrument.
Capacitors inside the instrument may still be charged, even though the
instrument has been disconnected from its source of supply. Dangerous
voltages, capable of causing serious personal injury, are present in this
instrument. Use extreme caution when handling, testing and adjusting.
When working with solvents please observe appropriate safety procedures
(e.g. goggles, safety gloves and protective clothing) as described in the material
handling and safety data sheet by the solvent vendor, especially when toxic or
hazardous solvents are used.
1100 Series DAD and MWD Reference Manual
301
A
Safety Information
Safety Symbols
Table 51 shows safety symbols used on the instrument and in the manuals.
Table 51
Symbol
!
Safety Symbols
Description
The apparatus is marked with this symbol when the user should refer to the instruction manual in order to
protect the apparatus against damage.
Indicates dangerous voltages.
Indicates a protected ground terminal.
Indicates eye damage may result from directly viewing the light produced by the deuterium lamp used in
this product.
WA R N I N G
A warning alerts you to situations that could cause physical injury or damage to the
equipment. Do not proceed beyond a warning until you have fully understood and
met the indicated conditions.
CAUTION
A caution alerts you to situations that could cause a possible loss of data. Do not
proceed beyond a caution until you have fully understood and met the indicated
conditions.
302
1100 Series DAD and MWD Reference Manual
Safety Information
A
Lithium Batteries Information
WA R N I N G
Danger of explosion if battery is incorrectly replaced. Replace only with the same or
equivalent type recommended by the equipment manufacturer. Lithium batteries
may not be disposed-off into the domestic waste.
Transportation of discharged Lithium batteries through carriers regulated by
IATA/ICAO, ADR, RID, IMDG is not allowed. Discharged Lithium batteries shall be
disposed off locally according to national waste disposal regulations for batteries.
WA R N I N G
Lithiumbatteri - Eksplosionsfare ved fejlagtig håndtering. Udskiftning må kun ske
med batteri af samme fabrikat og type. Lever det brugte batteri tilbage til
leverandøren.
WA R N I N G
Lithiumbatteri - Eksplosionsfare. Ved udskiftning benyttes kun batteri som anbefalt
av apparatfabrikanten. Brukt batteri returneres appararleverandoren.
NOTE
Bij dit apparaat zijn batterijen geleverd. Wanneer deze leeg zijn, moet u ze niet weggooien
maar inleveren als KCA.
1100 Series DAD and MWD Reference Manual
303
A
Safety Information
Disposal of Mercury from Deuterium Lamp
The long-life deuterium lamp (part number 5181-1528) includes a timer, which
contains mercury. The timer has to be disposed of locally according to national
waste disposal regulations.
304
1100 Series DAD and MWD Reference Manual
Safety Information
A
Radio Interference
Never use cables other than the ones supplied by Aligent Technologies to
ensure proper functionality and compliance with safety or EMC regulations.
Test and Measurement
If test and measurement equipment is operated with equipment unscreened
cables and/or used for measurements on open set-ups, the user has to assure
that under operating conditions the radio interference limits are still met
within the premises.
1100 Series DAD and MWD Reference Manual
305
A
Safety Information
Sound Emission
Manufacturer’s Declaration
This statement is provided to comply with the requirements of the German
Sound Emission Directive of 18 January 1991.
This product has a sound pressure emission (at the operator position) < 70 dB.
• Sound Pressure Lp < 70 dB (A)
• At Operator Position
• Normal Operation
• According to ISO 7779:1988/EN 27779/1991 (Type Test)
306
1100 Series DAD and MWD Reference Manual
Safety Information
A
UV-Radiation
Emissions of ultraviolet radiation (200-315 nm) from this product is limited
such that radiant exposure incident upon the unprotected skin or eye of
operator or service personnel is limited to the following TLVs (Threshold
Limit Values) according to the American Conference of Governmental
Industrial Hygienists:
Table 52
UV-Radiation Limits
Exposure/day
Effective Irradiance
8 hours
0.1 µW/cm2
10 minutes
5.0 µW/cm2
Typically the radiation values are much smaller than these limits:
Table 53
UV-Radiation Typical Values
Position
Effective Irradiance
Lamp installed, 50 cm distance
Average 0.016 µW/cm2
Lamp installed, 50 cm distance
Maximum 0.14 µW/cm2
1100 Series DAD and MWD Reference Manual
307
A
Safety Information
Solvent Information
Observe the following recommendations on the use of solvents.
Flow Cell
Avoid the use of alkaline solutions (pH > 9.5) which can attack quartz and thus
impair the optical properties of the flow cell.
Prevent any crystallization of buffer solutions. This will lead into a
blockage/damage of the flow cell.
If the flow cell is transported while temperatures are below 5 degree C, it must
be assured that the cell is filled with alcohol.
Aqueous solvents in the flow cell can built up algae. Therefore do not leave
aqueous solvents sitting in the flow cell. Add small % of organic solvents (e.g.
Acetonitrile or Methanol ~5%).
Solvents
Brown glass ware can avoid growth of algae.
Always filter solvents, small particles can permanently block the capillaries.
Avoid the use of the following steel-corrosive solvents:
• Solutions of alkali halides and their respective acids (for example, lithium
iodide, potassium chloride, and so on).
• High concentrations of inorganic acids like nitric acid, sulfuric acid
especially at higher temperatures (replace, if your chromatography method
allows, by phosphoric acid or phosphate buffer which are less corrosive
against stainless steel).
• Halogenated solvents or mixtures which form radicals and/or acids, for
example:
2CHCl3 + O2 → 2COCl2 + 2HCl
This reaction, in which stainless steel probably acts as a catalyst, occurs
quickly with dried chloroform if the drying process removes the stabilizing
alcohol.
308
1100 Series DAD and MWD Reference Manual
Safety Information
A
• Chromatographic grade ethers, which can contain peroxides (for example,
THF, dioxane, di-isopropylether) such ethers should be filtered through dry
aluminium oxide which adsorbs the peroxides.
• Solutions of organic acids (acetic acid, formic acid, and so on) in organic
solvents. For example, a 1-% solution of acetic acid in methanol will attack
steel.
• Solutions containing strong complexing agents (for example, EDTA,
ethylene diamine tetra-acetic acid).
• Mixtures of carbon tetrachloride with 2-propanol or THF.
1100 Series DAD and MWD Reference Manual
309
A
Safety Information
Declaration of Conformity for HOX2 Filter
We herewith inform you that the holmium oxide glass filter (type Hoya HY-1)
(Part No. 79880-22711)
meets the following specification of absorbance maxima positions:
361.0 nm - 418.9 nm - 453.7 nm - 536.7 nm (spectral bandwidth: 2 nm).
Agilent Technologies guarantees the traceability of the specified absorbance
maxima to a National Institute of Standards & Technology (NIST) holmium
oxide solution standard with a lot-to-lot tolerance of ±0.3nm.
The wavelength calibration filter built into the Agilent Technologies UV-visible
detectors
Table 54
Wavelength Accuracy
Product No.
79880A
HP 1090 system
± 1 nm
79883A
HP 1090 system
± 1 nm
79854A
HP 1050 series
± 1 nm
1306A
HP 1050 series
± 1 nm
G1315A/B
Agilent 1100 series
± 1 nm
G1365A/B
Agilent 1100 series
± 1 nm
G1600A
± 1 nm
is made of this material and meets these specifications. It is, therefore,
suitable for wavelength calibration of these detectors within the specified
wavelength accuracy of the respective detector over its wavelength range.
___March 20, 2000__
Date
Engineering Manager
310
Quality Manager
1100 Series DAD and MWD Reference Manual
Safety Information
A
Agilent Technologies on Internet
For the latest information on products and services visit our worldwide web
site on the Internet at:
http://www.agilent.com
Select “Products” - “Chemical Analysis”
It will provide also the latest firmware of the Agilent 1100 series modules for
download.
1100 Series DAD and MWD Reference Manual
311
A
312
Safety Information
1100 Series DAD and MWD Reference Manual
Index
A
accessory kit, 18, 208
accuracy of wavelength, 296
achromat (source lens), 229
Agilent on internet, 311
algea information, 308
alpha and beta line, 84
analog signal output, 257
APG remote interface, 257
array, 230
ASTM
environmental conditions, 15
ASTM - reference, 297
cell support windows, 229
choosing a flow cell, 32
configuration switch
default settings, 261
description and factory settings, 261
control module
diagnostics and tests, 290
EMF, 285
firmware update, 286
serial number change of MWD, 288
test chromatogram, 292
tests, 290
control module, part number, 201
correction factors for flow cells, 34
B
D
battery
description, 239
location on DAM board, 144
safety information, 303
BCD/LAN board, 253
Beer-Lambert (law), 33
bench space, 15
beta and alpha line, 84
boards
interface board (BCD/LAN), 253
location of connectors, 144
main board MWM), 238
SCI board, 241
bunching of wavelength, 296
DAM board
A/D converter, 241
analog outputs, 241
battery, 239
diagnostic A/D converter, 245
diagram of lamp supply, 244
diagram of main controller, 240
diagram of PFP functions, 242
fan drive, 239
firmware description, 246
interfaces, 245
lamp control, 243
leak sensor, 239
memory (SIMM) modules, 239
PDA electronics, 241
PDA frontend processor, 241
processors, 238
safety switches, 245
SCI board, 241
dark current spectrum, 291
dark current test, 91
delivery checklist, 17
diagnostics and tests with control
module, 290
dimensions and weight, 16
C
cable
connecting APG remote, 21
connecting CAN, 21
connecting GPIB, 21
connecting the ChemStation, 21
connecting the power, 21
overview and identification, 210
CAN interface, 257
1100 Series DAD and MWD Reference Manual
diode array, 230, 231
diode width, 296
disposal of mercury, 304
E
early maintenance feedback (EMF), 235
electrical connections
description of, 232
location of connectors, 233
EMF
on control module, 285
EMF (early maintenance feedback), 235
entrance slit, 230
environment, 15
error messages, 53
communication error, 69
compensation sensor open, 62
compensation sensor short, 63
cover violation, 66
diode current leakage, 71
fan failed, 64
G1315B/G1365B, 77
heater at limit, 83
heater failed, 82
holmium oxide test failed, 72
ignition without cover, 65
illegal value from air inlet sensor, 81
illegal value from heater sensor, 80
leak, 58
leak sensor open, 60
leak sensor short, 61
module type changed, 78
remote timeout, 56
shutdown, 55
synchronization lost, 57
time-out, 54
unsupported module, 271
uv heater current, 76
uv ignition failed, 75
uv lamp current, 73
uv lamp voltage, 74
313
Index
visible lamp current, 67
visible lamp voltage, 68
wavelength calibration failed, 70
ESD (electrostatic discharge) strap, 98
exchanging. see repairs
F
fan parts, 196
features
safety and maintenance, 297
filter test, 93
firmware
description, 246
flow diagram, 249
main system, 246
peak detector, 251
raw data conversion, 248
rawdata file, 251
resident system, 246
spectra acquisition modes, 252
spectra buffer, 250
update with control module, 286
updates, 180, 247
flow cell, 229
correction factors, 34
path length, 34
test, 90
what kind of cell, 32
front view of module, 22
fuses
BCD board, 183, 253
power supply, 267
G
GLP features, 297
GPIB
default addresses, 257, 262
interface, 257
grating, 230
H
heater for fan, 196
holmium oxide
declaration of conformity, 310
filter, 229
spectrum, 291
314
M
test, 86
humidity, 16
I
Identifying, 181
information
on uv-radiation, 307
installation
accessory kit, 18
bench space, 15
delivery checklist, 17
environment, 15
flow connections, 25
of flow cell and capillaries, 25
of the detector, 22
physical specifications, 16
power considerations, 14
power cords, 14
site requirements, 14
unpacking, 17
instrument layout, 234
intensity test, 88
interface board (BCD/LAN), 253
interfaces
analog signal output, 257
APG remote, 257
CAN, 257
GPIB, 257
overview, 256
RS-232C, 259
internet, 311
introduction
optical system diagram, 229
optical system overview, 229
optical unit parts, 229
L
lamps, 229
LAN cables, 226
LAN interface board, 255
leaks
correcting, 130
line voltage and frequency, 16
location of connectors, 233
maintenance (simple repairs), 99
margins, 42
memory
description, 239
Mercury, disposal, 304
message
communication error, 69
compensation sensor open, 62
compensation sensor short, 63
cover violation, 66
diode current leakage, 71
fan failed, 64
holmium oxide test failed, 72
ignition without cover, 65
leak, 58
leak sensor open, 60
leak sensor short, 61
remote timeout, 56
shutdown, 55
synchronization lost, 57
time-out, 54
uv heater current, 76
uv ignition failed, 75
uv lamp current, 73
uv lamp voltage, 74
visible lamp current, 67
visible lamp voltage, 68
wavelength calibration failed, 70
MWM board
description, 238
N
Nano Flow Cells, 192
nano-flow cells, 192
negative absorbance, 43
O
operation temperature, 16
optical system
diagram, 229
overview, 229
optimization
choosing a flow cell, 32
detector performance, 30
1100 Series DAD and MWD Reference Manual
Index
for sensitivity, selectivity, linearity,
dispersion, 33
how to get the best performance, 30
margins for negative absorbance, 43
of selectivity, 44
overview, 31
peak width, 35
sample and reference wavelength, 36
slit width, 39
spectra acquisition, 42
theshold, 43
P
parts identification, 181
accessory kit, 208
achromat (source lens), 199
cable overview, 210
cables - analog, 212
cables - APG remote, 215
cables - auxiliary, 222
cables - BCD, 220
cables - CAN, 223
cables - external contact, 224
cables - LAN cables, 226
cell support, 200
control module, 201
coupling lens, 198
foams and dampers, 205
high pressure (micro) flow cell, 190
holmium oxide filter, 197
leak panels, 207
main assemblies, 183
nl flow cells, 192
optical unit, 184
overview, 182
plastics, 204
power and status, 205, 206
semi-micro flow cell, 188
sheet metal, 202, 203
standard flow cell, 186
union holder/ZDV, 202, 203
peak detector, 251
peak width (response time), 35
performance
optimization, 30
photometric accuracy, 34
physical specifications, 16
humidity, 16
line voltage and frequency, 16
operation temperature, 16
power consumption, 16
safety standards, 16
weight and dimensions, 16
power considerations, 14
power consumption, 16
power cords, 14
power supply
description, 266
specifications, 267
programmable slit width, 296
R
range, 42
rawdata file, 251
rear view of module, 24
recalibration of wavelength, 50, 84, 291
Repairing, 95
repairs
assembling main cover, 178
cleaning the instrument, 97
correction leaks, 130
definition of, 96
exchanging a flow cell, 105
exchanging a lamp, 102
exchanging holmium oxide filter, 127
exchanging internal parts, 138
exchanging leak sensor, 167
exchanging main board (DAM), 143
exchanging power supply, 164
exchanging the achromat, 158
exchanging the fan ("A"), 148
installing optical unit, 171, 173
introduction, 96
of the detector, 3, 95
removing the optical unit, 154, 156
removing top cover and foam, 140
replacing cell support window, 135
replacing coupling lens, 132
replacing filter motor, 162
replacing firmware, 180
replacing foam and top cover, 175
replacing leak handling system, 131
replacing semi-micro flow cell
capillaries, 119
replacing status light pipe, 170
replacing STD flow cell capillaries, 114
1100 Series DAD and MWD Reference Manual
simple repairs overview, 99
the high pressure flow cell, 112
the standard/semi-micro flow cell, 108
using the ESD strap, 98
warnings and cautions, 96
replacing interface board (ECB), 179
Replacing the Fan Parts ("B"), 150
response time (peak width), 35
RS-232C
cable kit to PC, 225
communication settings, 263
interface, 259
settings, 263
S
safety information
on lithium batteries, 303
standards, 16
sample and reference wavelength, 36
sample, holmium and dark current
spectrum, 291
selectivity optimization, 44
sensor for fan, 196
serial number
entered on ChemStation, 147
entered on control module, 146, 288
serial number change with control
module, 288
site requirements, 14
slit width, 39
specifications
analog outputs, 297
communications, 297
diode width, 296
flow cell, 296
GLP features, 297
linear range, 296
noise and drift (ASTM), 296
programmable slit width, 296
safety and maintenance, 297
wavelength accuracy/bunching, 296
wavelength range, 296
spectra
acquisition, 42
acquisition modes, 252
acquisition range, 42
acquisition step and threshold, 42
run buffer, 250
315
Index
spectrograph, 229, 230
diodes per nm, 230
stack configuration, 20, 21
front view, 20
rear view, 21
steps, 42
T
temperature control, 245
test chromatogram on control module, 292
test functions, 50
tests
dark current, 85, 91
filter, 85, 93
flow cell, 85, 90
holmium oxide, 85, 86
intensity, 85, 88
overview, 85
tests on control module, 290
threshold, 43
troubleshooting
error messages, 50, 53
status indicators, 50, 51
U
unpacking, 17
unsupported Module, 271
using EMF, 235
uv-radiation, 307
V
variable entrance slit, 230
W
wavelength
accuracy and bunching, 296
range, 296
recalibration, 50, 84, 291
weight and dimensions, 16
316
1100 Series DAD and MWD Reference Manual
www.agilent.com
In This Book
This manual contains
technical reference
information about the
Agilent 1100 Series diode
array detectors.
The manual describes the
following:
• installing the detector,
• introduction to the diode
array detector and its
optimization,
• diagnostics and
troubleshooting,
• repairing the detector,
• parts and materials,
• theory of operation, and
• screens of the local control
module.
Agilent Technologies 1995, 1996-2004
Printed in Germany
Edition 05/2004
*G1315-90005*
*G1315-90005*
G1315-90005
Agilent Technologies