1
** UNPACKING AND INSPECTION **
UNPACKING INSTRUCTIONS: Carefully unpack urn and inspect immediately for shipping damage. Your automatic coffee urn was shipped in
a carton designed to give it maximum protection in normal handling. It was thoroughly inspected before leaving the factory and the carrier
accepted and signed for it. File any claims for shipping damage or irregularities directly with the carrier, not with the company.
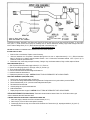
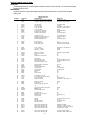
ASSEMBLY ( SEE Illustration 3): The four legs (38), faucets (36), vent cap drain (2) and water strainer assembly (23,24) are packed separately
with urn. Install legs by tilting urn on its side and screwing legs into urn leg supports until hand tight. Carefully right unit and install in its
permanent location, being sure to leave at least 6" on right side of urn for access to controls. Level urn by adjusting legs. Then attach faucets
and install vent cap drain. Cover(s) (3) are shipped with knob(s) on inside to prevent damage. Simply unscrew and reverse knob(s) and
hardware. Your urn comes with one brew basket (11) and an introductory filter pack. Additional Cecilware filters are available from your dealer.
** INSTALLATION INSTRUCTIONS **
FOR QUALIFIED SERVICE PERSONS ONLY
CAUTION: DO NOT TURN THERMOSTAT ON UNTIL ALL INSTALLATION INSTRUCTIONS HAVE BEEN FOLLOWED.
WATER HOOK-UP (See Illustration 3): Your urn comes supplied with a water strainer assembly (23,24). Connect copper tubing (24) to elbow
(22) at lower back of side box; then connect other end of water strainer to a suitable length of 1 /4" tubing with shut-off valve (plumber
supplied), connected to cold water supply.
The National Sanitation Foundation also requires an approved flowback prevention device such as a double check valve to be installed
between urn and water supply. Adjust water pressure to 20 p.s.i. for proper operation.
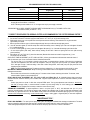
STEAM URNS
Steam Inlet Pressure
Steam Requirement
Plumbing Connection
Electrical Connection
Input Power
SPECIFICATIONS
15-30 p.s.i.
7-21 Ibs./hr.
1/2n.p.t.
Plug line cord into any convenient 120V outlet
120 VAC, 6A, 50/60 HZ
TO PRIME: CAUTION: THERMOSTAT MUST BE IN THE "OFF position. Turn on water supply and electrical power to urn and wait until water
is visible in center gauge glass (left-hand gauge glass on 3-gallon single urns). Priming can be accelerated by manual filling through vent cap
opening in top of urn, using a water hose. Then turn thermostat knob (33, III. 3) to 10; thermostat pilot light shows heater is on. Urn jacket will
continue to fill automatically until water reaches the proper level. When indicator on dial thermometer (32) approaches the "W" in BREW zone,
197°-205°F (92°-96°C), urn is ready to brew coffee. In high altitude locations (at least 5000 ft. above sea level), thermostat may have to be
lowered to prevent boiling.
NOTE: FOLLOW THE ABOVE INSTRUCTIONS FOR INITIAL PRIMING AND AFTER DRAINING URN FOR SERVICING.
TO BREW COFFEE: Follow instructions on front of urn.
ELECTRIC URNS
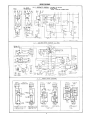
All electric urns come wired single (1) or three (3) phase, except for the FE300 which is 3 phase only. See wiring diagrams,
Illustration 6.
1 Phase Hookup. Remove screws and lift off side box door. Terminal block (20, III. 3) is located on rear wall of side box. Install a
suitable conduit through knockout in rear of side box and connect No. 14 neutral wire to the center connection of terminal block
(20). Then connect the remaining 2 wires to terminals L1 and L2. 3 Phase Hookup. 3 phase units have a 4-wire terminal block.
Connect No. 14 neutral wire to end terminal marked NEUT and connect remaining wires to terminal L1, L2 and L3.
2