1
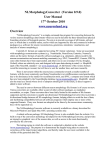
OWNER'S MANUAL
®
Microprocessor Controlled,
Operation Battery Charger
with Engine Starter
Fully Automatic
Plus Battery
Tester
and Alternator
2=AMP SLOW CHARGE
12=AMP FAST CHARGE
30=AMP RAPID
80=AIVIP ENGINE
FOR 6 AND
BATTERIES
CHARGE
START
12-VOLT
Model No.
200.71225
CAUTION:
Read all Safety Rules and Operating Instructions,
and follow them with each use of this product.
Sears, Roebuck and Co., Hoffman Estates, IL 60179 U.S.A.
00-99-000536/0506
WARRANTY
................................................................................................................
2
IMPORTANT
SAFETY
...................................................................
3
......................................................................
4
PERSONAL
BEFORE
INSTRUCTIONS
SAFETY
USING
Plugging
PRECAUTIONS
YOUR
BATTERY
CHARGER
Your Charger
Using An Extension
5
Cord ......................................................................................
5
YOUR
OPERATING
INSTRUCTIONS
BATTERY
TO BE CHARGED
Battery
In The Vehicle
Charging
Battery
Removed
YOUR
BATTERY
CONTROLS
CONTROL
From The Vehicle
PANEL
CHARGER
10
USING
THE
BUILT-IN
ALTERNATOR
TESTER
AND
TIME
TIPS
TESTER
CHARGE
..............................................................
11
......................................................
12
............................................................
13
......................................................................................................
AND
CARE
TROUBLESHOOTING
14
...................................................................................
14
..............................................................................................
15
.......................................................................................................................
WIRING
DIAGRAM
PLEASE
OWNER'S
Model
Charger
to accommodate
71225
with Engine
about
7 am to 4:30 pm
(1-800=732-7764).
THREE=YEAR
FULL
If this Battery
Charger
vary from
READ
Plus Battery
safely
Fully
and Alternator
and effectively.
troubleshooting,
Time
call
Monday
toll-free
EACH
Automatic
Tester
USE.
Operation
offers features
use. This manual
Please
from
through
will explain
read and follow
these
anywhere
Friday.
in the
U.S.A.
1-800-SEARS-64
WARRANTY
fails due to a defect
in material
gives you specific
and Co.,
or workmanship
RETURN
IT TO ANY SEARS STORE
STATES FOR FREE REPLACEMENT.
legal rights,
and you may also
state to state.
Roebuck
BEFORE
Controlled,
16
carefully.
Central
from the date of purchase,
OUTLET IN THE UNITED
This warranty
Starter
charger
and precautions
For information
MANUALAND
Microprocessor
the needs for home or light commercial
how to use the battery
instructions
16
...................................................................................................
SAVE THIS
DieHard
Battery
Sears,
8
.......................................................................................
GUIDE
PERCENT
7
9
BATTERY
The
7
.............................................................................................
BUILT-IN
PARTS
6
.....................................................
........................................................................
THE
MAINTENANCE
6
...........................................................................
USING
CHARGING
5
Start ................................................................................................
CHARGER
BATTERY
..................................................
...................................................................................
Charging
Engine
5
.....................................................................................
PREPARING
USING
5
It In .........................................................................................................
Assembling
Using
........................................................
Hoffman
Estates,
IL 60179
within
or OTHER
have other
three
years
DIEHARD
rights which
WARNING - RISK OF EXPLOSIVE GASES
WORKING
TERIES
IN VICINITY
GENERATE
OPERATION.
EACH TIME
AND
risk
manufacturer
battery.
Review
product
THE
INSTRUCTIONS
of battery
battery
• WARNING:
explosion,
expose
cautionary
Handling
cancer
the cord on this
of California
harm.
may
Read all instructions
printed
hands
after
and vehicle
charger,
or equipment
Use charger
only on lead-acid
batteries,
used in cars, trucks,
planes,
vans,
This charger
power
system
RVs, trolling
other
Battery
entire
bat-
charger
type
etc.
to supply
electrical
for charging
appliances
controls,
teries
may burst
dry
used
like radios,
ste-
etc. These
bat-
and cause
in a well-ven-
chargers
get
and must have
Air needs
charger.
to flow
Do not set
on flammable
materials
upholstery,
paper,
board,
etc. Charger
leather
and melt plastic
like
card-
may damage
and rubber.
air-
that are commonly
remote
battery
operation
HELP
US HELP YOU --
Remember:
Place
charger
battery
being
cables
reos,
shock,
any maintenance
ventilation.
than in a starter-motor
use charger
with home
personal
injury.
Do
as far away
charged
from
the
as the charger
will permit.
not
expose
charger
to
rain
or
snow,
Never
charge
a frozen
fluid (electrolyte)
battery
battery.
becomes
into a warm
If battery
frozen,
bring
area to thaw before
you begin charging.
Do not disassemble
to a qualified
service
attempting
around
motors,
is not intended
of
from the outlet
hot during
such as those
tractors,
to a low voltage
cell batteries
•
before
proper
application.
• Never
the charger
carpeting,
rechargeable
risk of electrical
unplug
• WARNING:
tery.
•
by
and on engine.
battery,
using
published
to use in vicinity
or cleaning.
and cautions
on the battery
and those
• Always charge
tilated area.
handling.
•
BAT-
BATTERY
you intend
• To reduce
known
or other
Wash
instructions
products
with ac-
to cause
and birth defects
these
on these
sold with this product,
reproductive
NORMAL
of any equipment
markings
you to lead, a chemical
to the State
IS DANGEROUS.
DURING
EXACTLY.
follow
and manufacturer
or cords associated
cessories
BATTERY
GASES
FOR THIS REASON,
IT IS OF UTMOST IMPORTANCE
THAT
BEFORE
USING YOUR CHARGER,
YOU READ THIS MANUAL
FOLLOW
To reduce
OF A LEAD-ACID
EXPLOSIVE
service
or repair
charger.
professional
is required.
assembly
may result
cal shock.
Take it
if
Incorrect
in fire or electri-
Never
allow
charger
when
or filling
battery.
Never
ger.
battery
acid
reading
set a battery
to
specific
drip
on
gravity
on top of the char-
Never
place charger
being charged.
will corrode
Never
and damage
touch
the battery
when the charger
a spark.
Never
directly
operate
a hard blow,
damaged.
above battery
The gases from the battery
been
clamps
Never
• Wear
together
cause
complete
Do
professional
damaged
working
sure
range
of your voice
while
plenty
from
is within
working
to come
of fresh
your eyes,
this happens,
wash
soap and water.
tention.
• Avoid
working
touching
and soap
battery
eyes
immediately
cold water for at least
immediately
get medi-
onto the battery.
operate
This
the battery
device
that may
smoke
or allow
baking
charger
a spark
any acid spills
or flame
or engine.
explosive
soda before
in
area.
of the battery
generate
• Neutralize
up.
the battery
well-ventilated
in the vicinity
clean
burn.
not to drop any metal tool
electrical
with
current
an explosion.
Batteries
10
a severe
or another
• Never
If
a short circuit
to weld a ring (or the like)
or short circuit
cause
while
battery. A bat-
may spark
an open,
while
flush eyes
cal attention.
at-
Acid particles
this occurs,
Then
items
and watches,
causing
• Take care
• Always
may get into your eyes.
minutes.
If
with
get medical
(corrosion)
with running
metal
a
the
as rings, brace-
with a lead-acid
or metal object
acid
immediately
your
Have
all personal
high enough
skin, or clothing.
with a battery.
if it has
or plug.
your body such
to metal,
water
Then
Pulling
on the
to the cord or
charger
cord
tery can produce
to your
battery.
for use in case
contacts
the
power
• Remove
you work with or
are near a lead-acid
nearby
operate
lets, necklaces
that someone
aid if needed
• Have
not
with lead-
acid batteries.
• Make
the charger.
cause damage
cord replaced.
eye and clothing
when
on, tripped
pull out the plug by the cord when
unplugging
cord may
or otherwise
and repair.
protection
power cord
the plug.
if it has received
dropped,
the charger
it from being stepped
over, or damaged.
Take itto a qualified
for inspection
to prevent
the charger.
is on. You could
charger
Be sure to position
gases.
thoroughly
attempting
to
Itisimportant
tounderstand
yourcharger's
requirements.
Thissection
willtellyouabout
yourcharger's
electrical
requirements
andhowtoprepare
a battery
forcharging.
PLUGGING
ITIN
Wrapclampcablesafterunplugging
the
Yourcharger
requires
a 120V
AC2-prong powercordfromtheACwalloutletand
walloutletreceptacle
installed
according storeyourcharger
inadrylocation.
toalllocalcodesandordinances.
USING
ANEXTENSION
CORD
Theuseofanextension
cordis notrecommended.
Ifyoumustuseanextension
cord,pleasemakesurethatyoufollow
theseguidelines:
• Makesurethatthepinsoncharger's
powercordfitfirmlyintotheextension
ASSEMBLING
YOURCHARGER
cord,andthattheextension
cordfits
Included
withyourbattery
charger
aretwo
firmly
intothereceptacle.
cordwrapcleatsforstorage
oftheclamp
• Check
thattheextension
cordisproperly
cables.
wired
andingood
electrical
condition.
Toinstall,
alignthetwotabstocorrespond • Makesurethatthewiresizeis
large
withthetworeceptacles
andpushuntilyou
enough
f
orits
length
andfortheAC
hearasnap.
ampere
rating,
asspecified
inthechart
below.
MINIMUM
EXTENSION
CORD
Length
of RECOMMENDED
Cord, in Feet
i_ -?._
_ -5N _ 1_
---N
15N_
---i I
AWG* Size of Cord
• AWG=American
It is important
that you read and follow
these guidelines
18
16
12
10
Wire Gauge
while
you are preparing
time
to
to charge
the battery.
• Make
sure that you have a 6 or 12 volt
lead-acid
battery.
Determine
battery
by referring
manual
or the battery
battery
initially
your eyes
If required,
read
manufacturer's
such as removing
Charge
caps while
lowest
rate.
Be careful to
from getting
in or around
Precautions"
for batteries
"Per-
on page 4.
with removable
of
the
or not removing
charging,
tery
that
the
area around
is well ventilated
Gas
can
while
the batit is being
be forcefully
• If it is necessary
the battery
it, always
reaches
level
remove
the grounded
This
battery
first. Turn off all vehicle
by the manufacturer.
will help purge excessive
gases from the
cells. Be careful notto overfill.
If you have
a sealed battery with non-removable
caps,
no action
is necessary.
vent
sories
• NOTE:
vehicle
to charge
until
recommended
the
to avoid
A marine
or
to remove
from
the
blown
away by using a piece of cardboard
other nonmetallic
material as a fan.
water to each cell
acid
vent
and recommended
vent caps, add distilled
the battery
battery
precautions,
rates of charge.
• Be sure
charged.
See additional
all
specific
owner's
or on your hands.
sonal Safety
• Take
markings.
at charger's
• Wear safety glasses.
•
of
to vehicle
• Clean the battery terminals.
keep corrosion
voltage
sparks
(boat)
terminal
from the
acces-
from occurring.
battery
in a boat must be removed
on shore.
installed
and charged
NOTE:Amarine
(boat)
boatbattery
mustberemoved
andcharged
onshore.Tocharge
itonboardrequires
equipment
specially
designed
formarine
use.
IMPORTANT:
Follow
allsafetyinstructions
andprecautions
whencharging
yourbattery.
Wearcomplete
eyeprotection
andclothing
protection.
Charge
yourbatteryina wellventilated
area.
CHARGING
BATTERY
INTHE
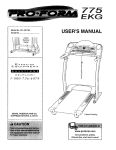
part of the chassis or engine block,
VEHICLE:
away from the battery (see figure).
DO NOT connect clamp to negative
1.Avoidpersonal
injurybykeeping
clear
battery post, carburetor,
fuel line or
offanblades,
belts,pulleys
andother
sheet metal part.
engine
parts.
Connecting
to a positive=grounded
2.Avoiddamaging
thecharger
bykeepsystem:
Connect the black (NEGAingthepowercordandoutputcords
TIVE) output clamp to the NEGATIVE
awayfromthehood,
doorormoving
post of the battery. Rock and twist
engine
parts.
the clamp back and forth to be sure
3. Notethepolarity
ofthebatteryposts
a solid electrical connection
is made.
bychecking
theidentification
marks
Then connect the red (POSITIVE)
onthebattery:
POSITIVE
(POS,Por
output clamp to a heavy, unpainted
+)andNEGATIVE
(NEG,Nor-).The
metal part of the chassis or engine
positive
postisusually
largerthanthe
block, away from the battery. DO NOT
negative
post.
connect clamp to positive battery
4. Identify
whichbatterypostisgroundpost, carburetor,
fuel line or sheet
edorconnected
tothechassis.
THIS
metal part.
ISNORMALLY
THENEGATIVE
6. Plug power cord into a 120V AC
POST.
2-prong wall outlet. The charger will
be set to the default
REGULAR
battery
rate (tester
mode).
state of 12V
type, no charge
7. Press the appropriate
to select
battery
control
the desired
type. Within
the CHARGING
charge
buttons
rate and
a few seconds,
(yellow)
light and the charging
LED should
process
should
start. If the CHECK (red) LED is on,
check for correct cable connections.
8. To disconnect
NEGATIVE
GROUNDED
5. Connecting
system:
to a negative=grounded
Connect
output
SYSTEM
clamp
the red (POSITIVE)
to the POSITIVE
post of
the battery. Rock and twist the clamp
back and forth to be sure a solid
electrical
connect
clamp
connection
is made. Then
the black (NEGATIVE)
to a heavy,
unpainted
output
metal
its power
disconnect
standing
move
the charger,
cord before
the output
clamps.
to
Then,
away from the battery,
the output
sis or engine
the output
unplug
attempting
clamp
block.
clamp
re-
from the chas-
Finally,
remove
from the battery
post.
9. Clean and store the charger
location.
in a dry
CHARGING BATTERY REMOVED
FROM THE VEHICLE:
POSITIVE
USING
START
charger
ENGINE
BATTERY
CHARGER
START
iMPORTANT:
feature.
Follow all safety instructions
and precautions
CORD
POWER
TO
GROUNDED
POWER
OUTLET
1. Note the polarity
checking
battery:
of the battery
posts
by
the identification
marks on the
POSITIVE
(POS, P or +) and
NEGATIVE
(NEG, N or -). The positive
post is usually larger than the negative
post.
2. Attach at least a 24-inch-long,
(AWG),
insulated
battery
6-gauge
cable
to
NEGATIVE
(NEG, N or -) battery post.
Rock and twist the clamp back and forth
to be sure a solid electrical
connection
is made.
3. Connect
the
clamp to the
red (POSITIVE)
output
POSITIVE
battery
post.
Rock and twist the clamp back and forth
to be sure a solid electrical
connection
is made.
4. Position
yourself
as far away from
the
battery as possible, and then connect
the black (NEGATIVE)
output clamp to
the free end of the cable.
5. Plug the
power
cord
into a 120V AC
2-prong wall outlet. The chargerwill
be set
to the default state of 12V REGULAR battery type, no charge rate (tester mode).
6. Press the appropriate
control buttons
to select
the
desired
charge
can be used to jump
start your car if the battery
is low. Follow these instructions
on how to use the
NEGATIVE
BATTERY
ENGINE
Your battery
rate and
tery.
Wear
when
complete
clothing
protection.
in a well-ventilated
iMPORTANT:
feature
Charge
area.
Using
WITHOUT
the vehicle
could
vehicle's electrical
charging
your bat-
eye protection
your
the ENGINE
a battery
and
battery
START
installed
cause damage
system.
in
to the
1. For battery
connections,
see page 6
and follow instructions
1 - 6 of CHARGING BATTERY
IN THE VEHICLE.
With
the charger plugged in and connected
to the battery
of the vehicle,
set the
CHARGE RATE to 80A START. Only the
80A START, CHARGING,
and VOLTAGE LEDs should be lit, unless the 6V
REGULAR
battery type has been selected. In that case, the 6V REGULAR
LED will also be lit.
2. Crank the engine until it starts or 5 seconds passes. If engine does not start,
wait 3 minutes before cranking
again.
3. After the engine starts, unplug the power
cord before disconnecting
clamps from the battery.
4. Clean and
location.
store
the output
the charger
NOTE:
During the starting
above,
states.
the charger
in a dry
sequence
is set to one
listed
of three
1. Wait for cranking
- The charger waits
until the engine is actually being cranked
battery type. Within a few seconds, the
CHARGING
(yellow) LED should light
before delivering
start. The charger
80 amps for engine
delivers charge at a
and the charging process should start.
If the CHECK (red) LED is on, check for
correct cable connections.
rate of up to 12 amps while waiting and
will reset if the engine is not cranked
within 15 minutes. (If the charger resets,
unplug its
to discon-
it sets itself for a 2A charge and 12V
REGULAR
battery.) While waiting for
nect the charger clamps. Then, standing
away from the battery, remove the out-
cranking,
the digital
display
shows
the battery voltage
(it can't be set to
7. To disconnect
the charger,
power cord before attempting
put clamp from the NEGATIVE
battery
post. Finally, remove the output clamp
from the POSITIVE
battery post.
8. Clean and store the charger
in a dry
location.
percent).
2. Cranking
- When cranking
is detected,
the charger will automatically
deliver up
to its maximum
output
(at least 80A)
as required
by the starting
system
for
upto 5 secondsor untilthe engine
thecooldownperiod,
nocurrent
isdecrankingstops.Thedigitaldisplay
livered
tothebattery.
After3 minutes,
showsa countdown
oftheremaining the80ASTART
LEDwillstopblinking
cranktimeinseconds.
Itstartsat5and
andwilllightcontinuously,
indicating
that
countsdownto0.
another
crankcyclecanbestarted.
The
3.CoolDown- Aftercranking,
thechardigitaldisplay
willchange
fromdisplaygerentersa mandatory
3-minute
(180
ingthecountdown
backtodisplaying
second)
cooldownstate.Duringthis
thebatteryvoltage.
TheCHARGING
period,nosettings
canbe changed. LEDwillthenbelit.
Thebuttonsareignored.
Thedigital ENGINE
STARTING
NOTES:
displayindicates
theremaining
cool • Ifthebatteryisdisconnected
during
downtimeinseconds.
Itstartsat180
thecharger
will
andcounts
downto0.The80ASTART thecooldownperiod,
reset.
LEDblinksonceeverysecond.
During
OVERVIEW
sulfated
battery,
thecharger
willswitch
to
Usingthisbatterycharger
isverysimple. aspecial
modeofoperation
designed
for
First,connect
thebatteryandACpower suchbatteries.
Activation
ofthespecial
followingtheprecautions
listedunder desulfation
modeis indicated
byblinking
"OPERATING
INSTRUCTIONS".
Then theCHARGING
LED.If successful,
norselecttheappropriate
BATTERY
TYPE malcharging
willresume
afterthebattery
TheCHARGING
LEDwill
andCHARGE
RATE
foryourbattery.
The is desulfated.
charger
willthendoeverything
automati- thenstopblinking
andlightcontinuously.
cally.Thissection
explains
afewdetails. Desulfation
couldtakeupto10hours.If
desulfation
fails,
charging
willbeaborted
CHARGING:
If the chargerdoesnot
and
theCHECK
(
red)
L
ED
willblink.
detecta properly
connected
battery,
the
CHECK
(red)LEDwilllightcontinuously COMPLETION
OFCHARGING:
Charge
untilsucha batteryisdetected.
Charging completion
isindicated
bytheCHARGED
willnotbeginwhiletheCHECK
LEDison. (green)LED;whenlit,thechargerhas
Whencharging
begins,
theCHARGING stoppedcharging
andswitchedtothe
LEDwillbelit.
Maintain
Modeofoperation.
If the12V
DEEP
CYCLE
b
attery
t
ype
wasselected
AUTOMATIC
SHUTOFF:Whenthe2A,
12Aor 30Achargerateisselected,
the forotherchargetypes,theCHARGED
chargeris setto performanautomatic LEDcomeson whenthe batteryis
enough
fornormaluse.
charge.Whenan automatic
chargeis charged
performed,
thecharger
stopscharging
au- MAINTAIN MODE: When the CHARGED
tomatically
afterthebatteryischarged. (green) LED is lit, the charger has started
Mode. This mode of operation
is
ABORTED
CHARGE:
If charging
can't Maintain
also known as Float-Mode
Monitoring.
In
becompleted
normally,
charging
willbe
this mode, the charger keeps the battery
aborted.
Whencharging
is aborted,
the
charged by delivering a small amount
charger's
outputis shutoffandthered fully
of current, when necessary.
The voltage
CHECK
LEDanddigitaldisplay
blinkon is maintained at a level determined
the
andoff(atopposite
times).
Inthatstate,
the BATTERY TYPE selected. NOTE: by For
charger
ignores
allbuttons.
Toresetfrom
types other than DEEP CYCLE,
afteranaborted
charge,
eitherdisconnect charge
the CHARGED
LED might be lit before
thebatteryorunplug
thecharger.
Maintain
Mode is started.
DESULFATION
MODE:If a batteryis GENERAL CHARGING
NOTES:
The
leftdischarged
foranextended
period,
charger is designed
to control its cooling
it couldbecome
sulfated
andnotaccept
a normal
charge.
Ifthecharger
detects
a fan for efficient operation. Consequently, it
isnormal
forthefantostartandstopwhen
maintaining
afullycharged
battery.
Thefan
doesnotruninTester
Mode.
Ifthecharge
mode
ischanged
aftercharginghasstarted
(bypressing
theCHARGE
RATEorBATTERY
TYPEbutton),
the
charging
process
willberestarted.
Thevoltage
displayed
during
charging
is
thecharging
voltage
andusually
willbe
higher
thanthebattery's
resting
voltage.
or "marine".
usually
Deep
larger
cycle
batteries
than the other
are
types.
• 12VAGM/GEL:
AGM and gel cell batteries have sealed cases without vent
caps.
Such
batteries
than the other
• 6V REGULAR:
tery usually
in antique-and
vehicles.
With
the
exception
all other
not have
Batteries
MODE
Use this switch
the digital
SWITCH
button to set the function
display
• BATTERY
%: The digital display
of the percent
the
connected
battery
battery
of
to one of the following.
an estimate
E: The digital display
voltage at the charger
DC volts.
• ALTERNATOR
of
charger
an estimated
output
of the vehicle
connected
BATTERY
If the battery
use the REGULAR
battery complies
clamps
charging
in
display
of the
system
battery clamps
to a properly
functioning
type is unknown,
setting.
Make sure the
with the safety instructions
TYPE
switch
SWITCH
button
REGULAR:
to set the type of
to one of the fol-
usually
and motorcycles.
This
used
These
is the
in cars,
type
12V DEEP
CYCLE:
batteries
Deep
marked
cycle
of
trucks,
vent caps and are often marked
maintenance"
or "maintenance-free".
ies are usually
RATE
SWITCH
button to set the maximum
charge rate to one of the following.
2ASLOW
CHARGE
RATE: Intended
charging
small
commonly
batteries
have
"low
batter-
as "deep cycle"
for
such as those
used in garden
tractors,
snow
mobiles and motorcycles.
The 2A rate
is not intended to be used as a trickle
charger for larger batteries.
• 12A FAST or 30A RAPID
lowing.
•
with their type.
is not marked,
item that uses
Use this switch
percentage
to be charged
battery
or
are
on page 3.
system.
12V
may
Vent caps
be marked
CHARGE
battery
to the charger
as compared
•
caps.
a battery that
manual of the
shows the
%: The digital
shows
battery
and gel cell
types
clamps.
• VOLTAG
Use this
vent
should
If charging
check the
the battery.
shows
of charge
to the
of AGM
battery
located on top of the battery and provide a
means to add distilled water when needed.
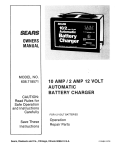
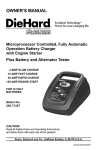
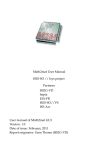
71225 CONTROL PANEL
DISPLAY
for batteries
than 8.5V DC.
batteries,
may
some
The 6V REGULAR
battery type is not selectable
greater
smaller
This is the type of bat-
used
specialized
are often
types.
RATE:
Use
batteries,
for
charging
marine
cycle batteries.
batteries,
Not intended
CHARGE
automotive
and
deep
for industrial
applications.
• 80ASTART:
Provides8Oampsforcrank-
ing an engine
battery.
Always
with a weak
or run down
use in combination
with
a battery.
NOTE:
To turn OFF the charger,
unplug
from the power cord from the wall outlet.
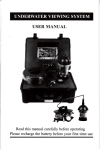
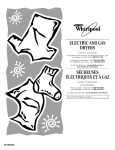
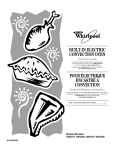
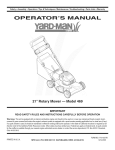
71225
CONTROL
PANEL
GUIDE
/
MODE OF OPERATION
Digital
Display
Initial power-up, battery not detected
o
Ioi
No battery or reversed battery detected
0
User selected
Battery tester activated
Battery tester with charged battery
0
Battery tester with no battery
I
I
ol
I
User selected
User selected
0~100%
0
User selected
100%
0
User selected
O%
User selected
0.0~17.0V
User selected
0~199%
User selected
0~199%
o
o
o
0
2 Amp charge with battery detected
0
User sel.
12 Amp charge activated
o
User sel.
30 Amp charge activated
0
User sel.
Charge complete - Maintain Mode started
0.0
0
0
0
I
0% or 0.0V
Voltage meter activated
Alternator tester activated
Alternator tester on good alternator
Alternator tester on bad alternator
I
User selected
0
0
0
User sel.
User selected
0~199%
User selected
xx% or xx.xV
User selected
xx% or xx.xV
User selected
xx% or xx.xV
User selected
100% or xx.xV
80A Engine Start
o
Waiting for engine crank
O
Cranking engine
Cool down after cranking
Desulfation mode activated
Charge aborted
User sel.
I
0 indicates an LED that is on continuously.
User selected
I
I
1 .O-16.OV
O
5 _0
B
180.-0
User selected
I
I
B indicates an LED that blinks on and off.
I
15% or 16V
8.8.8. (B)
OVERVIEW
powered up, the battery will remain a
Thisbattery
charger
hasa built-in
battery tester (not a charger) indefinitely, unless
testerthatdisplays
eitheranaccurate
a charge rate is selected.
battery
voltage
oranestimate
ofthe
TESTING
AFTER CHARGING
battery's
relative
charge
basedonthe
After the battery has been changed from
battery
voltage
andtheBattery
Council tester to charger (by selecting a charge
International
scale.
rate), it remains a charger. To change
TESTING
SEQUENCE
the battery back to a tester, press the
Therearefourbasicstepsrequired
to
CHARGE
RATE switch until all charge
rate LEDs are off.
usethe71225asabattery
tester.
1.Connect
thecharger
battery
clamps
to TESTER STATUS LEDs
thebattery.
Besuretofollowallofthe When the 71225 is operating as a batprecautions
listedunder"OPERATINGtery tester, the status LEDs light under
INSTRUCTIONS".
the following conditions:
2.Connectthecharger
power
cordto
a120V • The CHARGED (green) LED will light if
AC2-prong
walloutlet.
Again,
besureto
a charged battery is tested.
followalloftheprecautions
listedunder • The CHARGING (yellow) LED does not
"OPERATING
INSTRUCTIONS".
light in the battery test mode.
3. If necessary,
pressthe BATTERY • The CHECK (red) LED lights unless a
TYPEbuttonuntilthecorrecttypeis
properly connected
battery is detected.
indicated.
• When the tester display mode is set to
4. Readthevoltage
onthedigitaldisplay VOLTAGE, the CHARGED and CHARGorpress
thedisplay
mode
button
toset
ING LEDs won't light.
thetestertoBATTERY
%andreadthe
INITIAL PERCENT
CALCULATION
batterypercent.
When a battery % is calculated
for the
TESTER
ANDCHARGER
first time after connecting
a battery, the
When
firstturned
on,the71225
operdigital display will show three dashes
atesonlyasatester,
notasa charger.
To
("---") for a period as long as several
continue
touseitasonlyatester,
avoid
seconds while the tester analyzes the
pressing
theCHARGE
RATE
switch
butbattery.
ton.Selecting
acharge
rateactivates
the
battery
charger
anddeactivates
thetester. NOTES FOR TESTING BATTERY %
Pressing
theCHARGE
RATE
button
when A recently charged battery could have a
temporarily
high voltage
due to what is
the8OA
StartLEDislit(except
during
the
known as "surface
charge". The voltage
180second
cooldown)
willshutoffthe
of such a battery will gradually drop during
charger
andactivate
thetester.
the period
POWER-UP
IDLE
If no switch
button
minutes
TIME
is pressed
after the battery
up, the charger
to charger,
connected.
In that case,
TESTER
battery
If either the DISPLAY
button
the first ten minutes
15
is first powered
switch
reading,
the
is
removed
by temporarily
the battery
will
The battery
LIMIT
MODE
or BAT-
is pressed
within
after the battery
after the charging
Consequently,
surface
charge
The battery
batteries.
% ranges
tester
Testing
I1
be
a load on
on lights or
from 0 to 100.
is only designed
a device
changing
voltage could
or inaccurate
results.
is
the
values
accurate
should
creating
the battery, such as by turning
other accessories.
rate and 12V
TIME
immediately
is disengaged.
tester could display inconsistent
for such a battery. For a more
type.
WITHOUT
TYPE
within
if a battery
be set for the 2A charge
REGULAR
system
will automatically
from tester
TERY
LIMIT
with
to test
a rapidly
yield unexpected
Thisbattery
charger
hasa built-in
alternatortesterthatdisplays
eitheranaccuratealternator
voltage
oranestimate
of
thealternator's
relative
output
compared
tonormal
alternators.
TheAlternator
%
valuesdisplayed
should
betakenas
general
reference,
notprecise
diagnosis.
Thealternator
testerfunctions
thesame
asthebattery
tester(seeprevious
sectionofthismanual
fordetails)
withafew
differences.
TESTING
SEQUENCE
There
arethreebasicstepsrequired
touse
the71225
asanalternator
tester.
1.Connect
thecharger
battery
clamps
tothebattery
orcharging
system.
Be
suretofollowalloftheprecautions
listedunder"OPERATING
INSTRUCTIONS".
2.Connect
thecharger
powercordtoa
120V
AC2-prong
walloutlet.
Again,
besuretofollowalloftheprecautions
listedunder"OPERATING
INSTRUCTIONS".
3.Startthevehicle
andturnonthe
vehicle's
headlights.
Readthevoltage
onthedigitaldisplay
orpressthe
DISPLAY
MODEbutton
tosetthe
testertoALTERNATOR
%andread
thealternator
percent.
TESTER
STATUS
LEDs
When
the71225
isoperating
asanalternatortester,
thestatusLEDslightunderthe
following
conditions.
• TheCHARGED
(green)
LEDwilllight
iftheoutput
ofthecharging
system
is
atthenormally
desired
level.
• TheCHARGING
(yellow)
LEDdoes
notlightinthealternator
testmode.
• TheCHECK
(red)LEDlightsifthe
voltage
ismuchhigherorlowerthan
normally
desired.
• Whenthetesterdisplay
modeisset
toVOLTAGE,
theCHARGED
and
CHARGING
LEDswon'tlight(itcould
betesting
a battery
oranalternator).
ALTERNATOR
TESTING
NOTES
• Thealternator
percent
display
can
rangefrom0to199.
• TheDISPLAY
MODE
cannot
besetto
ALTERNATOR
%during
charging.
12
Thischarger
adjusts
thecharging
timein There
aresomeimportant
factstokeepin
orderto chargethebatterycompletely, mindwhencharging
a battery.
efficiently
andsafely.Themicroproces- Whenthedisplay
indicates
77%
sorautomatically
makesthenecessary
charged,
thebattery
h
asbeen
charged
decisions.
However,
thissection
includes
tostartmostvehicles
andhas
guidelines
thatcanbeusedtoestimate enough
already
beencharged
asmuchasby
charging
times.
manyotherbattery
chargers.
Theduration
ofthecharging
process
deWhenthedisplay
indicates
85%
pendsonthreefactors:
charged,
thebatteryhasalready
been
1.BatteryState- Ifa battery
hasonly
charged
atleastasmuchasbymost
beenslightly
discharged,
itcanbe
otherbattery
chargers.
charged
inlessthana fewhours.
Thebattery
%shownintestermode
Thesamebattery
couldtakeupto10
isanestimate
basedonthebathoursifveryweak.Thebattery
state
tery
voltage
a
nd
theBattery
Council
canbeestimated
byusingthebuilt-in
International
scale.
The
battery
%
tester(seepage11).Thelowerthe
shownincharger
modeisanestimate
reading
thelonger
charging
willtake.
oftherelative
charge
inthebattery
2. Batteryrating- Ahigherrated
compared
tothecharge
itshouldhave
battery
willtakelonger
tocharge
ifthecharging
process
isallowed
to
thana lowerratedbattery
underthe
complete.
sameconditions.
Abattery
isratedin
Thebattery
%shownintestermode
ampere-hours
(AH),reserve
capacity
canbeusedtoestimate
therelative
(RC)andcoldcranking
amps(CCA).
Thelowertheratingthequicker
the
charge
time.Thelowerthe%shown,
battery
willbecharged.
thelonger
thecharge
timeforagiven
battery.
3.Chargerate- Thecharge
rateis
measured
inamps.Thischarger
Thebattery
%shownincharger
mode
provides
charge
ratesof2A,12A
isanindication
oftherelative
progress
and30A.The80Arateisforengine
ofthecharging
process.
Thehigher
startonly.The2Arateisforchargthebattery
%displayed,
theless
ingsmaller
batteries
suchasthose
charge
timeremains.
usedformotorcycles
andgarden
Themoreabatteryisdischarged,
tractors.
Suchbatteries
should
notbe
thefasteritabsorbs
charge
froma
charged
usingthe12Aor3OA
rate.
charger.
Thatmeans
thatthebattery
The12Aand30Aratesareforcharg%increases
fasteratthebeginning
inglargerbatteries.
Inthe30Amode,
ofthecharging
process
thanatthe
thecharger
begins
ata low-charge
end.
I
nother
words,
ittakes
longer
rateandincreases-the
charge
rateif
forthebattery
toabsorb
thelastfew
itisdetermined
thatthebattery
can
accept
thehigher
rate.Allcharging
percent
ofcharge
thanthefirstseveral
modes
willdecrease
thechargerate
percent.
asthebattery
approaches
maximum
charge.
Afterthecharging
process
hasstarted,
thedigitaldisplay
canbe
usedtodetermine
charging
progress
byselecting
theBATTERY
%mode.
13
Readthisentiremanual
before
usingyourcharger.
Thetipsbelowserveonlyasa guide
forspecific
situations.
Ifyourvehicle
won'tstart:Youdon'tneed Reviving
yourbattery:If youonlywish
tofullychargea battery
tostartyourve- tocharge
yourbattery
enough
tooperate
hicle.Ifthecharger
won'tstartyourvehicle yourvehicle,
youdon'tneedtowaitforthe
usingthe80ASTART
rate,trycharging entirecharging
process
tobecompleted.
thebattery
usingthe30Aratefor10or15 Whenthecharger
displays
a battery%
minutes.
Thatshouldchargethebattery of77or more(seepage13),thebattery
enough
toallowthe80ASTART
rateto hasusually
beencharged
enough
forthe
startthevehicle.If thevehicle
willthen vehicle
tostartandoperate
normally.
beoperated
continuously
foranextended
an interrupted charge: if
period(suchasa longdrive),thevehicle Completing
the charging process has been interrupted
couldchargethebatterybackto normal and restarted after the charger displays a
duringthatperiod.
If thevehicle
willonly battery % of 85 or more, the charger could
beoperated
forashortperiod
(short
drive), go straight to Maintain Mode (see page
thebattery
might
needtobecharged
again 8). However, if the original charge was
before
itcouldstartthevehicle
again.
started using 3OA, the charge can often
be completed
A minimal
1. Clean
amount
of care can keep your battery
the clamps
each time you are finished
that may have come in contact
2. Coil the input and output
vent accidental
3. Occasional
damage
cleaning
cords
charger
working
charging.
Wipe
with the clamps
neatly
to the cords
when
using the 2A rate.
to prevent
storing
properly
for years.
off any battery
fluid
corrosion.
the charger.
This will help pre-
with a soft cloth
will keep the finish
and charger.
of the case of the charger
shiny.
14
Performance
problems
oftencanbecorrected
bytheuser.Please
readthrough
thischart
fora possible
solution
tocommon
problems.
PROBLEM
POSSIBLE
CAUSE
Thebatteryisconnected Thecharger
isintester
andthecharger
ison,
mode,notcharger
mode.
butisn'tcharging.
Indicator
lightsarelitin
anerraticmanner
not
explained
inthe"Using
YourBattery
Charger"
section.
SOLUTION
PresstheCHARGE
RATEbutton
toactivate
charging
andselecta
chargerate.
Youmighthaveacciden- Makesurenothing
is
tallyactivated
aspecial touching
thecontrol
diagnostic
mode.
panel,thenunplug
the
charger
andplugitin
again.
Thecharger
maybe
defective.
BATTERY
TheCHECK
(red)LED Theincorrect
always
flashes
before
TYPEmayhavebeen
thebatteryiscompletely selected.
charged.
Thiswillhappen
ifthe
batterydidnotreachfull
charge
within24hours.
Maybeduetoavery
largebatteryora bank
ofbatteries
requiring
morepower
thana30/12
Ampcharger
candeliver
within24hours.
Thebatterymayalsobefaulty.
Engine
cranktimeisless Startermotormaybe
thanspecified.
drawing
morethan80
Amps.
Return
toplaceofpurchaseforreplacement.
Resetthecharger
by
unplugging
itorbriefly
disconnecting
itorbriefly
disconnecting
thenegativebattery
clip.Select
thedesired
CHARGE
RATEandBATTERY
TYPEagain,ifnecessary.
Charge
thebattery
at
the30Aratefor10to15
minutes
thencrankthe
engine.
ThegreenCHARGED Thebatterymaybe
If thebatteryisinaveLEDlightsafewminutes fullycharged
orrecently hicle,turntheheadlights
afterconnecting
tothe
charged,
leaving
thebat- onforafewminutes
battery.
teryvoltage
highenough toreduce
thebattery
toappear
tobefully
voltage
andtrycharging
charged.
again.
Theincorrect
BATTERY Resetthecharger
byunTYPEmayhavebeen
plugging
itorbrieflydisselected.
connecting
thenegative
batteryclip.Select
the
desired
CHARGE
RATE
andBATTERY
TYPE
again,ifnecessary.
15
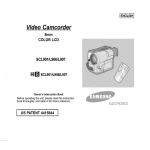
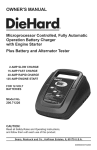
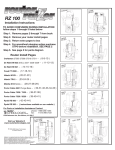
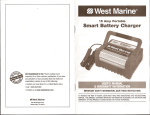
Thissection
shows
anillustration
ofyourbattery
charger.
Useittobecome
familiar
with
partlocations
andappearance.
Replacement
Parts
List Sears 71225
ITEM
DESCRIPTION
PART NUMBER
1
HandleAssembly
2299001477
2
Case, Top
3799004060
3
Faceplate
0899002634
4
Control BoardAssembly 2299001462
5
3899002000
6
Output Cablesand
Clamps
PowerCord
7
Cord Cleat
1199004390
8
Transformer
93026580
9
10
PowerBoard/
90026135
2299001471
HeatsinkAssembly
Circuit Breaker
3999000105
11
Fan
0099000453
12
Case, Bottom
3699001330
13
Instructi0nManual
0099000536
:=D3:
o
aaa
0
aaaa
i
For information
in the
U.S.A.
about
troubleshooting,
7 am to 4:30
pm Central
1-800-SEARS-64
call
Time
tol!-free
Monday
(1-800-732-7764).
I6
from
through
anywhere
Friday.
i


![PLAS A O ]-OR](http://vs1.manualzilla.com/store/data/005852706_1-5db0b7ed584537f0e62af161fb124638-150x150.png)