1
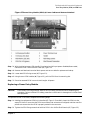
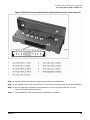
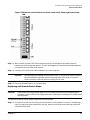
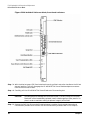
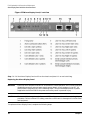
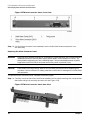
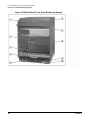
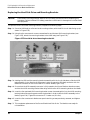
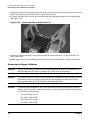
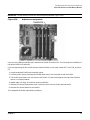
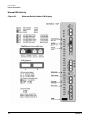
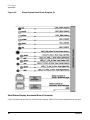
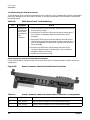
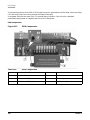
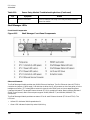
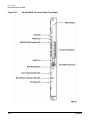
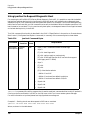
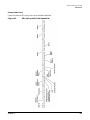
Field Replaceable Unit Removal and Replacement
Shelf Manager
Step 2. When the blue H/S LED illuminates continuously, pull the extraction handle as far as it will go.
This will release the ShMM unit from the 14-Slot Shelf.
Step 3. Remove the ShMM by pulling it out of its 14-Slot Shelf mounting slot, and place it in an anti-static
bag.
Replacing a Shelf Manager
CAUTION
Electrostatic Discharge Hazard. Observe all ESD safety precautions while completing this
procedure. Failure to follow ESD safety precautions could result in damage to the 14-Slot Shelf
and equipment.
To replace a ShMM unit, complete the following steps:
Step 1. Ensure that the replacement ShMM extraction handle (#11, Figure 1-4 is completely pulled out as
far as it will go.
Step 2. Carefully insert the ShMM into the empty Shelf ShMM slot until the two ShMM backplane
connectors align with the 14-Slot Shelf connectors.
Step 3. Press the extraction/insertion handle toward the ShMM unit front panel (Figure 1-4) until the unit
is fully seated into the ShMM slot, and the extraction/insertion handle closes fully against the
ShMM front panel.
Step 4. Tighten the ShMM fixing screw (#1, Figure 1-4) until it is snug.
Step 5. The blue H/S LED will illuminate with a long blink cycle while the replacement ShMM is
activating itself. When the ShMM is active, the blue H/S LED will go out.
Step 6. After replacement, the green STATUS LED (#9, Figure 1-4) will illuminate continuously when the
ShMM is active, and blink when the ShMM is operating in standby mode.
Chapter 1
35