1
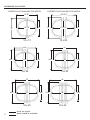
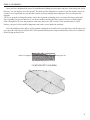
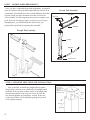
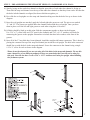
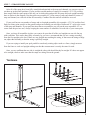
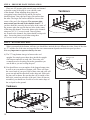
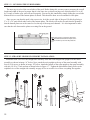
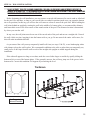
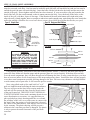
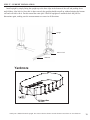
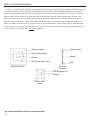
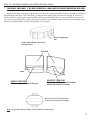
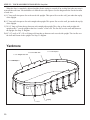
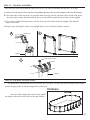
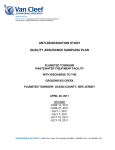
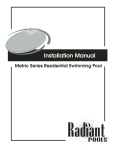
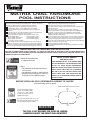
STEP 8 – PRESSURE PLATE INSTALLATION:
Place one 44" pressure plate on each strap end channel
so that the center of the plate is even with the center
of the channel. When installing these plates the
corrugation bumps should be up and the flat surface
should be down. One edge has a larger flat surface than
the other. The larger flat surface should be closer to the
center of the pool. (See diagram). The pressure plate
must extend past the end of the channel about 1". If
you have done this correctly the two holes in the center of
the pressure plate line up with the two holes in the center
of the strap end channel. Secure the plates to the channels
using two #12 X ¾" screws in each. Once all plates
are secured to the channels, the plates should overlap each
other. Secure the plates to each other using three
#12 screws in each overlapping area.
Yardmore
STEP 9 – BOTTOM WALL RIM:
When you unpacked the bottom wall rims you should have noticed the two different size rims. Some of the rims
are 37 '' and the rest of the rims are longer but the exact measurement depends on which size pool you have.
It is very important to separate rims by size now.
A) The 37" long bottom rims go in between the oval
uprights.You simply press them down inside the straight
side bottom connector on each side. These rims will
eventually need to be sitting flat on the ground but you
can do that as you are leveling the pool.
B) You should have an even number of the longest bottom rims,
as well as an even number of bottom cuffs. These will form
the curved ends of your pool. Half of these rims and cuffs will
go on one end and the other half on the other end. Slide each
rim into cuff as shown. Be sure that the cuff is outside of the
half circle created on each side of the pool. Once all rims are
assembled, you should now be able to see the entire shape of
the oval pool on the ground.
Yardmore
10
Bottom Cuff
Wall Rim