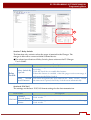
1
Copyright © 2010, Unication Co., Ltd.
All rights reserved.
0
INDEX:
E5 PROGRAMMING SOFTWARE MANUAL
Index
1.Scope of This Manual ......................................................................... 2
1-1 Introduction .................................................................................................................... 2
1-2 Scope Of This Manual .................................................................................................. 2
2.Getting Started ..................................................................................... 3
2-1 Equipment Required ..................................................................................................... 3
2-2 Equipment Setup ........................................................................................................... 4
2-3 Software Installation ..................................................................................................... 5
2-4 Basic Layout.................................................................................................................. 12
3. Using Your PPS ................................................................................. 13
3-1 Overview for Programming a Pager .......................................................................... 13
3-2 Main Menu ................................................................................................................... 14
3-3 File Menu ...................................................................................................................... 15
3-4 Edit Menu ..................................................................................................................... 17
3-5 Options Menu .............................................................................................................. 18
3-6 Program Menu.............................................................................................................. 19
3-7 Help Menu .................................................................................................................... 20
4. Programming Menu ......................................................................... 21
4-1 General Settings........................................................................................................... 21
4-2 Code Settings................................................................................................................ 23
4-3 Folder Settings ............................................................................................................. 27
4-4 Profile Settings ............................................................................................................. 29
4-5 Alert Settings ................................................................................................................ 31
4-6 Password / OTA Settings ............................................................................................ 34
4-7 Features Settings .......................................................................................................... 36
4-8 Rapid Call Settings ...................................................................................................... 45
4-9 GSM Settings (Only For GSM Model) ..................................................................... 47
5. Information ..................................................................................................................... 49
1
1.Scope of This Manual
E5 PROGRAMMING SOFTWARE MANUAL
Index
1-1 Introduction
The E5 programming software allows for the configuration of Unication E5
Pager. The programming kits includes below items:
• Programming cradle
• Programming mini USB cable
• Pager Programming Software CD (Programming manual included)
1-2 Scope Of This Manual
This pager programming guide contains below sections to assist you in the use
of the E5 Programming Software (PPS):
• Getting Started - information about equipment requirements, installation,
setup, and use of the software.
• Using Your PPS - the sequence of screens used to read and program one or
more pager(s).
• Programming Menu – introductions to all the feature settings in the
programming software.
2
2.Getting Started
E5 PROGRAMMING SOFTWARE MANUAL
Getting Started
The E5 PPS and interface package, combined with a personal computer (or
compatible), provides the flexibility to program E5 to meet individual
requirements. This software has a modern look and ease-of-use operation. To
obtain the best results from the product, please take a few minutes to read this
instruction guide.
2-1 Equipment Required
• Pager Interface
This unit provides communication between the computer and the Pager
Mechanical Interface. This package includes all cables necessary for
connection with the computer and the Pager Mechanical Interface.
• Pager Programming Software
This software program, designed specifically for the E5 Pager. It is compatible
with Windows 2000, Windows XP, Windows 2003, Windows 2007 and Vista.
This software program allows you to select the desired information to
program into the pager. A CD is provided to facilitate the programming
procedure.
Use only the latest model of the Programming Interface to work with the E5
and pager programming software. Use only the Unication-supplied cable for
connection between the Pager Mechanical Interface and the Programming
Interface. Use of non-approved cables can result in improper operation and/or
incorrect programming of the pager.
E5 PROGRAMMING SOFTWARE MANUAL
Getting Started
2-2 Equipment Setup
Please follow below steps for setting up the programmer.
STEP1: Connect the mini USB cable to the programmer interface and the PC.
Figure 1. E5 Equipment Connection Diagram
STEP2: Preparing E5 for Reading or Programming
Place the pager (※The pager must be turned on.) in the upright
position into the programming station, the LED on the programmer
will turn on with RED.
Ensure the pager is tight in the programming station.
Now the pager is connecting with the computer and ready to be read
or programmed.
◆ While the programmer is reading or programming the pager, the solid
RED LED will turn to flash.
◆ After the programmer reads or programs the pager, the pager will turn
on automatically and generates an alert.
◆ To read or program the pager again, please make sure the alert stops
and the pager already turns on.
4
E5 PROGRAMMING SOFTWARE MANUAL
Getting Started
2-3 Software Installation
The Product E5 programming software CD includes the “SETUP_E5 PPS.exe”. When
insert the PPS CD into the computer, an auto run direction software will automates
running and guiding you through the software installation.
STEP1: Welcome wording display when the CD is put into the computer.
Click “Enter” to next step.
STEP2: Select a desired language. Click “Enter” to next step.
5
E5 PROGRAMMING SOFTWARE MANUAL
Getting Started
STEP3: Double click “Software Installation” to start the software installation.
◆ Only one configuration for the programming software is allowed; therefore, if you want to
keep an old/new version of the programming software, you must remove the current
version which is on your system.
STEP4: Click “Next” to enter the next screen.
STEP5: Before the software installation, please read the agreement carefully.
6
E5 PROGRAMMING SOFTWARE MANUAL
Getting Started
If you agree with the content, click “I accept the agreement.” Then click “Enter” to
move to next step.
STEP6: Click "Browse" to change the location where you want to install the
software or click "Next" to enter the next screen.
STEP7: Select the additional task you would like Setup to perform or click "Next" to
enter the next screen.
7
E5 PROGRAMMING SOFTWARE MANUAL
Getting Started
STEP8: The programming software now is ready to install.
Installing process bar indicates the status of installation.
8
E5 PROGRAMMING SOFTWARE MANUAL
Getting Started
STEP9: Install the USB driver
STEP10: The driver installation is completed. Click “Finish “ to exit the window.
9
E5 PROGRAMMING SOFTWARE MANUAL
Getting Started
STEP11: Click "Finish" to exit the installation program.
The PPS menu will launch on the desktop.
◆Please select the correct comport to connect with the programmer.
STEP12: Click "Options" to select Communication Setup.”
10
E5 PROGRAMMING SOFTWARE MANUAL
Getting Started
STEP13: Click "E5 Programmer" to set up a connect Com port. Now your computer
can connect with the programmer.
11
E5 PROGRAMMING SOFTWARE MANUAL
Getting Started
2-4 Basic Layout
The E5 PPS uses a graphical interface that supports both a mouse and/or a keyboard.
Refer to Figure 2.
Title Bar
Tool Bar
Desktop
Explorer Box
Figure 2. E5 PPS Blank Desktop Screen
1.
Title bar –
Located above the Tool bar, contains the title name of the program.
2.
Tool barThe Standard toolbar contains the basic file and program operations.
3.
Explorer BoxExplorer Box, the main feature categories are included. Click to expand the
feature items, and the settings screen will display in Desk Top.
4.
Desktop Desk top, the main portion of the screen, most of the interaction occurs during
programming. All dialog and message boxes activated from the tool bar and
their status is displayed on the desktop.
12
E5 PROGRAMMING SOFTWARE MANUAL
Using Your PPS
3. Using Your PPS
3-1 Overview for Programming a Pager
To read and program your pager, follow these steps:
1. Use the Menu Bar to select the Read/Write Pager options.
2.
3.
Enter information in the options screens.
Choose the program option from the Tool Bar.
These steps are shown graphically in Figure 3:
TOOL
MENU
EXPLORER
BOX
DESKTOP
PROGRAM
Figure 3. Basic Steps in Programming a Pager
E5 PROGRAMMING SOFTWARE MANUAL
Using Your PPS
3-2 Main Menu
Please see the main menu screen as shown in Figure 4. The Main menu
provides selections for reading and programming a pager and setting up your
computer configuration. Each task is explained in detail as you continue
through this manual.
Figure 4. Main Menu Screen
Help.
There are four sections on Tool Bar: File, Edit, Options, Program and
Ex. To select the File menu, click your mouse on the tool bar item File or
press
simultaneously.
The File pull-down menu has three items: Any of the menu items can be
selected in one of two ways:
• Click on the text.
• Press the function key associated with the command/option, such as
Ctrl+O for Load Codeplug.
14
E5 PROGRAMMING SOFTWARE MANUAL
Using Your PPS
3-3 File Menu
Load Codeplug
Selecting this screen loads an existing codeplug from disk storage. Choose the
codeplug from the list or enter the name on the input line. Click Open to load
or Cancel to exit.
•Shortcuts
Toolbar:
Keys:
Ctrl+O
• The following options allow you to specify which file to open:
15
E5 PROGRAMMING SOFTWARE MANUAL
Using Your PPS
Save Codeplug
Selecting this screen creates a file on disk with an extension of .CP as a default
or any extension you choose. This file contains all current codeplug settings.
•Shortcuts
Toolbar:
Keys:
Ctrl+S
• The following options allow you to specify the name and location of the file
you're about to save:
16
E5 PROGRAMMING SOFTWARE MANUAL
Using Your PPS
3-4 Edit Menu
Edit Options
This screen allows you to cut, copy and paste the existing string.
Cut
Cut the existing string.
•Shortcuts
Keys: Ctrl+X
Copy
Copy existing string.
•Shortcuts
Keys: Ctrl+C
Paste
Past existing string.
•Shortcuts
Keys: Ctrl+V
17
E5 PROGRAMMING SOFTWARE MANUAL
Using Your PPS
3-5 Options Menu
Option
This screen allows you to select the comport to connect with the programmer.
Communication Setup
Select a com port to connect with the programmer cradle.
Configuration Report
Display the PPS configuration.
Click “SAVE AS” to save the configuration as a .csv file.
◆T he .csv file can be opened by excel.
Click “Exit” to exit the Configuration Report and return back PPS windows.
18
E5 PROGRAMMING SOFTWARE MANUAL
Using Your PPS
3-6 Program Menu
Read Pager
Read the pager.
•Shortcuts
Toolbar:
Keys: F3
Write Pager
Program the pager.
•Shortcuts
Toolbar:
Keys:F2
19
E5 PROGRAMMING SOFTWARE MANUAL
Using Your PPS
3-7 Help Menu
Click “ Help” which is on the Tool Bar.
Help Topics
Click Help Topics to display the Programming User’s Manual.
About
Display the Programming Software version and copyright information about
the application.
20
E5 PROGRAMMING SOFTWARE MANUAL
Programming Menu
4. Programming Menu
4-1 General Settings
General Settings provide for entering essential pager code and function information,
allowing you to select the configuration you want to use to program the pager.
1.
Click “General” in the explorer box.
Field Name
Serial No.
Settings
Inventor
Control No.
Description
This non-editable field displays the serial number
programmed into the pager at the factor, and should
match the serial number on one of the labels attached to
the pager. If this label is not available, refer to the order
form for the appropriate serial number.
This non-editable field displays the Inventory Control
Number (up to ten characters) that is stored in the pager.
21
E5 PROGRAMMING SOFTWARE MANUAL
Programming Menu
Field Name
Code Format/Baud Rate
Frequency Type
Data Inversion
Alert By Folder
Pager Model
Pager Type
Information
(Non-editable)
Band Split
Codeplug
Version
Primary
Frequency
Frequency
Secondary
Frequency
Description
This field designates the baud rate on which the
pager operates.
The options are :
POCSAG 512, POCSAG 1200, POCSAG 2400
Press the pull-down menu to toggle among the
choices.
This field designates the frequency type on which
the pager operates.
The options are:
Single Frequency, Dual Frequency.
◆ If the Dual Frequency is enabled, Secondary
Frequency column will display and allow you to
edit the frequency.
This field designates if Data Inversion is required to
the applied paging system. Certain frequencies
require data to be inverted, refer to applicable
service manuals for frequencies and their
corresponding Data Inversion settings.
This field designates the message alert type to be
reset on “Folder”, not “the address.
When this feature is enabled, the folders determine
the alert type, not the address; the folder setting will
then contain all the related alert options.
This field indicates the Pager model.
This field indicates the maximum pager addresses.
32 RIC’s , 64 RIC’s, 96 RIC’s (128RIC is an option)
This field indicates the Band split on which the
pager operates, either :
VHF A , VHF B, VHF C, UHF D, UHF E
This field indicates the version of the pager
Codeplug.
This field designates the primary frequency on
which the pager operates.
◆ If the Frequency Type is set as “Single
Frequency”, there will be only one frequency
column for the setting.
This field designates the secondary frequency on
which the pager operates.
◆ The Dual Frequency must be within the band
split that the pager supports.
22
E5 PROGRAMMING SOFTWARE MANUAL
Programming Menu
4-2 Code Settings
Code Settings provide for programming pager addresses and function information.
1. Click “Code ”in the explorer box.
2. Click the pull-down menu and select assigned RIC quantity on the “RIC
3.
4.
5.
OPTION”.
The “Code” item in the explorer box will extend the RIC options as the assigned
quqntity of the “RIC OPTION”.
Click to expand the Code list.
Select a specific RIC for related settings.
Field Name
RIC Option
Description
This field designates the assigned addresses quantity on the pager.
Reset on the activated addresses quantity, the PPS will extend the
Code explorer box automatically.
23
E5 PROGRAMMING SOFTWARE MANUAL
Programming Menu
RIC Settings provides the settings of the related indication when the pager is
receiving messages.
Field Name
RIC 01
Message
Encryption
Network ID
Activate in
Primary
Frequency
Activate in
Secondary
Frequency
Source Prompt
Description
This field designates a 7-digit code to each RIC.
This field designates the encryption to be applied on the assigned RIC
for confidential data security.
◆The system must be capable of transmitting encrypted messages
◆Encryption Key is set up in “PASSWORD / OTA Settings.”
This field designates the address as the home network ID which is
used for the home network recognition. When the pager receives the
preamble and home network ID regularly, the pager will be
determined in home area. Otherwise, the “Out of Range” indicator
will be initiated.
This field designates the selected address to be activated in the
primary frequency. If the address is activated in primary frequency
then only the message sends from primary frequency can be received.
This field designates the assigned address to be activated in the
secondary frequency.
This field designates an alias (max. 32characters) to each functional
address.
24
E5 PROGRAMMING SOFTWARE MANUAL
Programming Menu
Field Name
Description
This field designates the type of received message to each functional
address.
Click the pull-down menu to select among the choices:
Function Type N = Numeric
T = Tone Only
A = Alphanumeric
X = Inactive; to disable the selected functional address.
This field designates the defined folder to each functional address.
Messages received by individual RICs and individual function bits can
Folder
be directed to a defined folder.
Click the pull down menu to select from available folders.
A total of 32 folders can be defined in the FOLDER screen.
This field designates the assigned functional address as the
priority address.
Any message receives from this functional address is taken as
priority message.
Priority
◆When the pager receives a priority message, a default “Priority
Alert Tone” will be generated.
◆To set up the priority alert tone in “Alert Settings”.
This field designates the escalating message alert type to each
Escalating
functional address.
This field designates the fix alert to each functional address.
Fixed alert removes the user message alert setting options of the
Fix Alert
assigned functional address from the “Pager Setting” user interface.
◆Universal alert settings are not affected
This field designates a default vibration types as interval vibration to
Vibration
Interval
each functional address.
This field designates a default alert mode to each functional address.
Click the pull-down menu to select among the choices:
Alert : Alert Only
Vibrate: Vibration Only
Silent: No Alert or Vibration, only message icon and “New Message”
text indication display to indicate the pager already received
Alert Mode
messages.
Chirp: Chirp alert is a short alert tone.
Vibrate then Alert: Vibration initialed a period of time then alert when
the pager receives message.
Alert and Vibrate: Alert and Vibration initialed simultaneously when
the pager receives messages.
This field designates a default alert pattern to each functional address.
There are 18 alert patterns (STD Tone 1~STD Tone 18) for the selection.
Alert Pattern
◆Press
to listen to the alert tone you select.
Paging
This field designates a default backlight color to each functional
Backlight
address that is displayed when a new messages is received.
25
E5 PROGRAMMING SOFTWARE MANUAL
Programming Menu
When “Alert by Folder” is activated in “General” settings, the Code Settings
only provide the basic functionalities for message receiving.
26
E5 PROGRAMMING SOFTWARE MANUAL
Programming Menu
4-3 Folder Settings
The E5 pager provides the maximum 32 folders to save and classify the
messages.
There are two types of “Folder Settings” screen.
Folder Settings are to activate selected folders and edit the folder alias.
1.
Click Folder in the explorer box.
Field Name
Folder
Enable Leading
Code
Leading
Code Setting
Folder Prompt
Description
This field is to activate the selected folder. Click
the check box to activate the selected folders.
After the folder is activated, it will be shown in
“Code Settings” as message storage options.
This field is to activate “Leading Code” feature,
the received messages will be stored in the
assigned folder reset on the leading code.
Ex. Assign a leading code “@@” to a folder. Then
transmit a message with @@ leading, the pager
will save this message in the folder which is with
@@.
◆The priority of “Leading Code” is higher than
the folder settings that are set in “Code
Settings”.
This field designates a 2-digit leading code to
each folder.
◆The leading code could be any characters or
symbols only the transmission system is
allowed.
This field designates the folder alias with max. 21
characters.
27
E5 PROGRAMMING SOFTWARE MANUAL
Programming Menu
When “Alert by Folder” is activated in “General Settings”, the Folder Settings
include the alert tone options and other related settings.
Field
Name
Priority
Escalating
Fix Alert
Vibration
Interval
Alert
Mode
Alert
Pattern
Paging
Backlight
Description
This field designates the selected folder as a priority alert. If the
pager receives a message assigned to a priority folder, the defined
priority alert will sound, see Alert settings to change the priority alert
tones. Priority alert overrides all other alert settings and disables any
user settings.
This field designates the default folder alert as escalating alert.
This field designates the fix alert to the selected folder.
Fixed alert removes the user message alert setting options of the assigned
folder from the “Pager Setting” user interface.
◆Universal alert settings are not affected
This field designates the default vibration type as interval vibration to
each folder.
This field designates the default alert mode to the selected folder.
Click the pull-down menu to select among the choices:
Alert, Vibration, Silent, Chirp, Vibration then Alert, Alert & Vibration.
This option designates the default alert patterns to each folder.
Click the pull-down menu to select among the choices:
STD Tone 1~STD Tone 18
◆Press
to listen to the alert tone you select.
This field designates a default backlight color to each folder that is
displayed when a new messages is received.
28
E5 PROGRAMMING SOFTWARE MANUAL
Programming Menu
4-4 Profile Settings
The E5 provides 32 Profiles to set up the addresses configuration for different
applications. Only the address that is included in the activated Profile will be
able to receive messages. The default activated Profile will be shown on the
pager.
In Profile Settings, must designate the enable profile quantities first.
1. Click “Profile” in the explorer box.
2.
Click the pull-down menu to select the quantity of enabled profile.
3.
The “Profile” item in the explorer box will extend profile selections as the
setting on the “Enable Profile”.
Click to expand the Profile list.
Select a specific RIC for related settings.
4.
5.
Field Name
Enable
Profile
Enable
Profile
Multi-Profile
Description
This field designates the quantity of the enabled
profile.
This field designates whether Multi-profile is enabled.
Click the pull-down menu to select “ON” to enable
“Multi Profile.
When this feature is enabled, two or more profiles are
able to be activated as the default activated profile
simultaneously.
29
E5 PROGRAMMING SOFTWARE MANUAL
Programming Menu
Click on the explorer box to assign the default activated Profile. Then select the
desired Profile to configure the addresses which are included in the selected
profile.
Default Activated
Profile
Field Name
Activate the Default Profile
Profile Prompt
Valid Source List
Description
Assign the default activated profile by clicking the
check box in the explorer box.
◆This selection is a single option.
Only “Multi-profile” is activated, more than one
profile can be activated at the same time.
This filed designates the alias (max. 21characters) to
the selected profile.
Valid Source list is to include the selected
addresses in the selected profile.
◆ Click "Select All" to select all the addresses to be
included in the assigned profile.
◆ Only the codes with valid RICs will become
enabled.
30
E5 PROGRAMMING SOFTWARE MANUAL
Programming Menu
4-5 Alert Settings
Alert Settings provide all the features which are related with the alert indications.
Click “Alert ” in the explorer box.
Field Name
Description
Alert Duration This field designates the duration of a message alert.
Vibration
Alert period
Out of Range
SOUND
CONTROL
Out of Range
Interval
Out of Range
Duration
Priority Alert
tone
This field is only used for “Vibrate then Alert” mode. In
this mode, the vibration period is defined before the
audible alert starts. After the set vibration period ends
the audible alert starts (using Alert duration) along with
continued vibration.
This field designates whether the out of range reminder
alert activates when the pager is considered "Out Of
Range".
◆ Once the pager does not detect any POCSAG
synchronization for a time period, it will be identified as
out of range.
This field designates the “Out of Range time”. The pager
is considered as "Out Of Range" when it does not detect
any POCSAG signaling for a specific time period. This
time period is identified as “Out of Range Time”. The
out-of-range icon displays on the pager when the Out of
Range Timeout expires.
This field designates the “Out of Range” reminder
duration. When the duration expires, the pager will stop
generating “Out of Range” reminder tone.
This field designates the default Priority Alert Tone.
Press
to listen to the alert tone you select.
31
E5 PROGRAMMING SOFTWARE MANUAL
Programming Menu
Field Name
Universal
Alert Mode
SOUND
CONTROL
Vibration
Interval
Alert Volume
Dynamic
Priority Alert
Leading Code
Reminder
Alert
Reminder
Alert Interval
Reminder
Reminder
Alert Timeout
Reminder
Alert Tone
Alert
Description
This field designates the default Universal Alert Mode.
Alert: When "Alert" mode is selected, the pager generates
alerts to indicate the pager status.
Vibrate: When "Vibration" mode is selected, the pager
only activates vibration to indicate the pager
status.
Silent: When "Silent" mode is selected, the pager doesn't
alert nor vibrate, except for receiving "Priority
Alerts".
This field designates the vibration interval between
vibrate sequences.
This field designates the default alert volume for standard
alert modes; it has no effect if escalating alert is selected.
This field designates the dynamic priority alert code.
When receives the messages with the assigned “Dynamic
Priority Alert Leading Code (2-digit)”, the pager will
interpret this message as a priority message.
This field is to enable or disable "Reminder Alert" feature.
When Reminder Alert is enabled, the pager will alert if
there are unread messages.
This field designates the interval between the Reminder
Alerts.
This field designates a period of time for reminder
alerting elimination. When Reminder Alert Timeout
expires, the pager does not emit any more reminder alerts
until a new message arrives. The time period begins with
a newly arrived message and it resets every time a new
message is received.
This field designates the default Reminder Alert Tone
Pattern.
Press
to listen to the alert tone you select.
Reminder
This field designates the total duration of the Reminder
Alert Duration Alert Tone.
When this feature is enabled, the pager will generate a
Key Click
“beep” to indicate any key is pressed.
When this feature is enabled, the pager will generate a
Low Power
“Low battery alert” and “text indication” to identify the
Alert
low battery status when the battery capacity is lower than
a default voltage.
When this feature is enabled, users are allowed to set up
message alarm by operating the pager.
Individual
◆When message alarm activates, the pager will generate
Message
Alarm
message alerts to remind user to read a selected
message.
32
E5 PROGRAMMING SOFTWARE MANUAL
Programming Menu
Field Name
Message
Alarm always
audible
Alert
Clock Alarm
always
audible
Auto Alarm
Turn On
Description
When this feature is enabled, the alert mode of the
message alarm will always be audible. Otherwise, the
message alarm status will be reset on the “Universal
Alert.”
When this feature is enabled, the alert mode of clock
alarm will always be audible, regardless of the status of
“Universal Alert.”Otherwise, the alert mode of clock
alarm will reset on the “Universal Alert”.
If this feature is enabled, the pager will automatically turn
on when any type of alarm is initiated.
33
E5 PROGRAMMING SOFTWARE MANUAL
Programming Menu
4-6 Password / OTA Settings
Password / OTA Settings are the configurations for pager programming and
message receiving security.
1.
Click “Password / OTA” in the explorer box.
Field Name
Programming
Options
Message
Encryption
Security
Programmin
g Password
Encryption
Key
Description
When this feature is enabled, the Programming
Software will request entering pre-set password
before reading or programming the pager.
This field designates a password for the download
from the pager. A 10-digit assigned password is to
protect the pager from downloading the pager from
unauthorized personnel.
When a transmitted message is encrypted, the pager
needs the encryption key to decode the cipher text.
◆8-digit encryption key is made up by A-E, 0-9.
34
E5 PROGRAMMING SOFTWARE MANUAL
Programming Menu
Field Name
OTA
Programming
OTA
Options
OTA
Programming
Password
Silent OTA
Message
Password
Message
Password
Change
Message
Security
Message
Admin
Password
Message
Owner
Password
Password
Timeout
(Max. 12
hours)
Description
With this option enabled, the pager can be remotely
reconfigured. It can be used to change options, enable
or disable a pager and changing codeplug data.
The OTA page cannot enable a dead (more than eight
attempts with an incorrect password) pager.
An OTA password (Ten characters :A-Z, 0-9, space) is
required before transmitting an OTA command.
With this option enabled, the pager powers up
silently after it has been programmed over the air.
This field designates whether the message password
is activated. When this feature is enabled, users are
required to enter owner password to read the
protected messages.
◆ Only the read messages are protected by the
“MESSAGE PASSWORD”. No password required
when reading an unread message.
If enabled, the read message password is allowed to
be changed by the user by operating the pager
interface.
Click the pull-down menu to enable this feature.
This field designates a message Admin password. A
12-digit password that overrides the owner password.
The Admin password must be combined with 12
symbols selected from the navigation keys: U (up), D
(down), L (left), R (right).
◆ This password should not be modified by the User.
This field designates the message password.
The passwords are combined with 2~8 symbols
selected from the navigation keys:
U (up), D (down), L (left), R (right).
This field designates a period of time to omit message
password request.
Once the user has entered the message password,
within the assigned period of time, message password
will not be required when attempt reading messages.
35
E5 PROGRAMMING SOFTWARE MANUAL
Programming Menu
4-7 Features Settings
Feature Settings provides 8 functional sections for the different functionality.
1. Click “Features ” in the explorer box .
Section 1. Show Message Prompt
This section is to designate how the source prompt and folder prompt display in
different types of the folders.
1
Field Name
Today Message
Read
Today Message
List
Description
If enabled, the source prompt or folder prompt will be displayed
when reading Today’s message.
If enabled, the source prompt or folder prompt will be displayed
when viewing Today’s message list.
Unread message If enabled, the source prompt or folder prompt will be displayed
read
when reading an unread message.
Show
Message
Prompt
Unread message If enabled, the source prompt or folder prompt will be displayed
list
when viewing the unread message list.
Folder Message
Read
Folder Message
List
Notebook
Message Read
Notebook
Message List
If enabled, the source prompt or folder prompt will be displayed
when reading messages in a specific folder.
If enabled, the source prompt or folder prompt will be displayed
when viewing messages.
If enabled, the source prompt or folder prompt will be displayed
when reading a message stored in the Notebook.
If enabled, the source prompt or folder prompt will be displayed
when viewing the Notebook message list.
36
E5 PROGRAMMING SOFTWARE MANUAL
Programming Menu
Section 2. Show Standby Prompt
This section is to edit the pager stand-by information. When the pager is in
stand-by mode, the programmed information will display on the pager LCD.
2
Field Name
Show
Standby
Prompt
Enable Standby
Prompt Display
Standby
Line 1~3
Prompt
Description
Click the check-box to enable the edited information to be
shown on the stand-by mode.
This field designates the information (max. 21 characters)
which is assigned to be shown on the stand-by mode.
37
E5 PROGRAMMING SOFTWARE MANUAL
Programming Menu
Section 3. Basic Features
The settings in this section are to determinate how the pager receive messages.
3
Field Name
Features
Retain Error
Numeric
Message
Retain Error
Non-Num
Message
Source
Independent
Duplication
Truncated
Message
Indicator
Message
Continue
Indicator
Manual Delete
Message
Locking
Description
If enabled, the pager retains numeric messages that contain
errors.
If enabled, the pager retains non-numeric messages that contain
errors.
If enabled, the duplicate message detects regardless of the
addresses.
If enabled, an error truncated message or a normal truncated
message is displayed, a “truncated message” indicator displays
over the last character in the message.
If enabled, a “down” arrow will be shown on the last line of the
display when the read message is longer than what can be
displayed on the display.
If enabled, messages can be deleted by operating the pager, except
for unread messages.
If enabled, up to 10 messages in every folder can be set to be
locked to protect. When a message is locked, it cannot be
automatically deleted by the pager when the pager message
memory is full.
38
E5 PROGRAMMING SOFTWARE MANUAL
Programming Menu
Field Name
Memory
Retention
Error Data
Indicator
Show Memory
Full Prompt
Show Protected
Memory Full
Prompt
Features
ECM Enable
Receive Msg
With Tone
Only RIC
Auto Display
Message
Zoom Disable
Default Zoom
Home Network
Detection
Description
This option is also called Non-Volatile Memory. If selected, the
pager retains all message information when the pager is turned off
and back on.
◆For the first use, please insert the AA battery and keep the
battery in the pager at least 72 hours to make sure the backup
battery is fully charged to maintain the memory retention.
If enabled, the error character alternately displays with the “best
guess” of the error data. If not enabled, the “best guess” of the
error data is displayed without any indication that it contains
errors.
If enabled, the pager displays the memory full prompt when the
memory size of the total messages is close to 32 K.
If enabled, the pager displays the protected memory full prompt
when the memory size of the total protected messages is close to
16 K.
For power saving purpose, when the pager is not operated for a
period, the pager will proceed to the ECM (Economy) mode and
turn off the LCD.
If enabled, the pager is allowed to receive the text message on
RICs that are programmed for Tone Only RIC.
If enabled, the pager will display the received messages
automatically. If there is more than one new message, the latest
message will be shown on the display.
◆ The auto displayed messages are interpreted as Unread Read
Message till “OK” key is pressed by the uers.
This field determines whether the pager can enlarge the characters
in the display. If enabled, the pager will not provide “Zoom” on
the pager user interface.
If enabled, the pager will display with the enlarged characters as
the default display format.
If enabled, RF signal and Home network ID will be the detection
of the “Out of Range. When the pager receives the signal and
Home network ID periodically, the pager will then indicate in
range, otherwise, the “Out of Range” reminder will be initiated.
◆ This item should be enabled first, then a certain address can be
assigned to the Hoe Network Id in the ADDRESSS setting.
39
E5 PROGRAMMING SOFTWARE MANUAL
Programming Menu
Section 4. Basic Features
The settings in this section are the basic settings for the LCD display.
4
Field Name
Description
Pager Backlight
Pager Backlight
Control
Features
Backlight Flash
Folder
Msg.
Max.
LCD Contrast
Date Format
Normal
Backlight Duty
This field designates a default backlight color. There are 7
options, click the pull-down menu to select the option.
This field designates the control modes to illuminate pager
backlight. There are three options :
1. Auto detect: Backlight will operate only when in a low light
environment; then it operates on any key press
or on message received (if enabled for message
receive backlight)
2. Always On: Backlight will operate on any key press or on
message received (if enabled for message receive
backlight)
3. Always Off: Backlight will not operates regardless of buttons
press or message received.
This field designates the message backlight flash mode.
When enable this feature, once the pager receives message, the
message backlight flash once per second until the backlight duty
expires.
This field designates the maximum message capacity to each
folder.
This field designates a default LCD contrast.
This field designates a default date display format.
This field designates the backlight on duration.
40
E5 PROGRAMMING SOFTWARE MANUAL
Programming Menu
Field Name
Saved Window
Timeout
Menu Timeout
Tool
Prompt
Timeout
Features
Bar
Description
This field designates the display duration for the “SAVED”
window.
This field designates the display duration for the pager “Menu”.
For power saving purpose, when the Menu Timeout expires, the
pager will return stand-by mode and turn off the LCD.
This field designates a period of time to display the “Tool Bar
Prompt”.
New Message
LED Indicator
Cycle
This field designates the new message LED flash cycle. When
there is a new message, the pager LED will illuminate as an
indicator.
Operation
Mode
This field designates the default setting of the operation mode.
When Simple mode is enabled, users are only allowed to read the
latest message, by pressing the OK button.
End of Message
Character
This field designates the end of alphanumeric message character
transmitted by the Pager System.
Key Lock
This field designates the default status of “Key Lock”. If enabled,
the “Key Lock” will be activated after programming.
Auto Key Lock
Time
This field designates the “Key Lock Timeout”.
When “Key Lock” is enabled, if the pager is not operated for a
default time period, the pager will be locked up, until “Menu
Key” is pressed to unlock the pager.
41
E5 PROGRAMMING SOFTWARE MANUAL
Programming Menu
Section 5. Message Error Correction
The settings in this section are the duplicated and error correction settings.
“Duplicate Message Detection ”must be enabled before other settings.
5
Field Name
Duplicate
Message
Detection
Duplication
Re-correct
Description
This field designates the duplicated message detection to apply
with message receiving. When duplicated messages are received
within the sequential lockout period, the message alert will not
be initiated.
◆ Duplicate Message Detection must be enabled before
activating the error correction feature.
When this feature is enabled, the pager will correct the error
message from matching the duplicated messages.
This field designates the sequential lockout timer. The timer
Message
begins when a message arrives. If a duplicate message arrives
Error
within the lockout period the pager will not alert or display the
Correction Sequential
second message. If a duplicated message is received out of the
Lockout Period
Sequential Lockout period, the pager will alert and the text
indicator “Duplicated Message” will be displayed with the
message.
Percentage
of This field designates the maximum percentage of the allowable
Tolerated Error error characters in a message.
Characters
◆ If set this item as 0, the re-correction feature will be disabled.
Max. Tolerated This field designates the maximum allowable duplicated
Duplicated
characters in a message.
Characters
◆ If set this item as 0, the re-correction feature will be disabled.
42
E5 PROGRAMMING SOFTWARE MANUAL
Programming Menu
Section 6. Menu Options
If any of the below features is not enabled in this section, the users will not able
to operate this feature on the pager.
6
Field Name
Menu Options
Description
This field designates the menu options for some certain features, only
the features are enabled in this field will be show up on the pager
setting menu. Click this tag to enable the selected features to the
pager.
On/Off Duty Menu
Self Programming Menu
Alert Setting Menu
If the features are not activated in the PPS, the pager will not list the
feature in the settings menu.
43
E5 PROGRAMMING SOFTWARE MANUAL
Programming Menu
7
8
Section 7. Relay Switch
This function only activates when the pager is inserted in the Charger. The
charger is allowed to connect with the external device.
◆The related specification of Relay Switch, please reference the E5 Charger
User’s Guide.
Field Name
Relay
Switch
Relay Switch By
Capcode
Relay
Switch
Reset Timeout
Description
This field designates the Relay Switch status resets on the message
receiving.
Click the check-box to enable this feature.
When this feature is enabled, when the pager receives message, it
will activate the Relay Switch.
This field designates the reset timeout for “Relay Switch”. When
the timeout is expired, the Relay Switch resets automatically.
Section 8. POCSAG
The settings are the basic POCSAG format settings for the data transmission.
Field Name
POCSAG
Address
Decode Errors
Data Decode
Errors
Description
This field designates the allowable detected bit errors in Address
Code words.
This field designates the allowable detected bit errors in Message
Code words.
44
E5 PROGRAMMING SOFTWARE MANUAL
Programming Menu
4-8 Rapid Call Settings
To express calls to a large group, the E5 provides Rapid Call to simplify paging
procedures. The following settings have to match up with Paging System to
ensure correct operation.
◆This feature must be supported by the transmission system.
Field
Name
Description
This field designates whether the pager can receive message with Rapid Code
message format. Click the tag to enable Rapid Call.
This field designates an address to be the start code of Rapid
Rapid
Rapid Call Call. A 7-digit address can be fitted in.
Call
Start RIC
◆The software will add leading “0”(s) if the address number
given is less than 7 digits.
“Frame” field is read only. The PPS will automatically generate
Frame
the “frame” when the Rapid Call Start RIC is entered.
This field designates the address to the text message identification code for
Rapid Call transmission.
Rapid
Click the tag to enable Rapid Call RIC Alpha (which is also identified a “RIC
Call RIC
Rapid-Ending Code”)
Alpha
◆ If Rapid Call RIC Alpha is not activated, the default Alpha start address will
be the same as “RIC Rapid Call Start”.
45
E5 PROGRAMMING SOFTWARE MANUAL
Programming Menu
Field Name
Description
Activate in This field designates the Rapid Call transmission is applied to
primary frequency.
Primary
Frequency ◆ This option displays only when dual frequency is enabled.
Rapid
Call
RIC
Alpha
Activate in This field designates the Rapid Call transmission is applied to
Secondary secondary frequency.
Frequency ◆ This option displays only when dual frequency is enabled.
This field designates an address in RIC Alpha field for the ending
Rapid Call code of Rapid Call. Up to 7 digits of number can be fitted in. The
RIC Alpha software will add leading “0”(s) if the address number given is
less than 7 digits.
Frame
Rapid
Call
Timeout
Max
“Frame” field is read only. The PPS will automatically generate
the frame when a Rapid Call RIC Alpha is entered.
◆For power saving purpose, it’s better to assign the “RIC Rapid
Start” and “Rapid Call RIC Alpha” in the same frame.
This field designates the time period to terminate Rapid Call
reception.
46
E5 PROGRAMMING SOFTWARE MANUAL
Programming Menu
4-9 GSM Settings (Only For GSM Model)
“GSM Settings “ is used for GSM Pager only. The settings are all for the GSM
Confirmation functionalities.
Field Name
Security
& Pager
Identify
SIM Card
PIM Code
Number
GSM
ID
Description
Pager
SIM
Card
PIN
Code
Number
GSM
Message
ACK
Data
Format
This field designates the ID (7 digits) for the programmed
Pager.
※ GSM Pager ID is used to match the E5 GSM Confirmation
functions with E5 Console.
Each E5 GSM pager should be assigned to a unique ID (from
0000000 to 9999999.)
Enter the PIN code of the SIM card inserted into E5 GSM pager.
(The maximum length is 8 digits, from 0 to 99999999 )
Select the SMS format to transmit ACK messages to E5
Console.
Options: Text MODE、PDU MODE.
※The format of the message transmission must be confirmed
with the GSM provider.
47
E5 PROGRAMMING SOFTWARE MANUAL
Programming Menu
Field Name
Emergency
Call
Phone
SIM Card Number
PIM Code SMS
Number
Message
Response
Phone
Number
GPRS ACK
Message
Function
GPRS
Parameter
Description
To assign a GSM phone number (maximum 20 digits) for
Emergency Voice Call.
※Note: This function is only provided by GSM Voice Model.
To assign a GSM phone number (maximum 20 digits) for SMS
Confirmation.
To enable or disable the GPRS ACK function.
GPRS Server
IP Address
To designate the GPRS server IP Address for the Response
Confirmation.
GPRS Server
Port Number
This filed is used to define the TCP/IP port for the Response
Confirmation.
GPRS APN
Server
To designate the GPRS APN Server
GPRS
Name
APN
GPRS APN
Username
GPRS APN
Password
To designate the GPRS Network Identifier
To designate the user name to access GPRS network.
To designate the password (maximum is 16 characters) to
access GPRS network.
48
E5 PROGRAMMING SOFTWARE MANUAL
Information
5. Information
Only the correct version of programming software that matches the pager
firmware version is able to use for programming the pager.
The new programming software and programming manual will be released on
the Unication official website: www. unication.com
Please follow the instruction to operate the programming. Unication is not
responsible for the damages caused from improper operations or programs.
49