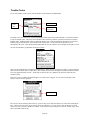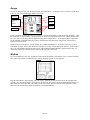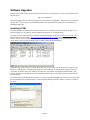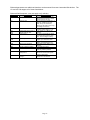
1
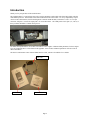
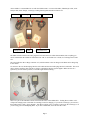
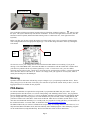
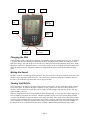
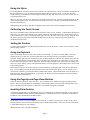
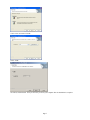
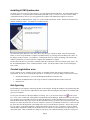
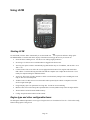
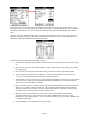
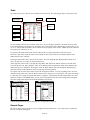
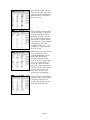
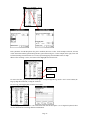
LS1M
User’s Guide
PDA OBD2 Scanner
Version 1.7e
Optimized for GM LS1 and L67/L36 Engine
Copyright by Mark Chauvin, Mark-It Upgrades, 2006
Page 1
Introduction
Thank you for your purchase of the LS1M Scanner.
The LS1M Scanner is a scan tool that can retrieve engine parameters and trouble codes from GM vehicle using the
VPW OBD-2 protocol. That includes most GM cars & trucks from 1996 to 2006. To verify compatibility of your
vehicle to the LS1M scanner, look for the diagnostic connector under the dash, on the driver’s side. It’s a 16-pin
connector with pins 1-8 across the top & pins 9-16 across the bottom. The VPW protocol uses pins 2, 4, 5 & 16, so
these positions should have a metal insert present.
LS1M has been optimized for use in GM’s LS1 and L67 series engines. Enhanced data parameters for these engine
types are supported; there’s a list of them in the appendix. Some of these enhanced parameters will also work on
other GM vehicles.
The basic LS1M scanner comes with an OBD2 interface cable, software CD and this User’s Guide:
OB2 Cable
User’s Guide
Software CD
Page 2
Also available is a custom PDA for use with the LS1M scanner. It comes with a PDA, USB hotsync cable, serial
hotsync cable, home charger, car charger, Getting Started guide and a PDA software CD.
Serial Cable
Car Charger
Getting Started
PDA
Home Charger
USB Cable
PDA Software CD
The PDA software CD has some extra programs on it and some more online documentation, but everything you
need is contained on the LS1M CD. When the term “CD” is used in this User’s Guide, it’s referring to the LS1M
CD.
The serial cable also has a charge connector on it, which connects to the car charger so the PDA can be charged up
in the vehicle.
To connect to the car, the PDA plugs into the serial cable and the serial cable plugs into the LS1M cable. The serial
cable’s charge connector plugs into the car charger, which plugs into the cigarette lighter. Make sure the car’s
ignition key is in the “RUN” position, or start the engine before scanning.
There are a pair of internal DIP switches in the little black box of the OBD2 cable. Turning these switches “ON”
will provide enough power to the PDA for scanning, but not for charging. If you use the car charger, you can leave
these DIP switches “OFF” (facory default). Turn these switches “ON” if you don’t want to use the car charger, or if
you are using your own Handspring PDA. If you have a Palm PDA, leave the switches “OFF”.
Page 3
Both switches ON
Turn on the PDA with the power button, located on the top of the PDA. Find the LS1M icon:
and tap it with
the stylus. The stylus is tucked away near the back of the PDA. To return to the application screen later, click the
blue button on the keyboard, and then the Home button (picture of a blue house on it, lower right of the PDA
keyboard).
Before your first scan, be sure to check the engine type on the Config screen. Once you start the LS1M program,
click Config and then select the appropriate engine type. You can also change the units to metric by selecting the
Units button.
Engine
Type
Units
Click on Save to save your settings, then click on Scan from the Main Menu to start scanning. If you get the
message “Can’t Find OBD2 Cable”, that means the PDA can’t communicate with the LS1M cable. Double-check
your cables are pushed in all the way and the ignition key is “ON”. If it still won’t work, your car’s OBD2
connector may have blown a fuse. Check for 12 volts between pins 16 and 4 with a voltmeter, or open up the LS1M
cable’s little box and see if the LED is on. If there is no voltage, check your cigarette or accessory fuse, which is
usually the one that powers the OBD2 port.
Warning
Operation of the LS1M scanner while driving can pose a danger to you, your passengers and other drivers. Please
always keep your eyes on the road. If necessary, have someone else operate the scanner while you drive, or use the
logging functions to record data for later playback.
PDA Basics
No software installation is required before using LS1M, if you purchased the PDA with your scanner. (If you
purchased just the cable & software, see sections “Hotsynching” and “Installing LS1M” below.) The program has
been pre-loaded on the PDA. However, if you are not familiar with PDA’s, the following basic information should
give you enough skill to use the program. For a full introduction to your new PDA, see the “Getting Started with
your PDA” booklet or the “PDA Docs” folder on the LS1M CD. PDA docs are in Adobe Acrobat format. If you
don’t have Acrobat Reader installed yet (it’s a widely used, free program for viewing .pdf files), you can install it off
the LS1M CD from the “Acroread” folder, or download it from http://www.adobe.com/reader.
The PDA included with your scanner is intended to be used primarily for scanning with the LS1M. However, it is a
fully functional PDA with address book, date book and many other standard programs. Other third-party programs
can be loaded if desired, using Palm Desktop. Refer to the PDA Docs folder for more information.
Page 4
Power
Mute
LS1M
Icon
Stylus
Battery
Indicator
Shift
Home/
Menu
Page
up/down
Hotsync connector
(on bottom)
Charging the PDA
Your PDA has been fully charged before shipping, so it shouldn’t require any charging before first use. To recharge
it, plug the USB cable into the bottom connection on the PDA, and plug the other end into any USB port or to the
PDA home charger. The light on the top, next to the power button, will turn orange indicating charge mode. When
charging is complete, the light will turn green. You can also charge it in the car, using the car charger and the serial
cable with charge connector. The Battery Indicator on the applications (home) screen will also show the charge
status.
Muting the Sound
The PDA will make sounds during certain operations. The most noticeable is the alarm sound that occurs when you
reach your upper speed limit on the Accel Test. The sounds can be defeated by sliding the sound defeat button to
the right. It’s located on the top of the PDA, next to the power button.
Turning the PDA On
To turn the PDA on, press the power button, located on the top of the PDA. To turn off the PDA, simply press the
power button again. To adjust for daylight or nighttime viewing, “double-click” the power button (press it twice
real fast). Don’t hold the power button down for more than 2 seconds, though. That will cause an error and may
require the PDA to be reset.
PDAs are designed to be used for brief periods many times during the day. As such, they don’t require long boot-up
times or shutdown procedures like a PC does. The PDA remembers exactly what screen is being displayed when
you turn it off, and when you turn it on again it will be at the same place. Also, PDAs will typically turn themselves
off after a couple of minutes if no key is pressed to save batteries. However, since this can be quite annoying when
you’re scanning a car, LS1M has an option on the Config screen for changing the “sleep” time while scanning. If
the PDA is left on for a considerable amount of time, the PDA’s internal rechargeable batteries will go dead.
Page 5
Using the Stylus
For clicking buttons on a PDA, you use a stylus, which is just a plastic pointer. The stylus should be in its holder on
the back of the PDA. To use it, pull it out & tap the display where you want to “click”. If you don’t have the
sounds silenced, you should hear a little ticking noise when you click, and whatever icon you click on will cause its
associated program to run.
When you first start your PDA, you should see a screen full of program icons. To start a particular program, tap the
stylus on that program’s icon. To return to the main menu (set of icons), you need to press the Home button (see
Keyboard section below).
Other pointing devices can be used (like a fingernail if you lose the stylus), but may damage the touch screen.
Calibrating the Touch Screen
The screen on the PDA must be calibrated so the PDA knows where you’re “clicking”. Calibration has already been
done before your scanner was shipped, but to redo the calibration, click the Welcome icon. On the main screen of
icons (as shown above), there is a scroll bar on the right, since all of the icons won’t fit on one page. Drag the scroll
bar down or press the page-down button until the Welcome icon shows up. Then just follow the directions to
recalibrate the touch screen.
Setting the Contrast
To set the contrast, press the blue Shift button, then the letter Q on the keyboard. Use the on-screen slider to set the
contrast lighter or darker.
Using the Keyboard
Users of other Palm devices will notice the “graffiti” area is missing. To enter text with this PDA, you use the
ASCII keyboard. To enter text, just click on the letters with your finger just like you would use a standard
keyboard. On the right side of the keyboard, you will see the backspace key and arrow key, and the space bar is the
big wide one at the bottom of the keyboard. Next to the space bar is an up-arrow for capital letters. To use it, click
it once and the following letter will be capitalized. To the far right of the space bar is a key with a dot and line on it.
This is the “menu” button. Click it to drop-down the menu’s on certain programs. (Drop-down menu’s are not used
in the LS1M program.)
Notice that the keys have white letters but also some blue characters to the upper right. Those are the shift-mode
keys. You use them by pressing the blue shift button (lower left) and then press the key. So, for instance, if you
want to enter a number 5, press the blue shift key and then the J button. On the Menu button, notice the picture of a
little blue house. That’s the Home button. To get back to the Home screen (list of program icons), press the blue
shift button and then the Home key.
Using the Page-Up and Page-Down Buttons
Under the ASCII keyboard are some silver keys. The two buttons in the middle are the page-up and page-down
buttons. They are programmed to do certain things in the LS1M program, such as start/stop scanning on the Scan
screen. The other four silver buttons are shortcuts to various built-in programs on the PDA.
Installing Palm Desktop
Your PDA is shipped ready to use immediately, but if you would like to save data from the PDA to your computer,
you must install Palm Desktop and the LS1M Synchronizer. Palm Desktop software for Windows or Macintosh is
available as a free download from the Palm website:
http://www.palm.com/us/software/desktop/
The Windows version 4.1 is also available on the LS1M CD. To install it, navigate to the CD drive in the “Palm
Desktop Software” directory and run the install program “PDADesktop41ENG”. Follow the on-screen instructions
to install Palm Desktop on your computer.
When prompted, select “Complete Installation”
Page 6
Create a new user named “LS1M”
Select “USB”
Click Next, and the Install. It may be necessary to reboot your computer after the installation is complete.
Page 7
Installing LS1M Synchronizer
To enable you to save logs to text files on the PC, you must install LS1M Synchronizer. First install Palm Desktop
as described above. If you already have Palm Desktop installed, verify it’s version 4.1 or better (select to Help>About Palm Desktop). Be sure you are logged into the computer with administrator rights to avoid errors.
Insert the LS1M CD and find the file “Setup.exe” in the “LS1M Synchronizer” folder. Double-click on this file to
start the installation routine. You should see a window like this:
Click the Next button, then wait. On a slower PC, it may take up to a minute to install. Then click the Finish
button. You can verify the install is complete from Palm Desktop, by selecting menu item Hotsynch, Custom. In
the dialog box titled “Custom”, you should see “LS1M Synch” in the list. Before attempting your first hotsynch
with the Synchronizer, be sure to reboot the computer after installation is complete.
On the LS1M CD, there is a procedure to manually install the synchronizer instead of using the setup routine. See
the file “ManualInstall.txt” in the “LS1M Sychronizer” folder. Use this procedure if there is an error during the
setup routine.
Conduit registration error
If you’re getting an error “Failed to register conduit” or something similar when trying to install the LS1M
Synchronizer, be sure you’re following the steps below. Usually, this is caused by failing to reboot between steps.
1.
Install Palm Desktop 4.1 or newer (file PDADesktop41ENG.exe from the CD).
2.
Install the LS1MSynchronizer (file setup.exe from the LS1M Synchronizer folder on the CD).
3.
Reboot the PC.
Hot-Synching
Hot-Synching is term applied to connecting the PDA to the computer, through the USB port, and synchronizing data
between the two. First, insert the USB hotsynch cable into the PDA, then plug the other end into an available USB
port on your computer.
To hot-synch, first make sure Hotsync Manager is running. If it is, you’ll see the hotsync icon
in the system
tray. If not, select it under Start, All Programs, Palm Desktop, Hotsync Manager. Right-click the icon in the system
tray, and make sure Local USB is selected. To initiate the hotsynch, you must find the Hosync icon on the PDA.
Press the Home button (don’t forget to press the blue shift button first) to get back to the list of program icons. The
Hotsync icon will look just like the one on your computer’s system tray (red and blue with arrows). Click on it with
the stylus, then click the big button in the middle of the screen to start the hotsync operation. The first time you do
this, you will see “Found New Hardware” displayed around the system tray area. It will take a couple of minutes
while Windows installs the USB drivers for the PDA, then you will have to repeat the hotsync by pressing the icon
on the PDA again. Then you should see a dialog box pop up on your computer indicating a hotsync is in progress,
Page 8
and another dialog box “LS1M Sycnchronizer” will pop up, which is what you use to save logged data from the
PDA to the computer. See “Exporting Logs to the PC” on page 18.
Resetting the PDA
PDA’s are little computers, and like computers hang up sometimes, every once in a while the PDA can get “stuck”.
There’s usually an error message on the screen, or the screen simply freezes. If this happens, you need to do a reset.
Unscrew the tip of the stylus to reveal a thin little pointer. On the back of the PDA, locate the “reset” hole to the
right of the serial number sticker. Press the thin pointer into this hole until you feel a “click”. That will “reboot” the
PDA.
If it’s really stuck and a regular reset doesn’t fix it, then you need to do a “hard reset”. This will wipe out the PDA
memory and put it back to how it was when you bought it. To do a hard reset, hold the power button down, press
the reset button (hole), wait for the “Palm Powered” screen to show up, then let go of the power button. Press the
page-up button to confirm, and the Palm will reset itself. It will prompt you to recalibrate the touch screen. Just
follow the directions and when you’ve completed the calibration, your PDA will be ready to use again. Any lost
programs can be restored by doing a hotsync, which will put it back to the same condition it was when the last
hotsync was performed.
Page 9
Using LS1M
Starting LS1M
To start LS1M, click the “home” button until you see the LS1M icon.
Tap the LS1M icon to bring up the
LS1M Main Menu. From this main menu, tap any of the buttons to bring up the screen you want to use:
•
Scan: The basic scanning screen. Use this to view and log engine parameters.
•
Saved Logs: Use this screen to recall data that was logged in the Scan screen.
•
Auto-Log: Set up the scanner to automatically log data based on any set of conditions, such as SPD > 30 or
TPS >= 90.
•
Collect LTrims: This screen will work on cars equipped with LS1 & L67/L36 engines and certain other
GM vehicles. It extracts the long-term fuel trims that the computer uses to adjust the air/fuel ratio. Used
mainly for computer tuning for modified vehicles.
•
Accel Test: This screen is used to measure a vehicle’s acceleration by timing it from a standing start to 60
mph, or other user-selected speeds.
•
Trouble Codes: Use this screen to view the trouble codes reported by the vehicle’s computer & reset the
Service Engine Soon light.
•
Gauge: Displays just a few parameters in a large font. Useful for in-car monitoring.
•
Misfires: This screen will count up the reported misfires on each cylinder to help isolate an engine misfire.
•
About LS1M: Version info and available memory.
•
Config: Set options on the behavior of the scanner.
Engine type and other configurable items:
LS1M supports enhanced parameters on two types of engines: the LS1 V8 and the L67/L36 V6. Click on the Config
button to bring up the Config screen.
Page 10
Select which vehicle you intend to scan by clicking on the appropriate box on the screen, as shown above. (Note
that support for the L67 is only available with a combo LS1/L67 cable. Cables purchased before July 2003 may not
have the new chip installed.) You can also click the Units button to change from default English units to Metric
units.
Click the “Cable Test” button while the cable is connected to the car and the car’s key is in the “run” position. A
dialog box will pop up telling you which cable was detected and will poll the vehicle for all available parameters.
This can be useful when troubleshooting connection problems.
Other items that can be configured on the Config screen are:
•
Scan Timeout: How many milliseconds the scanner will wait for a response from the vehicle before giving
up.
•
Pause between scans: How many milliseconds the scanner will wait after receiving a reply, before polling
the vehicle again.
•
Power off after: How many minutes the PDA will stay on with no user input, while running LS1M
•
Vehicle weight: Enter approx vehicle weight here. Used for estimated horsepower on the Accel Test
screen. See “Using the Keyboard” above for how to enter numbers here.
•
Automatically save logs: Click this to have your logged data automatically saved every time you switch off
of the Scan screen. This can prevent logged data from being accidentally lost. Also consider using the
Auto-Log screen to automatically record data.
•
Retry on Timeout: If the car’s computer doesn’t respond within the configured timeout period, LS1M will
display “T.O.” instead of a number for that scan. This can happen especially during wide-open throttle
when the computer may be too busy to answer a request from a scan tool. Click this retry option to have
the scanner retry once after getting no response from the vehicle.
•
Barometer: Enter the current barometric pressure here. This is used in the Boost calculation for
supercharged engines (L67). You can also select the vehicle’s BARO sensor as the source of this
information, if your vehicle supports it. Use the “Test Sensor” button to see if your vehicle’s BARO sensor
is compatible with LS1M.
•
Click on Defaults to set config parameters to factory values.
Page 11
Scan
To start the Scan screen, click the “Scan” button on the main menu. This will bring up Page 1 of the Scan screen.
Page Number
Mode
Info Button
Scan
Button
Parameter
Value
Units
Status
To start scanning, click the “Scan” button on the screen, or press the Page-Up button. The mode at the top of the
screen should change from “Stopped” to “Scanning”, and you should see some values display on the screen. If you
see “T.O.” instead, that means there’s been a timeout error (no response from vehicle). Double-check the cables are
all in place & the vehicle key is “on”.
To go back to the main menu, tap the <Home> button at the very upper right corner of the Scan screen.
In the lower part of the screen, the status text will update to show you the current scan number and how many
milliseconds it took to complete.
In the upper right of the screen, click the “Info” button. This will change the data displayed from current (live)
values, to min, max, or averages for the listed parameters.
At the upper left of the screen, try clicking the “Page Back” and “Page Fwd” buttons. When you start the Scan
screen for the first time, page 1 displays. There are 10 different pages of parameters which can be displayed. By
default, the first 6 are configured. Pressing the “Fwd” & “Back” buttons will cycle through the different pages.
(Note that only the visible parameters on the current page are being scanned.)
To stop the scan, click the “Stop” button or press the “Page Down” button. To reset everything to zero (erase all
min/max/average values too), click the “Reset” button or press “Page Down” a second time. The status will change
to “Resetting“ for a couple of seconds, then return to “Stopped.” All parameters should will then show zero value.
When the scanner is in STOPPED mode, you can click on a parameter in the list, and a Config button will appear.
Click the Config button, then select the desired parameter from the list.
A list of all the parameters and their meanings is in the Appendix on page 26.
Sample Pages
The first six pages of the Scan screen are pre-configured with scan parameters. Any of these can be customized;
they are just a good starting point.
Page 12
The first page is filled with some
of the most common, basic engine
parameters, from temperatures &
ignition advance, to fuel trims &
O2 sensor values.
The second page is configured for
just ignition voltage. This can be
useful to determine the state of
health of your battery. Turn the
key on, start scanning this page,
then start the car. Then click the
“Info” button to see the minimum
voltage that occurred while
cranking the engine over. If it’s
less than 9.5V, your battery may
be on its way out.
This page shows how injector duty
cycle is monitored. First you
configure RPM and the injector
pulse width, then the IDC1
parameter calculates the duty
cycle. You can use IDC1 & IDC2
to see if your fuel injectors are
being over-worked. Scan this
page & do a wide-open-throttle
run, then click the “Info” button to
see how high your duty cycle
went. If it’s over 90%, your
injectors may need upgrading.
Page 4 contains some fuel-specific
parameters. FTC is the fuel trim
cell number, followed by O2
voltages, short & long-term fuel
trims, and closed-loop status.
Page 13
Page 5 has some of the diagnostic
parameters. MAF and MAFF
show mass air flow sensor output.
MISP and MISR are used for
misfire diagnosis. MAP shows the
manifold air pressure, while IAC
shows the idle air controller
position in counts, and TPSV
shows the throttle position switch
output in volts.
The final sample page is an
example of how you might
diagnose engine knock (pinging).
You can log these parameters and
determine under what conditions –
speed, rpm, throttle position – the
knock retard (KR) is occurring.
Remember that these are just starting points. Any parameter on any page can be customized. Just click on the item,
then click Config. Your changes will be saved so whichever page you customize will still be customized the next
time you use your scanner.
Logging
LS1M can save the data in an internal database for later playback. This is called logging. To initiate a log, first start
scanning. The Scan button will change to a Log button. Click the Log button and the mode will change to
LOGGING. You can also do this by pressing the Page Up button twice in a row.
All of the data you see on the current page will be recorded in memory. In the lower left of the screen, the Status
field will show you how many scans have been logged.
During logging, while the scan number is incrementing, you can switch from Current data (with the “Info” button)
to Min, Max or Average. If you switch to another page (different parameters), it will empty out the buffer and start
scanning (not logging) the new page of parameters instead.
If you click the Stop button after logging, two new buttons will appear: Filter and Range. You can use options on
this screen to filter the logged data to only include certain scans, or just get a range of scans with a given start & stop
condition.
Page 14
Pick a parameter from the drop-down list, pick a condition, then enter a value. In the example on the left, all scans
will be shown that contain ignition timing advance greater than 25 degrees. In the example on the right, scans will
be filtered starting when the throttle is over 90% open and stopping when the SPD reaches 70 mph.
When a Filter or Range is active, the button will be highlighted as shown below.
Fwd/Rev
Buttons
Scroll Bar
To remove the filter, just press the Filter button again. To step through the log, use the < and > arrow buttons, the
Page Up/Page Down buttons, or drag the scroll bar.
To save a log, after logging data, click the Save button.
Enter a description, then click Save. The Clear button will clear the description. See “Using the Keyboard” above
for more information on entering characters and numbers.
Page 15
Playing Back a Log
On the main menu, click the Saved Logs button.
All of your internally saved logs will appear in the list at the top. Click an entry to view the description. Click View
to load the saved data into the Scan screen. Delete will delete the currently selected entry. Delete All will delete all
entries.
Dump will send the log out the serial hotsync cable. This feature is for mainly Mac and Linux users. The LS1M
Synchronizer is designed to work with Palm Desktop for Windows only. On a Mac or Linux PC, there is no way to
run a Windows application. So, instead, you can use the Dump feature, along with a communication application like
Term, to capture the data serially. Click Dump and follow the on-screen instructions for setting baud rate & data
bits on your Term program.
Once you click View, the Scan screen will appear with the saved data so you can view and filter the values.
Saving Data with the Auto-Log Screen
To start the auto-logger, click Auto-Log on the main menu.
This is the main Auto-Log screen. Here, you can specify three parameters to “keep an eye on” while you’re waiting
for the logging to start. Click on one of the parameters on the left (ECT, MPH or RPM in this picture) and a
window pops up with a list of all the parameters that are available.
Click the parameter you’d like to watch, then click OK to return to the main screen.
On the main screen, you can see that it says you’re using “Parameter List 1”. To edit the list of parameters that will
be automatically recorded, press the Edit button.
Page 16
There are three lists that you can cycle between by clicking the List 1, List 2 or List 3 check boxes. To modify the
list, click on an item, and then click Change to select a new one. (These lists are kept separate from the Scan screen,
so any changes you make here only affect the Auto-Log screen.)
Click Save or Cancel to get back to the main screen. Now, to select what conditions will trigger the automatic
logging, click the Setup button from the main Auto-Log screen.
In this example, the scanner will automatically log when the TPS (throttle position sensor) is reading > 90%, and
will continue to log until the TPS is reading below 10%, for a maximum of 30 seconds. To change which conditions
start & stop the automatic logging, click the parameter name, the condition “<”, or click on the value to type in a
new one. You can also use the up & down arrows to “spin” the values up or down quickly.
There are a couple of options at the bottom. The first, Display params while logging, is used to specify that the 3
parameters on the main screen continue to be updated even when automatic logging starts. It’s useful if you want to
continue to monitor them, but it does slow the scan rate down somewhat. The other option, Start again
automatically, means that after the “Stop Logging” condition is true, and the logged data is saved to the internal
PDA database, it will automatically start monitoring the “Start Logging” conditions again. Otherwise, you will have
to start it up by clicking the Begin button yourself.
Once everything is set up the way you want it, on the main screen click the Begin button to start scanning.
The AutoLog status at the top will change from STOPPED to SCANNING, and will continuously monitor the
configured Start parameter & see if it’s time to start logging. When the conditions are met, the status will change
from SCANNING to LOGGING, and will stay that way until the Stop Logging condition is true, or the max number
of seconds is reached.
Once the logging is complete, you can click on the Last Run tab (at the top) to get a summary of what was recorded.
Page 17
In this example, the engine coolant temperature reached a maximum of 209.9 degrees F, the average intake air
temperature was 89.9 degrees F, and the maximum vehicle speed was 39.3 MPH. Click on a parameter name or the
word “Max” to change the display. Note that only the parameters that were selected to log will be included here.
For instance, if KR (knock retard) was not included in parameter list 1, then you can’t view the Min, Max or Avg
value of KR during this run.
To view the logged data frame by frame, click the View Logs button & it’ll take you to the Saved Logs screen,
where you can load the logged run into the Scan screen.
Page 18
Exporting Logs to the PC
Once logs have been saved on the PDA, you can export them to files on your PC during a hot-synch operation. This
requires that Palm Desktop 4.1 and the LS1M Synchronizer are both installed on your computer. See the section
below on Palm Desktop for installation instructions.
If both Palm Desktop 4.1 and LS1M Synchronizer are installed, you will see this window appear when you hotsynch:
The saved logs will appear in the list. Click on one to get more information at the bottom of the screen. You can
also select multiple items by holding down the Control key on the PC keyboard or using the Select All button. You
can Delete the selected logs, or use Delete All to delete all saved logs from the PDA.
To save the selected log(s), click the Save button. A dialog box will appear asking for an appropriate file name or
file location. Be sure to select what file type you want to save the data as.
A comma-delimited file contains all the values separated by commas (eg 35,2.5,3253,10.8 etc). This is a format
spreadsheets like Excel can easily read. A space-delimited file is readable in Notepad or other text editors. The
Page 19
EFILive format is for compatibility with the EFILive scan tool program. Note that if you selected metric units on
the LS1M Config screen, then metric units will be saved to the log file by the synchronizer.
Clicking the other tabs across the top of the synchronizer window – Ltrims, Accel Tests, Trouble Codes – will show
the saved data from the other scan screens. Each time LTrims are collected, or an Accel test is competed, or trouble
codes are scanned, the results are saved in an internal log database in the PDA. These saved results can be saved
here in text-file format.
LTrims
Cell Data
Status
Selector
This screen is used to collect the LTRIM’s (Long-Term Fuel Trims). These are the amounts by which the computer
has increased or decreased the amount of fuel delivered under different conditions, in order to maintain a perfect
14.7:1 air/fuel ratio, as seen by the O2 sensors. Each set of conditions is called a “cell”. Cell 16, for instance, is
normally used when the car is idling.
To collect the LTrims, click the “Start” button or press “Page Up”. As data is collected, the different cell values in
the display will be updated. The current cell will be outlined. In the example above, for instance, the current cell
number is 15, with a positive value of 2.20 percent. The overall averages for the left and right bank are listed on the
Status line. If the vehicle is a V8 (LS1), then you can select the left or right bank to view, or an average of the two.
V6 vehicles (L67/L36) typically only have the Left values, since there’s usually only one oxygen sensor on those
engines. (Values for the left and right are collected, regardless of whether Left, Right or Avg is selected.)
Pressing the Stop button will stop data collection. Reset will zero all values on the display. Results of LTrim
collections are saved in the internal PDA database. To view the saved results, click theView Log button.
Page 20
Click the saved entry at the top. Detailed information will be displayed in the bottom part of the screen. Use the
scroll bar to the right of this data to page down & see all the collected cell values. The Clear Log button will erase
all saved LTrim collections.
Accel Test
Start/Stop
Speeds
Elapsed
Time
Speed
Estimated
horsepower
Status
Vehicle
weight
This screen will perform an acceleration test of your vehicle. First, select the start & stop speeds you wish for the
test (0-60mph in the example above). Click the down arrows to select the desired values. Then click the Start
button or press Page Up. Your current speed will read out on the screen. The test will not actually start until you
slow down to the first speed point and then accelerate. So, for instance, if you’re going 35 mph and press start, then
you can slow down to a full stop, and then accelerate when you’re ready. When the timer starts, you’ll hear a short
beep, then when you pass the second speed point there will be an alarm sound (if the sounds are not muted – see
“Muting the Sound” on page 5. Your elapsed time will be shown, in seconds, as well as your estimated horsepower.
Estimated horsepower is based on vehicle weight. You can flip over to the config screen to change this value by
pressing the Config button.
Each accel test is logged to an internal database. To view the saved accel tests, click on View Log.
Click the saved entry at the top. Detailed information will be displayed in the bottom part of the screen. The Clear
Log button will erase all saved Accel tests.
Page 21
Trouble Codes
To go to the Trouble Codes screen, click the Trouble Codes button on the Main Menu.
Current
Trouble
Codes
Tab Control
Code
Description
From this screen you can scan for current and pending trouble codes and reset the SES light. Click the Scan button
to scan for trouble codes. The list of current trouble codes is shown by default. Click the Tab control to switch to
Pending codes. Pending trouble codes are problems that have not occurred consistently enough to be reported as a
trouble code, but will become a current trouble code if they persist. Click on an item in either list to see a
description of the code. Click the Reset SES Light button to reset the vehicle’s Service-Engine-Soon light if it is on.
Click on Test Results to get the EPA emissions test status.
These are the self-diagnostic tests that the computer does to make sure the equipment is working. Tests are listed by
name, then their status. In the example above, the Catalyst self-test has been completed (YES), the Heated Catalyst
test is not supported in this car (NA – means this car doesn’t have one), and the Evap System test has not been
completed (NO).
Each time a scan is completed or the SES light is reset, that event is logged. To view the saved Trouble Code
activity, click the View Log button.
Scroll bar
The saved events are listed by date on the top. Click an entry to see what the results were of the scan on that day &
time. On the lower part of the screen, the saved text log will appear. Use the stylus to click & drag the scroll bar
down to see more, just like a Windows scroll bar. Click Close to return to the previous screen, or Clear Log to erase
all saved Trouble Code activity.
Page 22
Gauge
To go to the Gauge screen, click the Gauge button on the Main Menu. The Gauge screen is useful for a quick check
in the car. The font is much bigger than the Scan screen.
Parameter
Min
Max
Start/Reset/
Clear
Buttons
Averag
Selector
Parameter
Select a parameter (the little down arrow) to change it. Click the Clear button to clear all selected parameters. Click
the Start button to begin scanning. The parameters you picked will be updated on the screen. The big number at the
top is the value for your first parameter (Ignition timing in the example above). To the right of that first parameter
are the minimum, maximum and average values, calculated since the Start button was pressed. Click the Reset
button to clear these totals.
On the lower part of the screen, you can monitor up to 3 additional parameters. Each value that shows up can be
individually set to the current value, minimum, maximum or average, with the appropriate Selector. In the example
above, the current RPM is displayed at the bottom, and the Maximum Knock Retard is displayed above that. To
return to the main menu, click the <Home> button at the top right of the screen.
Misfires
To go to the Misfires screen, click the Misfires button on the Main Menu. The Misfires screen is used to count how
many times each cylinder is identified as the “primary misfiring cylinder” by the computer.
Press the Start button to start scanning. The chart will be updated as misfires are detected. In the example above,
cylinders 1 & 6 have had 2 misfires, and cylinder 8 has had one. You can see the current RPM and how many rev’s
have had misfires below the chart. The status is at the very bottom. The Reset button will set all misfire counts
back to zero & clear the chart, and the Stop button will suspend scanning.
Page 23
Software Upgrades
Updates to the LS1M software are free for the life of the scanner. Information on revisions will be available on the
LS1M web site:
http://www.LS1M.com
The LS1M program, like most all PDA programs, consists of one file (LS1M.PRC). This program can be installed
just any other 3rd-party software, with the Palm Desktop, or the downloaded setup file can be used instead. See
Installing LS1M below.
Installing LS1M
To install LS1M on your PDA PDA, either after a hard reset (see “Resetting to Factory Defaults” on page 9) or to
install an update, you can either use the downloaded setup program, or use Palm Desktop.
The latest version of LS1M software is available on the Download page of the web site (http://www.LS1M.com).
Right-click the link (for example, http://www.ls1m.com/demo/LS1M_v1.7d.zip) and select “Save Target As” to
save the .zip file on your computer. Then you’ll need to unzip its contents, using a utility like Winzip, or you can
use the built-in zip file support in Windows XP by double-clicking the downloaded file.
In Windows XP, you’ll need to select all the files (shown above for version 1.7d) & copy them to a folder on your
hard drive. With WinZip, you double-click the zip file, select all the files & click the Extract button. Either way,
you need to get all these files into a folder on your hard drive, then run the setup program from that folder. The
program will guide you through the rest of the installation, and the new version will get transferred to the PDA on
the next hotsync.
To install LS1M with the Palm Desktop program, you will just need the LS1M.PRC file, which you can extract from
the downloaded zip file as mentioned above. Then start Palm Desktop & click the “Install” icon on the left side of
the screen.
Page 24
Click the “Add…” button & navigate to the directory where the new LS1M.PRC is. Select the file LS1M.PRC and
click “Done”. Now, the next time a hot-synch is performed, the new version of LS1M will be installed. To verify
that the new version actually got installed, start LS1M on the PDA and note the version number at the bottom of the
screen. (Go to the main menu & click “About LS1M” to view the startup screen again.)
More Information
For more information on the PDA, see the “Getting Started with your PDA” booklet or the “Palm Docs” folder of
the LS1M CD. The file “Palm Treo 300 User Guide” will have some pertinent information in it, although the LS1M
PDA is not exactly a Treo 300, it is very similar. You will need to install the Adobe Acrobat reader, if you
computer doesn’t already have it, to view these files. Adobe Acrobat reader is a free program available from Adobe
at:
http://www.adobe.com/products/acrobat/readstep.html
or you can install it from the “Adobe Acrobat Reader” folder on the LS1M CD.
Getting Support
Support for the LS1M scanner is available through the online forum or directly through email. To get to the forum,
go to the main LS1M web site:
http://www.LS1M.com
and click on “Support Forum” on the left.
Email address for technical support:
[email protected]
Page 25
Appendix
Scan Parameters
Please note that not every vehicle will support every parameter. For example, most V6-equipped
vehicles do not have a passenger-side O2 sensor; therefore, codes such as LFT2 & O2R will return
“T.O.” (timeout). The engine type selected on the Config screen will also determine which parameters
are available on the screen when you’re configuring the scanner.
Standard OBD2 Parameters: (supported by all compatible vehicles except as stated above)
Description
Typical Value
Parameter
B
CLSD
Boost (L67 only)
Closed-loop status
ECT
IAT
Engine coolant temperature
Intake air temperature
IGN
Ignition advance
LD
LFT1
LFT2
Engine load (calculated by
the vehicle’s computer)
Long-term fuel trim, driver’s
side & passenger side
MAF
Mass air flow
MAP
Manifold air pressure
O2L
O2R
RPM
Oxygen sensor, driver’s side
Oxygen sensor, passenger
side
Engine speed
SPD
SFT1
SFT2
Vehicle speed
Short-term fuel trim, driver’s
side & passenger side
0 to 10 PSI at wide-open throttle
0 (open loop) when cold
1 (closed loop) after engine
warms up
185-220 deg F
Depends on the weather; rises
above ambient as engine warms
up
Varies: 15-20 degrees at idle, 2030 at full throttle
0-100%, depending on conditions.
2 or 3% or so at idle.
-10 to +10%
Zero after battery change or
vehicle computer reset
From 0.5-1 lb/min at idle to 3035 at full throttle
9-10”Hg at idle to near 30 at full
throttle
Should move around a lot after
engine warms up; 850mV to
950mV at full throttle
600-700 at warm idle, up to 6000
or more before shifts at full
throttle
Should match speedometer
-10 to +10%
Zero after battery change or
vehicle computer reset
Page 26
Enhanced parameters are additional data that can be scanned from most late-model GM vehicles. The
LS1 and L67/L36 support all of these listed below.
Enhanced GM Parameters: (may not apply to all vehicles)
Description
Typical Value
Parameter
BARO
Barometric pressure
FTC
Fuel trim cell
IAC
Idle air counts
IDC1
IDC2
IGNV
Injector duty cycle, driver’s
side & passenger side
Ignition volts
IPW1
IPW2
KR
Injector pulse width
Knock retard
MAFF
Mass air flow frequency
MISP
MISR
Primary misfiring cylinder
Revolutions with misfires
TFT
Transmission Fluid
Temperature
TPSV
Throttle position sensor
voltage
Depends on weather. Typically
29-30 inches of mercury. NOTE:
Doesn’t work on all cars
Varies with engine conditions. In
general, numbers go up with
load, except for cells 20-22,
which may be used for open loop
(including full throttle)
20-60 at warm idle to 100 while
cruising; higher when a/c is on
1-2% at idle, up to 85% at full
throttle
12 volts or so with key on, down
to 9.5-9.8 during starting, then
13.5-14.5 with engine running
2-4 milliseconds up to 15-20 at
higher rpm’s and full throttle
Zero to 3-4 degrees
Ideally, should always be zero
2200-2300 at idle, 9000+ at full
throttle
1-8 if misfires present
0-10 revs is common; more than
that may indicate problem
Ambient to 200 deg F or so.
Above 225 and the tranny fluid
starts to deteriorate.
0-5Volts; typically 0.5 volts at
idle & 4.5 at full throttle
Page 27
Licensing Agreement
As a purchaser of the LS1M scanner, you MAY:
•
Use the scanner on as many different vehicles as you want.
•
Loan the scanner to a friend to use.
•
Sell the scanner. (The new owner will also be bound by the terms of this licensing agreement.)
•
Make a backup copy of the program.
You may NOT:
•
Give a copy of the program to anyone else. If someone wants a copy, direct him/her to the web site where
he/she can download the demo version.
•
Reverse-engineer the program or the OBD-2 interface cable.
•
Modify the program or the OBD-2 interface cable.
•
Export the program or the OBD-2 interface cable to any country which is under a trade embargo with the
US Government.
WARNING:
•
Monitoring your vehicle while driving poses certain risks. Always keep your eyes on the road, not on the
scanner.
•
Mark-It Upgrades is not responsible for any damage to your vehicle or engine. If you modify your vehicle,
you assume all the associated risks and liabilities.
Warranty:
The LS1M scanner is guaranteed to be free from defect for one year from the date of purchase. Mark-It Upgrades
will repair or replace a defective scanner free of charge for one year if such defect or fault is not the result of abuse
or neglect. Contact Mark at [email protected] for more information or instructions on returning a defective unit.
Page 28