1
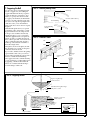
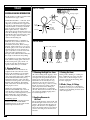
FIG. 16 - Taper On Masts & Spars
Center of a yard, heel of a mast, or maximum
diameter of a gaff or boom
Straight line
Minimum
diameter
Maximum
diameter
This is the desired curve. Mathematically it is a parabola. It's
very close to the arc of a circle. Simply taper the spar gradually from maximum diameter to the end. For yards, make
sure both sides are the same.
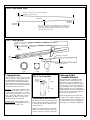
FIG. 17 - Shaping the Masts
Taper
required
Dowel
Kit dowel (if tapered)
Draw
square
on end
MAST
Correct parabolic curve
YARD
1st cut
square
3. Shaping the Spars
Main Boom & Two Gaffs: The boom and
gaffs also taper in a slight parabolic curve.
The maximum diameter of these spars
should be about one-third from their fore
end, and then they should taper toward
each end. The forward end is slightly larger in diameter than the aft end.
2nd cut
8 sided
Sanded
round
FIG. 18 - Top of Lower Masts
Tenon to fit
mastcap
casting
Square
Round
Bowsprit: The bowsprit should be square
from the inboard end to about 1/8” outboard, then it should change to a round
shape and taper forward. It is best to start
with a square stick rather than a dowel.
On the inboard end, also cut the tenon
that fits between the winch bitts.
4. Main Boom & Gaff Assemblies
Finishing Spars: When shaping and fitting of each spar is completed, stain, varnish and set them aside to dry.
The main boom and two gaffs require that
jaws be added to their throats for joining
to the masts. Plan sheet 3 illustrates how
to make the jaws.
5. Mounting the Mast
Assemblies & Bowsprit
After staining and varnishing the mast
assemblies and bowsprit, they can be
placed in the holes you drilled into the
hull. The bowsprit hole should be square
to fit the square end of the bowsprit. It is
suggested that you do not glue the masts
and bowsprit into the holes. The rigging
will hold them in position. Furthermore, if
the model gets restored in the future, the
masts can be easily removed.
Check the alignment of the masts and
bowsprit. If not straight, looking aft, or at
the correct angle shown on the plans, you
can shim the holes. If necessary, drill the
holes larger to accommodate shimming.
Drill holes to represent the sheaves in the
main boom. Add the eyebolts, cleats and
chocks to all spars as shown on the plans.
11