1
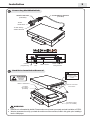
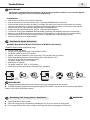
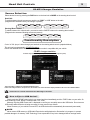
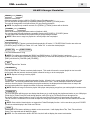
VAIS TECHNOLOG Y
www.vaistech.com
Quick Start
Model :VML
Automotive Audio Player
with USB 2.0 Host
and optional HDD
TOYOTA • LEXUS • SCION
Copyright (C) 2003-2008 VAIS Technology
Published September 29, 2008
2
Installation
i
Connecting MultiMediaLinQ
Audio Wiring Harness
(included)
Audio Y-Harness
(included)
To the
Head Unit
To the factory
Audio harness
Model :VML
Used for
programming
i
Service
Port
USB 2.0 Host
Power and Audio
wiring harness
Hard Drive Installation/Removal
! WARNING
CAUTION
ELECTROSTATIC
SENSITIVE
DEVICES
IDE 2.5” Hard Drive
4 screws
M3 x 5mm*
(included)
Do not cover
ventilation holes
if you have hard drive
installed
Remove 3 screws
M3 x 5mm*
Flat ribbon cable
(Pin 1 is marked)
! WARNING
?
?
Hard Drive is unformatted by default. Please make sure to format your newly received hard drive as FAT32.
We also recommend to set up your hard drive with one of the scenarios, listed in this guide, prior installing it
into the VML player.
3
Installation
i
IMPORTANT
We strongly recommend that you install the unit in an easily accessible location, so you can later upgrade
the unit or re-program it in case of incorrect programming.
@
@
@
Installation
Gain access to the back of you vehicle’s Head Unit.
Find the same port as our Audio Harness (see “Connecting MultiMediaLinQ to head unit”)
Disconnect the existing connector and plug in our Audio connector into this port, then plug female end of Audio
Harness to the plug in for your factory connector. Audio harness female connector is not used In some vehicles.
Plug the other end of Audio cable into designated port on MultiMediaLinQ.
Setup proper Emulation Mode for this unit (see “Emulation Mode Selection”)
Turn the car on and check MultiMediaLinQ functionality (especially Text capability) before the final assembly.
Make sure your USB Storage device has at least two Folders/playlists, in order for this unit to operate properly.
Please mount this unit in an easy accessible location for upgrading and re-programming purposes.
Secure the Head Unit in its original position.
@
@
@
@
@
@
i
Emulation Mode Selection
CD-MP3 Emulation Mode Selection (CD-MP3 emulation)
CD-MP3 Emulation Mode programming steps:
@
@
@
@
@
@
@
@
@
Properly install VML player.
Put the “Left” programming switch in the “DOWN” position.
Put ignition switch into the “ACC” position.
Wait for a long beep followed by a few short beeps. This may take up to one minute.
Return programming switches to their default position (both switches “UP”).
Wait up to 30 seconds until confirmation beep.
Put ignition switch into the “OFF” position.
Wait at least 10 seconds.
Put ignition switch into “ACC” or “ON” position.
Check SoundLinQ for functionality, especially TEXT capabilities.
Left
switch
“DOWN”
!
!
i
Ignition into
“ACC” or “ON”
position
Both
switches
“UP”
up to 30 sec
Ignition into
“OFF” position
Confirmation beep
IMPORTANT
Improper Emulation Mode setting may cause this unit to be unrecognized by the head unit.
CD-MP3 Changer Emulation Mode Programming MUST BE DONE in order for the unit to find the proper address
location in the vehicle Audio/Video network.
i
!
!
!
Mounting unit using Velcro fasteners
! WARNING
Velcro Fasteners are not included
VAIS Technology strongly recommends grounding the unit to the car chassis for best results.
Do not more the 5mm size screws. Using screws larger then 5mm may damage the PCB board.
4
Storage Organization
i
Media Files location
SCENARIO 1
SCENARIO 2
SCENARIO 3
“M3U playlists files”
“MultiMediaLinQ Music Folder”
“ROOT Music Folders”
PRIORITY
PRIORITY
1
ROOT
PRIORITY
2
ROOT
multimedialinq
m3u
Playlist1.m3u
Playlist2.m3u
ROOT
multimedialinq
music
Playlist 1
Song 1
Song 2
PlaylistX.m3u
cache
music
Folder 1
Folder 2
Folder 3
Folder 4
Folder 5
Folder 6
Folder 7
Folder 8
Folder 9
?
3
Song X
Playlist 2
Song 1
Song 2
Song X
Playlist 3
Song 1
Song 2
Playlist 1
Song 1
Song 2
Song X
Playlist 2
Song 1
Song 2
Song X
Playlist 3
Song 1
Song 2
Song X
Song X
VAIS Technology recommends setting up files on your mass storage device according to one of the three
scenarios listed below.
? Depending on complexity of your files setup and your needs please choose one of the scenarios below to
utilize VML player. For more detailed information about scenarios please refer to the “Owner’s Manual” manual.
5
Head Unit Controls
CD-MP3 Changer Emulation
Source Selection
Select desired source by pressing the DISC button on the head unit or MODE on the steering wheel control.
Head Unit:
To switch between the unit sources you need to use “DISC” or “CD” button on the radio
(Diagram below assumes factory CD changer is present).
CD
CDC1
CD
CDC1
VML
VML
CDC1
CDC2
OR
CDC1
CDC2
VML
VML
Steering Wheel control:
To switch between the unit and radio you need to use the “MODE” button on the steering wheel control.
(Diagram below assumes following sources are present).
AM
FM1
FM2
TAPE
CD1
CD
VML
Functionality Description
Control of VML player is done through your head unit or the steering wheel controls (explained below).
This unit can be programmed in CD-MP3 Emulation.
Please see attached chart to determine which emulation mode is compatible with your vehicle.
CD-MP3 changer emulation
For Radio Integrated into Navigation System (5th Generation Navigation System)
List Of Folders (Playlists)
List Of Files (List of songs in selected Playlist)
This functionality is available for all 5th Gen Navigation system.
Please note all Toyota vehicles, except for Prius, do not have a list of files and folders display available on the screen due to Radio limitation.
!
Please also see “Activate / Deactivate ‘Disc Switching Fix’ Function”
i
How to Eject a USB device?
Simply push the “SCAN” button twice in one second and then immediately push the “PWR” button on your radio. On
some radios the “PWR” button is combined with “VOL” knob.
Message “Ejecting USB. Please wait” is displayed to confirm you can safely remove the USB device. Do not remove
USB storage while the device is being accessed, as it may result in loss of data.
When Accessory of your vehicle is turned OFF, the USB device will be automatically disconnected (unmounted).
NOTE
Never remove USB memory or USB Audio Player device while playback or file transfer is in progress, to prevent
possible damage to its memory. VAIS Technology is not responsible for any lost or damaged data on storage media.
6
VML controls
CD-MP3 Changer Emulation
TRACK+ and TRACK-
Select the desired track
(Maximum number of tracks is 999 for CD-MP3 changer Emulation mode).
You can fast switch through tracks by repeatedly pressing the [TRACK+] / [TRACK-] button.
The track will change after a brief pause when you stop pressing the button.
NOTE: If a playlist only contains one track, the [TRACK+] / [TRACK-] buttons will not function.
FOLDER+ and
FOLDER-
Select the desired playlist (Maximum number of playlists is 999).
You can fast switch through playlists by repeatedly pressing the [FOLDER+] / [FOLDER-] button.
The new playlist will start after a brief pause when you stop pressing the button.
NOTE: If there are no songs in a playlist the unit will jump to the next playlist.
FOLDER SCAN
Press and hold the RPT button to activate/disactivate playlist +50 mode. if “FOLDER SCAN” function are active use
[FOLDER+] and [FOLDER-] as “Folder +50” and “Folder -50” to select the desired playlist
SCROLL UP
and
SCROLL DOWN
Fast Forward/Rewind the song
NOTE: For vehicle not equipped with [DISC+] and [DISC-] buttons, if “SCAN” function is active use
[SCROLL UP] and [SCROLL DOWN] as [DISC+] and [DISC-] to select the desired playlist (in this case [DISC+] and
[DISC-] will work as a [FOLDER+] and [FOLDER-])
RPT
Activates “Repeat One” function
FOLDER RPT
Press and hold the RPT button to activate playlist repeat. This mode will cause the current playlist to start over with
the first track after the last track has been played, instead of moving on to the next playlist.
NOTE: Repeats all songs in active playlist.
RAND
The RAND button activates the playlist randomizer function. All tracks in the current playlist will be placed into a new,
random order. The currently selected track will be renumbered to Track 1, and all subsequent tracks will be random
selections from the playlist. After activating the playlist randomizer, the displayed track number does not map to the
physical track number in the playlist, but rather to the new, randomized order.
NOTE: Shuffles all songs in the active playlist. VML player starts playing songs from your entire playlist in random order.
FOLDER LIST
The FOLDER button will bring up a new display that allows you to scroll through the playlists and tracks on your VML player.
[Folder Up] or [Folder Down] will scroll through playlists, while [File Up] or [File Down] will scroll through tracks.
If a playlist contains a large number of songs, it may take some time for the data to be transferred to the head unit.
This can cause the scroll buttons to become unresponsive during rapid scrolling, until data has been loaded from the VML
player.
NOTE: Some vehicles' head units do not support the Folder/File display function. In this case when you press FOLDER
you will see a blank display in the Folder and File lists.
DETAIL
Pressing the DETAIL button will bring up details on the current track. It will display Album Title, Track Title, and Artist.
Genre is not supported and will always be blank.
NOTE: You can switch tracks while in DETAIL view, but it will not display the current track number.
What You need to know
i
7
IMPORTANT
The VML Audio Player supports playback of MP3 and WAV files from a USB Mass Storage Device or optional automotive
grade internal Hard Drive (see details below).
i
What is MP3?
MP3 (MPEG-1 Audio Layer 3) is a digital audio encoding format using a form of lossy data compression.
“MPEG Layer 3 audio coding technology licensed from Fraunhofer IIS and Thomson.”
“Supply of this product only conveys a license for private, non-commercial use and does not convey a license nor imply
any right to use this product in any commercial (i.e. revenue-generating) real time broadcasting (terrestrial, satellite, cable
and/or any other media), broadcasting/streaming via internet, intranets and/or other networks or in other electronic content
distribution systems, such as pay-audio or audio-on-demand applications. An independent license for such use is required.
For details,please visit http://www.mp3licensing.com.”
i
Audio Format Compatibility
MP3
!
Bit rate: 8 kbps to 320 kbps
Sampling frequency: 16 kHz to 48 kHz
!
Compatible ID3 tag version: 1.0, 1.1, 2.2, 2.3, 2.4 (ID3 tag Version 2.x is given priority over Version 1.x.)
!
M3u playlist: Supported
!
MP3 PRO: Not supported
!
WAV
Compatible format: Linear PCM (LPCM)
Quantization bits: 8, 16, 24 and 32 (LPCM)
Sampling frequency: 16 kHz to 48 kHz (LPCM)
!
!
!
i
!
USB Memory/Portable Audio Player Handling
This unit can playback files in USB memory and USB Portable Audio Players that support the USB Mass Storage
Class (MSC) protocol.
You cannot connect a USB memory or USB Portable Audio Player to this unit via a USB hub (unless otherwise
specified).
Partitioned USB memory is compatible with this unit.(Can not be managed by Windows XP and Windows Vista).
USB memory or USB Portable Audio Player must be formatted as FAT16 or FAT32.
Unit can playback up to 999 playlists and up to 999 files in each playlist (per partition). Large amount of playlists and
files can result in slow navigation and playback.
You must maintain “Free Space” on USB memory or USB Portable Audio Player necessary for unit operation
(approximately 1% of partition capacity).
!
!
!
!
!
i
!
!
!
!
!
!
Internal Hard Drive Handling
This unit can playback files from the optional internal IDE Hard Disc Drive (HDD).
HDD playback functionality requires additional activation.
HDD playback functionality will be automatically de-activated after 5 failed attempts to recognize HDD.
Unit can recognize up to 4 Primary Partitions accessible as separate Discs.
HDD must be formatted as FAT16 or FAT32.
Unit can playback up to 999 playlists and up to 999 files in each playlist (per partition). Large amount of playlists and
files can result in slow navigation and playback.
You must maintain “Free Space” on HDD necessary for unit operation (approximately 1% of partition capacity).
!
i
IMPORTANT
!
!
!
To prevent the accidental loss of data, we are strongly recommend always backing up important data on your
computer.
VAIS Technology accepts no responsibility for any loss of data on USB memory/USB Portable Audio Player
and/or HDD, even if data is lost while using this unit.
This unit does not support connections to a computer.